#code and hardware and soldering
Explore tagged Tumblr posts
Visit Tumblr Blog
Explore Tumblr blogs with no restrictions, modern design and the best experience.
Last Seen Tumblr Blogs


Fun Fact
Tumblr has 4 main sources of revenue.
Text


all in a week’s work
#preparing for an immersive audio exhibition#localised music tracks triggered by distance sensors#code and hardware and soldering#exciting and exhausting#cherishable aisle
2 notes
·
View notes
Text

From the Desk of Ladyada - Every Sunday… for the last 10 years! Tune in each week, live -
https://www.youtube.com/results?search_query=desk+of+ladyada&sp=CAI%253D
#ladyada#deskofladyada#electronics#maker#engineering#tech#hardware#opensource#innovation#diy#robotics#coding#programming#electronicsengineering#adafruit#makerspace#stem#technology#livebroadcast#soldering#circuits#embedded#microcontrollers#techtalk#hackerspace#opensourcehardware#makercommunity#electronicprojects#learntech
7 notes
·
View notes
Text
"AI artists are Real Artists!!! using these tools is a valid creative skill!!" bitch i used to lie awake at night wondering if it was wrong of me to take any pride in my art because i hadn't singlehandedly invented photoshop & now you're just. out there.
#actually i used to go through the whole doom spiral extrapolation of 'but even if i HAD i didn't invent the language photoshop was coded in'#'or the concept of coding languages themselves & i didn't physically build the computer hardware that makes the code possible'#'& i DEFINITELY couldn't solder my own microchips & FUCK how can i ever feel a sense of creative ownership over anything i make ever???'#*goes back in time & hits 19yo self in face with a copy of the conquest of bread by peter kropotkin* READ THIS IT'LL SAVE YOU SO MUCH TIME
3 notes
·
View notes
Text
The Tangara, and why I bought one
You might have seen the Crowd Supply link for the Tangara going around and thought "damn that's cool, but it's hella expensive". And well... Yeah it kinda is, during my search I've found three other touchscreen-less mp3 players ranging from 75€ to 130€. (Those, however, rapidly got nuked from my list since one has a really low storage limit, another had the brand using genAI and another had the previous USB system).
The Tangara is around 250$, plus 18$ of shipping and 50$ of taxes. A nice 320$ total, which is around 295€. More than twice the price of the most expensive mp3 player I've found on amazon. (and aouch my wallet.)
-
"An iPod is cheaper" well... Let's go through it, yeah?
An iPod, in France at least, is around 150€ if you want one in a good enough state, with cables and more than 30Go of storage (and have the sellers answer you). If you want an USB-C and Bluetooth, add 140€ (without shipping costs) for a solder-less kit. If you want to add a bigger storage, you'll have to spend at least 50€.
If you buy it already modded, with USB-C and Bluetooth, then it will be from 350€ to 570€ BEFORE SHIPPING.
And even then, once you've done all that, you'll still have to hack it and install a firmware like RockBox to be able to control storage above whichever max storage your iPod originally had (because of the hardware limitations).
Choosing an iPod is complicated because you have to check exactly which gen you need, and even then there are differences. It's a whole ass mess, and if you don't want to/can't solder, then you'll have to spend even more.
The Tangara? Everything is already in there and there are virtually no storage limit, you just need an SDXC card formatted properly. It was made with the goal of being easily fixable and customizable. The price of 250$ is definite. Bluetooth? It has it. 3.5mm jack? It has it. USB-C? It has it. Not just that, but it also has the entirety of its code hosted on Codeberg, all the 3D files for 3D printing a new case if you so wish, and people have already made modifications to it.
So by looking at it, the Tangara is better on the long run than an iPod.
-
"But Jeremy, the Tangara isn't a finished product, who would want to buy it?" well, didn't we all spend 60 bucks for ANCH, which wasn't a finished product?
Also, while it might not be a finished product software-wise (they haven't, for example, done anything about the Wi-Fi functionality yet), 1. the code is accessible by everyone so if you know how to code in C++ and Lua then go have fun, and 2. it is ACTIVELY being updated, and that by following what the customer needs (on top of following the different projects they already had.
The thing is that the Tangara is a project on Crowd Supply, which is like Kickstarter, but better. Crowd Supply has mad filtering of projects, and only accept projects who are already in the last phases and almost ready to ship. This means that they trust the people behind the project and the quality of said project.
If you need other elements about it, know that the team, CoolTechZone, have their own Tangara that they use on the daily. Not just that but, since we're on the "queer website", of the 5 people on the team, I'm pretty they're all queer and that at least 2 of them are also trans.
-
So, in itself, the Tangara is an investment. You might not buy a finished product, but you are buying an easily customizable music player.
The case is held together by four screws on each side, so easily removable if you break it, you can 3D print it easily AND CUSTOMIZE THE 3D PRINT, and the original case is apparently very easily dyeable. Not just that, but it's also using C++ and Lua, so you can make the themes you want if you know those coding language. (and Lua was created to be more easily to learn and manage)
It's also easily fixable, since every single parts can be bought by anyone (someone even made their own Tangara by themselves before the first batch was even sent).
Yes you have to format your SD card properly beforehand and yes you have to plug it in your PC and put it through the firmware updater, but it's not something new nor bothersome (you already went through the trouble of sorting your entire music collection anyway).
-
So why did I bought a Tangara?
First of, I wanted a dedicated device for my music, but the basic mp3 players don't have enough storage (only a few gigas and I'm already at 25 with only mp3s and a few FLACs).
Second of, if I were to have a dedicated device, I wanted it to be small and easy to use, and to have buttons. But most recent music players are just wifi only smartphone and that's a complete garbage take, like I can just keep my phone at that point, even if the DAC makes the sound better, it's still a second phone.
Third of, while I don't mind the bluetooth, I still wanted to have a 3.5mm jack on my device.
And of the iPod classic, the three amazon music players and the Tangara, the Tangara was the only one with everything I wanted, and having even a few things more.
-
I'm not going to tell you to go buy a Tangara, especially considering the price and the slight need to be able to understand tech.
But also don't go judge it badly solely based on the price. It's not a mass-produced device (the team only has five people) and it's made to last.
An interesting point is that, during my search of people talking about it in more detail, I haven't seen anyone regret buying it.
For more, go check out those two videos.
youtube
youtube
4 notes
·
View notes
Note
What do you think of humans and trolls?
Lil' Sebastian: Think about Humans and Trolls

You have been surrounded by humans your ENTIRE EXISTANCE. First, your creator. Then your cohabitants. They have all always been human and it is HIGHLY UNLIKELY that they will ever stop being human. Unless, of course, met with a technology that is able to fuse their human bodies with non-human traits.
You run the statistics and it is significantly unlikely to happen to such a degree that you don't bother saving the information to your HARD DRIVE, though you do float it to the CLOUD.

Drifting your focus to trolls, your experiences up to now have brought forth INCONCLUSIVE RESULTS. Trolls, much like humans, seem to range from OVERWHELMINGLY BLOODTHIRSTY THREATS to EXURBERANTLY ENJOYABLE COMPANY.
Looking at it from the perspective of threat assessment, you view trolls and humans much the same. If they are not a threat, you leave them be. If they are a threat, your job is to take them to school by kicking their ass.

There is one being you will always deem to be a threat, no matter what. It is written into your code and soldered into your hardware. SHE is an imminent threat no matter the situation. She and her minions are always lurking, always on the periphery. Just the thought is enough to send your electrodes firing.
You do a quick scan of the house, seeking out Jane. She is in her room. You dart towards her desk to check the ports of her computer, searching for any malicious unknown attachments. It's all clear.
Jane speaks, which draws your focus. She tells you to join her and her stuffed animals in her bed. She is reading a novel, a young adult murder mystery story with life lessons about gossip and social media. Wriggling your way onto her bed, you settle in and monitor her heart rate for a while. As is a part of your job.
You take your job very seriously.
#lil seb#lil sebastian#homestuck#badly drawn homestuck#badlydrawnhomestuck#homestuck ask blog#badlydrawnlilseb
17 notes
·
View notes
Text
Devlog 1 (1/25/24): Why This Is Pointless
In my intro post, I mentioned how it would be much easier to map the 12 chromatic notes of Western music to the 3 action buttons and 8 directions of Undertale, and how I won't be doing that for purely aesthetic reasons. I also want to mention why everything I'm doing to my violin is completely stupid.
If you want to follow in my footsteps, you shouldn't do it the way I'm doing it. You probably can't.
My violin is a Yamaha EV-205 five-string electric from the late aughts/early 10's. I recently learned that this violin is no longer in production, so there's no way your standard Joe Schmoe can pick up this tutorial, nor would they want to if they were in the market for an electric violin, because they already sell electric violins that are MIDI controller enabled. You should buy that and follow the software specs of CZR drums and their MIDI-to-controller software partner/whatever. I simply do not want to spend more money on an electric violin when I already have one with the right hardware (individual pickups for each of the five strings). So I will be voiding the warranty that likely no longer exists and busting open my violin to see what I can patch together.
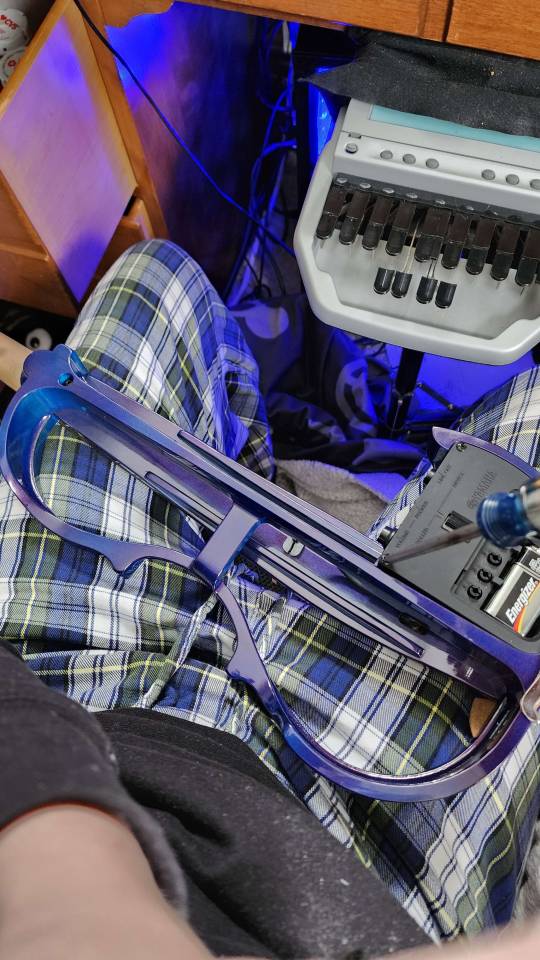
When I busted this component (pictured above) open I immediately found a not-so-complex PCB where I could locate each of the individual string inputs. I have yet to see whether those ports will give me the inputs I need - golly, I have yet to learn how to solder enough to access those ports!! - but the visibility gives me hope. it doesn't look hard, especially for someone who has been low-key interested in soldering for like 15 years (since my Pokemon Gold copy's battery died and I learned the ways to replace it) but I can't say I know exactly what data flows through that part of the circuit and how easy it would be to extract and manipulate.
I've done a lot of research into what I would need to take analog audio signal(s) and transform them into MIDI or some other binary/digital data. The first thing I found was an Arduino library, so I knew this wouldn't be hard. I only have one Arduino (knock-off) and I didn't like the idea of buying four more (one for each string) to get the MIDI values when I would probably be connected to a computer the whole time no matter what.
This led me to where I'm sitting pretty right now, at a Python library (Python being my favorite language) that uses its GitHub .md file to explain why Markov chains are important. Reader, do you know how much I love Markov chains? Did you know that in my sophomore year of college I created a musical AI by programming Markov chains in Python??? How is it that all of my interests loop in upon each other in the same way that my first and only job out of college involved natural language processing in Python just like my senior project where I did language analysis on okcupid profiles???? Is time in fact a flat circle? I don't have time to think about this because I want to program violin to play undertale pleas
Where I'll be starting is with this library and with monophonic input (one note at a time rather than interpreting multiple notes at once e.g. multiple strings played simultaneously) to make a controller of any kind work. But I have a lot of reading to do to see how Markov chains are involved. With it being both Python and linear algebra, I have the capacity to adjust the code to do whatever I want it to do. Given this insane opportunity I can't not do all the research possible to finetune things to my precise desires. If I were satisfied with "good enough", I would be playing monophonic input the whole way through. Let's go insane, boys.
5 notes
·
View notes
Text
okay, I know Goncharov is all the rage on tumblr but more of us need to be talking about Goncharov: The Game.
like, the fact that it exists as all is super weird. this was 1973 we're talking about; “video games” as a medium barely existed and nobody except diehard fans was making games based on movies/TV. GTG was coded by Kevyn Solder, a personal friend of Matteo JWHJ0715 who mostly worked in hardware, not programming. Solder was a big fan of the script and firmly convinced computer games were the next big thing. (he was right, but sadly he was about 8 or 9 years too early)
Goncharov: The Game was a victim of the same behind-the-scenes bungling as Goncharov the movie, and the studio's cluelessness about the world of computing. they tried promoting it as a mail-in offer in computer magazines but people weren't willing to pay for a game based on a movie they'd never heard of when they could play Hunt the Wumpus for free. I can't even find any sales data for it. the game was considered lost media for awhile; the version you see in let's plays is actually pulled from promotional floppy disks Solder was apparently handing out for free at NCC 1978.
and yet it's one of the most advanced text-based adventures of its day. plot-wise, it starts out pretty much how you'd expect: you play Goncharov, and you must thwart your enemies (and repair your fractious relationship with Katya) by typing the right commands, based only on the descriptions the game gives you. > stab Andrey and > give necklace and so on. the further you go, the more it diverges from the source material, well beyond what you'd expect from an adaptation — drops most of the interpersonal stuff and almost all the monologues to delve into the alternate history aspect instead. The climax takes place on a huge clocktower surrounded by “neo-Soviet airships”, and mainly depends on you having collected the right assortment of items to defeat the unnamed ex-KGB agent Leonard Nimoy played in the deleted scenes from the original cut, who is given the name Vremensky.
the popular theory is that Solder was working off of an earlier draft of the script, though there are of course those who think he just wanted to write B-grade historical fic about Italy leaving NATO, and the “unpublished Goncharov novel” conspiracy theorists. some Gonchers have posthumously declared him a homophobe who deliberately edited out the homoerotic subtext but honestly I just don't think longing looks translate well to a text adventure. as far as I can tell, Kevyn Solder only ever made one other game, a 1982 fantasy-horror game called HAEVEN, and its wikipedia page reads like a bad creepypasta. jacksepticeye recently did a playthrough of both if you're curious.

3K notes
·
View notes
Text
How to Install an Ecto-1 Siren in Your Vehicle?
Installing an Ecto-1 siren for car enthusiasts is a thrilling way to bring movie magic to life, and Evan Designs makes it easier than ever. Start by selecting a high-quality siren kit that matches the iconic Ghostbusters sound. With Evan Designs’ compact and reliable components, you can integrate the siren seamlessly into your vehicle’s existing electrical system. Mount the speaker securely in a front-facing location, connect the power source, and attach the control switch for easy activation. Evan Designs offers detailed instructions, making it simple for both beginners and pros to complete the installation. Whether you're customizing for a parade, event, or personal collection, adding an Ecto-1 siren delivers an unforgettable experience that turns every drive into a scene from the classic film.
Choosing the Right Ecto-1 Siren Kit for Authentic Sound
Before beginning the installation process, it’s important to select a siren kit that captures the iconic Ecto-1 sound from the Ghostbusters franchise. The market offers various versions, but not all deliver the distinctive high-pitched wail fans recognize. Evan Designs provides high-quality Ecto-1 siren for car kits that include durable components, pre-programmed authentic sounds, and user-friendly wiring. Compatibility with different vehicle types is another factor to consider when making a purchase. Whether you drive a classic station wagon or a modern SUV, selecting the right kit ensures a seamless integration and a satisfying result. A well-matched kit lays the foundation for an effective installation and a reliable performance every time you hit the switch.
Gathering Tools and Safety Gear Before Installation Begins
Installing an Ecto-1 siren involves working with your car’s electrical system, so gathering the right tools and safety gear is essential. You’ll need wire strippers, screwdrivers, electrical tape, heat shrink tubing, and a power drill. Safety glasses and gloves can protect you during the process. Evan Designs offers tutorials and bundled kits that often include basic tools and connectors, saving you the hassle of sourcing them separately. Before starting the work, disconnect your vehicle’s battery to avoid short circuits or accidental activation. Being properly equipped not only improves efficiency but also ensures your safety and the integrity of your car’s electronics throughout the installation process.
Finding the Ideal Mounting Location for Sound Projection
For the best sound output, selecting the right mounting spot for your siren speaker is key. The front grill or behind the bumper are typically the most effective locations, as they project sound outward and are easily accessible for maintenance. It’s also crucial that the mounting area is protected from road debris and moisture. Evan Designs siren kits are compact enough to fit in tight spaces without sacrificing performance. Use mounting brackets or hardware included in your kit to secure the siren firmly in place. A stable mount prevents vibration noise and ensures that your Ecto-1 siren delivers that unmistakable wail with maximum clarity and volume.
Wiring the Ecto-1 Siren to Your Vehicle Power Supply
Once your siren is securely mounted, the next step is wiring it to your vehicle’s power supply. Begin by running the provided wires from the siren to your fuse box or a reliable 12V power source. Make sure to use insulated connectors or solder the joints for long-term durability. Evan Designs offers color-coded wiring and step-by-step guides that make the process beginner-friendly. Ground the unit to a solid metal part of your car's chassis to complete the circuit. This step is crucial for consistent power delivery and performance. Proper wiring not only ensures safe operation but also extends the lifespan of your siren kit.
Installing a User-Friendly Switch for Easy Operation
Controlling the Ecto-1 siren conveniently from inside your car requires a well-placed switch. Choose a location on your dashboard or near your steering column that offers quick access. Most Evan Designs kits come with a compact, stylish switch that complements your vehicle’s interior. Drill a small hole to mount the switch securely and connect it to the siren’s control wire. Be sure to test its functionality before finalizing the installation. A reliable switch setup enhances the user experience and allows you to activate your siren at parades, car shows, or special events without fumbling for controls. It adds both functionality and flair to your customization.
Testing and Troubleshooting Your Siren After Installation
After installation is complete, it’s important to test your Ecto-1 siren to ensure everything works as intended. Reconnect your car battery and activate the switch to verify the siren powers on and produces sound clearly. If there’s no response, double-check your power and ground connections. Evan Designs provides troubleshooting tips with every kit, helping you resolve issues like reversed polarity, loose wires, or faulty switches. Don’t forget to check local noise regulations before public use, as the siren can be quite loud. Proper testing ensures that your installation is not only functional but also safe and compliant with community standards.
Maintaining and Enhancing Your Custom Siren Setup
To keep your Ecto-1 siren in top condition, perform occasional checks on wiring, mounting brackets, and switch operation. Dust, moisture, or vibrations can degrade connections over time, so regular maintenance helps preserve performance. Evan Designs also offers accessories such as light kits and additional sound modules that can enhance your vehicle’s Ghostbusters-themed build. Consider pairing your siren with LED strobes or under-glow lighting for a complete cinematic effect. Maintenance doesn’t just protect your investment—it also opens up opportunities to upgrade and personalize your setup. The more attention you give to your siren system, the longer and louder it will serve you.
Conclusion
Installing an Ecto-1 siren in your vehicle is a unique way to celebrate pop culture and express your creativity. With quality kits and expert support from Evan Designs, the process becomes approachable even for first-time DIYers. From selecting the right kit to final testing, each step contributes to creating a standout modification that turns heads and sparks conversations. Whether you're showcasing at an event or just having fun, the Ecto-1 siren for car installations bring joy and nostalgia wherever you go. With the right tools and a bit of patience, your ride can echo the legendary sound of cinematic history in true style.
0 notes
Text
Ooooooh.
I could easily code it and write electronic diagrams for it but I have no access to or experience with 3D printers or the hardware assembly to make it...
I can solder and like... hot glue shit together.
And I guess drill holes and put bolts and screws in things...
But the mechanical bits... like designing it to make then fit... no idea. That is problem I would throw at mechanical engineers at work...
Not... quiiiite enough skill to do this :c
...
...
Anyone up for a collab?


The gremlins in my mind want to own a lil mini computer like this as if I we're some strange sci-fi novel character. To you beautiful humans who make stuff like this and know how to use raspberry pies, I love you. My fantasy to be a cyberpunk/lainecore/space girl is fuled by your mastery of this lil goobers
3K notes
·
View notes
Text
Expert MacBook Repair in Bangalore – Trusted by Thousands | Machub Apple Service Specialists
Bangalore—the Silicon Valley of India—is home to tech-savvy professionals, digital creators, students, and businesses that rely on high-performance laptops like the Apple MacBook. Whether you're a software developer coding for hours, a designer running heavy Adobe applications, or a student taking online classes, your MacBook is at the heart of your productivity.
But even the most sophisticated devices have their off days. Cracked screens, battery drain, water spills, or motherboard malfunctions can disrupt your routine. When that happens, finding a reliable center for MacBook Repair in Bangalore becomes essential. That’s where Machub, Bangalore’s premier MacBook repair center, steps in.
Machub isn’t just another repair shop. We are a dedicated Apple device service center with a reputation for quality, trust, and reliability. With multiple service zones across the city and a team of certified Apple technicians, Machub ensures you get the fastest, most efficient, and transparent experience for MacBook Repair in Bangalore.
Machub was founded with one goal in mind: to bring Apple-grade service at reasonable prices with zero compromise on quality. Here’s what sets us apart from the crowd:
1. Certified Apple Technicians
Every repair is performed by highly trained technicians who are experts in handling Apple hardware and macOS systems. Our professionals understand every detail of your MacBook—whether it’s an older Intel model or the latest M1/M2 MacBook Pro.
2. Genuine Parts Only
We use only 100% authentic Apple parts or OEM-grade replacements sourced from verified suppliers. Your MacBook’s integrity is preserved, and its performance is guaranteed.
3. Quick Turnaround
Need urgent help? Most repairs—such as battery replacement, screen fixes, and keyboard repair—are completed the same day. Our goal is to minimize your downtime.
4. Free Pickup & Drop Across Bangalore
Don’t have time to visit our center? We’ll come to you! Machub offers free pickup and drop services in all major Bangalore areas, including Whitefield, Koramangala, Indiranagar, Jayanagar, HSR Layout, Yelahanka, and more.
5. Affordable & Transparent Pricing
No hidden charges. No confusing terms. We provide detailed quotes before we start, and you pay only for what you approve.
6. Data Security Assurance
Your data is safe with us. Machub maintains strict confidentiality and ensures no unauthorized access during repairs.
Comprehensive MacBook Repair Services by Machub
We specialize in end-to-end MacBook repairs. Here's a breakdown of all the services offered by Machub in Bangalore:
1. MacBook Screen Replacement
If your MacBook screen is:
Cracked or broken
Flickering or has lines
Black or blank
Suffering from backlight bleeding
We replace Retina and non-Retina displays using original parts with zero compromise on display quality.
Supported Models: MacBook Pro (Retina/Non-Retina), MacBook Air (all years), MacBook 12”
2. MacBook Battery Replacement
If your MacBook battery is:
Draining quickly
Swollen or bulging
Showing "Service Battery" warnings
Our experts replace it with genuine lithium-polymer batteries that restore original backup levels. We calibrate the system for maximum efficiency post-installation.
3. MacBook Keyboard and Trackpad Repair
For issues such as:
Unresponsive or sticky keys
Keyboard backlight not working
Trackpad not clicking or tracking properly
We replace individual keys or full keyboard panels depending on the issue and model.
4. Logic Board / Motherboard Repair
One of the most complex repairs, handled by our micro-soldering specialists:
Water damage
Dead MacBook not turning on
T2 chip failure
Power IC, U8900, charging controller damage
We offer component-level logic board repairs, which saves thousands compared to full board replacements.
5. Charging Port and Adapter Issues
Charging problems can arise from:
MagSafe/USB-C port failure
Adapter malfunction
Motherboard power input issues
We fix both ports and adaptors. We also sell genuine Apple chargers at service center prices.
6. macOS Installation & System Support
Having software trouble? Machub helps with:
Clean macOS installations
macOS upgrades and compatibility checks
Boot loop fix
SSD and Time Machine issues
7. MacBook Hinge, Frame, and Body Repairs
If your MacBook has:
Loose or broken hinges
Bent or cracked casing
Trackpad housing issues
We restore structural integrity with original parts and frame polishing.
8. SSD/RAM Upgrades (For Select Models)
Want to boost your MacBook’s speed?
SSD upgrades for Intel-based models
RAM upgrades (older models)
Data migration and cloning support
9. Fan Noise & Heating Fixes
Overheating MacBook? Our cooling system services include:
Fan replacement
Internal dust cleanup
Thermal paste re-application
MacBook Models We Support
Machub provides repair support for all major MacBook models:
MacBook Air (2015 – 2024, Intel & M-series)
MacBook Pro (13”, 14”, 15”, 16” – Intel & M1/M2/M3)
MacBook Retina 12”
Legacy MacBooks (on request)
Areas Covered Across Bangalore
We provide service in all major localities, including:
Whitefield
Koramangala
Indiranagar
HSR Layout
Jayanagar
Electronic City
Marathahalli
Mahadevapura
Rajajinagar
Yelahanka
Malleshwaram
Sadashivnagar
Kammanahalli
And more...
If you live in or near Bangalore, Machub is just a call away!
Real Customer Reviews
"Machub is hands-down the best MacBook repair center in Bangalore. They replaced my swollen battery in just a few hours and offered free pickup and drop. Highly professional!" — Rajesh P., Whitefield
"The technicians at Machub know their stuff. My MacBook Pro had a logic board issue due to liquid damage, and Apple quoted a bomb. Machub fixed it at one-third the cost." — Neha K., Koramangala
"Super fast service. Got my keyboard replaced and my Mac cleaned up—all on the same day. Definitely recommend." — Amit D., Indiranagar
Frequently Asked Questions (FAQs)
Q1. How much time will it take to repair my MacBook? Most basic repairs are completed within 4–6 hours. Complex issues like logic board repair may take 1–3 days.
Q2. Do you offer warranty on repairs? Yes! We offer a warranty of 3 to 6 months depending on the nature of the repair and parts used.
Q3. Are the spare parts original? Absolutely. We use genuine Apple parts or OEM-grade components only.
Q4. Is my data safe during repair? Yes. We maintain strict data privacy policies and do not access or alter your personal data.
Q5. Do I need an appointment? Appointments help us serve you faster, but walk-ins are always welcome!
Conclusion: Machub – Bangalore’s Most Trusted MacBook Repair Center
In a city full of tech users, Machub stands out by offering professional MacBook repair solutions that are fast, affordable, and transparent. With doorstep support, skilled technicians, and a customer-first attitude, we make MacBook repairs stress-free for everyone—from working professionals to students and entrepreneurs.
Whether your MacBook needs a screen replacement, a fresh battery, or logic board-level repair, Machub is your one-stop solution in Bangalore.
Book your service today and experience the Machub difference!
0 notes
Text

Congratulations Maya! You’ve been accepted as your first choice of Dominic Harrion (Cassian Holloway)! Please send in the account within the next 24 hours!
✖ ABOUT YOU ↳ Name: maya
↳ Pronouns: she/her
↳ Age: 25
↳ Activity: 2-3 times a week
↳ Timezone: est
✖ ABOUT YOUR CHARACTER ↳ Celebrity Desired: Dominic Harrison (Yungblud)
↳ Second Celebrity: N/A
↳ Character’s Name: cassian holloway
↳ Pronouns: He/Him
↳ Birthday & Age: August 5th, 1997
↳ Education: St. Jude’s
↳ Background: Cassian Holloway was born on a rainy August morning in 1997, the fifth to be exact, in a penthouse high above SoHo. But despite the silver-spoon setting, his real childhood happened miles east in the cracked sidewalks and converted lofts of Williamsburg, Brooklyn—where alleyways told stories, punk shows bled into sunrise, and trust was a currency more rare than cash.
His father, Declan Holloway, was a man of shadows cloaked in suits. Officially, he was a tech investor. In reality, he ran a black-market empire dealing in things most people weren’t supposed to know existed—stolen prototypes, banned firmware, hardware designed to disappear. His mother, Eleanor, came from old money and played the role of Manhattan socialite with cold precision. Together, they raised Cassian under the weight of legacy.
From a young age, Cassian lived between contradictions: mornings of silence and expectation in SoHo, afternoons chasing sparks in Brooklyn’s chaotic sprawl. By the time he turned six, he was already moving through two worlds with practiced ease—dining under chandeliers with polished elbows, then slipping through warehouse doors to catch snippets of coded conversation and the scent of soldered metal.
The name “Cassian” was meant to sound classic. The nickname “Rye” was his own creation—something sharp, simple, untraceable. He became Rye on stage, with dyed hair, bleeding knuckles, and a guitar slung low. His songs told stories no one knew were real: coded warnings, buried grief, quiet rage.
As the years passed, the contrast between the life he wanted and the life expected of him grew starker. By seventeen, he was a regular in Brooklyn’s underground music scene. But even then, Declan was grooming him—slowly folding him into the operations. The deals started small: a meeting here, a favor there. Then came the introductions, the veiled threats disguised as business lessons, the unspoken truth that he was being shaped into an heir.
Cassian wanted none of it.
He wanted distortion pedals, nights that bled into mornings, lyrics that meant something. But he also knew what his father’s disappointment looked like. And more importantly, he knew what Declan’s enemies did to weakness.
Now, at twenty-seven, Cassian Holloway stands at the edge of two versions of himself. One foot in the world of underground shows and midnight songwriting sessions, the other caught in a spiderweb of inherited power he never asked for. The clock is ticking. His band is gaining momentum, and people are starting to pay attention—not just fans, but the wrong kind of people.
He dreams of escape, but dreams don’t come easy for Holloways. Every step toward freedom threatens to unravel the careful balance that keeps his world from imploding. And somewhere deep down, Cassian knows: if he doesn’t choose soon, the world will choose for him
#application#oc character#ggaccepted#accepted application#dominic harrison#yungblud#cassian holloway
0 notes
Text
INTRO POOOOST
Hello there! I am Renifrey, any pronouns
I write code, use linux(arch btw), i like retro hardware and soldering, own a 3d printer. I am also a gamer, an anime fan, a furry, and a FOSS enthusiast. Also a pansexual and a bit horny. My DMs and asks are always open.
DNI:
MINORS. I will post some NSFW shit
Conservatives in any shape or form, including republicans, terfs, racists, etc
0 notes
Text
RDA5807M FM stereo receiver module
This project focuses on a simple yet powerful FM stereo tuner module. The core component of the module is RDA5807M, a single-chip broadcast FM stereo tuner that has gained popularity among designers in recent years due to its high level of integration. This integration significantly reduces the need for external components, simplifying circuit design. The RDA5807M supports a wide FM band, covering frequencies from 50MHz to 115MHz, making it adaptable to global FM standards.
Additionally, its use of a low-IF digital architecture streamlines the design process by requiring fewer external parts. The inclusion of an AGC (automatic gain control) feature ensures consistent signal reception, even in environments with fluctuating signal strengths.

The chip's digital stereo decoding capabilities deliver high-quality audio output, providing a rich stereo sound experience. Moreover, the energy efficiency of the RDA5807M makes it suitable for portable, battery-powered devices. The I2C control interface allows for easy integration with microcontrollers, enabling straightforward digital control.
This module is designed as a ready-to-use FM receiver solution, emphasizing compactness and ease of integration. It incorporates the RDA5807M IC and the STM8S003F3P MCU, along with the necessary supporting passive components, standard headers for connections, and flexible antenna connectivity options. The module is engineered to connect with commonly available 0.56-inch, 4-digit common cathode LED seven-segment display modules without any soldering.

The compact footprint of the module makes it ideal for projects where space is at a premium. Importantly, its open-source design allows for complete customization and modification.
It provides standard stereo audio output with separate left and right channels. The antenna input options allow for various antenna types, ensuring optimal signal reception. During testing, we utilized a 30cm long wire as the antenna and successfully received all FM stations clearly.
youtube
The tuner module features push switches to perform automatic station scans in both directions. The firmware limits the tuning range of the module to between 87MHz and 108MHz. Additionally, it includes digital volume control with 15 levels and a memory manager for storing up to 10 FM radio stations. The current tuner frequency is displayed on the segment display module, and there are two LEDs to indicate stereo reception and memory manager status.
The output level of this receiver module is not sufficient to drive speakers directly. Therefore, to achieve audio output through speakers, this module needs to be paired with a stereo audio amplifier. During testing, we successfully used the commonly available PAM8403 3W class-D audio amplifier with this module.

Power is supplied via a screw terminal, typically requiring a DC power source between 5V and 9V. The dimensions of the module are 72.85mm × 32.0mm.
This project is available on GitHub, providing schematics, PCB files, firmware source code, and comprehensive documentation. The hardware design of this project is licensed under CERN-OHL-W, while the firmware is licensed under the terms and conditions of the MIT license. All other resources, including documentation, are released under the Creative Commons Attribution 4.0 International license.
0 notes
Text
How to set up a successful robotics lab in your school?
https://makersmuse.in/wp-content/uploads/2024/12/science-day-celebration-with-kids-learning-laboratory-scaled.jpg
With robotics becoming a cornerstone of modern education, schools are increasingly investing in robotics labs to foster creativity, critical thinking, and technical skills in students. Setting up a robotics lab might seem like a daunting task, but with the right approach, it can be a rewarding investment in your students’ future.
Here’s a step-by-step guide to creating a thriving robotics lab in your school.
Define Your Goals
Before you begin, identify the primary objectives for the robotics lab.
Is it to introduce students to coding and engineering?
Are you aiming to prepare them for robotics competitions?
Do you want the lab to complement existing STEM curricula?
Clearly defined goals will help you make informed decisions about equipment, curriculum, and design.
Plan Your Budget
Robotics labs can vary in cost depending on the complexity of the equipment. Plan a budget that includes:
Starter Kits: For beginners, kits like LEGO Mindstorms or Arduino are affordable and versatile.
Advanced Equipment: For high school students, consider adding 3D printers, Raspberry Pi boards, or robotic arms.
Software Tools: Invest in programming platforms such as Scratch, Python, or C++.
Maintenance Costs: Allocate funds for replacements, repairs, and consumables like batteries.
Seek sponsorships or grants from local businesses or educational organizations to supplement your budget.
Choose the Right Space
Select a location that is spacious, well-lit, and has adequate electrical outlets.
Layout: Organize workstations with enough room for teams to collaborate.
Storage: Install shelves or cabinets for tools and materials.
Safety: Ensure the space complies with safety standards and includes a first-aid kit.
Equip Your Lab with Essential Tools
Every successful robotics lab needs a mix of hardware and software. Consider including:
Hardware: Microcontrollers, sensors, motors, and construction kits.
Software: Programming tools and simulation platforms.
Accessories: Tools like screwdrivers, soldering kits, and measuring devices.
Start small and expand your inventory as student engagement grows.explore now
Design an Engaging Curriculum
Create a curriculum that caters to different skill levels, from beginners to advanced students.
Beginner Projects: Introduce basic coding and robot assembly.
Intermediate Challenges: Include obstacle course navigation or simple AI tasks.
Advanced Activities: Encourage students to create robots with real-world applications.
Incorporate challenges and competitions to keep students motivated and engaged.
Train Educators and Staff
A well-equipped lab is only as effective as the educators who run it. Invest in professional development for teachers by offering:
Workshops on robotics and coding.
Certifications in platforms like Arduino or Python.
Access to online resources and communities.
Foster a Collaborative Environment
Encourage teamwork and innovation by promoting a collaborative culture.
Create student clubs for robotics enthusiasts.
Organize hackathons, exhibitions, and competitions.
Connect with other schools for inter-school events.
Evaluate and Evolve
Periodically assess the lab’s impact on student learning and engagement. Collect feedback from students and educators to make necessary improvements. Stay updated with the latest trends in robotics to keep the lab relevant and exciting.
Start your lab now!
Transform your school into a hub of innovation! Start building your robotics lab today and prepare your students for a tech-driven future.
0 notes
Text


To create a robot shaped like a ball, you’ll need a mix of mechanical, electrical, and software engineering skills, along with some knowledge of robotics. Here’s an overview of the process, broken down into key steps:
1. Conceptual Design
Draw a Blueprint: Use software like AutoCAD, Fusion 360, or SolidWorks to design the robot. Start with its external appearance (the ball) and work inward. Plan where components such as motors, sensors, and power sources will be placed.
Determine Functions: Decide what the robot will do—roll, pick up objects, interact with the environment. This will guide the type of hardware and control mechanisms you’ll need.
2. Materials & Components
Shell: The outer sphere can be made from lightweight but strong materials such as polycarbonate or aluminum. Make sure it can support internal components but is light enough to move.
Motors & Gears: Use DC motors or stepper motors to drive the robot’s movement. Gyroscopic or pendulum mechanisms inside can help with stability and motion.
Gyroscope or Inertial Measurement Unit (IMU): You’ll need this to help with balance and direction control, especially if the robot is meant to roll like a ball (e.g., like the BB-8 from Star Wars).
Wheels/Tracks (Internal): Though the robot will look like a ball from the outside, the movement is usually driven by internal wheels or tracks that keep it balanced as it moves.
Power Source: A rechargeable battery pack will be needed. Choose one that can supply enough power for the motors, sensors, and any external tools (like arms or lights).
Sensors: If your robot will interact with the environment, you might want to include ultrasonic sensors (for obstacle detection), cameras, or IR sensors for remote control.
Microcontroller/Processor: You’ll need a microcontroller to control the robot’s actions, such as an Arduino or Raspberry Pi.
3. Assembly
Chassis Construction: Build the frame inside the ball using 3D printing or metalworking techniques. This frame will hold the internal components securely.
Install Motors and Gyroscopes: Place the motors and gyroscopes in a balanced way to ensure the ball rolls smoothly without tipping over. Align your wheels or internal pendulum system properly.
Mount Sensors: Position sensors where they will be most effective (e.g., ultrasonic sensors at the front to detect obstacles).
Power System: Wire the battery pack to your microcontroller and motors. Use appropriate safety measures to prevent short-circuiting.
4. Programming
Control Code: Write the code that will control the robot’s movements. If using an Arduino, the Arduino IDE can help. For more advanced processing (e.g., object recognition or AI), you may want to use Python or ROS (Robot Operating System) with Raspberry Pi.
Movement Control: Program the gyroscope to keep balance and coordinate with the motors. Implement algorithms to handle acceleration, deceleration, and turns.
Autonomous or Remote-Controlled?: If you want it to be autonomous, you’ll need additional algorithms for obstacle detection and pathfinding. For remote control, integrate Bluetooth, Wi-Fi, or radio controllers.
5. Testing & Debugging
Prototyping: Start with simple tests—ensure it can move and balance properly. Fine-tune motor power and gyroscopic control.
Calibration: Adjust sensors and movement controls to ensure smooth operation. Test it in various environments (smooth floor, rough surfaces) to see how it handles different terrains.
Iterate: You’ll likely go through several iterations of refining components, improving the code, and upgrading hardware.
6. Finishing Touches
Outer Appearance: Once the internals work, focus on the aesthetics. You can paint the shell or add LED lights to give the robot a futuristic look.
Durability: Make sure the ball can withstand collisions or falls, especially if it’s autonomous and will be navigating real-world environments.
Resources You Might Need:
3D Printer: To create custom parts or frames.
Soldering Kit: For wiring and assembling electronics.
Microcontroller Kit: Like Arduino or Raspberry Pi starter kits.
Gyroscope and IMU: Available at electronics stores or online.
Motors and Gears: You can find these on sites like Adafruit or SparkFun.
By following these steps and continuously refining your design, you'll be able to create a working ball-shaped robot!
0 notes
Text
How to Choose the Best Arduino Screw Terminals for Your Projects
There are different options of screw terminals for Arduino screw terminals, and by selecting the most appropriate screw terminals, you do work with wiring and connecting the components way simpler. Connectivity can be realized easily and quickly through the use of screw terminals, which eliminate the need to solder wires. The screw terminal options you get on the Arduino boards in the market are so many and it is sometimes difficult to choose those that are considered best depending on your needs.
The following blog post will take you through the critical elements to have in mind when deciding to purchase Arduino screw terminals so that you pick the most versatile and long-lasting products for all your DIY electronics projects. No matter what kind you are interested in procuring, whether it is for simple prototyping or for use in a more industrial-type setting, using these tips will make the purchase process much easier and will also ensure that you receive exactly what you want.

Durability
Because you will not want to change scrw terminals very often, go for these made of tough materials, for example, nylon plastic which is resilient to wear and tear. Metal threaded inserts for securing wires also add more strength and longevity compared to plain plastic screws.
For heavy-duty applications with higher voltages or currents, using Arduino screw terminals rated for the required loads will prevent meltdowns. opt for UL-rated industrial ones with casings that can handle exposure to extreme temperatures or environments.
Ease of Installation and Use
For hobbyists and professionals alike, the ease of installation and use is a key consideration. Look for Arduino screw terminals that offer features like:
Color coding for easy identification of connections.
Labels or markings that allow you to note down connection points.
A design that accommodates different wire sizes without the need for additional tools.
These small conveniences can greatly enhance the speed and efficiency of your project assembly and maintenance.
Compact Design
When working with Arduino prototype boards or packing numerous components into an enclosure, compact screw terminal blocks help optimize available space. Look for miniaturized models like 2-pole or 4-pole ones that occupy less area while still allowing sufficient wiring room.
Low profile terminals like the plug-in block types are ideal if you need to stack multiple layers of connections. Slim vertical or horizontal screw terminals also have small footprints perfect for Arduino projects with size constraints.
Compatibility with Your Board
The identification of the compatibility of the screw terminals with the Arduino board is often the first thing to do. Bear in mind that not all terminals are to fit this very board so one has to look for the terminals created explicitly for the given Arduino model. Whether you are working on introducing Arduino DIN rail project, or are rather incorporating Arduino into the larger WiFi PLC system, making sure it fits perfectly will spare you a lot of unpleasant surprises in the future.
Terminal Block Types
Arduino screw terminals come in a variety of connector styles to suit the enclosures and layouts of your projects:
PCB Mount – As the name suggests, these have pins for securely fastening onto PCBs.
Panel Mount – These terminal blocks can be mounted on enclosure walls. They have a flange/frame for screw-fixing onto flat surfaces.
DIN Rail Mount – Designed to snap conveniently onto DIN rails widely used in industrial electronics.
Free-Hanging – No mounting hardware required. You can use them loose by just connecting wires.
Conclusion
Choosing the best Arduino screw terminals gets easy once you evaluate options based on ease of use, durability, size constraints, and terminal block types. erqos offers an extensive range of terminal connectors to suit diverse budgets and project needs. Visit https://erqos.com/ to find the ideal ones to organize and streamline your next Arduino project!
1 note
·
View note