#costume construction
Text
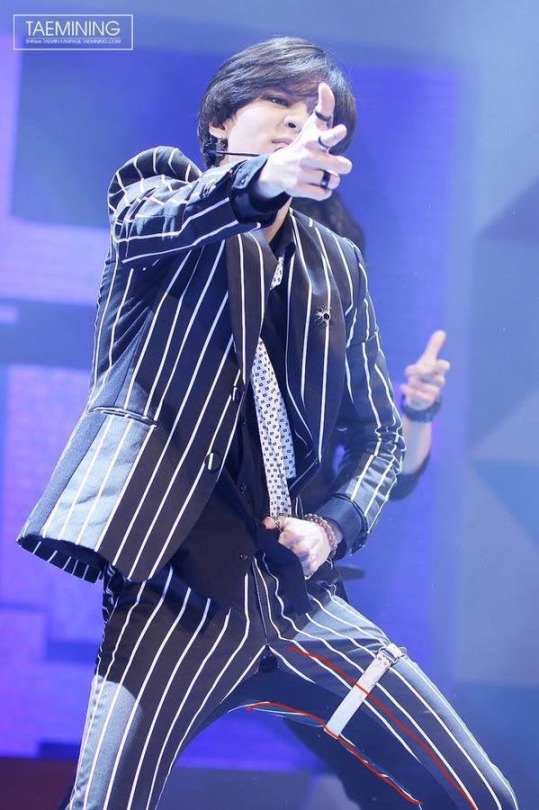
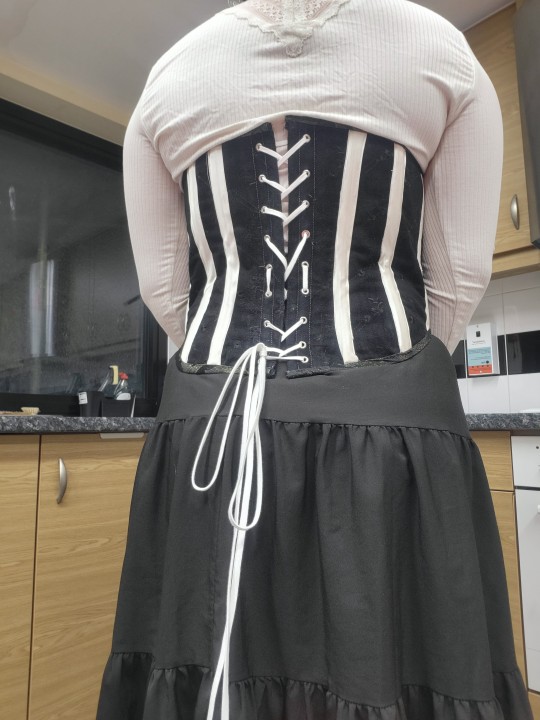
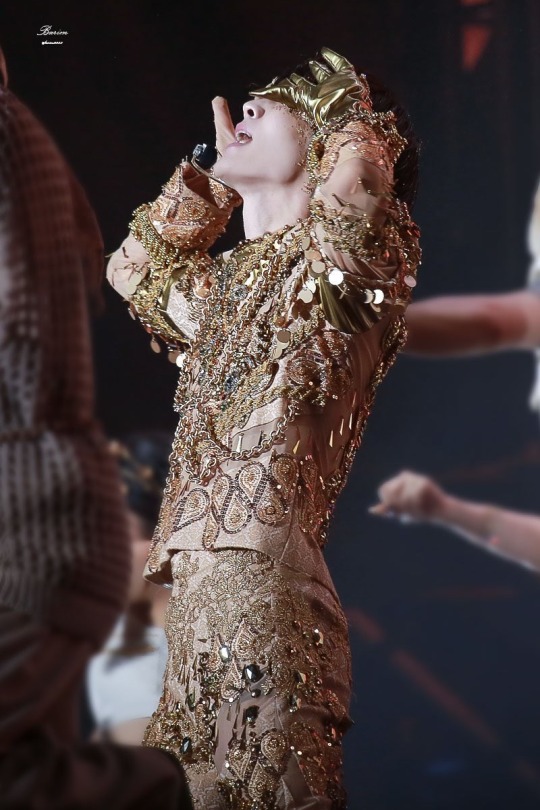
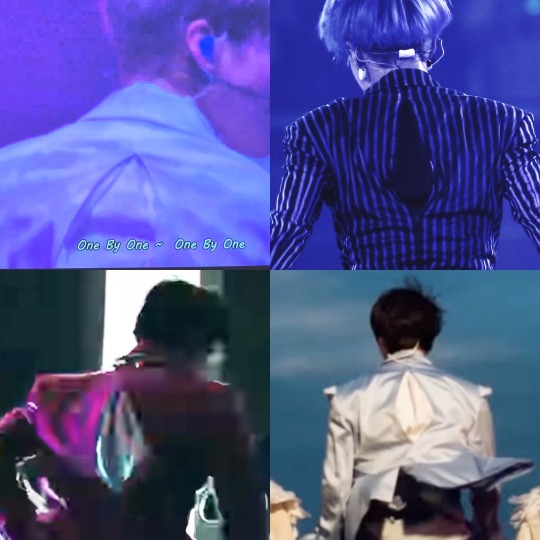
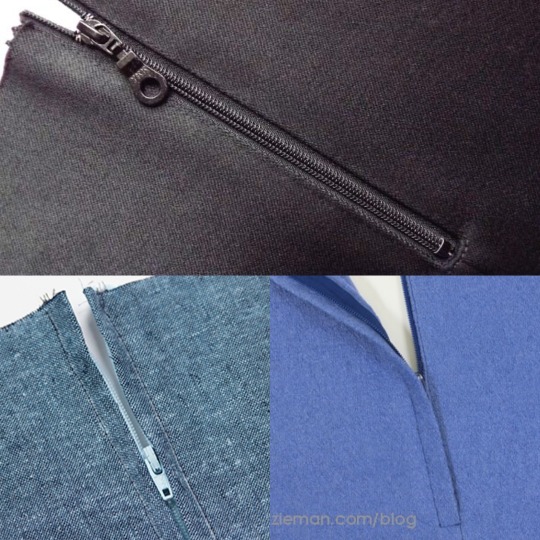
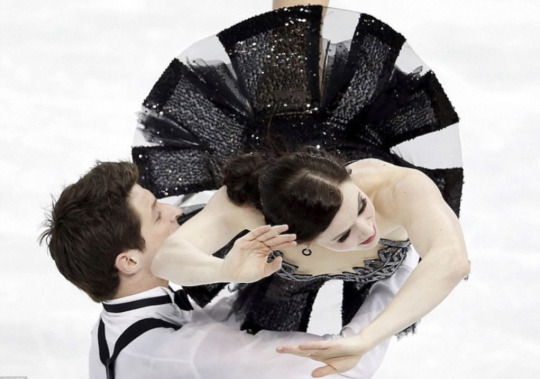
There’s something wrong with me. I was so excited to see this photo. Yeah, of course, for the obvious reasons. But also because it confirmed and showcased an alteration that has been done to Taemin’s clothes so he’s less likely to split his trousers.
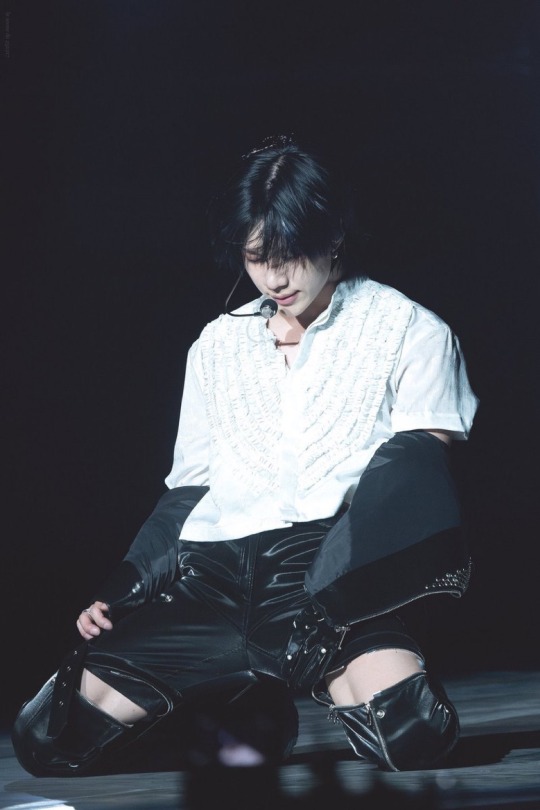
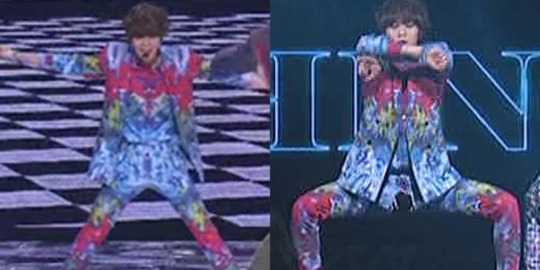
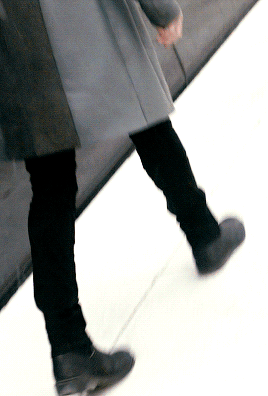
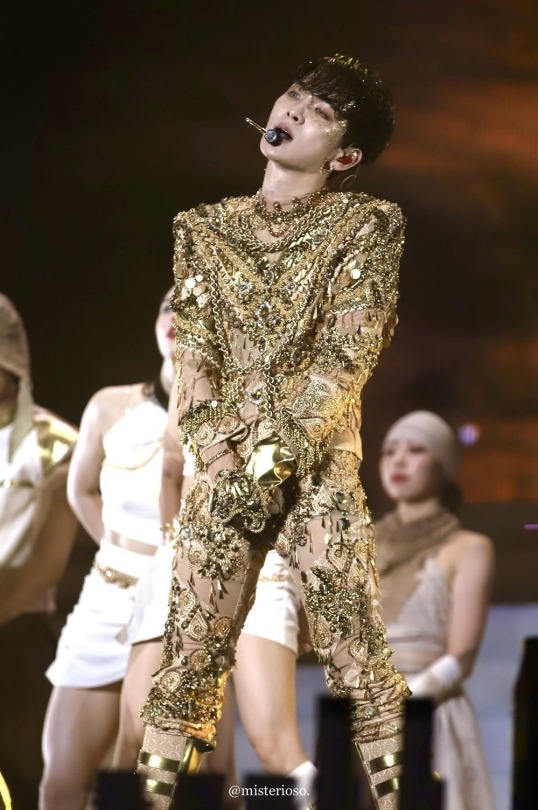
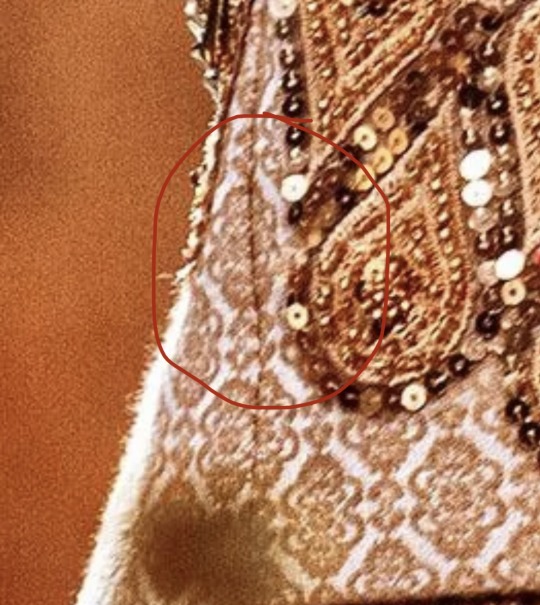
Taemin in his pleather pants at his Metamorph concert, 2023.
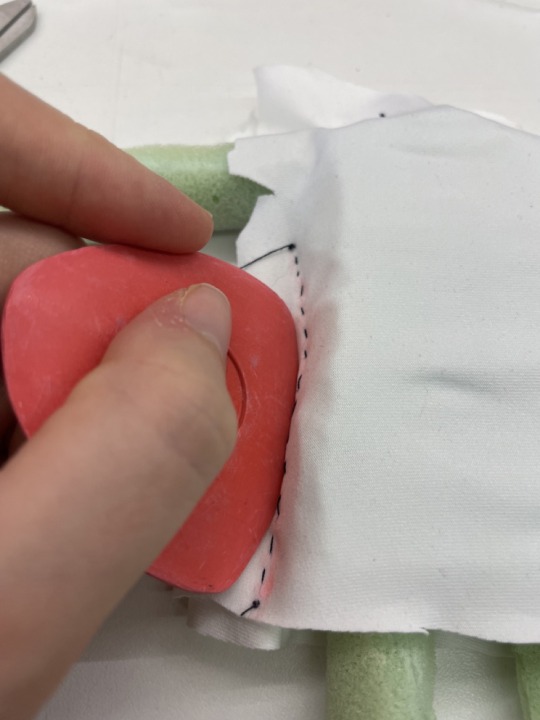
He’s got crotch gussets. Such a sexy term, I know. Basically, it’s a long triangular piece of fabric that’s stitched from the crotch down into the trouser legs. This provides some extra depth to allow for a fuller range of movement during squats, lunges, etc.
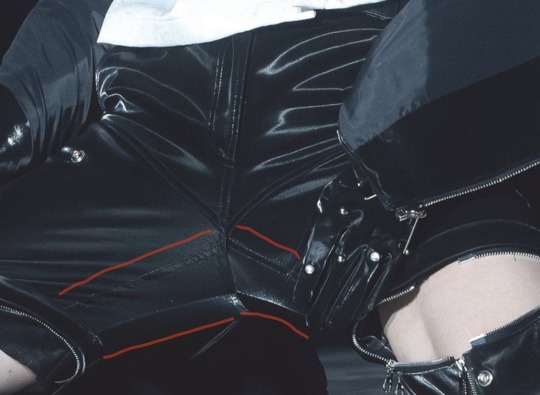
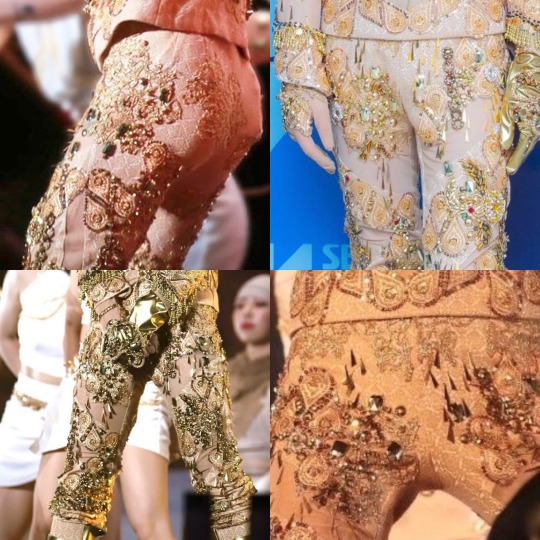
The gusset is that piece of pleather, pieced inside those red lines.
Sometimes it’s made of matching stretch fabric, and sometimes it’s the same fabric as the trousers. The width and length of the triangle can vary based on the amount of extra ease required for the specific movements. In this specific pair, the gusset is truncated at the zippered knee so there’s no point.

Jinki during the Your Number Performance Video (Black Version) showcasing a beautiful example of a gusset
During a fitting, it’s important to have the performer do all of their most extreme moves to make sure things don’t bunch or bind. Since we don’t normally get…excellent crotch shots…of Taemin, like that one, I can’t tell how common it is for him to get these gussets.
If it’s a shopped garment and not custom built (I’m assuming the Metamorph pair is custom) and they have the money, it’s possible they could purchase two pairs. They could then cannibalize one pair simply to make perfectly matching gussets.
If the trouser hem is taken up quite a bit, it may also be possible to use that fabric to make some.
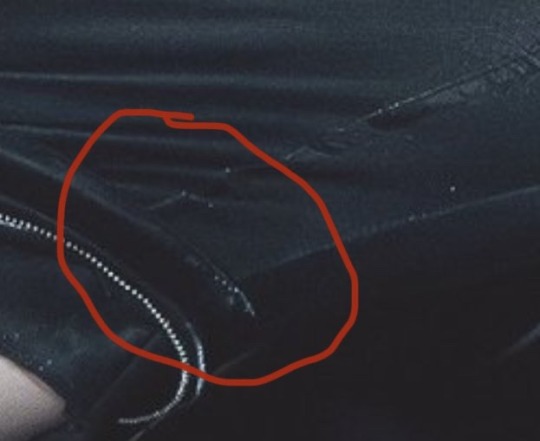
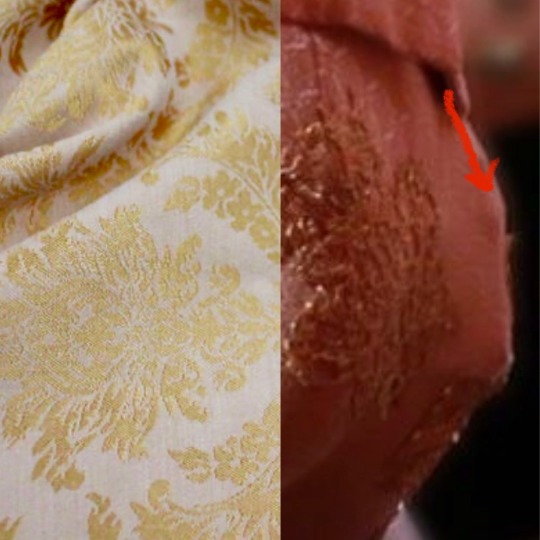
It's also notable that the seams in these trousers are “flat felled.” That’s the type you typically see on jeans. It’s topstitched twice so it’s a very strong seam, which also helps to prevent split crotches.
You can see the beautifully done flat felled seams at this intersection of center front seam, front and back leg, and gussets. It's so pleasing to me!

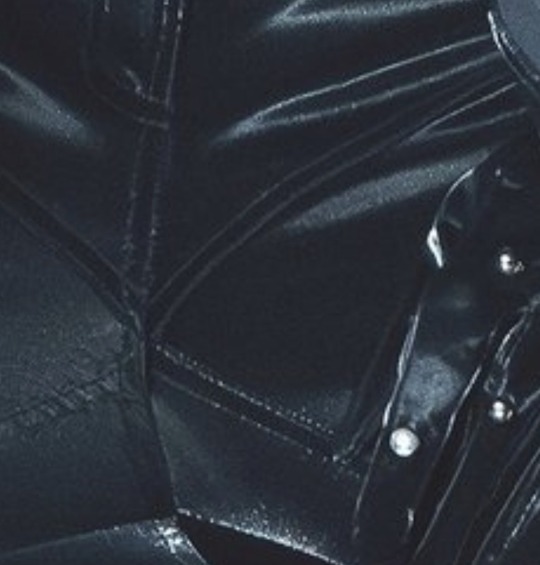
Here's what a flat felled seam looks like. Hefty jeans seam. Big, beefy jeans seam.
Perhaps his most famous “blowout” was during the 2012 performance of Sherlock at the KBS year end music show. But he’s pretty famous for them in general.
That's just impressive
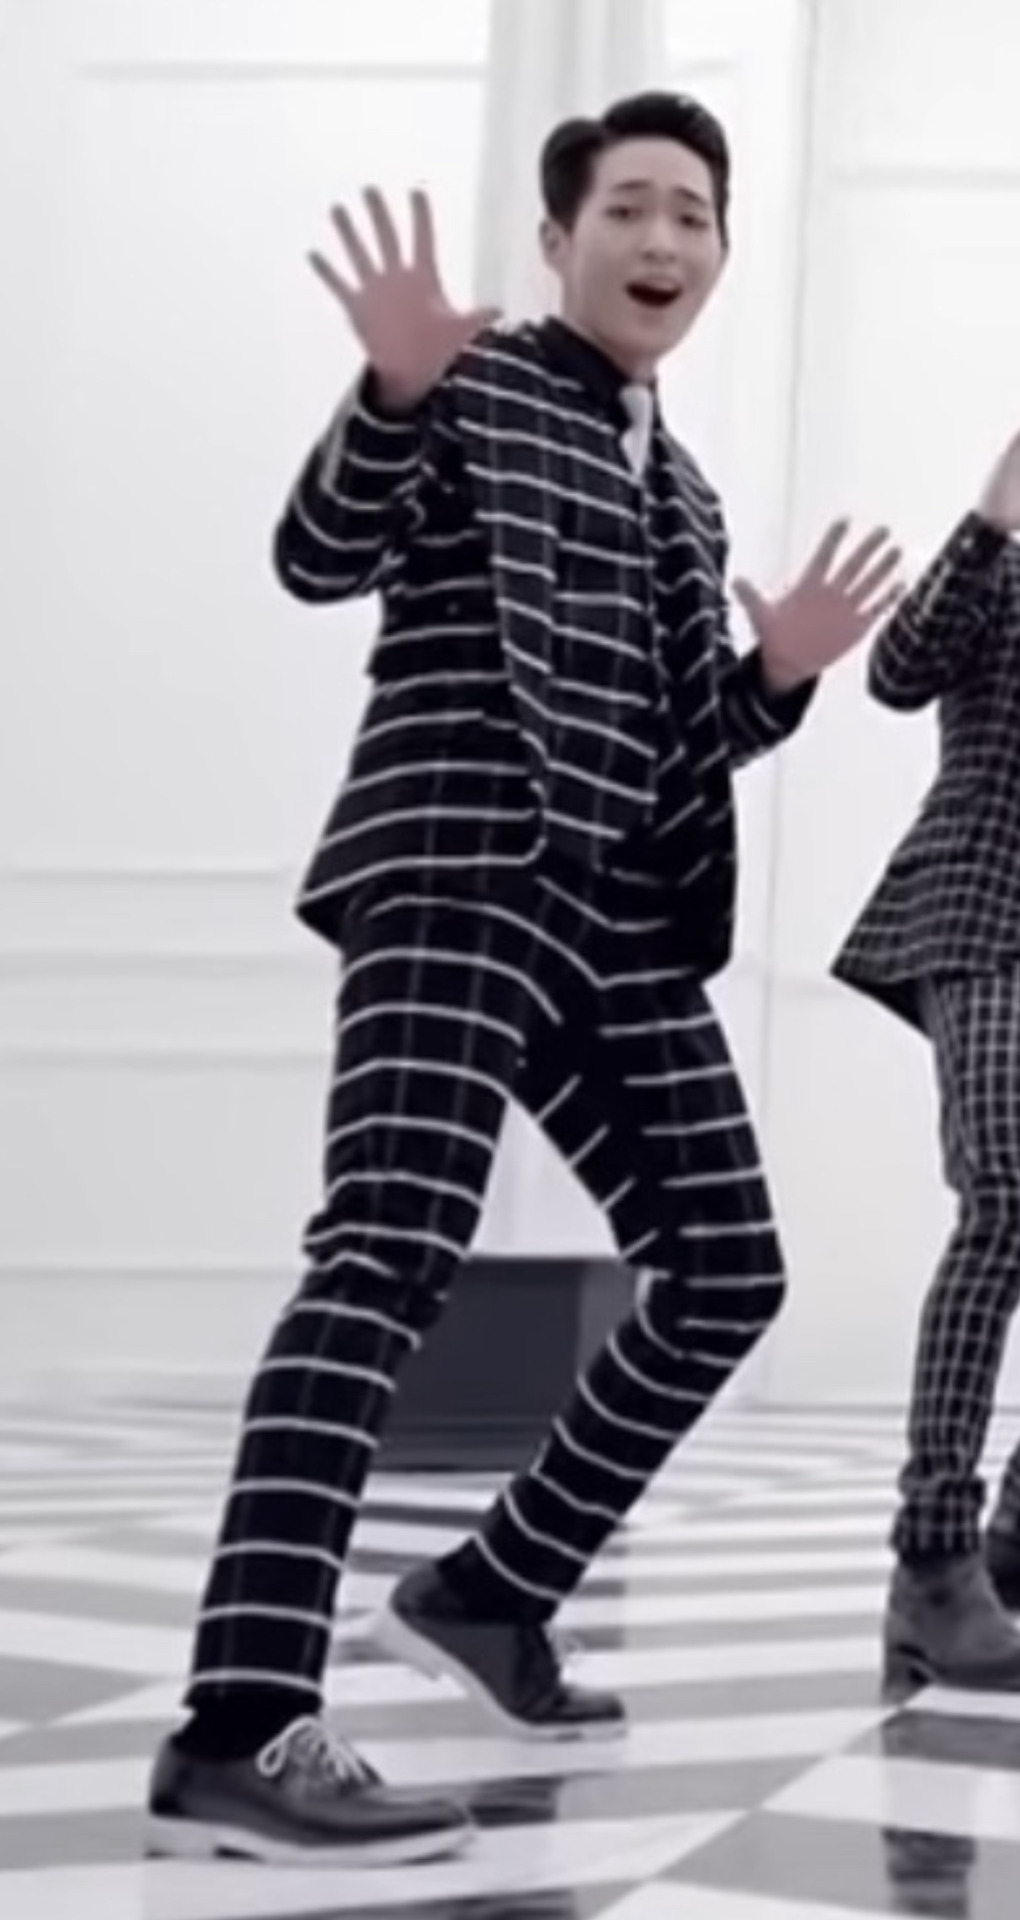
I’m not quite sure when Taemin’s styling team started incorporating crotch gussets into his costumes…my research is pretty spotty.
There is one instance during his Danger era in 2014 where he had a sort of gusset installed, however, it lacked a center front seam. This, along with the fact that his trousers were riding low, didn’t provide the correct…body geometry, to broadly explain it, to really help. It was also very wide and not tapered, which widened his whole trouser leg. It was also not stitched securely enough to keep from popping open at the center front. But this is the first attempt I've seen trying to accommodate his issues.
You can see how it lacks the refinement and finesse of the future "generations" of gussets.
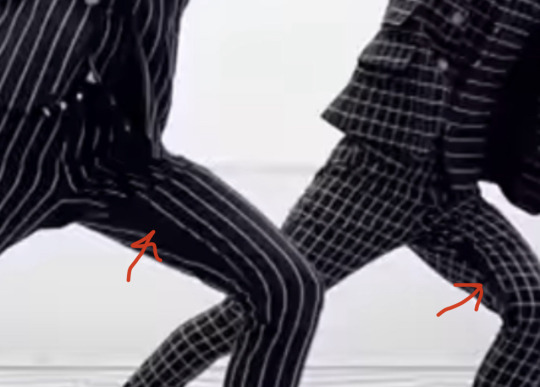
There were at least two instances of Taemin splitting his trousers in 2016 at a DxDxD concert and a Drip Drop live performance. His striped DxDxD suit definitely did not have gusset, and I’m unsure about the latter. I think it’s interesting that they tried a gusset on him two years prior, then didn’t again. Except….

Taemin's gusset-less suit which he wore during Shinee's DxDxD concert in 2016, which split during the show.
All of SHINee had crotch gussets in their Your Number suits in 2016. I wrote a whole thread about that here.
So basically, I’m confused. It seems like the usage of gussets in Taemin’s trousers was very sporadic.
I haven’t seen more recent examples of either gussets or split trousers, other than the Metamorph trousers. But I haven't been able to get good views of most of the things he's worn over the last 7 years. This could mean that his team has begun to incorporate gussets into more of them, or we just don’t know about the blow-outs. Or I haven't done enough research. I got a good view of the inner legs of his blue satin suit in the Idea MV and I didn’t see anything. Same with his black Criminal trousers.


Nope?
Wearing trousers high on one’s waist and very close to their body helps a great deal. You can see that in the blue satin Idea trousers. That way, the loose fabric doesn’t stretch more than it should as the legs splay apart and cause ripping. The styling team may have made sure to do that more. It’s possible that they could have also made sure to incorporate more stretch into the trousers they buy (or possibly, occasionally, make) for him.

Taemin's Kcon look. You can see how the trousers go nearly all the way up to his "natural waist" (which is where you crease when you bend to your side.) That helps keep them up to where they need to be, preventing a saggy crotch, which, in turn, prevents rips.
Working with performers for many years, one gets to know the idiosyncrasies and patterns of the way they move in their clothing. I worked with one performer in musical theatre who was infamous for splitting his trousers. We searched for matching fabric before we even tried on his trousers for the first time, knowing he would be getting gussets.
All this is to say, I applaud the stylist team for making these accommodations for Taemin. He, more than anyone, needs these alterations to give him peace of mind to perform "full out" and stay rip free!
Here’s a bonus 9 minute compilation of Taemin ripping his trousers. Serial Pants Ripper Taemin. (Cw: The last bit is uncomfortable, featuring some prompting from hosts for Minho to touch Taemin’s butt to see if it was pointy, which was preferable to the host doing so.)
#shinee#taemin#lee taemin#costumes#kpop#k pop#gussets#sewing#costume design#costume construction#shinee taemin
105 notes
·
View notes
Text

do you all mind if i just… slide these on your dash?
i'm so close to being finished with this cosplay ahhh <3
#don't worry the sleeves have cuffs now#cosplay#alastor#alastor hazbin hotel#hazbin hotel#alastor cosplay#costume design#costume construction#hazbin hotel cosplay#handmade#handmade cosplay#wig styling
22 notes
·
View notes
Text


Cheers, loveys!
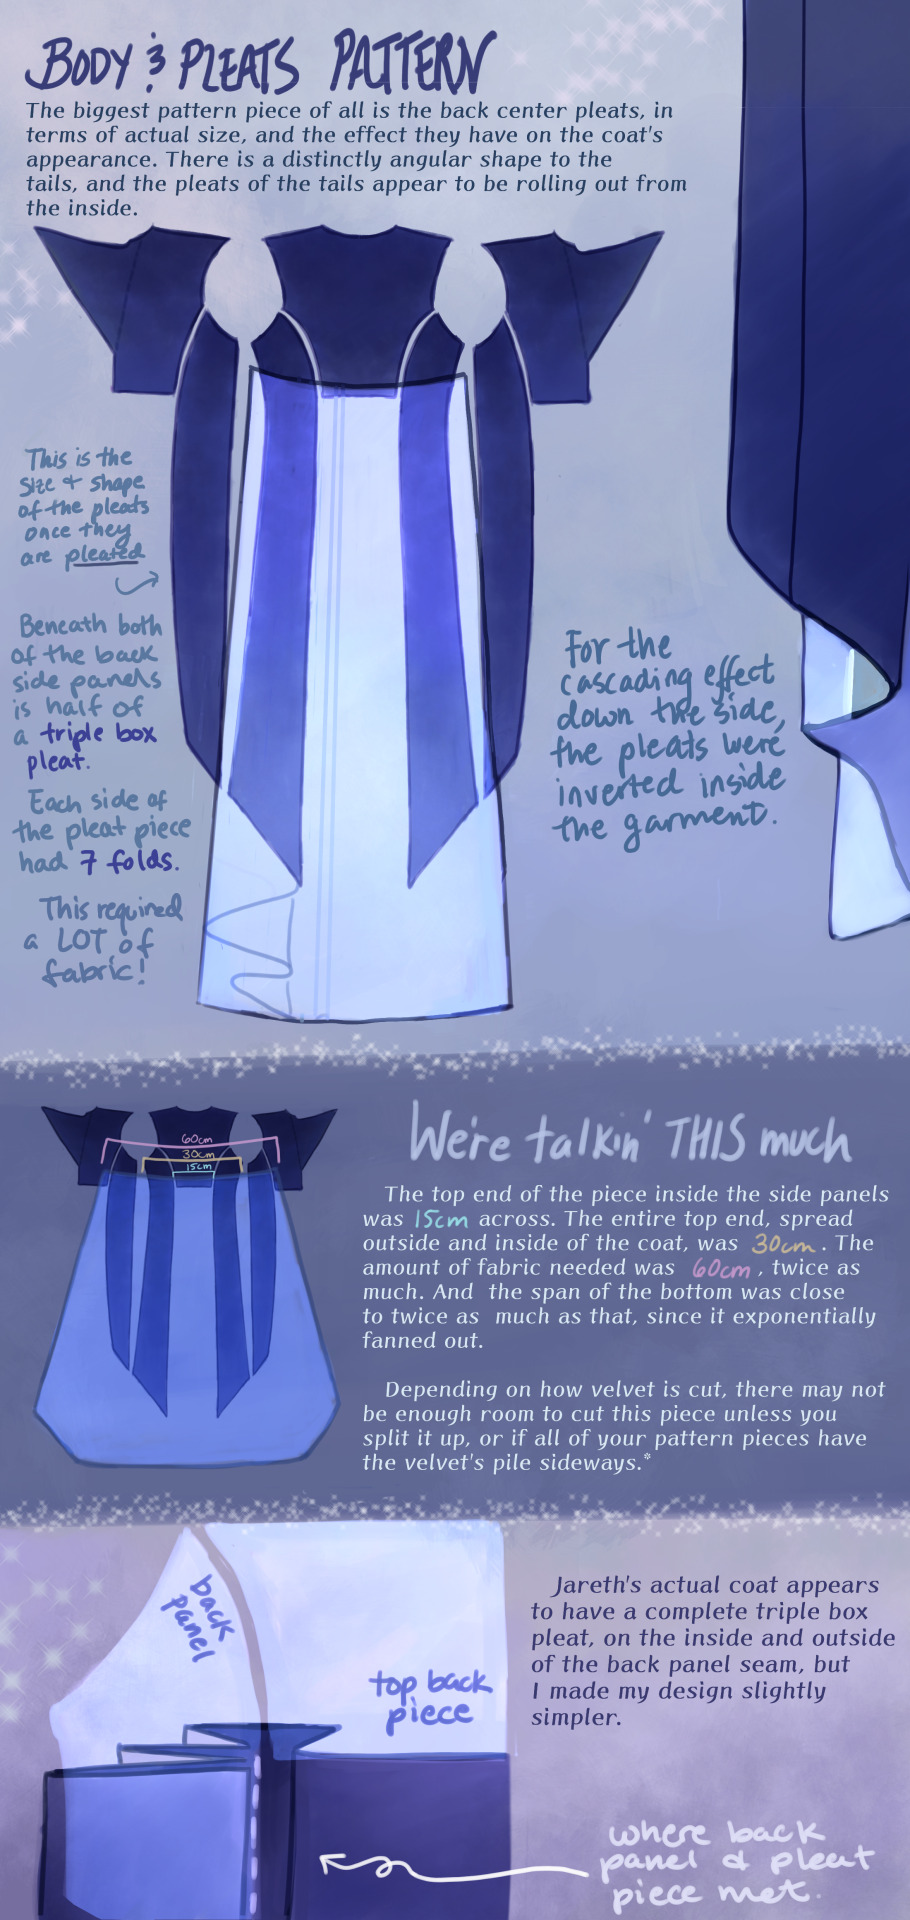
Here is post 1 of 3 about Pattern Construction. I’ll make a diagram post like this and then also take photos of my actual coat and with me in it.
I don’t remember how I started off doing the pattern, but I will guess that I took a tailcoat that I already possess and used it as a base, which in general seems to be a helpful way to start making clothes that fit if you’re not a master pattern maker (which I’m not, and I made plenty of mistakes which we’ll get into.)
There are two people I want to thank, and the first is Aria Couture [X] and their quality photos and observations, vocabulary and groundwork. They are the shoulders I stand on. Their photos were how I made all of the notes discussed in these diagrams, and how I discerned what kind of pattern needed to be made.
So the main changes that needed to happen to my base pattern was 1.) jacking up the shoulders to high heavens, 2.) elongating the side pieces (which I’ve come to call panels so go with me), 3.) adding pleats in that squared off spot in the back between them, 4.) adding a custom collar and cuffs, 5.) designing my own lining.
THE PLEATS were a nightmare. There was a lot of math involved, and math that was not necessary, but the most important thing was creating a shape that would fold together into a straight line on top, look cascading on the sides, and marry the rest of the coat in a reasonable place. After a lot of trial and error, I ended up with this rounded wedge that spreads out on the inside of the coat, but also folds backwards onto itself (like half of a box pleat), to reattach to the back side panels. This is what gives the coat its look of all this shiny velvet blossoming from beneath the back buttons and gushing out the sides.
As to why the pleat piece is rounded, all of the pleat lines were diagonal, so that the coat would flare out. Cutting this piece as a completely straight line on top meant it ran out of fabric in the top corners, and more of it needed to be pulled in, more and more sideways. Adding a sloped height to its corners helped it do what it was supposed to and become a mostly straight line when folded together.
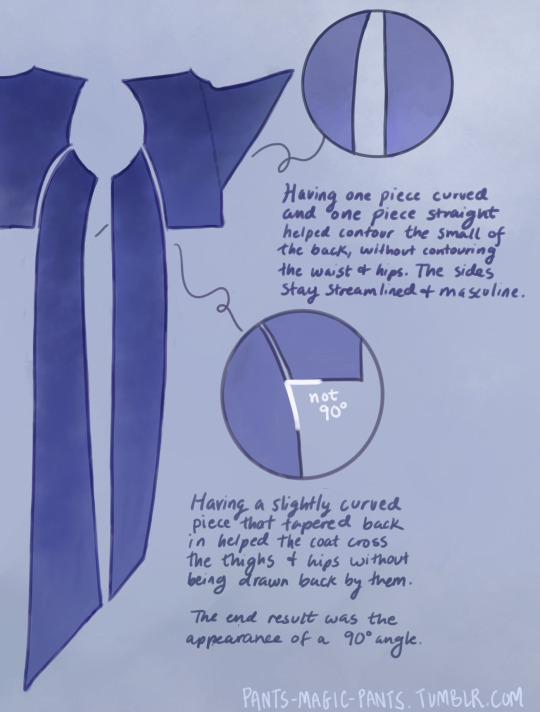
THE PANELS (second image), there are just a few notes about those which I think are important. As I am female cosplaying a male and wish to keep the masculine shape of the garment, some tricks needed to be pulled to hide my waist and hips, so this is what I came up with.
PROPORTIONS MATH. It’s a thing I started doing a couple cosplays ago, to get accurate shapes and lengths of garments, to give me the same silhouette as characters. It’s worked out really well for me. It’s been a real life application of algebra that I wasn’t expecting, as a former student who hated math. Now, I love math! Armed with a ruler and a protractor, I have taken down a lot of notes about such silly things as: what degrees the angles of the lapels are, and how wide are the shoulders compared to the head? (In Jareth’s coat’s case, the ratio of head:shoulders is 1:4.) With that knowledge, I took a photo of myself in the bathroom, measured my own head and shoulders in pixels, wearing a mock-up, and corrected shoulder span measurements to fit this ratio. It was a whooole thing, but I think it was worth it.
And I used proportions math for everything. How much of the arm do the cuffs take up? Where along the legs did the dramatic slope of Jareth’s “fishtail” start? Those things aren’t listed here, but hopefully this post gives you enough tools to figure it out on your own for your specific garment, or any garment you ever want to make.
THE COLLAR. Not much to say about it, but there’s how it looks.
SLEEVES. Dear God. I was stuck on sleeves for months because go ahead and look around online for detailed information about how to add basically football gear sized padding to your shoulders, and all of the intertwined modifications that needs. It isn’t out there.
One thing I can at least say is that it helps to start off with a great base, and the other person I have to thank is a tailor on YT called Chris Sartorial [X]. This guy hasn’t been active for years, but when he was, he was no nonsense, such a professional who knew what he was doing that he couldn’t even take the time to properly light his videos. Such a king. His channel helped me with my dress shirt, and also with making the base sleeves for this coat, which were of the “2 piece” variety. This kind of sleeve is used for blazers and coats so that it appears to fall in a nice boxy shape off the arm, usually from a shoulder pad, and then slightly turn at the elbow. While he doesn’t go into shoulder pads, this still halfway set me up for success, and knowing the relationship between shoulder and sleeve.
However, there are a few things I learned about shoulder+sleeve modification as shown above, and hopefully it’s a good “bouncing off” observation.
THE CUFFS. Again, not much to say, but this is how my pattern came out, to create that nice tear-drop shaped gap, with that sort of blooming and expanding height that his cuffs have, like a vase. The lace trim will be in another post. One thing I should mention is that the lace trim is tall enough that the bottom of the cuff won’t end on your wrist if you want to be able to see your own hands. The cuff needs to be measured so that it will end 2-3 inches up from your wrist.
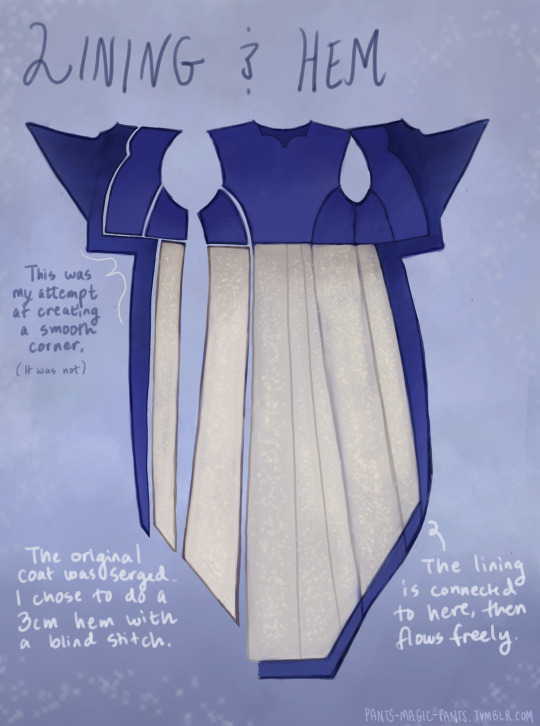
THE LINING
Dear God, she’s still writing. I am a huge fan of lining even though I’m not good at it, and my actual lining didn’t turn out looking as smooth as my drawings, but this is what I came up with, which in theory should look good. haha Any deviations from the norm that you see are just stylistic choices. I wanted the area in the top back to look sort of dripping like the back lace piece.
Was this interesting? I sure hope so. Please ask me questions if I’ve glossed over something.
53 notes
·
View notes
Note
hi!! idk if you've answered this already, but how many panels does the boleyn skirt have? it's difficult to tell. thanks 🥰
Eight! And it’s patterned like a hi-lo circle skirt, just cut up into the eight panels and with seam allowance added.
#six the musical#anne boleyn six#boleyn 3.0#boleyn 2.0#Boleyn 1.0#six construction#costume construction
13 notes
·
View notes
Text
I met a lot of new fiber friends at katsu and I know I've also reached some more people after posting my updated rococo gown, so here's a reminder that there is a discord server dedicated to all things yarn and nerdy 🥰
#artist#crochet#crocheting#fiber art#yarn#yarn crafts#cosplay#crochet cosplay#fiber artist#crochet inspo#crochet inspiration#crafts#costume#costume construction#knitwear#knitblr#crochetblr#crochet clothes#knitting#knitters of tumblr#crocheters of tumblr#fibre artist#fibre arts#fiber crafts#fibre crafts#needlework#needlecraft#yarnblr#yarnbending#yarn art
5 notes
·
View notes
Text

Handmade corset stitched for my Underpinnings unit at university, made to my measurements
I am very fond of this corset, though my one regret is not reinforcing the channels where the cup is inserted at the top. I had to redo the insertion several times so the fabric there was quite frayed and I was unable to insert a channel where the boning or wire would 1. Fit or 2. Not poke out. I also wish I had finished the edge of the bias binding on the top and bottom more neatly - I've been getting into better habit of finishing things in a neater way, but at this point I hadn't achieved that quality of work quite yet. Completed in December of 2023
1 note
·
View note
Text
Performance and Character: Costume Fabrication
I attended a stop-motion Costume Making course by Amanda Thomas, who did the puppet fabrication for Fantastic Mr. Fox (2009), The Corpse Bride (2005) and Pinocchio (2022).


We learned how to make a basic shirt pattern. Using stretchy jersey fabric from a large roll, I stretched two parts onto the front and back of a foam armature.

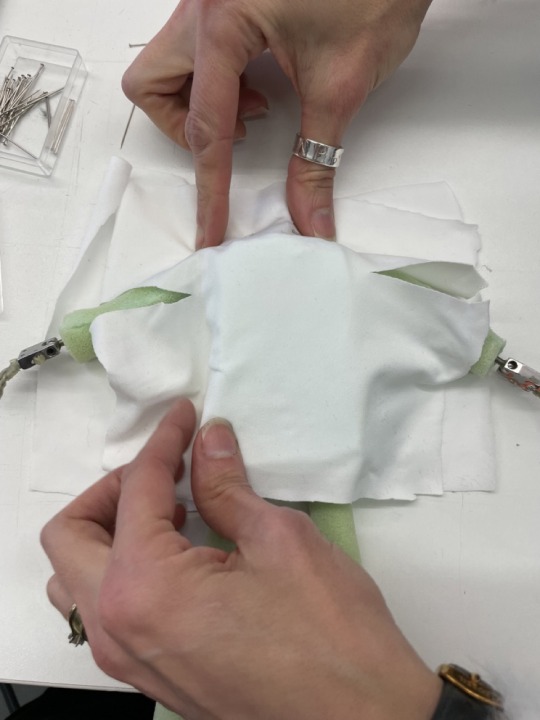


I then pinned and sewed the two pieces together and marked the sewing with tailors chalk.


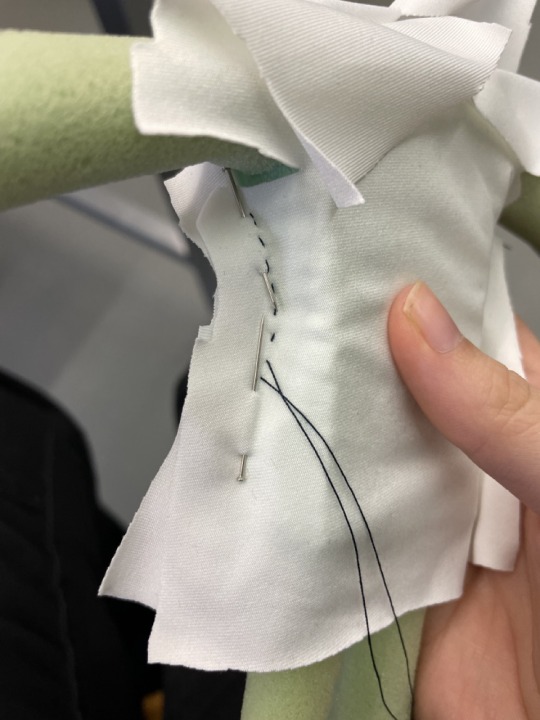


Once I'd marked these parts, I undid the stitching and marked again while flat.
Then I traced over jersey templates and put translucent paper on them, tracing over the shirt measurements. By folding the paper in half I traced over the drawn half, so that the shirt would be symmetrical.


I then cut out the two pattern piecies.

I then cut out some glue fabric. This is ironed onto the under part of the shirt to keep its shape and stop tearing.


I noticed that the blue marker pen I'd used was showing through in one place - so I will stitch a pattern or shape over this area, so this is not distracting while filming. Next time I will use non staining pen or chalk.

1 note
·
View note
Text
Reminder to all Europeans: Your "national" traditions were probably invented in the 1800s
#that doesn't make them fake traditions!#but please be aware that national identities were pretty much all constructed in the 1800s#your 'national costume' was a regional variant of contemporary fashion that nationalists decided should represent 'the nation'#your 'national dish' was a regional dish with no set recipe and no connection to the concept of the nation-state
428 notes
·
View notes
Photo


Captain Pike's Starfleet coat in Strange New Worlds 2x02 "Ad Astra Per Aspera"
"For Pike's travelling look, we went with a trench style leather coat with no insignia so he could blend in with the Illyrians. Lightly broken down for a "lived in" look." - Bernadette Croft, Strange New Worlds costume designer
Illustration by Strange New Worlds concept artist Christian Cordella.
#star trek strange new worlds#strange new worlds#star trek#spoilers#captain pike#christopher pike#anson mount#trekedit#tvedit#strangenewworldsedit#*edit#was hoping we'd get some concept art of the coat! :)#i'm so glad the costume designer posted it#love the construction of the back especially#croft is doing amazing work on the show#the dark lighting makes the costumes#hard to see in detail sometimes#also due to the show's color grading#i cleaned up the footage as best as i could
392 notes
·
View notes
Text

spideypool valentines doodles <3
#love the idea of wade (fully costumed) waiting patiently for a florist to construct a spidey-colored bouquet#spideypool
25 notes
·
View notes
Text

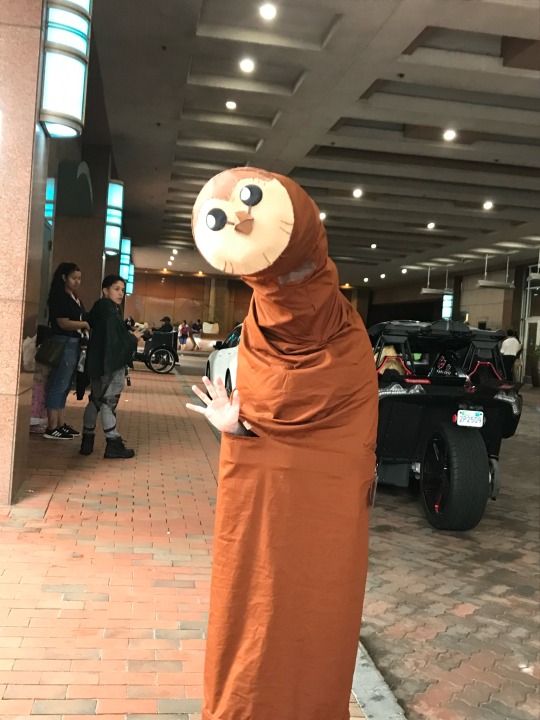
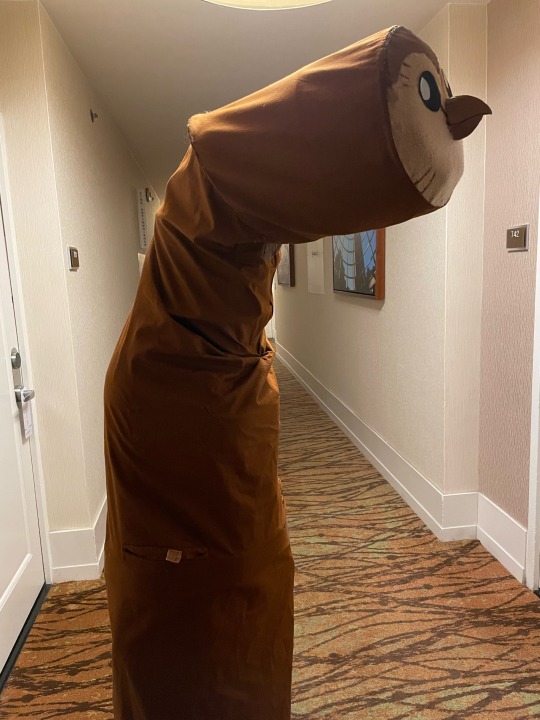
My extremely cursed Hooty costume from over the weekend, fueled by the pure existential terror of every person who had no idea what I was
#owl house#the owl house#toh hooty#Hooty#costume#cosplay#cursed costumes#anime boston#at one point I was waiting for the elevator#and one arrives but it's full#and in the 3 seconds before they close the door again I just hear#what the fu-#10/10 experience#I'm sure someone will ask so#the top of him is made from a cat tube#keeping the cats out of it during construction#presented an extra challenge#carmelvardi#is the inspiration for this
701 notes
·
View notes
Text
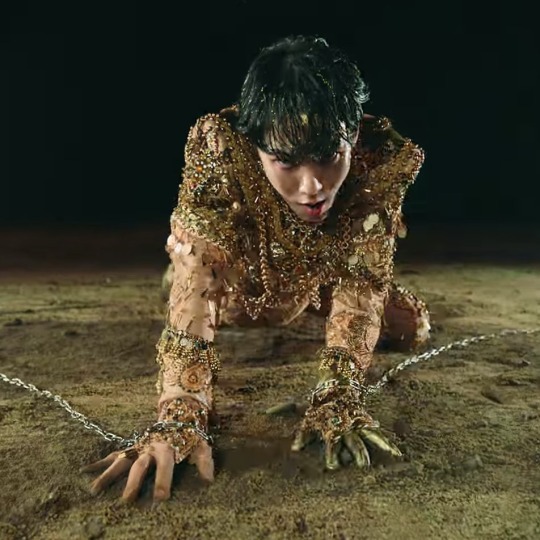
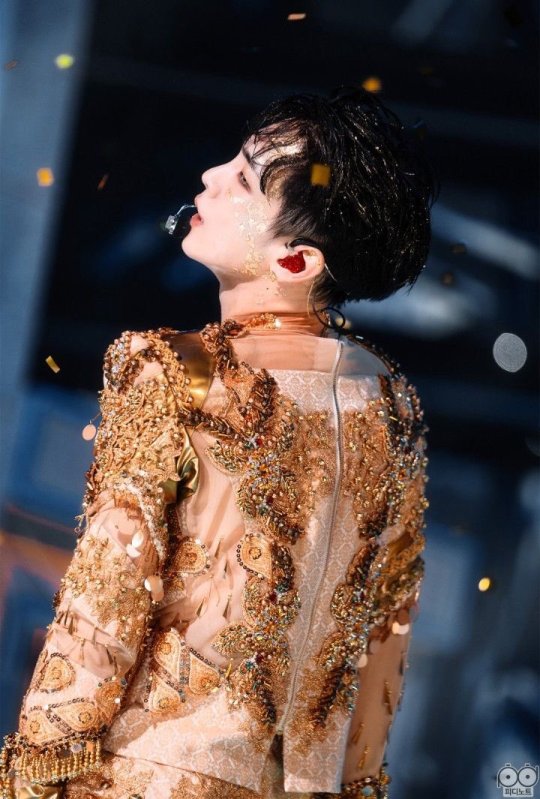
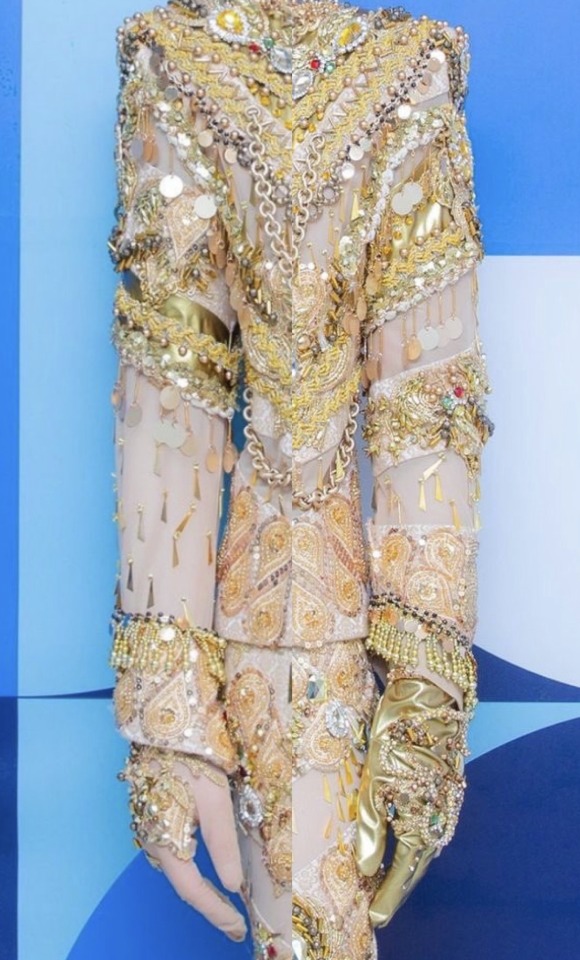
Isn't it glorious?
It’s here! I finally tackled my analysis of Key’s gold Gasoline era costume, worn in his music video for the song, photoshoots, a stage performance at the Inkigayo show, and a live performance at SM Town 2022. I’ll discuss everything from the fabrics used, the gloves, the shoes, complain about the zipper, talk about whatever the heck jumps are, break down all of the tiny little types of ornamentation (including the things I don’t actually know the name for) and more.
It’s scary in the best way. Buckle up. Grab some coffee or tea or vodka and a blanket.
I want to preface this by saying that this is going to be VERY long. I’ve polled my followers and nearly everyone said they want me to get as granular as I want. So I’m doing that. If that’s not your thing, here’s your exit ramp now. I get it. This is absurd.
You can also read it on my Twitter here. It actually has a LOT of bonus photos because they only allow me to have 30 on here, if you’re interested in seeing more. It may help clarify some things, as well.
Now then. Welcome to those who are left. Let’s begin!
Costumes by Dénicheur by Seo Seung Yeon
For his Gasoline era, Key has had four costumes designed and made by Dénicheur by Seo Seung Yeon, a Haute Couture Designer House that, among other things, makes elaborate costumes for Kpop performers. They’ve got an amazing Instagram portfolio to check out. They made him a gold and black costume for his G.O.A.T in the Keyland concert, the blue and white one for the Gasoline MV, this gold one, and a cream and gold beaded jacket for the 2023 SM Town Concert.
This fashion house’s trademark is intricately beaded, appliquéd…encrusted…costumes. I was able to get some high quality photos from some of you (thanks so much!) And the more I looked, the more I discovered.
If this were a piece of art (well, it is, but not in the same way) “Mixed Media” is what I’d call it. There are literally over twenty different types of beading techniques, appliqués, various types of sequins, trims, braids, rhinestones, chains, and more.
First, I’ll do an overview of the garments themselves, and then I’ll move on to the ornamentation.
The top (it’s not a jacket, it’s not really a shirt, it’s not a tunic. So I’m going with “top”) has a very boxy torso with exaggerated wide, padded shoulders. They’re completely squared. There are straight sleeves—not too slim, not too bulky. There’s a heavily ornamented oversleeve that reaches down to about his elbows and a “nude” colored full length under sleeve. It also has heavily ornamented cuffs at the bottom the sleeve. It has an exposed zipper up the center back that goes up into a short turtleneck collar. The collar and a portion of the lower neck back region are sheer with some beading and appliqués. There are sheer spirals around his arms and in chevrons on his front and scooping around to his back.
Just LOOK AT that masterpiece
The trousers are closely cut through the waist, hips, and thighs but become a bit wider at the knee. It looks like they were made full length but are always worn bunched up over knee high boots. They close at the center front with a very beautifully set fly zipper and flat trouser hook and bar. It’s so low profile that it wasn’t until I got some 4K images that I was even sure of where they closed. It was like he had been sewn in. I wrote a whole thread about it on Twitter that reads like a mystery novel, though I already spoiled the ending for you. Sorry.
The top is made of what is probably a “nude” (aka specially dyed to his skin tone) base fabric to hold the structure, with the ornamentation stitched over top. The external stabilizing fabric is what appears to be some sort of jacquard, possibly silk.
Jacquard is a type of weave, where the fabric is made of long and short “up and down” stitches of sorts, to make a pattern. Because some of the time it uses longer “stitches” on top, it becomes more vulnerable to the fiber breaking and makes it become kind of “fuzzy” looking. This can be especially true if it’s a natural fiber that usually has less structural integrity than a synthetic one. I initially thought this had started to happen on Key’s rear, but after a very close zoom in, I think that’s just a bit of appliqué edge pulling up. I think maybe one of his mic packs is down there too, but I’m really not an expert in that. I did the research so you don’t have to, folks.
Left: A type of jacquard fabric. The shine comes from the longer top threads, contrasting with details of shorter threads. Right: Is it an applique or is it some snagged fibers? Ultimately, I think it's an applique edge.
Perhaps the most interestingly nerdy thing about jacquard is that it was originally made on a loom that led to the creation of computer programming by utilizing a sort of “binary code.” There were punchcards that showed the strands of fibers when to go up and down. Like “holes and not holes” in which to weave.
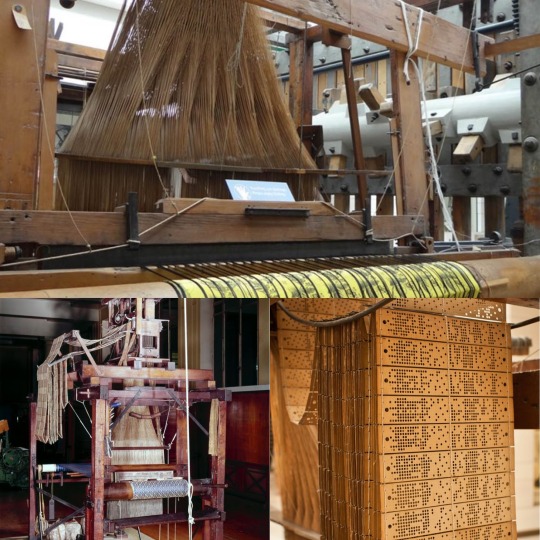
A Jacquard Machine Loom with punchcards that create the desired design on the fabric
It’s important to note that this fabric needs to have some stretch because it is also used to make his very tight fitting trousers. If it were not a stretch fabric, he wouldn’t be able to do this like THIS or…most things, really.
Even though the jacquard is stretchy, it has some structure to it. It’s used as a stabilizer in between the “flesh mesh” on the outer layer. (aka power net, stretch mesh... There are many names!) It forms the base on which the majority of the ornamentation is stitched.
Flesh mesh is a stretchy mesh fabric dyed to the performer’s skin color and is used to give the illusion that you’re seeing their skin, but it gives much more strength than just a cutout. I wrote a thread about flesh mesh and the importance of taking into consideration the performer’s actual skin tone when building them a costume here
In this case, flesh mesh allows for adornment of these areas, as well. It’s important to note that, even though it’s a separate layer over the base, it is “tacked” through all layers in a regular fashion so it doesn’t droop with the weight of all of the ornamentation.
There are also some parts that have metallic gold applied pieces. This was probably made of a beefy metallic spandex applied on top of the base rather than some solid pleather, due to way it behaves on the body. The latter would have been way too rigid in comparison to the rest of the fabrics.
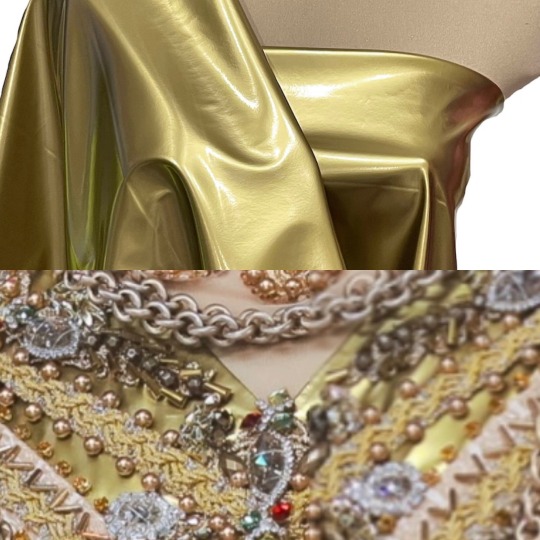
Heavy gold stretch spandex, forming a chevron on which to affix beads and other trims
Okay. Range of movement time. You know how I love discussing this. That’s because it’s the single most important aspect of costumes for dancers.
Let’s talk armpit gussets. They’re an American football shaped piece of fabric that is stitched in the armpit partially to the sleeve underarm, and partially to the torso underarm. It’s often made of a stretch fabric, but sometimes it’s out of the original “fashion fabric,” which is what we call the main garment fabric.
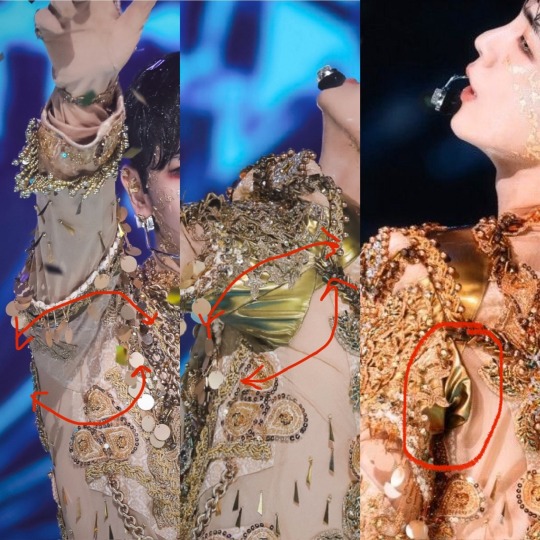
Gussets out of different fabrics under each underarm. You can see the gold bunch under his arm when it's at his side
It allows the performer to more easily move their arms above their chest and head to help keep the top from riding up. You can see in this photo, though, that it does bunch up a little when his arm is down, because of the extra fabric. It has to go somewhere when it’s not taut.
With this particular top, it’s interesting to note that, due to the asymmetrical decoration of his arms, one gusset is the gold stretch fabric and the other is the jacquard. That means that, either both fabrics have the exact same stretch, or his arms may be SLIGHTLY more limited on one side than the other. That’s fun! I really geeked out about this observation.
Often with jackets for dancers, they’ll have what are called “commodity pleats” around the center back shoulder area. They’re a sort of sneaky hidden accordion-like bit of fabric that stretches out during movement that may otherwise split the back open. Taemin uses them a LOT. But, since this top is so boxy, Key doesn’t need them in this instance. He already had the room he needed without any other accommodations.
They put commodity pleats in the back of most of Taemin's closer fitting jackets. I wish they'd make them the same color as his jackets, though!
With Key’s trousers, we’ve already established that they’re made of a fabric with a decent amount of stretch. But since I can’t find many good photos of his bottom half, I’m unsure about if he also has “crotch gussets.”
By this point, I’m kind of notorious as being the “crotch gusset person.”
The following posts explain them in much more detail, but basically, they’re long triangular wedges that start in the trouser crotch and taper down to nothing in the inseam. These are often put in trousers of dancers when people need a better range of movement.
I wrote about this in detail regarding Taemin’s pleather pants he wore in his Metamorph concert, as well as all of SHINee in the Your Number dance video. You can find my posts on the subject here:(Metamorph) (Your Number)
Jinki rocking a black crotch gusset in SHINee's "Your Number" Performance Video (Black Version)
Gussets allow for extra room and movement when one is trying to do extreme leg movements like squatting. Unfortunately, I don’t have many good photos of his inseam. There’s so much going on with appliqués and piecing of mesh vs jacquard, it’s hard to tell. Part of the front half of his trousers is flesh mesh, swirling around them. The other parts are the jacquard, whereas the back is all jacquard.
I saw one photo which made me begin to wonder if the inseam is a little further forward than it could be, though. That could mean there IS a gusset. I’m really not sure...I don't have official visual confirmation, but now you know more about crotch gussets either way. You’re welcome.
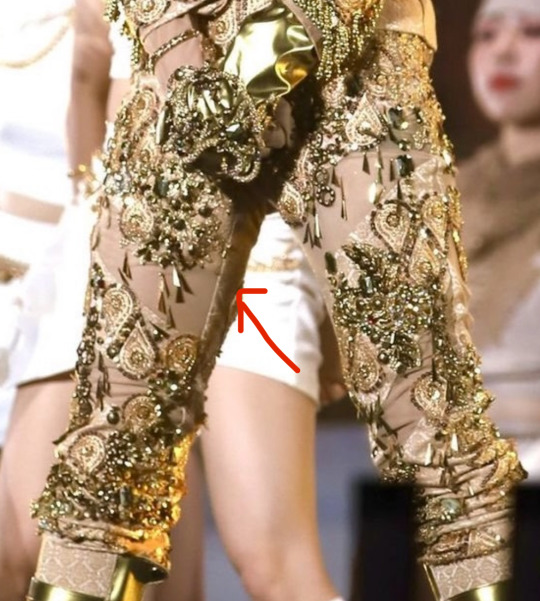
That seam line is up a bit more forward than usual. It really has me wondering, because that would happen if there was a gusset installed. Hmmmm.
Okay. Zipper education time. I apologize in advance. Things get spicy but I tried to tamp it down. The center back (abbreviated as “CB” in the industry) of the top has an exposed zipper. This means exactly what it sounds like: it’s exposed. You look at it, and it looks like there’s a zipper right there. It’s not hidden. Sometimes it’s a perfect match, and sometimes it’s “featured.” Exposed zippers actually become a trend every once in a while in everyday fashion.
I thought it was extremely interesting that, on this elaborate costume, they chose to use a zipper with metallic teeth on white “tape.” (The fabric on the sides of the teeth.) It was a huge disappointment for me, actually. I would have loved to have seen the zipper more carefully hidden like his fly was.
Hello, zipper. I see you loud and clear!
I have to comment a bit on what I view as the one flaw in this otherwise perfect costume. I will preface this by saying that I was not in the fitting room where this was conceived, and I don’t know about any extenuating circumstances and the reasoning behind this decision. But there a few things that I would have done differently regarding the zipper and back collar of this top if were to have made it.
But first: some zipper education. Besides exposed, there are center lapped, as well as regular lapped zippers. With the center lap, it’s like the fabric covers your zipper but you can pull the zipper down through it. Your hoodie probably has one. The regular lap zipper is more like your trouser fly in that there is one flap of fabric that covers the whole zipper, hiding it.
Top: Exposed. (Though it has a matching zipper and zipper tape.) Bottom Left: Center Lapped. Right: Regular Lapped.
Either of those types could have been used to make the zipper more discreet. I personally would have chosen to use a regular lapped zipper, which is less likely to get snagged than a center lapped zipper.
People have defended the exposed zipper by asking if it’s because it’s less likely to get caught. I very much get this argument, and, technically it’s right.
But, in my extensive experience, I don’t think I can recall a case of an exposed zipper in the back of a costume, quick change or no. It’s unattractive. (Not to mention a dead giveaway in a period garment!)
If it’s sewn well and tested, with the correct size lap and no loose fabric, it will work just fine. There should be a hook and eye at the top to make sure that it stays secure while dancing.
Part of being a good dresser is being methodical and purposeful, not frantically zipping something up in a way that is more prone to snagging. They keep their cool, perhaps taking a couple more seconds but ensuring that they pull it up smoothly. They use their fingers to block the overlap as they guide the zipper up.
(Random side note: I met a dresser once who preferred zippers be installed upside down for their quick changes. Hey, whatever works best for them! I wonder how they discovered that…)
I will also note that, as far as I’m aware, the only times he’s worn this costume, he didn’t need to get in or out of it quickly. I know that he wore it in the MV, the Inkigayo performance, and the photoshoot. He also performed at SM Town Tokyo 2022, though he had 11 songs during which to change between Bad Love and this. He never wore this look at his G.O.A.T. in the Keyland concert. Oh, and the collab with the Jinro frog. I’ll talk about that later.
So ultimately, all of the zipper quick change talk is for nothing. There COULD have been a chance that this was going to be worn during his concert, I suppose. But if not, in the end, I can find no reason that there needed to be an exposed zipper other than: they wanted it that way.
Sorry for that rant. I know that it was intense. I just…wish it were pretty. That’s all. I know it wouldn’t have bothered most people, but I personally think that the costume deserved better!
Well then. They arranged the symmetrical beaded appliqué motifs so they didn’t interfere with the center back line, so it wasn’t an issue being all chonky around the zipper.
Unfortunately, since the zipper was built into the neck with just the “stretch mesh,” it moves very differently than the rest of the top. It has a substantially weaker structural makeup and it can’t support itself the same, so it stretched at a different rate than the zipper on the solid fabric on the bottom. It kind of “bubbled” when he moved and it rode up.

Showing the neck bubbling, and, on the bottom left photo, you can see that there is some sheer stabilizer to ensure that the zipper doesn't just tear out of the sheer net.
It couldn’t have been helped unless that whole back neck area had been backed with the solid nude base fabric. That’s what I would have done, personally. But using the stabilizer helped a bit. Without it, it may have not lasted a performance.
I don’t know why they did it that way, but the result was rather disappointing to me, especially considering the care that was taken with the rest of the garment.
Okay. End rant. The rest of the costume is EXQUISITE.
One more thing to note is that the zipper terminates about 4” above the top’s bottom hem. It is right around where his waist is. It was built that way to ensure that he was able to move his legs and hips comfortably without getting hung up anywhere.
His knee high boots were covered with the same peach jacquard as his top, as well as utilizing the gold fabric to serve as ornamental buckled straps.

The stretch element of the jacquard is further showcased by the fact that it pulls over the boot toe smoothly, with little issue. A completely stable fabric wouldn’t be able to do that.
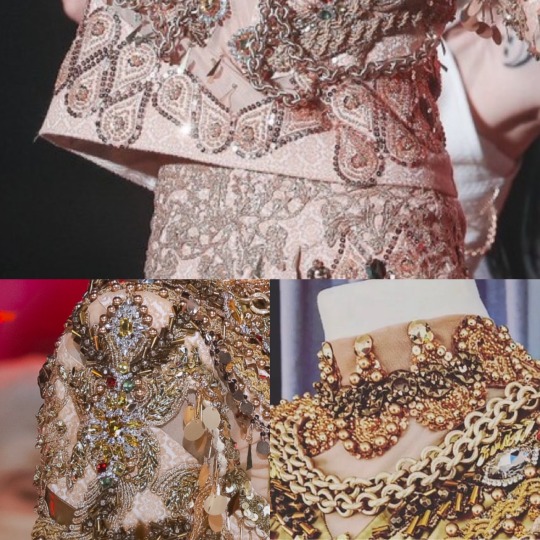
Now for the ornamentation. Oooooh boy. There are around twenty types of various adornments on this costume, and I thought I’d highlight some of them.

I can spy about 15 different types of ornamentation here alone.
Beaded appliques at the neckline
Heavy chains
Rhinestone appliques and/or individual rhinestone pieces
Bugle bead chevrons
Gold round beads
Yellow individual small rhinestones
Grey beads in between bugle beads
Gold and silver flat braid trim
Gold stretch fabric
Round flat decorative chain
Hanging paillettes
Dark seed beads with some of the paillettes
Gold dangling lil dudes
A sequined applique peeking out from behind a chain
Utilizing the main fabric as a chevon stabilizer as a design detail
About paillettes: these might actually be my favorites. They’re like “floppy sequins” that only have one hole at an edge. They’re made of a very lightweight plastic, so they’re virtually silent. If you wear a dress completely covered in paillettes, you’ll just hear a little rustle. In this case, his were mainly attached via dangly wires as fringe around the upper sleeves. There are a few other random instances throughout the garment where they’re stitched on individually. You can read more about paillettes in my post here.
Appliqués: There are at least three different types of appliqués in this costume:
Beaded
Lace
Sequined
Rhinestone
Appliqués are premade decorative pieces. It looks like someone hand beaded everything on the costume, but they were able to take a shortcut by using these. So no, contrary to what you might believe, there wasn't someone laboriously hand beading every single thing on to this costume.
It still takes FOREVER to invisibly stitch each motif on to the costume as well as, in this case, sometimes layer upon layer. A lot of them are attached to a net base, and in closeups, I saw how they trimmed the net away closely around the motifs.
On the top, we have the gold paisley sequined appliques. On his trousers, you can see the low profile lurex embroidered lace appliques. Bottom left, you can see the beaded and rhinestone applique. And on the right, beaded appliques. You can see that they're over flesh mesh so, when it's on Key, it just looks like he has a beaded collar.
The sequined, beaded paisley motifs are the most prominent and plentiful form of appliqués, focusing around the top’s cuffs and lower edge. They’re also heavily featured spiraling around the trousers. There are even some appliqués stitched across the seams of the trousers and top.
There are some huge, gorgeous bead and rhinestone appliqués, like this one on his right bicep that you can see in the photo above.
There’s also the Lurex lace (metallic threaded) embroidered appliqués that concentrate mostly on his trousers' waist and hips. It’s low profile without any bits that might snag the top while moving. They added a few jewels to it further down once it was no longer posing any danger to snags. There are also a few flat appliqués on his rear, so as to not make sitting uncomfortable but still be adorned.
Beads and gemstones: There are also individual beads and jewels both sewn and what appears to be discreetly glued on as accents. A popular adhesive we use for that sort of application is called E6000. It bonds pretty much everything from plastic, leather, metal, rubber, and wood. It’s like a slower acting super glue, but is more flexible.
You definitely need to use this in a ventilated area or, ideally, with a respirator. The fumes are no joke! There are little chevrons made out of long tubular metallic bugle beads that were probably glued instead of stitched on. There are also round bronze beads and gold rhinestones glued to the edges of the metallic fabric.
There are little dangling gold dudes, though I don’t know what they’re officially called. There are individual sew on rhinestones. There are circular decorative flat chains. There is gold beaded fringe at the wrists of the sleeves.
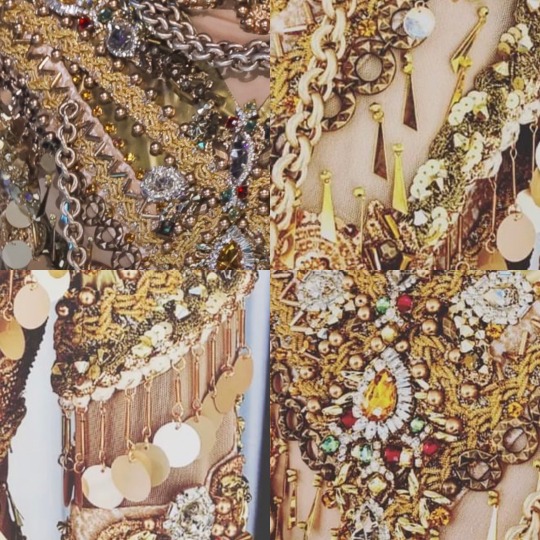
Top left: gold braid, beads and chains are heavily featured. Top right: the dangling gold dudes. I don't know what to call them. Bottom left: Paillettes, hanging on gold wires on the upper sleeve hem. Bottom right: Gemstones highlighting the center of the chest, with a whole organized, beautiful mess of braid, beads, etc.
There’s gold flat “braid” trim that also looks like it has a bit of silver in it to add dimension. It’s basically like a braided ribbon, often in metallic colors. It’s used a lot in military uniforms.
And there are a few other various random beads and trims that show up amongst the circus of adornment.
The layout of the overall design is asymmetrical, with left and right arms and legs that don’t match. However, the front of the top is completely symmetrical (which is extremely impressive) except for a few rampant rhinestones that intentionally deviate a bit. Here’s an abomination I made of the sleeves next to each other to see the asymmetry more clearly.
I THINK (not based on this photo but others that aren't Frankensteined together with different perspectives) that the sleeves are actually different lengths as well.
Something that I should cover is that with garments made out of a stretch fabric, like Key���s trousers in this case, stitching on something non-stretchy (like some appliqués) can be fraught. The appliqué can keep the fabric from stretching as much as it needs to accommodate a body in it, and it might tear off.
Sometimes, we need to stretch the fabric a bit as we sew on the motif so it will look normal when a leg is in it. It may look a bit puckered when it’s not being worn. The good news is that it appears that most of the motifs in this costume are on what is most likely a mesh backing, so they probably didn’t have to deal with that headache here!
Since the motif on the Jacquard fabric is pretty small, as well as the fact that some of the appliqués wrapped across the side seams, “pattern matching” wasn’t a big priority on this. However, it’s always preferable to keep the motifs at the same horizontal height. This is a REALLY small pattern, so it wouldn't matter terribly, plus the fact that it was so covered it can hardly be seen. There WAS a point on the right side seam where the pattern did match, but the fabric slightly torqued on the left so it didn’t. All in all, it wasn’t a big deal whatsoever. If it were a bigger print though, it could have been. I made a thread about pattern matching here. It's a subject I'm pretty passionate about!
This side seam was cut so that, at a fixed point, the motif was all at the same level horizonatally at there was a part where the motif perfectly matched up to create one complete one. Because there are curves in the seam, it can't do that everywhere.
Now for a bit of a departure: SHINee and its members have done a few collabs over the years, dancing with the frog mascot from Jinro soju. SHINee did one for Don’t Call Me, Taemin did one for Move, and Key did one for Gasoline.
They dressed the frog up like Key, complete with jewels and chains! It was precious. SO GOOD. Watch it now. I also bring this up because that video was the resource I used to figure out where the gold chains on Key’s top were “tacked” (AKA stitched to keep it held down strategically.) It was a nice close-up view. Thanks, Jinro frog!
(Side note: I have made mascots before and it's ironic because they freak me out. I also refurbished a hot dog mascot that had gotten too gross after public appearances over a decade. My life is weird.)
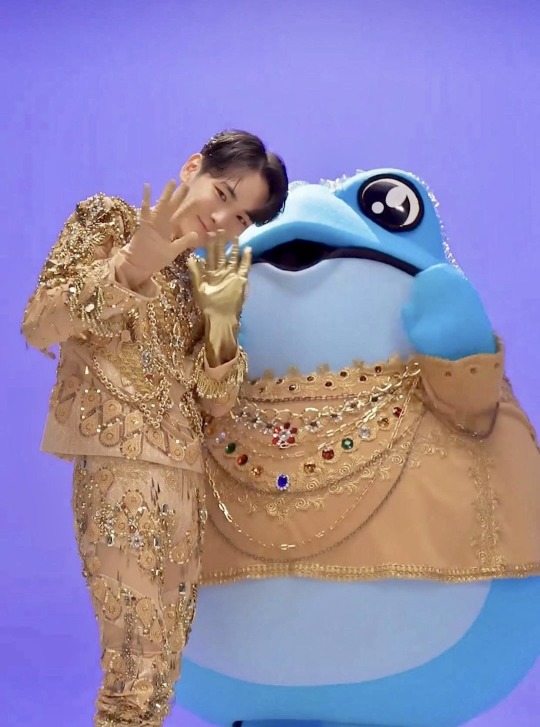
I love how scaled-back but accurate the frog's costume was.
Through the magic of the Jinro frog, I found the answer to the question “where were the chains tacked?” Here. Enough that they still have independent swing and look natural, but frequent enough to keep them from smacking him in the face. Based on the way they move, I think that is metallic coated plastic and not actual metal. Also, for safety's/comfortability's sake! You don't want to be thumped in the chest with every move.
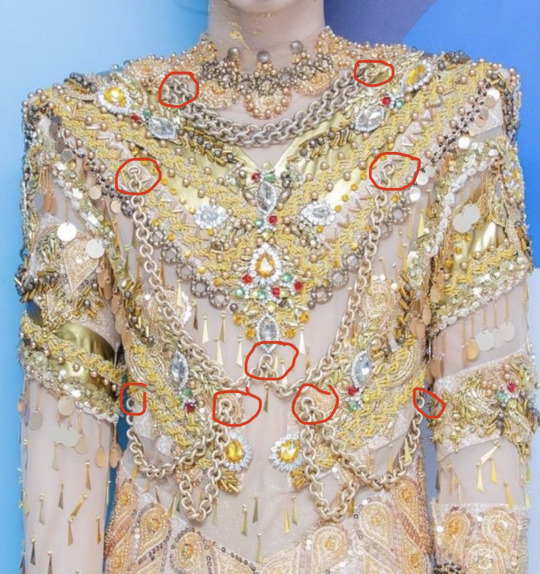
Here's where the chains were tacked
Someone asked me how much they thought this costume weighed. My answer?
I really have no idea…but probably not NEARLY as much as it looks? I'm like 99.9% sure the chains aren't actual metal. I’m not sure if the “jewels” are glass or plastic. The tiiiiiny “seed beads” and "bugle beads" are glass, but there aren’t enough that they would weigh a significant amount. There's a lot of gold braid on there that's very lightweight. A lot of what you see are layered appliqués with sequins and seed beads, which weigh nearly nothing. The dangling paillettes are just a light plastic.
For the garments themselves, as we’ve established, the are a few layers of fabric and mesh, which aren’t very heavy. Because of the “encrusted” nature of the ornamentation, of course, it still weighs a bit more than just a regular top, and is probably kind of rigid on the front. However, it’s not like he’s dancing around in chainmail.
Lastly, there are his gloves. His left one is made out of that heavy gold stretch fabric that was incorporated into the rest of his costume, and his right was also made out of a flesh mesh. From the way it behaves in this photo, it appears to be a much heavier mesh than the top and trousers.
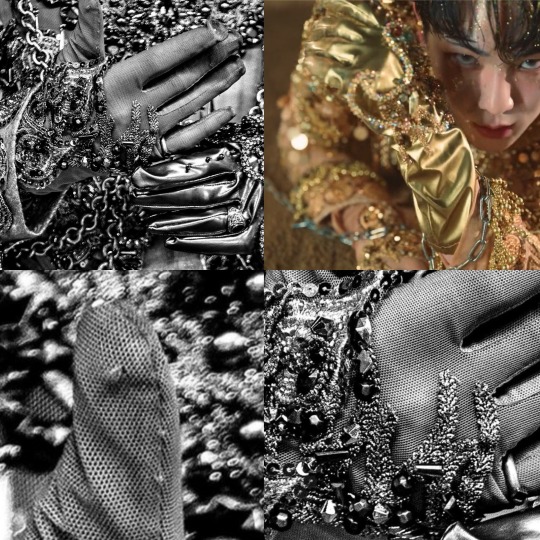
The right glove has thicker mesh that almost appears to have a natural fiber content that is getting snagged. It doesn't completely conform to the skin like a tight flesh mesh would.
The gloves are heavily ornamented with appliqués and beads. I’m going to guess that these were actually custom made for him, which is a big deal. I know very little about glove making, except it involves a TON of pieces to be done right. Gussets in between the fingers to make them slim and elegant and such. No Mickey Mouse hands here.
Stitching the ornamentation on to gloves is pretty difficult work. You either need a hand form and a curved needle or a very brave stitcher who uses their own hand as a form (palm up.) I haven’t done that for gloves, specifically, but I have been a “sacrificial hand” for other situations. I’m so calloused in most places, I don’t really feel much anymore!
There’s one more aspect to this costume that was seen in the intro for his Gasoline Inkigayo performance: the cloak. He didn’t wear it for very long, but it appears to button across his chest to the other shoulder with snaps underneath. The snaps keep the underlap from peeking out from…under the lap.
It looks like they might have had a wardrobe emergency here, because you can see that two of the three snaps were hastily stitched on with red thread. The ornamentation is asymmetrical, mostly focused on his right side. On his left shoulder, there is a decorative beaded “epaulette.” Those are the ornamental shoulder pieces you often see on military dress uniforms.

Left: The full cloak. You can see the facing on the inside edges, made of the same fabric as the outside. I'll write about that in a bit, and I'll show you a closer view later. Top right: The red thread holding on the upper snaps. Bottom right: Metallic epaulette.
It’s hooded and made out of the same jacquard fabric as the rest of his costume, and it has a satin lining the same color as the “fashion fabric.” It appears to be about calf length. One of the photos I found actually has a shot that shows the facing, the lining, and how the hem is done. Of course, I nerded out. It’s “self faced,” which means that there’s the same fabric that’s on the outside making up the “facing.” The facing is the first ten inches or so of the inside edge of the cloak. It makes a pretty transition from the outside to the inside, without a harsh switch to lining.
Then, there’s the hem.
While attached at the top, the hem of the lining and the outer fashion fabrics are allowed to “hang out” separately while on a dress form. Because fabrics stretch out at different rates (and it also changes by the direction they’re cut from the fabric, but that’s a whole different lesson…) it’s ideal for something like this to hang on a dress form and do its thing for a day or so.
In an ideal world, you’d have a fitting with your performer and you would mark a “level line” on them while they’re wearing the cloak (and also the shoes they will be wearing. Different shoes can change a lot!)
There are several different ways you can mark a hem. You can safety pin it up the way you want it, using a ruler measuring up from the floor to keep it even. But this can be awkward and clunky.
Or you can safety pin a “level line” and say that it’s, for instance, 18” off the ground, and you’d like the hem to be 16” off the ground. You’d draw a new hemline 2” down from the pins. It's the easiest way to know what's level and then decide exactly what you want to do later.
OR you can use what I call “the poofer” which is a little measuring stick on a tripod with chalk and a rubber squeezy ball that poofs chalk into a line at a set height, instead of dealing with pins. But sometimes the chalk doesn’t like to brush away, so that’s a bit of a risk in exchange for convenience.
First, let’s talk about hemming the outside cloak fabric. Because it may have stretched out unevenly, you may have wildly different hems lengths now that they’ve been “leveled.” Let’s say we’ll leave 6” of “hem allowance” to fold up into the garment so it can be lengthened later if we need to. You’ll trim the rest of it away. I can’t tell you how many times I’ve altered hem lengths on cloaks over the years! I'm always grateful to have extra.
You may want to finish the hem with a “serger” or “overlock” machine, which is the sewing machine that uses 3-4 threads to sew things, often stretch, together and kind of seals off the edges. It’s probably what stitches together the side seams of your t-shirt or hoodie or lounge pants or basically anything stretchy. It’s used to keep hems and the edges of fabrics inside garments from fraying. Sometimes people don’t do it, especially since it's inside, but it’s nice if you’re planning on altering it or if the fabric is really prone to fraying.
The cloak fabric is then thoroughly pinned and hand stitched up. There are many different sneaky stitches which grab a few threads at a time from the front of the fabric and are virtually invisible. Everyone has their favorites. My personal favorite is the “vertical hemming stitch” or “vertical blind hem.” I like it because it holds the inner hem and the outside of the cloak more tightly together than a lot of other styles. The “cross stitch” which is called the “blind catch stitch” here in this diagram is one of the most popular methods. However, I feel it can be a bit too loose some times and is more likely to be caught on something. The one downside of the vertical blind hem is that, if you pull it too tight, it’s more likely to show from the outside. It takes a very sensitive hand to get it right. The lining is usually slip-stitched to the cloak hem.

Once you’ve got your level line of your fashion fabric, it goes back on the dress form. I’m…not entirely sure I’ll do a good job explaining this because I work best with showing things with points and grunts. My apologies.
You mark the lining to match the level where the hem of the fashion fabric ends. You decide how far up from the bottom of the hem you want the lining to end (in this case, 4”.) So normally, you think you'd fold it up 4", right? Ha! You subtract two inches from that number. This means you’ll be folding up only two inches of lining. But, since we will be stitching it 4” up from the hem, that means there’s a floppy extra two inches. (Cue Advice.) What’s that for? Now I have to tell you about “jumps.”
Jumps are a sneaky trick. This method is used in suit coat hems and sleeve linings as well. Basically, they’re a way to give a little bit of wiggle room with the length of the lining to hem interaction.
After the fashion fabric is hemmed, you hand stitch the lining 4” up from the hem. You have two extra inches of lining. One extra inch of lining is pressed down so there’s an extra inch of “underlap". This photo (top right) showed me that they had done this to Key’s cloak. You can see it stretched out with the pressed line on the left, and it is folded over on the right.

Left: The "self fabric facing" at the center front inside of the cloak. Top right: The cloak hem showing the underside of the "jump" (left) and it down in its "resting" position (right). Bottom right: the "poofer." They're marking a level line.
If you want to get even MORE granular, that is considered a “soft press”, which means that the iron steams and very lightly rests on the fabric. A “hard press” is what it sounds like. Squish that lil dude and steam the heck out of it. That line is never gonna come out.
Okay. Enough of that. I can’t believe myself.
I could literally discuss this costume inch by inch, but I think I’ve covered it enough that you can peruse it yourself if you’d like and kind of know what you’re looking at.
I deeply admire and respect the, perhaps, 100+ hours of craftspersonship that it took to make this stunning costume. Don’t even ask me what it cost to make!
Do check out the Instagram of @denicheur.official where you can see other costumes they’ve worked on for groups like IVE, Enhypen, Stray Kids and more. They’ve got an amazing portfolio to drool over.
I hope you’ve gained an even greater appreciation for this gorgeous look, and the knowledge you’ve gained here can go forward with you as you enjoy future costumes! And thanks so much for sticking with me. I hope it was worth it!
#Shinee key#Key shinee#kpop#kpop costume#kpop costumes#Key#shinee#costume design#costume construction#costumes#gold costume#costume analysis#fashion analysis
50 notes
·
View notes
Text
his suspenders rightly get a lot of love but look

at

this

dress
#subtle magic in the construction of this dress#perfect allusions to the period of the music without feeling like a costume#underrated just like this program was underscored#robbed#virtue moir
45 notes
·
View notes
Text
Jareth Ballroom Master Post
Cheers, lovies!
This will become a pinned master post for all things related to Jareth’s ballroom costume construction. Below is a comprehensive list of all the topics that will be covered.
PATTERN MAKING (1 of 2 posts complete)
Complete diagram of coat and all the pieces. Sketches of the trickier pattern pieces, such as the pleat situation and the collar. Notes about the cuff design. Notes and sketches for proportions and angles.
Separate post on infrastructure: where to add interfacing, extra support, padding. The “pleat vest”.
FABRIC SELECTION (2 posts)
The Saga of the Metallic Velvet
The Drama of the Lining
MATERIALS SELECTION (1 of 2 posts complete)
Digital list with illustrations of most of the decorative elements observed, their details, and where/how they're used.
Separate post about DIY cabochons!
PROCESS AND CRITIQUE
Mostly just about how everything was intertwined, order of the work being done, how materials were handled, and what worked or could have been done differently.
LACE
Pattern pieces. Plans vs. reality.
A video showing the embroidery process.
GLUE SHENANIGANS
Why done this way?!
A video showing the process of making a base piece, adding to it, painting it, techniques to make it look good. lol
How they were attached.
SHIRT & BROOCH (2 posts)
Shirt pattern, how the collar was done, how the ruffles were done.
How the brooch was made (if you’re on a budget and desperate.)
THE BUTTONS (2 posts)
An explanation of the process.
A video of the process!
CUMMERBUND
WIG MODIFICATION
Which I would have never figured out without mornings-of-gold
MAKEUP (2 posts)
What all was needed, observations and tips.
A new timelapse video because why not
Anyway, looking forward to all the evenings I will now spend reminiscing about this with you all. Hope it will be helpful and interesting.
–pants-magic-pants
#labyrinth#jareth cosplay#labyrinth cosplay#jareth ballroom coat#ballroom costume#costume construction
22 notes
·
View notes
Note
Hiii! Currently making Howard's costume, and I'm looking for more info on how the skirt closes AND the skirt pattern. Any help would be SO appreciated!
Hey!
I have this post about some of the construction and layers.
As far as the closure goes, it’s basically an extended tab. Here’s Cassie Silva’s both open and closed:

And then the closure method goes on the overlapped section. The closure method has varied between Velcro and snaps, but you could also try magnets. (They also previously had a different closure set up using zippers for a bit, but I would not recommend it)
If you use magnets or Velcro make sure to get a stronger strength, and/or match the strength to the materials and construction you’re using. And snaps will cause stress to the vinyl so if you do use them I’d suggest using the black base as discussed below.
And this isn’t necessary, but for my own cosplay I’m planning to do either Velcro or multiple rows of snaps just to give myself some sizing range which Six has often done as well.
You can see two different placements of snaps used here:

Left is UK make, with a single snap in the middle of the waistband. Right is US make (the early 2022 style) with two black snaps on either side of the trim. This is one way the US has accommodated for potential minor fluctuations in waist measurement, like I mentioned above.
Also, note that while the black trim continues the studs do not - this is so they don’t get in the way of the closure or make things uneven or bumpy.
You also may wonder how Cassie’s skirt is staying up even though it’s not closed - there are snaps on the inside lining of the waistband that correlate and snap into snaps on the back and side of the leotard.
————————
The other things that are worthy of note are exactly where the closure is located and the backing of the closure. Here’s a bunch of examples of how that’s varied:
The exact placement of the closure has differed. Early iterations included the mic holster attached on top of the waistband tab (shown on Vicki Manser’s UKT costume, top far left) and the waistband closing in the front (shown on Didi Romero’s ANAT costume, bottom far left). But the current-and-definitely-best way is to have the mic holster on the main case, with the waistband tab attaching over in a way that nestles it right next to the holster. That keeps seams minimal and everything nice and stable. You can see that current system on the three furthest right photos on each row.
Finally, the base color. Originally the tabs on both sides would be a continuation of the rest of the waistband materials, just the same pink vinyl and trim (but again missing the studs as noted above). More recently they have switched to a pure black base on the space where the tab overlaps, most likely to use a more stable/strong material. It’s easiest to see that difference on the bottom row - compare the continuation of pink on both sides of Didi’s closure (far bottom left) versus the black gap that can be seen on Aline Mayagoitia, Abigail Sparrow’s CAN, and Audrey Fisher (2L-R, bottom row).
————————
For patterning I’ll refer you to @lightleckrereins, who has already been working on a post about that after just recently making her own.
Hopefully that’s helpful! If you need any clarification or have further questions, feel free to drop me another ask.
Credits: cassiemsilva, cassiemsilva; jainabrockpatel, cassiemsilva; vicki_manser, thisistsemaye, beccawickes, inezbudd, didiromero_8, alinemayagoitia, abigailsparrowofficial, aujeee
#six the musical#six costumes#katherine howard six#howard 2.0#six musical#six construction#six cosplay#six cosplay refs#greatest hits
39 notes
·
View notes
Note
so when IS your birthday? :0
I know right??? math is such a fun subject!!!
Open the tags if you dare
#i promise im not avoiding the question this is just funny#asks#honestly tho i do like math#english is one of my worst subjects because numbers make more sense to me#it funny that people look at me as an artist and are like “so you're majoring in art right?'”#nope lol im going into accounting#im decent at resource management and organization#i even got an award for most organized in my stage craft class#incase you dontnknow what stage craft is its basically the construction crew for the drama kids to do their thing#props costumes backgrounds lighting sound#all of that is stage craft stuff#do some math silly ✨#and basically i got that award by organizing the entirety of the stagecraft room#everything was stored in there and it was a mess#ended up spending a few weeks just organizing the nails screws and bolts#was supposed to only take a few days but no one was helping#also had to organize them by length too#but in the end it was a lit of fun and not i have a cool poster up on my wall with my chosen name#so not all a loss#yes i am rambling on purpose#and i shall keep doing it now#but honestly its so nice that people are being more considerate of my pronouns and chosen name#i actually feel like im being respected as a person and not just a student#its like they didn't trust me to know myself before which is annoying#but hey i guess it could be worse#im living with my aunt now so thays a huge improvement#my parents may have tried but uhhh#they didn't always do the right thing#ok i think thats enough rambling for people to have stopped read at this point#i got to get ready for school now
15 notes
·
View notes
Last Seen Blogs

h1v3-m1nd
Bitch

kkrae
the cornicopia of my sanity
purplerat111
Purple Rat

crookedlovergarden
My master blog 3116

bigleo
BIG LEO PRODUCTIONS