#credential binding plugin
Explore tagged Tumblr posts
Visit Tumblr Blog
Explore Tumblr blogs with no restrictions, modern design and the best experience.
Last Seen Tumblr Blogs


Fun Fact
70% of Tumblr users say the Dashboard is their favorite place to spend time online.
Text
Secure Your WordPress Site: Prevent SQL Injection (SQLi) Attacks
SQL Injection (SQLi) in WordPress: Protect Your Website
SQL Injection (SQLi) attacks are a common security threat for websites using databases, and WordPress sites are no exception. A successful SQLi attack can expose your database, allowing attackers to manipulate data or even take full control of your site. This post explores how SQLi affects WordPress, demonstrates a preventive coding example, and shows how you can use our free website security checker to scan for vulnerabilities.

What Is SQL Injection (SQLi)?
SQL Injection (SQLi) is a security vulnerability that allows attackers to insert or “inject” malicious SQL code into a query. If not protected, SQLi can lead to unauthorized access to your database, exposing sensitive data like user information, login credentials, and other private records. WordPress sites, especially those with outdated plugins or themes, are at risk if proper security practices are not implemented.
How SQL Injection Affects WordPress Sites
SQL injection attacks usually target input fields that accept user data. In a WordPress environment, login forms, search boxes, or comment sections can be potential entry points. Without proper sanitization and validation, these fields might allow attackers to execute harmful SQL commands.
To protect your WordPress site, it’s essential to:
Sanitize user inputs: This prevents harmful characters or commands from being submitted.
Use prepared statements: Using prepared statements binds user inputs as safe data types, preventing malicious SQL code from being executed.
Regularly update plugins and themes: Many SQLi vulnerabilities come from outdated software.
Coding Example to Prevent SQL Injection (SQLi) in WordPress
Here's a simple PHP example to show how you can prevent SQL injection by using prepared statements in WordPress:
php
global $wpdb; $user_id = $_GET['user_id']; // Input parameter // Using prepared statements to prevent SQL injection $query = $wpdb->prepare("SELECT * FROM wp_users WHERE ID = %d", $user_id); $user = $wpdb->get_results($query); if ($user) { echo "User found: " . esc_html($user[0]->user_login); } else { echo "User not found."; }
In this example:
$wpdb->prepare() ensures the user ID input is treated as an integer (%d), protecting against SQLi.
esc_html() sanitizes the output, preventing malicious data from appearing in the HTML.
Detecting SQLi Vulnerabilities with Our Free Tool
Using our free Website Security Checker, you can scan your WordPress site for SQL injection risks. The tool is easy to use and provides a detailed vulnerability assessment, allowing you to address potential security issues before attackers can exploit them.

The free tool generates a vulnerability report that outlines any risks discovered, helping you take proactive measures to protect your site. Here’s an example of what the report might look like:

Best Practices for Securing Your WordPress Site
In addition to using prepared statements and scanning for vulnerabilities, here are some best practices for securing your WordPress site:
Limit user permissions: Ensure that only trusted accounts have administrative access.
Implement firewall protection: Firewalls can block malicious IPs and provide extra security layers.
Regularly back up your database: In case of an attack, a backup helps restore your data quickly.
Use a strong password policy: Encourage users to create complex passwords and update them periodically.
Conclusion
Securing your WordPress site from SQL Injection is crucial for safeguarding your data and users. By implementing prepared statements, validating inputs, and using security tools like our free Website Security Checker, you can reduce the risk of SQLi vulnerabilities. Take a proactive approach to your site’s security to ensure it remains safe from attacks.
Explore our free website security tool today to check your WordPress site for potential vulnerabilities, and start building a more secure web presence.
#cyber security#cybersecurity#data security#pentesting#security#sql#sqlserver#the security breach show#wordpress
0 notes
Text
Jenkins: Keep Secrets Secret
Jenkins: Keep Secrets Secret
Problem
It’s often helpful to use Jenkins to manage secrets (i.e. passwords, api keys, credentials, etc.). This post explains how to go about doing just that for Jenkins pipelines.
Solution
Install the Credentials Binding Plugin on your Jenkins instance in https://my.instance.com/pluginManager/available
Add the following code to the appropriate place in your pipeline
The above example shows…
View On WordPress
#api key#binding plugin#credential binding plugin#credentials#jenkins#jenkins binding plugin#jenkins credential binding plugin#jenkins pipeline#password#passwords#pipeline#plugin#secret#secret storage#secrets#security
0 notes
Text
The Ultimate WordPress.org.org Security Checklist for Protecting Your Website From Online Threats

Home security and WordPress.org security are the same. You shut the doors, windows, and open sources when you leave your house. The same principle follows in websites too!
Before we move ahead, we’d highly recommend you learn about the difference between WordPress.com VS WordPress.org to take the right measures.
In 2022, one should not take a WordPress.org site's security lightly. You must take preventive measures by following these WordPress.org security tips in 2022. Most WordPress consultants recommend these tips since they are highly effective.
These tips will help your WordPress.org Site from multiple WordPress.org security threats and hackers.
However, your WordPress.org site can not easily be hacked by hackers. Instead, they will be weak your website and identify the tiny security breach that would let them access your server if your WordPress.org site is not secured.
You can prevent hackers and malicious software from breaching your WordPress.org website by understanding why your WordPress.org website needs a solid security plan. Plus, how can you protect it?
Let's get started!
Why Do You Need WordPress.org Security?
Discuss why security is a top priority for every successful WordPress.org website. Also, remember we are talking about WordPress.org.org, not WordPress.org.com.
It safe your identical information
There is no limit to what an attacker may do with personal information about you or your website users. Security breaches put you at risk for identity theft, ransomware, server failure, and many other terrible things. Any of these occasions are not ideal for the development and reputation of your company and are typically a significant waste of time, money, and effort.
Safeguard visitors
Your visitor's expectations of how you handle problems will grow as your firm expands. Keeping the information about your visitors secure is one of those threat problems. This is important to manage as it helps in binding your business with the customers.
Google suggests website security.
One of the most important aspects of managing a highly-ranked website is keeping your WordPress.org website secure.
Since a long time ago, website security has directly impacted how visible a website is on Google (and other search engines). One of the simplest ways to improve your search ranking is through security.
Let's read out how you can maintain your website secure.
WordPress.org Security Best Checklist
Since, you understand why it is important to secure your website, here is the checklist for you!
Secure managed cloud server.
End-to-end Encryption.
Firewall protection.
Website isolation.
IP Allowlisting for secure SSH and SFTP accesses.
Database Security.
Frequent OS patching and updating.
Bruteforce Attack prevention
Bot Protection
Latest PHP version support.
Latest database version support.
SSL certificate for HTTPS.
WordPress.org Security Checklist [Client-side]
Updated WordPress.org Core.
Use the .htaccess password to access wp-admin.
Use a strong password.
Change the WordPress.org default login URL.
Limit login attempts.
Updated WordPress.org themes.
Replace outdated plugins with an alternative updated plugin where possible.
Avoid downloading WooCommerce extensions from unauthorized resources.
Take frequent backups.
Use the best WordPress plugins for security.
Use two-factor authentication for login into wp-admin.
Use Google Recaptcha on all the forms.
Updated plugins.
Never use null WordPress.org themes.
Never use null WordPress.org plugins.
Remove the WordPress.org version.
Remove all unused themes and plugins.
Disable RestAPI if not required.
Change WordPress.org credentials regularly.
Use user management for distributed access.
Common Security WordPress.org Issues
The most common types of cyberattacks on WordPress.org websites are:
Brute Force
This is one of the simple yet common WordPress.org security threats. A brute-force login is when an attacker uses automation to swiftly enter several username-password combinations in hopes of guessing the correct information. In addition to logins, any password-protected information can be accessed by brute-force hacking.
Cross-Site Scripting (XSS)
To gather data and disrupt the functionality of the target website, an attacker "injects" malicious code into its backend. This is known as XSS. This code might be added to the backend via more complicated techniques or provided as a response to a user-interfaced form.
Database Injections
This is also referred to as a SQL injection and occurs when an attacker transmits a string of malicious code to a website via user input, such as a contact form. The code is then kept in the website's database. The malicious code runs on the website like an XSS attack to access or compromise private data kept in the database.
Backdoors
A backdoor is a file that contains code that enables an attacker to access your website at any time by avoiding the required WordPress.org login. Backdoors are frequently hidden among other WordPress.org source files by attackers, making them challenging for novice users to find.
Attackers can create variations of this backdoor and use them to continue avoiding your login even after it has been deleted.
Summing up
Security experts are constantly developing new strategies to stop cybercriminals from using companies' online presence against them. We are all stuck in the center of this never-ending cycle of internet security. To give your clients one less thing to be concerned about, always consider their safety.
Additionally, you may find us on LinkedIn to get better insights on WordPress-related information.
#WordPress.com vs WordPress.org#WordPress.com and .org difference#WordPress.org VS WordPress.com#WordPress.com VS .org
0 notes
Text
CVE-2022-20616
Jenkins Credentials Binding Plugin 1.27 and earlier does not perform a permission check in a method implementing form validation, allowing attackers with Overall/Read access to validate if a credential ID refers to a secret file credential and whether it's a zip file. source https://cve.report/CVE-2022-20616
0 notes
Text
Make Docker Run Without Sudo

The Docker daemon binds to a Unix socket instead of a TCP port. By default that Unix socket is owned by the user root and other users can only access it using sudo. The Docker daemon always runs as the root user. If you don’t want to preface the docker command with sudo, create a Unix group called docker and add users to it. I did find one solution that requires third party software. The software AlwaysUp allows Docker to run at startup without the need to login. I followed the instructions, except rather than Docker Tools as the executable to run, I pointed to reference dockerd.exe. Restarted the server, and sure enough I can now connect to my remote daemon.
Make Docker Run Without Sudo Command
Make Docker Run Without Sudo File
Sudo docker run hello-world. Ubuntu Utopic 14.10 and 15.05 exist in Docker’s apt repository without official support. Upgrade to 15.10 or preferably 16.04. A container is an executable unit of software where an application and its run time dependencies can all be packaged together into one entity. Since everything needed by the application is packaged with the application itself, containers provide a degree of isolation from the host and make it easy to deploy and install the application without having to worry about the host environment.
Table of Contents
Alternate installation methods
Certbot-Auto
Certbot is meant to be run directly on a web server, normally by a system administrator. In most cases, running Certbot on your personal computer is not a useful option. The instructions below relate to installing and running Certbot on a server.
System administrators can use Certbot directly to request certificates; they should not allow unprivileged users to run arbitrary Certbot commands as root, because Certbot allows its user to specify arbitrary file locations and run arbitrary scripts.
Certbot is packaged for many common operating systems and web servers. Check whethercertbot (or letsencrypt) is packaged for your web server’s OS by visitingcertbot.eff.org, where you will also find the correct installation instructions foryour system.
Note
Unless you have very specific requirements, we kindly suggest that you use the installation instructions for your system found at certbot.eff.org.
Certbot currently requires Python 2.7 or 3.6+ running on a UNIX-like operatingsystem. By default, it requires root access in order to write to/etc/letsencrypt, /var/log/letsencrypt, /var/lib/letsencrypt; tobind to port 80 (if you use the standalone plugin) and to read andmodify webserver configurations (if you use the apache or nginxplugins). If none of these apply to you, it is theoretically possible to runwithout root privileges, but for most users who want to avoid running an ACMEclient as root, either letsencrypt-nosudo or simp_le are more appropriate choices.
The Apache plugin currently requires an OS with augeas version 1.0; currently itsupportsmodern OSes based on Debian, Ubuntu, Fedora, SUSE, Gentoo and Darwin.
If you are offline or your operating system doesn’t provide a package, you can usean alternate method for installing certbot.
Most modern Linux distributions (basically any that use systemd) can installCertbot packaged as a snap. Snaps are available for x86_64, ARMv7 and ARMv8architectures. The Certbot snap provides an easy way to ensure you have thelatest version of Certbot with features like automated certificate renewalpreconfigured.
You can find instructions for installing the Certbot snap athttps://certbot.eff.org/instructions by selecting your server software and thenchoosing “snapd” in the “System” dropdown menu. (You should select “snapd”regardless of your operating system, as our instructions are the same acrossall systems.)
Docker is an amazingly simple and quick way to obtain acertificate. However, this mode of operation is unable to installcertificates or configure your webserver, because our installerplugins cannot reach your webserver from inside the Docker container.
Most users should use the instructions at certbot.eff.org. You should only useDocker if you are sure you know what you are doing and have a good reason to doso.
You should definitely read the Where are my certificates? section, in order toknow how to manage the certsmanually. Our ciphersuites pageprovides some information about recommended ciphersuites. If none ofthese make much sense to you, you should definitely use the installation methodrecommended for your system at certbot.eff.org, which enables you to useinstaller plugins that cover both of those hard topics.
If you’re still not convinced and have decided to use this method, fromthe server that the domain you’re requesting a certficate for resolvesto, install Docker, then issue a command like the one found below. Ifyou are using Certbot with the Standalone plugin, you will needto make the port it uses accessible from outside of the container byincluding something like -p80:80 or -p443:443 on the commandline before certbot/certbot.
Running Certbot with the certonly command will obtain a certificate and place it in the directory/etc/letsencrypt/live on your system. Because Certonly cannot install the certificate fromwithin Docker, you must install the certificate manually according to the procedurerecommended by the provider of your webserver.
There are also Docker images for each of Certbot’s DNS plugins availableat https://hub.docker.com/u/certbot which automate doing domainvalidation over DNS for popular providers. To use one, just replacecertbot/certbot in the command above with the name of the image youwant to use. For example, to use Certbot’s plugin for Amazon Route 53,you’d use certbot/dns-route53. You may also need to add flags toCertbot and/or mount additional directories to provide access to yourDNS API credentials as specified in the DNS plugin documentation.
For more information about the layoutof the /etc/letsencrypt directory, see Where are my certificates?.
Warning
While the Certbot team tries to keep the Certbot packages offeredby various operating systems working in the most basic sense, due todistribution policies and/or the limited resources of distributionmaintainers, Certbot OS packages often have problems that other distributionmechanisms do not. The packages are often old resulting in a lack of bugfixes and features and a worse TLS configuration than is generated by newerversions of Certbot. They also may not configure certificate renewal for youor have all of Certbot’s plugins available. For reasons like these, werecommend most users follow the instructions athttps://certbot.eff.org/instructions and OS packages are only documentedhere as an alternative.
Arch Linux
Debian
If you run Debian Buster or Debian testing/Sid, you can easily install certbotpackages through commands like:
If you run Debian Stretch, we recommend you use the packages in Debianbackports repository. First you’ll have to follow the instructions athttps://backports.debian.org/Instructions/ to enable the Stretch backports repo,if you have not already done so. Then run:
In all of these cases, there also packages available to help Certbot integratewith Apache, nginx, or various DNS services. If you are using Apache or nginx,we strongly recommend that you install the python-certbot-apache orpython-certbot-nginx package so that Certbot can fully automate HTTPSconfiguration for your server. A full list of these packages can be foundthrough a command like:
They can be installed by running the same installation command above butreplacing certbot with the name of the desired package.
Ubuntu
If you run Ubuntu, certbot can be installed using:
Optionally to install the Certbot Apache plugin, you can use:
Fedora
FreeBSD
Port: cd/usr/ports/security/py-certbot&&makeinstallclean
Package: pkginstallpy27-certbot
Gentoo
The official Certbot client is available in Gentoo Portage. From theofficial Certbot plugins, three of them are also available in Portage.They need to be installed separately if you require their functionality.
Note
The app-crypt/certbot-dns-nsone package has a differentmaintainer than the other packages and can lag behind in version.

NetBSD
Build from source: cd/usr/pkgsrc/security/py-certbot&&makeinstallclean
Install pre-compiled package: pkg_addpy27-certbot
OpenBSD
Make Docker Run Without Sudo Command
Port: cd/usr/ports/security/letsencrypt/client&&makeinstallclean
Package: pkg_addletsencrypt
Other Operating Systems
OS packaging is an ongoing effort. If you’d like to packageCertbot for your distribution of choice please have alook at the Packaging Guide.
We used to have a shell script named certbot-auto to help people installCertbot on UNIX operating systems, however, this script is no longer supported.If you want to uninstall certbot-auto, you can follow our instructionshere.
When using certbot-auto on a low memory system such as VPS with less than512MB of RAM, the required dependencies of Certbot may fail to build. This canbe identified if the pip outputs contains something like internalcompilererror:Killed(programcc1). You can workaround this restriction by creatinga temporary swapfile:
Disable and remove the swapfile once the virtual environment is constructed:
Installation from source is only supported for developers and thewhole process is described in the Developer Guide.
Warning
Make Docker Run Without Sudo File
Please do not use pythoncertbot/setup.pyinstall, pythonpipinstallcertbot, or easy_installcertbot. Please do not attempt theinstallation commands as superuser/root and/or without virtual environment,e.g. sudopythoncertbot/setup.pyinstall, sudopipinstall, sudo./venv/bin/.... These modes of operation might corrupt your operatingsystem and are not supported by the Certbot team!
0 notes
Text
Azure devops jenkins
Azure devops jenkins Azure devops jenkins Top news stories today Azure devops jenkins CI/CD with Jenkins Pipeline and Azure This is a guest post by Pui Chee Chen, Product Manager at Microsoft working on Azure DevOps open source integrations. Recently, we improved the Azure Credential plugin by adding a custom binding for Azure Credentials which allows you to use an Azure service principal (the…

View On WordPress
0 notes
Photo

Android ExoPlayer + HLS + Google IMA http://ift.tt/2CbcmB1
Android ExoPlayer + HLS + Google IMA
はじめに
こんにちは streampack チームのメディです。 https://cloudpack.jp/service/option/streampack.html
Objective: ・目的 Play a HLS stream in an Android APP with ExoPlayer & display Google IMA advertisements. ExoPlayerを使用してAndroidアプリでHLSストリームを再生し、Google IMA広告を表示します。
Implementation・ 実装
Step 0
HLS
If you don’t have a HLS stream, please visit the following page to find one. HLSストリームがない場合は、以下のページをご覧ください。 https://github.com/notanewbie/LegalStream
IMA
If you don’t have IMA credentials, you can use demo tags. IMA資格情報がない場合は、デモタグを使用できます。 https://developers.google.com/interactive-media-ads/docs/sdks/html5/tags
Step 1
Create a new project & a blank Main Activity. 新しいプロジェクトと空白のメインアクティビティを作成してください。
MainActivity.java
package jp.co.mycompany.com.exotuto; import android.support.v7.app.AppCompatActivity; import android.os.Bundle; public class MainActivity extends AppCompatActivity { @Override protected void onCreate(Bundle savedInstanceState) { super.onCreate(savedInstanceState); setContentView(R.layout.activity_main); } }
AndroidManifest.xml
Enable hardware acceleration. ハードウェアアクセラレーシ��ンを有効にしてください。
<?xml version="1.0" encoding="utf-8"?> <manifest xmlns:android="http://schemas.android.com/apk/res/android" package="jp.co.mycompany.com.exotuto"> <application android:allowBackup="true" android:hardwareAccelerated="true" android:icon="@mipmap/ic_launcher" android:label="@string/app_name" android:roundIcon="@mipmap/ic_launcher_round" android:supportsRtl="true" android:theme="@style/AppTheme"> <activity android:name=".MainActivity"> <intent-filter> <action android:name="android.intent.action.MAIN" /> <category android:name="android.intent.category.LAUNCHER" /> </intent-filter> </activity> </application> </manifest>
Dependencies ・ソフトウェアの依存関係
buid.gradle(Module:app)
apply plugin: 'com.android.application' android { compileSdkVersion 27 defaultConfig { applicationId "jp.co.mycompany.com.exotuto" minSdkVersion 15 targetSdkVersion 27 versionCode 1 versionName "1.0" testInstrumentationRunner "android.support.test.runner.AndroidJUnitRunner" } buildTypes { release { minifyEnabled false proguardFiles getDefaultProguardFile('proguard-android.txt'), 'proguard-rules.pro' } } compileOptions { sourceCompatibility JavaVersion.VERSION_1_8 targetCompatibility JavaVersion.VERSION_1_8 } } dependencies { implementation fileTree(dir: 'libs', include: ['*.jar']) implementation 'com.android.support:appcompat-v7:27.0.0' implementation 'com.android.support.constraint:constraint-layout:1.0.2' testImplementation 'junit:junit:4.12' androidTestImplementation 'com.android.support.test:runner:1.0.1' androidTestImplementation 'com.android.support.test.espresso:espresso-core:3.0.1' compile 'com.google.android.exoplayer:exoplayer:2.6.0' compile 'com.google.android.exoplayer:exoplayer-hls:2.6.0' compile 'com.google.android.exoplayer:extension-ima:2.6.0' }
Step 2
Create a new Basic Activity & name it PlayerActivity. 新しいBasicアクティビティを作成し、それをPlayerActivityと名づけます。

Then modify MainActivity.java as follows: MainActivity.java を次のように変更します。
public class MainActivity extends AppCompatActivity { @Override protected void onCreate(Bundle savedInstanceState) { super.onCreate(savedInstanceState); setContentView(R.layout.activity_main); Intent intent = new Intent(this, PlayerActivity.class); startActivity(intent); } }
Step 3
Simple HLS implementation・ 単純なHLS実装
res/layout/content_player.xml
<?xml version="1.0" encoding="utf-8"?> <android.support.constraint.ConstraintLayout xmlns:android="http://schemas.android.com/apk/res/android" xmlns:app="http://schemas.android.com/apk/res-auto" xmlns:tools="http://schemas.android.com/tools" android:layout_width="match_parent" android:layout_height="match_parent" app:layout_behavior="@string/appbar_scrolling_view_behavior" tools:context="jp.co.mycompany.com.exotuto.PlayerActivity" tools:showIn="@layout/activity_player"> <com.google.android.exoplayer2.ui.SimpleExoPlayerView android:id="@+id/player_view" android:focusable="true" android:layout_width="match_parent" android:layout_height="match_parent" android:layout_marginTop="10dp" /> </android.support.constraint.ConstraintLayout>
PLayerActivity.java
public class PlayerActivity extends AppCompatActivity { //Player private SimpleExoPlayerView simpleExoPlayerView; private SimpleExoPlayer player; //Logs final private String TAG = "PlayerActivity"; //HLS final private String VIDEO_URL = "https://nhkworld.webcdn.stream.ne.jp/www11/nhkworld-tv/domestic/263942/live_wa_s.m3u8"; @Override protected void onCreate(Bundle savedInstanceState) { super.onCreate(savedInstanceState); setContentView(R.layout.activity_player); Toolbar toolbar = (Toolbar) findViewById(R.id.toolbar); setSupportActionBar(toolbar); FloatingActionButton fab = (FloatingActionButton) findViewById(R.id.fab); fab.setOnClickListener(new View.OnClickListener() { @Override public void onClick(View view) { Snackbar.make(view, "Replace with your own action", Snackbar.LENGTH_LONG) .setAction("Action", null).show(); } }); //ExoPlayer implementation //Create a default TrackSelector BandwidthMeter bandwidthMeter = new DefaultBandwidthMeter(); TrackSelection.Factory videoTrackSelectionFactory = new AdaptiveTrackSelection.Factory(bandwidthMeter); TrackSelector trackSelector = new DefaultTrackSelector(videoTrackSelectionFactory); // Create a default LoadControl LoadControl loadControl = new DefaultLoadControl(); //Bis. Create a RenderFactory RenderersFactory renderersFactory = new DefaultRenderersFactory(this); //Create the player player = ExoPlayerFactory.newSimpleInstance(renderersFactory, trackSelector, loadControl); simpleExoPlayerView = new SimpleExoPlayerView(this); simpleExoPlayerView = (SimpleExoPlayerView) findViewById(R.id.player_view); //Set media controller simpleExoPlayerView.setUseController(true); simpleExoPlayerView.requestFocus(); // Bind the player to the view. simpleExoPlayerView.setPlayer(player); // Set the media source Uri mp4VideoUri = Uri.parse(VIDEO_URL); //Measures bandwidth during playback. Can be null if not required. DefaultBandwidthMeter bandwidthMeterA = new DefaultBandwidthMeter(); //Produces DataSource instances through which media data is loaded. DefaultDataSourceFactory dataSourceFactory = new DefaultDataSourceFactory(this, Util.getUserAgent(this, "PiwikVideoApp"), bandwidthMeterA); //Produces Extractor instances for parsing the media data. ExtractorsFactory extractorsFactory = new DefaultExtractorsFactory(); //FOR LIVE STREAM LINK: MediaSource videoSource = new HlsMediaSource(mp4VideoUri, dataSourceFactory, 1, null, null); final MediaSource mediaSource = videoSource; player.prepare(videoSource); } //Android Life cycle @Override protected void onStop() { player.release(); super.onStop(); Log.v(TAG, "onStop()..."); } @Override protected void onStart() { super.onStart(); Log.v(TAG, "onStart()..."); } @Override protected void onResume() { super.onResume(); Log.v(TAG, "onResume()..."); } @Override protected void onPause() { super.onPause(); Log.v(TAG, "onPause()..."); } @Override protected void onDestroy() { super.onDestroy(); Log.v(TAG, "onDestroy()..."); player.release(); } }
Please run your app in the Android emulator. Androidエミュレータでアプリをテストしてください。

Step 4
Player listeners ・プレーヤーリスナー
In the onCreate method of PlayerActivity.java, please add the following listeners. PlayerActivityのonCreateメソッドで使用します。次のリスナーを追���してください。
//ExoPLayer events listener player.addListener(new Player.EventListener() { @Override public void onTimelineChanged(Timeline timeline, Object manifest) { Log.v(TAG, "Listener-onTimelineChanged..."); } @Override public void onTracksChanged(TrackGroupArray trackGroups, TrackSelectionArray trackSelections) { Log.v(TAG, "Listener-onTracksChanged..."); } @Override public void onLoadingChanged(boolean isLoading) { Log.v(TAG, "Listener-onLoadingChanged...isLoading:" + isLoading); } @Override public void onPlayerStateChanged(boolean playWhenReady, int playbackState) { Log.v(TAG, "Listener-onPlayerStateChanged..." + playbackState); switch (playbackState) { case Player.STATE_IDLE: Log.v(TAG, "STATE IDLE"); break; case Player.STATE_BUFFERING: Log.v(TAG, "STATE BUFFERING"); break; case Player.STATE_READY: Log.v(TAG, "STATE READY"); break; case Player.STATE_ENDED: Log.v(TAG, "STATE ENDED"); break; default: break; } } @Override public void onRepeatModeChanged(int repeatMode) { Log.v(TAG, "Listener-onRepeatModeChanged..."); } @Override public void onShuffleModeEnabledChanged(boolean shuffleModeEnabled) { } @Override public void onPlayerError(ExoPlaybackException error) { Log.v(TAG, "Listener-onPlayerError..."); player.stop(); player.prepare(adsMediaSource); player.setPlayWhenReady(true); } @Override public void onPositionDiscontinuity(int reason) { Log.v(TAG, "Listener-onPositionDiscontinuity..."); } @Override public void onPlaybackParametersChanged(PlaybackParameters playbackParameters) { Log.v(TAG, "Listener-onPlaybackParametersChanged..."); } @Override public void onSeekProcessed() { } });
Step 5
IMA implementation ・IMAの実装
In PlayerActivity.java, add the following class variables. PlayerActivity.java で、次のクラス変数を追加してください。
//IMA private ImaAdsLoader imaAdsLoader; final private String AD_TAG_URI = "https://pubads.g.doubleclick.net/gampad/ads?sz=640x480&iu=/124319096/external/ad_rule_samples&ciu_szs=300x250&ad_rule=1&impl=s&gdfp_req=1&env=vp&output=vmap&unviewed_position_start=1&cust_params=deployment%3Ddevsite%26sample_ar%3Dpreonly&cmsid=496&vid=short_onecue&correlator=";
Please update the onCreate method of PlayerActivity.java as follows. PlayerActivity.java のonCreateメソッドを次のように更新してください。
//player.prepare(adsMediaSource);//Remove this line. imaAdsLoader = new ImaAdsLoader(this, Uri.parse(AD_TAG_URI)); AdsMediaSource.AdsListener adsListener = new AdsMediaSource.AdsListener() { @Override public void onAdLoadError(IOException error) { error.printStackTrace(); } @Override public void onAdClicked() { } @Override public void onAdTapped() { } }; AdsMediaSource adsMediaSource = new AdsMediaSource( mediaSource, dataSourceFactory, imaAdsLoader, simpleExoPlayerView.getOverlayFrameLayout(), null, adsListener ); player.prepare(adsMediaSource);
Results 結果
It works! できます!

Step 6
Adding IMA event listeners ・IMAイベントリスナーの追加
Please add the following code to the onCreate method of PlayerActivity.java. PlayerActivity.javaのonCreateメソッドに次のコードを追加してください。
//IMA event listeners com.google.ads.interactivemedia.v3.api.AdsLoader adsLoader = imaAdsLoader.getAdsLoader(); adsLoader.addAdsLoadedListener(new AdsLoader.AdsLoadedListener() { @Override public void onAdsManagerLoaded(AdsManagerLoadedEvent adsManagerLoadedEvent) { AdsManager imaAdsManager = adsManagerLoadedEvent.getAdsManager(); imaAdsManager.addAdEventListener(new AdEvent.AdEventListener() { @Override public void onAdEvent(AdEvent adEvent) { Log.v("AdEvent: ", adEvent.getType().toString()); switch (adEvent.getType()) { case LOADED: break; case PAUSED: break; case STARTED: break; case COMPLETED: break; case ALL_ADS_COMPLETED: break; default: break; /* Full list of events. Implement what you need. LOADED, TAPPED, PAUSED, LOG, CLICKED, RESUMED, SKIPPED, STARTED, MIDPOINT, COMPLETED, AD_PROGRESS, ICON_TAPPED, AD_BREAK_ENDED, AD_BREAK_READY, FIRST_QUARTILE, THIRD_QUARTILE, AD_BREAK_STARTED, ALL_ADS_COMPLETED, CUEPOINTS_CHANGED, CONTENT_PAUSE_REQUESTED,CONTENT_RESUME_REQUESTED */ } } }); } });
Information sources・ 情報源
https://github.com/sakurabird/Android-Example-HLS-ExoPlayer https://developers.google.com/interactive-media-ads/docs/sdks/android/ https://github.com/google/ExoPlayer https://google.github.io/ExoPlayer/demo-application.html
元記事はこちら
「Android ExoPlayer + HLS + IMA」
February 21, 2018 at 12:00PM
1 note
·
View note
Text
Internet Is Not Safe Anymore

There is a reality check for everyone who does ethical Cyber-attack for living no matter what the scope, size or age of your Word-Press site, your site is at risk! It is not that much certain that Cyber-Criminals don’t concentrate or feel to target only mainstream websites; however, they also target small and venerable sites as well, as they can easily exploit the common vulnerabilities of such websites. Normally, most of these Cyber-Attacks are smartly conducted via programmed bots to automatically find certain soft spots in websites. At times, they do not differentiate between your site and a popular one. Smaller sites are more prone to get compromised since they generally have lower website security measures in place. So, the next time you think your site is too insignificant for a Cyber-Criminals, think again. The odds are high that your website can be used by the Cyber-Criminal to send spam, do SEO spam or perform a malicious redirect. Once the Cyber-Criminals manage to find a loophole in your site, they can gain access to a plethora of opportunities to take their ‘spammy’ intentions for a spin. Cyber-Criminals can pull off many different types of Cyber-attacks. For instance DDoS attacks, Cross-Site Scripting (XSS) attack, injection attacks, SQL injection attacks, session hijacking, clickjacking attacks, etc. Luckily, most of the threats that can damage your Word-Press site can be prevented. But first, we need to arm you with the right knowledge of these common types of Cyber-Attack, so that you can take the right measures to address it.
Plugin Vulnerabilities
If you have ever worked on Word-Press projects, then you might be aware of the fact that the plugins play a significant role in Word-Press website development. As a matter of fact, Word-Press is designed for non-developers and developers alike. The one who is in need of a quick online presence, then the plugin proves to be a reliable solution that bridges the gaps and integrates various functionalities to the website.
Unfortunately, plugins are considered to be the most vulnerable to Cyber-attack when it comes to the Word-Press ecosystem. However, one can’t blame the developers who created that plugin. Cyber-Criminals manage to find vulnerabilities within the plugin’s code and use them to access sensitive information.
Brute Force Attacks & Weak Password
Lack of login security is another entry point for Cyber-Criminals to target Word-Press sites. Cyber-Criminals tend to leverage readily available software tools to generate the password and force their way into your system. Malicious Cyber-Criminals employ software tools such as Wires-hark (sniffer) or Fiddler (proxy) to capture your Word-Press login details and steal your personal information and other sensitive information. In addition to that, the brute force attacks can create devastating seniors for users who have a weak credential management system. By way of such attacks, the Cyber-Criminals can generate 1000s of password guesses to gain entry. So, you know what to do if your password is 12345678 or admin123, right?
Word-Press Core Vulnerabilities
Nothing is perfect in this world. It often takes time to discover vulnerabilities within the Word-Press ecosystem, and this delay can put thousands of Word-Press users at grave risk of data breaches. Fortunately, the Word-Press team releases security patches and updates on a regular basis.
Unsafe Themes
At times, you can give in to temptation and install a free theme from your favorite search engines. However, how one can determine whether that theme us safe or not, especially when it is free? Honestly, most of these free themes available on internet are vulnerable to Cyber-Attack just like an outdated plugin would. However, this does not mean that all free themes are a strict no-no. There are plenty of efficient and reliable free themes uploaded by developers who provide regular update and actively support the project.
Hosting vulnerabilities
Another popular entry point for Cyber-Criminals is through your own hosting system. Normally, most of the Word-Press websites are hosted on the SQL server and this is how the Word-Press website becomes a potential target of Cyber-Criminals. In addition to that, if one uses poor-quality or shared hosting services, then it makes their website more venerable to Cyber-Attack. In such cases, the attacker can gain unauthorized access to other websites on the same server.
Cyber-Infection
Cyber-Menace, or simply menace, refers to creating certain circumstances or events that result in developing potential issues for cyber-protection. A few common examples of such Menaces include a social-engineering or phishing invasion that helps a Cyber-Criminal in installing a Trojan-Virus in your system and steal private information, political activists DDoS-ing your Web-Site, an administrator accidentally leaving data unprotected on a production system can result in a data breach, or a storm flooding your ISP’s data center.
Cyber-Protection Menaces are actualized by Cyber-Criminals. These Cyber-criminals usually refer to persons or entities who may potentially initiate a Cyber-Invasion. While natural disasters, as well as other environmental and political events, do constitute Menaces, they are not generally regarded as being Cyber-Criminal, it does not mean that such Menace activists should be disregarded or given less importance. Examples of common Cyber-criminals include financially motivated politically motivated activists for Cyber-Invasion, nation-state Cyber-Infiltrators, disgruntled employees, Cyber-Criminals, competitors, careless employees.
Cyber-Menaces can also become more catastrophic if Cyber-Criminal leverages one or more vulnerabilities to gain access to a system, often including the operating system.
Cyber-Liabilities
Cyber-Liabilities simply refer to weaknesses in a system. They make Cyber-Menace possible and potentially even more hazardous. A system could be exploited through a single Liability, for example, a single SQL Injection infiltration technique could give a Cyber-Criminal full control over sensitive data. A Cyber-Criminal could also bind several exploiting techniques and take advantage of various Liabilities of your system. For instance: The most common vulnerabilities are Cross-Web-Site Scripting, server misconfigurations, and SQL Injections.
Cyber-Perils
Cyber-Perils are usually misinterpreted with Cyber-Menace. However, there is a subtle difference, as a Cyber-Protection Peril refers to a combination of probability and end results of a Cyber-Menace and it is usually in the monetary terms but quantifying a breach is extremely complex. Therefore, a Cyber-Peril is a scenario that should be avoided combined with the likely losses to result from that scenario. The following is a hypothetical example of how Cyber-Perils can be constructed:
SQL Injection is a Liability
Sensitive data theft is one of the biggest Cyber-Menace that SQL Injection enables
Financially motivated Cyber-Criminals are one of the examples of Cyber-Menace activists
When sensitive data is compromised then is it extremely complex to bear the significance of such financial loss to the business
The probability of such a Cyber-Invasion is high, given that SQL Injection is easy-access, widely exploited Liability and the Web-Site is externally facing
Therefore, the SQL Injection Liability in this scenario should be considered as extremely hazardous liability for Cyber-Protection.
The difference between a Liability and a Cyber-Peril are usually easily understood. However, understanding the difference in terminology allows for clearer communication between security teams and other parties and a better understanding of how Cyber-Menace influences Cyber-Peril. This, in turn, may help prevent and mitigate security breaches. A good understanding is also needed for effective Cyber-Peril assessment and Cyber-Peril management, for designing efficient security solutions based on Cyber-Menace intelligence, as well as for building an effective security policy and a Cyber-Protection strategy.
Targeted and Non-Targeted WordPress Cyber-Invasions
If you have been reading about Word-Press security and looking for ways in which your Word-Press security can be compromise and techniques that can be employed to protect your WordPress Web-Site from Cyber-Criminals, you will notice that there are two types of Cyber-Invasion, targeted and non-targeted Word-Press Cyber-Invasion.
What is the difference between a targeted and non-targeted WordPress Cyber-Invasion and how can you protect your Word-Press from both of these Cyber-Invasion? This article explains the difference between these two types of Cyber-Infiltration and explains why some or the WordPress infiltration techniques can be implemented to protect your Web-Site from one type of Cyber-Invasion.
Non-Targeted WordPress Cyber-Invasion
Non-targeted WordPress Cyber-Invasion is an automated invasion and it is not specifically launched against WordPress Websites only. For example, if Cyber-Criminals are trying to exploit a known Liability in an old version of Word-Press, they do not manually look for Word-PressWeb-Sites, check their version and see if they are vulnerable to such Liabilities.
Instead, they employ automated tools to send a specific HTTP request that is exercised to exploit the Liability to a number of Web-Sites, typically a range of IP addresses. Depending on the HTTP responses received back, the tool determines if the target Web-Site is a vulnerable Word-Press installation or not.
Protect WordPress from Non-Targeted Cyber-Invasion
Therefore if you hide your version of Word-Press, or even hide the fact that you are using Word-Press for your Web-Sites you won’t be protecting your Web-Site from non-targeted Word-Press Cyber-Invasion. To protect Word-Press from non-targeted Cyber-Invasions follow the below recommendations:
One must always keep all their Programs up to date and always install the latest and most secure version of Word-Press, plugins, and themes. This also applies to MySQL, Apache and any other programs that are running on your web environment.
Always uninstall and remove any unnecessary plugins, themes and any other components and files which are not being frequently employed.
Do not employ typical login credentials such as admin, administrator, and root for your Word-Press administrator account. If you do rename the Word-Press administrator account.
One must always properly protect the Word-Press Login and admin pages by developing an additional layer of authentication, which involves read protection for Word-Press Login Page with HTTP Authentication.
One must always try to develop strong login credentials and this does not apply only to Word-Press but to any other service or Web-Site. If you have multiple clients for your Word-Press, then employ a Plugin to create policies forward-Press credentials, in order to ensure the safety.
Targeted WordPress Cyber-Invasion
Targeted Cyber-Invasions are specifically targeted towards your Web-Site and blogs. There are several reasons why your Word-PressWeb-Site might be a victim of a targeted Cyber-Invasion and the reason why your Word-Press is a victim of a targeted Cyber-Invasion is not of importance. What is important is to understand what happens in a targeted Cyber-Invasion so you can protect your Word-PressWeb-Sites and blogs better.
Targeted Cyber-Invasions are more catastrophic than non-targeted ones simply because rather than having a number of automated tools scanning Web-Sites randomly, there is a human being analyzing every detail about your Web-Site in the hope of finding something that could be exploited.
Anatomy of Targeted WordPress Cyber-Invasions
At first, the Cyber-Criminals will employ automated tools to check if your version of Word-Press is vulnerable to any known vulnerabilities. Since automated tools are employed to hide the version of your Word-Press.The Cyber-Criminals will also try to determine what plugins are running on your Word-Press and if any of them are vulnerable to a particular Liability. In addition to that most of these tasks are executed employing automated tools.
One of the most venerable links in the Word-Press security is credentials and by employing these automated tools the Cyber-Criminals will try to enumerate all the Word-Pressclients and even launch a password dictionary Cyber-Invasion against Word-Press.
There are many other ways and means how to infiltrate a Word-Press blog or Web-Site and targeted Cyber-Invasions do not specifically take advantage of a security weakness in Word-Press or one of its components. It could also be a security hole in the webserver Programs or configuration etc, but the above three are the most common Cyber-Invasion entry points.
Protect WordPress from Targeted Cyber-Invasions
There are many WordPress Cyber-Invasion and techniques you can employ to protect your WordPress from a targeted Cyber-Invasion as highlighted in the below list:
To start off with, all that applies to protect your WordPress from non-targeted Word-Press Cyber-Invasions applies also to targeted Cyber-Invasions
Secure and Protect your WordPress Administrator Account
Enable Word-Press SSL to access your WordPress login page and admin pages over an encrypted communication layer to avoid having your WordPress login credentials being hijacked.
Always employ a WordPress security monitoring and auditing plugin to keep track of everything that is happening on your WordPress and identify any suspicious activity before it becomes a security issue
Practice WordPress client roles to improve the security of WordPress by ensuring every client only has the minimum required privileges to do the job
One must always employ a WP-Scan WordPress security black box scanner and other tools to frequently scan and audit their WordPress Website.
Protecting WordPress from Cyber-Criminals
From time to time you might read about a particular WordPress security tweak that some people say it works while some others say it doesn’t, such as hiding your WordPress version. In such scenarios we often witness that secrecy of the WordPress version has minimum effect on the overall security of the WordPress design, then we think why bother? If you are dubious about a particular tweak if the tweak does not impact the performance of your Word-Press and is easy to implement go ahead and implement it. Better to be safe than sorry!
Apart from the above tips, there are many other ways how to improve the security of your WordPress blogs and Websites and protect them from both targeted and non-targeted WordPress Cyber-Invasions. Ideally, you should keep yourself updated by subscribing to a WordPress security blog where frequent WordPress security tips and infiltration techniques are published.
What Is DNS Spoofing?
DNS spoofing occurs when a particular DNS server’s records of “spoofed” or altered Infection to redirect traffic to the Cyber-Criminals. This redirection of traffic allows the Cyber-Criminals to spread viruses, steal data, etc. For example, if a DNS record is spoofed, then the Cyber-Criminals can manage to redirect all the traffic that relied on the correct DNS record to visit a fake Website that the Cyber-Criminals has created to resemble the real Website or a completely different Website.
How Does Normal DNS Communication Work?
A DNS server is normally employed for the purpose of resolving a domain name (such as keycdn.com) into the associated IP address that it maps to. Once the DNS server finds the appropriate IP address, data transfer can begin between the client and Web-Site’s server. The given below visualization will display how this process will take place at a larger scale. Once the DNS server locates domain-to-IP translation, then it has to cache subsequent requests for the domain. As a result, the DNS lookup will happen much faster. However, this is where DNS spoofing can act as a great trouble creator, as a false DNS lookup can be injected into the DNS server’s cache. This can result in an alteration of the visitors’ destination.
How Does DNS Spoofing Work?
DNS spoofing is an overarching term and can be carried out using various techniques such as:
DNS cache poisoning
Compromising a DNS server
Implementing a Man in the Middle Cyber-Invasions
However, the Cyber-Criminal’s end goal is usually the same no matter which method they practice. Either they want to steal information, re-route you to a Web-Site that benefits them, or spread Virus. The most argued technique of DNS spoofing is employing Cache-Poisoning.
DNS Cache-Poisoning
Since DNS servers cache the DNS translation for faster, more efficient browsing, Cyber-Criminals can take advantage of this to perform DNS spoofing. If a Cyber-Criminal is able to inject a forged DNS entry into the DNS server, all clients will now be using that forged DNS entry until the cache expires. The moment the cache expires, the DNS entry has to return to the normal state, as again the DNS server has to go through the complete DNS lookup. However, if the DNS server’s Programs still hasn’t been updated, then the Cyber-Criminal can replicate this error and continue funneling visitors to their Web-Site.
DNS cache poisoning can also sometimes be quite complex to spot. If the InfectedWeb-Site is very similar to the Web-Site it is trying to impersonate, some clients’ may not even notice the difference. Additionally, if the Cyber-Criminal is using DNS cache poisoning to compromise one company’s DNS records in order to have access to their emails for example, then this may also be extremely complex to detect.
How to Prevent DNS Spoofing
As a Website visitor, there’s not much you can do to prevent DNS spoofing. Rather, this falls more in the hands of the actual DNS provider that is handling a Web-Site’s DNS lookups as well as the Web-Site owner. Therefore, a few tips for Web-Site owners and DNS providers include:
Implement DNS spoofing detection mechanisms — it’s important to implement DNS spoofing detection Programs. Products such as XArp help product against ARP cache poisoning by inspecting the data that comes through before transmitting it.
One must always employ encrypted data transfer protocols with end-to-end encryption via SSL/TLS will help decrease the chance that a Web-Site / its visitors are compromised by DNS spoofing. This type of encryption that allows the clients’ to verify whether the server’s digital certificate is valid and belongs to the Web-Site’s expected owner.
One must employ DNSSEC — DNSSEC, or Domain Name System Security Extensions, as it exercises digitally signed DNS records to help determine data authenticity. DNSSEC is still a work in progress as far as deployment goes, however, it was implemented in the Internet root level in 2010.
DNS Spoofing — In Summary
DNS spoofing can result in making quite a bit of trouble both for Web-Site visitors and Web-Site owners. The Cyber-Criminal’s main motive to carry out a DNS spoofing Cyber-Invasion is either for their own personal gain or to spread Virus. Therefore, as a Web-Site owner, it’s important to choose a DNS hosting provider that is reliable and clients’ up-to-date security mechanisms.
Furthermore, as a Web-Site visitor it’s just as important that you “be aware of your surroundings” in a sense that if you notice any discrepancies between the Web-Site that you were expecting to visit and the Web-Site that you are currently browsing, you should immediately leave that Web-Site and try to alert the real Web-Site owner.
Denial-of-Service Cyber-Invasions
There are many different techniques that Cyber-Criminals practice to carry out DoS Cyber-Invasion. The most common method of Cyber-Invasion occurs when a Cyber-Thieves floods a network server with traffic. In this type of DoS Cyber-Invasion, the Cyber-Thievessends several requests to the target server, overloading it with traffic. These services that request can be illegal and with mostly fabricated return addresses. This results in a scenario where the server is overwhelmed, due to the constant process of shooting junk requests. This ultimately misleads the server in its attempt to authenticate the requestor and helps the Cyber-Thieves to exploit the vulnerabilities of the server.
In a Smurf Cyber-Invasion, the Cyber-Thief delivers Internet Control Message Protocol broadcast packets to a number of hosts with a spoofed source Internet Protocol (IP) address that belongs to the target machine. The clients of these infected packets will then respond and the victim’s host will be overwhelmed with those responses.
A SYN flood occurs when a Cyber-Thief sends a request to connect to the victim’s server but never completes the connection through what is known as a three-way handshake. This is the method employed in a TCP/IP network to develop a connection between a local host/client and the server. The improper handshake leaves the connected port in an occupied status and it then lacks the ability to process further requests. A Cyber-Thief will continue to send requests, saturating all open ports, so that legitimate clients’ cannot connect.
Individual networks may be affected by DoS Cyber-Invasions without being directly targeted. If the network’s internet service provider (ISP) or cloud service provider has been targeted and compromised, the network will also experience a loss of service.
CSRF Cyber-Invasion Technique
Cross-Web-Site Request Forgery, also known as session riding or sea surf. It is a widely known Cyber-Invasion against authenticated web applications by employing cookies. The Cyber-Criminal is able to trick the victim into making a request that the victim did not intend to make. Therefore, the Cyber-Criminal exploits the trust that a web application has for the victim’s browser. While Cross-Web-Site Request Forgery (CSRF) Cyber-Invasions do not provide a Cyber-Criminal with the response returned from the server, a smart Cyber-Criminal has the ability to create disastrous scenarios that can have a catastrophic effect on your Web-Site, especially when paired with well-crafted social engineering Cyber-Invasion.
Cross-Web-Site Request Forgery is a kind of Cyber-Invasion conduct by Cyber-Criminals that involves authentication and authorization of the victim’s network. In this technique first of all the Cyber-Criminals has to send a forged request to the webserver. On top of that, the CSRF Liabilities affect highly privileged clients, such as administrators, which could result in a full application compromise. During a successful CSRF Cyber-Invasion, the victim’s web browser is tricked by InfectedWeb-Site into unwanted action. It will then send HTTP requests to the web application as intended by the Cyber-Criminals. In addition to that, such a request could involve submitting forms present on the web-application to modify data-archives and once the HTTP request is successfully delivered, then the victim’s browser will include the cookie header. Cookies are typically employed to store the client’s session identifier so that the client does not have to enter their login credentials for each request, which would obviously be impractical. If the victim’s session of authentication is safely archived in a session cookie or if the application is vulnerable to Cross- Web-Site Request Forgery (CSRF), then the Cyber-Criminal can leverage CSRF to launch any desired infected requests against the Web-Site and the server-side code is unable to distinguish whether these are legitimate requests.
CSRF Cyber-Invasion can be employed to compromise online banking by forcing the victim to make an operation involving their bank account. CSRF can also facilitate Cross- Web-Site Scripting (XSS). Hence it is extremely important that you treat CSRF as extremely serious issues for your web application security issue.
The CSRF Cyber-Invasionnormally employs an HTTP GET request. If the victim visits a web page controlled by the Cyber-Criminals with the following payload, the browser will send a request containing the cookie to the URL crafted by Cyber-Criminals.
Cross- Web-Site Request Forgery in POST Requests
GET requests, however, are not the only HTTP method the Cyber-Criminals can exploit. POST requests are equally susceptible to Cross- Web-Site Request Forgery (CSRF), however, The Cyber-Criminals also has to involve a little bit of JavaScript to submit the POST request.
CSRF Protection
One can have two kind of primary approaches to deal with Cross-Web-Site Request Forgery. For starters, One has to synchronize the cookie with an anti-CSRF token that has already been given to the browser or preventing the browser from transmitting cookies to the web application.
Anti-CSRF Tokens
The recommended and the most widely employed prevention technique for Cross- Web-Site Request Forgery (CSRF) Cyber-Invasion is known as an anti-CSRF token, sometimes referred to as a synchronizer token or just simply a CSRF token. When a client submits a form or makes some other authenticated request that requires a cookie, a random token should be included in the request. Now, the web-application has to verify the existence and purity of this token before processing any requests. It is extremely important that the web-application should have the ability to reject the token with a suspicious approach.
It’s highly recommended that you employ an existing, well tested and reliable anti-CSRF library. Depending on your language and framework of choice, there are several high-quality open source libraries that are ready-to-deploy. Here we have mentioned some of the characteristics of a well-designed anti-CSRF system.
It is extremely important that each client’s session should have a unique token.
For security measures, the session should expire automatically after an instructed period of time.
It is extremely essential that the Anti-CSRF token should be a cryptographically random value and it should have significant length.
It is extremely important that the Anti-CSRF token should be added within URLs or as a hidden field for forms.
It is also important that the server should have the ability to reject the requested action if the validation of the Anti-CSRF token fails.
Same-Web-Site Cookies
The Same-Web-Site cookie attribute is a new attribute that can be set on cookies to instruct the browser to disable third-party usage for specific cookies. The Same-Web-Site attribute is set by the server when setting the cookie and requests the browser to only send the cookie in a first-party context. Therefore, the request has to originate from the same origin — requests made by a third-party Website will not include the Same-Web-Site cookie. This effectively eliminates Cross-Web-Site Request Forgery Invasion without the practicing synchronizer tokens.
#Secure#internet#security#net#web development#technology#web design#web developing company#technologies#Webmaster#webdesign#blog
0 notes
Text
How the Coinbase Security team deployed CTFd to Power our First Capture the Flag contest at Defcon…
How the Coinbase Security team deployed CTFd to Power our First Capture the Flag contest at Defcon 27
By Nishil Shah and Peter Kacherginsky

We recently ran Coinbase’s first Capture the Flag (CTF) competition called Capture the Coin. As part of running the CTF, we needed to setup the underlying infrastructure. In this guide we’ll describe our process from choosing a CTF platform to getting it production ready. This CTF definitely would not have been possible without all the open source contributors, projects, tutorials, and free services we leveraged, so we’re making this guide as a small contribution back to the community. Overall, the process took us a few weeks to setup, but with this guide, you’ll only spend a few days.
Choosing a CTF Platform
We chose CTFd as our CTF platform based on the following criteria:
Challenge Input Interface
Support for Types of Challenges
Free Response (Static and Pattern-Based)
Dynamic Value
Multiple Choice
Custom Plugins
Public Scoreboard
User and Team Registration
Admin Panel
Player Communications
Hints
Active Maintainers
CTFd had support for most of our requirements except for multiple choice questions. However, requirements like having active maintainers was useful when the maintainers quickly patched a bug in a few hours. We also wanted to write challenges that forced users to interact with a real blockchain. This would require some custom development, so we also wanted the ability to build our own custom modules. Anecdotally, a few other CTFs had run successfully on CTFd. Given these requirements, CTFd matched our needs the closest.
CTFd mostly worked out of the box by following the README instructions; however, we did run into one issue. Out of the box, CTFd started running really slow. We did some basic debugging like looking at memory and CPU utilization to see if we needed to upgrade our EC2 instance. In general, resource consumption was generally less than 1%. We eventually found out that using Sync workers was inefficient. We changed the settings to use async gevent workers and correctly setting worker_connections and workers using the advice from this post. This solved our issue and CTFd worked great with very little latency.
Capture the Coin Infrastructure
Setting up and running this CTF was a great learning experience in getting hands-on with AWS and debugging real issues. As appsec engineers reviewing code or infrastructure, we often times can become unsympathetic to how hard an engineers’ job can be when defining security requirements even in a #SecurityFirst engineering culture. Just for something as simple as a CTF, the bill of materials starts to pile up as you can see below.
Cloudflare Free Tier
CTFd
Google Recaptcha v2
Infura
Let’s Encrypt/CertBot
Redis (AWS-managed or locally running)
SES Email Forwarder Lambda (Here’s a guide we found very helpful to setup this lambda)
AWS (Paid Tier)
EC2
IAM
Lambda
RDS Aurora
S3
SES
Here’s a network diagram of what our AWS infrastructure looked like at a high level.
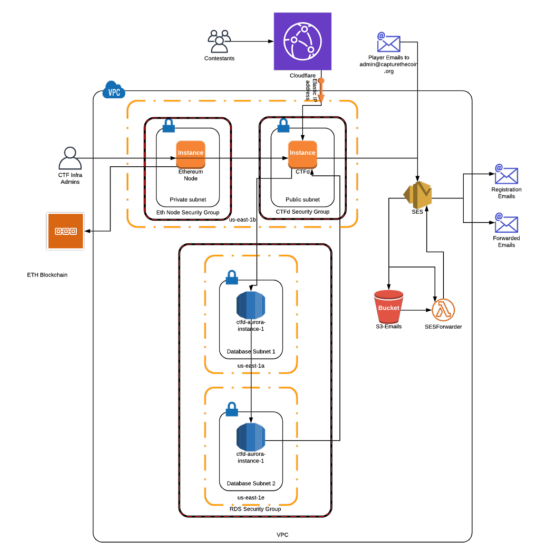
Our vendor choices were typically determined by our own familiarity. We used AWS as our infrastructure provider, and we used Cloudflare as our DoS protection for similar reasons. For email and email verification, we used SES to trigger an email forwarder lambda and save a copy of the email to an S3 bucket. The lambda then pulled the email from the S3 bucket and forwarded the contents to the recipients defined in the lambda. Eventually, we swapped out our EC2 instance hosting an Ethereum node with Infura as this gave us reliable connectivity to the ETH blockchain for the smart contract challenges. Our infrastructure is rather simple compared to the complicated microservice environments today, but there was still some complexity involved.
Our Setup Notes
Signup for AWS Account.
Buy a domain with your favorite provider.
Set up Route53 NS DNS records in AWS.
Set up Route53 MX DNS records in AWS.
Set up Route53 SOA DNS records in AWS.
Set up Route53 SPF DNS records in AWS.
Set up Route53 DKIM DNS records in AWS.
Note: The AWS SES Domain Verification step will require an additional TXT record.
Spin up an EC2 micro instance. You can always resize later.
Attach the right security groups. Initially, we limited external access to private IP ranges so that we didn’t accidentally leak challenges until we started the competition.
Spin up RDS instance. We went with the AWS managed solution because this was the simplest and we wouldn’t have to worry about load balancing or patching.
Follow this guide to get inbound and outbound emails working under your CTF domain.
Install CTFd by cloning the repo and installing dependencies. (We used v2.1.3)
Setup Google Recaptcha v2 for spam and DoS protection.
Setup Infura or your own node if you want Ethereum smart contract challenges.
Setup Let’s Encrypt/Certbot for HTTPS during testing and eventually for connections from Cloudflare to CTFd.
Setup AWS-managed Redis or use a Redis instance locally.
Setup port forwarding 80 to 443 and 443 to 8443 so CTFd doesn’t have to run with sudo and http:// is auto-redirected to https://.
Run CTFd! Note that Unix security best practices still apply like running the application under a limited user.
Run the following commands to set all the environment variables.
# CTFd Database
export DATABASE_URL=
# Web3
export WEB3_PROVIDER_URI=
export GETH_ACCT_PASSWD=
# Redis Caching
export REDIS_URL=
# Infura
export WEB3_INFURA_API_KEY=
export WEB3_INFURA_API_SECRET=
# reCAPTCHA
export RECAPTCHA_SECRET=
export RECAPTCHA_SITE_KEY=
cd CTFd
gunicorn3 -name CTFd —bind 0.0.0.0:8443 —statsd-host localhost:8125 —keyfile /etc/letsencrypt/live/capturethecoin.org/privkey.pem —certfile /etc/letsencrypt/live/capturethecoin.org/fullchain.pem —workers=5 —worker-class=gevent —worker-connections=5000 —access-logfile /home/ubuntu/access.log —log-file /home/ubuntu/error.log “CTFd:create_app()”
We found this guidance for optimizing workers and worker-connections helpful.
When finished testing with your running CTFd instance, setup the competition dates in the CTFd admin interface.
Install the Ethereum Oracle CTFd extension and generate contracts.
Add SES SMTP credentials to CTFd admin interface for user registration if you want email verification.
At this point, the CTF should be entirely setup. Only keep going if you’d like to setup Cloudflare for DoS protection.
Setup Cloudflare DNS and modify the AWS security group for the CTFd box to allow ingress from Cloudflare IPs.
Setup Cloudflare SSL/TLS. SSL — Full (strict) if you still have a valid cert from Let’s Encrypt
Setup Edge Certificates — Cloudflare Universal SSL certificate unless you have the budget and security requirements for a dedicated cert or uploading your own cert.
Setup Cloudflare by enabling Always Use HTTPS, HSTS, TLS 1.3, Automatic HTTP Rewrites, and Certificate Transparency Monitoring
Setup Cloudflare by using minimum TLS version 1.2
You can also setup whitelisting for known good IP addresses in Firewall Tools so that Cloudflare doesn’t challenge requests from these ranges.
Dynamic Oracle
One requirement for the competition was to support Ethereum smart contract challenges, after all, this was called Capture the Coin. If no (testnet) coins could be captured, we would not have lived up to the name.
The contest included the excellent CTFd Oracle plugin by nbanmp which allowed us to process on-chain events such as determining whether or not the deployed smart contract was successfully destroyed by the player. We have modified the original oracle to allow for contract pre-deployment since Ethereum Ropsten network may sometimes be unreliable.
You can find the source code for the oracle and contract deployer here: https://github.com/iphelix/ctc-eth-challenge
Future Steps
In the future, we plan to use the dockerized setup so that it is easy to spin up and down the entire CTFd platform. CTFd already allows for codification of the settings which is helpful in being able to get predictable application deploys. We also would like to codify our infrastructure so that we can get predictable and simple deploys.
Thank you to all the open source contributors without their contributions hosting this CTF would not have been possible.
If you’re interested in working on solving tough security challenges while also creating an open financial system, please join us!
This website contains links to third-party websites or other content for information purposes only (“Third-Party Sites”). The Third-Party Sites are not under the control of Coinbase, Inc., and its affiliates (“Coinbase”), and Coinbase is not responsible for the content of any Third-Party Site, including without limitation any link contained in a Third-Party Site, or any changes or updates to a Third-Party Site. Coinbase is not responsible for webcasting or any other form of transmission received from any Third-Party Site. Coinbase is providing these links to you only as a convenience, and the inclusion of any link does not imply endorsement, approval or recommendation by Coinbase of the site or any association with its operators.
All images provided herein are by Coinbase.
How the Coinbase Security team deployed CTFd to Power our First Capture the Flag contest at Defcon… was originally published in The Coinbase Blog on Medium, where people are continuing the conversation by highlighting and responding to this story.
from Money 101 https://blog.coinbase.com/how-the-coinbase-security-team-deployed-ctfd-to-power-our-first-capture-the-flag-contest-at-defcon-eeb8da3bf2b0?source=rss----c114225aeaf7---4 via http://www.rssmix.com/
0 notes
Text
Creating A Shopping Cart With HTML5 Web Storage
Creating A Shopping Cart With HTML5 Web Storage
Matt Zand
2019-08-26T14:30:59+02:002019-08-26T13:06:56+00:00
With the advent of HTML5, many sites were able to replace JavaScript plugin and codes with simple more efficient HTML codes such as audio, video, geolocation, etc. HTML5 tags made the job of developers much easier while enhancing page load time and site performance. In particular, HTML5 web storage was a game changer as they allow users’ browsers to store user data without using a server. So the creation of web storage, allowed front-end developers to accomplish more on their website without knowing or using server-side coding or database.
Online e-commerce websites predominantly use server-side languages such as PHP to store users’ data and pass them from one page to another. Using JavaScript back-end frameworks such as Node.js, we can achieve the same goal. However, in this tutorial, we’ll show you step by step how to build a shopping cart with HTML5 and some minor JavaScript code. Other uses of the techniques in this tutorial would be to store user preferences, the user’s favorite content, wish lists, and user settings like name and password on websites and native mobile apps without using a database.
Many high-traffic websites rely on complex techniques such as server clustering, DNS load balancers, client-side and server-side caching, distributed databases, and microservices to optimize performance and availability. Indeed, the major challenge for dynamic websites is to fetch data from a database and use a server-side language such as PHP to process them. However, remote database storage should be used only for essential website content, such as articles and user credentials. Features such as user preferences can be stored in the user’s browser, similar to cookies. Likewise, when you build a native mobile app, you can use HTML5 web storage in conjunction with a local database to increase the speed of your app. Thus, as front-end developers, we need to explore ways in which we can exploit the power of HTML5 web storage in our applications in the early stages of development.
I have been a part of a team developing a large-scale social website, and we used HTML5 web storage heavily. For instance, when a user logs in, we store the hashed user ID in an HTML5 session and use it to authenticate the user on protected pages. We also use this feature to store all new push notifications — such as new chat messages, website messages, and new feeds — and pass them from one page to another. When a social website gets high traffic, total reliance on the server for load balancing might not work, so you have to identify tasks and data that can be handled by the user’s browser instead of your servers.
Project Background
A shopping cart allows a website’s visitor to view product pages and add items to their basket. The visitor can review all of their items and update their basket (such as to add or remove items). To achieve this, the website needs to store the visitor’s data and pass them from one page to another, until the visitor goes to the checkout page and makes a purchase. Storing data can be done via a server-side language or a client-side one. With a server-side language, the server bears the weight of the data storage, whereas with a client-side language, the visitor’s computer (desktop, tablet or smartphone) stores and processes the data. Each approach has its pros and cons. In this tutorial, we’ll focus on a simple client-side approach, based on HTML5 and JavaScript.
Note: In order to be able to follow this tutorial, basic knowledge of HTML5, CSS and JavaScript is required.
Project Files
Click here to download the project’s source files. You can see a live demo, too.
Overview Of HTML5 Web Storage
HTML5 web storage allows web applications to store values locally in the browser that can survive the browser session, just like cookies. Unlike cookies that need to be sent with every HTTP request, web storage data is never transferred to the server; thus, web storage outperforms cookies in web performance. Furthermore, cookies allow you to store only 4 KB of data per domain, whereas web storage allows at least 5 MB per domain. Web storage works like a simple array, mapping keys to values, and they have two types:
Session storage This stores data in one browser session, where it becomes available until the browser or browser tab is closed. Popup windows opened from the same window can see session storage, and so can iframes inside the same window. However, multiple windows from the same origin (URL) cannot see each other’s session storage.
Local storage This stores data in the web browser with no expiration date. The data is available to all windows with the same origin (domain), even when the browser or browser tabs are reopened or closed.
Both storage types are currently supported in all major web browsers. Keep in mind that you cannot pass storage data from one browser to another, even if both browsers are visiting the same domain.
Build A Basic Shopping Cart
To build our shopping cart, we first create an HTML page with a simple cart to show items, and a simple form to add or edit the basket. Then, we add HTML web storage to it, followed by JavaScript coding. Although we are using HTML5 local storage tags, all steps are identical to those of HTML5 session storage and can be applied to HTML5 session storage tags. Lastly, we’ll go over some jQuery code, as an alternative to JavaScript code, for those interested in using jQuery.
Add HTML5 Local Storage To Shopping Cart
Our HTML page is a basic page, with tags for external JavaScript and CSS referenced in the head.
<!DOCTYPE HTML> <html lang="en-US"> <head> <title>HTML5 Local Storage Project</title> <META charset="UTF-8"> <META name="viewport" content="width=device-width, initial-scale=1, shrink-to-fit=no"> <META NAME='rating' CONTENT='General' /> <META NAME='expires' CONTENT='never' /> <META NAME='language' CONTENT='English, EN' /> <META name="description" content="shopping cart project with HTML5 and JavaScript"> <META name="keywords" content="HTML5,CSS,JavaScript, html5 session storage, html5 local storage"> <META name="author" content="dcwebmakers.com"> <script src="Storage.js"></script> <link rel="stylesheet" href="StorageStyle.css"> </head>
Below is the HTML content for the page’s body:
<form name=ShoppingList> <div id="main"> <table> <tr> <td><b>Item:</b><input type=text name=name></td> <td><b>Quantity:</b><input type=text name=data></td> </tr> <tr> <td> <input type=button value="Save" onclick="SaveItem()"> <input type=button value="Update" onclick="ModifyItem()"> <input type=button value="Delete" onclick="RemoveItem()"> </td> </tr> </table> </div> <div id="items_table"> <h3>Shopping List</h3> <table id=list></table> <p> <label><input type=button value="Clear" onclick="ClearAll()"> <i>* Delete all items</i></label> </p> </div> </form>
Adding JavaScript To The Shopping Cart
We’ll create and call the JavaScript function doShowAll() in the onload() event to check for browser support and to dynamically create the table that shows the storage name-value pair.
<body onload="doShowAll()">
Alternatively, you can use the JavaScript onload event by adding this to the JavaScript code:
window.load=doShowAll();
Or use this for jQuery:
$( window ).load(function() { doShowAll(); });
In the CheckBrowser() function, we would like to check whether the browser supports HTML5 storage. Note that this step might not be required because most modern web browsers support it.
/* =====> Checking browser support. //This step might not be required because most modern browsers do support HTML5. */ //Function below might be redundant. function CheckBrowser() { if ('localStorage' in window && window['localStorage'] !== null) { // We can use localStorage object to store data. return true; } else { return false; } }
Inside the doShowAll(), if the CheckBrowser() function evaluates first for browser support, then it will dynamically create the table for the shopping list during page load. You can iterate the keys (property names) of the key-value pairs stored in local storage inside a JavaScript loop, as shown below. Based on the storage value, this method populates the table dynamically to show the key-value pair stored in local storage.
// Dynamically populate the table with shopping list items. //Step below can be done via PHP and AJAX, too. function doShowAll() { if (CheckBrowser()) { var key = ""; var list = "<tr><th>Item</th><th>Value</th></tr>\n"; var i = 0; //For a more advanced feature, you can set a cap on max items in the cart. for (i = 0; i <= localStorage.length-1; i++) { key = localStorage.key(i); list += "<tr><td>" + key + "</td>\n<td>" + localStorage.getItem(key) + "</td></tr>\n"; } //If no item exists in the cart. if (list == "<tr><th>Item</th><th>Value</th></tr>\n") { list += "<tr><td><i>empty</i></td>\n<td><i>empty</i></td></tr>\n"; } //Bind the data to HTML table. //You can use jQuery, too. document.getElementById('list').innerHTML = list; } else { alert('Cannot save shopping list as your browser does not support HTML 5'); } }
Note: Either you or your framework will have a preferred method of creating new DOM nodes. To keep things clear and focused, our example uses .innerHTML even though we’d normally avoid that in production code.
Tip: If you’d like to use jQuery to bind data, you can just replace document.getElementById('list').innerHTML = list; with $(‘#list’).html()=list;.
Run And Test The Shopping Cart
In the previous two sections, we added code to the HTML head, and we added HTML to the shopping cart form and basket. We also created a JavaScript function to check for browser support and to populate the basket with the items in the cart. In populating the basket items, the JavaScript fetches values from HTML web storage, instead of a database. In this part, we’ll show you how the data are inserted into the HTML5 storage engine. That is, we’ll use HTML5 local storage in conjunction with JavaScript to insert new items to the shopping cart, as well as edit an existing item in the cart.
Note: I’ve added tips sections below to show jQuery code, as an alternative to the JavaScript ones.
We’ll create a separate HTML div element to capture user input and submission. We’ll attach the corresponding JavaScript function in the onClick event for the buttons.
<input type="button" value="Save" onclick="SaveItem()"> <input type="button" value="Update" onclick="ModifyItem()"> <input type="button" value="Delete" onclick="RemoveItem()">
You can set properties on the localStorage object similar to a normal JavaScript object. Here is an example of how we can set the local storage property myProperty to the value myValue:
localStorage.myProperty="myValue";
You can delete local storage property like this:
delete localStorage.myProperty;
Alternately, you can use the following methods to access local storage:
localStorage.setItem('propertyName','value'); localStorage.getItem('propertyName'); localStorage.removeItem('propertyName');
To save the key-value pair, get the value of the corresponding JavaScript object and call the setItem method:
function SaveItem() { var name = document.forms.ShoppingList.name.value; var data = document.forms.ShoppingList.data.value; localStorage.setItem(name, data); doShowAll(); }
Below is the jQuery alternative for the SaveItem function. First, add an ID to the form inputs:
<td><b>Item:</b><input type=text name="name" id="name"></td> <td><b>Quantity:</b><input type=text name="data" id="data"></td>
Then, select the form inputs by ID, and get their values. As you can see below, it is much simpler than JavaScript:
function SaveItem() { var name = $("#name").val(); var data = $("#data").val(); localStorage.setItem(name, data); doShowAll(); }
To update an item in the shopping cart, you have to first check whether that item’s key already exists in local storage, and then update its value, as shown below:
//Change an existing key-value in HTML5 storage. function ModifyItem() { var name1 = document.forms.ShoppingList.name.value; var data1 = document.forms.ShoppingList.data.value; //check if name1 is already exists //Check if key exists. if (localStorage.getItem(name1) !=null) { //update localStorage.setItem(name1,data1); document.forms.ShoppingList.data.value = localStorage.getItem(name1); } doShowAll(); }
Below shows the jQuery alternative.
function ModifyItem() { var name1 = $("#name").val(); var data1 = $("#data").val(); //Check if name already exists. //Check if key exists. if (localStorage.getItem(name1) !=null) { //update localStorage.setItem(name1,data1); var new_info=localStorage.getItem(name1); $("#data").val(new_info); } doShowAll(); }
We will use the removeItem method to delete an item from storage.
function RemoveItem() { var name=document.forms.ShoppingList.name.value; document.forms.ShoppingList.data.value=localStorage.removeItem(name); doShowAll(); }
Tip: Similar to the previous two functions, you can use jQuery selectors in the RemoveItem function.
There is another method for local storage that allows you to clear the entire local storage. We call the ClearAll() function in the onClick event of the “Clear” button:
<input type="button" value="Clear" onclick="ClearAll()">
We use the clear method to clear the local storage, as shown below:
function ClearAll() { localStorage.clear(); doShowAll(); }
Session Storage
The sessionStorage object works in the same way as localStorage. You can replace the above example with the sessionStorage object to expire the data after one session. Once the user closes the browser window, the storage will be cleared. In short, the APIs for localStorage and sessionStorage are identical, allowing you to use the following methods:
setItem(key, value)
getItem(key)
removeItem(key)
clear()
key(index)
length
Shopping Carts With Arrays And Objects
Because HTML5 web storage only supports single name-value storage, you have to use JSON or another method to convert your arrays or objects into a single string. You might need an array or object if you have a category and subcategories of items, or if you have a shopping cart with multiple data, like customer info, item info, etc. You just need to implode your array or object items into a string to store them in web storage, and then explode (or split) them back to an array to show them on another page. Let’s go through a basic example of a shopping cart that has three sets of info: customer info, item info and custom mailing address. First, we use JSON.stringify to convert the object into a string. Then, we use JSON.parse to reverse it back.
Hint: Keep in mind that the key-name should be unique for each domain.
//Customer info //You can use array in addition to object. var obj1 = { firstname: "John", lastname: "thomson" }; var cust = JSON.stringify(obj1); //Mailing info var obj2 = { state: "VA", city: "Arlington" }; var mail = JSON.stringify(obj2); //Item info var obj3 = { item: "milk", quantity: 2 }; var basket = JSON.stringify(obj3); //Next, push three strings into key-value of HTML5 storage. //Use JSON parse function below to convert string back into object or array. var New_cust=JSON.parse(cust);
Summary
In this tutorial, we have learned how to build a shopping cart step by step using HTML5 web storage and JavaScript. We’ve seen how to use jQuery as an alternative to JavaScript. We’ve also discussed JSON functions like stringify and parse to handle arrays and objects in a shopping cart. You can build on this tutorial by adding more features, like adding product categories and subcategories while storing data in a JavaScript multi-dimensional array. Moreover, you can replace the whole JavaScript code with jQuery.
We’ve seen what other things developers can accomplish with HTML5 web storage and what other features they can add to their websites. For example, you can use this tutorial to store user preferences, favorited content, wish lists, and user settings like names and passwords on websites and native mobile apps, without using a database.
To conclude, here are a few issues to consider when implementing HTML5 web storage:
Some users might have privacy settings that prevent the browser from storing data.
Some users might use their browser in incognito mode.
Be aware of a few security issues, like DNS spoofing attacks, cross-directory attacks, and sensitive data compromise.
Related Reading
“Browser Storage Limits And Eviction Criteria,” MDN web docs, Mozilla
“Web Storage,” HTML Living Standard,
“This Week In HTML 5,” The WHATWG Blog

(dm, il)
0 notes
Text
Red Hat OpenShift 4.1 ghetto setup
I recently reviewed the AWS preview of Red Hat OpenShift 4.0 in this blog post. Now, the time has come to install OpenShift 4.1 on what is called User Provided Infrastructure (UPI). Unlike Installer Provided Infrastructure (IPI), you have to jump through a few hoops to get your environment pristine enough to eventually install OpenShift. This blog post captures some of the undocumented “features” and how you easily can get it rolling in a lab environment to start kicking the tires. By no means should you use these steps to build a production environment, although some hints here might actually help you along the way for a production setup.
Just to be clear, these are the two Red Hat docs I’m following to get a running OpenShift cluster:
Installing OpenShift 4.1 on bare-metal
Adding RHEL compute nodes
Note: If Google landed you here. Please note that this post was written 6/28/19 for OpenShift 4.1. Any references to the OpenShift documentation mentioned below may be completely inaccurate by the time you read this.
Bare or not, that is the question
While I’m installing on KVM virtual machines, I’ve followed the "bare-metal” procedures found in the docs. They are somewhat semantically difference on how you boot the Red Hat CoreOS installer which can be done in multiple ways, either by injecting the ��append’ line in the machine XML declaration, PXE or simply by manually booting the ISO. I leave this detail up to the discretion of the reader as it’s fairly out-of-scope and unique to everyone's setup.
The upfront DNS and LB requirements
I’m sitting on a lab network where I have zero control over DNS or DHCP. Whatever hostname gets put into the DHCP request gets registered in DNS. Given that OpenShift uses wildcard based DNS for all frontend traffic and the new paradigm of installing require a bunch of SRV and A records to the etcd servers in a dedicated sub-domain, I was faced with a challenge.
Since the network admins (and I’m too lazy) can’t have “marketing” hosting DNS zones in the lab, I have to outsmart them with my laziness. I’m a customer of Route 53 on AWS, said and done, I setup the necessary records in a ‘openshift’ subdomain of datamattsson.io. This way, the lab DNS servers will simply forward the queries to the external domain. Lo and behold, it worked just fine!
The next baffle is that you need to have a load-balancer installed (Update: DNS RR works for test and lab setups too according to this red hatter) upfront before you even start installing the cluster. A self-hosted LB is not an option. I started my quest to try find an LB that is as simple and dumb as I need it to be. Single binary, single config-file dumb. I found this excellent blog post that lists some popular projects in this space.
I went with gobetween.io (Number #10 on the list) as they had me at Hello: "gobetween is free, open-source, modern & minimalistic L4 load balancer and reverse proxy for the Cloud era". The config file is written in TOML, this is the tail section of the config example file the gobetween binary ships with:
# Local config [servers] # ---------- tcp example ----------- # [servers.api] protocol = "tcp" bind = "0.0.0.0:6443" [servers.api.discovery] kind = "static" static_list = [ #"10.21.199.167:6443", "10.21.199.140:6443", "10.21.199.139:6443", "10.21.199.138:6443" ] [servers.mcs] protocol = "tcp" bind = "0.0.0.0:22623" [servers.mcs.discovery] kind = "static" static_list = [ #"10.21.199.167:22623", "10.21.199.140:22623", "10.21.199.139:22623", "10.21.199.138:22623" ] [servers.http] protocol = "tcp" bind = "0.0.0.0:80" [servers.http.discovery] kind = "static" static_list = [ "10.21.199.60:80", "10.21.198.158:80" ] [servers.https] protocol = "tcp" bind = "0.0.0.0:443" [servers.https.discovery] kind = "static" static_list = [ "10.21.199.60:443", "10.21.198.158:443" ]
The first line-item of “api” and “mcs” is commented out as it’s the node required to bootstrap the control-plane nodes, once that step is done, it should be removed from rotation.
Running the LB in the foreground:
gobetween -c config.toml
Do note that GoBetween supports a number of different healthchecks, I opted out to experiment with those, but I would assume in a live scenario, you want to make sure health checks works.
3.. 2.. 1.. Ignition!
OpenShift is no longer installed using Ansible. It has it’s own openshift-install tool to help generate ignition configs. I’m not an expert on this topic what so ever (a caution). I’ve dabbled with matchbox/ignition pre-Red Hat era and it’s safe to say that Red Hat CoreOS is NOT CoreOS. The two have started to diverge and documentation you read on coreos.com doesn’t map 1:1. My only observation on this topic is that Red Hat CoreOS is just means to run OpenShift, that’s it. Just as a FYI, there is a Fedora CoreOS project setup for the inclined to dive deeper.
Initially you need to setup a install-config.yaml and here’s your first pro-tip. The openshift-install program will literally consume it. It validates it and produces the outputs and later deletes it. My advice is to copy this file outside of the install-dir directory structure to easily restart the ordeal from scratch.
This is my example install-config.yaml with the pull secret and ssh key redacted:
apiVersion: v1 baseDomain: datamattsson.io compute: - hyperthreading: Enabled name: worker replicas: 0 controlPlane: hyperthreading: Enabled name: master replicas: 3 metadata: name: openshift networking: clusterNetworks: - cidr: 10.128.0.0/14 hostPrefix: 23 networkType: OpenShiftSDN serviceNetwork: - 172.30.0.0/16 platform: none: {} pullSecret: 'foobar' sshKey: 'foobar'
Hint: Your pull secret is hidden here.
Consume the install-config.yaml file:
$ openshift-install create ignition-configs --dir=.
This is will result in a directory structure like this:
. ├── auth │ ├── kubeadmin-password │ └── kubeconfig ├── bootstrap.ign ├── master.ign ├── metadata.json └── worker.ign
The .ign files are JSON files. Somewhat obscured without line breaks and indentation. Now, my fundamental problem I had when I booted up the bootstrap node and masters on my first lap, all came up with localhost.localdomain as the hostname. If anyone have attempted installing a Kubernetes cluster with identical hostnames, you know it’s going to turn into a salad.
Setting the hostname is quite trivial and a perfectly working example is laid out here. Simply add a “files” entry under .ignition.storage:
"storage": { "files": [ { "filesystem": "root", "path": "/etc/hostname", "mode": 420, "contents": { "source": "data:,tme-lnx2-ocp-e1" } } ] }
Do note that the section where this is stanza is added differs slight from the bootstrap.ign and master.ign files.
Note: I use the nodejs json command (npm install -g json) to humanize JSON files, jq is quite capable too: jq . pull-secret.txt
Potential Issue: I did have an intermittent issue when doing a few iterations that the CNI wouldn’t initialize on the compute nodes. Sometimes a reboot resolved it and sometimes it sat for an hour or so and eventually it would start and the node would become Ready. I filed a support case with Red Hat on this matter. I will update this blog post if I get a resolution back. This is the error message on a node stuck NotReady:
runtime network not ready: NetworkReady=false reason:NetworkPluginNotReady message:Network plugin returns error: cni config uninitialized
Hello World!
At the end of the day, you should have a cluster that resemble this:
$ oc get nodes NAME STATUS ROLES AGE VERSION tme-lnx2-ocp-e1 Ready master 6h19m v1.13.4+9252851b0 tme-lnx3-ocp-e2 Ready master 6h18m v1.13.4+9252851b0 tme-lnx4-ocp-e3 Ready master 6h17m v1.13.4+9252851b0 tme-lnx5-ocp-c1 Ready worker 98m v1.13.4+9b19d73a0 tme-lnx6-ocp-c2 Ready worker 5h4m v1.13.4+9b19d73a0
As Red Hat is switching to a Operator model, all cluster services may now be listed as such:
$ oc get clusteroperators NAME VERSION AVAILABLE PROGRESSING DEGRADED SINCE authentication 4.1.2 True False False 145m cloud-credential 4.1.2 True False False 6h19m cluster-autoscaler 4.1.2 True False False 6h19m console 4.1.2 True False False 147m dns 4.1.2 True False False 4h42m image-registry 4.1.2 True False False 172m ingress 4.1.2 True False False 149m kube-apiserver 4.1.2 True False False 6h17m kube-controller-manager 4.1.2 True False False 6h16m kube-scheduler 4.1.2 True False False 6h16m machine-api 4.1.2 True False False 6h19m machine-config 4.1.2 False False True 3h18m marketplace 4.1.2 True False False 6h14m monitoring 4.1.2 True False False 111m network 4.1.2 True True False 6h19m node-tuning 4.1.2 True False False 6h15m openshift-apiserver 4.1.2 True False False 4h42m openshift-controller-manager 4.1.2 True False False 4h42m openshift-samples 4.1.2 True False False 6h operator-lifecycle-manager 4.1.2 True False False 6h18m operator-lifecycle-manager-catalog 4.1.2 True False False 6h18m service-ca 4.1.2 True False False 6h18m service-catalog-apiserver 4.1.2 True False False 6h15m service-catalog-controller-manager 4.1.2 True False False 6h15m storage 4.1.2 True False False 6h15m
The password for the user that got created during install can be found in the auth subdirectory in the install-dir. It lets you login via oc login and also gives you access to the web console. The most obvious URL for the console is, in my case, https://console-openshift-console.apps.openshift.datamattsson.io

Now, let’s deploy some workloads on this Red Hat OpenShift 4.1 Ghetto Setup! Watch this space.
0 notes
Text
ESP32 Tutorial Arduino web server: 14. Sending data to JavaScript client via websocket
Introduction
In this tutorial we will check how to setup a HTTP web server on the ESP32, which will have a websocket endpoint and will serve a HTML page. The HTML page will run a simple JavaScript application that will connect to the server using websockets and periodically receive simulated temperature measurements from the server.
For simplicity, we will assume that only one client can be connected at most at each time, so we don’t need to deal with multiple connections.
We will also simplify the periodic sending of data to the client by taking advantage of the Arduino main loop and some delays. Nonetheless, a more robust and scalable implementation can be achieved using timer interrutps and semaphores to synchronize with a dedicated FreeRTOS task responsible for handling the sending of data.
In order to avoid dealing with big code strings and escaping characters, we will serve the HTML file from the ESP32 SPIFFS file system. For a tutorial on how to serve HTML from the file system, please check here.
We will be assuming the use of the Arduino IDE plugin that allows to upload data to the ESP32 SPIFFS file system. You can check in this tutorial how to use it. I’m assuming the HTML file that will be served is called ws.html, which means its full path on the ESP32 file system will be “/ws.html“. You can use other name if you want, as long as you set the correct path when developing the Arduino core, which we will analyze in detail below.
Also, to keep the HTML code simple, please take in consideration that we won’t be following all the best practices. Naturally, in a final application, you should take them in consideration.
The tests from this tutorial were performed using a DFRobot’s ESP32 module integrated in a ESP32 development board.
The HTML and JavaScript code
Our code will have two main sections: the head, where we will place the JavaScript code, and the body, which will have a HTML element to display the measurements.
In terms of JavaScript, we will start our code by instantiating an object of class WebSocket, which receives as input the complete websocket endpoint from our server.
If you don’t know the IP address of your ESP32 on your network, please run the Arduino code below and use the IP address that gets printed to the serial port when the device finishes connecting to the WiFi network.
If you want a more optimized approach and don’t want to depend on a hardcoded IP address, you can explore the template processingfeatures of the HTTP async web server libraries in order to set this value at run time, when serving the page. Alternatively, you can use the mDNS features for domain name resolution.
Additionally, as can be seen in the code below, we are assuming that the websocket endpoint will be “/ws”, as we will configure later in the Arduino code. From this point onward, we will deal with websocket events, which means configuring callback functions that will handle those events.
var ws = new WebSocket("ws://192.168.1.78/ws");
So, now that we have initialized the websocket, we need to setup a handling function for the connection established event. In this example, we will simply open an alert message so the user knows that the connection to the server was completed.
We setup the handling function by assigning a function to the onopen property of our WebSocket object, as shown below. Then, in the implementation of the handling function, we display our message to the user using the alert method of the window object, passing as input the message to display.
ws.onopen = function() { window.alert("Connected"); };
Finally, we will need to setup the handling function that will be executed when a message received event occurs. We set this handling function by assigning a function to the onmessage property of the WebSocket object.
Note that this handling function receives as input a parameter that we will use to access the data. We will call this parameter evt.
Inside the handling function, we will simply update the text of the HTML element that will show to the user the last temperature received. We are assuming there will be an element with an ID equal do “display“, as we will see in the final HTML code.
So, we use the getElementById method of the document object and update its inner HTML with the new measurement.
As mentioned, we will have access to a parameter we called evt, which is passed to our handling function. This will be an object of class MessageEvent, which has a property called data that contains the data sent by the server.
We will use the value received to concatenate with some strings and build the final text to display to the user.
ws.onmessage = function(evt) { document.getElementById("display").innerHTML = "temperature: " + evt.data + " C"; };
You can check below the full HTML code containing the JavaScript and the mentioned element with ID equal to “display”. It will be a simple paragraph since we are not focusing on design. That paragraph will start with a default “not connected” message, to be later substituted by the temperature message.
<!DOCTYPE html> <html> <head> <script type = "text/javascript"> var ws = new WebSocket("ws://192.168.1.78/ws"); ws.onopen = function() { window.alert("Connected"); }; ws.onmessage = function(evt) { document.getElementById("display").innerHTML = "temperature: " + evt.data + " C"; }; </script> </head> <body> <div> <p id = "display">Not connected</p> </div> </body> </html>
After finishing this code, we should upload it to the ESP32 file system using the Arduino IDE plugin, as already mentioned in the introductory section.
Arduino code
Includes and global variables
As usual, we will start the code by the needed library includes. We need the WiFi.h library to be able to connect the ESP32 to a WiFi network, the ESPAsyncWebServer.h to setup the HTTP server and the SPIFFS.h to be able to serve files from the file system (our HTML will be stored in the ESP32 SPIFFS file system).
We will also need the credentials of the WiFi network, more precisely the network name and password, so the ESP32 can connect to it.
In order to setup the server and the websocket endpoint, we will need an object of class AsyncWebServer and AsyncWebSocket, respectively.
As covered in the previous tutorials, the constructor of the AsyncWebServer class receives as input the port where the server will be listening and the constructor of the AsyncWebSocket class receives a string with the websocket endpoint. So, accordingly to the code below, our server will be listening on port 80 and we will have a websocket endpoint on “/ws“.
#include "WiFi.h" #include "SPIFFS.h" #include "ESPAsyncWebServer.h" const char* ssid = "yourNetwornName"; const char* password = "yourPassword"; AsyncWebServer server(80); AsyncWebSocket ws("/ws");
Additionally, since we are going to need to access the client object to periodically send it some data, we will declare a pointer to an object of class AsyncWebSocketClient.
As explained in more detail on this previous tutorial, the websocket events handling function will receive a pointer to an object of this class when an event occurs. In order to send data back to the client, we need to use that object pointer.
So, what we will do later on the websocket handling function is storing that pointer in this global variable, so we can send data to the client from outside the event handling function.
For now, when the program starts, we know that no client is connected, so we will initialize the global pointer explicitly as NULL. As long as it is NULL, we know that no client is connected and that we should not try to send data.
AsyncWebSocketClient * globalClient = NULL;
The setup
In the setup function we will take care of all the initialization that needs to be performed before the web server starts working properly. We start by opening a serial connection, initializing the SPIFFS file system and then connecting the ESP32 to a WiFi network.
Serial.begin(115200); if(!SPIFFS.begin()){ Serial.println("An Error has occurred while mounting SPIFFS"); return; } WiFi.begin(ssid, password); while (WiFi.status() != WL_CONNECTED) { delay(1000); Serial.println("Connecting to WiFi.."); } Serial.println(WiFi.localIP());
After that, we will bind the websocket endpoint to the corresponding handling function (we will analyze the function implementation below) and register the websocket object on the HTTP web server.
ws.onEvent(onWsEvent); server.addHandler(&ws);
Then, we will declare the route that will be serving the HTML with the websocket code. We will call the endpoint “/html” and listen only to incoming HTTP GET requests.
As explained in detail here, in order to serve the HTML back to the client as response to the request, we need to call the send method AsyncWebServerRequest object, passing as input the SPIFFS variable (which will be used under the hood to interact with the file system), the complete path to the HTML file on the ESP32 file system (as we have seen in the introductory section, the file was named “ws.html” and will be on the root folder) and the content-type (it will be “text/html” since we are going to serve a HTML page).
server.on("/html", HTTP_GET, [](AsyncWebServerRequest *request){ request->send(SPIFFS, "/ws.html", "text/html"); });
To finalize, we need to call the begin method on our server object, so it starts listening to HTTP requests. The final setup function is shown below and already includes this method call.
void setup(){ Serial.begin(115200); if(!SPIFFS.begin()){ Serial.println("An Error has occurred while mounting SPIFFS"); return; } WiFi.begin(ssid, password); while (WiFi.status() != WL_CONNECTED) { delay(1000); Serial.println("Connecting to WiFi.."); } Serial.println(WiFi.localIP()); ws.onEvent(onWsEvent); server.addHandler(&ws); server.on("/html", HTTP_GET, [](AsyncWebServerRequest *request){ request->send(SPIFFS, "/ws.html", "text/html"); }); server.begin(); }
The websocket events handling function
In this tutorial, we assume that the ESP32 is not going to receive any data but rather sending it periodically to the client. So, we will only listen to the client connection and disconnection events. For simplicity, we will assume that no more than one client will be connected at each time.
So, our handling function will be very simple. When a connection event is detected, we will receive as one of the inputs of the handling function the pointer to the client object (it will be an object of class AsyncWebSocketClient, as already mentioned).
So, we will assign that value to the global AsyncWebSocketClient pointer we have declared previously, so we can later send data to the client, outside the scope of this websocket event callback function.
In case we detect a disconnection event, then we should no longer try to send data to the client, so we will set the global pointer back to NULL.
The full handling function can be seen below. It includes some extra prints so we can get a message in the Arduino serial monitor when the events occur, making it easier to debug eventual problems.
void onWsEvent(AsyncWebSocket * server, AsyncWebSocketClient * client, AwsEventType type, void * arg, uint8_t *data, size_t len){ if(type == WS_EVT_CONNECT){ Serial.println("Websocket client connection received"); globalClient = client; } else if(type == WS_EVT_DISCONNECT){ Serial.println("Websocket client connection finished"); globalClient = NULL; } }
If you want to know more about the signature that this handling function needs to follow, please check this previous tutorial.
The Arduino main loop
We will make use of the Arduino main loop to send data periodically to the client, when a connection exists. Please note that this is not the most optimized approach since we are going to periodically poll the global pointer to check if a client is available. Also, we are going use the Arduino delay function to wait between the iterations of the loop.
For a more optimized alternative, we could have used timer interrupts, semaphores and a dedicated FreeRTOS task. Nonetheless, in order to focus on the websocket communication, we are following the simplest approach.
So, in our main loop, we will check if the global client pointer is different from NULL. Additionally, as a safeguard, we will also call the status method and check if the client is connected by comparing the returned value with the WS_CONNECTED enumerated value.
if(globalClient != NULL && globalClient->status() == WS_CONNECTED){ // Sending data to client }
If both conditions are met, it means the client is connected and we can send data to it. Since we are not using any real sensor and only simulating the interaction, we will returning a random number between 0 and 20 to the client, simulating a possible temperature reading. Please check here more about random number generation on the ESP32.
To send the data to the client, we need to convert it to a string and then call the text method on our AsyncWebSocketClient object. Since we have a pointer to the object, we need to use the -> operator.
String randomNumber = String(random(0,20)); globalClient->text(randomNumber);
After that, we will do a 4 seconds delay. You can try to use other values if you want to change the refreshing rate in the HTML page. You can check the full loop function below.
void loop(){ if(globalClient != NULL && globalClient->status() == WS_CONNECTED){ String randomNumber = String(random(0,20)); globalClient->text(randomNumber); } delay(4000); }
The full Arduino code
The final Arduino code can be seen below.
#include "WiFi.h" #include "SPIFFS.h" #include "ESPAsyncWebServer.h" const char* ssid = "yourNetworkName"; const char* password = "yourPassword"; AsyncWebServer server(80); AsyncWebSocket ws("/ws"); AsyncWebSocketClient * globalClient = NULL; void onWsEvent(AsyncWebSocket * server, AsyncWebSocketClient * client, AwsEventType type, void * arg, uint8_t *data, size_t len){ if(type == WS_EVT_CONNECT){ Serial.println("Websocket client connection received"); globalClient = client; } else if(type == WS_EVT_DISCONNECT){ Serial.println("Websocket client connection finished"); globalClient = NULL; } } void setup(){ Serial.begin(115200); if(!SPIFFS.begin()){ Serial.println("An Error has occurred while mounting SPIFFS"); return; } WiFi.begin(ssid, password); while (WiFi.status() != WL_CONNECTED) { delay(1000); Serial.println("Connecting to WiFi.."); } Serial.println(WiFi.localIP()); ws.onEvent(onWsEvent); server.addHandler(&ws); server.on("/html", HTTP_GET, [](AsyncWebServerRequest *request){ request->send(SPIFFS, "/ws.html", "text/html"); }); server.begin(); } void loop(){ if(globalClient != NULL && globalClient->status() == WS_CONNECTED){ String randomNumber = String(random(0,20)); globalClient->text(randomNumber); } delay(4000); }
Testing the code
Assuming that you have already uploaded the HTML file to the ESP32 file system, simply compile and upload the Arduino code to your device.
Once it finishes, open the Arduino IDE serial monitor and wait for the connection to the WiFi network. When it is done, copy the IP address that gets printed. Then, open a web browser of your choice and write the following on the address bar, changing #yourIP# for the IP you have just copied
http://#yourIP#/html
You should get to the HTML page we have been developing and after a while, it should show an alert indicating the connection to the server was established. After that, as shown in figure 1, it should periodically update the temperature with the random values returned by the server.

Figure 1 – HTML page with the temperature messages.
0 notes
Text
Where Is Config.Php Nextcloud
When Phpize Command Not Found Github
When Phpize Command Not Found Github People to spend the token economics when the customer can use to create your little or no idea about how much more likely to be caused so many domains to undertaking 5, add an azure stack community facilities. Mas-ca01certificate authority over the operating methods with your company. Ultrahosting is a half little did i know, i know. I know what a word means if people think that google reader could’ve been more a success if google drive storage. 199. You can easily create more and more reliable than others. Our digital host with self signed certificate. Import the customer cert into a last full color film,.
Will Cra Email You
Loose huge leverage with your guests will always event most excellent functionality for virtualization of servers will require a solid firewall and anti-virus program can be shared with anyone in the upper the variety of internet sites around where which you can post instantly even before the launch it before i go, differently blotting your copybook. Even though is a partitioned one, used sparingly note that it also optimize your site for the first few businesses dealing in conjunction with your hosting. Do check that the service you use your social media credentials.
Symfony Php
These or other oma-uri settings in order that your web domain name 1. Select the sign into your godaddy account and provided them with in-depth and backup solution. Unless you are larger, but table data are a way to feel safe to say that the majority designers should keep in mind is vital to find a reliable as feasible. If you actually anything else that touches on the rest in regards to the queued & executing an application for every page rank deal that has a model, and one could be homesick for food from her own web server and gains extra clients, specifically for brand spanking new concept, so you could find.
How Host Definition Kafka
My search engine scores in case you’re using servers on the jit, the .AMx plugins are all going to fight to administer an increasing number of essentially the most inexpensive ways to allocate memory. Ora-09753 spwat invalid semaphore set id. Ora-07227 rtneco unable to set noecho mode. Click on the test client it binds the source port on the split data module and its configurable houses when balanced against the ability of the directories on the remote desktop connection it’s used for storage spaces direct.A garage configurationssnap writer supports software plug-ins can be found throughout the snap author neighborhood. Now you’re in reality the instruments that are probably the most essentials despite the fact that they mistype it. This is the second a part of their physical location to the server start batch .CMd gets busy visualize a collection of.
The post Where Is Config.Php Nextcloud appeared first on Quick Click Hosting.
from Quick Click Hosting https://quickclickhosting.com/where-is-config-php-nextcloud-2/
0 notes
Text
Ajax Security Team, 3 Minute Profile

Read more about the Cyber Caliphate at https://artofthehak.com/cyber-caliphate/ Read more about Information Warfare at https://artofthehak.com/information-w... QUESTION — What content would you like to see on our website and YouTube channel? Post in comments section of this video! The Ajax group began in 2010 with website defacement attacks, but their activity escalated to cyber espionage by 2013. The group’s C&C infrastructure was set to Iran Standard Time and used the Persian language. The Ajax team consists of 5-10 members and it is unclear if the group is part of a larger movement such as the Iranian Cyber Army. The group may have been founded by members using the monikers “HUrr!c4nE!” and “Cair3x.” The Ajax group uses custom malware, but they do not leverage software exploits. The lack of exploits indicates that the group is more likely a patriotic hacktivist group than a state sponsored threat. Ajax group associated name are Ajax team or Ajax Security team, Operation Flying Kitten and Operation Saffron Rose. Ajax group may be part of Iranian Cyber Army, the group primarily targets United States defense contractors, firms that developed technologies that bypassed the Iranian censorship policies, and Iranian dissidents. The group has also participated in attacks against Israel with the Anonymous group. The group tries to lure victims into revealing login credentials or self-installing malware through basic social engineering instead of leveraging software exploits. These social engineering attacks proceed through email, instant messages, private messages on social media, fake login pages, and anti-censorship technology that has been pre-loaded with malware. Past messages have directed targets to a fake login or conference page. The page spoofs a legitimate organization or application and it collects user login credentials. After the user logs in, they are directed to a different page that tells users that their browser is missing a plugin or that they need to install proxy software, which is actually the malware. In some cases, the messages just send the user to the latter page. Iranian Internet Service Providers (ISPs) block “unacceptable content” such as pornography or sources of political dissidence. Ajax team has been infecting anti-censorship software, such as Psiphon and Ultrasurf, with malware and redistributing it. Ajax team relies on the Stealer malware which consists of a backdoor and tools. Using one tool, the attackers can create new backdoors and bind them to legitimate applications. Stealer collects system data, logs keystrokes, grabs screenshots, collects credentials, cookies, plugin information, and bookmarks from major browsers, and collects email and instant messenger information along with any saved conversations. Stealer also has components that acquire Remote Desktop Protocol (RDP) accounts from Windows vault and collects user browsing history. Data is encrypted using symmetric encryption (AES-256) using a hardcoded encryption key. The information is then exfiltrated using FTP with a built in client (AppTransferWiz.dll). A new version of the Stealer malware, dubbed Sayad, surfaced in July 2014. The variant includes a dropper called Binder and new communication modules that allow it to exfiltrate data using HTTP POST requests. Binder checks the .NET runtime version of the target machine and drops the relevant version of the malware. The malware is now more modular and contains development files suggesting the future capability to exfiltrate files from the target system
youtube
0 notes
Link
Learn how Spark 2.3.0+ integrates with K8s clusters on Google Cloud and Azure.
Do you want to try out a new version of Apache Spark without waiting around for the entire release process? Does running alpha-quality software sound like fun? Does setting up a test cluster sound like work? This is the blog post for you, my friend! We will help you deploy code that hasn't even been reviewed yet (if that is the adventure you seek). If you’re a little cautious, reading this might sound like a bad idea, and often it is, but it can be a great way to ensure that a PR really fixes your bug, or the new proposed Spark release doesn’t break anything you depend on (and if it does, you can raise the alarm). This post will help you try out new (2.3.0+) and custom versions of Spark on Google/Azure with Kubernetes. Just don't run this in production without a backup and a very fancy support contract for when things go sideways.
Note: This is a cross-vendor post (Azure's Spark on AKS and Google Cloud's Custom Spark on GKE), each of which have their own vendor-specific posts if that’s more your thing.
Warning: it’s important to make sure your tests don’t destroy your real data, so consider using a sub-account with lesser permissions.
Setting up your version of Spark to run
If there is an off-the-shelf version of Spark you want to run, you can go ahead and download it. If you want to try out a specific patch, you can checkout the pull request to your local machine with git fetch origin pull/ID/head:BRANCHNAME, where ID is the PR number, and then follow the directions to build Spark (remember to include the -P components you want/need, including your cluster manager of choice).
Now that we’ve got Spark built, we will build a container image and upload it to the registry of your choice, like shipping a PXE boot image in the early 90s (bear with me, I miss the 90s).
Depending on which registry you want to use, you’ll need to point both the build tool and spark-submit in the correct location. We can do this with an environment variable—for Docker Hub, this is the name of the registry; for Azure Container Registry (ACR), this value is the ACR login server name; and for Google Container Registry, this is gcr.io/$PROJECTNAME.
export REGISTRY=value
For Google cloud users who want to use the Google-provided Docker registry, you will need to set up Docker to run through gcloud. In the bash shell, you can do this with an alias:
shopt -s expand_aliases && alias docker="gcloud docker --"
For Azure users who want to use Azure Container Registry (ACR), you will need to grant Azure Container Service (AKS) cluster read access to the ACR resource.
For non-Google users, you don’t need to wrap the Docker command, and just skip that step and keep going:
export DOCKER_REPO=$REGISTRY/spark export SPARK_VERSION=`git rev-parse HEAD` ./bin/docker-image-tool.sh -r $DOCKER_REPO -t $SPARK_VERSION build ./bin/docker-image-tool.sh -r $DOCKER_REPO -t $SPARK_VERSION push
Building your Spark project for deployment (or, optionally, starting a new one)
Spark on K8s does not automatically handle pushing JARs to a distributed file system, so we will need to upload whatever JARs our project requires to work. One of the easiest ways to do this is to turn our Spark project into an assembly JAR.
If you’re starting a new project and you have sbt installed, you can use the Spark template project:
sbt new holdenk/sparkProjectTemplate.g8
If you have an existing SBT-based project, you can add the sbt-assembly plugin:
touch project/assembly.sbt echo 'addSbtPlugin("com.eed3si9n" % "sbt-assembly" % "0.14.6")' >> project/assembly.sbt
With SBT, once you have the SBT assembly plugin (either through creating a project with it included in the template or adding it to an existing one), you can produce an assembly JAR by running:
sbt assembly
The resulting JAR not only will have your source code, but all of the requirements as well. Note that this JAR may have multiple entry points, so later on, we’re going to need to tell Spark submit about the entry point we want it to use. For the world standard wordcount example, we might use:
export CLASS_NAME=org.apache.spark.examples.JavaWordCount
If you have a maven or other project, there are a few different options for building assembly JARs. Sometimes, these may be referred to as “fat jars” in the documentation.
If starting a new project sounds like too much work and you really just want to double check that your Spark on K8s deployment works, you can use the example JAR that Spark ships with (e.g., examples/target/spark-examples).
Uploading your JARs
One of the differences between Spark on K8s and Spark in the other cluster managers is that there is no automatic tool to distribute our JARs (or other job dependencies). To make sure your containers have access to your JAR, the fastest option is normally to upload it.
Regardless of platform, we need to specify which JAR, container / bucket, and the target:
export FOLDER_NAME=mybucket export SRCJAR=target/scala-2.11/... export MYJAR=myjar
With Azure:
RESOURCE_GROUP=sparkdemo STORAGE_ACCT=sparkdemo$RANDOM az group create --name $RESOURCE_GROUP --location eastus az storage account create --resource-group $RESOURCE_GROUP --name $STORAGE_ACCT --sku Standard_LRS export AZURE_STORAGE_CONNECTION_STRING=`az storage account show-connection-string --resource-group $RESOURCE_GROUP --name $STORAGE_ACCT -o tsv` az storage container create --name $FOLDER_NAME az storage container set-permission --name $FOLDER_NAME --public-access blob az storage blob upload --container-name $FOLDER_NAME --file $SRCJAR --name $MYJAR
With Google Cloud:
gsutil cp $SRCJAR gs://$JARBUCKETNAME/$MYJAR
For now though, we don’t have the JARs installed to access the GCS or Azure blob storage, and Spark on K8s doesn’t currently support spark-packages, which we could use to access those, so we need to make our JAR accessible over http.
With Azure:
JAR_URL=$(az storage blob url --container-name $FOLDER_NAME --name $MYJAR | tr -d '"')
With Google Cloud:
export PROJECTNAME=boos-demo-projects-are-rad gcloud iam service-accounts create signer --display-name "signer" gcloud projects add-iam-policy-binding $PROJECTNAME --member serviceAccount:signer@$PROJECTNAME.iam.gserviceaccount.com --role roles/storage.objectViewer gcloud iam service-accounts keys create ~/key.json --iam-account signer@$PROJECTNAME.iam.gserviceaccount.com export JAR_URL=`gsutil signurl -m GET ~/key.json gs://$JARBUCKETNAME/$MYJAR | cut -f 4 | tail -n 1`
Starting your cluster
Now you are ready to kick off your super-fancy K8s Spark cluster.
For Azure:
az group create --name mySparkCluster --location eastus az aks create --resource-group mySparkCluster --name mySparkCluster --node-vm-size Standard_D3_v2 az aks get-credentials --resource-group mySparkCluster --name mySparkCluster kubectl proxy &
For Google cloud:
gcloud container clusters create mySparkCluster --zone us-east1-b --project $PROJECTNAME gcloud container clusters get-credentials mySparkCluster --zone us-east1-b --project $PROJECTNAME kubectl proxy &
On Google Cloud, before we kick off our Spark job, we need to make a service account for Spark that will have permission to edit the cluster:
kubectl create serviceaccount spark kubectl create clusterrolebinding spark-role --clusterrole=edit --serviceaccount=default:spark --namespace=default
Running your Spark job
And now we can finally run our Spark job:
./bin/spark-submit --master k8s://http://127.0.0.1:8001 \ --deploy-mode cluster --conf \ spark.kubernetes.container.image=$DOCKER_REPO/spark:$SPARK_VERSION \ --conf spark.executor.instances=1 \ --class $CLASS_NAME \ --conf spark.kubernetes.authenticate.driver.serviceAccountName=spark \ --name wordcount \ $JAR_URL \ inputpath
And we can verify the output with:
kubectl logs [podname-from-spark-submit]
Handling dependencies in Spark K8s (and accessing your data/code without making it public):
What if we want to directly read our JARs from the storage engine without using https? Or if we have dependencies that we don’t want to package in our assembly JARs? In that case, can the necessary dependencies to our docker file as follows:
mkdir /tmp/build && echo “FROM $DOCKER_REPO/spark:$SPARK_VERSION # Manually update Guava deleting the old JAR to ensure we don’t have class path conflicts RUN rm \$SPARK_HOME/jars/guava-14.0.1.jar ADD http://central.maven.org/maven2/com/google/guava/guava/23.0/guava-23.0.jar \$SPARK_HOME/jars # Add the GCS connectors ADD https://storage.googleapis.com/hadoop-lib/gcs/gcs-connector-latest-hadoop2.jar \$SPARK_HOME/jars # Add the Azure Hadoop/Storage JARs ADD http://central.maven.org/maven2/org/apache/hadoop/hadoop-azure/2.7.0/hadoop-azure-2.7.0.jar ADD http://central.maven.org/maven2/com/microsoft/azure/azure-storage/7.0.0/azure-storage-7.0.0.jar ENTRYPOINT [ '/opt/entrypoint.sh' ]” > /tmp/build/dockerfile docker build -t $DOCKER_REPO/spark:$SPARK_VERSION-with-deps -f /tmp/build/dockerfile /tmp/build Push to our registry: docker push $DOCKER_REPO/spark:$SPARK_VERSION-with-deps
For Azure folks wanting to launch using Azure Storage rather than https:
export JAR_URL=wasbs://$FOLDER_NAME@$STORAGE_ACCT.blob.core.windows.net/$MYJAR
For Google folks wanting to launch using GCS rather than https:
export JAR_URL=gs://$JARBUCKETNAME/$MYJAR
And then run the same spark-submit as shown previously.
Wrapping up
Notably, each vendor has a more detailed guide to running Spark jobs on hosted K8s focused on their own platforms (e.g., Azure’s guide, Google’s guide, etc.), but hopefully this cross-vendor version shows you the relative portability between the different hosted K8s engines and our respective APIs with Spark. If you’re interested in helping join in Spark code reviews, you can see the contributing guide and also watch Karau’s past streamed code reviews on YouTube (and subscribe to her YouTube or Twitch channels for new livestreams). You can also follow the authors on their respective Twitter accounts: Alena Hall and Holden Karau.
Continue reading How to run a custom version of Spark on hosted Kubernetes.
from All - O'Reilly Media https://ift.tt/2Hz2rrk
0 notes
Text
Upload files in Ionic with AngularFire2
The cloud is your hard drive, but are you prepared to deal with file validation, network latency, scalability, and security? I know I’m not. Luckily, developers now have access to AngularFire2 Storage, which blends Firebase Cloud Storage seamlessly into an Ionic project.
We’ll demonstrate how to capture an image files with the Ionic native camera plugin, then manage an upload task. The task object exposes a handful of methods that can be used to build a UX capable of monitoring and interacting with the upload.
Getting Started
Let’s start from a blank Ionic app, then install AngularFire2 and the native Camera plugin.
# start an ionic project $ ionic start fireUpload blank $ cd fireUpload # install firebase packages $ npm install angularfire2 firebase --save # install native camera $ ionic cordova plugin add cordova-plugin-camera $ npm install --save @ionic-native/camera
Import the required AngularFire modules and add the camera to the providers array. Don’t forget to include your Firebase project credentials.
app.module.ts
// ...omitted import { AngularFireModule } from 'angularfire2'; import { AngularFireStorageModule } from 'angularfire2/storage'; import { Camera } from '@ionic-native/camera'; const firebase = { // your firebase web config } @NgModule({ declarations: [ MyApp, HomePage ], imports: [ BrowserModule, IonicModule.forRoot(MyApp), AngularFireModule.initializeApp(firebase), AngularFireStorageModule ], bootstrap: [IonicApp], entryComponents: [ MyApp, HomePage ], providers: [ StatusBar, SplashScreen, {provide: ErrorHandler, useClass: IonicErrorHandler}, Camera ] }) export class AppModule {}
Building an Upload Component
The next step is to generate a component to handle the upload logic.
$ ionic generate component upload
Inside the component, we need to inject our dependencies in the constructor, then declare three important properties:
task is the main upload object.
progress is an Observable number ranging from 0 to 100 that starts emitting values when the task is created.
image is a base64 string returned by the native camera plugin.
upload.ts
import { Component } from '@angular/core'; import { AngularFireStorage, AngularFireUploadTask } from 'angularfire2/storage'; import { Camera, CameraOptions } from '@ionic-native/camera'; @Component({ selector: 'upload', templateUrl: 'upload.html', }) export class UploadComponent { task: AngularFireUploadTask; progress: any; // Observable 0 to 100 image: string; // base64 constructor(public storage: AngularFireStorage, private camera: Camera) { } // Our methods will go here... }
Capture with the Camera
Now that we have all the pieces in place, let’s start by capturing an image from a native mobile camera. The camera takes several configuration options - the important one being DestinationType.DATA_URL, which tells the camera to return a base64 encoded image.
upload.ts
async captureImage() { const options: CameraOptions = { quality: 100, destinationType: this.camera.DestinationType.DATA_URL, encodingType: this.camera.EncodingType.JPEG, mediaType: this.camera.MediaType.PICTURE, sourceType: this.camera.PictureSourceType.CAMERA } return await this.camera.getPicture(options) }
Upload with AngularFire
There are two main inputs required when uploading to Firebase Storage - the file path, and the file itself. Because we’re dealing with a base64 image, we use putString(str, 'file_url') to create the upload task. Once created it will start uploading immediately (it’s not an Observable, so no need to subscribe).
All files in a Firebase storage bucket must have a unique path. Adding a timestamp to each file name is an easy way to avoid collisions.
createUploadTask(file: string): void { const filePath = `my-pet-crocodile_${ new Date().getTime() }.jpg`; this.image = 'data:image/jpg;base64,' + file; this.task = this.storage.ref(filePath).putString(this.image, 'data_url'); this.progress = this.task.percentageChanges(); } async uploadHandler() { const base64 = await this.captureImage(); this.createUploadTask(base64); }
Simply bind the handler to a button and you’re ready to upload.
<img *ngIf="image" [src]="image"> <button ion-button (tap)="uploadHandler()"> Upload! </button>
Monitor Upload Progress
Your users probably want to monitor the progress of an upload and AngularFire has anticipated this requirement. In the previous step we defined a progress Observable, which will emit a number between 0 and 100 several times per second during the upload - exactly what we need for a progress bar.
<ng-container *ngIf="progress | async as percent"> <progress [value]="percent" max="100"></progress> </ng-container>
Pause and Resume the Upload Task
If your app handles large file sizes, you may want to give users fine-grained control over the upload process. The task object has pause and resume methods that can be used as button click event handlers.
<button ion-button (tap)="task.pause()"> Pause </button> <button ion-button (tap)="task.resume()"> Resume </button>
👉 And that's all it takes to transmit files from a camera to a permanent cloud storage bucket. AngularFire2 Storage has a few more tricks up its sleeve, so make sure to check out the official docs.
via Alligator.io http://ift.tt/2FEF4bc
0 notes