#crochet jar cover tutorial
Text
youtube
#crochet#crochetdecoration#crochetlove#christmasdecor#crochetchristmas#crochet jar cover#crochet cover bottle#crochet jar cover tutorial#crochet jar cover pattern free#crochet jar cover Christmas#crochet glass jar cover#crochet candle Jar cover#FUN AND EASY CROCHET JAR COVER#Youtube
0 notes
Text
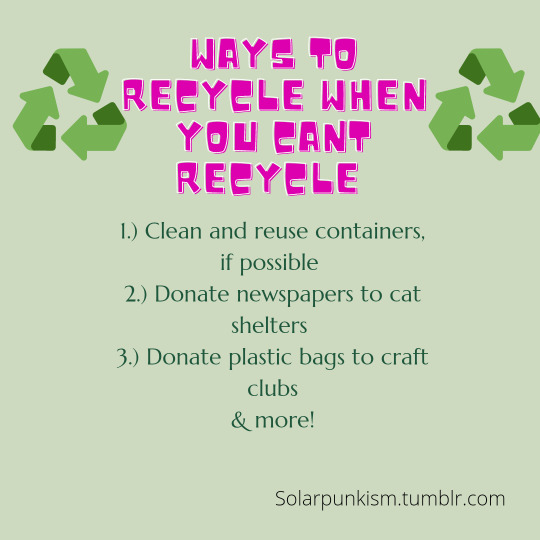
While the easy answer to cleaning up the earth may be “Just recycle!” unfortunately, it is not that simple. Many areas do not have recycling plants available or nearby. In my own neighborhood, to be part of the recycling route, you have to pay a monthly subscription, which not everyone can afford.
Because of this, I have found myself becoming increasingly creative in the ways that I reduce waste. Below are some of my most practical tips.
1.) Containers!
Containers are very easy to reuse--whether its a glass jam jar upcycled into a trendy coffee cup, or an old mayo jar being reused as a craft supply holder, containers are my favorite reusable item. I have washed out plastic ice cream tubs and used them as flour/sugar containers and as planters. Tin cans become cute pencil holders and planters with a coat of exterior paint or a ribbon. I have used vitamin/pill bottles as bathroom organizers for Q-Tips, tweezers, and make up brushes. Cutting a milk jug in half and covering the exterior with a colorful cloth makes a handy sock/underwear organizer. The possibilities are endless!
2.) Paper Goods!
Instead of throwing away paper, look for ways to reuse and donate! Many cat shelters use newspapers for their litter box liners and are glad to take the newspapers off your hands. There are DIY tutorials online about how to make a pet mat with newspapers and fabric, also a great item to donate to shelters! Make sure to call and check with the shelter to see if they need these items before beginning any project, though. Paper can also be reused to make fire starters, beads, decoupage material, and paper mâché. You can shred it and use it as small pet bedding, as well.
3.) Plastic Bags!
It is incredibly sobering to see so many photos of plastic bags in landfills, in oceans, and around the necks of our wildlife. Easy to make and easy to throw away, plastic bags are easily a castaway product that is easier to use and not think about. After seeing my own plastic bag usage, I realized I needed to make a change. I cut plastic bags into loops, connect, and roll them into balls of “Plarn” (plastic yarn). I have been crocheting the plarn into containers and reusable grocery totes. While the prep work is a bit time consuming, making plarn is still a lot of fun, and its the perfect fidget task for me while I watch movies.
4.) Clothes!
Clothes are one of the slower biodegradable items, with the plastics of common day production making breaking down difficult. Instead of tossing out a shirt with a rip in it, or a pair of shorts with a stain, look for ways to repair it first. Sewing a flower over a stain, or using a cute stitch to seam up a tear is a great way to add character and longer life to your clothes. If clothes no longer fit or are too damaged to repair, many thrift stores (or craft clubs!) will accept them. I like to donate clothes to smaller, personally owned thrift shops before large chain shops, but any type of donating keeps clothes out of landfills! If there are no thrift shops that accept donations, churches, benefit clubs, and homeless shelters often accept items into their closets so they can give them to people who need it directly. Sometimes food kitchens will collect clothes so when visitors get a free meal, they can also get a free shirt if they need one.
5.) Electronics!
Electronics are easier to donate, if recycling is not possible, with many pick up locations by large stores or busy areas. If there are no pick up/drop off electronic places, local high schools, trade schools and the like will also accept electronics (working or not) for the students to tinker with. Women’s shelters and assisted living centers also accept (working) electronics, even if they are older. Many occupants need devices or tech related items to help them apply for jobs or learn new skills, and often these places don’t have enough to go around. Depending on what electronic you are trying to dispose of, you could use the frame (like a computer frame) as a cute planter or quirky garden decor, or paint it into an artistic piece.
These are just a few of the tips I have picked up along the way! Happy reusing and recycling, SolarPunks! Let me know what you have reused or how you have recycled it.
#eco friendly#ecology#mother earth#happy planet#solarpunk#solarpunkism#recycle#reuse and recycle#green living#good vibes#hippie stuff
102 notes
·
View notes
Note
Ahhhh, your self bound books just look really beautiful? All the color choices and the layout just look soooo good together. And that's such a beautiful gift? I have not read primium non nocere, as I haven't watched Charité but if it is worthy of such a tribute I am definitely giving it a shot anyway. I'd also be really interested of your creative process and choices with the binding, if you're willing to talk about that
hi omg! thank you so much <3<3 Primum Non Nocere is a very good story, and I'd say even if you haven't seen the show, give it a shot anyway, if you're interested? I mean, by all means, try the show as well, season 2 is on Netflix w english subs afaik and it's also really, really good (not perfect, but leagues better than the stuff this country usually makes abt the nazi regime). It's a retelling of canon events from a character's perspective who isn't a focal character in the show - there's probably one or two points at which it skips canon events or may seem a little jumpy, but overall, it's more of a companion piece to canon than a classic fanfic. It's very well researched and detailed; it expands on canon in beautiful ways and honestly, fits with it seamlessly; it might as well be an official novelization (although its focuses are a little different than the og)
as for the bookbinding, I'm really flattered you're interested in my process! I'm still very much a beginner, but I'm slowly figuring out something that works for me.
Also, I don't really know what information you're looking for, so I'm just gonna share some things that come to mind. This isn't really a step-by-step how-to but if you're interested in that, I can try to take some pictures next time I make a book and make a better reference post.
Typesetting
I typeset in OpenOffice because that's my office suite of choice & I'm old; I have never used google docs and I don't plan on starting. I download the fic in html, and then just copy/paste the text chapter by chapter; that's easiest for me. As for fonts, I wanted it to look vintage but I definitely didn't want it to have Nazi aesthetics. I went with Baskerville for the main text (which is such a beautiful font, it might become my go-to) (Garamond is what is most commonly used in books I think, but it almost looks too professional for me. I love that Baskerville has this very distinct, vintage feel to it.) and an Art Deco font for the title and chapter headings. Overall I think it looks more 1920's which, considering that the Nazis really hated the Weimar republic, seems fitting. I'm happy with how it turned out and I hope the author is, too :) As for the rest, it's set in 16pt, 120% line spacing and the margins could be a little larger, tbh, but it works and I'm a little stingy with the paper XD
OpenOffice also lets you draw simple graphics directly onto the document which is what I did for the title page and the little ornaments at the beginning of the chapters.
To make signatures, I use Quantum Elephant Bookbinder. It does what it's supposed to, the only thing that doesn't quite work is the flyleaf option, but I can just add that in the og pdf.
Book construction
I print on copying paper, 80gsqm. It's recycling, 55CIE which is really quite grey; I like it, because white is uncomfortable for me to look at. As for grain, I cut my sheets from A3. The grain is also wrong there, so I ended up wasting half the paper. Whatever; I think it's worth it. Having the grain in the right direction (parallel to the spine) makes it feel so much more like an actual book and not just a stack of copying paper stapled together. I honestly believe it's more important than having fancy paper.
After folding, I do not use a model and an ale for punching holes; instead I put all the signatures together in my makeshift press (2 old cutting boards and 2 bar clamps), I draw some guidelines and then I use a fine saw to cut them all at once.
I sew the signatures on tapes for stability; it makes keeping consistent tension easier. I use linen bookbinder's thread (worth it) and cotton tapes from the craft store (they do their job, and linen sewing tapes are hard to source & expensive). I do not have a sewing frame; but what I do is, I tape the tapes to the underside of my cutting mat, place the signature on top (fold aligned with the edge of the mat) and use a weight to keep it in place. It works okay.
After sewing, I round the spine with this method, which works surprisingly well. I do not trim the edges (I know myself well enough to know that it would not end well) & instead tap the short sides & spine to the table to align the signatures as perfectly as possible.
The rest is done as in pretty much any other tutorial. No backing, because I don't have equipment for that. I like to sand down the edges of the cover boards a little, so they're a bit rounded; I think it makes for nicer haptics.
Decorations
I like to make as much of the book myself as possible. There's several reasons for that; first of all, fancy handmarbled or printed paper, headbands, bookmarks etc are expensive. Second, I have a crafting addiction & what's the point of projects like this when you buy everything you could make yourself, right? But thirdly (most importantly) it's simply that my book blocks look pretty shitty (that's, untrimmed and uneven). But that's okay; you gotta embrace the "amateurishly handmade" look & just have to amateurishly handmake everything. Adding just one or two perfect, machine-produced details looks kinda jarring.
Paper decoration - mix water soluble paint and wallpaper paste and go wild (videos are in German, sorry, idk if this is a thing that's really done in the anglophone world? But I think they're pretty easy to follow even if you don't understand the instructions). I like to use this for covers, mainly, I'm also experimenting with decorating endpapers this way. The paste makes the paper really rough and horrible to the touch; as the very last step, I wax the cover (with a beeswax-based furniture polish. Floor wax works as well, it just doesn't smell very nice). Be careful not to get any on the bookcloth, it will cause stains & ruin everything at the last second.
Headbands - I found this tutorial very helpful.
Bookmarks - this gave me so much trouble. Most amateur bookbinders seem to use cotton, polyester or satin ribbons, which is fine, I guess. I don't particularly like either option. At first I thought I could weave my own; that didn't work out, because weaving tiny bands is harder than it looks (& also the resulting ribbon was much too stiff). But! Bookmarks in professionally made books aren't woven at all; they're braided. Seven-stranded braids work pretty well (tutorial is for 5 strands, but 7 strands work the same). As for the headbands, embroidery floss is best imho (silk would, of course, be traditional but come on). Mercerised cotton crochet thread works as well but isn't quite as nice.
this turned out way too long lol. Sorry. Hopefully the answer you were looking for is in there somewhere. Again, thank you and have a lovely evening!
#also feel free to ask if theres anything more youd like to know#<3#hoard of fanfiction#anonymaus#message
6 notes
·
View notes
Text
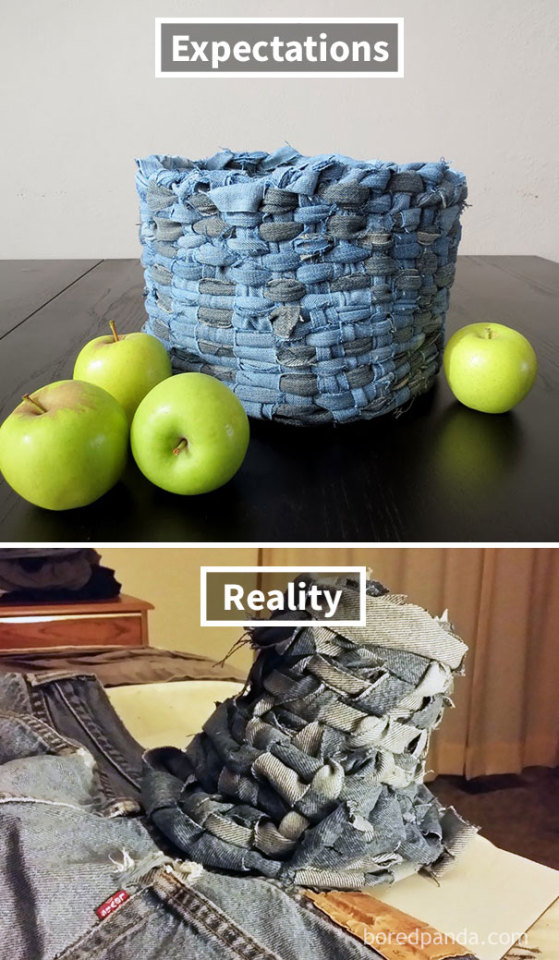
Would Like To Get Started In Crafts And Arts? These Guidelines Will Help!
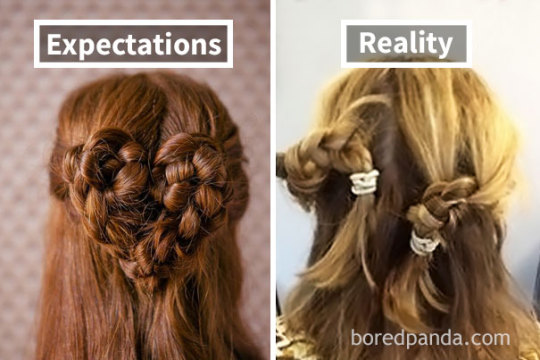
https://bbs.now.qq.com/home.php?mod=space&uid=550546
Once you went along to summer season camp out in the past, odds are arts and crafts was one of the most preferred sessions supplied. Everything has not transformed a whole lot. Crafts and arts remain well-liked by individuals. Why? Since it is something that you can do effortlessly and affordably, with achievement. In order to know more about crafts and arts, keep reading for a few tips.
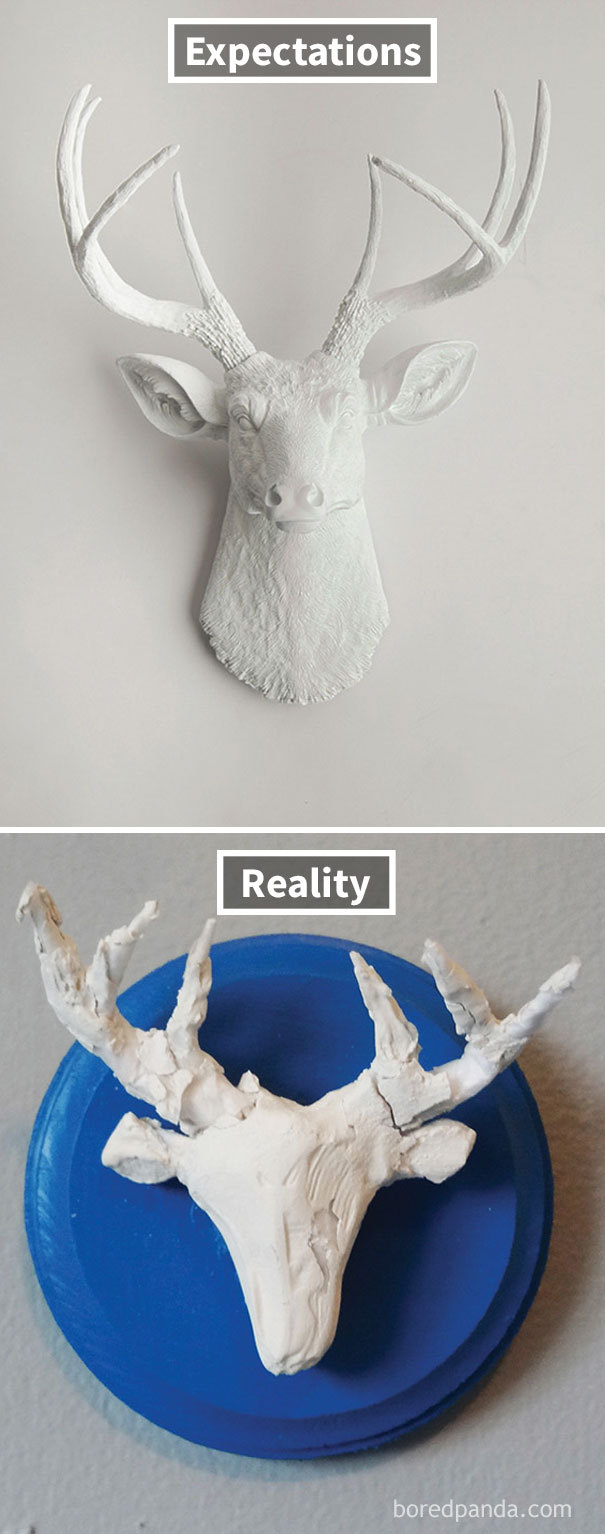
Have a collection of your arts and crafts textbooks. There are many points that can be done when you are a crafting particular person. And therefore implies many people blog about this issue. You'll have art publication following art book available to you. Your local library can grow very quickly. Ensure that is stays structured and you'll really enjoy trying to find fresh crafts to use.
If you are looking in starting crocheting or knitting, spend some time to search the web. You can get totally free videos online that may assist you from the a variety of stitches you need to know. There are also free designs on numerous blogs or even forums which are available.
Among the finest places to discover creating materials is Amazon. By subscribing to an Amazon online Excellent accounts, you can find shipping and delivery on an whole season. In addition, many of Amazon's sellers provide Free Very Delivery things. To be eligible for a Cost-free Very Shipping and delivery you need to spend at the very least $25 $ $ $ $ in items.
Do not forget that, with youngsters, create projects will almost always be messy. If messiness challenges you out, guard your surfaces having a document covering. Use supplies that are washable, such as a number of markers.
Maintaining your current crafts and arts supplies prepared can cause a much more nice expertise as soon as concentrating on assignments. Put money into very good storage boxes, coordinators plus cases especially for small goods. Items similar to beads and glitter can easily be spilled or perhaps shed. When you take property new products, right away shift them directly into safe-keeping as well as organizational bins.
Make buddies with those who personal or perhaps work on the regional hobby retail store. It will help you receive valuable understanding on sales, commitment special discounts and special deals. You may even be capable of display your products or perhaps meet up with others who would like to try a similar crafts that you will be.
Does a number of your crafts and arts assignments involve painting? Can you sometimes possess issues painting right facial lines? Masking adhesive tape can deal with this concern. Adhere typically the tape on the craft that you are currently artwork and even fresh paint just a little across the side of the tape. When the paint has extensively dried up, move it away. Today, you will find a perfectly direct series!
There is no need to help keep a create eternally. Products are usually 3-D and may swiftly dominate a bunch of room. Every thing a youngster tends to make is not a good masterwork. You can bid farewell to definitely old assignments once you help make new tasks together. The price of a craft is in the creating of this.
Gown correctly regarding arts and crafts. It can a dirty process. Dress in only shoes or boots plus clothes that you can both afford to possibly aspect with or could be laundered tough. A classic set of glowing blue jeans and a t- shirt you don't value are always excellent choices, particularly if there's artwork engaged.
If you've achieved a artistic standstill together with your ability to painting, begin to use new resources. You may fresh paint with essentially anything, coming from a toothbrush to a Resplandor pad, and each diverse item gives a new aspect to your work. Combine within the fresh paint in the color scheme as always, and let your creative thinking assist you!
When you are permitting your very little kids work with mixture, make sure to tell them that mixture fails to go in their own mouths. Preschoolers love to try out everything to view the actual way it likes, and paste is harmful. Eating it will make your baby ill, so you don't desire that to occur during crafts time.
To provide your children an introduction to the artwork method, start out with watercolors. The paints have a tendency leave long lasting unsightly stains upon garments, should you handle them swiftly sufficient, and they have practically difficult to ruin a good function area using them should you protect them appropriately. Right after the kids have mastered this particular, it's time and energy to proceed to the greater number of superior paints.
To help keep your children secure while they are producing craft tasks, use bright white college fasten and adhesive sticks as opposed to rubber concrete. As the cement makes a powerful sticky, the toxic gases of which come from the wide open jar can give little ones migraines and they are eventually poisonous. Maintain your youngsters harmless with a gentler sticky.
Vimeo is a great supply for learning how to perform a craft. there are millions of videos about each art project available to you to watch and gain knowledge from. Merely enter the name in the art you are considering and then peruse this video tutorials up until you find one that is right for you.
Crafts and arts assignments will be popular all over the world due to how quickly that can be done these people. Work with al the data you have acquired right here to be sure that you can find straight into the field of arts and crafts. You will have a large amount of entertaining making a lot of great points.
0 notes
Note
I'm looking for audio sensory toys, got any?
Anon, I’m guessing that by “audio sensory toys” you’re meaning something more akin to “fidgets that make noise” as opposed to “toys that just make noise”. In other words, toys that have the stimminess of noise in addition to movement or tactile stimming, and are more engrossing than just your sitting there and listening to the noise.
(If my approach is incorrect, please let me know when I open up the askbox and I’ll try again for you.)
I do have several things you might wish to check out. I’ll try as best I can to give some indication of the type of noise, but some of these things I haven’t used personally. All the bolded links below go to the item’s tag, as we have many posts on these sorts of toys by now.
Bean Bags: the sound they make depends on the filler. The best filler for sound I’ve used is Mackenzie’s Italian Style Soup Mix, as the different sizes of the dried beans and lentils makes for great rattle. (There must be something similar in one’s local supermarket, just under a different brand; it’s a staple food item.) So this may be best as a DIY, but you could also try putting the same mix into a knotted sock or a drawstring cloth bag as a no-sew option (just leave lots of space for the filler to roll around). Rice and plastic pellets are less interesting, auditorily, as there’s less variation in the sound.
Crocheted Stress Balls: these are filled with plastic pellets and crinkle paper, so they sound crunchy and scrunchy, with added weight and texture. Like plastic bags, but louder. I’ve DIY’d something similar by filling a tiny fabric bag with plastic pellets and cut-up plastic shopping bags, but they’re not as loud as the crinkle paper. For US folks, Stimtastic is probably the cheapest option, but you might find them at game and toy stores, sold as “hackysacks”.
(Mesh Stress Balls are very similar but don’t have the crinkle paper. The pellet filling does scrunch, though, and it sounds great. Similarly, Disney Mini Tsum Tsum Plush, particularly the pellet envelope sewn at the base of the toy.)
Grape Stress Balls: these can make a slurping sound when squished as the slime filler moves through the ball. Not all do, though–I’ve got one higher-quality one that makes almost no sound at all. The others are so loud.
Cracking Squishies: these can be purchased or DIY’d (using part of a tape measure or a snap clip glued inside a sponge) and they’re great for folks after a bendable toy with a crack sound that’s easily repeated. Please check the tag, as we’ve got a few DIY tutorials now, and if you don’t care for them being painted or fancy, they’re very easy to make. Plus they’re squishy!
(You can also just click a cut-up tape measure or a snap clip on their own. A Slap Band Bracelet may also work for you for that same snapping/slapping noise, especially as it has the added texture in the silicone covering.)
Velcro: great for a ripping, tearing sound that’s easily repeated, with additional rough and soft textures. You may have a clothing item that already has velcro, but you can buy this in the sewing sections of dollar shops for only a couple of dollars. If you can sew a little, it’s easy to attach to a keychain or bag.
Bottle Caps or Jam Jar Lids: the metallic kind with a pop seal. They make a popping noise, although some can be a little loud. Easily repeated and pretty easy to source, and if you reuse the bottle, it’s extremely stealth (in the sense of nobody recognising it as a stim toy).
Electronic Bubble Wrap: I haven’t used one personally, so I can’t attest as to how close the sound is to the real thing. But for a repeated sound-making stim toy, I think these are well worth your checking out.
(You can buy real bubble wrap in rolls - online, post office, some dollar shops, office supply stores. It’s often not that expensive, either, especially when bought in bulk. Truly, there is absolutely no reason why stimmers shouldn’t go out and buy themselves a roll of bubble wrap to work through and replace when needed. Just cut off a smaller strip if you need to take it somewhere!)
Slime: a really stretchy, taffy-like slime will bubble when squished and pulled, and the bubbles snap just like bubble wrap. Just mould and stretch the slime again to repeat for hours. You need handmade slime (the kind made using PVA glue and some form of borax or boric acid) for this to work, since all the storebought slimes I’ve handed were just oozy and globby. Slime isn’t so great for on-the-go stimming, but for at home it’s fabulous.
Thinking Putty: like slime, it will bubble and crack, and is easily remoulded to form new bubbles. Putty is better for on-the-go-stimming as it doesn’t leave residue on your hands and doesn’t stick to your skin. Mine doesn’t bubble quite as much as my handmade slimes do, but it’s much easier for me to use outside the house.
DIY Clicking Toy: a toy made by gluing metal bottle caps to either side of a folded piece of cardboard. I haven’t made one myself yet, but I imagine it’s a metallic clicking-clacking sound.
Roller Bead Fidget: these become auditorily-stimmy when you push the beads up and down the string, causing them to clack and click against each other. Rolled in your hands, they’re silent, but I usually stim with them by clicking the beads. Metal and glass beads are loudest, but plastic pony beads still make good noise, too.
Bead Rings: these make the rattling sound of the bead spinning over the metal ring. Again, metal and glass beads are loudest (like these ones on Stimtastic) and best for noise-stimming, but plastic pony beads still make a soft rattle-like spin.
Metal Slinky: these make a lovely metallic ringing and swooshing sound. If you like lots of hand movements and metallic noises, these are so nice. Plus if you rest one end of the full-sized slinky around one ear and bat at the slinky with your other hand, it sounds like a lightsaber or SF-style spaceship laser weapons… I’d get the full-size ones for optimum sound and fidget fun, but I am biased by the fact that I own and love mine. If you like sound with your fidgets or fidgets with your sound, anon, metal slinky.
Spinners: most of these make a great, steady, white-noise-style rustle-like spinning sound that’s pretty regular and lasts for a minute or two. The cheaper ones tend to be more noisy, so this is a case where you don’t want the good Zuru spinners (which are almost silent) over a dollar shop spinner. If you want a consistent sound that lasts for a longer time, spinners are great. If you hold the spinner very close to your ear, you can hear and feel the vibrations as well as the ball bearings!
Klixx / Wacky Tracks / Snap and Click Toys: I haven’t used these myself, but I’m told they’re quite clicky and great for folks who want something more Tangle-like but with added noise.
Light Switches / Knock-Off Fidget Cubes: if you like the clicking sound of a flicked switch, you can get either an actual light switch plate or a fidget cube (or fidget shape). I will personally attest that the “Fidget Fingers Series 2” cube is incredibly loud and clicky, and folks who love the sound of a flicked switch and want it louder will adore this cube.
You also may want to check out our sound category tag for even more toys.
I hope this gives you some ideas, anon. There’s a great many fidget toys that have some kind of sound component, so there should be something that works for you!
- Mod K.A.
#stim toy#stim toys#Stimtastic#Woolworths#USA#Australia#ask#text#link#resource list#category: sound#review#informative#DIY components#anon#mod K.A.#long post#very long post
36 notes
·
View notes
Text
Have you been looking for DIY projects to decorate your home on a budget? Well, do I have some easy projects for you to try!!

These are those wonderful clipboards upcycled. You can paint 3/4 of the board with chalkboard paint, leaving a space on the bottom to add paint or washi tape. Or you can simply wrap with contact paper.
You can dress up your table with tie-dyed Burlap.Buy enough light-colored burlap yardage from the fabrics store so it hangs 1-2 feet off the ends of your table. Cut it lengthwise so it’s several inches narrower than the width of your table. We used RIT fabric dye in fuschia to dye one-third of the runner at each end. To create a slight ombre effect, we repeated the dye bath on one-sixth of the runner on each end to darken the color. Finish the runner by fringing the edges, if desired.
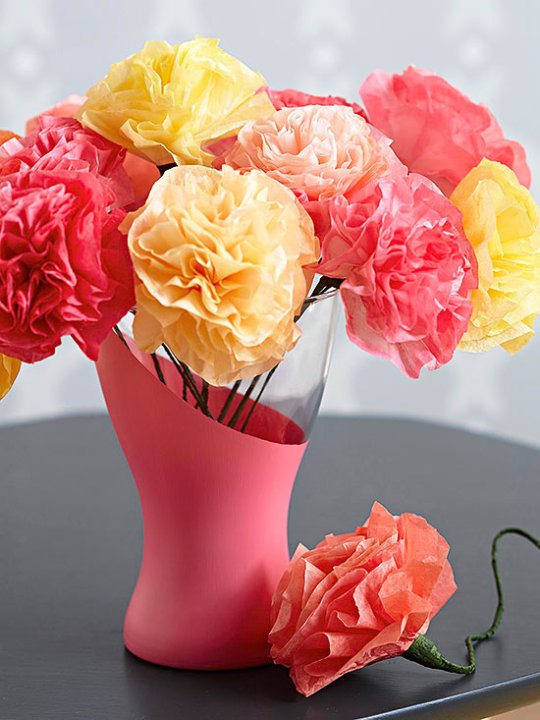
You can update a $1 store vase with acrylic paint. Hold the vase in your hands and tip it in different directions so the paint rolls around inside, creating a wave of color. Leave some of the vase clear. You can make these tissue paper flowers, twist then wrap the end of the flower with some wire. Cover the wire heavily at the top, then thinly the rest with green floral tape.

Use old t-shirts to update a plain pillow. You can also use jersey fabric. Either material is perfect for this project because they don’t unravel, so you won’t have to finish the edges. Cut fabric 1 to 1-1/2 inches wide. Use your fingers to scrunch the fabric into ruffles as you stitch down the middle with a sewing machine.
See more DIY pillow projects

Prevent water rings and add a style all at the same time with DIY cork coasters. Cut 4×4-inch squares from thin cork. You can find the cork at your local craft store. Cut a simple herringbone pattern from stencil acetate. Press the stencil onto a cork square and apply acrylic paint.
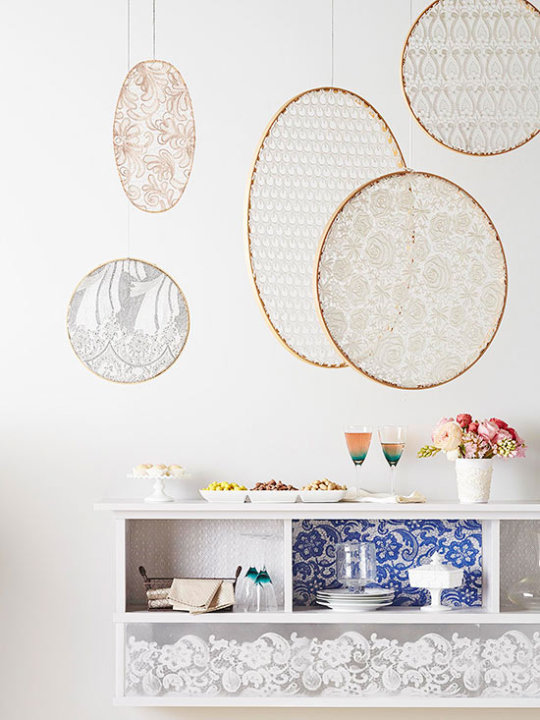
Create a whimsical mobile with lace and embroidery hoops. Stretch lace fabric in wood embroidery hoops. Trim excess lace. For a clean-lined look, drill two holes on either side of the embroidery hoop fastener and screw the two pieces of the hoop together, then pry off the original hardware. Hang from white cording and position at alternating levels.

All you need to create this funky string art is string, nails, and a board. Map out your design and hammer the nails into the board (don’t pound the nails in completely). Wrap string around the nailheads for the design. If you’re spelling a word, print out the letters and cut them out. Arrange the letters on the board and hammer a nail into each corner of the letters. Wrap string around the outlines of the letters first, then fill in the letters with woven designs.

http://kelleysdiy.com/2017/07/18/sea-shell-outdoor-table/
Outside I was playing with Garden Decor when I came up with these:
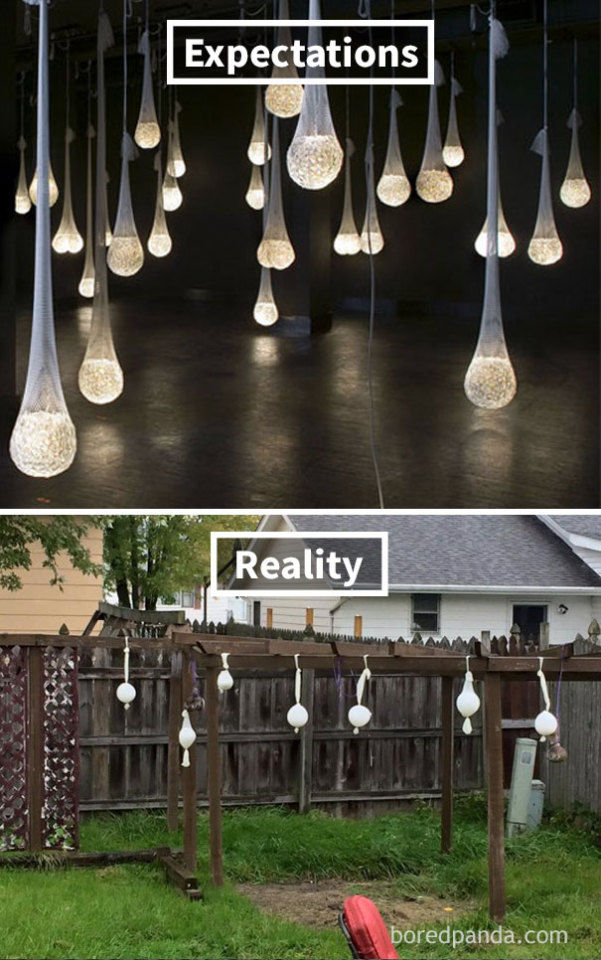
I love the light I made to hang in the Pergola https://kelleysdiy.com/2017/07/05/chandelier/. These Gazing Ball Stakes https://kelleysdiy.com/2017/04/08/gazing-ball-stakes-3/
Some of the best Crafts I have done, I think, are the ones I made with paint sticks. I did this wonderful post about some of the wonderful projects you can make, using paint sticks. You can find it here: https://kelleysdiy.com/2016/10/18/paint-stick-crafts/
I started by making this Rug Rag. You can see tutorial here: https://kelleysdiy.com/2017/02/01/rag-rug/ug/
Make labels from hardware store wood shims and institute order. They are so inexpensive! Cut a few shims to the desired size by either scoring with a crafts knife and snapping, or trimming with a rotary cutter. Sand each corner to round, and drill a hole in the middle of the thick end, about 1/2 inch from the edge. Use a small foam brush to paint the front and back of each tag with chalkboard paint. Let dry and write or stencil on labels with white charcoal pencil or chalk. Tie onto a bin or basket with a length of baker’s twine.

This is such a pretty idea for spring! Put your best foot forward with a unique flower vase. Arrange your flowers in a regular vase (make sure it will fit inside the boot first). Then simply tuck the vase inside the boot — the more colorful, the better!
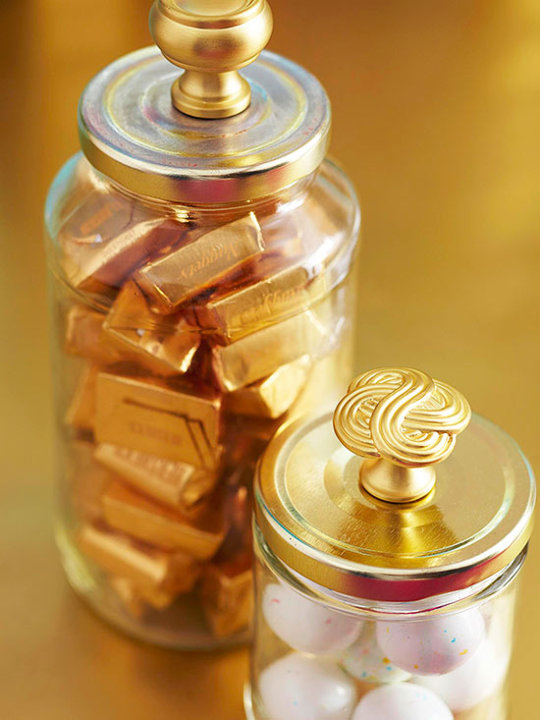
Rescue glass jars bound for the recycling bin for this upcycled project. Clean out the jars, poke a hole in the top of the lid, and screw a cabinet knob through the hole. We paired gold knobs with gold lids, but you can also paint the lids to match your hardware. Don’t you just love the metallic gold!
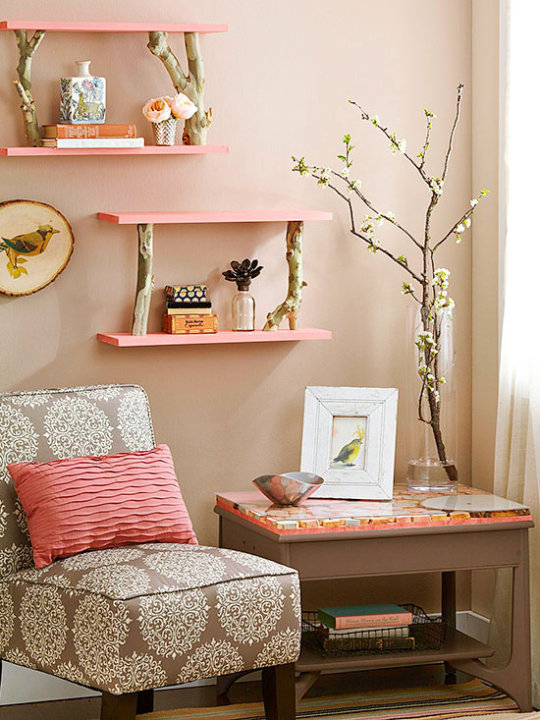
This one is easy. Create shelves with panache using birch logs as supports. Trim sturdy branches to equal lengths, keeping the cuts straight. Paint two 24-inch-long 1×6 boards in the desired color. Attach one board to the bottom of the branches using wood screws, and attach the second board to the top of the branches, again, with wood screws. Hang the shelves using picture-hanging hooks driven into wall studs.

Give a plain roller shade color and punch with a painted pattern. Using a ruler and T-square. Mask off straight stripes with blue painter’s tape. Apply latex paints in your desired colors using a foam roller. Let paint set, peel off the tape, and let the paint dry completely.

Give a mod twist to a wrought-iron chandelier with a string of wooden balls. Select several different-size balls from the woodworking aisle at the crafts store. Screw small metal eye hooks into opposite ends of each ball. Link the eye hooks to chain the balls together, then drape from the chandelier. DIY Tip: Use a pair of needle-nose pliers to grasp and twist the tiny eye hooks.
Put your touch on off-the-shelf furniture by transferring any favorite image — a photograph, a bit of a painting, or even a fabric pattern — to the plain surface. Scan the image into the computer and print it on transfer paper, which you can buy online and from office supply and crafts stores (about $20 for a package of ten 8×10-inch sheets). Follow the package instructions to transfer the image. These bentwood chairs have the perfect smooth surface for such a project.
If you are a budding artist, hand paint your own design!
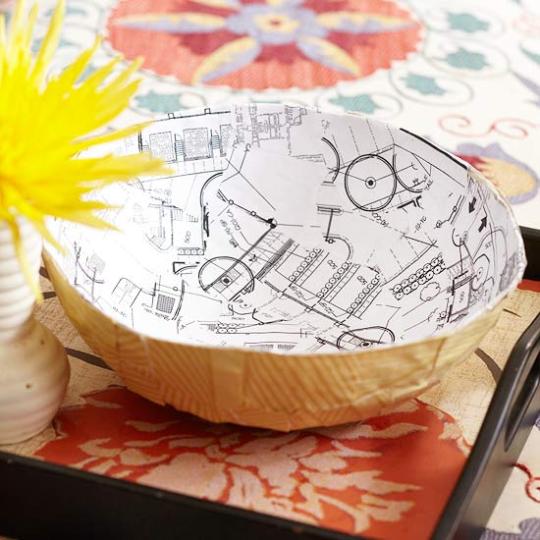
For virtually no cost at all, you can mold an attractive centerpiece. Employ the simple technique of paper-mache, which involves dipping strips of paper into a solution of equal parts white glue and water. Turn over a mixing bowl and cover it with plastic wrap. Tear strips of paper: book pages, magazines, sheet music, wrapping paper, or wallpaper will work. Here, the artistic look comes from copies of blueprints placed facedown with a layer of patterned scrapbook paper laid right side up. Apply at least three layers of paper to develop a sturdy vessel; let dry. Remove plastic wrap and bowl, and, if necessary, smooth any rough edges with fine-grit sandpaper.
Now, I am pretty sure all of you have seen this inexpensive idea.

Dress your windows quickly and smartly with tea towels turned into cafe curtains. Simply clip drapery rings to the top edges of the towels, and thread the rings onto a curtain rod. You’ll want the curtains to hang down to the windowsill, so mount the rod accordingly. If you have a double-hung window, position the rod so the top edge of the curtain lines up with the sash.
DIY Tip: If necessary, trim the towels to length and hem using a sewing machine — or iron on fusible webbing for a no-sew option.
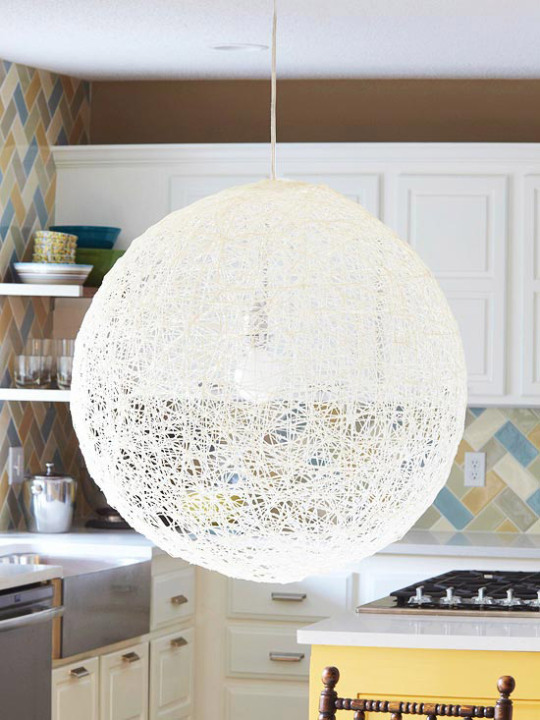
Create a chic, mid century pendant fixture using just string and a balloon. Purchase a 35-inch balloon from a party goods store, or if you can find it at the Dollar Tree, and blow it up to about 30 inches. Brush it with a thick coat of fabric stiffener, which you can find at fabrics and crafts stores. Wrap the balloon with white crochet string, brushing on more stiffener as you work to ensure a thick coating. Let dry for 24 hours, then pop the balloon.
DIY Steps: Illuminate the shade using an inexpensive light kit for hanging lanterns. First, tie a knot in the cord about 7 inches from the bulb. Thread the plug end through a slit in the center of a plastic butter-tub lid. Using kitchen shears, cut a hole in the top of the globe slightly smaller in diameter than the butter-tub lid. Insert the bulb and lid in the globe. Hang the cord from a hook in the ceiling. Use a low-watt light bulb.
Tin Art
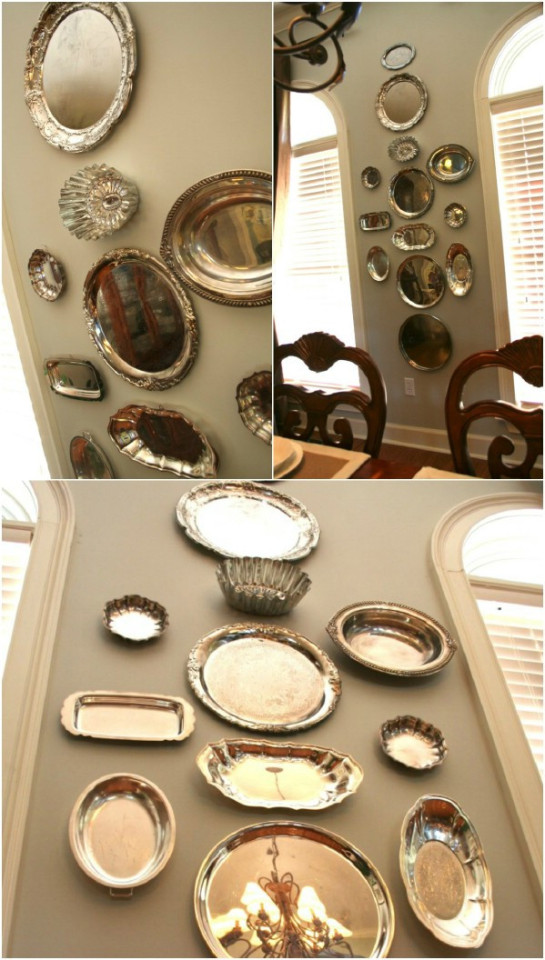
For this project you can get together all your old serving plates, etc and create a beautiful reflective wall. Dollar Tree, you can pick up beautiful serving plates and dishes in a bright silver that look expensive, but only $1.
So, did I get your creative juices flowing? Most of these are so inexpensive to make, and a lot of the items can be found at your Dollar Tree Store.
Have fun creating! If I inspired you to make your own home decoration, please send me a pic to [email protected]
Thank you so much for looking!


Inexpensive Home Decor DIY Projects Have you been looking for DIY projects to decorate your home on a budget? Well, do I have some easy projects for you to try!!
#chalkboard paint#cheap crafts#Crafts#decorating#diy#Easy crafts#Home#home crafts#Home Decor#home design#home hacks#recycles#Upcycles
0 notes
Text
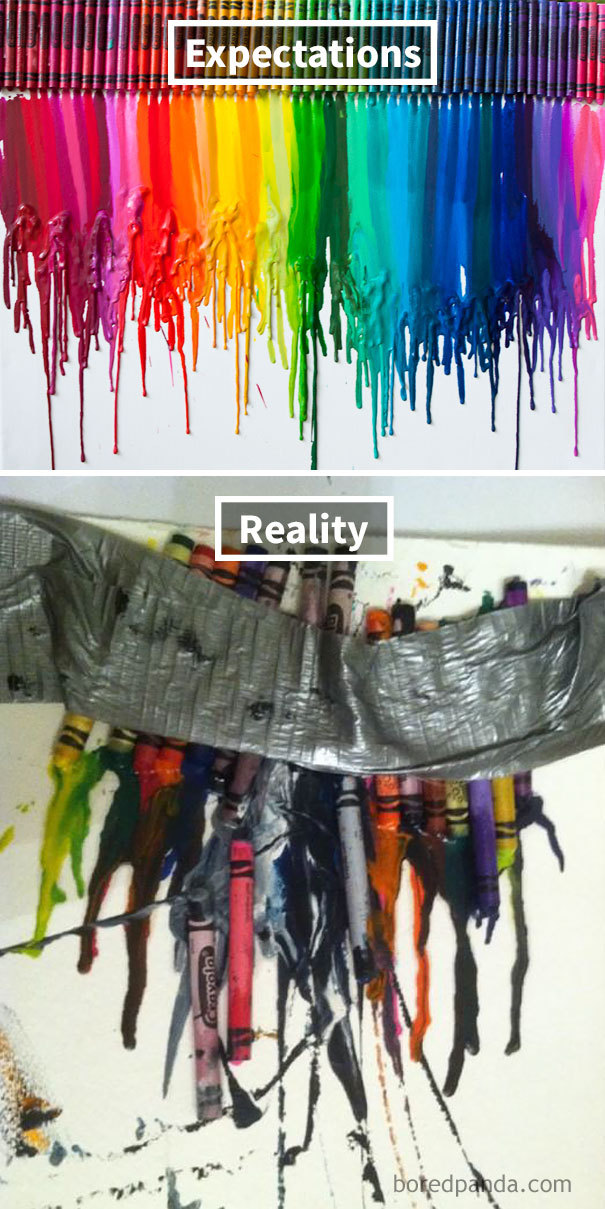
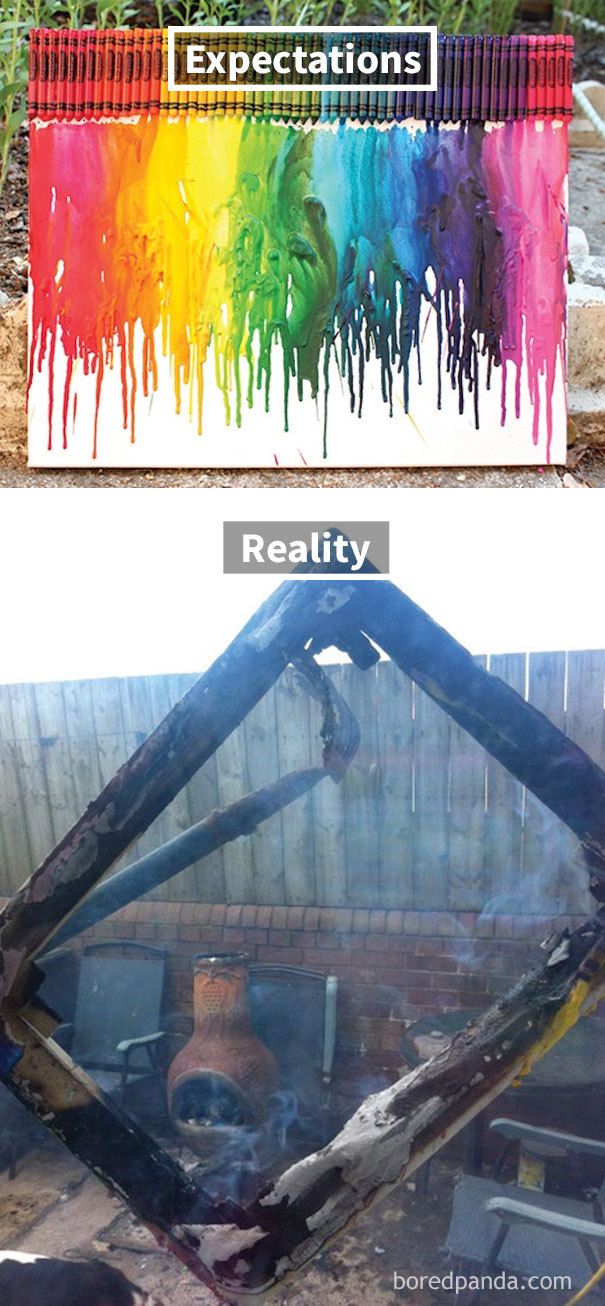
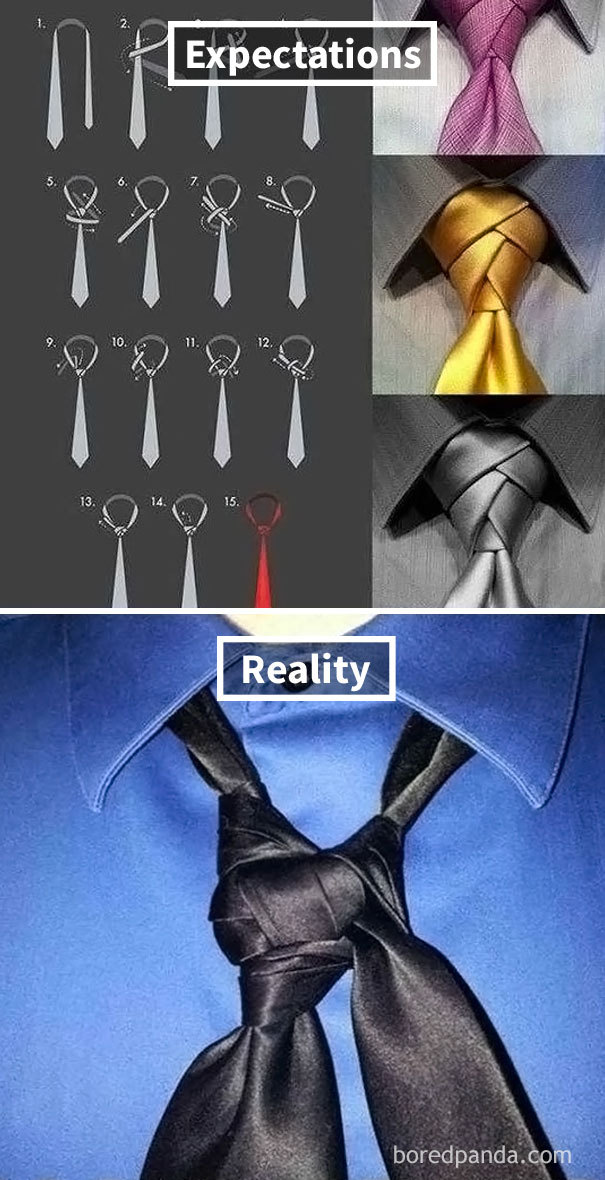
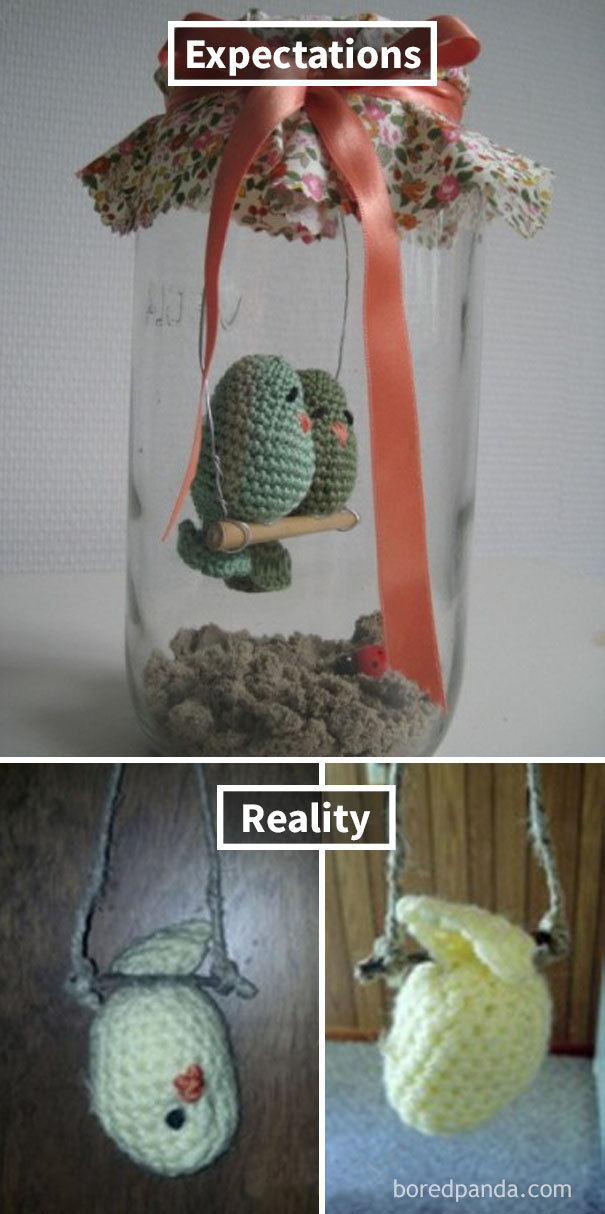
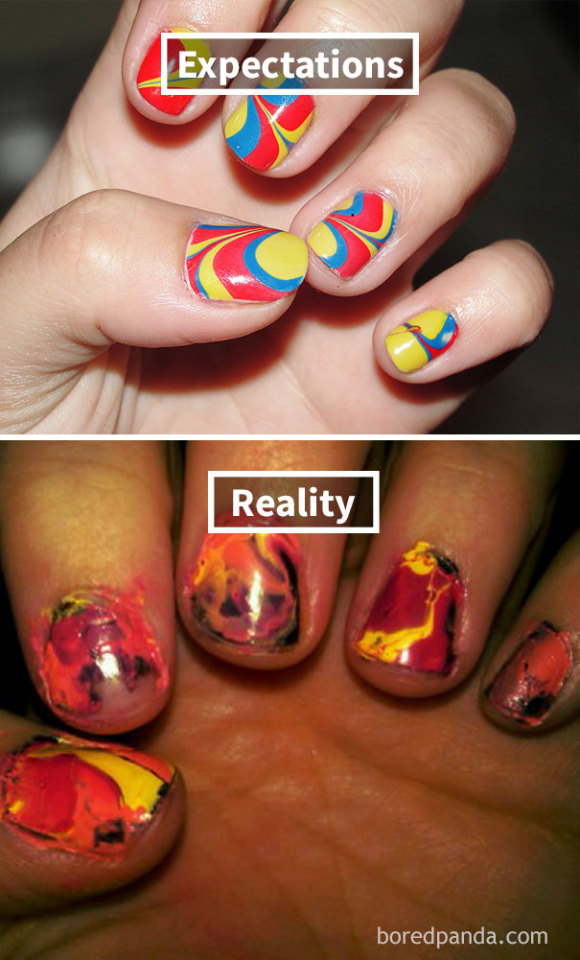
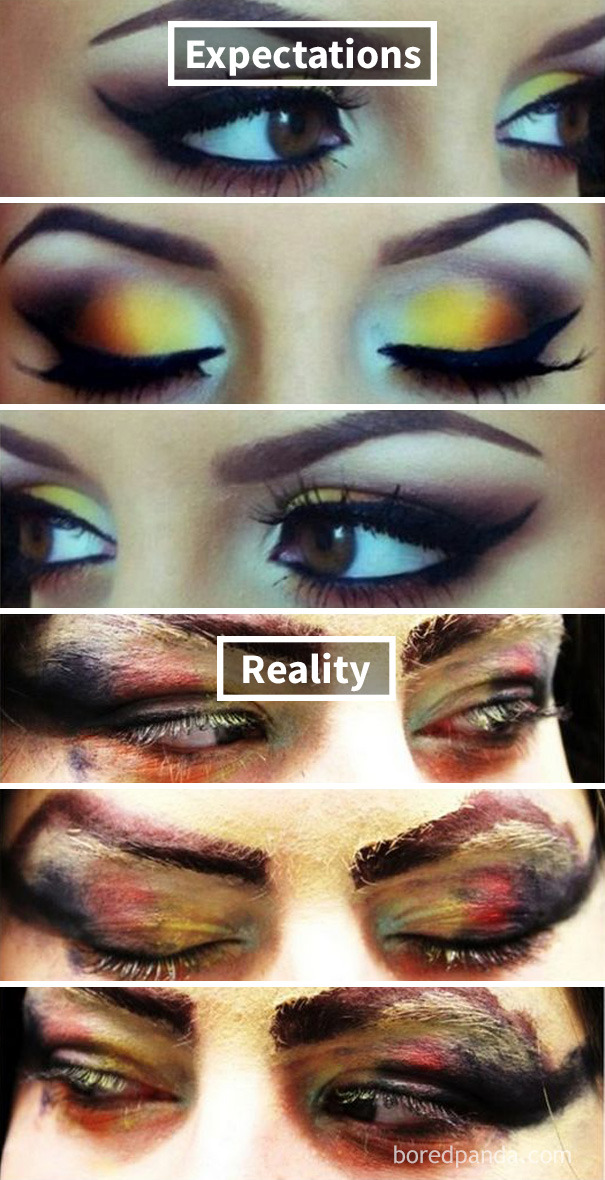
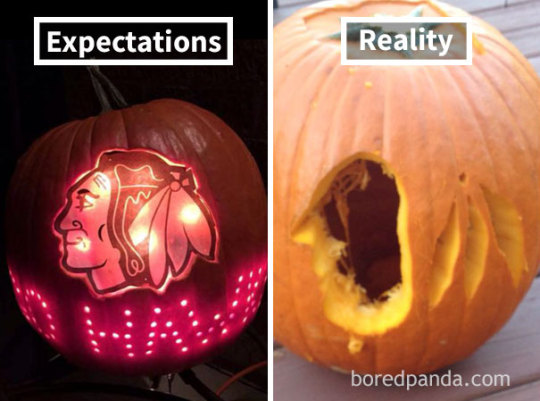
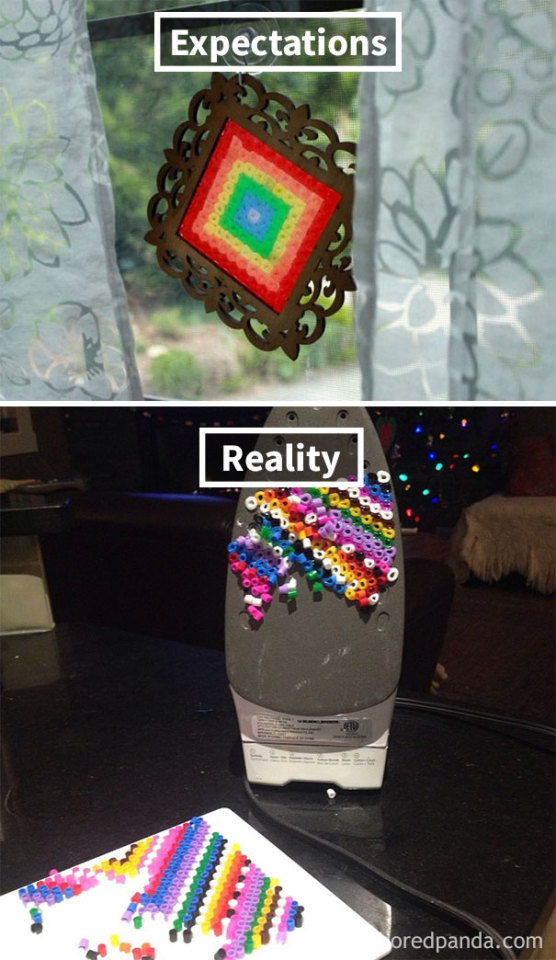
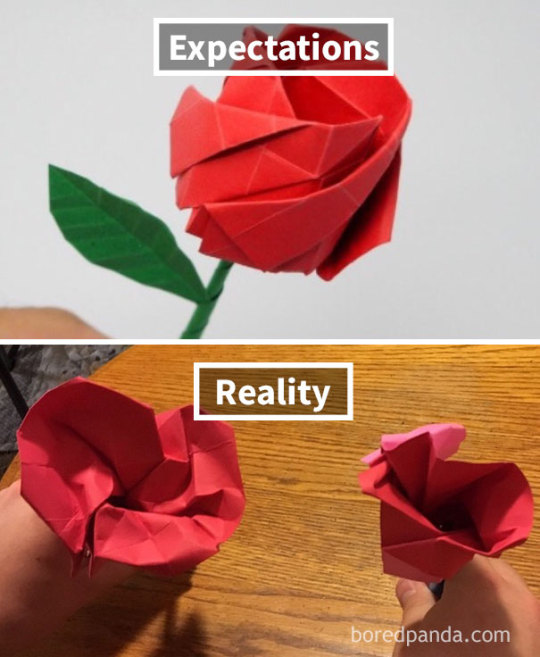
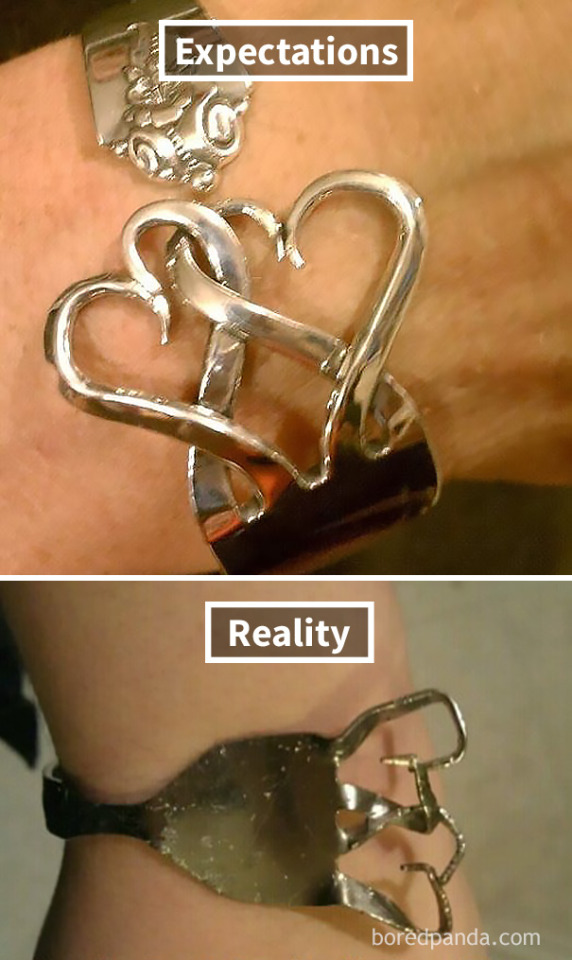
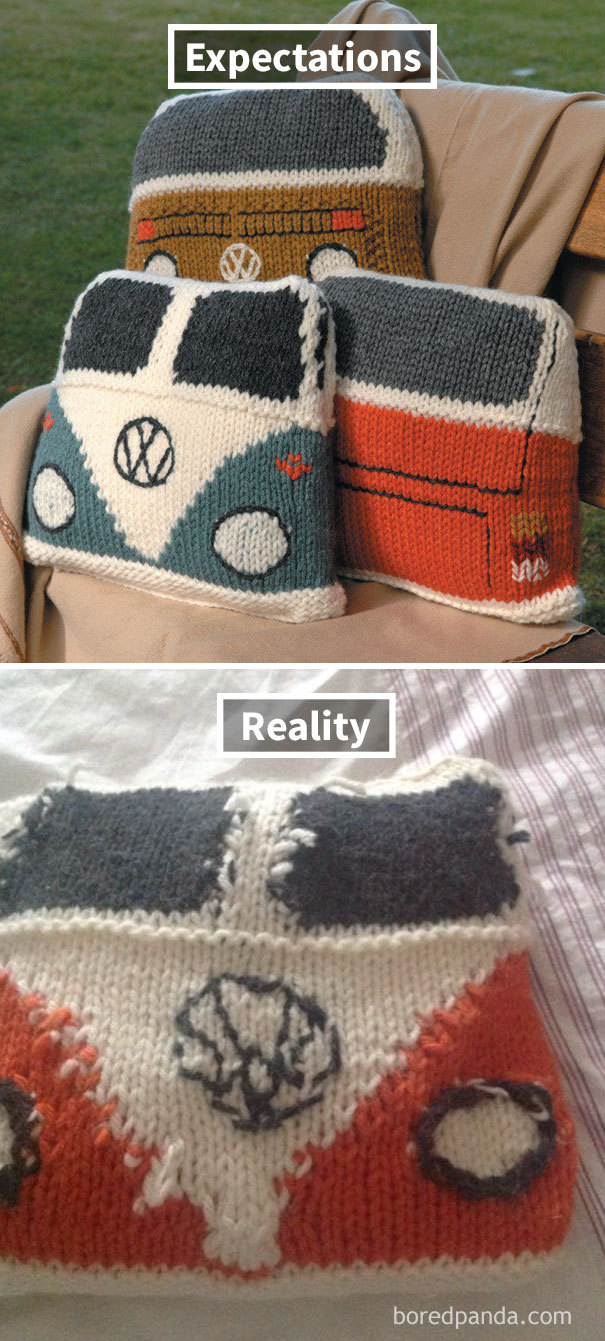
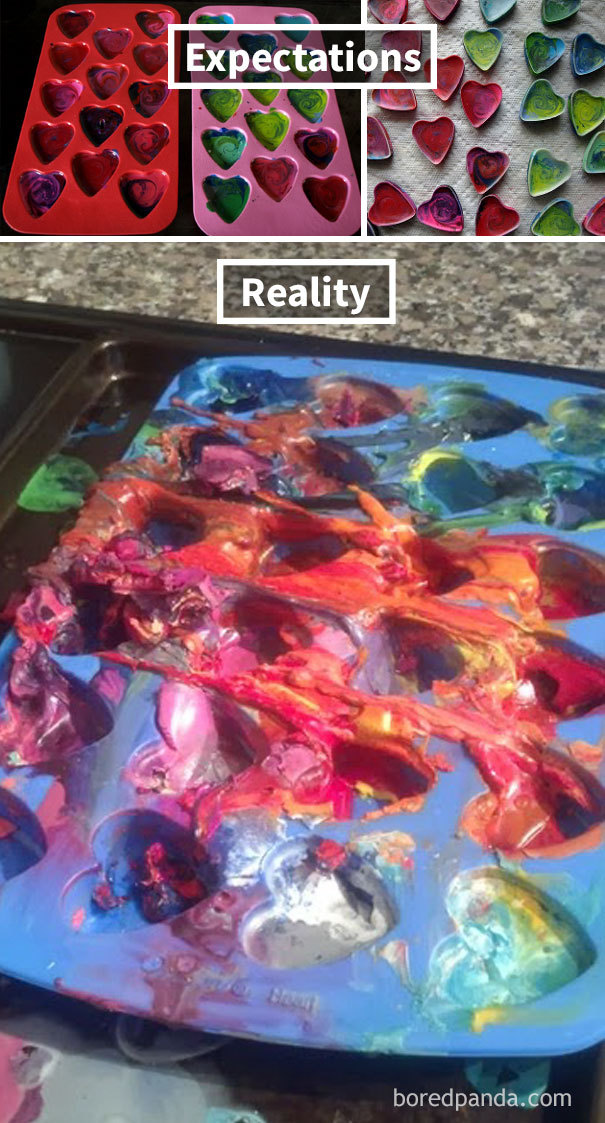
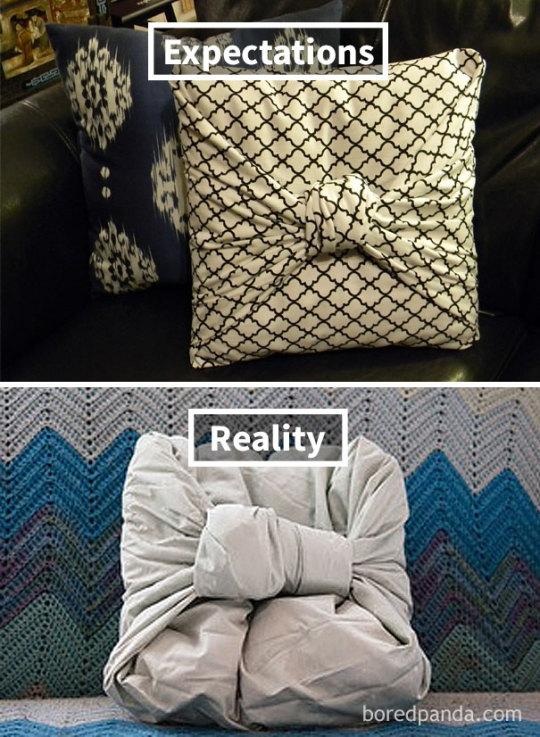
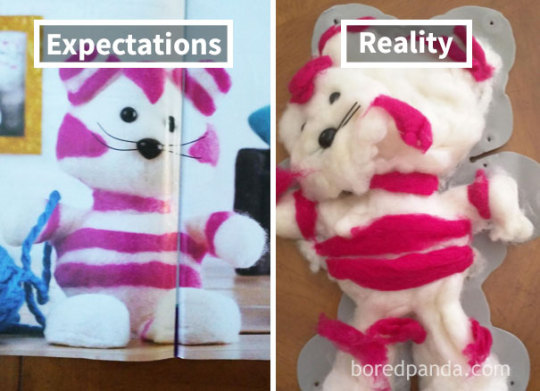
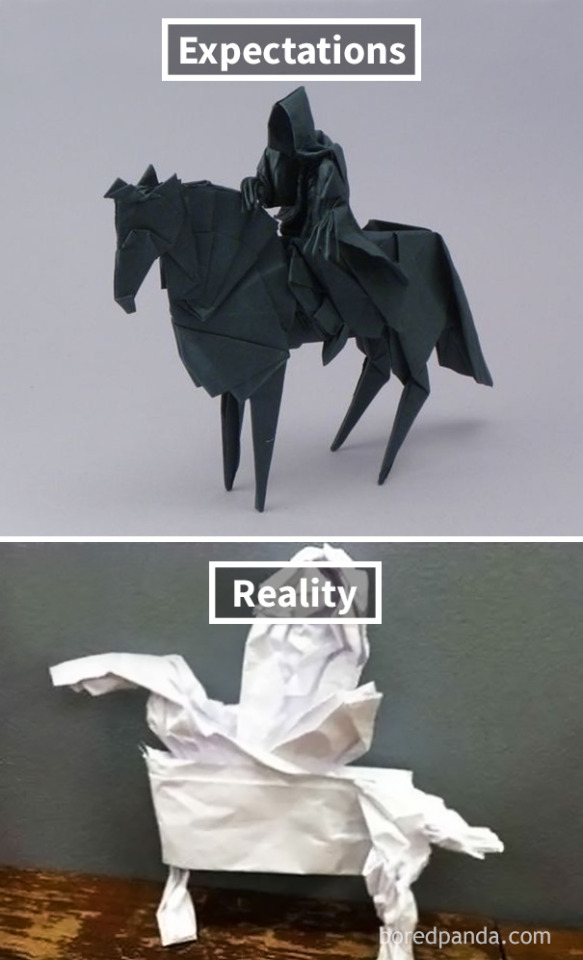
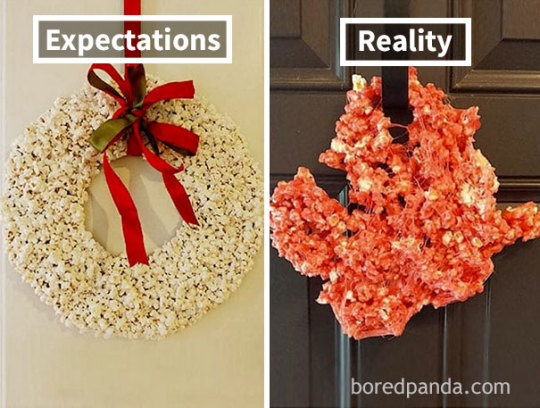
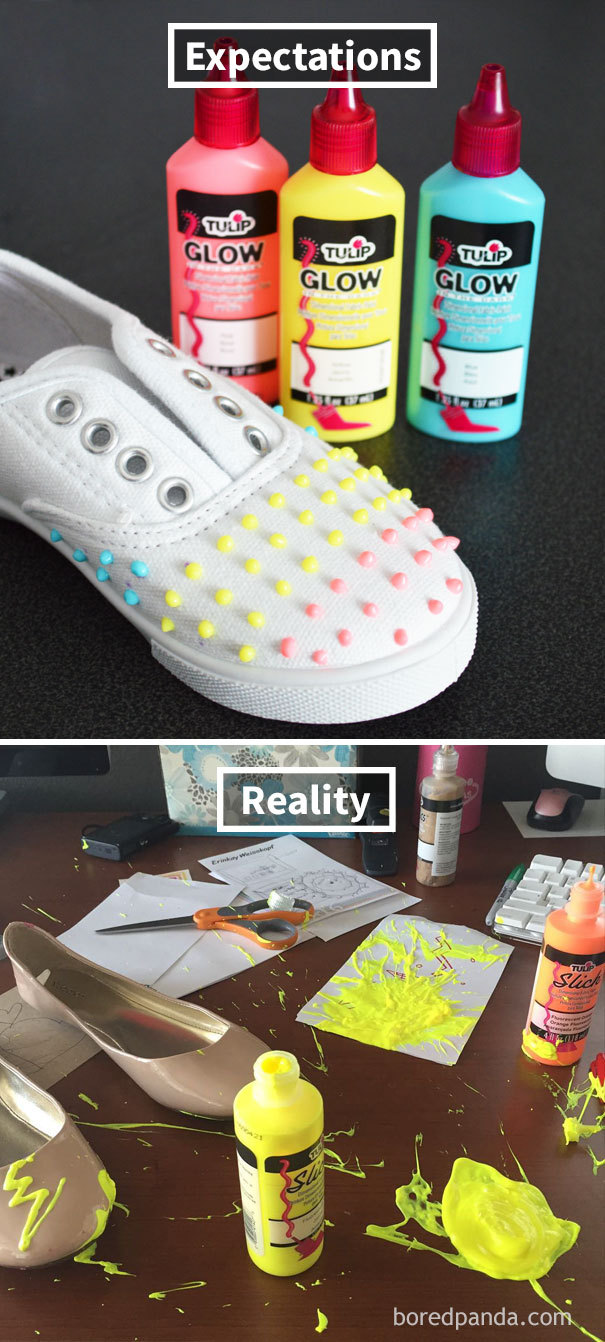
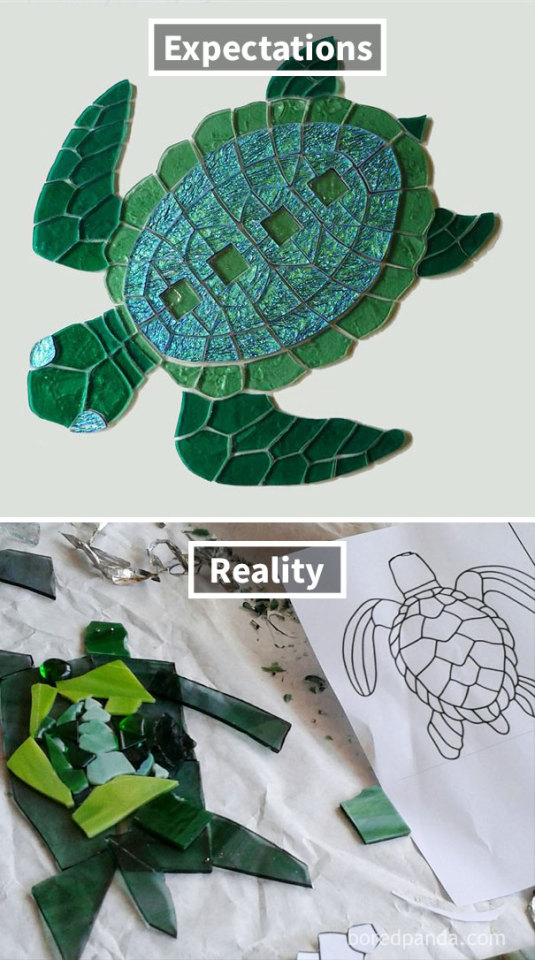
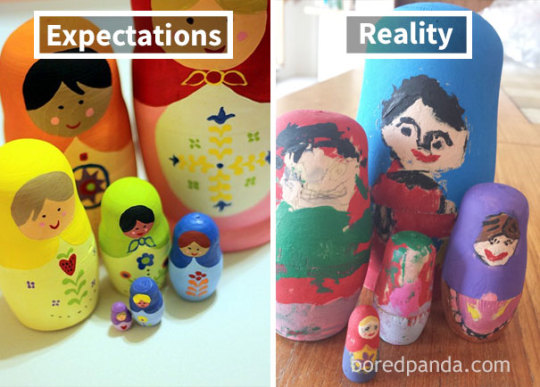
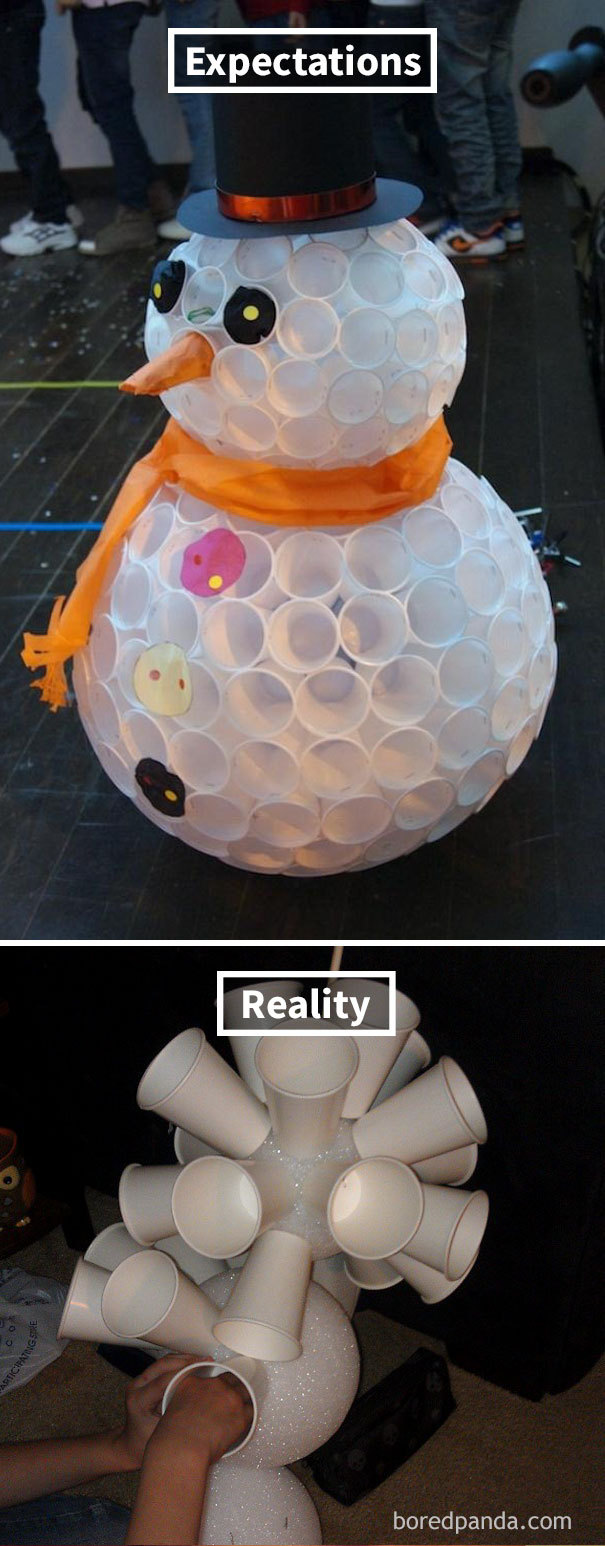
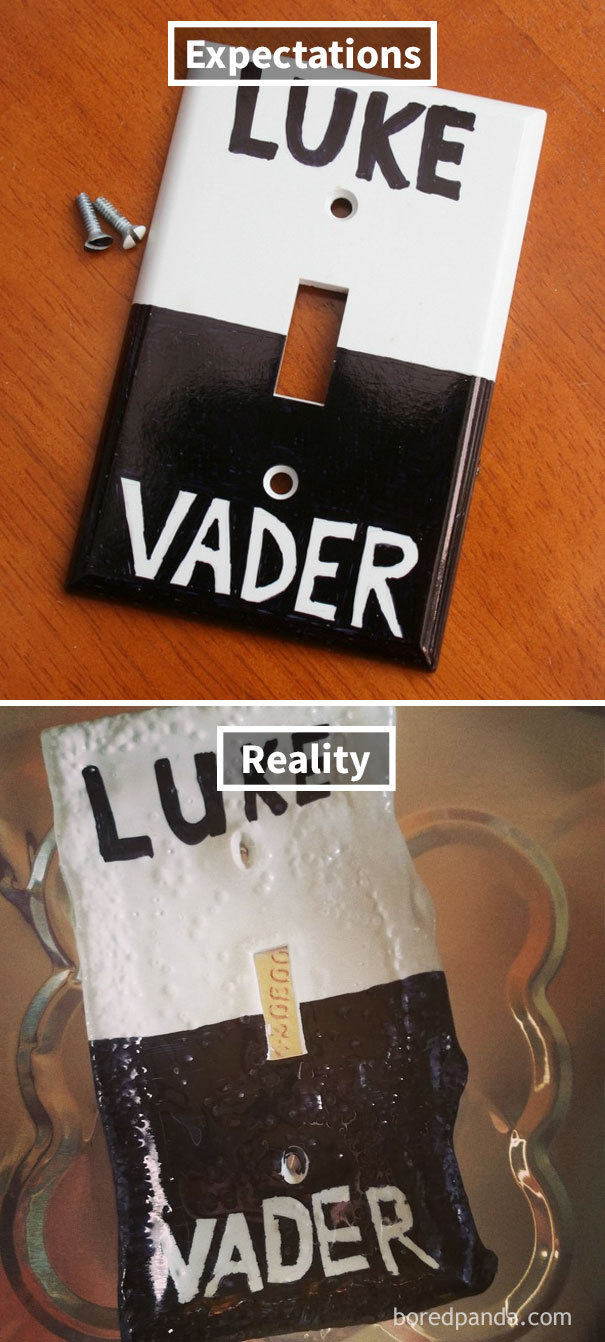
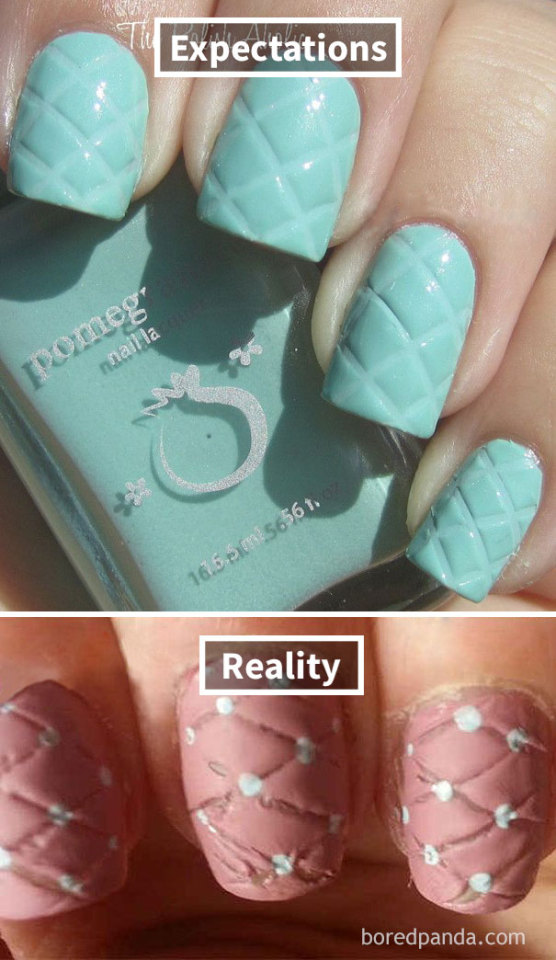
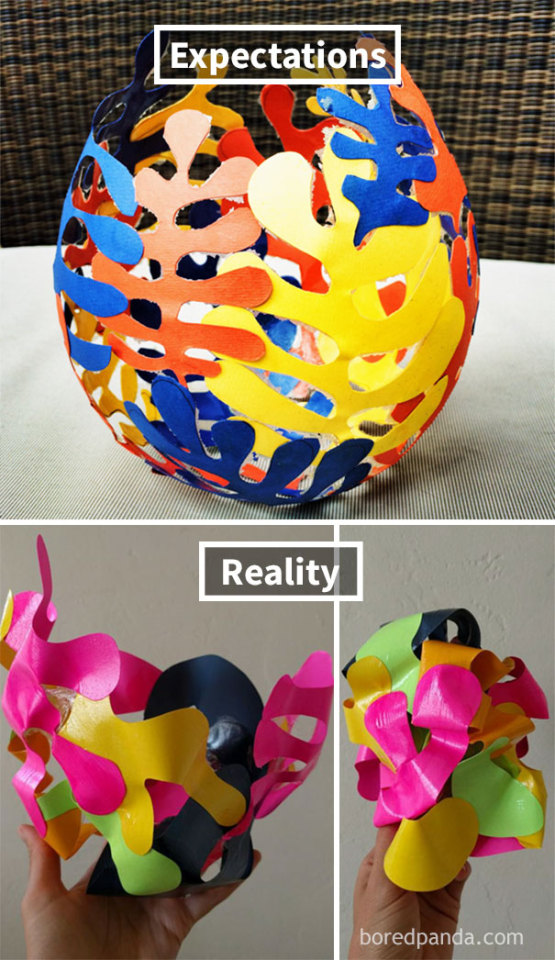
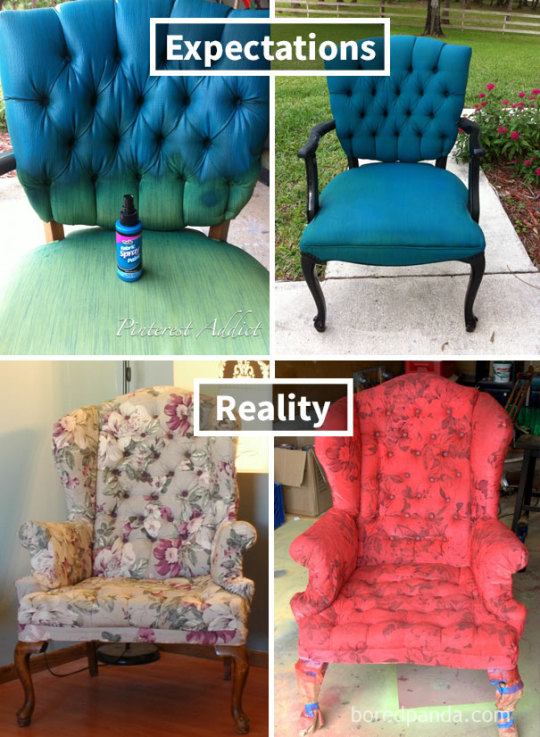
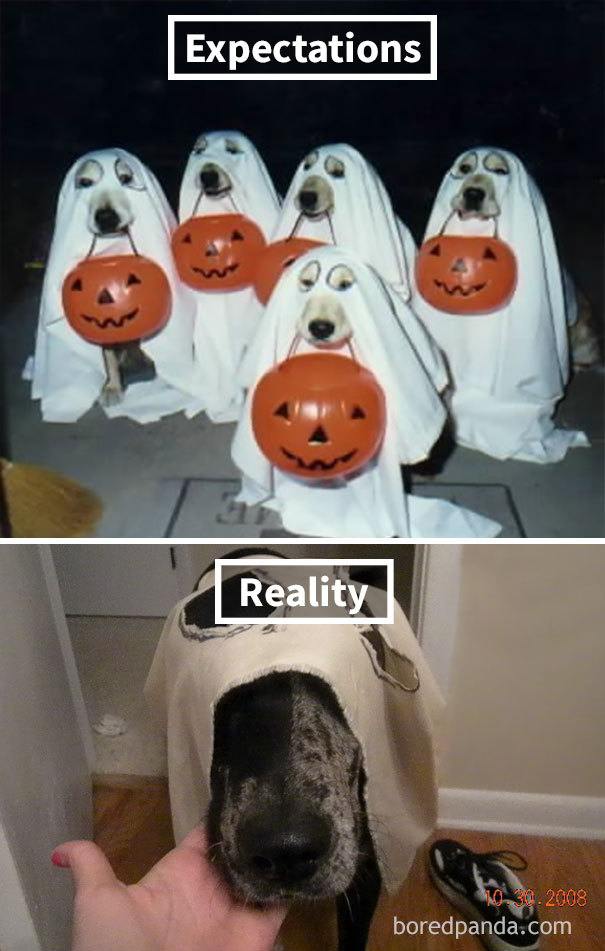
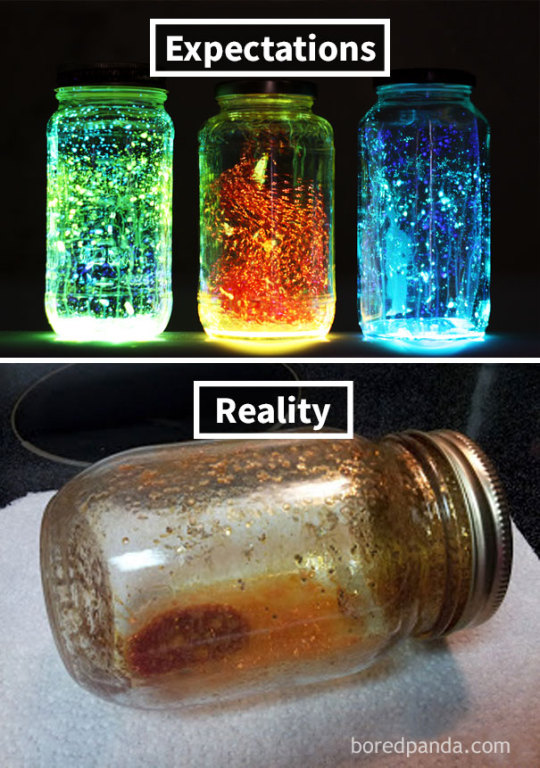
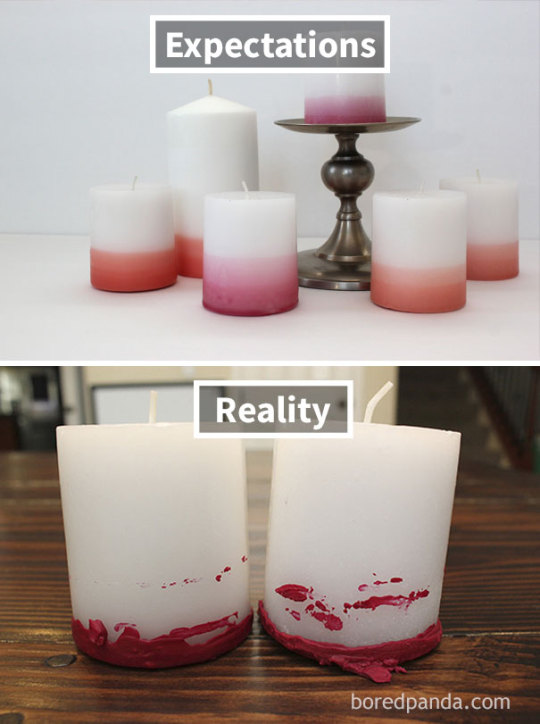
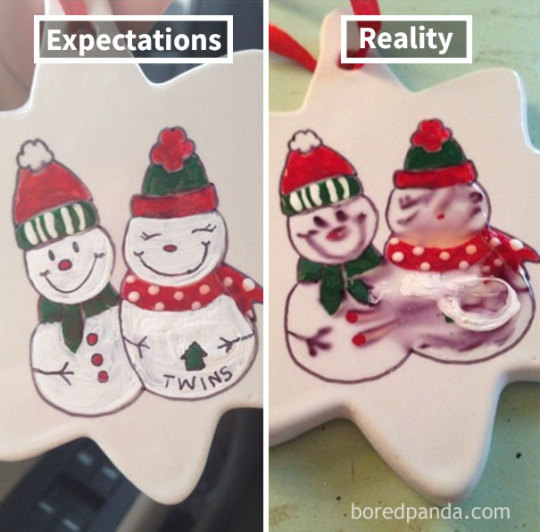
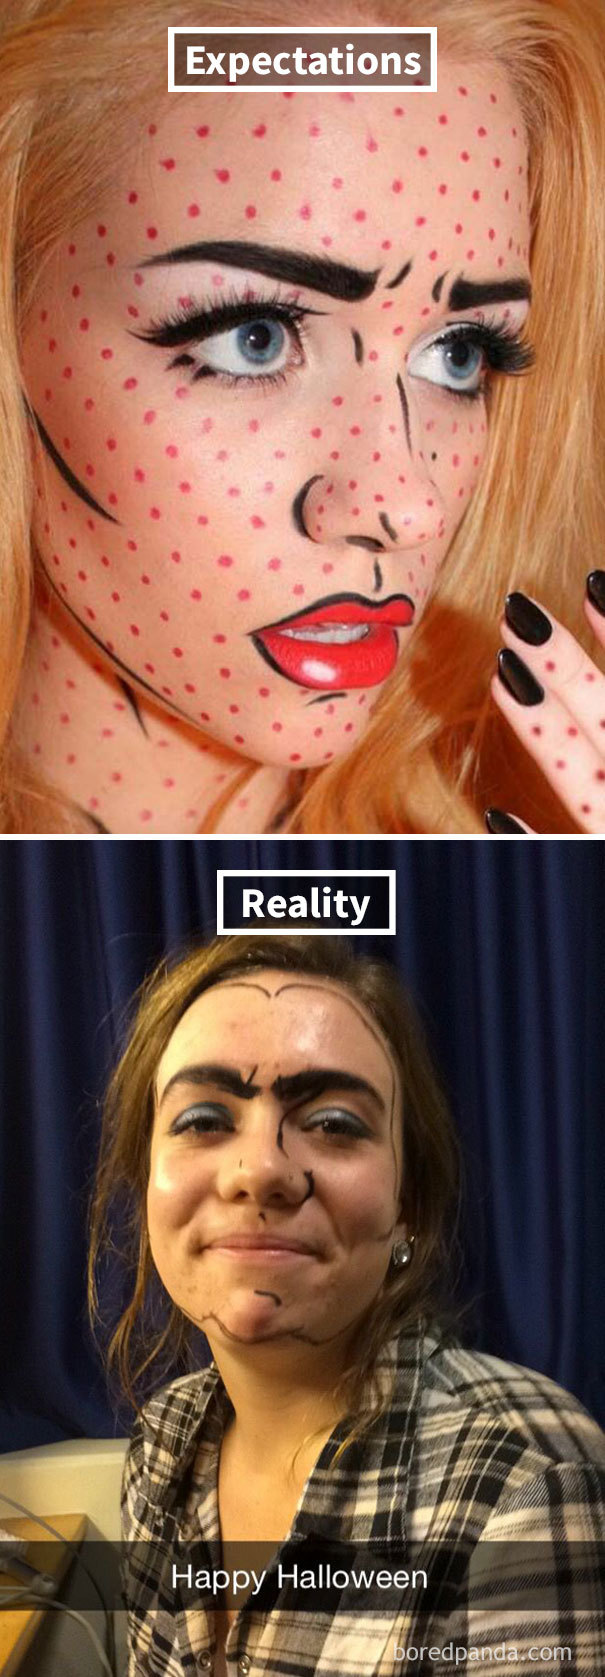
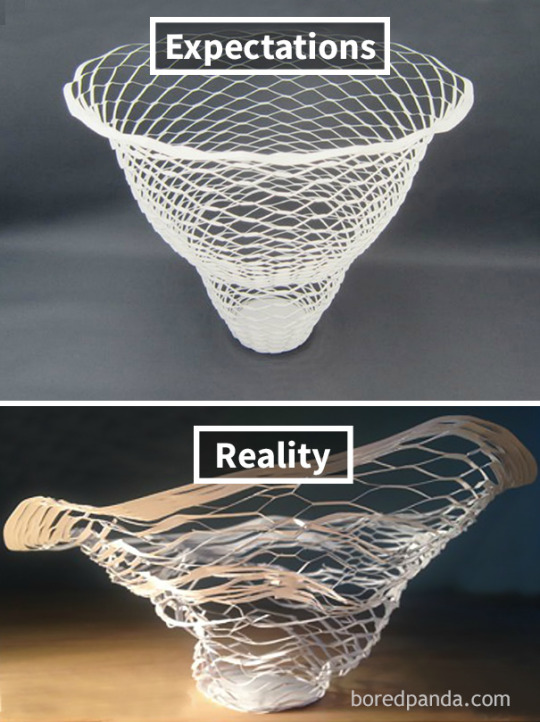
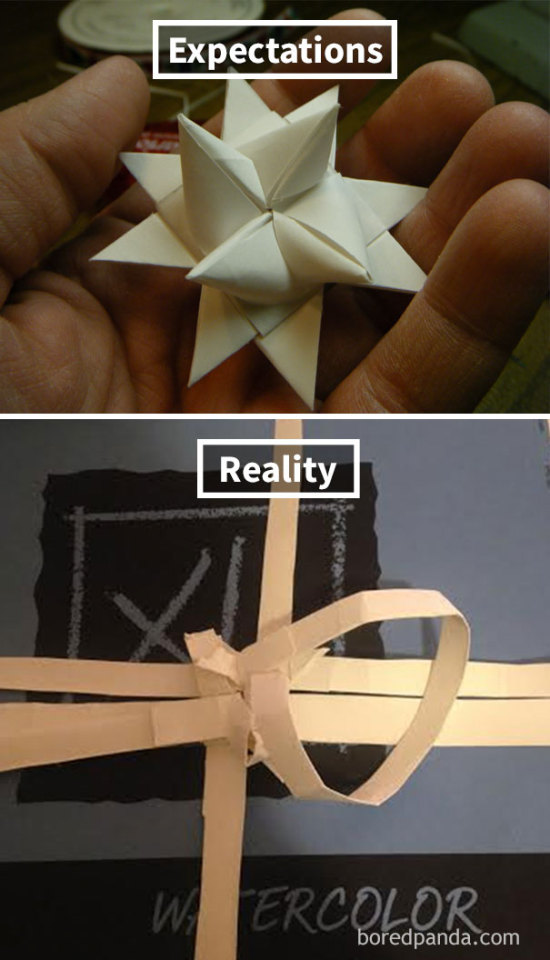
10+ DIY Fails That Are So Terrible It’s Impossible Not To Laugh At
With so many tutorials flooding the Internet lately, you’d think people would have the hang of this DIY craft thing by now. They don’t. They’re still failing and it’s still hilarious.
We get that directions are sometimes hard to follow. It’s totally true that things rarely look the same as on the screen. Come on, though. Did these people even try?
Have a look, and a laugh, at some of the worst outcomes of best intentions we could find below. If your DIY project didn’t go as planned either, add it to our list below, because there’s no shame in failure if you at least put in 50% effort.
#1 Nothing Rhymes With Fire Orange
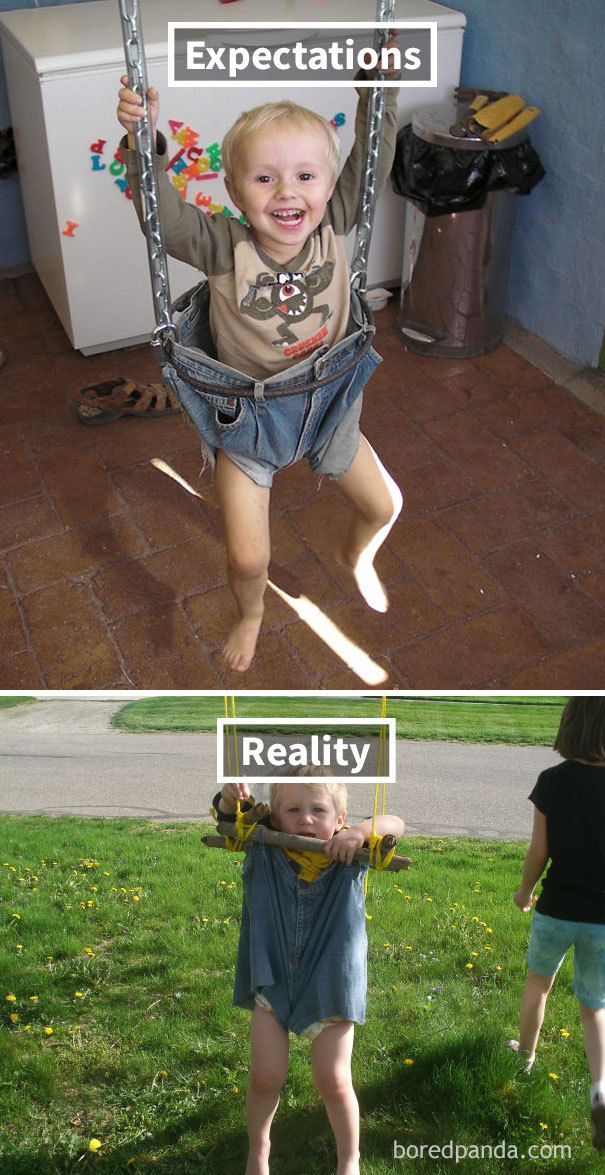
#2 Toddler Swing
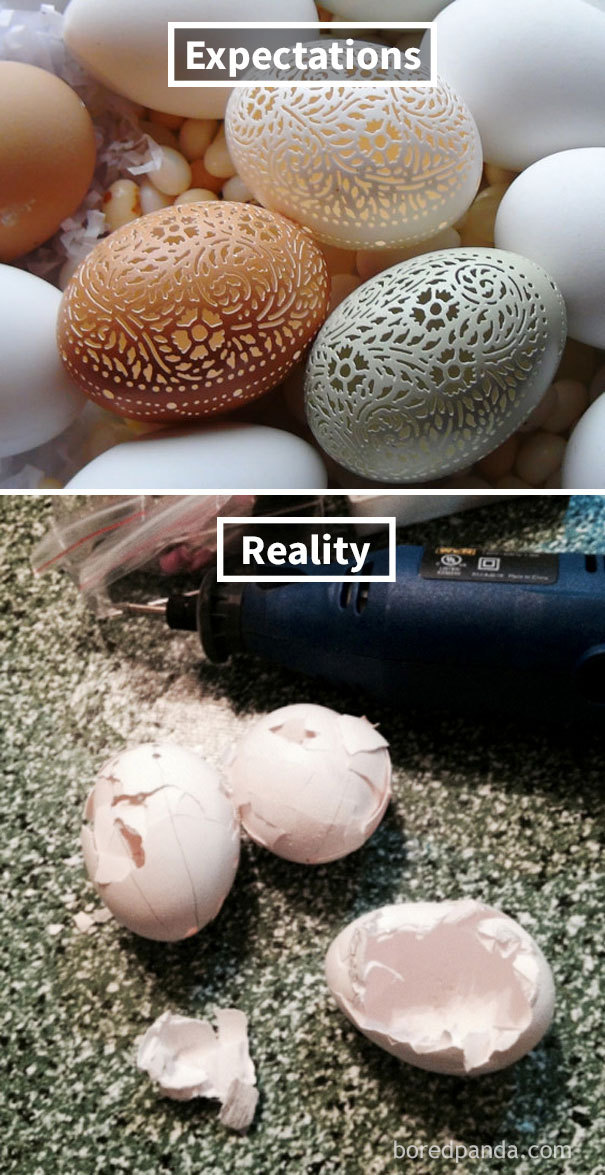
#3 Lace Eggs
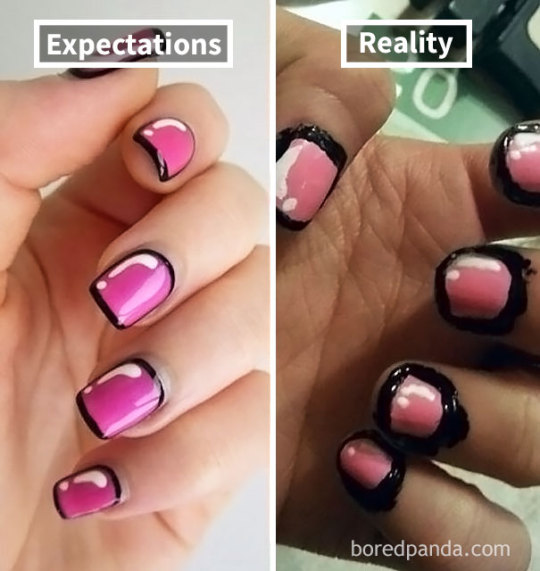
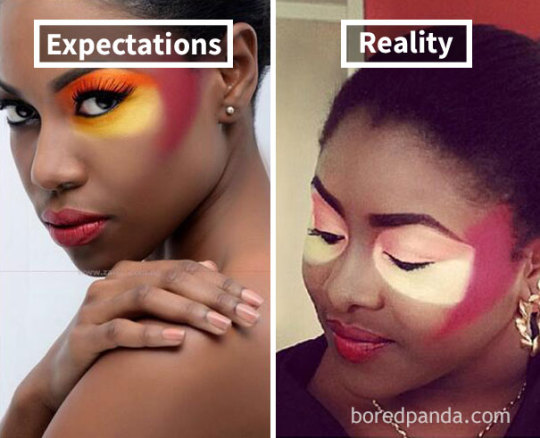
#4 Nail Design Fail
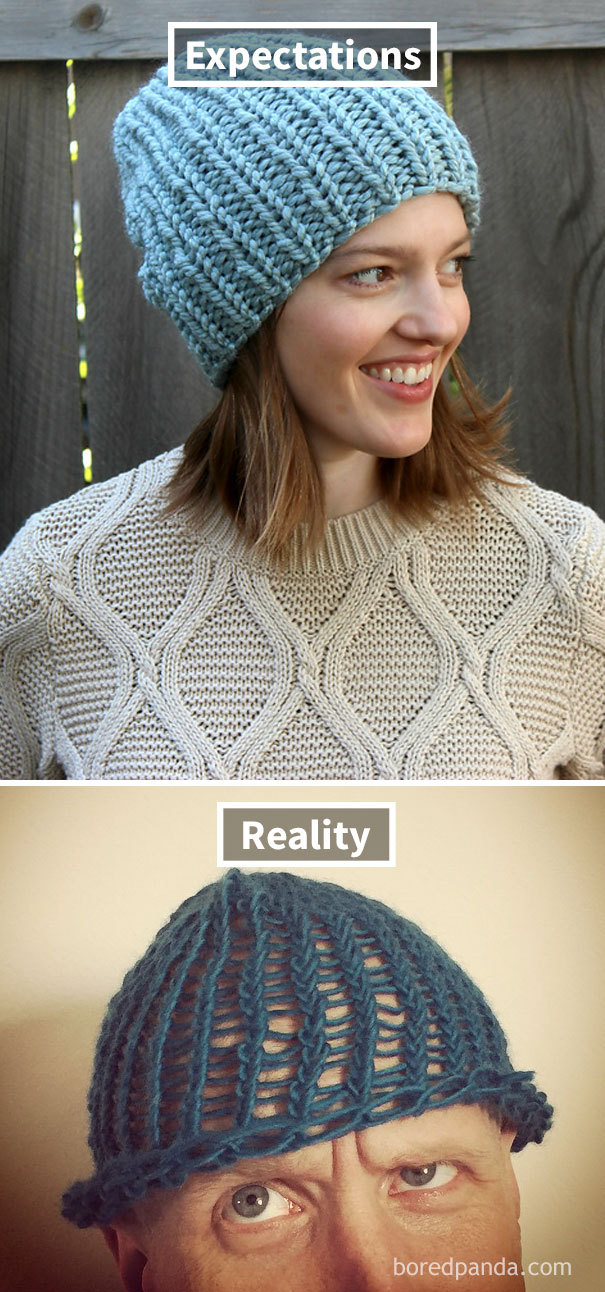
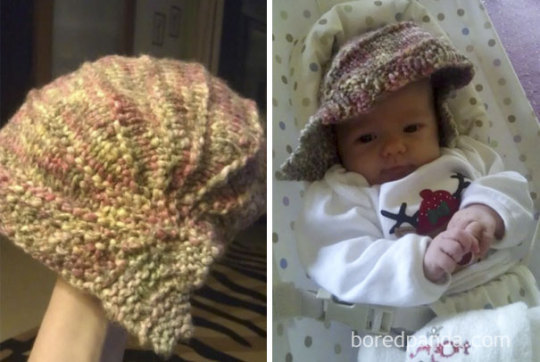
#5 Winter Cap
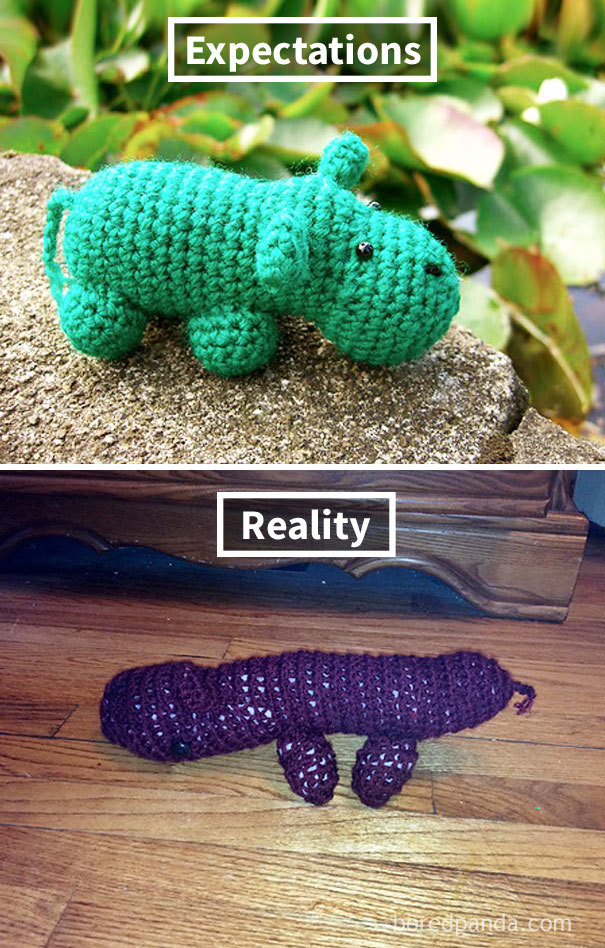
#6 Crochet Hippo Fail
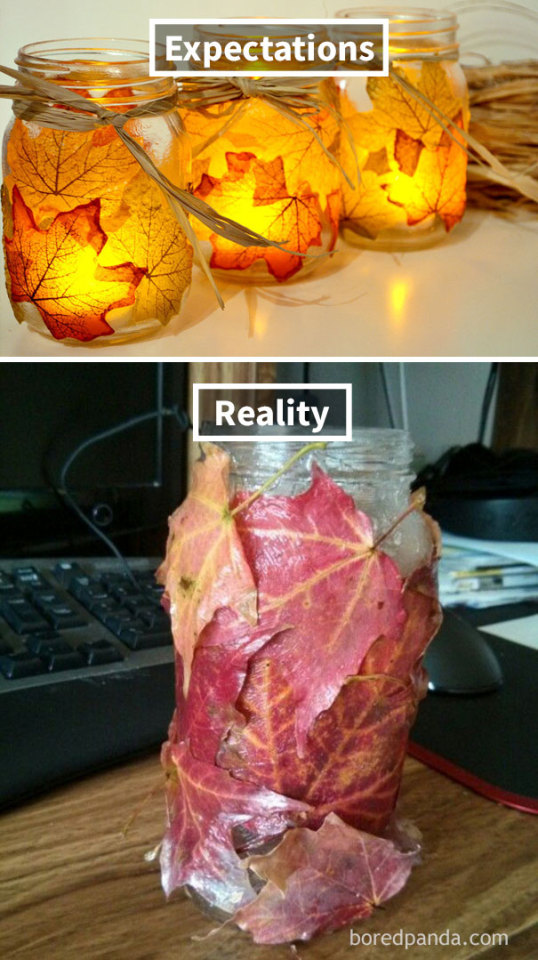
#7 Autumn Leaf Candle Holder
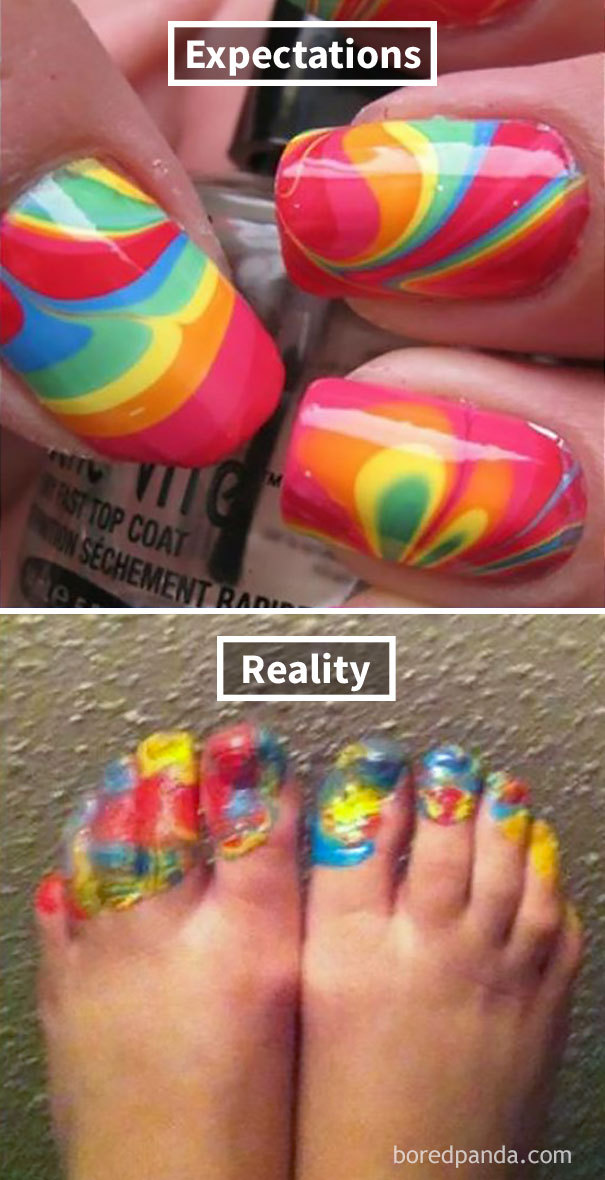
#8 Swirl Nails Fail
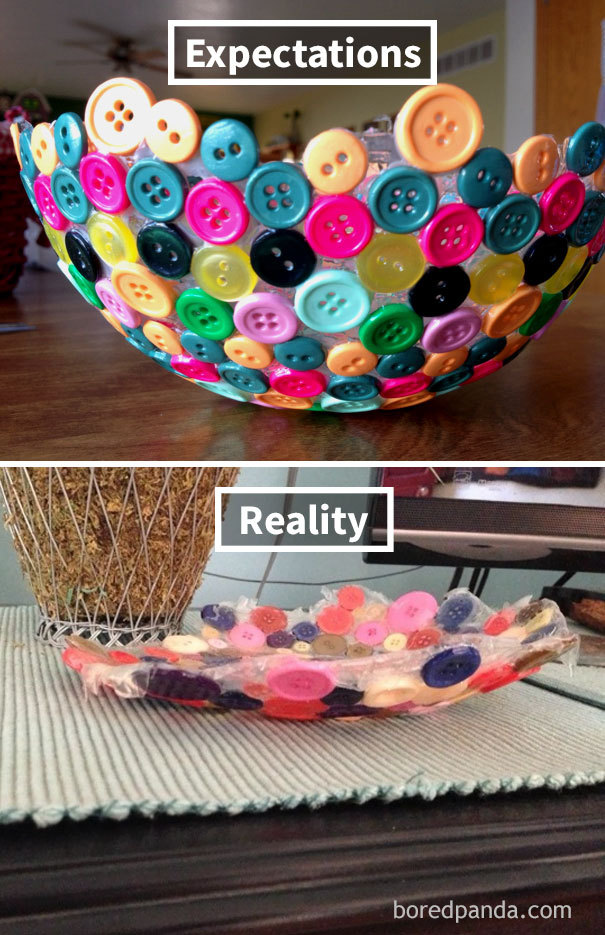
#9 Button Bowl
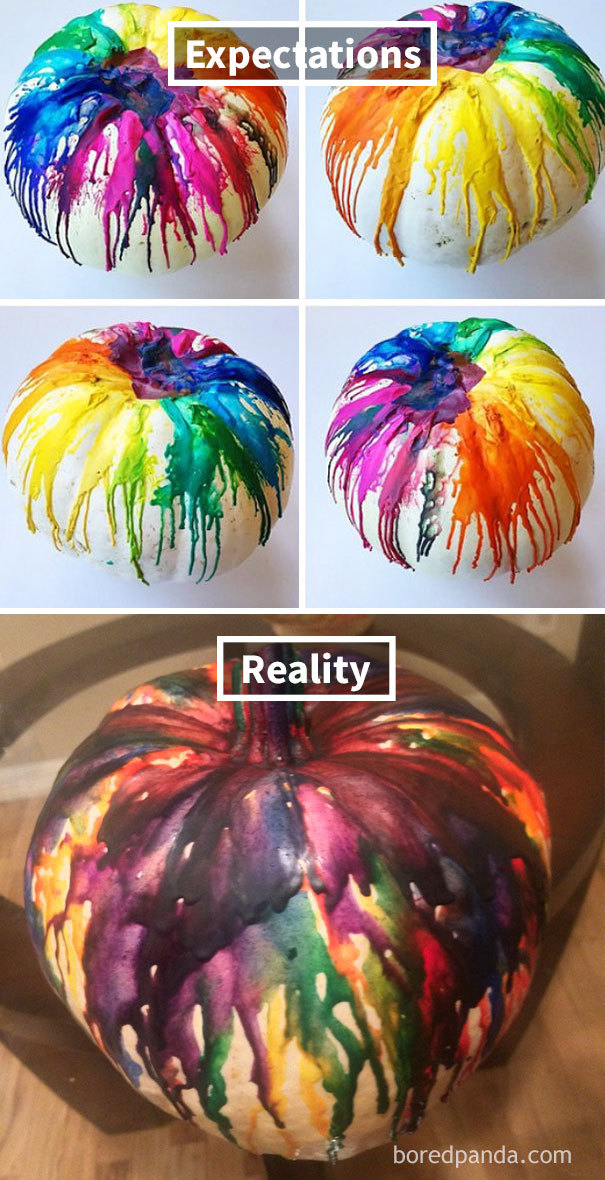
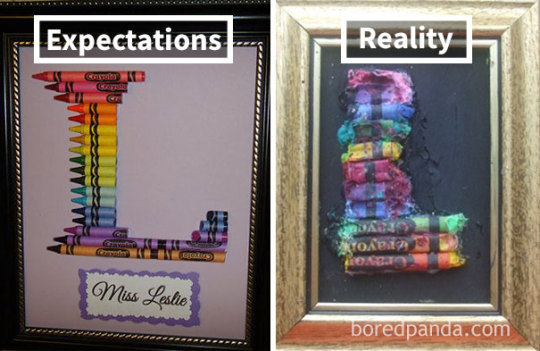
#10 Melted Crayon Art Attempt
#12 Eldregre Tie Knot Fail
#13 We Sent My Grandma A Pic Of The Snowman Tree Idea And She Came Up With This Disaster

#14 Dead Crocheted Birdie
#15 First Attempt At Arm Knitting. I Made A Stylish Volleyball Net

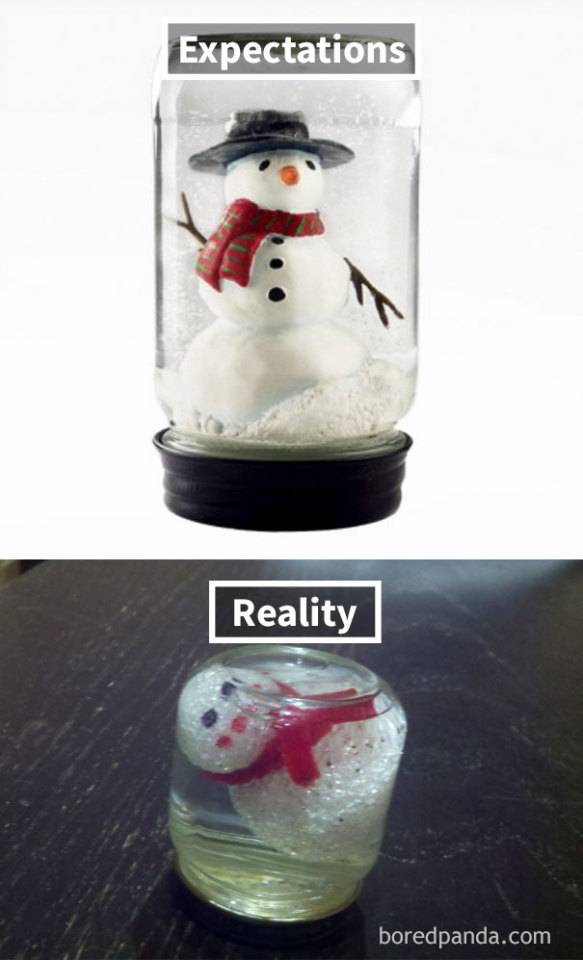
#16 Drowning In Snowglobe
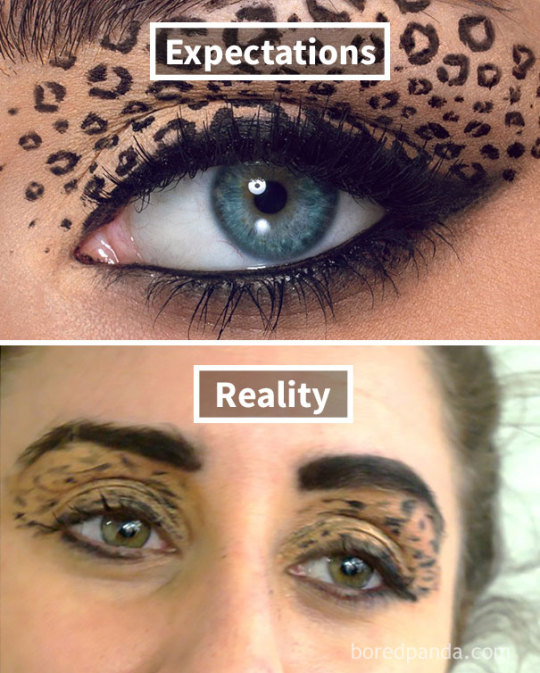
#17 Leopard Eyeshadow Fail
#18 It’s Official, I Am No Good At Crafts
#19 String Balloons Disaster
#20 Glow Stick Balloons
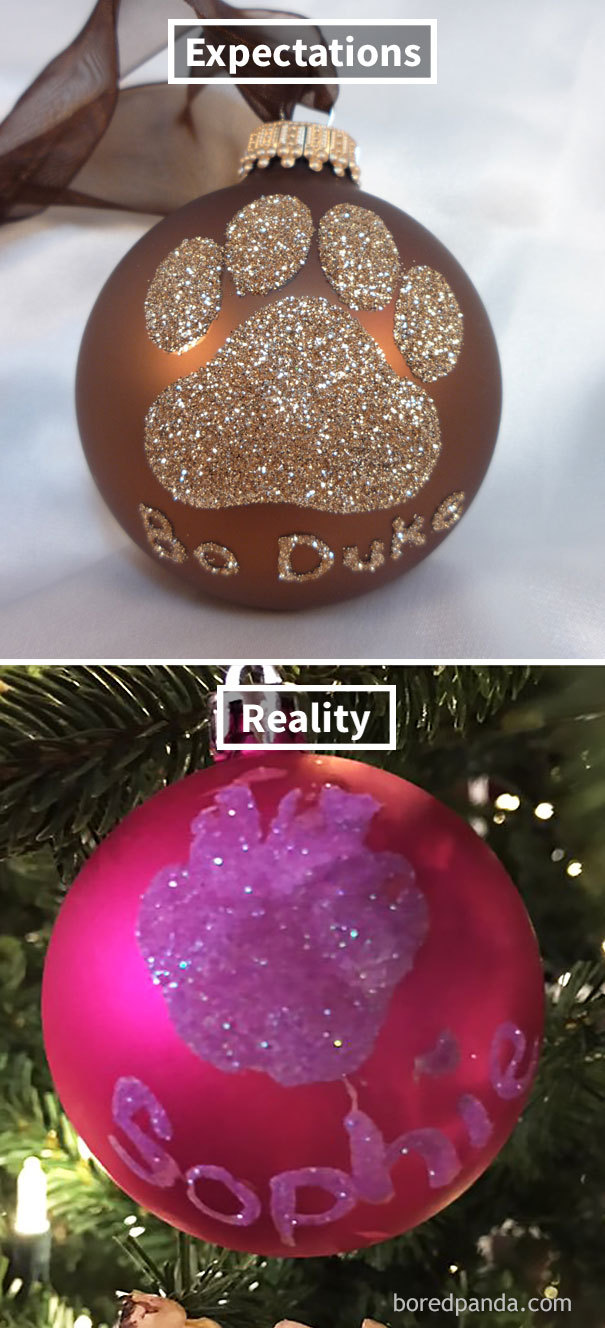
#22 Cute Little Paw Print Ornament Fail
#23 A Failed Attempt At Cut-Off Jean Shorts
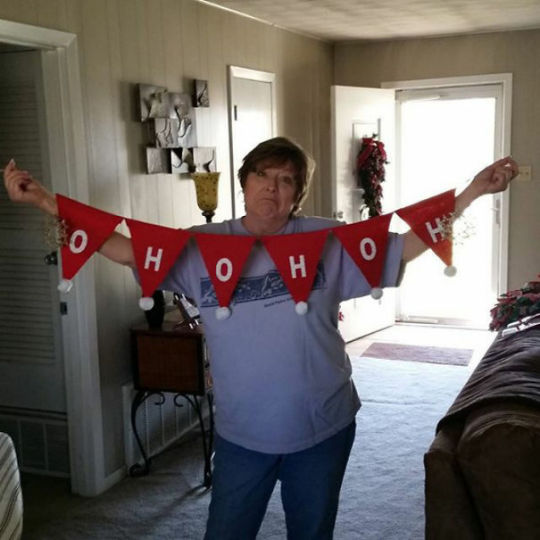
#24 Hohoho Decoration Fail
#25 Bottle Bottom Flowers
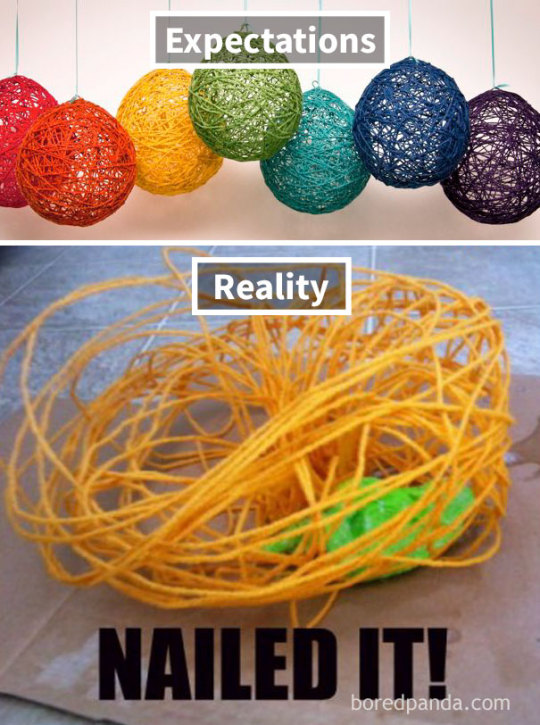
#26 Yarn Balloon Burst
#27 Sucky Socks
#28 Nice Try, Hot Lips

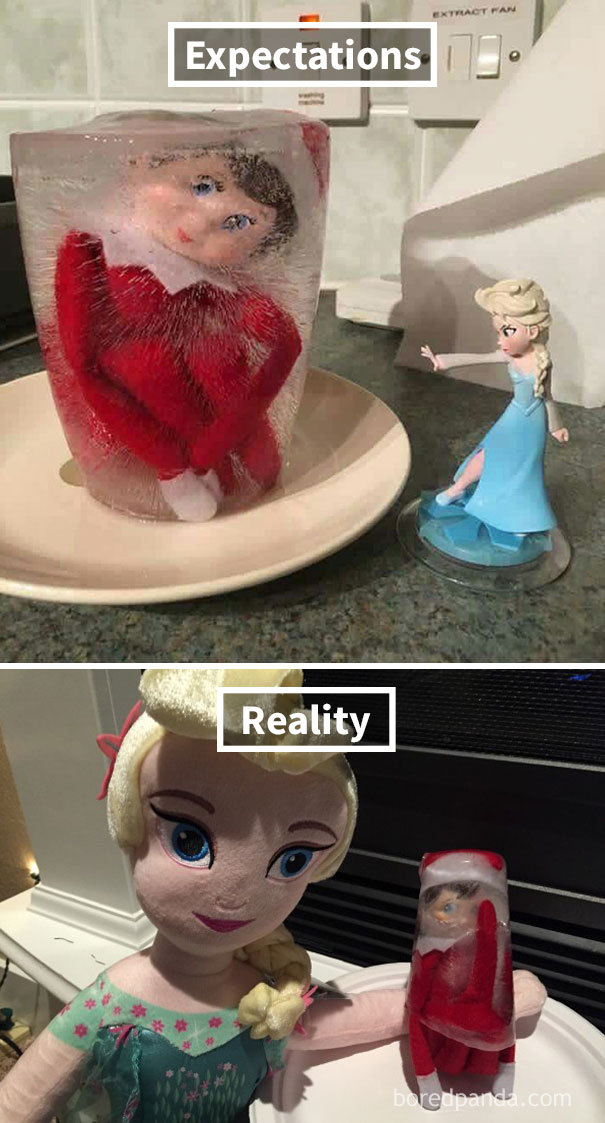
#29 Beware Of Leg Placement When Freezing An Elf
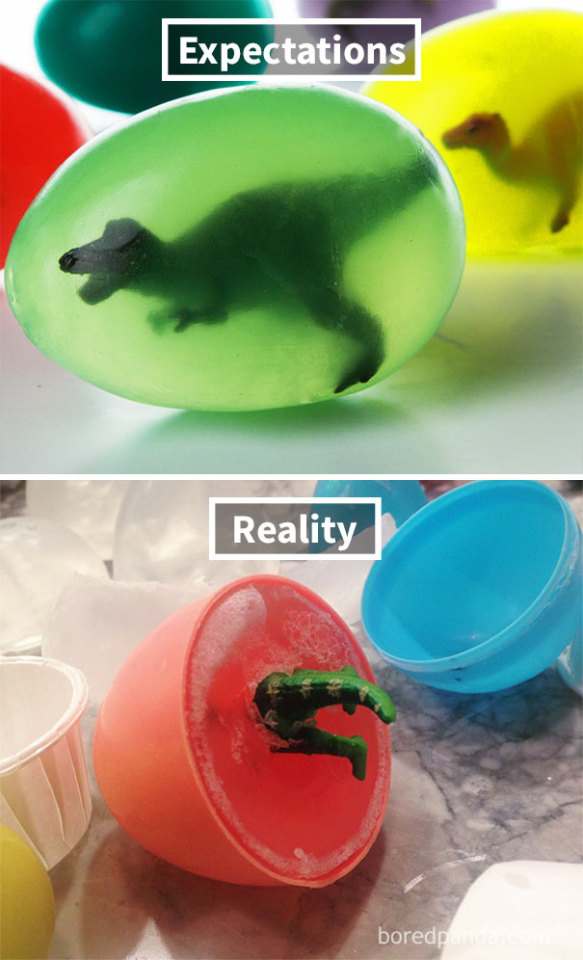
#30 It’s So Easy, They Said. Simply Squeeze And The Dino Egg Soap Will Come Out In One Piece, They Said

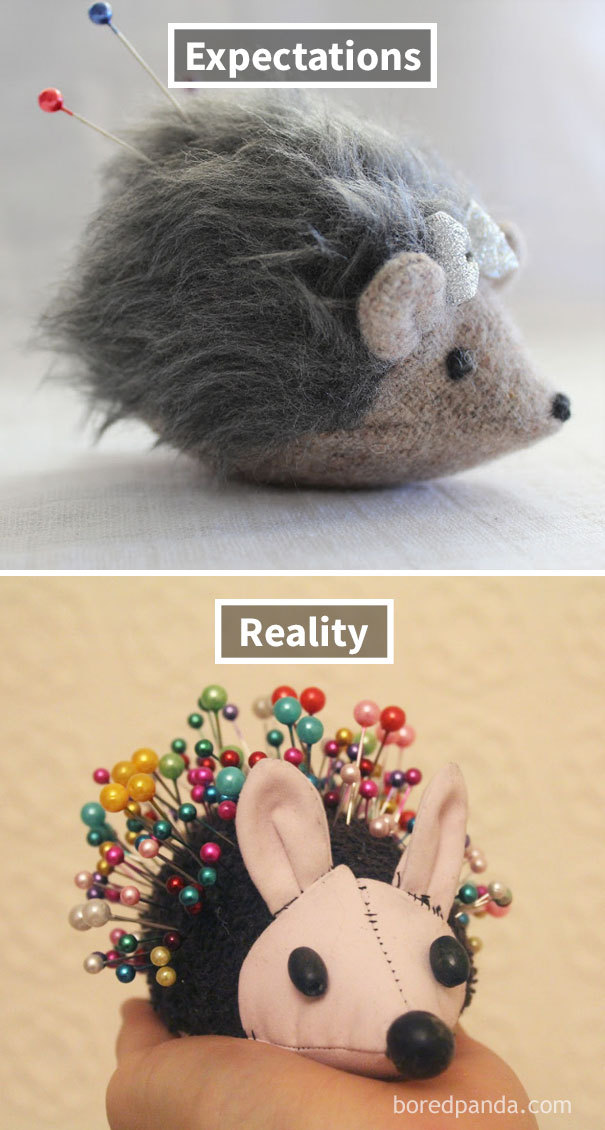
#32 Hedgehog Pin Cushion
#33 Hair Updo Fail

#34 Calming Jar Fail

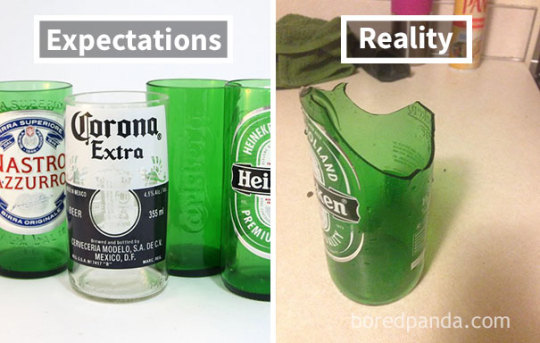
#35 Beer Glass
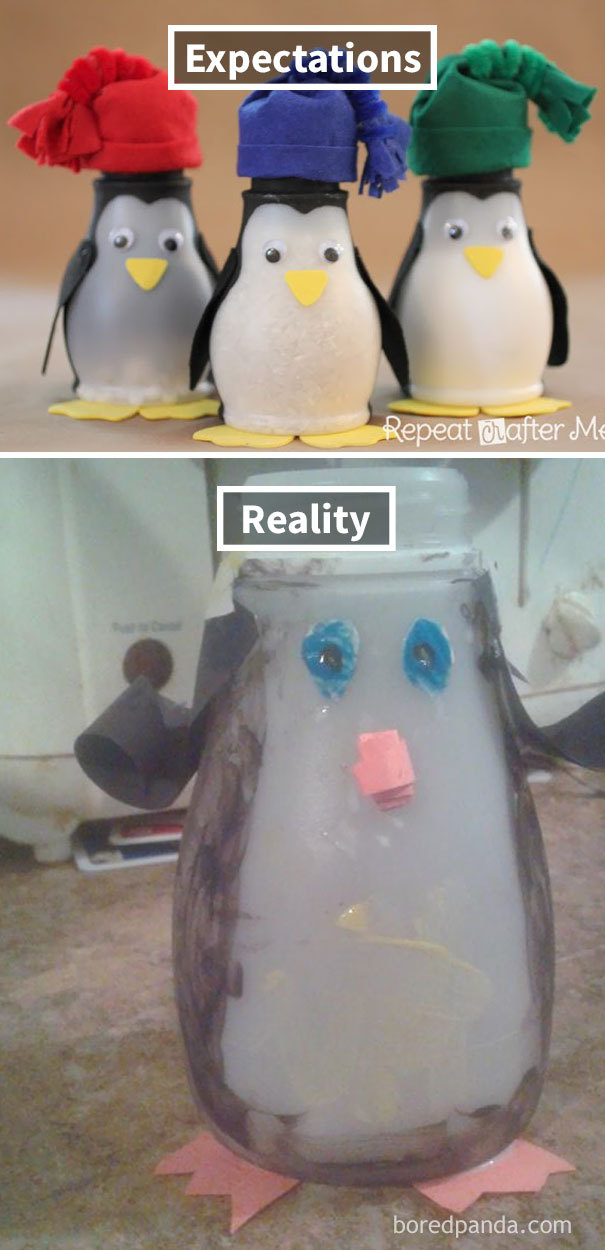
#36 Mcdonalds Milk Jug Penguin
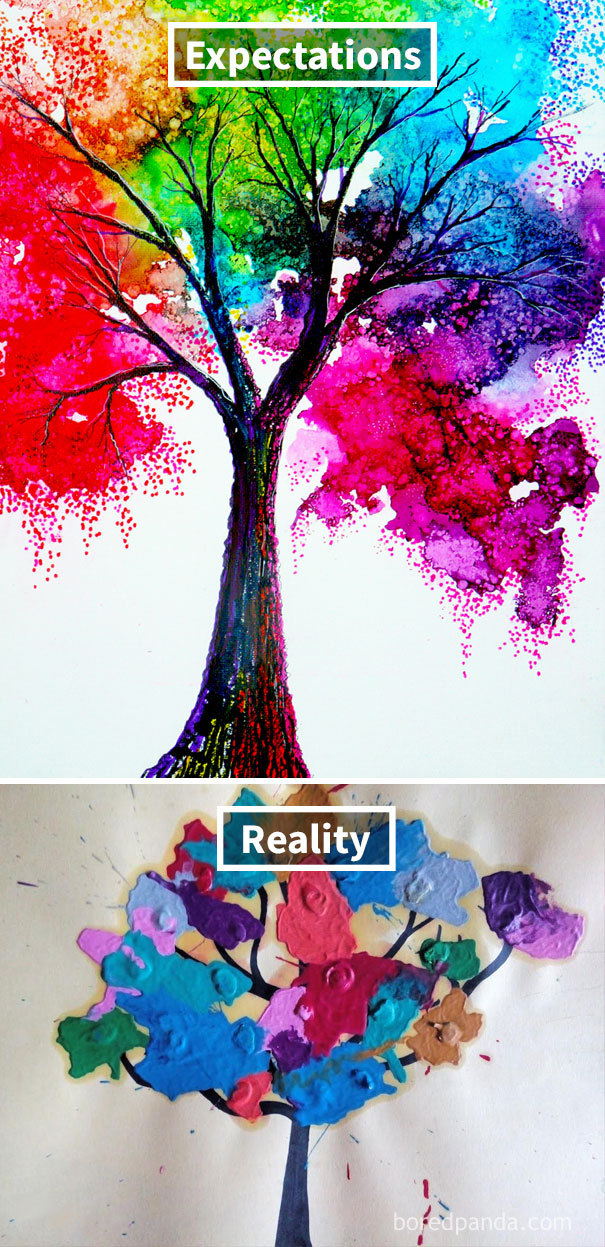
#37 Melted Crayon Tree Art
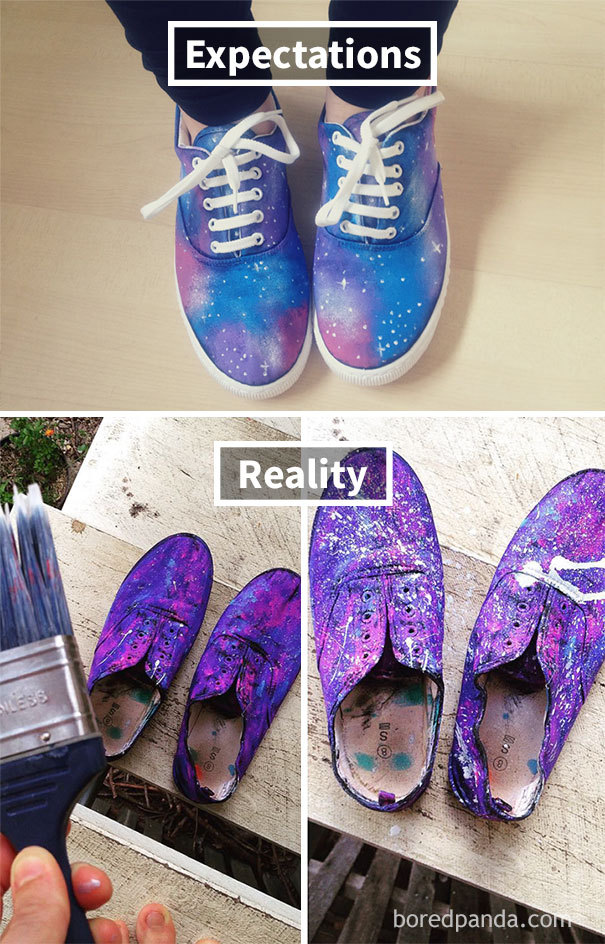
#38 Galaxy Shoe Fail
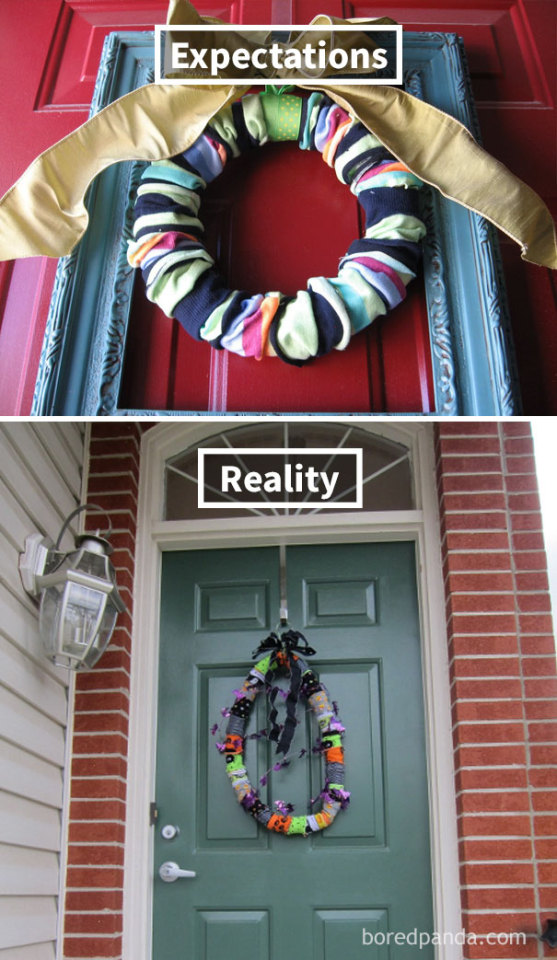
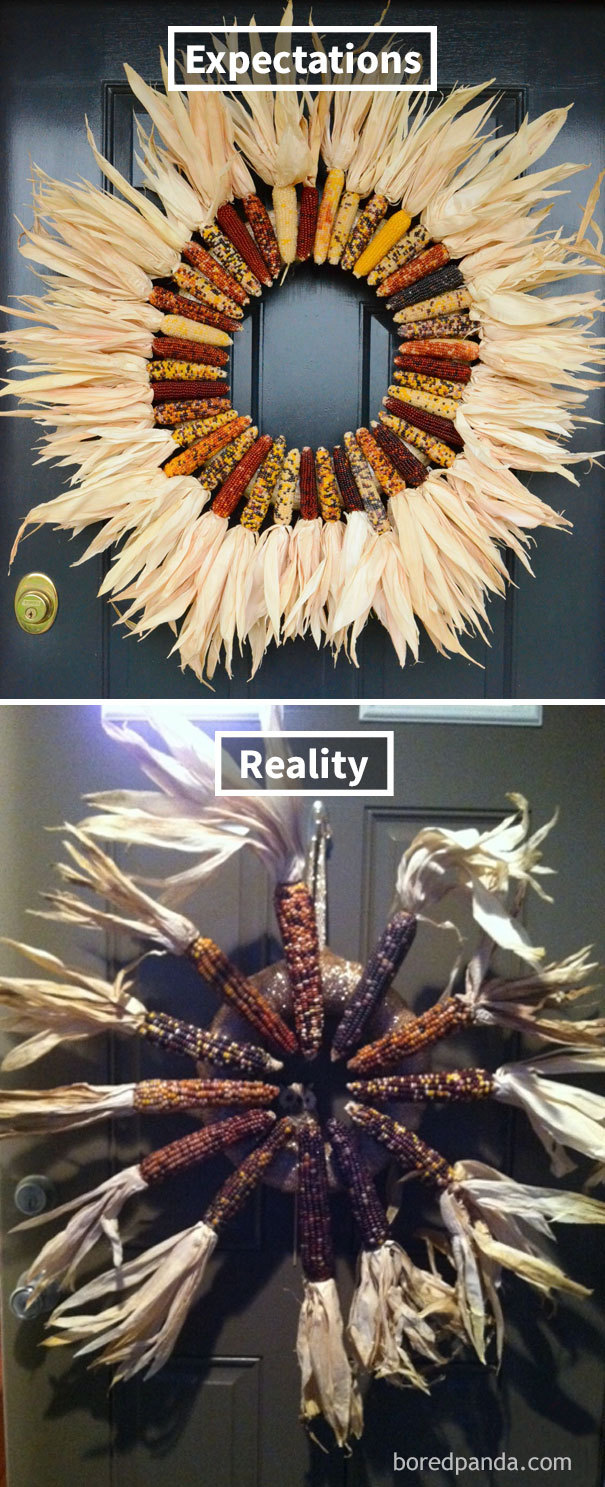
#39 Wreath Woes
#40 Zombie Nails
#42 Dog Toy Fail
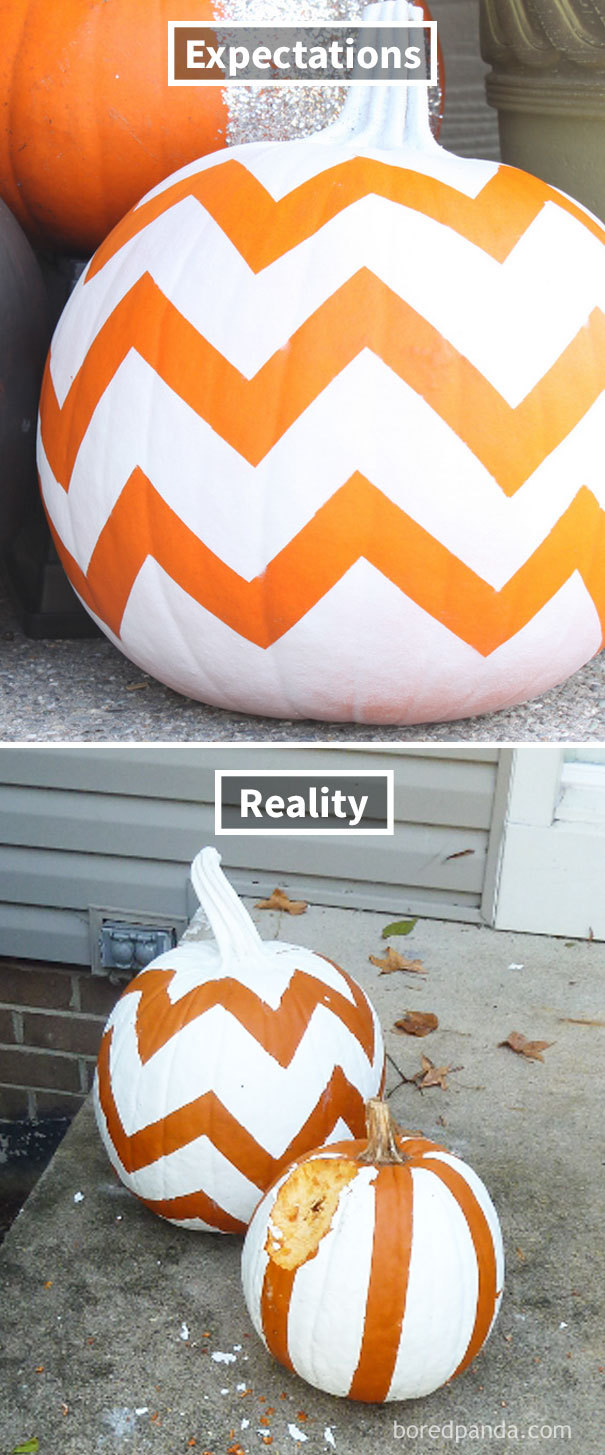
#43 Jacked Up Jack-O-Lantern
#44 Cut Out Dress Failure

#45 I Guess I Shouldn’t Have Thrown Out The Directions
#46 Origami Ain’t My Thing
#47 Fork Bracelet Fail
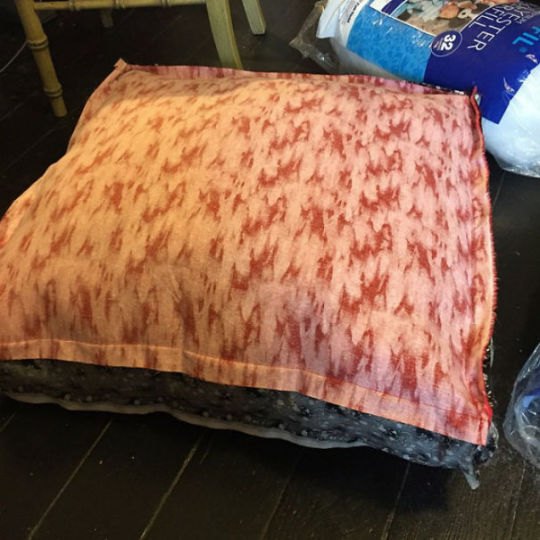
#48 Camper Van Cushion
#49 Denim Bascet Fail
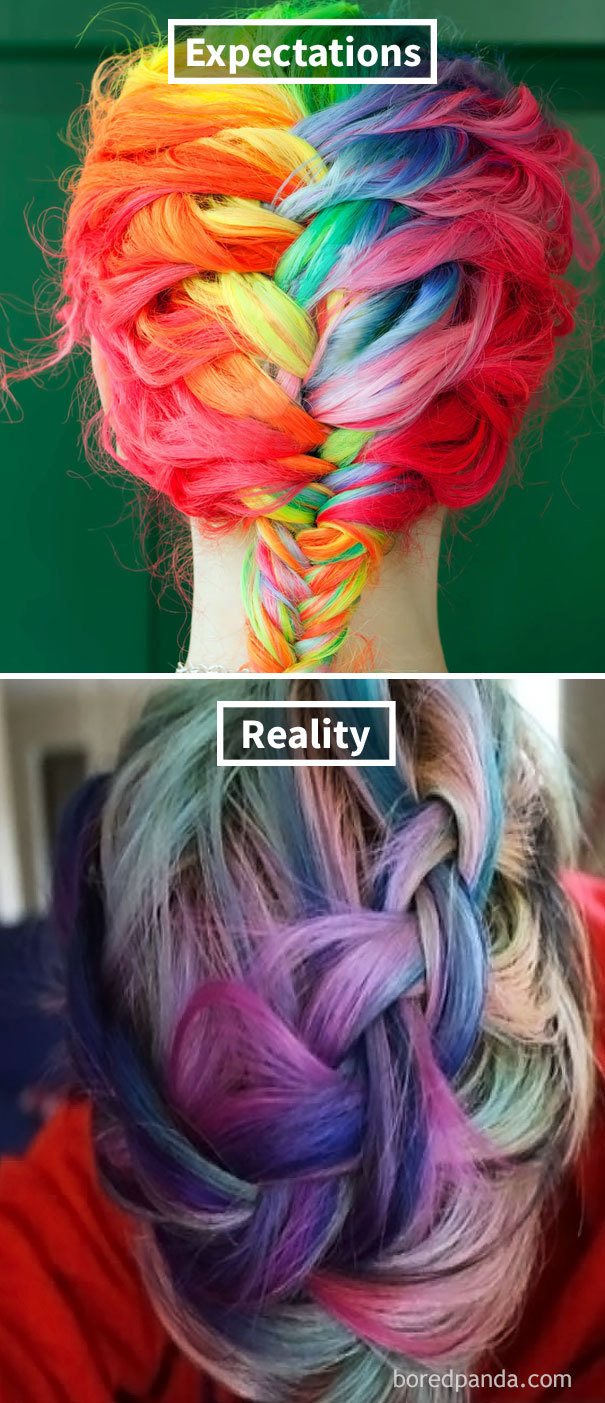
#50 Heart Braids Fail
#52 Faux Stag Head And Its Misshapen Paper-Mache Offspring
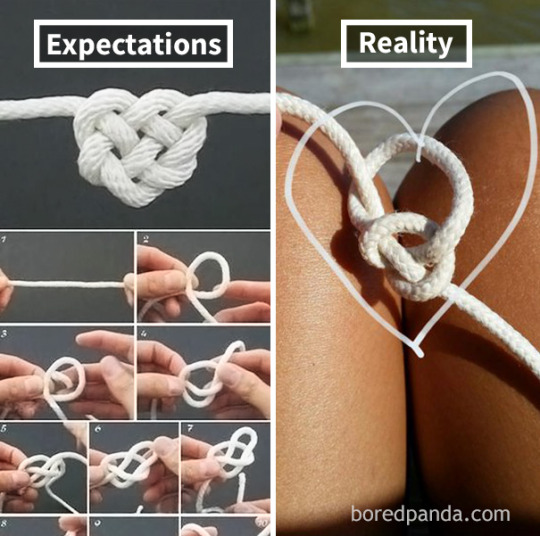
#53 Heart-Shaped Knot
#54 Decorating The Boyfriends Beard

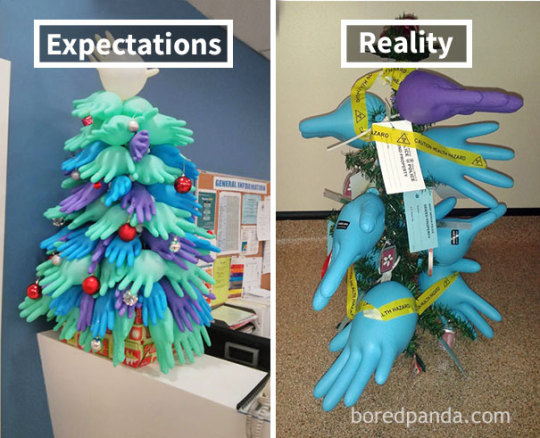
#55 Glove Christmas Tree Fail
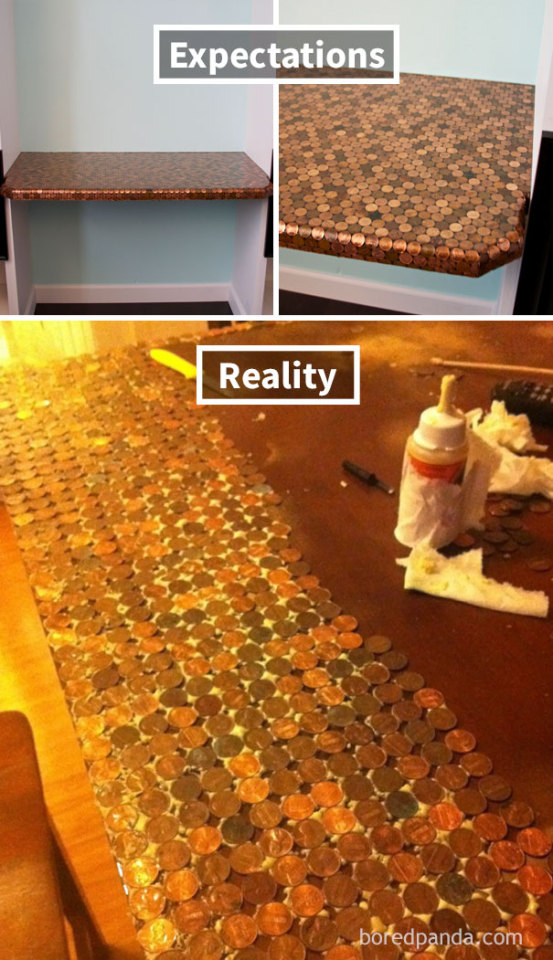
#56 Penny Covered Tabletop Faill
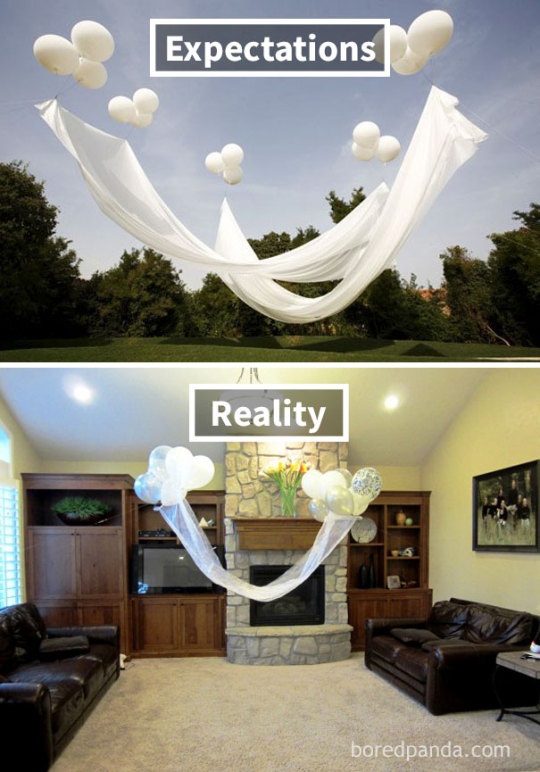
#57 Floating Canopy
#58 Valentine Crayons Mess
#59 No-sew Pillowcase Fail
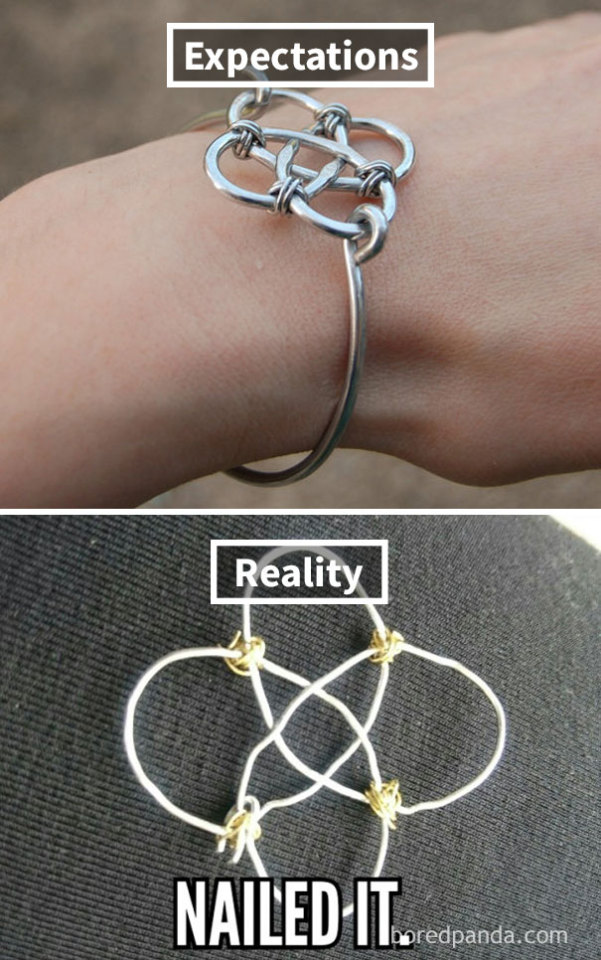
#60 Nailed It… Not
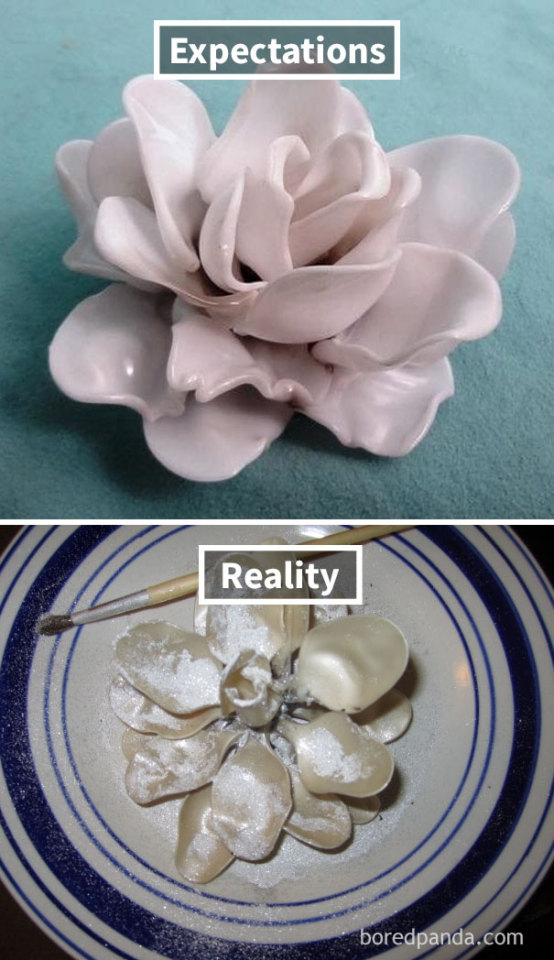
#62 Plastic Spoon Rose
#63 I Only Have Myself To Blame
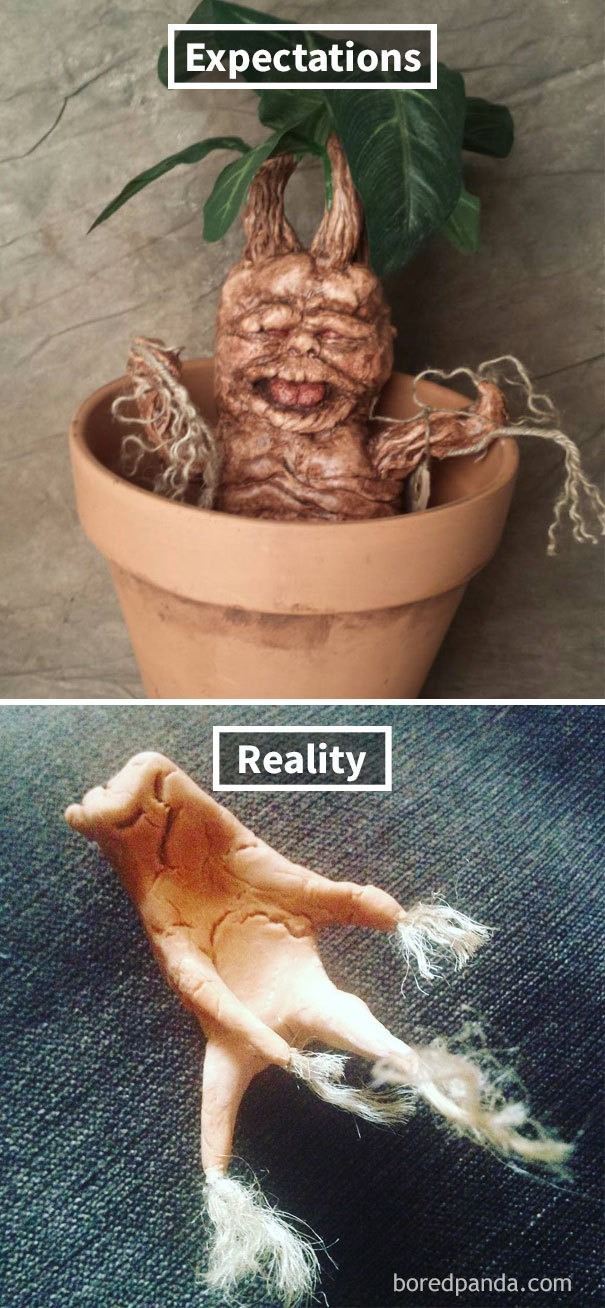
#64 Failed Mandrake Root Back To The Drawing Board
#65 Christmas Dogs Decoration

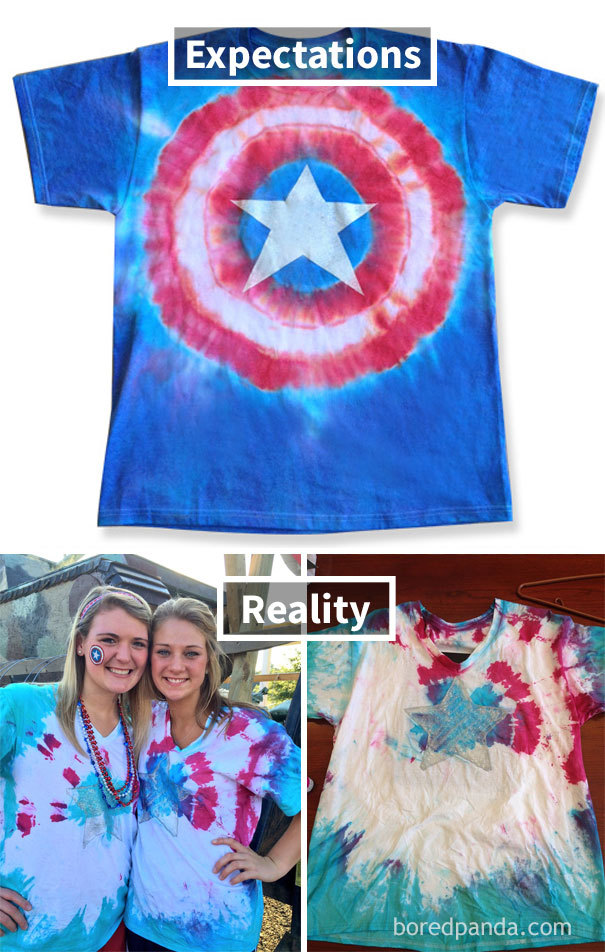
#66 Captain America Tie Dye Avengers Shirt Fail
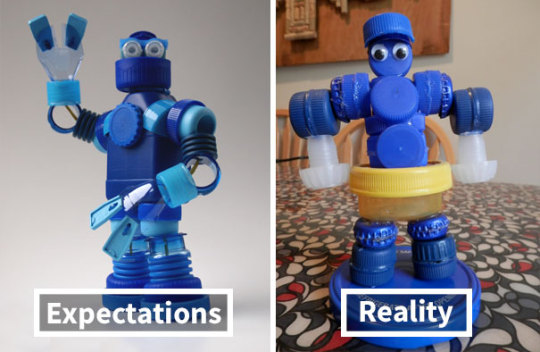
#67 Recycled Bottle Cap Robot
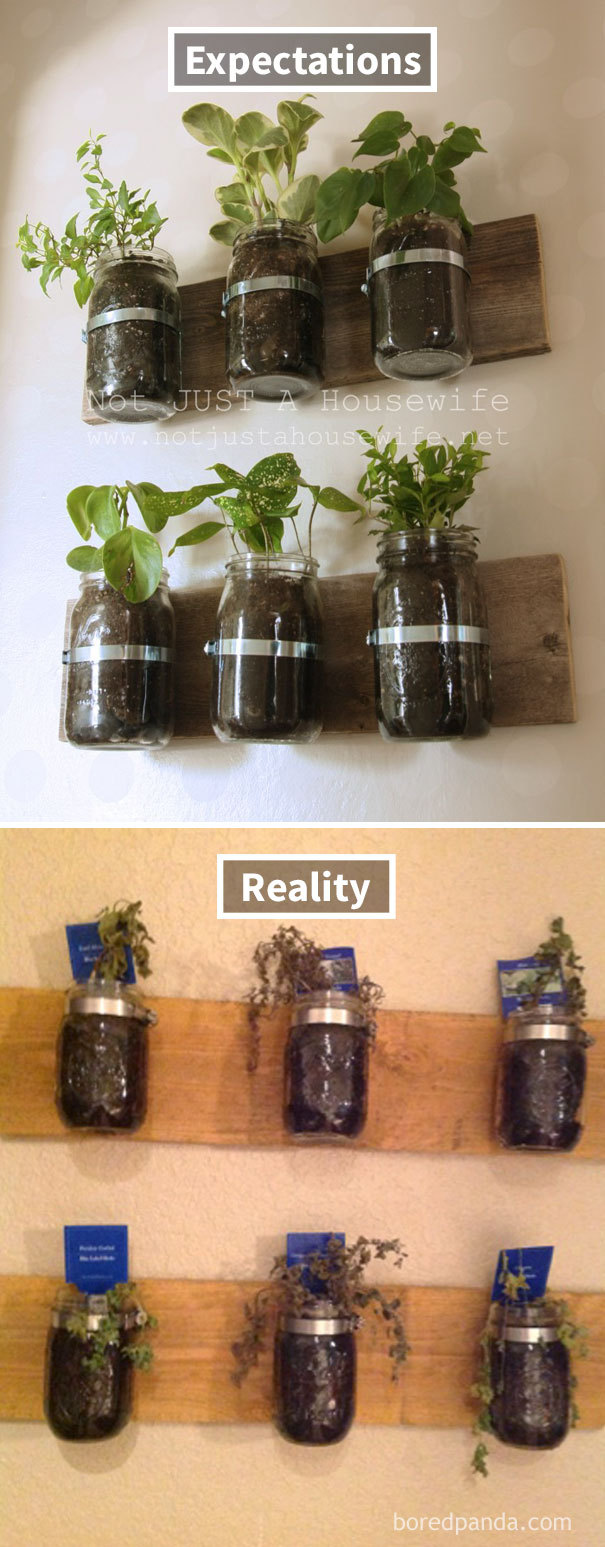
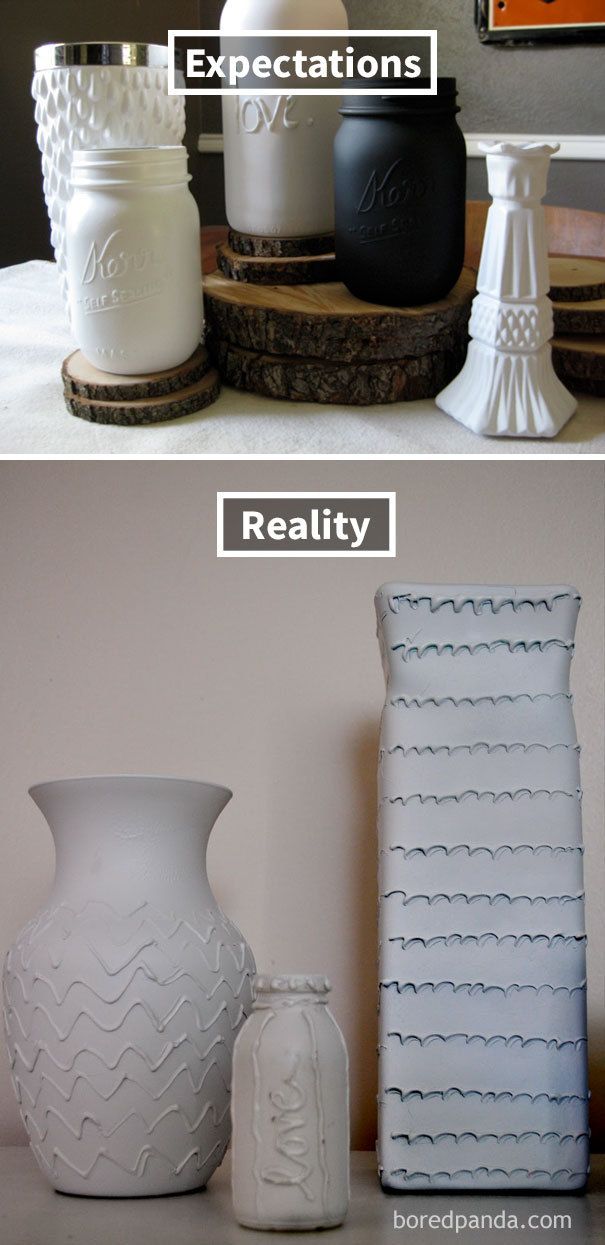
#68 Mason Jar Planters
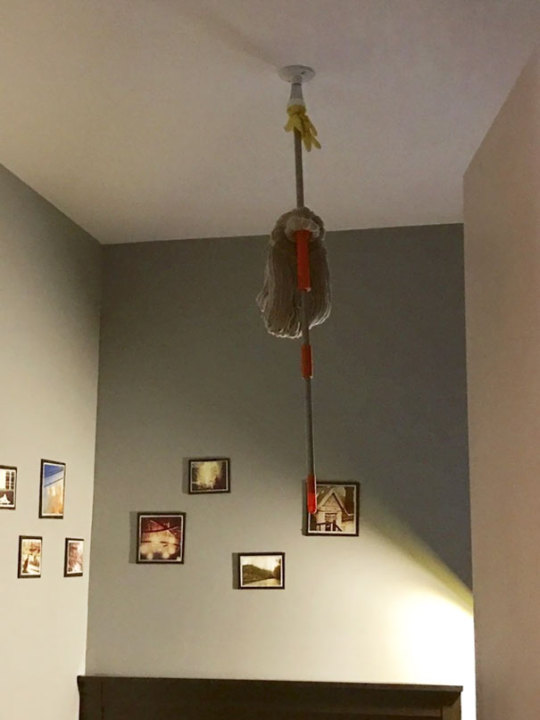
#69 Tried To Diy A Lightbulb Changing Stick. Mop. Rubber Glove. Tape. Bulb Got Stuck Going In. Fail Chandelier Was Born
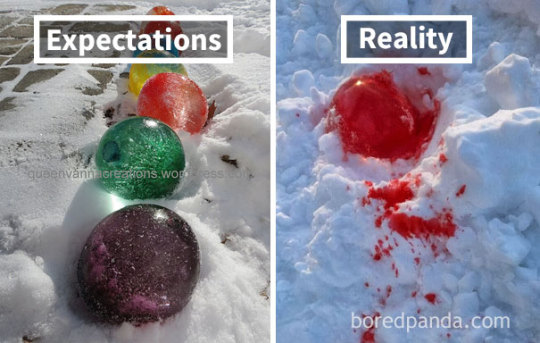
#70 Bloody Ice Ballons
#72 Glow-In-The-Dark Candy Button Shoes
#73 When Your Glass Project Isnt Going So Well
#74 Matryoshka Dolls Fail
#75 Makeup Fail
#76 Mason Jars Decoration Fail
#77 Thats One Big Baby Hat
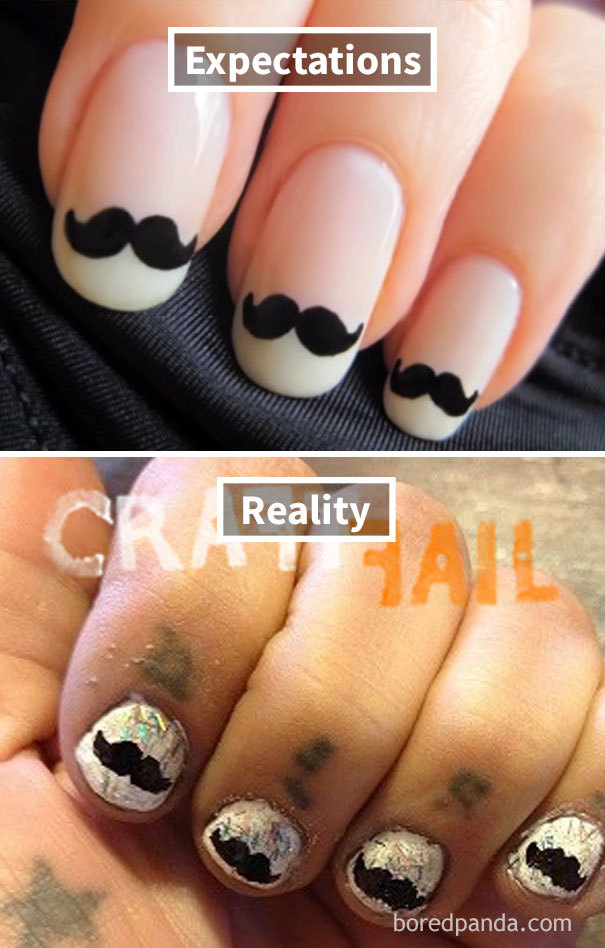
#78 Messed Up Mustache Nails
#79 Barbie Box Photobooth
#80 Doily Lamp Issues

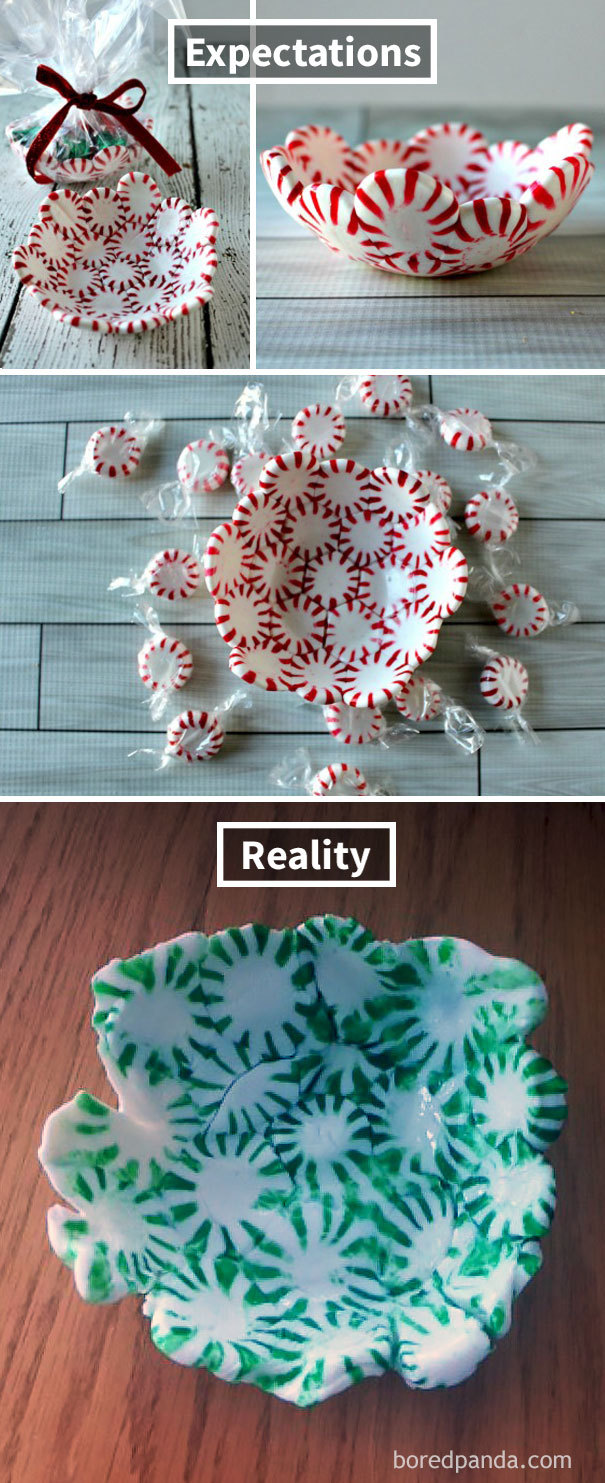
#82 Peppermint Bowl Fail
#83 Celtic Cross
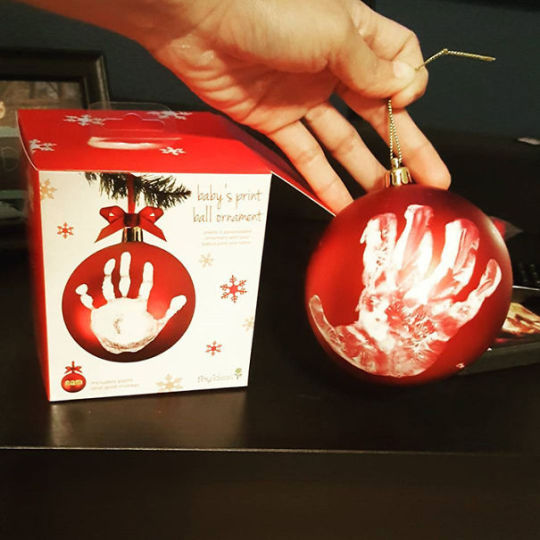
#84 Baby Print Ball Ornament Fail
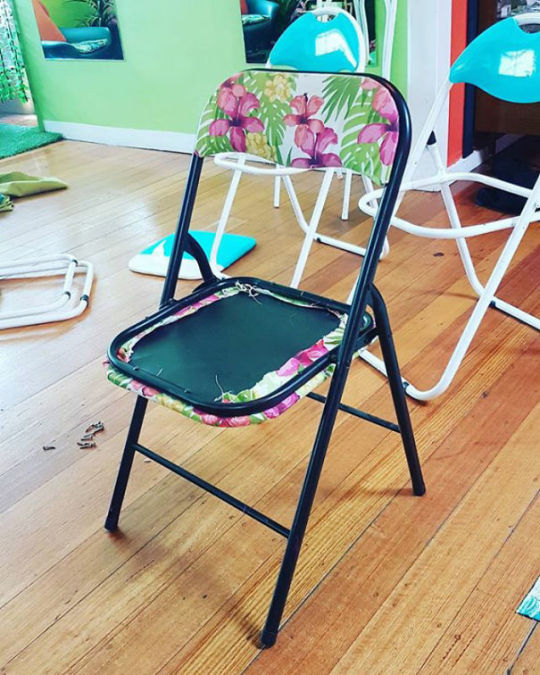
#85 Upholstery Fail
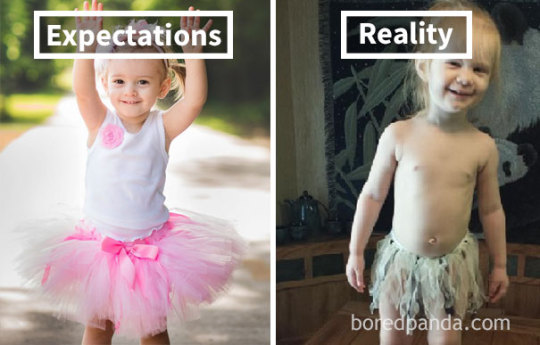
#86 Tutu Skirt Fail
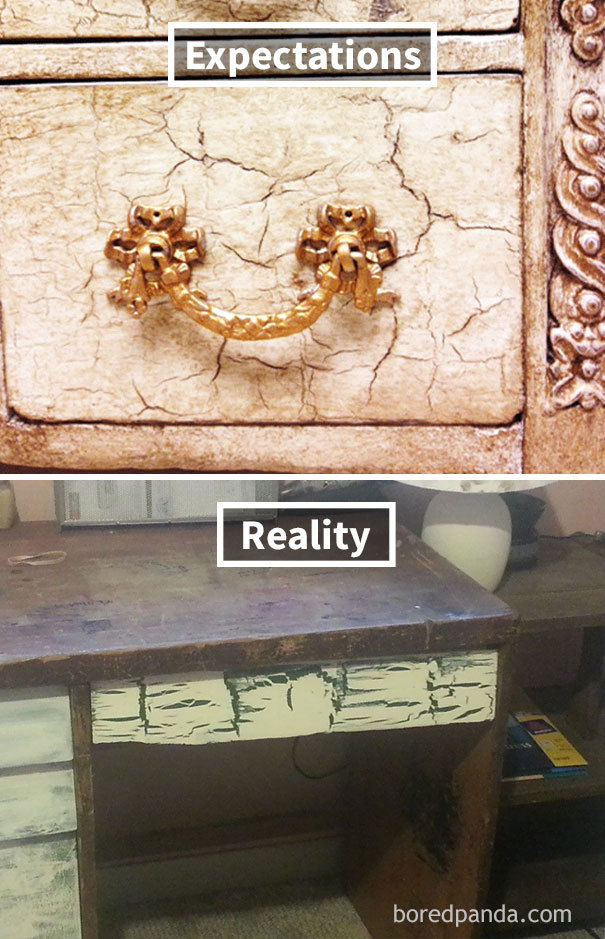
#87 Writing Desk Transformation Fail
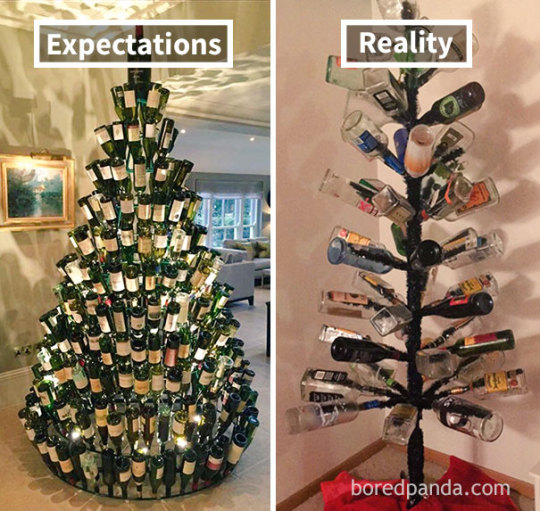
#88 Bottle Christmas Tree Fail
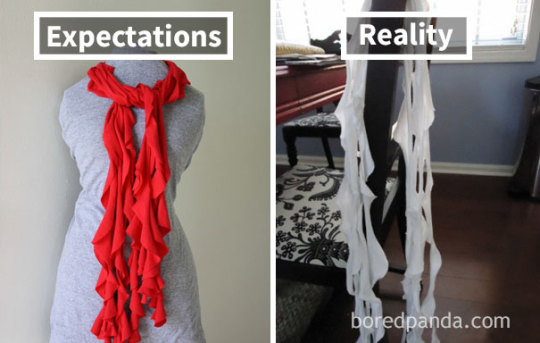
#89 T-Shirt Ruffle Scarf Fail
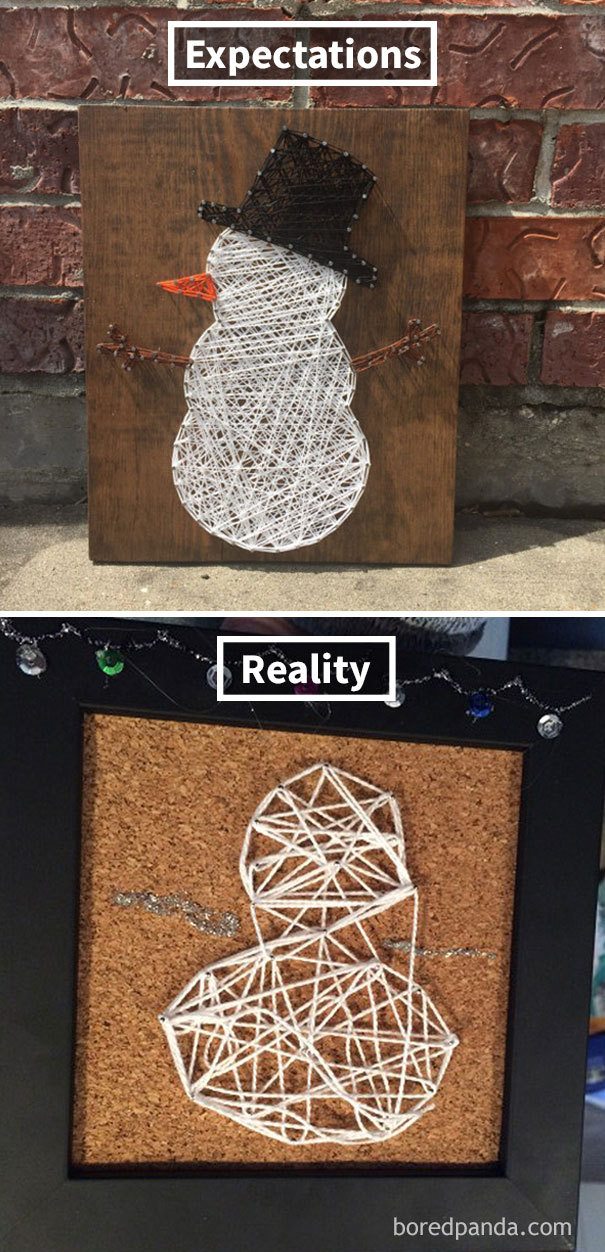
#90 Abstract String Art Snowman
#92 What? Its A Pet Rock Mouse Not A Craft Fail
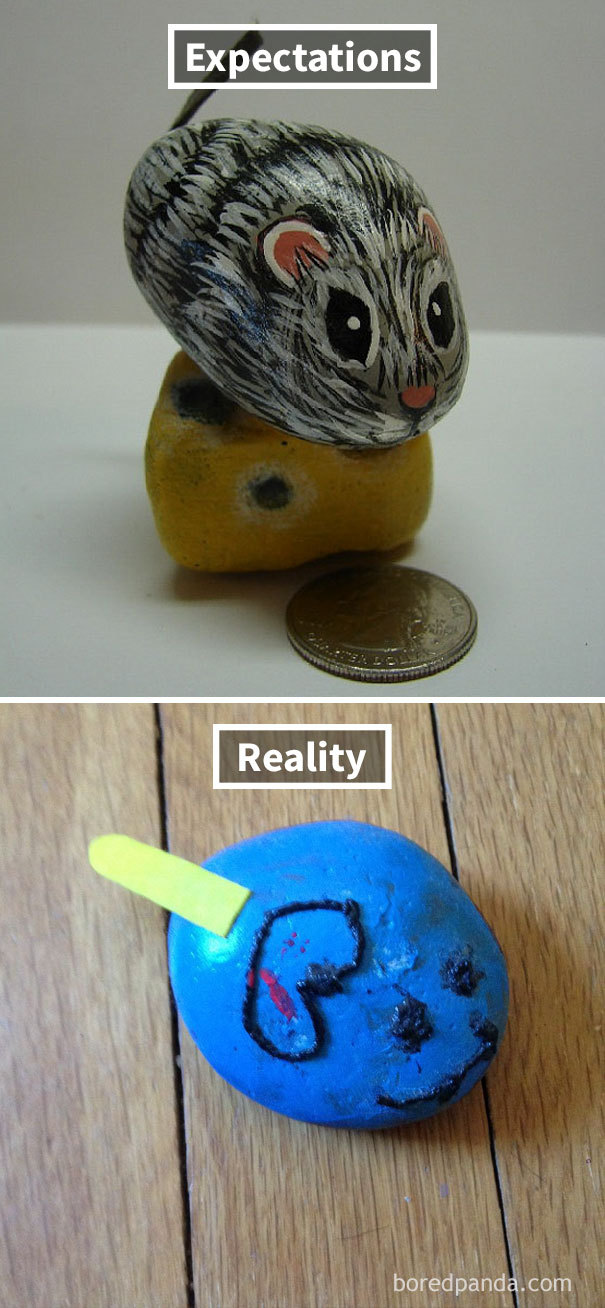
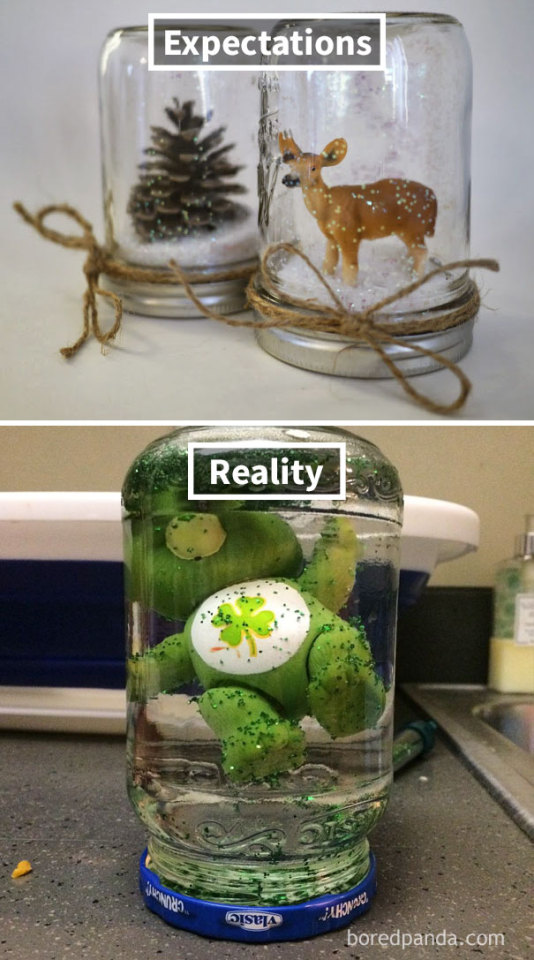
#93 First Attempt At Making Homemade Snow Globes. Care Bear Seems Really Uncomfortable In His New Environment
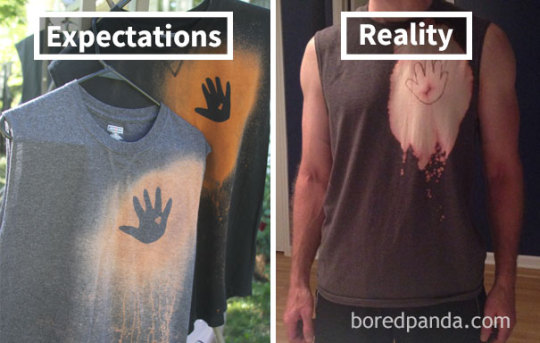
#94 Fathers Day Shirt Gone Wrong
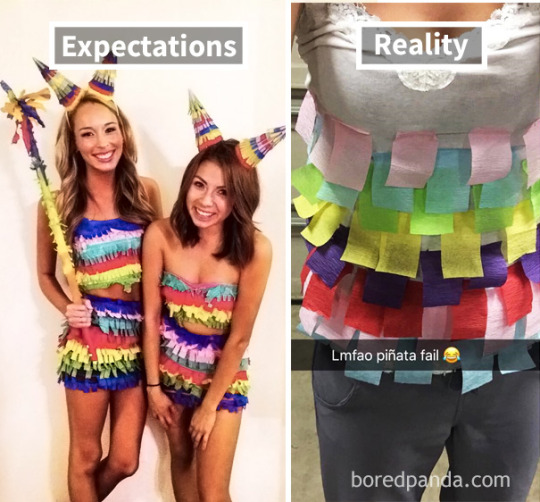
#95 Pinata Dress Fail
#96 Supposed To Be A Snowman
#97 Plastic In The Oven Is Not A Good Idea
#98 Nail-Art Fail
#99 Not Exactly What I Wanted
#100 Don’t Spray Paint Your Patterned Upholstery
#102 Tank Dress Fail

#103 Unfortunate Fairy Jar
#104 Not-So-Ombre Candles
#105 Halloween Decor Fail
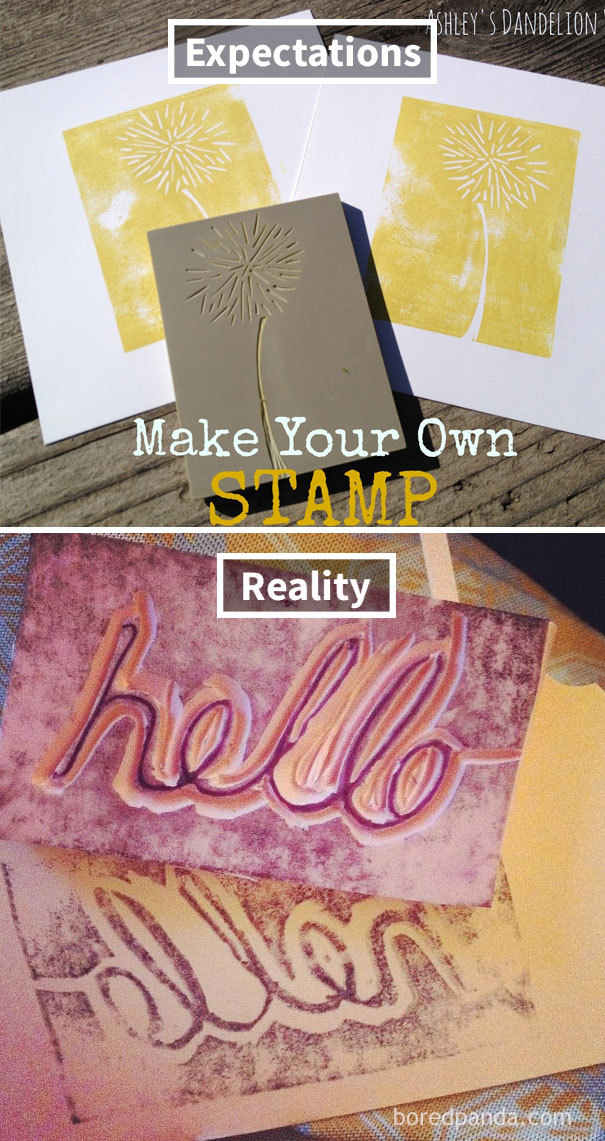
#106 Stamp Fail
#107 Snowflake Fail

#108 Pumpkin Decoration
#109 Hair Bow

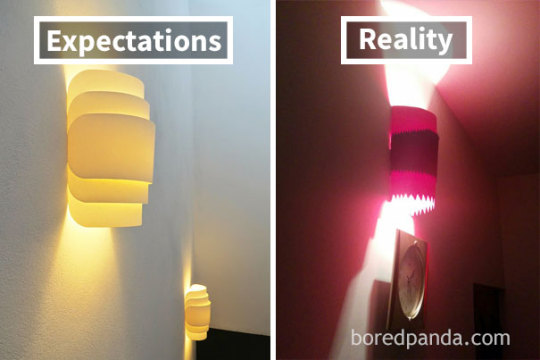
#110 Paper Wall Lamp Attempt
#112 Halloween Makeup Fail
#113 Air Vase Fail
#114 Origami Star
#115 Crayon Letter Mess
#116 It Was Supposed To Be A Butterfly
#117 That Moment You Realize You Forgot To Turn Your Project Inside Out
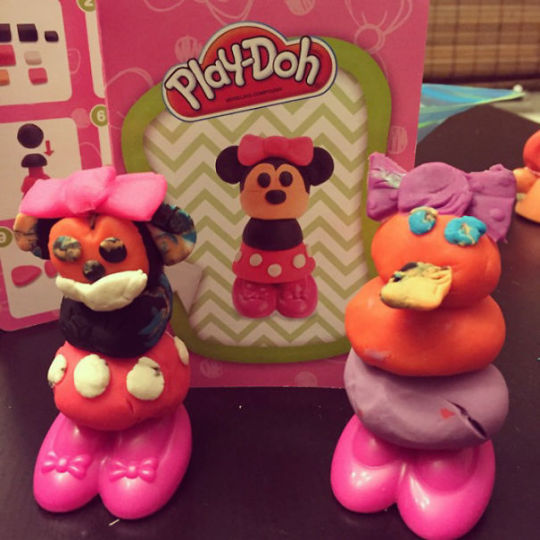
#118 It’ll Be Easy, They Said… Everything You Need To Make Minnie And Daisy, They Said
#119 Failed Chevron Melted Crayon Art
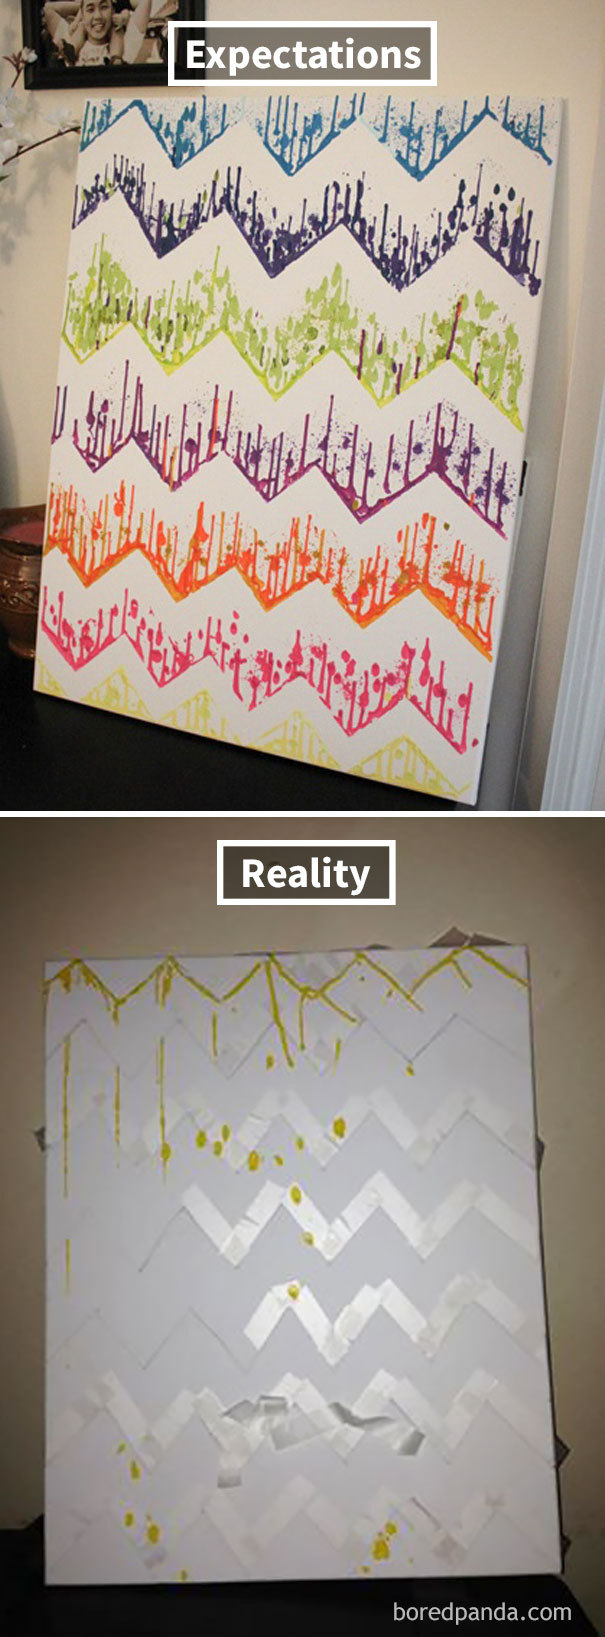
#120 Chevrons And Squirrels
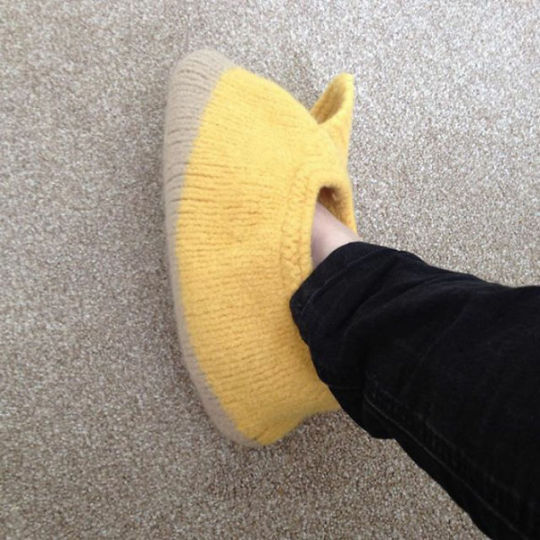
#122 Slipper Fail
<div class="open-list-item" open-list-block c
Source: http://allofbeer.com/10-diy-fails-that-are-so-terrible-its-impossible-not-to-laugh-at/
from All of Beer https://allofbeer.wordpress.com/2018/08/13/10-diy-fails-that-are-so-terrible-its-impossible-not-to-laugh-at/
0 notes
Link
12 Creative Gift Ideas / Valentine’s Day Special
Subscribe Here: https://www.youtube.com/channel/UCWwqHwqLSrdWMgp5DZG5Dzg?sub_confirmation=1 12 Life Hacks Every Lazy Person Should Know: https://youtu.be/GznrFIp2-Gs?list=PLy0LaulZe0vSljAapkasaxsIKJp7I-7j0&playnext=1 Supplies and tools: • Butter • Sugar • Eggs • Flour • Rolling pin • Heart-shaped cookie cutter • Powdered sugar • Citric acid • Food coloring • Ziploc bag • Love Is chewing gum wrappers • Ribbon • Box • Toilet paper • Double sided tape • Glitter • Colored twine • Flowers • Hardcover notebook • Pencil • Tablet • Utility knife • Printed “Crochet for Beginners” book cover • Soft clear plastic • Flat iron • Red slime • Pipe • Acrylic paint • Perfume bottle • Jar • Hand sanitizer • M&M’s • Crepe paper • EOS container • Bracelet • Card • Wireless headphones • Brick • Double sided foam tape • Chupa Chups • Plastic ball • Hot glue gun • Earrings • Plastic candy stick • Marshmallows • Chocolate bar • Wooden skewers • Gift wrapper • Dollar bills • Paper clips • Pizza box • Valentine’s Day card • Decorative hearts • Sticky note • Thick cardboard • Chocolate • Plastic detachable heart mold • Ring Watch More Troom Troom: Popular Videos: 14 Weird Ways To Sneak Food Into Class / Back To School Pranks: https://youtu.be/W5p2ndS34vA 18 Funny Pranks! Prank Wars! https://youtu.be/yWazGzCNtJ4 11 DIY Edible Makeup Ideas/11 Funny Pranks: https://youtu.be/kewz3hF63Xo 17 Weird Ways To Sneak Makeup Into Class: https://youtu.be/bvhBIsmzhwE Gummy Food vs Real Food Challenge! https://youtu.be/jBIG6GsQcq8 Popular Playlists: Funny Pranks: https://www.youtube.com/playlist?list=PLy0LaulZe0vRyRDcwVaqbvnbSqhSQNtS- Back to School: https://www.youtube.com/playlist?list=PLy0LaulZe0vSzNLVwlQZVJszbLCsIwl_C Life Hacks: https://www.youtube.com/playlist?list=PLy0LaulZe0vSljAapkasaxsIKJp7I-7j0 Beauty And Makeup Hacks: https://www.youtube.com/playlist?list=PLy0LaulZe0vSUQifjokDaw5m9aIgOQKt- Home Décor: https://www.youtube.com/playlist?list=PLy0LaulZe0vRWdxuF7xEwK_eJV2cZ8dt0 Follow Troom Troom: Subscribe: https://www.youtube.com/channel/UCWwqHwqLSrdWMgp5DZG5Dzg?sub_confirmation=1 Instagram: https://ift.tt/2sXpTD1 Facebook: https://ift.tt/2nV2y6g Pinterest: https://ift.tt/2FwuB59 Troom Troom Español: Subscribe: https://www.youtube.com/channel/UCu6oyJJ6PlkeNNv6n26ZNyA?sub_confirmation=1 Troom Troom Française: Subscribe: https://www.youtube.com/channel/UCyNeKmBHI10u4bwYEKimlZA?sub_confirmation=1 Troom Troom Russian: Subscribe: https://www.youtube.com/channel/UCq1JpGFxcZTbbOAz010U-og?sub_confirmation=1 Troom Troom Deutsch: Subscribe: https://www.youtube.com/channel/UCzgmxZIlgfH1fgch7OpigIA?sub_confirmation=1 Troom Troom Chinese: Subscribe: https://www.youtube.com/channel/UCV3NWBs2K7pOEGmI4w_2dhg?sub_confirmation=1 Troom Troom Português: Subscribe: https://www.youtube.com/channel/UCgCQlMYN2XypwYC2wcR32bA?sub_confirmation=1 Troom Troom Japanese: Subscribe: https://www.youtube.com/channel/UCPCwT9JMWPjg6xAWrQxhQaw?sub_confirmation=1 About Troom Troom: Easy DIY "how to" video tutorials. DIY Accessories, Scrapbooking Cards, Home Décor, Make Up Tutorials, Life Hacks, and MUCH more! Make it easy! For any business enquires please contact me at: [email protected] Question of the Day: did you like our cute gift ideas? Comment Below! Don’t forget to turn on notifications, like, & subscribe!
0 notes
Text
Crochet Mason Jar Cover
Crochet Mason Jar Cover
[ad_1]
learn to crochet this super beautiful mason jar cover with the help of the step by step tutorial
[ad_2]
learn to crochet this super beautiful mason jar cover with the help of the step by step tutorial
View On WordPress
0 notes
Text
10+ DIY Fails That Are So Terrible It’s Impossible Not To Laugh At
With so many tutorials flooding the Internet lately, you’d think people would have the hang of this DIY craft thing by now. They don’t. They’re still failing and it’s still hilarious.
We get that directions are sometimes hard to follow. It’s totally true that things rarely look the same as on the screen. Come on, though. Did these people even try?
Have a look, and a laugh, at some of the worst outcomes of best intentions we could find below. If your DIY project didn’t go as planned either, add it to our list below, because there’s no shame in failure if you at least put in 50% effort.
#1 Nothing Rhymes With Fire Orange
#2 Toddler Swing
#3 Lace Eggs
#4 Nail Design Fail
#5 Winter Cap
#6 Crochet Hippo Fail
#7 Autumn Leaf Candle Holder
#8 Swirl Nails Fail
#9 Button Bowl
#10 Melted Crayon Art Attempt
#12 Eldregre Tie Knot Fail
#13 We Sent My Grandma A Pic Of The Snowman Tree Idea And She Came Up With This Disaster
#14 Dead Crocheted Birdie
#15 First Attempt At Arm Knitting. I Made A Stylish Volleyball Net
#16 Drowning In Snowglobe
#17 Leopard Eyeshadow Fail
#18 It’s Official, I Am No Good At Crafts
#19 String Balloons Disaster
#20 Glow Stick Balloons
#22 Cute Little Paw Print Ornament Fail
#23 A Failed Attempt At Cut-Off Jean Shorts
#24 Hohoho Decoration Fail
#25 Bottle Bottom Flowers
#26 Yarn Balloon Burst
#27 Sucky Socks
#28 Nice Try, Hot Lips
#29 Beware Of Leg Placement When Freezing An Elf
#30 It’s So Easy, They Said. Simply Squeeze And The Dino Egg Soap Will Come Out In One Piece, They Said
#32 Hedgehog Pin Cushion
#33 Hair Updo Fail
#34 Calming Jar Fail
#35 Beer Glass
#36 Mcdonalds Milk Jug Penguin
#37 Melted Crayon Tree Art
#38 Galaxy Shoe Fail
#39 Wreath Woes
#40 Zombie Nails
#42 Dog Toy Fail
#43 Jacked Up Jack-O-Lantern
#44 Cut Out Dress Failure
#45 I Guess I Shouldn’t Have Thrown Out The Directions
#46 Origami Ain’t My Thing
#47 Fork Bracelet Fail
#48 Camper Van Cushion
#49 Denim Bascet Fail
#50 Heart Braids Fail
#52 Faux Stag Head And Its Misshapen Paper-Mache Offspring
#53 Heart-Shaped Knot
#54 Decorating The Boyfriends Beard
#55 Glove Christmas Tree Fail
#56 Penny Covered Tabletop Faill
#57 Floating Canopy
#58 Valentine Crayons Mess
#59 No-sew Pillowcase Fail
#60 Nailed It… Not
#62 Plastic Spoon Rose
#63 I Only Have Myself To Blame
#64 Failed Mandrake Root Back To The Drawing Board
#65 Christmas Dogs Decoration
#66 Captain America Tie Dye Avengers Shirt Fail
#67 Recycled Bottle Cap Robot
#68 Mason Jar Planters
#69 Tried To Diy A Lightbulb Changing Stick. Mop. Rubber Glove. Tape. Bulb Got Stuck Going In. Fail Chandelier Was Born
#70 Bloody Ice Ballons
#72 Glow-In-The-Dark Candy Button Shoes
#73 When Your Glass Project Isnt Going So Well
#74 Matryoshka Dolls Fail
#75 Makeup Fail
#76 Mason Jars Decoration Fail
#77 Thats One Big Baby Hat
#78 Messed Up Mustache Nails
#79 Barbie Box Photobooth
#80 Doily Lamp Issues
#82 Peppermint Bowl Fail
#83 Celtic Cross
#84 Baby Print Ball Ornament Fail
#85 Upholstery Fail
#86 Tutu Skirt Fail
#87 Writing Desk Transformation Fail
#88 Bottle Christmas Tree Fail
#89 T-Shirt Ruffle Scarf Fail
#90 Abstract String Art Snowman
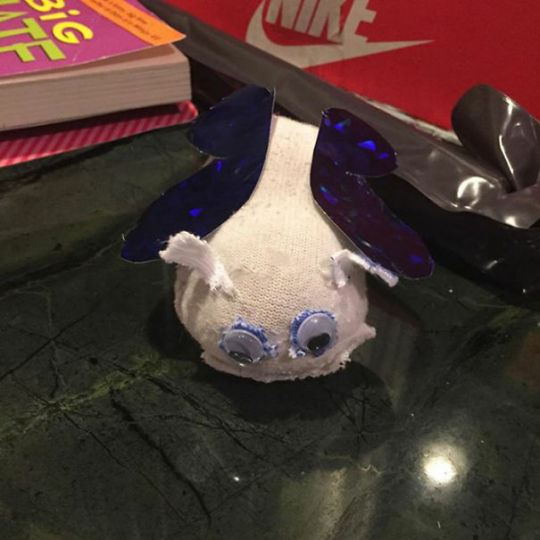
#92 What? Its A Pet Rock Mouse Not A Craft Fail
#93 First Attempt At Making Homemade Snow Globes. Care Bear Seems Really Uncomfortable In His New Environment
#94 Fathers Day Shirt Gone Wrong
#95 Pinata Dress Fail
#96 Supposed To Be A Snowman
#97 Plastic In The Oven Is Not A Good Idea
#98 Nail-Art Fail
#99 Not Exactly What I Wanted
#100 Don’t Spray Paint Your Patterned Upholstery
#102 Tank Dress Fail
#103 Unfortunate Fairy Jar
#104 Not-So-Ombre Candles
#105 Halloween Decor Fail
#106 Stamp Fail
#107 Snowflake Fail
#108 Pumpkin Decoration
#109 Hair Bow
#110 Paper Wall Lamp Attempt
#112 Halloween Makeup Fail
#113 Air Vase Fail
#114 Origami Star
#115 Crayon Letter Mess
#116 It Was Supposed To Be A Butterfly
#117 That Moment You Realize You Forgot To Turn Your Project Inside Out
#118 It’ll Be Easy, They Said… Everything You Need To Make Minnie And Daisy, They Said
#119 Failed Chevron Melted Crayon Art
#120 Chevrons And Squirrels
#122 Slipper Fail
<div class=“open-list-item” open-list-block c
from All Of Beer http://allofbeer.com/10-diy-fails-that-are-so-terrible-its-impossible-not-to-laugh-at/
from All of Beer https://allofbeercom.tumblr.com/post/176932723242
0 notes
Text
10+ DIY Fails That Are So Terrible It’s Impossible Not To Laugh At
With so many tutorials flooding the Internet lately, you’d think people would have the hang of this DIY craft thing by now. They don’t. They’re still failing and it’s still hilarious.
We get that directions are sometimes hard to follow. It’s totally true that things rarely look the same as on the screen. Come on, though. Did these people even try?
Have a look, and a laugh, at some of the worst outcomes of best intentions we could find below. If your DIY project didn’t go as planned either, add it to our list below, because there’s no shame in failure if you at least put in 50% effort.
#1 Nothing Rhymes With Fire Orange
#2 Toddler Swing
#3 Lace Eggs
#4 Nail Design Fail
#5 Winter Cap
#6 Crochet Hippo Fail
#7 Autumn Leaf Candle Holder
#8 Swirl Nails Fail
#9 Button Bowl
#10 Melted Crayon Art Attempt
#12 Eldregre Tie Knot Fail
#13 We Sent My Grandma A Pic Of The Snowman Tree Idea And She Came Up With This Disaster
#14 Dead Crocheted Birdie
#15 First Attempt At Arm Knitting. I Made A Stylish Volleyball Net
#16 Drowning In Snowglobe
#17 Leopard Eyeshadow Fail
#18 It’s Official, I Am No Good At Crafts
#19 String Balloons Disaster
#20 Glow Stick Balloons
#22 Cute Little Paw Print Ornament Fail
#23 A Failed Attempt At Cut-Off Jean Shorts
#24 Hohoho Decoration Fail
#25 Bottle Bottom Flowers
#26 Yarn Balloon Burst
#27 Sucky Socks
#28 Nice Try, Hot Lips
#29 Beware Of Leg Placement When Freezing An Elf
#30 It’s So Easy, They Said. Simply Squeeze And The Dino Egg Soap Will Come Out In One Piece, They Said
#32 Hedgehog Pin Cushion
#33 Hair Updo Fail
#34 Calming Jar Fail
#35 Beer Glass
#36 Mcdonalds Milk Jug Penguin
#37 Melted Crayon Tree Art
#38 Galaxy Shoe Fail
#39 Wreath Woes
#40 Zombie Nails
#42 Dog Toy Fail
#43 Jacked Up Jack-O-Lantern
#44 Cut Out Dress Failure
#45 I Guess I Shouldn’t Have Thrown Out The Directions
#46 Origami Ain’t My Thing
#47 Fork Bracelet Fail
#48 Camper Van Cushion
#49 Denim Bascet Fail
#50 Heart Braids Fail
#52 Faux Stag Head And Its Misshapen Paper-Mache Offspring
#53 Heart-Shaped Knot
#54 Decorating The Boyfriends Beard
#55 Glove Christmas Tree Fail
#56 Penny Covered Tabletop Faill
#57 Floating Canopy
#58 Valentine Crayons Mess
#59 No-sew Pillowcase Fail
#60 Nailed It… Not
#62 Plastic Spoon Rose
#63 I Only Have Myself To Blame
#64 Failed Mandrake Root Back To The Drawing Board
#65 Christmas Dogs Decoration
#66 Captain America Tie Dye Avengers Shirt Fail
#67 Recycled Bottle Cap Robot
#68 Mason Jar Planters
#69 Tried To Diy A Lightbulb Changing Stick. Mop. Rubber Glove. Tape. Bulb Got Stuck Going In. Fail Chandelier Was Born
#70 Bloody Ice Ballons
#72 Glow-In-The-Dark Candy Button Shoes
#73 When Your Glass Project Isnt Going So Well
#74 Matryoshka Dolls Fail
#75 Makeup Fail
#76 Mason Jars Decoration Fail
#77 Thats One Big Baby Hat
#78 Messed Up Mustache Nails
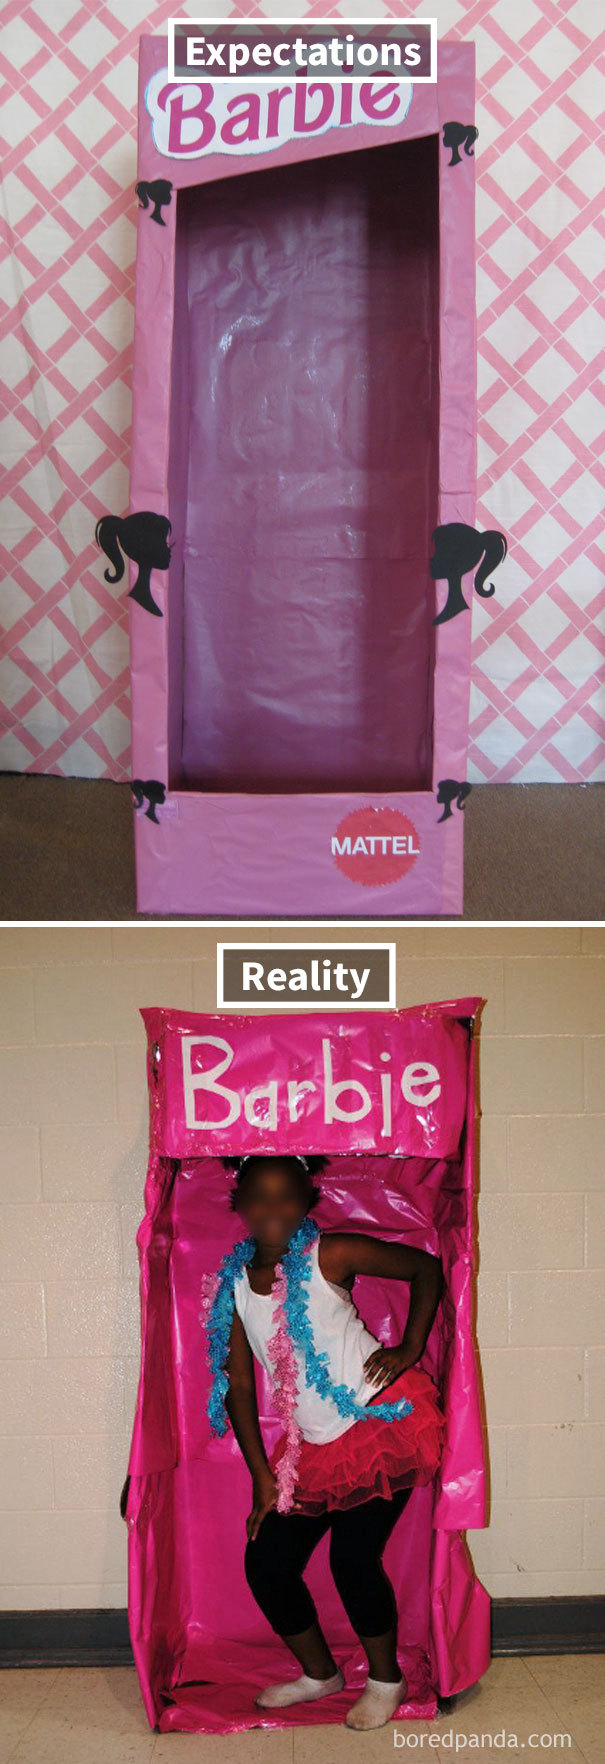
#79 Barbie Box Photobooth
#80 Doily Lamp Issues
#82 Peppermint Bowl Fail
#83 Celtic Cross
#84 Baby Print Ball Ornament Fail
#85 Upholstery Fail
#86 Tutu Skirt Fail
#87 Writing Desk Transformation Fail
#88 Bottle Christmas Tree Fail
#89 T-Shirt Ruffle Scarf Fail
#90 Abstract String Art Snowman
#92 What? Its A Pet Rock Mouse Not A Craft Fail
#93 First Attempt At Making Homemade Snow Globes. Care Bear Seems Really Uncomfortable In His New Environment
#94 Fathers Day Shirt Gone Wrong
#95 Pinata Dress Fail
#96 Supposed To Be A Snowman
#97 Plastic In The Oven Is Not A Good Idea
#98 Nail-Art Fail
#99 Not Exactly What I Wanted
#100 Don’t Spray Paint Your Patterned Upholstery
#102 Tank Dress Fail
#103 Unfortunate Fairy Jar
#104 Not-So-Ombre Candles
#105 Halloween Decor Fail
#106 Stamp Fail
#107 Snowflake Fail
#108 Pumpkin Decoration
#109 Hair Bow
#110 Paper Wall Lamp Attempt
#112 Halloween Makeup Fail
#113 Air Vase Fail
#114 Origami Star
#115 Crayon Letter Mess
#116 It Was Supposed To Be A Butterfly
#117 That Moment You Realize You Forgot To Turn Your Project Inside Out
#118 It’ll Be Easy, They Said… Everything You Need To Make Minnie And Daisy, They Said
#119 Failed Chevron Melted Crayon Art
#120 Chevrons And Squirrels
#122 Slipper Fail
<div class="open-list-item" open-list-block c
from All Of Beer http://allofbeer.com/10-diy-fails-that-are-so-terrible-its-impossible-not-to-laugh-at/
0 notes
Text
10 Patriotic 4th Of July Table Decor Ideas For A Successful Party - AMEPAC Furniture
Home Furniture Ideas on https://amepac.org/diy-projects/10-patriotic-4th-of-july-table-decor-ideas-for-a-successful-party/
10 Patriotic 4th Of July Table Decor Ideas For A Successful Party
Every year on the 4th of July the U.S. celebrates Independence Day. This event is commonly associated with parades, carnivals, fireworks as well as with family reunions and all sorts of public and private events. In that spirit, we’re hoping to inspire you too to plan something festive for this day. We’ve selected our favorite 4th of July table decor ideas so check them out and start planning. There’s still plenty of time to create something special.
One of our favorite ideas this year comes from 100layercakelet where a retro 4th of July table decor is proposed. The design is inspired by the Mad Men TV series and has a very classy and stylish mid-century overall feel. It would be cool if you could actually get your hands on some vintage tableware from the 1960’s. As far as the colors are concerned, stick with the red, white and blue and simple patterns.
Give your 4th of July table decor a delicate and chic spin with this floral centerpiece. To make it you’ll need a small wood stump with bark, a styrofoam ball, red, white and blue fabric flowers, a hot glue gun, wire cutters and ribbon. This floral 4th of July table decor idea also includes a few festive coasters which can be made out of wood slices and using a flower stencil and some craft paint.
You can make these wooden firecracker table centerpiece in less than 15 minutes, assuming you already have all the necessary supplies. This includes 3 pieces of 2×2 lumber in 3 different lengths, red, white and blue acrylic paint, some wire, ribbon, paint brushes, a drill and some sandpaper. These firecrackers won’t actually pop but they’ll sure look festive in the context of a 4th of July table arrangement. You can all the details about this project on practicallyfunctional.
These patriotic decorations are so easy to make it literally can be done in only a few minutes. All you need for this project is some clear glasses that you like, votive candles and red, white and blue sand. You just pour the sand into the glasses in layers and then you place a candle on top of each. Display these on the table on the 4th of July for a quirky and festive vibe. Check out mychinet for more details on the project.
Assuming you’re planning a family get together and you want to impress your guests with some themed 4th of July table decor, another one of the suggestions we’d like to give you is to decorate the silverware with patriotic washi tape. It’s a simple touch which helps to reinforce the overall theme of the decor. To find out how to best complete this task, have a look at the details offered on tikkido.
All of the silverware and utensils you and your guests will be needing have to be stored and displayed in a way that’s preferably good-looking in addition to being practical and we have a few ideas regarding that. One of them comes from petalstopicots where you can find a tutorial on how to craft a patriotic cozy for a mason jar out of yarn. This is what you’ll need: red, white and blue yarn, 2 crochet hooks of different sizes (check the tutorial for details), a wide-mouth mason jar, a tapestry needle and a glue gun.
A tin can could also be used as a utensil holder and making it look good and festive is actually super easy and involves paint, ribbon and some small flags which you can either craft or buy. Start by washing and drying 3 tin cans. Then cover a table with some newspaper and start painting the cans. One should be red, another one white and the third one should be blue. Let the paint dry and then attach a small American flag to the inside of each can using tape. Wrap some ribbon around each can too just to give it a more festive look. You can fill the cans with silverware as suggested on stockpilingmoms or you can use them as flower vases.
On certain occasions a table just doesn’t seem complete without a table runner. The 4th of July can be one of those cases so let’s review how you can craft a patriotic table runner that would fix the problem is a stylish and beautiful manner. First gather the supplies you’ll need. This includes things like burlap, scissors, some painter’s tape, star stickers, blue and red spray paint and some tailor’s chalk. Once you have everything, follow the instructions on everydaydishes to complete the project.
Can you guess what’s inside these jars? Believe it or not, it’s a sponge cut into three pieces, each painted a different color. The colors symbolize the American flag, making these jars great ornaments for the 4th of July table decor or for a patriotic party in general. If you want you can paint chalkboard labels on the jars as well so you can then personalize them with table numbers or the names of your guests. Either way, the project is simple and fun. Find out more about in the tutorial from bigbearswife.
The last idea we’re showing you today is yet another silverware-related project. This time the silverware is not displayed in tin cans or in jars. Instead eachs et is placed in a paper sack decorated with festive ribbon and printables along with a napkin and a straw. The plates featured on lilluna have patriotic patterns too and that’s a pretty cool touch.
The post 10 Patriotic 4th Of July Table Decor Ideas For A Successful Party appeared first on Home Decorating Trends – Homedit.
0 notes
Text
10 Patriotic 4th Of July Table Decor Ideas For A Successful Party - AMEPAC Furniture
10 Patriotic 4th Of July Table Decor Ideas For A Successful Party
[ad_1]
Every year on the 4th of July the U.S. celebrates Independence Day. This event is commonly associated with parades, carnivals, fireworks as well as with family reunions and all sorts of public and private events. In that spirit, we’re hoping to inspire you too to plan something festive for this day. We’ve selected our favorite 4th of July table decor ideas so check them out and start planning. There’s still plenty of time to create something special.
One of our favorite ideas this year comes from 100layercakelet where a retro 4th of July table decor is proposed. The design is inspired by the Mad Men TV series and has a very classy and stylish mid-century overall feel. It would be cool if you could actually get your hands on some vintage tableware from the 1960’s. As far as the colors are concerned, stick with the red, white and blue and simple patterns.
Give your 4th of July table decor a delicate and chic spin with this floral centerpiece. To make it you’ll need a small wood stump with bark, a styrofoam ball, red, white and blue fabric flowers, a hot glue gun, wire cutters and ribbon. This floral 4th of July table decor idea also includes a few festive coasters which can be made out of wood slices and using a flower stencil and some craft paint.
You can make these wooden firecracker table centerpiece in less than 15 minutes, assuming you already have all the necessary supplies. This includes 3 pieces of 2×2 lumber in 3 different lengths, red, white and blue acrylic paint, some wire, ribbon, paint brushes, a drill and some sandpaper. These firecrackers won’t actually pop but they’ll sure look festive in the context of a 4th of July table arrangement. You can all the details about this project on practicallyfunctional.
These patriotic decorations are so easy to make it literally can be done in only a few minutes. All you need for this project is some clear glasses that you like, votive candles and red, white and blue sand. You just pour the sand into the glasses in layers and then you place a candle on top of each. Display these on the table on the 4th of July for a quirky and festive vibe. Check out mychinet for more details on the project.
Assuming you’re planning a family get together and you want to impress your guests with some themed 4th of July table decor, another one of the suggestions we’d like to give you is to decorate the silverware with patriotic washi tape. It’s a simple touch which helps to reinforce the overall theme of the decor. To find out how to best complete this task, have a look at the details offered on tikkido.
All of the silverware and utensils you and your guests will be needing have to be stored and displayed in a way that’s preferably good-looking in addition to being practical and we have a few ideas regarding that. One of them comes from petalstopicots where you can find a tutorial on how to craft a patriotic cozy for a mason jar out of yarn. This is what you’ll need: red, white and blue yarn, 2 crochet hooks of different sizes (check the tutorial for details), a wide-mouth mason jar, a tapestry needle and a glue gun.
A tin can could also be used as a utensil holder and making it look good and festive is actually super easy and involves paint, ribbon and some small flags which you can either craft or buy. Start by washing and drying 3 tin cans. Then cover a table with some newspaper and start painting the cans. One should be red, another one white and the third one should be blue. Let the paint dry and then attach a small American flag to the inside of each can using tape. Wrap some ribbon around each can too just to give it a more festive look. You can fill the cans with silverware as suggested on stockpilingmoms or you can use them as flower vases.
On certain occasions a table just doesn’t seem complete without a table runner. The 4th of July can be one of those cases so let’s review how you can craft a patriotic table runner that would fix the problem is a stylish and beautiful manner. First gather the supplies you’ll need. This includes things like burlap, scissors, some painter’s tape, star stickers, blue and red spray paint and some tailor’s chalk. Once you have everything, follow the instructions on everydaydishes to complete the project.
Can you guess what’s inside these jars? Believe it or not, it’s a sponge cut into three pieces, each painted a different color. The colors symbolize the American flag, making these jars great ornaments for the 4th of July table decor or for a patriotic party in general. If you want you can paint chalkboard labels on the jars as well so you can then personalize them with table numbers or the names of your guests. Either way, the project is simple and fun. Find out more about in the tutorial from bigbearswife.
The last idea we’re showing you today is yet another silverware-related project. This time the silverware is not displayed in tin cans or in jars. Instead eachs et is placed in a paper sack decorated with festive ribbon and printables along with a napkin and a straw. The plates featured on lilluna have patriotic patterns too and that’s a pretty cool touch.
The post 10 Patriotic 4th Of July Table Decor Ideas For A Successful Party appeared first on Home Decorating Trends – Homedit.
[ad_2]
-
0 notes
Text
New Post has been published on AMEPAC Furniture
New Post has been published on https://amepac.org/diy-projects/10-patriotic-4th-of-july-table-decor-ideas-for-a-successful-party/
10 Patriotic 4th Of July Table Decor Ideas For A Successful Party
[ad_1]
Every year on the 4th of July the U.S. celebrates Independence Day. This event is commonly associated with parades, carnivals, fireworks as well as with family reunions and all sorts of public and private events. In that spirit, we’re hoping to inspire you too to plan something festive for this day. We’ve selected our favorite 4th of July table decor ideas so check them out and start planning. There’s still plenty of time to create something special.
One of our favorite ideas this year comes from 100layercakelet where a retro 4th of July table decor is proposed. The design is inspired by the Mad Men TV series and has a very classy and stylish mid-century overall feel. It would be cool if you could actually get your hands on some vintage tableware from the 1960’s. As far as the colors are concerned, stick with the red, white and blue and simple patterns.
Give your 4th of July table decor a delicate and chic spin with this floral centerpiece. To make it you’ll need a small wood stump with bark, a styrofoam ball, red, white and blue fabric flowers, a hot glue gun, wire cutters and ribbon. This floral 4th of July table decor idea also includes a few festive coasters which can be made out of wood slices and using a flower stencil and some craft paint.
You can make these wooden firecracker table centerpiece in less than 15 minutes, assuming you already have all the necessary supplies. This includes 3 pieces of 2×2 lumber in 3 different lengths, red, white and blue acrylic paint, some wire, ribbon, paint brushes, a drill and some sandpaper. These firecrackers won’t actually pop but they’ll sure look festive in the context of a 4th of July table arrangement. You can all the details about this project on practicallyfunctional.
These patriotic decorations are so easy to make it literally can be done in only a few minutes. All you need for this project is some clear glasses that you like, votive candles and red, white and blue sand. You just pour the sand into the glasses in layers and then you place a candle on top of each. Display these on the table on the 4th of July for a quirky and festive vibe. Check out mychinet for more details on the project.
Assuming you’re planning a family get together and you want to impress your guests with some themed 4th of July table decor, another one of the suggestions we’d like to give you is to decorate the silverware with patriotic washi tape. It’s a simple touch which helps to reinforce the overall theme of the decor. To find out how to best complete this task, have a look at the details offered on tikkido.
All of the silverware and utensils you and your guests will be needing have to be stored and displayed in a way that’s preferably good-looking in addition to being practical and we have a few ideas regarding that. One of them comes from petalstopicots where you can find a tutorial on how to craft a patriotic cozy for a mason jar out of yarn. This is what you’ll need: red, white and blue yarn, 2 crochet hooks of different sizes (check the tutorial for details), a wide-mouth mason jar, a tapestry needle and a glue gun.
A tin can could also be used as a utensil holder and making it look good and festive is actually super easy and involves paint, ribbon and some small flags which you can either craft or buy. Start by washing and drying 3 tin cans. Then cover a table with some newspaper and start painting the cans. One should be red, another one white and the third one should be blue. Let the paint dry and then attach a small American flag to the inside of each can using tape. Wrap some ribbon around each can too just to give it a more festive look. You can fill the cans with silverware as suggested on stockpilingmoms or you can use them as flower vases.
On certain occasions a table just doesn’t seem complete without a table runner. The 4th of July can be one of those cases so let’s review how you can craft a patriotic table runner that would fix the problem is a stylish and beautiful manner. First gather the supplies you’ll need. This includes things like burlap, scissors, some painter’s tape, star stickers, blue and red spray paint and some tailor’s chalk. Once you have everything, follow the instructions on everydaydishes to complete the project.
Can you guess what’s inside these jars? Believe it or not, it’s a sponge cut into three pieces, each painted a different color. The colors symbolize the American flag, making these jars great ornaments for the 4th of July table decor or for a patriotic party in general. If you want you can paint chalkboard labels on the jars as well so you can then personalize them with table numbers or the names of your guests. Either way, the project is simple and fun. Find out more about in the tutorial from bigbearswife.
The last idea we’re showing you today is yet another silverware-related project. This time the silverware is not displayed in tin cans or in jars. Instead eachs et is placed in a paper sack decorated with festive ribbon and printables along with a napkin and a straw. The plates featured on lilluna have patriotic patterns too and that’s a pretty cool touch.
The post 10 Patriotic 4th Of July Table Decor Ideas For A Successful Party appeared first on Home Decorating Trends – Homedit.
[ad_2]
0 notes
Photo

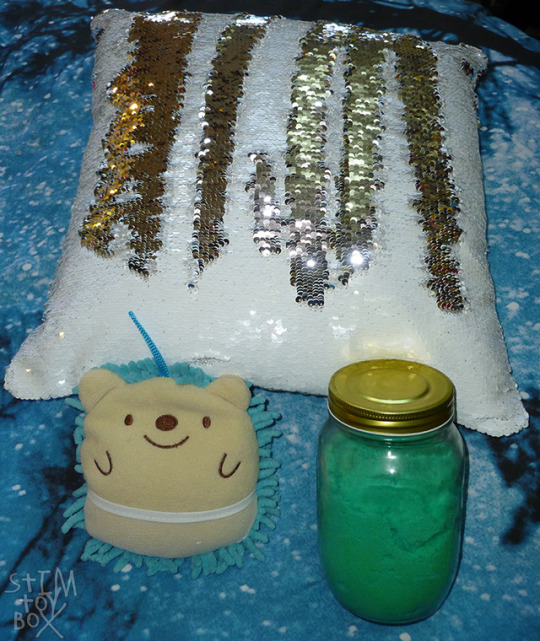
[image description: two photos, the first taken on a red watermelon slice pillow sitting on a blue, white and black night sky quilt cover, the second taken just on the quilt, of a wide variety of stim toys. Each toy is described and discussed underneath the read more cut below.]
Anon asked,
What are your favorite stim toys and why?
I’ve made this a photo post, anon, as I dislike how Tumblr compresses images when you insert them into an ask or text post.
I’ll work my way through everything photographed above, top to bottom, left to right. Note that I am mostly into fidget toys, that chronic hand pain does impact what I can use, and that I prefer toys that offer texture in addition to movement. This isn’t a general stim kit, just things that I like using, and everyone’s stim needs will differ depending on their health, situation and sensory likes/aversions.
This is a very long post even by my standards. I’ve given a description of each item as I discuss it, so I’m going to place everything under a read more cut:
Orange-red prickle/massage/sports ball: the textured ball is great as a distraction from my pain, as it gives a rough, harsh, pressing sensation without causing damage to my hands. I’d recommend this for folks who seek out pain sensations, as it’s as close as I’ve gotten to finding it in a non-harming toy.
Orange/aqua/pink/yellow/red fleuro mesh stress ball: it’s filled with plastic pellets, so it has weight and crunch, while the mesh offers a much more interesting texture than that of a conventional stress ball. Great for tossing.
Hama bead loop: a loop of hat elastic threaded with fifty-four different coloured perler or Hama beads. It’s like a lightweight Tangle you can twist and coil, with the rougher sensory input of the spaces between the beads catching your skin. Another good toy for people who like harsher or pain sensations without wanting to cause damage, as long as you don’t twist it too tightly around a finger or wrist.
Disney Tsum Tsum Elsa: a small, easily portable plush with lots of textures (plush-like hair, blue dress, cape, suede belly, her embroidered face) and a pocket of pellets in her belly for crunching and squishing.
DIY chain fidget: an oversized chain fidget made using 50 cm clip rings and strips of black felt sewn into chain-like pieces and stiffened using glitter glue. The large size makes it so much easier for me to use than the the standard 30 cm split ring fidgets. I hope I’ll have the time to do a proper tutorial on these one day - they’re a bit involved to make, but they work so well. Great for just idly flipping back and forth in one or two hands.
DIY marble maze: a marble maze made from aqua owl-print flannelette, pink minky fleece backing and purple chain stitching. These are so soft to touch and not too difficult to handsew, and they give the lovely tactile stim of the different fabrics combined with pushing a marble through the maze formed by the stitching. Harder to use in public than a Tangle, but a staple for many stim kits.
Bright pink stretchy squish ball: one of Stimtastic’s squish balls. It’s soft, mouldable, rollable, stretchy. Like playdough without the smell and with greater portability. It’s also a lot softer on my hands than putty or dough, which is fabulous. I truly love these. Third favourite toy, maybe?
Blue, yellow, green, orange and pink hedge balls: these are great for rolling, pulling and squishing. I love the texture and pressing the fronds into my skin, and the size means they’re easily portable.
Green and cream Slinky Tangle Glo: it’s an Original-sized Tangle that glows in the dark like nothing I’ve ever seen. So cool.
Red, purple, blue, green and yellow crocheted stress ball: a small stress ball stuffed with plastic pellets and crinkle paper for crunch and scrunch. As a fidget toy it has the weight and texture of the crocheted skin plus the sound of the paper crinkling. Not so good for public stimming, but amazing to fidget with.
Blue, green and purple Twiddle: it’s longer and looser than a Tangle, but it scrunches together nicely and is great for idle fidgeting. I mostly ball it in a hand and scrunch it, but it also works as a puzzle as well, if you prefer pulling it apart.
Wooden nut and bolt: this is a craft piece I found in Daiso, but it’s great for quiet fidgeting, and the grooves/rif provide great texture for stroking.
Yellow and rainbow tie-dye plastic tri-shaped spinners: I like spinners because they have the sound and vibration aspect - I seldom look at them while they spin. I just hold them and enjoy the feel of the movement. My fingers are long enough that I can hold one arm bearing between thumb and pointer finger and flip the spinner around, so there’s multiple ways I can fidget with these.
Chewigem Desert Rose Dog Tag pendant strung on a purple rattail cord: this is my favourite chewable so far because it’s thin and springy and not too wide. I love it’s smaller size. I want one not in pink.
Orange teardrop makeup blending sponge: these are such a great and inexpensive squishy alternative. They’re not slow-rising, but they’re soft, portable and great to touch and press.
White and pink Zuru Fidget Cube in blue Zuru Prism: I use this toy least often out of everything photographed, and I mostly stim with it by rolling the gears and ball on my face. It makes my pain flare more than anything else here, so I have to be careful with it, but I really do love the gears and roller ball.
Black Tangle Jr, worn rose-pink Tangle Jr Fuzzy, yellow/clear/pink/blue Tangle Jr Textured and translucent orange/translucent yellow/translucent purple/yellow Tangle Jr: Tangles are my favourite stim toy, easy. They’re easy to use, portable, colourful and good for unthinking stimming. I like that they offer texture or flocking in addition to movement, and they’re the type of toy that doesn’t draw too much attention in public, as an adult stimmer.
White and silver mermaid sequin pillow: this is my second favourite stim toy, easy! Lots of texture, the visual stimming of watching the sequins change colour and being so gentle on my hands all combine to make this absolutely amazing for me. The only downside is that’s not always a particularly good public stim toy, but that it never hurts me to swipe the sequins absolutely makes up for this.
Blue and cream Daiso embroidered hedgehog duster: there’s lots of these sorts of dusters and mop heads around (although most aren’t shaped like animals) and the chenille fronds are great for running one’s hand through.
Glass jar holding green kinetic sand: I’ve had to stop using kinetic sand for a while to see if it’s the reason for my dermatitis flares, but it is another silent, pain-free stim toy that’s great for occupying one’s hands while watching TV. Not very portable, unfortunately!
There’s more toys I like, and I’ll probably remember something else that should have made it to this list after it posts, but that’s most of them, anon!
- Mod K.A.
#stim toy#stim toys#personal#ask#text#link#photo#review#stimming and pain#category: stim toy collections#anon#mod K.A.#long post#very long post
37 notes
·
View notes
Text
ARTspiration
Artists or art that turns me on and feeds my soul. This piece is called Girl With Pigtails
by Sir Samuel Henry William Llewellyn, who was an English painter of the late 19th and early 20th Centuries
YOKE DU YOUR
Two elephants walk in the wilderness and spot a guy peeing at the bushes. One elephant nudges the other, “Man, I wonder how he ever manages to eat anything with that thing!”
DESIGNspiration
Look around you. Design is everywhere! Keep your eyes open. How can you incorporate the beauty that surrounds you into your art or craft?
IDEA I LOVE
I love the look of these ric rac flowers. They look pretty easy to make. Check it out here: http://todayscreativelife.com/how-to-make-ric-rac-flowers/
IDEA I LOVE
What kid wouldn’t love this cozy pillow bed? I’m trying to figure out the proportions for making an adult sized version. Click on the like to find out how to make your own for your munchkins: http://dabblesandbabbles.com/how-to-make-a-cozy-pillow-bed/
YUMMY DISH!
CLASSIC MARINARA SAUCE
(No Sugar like the jar versions)
Ingredients
San Marzano tomatoes
extra-virgin olive oil
garlic cloves
dried whole chile, or crushed red pepper flakes
kosher salt
fresh basil
FOR THE FULL RECIPE, CLICK HERE http://cooking.nytimes.com/recipes/1015987-classic-marinara-sauce?action=click&module=Collection+Page+Recipe+Card®ion=No-Sugar+Added&pgType=collection&rank=1
IDEA I LOVE
I’m a hoochie for little boxes, any kind of little boxes. Needless to say, I was thrilled to find this cool tutorial for making embossed boxes from soda cans. Let’s face it, it’s totally worth diabetes and morbid obesity just to get enough stash to create these little suckers. Click on the link for the tutorial for making your own:
Click on the link for the tutorial for making your own: http://hackaday.com/2011/01/21/making-boxes-from-soda-cans/
BREATHLESS INSPIRATION
Handmade marbles . . .
Aren’t these amazing? You can buy your own handmade marbles and see more examples by clicking this link: http://www.route66glassworks.com/Gallery.html
SO DRINK, CHUG-A-LUG CHUG-A-LUG
CHOCOLATE WHITE RUSSIAN
Ingredients
Vodka
Kahlua
Heavy Cream
Chocolate Syrup
Ice
FOR THE FULL RECIPE, CLICK HERE http://basilandbubbly.com/chocolate-white-russian/
IDEA I LOVE
Aren’t these sprocket pillows cute? They’re not hard to make and are totally the right project to start with if you’re ever considering a Dresden Plate quilt block and fabric covered buttons are one of my all-time favorite idiot-proof things to make. Heres’s the tutorial for making these fun pillows yourself: http://cluckclucksew.com/2011/03/tutorial-sprocket-pillows.html
WORDS TO LIVE BY
IDEA I LOVE, CROCHETspiration
Grab your crochet hook and a pair of rubber flip-flops and, oh baby, you will have boots to die for. Make them even better by weaving ribbons into your crochet, embellish, hand-dye, etc. If you have strong arches, these could be quite comfortable. If you have feet as flat as Donald Duck, well, you’re screwed. Here’s the tutorial on how to make a pair of your own boots: http://makeanddocrew.com/crochet-boots-flip-flops-pattern-video/
MAN CAN LIVE BY BREAD ALONE!
MARK BITMAN’S NO-KNEAD BREAD
Ingredients:
bread flour
instant yeast
salt
Cornmeal or wheat bran
For the full recipe CLICK HERE: http://cooking.nytimes.com/recipes/11376-no-knead-bread?action=click&module=Collection+Page+Recipe+Card®ion=No-Sugar+Added&pgType=collection&rank=6
MEMBA?
And now a word . . .
Now that the weather is cool, I’m heading back upstairs to continue clearing out my studio. Get first dibs on all of my eBay listings when you follow the Pickle Road Stash Busting page on Facebook! Here’s the link: https://www.facebook.com/groups/PickleRoadStashBusting/
win WIN win
Check back here soon. I’ll be a part of a blog hop and you can win the book I LOVE PRECUT QUILTS!
SALE SALE SALE
$5.00
Over 40% OFF the regular price of my digital Palm Beauty pattern
Today and Tomorrow only (January 28 &29 2017)
Order your Palm Beauty pattern here: http://www.marklipinski.com/shop-2/
AND
COOKIES!
TWIX COOKIES
Ingredients
butter
powdered sugar
flour
vanilla
salt
caramel
milk chocolate chips
shortening
FOR THE FULL RECIPE, CLICK HERE http://www.thisgrandmaisfun.com/twix-cookies-3/
LOL
JUST BECAUSE I SWOON
Documented 1971 Valentino Couture Italian Vogue Audrey Hepburn Gown Dress
DESIGNER: Valentino Couture, published in the 1971 Italian Vogue, in a different print, on model Isa Stoppi. The same blue version of this dress was worn by Audrey Hepburn in Italian Vogue 1971. The white long sleeve version of this dress, also seen in the photo with Isa Stoppi, was shown in the exhibit Valentino Retrospective. $42,999
You might disagree, but although this dress costs a mint, it reminds me of something that Eunice might wear.
IDEA I LOVE!
I think painting on fabric is an amazing talent. It’s an amazing way to create your own fabric. Can’t draw? So what? There are so many cheating tools you can use – lightboxes, computer printouts, embroidery transfer papers… Why not try it. It won’t break the bank, and you might just learn to love it. Click on the link for more information on how to rock your fabric: http://uniqart.blogspot.com/2015/02/tutorial-painting-on-fabric-with.html
BE DAZZLED!
This is a vintage piece of costume jewelry from 1948. It is marked, Coro with Pegasus
and designed by Adolph Katz. It is in excellent condition. $475 ‘
Here’s how you can own this piece: http://www.trifari.com/pages/cor1377.html
PATCHWORK, BABY! QUILTspiration!
Call me sentimental, but I love cheddar in a quilt. Make this easy traditional Album Patch quilt from McCall’s Quilting. Now, cupcakes, think out of the box. This pattern can look totally contemporary with just a change of fabric colors. Click-o on the link-o to get the pattern: http://www.mccallsquilting.com/content_downloads/Album_Patch_WEB_BONUS.pdf
SHOEspiration
So what do you think of these Clear Floral Oxfords by Kunihiko Morinaga? These are from the 2012 collection and made from leather, plastic, and embroidery!
IDEA I LOVE!
What a great idea for upcycling your Altoids tin. Make a pocket-sized watercolor box. Listen, I know you’ve always to create an art journal on the run. Now’s your chance to honor your creativity or try something completely new. Click on the link for a tutorial on how to make your own version of you watercolor box:
http://www.instructables.com/id/Altoids-Tin-Pocket-Sized-Watercolor-Box/?ALLSTEPS
IDEA I LOVE! KNITspiration!
These are the absolute cutest knitted pigs I’ve ever seen. I wish I could knit better; I’d try to tackle this. Instead, I’m going to have to sell my soul for one. Not only that, I’m guessing the knitting shops still don’t have pink yarn in stock after the run for the Women’s March hats (well, unless you’re in Franklin, Tennessee http://huff.to/2jzY8fT).
Here’s the pattern: http://blueskyfibers.com/wp-content/uploads/2011/04/Oink1.pdf
GARDENspiration
Yummy! Make a freshwater terrarium. It can’t be any easier. Here’s how to put one together for your home or office. Look, if this works out, say goodbye to the bathtub.
Here’s the tutorial: http://artseachic.blogspot.com/2013/07/diy-freshwater-terrarium.html
MUST HAVE
They say (whomeverthehelltheyare) that our phones are the filthiest and grimiest possessions we possess. No more, babycakes. I want to zap my smartphone with this sanitizer. Get one for you:
http://www.uncommongoods.com/product/phonesoap-smartphone-sanitizer
IDEA I LOVE!
A simple embroidery stitch can help you create the dopest border on napkins, collars, and almost anything (why not stitch on paper for homemade Valentine’s Day cards?). To learn the technique, click on the link:
http://www.designsponge.com/2014/02/diy-project-chain-of-heart-napkins.html
TIP I LOVE
Isn’t this a great tip? Organize your seam ripper, marking pencils, and snips by using a suction cup soap holder! Take a look:
http://sewmanyways.blogspot.ca/2014/01/organizing-ideas-for-suction-cup-soap.html
EMBROIDERYspiration!
LOVE this teeny tiny embroidery. What is better there is a tutorial for how to embroider your own version. What a terrific little embellishment for you bib overalls, mittens, jeans, or wherever you need a little life. Start your project by clicking the link:
http://randomactsofamy.com/2016/09/09/tiny-embroidery-tutorial/
DESSERT!
BEST EVER JAPANESE COTTON CHEESECAKE
INGREDIENTS
Full cream milk or Low-fat milk
Butter
Cheese cream
Plain flour
Corn flour
Egg yolks
Vanilla flavor
Egg whites
Cream of tartar
Sugar
FOR THE FULL RECIPE, CLICK HERE http://amirahwaznahku.blogspot.de/2014/06/best-ever-japanese-cotton-cheesecake.html
IDEA I LOVE
Dollar Store here I come. Grab several colorful bags of garden glass and glue them to a window. Glorious. It’s so darn simple, but if I were you, I would campaign for the death penalty for anyone breaking a stained glass window before you make yours. Start here:
http://www.hometalk.com/26593919/easy-stained-glass-window
… and VALENTINEpiration IS HERE
These are designed to be fabric heart coasters. I love them but I’d be afraid that the seams might tip my full glass of Old Turkey onto my rug, leaving me no option than to suck the juice from the carpet (like it hasn’t been done before). You could add a little ribbon to the top so they can be used as doorknob decor. I’d also love to see some embroidery accenting the fabric used for the hearts. Here’s how you make these pretty Valentine coasters: http://www.thirtyhandmadedays.com/fabric-heart-coasters/
IF YOU LIKE THIS BLOG
If you’re liking this blog Please tell your friends about it! I’d really appreciate it!
Just cut and paste this into an email or post on your Facebook and Twitter pages:
I LOVE this blog and think you will, too! Check it out: https://marklipinskisblog.wordpress.com
Please Leave a Comment Below
Create Ric Rac Roses! Sew a Cozy Pillow Bed! DIY Embossed Metal Boxes! Learn to Make Sprocket Pillows! Crochet Sweater Boots! Paint Fabric using Inktense! Piece an Album Patch Quilt! Craft a Portable Watercolor Box! Knit a Flying Pig! Plant a Freshwater Terrarium! Embroider a set of Chain of Hearts Napkins! Create Stunning Stained Glass Windows! Sew Heart-Themed Coasters! Mini Embroidery Project! Make a Soda Can Rose! A Sewing Machine Tip! How to Spin Yarn! Sewing Ric Rac! PLUS . . . Recipes, Videos, Inspiration, Creativity, Ideas, and More ARTspiration Artists or art that turns me on and feeds my soul. This piece is called
0 notes
Last Seen Blogs

rose-kingdoms
Higher Further Faster

qlistening
Ava's Post-Quarantine Blog

sedeleryart
Sedelery art


jinaplanet
Pine Planet