#css grid generator
Explore tagged Tumblr posts
Visit Tumblr Blog
Explore Tumblr blogs with no restrictions, modern design and the best experience.
Last Seen Tumblr Blogs


Fun Fact
The Tumblr app for Google Glass was released on May 16, 2013.
Text
2 notes
·
View notes
Text
Ao3 HTML/Coding Resources Part II
This is the HTML/Coding for Website mimicking resources in Archive of our Own (Ao3). To find Part I where I go over the Basics, General Text HTML and some Fancy Formatting (images, dividers, columns, photos, tabs etc. CLICK HERE!
Other Websites:
Texting
-How to make iOS Text Messages on Ao3 by CodenameCarrot, La_Temperanza
-A Quick Generator for Embeddable iOS Text Messages by 221b_ee
-imessage Skin by Adzaema
-Retro imessage by Adzaema
-Basic Text Message Work Skin by ProfessorMotz
- Bubble platform [workskin] by Khashana
-Chat Log HTML by deathbymistletoe
-LINE Messenger/Chat by imperiousmarshmellow
-IDOLish Rabbit Chat Workskin by associate
-Replika workskin by FaeriMagic
-Texting Workskin to match light/dark mode by irrationalpie
Tumblr
-Tumblr style CSS Tweaks by Aposiopesis
-Ao3 Workskin Testing and Tutorials by junietuesday25 tumblr DM
-How to make Tumblr Posts on Ao3 by phyyripo
-Plain Text Social Media Platforms by anubisms
-Tumblr Post Work Skin by tsukinosaugi
Twitter
-Repository - Twitter by gadaursan
- How to mimic Social Media in an Ao3 work by aerynevenstar
-Twitter Work Skin Template by etc e tal
-Twitter Workskin: Tweets and Profile by starskin
-Twitter Mock-Up by TheBrookesNook
Ao3/Fandom
-How to mimic Authors notes and Kudos/Comment Buttons by La_Temperanza
-How to mimic AO3 Comments by bittermoons
-How to add mobile Ao3 in your fic by DemigodofAgni
-How to make a fanfic style header Ao3 style by ElectricAlice
-Template for adding post chapter content by SpookyTesting
-CSS based full Ao3 fic integration (Header/Overview, Comments, Title, Summary & Buttons) by deciMae
-How to Mimic LiveJournal Posts and Comments by cursedcuriosities
-Dreamwidth Entries & Comments Work Skin by folk_melody
Facebook/Instagram/Whatsapp
-Whatsapp Group Chat builder by FestiveFerret
-How to make Facebook Messenger Chat on Ao3 by ran_a_dom
-Whatsapp Work Skin Template Revamped by etc e tal
-Whatsapp group chat skin by ovely
-Instagram DMs for Ao3 by monarch_rhapsodies
-How to make Instagram DM mockup by xslytherclawx
-Penstagram chats on ao3 by deciMae
Snapchat
-Snapchat skin by Azdaema
-Snapchat Template for Ao3 by starskin
Reddit/Forum
-UPDATED Reddit Skin by diamine
-2020 Reddit Work Skin by timstokerlovebot
-Reddit Work Skin CSS & HTML by knave_of_swords
-How to mimic Social Media in an Ao3 work by aerynevenstar
-template Reddit Skin by spookedcroon
-template:Subreddit page by ireseen
-Ao3 workskin for Forum Thread by fencesit
-Ao3 workskin for Forum Thread [Expansion Pack] by AMereDream
-How to mimic 4chan posts without just taking screenshots of 4chan
Twitch/Youtube
-Mimicking Twitch Chat for fics by Ultraviollett
-Twitch Chat Work Skin by cherrari
-Workskin testing by tohmas [Youtube comments]
-Youtube Work Skin by 1864s
-Youtube Comment Section Workskin by LupaMoe
Discord/Slack/Zoom
-2023 Discord Theme Workskin by TrojanTeapot
-Discord Work Skin by unpredictableArtist
-Discord (Dark Theme) Workskin by Heterochromia_Mars
-Skin for Recreating Discord’s Server Member List by SpookyTesting
-Ao3 Workskin Testing and Tutorials by junietuesday25
-Slack Workskin by Khashana
-Zoom inspired Ao3 skin by mystyrust
Wikipedia
-Fake Wikipedia article about a TV show: Work Skin by Anonymous
-Wikipedia article work skin by styletests
-SCP Wiki Style Workskin by thesnager
Working Games in Ao3 Tutorials
Logic Grid Puzzle Work Skin & Tutorial by BookKeep
The Case Of The Clickable Murdle by VThinksOn
Review Sites:
Yelp Reviews by kiwiana
Amazon Reviews by kiwiana
Rate My Professor Work Skin by BookKeep
Video Game Dialog Mimics
-Dialog [workskin] by Clover_Zero
-Dialogue Workskin (with parallax BG effect) by mystyrust
-My S Ranks--System Windows by unpredictableArtist [computer dialog workskin]
-Tutorial: Ace Attorney Work Skin by QuailFence
-Among Us Ao3 skin by mystyrust
-How to Mimic Undertale Fonts on Ao3 by La_Temperanza
-Tutorial:Rain Code Work Skin by faish
-Balder's Gate 3 Documents Work Skin by Professor_Rye
-SpookyTesting has SOO many Nintendo based ones
–Mimicking Minecraft for some fics by Ultraviollett
Runescape Right Click Menu Formatting by fennfics
How to put Z skits in your Tales fics by wingedcatgirl
How to make Honkai: Star Rail Messages by html_hell (jihnari)
Hold-hands inspired Texting skin by cursedcuriocities(SetsuntaMew)
Simple Linkshell Ao3 Work Skin by Pent – Final Fantasy XIV mimic
Homestuck Chat Clients by 77angel-skins
Workskin: Slay the Princess by ASpooky
Slay the Princess: Updated Workskin by Lilto
Misc. Sites
--How to mimic Deadpool Thinking boxes by La_Temperanza
--FetLife Skin [Work Skin] by Khashana
--Disco Elysium workskin by SarunoHadaki
--StarTrek PADD workskin by duskyspirit
--MDZS-themed letters by allollipoppins
--A Newbie's Guide to Podficcing by Adzaema [skin for podfics]
--Skin for making Character Intro Cards by SpookyTesting
--Kpop Photocards by legonerd
–OVR System Workskin by unpredictableArtist
-How to make Stylized CSS Card Links for your fics by buttertartz
-vroom vroom kachow: Formula1 Race Results Workskin by mackerel_cheese
Bonus: Ever wanted to see how crazy HTML can be on AO3? Try playing But can it run Doom? or Tropémon by gifbot
Happy Creating!
Last updated: Feb 8 2025 (Have a resource that you want to share? My inbox is open!)
View Part I with HTML Basics HERE!
#archive of our own#html coding#fanfiction#fanfic#fanfic writing#fic writing#fanfic help#ao3 fanfic#ao3 author#ao3 writer#ao3fic#ao3#ao3 link#ao3feed#fanfics#fanfic coding#fanfiction writer#fanfiction author#fanfiction crossover
61 notes
·
View notes
Text
Hello fellow FFIV lovers!
In just about a month, on July 19th, we will celebrate the 34th anniversary of that wonderful game. To celebrate, I would like to offer you a little help to get the creative mind running ~
This website will generate for you a Bingo sheet, customized based on selected elements and prompts. With this, you can create a grid of bits of inspiration to use for writing, drawing, anything you can think of! There are characters, places, elements specific to the game, themed prompt, writing or painting challenges...

I offered a few way to play but to celebrate this coming anniversary there's one I particularly have in mind. Creating a 6x6 grid gives you 18 pairs of prompts... Enough to cover from July 1st to the special day ! One day, two square checked, one piece of fanwork, until the grid is filled.
Of course, you don't have to use that. No matter what you make of this website, I would love to see the kind of grid you create and the fanwork that comes out of it!
To hype ourselves for the incoming anniversary, you can tag all your grids and works with #FFIVbirthday2025 !
And watch out for @wordlesslyjenneh's blog as july comes for more FFIV love and hype ~
(Finally: I'm all open to improvement suggestions, additional prompts, ideas... unless it's on the visual end. Don't make me touch more CSS.)
28 notes
·
View notes
Note
sorry if you’ve answered something similar before but how do you format things for your website? in the collections you have for poems
i love how it looks. the book kind of format it has
and i want to do similar/the same formatting for my own works but im really struggling…
i've been asked stuff like this a lot and i don't mind explaining it often because i want people to make websites more. i made a tutorial video at some point but it's kind of hard to make a curriculum or tutorial or whatever around this kind of thing because it's really just a self expression thing. i'll try to break down as much of my thought process as makes sense.
i design my pages in photoshop with either double/single page display in mind and then i use html to set them next to each other. most of the choice here comes down to how overwhelming i want my designs to feel. in the case of the lonely leaver page, the entire book was designed to be something that could be a physical book, and so from the getgo i made the pages in that kind of format. i previewed things in acrobat which has a booklet view mode (which singles out the front and back cover around the contents of the file) & allows you to process double page view as well. as for the actual process in photoshop before that point, i typically will open a canvas that is the size of the full 2 page spread (i.e. 8 inches wide for 2 pages which are both 4 inches wide) and i set grid lines for bleed margins and to mark the center of the page so that i can make the composition something that im comfortable with having a gap in the middle from the book folding. with lonely leaver i had to reformat about half the book at some point because i wanted to make it a larger resolution which was annoying but i just keep my guidelines for a print size in mind while im working. often if im a certain amount of time into a project that i feel like i will be spending a lot more time with i'll create a dummy psd file at this point which is devoid of content but which has all of the margins/resolution stuff set up already so i can just open that up and save a different version of it when i'm done.
my actual writing process and my design process is generally extremely intertwined, that's why things tend to be varying degrees stream of conscious in my work i think. i'll for instance, have a thought im stuck on for several days, and then open photoshop without having a poem or comic in mind, but i'll fill the canvas with some kind of color like red or yellow or a photo or whatever, and then open a text box or start drawing. telling a story through composition (i.e. page layout itself) is generally my favorite aspect of art and design because i enjoy how violent and dramatic framing angles can make the content of a piece feel so i'll try to move stuff around as much as possible in order to get my desired effect, often times using place holder shapes in lieu of finished design elements in order to get a rough blocking. as i do this i tend to react to what i'm writing/making as i'm doing it, and i do a lot of selective self editing during this part. for instance, i'll start manipulating rasterized text or cutting around images or whatever. i'll reread and look at whatever im doing for a couple of hours and then when i'm done with a spread or whatever i will save the document as a psd with a combined full spread and then each page separately as pngs or whatever (split at the middle grid line, back to the example, i'll save 2 different 4 inch wide images by changing the canvas size).
when it's time for me to put stuff on my website i then batch convert whatever pngs i exported into webp's because they load faster and take up less space on the server/my computer. you can look at my direct html/css files in your internet browser's explorer mode to see exactly what i do but essentially i just have either 1 or 2 images in a block and then a series of repeating vertical blocks containing images. i don't have an extremely efficient way of uploading pages and i'll typically just copy the same
"<p><img src="01.png"> <p><img src="02.png">"
like, 30 or 40 times or whatever into a html document. i use visual studio code for this stuff because it lets me do a bunch of stuff like having several files open at once & the navigation pane is nice & there's a live server extension that automatically refereshes the html file in my web browser on file save which is really awesome. i have a css page that i made like, 5 years ago, and i usually just link new projects to that because it has a bunch of different settings in it which i'll toggle on or off depending on the needs of whatever page or i'll add new div id's to it. it's kind of messy at this point, but it gets the job done. i use filezilla and something like bluehost or something for webhosting/file management.
i arrange and organize all of my art extremely methodically so usually in my like "<root catch all poetry folder>" inside of my "<root catch all art folder>" there will be a "<name of specific poem book>" folder which just contains the poems named by their actual name e.g. "dedication to saint eulalia 4.png" and then another folder inside of that is called "paginated" where i, using the acrobat document i arrange stuff in as reference, rename copies of my pages which i have placed in that folder to be named things like "01.png" so that i can then manually flip through it sequentially in the windows photo viewer and also just so that i don't have to go through the arduous process of renaming and tracking stuff inside of the root folder i'm containing that project's files in.
i'm 26 now and i made my first website when i was like 18, and my first zine project and i'm tired of feeling feeling around that same time, so i've got like, coming up on a decade of trial and error behind this and this is generally what has worked for me. my website isn't super complicated and mostly just gets the job done but because i try to think about style and presentation up front with whatever projects i'm doing i tend to just make plans based around that as early as it makes sense. to me having a website for art presentation has always been the Primary Method and intended landing zone for my art so it's genuinely always been a consideration in my process to try to plan around how i will put it on my website. i do this because i believe having my own curated space for containing my art allows it to exist in a context which best heightens whatever message i'm trying to convey. if there's an issues with my website right now they are that i'm very bad at mobile browser formatting & i havent updated the main look of the website in something like 4 years barely at all.
anyway, at the end of the day i think really as long as you can identify whatever your intentions are and do some planning/problem solving around that you should probably be able to find your own method which works for you better than mine might but if you do just want to copy my website the tools to do so are within your brain and internet searches and i believe in you. i think the biggest strength of my website is that it shows how easy it is to just put art big as fuck on a webpage and how effective that kind of minimalism can be. i just want my website to be like a museum's walls. and it's not super complicated to get to that level of html knowledge.
11 notes
·
View notes
Note
do you know any good places to put webcomics? is it best to just make your own website for them? I'm not really into sites like webtoon or whatever...
If you don't want much setup, you can make a Tumblr and use the Simple Webcomic Theme (or any other theme, as long as you set it so the blog shows 1 post per page for long form serialised work, or in a full-size grid for funny comics).
There are still other alternative platforms like Comics Fury, Comics Gator and Drunk Duck, those have been around before Webtoons.
If you are comfortable with HTML, CSS or generally learning/playing around with independent website setup, then you can go to Neocities or Wordpress. I use Wordpress (the dot org) for my personal website, The World in Deeper Inspection webcomic and the Comics Devices library, but that's a system that's worked with me and my brain for 11 years now.
Neocities allows you total freedom, but you really have to be comfortable with learning since this is old-school website building. There's a webcomic template though.
Squarespace or Wix is fine if you use their blog system.
I don't recommend Carrd for webcomics! I just don't think the infrastructure (one-page site) is flexible enough for yourself or your readership.
My general opinion is that I'll always recommend having your webcomic in a place that you can control, or at the least, easily export to another platform. I've been through so many eras of platforms rising and falling. And exporting all the posts/art you upload on that one dying platform only is an ordeal that you would want to avoid (ask me, who's working on manually transferring stuff from Twitter and Deviantart to my personal website OTL)
137 notes
·
View notes
Note
Hiya! I found your blog through your neocities website! I was wondering if there’s any tips or things you read/watched that help you make your site. (Im heavily considering making one of my own neocities site it just seems fun)
hihi welcome !! i have quite a few pieces of advice, but the tldr is you should come up with an idea for what you want to make beforehand, and look up how to do each piece! your knowledge will start to fill in along the way :]
(this is probably gonna be long as hell so under the cut is all of the fun stuff /silly)
the way i personally started off was by sketching out what i wanted my site to look like! if you know what you want before you begin, you'll know where to look to figure out what you need to do. html+ css are extremely easy languages to read/write once you know what to look for!
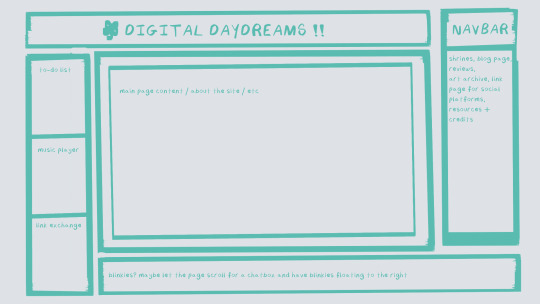
^ this was the original sketch for my site, where i planned out everything i wanted to include. it's a bit different from what actually ended up on the site, but that's alright! it's just about having an outline to work from. i think of it like outlining before you write, it feels like such a pain in the ass because u just wanna start working NOW but u will thank yourself later for taking the time to plan.
once you know what you want to make, start looking for tutorials and resources to make it easier! the grid for my homepage and some of my other subpages was made using a css grid generator, since its one of the more confusing bits of css. you can make grids without it, but its a very easy way to make a more asymmetrical design if ur using the generator!
thats linked here, it gives you some css to put in your head or css sheet, and then the html for the different boxes to slap in your main document. it can be easier to understand what itll look like if you give each one a border while you work, even if its just temporary!
when looking for information about css and html, w3schools is your best friend. its a pretty comprehensive database of every little piece of html + css you could ever need, with examples you can play with yourself to understand what each variable does! it's been a lifesaver for me, ive watched basically zero video tutorials because everything on there is explained so well and you can find basically Anything.
they even have code snippets for things that take more than one or two lines of code, which you can use and adapt yourself! (the tooltips on the official art + my art sections on the hinata shrine were adapted from a tutorial on there!)
in general, having a plan and working from there will make ur life so much easier. the pages that ive sketched out beforehand or ive had a very clear vision for have been WAYY easier to code than the ones i tried to come up with on the fly, and ive been much happier with how they've turned out as well. though i do also have some smaller, rapidfire tips as well that ill go thru now!!
— inline css (the style="" tag) seems so so useful but really should only be used when you're resizing images like buttons. when u keep all of your css in the head or in a seperate document, its way easier to debug and read later. i cleaned up my homepage recently by removing all of the inline css and looking at the code stresses me out WAY less because i can actually read it LOLOL ... plus cutting the css out and putting it in its own document made me realize that id accidentally wrote some really weird code in some places
— this is very much 'do as i say, not as i do,' but use an external editor (like visual studio code) instead of editing live on neocities! you can set up a live preview, and generally wont be pushing out 100 updates every single time you change or add something. i tend to code directly on neocities but its a bad habit and i want to break it eventually v_v
— if you really like an effect someone else has on their site, you can peek using inspect element i promise the coding police won't get you !! dont steal code line for line, but you can figure out what theyre doing and put your own spin on it. things like border images can be really cool, and i only figured out about them because i looked at what someone else was doing and figured out how to adapt it for my own site! check linkbooks and credit sections as well, a lot of people will include links to any effect they didnt make themself or got help with. (including me! the credits section of the linkbook has a ton of little things i got from other places, including a really neat little music player, the rss feed for my status cafe, and the wobbly text on the homepage!)
— most stuff in html and css basically just... says what it does in the tag. so looking stuff up for it is extremely easy! if you've used carrd before you honestly probably already know more abt html than u'd think just intuitively. when ur adjusting the margins or padding in carrd, you're adjusting the margin: and padding: properties in the css of the website it's outputting!
this is getting way too long but!! my best advice is to just get started. you'll never be able to learn without trying, and it genuinely is so fun to have something that's truly your own!
(if u have any specific questions im happy to answer anytime as well! i love talking abt neocities, its a super fun hobby and way easier to pick up than u would think!)
#originals.txt#inbox.txt#neocities.zip#god im so sorry abt how long this is i havent had time to work on the site for a while and its getting to my head /silly
6 notes
·
View notes
Text
Look, you don't have to do everything in code from scratch. It's fine to use generators to make your grid layout, or use scss to css converters to keep your stylesheets neater. As long as people have put a tool out there for the public to use, take free and full advantage. Most of the ethos in actual coding circles is in favor of open source- we none of us are doing anything truly original, unless we're writing a new language or framework from the ground up, which VERY few do. Even then, people want their tools to be used, and that's why they include examples, working sites, documentation, sometimes whole startup tools that will get you running a page in two commands. What matters on all sites it the actual CONTENT you put on a webpage, which is why all the most successful companies in the internet age rest on the foundation of what other people populate their sites with. netflix is nothing without creative film and television output, youtube is nothing without content creators, twitter, tiktok, facebook. even amazon doesn't mean anything if manufacturers don't sell their products there. All these sites are just wireframes for what YOU put on there. Do not shake in your boots about using freely disseminated code on the internet- stack overflow, open source repositories, design frameworks like bootstrap, material ui, free font packs, tutorials on code education websites, etc. Go, use it. People share these things with the intent of it all acting as a shortcut, usually without expectation of credit. They know that other people can figure this stuff out on their own eventually, their intent is to HELP. If a resource is open source, if a tool is available to the public, if a stranger answers a question on a coding help forum, I promise you. You can use it. There is no glory in making coding harder for yourself. Stand on the shoulders of coders who came before you. They wouldn't have put themselves there if they didn't want you to.
9 notes
·
View notes
Text
i keep getting sidetracked from art fight by tinkering on my website...
besides just generally messing with the jekyll layouts and condensing the stylesheet, i finally added a mobile layout to the site.
landscape mode is going to require a different layout but the power of CSS grid is probably gonna make it pretty easy...
6 notes
·
View notes
Text
Top 10 Front-End Frameworks and Libraries for 2024
As the web development landscape continues to evolve, staying updated with the latest front-end frameworks and libraries is crucial for any developer. Whether you're a seasoned pro or just starting out, knowing which tools to use can significantly impact your productivity and the quality of your projects. In this post, we’ll explore the top 10 front-end frameworks and libraries that are set to dominate in 2024.
1. React
React remains one of the most popular front-end libraries, known for its simplicity and flexibility.
Key Features of React
Component-Based Architecture: Reusable components make development efficient and manageable.
Virtual DOM: Enhances performance by minimizing direct DOM manipulation.
Strong Community Support: A vast ecosystem of tools, libraries, and tutorials.
2. Angular
Angular, backed by Google, is a powerful framework for building dynamic single-page applications (SPAs).
Why Choose Angular?
Two-Way Data Binding: Synchronizes data between the model and the view.
Dependency Injection: Improves code maintainability and testability.
Comprehensive Documentation: Extensive resources for learning and troubleshooting.
3. Vue.js
Vue.js has gained popularity due to its gentle learning curve and versatility.
Advantages of Vue.js
Reactive Data Binding: Simplifies state management.
Single-File Components: Encapsulate HTML, CSS, and JavaScript in one file.
Flexibility: Can be used for both large-scale and small-scale applications.

4. Svelte
Svelte is a relatively new player that compiles components into highly efficient vanilla JavaScript at build time.
Svelte’s Standout Features
No Virtual DOM: Directly manipulates the DOM for better performance.
Less Boilerplate: Cleaner code with minimal overhead.
Ease of Use: Intuitive and straightforward syntax.

5. Bootstrap
Bootstrap is a front-end framework that provides pre-designed components and a responsive grid system.
Benefits of Using Bootstrap
Responsive Design: Ensures your site looks great on all devices.
Pre-Styled Components: Saves time with ready-to-use UI elements.
Customizable: Easily customize with Sass variables and Bootstrap’s extensive options.
6. Tailwind CSS
Tailwind CSS is a utility-first CSS framework that allows for rapid UI development.
Tailwind CSS Features
Utility-First Approach: Use utility classes directly in your HTML.
Customizable: Extensive configuration options to suit your project’s needs.
Consistency: Enforces a consistent design language across your project.

7. Ember.js
Ember.js is a robust framework for building ambitious web applications.
Why Ember.js Stands Out
Convention over Configuration: Reduces the amount of decision-making and boilerplate code.
Strong Routing: Powerful routing capabilities for managing application state.
Productivity: Focuses on developer productivity with built-in best practices.
8. Alpine.js
Alpine.js offers a minimal and lightweight way to add interactivity to your websites.
Key Features of Alpine.js
Lightweight: Small footprint with only a few kilobytes.
Declarative Syntax: Similar to Vue.js, making it easy to understand and implement.
Ease of Integration: Can be easily integrated into existing projects.

9. Next.js
Next.js is a popular React framework that enables server-side rendering and static site generation.
Benefits of Using Next.js
Server-Side Rendering (SSR): Improves performance and SEO by rendering pages on the server.
Static Site Generation (SSG): Pre-renders pages at build time for fast load times.
API Routes: Allows you to create API endpoints within your application.
10. Lit
Lit is a simple library for building fast, lightweight web components.
Advantages of Lit
Web Components: Embraces the web components standard for reusable, encapsulated HTML elements.
Performance: Lightweight and highly performant.
Simple API: Easy to learn and use with a minimal API surface.
Conclusion
Choosing the right front-end framework or library can significantly impact your workflow and the quality of your projects. Whether you prefer the flexibility of React, the structure of Angular, or the simplicity of Svelte, there's a tool out there to suit your needs.
Final Tips for Selecting a Framework or Library
Project Requirements: Consider the specific needs of your project.
Community and Support: Look for frameworks with strong community support and documentation.
Learning Curve: Choose a tool that matches your current skill level and the time you have available to learn.
By staying informed about the latest tools and trends, you can ensure that your skills remain relevant and that you can deliver the best possible results in your projects. Happy coding!
Remember, the best tool is the one that helps you get the job done efficiently and effectively. So, dive into these frameworks and libraries, and take your front-end development skills to the next level!
Share Your Thoughts
I'm curious to know your thoughts on these front-end frameworks and libraries. Have you used any of them in your projects? Which one is your favorite, and why? Share your experiences and insights in the comments below.👇
2 notes
·
View notes
Note
i am the person who originally let lolita know that you had been taking credit for her apocrypha skin. honestly the fact that you're doubling down and insisting that you coded your site's skin is wild. i literally recognized the apocrypha skin immediately when i saw your site. someone else let me know and was like, "huh wow, isn't this lolita's skin?"
this isn't "inspiration" this is stealing. you may want to look into the difference between inspiration and ripping. Hope this helps.
Thanks for outing yourself I guess.
In coding parlance, the difference between ripping and inspiration is that ripping is taking the raw code without editing it or editing it minimally. Reverse engineering something to perform the same task is generally not considered ripping.
I am also a designer (my degree is in digital media) and I am not denying that Lolita is essentially the visual designer of the skin. She is still credited on the site. However she did not code NOX's skin.
This is the forum row code from the Apocrypha skin:

I'm using the inspect element tool here because I want you to see all that css in the forum rows (and I took that out of there immediately, even when we did have the Apocrypha skin). I also want you to see how the code is laid out. Notice how Lolita uses flex and :after and :before selectors.
This is NOX's forum row code:

Does it look even remotely the same? I use grid to achieve my layout. Instead of using a bunch of css in the forum rows, I have a second class assigned to the forum (that's what "right-half" is and it's assigned using javascript). I only use flex for alignment because i hate it, and instead of using :after to create gradient underlines, I use an entire class, because then I only have to style it once and if I want to change it, I only have to change that class.*
I did not want to bring it up, because most of the coders in the Jcink community are self taught, but the reason I rewrote NOX's skin is because it was difficult to work with and if I wanted to modify one thing, I then had to go through the entire skin and modify several other things to fix it.
I understand that you want to help your friend, but you are not helping anyone by making assumptions and not even asking for an explanation. Instead of doing that you could have asked for my side of the story at any time.
*not directly relevant but the reason our skin is styled like this is because we also allow our members to choose their own gradients for their character accounts, which you can see in the main member profiles. When I was skinning the site, we were unsure whether we would be allowing the entire site to change colour depending on which character you were logged into.
#jcink rpc#zach does design#zach does explaining things very simply for people who cannot find the show source button#jcink skins
1 note
·
View note
Text
Freelance Web Development Courses: Kickstart Your Career
The world of freelance web development is rapidly expanding. With more businesses going digital, the demand for skilled Freelance Web Designers and Freelance Web Developers has never been higher. Whether you're looking to become a Freelance Website Designer Singapore or upgrade your current skills, taking the right web development courses is a crucial step toward success.
This article explores the best freelance web development courses available, both free and paid, while helping you understand how they align with your goals as a Web Developer Singapore, Freelance Website Developer, or Website Designer Singapore.
Why Courses Matter in Freelance Web Development
The freelance industry values both experience and knowledge. Even if you're self-taught, completing recognized courses can help you stay competitive and earn client trust. If you aim to work in a competitive market like web design Singapore, certifications and formal training can give you an edge.
For a Freelance Web Designer Singapore, courses can improve not only technical skills but also soft skills such as client communication and time management.
1. freeCodeCamp – Responsive Web Design Certification
freeCodeCamp offers a highly regarded free certification in Responsive Web Design. This course covers HTML, CSS, Flexbox, Grid, and responsive design principles.
It’s ideal for a beginner Freelance Web Developer or someone looking to break into the Freelance Website Developer Singapore market. You’ll build real projects that can go into your portfolio.
2. Coursera – Meta Front-End Developer Professional Certificate
Meta (formerly Facebook) offers this comprehensive program on Coursera. It includes HTML, CSS, JavaScript, React, and even UI/UX design concepts. You also get a certificate from Meta.
This course is excellent for aspiring Website Developer Singapore professionals aiming to work in front-end development.
It’s a high-value credential for any Freelance Web Designer Singapore wanting to gain global recognition.
3. Google UX Design Professional Certificate (Coursera)
This course focuses on user experience design, research, and prototyping tools like Figma. It's perfect for Freelance Website Designers who want to understand the psychology and strategy behind beautiful, functional websites.
In markets like Singapore, where design standards are high, understanding UX can set a Freelance Website Developer Singapore apart from the competition.
4. Udemy – The Web Developer Bootcamp (by Colt Steele)
This is one of the most popular and comprehensive courses on Udemy. It includes HTML, CSS, JavaScript, Node.js, MongoDB, and Express. It’s ideal for those who want to become full-stack developers.
Whether you’re a Freelance Web Developer Singapore or a Website Designer Singapore, this course offers end-to-end web development skills.
The lifetime access and frequent updates make it a great long-term investment.
5. edX – W3C Front-End Web Developer Program
Developed by the World Wide Web Consortium (W3C), this course on edX teaches web standards and technologies like HTML5, CSS, and JavaScript.
This course is great for beginners as well as experienced Web Designers Singapore who want to polish their fundamentals and earn a globally respected certificate.
6. LinkedIn Learning – Become a Web Developer Learning Path
LinkedIn Learning offers curated course bundles that cover everything from the basics to advanced topics like API integration and server-side scripting.
It’s perfect for a Freelance Web Developer, and completing these courses can also enhance your LinkedIn profile—useful for networking with potential clients in web design Singapore.
7. General Assembly – Web Development Immersive
General Assembly offers intensive bootcamps in cities worldwide, including Singapore. Their full-time and part-time web development courses cover HTML, CSS, JavaScript, Git, and frameworks like React and Angular.
Perfect for those looking to transition into a full-time freelance career, whether as a Freelance Web Developer Singapore or a Website Developer Singapore.
8. The Odin Project
The Odin Project is a free and comprehensive curriculum that covers full-stack development using HTML, CSS, JavaScript, Node.js, and databases.
It’s excellent for someone who wants to become a self-taught Freelance Website Developer. You'll build real-world projects—great for your portfolio if you want to offer web design Singapore services.
9. Skillshare – Web Design and Freelance Courses
Skillshare offers shorter, project-based courses in web design, UI/UX, and freelancing. While not as in-depth as bootcamps, they’re perfect for learning specific skills quickly.
A Freelance Web Designer Singapore or Website Designer Singapore looking to sharpen a particular skill like typography, wireframing, or branding can benefit greatly.
10. Pluralsight – Paths for Front-End and Back-End Developers
Pluralsight offers expert-led, structured learning paths in various web technologies. Their assessments help you gauge your current skill level, making it ideal for intermediate and advanced developers.
It's a solid option for Freelance Website Developer Singapore professionals who want continuous learning.
What to Look for in a Web Development Course
Choosing the right course depends on your career goals. Here are a few factors to consider:
1. Course Content
Make sure it covers both front-end and back-end if you're aiming to be a full-stack Freelance Website Developer.
2. Hands-on Projects
Courses that include real-world projects are more valuable, especially for building your portfolio as a Freelance Web Designer Singapore.
3. Certifications
While not always mandatory, certificates can enhance your credibility, especially if you're just starting out in web design Singapore.
4. Community Support
A good learning platform should offer forums, peer reviews, or mentorship. These features are incredibly helpful for Freelance Web Developers working independently.
Freelancing-Focused Courses
Apart from technical skills, you need to understand how to manage your freelance business.
1. Freelancing 101 (by And Co)
This free course includes tips on setting rates, handling contracts, and finding clients—perfect for a Freelance Website Designer.
2. Skillshare – Building a Freelance Web Design Business
Tailored for Freelance Web Designer Singapore professionals, this course dives into client management, branding, and pricing models.
Certifications That Add Value in Singapore
In Singapore, credentials matter. Here are some certifications that boost your resume:
Google UX Design Certificate
W3C Front-End Developer Certificate
AWS Certified Cloud Practitioner
Meta Front-End Developer Certificate
Adobe Certified Professional – Web Authoring
These are valuable whether you're a Website Developer Singapore or a Freelance Website Designer Singapore offering services to corporations or startups.
Career Paths After Taking Courses
Once you've completed one or more of these courses, you’ll be equipped to take on various roles:
Freelance Web Developer for small businesses
Freelance Website Designer Singapore specializing in e-commerce
Web Developer Singapore offering full-stack solutions
Website Designer Singapore focusing on branding and UI/UX
The key is to continue learning and updating your portfolio. The more you apply your skills in real projects, the more you grow.
Final Thoughts
Freelance web development is one of the most rewarding career paths in the digital era. The right courses not only teach you how to code but also how to think critically, solve problems, and manage clients.
Whether you're a complete beginner or looking to specialize further as a Freelance Web Designer, Freelance Website Developer, or Web Designer Singapore, there's a course out there that fits your needs.
As competition grows in markets like web design Singapore, having relevant certifications and up-to-date skills is what sets successful freelancers apart.
Invest in yourself. Learn, build, and grow. The journey to becoming a top-tier Freelance Web Developer Singapore or Website Developer Singapore starts with the right education.Visit https://www.freelancewebdesigner.sg to learn on Website development in Singapore.
#freelance web designer singapore#web design singapore#web designer singapore#website developer singapore#web developer singapore#website designer singapore
0 notes
Text
Master the Code: How Java, Python, and Web Development Tutoring on MentorForHire Can Supercharge Your Tech Career
In a world powered by software, coding is no longer just a niche skill—it's a core competency. Whether you're looking to break into tech, ace a coding bootcamp, land your first junior developer job, or scale your expertise as a senior engineer, personalized mentoring makes a dramatic difference. That’s where MentorForHire.com comes in—a platform that connects you with industry professionals for hands-on Java Tutoring, Python Tutoring, and Web Development Tutoring.
Here’s how specialized tutoring in these key areas can accelerate your learning journey and help you achieve your software development goals.
Why One-on-One Coding Tutoring Beats Generic Online Courses
Self-paced tutorials and free courses are great for dipping your toes in—but when you're serious about growth, they often fall short. Why?
You don’t know what you don’t know.
Debugging can become a time-wasting nightmare.
Without accountability, progress slows down.
You’re not getting job-ready feedback from a real developer.
MentorForHire solves all of these problems by connecting you with real mentors who’ve worked in tech and know what it takes to succeed. Whether you're working on a class assignment, preparing for interviews, or building a full-stack project, you'll get tailored support.
Java Tutoring: Build Enterprise-Grade Skills from the Ground Up
Java isn’t just for beginners—it powers billions of devices, from Android apps to massive backend systems used in finance, healthcare, and e-commerce. If you're serious about software engineering, Java Tutoring offers a rock-solid foundation.
With a mentor, you can:
Understand core concepts like classes, inheritance, interfaces, and exception handling.
Master data structures and algorithms for whiteboard interviews.
Build scalable applications using Java frameworks like Spring and Hibernate.
Get help with unit testing, debugging, and version control.
Prepare for certifications like Oracle Certified Associate (OCA) and Oracle Certified Professional (OCP).
A mentor will not only explain the "how" of Java development but also the "why"��turning you from a coder into a software architect-in-training.
Python Tutoring: The Most Versatile Language in Tech
Python has become the go-to language for beginners and professionals alike because of its simplicity and power. Whether you want to get into automation, data science, machine learning, or back-end web development, Python Tutoring gives you the skills you need to thrive.
On MentorForHire.com, Python mentors can help you:
Write clean, efficient, and maintainable code.
Understand essential concepts like functions, loops, list comprehensions, and file I/O.
Use libraries like NumPy, pandas, Matplotlib, and scikit-learn for data analysis.
Build web apps with Flask or Django from scratch.
Automate tasks using Python scripts or integrate with APIs.
Whether you're solving LeetCode challenges or working on a startup prototype, personalized tutoring can take your Python skills to the next level.
Web Development Tutoring: Learn to Build the Web, Not Just Consume It
Today’s digital economy is built on the web—and web developers are in high demand across every industry. But with so many tools and frameworks, it’s easy to get overwhelmed. That’s where Web Development Tutoring comes in.
From front-end to back-end to full-stack, tutors on MentorForHire.com can guide you step-by-step:
Front-End Skills:
HTML, CSS, and JavaScript fundamentals
Responsive design using Flexbox and Grid
JavaScript frameworks like React, Angular, or Vue
Version control with Git and GitHub
Back-End Skills:
Node.js with Express or Java with Spring Boot
REST APIs and database integration (MySQL, MongoDB)
Authentication systems (OAuth, JWT)
DevOps basics: deploying apps with Heroku or AWS
You’ll work on actual projects like to-do lists, dashboards, or e-commerce stores—and get expert feedback every step of the way.
How MentorForHire Makes Learning Easier and Smarter
MentorForHire.com isn't just about hiring a tutor—it's about mentorship. The platform matches you with experienced developers who offer:
Flexible scheduling – Learn when it suits your life.
Customized roadmaps – No more cookie-cutter syllabi.
Real-world projects – Build apps that solve actual problems.
Code reviews & interview prep – Gain confidence before job applications.
Ongoing support – Whether it’s bugs, burnout, or breakthroughs.
This isn’t a YouTube tutorial or a lecture—it’s a partnership. Whether you're 16 or 60, learning to code becomes faster and more meaningful when you have someone guiding you in real time.
Who Is This For?
Students who want to stand out in their CS classes
Career changers entering tech from another field
Bootcamp grads who need more 1:1 help
Junior developers looking to climb the ladder
Entrepreneurs building their own software products
If you’ve got a goal and a laptop, MentorForHire.com has a mentor ready to help you reach it.
Final Thoughts: The Future Belongs to Lifelong Learners
The best investment you can make is in yourself. Whether you're learning Java, diving into Python, or building full-stack web apps, tutoring turns passive learning into active progress.
MentorForHire.com helps unlock your potential by giving you access to mentors who’ve been where you are—and know how to help you level up.
So why wait? Start your personalized tutoring journey today. Visit MentorForHire and connect with a mentor who can help you write your success story in code.
0 notes
Text
AI in Frontend Development: How Artificial Intelligence Is Transforming UI/UX in 2025 and Beyond

Frontend development is no longer just about staying updated with the latest JavaScript framework or mastering slick animations. The real shift? It’s AI in frontend development a transformation that’s reshaping how we design, build, and optimize digital interfaces.
From wireframing to code generation, what once took hours now takes minutes, thanks to artificial intelligence. Whether you’re focused on UI design, UX optimization, or code implementation, AI is becoming a powerful design partner. Let’s dive into how AI is revolutionizing frontend workflows, tools, and user experiences in 2025.
What Is AI in Frontend Development?
AI in frontend development refers to the use of artificial intelligence to simplify, automate, or enhance the tasks involved in creating user interfaces. It can assist with:
Generating responsive layouts
Writing component code
Improving accessibility
Predicting user behavior
This doesn’t mean developers and designers are being replaced. Instead, AI enhances human creativity, handling the repetitive parts and enabling teams to focus on strategy, storytelling, and innovation.
Best AI Tools for UI/UX Designers Today
There’s a growing wave of intelligent tools designed specifically for UI/UX professionals. These tools help teams build faster and smarter.
Figma AI
Figma now offers built-in AI tools that assist with layout tweaks, accessibility insights, auto-labeling images, and content suggestions — right inside your workflow.
Framer AI
With Framer AI, just describe your layout in plain English (e.g., “Create a SaaS homepage with pricing and testimonials”), and it delivers a fully responsive, ready-to-go design.
Uizard & Galileo
Uizard turns text prompts or sketches into wireframes. Galileo takes it further, generating pixel-perfect UI based on your descriptions — speeding up the designer-to-developer handoff.
These AI UI design tools don’t just boost efficiency, they unlock a new level of creative freedom.
How Do Frontend Developers Use AI in Real Workflows?
For developers, AI is becoming a game changer, especially in simplifying repetitive and structural frontend tasks.
Generative UI
Generative UI enables devs to create layouts or UI components simply by describing them. AI generates the code, whether it’s for dashboards, landing pages, or product grids.
Frontend Design Automation
Today’s smart tools can handle:
Responsive grid systems
Color scheme suggestions
HTML structure from wireframes
CSS and Tailwind class generation
By automating these tasks, developers gain more time to work on logic, experience design, and performance tuning.
How Does AI Improve Accessibility in Frontend Design?
AI for accessibility is one of the most valuable applications in frontend development. It helps teams build interfaces that are inclusive and compliant from the start.
Key features AI supports include:
Contrast checking to catch poor color pairings
Alt text generation for images using context recognition
Keyboard navigation validation to ensure mouse-free usability
Tools like Stark AI for Figma and smart IDE plugins are already making accessibility easier and more accurate.
AI in UI/UX design isn’t just convenient, it’s a step toward a more inclusive digital world.
Using Prompts for AI-Generated UI Design
Prompt-based UI design is rapidly emerging as a go-to method for fast prototyping.
You provide a natural language prompt, and the AI handles the layout or code creation. For example:
“Create a login screen with email, password, and forgot password link.”
“Design a 3-column product grid with hover animations.”
“Build a pricing section with a toggle for monthly/yearly plans.”
By learning basic prompt engineering, designers and devs can go from idea to prototype in minutes.
Top AI UX Design Trends You Should Know
AI UX design trends are evolving fast, and they’re making digital experiences more personal, intuitive, and engaging.
1. Predictive Interfaces
AI anticipates what users need based on behaviour and context, adapting layouts and navigation dynamically.
2. Hyper-Personalization
User interfaces now adjust in real-time — think personalized colour schemes, font sizes, or feature prioritization.
3. Conversational Interfaces
Chatbot-style UIs and voice interactions are on the rise, making apps feel more human and responsive.
These AI-driven experiences go beyond aesthetics, they enhance usability and engagement like never before.
Will AI Replace UI/UX Designers or Developers?
It’s a valid concern, but here’s the truth: AI won’t replace designers or developers.
Why? Because AI lacks what makes us human:
Creativity
Emotional intelligence
Contextual understanding
Brand intuition
What AI does is eliminate the tedious stuff , letting you spend more time on ideation, testing, and crafting user experiences that actually matter.
Real-Life Example: Building a Website with Framer AI
Let’s say you need a personal portfolio website. Here’s how AI makes that easier:
Prompt: “Build a personal portfolio with a hero section, about me, project cards, and a contact form.”
Output: Framer AI instantly generates a layout with sections, styling, and sample content.
You Customize: Update fonts, images, and animations — all in under 30 minutes.
What used to take days can now happen before your next coffee break.
What’s Next for AI in UI/UX and Frontend Design?
AI isn’t slowing down. Here are some exciting areas to keep your eyes on:
Voice-to-UI: Speak your interface, and watch it build itself in real time
AI-assisted A/B testing: Interfaces adjust based on live performance metrics
Ethical design checks: AI flags dark UX patterns or manipulative flows
Live AI collaboration: Smart assistants suggest edits during real-time teamwork
The goal is no longer speed alone. It’s better outcomes for both users and creators.
Partner with Ahex Technologies — Experts in AI & Frontend Development
At Ahex Technologies, we’re not just writing about the future, we’re building it.
Whether you’re a startup looking to launch a responsive web app or an enterprise modernizing your UI/UX processes, our team leverages AI in frontend development to craft smart, scalable digital products.
End-to-end design & development
AI-integrated workflows
Accessibility-first approach
Expertise in tools like Figma AI, Framer, and Uizard
Need a UI/UX or frontend partner you can trust? Let’s talk.
Final Thoughts: AI Is Your New Design Partner
Embracing AI in frontend development doesn’t mean giving up control. It means gaining a creative partner who amplifies your ideas and accelerates delivery.
From prompt-based UI design to AI for accessibility, the tools we use are getting smarter, and so are we. Whether you’re a designer, developer, or somewhere in between, AI helps you work faster, smarter, and more creatively.
So the next time you launch Figma, VS Code, or Framer, don’t just ask “What can I build?”
Ask: “What can AI help me build better?”
AI in Frontend Development- FAQs
What are the best AI UI design tools right now?
Top tools include Figma AI, Framer AI, Uizard, Galileo, and Penpot AI. They offer features like auto-layouts, design suggestions, and real-time code generation.
How does AI support accessibility in frontend development?
AI tools can check contrast issues, generate alt text for images, suggest ARIA labels, and flag usability problems for keyboard navigation.
Can frontend developers rely on AI for code?
Yes, GitHub Copilot, Cursor, and others can generate UI components, write CSS, and assist with layout logic. But human review is still essential.
What is generative UI?
Generative UI involves creating components or layouts using AI-generated code from prompts, reducing manual work and enabling rapid prototyping.
Will AI replace UI/UX designers?
Not at all. AI helps streamline repetitive tasks, but creativity, strategy, and empathy are still human superpowers.
Want a deeper dive into AI-powered frontend workflows? Explore our full article on AI in frontend development over at Ahex.co.
0 notes
Text
CSS 58 💻 Cheatsheet
New Post has been published on https://tuts.kandz.me/css-58-%f0%9f%92%bb-cheatsheet/
CSS 58 💻 Cheatsheet

youtube
Basic Selectors Element Selector: Targets elements by tag name. `p color: blue; ` Class Selector: Targets elements with a specific class. ` .highlight background-color: yellow; ` ID Selector: Targets an element with a specific ID (unique). ` #main-title font-size: 36px; ` Universal Selector: Applies to all elements. ` * margin: 0; padding: 0; ` Attribute Selector: Targets elements with specific attributes or attribute values. `[type="text"] border: 1px solid black; ` Combinators Descendant Combinator (Space): Selects elements that are descendants of another element. ` div p color: red; ` Child Combinator ( ): Selects direct children of an element. ` ul li font-weight: bold; ` Adjacent Sibling Combinator (+): Selects the element immediately following another element. ` h1 + p margin-top: 20px; ` General Sibling Combinator (~): Selects all siblings that follow another element. ` h2 ~ p font-style: italic; ` Box Model Margin: The space outside the border. ``` margin: 10px; margin-top: 20px; margin-left: 30px; margin-right: 40px; margin-bottom: 50px; ``` Padding: The space inside the border. ``` padding: 10px; padding-top: 20px; padding-left: 30px; padding-right: 40px; padding-bottom: 50px; ``` Border: The line around an element. ``` border: 1px solid black; border-width: 2px; border-style: dashed; border-color: red; ``` Width/Height: Sets the width and height of an element. ``` width: 300px; height: 200px; ``` Typography Font Family: Specifies the font family for text. `font-family: Arial, sans-serif;` Font Size: Sets the size of the font. `font-size: 16px;` Font Weight: Controls the boldness of the font. ` font-weight: bold;` Text Align: Aligns text within an element. ` text-align: center;` Background Background Color: Sets the background color of an element. `background-color: #f0f0f0;` Background Image: Sets a background image for an element. `background-image: url('image.jpg');` Background Repeat: Controls how the background image is repeated. `background-repeat: no-repeat;` Background Position: Positions the background image within an element. ` background-position: center;` Display Display Block: Makes an element take up the full width available and start on a new line. ` display: block;` Display Inline: Allows elements to sit next to each other horizontally. ` display: inline;` Display Inline-Block: Combines both inline and block properties. ` display: inline-block;` Display Flex: Creates a flex container for child elements. `display: flex;` Display Grid: Creates a grid container for child elements. ` display: grid;` Positioning Position Static: Default value. Elements are positioned according to the normal flow of the document. ` position: static;` Position Relative: Moves an element relative to its normal position. ``` position: relative; top: 20px; left: 30px; ``` Position Absolute: Positions an element relative to the nearest positioned ancestor (not static). ``` position: absolute; top: 50px; right: 100px; ``` Position Fixed: Keeps an element in a fixed position even when scrolling. ``` position: fixed; bottom: 20px; left: 30px; ``` Flexbox Flex Direction: Defines the direction of the main axis (row or column). ``` flex-direction: row; /* Default */ flex-direction: column; ``` Justify Content: Aligns items along the main axis. ``` justify-content: flex-start; /* Default */ justify-content: center; justify-content: flex-end; justify-content: space-between; justify-content: space-around; ``` Align Items: Aligns items along the cross axis. ``` align-items: stretch; /* Default */ align-items: flex-start; align-items: center; align-items: flex-end; ``` Grid Grid Template Columns: Defines the number and size of columns in a grid container. ` grid-template-columns: repeat(3, 1fr);` Grid Template Rows: Defines the number and size of rows in a grid container. ` grid-template-rows: auto;` Justify Items: Aligns items along the row axis within their grid area. ``` justify-items: start; /* Default */ justify-items: center; justify-items: end; justify-items: stretch; ``` Align Items: Aligns items along the column axis within their grid area. ``` align-items: start; /* Default */ align-items: center; align-items: end; align-items: stretch; ``` Other Useful Properties Color: Sets the color of text. ` color: #333333;` Opacity: Sets the opacity level of an element. ` opacity: 0.5;` Margin/Padding: Controls the space around or inside an element. ``` margin: 10px; padding: 20px; ``` Box Shadow: Adds a shadow effect to an element. ` box-shadow: 2px 4px 6px rgba(0, 0, 0, 0.5);` Transform: Applies 2D or 3D transformations to an element. ` transform: rotate(90deg);`
0 notes
Text
Responsive vs. Adaptive vs. Neither of those things
Aight so. Big topic. We hear the word 'responsive' a lot when talking about web design but it's kind of a wishy washy topic for lots of people outside tech, especially if you've mostly coded while interacting with jcink. John did it really weird, with two skins- one for mobile, and one for desktop. This is actually pretty convenient because it helps distinguish two ideas. If you go to a website like youtube or even tumblr and resize your window as large as you can and as small as you can. These sites are properly responsive- the layout changes and adapts to the size of the screen. Youtube is (unsurprisingly) better at this than tumblr. It changes to use all of the available screen width at every size, pretty much no matter what. Tumblr (the dash anyway) only expands to a certain size- but it also doesn't break when you make it really small. Now go look at the base jcink skin- jcink support forums for instance. If you look at it on a phone, it'll mostly look okay, and after a certain size, will mostly look okay on desktop too. But there's this whole area between the two where things start to get janky. The fixed sizes of everything start to spill over the window size. That's an adaptive skin. Everything is a fixed size, and which layout you see depends on the type of device you're using. Adaptive sites are generally seen as outdated at this point. Almost no one is coding this way anymore. Now go to a jcink skin. Do the same thing with making your window bigger and smaller. In every skin I've ever seen, *something* will break. Text will overflow, you'll have to scroll from side to side to read a post, images will start to overlap other content. That kind of thing. Some sites will resize to a certain point, but almost none of them will do so all the way down to a mobile size, or even half of a laptop screen. This is neither adaptive nor responsive. THIS IS OKAY. I mean it's not ideal, but almost no one coding for jcink is a professional, and these are legitimately difficult things to get right. You have to be thinking about it from the start of the design process. What's going to happen to that icon when the screen gets small? What about the topic information? How are you going to keep information which looks beautiful at a desktop size looking good at tablet and phone sizes? It's legitimately difficult, and if you're not building with that in mind from the start it's a non-trivial task to make an unresponsive skin responsive. If you want to start thinking about these things, I'd recommend reading about media query breakpoints. For jcink, I think it's fair to code for desktop first (usually it's mobile first today) because people using a jcink site will usually want to be typing in it somewhere. Anecdotally, I think even people who post on mobile usually are writing in a notes app first. My skin worked really well at a 600px breakpoint, but other skins might need different figures. That's okay! As long as you can identify (maybe two) places where your views start to breakdown and have consistent behavior in your css for those breakpoints, you should be fine. I think it's good practice to know what you want your mobile version to look like, and code at least the skeleton of both views as you go, so you don't back yourself into corners. That's already a lot of text, so I'll stop there. I'll follow this up with a few different ways you can approach responsive design beyond breakpoints- grid, flexbox, and percentage based css. I can't really effectively teach these things on tumblr, but I can talk about the pros and cons of each approach so you can start looking into the things that seem like they might fit your use case.
2 notes
·
View notes