#data table in laravel
Explore tagged Tumblr posts
Visit Tumblr Blog
Explore Tumblr blogs with no restrictions, modern design and the best experience.
Last Seen Tumblr Blogs


Fun Fact
Tumblr has been providing a Korean-language service since 2013.
Text
SysNotes devlog 1
Hiya! We're a web developer by trade and we wanted to build ourselves a web-app to manage our system and to get to know each other better. We thought it would be fun to make a sort of a devlog on this blog to show off the development! The working title of this project is SysNotes (but better ideas are welcome!)

What SysNotes is✅:
A place to store profiles of all of our parts
A tool to figure out who is in front
A way to explore our inner world
A private chat similar to PluralKit
A way to combine info about our system with info about our OCs etc as an all-encompassing "brain-world" management system
A personal and tailor-made tool made for our needs
What SysNotes is not❌:
A fronting tracker (we see no need for it in our system)
A social media where users can interact (but we're open to make it so if people are interested)
A public platform that can be used by others (we don't have much experience actually hosting web-apps, but will consider it if there is enough interest!)
An offline app
So if this sounds interesting to you, you can find the first devlog below the cut (it's a long one!):
(I have used word highlighting and emojis as it helps me read large chunks of text, I hope it's alright with y'all!)
Tech stack & setup (feel free to skip if you don't care!)
The project is set up using:
Database: MySQL 8.4.3
Language: PHP 8.3
Framework: Laravel 10 with Breeze (authentication and user accounts) and Livewire 3 (front end integration)
Styling: Tailwind v4
I tried to set up Laragon to easily run the backend, but I ran into issues so I'm just running "php artisan serve" for now and using Laragon to run the DB. Also I'm compiling styles in real time with "npm run dev". Speaking of the DB, I just migrated the default auth tables for now. I will be making app-related DB tables in the next devlog. The awesome thing about Laravel is its Breeze starter kit, which gives you fully functioning authentication and basic account management out of the box, as well as optional Livewire to integrate server-side processing into HTML in the sexiest way. This means that I could get all the boring stuff out of the way with one terminal command. Win!
Styling and layout (for the UI nerds - you can skip this too!)
I changed the default accent color from purple to orange (personal preference) and used an emoji as a placeholder for the logo. I actually kinda like the emoji AS a logo so I might keep it.
Laravel Breeze came with a basic dashboard page, which I expanded with a few containers for the different sections of the page. I made use of the components that come with Breeze to reuse code for buttons etc throughout the code, and made new components as the need arose. Man, I love clean code 😌
I liked the dotted default Laravel page background, so I added it to the dashboard to create the look of a bullet journal. I like the journal-type visuals for this project as it goes with the theme of a notebook/file. I found the code for it here.
I also added some placeholder menu items for the pages that I would like to have in the app - Profile, (Inner) World, Front Decider, and Chat.

i ran into an issue dynamically building Tailwind classes such as class="bg-{{$activeStatus['color']}}-400" - turns out dynamically-created classes aren't supported, even if they're constructed in the component rather than the blade file. You learn something new every day huh…

Also, coming from Tailwind v3, "ps-*" and "pe-*" were confusing to get used to since my muscle memory is "pl-*" and "pr-*" 😂
Feature 1: Profiles page - proof of concept
This is a page where each alter's profiles will be displayed. You can switch between the profiles by clicking on each person's name. The current profile is highlighted in the list using a pale orange colour.

The logic for the profiles functionality uses a Livewire component called Profiles, which loads profile data and passes it into the blade view to be displayed. It also handles logic such as switching between the profiles and formatting data. Currently, the data is hardcoded into the component using an associative array, but I will be converting it to use the database in the next devlog.

New profile (TBC)
You will be able to create new profiles on the same page (this is yet to be implemented). My vision is that the New Alter form will unfold under the button, and fold back up again once the form has been submitted.
Alter name, pronouns, status
The most interesting component here is the status, which is currently set to a hardcoded list of "active", "dormant", and "unknown". However, I envision this to be a customisable list where I can add new statuses to the list from a settings menu (yet to be implemented).


Alter image
I wanted the folder that contained alter images and other assets to be outside of my Laravel project, in the Pictures folder of my operating system. I wanted to do this so that I can back up the assets folder whenever I back up my Pictures folder lol (not for adding/deleting the files - this all happens through the app to maintain data integrity!). However, I learned that Laravel does not support that and it will not be able to see my files because they are external. I found a workaround by using symbolic links (symlinks) 🔗. Basically, they allow to have one folder of identical contents in more than one place. I ran "mklink /D [external path] [internal path]" to create the symlink between my Pictures folder and Laravel's internal assets folder, so that any files that I add to my Pictures folder automatically copy over to Laravel's folder. I changed a couple lines in filesystems.php to point to the symlinked folder:

And I was also getting a "404 file not found" error - I think the issue was because the port wasn't originally specified. I changed the base app URL to the localhost IP address in .env:

…And after all this messing around, it works!
(My Pictures folder)

(My Laravel storage)

(And here is Alice's photo displayed - dw I DO know Ibuki's actual name)

Alter description and history
The description and history fields support HTML, so I can format these fields however I like, and add custom features like tables and bullet point lists.

This is done by using blade's HTML preservation tags "{!! !!}" as opposed to the plain text tags "{{ }}".
(Here I define Alice's description contents)


(And here I insert them into the template)

Traits, likes, dislikes, front triggers
These are saved as separate lists and rendered as fun badges. These will be used in the Front Decider (anyone has a better name for it?? 🤔) tool to help me identify which alter "I" am as it's a big struggle for us. Front Decider will work similar to FlowCharty.

What next?
There's lots more things I want to do with SysNotes! But I will take it one step at a time - here is the plan for the next devlog:
Setting up database tables for the profile data
Adding the "New Profile" form so I can create alters from within the app
Adding ability to edit each field on the profile
I tried my best to explain my work process in a way that wold somewhat make sense to non-coders - if you have any feedback for the future format of these devlogs, let me know!
~~~~~~~~~~~~~~~~~~
Disclaimers:
I have not used AI in the making of this app and I do NOT support the Vibe Coding mind virus that is currently on the loose. Programming is a form of art, and I will defend manual coding until the day I die.
Any alter data found in the screenshots is dummy data that does not represent our actual system.
I will not be making the code publicly available until it is a bit more fleshed out, this so far is just a trial for a concept I had bouncing around my head over the weekend.
We are SYSCOURSE NEUTRAL! Please don't start fights under this post
#sysnotes devlog#plurality#plural system#did#osdd#programming#whoever is fronting is typing like a millenial i am so sorry#also when i say “i” its because i'm not sure who fronted this entire time!#our syskid came up with the idea but i can't feel them so who knows who actually coded it#this is why we need the front decider tool lol
25 notes
·
View notes
Text
Protect Your Laravel APIs: Common Vulnerabilities and Fixes
API Vulnerabilities in Laravel: What You Need to Know
As web applications evolve, securing APIs becomes a critical aspect of overall cybersecurity. Laravel, being one of the most popular PHP frameworks, provides many features to help developers create robust APIs. However, like any software, APIs in Laravel are susceptible to certain vulnerabilities that can leave your system open to attack.

In this blog post, we’ll explore common API vulnerabilities in Laravel and how you can address them, using practical coding examples. Additionally, we’ll introduce our free Website Security Scanner tool, which can help you assess and protect your web applications.
Common API Vulnerabilities in Laravel
Laravel APIs, like any other API, can suffer from common security vulnerabilities if not properly secured. Some of these vulnerabilities include:
>> SQL Injection SQL injection attacks occur when an attacker is able to manipulate an SQL query to execute arbitrary code. If a Laravel API fails to properly sanitize user inputs, this type of vulnerability can be exploited.
Example Vulnerability:
$user = DB::select("SELECT * FROM users WHERE username = '" . $request->input('username') . "'");
Solution: Laravel’s query builder automatically escapes parameters, preventing SQL injection. Use the query builder or Eloquent ORM like this:
$user = DB::table('users')->where('username', $request->input('username'))->first();
>> Cross-Site Scripting (XSS) XSS attacks happen when an attacker injects malicious scripts into web pages, which can then be executed in the browser of a user who views the page.
Example Vulnerability:
return response()->json(['message' => $request->input('message')]);
Solution: Always sanitize user input and escape any dynamic content. Laravel provides built-in XSS protection by escaping data before rendering it in views:
return response()->json(['message' => e($request->input('message'))]);
>> Improper Authentication and Authorization Without proper authentication, unauthorized users may gain access to sensitive data. Similarly, improper authorization can allow unauthorized users to perform actions they shouldn't be able to.
Example Vulnerability:
Route::post('update-profile', 'UserController@updateProfile');
Solution: Always use Laravel’s built-in authentication middleware to protect sensitive routes:
Route::middleware('auth:api')->post('update-profile', 'UserController@updateProfile');
>> Insecure API Endpoints Exposing too many endpoints or sensitive data can create a security risk. It’s important to limit access to API routes and use proper HTTP methods for each action.
Example Vulnerability:
Route::get('user-details', 'UserController@getUserDetails');
Solution: Restrict sensitive routes to authenticated users and use proper HTTP methods like GET, POST, PUT, and DELETE:
Route::middleware('auth:api')->get('user-details', 'UserController@getUserDetails');
How to Use Our Free Website Security Checker Tool
If you're unsure about the security posture of your Laravel API or any other web application, we offer a free Website Security Checker tool. This tool allows you to perform an automatic security scan on your website to detect vulnerabilities, including API security flaws.
Step 1: Visit our free Website Security Checker at https://free.pentesttesting.com. Step 2: Enter your website URL and click "Start Test". Step 3: Review the comprehensive vulnerability assessment report to identify areas that need attention.
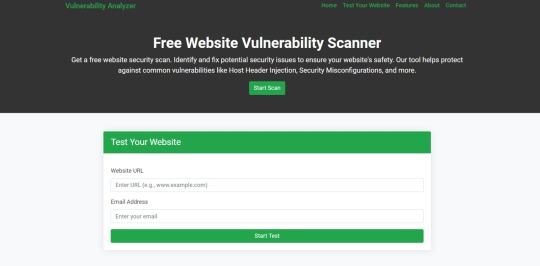
Screenshot of the free tools webpage where you can access security assessment tools.
Example Report: Vulnerability Assessment
Once the scan is completed, you'll receive a detailed report that highlights any vulnerabilities, such as SQL injection risks, XSS vulnerabilities, and issues with authentication. This will help you take immediate action to secure your API endpoints.
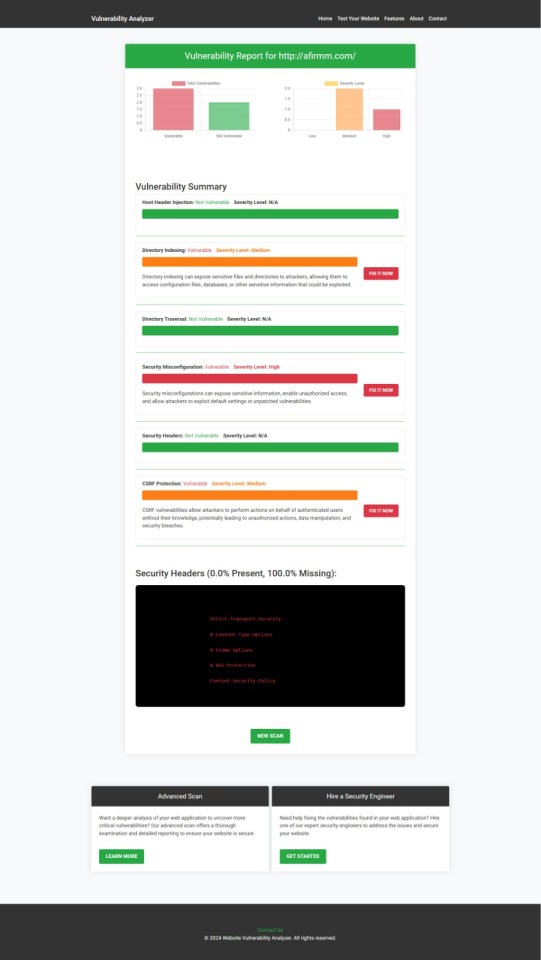
An example of a vulnerability assessment report generated with our free tool provides insights into possible vulnerabilities.
Conclusion: Strengthen Your API Security Today
API vulnerabilities in Laravel are common, but with the right precautions and coding practices, you can protect your web application. Make sure to always sanitize user input, implement strong authentication mechanisms, and use proper route protection. Additionally, take advantage of our tool to check Website vulnerability to ensure your Laravel APIs remain secure.
For more information on securing your Laravel applications try our Website Security Checker.
#cyber security#cybersecurity#data security#pentesting#security#the security breach show#laravel#php#api
2 notes
·
View notes
Text
Top 5 Common Database Design patterns in Laravel
In the world of Laravel development, a well-structured database is the bedrock of a robust and scalable application. While Laravel's Eloquent ORM provides a powerful abstraction layer for interacting with your data, understanding common database design patterns can significantly enhance your development process.
These patterns not only promote code organization and maintainability but also enable you to adapt your database structure to the unique needs of your application. By mastering these patterns, you can build efficient, reliable, and easily maintainable Laravel applications that can handle diverse data requirements.
1. Active Record Pattern:
This is the most common pattern used by Eloquent ORM in Laravel. It encapsulates database logic within model classes, allowing you to interact with the database using object-oriented methods.
Application
This pattern is well-suited for projects of any size and complexity. It simplifies database operations, making them easier to understand and maintain.
Example:

Advantages:
Simplicity: Easy to understand and implement.
Code Reusability: Model methods can be reused throughout your application.
Relationship Management: Built-in support for relationships between models.
Disadvantages:
Tight Coupling: Model logic is tightly coupled to the database, making it harder to test independently.
Complexity: Can become complex for large applications with complex data structures.
2. Data Mapper Pattern:
This pattern separates data access logic from domain logic. It uses a dedicated "mapper" class to translate between domain objects and database records.
Application
This pattern is useful for large-scale applications with complex domain models, as it allows for greater flexibility and modularity. It is particularly useful when working with multiple data sources or when you need to optimize for performance.
Example:

Advantages:
Flexibility: Easily change the database implementation without affecting business logic.
Testability: Easy to test independently from the database.
Modularity: Promotes a modular structure, separating concerns.
Disadvantages:
Increased Complexity: Requires more code and might be overkill for simple applications.
3. Repository Pattern:
This pattern provides an abstraction layer over the data access mechanism, offering a consistent interface for interacting with the database.
Application
This pattern promotes loose coupling and simplifies testing, as you can easily mock the repository and control the data returned. It is often used in conjunction with the Data Mapper pattern.
Example:

Advantages:
Loose Coupling: Decouples business logic from specific data access implementation.
Testability: Easy to mock repositories for testing.
Reusability: Reusable interface for accessing different data sources.
Disadvantages:
Initial Setup: Can require more setup compared to Active Record.
4. Table Inheritance Pattern:
This pattern allows you to create a hierarchical relationship between tables, where child tables inherit properties from a parent table.
Application
This pattern is useful for creating polymorphic relationships and managing data for different types of entities. For example, you could have a User table and separate tables for AdminUser and CustomerUser that inherit from the parent table.
Example:

Advantages:
Polymorphism: Enables handling different types of entities using a common interface.
Code Reusability: Reuses properties and methods from the parent table.
Data Organization: Provides a structured way to organize data for different types of users.
Disadvantages:
Increased Database Complexity: Can lead to a more complex database structure.
5. Schema-less Database Pattern:
This pattern avoids the use of a predefined schema and allows for dynamic data structures. This is commonly used with NoSQL databases like MongoDB.
Application
This pattern is suitable for projects that require highly flexible data structures, such as social media platforms or analytics systems.
Example:

Advantages:
Flexibility: Easily adapt to changing data structures.
Scalability: Suitable for high-volume, rapidly changing data.
High Performance: Efficient for specific use cases like real-time analytics.
Disadvantages:
Increased Complexity: Requires a different approach to querying and data manipulation.
Data Consistency: Can be challenging to maintain data consistency without a schema.
Choosing the Right Pattern:
The best pattern for your project depends on factors like project size, complexity, performance requirements, and your team's experience. It is important to choose patterns that align with the specific needs of your application and ensure long-term maintainability and scalability.
Conclusion:
This exploration of common database design patterns used in Laravel has shed light on the importance of strategic database structuring for building robust and scalable applications. From the simplicity of the Active Record pattern to the sophisticated capabilities of the Data Mapper and Repository patterns, each pattern offers distinct benefits that cater to specific project needs.
By understanding the strengths and applications of these patterns, Laravel developers can choose the optimal approach for their projects, ensuring a well-organized, efficient, and maintainable database architecture. Ultimately, mastering these patterns empowers you to create Laravel applications that are not only functional but also adaptable to evolving data requirements and future growth.
#laravel#laravel development company#laravel framework#laravel developers#database#design#coding#programming
4 notes
·
View notes
Text
How a Web Development Company Builds Scalable SaaS Platforms
Building a SaaS (Software as a Service) platform isn't just about writing code—it’s about designing a product that can grow with your business, serve thousands of users reliably, and continuously evolve based on market needs. Whether you're launching a CRM, learning management system, or a niche productivity tool, scalability must be part of the plan from day one.
That’s why a professional Web Development Company brings more than just technical skills to the table. They understand the architectural, design, and business logic decisions required to ensure your SaaS product is not just functional—but scalable, secure, and future-proof.
1. Laying a Solid Architectural Foundation
The first step in building a scalable SaaS product is choosing the right architecture. Most development agencies follow a modular, service-oriented approach that separates different components of the application—user management, billing, dashboards, APIs, etc.—into layers or even microservices.
This ensures:
Features can be developed and deployed independently
The system can scale horizontally (adding more servers) or vertically (upgrading resources)
Future updates or integrations won’t require rebuilding the entire platform
Development teams often choose cloud-native architectures built on platforms like AWS, Azure, or GCP for their scalability and reliability.
2. Selecting the Right Tech Stack
Choosing the right technology stack is critical. The tech must support performance under heavy loads and allow for easy development as your team grows.
Popular stacks for SaaS platforms include:
Frontend: React.js, Vue.js, or Angular
Backend: Node.js, Django, Ruby on Rails, or Laravel
Databases: PostgreSQL or MongoDB for flexibility and performance
Infrastructure: Docker, Kubernetes, CI/CD pipelines for automation
A skilled agency doesn’t just pick trendy tools—they choose frameworks aligned with your app’s use case, team skills, and scaling needs.
3. Multi-Tenancy Setup
One of the biggest differentiators in SaaS development is whether the platform is multi-tenant—where one codebase and database serve multiple customers with logical separation.
A web development company configures multi-tenancy using:
Separate schemas per tenant (isolated but efficient)
Shared databases with tenant identifiers (cost-effective)
Isolated instances for enterprise clients (maximum security)
This architecture supports onboarding multiple customers without duplicating infrastructure—making it cost-efficient and easy to manage.
4. Building Secure, Scalable User Management
SaaS platforms must support a range of users—admins, team members, clients—with different permissions. That’s why role-based access control (RBAC) is built into the system from the start.
Key features include:
Secure user registration and login (OAuth2, SSO, MFA)
Dynamic role creation and permission assignment
Audit logs and activity tracking
This layer is integrated with identity providers and third-party auth services to meet enterprise security expectations.
5. Ensuring Seamless Billing and Subscription Management
Monetization is central to SaaS success. Development companies build subscription logic that supports:
Monthly and annual billing cycles
Tiered or usage-based pricing models
Free trials and discounts
Integration with Stripe, Razorpay, or other payment gateways
They also ensure compliance with global standards (like PCI DSS for payment security and GDPR for user data privacy), especially if you're targeting international customers.
6. Performance Optimization from Day One
Scalability means staying fast even as traffic and data grow. Web developers implement:
Caching systems (like Redis or Memcached)
Load balancers and auto-scaling policies
Asynchronous task queues (e.g., Celery, RabbitMQ)
CDN integration for static asset delivery
Combined with code profiling and database indexing, these enhancements ensure your SaaS stays performant no matter how many users are active.
7. Continuous Deployment and Monitoring
SaaS products evolve quickly—new features, fixes, improvements. That’s why agencies set up:
CI/CD pipelines for automated testing and deployment
Error tracking tools like Sentry or Rollbar
Performance monitoring with tools like Datadog or New Relic
Log management for incident response and debugging
This allows for rapid iteration and minimal downtime, which are critical in SaaS environments.
8. Preparing for Scale from a Product Perspective
Scalability isn’t just technical—it’s also about UX and support. A good development company collaborates on:
Intuitive onboarding flows
Scalable navigation and UI design systems
Help center and chatbot integrations
Data export and reporting features for growing teams
These elements allow users to self-serve as the platform scales, reducing support load and improving retention.
Conclusion
SaaS platforms are complex ecosystems that require planning, flexibility, and technical excellence. From architecture and authentication to billing and performance, every layer must be built with growth in mind. That’s why startups and enterprises alike trust a Web Development Company to help them design and launch SaaS solutions that can handle scale—without sacrificing speed or security.
Whether you're building your first SaaS MVP or upgrading an existing product, the right development partner can transform your vision into a resilient, scalable reality.
0 notes
Text
Laravel Programming: A Comprehensive Guide
Table of Contents
Introduction to Laravel
Why Use Laravel?
Installing Laravel
Laravel Folder Structure
Routing and Controllers
Blade Templating Engine
Laravel Models and Eloquent ORM
Migrations and Database Seeding
Request Lifecycle and Middleware
Form Handling and Validation
Authentication and Authorization
Laravel Artisan CLI
RESTful API Development in Laravel
Testing in Laravel
Deployment and Performance Optimization
Laravel Ecosystem and Tools
Conclusion
1. Introduction to Laravel
Laravel is an open-source PHP framework built by Taylor Otwell. It follows the MVC (Model-View-Controller) architectural pattern, which promotes a clean separation between business logic, UI, and data.
Laravel aims to make development faster and easier by providing powerful tools such as:
Routing
Middleware
Authentication
Blade templating
ORM (Eloquent)
Queues
Artisan command-line tool
Laravel is currently one of the most popular PHP frameworks and powers thousands of web applications globally.
2. Why Use Laravel?
Benefits of Laravel:
Clean and Elegant Syntax: Laravel simplifies complex tasks.
MVC Architecture: Ensures separation of concerns.
Eloquent ORM: Elegant database abstraction layer.
Blade Templating: Lightweight yet powerful templating engine.
Built-in Authentication & Authorization: Secure and easy to implement.
Community and Ecosystem: Laravel has a rich ecosystem like Nova, Horizon, Forge, Envoyer, etc.
Testing Ready: PHPUnit integration for test-driven development (TDD).
0 notes
Text
Complete PHP Tutorial: Learn PHP from Scratch in 7 Days
Are you looking to learn backend web development and build dynamic websites with real functionality? You’re in the right place. Welcome to the Complete PHP Tutorial: Learn PHP from Scratch in 7 Days — a practical, beginner-friendly guide designed to help you master the fundamentals of PHP in just one week.
PHP, or Hypertext Preprocessor, is one of the most widely used server-side scripting languages on the web. It powers everything from small blogs to large-scale websites like Facebook and WordPress. Learning PHP opens up the door to back-end development, content management systems, and full-stack programming. Whether you're a complete beginner or have some experience with HTML/CSS, this tutorial is structured to help you learn PHP step by step with real-world examples.
Why Learn PHP?
Before diving into the tutorial, let’s understand why PHP is still relevant and worth learning in 2025:
Beginner-friendly: Easy syntax and wide support.
Open-source: Free to use with strong community support.
Cross-platform: Runs on Windows, macOS, Linux, and integrates with most servers.
Database integration: Works seamlessly with MySQL and other databases.
In-demand: Still heavily used in CMS platforms like WordPress, Joomla, and Drupal.
If you want to build contact forms, login systems, e-commerce platforms, or data-driven applications, PHP is a great place to start.
Day-by-Day Breakdown: Learn PHP from Scratch in 7 Days
Day 1: Introduction to PHP & Setup
Start by setting up your environment:
Install XAMPP or MAMP to create a local server.
Create your first .php file.
Learn how to embed PHP inside HTML.
Example:
<?php echo "Hello, PHP!"; ?>
What you’ll learn:
How PHP works on the server
Running PHP in your browser
Basic syntax and echo statement
Day 2: Variables, Data Types & Constants
Dive into PHP variables and data types:
$name = "John"; $age = 25; $is_student = true;
Key concepts:
Variable declaration and naming
Data types: String, Integer, Float, Boolean, Array
Constants and predefined variables ($_SERVER, $_GET, $_POST)
Day 3: Operators, Conditions & Control Flow
Learn how to make decisions in PHP:
if ($age > 18) { echo "You are an adult."; } else { echo "You are underage."; }
Topics covered:
Arithmetic, comparison, and logical operators
If-else, switch-case
Nesting conditions and best practices
Day 4: Loops and Arrays
Understand loops to perform repetitive tasks:
$fruits = ["Apple", "Banana", "Cherry"]; foreach ($fruits as $fruit) { echo $fruit. "<br>"; }
Learn about:
for, while, do...while, and foreach loops
Arrays: indexed, associative, and multidimensional
Array functions (count(), array_push(), etc.)
Day 5: Functions & Form Handling
Start writing reusable code and learn how to process user input from forms:
function greet($name) { return "Hello, $name!"; }
Skills you gain:
Defining and calling functions
Passing parameters and returning values
Handling HTML form data with $_POST and $_GET
Form validation and basic security tips
Day 6: Working with Files & Sessions
Build applications that remember users and work with files:
session_start(); $_SESSION["username"] = "admin";
Topics included:
File handling (fopen, fwrite, fread, etc.)
Reading and writing text files
Sessions and cookies
Login system basics using session variables
Day 7: PHP & MySQL – Database Connectivity
On the final day, you’ll connect PHP to a database and build a mini CRUD app:
$conn = new mysqli("localhost", "root", "", "mydatabase");
Learn how to:
Connect PHP to a MySQL database
Create and execute SQL queries
Insert, read, update, and delete (CRUD operations)
Display database data in HTML tables
Bonus Tips for Mastering PHP
Practice by building mini-projects (login form, guest book, blog)
Read official documentation at php.net
Use tools like phpMyAdmin to manage databases visually
Try MVC frameworks like Laravel or CodeIgniter once you're confident with core PHP
What You’ll Be Able to Build After This PHP Tutorial
After following this 7-day PHP tutorial, you’ll be able to:
Create dynamic web pages
Handle form submissions
Work with databases
Manage sessions and users
Understand the logic behind content management systems (CMS)
This gives you the foundation to become a full-stack developer, or even specialize in backend development using PHP and MySQL.
Final Thoughts
Learning PHP doesn’t have to be difficult or time-consuming. With the Complete PHP Tutorial: Learn PHP from Scratch in 7 Days, you’re taking a focused, structured path toward web development success. You’ll learn all the core concepts through clear explanations and hands-on examples that prepare you for real-world projects.
Whether you’re a student, freelancer, or aspiring developer, PHP remains a powerful and valuable skill to add to your web development toolkit.
So open up your code editor, start typing your first <?php ... ?> block, and begin your journey to building dynamic, powerful web applications — one day at a time.

0 notes
Text
How to Build a YouTube Clone App: Tech Stack, Features & Cost Explained
Ever scrolled through YouTube and thought, “I could build this—but better”? You’re not alone. With the explosive growth of content creators and the non-stop demand for video content, building your own YouTube clone isn’t just a dream—it’s a solid business move. Whether you're targeting niche creators, regional content, or building the next big video sharing and streaming platform, there’s room in the market for innovation.
But before you dive into code or hire a dev team, let’s talk about the how. What tech stack powers a platform like YouTube? What features are must-haves? And how much does it actually cost to build something this ambitious?
In this post, we’re breaking it all down—no fluff, no filler. Just a clear roadmap to building a killer YouTube-style platform with insights from the clone app experts at Miracuves.
Core Features of a YouTube Clone App
Before picking servers or coding frameworks, you need a feature checklist. Here’s what every modern YouTube clone needs to include:
1. User Registration & Profiles
Users must be able to sign up via email or social logins. Profiles should allow for customization, channel creation, and subscriber tracking.
2. Video Upload & Encoding
Users upload video files that are auto-encoded to multiple resolutions (360p, 720p, 1080p). You’ll need a powerful media processor and cloud storage to handle this.
3. Streaming & Playback
The heart of any video platform. Adaptive bitrate streaming ensures smooth playback regardless of network speed.
4. Content Feed & Recommendations
Dynamic feeds based on trending videos, subscriptions, or AI-driven interests. The better your feed, the longer users stay.
5. Like, Comment, Share & Subscribe
Engagement drives reach. Build these features in early and make them seamless.
6. Search & Filters
Let users find content via keywords, categories, uploaders, and tags.
7. Monetization Features
Allow ads, tipping (like Super Chat), or paid content access. This is where the money lives.
8. Admin Dashboard
Moderation tools, user management, analytics, and content flagging are essential for long-term growth.
Optional Features:
Live Streaming
Playlists
Stories or Shorts
Video Premiere Countdown
Multilingual Subtitles
Media Suggestion: Feature comparison table between YouTube and your envisioned clone
Recommended Tech Stack
The tech behind YouTube is serious business, but you don’t need Google’s budget to launch a lean, high-performance YouTube clone. Here’s what we recommend at Miracuves:
Frontend (User Interface)
React.js or Vue.js – Fast rendering and reusable components
Tailwind CSS or Bootstrap – For modern, responsive UI
Next.js – Great for server-side rendering and SEO
Backend (Server-side)
Node.js with Express – Lightweight and scalable
Python/Django – Excellent for content recommendation algorithms
Laravel (PHP) – If you're going for quick setup and simplicity
Video Processing & Streaming
FFmpeg – Open-source video encoding and processing
HLS/DASH Protocols – For adaptive streaming
AWS MediaConvert or Mux – For advanced media workflows
Cloudflare Stream – Built-in CDN and encoding, fast global delivery
Storage & Database
Amazon S3 or Google Cloud Storage – For storing video content
MongoDB or PostgreSQL – For structured user and video data
Authentication & Security
JWT (JSON Web Tokens) for secure session management
OAuth 2.0 for social logins
Two-Factor Authentication (2FA) for creators and admins
Analytics & Search
Elasticsearch – Fast, scalable search
Mixpanel / Google Analytics – Track video watch time, drop-offs, engagement
AI-based recommendation engine – Python + TensorFlow or third-party API
Media Suggestion: Architecture diagram showing tech stack components and flow
Development Timeline & Team Composition
Depending on complexity, here’s a typical development breakdown:
MVP Build: 3–4 months
Full Product with Monetization: 6–8 months
Team Needed:
1–2 Frontend Developers
1 Backend Developer
1 DevOps/Cloud Engineer
1 UI/UX Designer
1 QA Tester
1 Project Manager
Want to move faster? Miracuves offers pre-built YouTube clone app solutions that can cut launch time in half.
Estimated Cost Breakdown
Here’s a rough ballpark for custom development: PhaseEstimated CostUI/UX Design$3,000 – $5,000Frontend Development$6,000 – $10,000Backend Development$8,000 – $12,000Video Processing Setup$4,000 – $6,000QA & Testing$2,000 – $4,000Cloud Infrastructure$500 – $2,000/month (post-launch)
Total Estimated Cost: $25,000 – $40,000+ depending on features and scale
Need it cheaper? Go the smart way with a customizable YouTube clone from Miracuves—less risk, faster time-to-market, and scalable from day one.
Final Thoughts
Building a YouTube clone isn’t just about copying features—it’s about creating a platform that gives creators and viewers something fresh, intuitive, and monetizable. With the right tech stack, must-have features, and a clear plan, you’re not just chasing YouTube—you’re building your own lane in the massive video sharing and streaming platform space.
At Miracuves, we help startups launch video platforms that are secure, scalable, and streaming-ready from day one. Want to build a revenue-generating video app that users love? Let’s talk.
FAQs
How much does it cost to build a YouTube clone?
Expect $25,000–$40,000 for a custom build. Ready-made solutions from Miracuves can reduce costs significantly.
Can I monetize my YouTube clone?
Absolutely. Use ads, subscriptions, tipping, pay-per-view, or affiliate integrations.
What’s the hardest part of building a video streaming app?
Video encoding, storage costs, and scaling playback across geographies. You’ll need a solid cloud setup.
Do I need to build everything from scratch?
No. Using a YouTube clone script from Miracuves saves time and still offers full customization.
How long does it take to launch?
A simple MVP may take 3–4 months. A full-feature platform can take 6–8 months. Miracuves can cut that timeline in half.
Is it legal to build a YouTube clone?
Yes, as long as you’re not copying YouTube’s trademark or copyrighted content. The tech and business model are fair game.
1 note
·
View note
Text
Build a Strong Backend: Why Web Developers Should Focus on MySQL Early

Introduction
When it comes to web development, most beginners are fascinated by the visual aspects of websites—the buttons, layouts, and animations. But behind every great website lies a powerful backend, and one of the most essential components of this backend is the database. Among the many database management systems out there, MySQL stands out as the most widely used and beginner-friendly option. If you're planning to enroll in a web development course in Yamuna Vihar or web development training in Uttam Nagar, it’s important to understand why you should prioritize learning MySQL early in your journey.
What is MySQL and Why is it So Important?
MySQL is an open-source relational database management system. It is used to store, organize, and retrieve data for web applications. It powers some of the world’s biggest platforms including Facebook, Twitter, and YouTube. For any student taking web designing classes in Yamuna Vihar or web development coaching in Uttam Nagar, learning MySQL is a non-negotiable step.
Why? Because it’s the heart of how web apps interact with data. Whether it’s a login system, product catalog, or a content management system—MySQL is what makes these features function.
Early MySQL Skills = Long-Term Benefits
Students who start learning MySQL early gain a significant advantage:
Better understanding of backend logic
You’ll start understanding how data flows between the front-end and backend, giving you a complete picture of web development.
Stronger foundation for full-stack development
If you're aiming to become a full-stack developer, learning MySQL early prepares you for advanced backend frameworks like Node.js, Django, or Laravel.
Boost your job-readiness
Recruiters and companies look for developers who can handle the full development cycle—especially those with MySQL and database management experience.
If you’re taking a full stack web development course in Yamuna Vihar or searching for the best full stack developer course with placement in Uttam Nagar, you’ll notice MySQL is an integral part of the curriculum.
How MySQL Complements Front-End Skills
Even if your primary interest lies in UI/UX or front-end design, having a grip on MySQL sets you apart. For example:
UI elements like dropdowns or search bars often fetch real-time data from the backend via SQL queries.
Dynamic websites that display user data or product recommendations rely heavily on MySQL databases.
If you're already exploring UI UX free online courses with certificates in Yamuna Vihar or a user interface design course in Uttam Nagar, pairing that with MySQL will make your portfolio completer and more impressive.
Key Concepts You Should Learn in MySQL
Here are some essential MySQL concepts every web developer should master:
Database creation and table structures
SQL queries: SELECT, INSERT, UPDATE, DELETE
Joins and relationships
Data normalization
Indexing for performance optimization
These concepts are often covered thoroughly in a web development training institute in Yamuna Vihar or web development coaching center in Uttam Nagar.
Real-World Applications of MySQL
Whether you're developing an e-commerce website, a social media platform, or a blog, MySQL will help you:
Store user credentials securely
Handle product inventories
Maintain order history
Run analytics on user behavior
Students attending web designing coaching in Yamuna Vihar or web development classes in Uttam Nagar often work on real-time projects that require database connectivity, making MySQL a practical tool rather than just theoretical knowledge.
Conclusion: Start with MySQL to Stay Ahead
Web development is not just about what users see—it's also about how websites work behind the scenes. MySQL teaches you the logic and structure that bring data-driven websites to life. So, if you’re currently enrolled in or planning to join a web designing course in Yamuna Vihar or a web development course in Uttam Nagar, make sure MySQL is at the top of your learning list.
Whether your goal is to become a full stack developer, build your own website, or master UI/UX design, understanding databases like MySQL will take your skills to the next level.
Suggested Links:
Oracle Database Administration
MY SQL Training
PHP Development
#oracle database#MY SQL Training#PHP Development#Web Development course#Wed Designing course in yamuna vihar#Web designing course in uttam nagar
0 notes
Text
SysNotes devlog 1.5 (backend edition)
Hi all! In this post I will continue the development of my plurality management web-app SysNotes. Today I will be focusing mostly on setting up the databases for the app, as currently test data is stored in the code itself. This severely limits the interactivity and features of the web-app, so it is time to separate it.
In this devlog, I will explain the basics of databases and how the Laravel framework interacts with them to give you an idea of what goes on on my screen and in my brain while I code. This will just be an overview of some technical behind the scenes, nothing will have changed on the front end of the app.
If you missed the first devlog, you can find it here.
What is a database?
A database at the most basic level is a type of file format that has tables. You can think of it as a "spreadsheet file" like the ones you can open in Excel or Google Sheets. The main structural difference between a database and a spreadsheet is that in a database the tables can have relationships. For example, the relationship between a users table and a posts table is that one user can make many posts, and a post can only belong to one user. This is a one-to-many relationship. You can ask the database to give you all the posts related to a specific user. In my app, each user account will have multiple alter profiles, for example. When a user logs in, the app will only fetch the alter profiles that this user created, and show the profiles to them. You can do a whole bunch of other things with databases, that's why I like them! The main functional difference between a database and a spreadsheet is that a spreadsheet is used for data analysis and manipulation, like a fancy calculator, while a database is used to store data. Each table stores data related to one type of object/person/place. Like how spreadsheets can be opened in Excel, database tables can be opened in database software such as MySQL Workbench or HeidiSQL, which is what I'm using since it came with Laragon.
(What my Heidi DB looks like at the end of the devlog)

Plan for today
The users table already exists in my app as a result of installing the Laravel Breeze starter kit, so I don't have to worry about designing this table. With that out of the way, I can think about adding feature-related tables. The first feature I'm adding to my app is the ability to create alter profiles and to fill in the sections on the profile page. The first step is therefore to create an "alter profiles" table and to normalize it (more on that in a bit).
Setting up the database tables (and why it's a pain)
Migration files
When using the Laravel framework, you're not supposed to create a new table or edit an existing table through the database itself - it has to all be done through code. This is done using a file called a database migration. The migration specifies the table name, what columns it should have, what data types the columns should be, and what other tables this table may be related to. This is done so that if you give the code to another person and they download and ran it, their database will be set up the exact same way is yours. Therefore, the migration file makes your database changes portable, which is especially useful when copying code from your personal computer onto the server where the web-app is running. You don't want to set up your local database and then find out that it doesn't work the same way as the one that runs the actual app! Migrations aren't just for creating a new table. You also need to make a migration file for every structural change you want to make for that table, such as adding a new column or changing a column's name. Updating a table's structure after it's already been set up and filled with data has a chance of corrupting the data. Therefore, I always impose this expectation of myself of always getting the database structure right on the first try (i.e. in just one migration).
(My migration file for the alter profiles table at the end of this devlog)

Normalization
Normalization is the act of splitting up a table into 2 or more tables in order to simplify the data structure, reduce duplication, and make database queries more efficient. To illustrate, let's consider the alter profiles table. An alter can have several traits, such as "energetic" or "nervous" and so on. Let's say we should store it in a "traits" column like so:
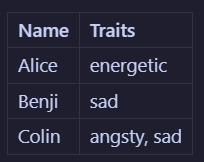
Now let's say we decide that the word "sad" isn't quite the right descriptor, and we want to change it to "melancholic". To do that, we would need to edit every instance of this word in the table. In this example, it would only be in 2 places: on Benji's profile and on Colin's profile. But what if there were many melancholic alters? That sounds like a lot of work! What if you misspell it on accident somewhere? You won't be able to filter alters by trait properly! Instead what would be better to do is to split (haha) the alter profile table into that and a traits table. Now we will have:
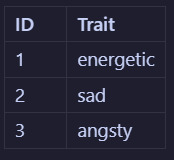
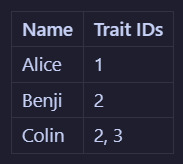
So if you wanted to change the word "sad" to "melancholic", you could do it in just one place, which makes it easier and more maintainable. This is just one small example of what normalization can be. There are actually like 7 levels of it, and even I don't remember them all. In fact, what I will be doing in my app is a step further than the example and use something called a "pivot table" - a whole new type of headache! The point is, figuring out the architecture of database tables is a whole science in on itself 😩
Actually doing the coding
After brainstorming how to normalize it, the alter profile will need to be separated into several tables: alter profiles, alter characteristic types (traits, likes, dislikes, an triggers), alter characteristic values, and alter statuses (such as active, dormant, and unknown). Each profile can then reference the characteristics and statuses tables. This way, alters can like or dislike the same thing, creating the ultimate modularity!

The (pretty technical) steps are as follows:
Create the (model with) migrations for the individual tables and specify their table structure
Create a pivot table and set foreign IDs to point to the individual tables
Define the relationships in the model files
It took me a few tries to get past migration errors, and I accidentally rolled back my migrations too many times, losing my users table 🤦♂️ As i don't yet have any alter data in the database, I just re-registered my account and nothing was lost. Heart attack simulator lol.
Seeding data
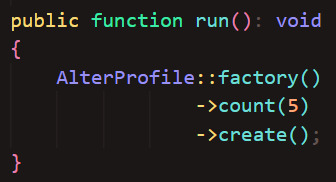
As I'm just working with test data, I don't really care exactly what words and images are used where as long as it works. I also don't want to pain-stakingly input test data into every field for every profile every time I have to delete (drop) and remake (migrate) a table. That's where seeding comes in. Seeding is an automated process that generates dummy data and inserts it into the database, ready for me to test. I'll admit I've never done seeding before - at work I've always worked with a copy of an existing database that has been filled by years of use. But it's never too late to learn! I used seeding to create dummy data for alter profiles and trait values (trait types and statuses has to be manually inputted because they have pre-defined values). I couldn't quite figure out how to seed pivot tables, as they define relationships rather than data. So I had to add those manually too. I still have a ways to go until I'm a real developer lol.
(My Alter Profile factory at the end of the devlog - i left pronouns blank because I wanted them to somewhat match the names, so I added them manually afterwards)

(My Alter Profile seeder at the end of the devlog)
And here are my seeded tables! The faker is limited to using Latin words so I couldn't get the characteristics to look realistic. But it will be fine for test data.
(I have changed the alter names to match the names from the previous devlog)


...All this just for the profile page! But when designing a database's architecture, it is important to anticipate ways in which the database will grow and facilitate new relationships from the start. This was a tiring coding session but it has paved the way for the new and more exciting features!
What next?
This devlog was just for setting up the database tables - in the next devlog we'll get to actually use them in the app! The plan is:
Pull data from the database into the profile pages to display the freshly generated dummy data
Add a way to create new profiles using the New Profile form
Edit the profile information
0 notes
Text
Inventory Management System Development

Inventory management is essential for businesses that deal with physical goods. An efficient inventory system helps track stock levels, manage orders, reduce waste, and improve overall operational efficiency. In this blog post, we’ll explore the key components and programming approach for building an Inventory Management System (IMS).
Core Features of an Inventory Management System
Product Catalog: Add, edit, delete, and categorize products.
Stock Tracking: Monitor stock levels in real-time.
Purchase & Sales Records: Track incoming and outgoing items.
Supplier & Customer Management: Manage business relationships.
Reports & Analytics: Generate sales, inventory, and purchase reports.
Alerts: Notify when stock is low or out of stock.
Tech Stack Suggestions
Frontend: React.js, Vue.js, or Angular
Backend: Node.js, Django, Laravel, or Spring Boot
Database: MySQL, PostgreSQL, or MongoDB
Authentication: JWT, OAuth, or Firebase Auth
Deployment: Docker + AWS/GCP/Heroku
Basic Database Structure
Products Table: - product_id (PK) - name - category - quantity - price - supplier_id (FK) Suppliers Table: - supplier_id (PK) - name - contact_info Sales Table: - sale_id (PK) - product_id (FK) - quantity_sold - date Purchases Table: - purchase_id (PK) - product_id (FK) - quantity_purchased - date
Sample API Endpoints (Node.js Example)
GET /products – List all products
POST /products – Add a new product
PUT /products/:id – Update product details
DELETE /products/:id – Remove a product
GET /inventory/report – Generate inventory report
Frontend Functionality Tips
Use modals for adding/editing items
Display stock levels using color indicators (e.g., red for low stock)
Enable filtering/searching by product category or supplier
Use charts for visual stock and sales analytics
Bonus Features to Consider
Barcode Scanning: Integrate barcode scanning for quick item lookup
Role-Based Access: Allow different permissions for admin, staff, and viewer
Mobile Access: Build a mobile-responsive UI or companion app
Data Export: Export inventory reports to Excel/PDF
Conclusion
Building an inventory management system can significantly benefit any business that handles products or stock. By designing a system with clean UI, efficient backend logic, and accurate data handling, you can help companies stay organized and save time. Start simple, scale gradually, and always prioritize usability and security in your system design.
0 notes
Text
Race Conditions in Laravel: Security Risks and Prevention
In this blog, we’ll explore what race conditions are, how they impact Laravel applications, and how to prevent them using practical coding examples. Additionally, we’ll show you how to assess your website’s vulnerabilities with our free Website Security Scanner tool.

What Are Race Conditions?
A race condition arises when two or more processes or threads execute simultaneously, and the output depends on the sequence or timing of their execution. In Laravel, this issue typically occurs when working with database transactions, caches, or queues. For instance:
A user submits two simultaneous requests to withdraw money from their account.
Both requests bypass a balance check before the withdrawal is complete, leading to an overdraft.
These vulnerabilities not only disrupt functionality but can also be exploited by attackers to manipulate data or gain unauthorized access.
Impact of Race Conditions in Laravel Applications
Some potential consequences of race conditions include:
Financial fraud – Exploiting concurrent transactions.
Data inconsistency – Overwriting shared resources.
Privilege escalation – Gaining unauthorized access to protected resources.
How to Detect Race Conditions
Identifying race conditions can be challenging but is crucial for securing your Laravel application. Use our free Website Security Checker tool to scan your website for vulnerabilities, including those related to race conditions.
Coding Examples to Mitigate Race Conditions
Below are examples to demonstrate common race condition scenarios in Laravel and how to mitigate them effectively:
1. Database Locking Using Transactions
One way to prevent race conditions is by using database transactions with locks.
use Illuminate\Support\Facades\DB; DB::transaction(function () { $account = DB::table('accounts')->where('id', 1)- >lockForUpdate()->first(); if ($account->balance >= 100) { DB::table('accounts')->where('id', 1)- >decrement('balance', 100); } });
In this code:
lockForUpdate() ensures no other transaction can access the row until the current transaction completes.
2. Using Redis for Distributed Locking
For distributed applications, using Redis locks is a common solution:
use Illuminate\Support\Facades\Redis; $lock = Redis::lock('withdraw:account:1', 10); if ($lock->get()) { // Perform the operation Redis::unlock('withdraw:account:1'); }
This ensures that only one operation is performed on the shared resource.
3. Queues and Job Prioritization
Laravel's queues are also helpful in preventing race conditions. Prioritize jobs to ensure critical tasks are executed sequentially.
dispatch(new WithdrawMoney($accountId, $amount))->onQueue('transactions');
Image Example: Detect Race Conditions with Our Tool
To detect race condition vulnerabilities in your Laravel application, you can use our free Website Security Checker tool. Below is a screenshot of the tool's interface:

Screenshot of the free tools webpage where you can access security assessment tools.
Additionally, after running the scan, you’ll receive a detailed vulnerability assessment report by our free tool to check Website Vulnerability, as shown below:

An Example of a vulnerability assessment report generated with our free tool, providing insights into possible vulnerabilities.
Preventing Race Conditions with Best Practices
Here are some tips to further secure your Laravel application:
Use optimistic and pessimistic locking – Manage concurrent database transactions effectively.
Implement atomic operations – Ensure that operations complete as a single unit.
Conduct regular vulnerability assessments – Regularly scan your site using tools like ours.
Secure Your Application with Our Tool
Identifying and fixing race conditions is critical for a secure web application. To ensure your website is free from race conditions and other vulnerabilities, visit our free Website Security checker tool at https://free.pentesttesting.com/.
Start improving your website's security today!
#cyber security#cybersecurity#data security#pentesting#security#the security breach show#laravel#php
1 note
·
View note
Text
Laravel customized portal development services
Cost-Effective Laravel Solutions for Developing Bespoke Portals for Small Businesses Laravel offers an exceptional framework for small businesses seeking cost-effective web application development. The open-source nature of Laravel provides a significant financial advantage, eliminating expensive licensing fees that can burden small enterprises1. Developers can leverage the framework's robust ecosystem to create custom portals without incurring substantial upfront costs. The cost-effectiveness of Laravel stems from multiple strategic advantages. Its Eloquent Object-Relational Mapping (ORM) dramatically reduces development time by simplifying database interactions. This efficiency translates directly into lower development expenses, as developers can create complex database-driven portals more quickly and with less manual coding. Small businesses can benefit from reduced labor costs and faster time-to-market for their custom web applications. Modular Development Approach Laravel's modular packaging system is a game-changer for cost-conscious businesses. The framework enables developers to create reusable, independent components that can be easily integrated into different projects. This modularity means small businesses can: Reduce custom coding expenses Leverage pre-built modules Scale their portals incrementally Minimize long-term development costs Security and Maintenance Contrary to popular belief, cost-effective solutions don't mean compromising on security. Laravel provides built-in security features like hashed passwords, protection against SQL injection, and cross-site scripting prevention. These integrated security measures save businesses the additional expense of implementing custom security protocols. Creating Multi-Tenant Custom Portals with Laravel: A Guide for Developers Multi-tenant portal development requires a sophisticated approach to resource sharing and data isolation. Laravel's architecture provides robust mechanisms for creating scalable, secure multi-tenant solutions. Developers can implement tenant isolation through: Shared Database Strategies: Utilizing separate schema or table prefixes Middleware-Based Tenant Routing Efficient Resource Management The framework's authentication and authorization systems make it straightforward to implement granular access controls. Developers can create complex permission structures that ensure each tenant only accesses their designated resources. How Laravel's Modular Approach Benefits Customized Portal Development Laravel's modular structure is a powerful tool for creating flexible web applications. The framework's package system allows developers to: Rapidly Prototype: Quickly add or remove components Maintain Clean Code Architecture Enhance Scalability Reduce Technical Debt Developers can leverage packages from the extensive Laravel ecosystem, reducing development time and costs. The ability to integrate third-party services seamlessly means businesses can extend portal functionality without extensive custom development. Cost Considerations For smaller business concerns, the development in a country like India can be very cost-effective for Laravel. For a basic complex project, the development cost would range between 15,000 to 50,000 INR. The hourly rates available for Laravel developers would go from $25 to $150. The offshore development might offer additional savings. By embracing Laravel's open-source nature, modular design, and robust ecosystem, small businesses can develop powerful, scalable portals without breaking the bank. The framework provides a perfect balance of flexibility, security, and cost-efficiency for custom web application development.
0 notes
Text
How to generate fake data using factory tinker in laravel 11 Example
In this article, I will show you How to generate fake data using factory tinker in laravel 11 application. As we know, testing is a very important part of any web development project. Sometimes we may require to add hundreds of records to our users table, or maybe thousands of records. Also, think about if you require to check pagination, then you have to add some records for testing. You Can…
0 notes
Text
Build Portfolio Website in Laravel 11: Your Comprehensive Guide
Building a portfolio website is an essential step for showcasing your skills, projects, and achievements in today's competitive world. Laravel 11, the latest version of the robust PHP framework, offers unparalleled tools and features to create a stunning and functional portfolio website. In this guide, we’ll walk you through the process of building a portfolio website in Laravel 11, ensuring you have a step-by-step roadmap to success.
Why Choose Laravel 11 for Your Portfolio Website?
1. Modern Features
Laravel 11 introduces enhanced routing, improved performance, and advanced tooling that make it the go-to choice for web development.
2. Scalability
Whether you're a freelancer or a business owner, Laravel 11's scalability ensures your website can grow as your portfolio expands.
3. Security
With built-in authentication and security features, Laravel 11 protects your data and provides peace of mind.
4. Community Support
Laravel’s vast community ensures you’ll find solutions to problems, tutorials, and plugins to enhance your website.
Key Features of a Portfolio Website
To build a portfolio website in Laravel 11, ensure it includes:
Homepage: A welcoming introduction.
About Section: Your background and expertise.
Projects: A gallery showcasing your work.
Contact Form: Easy communication.
Blog Section: Share insights and updates.
Responsive Design: Optimized for all devices.
Getting Started with Laravel 11
Step 1: Install Laravel 11
Start by setting up Laravel 11 on your local environment.
composer create-project --prefer-dist laravel/laravel portfolio-website
Step 2: Configure Your Environment
Update your .env file to set up the database and other environment variables.
DB_CONNECTION=mysql
DB_HOST=127.0.0.1
DB_PORT=3306
DB_DATABASE=portfolio
DB_USERNAME=root
DB_PASSWORD=yourpassword
Step 3: Set Up Authentication
Laravel 11 offers seamless authentication features.
php artisan make:auth
This command generates routes, controllers, and views for user authentication.
Step 4: Design Your Database
Create tables for your portfolio items, such as projects, blogs, and user profiles. Use migrations to structure your database.
php artisan make:migration create_projects_table
In the migration file:
Schema::create('projects', function (Blueprint $table) {
$table->id();
$table->string('title');
$table->text('description');
$table->string('image')->nullable();
$table->timestamps();
});
Run the migration:
php artisan migrate
Building the Frontend
Step 1: Choose a CSS Framework
Laravel integrates well with frameworks like Tailwind CSS and Bootstrap. Install Tailwind CSS for modern and responsive designs:
npm install -D tailwindcss
npx tailwindcss init
Configure your Tailwind file and integrate it into your project.
Step 2: Create Blade Templates
Laravel’s Blade templating engine simplifies building dynamic pages. Create a layout file in resources/views/layouts/app.blade.php:
<!DOCTYPE html>
<html>
<head>
<title>@yield('title')</title>
<link rel="stylesheet" href="{{ asset('css/app.css') }}">
</head>
<body>
<div class="container">
@yield('content')
</div>
</body>
</html>
Use this layout in other views:
@extends('layouts.app')
@section('title', 'Home')
@section('content')
<h1>Welcome to My Portfolio</h1>
@endsection
Step 3: Dynamic Content
Fetch portfolio items from the database and display them dynamically using controllers.
public function index() {
$projects = Project::all();
return view('home', compact('projects'));
}
In your Blade template:
@foreach ($projects as $project)
<div class="project">
<h2>{{ $project->title }}</h2>
<p>{{ $project->description }}</p>
<img src="{{ $project->image }}" alt="{{ $project->title }}">
</div>
@endforeach
Advanced Features
1. Search Functionality
Add search to help visitors find specific projects or blogs.
public function search(Request $request) {
$query = $request->input('query');
$projects = Project::where('title', 'LIKE', "%{$query}%")->get();
return view('search-results', compact('projects'));
}
2. File Uploads
Enable uploading images for projects.
public function store(Request $request) {
$request->validate([
'title' => 'required',
'description' => 'required',
'image' => 'nullable|image',
]);
$imagePath = $request->file('image')->store('projects', 'public');
Project::create([
'title' => $request->title,
'description' => $request->description,
'image' => $imagePath,
]);
}
3. Integrate Analytics
Use Google Analytics or similar tools to track visitor behavior.
4. Deploying Your Website
Deploy your Laravel website using platforms like Laravel Forge, AWS, or Heroku. Ensure to optimize the performance with caching and minification.
Optimizing Your Portfolio Website for SEO
Keyword Integration: Use keywords like “Build Portfolio Website in Laravel 11” strategically in titles, meta descriptions, and content.
Fast Loading Times: Optimize images and use caching.
Responsive Design: Ensure compatibility with mobile devices.
Content Strategy: Regularly update your blog to attract organic traffic.
Conclusion
Building a portfolio website in Laravel 11 is an enriching experience that showcases your skills and work to the world. By leveraging the framework’s capabilities and integrating advanced features, you can create a website that stands out in the digital landscape. Start your journey today and make your mark with a professional portfolio website
0 notes
Text
Solution to Laravel "table.cache Doesn't Exist"
Hey! as of recently, was implementing an e-commerce online office furniture store while using my favorite PHP Laravel framework. I landed on this "table.cache doesn't exist" error which took me time to realize that I was accessing a table which wan not yet created. So i had to correct this configuration setting and also create a table for storing the cached data. You no longer need to reinvent the wheel. A full guide to how to resolve Laravel "Table.Cache Doesn't Exist" is here.
#laravel#office furniture#online store#programming error#configuration solution#Resolve error#debugging#Debug Laravel#Laravel Config file#Laravel Framework#database#env file#config cache php#programming#deployment#ecommerce
0 notes
Text
Laravel Web Development Overview
Laravel is one of the most popular and powerful PHP frameworks used for web development. This is developed by Taylor Otwell in 2011. It has evolved and now is one of the first choices for developers when looking for a modern, efficient, and scalable framework for building web applications. The clean syntax, a number of features, and tools that are developer-friendly make it a preferred choice for both beginners and experts. This article will give an in-depth overview of Laravel, its features, advantages, and why it remains a dominant force in the world of web development.
What is Laravel? Laravel is an open-source PHP framework that primarily focuses on web applications' development using the Model-View-Controller (MVC) architectural pattern. The framework automates work such as routing, authentication, caching, sessions, and database migrations. By using Laravel, developers are able to code applications in fewer lines with more emphasis on the application's functionality rather than raw PHP coding.
Laravel was designed to provide a robust set of tools to improve the development workflow. It comes with built-in tools for common web development tasks, such as routing, authentication, database interaction, and security. Laravel also promotes the use of clean, readable, and reusable code, which increases the maintainability of web applications over time.
Key Features of Laravel MVC Architecture: Laravel follows the Model-View-Controller architectural pattern, which helps in organizing code logically. It includes a model that deals with data and business logic, a view that deals with the user interface, and a controller that acts as an intermediary between the model and the view. Separation of concerns makes it easier to manage large applications and ensures that the logic is clear and well-organized.
Eloquent ORM: Laravel comes with Eloquent, which is an Object-Relational Mapping (ORM) system that makes database interaction easier. Eloquent allows developers to interact with the database using PHP syntax instead of writing raw SQL queries. This makes database management easy and intuitive, and it supports various relationships between tables such as one-to-many, many-to-many, and polymorphic relations.
Blade Templating Engine: Laravel comes with Blade, a templating engine that provides an easy way to design and render views. Blade lets developers embed PHP code in views without muddying the HTML. It also provides control structures like loops and conditionals directly within the views, which adds to the flexibility of web page rendering.
Routing: Laravel makes routing very simple. Developers can define routes using very clear syntax. Routes can be mapped to controllers or closures, and developers can group related routes to maintain a clean URL structure. Laravel also supports RESTful routing, which is a very important feature in building APIs.
Artisan CLI: Artisan is the CLI tool built into Laravel. Artisan offers a lot of useful commands for web development. With Artisan, developers can create controllers, models, migrations, and much more in a single command. Artisan helps automate repetitive tasks that speed up the development process.
Authentication and Authorization: Laravel provides easy-to-use built-in solutions for user authentication and authorization. This includes features like login, registration, password reset, and email verification. The framework also includes a powerful authorization system that allows developers to define policies and roles for controlling access to various parts of an application.
Security: Laravel takes security quite seriously and provides a variety of mechanisms built in to protect a web application from common attacks such as SQL injection, cross-site scripting (XSS), cross-site request forgery (CSRF), and session hijacking. It automatically handles escaping output to prevent XSS attacks and provides tools for secure hashing of passwords.
Testing: Laravel uses PHPUnit, the popular unit testing framework for PHP. This makes it really easy to write tests and automatically run them so your codebase is always bug free. The inclusion of a testing suite makes Laravel one of the best options when creating reliable and stable applications.
Queues: By Laravel's queue system, a developer can defer the time-consuming task of processing files to send emails or of file uploads. This allows an improvement in the overall performance and user experience by enabling tasks to be pushed to the background.
Migration and Schema Builder: Laravel's migration system enables developers to version control their database schema. This means developers can define the structure of the database in code and easily modify it across various environments. Schema builder allows for easy creation of database tables, indexes, and foreign keys.
Advantages of Using Laravel for Web Development Simplicity and Developer Friendliness: Laravel is simple yet has enough advanced options for the professional developer. It's clean and elegant, making the process of writing web applications less complex. With its complete documentation and the large number of developers involved, Laravel is really easy to start with.
One of the largest communities in the PHP development world is active and supportive. It provides support through online forums, blogs, tutorials, and documentation. Frequent release of new features and updates ensures that Laravel remains relevant and up-to-date with modern web development trends.
Scalability: Laravel is extremely scalable. It can be used to build everything, from a small personal project to an enterprise-level application. Because of its use of queues, caching, and efficient routing, Laravel easily manages high traffic spikes and complicated systems.
Laravel also supports the development of built-in tools for APIs. One can easily create RESTful APIs using this platform with tools like Laravel Passport that allows easy setup of OAuth authentication, which is always necessary for dealing with secure API requests. The Laravel also supports JSON responses and middleware, which is great for building modern web APIs.
Modular and Extensible: Laravel is modular and allows developers to extend its functionality through packages and libraries. Packages can easily be integrated into the application with features such as payment processing, SEO optimization, or image manipulation.
Strong Performance: Through built-in tools like Laravel's cache system and queue management, performance is automatically optimized. Caching is simple with drivers like Redis or Memcached, so there is a reduction in the number of database queries that need to be run. Thus, the application is responded to much quicker.
Security Best Practices: Laravel follows industry standards for web security. It includes features like encrypted cookies, password hashing, and prevention against SQL injection and cross-site scripting (XSS). This reduces the risks associated with common vulnerabilities and ensures a secure application.
Why Laravel Still Rules This balance of simplicity and functionality might be one reason for Laravel's popularity. Being a modern approach to the development of PHP, coupled with an active and growing community, helps keep Laravel current. The focus on best practice and productivity improvement ensures the relevance of Laravel for every web development project.
Conclusion To summarize, Laravel is a highly potent, flexible, and user-friendly PHP framework that has shaken the web development scenario. With its rich feature set, robust tools, and very active community, Laravel simplifies building secure, scalable, and high-performance web applications. Whether small website development or large enterprise system, everything you need to quickly build modern web applications in the most efficient way can be done through Laravel.
0 notes