#dbh mod tutorial
Explore tagged Tumblr posts
Visit Tumblr Blog
Explore Tumblr blogs with no restrictions, modern design and the best experience.
Last Seen Tumblr Blogs


Fun Fact
Tumblr.com is the 103rd most visited website in the world.
Text
Some Tips for new DBH modders

This will have 2 sections :
1 . QUANTIC dream textures - getting them stable throughout the game
2. Handy tool I found for normal maps.
QD TEXTURES - MY TOOL KEEPS BREAKING?
this is for the 2 ppl that actually mod Detroit and want to make their mods public and usable the entire game. and don't know abt this.
As you probably know, models ( containers ) share textures. So when you update a quantic dream texture for 1 model you need to update every single container/model that shares that texture or else it'll look black and crash your game. Why? because your game is expecting the file in qd format for that container when it's a dds file now.
But I'm sure youve noticed after the 3rd or so containers texture being 'refreshed' ( inserting the texture for each use of it in the tool) it just breaks. The only way around this is to tell the game it should expect a dds format manually.
Ok enough yapping. Here’s the tutorial :
Add your texture like you normally would in the editor. Do this for only one model, u can do it for more just before it crashes if u want too it shouldn’t affect it, I haven’t tested it tho.
Enable editing for all the containers/models that use that texture. So it clones it.
Now,, Repeat these steps for every texture that needs to be made into dds format other than the ones you changed in the editor:
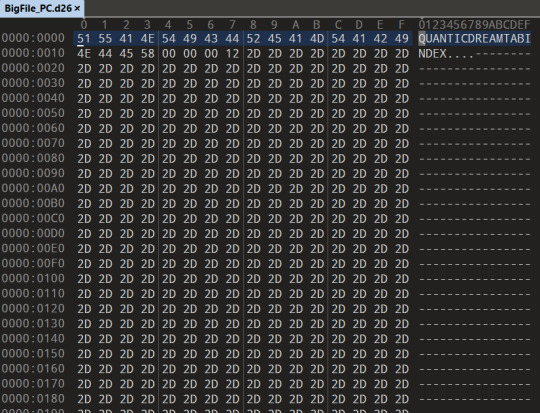
1.Using Rk900 (INTO_3) as an example, I swapped the connor into_2 model face texture so now we need to tell the game to expect a dds for nines face. Get the offset of nines’ face texture. It’s SUPER important that the INTO_3 container is cloned as the offset will be different.
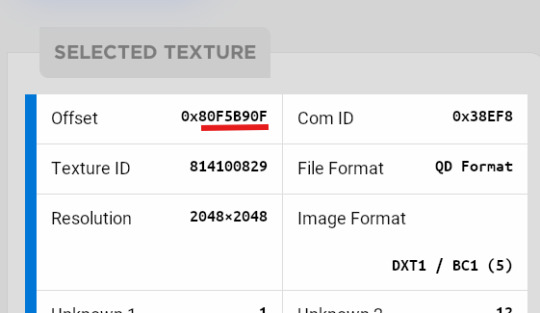
2.go to ( ctrl + g ) to the offset in d26 file. (so 80F5B90F)
3.change the following : we start at ‘0E’ for this example.

Change the 14th and 19th bytes (02) to 01 . it should look like this now
The hex code will change for each texture, but it will always be the 14th and 19th bytes.

4.Repeat for all textures and models that use them :)
Your tool will now load the containers correctly ( they will appear black still, but it will work ingame.)
USEFUL TOOL FOR CREATING NORMAL MAPS:
Normal maps are what gives flat surfaces fake 3d-ness without actually being there ! An example of this is the pores of dbh characters. Normal maps basically allow us to use less polygons which is good for efficiency:))
How do normal maps work ? Well all digital images contain 3 color channels : Red, Green and Blue (RGB) , what normal maps do is assign x,y,z values to these channels. So red would be the x value, green is the y value , blue is the z value . These give us the fake 3d values for each pixel that alter how our game calculates the light ( surface normals ) .
I use this website to generate my normal maps from height maps :
Height maps are black and white images that tell us the height (z value) of each pixel, typically white is high,black is low. Here is an example of the sylus mask I made :

IMPORTANT!! 99% of dbh’s normal maps DONT have a blue channel ( z value) so you HAVE to remove the blue channel completely after generating it from here.
This was how my modified face texture looked like after nuking the blue channel ( in gimp you have to go to colors -> Components -> decompose and delete the blue channel then recompose it )
^^ basically i overlayed the new normal map over connors original one.
Ok thats it. idk if this helps anyone but here u go :P
Pls correct me if I’m wrong abt anything, I’m small brain tbh
11 notes
·
View notes
Text
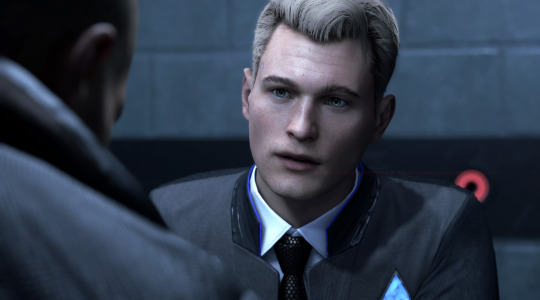
i caved and got dbh for my pc (despite already having it for my console) and honestly it's nice to be able to have have my monitor so close to me and be able to really just stare at all the details in the gallery (i may have spent an obscene amount of time staring at each character model)
here's some details i noticed about connor's model
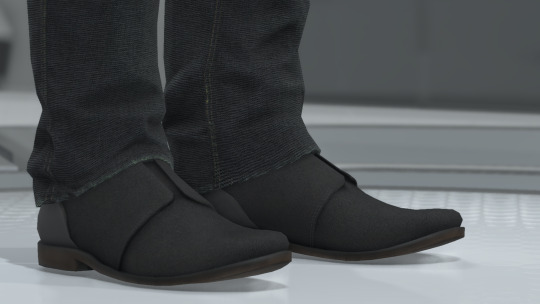
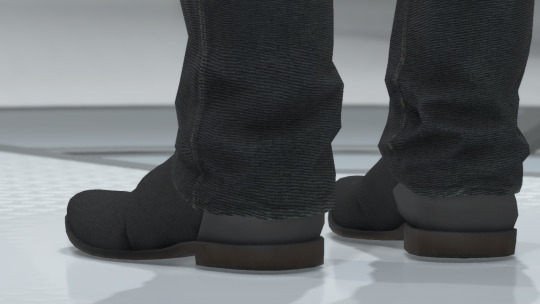
firstly, wtf is going on with his shoes. like does it have laces???? is it just a slip-on??? I WANT TO KNOW WHAT THE TOPS OF THE SHOES LOOK LIKE. also why are his jeans unhemmed?????
at the bottom of his jacket there's the two little dark grey rectangles that honestly i never really noticed and i don't think i've ever included it in my art bc my brain just erases them from my brain. it's such a random design choice and i can't decide if i hate them or not.
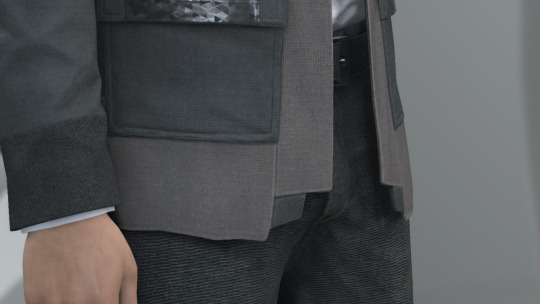
also why tf does he have two random button holes on the front of his jacket??? his jacket doesn't have buttons???? i cannot fathom why these exist or what their purpose is
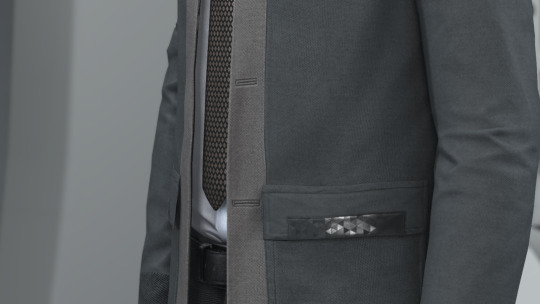
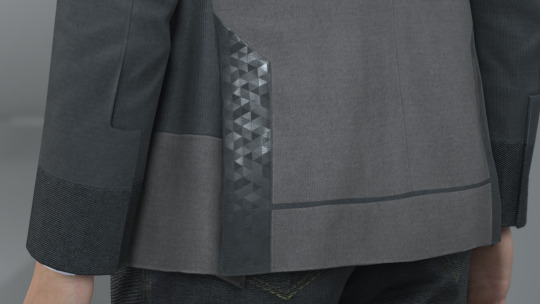
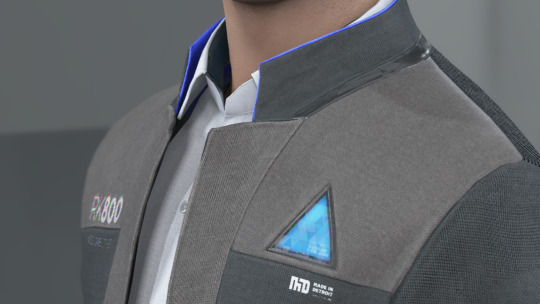
never really took the time to analyze connor's jacket so closely and i love the detail of the different materials on his jacket. like the tessellated triangle motif throughout his jacket clearly being some sort of synthetic material compared to the cotton/wool fibers
also i love the seam detail on his sleeve? like i love how it's not just one straight line but adds more shape and design to his cuff.
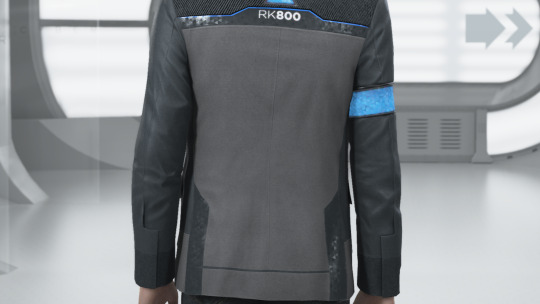
i love the texture on the top back half of connor's jacket. it reminds me of carpet or those really textured couches. it's like some type of corduroy likely or something. i wanna touch it. also the cyberlife branding right under the ANDROID text how did i never notice that??

if you look at the inner lining of his white collar, it has a darker liner on the inside. i don't think you typically see that on white button-ups???
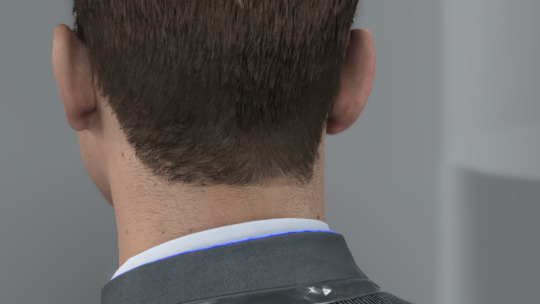
lastly LOOK AT HIS NECK MOLES. HE'S GOT SO MANY LITTLE NECK MOLES. and after extensive zooming in and out and looking at it from all angles, i have determined that he has a little tiny mole on the back of his right ear on the rim. idk if you can see it in these screenies BUT IT'S THERE I SWEAR TO YOU. he's also got the little divot some ppl have on their ears near the top of his ear.

anyway, uhm, yeah i totally haven't spent more time staring at the character models than i have spent playing the actual game
i was also staring at kara's and markus' models and might post my thoughts observations on those at another time. but for now we got connor.
#duda if you're reading this just know i am 1000% going to consult you on how to take screenies bc the in-game camera is ass#also nine if you are reading this imma ask you too and ask you for a tutorial on how to add your mods to the game bc ANDROID HANDS#mine#reference#connor#dbh screenshots#dbh reference#dbh connor#connor rk800#detroit become human#detroit: become human#d:bh#dbh
519 notes
·
View notes
Text
mod tutorial: Connor's android hands
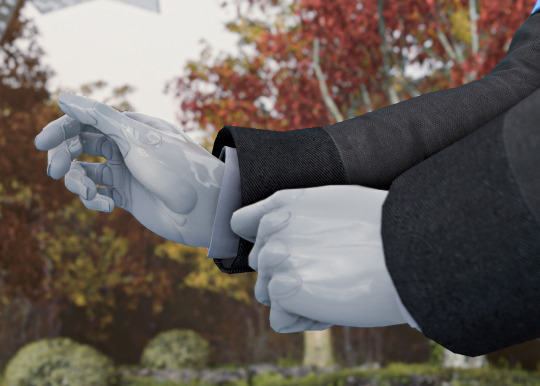
some info: the visibility of Connor's android hands is controlled by "invokes", which can affect textures and certain submeshes and when/if they appear. some other notable uses include Connor's open collar and lack of tie vs closed collar with tie, and bullet wounds and blood that appear dynamically.
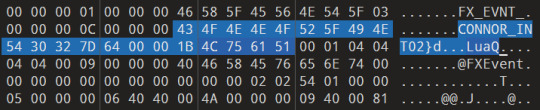
Step 1: Accessing the Lua bytecode
you can do this by using the texture tool from deadray. in the tool, under "Catalog", search for Connor. you will see multiple entries, but "CONNOR_INT02" is the Connor's most frequently used game model, so i'll use that one as an example.
select CONNOR_INT02, and click "Enable Editing".
(explanation: the texture tool decompresses the model's data and appends the more easily edited data to one of the game files, .d26.)
once you've enabled editing on the model, open up the .d26 file from the Detroit: Become Human folder in a hex editor such as HxD or 010.
you will be greeted with something like this:
search for (Ctrl+F, case sensitive) the text "LuaQ". if you find this string near the text CONNOR_INT02, you're in the right place.
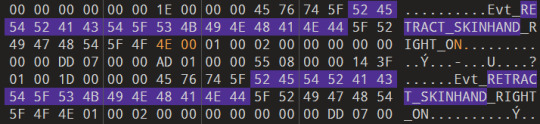
Step 2: Finding the invokes
once you scroll down a bit, you'll find a lot of strings that "HIDE" or "SHOW" things, or turn things "ON" or "OFF".
for Connor's android hands, we are looking for "Evt_RETRACT_SKINHAND_LEFT_OFF" and "Evt_RETRACT_SKINHAND_RIGHT_OFF". Change the bytes 46 46 (the FF in OFF) to 4E 00 (N and a null character, resulting in ON). Repeatedly turn all the instances of OFF to ON in each occurrence of the RETRACT_SKINHAND phrases until you reach the end (signaled by the text MESHDATA).
make sure you have a clean backup of .d26 and .idx for uninstallation. save the new .d26, and place it in the DBH folder after you've moved the old one to a different location like your desktop.
Step 3: Removing the synth skin
open the .idx file (located in the same folder as .d26) in your hex editor. search for the hex-values 00 00 08 B5 00 00 00 01 00 00 7B 88. change the following four bytes (which are 22 1A 40 00) to 99 99 99 99. save it and replace the unedited .idx, like with .d26.
Start up the game!

the method explained in steps 1 and 2 of opening a model catalog, editing OFF to ON or HIDE to SHOW can work with a lot of other stuff.
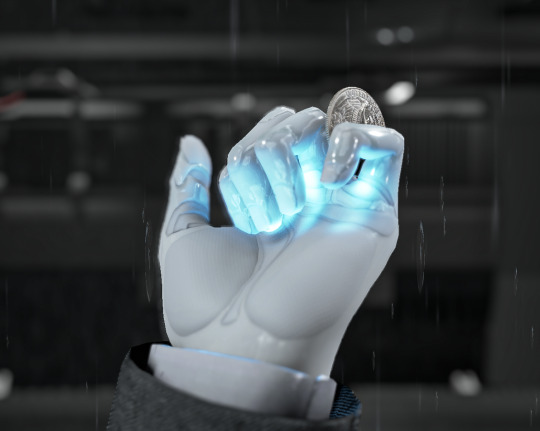
for example, you can make Connor's android hands glow:
or give him a lot of bullet wounds, like i did in this post.
you can also have Kara showing up in A New Home covered in blood. or have Markus be literally on fire during the entirety of Crossroads. the possibilities are endless.
happy modding!
102 notes
·
View notes
Text
The fucking void.
I mean, dbh void

I made this cuz i'm paranoid, it's supposed to make my life easier not yours.
➫ Android Deviancy:
❯ Androids VS Laws theory
❯ Android deviancy theory + weak HCs [Docs]
❯ RK Connor series theory + weak HCs [Docs]
➫ Android functionality:
❯ Android interfacing
❯ Android temperature
➫ Game overall exploration:
❯ All DBH Firearms
❯ Kara and Connor public image assumption
❯ DBH Android Zone
❯ DBH Camden
❯ Stratford Tower Exploration
❯ 1 useless DBH worldbuilding info everyday
❯ 1 DBH random place or location everyday
❯ My Mostly-Unused Content List
❯ All rA9 mentions in DBH (including cut content) + David Cage's take on rA9
❯ All Magazine Background Images
❯ The Nest Chase path map
❯ All DBH ID Textures (not related to the index)
❯ Some DBH Paper and Magazines stuff, also some documents and stickers
❯ Some DBH Screen Textures (Computers, TVs, Pads, Cellphones, Boards etc)
❯ My Detroit Locations Google Maps
Tumblr gonna make everything difficult with these tag results getting bugged so good luck (for me, not for you)
→ #dbh observation list (generalization)
Mix of posts about dbh universe I think should be remembered. May contain relevant analyzes, theories, discussions and curiosities.
→ #dbh scenery details
I'll be using this tag everytime I see a post with scenery details like interiors or, well, environment DETAILS - but what i judge "interesting" 🥃😁
→ #dbh relevant android shots
Pretty forward. I'll be using this tag when i find relevant screenshots (or official concept arts) of androids like anatomy and mods related to that (also "gore"). Let's celebrate the droidhood 🤧
→ #dbh skinless android fanart comp
It's so fucking difficult finding fanarts with skinless androids or shit highlighting this side around the net. I'm dedicating this tag to all heroes that think androids are cool the way they really are 🫡
→ #dbh mods tutorial collection
I'll be using this tag for dbh mods. No, not those edits u see around, i'm talking about "tutorials" or people explaining how they did X thing and also how things work.
→ #dbh androids x guns
Androids and guns shouldn't be treated like evil, bad like the game wants u to believe. So why not make a tag for fanarts, GIFs and screenshots of androids with guns? 🤷🏾♂️
→ #dbh interesting fanfics
I'll be using this tag everytime i find some interesting fanfics (or pieces of fics and ideas) around the net.
-> #dbh: how i think shit works
Some theories about stuff with more detailed pov, often home for hcs as justification
-> #dbh my ideas
My headcanons and ramblings about a specific topic
-> #dbh logic club the list
Where i use my 60% sarcasm trynna finding logic in the game. Would be a cool content for a "Everything Wrong With", to be honest
20 notes
·
View notes
Text
Model Swapping: Browser
"Model swapping" refers to swapping one character's appearance out with another. Here is the link to the browser model swapper.

Keep reading for the step-by-step tutorial.
Pick which game version you use. (This will not work if you have a cracked version of the game. Please purchase the game.)
At the top, locate your .idx file. This is in your game files where you downloaded DBH. (For example: HDD > steamapps > common > Detroit Become Human > BigFile_PC.idx)
Click on the models you'd like to swap in the browser.
Click APPLY.
Click SAVE MOD.
The edited .idx file will most likely download straight to your downloads folder. Go there, cut the file, then paste it into the Detroit Become Human game files folder that you just located.
You will be asked if it's okay to replace your current .idx file. Click OK.
Boot up your game and see if it worked.
To return your .idx file to its original state, on the model swapper, click REPAIR IDX, SAVE MOD, and paste it into your game files.
Sources:
Image source.
Deadray model swapper.
4 notes
·
View notes
Text
How to create your own custom textures for Detroit: Become Human (Epic Games + Steam)
Some people have been asking how I get the dbh models to look like this in my game:
So today I’m going to break down how to manipulate the textures in the game with deadray’s custom tool and how to avoid crashing.
Before we start with the tutorial, we require several tools. The dbh custom tool found on the website linked above, a texture exporter tool and an image converter which you can find and install in the "resources” folder I’ve prepared here.
PART 1: RECOLORING CLOTHING & ACCESSOIRES.
The character textures we want to change are in the tools "catalog" section. You can locate any specific model by typing their name into the search function, we are going to start with Kara. Kara uses mostly DDS textures which won't cause trouble in your game, while Alice and Connor for example use mostly QD textures which will cause crashes if not used correctly.
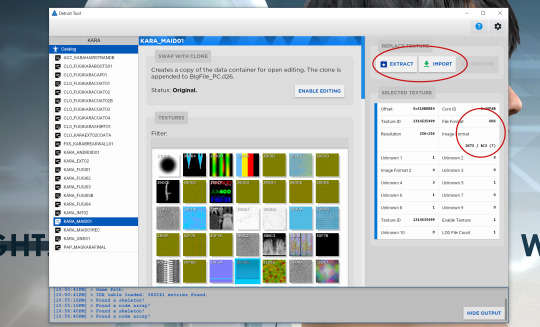
Once we’ve searched for KARA, the catalog lists all of her models. Here I have opened the section “maid” which is her standard outfit and selected her armband. To change the texture, we select to “extract” the file and pay attention to the required image format listed on the right side of the panel. Her armband is listed as DTX5 / BC3.
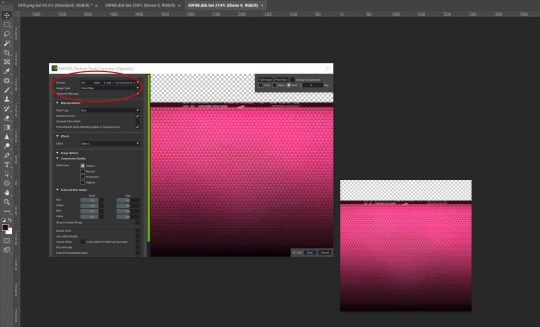
Once you have installed the Nvidia Texture Exporter, launch Photoshop and open your exported DDS file. (Btw, the texture tool can’t be installed with a cracked PS version, so if you can’t purchase PS then Gimp will also work.) In Photoshop, I have recolored the blue armband to pink and I save my new file, selecting the “DDS - Nvidia Texture Exporter” under “Data Type”. The Texture Exporter will open in Photoshop and ask for the required DDS image format. I select BC3, as listed by the custom tool, and click “save.”
Now you need to insert your new file into its respective thumbnail by selecting “import” in the custom tool. I have changed Kara’s triangle in addition, which is the same image format (BC3) as her armband. Close the tool, open your game and voilà, Kara is now sporting preppy pink android markers!
PART 2: OVERWRITING FONTS & SERIAL NUMBERS.
To change fonts and serial numbers, we simply need to paint over the file’s original letters and overwrite it with something else. Here you can see an example of Connor’s original model identification marker and my custom marker. You can blacken out the whole thumbnail if you want to erase the markers on the jacket altogether. The image format for this particular DDS is DTX1 / BC1 and you can find it in the catalog under CONNOR_HOSTAGE, CONNOR_INT02 and CONNOR_WAR.
CONNOR_INT03 is NINES, so don’t change those files unless you want to overwrite Nines’ markers as well.

Serial codes can be swapped and overwritten in a similar fashion. The RK models all draw their serial numbers from the same file. In this example you see I’ve swapped the serials of Connor-51 and Connor-60. The image format for this particular DDS is DTX1 / BC1.
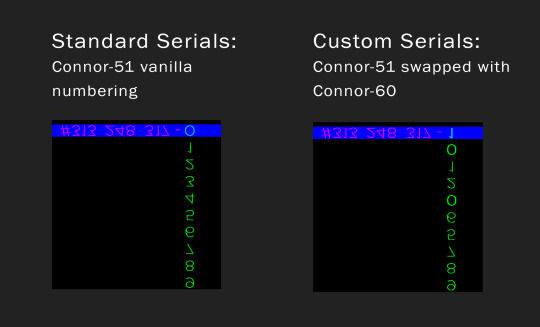
However, a swapped serial won’t update accordingly with every death within in the game. If you were to do a death run starting with -60, the serial bugs out at death five because of the modified starting number. -65 becomes -66 instead because -55 can’t be overwritten.
PART 3: EXTRACTING AND IMPORTING QD TEXTURES.
Don’t start with QD textures unless you’re already experienced with DDS textures or don’t know what you’re doing. Otherwise I guarantee you will break/corrupt your game files. Always have a backup of your original files on your PC in the case of corruption. QD textures are usually shared between various different models and need to be updated within every single model in the game that uses the same texture. Otherwise, your game will crash.
First things first, open the tool and add the detroit_img.exe in tool settings in order to display QD texture thumbnails.
We are going to change Hank’s intro shirt for the QD example. All of Hank’s shirts are shared between HANK_INT01, HANK_INT03, CLO_HANKSHIRT_01 and CLO_HANKCLOTHESBALL. They are DTX1 / BC1 QD formats. In order to export the texture, we need to unlock “enable editing�� on top of the catalog chart.
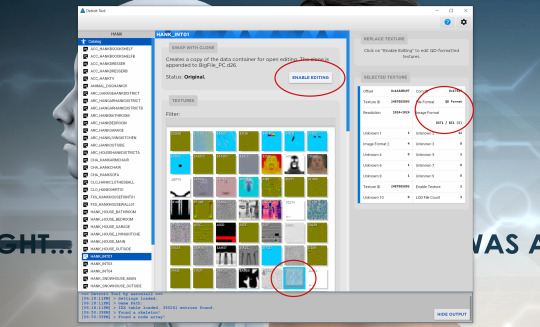
To export and edit QD files, it's important to "enable editing" in each catalog section you want to modify. QD files are exported in uneditable data format. Drag and drop this data file into the detroit_img application to convert it into a TGA file. Open this TGA in Photoshop or Gimp and flip the new image vertically before you save the edited file as a DDS.
Afterwards you need to import this new DDS into each thumbnail that used the original QD texture. After I imported the first custom DDS into HANK_INT01 its thumbnail will turn black in every other section and needs to be refreshed. Therefore remember the position of your original thumbnail or note their file names in order to find them again later. If your game starts crashing because you haven’t refreshed every shared texture, selecting “restore” for the thumbnail won’t work for QD files. So it’s always important you have backed up your game files in case something goes wrong.

For beginners, stay away from QD eye colors since they are shared with lots of random NPC. (If you’re absolutely itching to edit the eyes, you can message me and I can send you a list of known NPC who shares it with them).
PART 4: COUNTERACTING SHADERS.
Some texture have an inaccessible colored shader assigned, meaning your own recolor and this shader will combine and create an entirely different color. We don’t want that, so we need to counteract the shader’s color preset. An example is North’s hair for EXT01 and EXT02, both are assigned a red shader. To turn her hair brunette I’ve recolored her hair texture into a soft blue and lowered the lightness to counteract the red.
Some color shaders are accessible to you, like the hair coloration of Echo (blue) and her girlfriend Ripple (reddish). Her shader looks like this:
In Echo’s case, I’ve turned her hair black just by recoloring the blue-ish section and left her actual hair texture the way it is. I don’t recommend recoloring these type of shaders with android uniforms unless you only want to take photos, as it will take a toll on gameplay and cause a slight lag (same goes for editing facial textures with heavy make-up).
I hope I managed to explain the tool in a somewhat comprehensible way. This is all old news to me by now, but I remember it was incredibly hard to understand back when I was a newbie with modding dbh. If you have any specific questions about the custom tool that I haven’t addressed, or if you get stuck with a texture and don’t know how to procced feel free to chat me or comment under this thread! :)
158 notes
·
View notes
Note
Ma'am/sir I am LIVING for your Daniel model swap screenshots. Daniel deserved better 🙏
ahh ty!!!! if you have dbh on your pc you can follow TheLeonX’s dbh modding tutorial and swap them by yourself! Daniel was so beautiful in the zen garden i cried at those scenes myself T.T
5 notes
·
View notes
Note
Hi! I am rather new to modding Oblivion and I was wondering if there is any mods you would recommend for it? Or maybe just your mod list, if you are comfortable with sharing that? Your Oblivion characters always look so beautiful, especially Iriana. Anyway, I hope you having a wonderful day! :)
It’s ironic you ask Nonnie, considering I’m wrestling with Oblivion myself and failing atm XD
Still, I’m happy to drop some recommendations for mods I use and can usually get to cooperate with me ^-^
First off, you’ll want the Official Oblivion Patch, the Unofficial Oblivion Patch, the Unofficial Shivering Isles Patch, and the Unofficial Oblivion DLC Patches (if you have the GOTY edition). They fix a bunch of issues in the game, and some mods require them to be installed, so they’re a solid place to start.
The rest are under the cut because boy this got long o.o
Character Creation:
I cannot recommend Nuska’s Oblivion Character Overhaul enough. It’s an absolute must have for me as it deals with Oblivion’s potato faces beautifully. And, thanks to the hard work of other modders, it is possible to customise OCO further. I’ll list those in just a second. You’ll also need the Oblivion Script Extender and Blockhead to get it to work.
I also use the HGEC Female Body for my OCs - if you use that mod or any other body mods, there are some additional files provided by Nuska that make OCO compatible with them. They’re located in the optional files for OCO, and the description for those will tell you what order you need to install them in.
Now, my other OCO Mods that I recommend:
Orsimer Overhaul for OCOv2 - merges OCO and Orsimer Overhaul for a look I personally love for orc characters. It can be a little hit and miss with getting it to work on my end, so you’ll need to decide if you want to have a go at wrestling with it, but I personally think it’s worth a try
OCOv2 Martin and Adoring Fan Fix - I’m not a huge fan of OCO’s take on Martin, so I prefer this one even though it makes him look a bit too young imo
Unique Face Features for OCOv2 - Adds some warpaints, scars, freckles, and other kinds of face markings to the cc. iirc they’re tweaked with the age slider
Warpaint for OCOv2 - adds some more Skyrim warpaints
Seamless for OCOv2 - removes the very visible neckseam on characters. Whether or not I can get this one to work is usually hit and miss for me ^^”
New Brows for OCOv2 - exactly what it says on the tin ;)
New Eyes for OCOv2 - new eye texture replacements, along with some optional files to customise them a little
Better Necks for OCOv2 - adds some detailing to the neck and throat of the character model. Not a requirement ofc, I’m just a sucker for detail
OCOv2 Male Beard - adds some actual beards to the cc
Hairstyle mods can vary in quality, and some only come available as wigs. I only use a couple myself.
Sidenote, wigs tend to make your characters look like they have no ears so you’ll need a mod that adds equip-able ears - I’ll have one recommended further down.
ANiceOakTree’s Hairstyles for Oblivion is a mod that adds hairs as wigs. There’s a few styles in different colours, and it’s the one I use for Iriana. You create your character with whatever hair, it doesn’t matter, and then travel to either Vilverin, which is the Ayleid Ruin literally opposite the Sewer Exit after you finish the tutorial, or in the Cheydinhal Chapel near the doors.I usually tend to go to Vilverin, as it’s closer for me and the chest is literally down the stairs from the entrance, plus it counts as stealing from the chapel so I’d recommend the ruin if you’d rather not get in trouble for wanting nice hair.
Zinni_s Braided Redguard Expanded is good if you plan to play as a Redguard and would like a braided style. It’s added to the cc, so you don’t need to go looking for it ^^
Chakaru Wigs 2.0 is a bit trickier. You need to access the Testing Hall in order to find them, and I can’t remember exactly which room they’re in. They’re located in a chest directly opposite the door, however, so it narrows the search a little. If I get to the point where Oblivion is cooperating with me, I’ll add the location here.In order to access the Testing Hall, open the console and type ‘coc testing hall’ (if that doesn’t work try removing the space between testing and hall, I forget which is the correct way), and then in the centre of the main room, find the door labelled Hawkhaven, go through it, and fast travel to return to Cyrodiil.
I’ve not used the Cazy Hair Pack in some time now, but it’s still worth a mention. It adds some new hairs to the cc, so no looking around ruins and testing halls to find them ^^
Armour and Clothing
Ordinarily I would never download Apachii Goddess Store, but it is where I get Iriana’s ears. On the ground floor, there’s a container full of equip-able ears you can take free of charge, and iirc they match to your character’s skintone.
Belphe’s Travelling Gear (the female version) is another mod I wouldn’t usually use, but it looks surprisingly good on Iriana sooooo. There’s a few mods on this page you can try out if you’re interested, but I have no idea how to install the ones without esp files, so I can’t help you if you want any of those.
This is my favourite remodel of the Archmage Robes (I could do without the titty physics, but it’s very unnoticeable most of the time so it’s survivable). Because of the unfortunate physics aspect, it does require Coronerras Maxiumum Compatibility Skeleton, but otherwise it’s a brilliant remodel. However, the Archmage Robes present a problem with equip-able ears - as they take up an amulet slot and these robes don’t let amulets show, you will have missing ears with these robes. There’s another mod I use to fix this, which I’ll get to late.
Alternatively, there is a male replacer for the Archmage Robes that I like but (obviously) have never used if you’re making male characters
The Triss Armour Retexture is another great mod, and I personally like to use the Dark Brotherhood variant for my DBH characters as opposed to actual Shrouded Armour. They can be a pain to obtain as you need to fight your way through some bandits in Fort Cedrian, then locate the bag in the Mausoleum, but they are worth the trouble.
Assorted Protective Female Armours is another must imo as it fixes the ridiculous boobplates and some textures for some of the game’s heavy armours.
If you used the HGEC Body for female characters, then you’ll want to grab the Vanilla Amulets Fix for HGEC as it’ll fix how amulets fit on that body.
Spike4072s Female Sheogorath Regalia is a great mod if you’d rather keep the iconic Sheogorath look on a female character rather than have it swapped out for a dress.
Shrouded Armour Cowl is another great mod for DBH characters; I use it with the Dark Brotherhood Triss Armour, seeing as the hood doesn’t really mix with it.
Sinblood_SonjaArmourTweaked is another good female armour mod; it looks good, and is reasonably functionable.
Other Mods
Oblivion Reloaded is a fantastic mod; primarily it’s a graphics extender mod, and it really does make the world of Oblivion look amazing.
Alternative Start is a great mod, and it functions very much like its Skyrim counterpart. If you want to do the Main Quest but start elsewhere, after a certain number of days pass you’ll receive a message to meet someone in a set period of time at the Temple of the One. That will put you in the tutorial and set up the Main Quest. Word of warning, miss that meeting and I don’t think it’s possible to do the Main Quest at all so just be careful.
Oblivion XP is an absolute must if you struggle with Oblivion’s levelling system like I do. XP is awarded for defeating foes, discovering locations, completing quests, stealing things, etc. It’s installed with Oblivion Mod Manager, so make sure you grab that.
Kvatch Rebuilt is a pretty damn good mod which offers a questline to rebuild the city of Kvatch and give it a ruler. That ruler can even be the player, depending on some choices you make. The voice acting isn’t stellar, but it’s worth it to see Kvatch restored.It requires the Engine Bugs Fixes so make sure to grab that.Also, make sure you pick up Compatibility Patches for OCO to avoid too many weird faces around Kvatch and other places.
Reneers Guard Overhaul is also a pretty useful mod if the ever-charming behaviour of the Oblivion Guards gets a bit wearing. They’ll no longer chase you to the ends of Tamriel, and a crime committed in Cheydinhal won’t get you attacked in Leyawiin (kinda like how Skyrim manages crime).
No Anachronistic Main Quest Comments is good for immersion; you won’t have people saying how a city might not go the way of Kvatch after the Oblivion Crisis is over.
Now, the amulet issue with the Archmage Robes. I fixed that with the Summonable Private Quarters, which provides a station where you can mess with slots for armour/clothing sets. There’s lots of use for this mod besides just making your amulets and ears visible, but this is what I primarily use it for.To make it work you need the Core files of Cobl, so manually download that and move the core folder into Oblivion’s Data folder.
I also use a couple of animation mods, namely Staff Animation which changes the PC’s idles and the way they move when holding a staff so it looks less awkward.
There’s also the Heroic Female Idle Replacer which is less stiff than the vanilla female idle. Otherwise I recommend searching through the Oblivion Nexus’ animation tag and finding any mods that suit you and your characters best.
Project Oblivion Gate Destruction Spell is useful if you get tired of diving into gates over and over again when you just want to get on with the game. Just cast the spell and poof, no more gate and you still get the Sigil Stone. It’s good for when you’ve already played the game over a few times.
The Elder Scrolls Online Imports is a must have if you love ESO like I do. It adds some bits of lore, creatures, and locations from ESO.
Better Cities makes the cities of Cyrodiil more varied and interesting, though it might be a bit troublesome at times. I’ve had the occasional problem with this mod, purely based on load order so just keep that in mind. Otherwise it’s a gorgeous mod with a lot of effort and creativity put into it.
Vanilla Staff Replacer isn’t necessary if you’re not playing a mage, but I really enjoy it personally ^^
I’m going to add Black Horse Colour Overhaul because it honestly bugs me that the black horses in Oblivion aren’t black
Companion Vilja is a mod I haven’t actually used yet, but I’ve got installed for this playthrough because I’ve been meaning to play it forever. Apparently Terry Pratchett himself contributed to this mod, so that should speak for its quality.
I hope this was helpful to you Nonnie, and good luck with modding Oblivion ^^
21 notes
·
View notes
Text
So I’m currently back at experimenting with Deadray’s mods and custom texture tool again. I was wondering, would anyone be interested if I wrote a small tutorial for the custom tool on how to:
navigate the tool’s catalog
manipulate the textures of clothing, hair, eyes and LEDs
change serial numbers
counteract shader coloring
edit and insert QD textures without causing errors and crashing your game
Hit me up if there’s interest.
11 notes
·
View notes
Text
Download and Set Up the Custom Texture Tool
The Custom Texture Tool is necessary for most modding. Download it on deadray.com/detroit/.

Keep reading for the step-by-step tutorial.
Pick which game version you use. (This will not work if you have a cracked version of the game. Please purchase the game.)
At the top right, click on MORE TOOLS.
Click on CUSTOM TEXTURE TOOL.
A .zip folder will download.
Put the folder in a location you'd like to keep it, then extract it.
Open DetroitTool. It will look like this:

7. Locate your game. (For example: HDD > steamapps > common > Detroit Become Human) 8. When you locate your game correctly, the Tool will look like this:

9. Click on CATALOG. 10. You can utilise the search bar to find specific models, but the QD files will not load. It will look like this:

How to Install the QD file extractor
You must have WinRAR installed.
Visit this Xentax forum and scroll down past the images. Click on the link to detroit.7z.

If you cannot download the file, disable your antivirus protection(s). If you have multiple antivirus software on duty, you must ensure that all of them are turned off.
On your PC, go to your Settings.
Go to Virus & Threat protection.
Disable your antivirus.
If you're using AVG for your protection:
Search your PC for "AVG".
Click on MENU.
Click on SETTINGS.
Click on BASIC PROTECTION.
Toggle Detections to "off".
If you still cannot download the file, it may be due to your browser's security settings.
Go to your browser's settings.
Depending on your browser, there may be a security tab.
There may be an option for "safe browsing" or limiting what you can download in terms of safety.
Disable this option.
After downloading the detroit.7z attachment, extract it in the place you want to keep the file. Do not move the files after this.
Open DetroitTool.
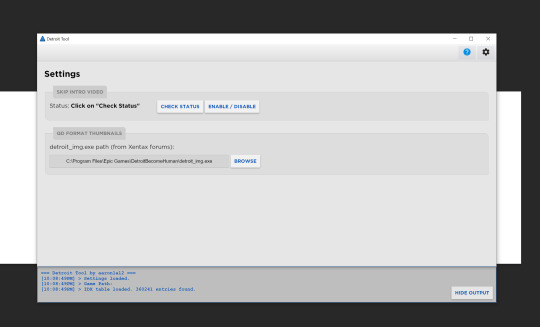
Go to SETTINGS.
Under QD FORMAT THUMBNAILS, click BROWSE.
Locate detroit_img.exe where you extracted detroit.7z.
The thumbnails should now load appropriately.

Sources:
Deadray model swapper.
Download WinRAR.
Download daemon1's DetroitTool on Xentax.
1 note
·
View note
Text
About
DBH Mod Archive (DBHMA) is committed to teaching the Detroit: Become Human community how to mod the game, making modding methods accessible and easy to understand, and connecting modders together. DBHMA stores mod inspiration, tutorials, information, tools, and anything necessary for you to achieve your Detroit: Become Human mod dreams.
Topics can be found in the CONTENTS menu. If you have any questions, requests, corrections, or updates, feel free to MAIL us.
https://dbhmodarchive.tumblr.com/
Disclaimer: Most DBHMA tutorials will be relevant only for the Steam version of Detroit: Become Human.
3 notes
·
View notes
Note
pretty new to the fandom and been a fan of yours for a couple months, mind if i ask why the dbh fandom is so... secretive? with their mods? seems like the only publicly available ones are basic ones like freecams and model and texture swap tools.
Hi, Anon.
I think it’s less about people being secretive about mods, but mostly about there being a general lack of mods. It’s a complex game and modifying it from scratch isn’t easy. Not a lot of people work on modding Detroit: Become Human afaik and a good bunch of the modders I’ve followed left the fandom.
The mods from deadrays custom tool & online swapper, the freecam and Dragonbane0‘s mod module are the only mod frameworks that I know personally. Dragonbane0’s module is unfinished, but may be available to the public eventually. If there are other mod modules I guess they‘re so top secret that I haven’t heard of them.
My own two retexture mod packs made with deadray‘s custom tool are released for public download, here and here. The most recent one will receive another update soon.
I also wrote a basic tutorial for everyone interested into implementing custom textures for D:BH.
Other modders, Vrtuellereality and Cereal for example, didn’t share their mods in public since the fandom is known for pirating the shit out of our mods. I‘m well aware my mod videos still get stolen every other day, uncredited and with those people’s own watermarks slapped onto them. It doesn’t matter that my mod packs are publicly available for download or that I explicitly noted not to repost my videos, people will pirate simply because it’s the laziest, fastest way.
So I wouldn’t say most modders are secretive, but protective over their own unique modifications. No one likes to put work and effort into something just to see it stolen. So I completely understand when they don’t want to share them.
11 notes
·
View notes
Note
Hi! Quick question, where can I find detroit_img.exe?
I was reading that texture tutorial you made a few months ago and I can't find it anywhere online.
Hello Anon,
detroit_img.exe is included with the resources folder I set up for the dbh modding tools. Its download link is attached to the tutorial.
Oftentimes the firewall will classify it as malware and purge it, make sure to pause your Anti Virus to use it in that case. You only need to install img.exe to display the advanced QD textures, DDS textures can be viewed without this program.
7 notes
·
View notes
Text
All Tutorials by DBH Mod Archive
#getting started
Model Swapping: Browser Download and Set Up the Custom Texture Tool
#skills
Bits and Bytes How to Read a String Textures and Texture Maps
1 note
·
View note
Text
Great job, Auguris!! I’m happy to hear everything worked out fine. Deviant!Connor looks amazing in your black jacket and green shirt! 👏
How to create your own custom textures for Detroit: Become Human (Epic Games + Steam)
Some people have been asking how I get the dbh models to look like this in my game:
So today I’m going to break down how to manipulate the textures in the game with deadray’s custom tool and how to avoid crashing.
Before we start with the tutorial, we require several tools. The dbh custom tool found on the website linked above, a texture exporter tool and an image converter which you can find and install in the “resources” folder I’ve prepared here.
PART 1: RECOLORING CLOTHING & ACCESSOIRES.
The character textures we want to change are in the tools “catalog” section. You can locate any specific model by typing their name into the search function, we are going to start with Kara. Kara uses mostly DDS textures which won’t cause trouble in your game, while Alice and Connor for example use mostly QD textures which will cause crashes if not used correctly.
Once we’ve searched for KARA, the catalog lists all of her models. Here I have opened the section “maid” which is her standard outfit and selected her armband. To change the texture, we select to “extract” the file and pay attention to the required image format listed on the right side of the panel. Her armband is listed as DTX5 / BC3.
Once you have installed the Nvidia Texture Exporter, launch Photoshop and open your exported DDS file. (Btw, the texture tool can’t be installed with a cracked PS version, so if you can’t purchase PS then Gimp will also work.) In Photoshop, I have recolored the blue armband to pink and I save my new file, selecting the “DDS - Nvidia Texture Exporter” under “Data Type”. The Texture Exporter will open in Photoshop and ask for the required DDS image format. I select BC3, as listed by the custom tool, and click “save.”
Now you need to insert your new file into its respective thumbnail by selecting “import” in the custom tool. I have changed Kara’s triangle in addition, which is the same image format (BC3) as her armband. Close the tool, open your game and voilà, Kara is now sporting preppy pink android markers!
PART 2: OVERWRITING FONTS & SERIAL NUMBERS.
To change fonts and serial numbers, we simply need to paint over the file’s original letters and overwrite it with something else. Here you can see an example of Connor’s original model identification marker and my custom marker. You can blacken out the whole thumbnail if you want to erase the markers on the jacket altogether. The image format for this particular DDS is DTX1 / BC1 and you can find it in the catalog under CONNOR_HOSTAGE, CONNOR_INT02 and CONNOR_WAR.
CONNOR_INT03 is NINES, so don’t change those files unless you want to overwrite Nines’ markers as well.
Serial codes can be swapped and overwritten in a similar fashion. The RK models all draw their serial numbers from the same file. In this example you see I’ve swapped the serials of Connor-51 and Connor-60. The image format for this particular DDS is DTX1 / BC1.
However, a swapped serial won’t update accordingly with every death within in the game. If you were to do a death run starting with -60, the serial bugs out at death five because of the modified starting number. -65 becomes -66 instead because -55 can’t be overwritten.
PART 3: EXTRACTING AND IMPORTING QD TEXTURES.
Don’t start with QD textures unless you’re already experienced with DDS textures or don’t know what you’re doing. Otherwise I guarantee you will break/corrupt your game files. Always have a backup of your original files on your PC in the case of corruption. QD textures are usually shared between various different models and need to be updated within every single model in the game that uses the same texture. Otherwise, your game will crash.
First things first, open the tool and add the detroit_img.exe in tool settings in order to display QD texture thumbnails.
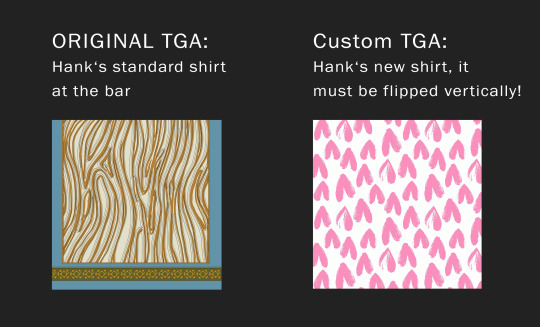
We are going to change Hank’s intro shirt for the QD example. All of Hank’s shirts are shared between HANK_INT01, HANK_INT03, CLO_HANKSHIRT_01 and CLO_HANKCLOTHESBALL. They are DTX1 / BC1 QD formats. In order to export the texture, we need to unlock “enable editing” on top of the catalog chart.
To export and edit QD files, it’s important to “enable editing” in each catalog section you want to modify. QD files are exported in uneditable data format. Drag and drop this data file into the detroit_img application to convert it into a TGA file. Open this TGA in Photoshop or Gimp and flip the new image vertically before you save the edited file as a DDS.
Afterwards you need to import this new DDS into each thumbnail that used the original QD texture. After I imported the first custom DDS into HANK_INT01 its thumbnail will turn black in every other section and needs to be refreshed. Therefore remember the position of your original thumbnail or note their file names in order to find them again later. If your game starts crashing because you haven’t refreshed every shared texture, selecting “restore” for the thumbnail won’t work for QD files. So it’s always important you have backed up your game files in case something goes wrong.
For beginners, stay away from QD eye colors since they are shared with lots of random NPC. (If you’re absolutely itching to edit the eyes, you can message me and I can send you a list of known NPC who shares it with them).
PART 4: COUNTERACTING SHADERS.
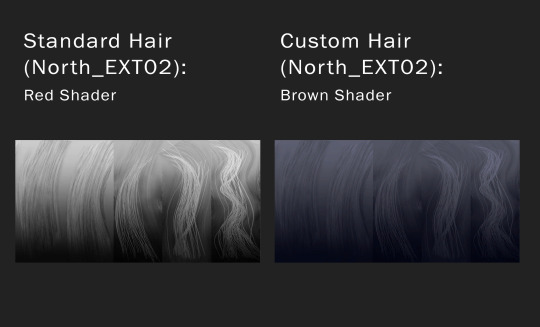
Some texture have an inaccessible colored shader assigned, meaning your own recolor and this shader will combine and create an entirely different color. We don’t want that, so we need to counteract the shader’s color preset. An example is North’s hair for EXT01 and EXT02, both are assigned a red shader. To turn her hair brunette I’ve recolored her hair texture into a soft blue and lowered the lightness to counteract the red.
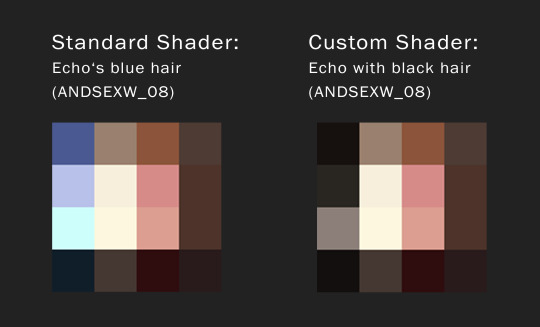
Some color shaders are accessible to you, like the hair coloration of Echo (blue) and her girlfriend Ripple (reddish). Her shader looks like this:
In Echo’s case, I’ve turned her hair black just by recoloring the blue-ish section and left her actual hair texture the way it is. I don’t recommend recoloring these type of shaders with android uniforms unless you only want to take photos, as it will take a toll on gameplay and cause a slight lag (same goes for editing facial textures with heavy make-up).
I hope I managed to explain the tool in a somewhat comprehensible way. This is all old news to me by now, but I remember it was incredibly hard to understand back when I was a newbie with modding dbh. If you have any specific questions about the custom tool that I haven’t addressed, or if you get stuck with a texture and don’t know how to procced feel free to chat me or comment under this thread! :)
158 notes
·
View notes