#dht22
Text
Shelly 1 #5 - Shelly 1 PM mit DHT22 Sensor

In diesem Beitrag möchte ich dir zeigen, wie du den Shelly 1 PM mit Temperatur Add-on um einen DHT22 Sensor erweitern kannst.

Shelly 1 #5 - Shelly 1 PM mit DHT22 Sensor
Den Shelly 1 PM habe ich dir bereits im Beitrag Shelly 1 #4 - Shelly 1 PM vorgestellt. Dieses smarte Gerät verfügt über ein Relais, welches sich per App oder auch per Sprachassistenten wie Amazon Alexa oder Google Home steuern lässt. Des Weiteren kann der Shelly 1 PM noch die Leistungsaufnahme eines angeschlossenen Verbrauchers messen.


Hier soll es nun darum gehen, wie du ein Temperatur Add-on inkl. DHT22 Sensor an diesen anschließt und somit die Temperatur & relative Luftfeuchtigkeit messen kannst.
Bezug der Bauteile für dieses kleine Projekt
Die Bauteile für dieses Projekt habe ich günstig von berrybase.de erworben. (Den Shelly 1 PM, hatte ich noch auf Lager.)
- Temperatur Add-on für Shelly 1 / PM - 10,90 €
- DHT22 Sensor - 7,70 €
Du findest diese Bauteile jedoch auch auf anderen Plattformen wie amazon.de, ebay.de usw. jedoch hatte zur Erstellung des Beitrages der genannte Shop den besten Preis inkl. Versandkosten.
DHT22 Sensor für Temperatur & rel. Luftfeuchtigkeit
Den DHT22 Sensor habe ich bereits in einigen Arduino und ESP Projekten vorgestellt und behandelt. Hier zunächst die technischen Daten des Sensors:
- Betriebsspannung: 3 - 5V DC
- Stromaufnahme: ~ 2,5 mA
- Messbereich
- rel. Luftfeuchtigkeit: 0 - 100 %
- Temperatur: -40 - 80 °C
- Toleranz
- rel. Luftfeuchtigkeit: ± 2 - 5 %
- Temperatur: ± 0,5 °C

DHT22 / AM2302 Sensor

Rückseite des DHT22 / AM2302 Sensors
Der mir vorliegende Sensor hat eine knapp 25 cm lange, 3 adrige, farbige Zuleitung. Wobei die Farben wie folgt belegt sind:
- Schwarz - Minus
- Rot - 5V
- Gelb - Data
Anschließen des Temperatur Add-ons an den Shelly 1 PM
Das Temperatur Add-on wird auf den Shelly 1 gesteckt und mit einer kleinen Nase hinter das Gehäuse bei den Schraubklemmen geklickt. Somit muss deine Schaltung bereits fertig sein, wenn du diesen auf deinen Shelly stecken möchtest.
https://youtu.be/Vx9gW2xb4OQ
Austauschen der Klemmen gegen Lüsterklemmen
In meinem Fall musste ich die beigelegten Klemmen gegen Lüsterklemmen tauschen, denn diese haben die dünnen Leitungen vom Temperatur Add-on nicht sicher gehalten.

Einrichten im Webfrontend
Wenn das Temperatur Add-on mit dem DHT22 Sensor am Shelly 1 PM verbunden wurde, dann wird dieses automatisch erkannt und die Daten im Webfrontend bzw. in der Shelly App angezeigt.

Zusätzlich werden ein paar neue Menüpunkte sichtbar, um Aktionen für diese Sensorwerte festzulegen.


Read the full article
0 notes
Text

Messing with ThingsBoard CE local server, a quartet of ESPs & DHT22s. Using IFTTT to trigger humidifiers, pellet stove, and space heaters. I want winter to be over...
What we do
0 notes
Text
Essential Electronic Items for IoT and Electronics Enthusiasts
Are you diving into the world of Internet of Things (IoT) and electronics? Whether you are a seasoned engineer or simply beginning out, having a stable list of essential components is key to bringing your initiatives to existence. Here’s a curated list of electronic objects that each maker and tech enthusiast ought to have of their toolkit:
1. Microcontrollers
Arduino Uno: Great for novices and versatile for diverse projects.
Raspberry Pi: Ideal for more complex duties and going for walks complete operating structures.
ESP8266/ESP32: Perfect for wireless communication and IoT projects.
2. Sensors
DHT22: For temperature and humidity readings.
PIR Sensor: Useful for movement detection.
Ultrasonic Distance Sensor: Measures distances with high accuracy.
3. Actuators
Servo Motors: For unique manage in robotics and mechanical structures.
Stepper Motors: Ideal for applications requiring particular movement.
Solenoids: Good for growing mechanical actions and locks.
4. Displays
LCD Display: Useful for showing records and debugging.
OLED Display: Compact and clean for exact photographs and texts.
5. Connectivity Modules
Bluetooth Module (HC-05/HC-06): For short-range wi-fi communication.
Wi-Fi Module (ESP8266): Connects gadgets to the internet.
GSM Module: Enables verbal exchange over mobile networks.
6. Power Supplies
Battery Packs: Various types for transportable electricity.
Voltage Regulators: Ensure solid voltage ranges in your circuits.
Power Banks: Handy for charging and powering devices on the move.
7. Prototyping Tools
Breadboards: Essential for prototyping with out soldering.
Jumper Wires: For making connections on breadboards.
Soldering Kit: For everlasting connections and circuit meeting.
eight. Additional Components
Resistors, Capacitors, and Diodes: Fundamental for circuit design and stability.
Transistors: Key for switching and amplification tasks.
Connectors and Switches: For interfacing and controlling circuits.
By preserving these objects handy, you'll be nicely-prepared to address a huge range of IoT and electronics projects. Whether you're constructing smart domestic devices, wearable tech, or computerized structures, having the right additives can make all the difference.
#IoT#Electronics#Arduino#RaspberryPi#ESP32#Sensors#Actuators#Displays#ConnectivityModules#PowerSupplies#Prototyping#Tech#DIY#Makers#Engineering#ElectronicComponents#TechProjects
2 notes
·
View notes
Text
DHT11 Digital Temperature And Humidity Sensor is a basic and low-cost digital temperature and humidity sensor. This sensor is used for projects where accuracy and precision doesn't play big role. This comes in a blue perforated plastic enclosure. This has four pin. There is an upgraded version of the DHT11 temperature and humidity sensor available, which is DHT22 Sensor with higher sensing ranges.
2 notes
·
View notes
Text

DHT11 Temperature and Humidity Sensor
The DHT11 Digital Temperature And Humidity Sensor is a basic, ultra low-cost digital temperature and humidity sensor. It uses a capacitive humidity sensor and a thermistor to measure the surrounding air and spits out a digital signal on the data pin (no analog input pins needed).
Its fairly simple to use, but requires careful timing to grab data. The only real downside of this sensor is you can only get new data from it once every 2 seconds, so in your code please use sensor reading interval at 2 seconds or more. Compared to the DHT22, this sensor is less precise, less accurate and works in a smaller range of temperature/humidity.
But despite its disadvantages over DHT22, it is smaller and less expensive sensor for temperature and humidity measurement.
Note:
This package does not include Arduino board, you have to buy it separately.
Features:
-Low power consumption.
-Relative humidity and temperature measurement
-All calibration, digital output
-Excellent long-term stability
-No additional components
-Long distance signal transmission
-Ultra-low power
-4-pin package
-Completely interchangeable
0 notes
Video
youtube
iot based agriculture monitoring pump on/off using arduino with Manual / Automatic | Smart Agriculture IoT Solution - IoT Sensors (Soil Moisture, Humidity, Temperature) | Smart Irrigation System | Arduino Uno | DHT11 | Humidity Sensor | Soil Moisture Sensor | Relay | GSM Based Motor Controller in Irrigation by Using Sensor's [ Soil Moisture Tank Water Level ] | SMS Based Remote Agriculture Pump ON/OFF Control and Notification | IOT BASED SUBMERSIBLE MOTOR PUMPS ON/OFF | IoT Based Agriculture Monitoring | pH | Moisture | Light | Irrigation | Rain | Temp | Humidity | IOT Based Agriculture Monitoring and Controlling System using Arduino Uno.***********************************************************If You Want To Purchase the Full Working Project KITMail Us: [email protected] Name Along With You-Tube Video LinkWe are Located at Telangana, Hyderabad, Boduppal. Project Changes also Made according to Student Requirementshttp://svsembedded.com/ https://www.svskits.in/ http://svsembedded.in/ http://www.svskit.com/M1: 91 9491535690 M2: 91 7842358459 We Will Send Working Model Project KIT through DTDC / DHL / Blue Dart / First Flight Courier ServiceWe Will Provide Project Soft Data through Google Drive1. Project Abstract / Synopsis 2. Project Related Datasheets of Each Component3. Project Sample Report / Documentation4. Project Kit Circuit / Schematic Diagram 5. Project Kit Working Software Code6. Project Related Software Compilers7. Project Related Sample PPT’s8. Project Kit Photos9. Project Kit Working Video linksLatest Projects with Year Wise YouTube video Links157 Projects https://svsembedded.com/ieee_2022.php135 Projects https://svsembedded.com/ieee_2021.php 151 Projects https://svsembedded.com/ieee_2020.php103 Projects https://svsembedded.com/ieee_2019.php61 Projects https://svsembedded.com/ieee_2018.php171 Projects https://svsembedded.com/ieee_2017.php170 Projects https://svsembedded.com/ieee_2016.php67 Projects https://svsembedded.com/ieee_2015.php55 Projects https://svsembedded.com/ieee_2014.php43 Projects https://svsembedded.com/ieee_2013.php1100 Projects https://www.svskit.com/2022/02/900-pr...***********************************************************Creating an IoT-based Smart Agriculture Monitoring System using Arduino can greatly improve the efficiency and productivity of farming. In this project, we'll use Arduino, various sensors, and an IoT platform like ThingSpeak or Adafruit IO to collect data and monitor the agricultural environment remotely. Here's a step-by-step guide to help you get started:Components Needed:1. Arduino (e.g., Arduino Uno or Arduino Mega)2. Sensors:• Soil Moisture Sensor• DHT22 or DHT11 Temperature and Humidity Sensor• Light Sensor (LDR)• Rainfall Sensor (optional)3. ESP8266 Wi-Fi module or ESP32 (for IoT connectivity)4. Relay module (for controlling irrigation systems)5. Power supply (solar or standard power source)6. Water pumps, valves, or actuators (for automated irrigation)7. Enclosure for outdoor installation (to protect electronics)8. Jumper wires, breadboard, and connectors9. Internet connectionProject Steps:1. Hardware Setup:• Connect the sensors and actuators to the Arduino using jumper wires.• Connect the ESP8266 or ESP32 to the Arduino using serial communication or I2C for data transfer.• Make sure all connections are secure and powered properly.2. Sensor Data Collection:• Read data from the soil moisture sensor to monitor soil moisture levels.• Use the DHT22/DHT11 sensor to measure temperature and humidity.• The light sensor can be used to monitor light intensity.• Optionally, include a rainfall sensor to measure precipitation.3. Arduino Programming:• Write Arduino code to read data from the sensors.• Implement control logic for irrigation systems based on the sensor data. For example, turn on/off water pumps or open/close valves.• Create a mechanism to send sensor data and control commands to the IoT platform via the ESP8266 or ESP32.4. IoT Integration:• Sign up for an IoT platform like ThingSpeak, Adafruit IO, or Ubidots.• Obtain the necessary credentials (API keys) to connect your Arduino to the platform.• Modify your Arduino code to send sensor data to the IoT platform periodically.• Set up dashboards and alerts on the IoT platform to visualize and analyze the data remotely.5. Remote Monitoring and Control:• Access your IoT platform's dashboard or mobile app to remotely monitor the agricultural conditions.• Implement automation rules and alerts to trigger actions (e.g., irrigation) based on specific conditions (e.g., low soil moisture).6. Power Supply:• Depending on your project's location, consider using solar power or a reliable power source to ensure continuous operation.
#youtube#IOT Based Smart Agriculture Monitoring Pump ON/OFF Control Using Arduino With Manual / Automatic https://www.youtube.com/watch?v=F3E0MiYCWpw
0 notes
Text
0 notes
Text
Sensores de temperatura DHT11, DHT22
Sensores de temperatura DHT11, DHT22
Abro hilo ⬇️
Los sensores de temperatura DHT11, y DHT22 son sensores que nos permiten obtener la humedad relativa y la temperatura en un formato digital, esto significa que no es necesario calibrar el sensor para obtener datos confiables dentro de sus márgenes de confiabilidad.
La diferencia entre estos dos tipos de sensores son sus rangos de operación, pero en general su operación es diferente. Los detalles…

View On WordPress
0 notes
Text
Geting semaphor value

Geting semaphor value how to#
Geting semaphor value 64 Bit#
Geting semaphor value code#
The first thing we are going to do is including the DHTesp.h library, so we can interact with the DHT22 using a high level API rather than having to worry about the lower level details of the communication protocol between the ESP32 and this sensor. The tests were performed using a DFRobot’s ESP32 module integrated in a ESP32 development board. To facilitate the interaction with the mentioned sensor, I’m using a DFRobot DHT22 module which already has all the electronics needed and exposes a wiring terminal that facilitates the connections to the ESP32. Nonetheless, for simplicity and to focus on the synchronization, we will only fetch temperature measurements. On a final introductory note, please take in consideration that the DHT22 allows to both get temperature and humidity measurements. Nonetheless, in a real application use case where multiple tasks may be executing concurrently, freeing the CPU from a task when it is not doing anything is of extreme importance. Naturally, this blocking architecture doesn’t add much to our simple example where our application doesn’t do anything else than interacting with the DHT22.
Geting semaphor value code#
We could have used a dedicated FreeRTOS task but since for this example we will only fetch and print measurements, we will keep the code simpler by using the main loop. So, we will use the semaphores to keep the main loop “blocked” while it is waiting for the next interrupt, leaving the CPU available for the scheduler to execute other tasks. So, between measurements, it doesn’t make sense to leave the main loop active, wasting precious CPU time. We will use an interval of 10 seconds between each measurement, which is a lot of time when we think about machine instructions and clock frequencies. So, the interrupts will only be responsible for signaling the Arduino main loop when its time to get a new measurement. Note however that interrupt handling functions should run as fast as possible, so we should not communicate with the DHT22 inside those functions. Nonetheless, instead of relying on polling or Arduino delays, we will use the timer interrupts to implement the periodicity of the measurements. In terms of implementation, our code will periodically read measurements from the DHT22 sensor. As shown in that tutorial, we will take advantage of the FreeRTOS semaphores to achieve such synchronization. So later, in the coding section, we are going to be configuring the timer interrupt by setting the counter value at which the interrupt should be triggered.įor a tutorial that introduces the synchronization between a task and an Interrupt service Routine, please check here.
Geting semaphor value 64 Bit#
One important thing to remember about the ESP32 timers is that they are implemented with 64 bit counters and 16 bit prescalers. It explains in detail the timer concepts, which will be important to understand the code below.
Geting semaphor value how to#
Please check this tutorial which explains how to install it and also how to wire the ESP32 to the DHT22.įor an introduction on the ESP32 timers, please check this previous post. In order to interact with the DHT22 from the ESP32, we will need an auxiliary library. In this tutorial we will check how to obtain temperature measurements from a DHT22 sensor using the ESP32, the Arduino core and timer interrupts. In this tutorial we will check how to obtain temperature measurements from a DHT22 sesnor using the ESP32, the Arduino core and timer interrupts. The tests were performed using a DFRobot’s ESP32 module integrated in a ESP32 development board, and a DFRobot DHT22 module.
0 notes
Text
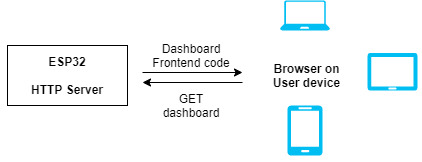
ESP32: Dynamic sensor network
ESP32: Dynamic sensor network
Introduction
In this tutorial we are going to learn how to build a dynamic sensor network that can be monitored through a web-based real-time dashboard. We will be using the ESP32 to implement the nodes of the sensor network and the Arduino core to program them. For exemplification purposes we will be using temperature sensors, but the architecture of the network fits other sensor types with…
View On WordPress
#Arduino#C++#DHT22#ESP32#HTTP#Internet of Things#IP address#mDNS#platformio#real-time dashboard#sensor network#Server#Temperature sensor#websockets#WiFi
6 notes
·
View notes
Photo

* 🇧🇷 Servidor Web com Walduininho V2 , ProgESP 01, Rele Board e DHT 22. Medindo a temperatura e a umidade ambiente . Em breve vídeo completo -------------‐------------ youtube.com/ProjetosEletronicos -------------------------- 🇺🇸 Web server with Walduininho V2 , ProgESP 01, Rele Board and DHT 22. Measuring temperature and ambient humidity. Soon full video -------------------------- #walduininho #progesp #releboard2 #dht22 #servidor #web #arduino #arduinouno #arduinonano #internet #iot #servidor #kit #hardware #desenvolvimento #walproj #projetoseletronicos #projetosmaker (em Projetos Eletronicos) https://www.instagram.com/p/CDH2q3VDE7S/?igshid=11iomftes8p2l
#walduininho#progesp#releboard2#dht22#servidor#web#arduino#arduinouno#arduinonano#internet#iot#kit#hardware#desenvolvimento#walproj#projetoseletronicos#projetosmaker
1 note
·
View note
Text
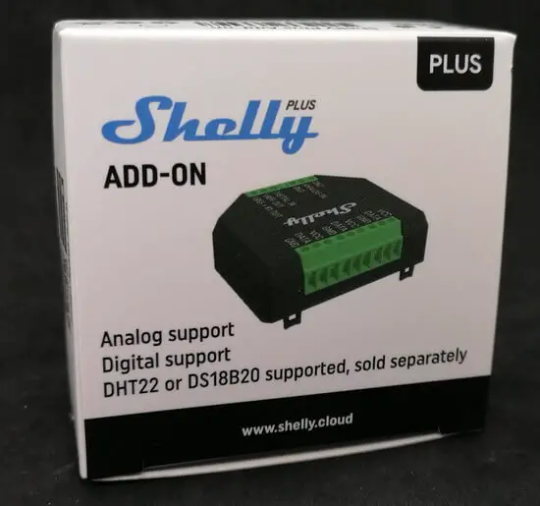
Shelly Plus #2: Shelly Plus AddOn

In diesem Beitrag möchte ich dir das Shelly Plus AddOn vorstellen und zeigen wie du an diesen ein DHT22 Sensor anschließt.

Shelly Plus #2: Shelly Plus AddOn
Im Beitrag Shelly 1 #2 – Temperatursensor DS18B20 anschließen habe ich dir bereits für das Vorgängermodell dem Shelly 1 gezeigt, wie ein DHT22 Sensor angeschlossen und eingerichtet wird. Die Firma Shelly hat beim neuen Modell für die Plus Varianten einige nützliche Veränderungen einfließen lassen, welche ich dir hier gerne zeigen möchte.
Technische Daten des Shelly Plus AddOn
Nachfolgend die technischen Daten zu diesem Modul:
Unterstützte GeräteShelly Plus 1 / 1 PM, Shelly Plus 2PM, Shelly Plus i4/i4DCmaximale Stromaufnahme am GPIO10 mABetriebsspannung3,3 V (vom Shelly)Leistungsaufnahme< 0,5 W (ohne Sensor)Abmaße (L x B x H))42 mm x 37 mm x 15 mmGewicht105 gFarbeSchwarzTechnische Daten des Shelly Plus AddOn
Die hier aufgeführten technischen Daten habe ich von der offiziellen Seite https://www.shelly.cloud/de/products/product-overview/shelly-plus-add-on entnommen.
Vergleich mit dem Vorgängermodell
Zunächst möchte auf die Unterschiede zwischen den beiden Modellen eingehen. Das alte Model hat beim Shelly die Schraubklemmen verdeckt, dieses bedeute immer das bei einer Änderung an der Verkabelung das AddOn entfernt werden musste.
Dieses wurde beim neuen AddOn geändert und so gelangt man an die Schraubklemmen, auch wenn das Modul aufgesteckt ist. Des Weiteren sind die Kontakte nun mit vernünftigen Schraubklemmen und nicht mehr mit feinen Drähten.

An das alte Modell konntest du lediglich drei Sensoren vom Typ DS18B20, einen DHT22 oder einen Magnet-Sensor anschließen. Der neue hat hier deutlich zugelegt und kann sogar noch analoge Sensoren auswerten, aber dazu später mehr.
Bezug
Du bekommst den AddOn auf den gängigen Portalen, wo du Shelly Geräte kaufen kannst. Jedoch auch hier gehen die Preise sehr auseinander.
Hier jetzt eine kleine Auswahl von Shops, welche dieses Modell anbieten.
ShopPreisVersandkostenhttps://www.reichelt.de/16,95 €5,95 €https://www.berrybase.de/17,90 €3,95 €https://mysmartshop.de/17,85 €5,90 €https://shellyparts.de/17,78 €3,50 €eine kleine Auswahl von Shops welche den Shelly Plus AddOn anbieten
Natürlich findest du das neue AddOn auch auf ebay.de, dort jedoch zu deutlich höheren Preisen.
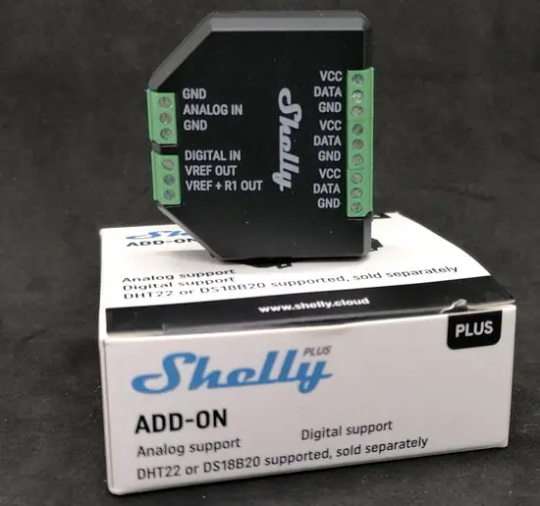
Aufbau des AddOn
Das AddOn hat auf der linken & rechten Seite Schraubklemmen, für welche du einen Schlitzschraubendreher der Größe 1,5 mm benötigst.
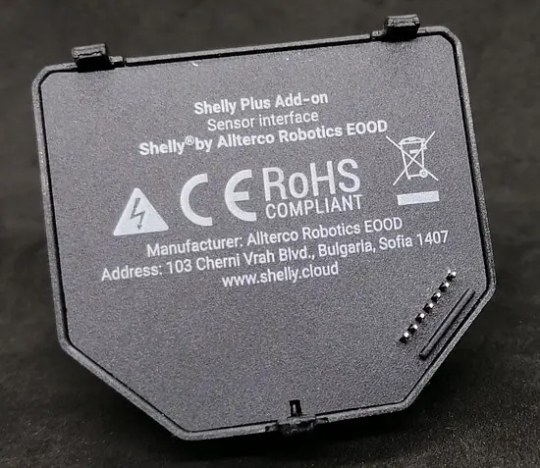
Auf der Rückseite befindet sich eine kleine Stiftleiste, welche in den Shelly Plus gesteckt wird.
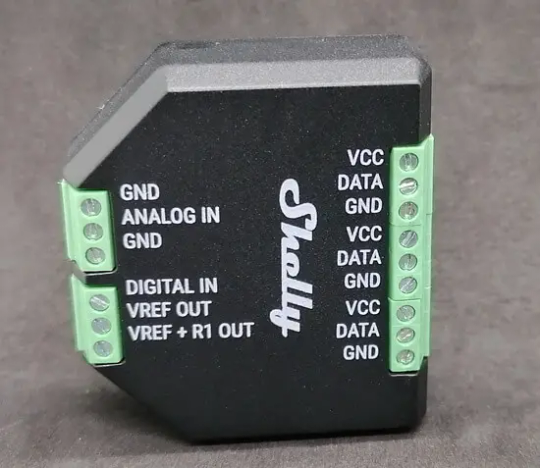
Mögliche Sensoren für das AddOn
Wie du auf den Bildern sehen kannst, besitzt das AddOn einen analogen sowie digitalen Eingang.
Du kannst an dieses AddOn nachfolgenden Sensoren anschließen:
- einen Magnet-Schalter,
- einen Fotowiderstand,
- ein Geräuschdetektor,
- ein Regensensor,
- einen Temperatursensor DS18B20,
- einen Bodenfeuchtesensor,
- einen DHT22 Sensor,
- einen PIR / Bewegungssensor,
- einen Ultraschall-Abstandssensor,
- usw.

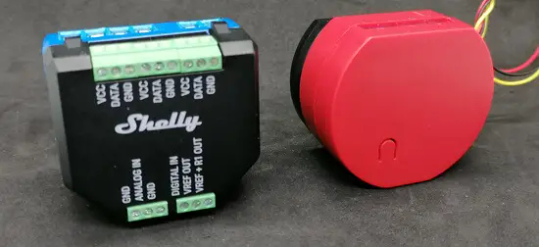
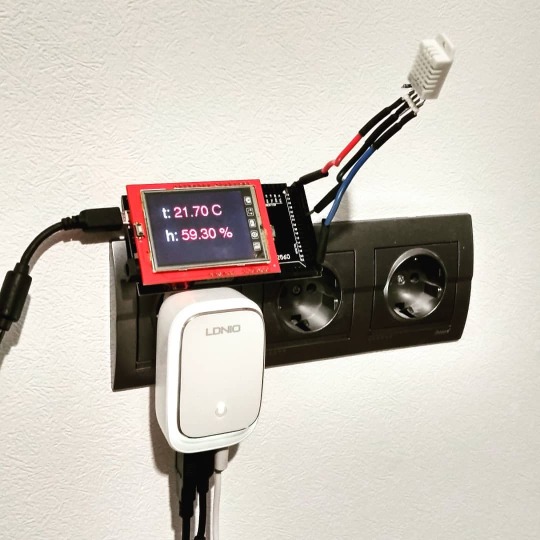
Anschluss eines DHT22 mit Shelly Plus AddOn an den Shelly Plus 1
Schließen wir zunächst einen einfachen DHT22 Sensor an das AddOn an und schauen uns an, wie dieses in der App eingerichtet wird.

Shelly Plus 1 mit AddOn & DHT22 Sensor
Wenn du bereits Erfahrungen mit dem Shelly hast, dann wirst du bereits wissen, dass ein Sensor sich fast selbständig in der Shelly App einrichtet.
https://youtu.be/-6hS4BTGP_0
Read the full article
0 notes
Photo

Low Cost Temperature and Humidity Estimator with Atmega8 Microcontroller
by M. Matsive Ali | MD. Rhineul Islam | Ashikur Rahman "Low Cost Temperature and Humidity Estimator with Atmega8 Microcontroller"
Published in International Journal of Trend in Scientific Research and Development (ijtsrd), ISSN: 2456-6470, Volume-5 | Issue-4 , June 2021,
URL: https://www.ijtsrd.compapers/ijtsrd41155.pdf
Paper URL: https://www.ijtsrd.comengineering/electrical-engineering/41155/low-cost-temperature-and-humidity-estimator-with-atmega8-microcontroller/m-matsive-ali
openaccessjournalofengineering, engineeringjournal, paperpublicationforengineering
This paper presents a efficient but also cost effective system to determine two parameters of the atmosphere, which are the temperature and humidity. The Digital Temperature and Humidity Sensor 22 DHT 22 is used to measure the temperature and humidity. The temperature measured is the ambient temperature of the atmosphere and humidity is the relative humidity of the atmosphere. The system is constructed with AVR atmega8 as a controller and a LCD liquid crystal display 16x2 display as a means to display the temperature and humidity. Through the Arduino IDE Integrated Development Environment code Is uploaded to the ATmega8. Also as the display is operated in 4 bit mode thus there are many pins of the ATmega8 which are available for other purposes and the system becomes compact. Thus the small device can be adjusted in different places for use. As it is using a ATmega8 it can be used to command various devices as temperature and humidity varies.
0 notes
Photo
@aelmaker #dht22 sensor is better than #dht11.🌡️ Stable, but you still need to average the data. What do you think? 😏 #arduinolove #arduinoide #arduinobrasil #arduinofun #arduinolover #arduinorobot #sensorselfie #sensors #arduinouno #arduinomega #arduinoprogramming #aelmaker (Wanchai Hongkong) https://www.instagram.com/p/CM6he5oLpr_/?igshid=1pqe087c8axo5
#dht22#dht11#arduinolove#arduinoide#arduinobrasil#arduinofun#arduinolover#arduinorobot#sensorselfie#sensors#arduinouno#arduinomega#arduinoprogramming#aelmaker
0 notes
Text
DHT11 Digital Temperature And Humidity Sensor is a basic and low-cost digital temperature and humidity sensor. This sensor is used for projects where accuracy and precision doesn't play big role. This comes in a blue perforated plastic enclosure. This has four pin. There is an upgraded version of the DHT11 temperature and humidity sensor available, which is DHT22 Sensor with higher sensing ranges.
The sensor uses a capacitive humidity sensor and a thermistor based temperature sensor to measure the ambient humidity and temperature. The humidity sensing ranges from 20% to 90% with ±5% accuracy and the temperature sensing ranges from 0 degrees to the 50 degrees Celsius with ±2°C accuracy. The sampling time of this sensor is 2 seconds almost. This Temperature and Humidity Sensor uses digital pins to communicate with the microcontroller unit and does not have any kind of analog pins.
2 notes
·
View notes
Text
DHT11 Temperature and Humidity Sensor

The DHT11 Digital Temperature And Humidity Sensor is a basic, ultra low-cost digital temperature and humidity sensor. It uses a capacitive humidity sensor and a thermistor to measure the surrounding air and spits out a digital signal on the data pin (no analog input pins needed).
Its fairly simple to use, but requires careful timing to grab data. The only real downside of this sensor is you can only get new data from it once every 2 seconds, so in your code please use sensor reading interval at 2 seconds or more. Compared to the DHT22, this sensor is less precise, less accurate and works in a smaller range of temperature/humidity.
But despite its disadvantages over DHT22, it is smaller and less expensive sensor for temperature and humidity measurement.
Note:
This package does not include Arduino board, you have to buy it separately.
Features:
Low power consumption.
Relative humidity and temperature measurement
All calibration, digital output
Excellent long-term stability
No additional components
Long distance signal transmission
Ultra-low power
4-pin package
Completely interchangeable
0 notes
Last Seen Blogs

wrathbite
The Bisexual Agenda

supplierjenitri
Untitled

saadzniber
Saad Zniber

vvvvanda-blog
"Im Not Sure What's Going On But I Dont Like It"

lionsmansworld
Untitled