#diyarts
Explore tagged Tumblr posts
Visit Tumblr Blog
Explore Tumblr blogs with no restrictions, modern design and the best experience.
Last Seen Tumblr Blogs


Fun Fact
Tumblr is available in 18 languages.
Link
🚨 ART LEVEL: BEGINNER 🚨
So you wanna draw, but your stick figures look like they've seen things? 👁️👄👁️
No worries, this guide’s got you. Learn how to teach yourself drawing without any “talent” required: https://www.diy.org/blogs/teach-yourself-drawing
You’ve got the imagination. Let’s give it a pencil. ✏️
10 notes
·
View notes
Text

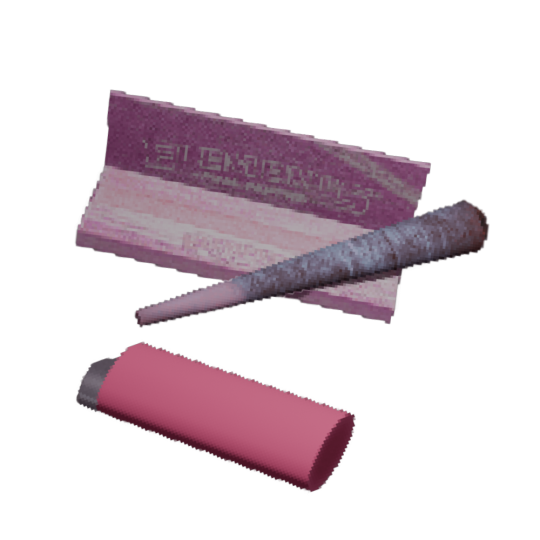
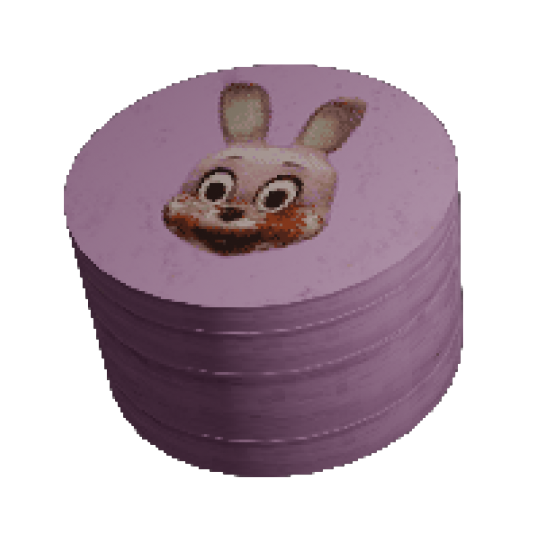
♫ Traversing the Portals of Reality - Akira Yamaoka ♫ 。⋆♡ Smoke Sesh With Robbie♡ ⋆。 ⟡ made in blender ⟡
#silenthill#sh3#robbietherabbit#blender3d#ps1horror#lowpoly#ps2aesthetic#retrohorror#horrorgaming#blenderart#diyart#stonergaming#smokeshop#gamingnostalgia#retrorender#ps1aesthetic#horrorart#darkart#gameart#vaporwave#liminalspace#weedlife#smoke session#pink aesthetic#truamacore#3d art#blender#420life
14 notes
·
View notes
Text
youtube
Cup drawing | Wall art | Satisfying Drawing using objects and mandala art https://youtu.be/jyLNuMxYmgg
#CupDrawing #WallArt #SatisfyingDrawing #MandalaArt #DIYArt #ArtTherapy #RelaxingArt #thesketcher #howto #art #artist #sketch #sketching #mandalaart #trending #viral #insta #instagramreels #fb #Youtube
#Cup drawing | Wall art | Satisfying Drawing using objects and mandala art#https://youtu.be/jyLNuMxYmgg#CupDrawing#WallArt#SatisfyingDrawing#MandalaArt#DIYArt#ArtTherapy#RelaxingArt#thesketcher#howto#art#artist#sketch#sketching#mandalaart#trending#viral#insta#instagramreels#fb#Youtube#draw#drawing#love#design#howtodraw
3 notes
·
View notes
Text
Check out my song "Forbidden Fruit" that I dropped on Souncloud almost two months ago. It's giving Pussycat Dolls and Britney Spears "In the Zone" vibes. This delicious fruit is ripe and ready to be eaten. 😜🍏
https://on.soundcloud.com/gVhpA
2 notes
·
View notes
Text
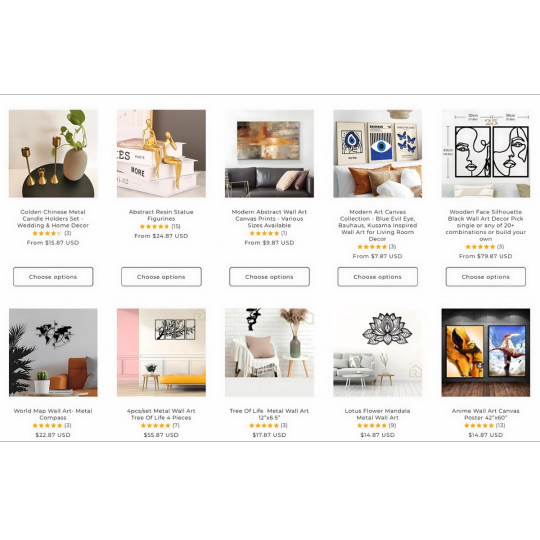
Elevate Your Home Decor with DIY Framing: A Fun and Cost-Effective Solution
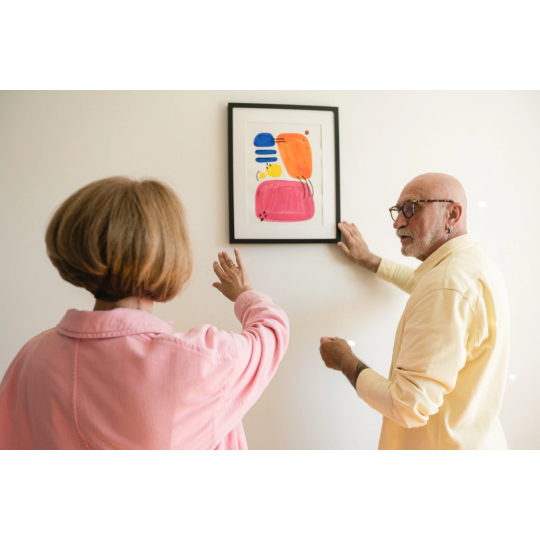
Decorating your home is an exciting journey, but it often comes with challenges such as limited selection and high prices. At Rooh Dynamics, we aim to make this process easier and more enjoyable for you. One of the ways we do this is by offering unframed canvas art, allowing you to frame them yourself. This not only saves you money but also gives you the opportunity to engage in a fun DIY project. Here’s how you can make the most of this unique offering.

The Benefits of Unframed Canvas Art
Cost Savings: Framing can significantly increase the cost of artwork. By purchasing unframed canvas art, you can save a substantial amount of money. Custom framing services can be expensive, often costing hundreds of dollars. By opting for unframed art, you can allocate your budget towards other decor items or even more art pieces.
Creative Control: Unframed canvas art gives you complete creative freedom. You can choose a frame that perfectly matches your decor style, whether it’s modern, rustic, or classic. This level of customization allows you to create a cohesive look throughout your home.
DIY Fun: Framing your own canvas art can be a rewarding DIY project. It’s a great way to spend a weekend afternoon, especially when paired with a glass of wine. Not only will you have a beautiful piece of art to display, but you’ll also have the satisfaction of knowing you created it yourself.
How to Frame Your Own Canvas Art
Framing your own canvas art is simpler than you might think. Here’s a step-by-step guide to get you started:
Materials Needed:• Wooden frame pieces (available at most craft stores) • Wood glue • Nails or screws • Hammer or screwdriver • Stain or paint (optional) • Hanging hardware
Steps:1. Measure Your Canvas: Determine the dimensions of your canvas to ensure your frame pieces are the correct size. 2. Assemble the Frame: Use wood glue to attach the frame pieces together. Reinforce the corners with nails or screws for added stability. 3. Finish the Frame: Apply a coat of stain or paint to match your decor. Allow it to dry completely. 4. Attach the Canvas: Place your canvas into the frame and secure it with nails or screws. Make sure it’s centered and taut. 5. Add Hanging Hardware: Attach the necessary hardware to the back of the frame for easy hanging.
Upcoming Offerings at Rooh Dynamics

We understand that not everyone has the time or inclination to find expansive local frames for their canvas. That’s why we’re excited to announce that we’ll soon be offering a selection of high-quality frames. This will allow you to purchase frames along with your art, giving you the convenience of having everything you need for your DIY project in one place. You’ll still get the joy and satisfaction of framing your art yourself, with the added benefit of our specially curated frames.
Why Choose Rooh Dynamics?
At Rooh Dynamics, we are committed to providing you with a diverse range of stylish and high-quality home decor products. Our process of adding new items is meticulous and time-consuming, as we carefully vet each supplier to ensure they meet our high standards of quality and customer service. This ensures that every piece you purchase from us is not only beautiful but also reliable.
Conclusion
Decorating your home should be a joyful experience, not a stressful one. By offering unframed canvas art, Rooh Dynamics provides you with a cost-effective and creative way to enhance your living space. Whether you decide to frame the art yourself or take advantage of our upcoming framing options, you can be sure that you’re getting high-quality products at great prices. Visit our decor collection today and start creating a home that truly reflects your style and personality.
Remember, nothing looks better on a wall than something you’ve had a hand in creating. So grab a canvas, a frame, and maybe a glass of wine, and enjoy the process of making your house a home.
#HomeDecor#InteriorDesign#HomeStyling#DecorInspo#DecorIdeas#HomeDecorTips#HomeInspiration#InteriorStyling#InteriorInspo#DecoratingTips#DIYHomeDecor#DIYProjects#DIYFraming#FrameItYourself#DIYArt#CraftYourHome#HomemadeDecor#FramingIdeas#DIYDecor#DIYArtProjects#CanvasArt#WallArt#ArtLovers#UnframedArt#CanvasPrints#ArtDecor#AffordableArt#ArtCollection#ArtInspo#ArtForHome
1 note
·
View note
Text

I Did What Now?! Embarking on a Blogging Odyssey
Welcome to the wild ride of Sustainable Living & Creative Exploration—where we get our hands dirty, spill the tea on culture, doodle outside the lines, and laugh our way to health. Here's to living creatively, eating well, and painting our way to happiness, one plant at a time! 🌱✨
#SustainableLiving#CreativeExploration#GardenToTable#CulturalChronicles#ArtisticAdventures#HealthHorizons#HomeGrown#FoodieJourney#ArtEveryday#LifeInColor#EpicureanExcursions#DIYArt#HealthyLiving#EcoFriendly#PlantLove#food critic#movie reviews#movies#book reviews#reviews#restaurants#writers on tumblr#about the blogger#blog#blogger#bloggerlife#bloggerscommunity#bloggersl#blogging#book blog
1 note
·
View note
Text
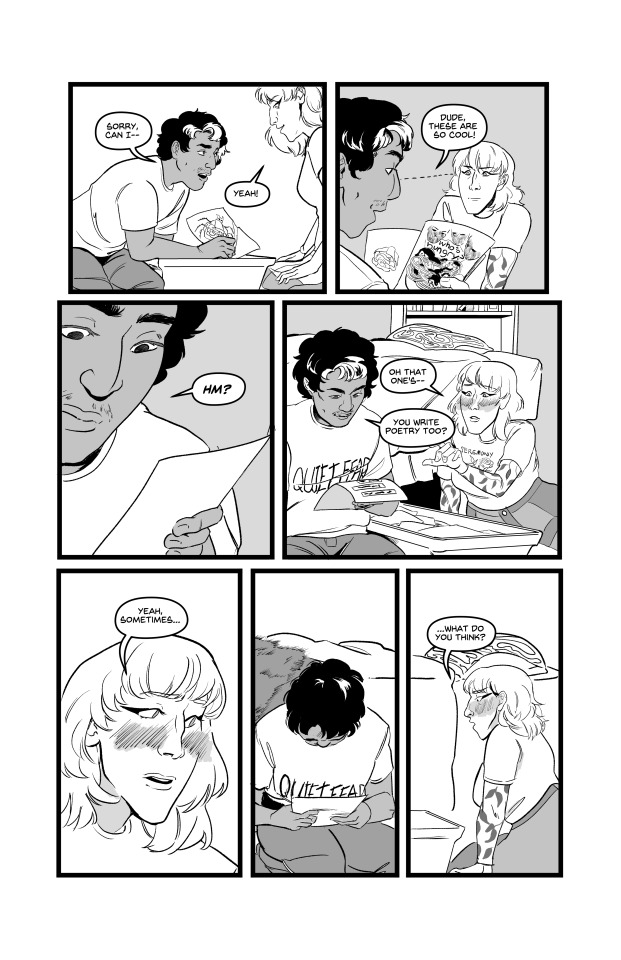
#webcomic#comics#crash coral#black and white comics#diypunk#collage#poetry#diyart#quiet fear#ceremony
4 notes
·
View notes
Text
youtube
🖋️ From Scribbles to Masterpieces: The Pen Star Maker's Journey
🌟 Join me on an artistic odyssey where ordinary pens are transformed into instruments of creativity!
✨ In this captivating video, witness the incredible journey of the Pen Star Maker as we explore the magical transformation of simple scribbles into mesmerizing masterpieces.
🚀
🔹 Discover the Artistry: Dive into the world of pen artistry as we showcase the meticulous techniques and tools that bring life to our creations.
🔹 Unlock Creative Secrets: Learn the insider tips and tricks that turn a blank canvas into a work of art, empowering you to embark on your own creative journey.
🔹 Coding Craftsmanship: Behind every stroke of the pen lies hours of dedicated coding in Scratch. I poured my heart and soul into crafting a code that breathes life into each design, making this journey truly one of a kind.
🔹 Inspiration Galore: Be inspired by a dazzling array of our finest pen creations, each a testament to the power of imagination, perseverance, and the artistry of coding.
Are you ready to embark on this artistic adventure? Click play and let's transform scribbles into masterpieces together!
🌠 Don't forget to like, share, and subscribe for more inspiring content.
#PenArt#ArtisticCoding#PenCrafting#DIYArt#CreativeProcess#PenDesign#ArtisticInspiration#DigitalArt#CodeArt#CraftingMasterpieces#ScribbleArt#PenDrawing#ArtisticJourney#VisualCreativity#PenCraftsmanship#CodingMagic#DigitalCreativity#ArtisticTechniques#ArtisticExpression#ScratchProgramming#PenStarMaker#Masterpiece#Artistry#CreativeJourney#PenCraft#ArtisticCode#DIYCrafts#DigitalCreation#PenIllustration#Innovation
3 notes
·
View notes
Text

Show your strength and love with this fierce ninja-themed Valentine tumbler wrap! Perfect for personalized gifts, featuring inspiring warrior hearts and ready for sublimation. Download now! #WahGwanDigi #Tumbler Design #Cupid Sublimation #Skinny Tumbler Wrap #Digital Download #DIY Tumbler Art #20oz Tumbler Graphic #Valentines Day #Love Hearts Print #Drinkware Decoration #Instant File #Print at Home #Sublimation Design #Romantic Gift Idea https://www.pinterest.com/pin/1080019554398535864/?utm_source=dlvr.it&utm_medium=tumblr
0 notes
Video
youtube
Update On Projects & Art Shows
#youtube#inspiration#artinspiration#artideas#diy#diyart#needlefelting#boro#borosashikohat#handsewhat
0 notes
Text
Learn Origami from Scratch
Explore the peaceful and creative world of origami with the Origami: Beginner to Advanced course on EasyShiksha. This hands-on course guides you through traditional and modern folding techniques—perfect for anyone looking to build patience, focus, and artistic flair. Whether you're a beginner or looking to refine your skills, this course offers something for every paper craft enthusiast.
1 note
·
View note
Text
DIY Paper Egg Craft: A Mozaic Studio How-To with Cakewalk Flair

Spring’s blooming, and I’ve got a craft that’s pure Mozaic magic with a sprinkle of Cakewalk’s DIY charm—3D paper eggs! These come together with just 6 shapes, a few folds, and some glue—easy enough for a quick win, artsy enough to hang or scatter. Go all-solid or mix solids and patterns for a playful twist. Let’s dive in!
Materials
Egg Template: Download the print sheet. Or grab the Cricut PNGs.
Colored Cardstock: Spring shades—lavender, yellow, green (1 sheet per egg);
Patterned Paper: Optional—floral, dots, stripes;
Glue: Glue stick or craft glue;
Scissors: For hand-cutting;
String: Optional—twine or ribbon for hanging.

Directions
Step 1: Cut Your Shapes
Print the Cakewalk template sheet on colored cardstock and cut out the 6 egg shapes per egg. For all-solid eggs, use one color (e.g., 6 yellow). For alternating sides, cut 3 solid shapes (e.g., yellow) and 3 patterned shapes (e.g., floral) per egg—mix it up!
Cricut Option: Upload the PNG, set to cut 6 shapes (3 solid, 3 patterned if alternating)—load your papers and go.

Step 2: Fold ‘Em Up
Fold each of your 6 shapes in half vertically with a sharp crease firm. These are your egg’s building blocks.

Step 3: Group and Plan
Split your 6 folded shapes into 2 groups of 3:
All-Solid: 3 solid shapes per group (e.g., all yellow).
Alternating Sides:
Group A = 1 solid + 2 patterned (e.g., 1 yellow + 2 floral);
Group B = 2 solid + 1 patterned (e.g., 2 yellow + 1 floral).
Number them mentally:
Group A (#1, #2, #3)
Group B (#4, #5, #6).

Step 4: Glue the First Half
Take Group A:
Glue the right side of #3 to the right side of #1.
Glue the left side of #2 to the left side of #1.
You’ve got a 3-piece half—#1 on the bottom, #2 on the left and #3 on the right. Set it aside.

Step 5: Glue the Second Half
Take Group B:
Start with #4 (patterned if alternating; make sure the patterned side is face down)—glue the right side of #6 to the right side of #4.
Glue the left side of #5 to the left side of #4.
Now you’ve got #4 (patterned, back side) on the bottom with #5 (solid) on the left and #6 (solid) on the right—the opposite of the first half.
Step 6: Assemble the Egg
Glue the two halves together back to back:
Right side of #2 to right side of #6.
Left side of #3 to left side of #5.
Press firm—your egg’s now 3D, with alternating solid/pattern sides if you mixed it up!


Step 7 (Optional): Add a Hanging Loop
Before gluing the halves, slip a 6-8 inch string loop into one half’s top crease—glue it in, then finish Step 6. Hang and admire!

Wrap-Up
These eggs are easy to vary—6 shapes, endless charm! Keep ‘em solid or alternate patterns. Pair with Cakewalk’s Easter Ears printable (mozaicstudio.com) for extra spring fun. Tag me @mozaicstudioart—I want see your combos!
0 notes
Text
Cup drawing | Wall art | Satisfying Drawing using objects and mandala art https://youtu.be/jyLNuMxYmgg
#CupDrawing #WallArt #SatisfyingDrawing #MandalaArt #DIYArt #ArtTherapy #RelaxingArt #thesketcher #howto #art #artist #sketch #sketching #mandalaart #trending #viral #insta #instagramreels #fb #Youtube
#Cup drawing | Wall art | Satisfying Drawing using objects and mandala art#https://youtu.be/jyLNuMxYmgg#CupDrawing#WallArt#SatisfyingDrawing#MandalaArt#DIYArt#ArtTherapy#RelaxingArt#thesketcher#howto#art#artist#sketch#sketching#mandalaart#trending#viral#insta#instagramreels#fb#Youtube#drawing#howtodraw#draw#love#design
3 notes
·
View notes
Text

✨ Felt Elf, The Lucky Doll 🍀 🧵Every stitch and smile on a felt elf carries a bit of magic, making them the perfect charm for warmth and joy. 🧸🎨 "Carry a lucky elf wherever you go—because magic loves company." ✨
#iivovii#FeltElf#LuckyCharm#HandmadeDolls#CraftingMagic#CozyVibes#DIYArt#WhimsicalCreatures#HolidayDecor#SoftSculptures#CuteAesthetic
0 notes