#docker disk space
Explore tagged Tumblr posts
Visit Tumblr Blog
Explore Tumblr blogs with no restrictions, modern design and the best experience.
Last Seen Tumblr Blogs


Fun Fact
China blocked Tumblr because of pornography and censorship problems in 2013.
Text
Docker Overlay2 Cleanup: 5 Ways to Reclaim Disk Space
Docker Overlay2 Cleanup: 5 Ways to Reclaim Disk Space #DockerOverlay2Cleanup #DiskSpaceManagement #DockerContainerStorage #OptimizeDockerPerformance #ReduceDockerDiskUsage #DockerSystemPrune #DockerImageCleanup #DockerVolumeManagement #virtualizationhowto
If you are running Docker containers on a Docker container host, you may have seen issues with disk space. Docker Overlay2 can become a disk space hog if not managed efficiently. This post examines six effective methods for Docker Overlay2 cleanup to reclaim space on your Docker host. Table of contentsDisk space issues on a Docker hostWhat is the Overlay file system?Filesystem layers…
View On WordPress
0 notes
Link
#Automation#cloud#configuration#Dashboard#energymonitoring#HomeAssistant#homesecurity#Install#Integration#IoT#Linux#MQTT#open-source#operatingsystem#RaspberryPi#self-hosted#sensors#smarthome#systemadministration#Z-Wave#Zigbee
0 notes
Text
Postal SMTP install and setup on a virtual server

Postal is a full suite for mail delivery with robust features suited for running a bulk email sending SMTP server. Postal is open source and free. Some of its features are: - UI for maintaining different aspects of your mail server - Runs on containers, hence allows for up and down horizontal scaling - Email security features such as spam and antivirus - IP pools to help you maintain a good sending reputation by sending via multiple IPs - Multitenant support - multiple users, domains and organizations - Monitoring queue for outgoing and incoming mail - Built in DNS setup and monitoring to ensure mail domains are set up correctly List of full postal features
Possible cloud providers to use with Postal
You can use Postal with any VPS or Linux server providers of your choice, however here are some we recommend: Vultr Cloud (Get free $300 credit) - In case your SMTP port is blocked, you can contact Vultr support, and they will open it for you after providing a personal identification method. DigitalOcean (Get free $200 Credit) - You will also need to contact DigitalOcean support for SMTP port to be open for you. Hetzner ( Get free €20) - SMTP port is open for most accounts, if yours isn't, contact the Hetzner support and request for it to be unblocked for you Contabo (Cheapest VPS) - Contabo doesn't block SMTP ports. In case you are unable to send mail, contact support. Interserver
Postal Minimum requirements
- At least 4GB of RAM - At least 2 CPU cores - At least 25GB disk space - You can use docker or any Container runtime app. Ensure Docker Compose plugin is also installed. - Port 25 outbound should be open (A lot of cloud providers block it)
Postal Installation
Should be installed on its own server, meaning, no other items should be running on the server. A fresh server install is recommended. Broad overview of the installation procedure - Install Docker and the other needed apps - Configuration of postal and add DNS entries - Start Postal - Make your first user - Login to the web interface to create virtual mail servers Step by step install Postal Step 1 : Install docker and additional system utilities In this guide, I will use Debian 12 . Feel free to follow along with Ubuntu. The OS to be used does not matter, provided you can install docker or any docker alternative for running container images. Commands for installing Docker on Debian 12 (Read the comments to understand what each command does): #Uninstall any previously installed conflicting software . If you have none of them installed it's ok for pkg in docker.io docker-doc docker-compose podman-docker containerd runc; do sudo apt-get remove $pkg; done #Add Docker's official GPG key: sudo apt-get update sudo apt-get install ca-certificates curl -y sudo install -m 0755 -d /etc/apt/keyrings sudo curl -fsSL https://download.docker.com/linux/debian/gpg -o /etc/apt/keyrings/docker.asc sudo chmod a+r /etc/apt/keyrings/docker.asc #Add the Docker repository to Apt sources: echo "deb https://download.docker.com/linux/debian $(. /etc/os-release && echo "$VERSION_CODENAME") stable" | sudo tee /etc/apt/sources.list.d/docker.list > /dev/null sudo apt-get update #Install the docker packages sudo apt-get install docker-ce docker-ce-cli containerd.io docker-buildx-plugin docker-compose-plugin -y #You can verify that the installation is successful by running the hello-world image sudo docker run hello-world Add the current user to the docker group so that you don't have to use sudo when not logged in as the root user. ##Add your current user to the docker group. sudo usermod -aG docker $USER #Reboot the server sudo reboot Finally test if you can run docker without sudo ##Test that you don't need sudo to run docker docker run hello-world Step 2 : Get the postal installation helper repository The Postal installation helper has all the docker compose files and the important bootstrapping tools needed for generating configuration files. Install various needed tools #Install additional system utlities apt install git vim htop curl jq -y Then clone the helper repository. sudo git clone https://github.com/postalserver/install /opt/postal/install sudo ln -s /opt/postal/install/bin/postal /usr/bin/postal Step 3 : Install MariaDB database Here is a sample MariaDB container from the postal docs. But you can use the docker compose file below it. docker run -d --name postal-mariadb -p 127.0.0.1:3306:3306 --restart always -e MARIADB_DATABASE=postal -e MARIADB_ROOT_PASSWORD=postal mariadb Here is a tested mariadb compose file to run a secure MariaDB 11.4 container. You can change the version to any image you prefer. vi docker-compose.yaml services: mariadb: image: mariadb:11.4 container_name: postal-mariadb restart: unless-stopped environment: MYSQL_ROOT_PASSWORD: ${DB_ROOT_PASSWORD} volumes: - mariadb_data:/var/lib/mysql network_mode: host # Set to use the host's network mode security_opt: - no-new-privileges:true read_only: true tmpfs: - /tmp - /run/mysqld healthcheck: test: interval: 30s timeout: 10s retries: 5 volumes: mariadb_data: You need to create an environment file with the Database password . To simplify things, postal will use the root user to access the Database.env file example is below. Place it in the same location as the compose file. DB_ROOT_PASSWORD=ExtremelyStrongPasswordHere Run docker compose up -d and ensure the database is healthy. Step 4 : Bootstrap the domain for your Postal web interface & Database configs First add DNS records for your postal domain. The most significant records at this stage are the A and/or AAAA records. This is the domain where you'll be accessing the postal UI and for simplicity will also act as the SMTP server. If using Cloudflare, turn off the Cloudflare proxy. sudo postal bootstrap postal.yourdomain.com The above will generate three files in /opt/postal/config. - postal.yml is the main postal configuration file - signing.key is the private key used to sign various things in Postal - Caddyfile is the configuration for the Caddy web server Open /opt/postal/config/postal.yml and add all the values for DB and other settings. Go through the file and see what else you can edit. At the very least, enter the correct DB details for postal message_db and main_db. Step 5 : Initialize the Postal database and create an admin user postal initialize postal make-user If everything goes well with postal initialize, then celebrate. This is the part where you may face some issues due to DB connection failures. Step 6 : Start running postal # run postal postal start #checking postal status postal status # If you make any config changes in future you can restart postal like so # postal restart Step 7 : Proxy for web traffic To handle web traffic and ensure TLS termination you can use any proxy server of your choice, nginx, traefik , caddy etc. Based on Postal documentation, the following will start up caddy. You can use the compose file below it. Caddy is easy to use and does a lot for you out of the box. Ensure your A records are pointing to your server before running Caddy. docker run -d --name postal-caddy --restart always --network host -v /opt/postal/config/Caddyfile:/etc/caddy/Caddyfile -v /opt/postal/caddy-data:/data caddy Here is a compose file you can use instead of the above docker run command. Name it something like caddy-compose.yaml services: postal-caddy: image: caddy container_name: postal-caddy restart: always network_mode: host volumes: - /opt/postal/config/Caddyfile:/etc/caddy/Caddyfile - /opt/postal/caddy-data:/data You can run it by doing docker compose -f caddy-compose.yaml up -d Now it's time to go to the browser and login. Use the domain, bootstrapped earlier. Add an organization, create server and add a domain. This is done via the UI and it is very straight forward. For every domain you add, ensure to add the DNS records you are provided.
Enable IP Pools
One of the reasons why Postal is great for bulk email sending, is because it allows for sending emails using multiple IPs in a round-robin fashion. Pre-requisites - Ensure the IPs you want to add as part of the pool, are already added to your VPS/server. Every cloud provider has a documentation for adding additional IPs, make sure you follow their guide to add all the IPs to the network. When you run ip a , you should see the IP addresses you intend to use in the pool. Enabling IP pools in the Postal config First step is to enable IP pools settings in the postal configuration, then restart postal. Add the following configuration in the postal.yaml (/opt/postal/config/postal.yml) file to enable pools. If the section postal: , exists, then just add use_ip_pools: true under it. postal: use_ip_pools: true Then restart postal. postal stop && postal start The next step is to go to the postal interface on your browser. A new IP pools link is now visible at the top right corner of your postal dashboard. You can use the IP pools link to add a pool, then assign IP addresses in the pools. A pool could be something like marketing, transactions, billing, general etc. Once the pools are created and IPs assigned to them, you can attach a pool to an organization. This organization can now use the provided IP addresses to send emails. Open up an organization and assign a pool to it. Organizations → choose IPs → choose pools . You can then assign the IP pool to servers from the server's Settings page. You can also use the IP pool to configure IP rules for the organization or server. At any point, if you are lost, look at the Postal documentation. Read the full article
0 notes
Text
Installing Jekins
In this blog I will guide you on installing Jenkins on ubunutu machine. Prerequisites 256MB of RAM 1 GB of Disk space (10GB recommended for running as Docker container) Download the jenkins keyring and store the file in “/usr/share/keyrings/jenkins-keyring.asc” file sudo wget -O /usr/share/keyrings/jenkins-keyring.asc https://pkg.jenkins.io/debian-stable/ jenkins.io-2023.key Enter fullscreen…

View On WordPress
0 notes
Text
How to Train and Use Hunyuan Video LoRA Models
New Post has been published on https://thedigitalinsider.com/how-to-train-and-use-hunyuan-video-lora-models/
How to Train and Use Hunyuan Video LoRA Models
This article will show you how to install and use Windows-based software that can train Hunyuan video LoRA models, allowing the user to generate custom personalities in the Hunyuan Video foundation model:
Click to play. Examples from the recent explosion of celebrity Hunyuan LoRAs from the civit.ai community.
At the moment the two most popular ways of generating Hunyuan LoRA models locally are:
1) The diffusion-pipe-ui Docker-based framework, which relies on Windows Subsystem for Linux (WSL) to handle some of the processes.
2) Musubi Tuner, a new addition to the popular Kohya ss diffusion training architecture. Musubi Tuner does not require Docker and does not depend on WSL or other Linux-based proxies – but it can be difficult to get running on Windows.
Therefore this run-through will focus on Musubi Tuner, and on providing a completely local solution for Hunyuan LoRA training and generation, without the use of API-driven websites or commercial GPU-renting processes such as Runpod.
Click to play. Samples from LoRA training on Musubi Tuner for this article. All permissions granted by the person depicted, for the purposes of illustrating this article.
REQUIREMENTS
The installation will require at minimum a Windows 10 PC with a 30+/40+ series NVIDIA card that has at least 12GB of VRAM (though 16GB is recommended). The installation used for this article was tested on a machine with 64GB of system RAM and a NVIDIA 3090 graphics cards with 24GB of VRAM. It was tested on a dedicated test-bed system using a fresh install of Windows 10 Professional, on a partition with 600+GB of spare disk space.
WARNING
Installing Musubi Tuner and its prerequisites also entails the installation of developer-focused software and packages directly onto the main Windows installation of a PC. Taking the installation of ComfyUI into account, for the end stages, this project will require around 400-500 gigabytes of disk space. Though I have tested the procedure without incident several times in newly-installed test bed Windows 10 environments, neither I nor unite.ai are liable for any damage to systems from following these instructions. I advise you to back up any important data before attempting this kind of installation procedure.
Considerations
Is This Method Still Valid?
The generative AI scene is moving very fast, and we can expect better and more streamlined methods of Hunyuan Video LoRA frameworks this year.
…or even this week! While I was writing this article, the developer of Kohya/Musubi produced musubi-tuner-gui, a sophisticated Gradio GUI for Musubi Tuner:
Obviously a user-friendly GUI is preferable to the BAT files that I use in this feature – once musubi-tuner-gui is working. As I write, it only went online five days ago, and I can find no account of anyone successfully using it.
According to posts in the repository, the new GUI is intended to be rolled directly into the Musubi Tuner project as soon as possible, which will end its current existence as a standalone GitHub repository.
Based on the present installation instructions, the new GUI gets cloned directly into the existing Musubi virtual environment; and, despite many efforts, I cannot get it to associate with the existing Musubi installation. This means that when it runs, it will find that it has no engine!
Once the GUI is integrated into Musubi Tuner, issues of this kind will surely be resolved. Though the author concedes that the new project is ‘really rough’, he is optimistic for its development and integration directly into Musubi Tuner.
Given these issues (also concerning default paths at install-time, and the use of the UV Python package, which complicates certain procedures in the new release), we will probably have to wait a little for a smoother Hunyuan Video LoRA training experience. That said, it looks very promising!
But if you can’t wait, and are willing to roll your sleeves up a bit, you can get Hunyuan video LoRA training running locally right now.
Let’s get started.
Why Install Anything on Bare Metal?
(Skip this paragraph if you’re not an advanced user) Advanced users will wonder why I have chosen to install so much of the software on the bare metal Windows 10 installation instead of in a virtual environment. The reason is that the essential Windows port of the Linux-based Triton package is far more difficult to get working in a virtual environment. All the other bare-metal installations in the tutorial could not be installed in a virtual environment, as they must interface directly with local hardware.
Installing Prerequisite Packages and Programs
For the programs and packages that must be initially installed, the order of installation matters. Let’s get started.
1: Download Microsoft Redistributable
Download and install the Microsoft Redistributable package from https://aka.ms/vs/17/release/vc_redist.x64.exe.
This is a straightforward and rapid installation.
2: Install Visual Studio 2022
Download the Microsoft Visual Studio 2022 Community edition from https://visualstudio.microsoft.com/downloads/?cid=learn-onpage-download-install-visual-studio-page-cta
Start the downloaded installer:
We don’t need every available package, which would be a heavy and lengthy install. At the initial Workloads page that opens, tick Desktop Development with C++ (see image below).
Now click the Individual Components tab at the top-left of the interface and use the search box to find ‘Windows SDK’.
By default, only the Windows 11 SDK is ticked. If you are on Windows 10 (this installation procedure has not been tested by me on Windows 11), tick the latest Windows 10 version, indicated in the image above.
Search for ‘C++ CMake’ and check that C++ CMake tools for Windows is checked.
This installation will take at least 13 GB of space.
Once Visual Studio has installed, it will attempt to run on your computer. Let it open fully. When the Visual Studio’s full-screen interface is finally visible, close the program.
3: Install Visual Studio 2019
Some of the subsequent packages for Musubi are expecting an older version of Microsoft Visual Studio, while others need a more recent one.
Therefore also download the free Community edition of Visual Studio 19 either from Microsoft (https://visualstudio.microsoft.com/vs/older-downloads/ – account required) or Techspot (https://www.techspot.com/downloads/7241-visual-studio-2019.html).
Install it with the same options as for Visual Studio 2022 (see procedure above, except that Windows SDK is already ticked in the Visual Studio 2019 installer).
You’ll see that the Visual Studio 2019 installer is already aware of the newer version as it installs:
When installation is complete, and you have opened and closed the installed Visual Studio 2019 application, open a Windows command prompt (Type CMD in Start Search) and type in and enter:
where cl
The result should be the known locations of the two installed Visual Studio editions.
If you instead get INFO: Could not find files for the given pattern(s), see the Check Path section of this article below, and use those instructions to add the relevant Visual Studio paths to Windows environment.
Save any changes made according to the Check Paths section below, and then try the where cl command again.
4: Install CUDA 11 + 12 Toolkits
The various packages installed in Musubi need different versions of NVIDIA CUDA, which accelerates and optimizes training on NVIDIA graphics cards.
The reason we installed the Visual Studio versions first is that the NVIDIA CUDA installers search for and integrate with any existing Visual Studio installations.
Download an 11+ series CUDA installation package from:
https://developer.nvidia.com/cuda-11-8-0-download-archive?target_os=Windows&target_arch=x86_64&target_version=11&target_type=exe_local (download ‘exe (local’) )
Download a 12+ series CUDA Toolkit installation package from:
https://developer.nvidia.com/cuda-downloads?target_os=Windows&target_arch=x86_64
The installation process is identical for both installers. Ignore any warnings about the existence or non-existence of installation paths in Windows Environment variables – we are going to attend to this manually later.
Install NVIDIA CUDA Toolkit V11+
Start the installer for the 11+ series CUDA Toolkit.
At Installation Options, choose Custom (Advanced) and proceed.
Uncheck the NVIDIA GeForce Experience option and click Next.
Leave Select Installation Location at defaults (this is important):
Click Next and let the installation conclude.
Ignore any warning or notes that the installer gives about Nsight Visual Studio integration, which is not needed for our use case.
Install NVIDIA CUDA Toolkit V12+
Repeat the entire process for the separate 12+ NVIDIA Toolkit installer that you downloaded:
The install process for this version is identical to the one listed above (the 11+ version), except for one warning about environment paths, which you can ignore:
When the 12+ CUDA version installation is completed, open a command prompt in Windows and type and enter:
nvcc --version
This should confirm information about the installed driver version:
To check that your card is recognized, type and enter:
nvidia-smi
5: Install GIT
GIT will be handling the installation of the Musubi repository on your local machine. Download the GIT installer at:
https://git-scm.com/downloads/win (’64-bit Git for Windows Setup’)
Run the installer:
Use default settings for Select Components:
Leave the default editor at Vim:
Let GIT decide about branch names:
Use recommended settings for the Path Environment:
Use recommended settings for SSH:
Use recommended settings for HTTPS Transport backend:
Use recommended settings for line-ending conversions:
Choose Windows default console as the Terminal Emulator:
Use default settings (Fast-forward or merge) for Git Pull:
Use Git-Credential Manager (the default setting) for Credential Helper:
In Configuring extra options, leave Enable file system caching ticked, and Enable symbolic links unticked (unless you are an advanced user who is using hard links for a centralized model repository).
Conclude the installation and test that Git is installed properly by opening a CMD window and typing and entering:
git --version
GitHub Login
Later, when you attempt to clone GitHub repositories, you may be challenged for your GitHub credentials. To anticipate this, log into your GitHub account (create one, if necessary) on any browsers installed on your Windows system. In this way, the 0Auth authentication method (a pop-up window) should take as little time as possible.
After that initial challenge, you should stay authenticated automatically.
6: Install CMake
CMake 3.21 or newer is required for parts of the Musubi installation process. CMake is a cross-platform development architecture capable of orchestrating diverse compilers, and of compiling software from source code.
Download it at:
https://cmake.org/download/ (‘Windows x64 Installer’)
Launch the installer:
Ensure Add Cmake to the PATH environment variable is checked.
Press Next.
Type and enter this command in a Windows Command prompt:
cmake --version
If CMake installed successfully, it will display something like:
cmake version 3.31.4 CMake suite maintained and supported by Kitware (kitware.com/cmake).
7: Install Python 3.10
The Python interpreter is central to this project. Download the 3.10 version (the best compromise between the different demands of Musubi packages) at:
https://www.python.org/downloads/release/python-3100/ (‘Windows installer (64-bit)’)
Run the download installer, and leave at default settings:
At the end of the installation process, click Disable path length limit (requires UAC admin confirmation):
In a Windows Command prompt type and enter:
python --version
This should result in Python 3.10.0
Check Paths
The cloning and installation of the Musubi frameworks, as well as its normal operation after installation, requires that its components know the path to several important external components in Windows, particularly CUDA.
So we need to open the path environment and check that all the requisites are in there.
A quick way to get to the controls for Windows Environment is to type Edit the system environment variables into the Windows search bar.
Clicking this will open the System Properties control panel. In the lower right of System Properties, click the Environment Variables button, and a window called Environment Variables opens up. In the System Variables panel in the bottom half of this window, scroll down to Path and double-click it. This opens a window called Edit environment variables. Drag the width of this window wider so you can see the full path of the variables:
Here the important entries are:
C:Program FilesNVIDIA GPU Computing ToolkitCUDAv12.6bin C:Program FilesNVIDIA GPU Computing ToolkitCUDAv12.6libnvvp C:Program FilesNVIDIA GPU Computing ToolkitCUDAv11.8bin C:Program FilesNVIDIA GPU Computing ToolkitCUDAv11.8libnvvp C:Program Files (x86)Microsoft Visual Studio2019CommunityVCToolsMSVC14.29.30133binHostx64x64 C:Program FilesMicrosoft Visual Studio2022CommunityVCToolsMSVC14.42.34433binHostx64x64 C:Program FilesGitcmd C:Program FilesCMakebin
In most cases, the correct path variables should already be present.
Add any paths that are missing by clicking New on the left of the Edit environment variable window and pasting in the correct path:
Do NOT just copy and paste from the paths listed above; check that each equivalent path exists in your own Windows installation.
If there are minor path variations (particularly with Visual Studio installations), use the paths listed above to find the correct target folders (i.e., x64 in Host64 in your own installation. Then paste those paths into the Edit environment variable window.
After this, restart the computer.
Installing Musubi
Upgrade PIP
Using the latest version of the PIP installer can smooth some of the installation stages. In a Windows Command prompt with administrator privileges (see Elevation, below), type and enter:
pip install --upgrade pip
Elevation
Some commands may require elevated privileges (i.e., to be run as an administrator). If you receive error messages about permissions in the following stages, close the command prompt window and reopen it in administrator mode by typing CMD into Windows search box, right-clicking on Command Prompt and selecting Run as administrator:
For the next stages, we are going to use Windows Powershell instead of the Windows Command prompt. You can find this by entering Powershell into the Windows search box, and (as necessary) right-clicking on it to Run as administrator:
Install Torch
In Powershell, type and enter:
pip install torch torchvision torchaudio --index-url https://download.pytorch.org/whl/cu118
Be patient while the many packages install.
When completed, you can verify a GPU-enabled PyTorch installation by typing and entering:
python -c "import torch; print(torch.cuda.is_available())"
This should result in:
C:WINDOWSsystem32>python -c "import torch; print(torch.cuda.is_available())" True
Install Triton for Windows
Next, the installation of the Triton for Windows component. In elevated Powershell, enter (on a single line):
pip install https://github.com/woct0rdho/triton-windows/releases/download/v3.1.0-windows.post8/triton-3.1.0-cp310-cp310-win_amd64.whl
(The installer triton-3.1.0-cp310-cp310-win_amd64.whl works for both Intel and AMD CPUs as long as the architecture is 64-bit and the environment matches the Python version)
After running, this should result in:
Successfully installed triton-3.1.0
We can check if Triton is working by importing it in Python. Enter this command:
python -c "import triton; print('Triton is working')"
This should output:
Triton is working
To check that Triton is GPU-enabled, enter:
python -c "import torch; print(torch.cuda.is_available())"
This should result in True:
Create the Virtual Environment for Musubi
From now on, we will install any further software into a Python virtual environment (or venv). This means that all you will need to do to uninstall all the following software is to drag the venv’s installation folder to the trash.
Let’s create that installation folder: make a folder called Musubi on your desktop. The following examples assume that this folder exists: C:Users[Your Profile Name]DesktopMusubi.
In Powershell, navigate to that folder by entering:
cd C:Users[Your Profile Name]DesktopMusubi
We want the virtual environment to have access to what we have installed already (especially Triton), so we will use the --system-site-packages flag. Enter this:
python -m venv --system-site-packages musubi
Wait for the environment to be created, and then activate it by entering:
.musubiScriptsactivate
From this point on, you can tell that you are in the activated virtual environment by the fact that (musubi) appears at the beginning of all your prompts.
Clone the Repository
Navigate to the newly-created musubi folder (which is inside the Musubi folder on your desktop):
cd musubi
Now that we are in the right place, enter the following command:
git clone https://github.com/kohya-ss/musubi-tuner.git
Wait for the cloning to complete (it will not take long).
Installing Requirements
Navigate to the installation folder:
cd musubi-tuner
Enter:
pip install -r requirements.txt
Wait for the many installations to finish (this will take longer).
Automating Access to the Hunyuan Video Venv
To easily activate and access the new venv for future sessions, paste the following into Notepad and save it with the name activate.bat, saving it with All files option (see image below).
@echo off
call C:Users[Your Profile Name]DesktopMusubimusubiScriptsactivate
cd C:Users[Your Profile Name]DesktopMusubimusubimusubi-tuner
cmd
(Replace [Your Profile Name]with the real name of your Windows user profile)
It does not matter into which location you save this file.
From now on you can double-click activate.bat and start work immediately.
Using Musubi Tuner
Downloading the Models
The Hunyuan Video LoRA training process requires the downloading of at least seven models in order to support all the possible optimization options for pre-caching and training a Hunyuan video LoRA. Together, these models weigh more than 60GB.
Current instructions for downloading them can be found at https://github.com/kohya-ss/musubi-tuner?tab=readme-ov-file#model-download
However, these are the download instructions at the time of writing:
clip_l.safetensors llava_llama3_fp16.safetensors and llava_llama3_fp8_scaled.safetensors can be downloaded at: https://huggingface.co/Comfy-Org/HunyuanVideo_repackaged/tree/main/split_files/text_encoders
mp_rank_00_model_states.pt mp_rank_00_model_states_fp8.pt and mp_rank_00_model_states_fp8_map.pt can be downloaded at: https://huggingface.co/tencent/HunyuanVideo/tree/main/hunyuan-video-t2v-720p/transformers
pytorch_model.pt can be downloaded at: https://huggingface.co/tencent/HunyuanVideo/tree/main/hunyuan-video-t2v-720p/vae
Though you can place these in any directory you choose, for consistency with later scripting, let’s put them in:
C:Users[Your Profile Name]DesktopMusubimusubimusubi-tunermodels
This is consistent with the directory arrangement prior to this point. Any commands or instructions hereafter will assume that this is where the models are situated; and don’t forget to replace [Your Profile Name] with your real Windows profile folder name.
Dataset Preparation
Ignoring community controversy on the point, it’s fair to say that you will need somewhere between 10-100 photos for a training dataset for your Hunyuan LoRA. Very good results can be obtained even with 15 images, so long as the images are well-balanced and of good quality.
A Hunyuan LoRA can be trained both on images or very short and low-res video clips, or even a mixture of each – although using video clips as training data is challenging, even for a 24GB card.
However, video clips are only really useful if your character moves in such an unusual way that the Hunyuan Video foundation model might not know about it, or be able to guess.
Examples would include Roger Rabbit, a xenomorph, The Mask, Spider-Man, or other personalities that possess unique characteristic movement.
Since Hunyuan Video already knows how ordinary men and women move, video clips are not necessary to obtain a convincing Hunyuan Video LoRA human-type character. So we’ll use static images.
Image Preparation
The Bucket List
The TLDR version:
It’s best to either use images that are all the same size for your dataset, or use a 50/50 split between two different sizes, i.e., 10 images that are 512x768px and 10 that are 768x512px.
The training might go well even if you don’t do this – Hunyuan Video LoRAs can be surprisingly forgiving.
The Longer Version
As with Kohya-ss LoRAs for static generative systems such as Stable Diffusion, bucketing is used to distribute the workload across differently-sized images, allowing larger images to be used without causing out-of-memory errors at training time (i.e., bucketing ‘cuts up’ the images into chunks that the GPU can handle, while maintaining the semantic integrity of the whole image).
For each size of image you include in your training dataset (i.e., 512x768px), a bucket, or ‘sub-task’ will be created for that size. So if you have the following distribution of images, this is how the bucket attention becomes unbalanced, and risks that some photos will be given greater consideration in training than others:
2x 512x768px images 7x 768x512px images 1x 1000x600px image 3x 400x800px images
We can see that bucket attention is divided unequally among these images:
Therefore either stick to one format size, or try and keep the distribution of different sizes relatively equal.
In either case, avoid very large images, as this is likely to slow down training, to negligible benefit.
For simplicity, I have used 512x768px for all the photos in my dataset.
Disclaimer: The model (person) used in the dataset gave me full permission to use these pictures for this purpose, and exercised approval of all AI-based output depicting her likeness featured in this article.
My dataset consists of 40 images, in PNG format (though JPG is fine too). My images were stored at C:UsersMartinDesktopDATASETS_HUNYUANexamplewoman
You should create a cache folder inside the training image folder:
Now let’s create a special file that will configure the training.
TOML Files
The training and pre-caching processes of Hunyuan Video LoRAs obtains the file paths from a flat text file with the .toml extension.
For my test, the TOML is located at C:UsersMartinDesktopDATASETS_HUNYUANtraining.toml
The contents of my training TOML look like this:
[general]
resolution = [512, 768]
caption_extension = ".txt"
batch_size = 1
enable_bucket = true
bucket_no_upscale = false
[[datasets]]
image_directory = "C:UsersMartinDesktopDATASETS_HUNYUANexamplewoman"
cache_directory = "C:UsersMartinDesktopDATASETS_HUNYUANexamplewomancache"
num_repeats = 1
(The double back-slashes for image and cache directories are not always necessary, but they can help to avoid errors in cases where there is a space in the path. I have trained models with .toml files that used single-forward and single-backward slashes)
We can see in the resolution section that two resolutions will be considered – 512px and 768px. You can also leave this at 512, and still obtain good results.
Captions
Hunyuan Video is a text+vision foundation model, so we need descriptive captions for these images, which will be considered during training. The training process will fail without captions.
There are a multitude of open source captioning systems we could use for this task, but let’s keep it simple and use the taggui system. Though it is stored at GitHub, and though it does download some very heavy deep learning models on first run, it comes in the form of a simple Windows executable that loads Python libraries and a straightforward GUI.
After starting Taggui, use File > Load Directory to navigate to your image dataset, and optionally put a token identifier (in this case, examplewoman) that will be added to all the captions:
(Be sure to turn off Load in 4-bit when Taggui first opens – it will throw errors during captioning if this is left on)
Select an image in the left-hand preview column and press CTRL+A to select all the images. Then press the Start Auto-Captioning button on the right:
You will see Taggui downloading models in the small CLI in the right-hand column, but only if this is the first time you have run the captioner. Otherwise you will see a preview of the captions.
Now, each photo has a corresponding .txt caption with a description of its image contents:
You can click Advanced Options in Taggui to increase the length and style of captions, but that is beyond the scope of this run-through.
Quit Taggui and let’s move on to…
Latent Pre-Caching
To avoid excessive GPU load at training time, it is necessary to create two types of pre-cached files – one to represent the latent image derived from the images themselves, and another to evaluate a text encoding relating to caption content.
To simplify all three processes (2x cache + training), you can use interactive .BAT files that will ask you questions and undertake the processes when you have given the necessary information.
For the latent pre-caching, copy the following text into Notepad and save it as a .BAT file (i.e., name it something like latent-precache.bat), as earlier, ensuring that the file type in the drop down menu in the Save As dialogue is All Files (see image below):
@echo off
REM Activate the virtual environment
call C:Users[Your Profile Name]DesktopMusubimusubiScriptsactivate.bat
REM Get user input
set /p IMAGE_PATH=Enter the path to the image directory:
set /p CACHE_PATH=Enter the path to the cache directory:
set /p TOML_PATH=Enter the path to the TOML file:
echo You entered:
echo Image path: %IMAGE_PATH%
echo Cache path: %CACHE_PATH%
echo TOML file path: %TOML_PATH%
set /p CONFIRM=Do you want to proceed with latent pre-caching (y/n)?
if /i "%CONFIRM%"=="y" (
REM Run the latent pre-caching script
python C:Users[Your Profile Name]DesktopMusubimusubimusubi-tunercache_latents.py --dataset_config %TOML_PATH% --vae C:Users[Your Profile Name]DesktopMusubimusubimusubi-tunermodelspytorch_model.pt --vae_chunk_size 32 --vae_tiling
) else (
echo Operation canceled.
)
REM Keep the window open
pause
(Make sure that you replace [Your Profile Name] with your real Windows profile folder name)
Now you can run the .BAT file for automatic latent caching:
When prompted to by the various questions from the BAT file, paste or type in the path to your dataset, cache folders and TOML file.
Text Pre-Caching
We’ll create a second BAT file, this time for the text pre-caching.
@echo off
REM Activate the virtual environment
call C:Users[Your Profile Name]DesktopMusubimusubiScriptsactivate.bat
REM Get user input
set /p IMAGE_PATH=Enter the path to the image directory:
set /p CACHE_PATH=Enter the path to the cache directory:
set /p TOML_PATH=Enter the path to the TOML file:
echo You entered:
echo Image path: %IMAGE_PATH%
echo Cache path: %CACHE_PATH%
echo TOML file path: %TOML_PATH%
set /p CONFIRM=Do you want to proceed with text encoder output pre-caching (y/n)?
if /i "%CONFIRM%"=="y" (
REM Use the python executable from the virtual environment
python C:Users[Your Profile Name]DesktopMusubimusubimusubi-tunercache_text_encoder_outputs.py --dataset_config %TOML_PATH% --text_encoder1 C:Users[Your Profile Name]DesktopMusubimusubimusubi-tunermodelsllava_llama3_fp16.safetensors --text_encoder2 C:Users[Your Profile Name]DesktopMusubimusubimusubi-tunermodelsclip_l.safetensors --batch_size 16
) else (
echo Operation canceled.
)
REM Keep the window open
pause
Replace your Windows profile name and save this as text-cache.bat (or any other name you like), in any convenient location, as per the procedure for the previous BAT file.
Run this new BAT file, follow the instructions, and the necessary text-encoded files will appear in the cache folder:
Training the Hunyuan Video Lora
Training the actual LoRA will take considerably longer than these two preparatory processes.
Though there are also multiple variables that we could worry about (such as batch size, repeats, epochs, and whether to use full or quantized models, among others), we’ll save these considerations for another day, and a deeper look at the intricacies of LoRA creation.
For now, let’s minimize the choices a little and train a LoRA on ‘median’ settings.
We’ll create a third BAT file, this time to initiate training. Paste this into Notepad and save it as a BAT file, like before, as training.bat (or any name you please):
@echo off
REM Activate the virtual environment
call C:Users[Your Profile Name]DesktopMusubimusubiScriptsactivate.bat
REM Get user input
set /p DATASET_CONFIG=Enter the path to the dataset configuration file:
set /p EPOCHS=Enter the number of epochs to train:
set /p OUTPUT_NAME=Enter the output model name (e.g., example0001):
set /p LEARNING_RATE=Choose learning rate (1 for 1e-3, 2 for 5e-3, default 1e-3):
if "%LEARNING_RATE%"=="1" set LR=1e-3
if "%LEARNING_RATE%"=="2" set LR=5e-3
if "%LEARNING_RATE%"=="" set LR=1e-3
set /p SAVE_STEPS=How often (in steps) to save preview images:
set /p SAMPLE_PROMPTS=What is the location of the text-prompt file for training previews?
echo You entered:
echo Dataset configuration file: %DATASET_CONFIG%
echo Number of epochs: %EPOCHS%
echo Output name: %OUTPUT_NAME%
echo Learning rate: %LR%
echo Save preview images every %SAVE_STEPS% steps.
echo Text-prompt file: %SAMPLE_PROMPTS%
REM Prepare the command
set CMD=accelerate launch --num_cpu_threads_per_process 1 --mixed_precision bf16 ^
C:Users[Your Profile Name]DesktopMusubimusubimusubi-tunerhv_train_network.py ^
--dit C:Users[Your Profile Name]DesktopMusubimusubimusubi-tunermodelsmp_rank_00_model_states.pt ^
--dataset_config %DATASET_CONFIG% ^
--sdpa ^
--mixed_precision bf16 ^
--fp8_base ^
--optimizer_type adamw8bit ^
--learning_rate %LR% ^
--gradient_checkpointing ^
--max_data_loader_n_workers 2 ^
--persistent_data_loader_workers ^
--network_module=networks.lora ^
--network_dim=32 ^
--timestep_sampling sigmoid ^
--discrete_flow_shift 1.0 ^
--max_train_epochs %EPOCHS% ^
--save_every_n_epochs=1 ^
--seed 42 ^
--output_dir "C:Users[Your Profile Name]DesktopMusubiOutput Models" ^
--output_name %OUTPUT_NAME% ^
--vae C:/Users/[Your Profile Name]/Desktop/Musubi/musubi/musubi-tuner/models/pytorch_model.pt ^
--vae_chunk_size 32 ^
--vae_spatial_tile_sample_min_size 128 ^
--text_encoder1 C:/Users/[Your Profile Name]/Desktop/Musubi/musubi/musubi-tuner/models/llava_llama3_fp16.safetensors ^
--text_encoder2 C:/Users/[Your Profile Name]/Desktop/Musubi/musubi/musubi-tuner/models/clip_l.safetensors ^
--sample_prompts %SAMPLE_PROMPTS% ^
--sample_every_n_steps %SAVE_STEPS% ^
--sample_at_first
echo The following command will be executed:
echo %CMD%
set /p CONFIRM=Do you want to proceed with training (y/n)?
if /i "%CONFIRM%"=="y" (
%CMD%
) else (
echo Operation canceled.
)
REM Keep the window open
cmd /k
As usual, be sure to replace all instances of [Your Profile Name] with your correct Windows profile name.
Ensure that the directory C:Users[Your Profile Name]DesktopMusubiOutput Models exists, and create it at that location if not.
Training Previews
There is a very basic training preview feature recently enabled for Musubi trainer, which allows you to force the training model to pause and generate images based on prompts you have saved. These are saved in an automatically created folder called Sample, in the same directory that the trained models are saved.
To enable this, you will need to save at last one prompt in a text file. The training BAT we created will ask you to input the location of this file; therefore you can name the prompt file to be anything you like, and save it anywhere.
Here are some prompt examples for a file that will output three different images when requested by the training routine:
As you can see in the example above, you can put flags at the end of the prompt that will affect the images:
–w is width (defaults to 256px if not set, according to the docs) –h is height (defaults to 256px if not set) –f is the number of frames. If set to 1, an image is produced; more than one, a video. –d is the seed. If not set, it is random; but you should set it to see one prompt evolving. –s is the number of steps in generation, defaulting to 20.
See the official documentation for additional flags.
Though training previews can quickly reveal some issues that might cause you to cancel the training and reconsider the data or the setup, thus saving time, do remember that every extra prompt slows down the training a little more.
Also, the bigger the training preview image’s width and height (as set in the flags listed above), the more it will slow training down.
Launch your training BAT file.
Question #1 is ‘Enter the path to the dataset configuration. Paste or type in the correct path to your TOML file.
Question #2 is ‘Enter the number of epochs to train’. This is a trial-and-error variable, since it’s affected by the amount and quality of images, as well as the captions, and other factors. In general, it’s best to set it too high than too low, since you can always stop the training with Ctrl+C in the training window if you feel the model has advanced enough. Set it to 100 in the first instance, and see how it goes.
Question #3 is ‘Enter the output model name’. Name your model! May be best to keep the name reasonably short and simple.
Question #4 is ‘Choose learning rate’, which defaults to 1e-3 (option 1). This is a good place to start, pending further experience.
Question #5 is ‘How often (in steps) to save preview images. If you set this too low, you will see little progress between preview image saves, and this will slow down the training.
Question #6 is ‘What is the location of the text-prompt file for training previews?’. Paste or type in the path to your prompts text file.
The BAT then shows you the command it will send to the Hunyuan Model, and asks you if you want to proceed, y/n.
Go ahead and begin training:
During this time, if you check the GPU section of the Performance tab of Windows Task Manager, you’ll see the process is taking around 16GB of VRAM.
This may not be an arbitrary figure, as this is the amount of VRAM available on quite a few NVIDIA graphics cards, and the upstream code may have been optimized to fit the tasks into 16GB for the benefit of those who own such cards.
That said, it is very easy to raise this usage, by sending more exorbitant flags to the training command.
During training, you’ll see in the lower-right side of the CMD window a figure for how much time has passed since training began, and an estimate of total training time (which will vary heavily depending on flags set, number of training images, number of training preview images, and several other factors).
A typical training time is around 3-4 hours on median settings, depending on the available hardware, number of images, flag settings, and other factors.
Using Your Trained LoRA Models in Hunyuan Video
Choosing Checkpoints
When training is concluded, you will have a model checkpoint for each epoch of training.
This saving frequency can be changed by the user to save more or less frequently, as desired, by amending the --save_every_n_epochs [N] number in the training BAT file. If you added a low figure for saves-per-steps when setting up training with the BAT, there will be a high number of saved checkpoint files.
Which Checkpoint to Choose?
As mentioned earlier, the earliest-trained models will be most flexible, while the later checkpoints may offer the most detail. The only way to test for these factors is to run some of the LoRAs and generate a few videos. In this way you can get to know which checkpoints are most productive, and represent the best balance between flexibility and fidelity.
ComfyUI
The most popular (though not the only) environment for using Hunyuan Video LoRAs, at the moment, is ComfyUI, a node-based editor with an elaborate Gradio interface that runs in your web browser.
Source: https://github.com/comfyanonymous/ComfyUI
Installation instructions are straightforward and available at the official GitHub repository (additional models will have to be downloaded).
Converting Models for ComfyUI
Your trained models are saved in a (diffusers) format that is not compatible with most implementations of ComfyUI. Musubi is able to convert a model to a ComfyUI-compatible format. Let’s set up a BAT file to implement this.
Before running this BAT, create the C:Users[Your Profile Name]DesktopMusubiCONVERTED folder that the script is expecting.
@echo off
REM Activate the virtual environment
call C:Users[Your Profile Name]DesktopMusubimusubiScriptsactivate.bat
:START
REM Get user input
set /p INPUT_PATH=Enter the path to the input Musubi safetensors file (or type "exit" to quit):
REM Exit if the user types "exit"
if /i "%INPUT_PATH%"=="exit" goto END
REM Extract the file name from the input path and append 'converted' to it
for %%F in ("%INPUT_PATH%") do set FILENAME=%%~nF
set OUTPUT_PATH=C:Users[Your Profile Name]DesktopMusubiOutput ModelsCONVERTED%FILENAME%_converted.safetensors
set TARGET=other
echo You entered:
echo Input file: %INPUT_PATH%
echo Output file: %OUTPUT_PATH%
echo Target format: %TARGET%
set /p CONFIRM=Do you want to proceed with the conversion (y/n)?
if /i "%CONFIRM%"=="y" (
REM Run the conversion script with correctly quoted paths
python C:Users[Your Profile Name]DesktopMusubimusubimusubi-tunerconvert_lora.py --input "%INPUT_PATH%" --output "%OUTPUT_PATH%" --target %TARGET%
echo Conversion complete.
) else (
echo Operation canceled.
)
REM Return to start for another file
goto START
:END
REM Keep the window open
echo Exiting the script.
pause
As with the previous BAT files, save the script as ‘All files’ from Notepad, naming it convert.bat (or whatever you like).
Once saved, double-click the new BAT file, which will ask for the location of a file to convert.
Paste in or type the path to the trained file you want to convert, click y, and press enter.
After saving the converted LoRA to the CONVERTED folder, the script will ask if you would like to convert another file. If you want to test multiple checkpoints in ComfyUI, convert a selection of the models.
When you have converted enough checkpoints, close the BAT command window.
You can now copy your converted models into the modelsloras folder in your ComfyUI installation.
Typically the correct location is something like:
C:Users[Your Profile Name]DesktopComfyUImodelsloras
Creating Hunyuan Video LoRAs in ComfyUI
Though the node-based workflows of ComfyUI seem complex initially, the settings of other more expert users can be loaded by dragging an image (made with the other user’s ComfyUI) directly into the ComfyUI window. Workflows can also be exported as JSON files, which can be imported manually, or dragged into a ComfyUI window.
Some imported workflows will have dependencies that may not exist in your installation. Therefore install ComfyUI-Manager, which can fetch missing modules automatically.
Source: https://github.com/ltdrdata/ComfyUI-Manager
To load one of the workflows used to generate videos from the models in this tutorial, download this JSON file and drag it into your ComfyUI window (though there are far better workflow examples available at the various Reddit and Discord communities that have adopted Hunyuan Video, and my own is adapted from one of these).
This is not the place for an extended tutorial in the use of ComfyUI, but it is worth mentioning a few of the crucial parameters that will affect your output if you download and use the JSON layout that I linked to above.
1) Width and Height
The larger your image, the longer the generation will take, and the higher the risk of an out-of-memory (OOM) error.
2) Length
This is the numerical value for the number of frames. How many seconds it adds up to depend on the frame rate (set to 30fps in this layout). You can convert seconds>frames based on fps at Omnicalculator.
3) Batch size
The higher you set the batch size, the quicker the result may come, but the greater the burden of VRAM. Set this too high and you may get an OOM.
4) Control After Generate
This controls the random seed. The options for this sub-node are fixed, increment, decrement and randomize. If you leave it at fixed and do not change the text prompt, you will get the same image every time. If you amend the text prompt, the image will change to a limited extent. The increment and decrement settings allow you to explore nearby seed values, while randomize gives you a totally new interpretation of the prompt.
5) Lora Name
You will need to select your own installed model here, before attempting to generate.
6) Token
If you have trained your model to trigger the concept with a token, (such as ‘example-person’), put that trigger word in your prompt.
7) Steps
This represents how many steps the system will apply to the diffusion process. Higher steps may obtain better detail, but there is a ceiling on how effective this approach is, and that threshold can be hard to find. The common range of steps is around 20-30.
8) Tile Size
This defines how much information is handled at one time during generation. It’s set to 256 by default. Raising it can speed up generation, but raising it too high can lead to a particularly frustrating OOM experience, since it comes at the very end of a long process.
9) Temporal Overlap
Hunyuan Video generation of people can lead to ‘ghosting’, or unconvincing movement if this is set too low. In general, the current wisdom is that this should be set to a higher value than the number of frames, to produce better movement.
Conclusion
Though further exploration of ComfyUI usage is beyond the scope of this article, community experience at Reddit and Discords can ease the learning curve, and there are several online guides that introduce the basics.
First published Thursday, January 23, 2025
#:where#2022#2025#ADD#admin#ai#AI video#AI video creation#amd#amp#API#approach#architecture#arrangement#Article#Artificial Intelligence#attention#authentication#author#back up#bat#box#browser#cache#challenge#change#clone#code#command#command prompt
0 notes
Text
Web Applications with Full Stack Python Development

Scalability is a crucial consideration for modern web applications, especially as they grow in user base and functionality. In Full Stack Python development, building scalable web applications involves ensuring that both the front-end and back-end can handle increased load efficiently without compromising performance or reliability. This blog explores key strategies for building scalable web applications in Full Stack Python development
Understanding Scalability in Full Stack Python Development
Scalability refers to the ability of an application to handle an increased number of users, requests, or data volume without degrading performance. A scalable application can expand and adapt to meet growing demands, making it essential for developers to plan for scalability from the start of the project.
There are two primary types of scalability:
Vertical Scaling (Scaling Up):
Vertical scaling involves upgrading the hardware resources of a single server, such as increasing CPU, RAM, or disk space. This can improve performance but has physical and financial limitations. It is generally a short-term solution for scalability.
Horizontal Scaling (Scaling Out):
Horizontal scaling refers to adding more servers or instances to distribute the load. This approach is more effective for building large-scale applications and is essential in cloud-based environments, such as AWS, Google Cloud, or Azure.
In Full Stack Python development
, it's crucial to design your application architecture with horizontal scaling in mind, as this method ensures your application can grow more effectively over time.
Best Practices for Building Scalable Web Applications
Microservices ArchitectureOne of the most effective strategies for building scalable applications in Full Stack Python development is adopting a microservices architecture. This approach breaks down the application into smaller, independent services, each handling a specific business function (e.g., user authentication, payment processing, or inventory management).Microservices offer several scalability benefits:
Each service can be scaled independently based on demand.
Services can be developed, deployed, and maintained independently, enabling faster iterations and updates.
Microservices work well with containerization technologies like Docker, allowing easy scaling and deployment across different environments.
Load BalancingLoad balancing is essential for distributing incoming traffic evenly across multiple servers or instances. By using a load balancer, you ensure that no single server becomes overwhelmed with too many requests. This allows your Full Stack Python development application to handle more users efficiently.Load balancing also provides fault tolerance, as if one server fails, traffic is automatically redirected to other healthy instances. Some popular load balancers include Nginx, HAProxy, and cloud-native solutions like AWS Elastic Load Balancer.
Database Sharding and ReplicationAs your application scales, your database may become a bottleneck. Implementing sharding and replication can help address these challenges:
Sharding involves splitting the data into smaller, more manageable pieces, each stored on a different server. This reduces the load on any single database server and improves performance.
Replication involves copying data to multiple servers, ensuring high availability and fault tolerance. If one database server fails, the replicated servers can continue to serve the application.
Full Stack Python development projects that rely on databases such as PostgreSQL or MySQL can implement these techniques to improve scalability and reliability.
Caching for PerformanceCaching is an effective technique for improving the performance of web applications. Frequently accessed data, such as product details or user profiles, can be cached to avoid repeatedly querying the database. This reduces latency and server load, ensuring faster response times for users.Popular caching solutions include Redis and Memcached, both of which can store frequently accessed data in memory for quick retrieval. Caching should be used strategically to cache only the data that doesn’t change frequently, while ensuring that dynamic or sensitive data is retrieved directly from the database.
Choosing the Right Tools for Scalable Full Stack Python Development
Web FrameworksSelecting the right web framework is crucial for scalability in Full Stack Python development
Frameworks like Django and Flask are popular choices:
Django provides built-in tools for scaling, including an ORM (Object-Relational Mapper) for database management and caching mechanisms for better performance.
Flask, being a lightweight framework, offers more flexibility and control over the architecture, making it suitable for microservices and APIs in large-scale applications.Both frameworks can integrate with caching, load balancing, and database management tools to help scale your application effectively.
Asynchronous ProgrammingAsynchronous programming allows your application to handle multiple tasks concurrently, making it more efficient at managing requests. By using asynchronous libraries like asyncio, Celery, or FastAPI, you can handle long-running tasks (such as sending emails or processing images) without blocking the main thread.In Full Stack Python development, asynchronous frameworks are crucial for building scalable web applications that can handle a high number of concurrent requests, especially when dealing with real-time features like chat or notifications.
Cloud Infrastructure and ContainersCloud platforms like AWS, Google Cloud, and Microsoft Azure offer scalable infrastructure that automatically adjusts based on demand. These platforms provide services such as compute instances, managed databases, and load balancers that help scale your Full Stack Python development application without manual intervention.Additionally, containerization tools like Docker and Kubernetes enable you to deploy, scale, and manage your application components across a cluster of machines. Containers ensure consistency in development, testing, and production environments, making it easier to scale applications efficiently.
Monitoring and Scaling in Production
Once your Full Stack Python development application is live, monitoring its performance is key to maintaining scalability. Tools like Prometheus, Grafana, and New Relic help you track server metrics, application performance, and database queries. By identifying bottlenecks, you can make data-driven decisions to improve performance.
As traffic grows, scaling can be done dynamically by adding more instances or database nodes. Cloud providers like AWS offer auto-scaling features that automatically increase resources when demand spikes, ensuring that your application can handle peak loads.
Conclusion
Building scalable web applications in
Full Stack Python development requires careful planning and the right tools to handle increased user load, data volume, and system complexity. By adopting strategies like microservices architecture, load balancing, database sharding, and caching, you can ensure that your application can grow and scale seamlessly. Additionally, using cloud infrastructure, asynchronous programming, and monitoring tools enables efficient scaling in production.
Ultimately, scalability is not a one-time task but an ongoing process that requires continual optimization as your application evolves and grows in the future.
0 notes
Text
How to Clean Up Docker Images, Containers, and Volumes Older Than 30 Days
Docker is an excellent tool for containerizing applications, but it can easily consume your server’s storage if you don’t perform regular cleanups. Old images, containers, and unused volumes can pile up, slowing down your system and causing disk space issues. In this blog, we’ll walk you through how to identify and delete Docker resources that are older than 30 days to free up space. Remove…
0 notes
Text
How to Install CyberPanel on Ubuntu 22.04 Like a Pro! – Quick Tips
CyberPanel is a user-friendly control panel that makes managing websites and servers much easier, even for beginners. It uses LiteSpeed Web Server (a fast web server) and offers features like one-click WordPress installation, automatic SSL certificates, and a simple interface. In this guide, we’ll break down every step to help you Install CyberPanel on Ubuntu 22.04 server in a way that’s easy to follow, even if you’re not an expert. Let’s dive into each step How to Install CyberPanel on Ubuntu 22.04 Like a Pro!
Why Choose CyberPanel?
Before diving into the installation process, you might wonder why you should choose CyberPanel over other control panels like cPanel or Plesk. Here are a few compelling reasons: - Open Source: It’s completely free (though there’s an Enterprise version with additional features if you’re interested). - Lightweight and Fast: Built around OpenLiteSpeed, CyberPanel is optimized for speed and performance. - Intuitive Interface: The dashboard is clean and user-friendly, even for beginners. - Advanced Features: From one-click installations of WordPress to built-in support for Git, Redis, and Docker, CyberPanel offers plenty of powerful tools. - Auto SSL: Easily install and manage SSL certificates. Sounds like the control panel of your dreams, right?
Pre-Installation Checklist
Before you can install CyberPanel on Ubuntu 22.04, there are a few things you’ll need to prepare. Don’t worry, nothing too crazy! 1. A Fresh Ubuntu 22.04 Server Make sure you’ve got a clean installation of Ubuntu 22.04. You can set this up on a virtual private server (VPS) from your favourite hosting provider. Avoid running the installation on a server that already has web services installed, as that can cause conflicts. 2. Root Access or Sudo Privileges You’ll need root access to your server, or at the very least, a user account with sudo privileges. If you don’t have this, the installation won’t work properly. 3. Server Specifications Here are the minimum recommended system specs for running CyberPanel: - 1 GB of RAM (though 2 GB is ideal for better performance) - 10 GB of free disk space (more if you plan on hosting multiple websites) - A 64-bit operating system (which Ubuntu 22.04 is) 4. Domain Name While it’s not strictly required for the installation, having a domain name handy will allow you to configure your website and apply SSL certificates more easily.
Step-by-Step Guide: How to Install CyberPanel on Ubuntu 22.04
Alright, with your server ready and your domain name in hand, let’s get into the nitty-gritty of installing CyberPanel.
Step 1: Update Your Server’s Software
Before you install anything new, it’s a good idea to make sure your Ubuntu system is up to date. This helps avoid problems later and ensures everything runs smoothly. To update your server, open your terminal (a place where you can type commands) and enter these two commands one after the other:

- The first command, sudo apt update, checks for the latest updates for your system. - The second command, sudo apt upgrade -y, installs those updates. This could take a few minutes, depending on your internet connection and the speed of your internet. Once this is done, your system will be ready for the next steps.
Step 2: Install Basic Tools
Now, we need to install some basic tools that CyberPanel needs to run properly. These tools will help us download and install other software in the next steps. Run this command in your terminal:

- wget is a tool that helps us download files from the internet. - curl is a tool that allows us to transfer data and communicate with servers. By installing these, you’re preparing your system for the main installation.
Step 3: Download the CyberPanel Installer
Next, we need to download a special script (a small program) that will help us install CyberPanel. To do this, use the following command:

This command downloads the CyberPanel installer script and saves it to a file called installer.sh on your server. Once the script is downloaded, you need to permit it to run. To do that, enter:

This command makes the script executable, which means we can run it in the next step.
Step 4: Start the Installation Process
Now that everything is set up, we can begin the actual installation of CyberPanel. This step will take a while, and you’ll be asked to make some choices along the way. To start the installation, type:

This command runs the installer script. Once it begins, you’ll see several options. Let’s walk through them: Choosing the Web Server You’ll be asked whether to install the LiteSpeed Enterprise (a paid version) or OpenLiteSpeed (a free version). Since OpenLiteSpeed is free and works well for most users, we recommend selecting it by typing: Full Installation vs. Minimal Installation Next, you’ll be asked if you want to do a Full installation or a Minimal installation. Choose Full installation, as it includes important tools like PowerDNS (for managing your domain names) and Postfix (for sending emails). Installing Memcached and Redis These are tools that help speed up your websites by caching data (temporarily storing it so it can be accessed quickly). If you plan to host websites that need fast performance, select yes when asked to install Memcached and Redis. Setting an Admin Password At the end of the installation, you’ll be asked to set a password for the admin user. This password will be used to log in to the CyberPanel dashboard. Make sure to choose a strong password and write it down somewhere safe and secure place. After answering these questions, the installation will continue and It may take several minutes to finish.
Step 5: Access the CyberPanel Dashboard
Once the installation is complete, you’ll be given a link to log in to the CyberPanel web interface. This is where you can manage your websites and server settings. To access CyberPanel, open your web browser and type in the following:

- Replace with the actual IP address of your server. - The :8090 at the end is the port number where CyberPanel runs. You might see a warning saying that the site is not secure. This is normal because the server is using a self-signed SSL certificate. You can click through the warning to access the dashboard. Log in using the admin username and the password you created during installation.
Step 6: Configure OpenLiteSpeed
After logging in to CyberPanel, you’ll need to configure OpenLiteSpeed (the web server that powers your websites). Here’s how to do it: - Access the OpenLiteSpeed Admin: From the CyberPanel dashboard, click on OpenLiteSpeed WebAdmin. You’ll be taken to the OpenLiteSpeed admin page. - Log in to OpenLiteSpeed: Use the default credentials: - Username: admin - Password: 123456 (or the one you set during installation). - Change the Admin Password: For security reasons, it’s important to change the default admin password. To do this, run this command in your terminal:

- Follow the instructions to change your password.
Step 7: Secure CyberPanel with SSL
To protect your data and ensure a secure connection to CyberPanel, we need to set up an SSL certificate. CyberPanel allows you to do this automatically using Let’s Encrypt, a free service that provides SSL certificates.

Here’s how to do it: - Log in to the CyberPanel dashboard. - Go to SSL > Hostname SSL. - Enter your server’s hostname (the name of your server or domain). - Click Issue SSL. This will install an SSL certificate, and your CyberPanel interface will now be secure.
Step 8: Create and Manage Websites
With CyberPanel installed and secured, you can now start hosting websites. Here’s an easy-to-follow guide to help you begin: - Add a New Website: In the CyberPanel dashboard, go to Websites > Create Website. Fill in the necessary information: - Domain Name: The name of your website (e.g., example.com). - Email: Your email address. - PHP Version: Choose a version that works with your site (the default should be fine). Once you’ve entered this information, click Create Website. - Set Up DNS for Your Domain: DNS (Domain Name System) is what helps people find your website online. To configure DNS, go to DNS > Create Zone. Enter your domain name and set the A (Address) record to point to your server’s IP address. - Install WordPress: CyberPanel makes it easy to install WordPress. Go to Websites > List Websites, find your domain, and click Manage. You’ll see an option to install WordPress with one click.
Step 9: Enable Backups
It’s very important to regularly back up your website to ensure you can recover it if anything goes wrong. CyberPanel has a built-in tool for scheduling backups. - Go to Backup > Schedule Backup. - Select the website that you want to take a backup. - Choose how often you want to back up (daily, weekly, etc.). - Select a destination for your backups (you can save them locally or send them to a remote server). Once this is set up, CyberPanel will automatically create backups for you.

Step 10: Optimize CyberPanel for Speed
To get the best performance from CyberPanel, you can make a few adjustments: - Enable LSCache: LSCache is a caching system that speeds up websites. Go to Websites > List Websites, find your website, and enable LSCache for faster load times. - Adjust PHP Settings: If your website uses a lot of PHP scripts (common for WordPress sites), you can tweak the settings. Go to Server > PHP > Edit PHP Configs to adjust things like memory limits. - Use Security Plugins: To keep your server secure, consider installing Security plugins such as CSF Firewall and ModSecurity help protect your server from malicious attacks and enhance your website’s overall security. Here’s how you can install them through CyberPanel: CSF Firewall: - Go to Security > Install CSF from the CyberPanel dashboard. This firewall helps protect your server by blocking unwanted traffic. - After installation, you can configure it by navigating to Security > CSF Configuration where you can add specific rules or adjust settings to secure your server. ModSecurity: - To install ModSecurity, go to Security > Install ModSecurity in the dashboard. - Once installed, it will monitor web traffic for suspicious activities and block potential threats. It’s an excellent tool for preventing attacks like SQL injections and cross-site scripting. Both security plugins work in the background to safeguard your server and websites, helping to prevent common vulnerabilities.
Step 11: Monitor Server Performance
After you’ve successfully installed and set up CyberPanel, it’s crucial to keep an eye on your server’s performance. Monitoring your server helps you spot any potential issues before they turn into bigger problems. CyberPanel comes with built-in tools to help you with this: - Real-Time Monitoring: Go to Server Status > LiteSpeed Status to see how your server is performing. This page shows you important details like CPU usage, memory usage, and active connections. - System Health Check: Under Server Status > System Status, you can check the overall health of your server. This includes key metrics such as available disk space, RAM usage, and the status of various services like MySQL and DNS. Monitoring these areas regularly ensures that your server runs efficiently and doesn’t run out of resources unexpectedly.
Step 12: Troubleshooting Common Issues
Even with a detailed guide, you may run into problems during or after installation. Here are some common issues you may face and how to fix them: Issue 1: Can’t Access CyberPanel Web Interface - If you can’t access CyberPanel at https://:8090, the most likely reason is that port 8090 is blocked. To fix this, open the port by running the following command on your server:

After that, try accessing the panel again in your browser. Issue 2: SSL Certificate Not Working - If the SSL certificate you issued using Let’s Encrypt isn’t working, try reissuing the certificate: - Go to SSL > Manage SSL in CyberPanel. - Select your domain and click Issue SSL again. This will attempt to reissue the certificate, solving most SSL-related issues. Issue 3: Website is Running Slowly - If your website is slow, you can enable LiteSpeed Cache (LSCache) for faster performance. You should also consider using CDN (Content Delivery Network) services like Cloudflare to speed up content delivery.
Final Overview
Installing CyberPanel on Ubuntu 22.04 may seem like a technical task, but with this detailed guide, even a beginner can complete the process with ease. By following each step, you will set up a robust, secure, and high-performing web hosting environment using the OpenLiteSpeed web server and CyberPanel’s powerful features. From basic installation to security measures and performance optimization, this guide ensures that your websites will run smoothly on your server. Whether you're hosting a personal website or managing multiple domains, CyberPanel offers the flexibility and tools you need to succeed, making it an ideal choice for anyone new to server management. Now, go ahead and explore the many features of CyberPanel!
FAQs
1. Is CyberPanel free to use? Yes, CyberPanel is completely free. There’s also a paid Enterprise version with more features, but the free version is more than enough for most users. 2. Can I install CyberPanel on a VPS with less than 1 GB of RAM? While it’s technically possible, it’s not recommended. CyberPanel runs much more smoothly on systems with at least 1 GB of RAM (preferably 2 GB). 3. What’s the difference between OpenLiteSpeed and LiteSpeed Enterprise? OpenLiteSpeed is the free, open-source version of LiteSpeed. LiteSpeed Enterprise offers premium features like better performance and more advanced caching options, but it requires a license. Read the full article
#cloudpanelvscyberpanel#cyberpanel#cyberpanelhosting#cyberpanelinstall#cyberpanellogin#cyberpanelvps#cyberpanelvpshosting#cyberpanelvscpanel#installcyberpanel#whatiscyberpanel
0 notes
Text
I'd like to go back to Linux, I think modern wine/proton/bottles/etc might even enable all the gaming I really care about, unfortunately there are no mid-weight Wayland compositors right now: the space that under X11 was filled with XFCE, LXDE, LXQT, even things like OpenBox seems basically empty.
With Wayland it is either Gnome or KDE, or the ultra light compositors like Sway that are comparable to i3, dwm and the like. Which are fine if that's what you want... I used AwesomeWM for years and some other similar systems before that, but they are very much "build your own". You have to put in a lot of work on the config file typically, and you need to add your own status bar, menu system, sys tray, etc generally. Nowadays I'd rather have *some* basics there for me already. But Gnome and KDE are just as all-inclusive and heavy on disk space as ever, if not moreso.
Right now Wayland is becoming more and common, really taking over, but it seems the middle weight category is stalling on transitioning from X11.
Wayland is the better system for sure, and even if it wasn't, it is clearly where Linux is going in the future. It does have issues that need addressed, mainly more protocols need to be made/finalized to fill in the gaps (e.g. accessibility is fucked right now due to different, incompatible versions of the protocols). And then it just needs diversity and maturity of the ecosystem.
Oh and then there is the other issue: More and more common cross platform apps now distribute only one of the semi-sandbox formats: AppImage (modern form of Klik), Snap (Canonical NIH nonsense), and FlatPak (xdg-apps). FlatPak is the most thought out of them, and the best in most all ways... and it still sucks ass.
It needs a LOT more work and evolution, and even then kind only really makes sense if the vast majority of GUI, desktop software was being distributed that way, and the OS package managers somehow could work with it in a reasonable way. Oh, and probably even then, we would want affordable SSDs larger than 4 TB (really 2TB seems the limit of affordability right now).
That's best case for FlatPak. But right now not only do we not have that, everything is split. Some is FlatPak. Some is AppImage. Some also have Snap. Some few might be Snap only... It's horrific.
Sure, if you are using native Linux apps you are probably fine with your classic package manager, but if you want Telegram, Discord, Joplin, Signal... all kinds of stuff like that, you are in trouble. And yeah, I have issues with most of these being Electron nonsense in the first place, but at this point I am dependent on them and there aren't really viable alternatives, one way or another...
In theory I see that maybe the future is highly isolated apps. Mac started doing some of that ages ago. And iOS and Android do it to a large extent too. But IDK that GNU/Linux as it exists now is a good fit for that style. I'd rather see some major forking and a different OS name TBH, if not a totally different system. But that runs into all the issues anything like that always does with the amount of work needed, the adoption issues, etc... (for that matter the containerization/isolation/etc of server stuff that we see with cloud, k8s, docker, etc would all also be better served with a whole different type of system...) (as always we just need infinite time and money to make a new, good system, and then instant world-wide adoption. Easy!)
Windows 11 is by all accounts a disaster and they're rushing Win10 through EOL so in a few years I might be using Mint or Zorin.
#ugh#computers#linux#windows is a nightmare#linux is a nightmare#more now than before TBH#mac is a nightmare and a half
4 notes
·
View notes
Photo

Free up disk space by running these docker commands https://ift.tt/3dfwUK7
0 notes
Text
There's this idea that dynamic linking is better than static linking because it means you can get things like security upgrades in the libraries without having to recompile and reinstall the binaries that use them, and also because it means space savings, and so on.
I've been thinking about this on and off for years, and it seems a tad stale - wisdom from an earlier time which does not apply as much anymore.
If we assume someone has to manually compile every binary from source, that fits. This is the one situation in which I personally felt that benefit. When I was manually going through the cycle of download -> `./configure ...` -> `make` -> `sudo make install` and so on for a bunch of software on the Nokia N900. I learned a lot from this, but otherwise I'd say it was a waste of my precious finite life. If I had to recompile everything again for a fix to my libc or TLS libraries or something else that was used by a bunch of software, I'd have a bad time. Similarly, on that weak low-powered hardware, it would take a lot of time.
But let's assume proper automation. Let's assume that installing upgrades is a matter of running a single command, or even entirely automatic. As it is already for most users on most systems. In that case, static inclusion of libraries doesn't get in the way of upgradability from a manual effort perspective. All the binaries that use the library can be rebuilt.
Let's assume a typical system where a trusted build server does the builds, and most devices download pre-built libraries from those servers. As it is already with most package managers on most systems that most users have. Then static inclusion of libraries into binaries doesn't even affect upgrade time much, because the rebuilding of all those binaries that use a library is amortized and done out-of-band by the build system.
Let's assume some modest optimizations: static linking doesn't have to include the whole library - it can include just the parts that are used; whole program optimization means that those included parts might be inlined and simplified to just the cases in the logic that are actually used; if after all that there is still a lot of identical library code in binaries, downloads can use compression over all the binaries together. So static inclusion of libraries doesn't have to substantially increase download sizes for installs and upgrades.
(If it is commonly the case that large chunks of code are frequently duplicated between binaries, we can even design a package system where those duplications are detected and recorded, so the package manager doesn't have to download those chunks of a binary if it knows that it can copy it from another binary that is already locally available. I don't know how often this is an optimization worth making, but if I had to guess, you'd have large duplications in multiple binaries of code from libraries implementing network protocols, cryptography, and GUI frameworks - code which is complex or has to handle a lot of possible situations from the external world.)
Disk and memory space tends to be huge nowadays, so even if after whole program optimization programs are still big, that's not the same dire problem it once was. If benchmarking proves that it is, however, then splitting into dynamic libraries can be a separate optimization step! Tooling could identify common chunks of code in multiple statically compiled libraries, and pull them out into common files which are then dynamically linked at runtime.
Meanwhile, reproducible builds and stable behavior are a thing people value a lot nowadays. You know what really sucks? Having something break or behave differently because a dependency got upgraded or a different version got installed or the build options were different or whatever. This is true for dynamically linked libraries too. Look at package systems like Nix. Look at containerization systems like Docker. Look at application distribution systems like Flatpak. These things exist in large part to provide stable, exactly reproducible bundles of all dependencies. And if every app is bundling its own dynamically linked copy of typical libraries anyway, then the dynamic linking isn't getting you anything, except perhaps easy hooks for intercepting or redirecting calls across library boundaries, but during development there are easier ways to debug and if you want that feature in production that's the kind of thing that could be solved by a build-time step adding code to make it happen. If you embrace the wisdom of immutable dependency graphs, or want perfectly reproducible builds and executions, then static linking is more aligned with that than dynamic linking.
2 notes
·
View notes
Text
I fucking hate Linux so much it's unreal, had to make a new virtual machine and setup 40000 tools again because some bitch (docker? conan? fuck I know) has too many cache (???) and vm run out of disk space and can't fucking boot properly but I have zero idea what should I delete to make it work again and it's too late, gonna kill /var/logs or something in the morning
So ummm for some reason I got assigned to the other team working on n*tflix port
+ there's a nice coworker I worked with already
+ they have a ton of documentation
- it's for 1 sprint only??? Weird shit
- no way I'll do anything useful during 1 sprint on a project I don't know
6 notes
·
View notes
Text
Keygen Coreldraw X3

CorelDRAW X3 Free Download Latest Version for Windows. It is full offline installer standalone setup of CorelDRAW X3 for 32/64.
Coreldraw x3 free download. Photo & Graphics tools downloads - CorelDRAW Graphics Suite by Corel Corporation and many more programs are available for instant and free download. Corel draw x3 key, 241 records found, first 100 of them are: CorelDRAW Graphics Suite.X3.v13.0. Learn To Draw with Mrs. Hoogestraat v1.x.

Coreldraw Graphics Suite x3 Keygen is a basic outlining programming as well as been utilized as a part of a significant number of the no doubt understands businesses. Material industry is as well as can be expected considered at this very moment. Corel Draw X3 Keygen clean regular and extra things from any portrayal.
Corel draw x3 keygen xforce free download. DOWNLOAD NOWCorel Draw X7 2021 22.2.0.532 Crack + Activation Code full. free download 2021 Corel Draw. Aug 27, 2017 — Well, we just started, but before we get started make sure you already have the software Multi keygen x.
Corel DRAW X3 Overview
CorelDraw X3 is a very handy application which can be used for creating some amazing graphics. With this application you can create some amazing logos, ads and websites. This is one of the most widely used and appreciated graphic editing tool. You can also download CorelDRAW X5.
CorelDraw X3 has got some very impressive features which are as follows. CorelDraw X3 has got Hint Docker which can be used for proving you some small tips as well as hints. It has also got Corel Power Trace which will allow you to have full control as well as flexibility on your vector images. You can also create PDF and you can easily make it password protected. This application lets you crop your images and can remove the unwanted element from your photo. CorelDraw X3 has got more than 10,000 OpenType Font and it will you the Preview before the print that how will it look. All in all CorelDraw X3 is a useful application which can be used for creating imposing graphics. You can also download CorelDRAW X6.
Features of CorelDraw X3
Below are some noticeable features which you’ll experience after CorelDraw X3 free download.
Handy application which can be used for creating some amazing graphics.
Can create some amazing logos, ads and websites.
Most widely used and appreciated graphic editing tool.
Hot Hint Docker which can be used for proving you some small tips and hints.
Got Corel Power Trace which will allow you to have full control as well as flexibility on your vector images.
Can also create PDF and you can easily make it password protected.
Lets you crop your images and can remove the unwanted element from your photo.
Got more than 10,000 OpenType Font.
CorelDraw X3 Technical Setup Details
Keygen Coreldraw X3 Free
Software Full Name: CorelDRAW X3
Setup File Name: CorelDraw_X3.zip
Full Setup Size: 176 MB
Setup Type: Offline Installer / Full Standalone Setup
Compatibility Architecture: 32 Bit (x86) / 64 Bit (x64)
Latest Version Release Added On: 07th July 2018
Developers: CorelDRAW
Corel Draw X7 Serial Key
System Requirements For CorelDraw X3
Before you start CorelDraw X3 free download, make sure your PC meets minimum system requirements.
Operating System: Windows XP/Vista/7/8/8.1/10
Memory (RAM): 256 MB of RAM required.
Hard Disk Space: 200 MB of free space required.
Processor: 600 MHz Intel Pentium processor or later.
Keygen Corel Draw X3
CorelDraw X3 Free Download
Corel X3 Key
Click on below button to start CorelDraw X3 Free Download. This is complete offline installer and standalone setup for CorelDraw X3. This would be compatible with both 32 bit and 64 bit windows.
Descargar Corel Draw X3

Xforce Keygen For Corel Draw X3
Related Softwares
1 note
·
View note
Photo

hydralisk98′s web projects tracker:
Core principles=
Fail faster
‘Learn, Tweak, Make’ loop
This is meant to be a quick reference for tracking progress made over my various projects, organized by their “ultimate target” goal:
(START)
(Website)=
Install Firefox
Install Chrome
Install Microsoft newest browser
Install Lynx
Learn about contemporary web browsers
Install a very basic text editor
Install Notepad++
Install Nano
Install Powershell
Install Bash
Install Git
Learn HTML
Elements and attributes
Commenting (single line comment, multi-line comment)
Head (title, meta, charset, language, link, style, description, keywords, author, viewport, script, base, url-encode, )
Hyperlinks (local, external, link titles, relative filepaths, absolute filepaths)
Headings (h1-h6, horizontal rules)
Paragraphs (pre, line breaks)
Text formatting (bold, italic, deleted, inserted, subscript, superscript, marked)
Quotations (quote, blockquote, abbreviations, address, cite, bidirectional override)
Entities & symbols (&entity_name, &entity_number,  , useful HTML character entities, diacritical marks, mathematical symbols, greek letters, currency symbols, )
Id (bookmarks)
Classes (select elements, multiple classes, different tags can share same class, )
Blocks & Inlines (div, span)
Computercode (kbd, samp, code, var)
Lists (ordered, unordered, description lists, control list counting, nesting)
Tables (colspan, rowspan, caption, colgroup, thead, tbody, tfoot, th)
Images (src, alt, width, height, animated, link, map, area, usenmap, , picture, picture for format support)
old fashioned audio
old fashioned video
Iframes (URL src, name, target)
Forms (input types, action, method, GET, POST, name, fieldset, accept-charset, autocomplete, enctype, novalidate, target, form elements, input attributes)
URL encode (scheme, prefix, domain, port, path, filename, ascii-encodings)
Learn about oldest web browsers onwards
Learn early HTML versions (doctypes & permitted elements for each version)
Make a 90s-like web page compatible with as much early web formats as possible, earliest web browsers’ compatibility is best here
Learn how to teach HTML5 features to most if not all older browsers
Install Adobe XD
Register a account at Figma
Learn Adobe XD basics
Learn Figma basics
Install Microsoft’s VS Code
Install my Microsoft’s VS Code favorite extensions
Learn HTML5
Semantic elements
Layouts
Graphics (SVG, canvas)
Track
Audio
Video
Embed
APIs (geolocation, drag and drop, local storage, application cache, web workers, server-sent events, )
HTMLShiv for teaching older browsers HTML5
HTML5 style guide and coding conventions (doctype, clean tidy well-formed code, lower case element names, close all html elements, close empty html elements, quote attribute values, image attributes, space and equal signs, avoid long code lines, blank lines, indentation, keep html, keep head, keep body, meta data, viewport, comments, stylesheets, loading JS into html, accessing HTML elements with JS, use lowercase file names, file extensions, index/default)
Learn CSS
Selections
Colors
Fonts
Positioning
Box model
Grid
Flexbox
Custom properties
Transitions
Animate
Make a simple modern static site
Learn responsive design
Viewport
Media queries
Fluid widths
rem units over px
Mobile first
Learn SASS
Variables
Nesting
Conditionals
Functions
Learn about CSS frameworks
Learn Bootstrap
Learn Tailwind CSS
Learn JS
Fundamentals
Document Object Model / DOM
JavaScript Object Notation / JSON
Fetch API
Modern JS (ES6+)
Learn Git
Learn Browser Dev Tools
Learn your VS Code extensions
Learn Emmet
Learn NPM
Learn Yarn
Learn Axios
Learn Webpack
Learn Parcel
Learn basic deployment
Domain registration (Namecheap)
Managed hosting (InMotion, Hostgator, Bluehost)
Static hosting (Nertlify, Github Pages)
SSL certificate
FTP
SFTP
SSH
CLI
Make a fancy front end website about
Make a few Tumblr themes
===You are now a basic front end developer!
Learn about XML dialects
Learn XML
Learn about JS frameworks
Learn jQuery
Learn React
Contex API with Hooks
NEXT
Learn Vue.js
Vuex
NUXT
Learn Svelte
NUXT (Vue)
Learn Gatsby
Learn Gridsome
Learn Typescript
Make a epic front end website about
===You are now a front-end wizard!
Learn Node.js
Express
Nest.js
Koa
Learn Python
Django
Flask
Learn GoLang
Revel
Learn PHP
Laravel
Slim
Symfony
Learn Ruby
Ruby on Rails
Sinatra
Learn SQL
PostgreSQL
MySQL
Learn ORM
Learn ODM
Learn NoSQL
MongoDB
RethinkDB
CouchDB
Learn a cloud database
Firebase, Azure Cloud DB, AWS
Learn a lightweight & cache variant
Redis
SQLlite
NeDB
Learn GraphQL
Learn about CMSes
Learn Wordpress
Learn Drupal
Learn Keystone
Learn Enduro
Learn Contentful
Learn Sanity
Learn Jekyll
Learn about DevOps
Learn NGINX
Learn Apache
Learn Linode
Learn Heroku
Learn Azure
Learn Docker
Learn testing
Learn load balancing
===You are now a good full stack developer
Learn about mobile development
Learn Dart
Learn Flutter
Learn React Native
Learn Nativescript
Learn Ionic
Learn progressive web apps
Learn Electron
Learn JAMstack
Learn serverless architecture
Learn API-first design
Learn data science
Learn machine learning
Learn deep learning
Learn speech recognition
Learn web assembly
===You are now a epic full stack developer
Make a web browser
Make a web server
===You are now a legendary full stack developer
[...]
(Computer system)=
Learn to execute and test your code in a command line interface
Learn to use breakpoints and debuggers
Learn Bash
Learn fish
Learn Zsh
Learn Vim
Learn nano
Learn Notepad++
Learn VS Code
Learn Brackets
Learn Atom
Learn Geany
Learn Neovim
Learn Python
Learn Java?
Learn R
Learn Swift?
Learn Go-lang?
Learn Common Lisp
Learn Clojure (& ClojureScript)
Learn Scheme
Learn C++
Learn C
Learn B
Learn Mesa
Learn Brainfuck
Learn Assembly
Learn Machine Code
Learn how to manage I/O
Make a keypad
Make a keyboard
Make a mouse
Make a light pen
Make a small LCD display
Make a small LED display
Make a teleprinter terminal
Make a medium raster CRT display
Make a small vector CRT display
Make larger LED displays
Make a few CRT displays
Learn how to manage computer memory
Make datasettes
Make a datasette deck
Make floppy disks
Make a floppy drive
Learn how to control data
Learn binary base
Learn hexadecimal base
Learn octal base
Learn registers
Learn timing information
Learn assembly common mnemonics
Learn arithmetic operations
Learn logic operations (AND, OR, XOR, NOT, NAND, NOR, NXOR, IMPLY)
Learn masking
Learn assembly language basics
Learn stack construct’s operations
Learn calling conventions
Learn to use Application Binary Interface or ABI
Learn to make your own ABIs
Learn to use memory maps
Learn to make memory maps
Make a clock
Make a front panel
Make a calculator
Learn about existing instruction sets (Intel, ARM, RISC-V, PIC, AVR, SPARC, MIPS, Intersil 6120, Z80...)
Design a instruction set
Compose a assembler
Compose a disassembler
Compose a emulator
Write a B-derivative programming language (somewhat similar to C)
Write a IPL-derivative programming language (somewhat similar to Lisp and Scheme)
Write a general markup language (like GML, SGML, HTML, XML...)
Write a Turing tarpit (like Brainfuck)
Write a scripting language (like Bash)
Write a database system (like VisiCalc or SQL)
Write a CLI shell (basic operating system like Unix or CP/M)
Write a single-user GUI operating system (like Xerox Star’s Pilot)
Write a multi-user GUI operating system (like Linux)
Write various software utilities for my various OSes
Write various games for my various OSes
Write various niche applications for my various OSes
Implement a awesome model in very large scale integration, like the Commodore CBM-II
Implement a epic model in integrated circuits, like the DEC PDP-15
Implement a modest model in transistor-transistor logic, similar to the DEC PDP-12
Implement a simple model in diode-transistor logic, like the original DEC PDP-8
Implement a simpler model in later vacuum tubes, like the IBM 700 series
Implement simplest model in early vacuum tubes, like the EDSAC
[...]
(Conlang)=
Choose sounds
Choose phonotactics
[...]
(Animation ‘movie’)=
[...]
(Exploration top-down ’racing game’)=
[...]
(Video dictionary)=
[...]
(Grand strategy game)=
[...]
(Telex system)=
[...]
(Pen&paper tabletop game)=
[...]
(Search engine)=
[...]
(Microlearning system)=
[...]
(Alternate planet)=
[...]
(END)
4 notes
·
View notes
Text
Introduction to the framework
Programming paradigms
From time to time, the difference in writing code using computer languages was introduced.The programming paradigm is a way to classify programming languages based on their features. For example
Functional programming
Object oriented programming.
Some computer languages support many patterns. There are two programming languages. These are non-structured programming language and structured programming language. In structured programming language are two types of category. These are block structured(functional)programming and event-driven programming language. In a non-structured programming language characteristic
earliest programming language.
A series of code.
Flow control with a GO TO statement.
Become complex as the number of lines increases as a example Basic, FORTRAN, COBOL.
Often consider program as theories of a formal logical and computations as deduction in that logical space.
Non-structured programming may greatly simplify writing parallel programs.The structured programming language characteristics are
A programming paradigm that uses statement that change a program’s state.
Structured programming focus on describing how a program operators.
The imperative mood in natural language express commands, an imperative program consist of command for the computer perform.
When considering the functional programming language and object-oriented programming language in these two languages have many differences
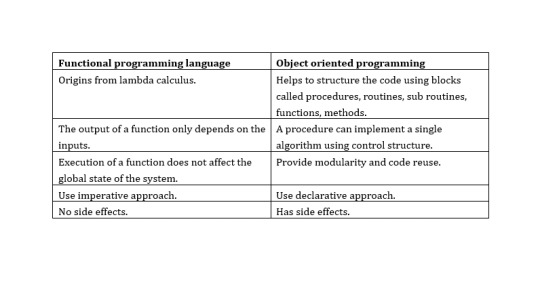
In here lambda calculus is formula in mathematical logic for expressing computation based on functional abstraction and application using variable binding and substitution. And lambda expressions is anonymous function that can use to create delegates or expression three type by using lambda expressions. Can write local function that can be passed as argument or returned as the value of function calls. A lambda expression is the most convenient way to create that delegate. Here an example of a simple lambda expression that defines the “plus one” function.
λx.x+1
And here no side effect meant in computer science, an operation, function or expression is said to have a side effect if it modifies some state variable values outside its local environment, that is to say has an observable effect besides returning a value to the invoke of the operation.Referential transparency meant oft-touted property of functional language which makes it easier to reason about the behavior of programs.
Key features of object-oriented programming
There are major features in object-oriented programming language. These are
Encapsulation - Encapsulation is one of the basic concepts in object-oriented programming. It describes the idea of bundling the data and methods that work on that data within an entity.
Inheritance - Inheritance is one of the basic categories of object-oriented programming languages. This is a mechanism where can get a class from one class to another, which can share a set of those characteristics and resources.
Polymorphous - Polymorphous is an object-oriented programming concept that refers to the ability of a variable, function, or object to take several forms.
Encapsulation - Encapsulation is to include inside a program object that requires all the resources that the object needs to do - basically, the methods and the data.
These things are refers to the creation of self-contain modules that bind processing functions to the data. These user-defined data types are called “classes” and one instance of a class is an “object”.
These things are refers to the creation of self-contain modules that bind processing functions to the data. These user-defined data types are called “classes” and one instance of a class is an “object”.
How the event-driven programming is different from other programming paradigms???
Event driven programming is a focus on the events triggered outside the system
User events
Schedulers/timers
Sensor, messages, hardware, interrupt.
Mostly related to the system with GUI where the users can interact with the GUI elements. User event listener to act when the events are triggered/fired. An internal event loop is used to identify the events and then call the necessary handler.
Software Run-time Architecture
A software architecture describes the design of the software system in terms of model components and connectors. However, architectural models can also be used on the run-time to enable the recovery of architecture and the architecture adaptation Languages can be classified according to the way they are processed and executed.
Compiled language
Scripting language
Markup language
Communication between application and OS needs additional components.The type of language used to develop application components.
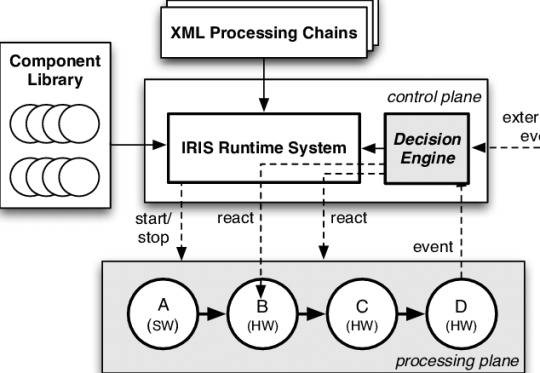
Compiled language
The compiled language is a programming language whose implementation is generally compiled, and not interpreter
Some executions can be run directly on the OS. For example, C on windows. Some executable s use vertical run-time machines. For example, java.net.
Scripting language
A scripting or script language is a programming language that supports the script - a program written for a specific run-time environment that automates the execution of those tasks that are performed by a human operator alternately by one-by-one can go.

The source code is not compiled it is executed directly.At the time of execution, code is interpreted by run-time machine. For example PHP, JS.
Markup Language
The markup language is a computer language that uses tags to define elements within the document.
There is no execution process for the markup language.Tool which has the knowledge to understand markup language, can render output. For example, HTML, XML.Some other tools are used to run the system at different levels
Virtual machine
Containers/Dockers
Virtual machine
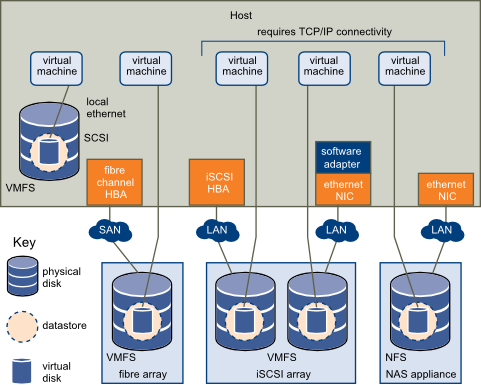
Containers
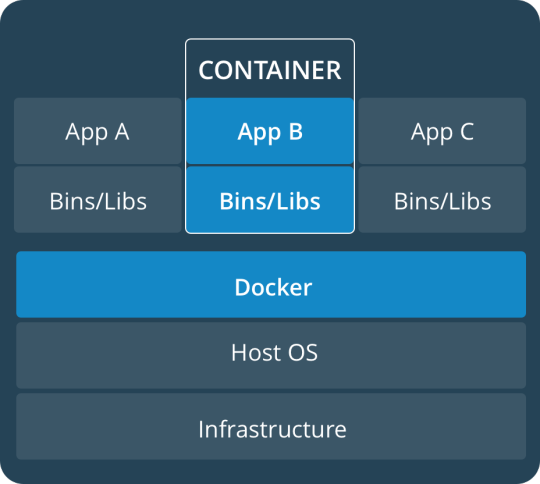
Virtual Machine Function is a function for the relation of vertical machine environments. This function enables the creation of several independent virtual machines on a physical machine which perpendicular to resources on the physical machine such as CPU, memory network and disk.
Development Tools
A programming tool or software development tool is a computer program used by software developers to create, debug, maintain, or otherwise support other programs and applications.Computer aided software engineering tools are used in the engineering life cycle of the software system.
Requirement – surveying tools, analyzing tools.
Designing – modelling tools
Development – code editors, frameworks, libraries, plugins, compilers.
Testing – test automation tools, quality assurance tools.
Implementation – VM s, containers/dockers, servers.
Maintenance – bug trackers, analytical tools.
CASE software types
Individual tools – for specific task.
Workbenches – multiple tools are combined, focusing on specific part of SDLC.
Environment – combines many tools to support many activities throughout the SDLS.
Framework vs Libraries vs plugins….
plugins
plugins provide a specific tool for development. Plugin has been placed in the project on development time, Apply some configurations using code. Run-time will be plugged in through the configuration

Libraries
To provide an API, the coder can use it to develop some features when writing the code. At the development time,
Add the library to the project (source code files, modules, packages, executable etc.)
Call the necessary functions/methods using the given packages/modules/classes.
At the run-time the library will be called by the code
Framework
Framework is a collection of libraries, tools, rules, structure and controls for the creation of software systems. At the run-time,
Create the structure of the application.
Place code in necessary place.
May use the given libraries to write code.
Include additional libraries and plugins.
At run-time the framework will call code.

A web application framework may provide
User session management.
Data storage.
A web template system.
A desktop application framework may provide
User interface functionality.
Widgets.
Frameworks are concrete
Framework consists of physical components that are usable files during production.JAVA and NET frameworks are set of concrete components like jars,dlls etc.
A framework is incomplete
The structure is not usable in its own right. Apart from this they do not leave anything empty for their user. The framework alone will not work, relevant application logic should be implemented and deployed alone with the framework. Structure trade challenge between learning curve and saving time coding.
Framework helps solving recurring problems
Very reusable because they are helpful in terms of many recurring problems. To make a framework for reference of this problem, commercial matter also means.
Framework drives the solution
The framework directs the overall architecture of a specific solution. To complete the JEE rules, if the JEE framework is to be used on an enterprise application.
Importance of frameworks in enterprise application development
Using code that is already built and tested by other programmers, enhances reliability and reduces programming time. Lower level "handling tasks, can help with framework codes. Framework often help enforce platform-specific best practices and rules.
1 note
·
View note
Text
docker commands cheat sheet PC 6TV+
💾 ►►► DOWNLOAD FILE 🔥🔥🔥🔥🔥 docker exec -it /bin/sh. docker restart. Show running container stats. Docker Cheat Sheet All commands below are called as options to the base docker command. for more information on a particular command. To enter a running container, attach a new shell process to a running container called foo, use: docker exec -it foo /bin/bash . Images are just. Docker is a containerization technology to build, ship and run applications inside containers. We can create different Docker containers for packaging different software as it uses virtualization at the level of an operating system. This article is a comprehensive list of Docker commands that you can refer to while building applications and packaging them in Docker containers. Native Docker integrations make Buddy the perfect tool for building Docker-based apps and microservices. We can also use docker container ps or docker container ls to list all the running containers. There is no difference between docker ps and docker container ps commands with respect to the result of their execution. The docker container ls command is an appropriate version of the command compared to ps as ls is a shortcut for list. Please note: -a is the short form for --all and they both can be used interchangeably. This command adds SIZE column to the output. As it can be seen from the screenshot above, 1. In simple words, the value in the SIZE column represents the size of the data that is written by the container in its writable layer. This text virtual MB represents the amount of disk space used by the image of this container. This command modifies the docker ps output and displays only the Ids of the running containers. We can also write the above command by combining a and q as:. We can filter the output of docker ps or docker ps -a commands using the --filter option as:. In the above screenshot, the command filters the containers and only displays the ones whose name starts with un. Similarly, we can add -f option with the docker ps -a command:. As seen in the above screenshot, the filter command filters the containers and displays only the running ones in the list! You can check the other filter options available from the official Docker documentation. The docker create command is used to create a new container using a Docker image. It does not run the container but just adds a writable layer on top of the Docker image. We'll have to run the docker start command to run the created container. As docker create command interacts with the container object, we can also use the below command:. Let's create a container using an nginx Docker image:. The container is created. Let's verify that using the docker ps command:. The status of the container is Created as expected! We can also create a Docker container with some fixed names. Let's do that right away! Let's create a container named nginx-container using nginx image:. The container nginx-container is created! We can use the docker start command either using the container ID or name. Let's start the nginx-container :. As seen from the above screenshot, nginx-container is created and the docker ps command is used to verify the status of the container. Here's the command for stopping the nginx-container :. As seen in the above screenshot, the container nginx-container is exited 17 seconds ago. This container won't be listed in the docker ps command. The nginx-container is now restarted and is up for the last 8 seconds. Let's try to pause the nginx-container :. To unpause the nginx-container , we can use the below command. It is a combination of the create and the start commands. This command creates the container and starts it in one go! The docker create or docker container create command creates the container and to run the container, we have to use the docker start command. It rarely happens that we will create the container and run it later. Generally, in real-world cases, we would create and run the container in one go using the docker run command. If the Docker image is locally available, Docker will run the container using that image otherwise it would download the image from the remote repository. Docker runs the container in the foreground mode by default. In this mode, Docker starts the root process in the container in the foreground and attaches the standard input stdin , output stdout , and error stderr of the process to the terminal session. In the foreground mode, you cannot execute any other command on the terminal session until the container is running. This is the same as running a Linux process in the foreground mode. Let's create and run a container in the foreground mode using the nginx Docker image:. The above screenshot shows the output of the Nginx container on the terminal. The Nginx process is running in the foreground and hence this terminal session cannot be used for executing other commands or performing any other operation. If you end the terminal session by closing the terminal tab or by using the exit command, the container will die automatically and the Nginx process would stop running. The run command worked as expected - it created the container and also started the container. The long-running processes such as Nginx are run in the background mode and so are not dependent on the terminal session. Now if you execute the docker ps command, you can see that the container is in exited stated but it is not deleted. This is because when the container exits or when we stop the container, the filesystem of the container continues to persist on the host machine. If you want to also delete the container after it is exited, you can start the container in the foreground using this command:. This command would start the nginx container in the foreground mode. If you kill the terminal session, it would stop the container and delete it! To run the container in the background or in daemon mode, we can use the -d --detach option. Let's run a container with nginx image in the background mode:. From the above image, we can see that the container process is not attached to the terminal session and the container is running in the background mode. Let's verify if the container is in the running state using the docker ps command:. We can use --name option to assign a name to the container as shown below:. Let's create a container named nginx-container from nginx image:. Here, we can see that inside nginx-container there are two processes running with the Ids and We know that nginx process listens on port Hence, a container running an nginx process will expose port 80 on the container. Docker will map port 80 of the nginx container with port 80 of the host machine. The nginx container will be accessible to the outside world from port 80 of the host machine. But what if we want to run multiple nginx containers on the same host machine? The port mappings allow us to map a port on the container with a different port on the host machine. To expose nginx container port 80 on port of the host machine, we can use the below command:. The port mappings are also indicated in the docker ps command as shown in the above screenshot! As the container is mapped to the port of the host machine, we can access the Nginx container on using the curl command. Let's try that out! Let's rename nginx-container to nginx-cont :. When we run the container in an interactive mode, Docker will attach the stdin standard input of the container to the terminal. This will give us entry inside the container and now we can run any command inside the container. This command simply means that we want to start the bash shell inside the container. Let's create a container from an Nginx image and run the bash command inside the container:. Please open another tab and let's list down the processes running inside the container:. As seen in the above screenshot, only one process is running inside the nginx container. This is the same process that we have opened in Tab 1. When we had checked the processes running inside the nginx-container earlier, we saw two processes nginx master and worker inside the nginx container but now there is just one process - bash shell. This command overrides the dockerfile CMD or Entrypoint commands and so the Nginx processes were not started inside the Nginx container. If you have a container that is already running and you want to go inside that container, here's a command that will take you to the container world:. This is quite a handy command and is used more often to get into the running container and perform some operations. Here's a quick example:. The life of a container depends on the root process inside the container. So far we have run nginx process inside the containers. If we run a process that is short-lived inside the container, it will die once that process dies! For example, if we run a container using the centos Docker image, it will die as soon as the process inside the centos dies. The bash command runs and dies immediately. Hence, the centos container also dies immediately as shown below:. To continue running the container that has a short-lived process, we can use the below command:. To continuously run the container created from centos image, we can use the below command:. The Docker container and the host file systems are isolated from each other. We cannot use the normal cp or copy command to copy content from the container to the host and vice-versa. To copy content from the container to the host machine, we can use the below command:. Let's copy this file inside the centos-container using the below command:. To remove a Docker container, you first have to stop the running container and then delete it:. If you want to directly remove the container without stopping it, you can use the below command:. This will create and run a container that will be deleted automatically once the container stops. We know that docker ps -a -q will list all running as well as not running container Ids. Once we get the Ids using the rm option, we can then remove all the containers. Let's now create an image centos-with-new-file from centos-container using the below command:. As shown in the above image, we created a new image centos-with-new-file and using this image, we created a new container centos-with-new-file-container. We have already seen that we can directly go inside the container using the docker exec command. Let's see how we can execute commands inside the container without actually going inside the container. To run any command inside the container, we can use the docker exec command as shown below:. For example, to get the list of processes running inside the centos image, we can use the below command:. We can set environment variables inside the container environment using the below command:. To create an environment variable with the name NAME and value Buddy inside the centos image, we can use the below command:. To check if the environment variable has been set inside the container, we can use the below commands:. The docker exec command executes printenv to print environment variable inside the centos-container container and prints the output on the terminal. The file file1. The --env-file flag takes a filename as an argument. Let's create environment variables inside the centos-container-1 container using the file file1. Let's create a Dockerfile as shown below in the current directory:. We can now build a Docker image centos from this Dockerfile using the below command:. Here, dot. The above command will build an image with imagename and tag 1. We can build a Docker image from a Dockerfile which is not named Dockerfile using the below command:. This command will delete the Docker image if the image is not used by any container. The images that are displayed when we do docker ps -a are used by some of the existing containers. All images from docker images -a - all images from docker ps -a. When we build a Docker image using Dockerfile, Docker creates an image with the given name. Docker will create an image from the Dockerfile in the current directory with the name imagename. If the dangling images are referenced by containers either running or not running , Docker will not prune these dangling images. To remove dangling images, we've to make sure that they are not referenced by any container. We can first run docker container prune to remove all the stopped containers and the docker images command will now remove the dangling images that were referenced by these stopped containers. Once we are logged in to Docker hub, we can push the Docker images to the registry using the below command:. If the image is not present on the host machine, Docker will pull the image from the Docker registry. Let's now look at some commands useful for checking logs in a Docker container:. The above screenshot shows the logs of the container nginx-container. To display the last few lines of the container logs and monitor them, we can use the below command:. The new messages in the container would be displayed here! This is similar to the tail -f command. The network called new-network is created successfully! The above command will connect the container with the specified network. Let's look at an example:. The container nginx-container is connected to the network new-network and we can verify this using docker network inspect :. In this section, we'll look at some of the commonly used Docker volumes commands! We can mount the volume inside the Docker container once it is created using the below command:. To remove the volume, we first have to remove the containers using that volume and then only we can remove the volume. To mount any specific host directory inside the container, we have to use the below Docker run command:. If a directory in a container has some content and you mount the volume with type bind onto that directory, the existing content of that directory would be lost and you get an empty directory. This is an extensive guide on using Docker. We learned many useful commands related to Docker containers, images, networks and volumes in this article. Rupesh Mishra is a backend developer, freelance blogger, and tutor. When he is not coding he enjoys watching anime and movies. Sign up for a free monthly scoop of news and features articles handpicked by our staff. Unsubscribe at any time. No hidden catch. Rupesh Mishra November 19, Let's first look at some of the fundamental container commands! Copy link. Securing our Docker image Check out our tutorial. Optimizing Dockerfile for Node. The Web Dev Monthly Sign up for a free monthly scoop of news and features articles handpicked by our staff. Email Subscribe.
1 note
·
View note