#docker image tagging best practices
Explore tagged Tumblr posts
Visit Tumblr Blog
Explore Tumblr blogs with no restrictions, modern design and the best experience.
Last Seen Tumblr Blogs


Fun Fact
Tumblr was named as a finalist in Lead411’s New York City Hot 125 in Aug 2010.
Text
Docker Tag and Push Image to Hub | Docker Tagging Explained and Best Practices
Full Video Link: https://youtu.be/X-uuxvi10Cw Hi, a new #video on #DockerImageTagging is published on @codeonedigest #youtube channel. Learn TAGGING docker image. Different ways to TAG docker image #Tagdockerimage #pushdockerimagetodockerhubrepository #
Next step after building the docker image is to tag docker image. Image tagging is important to upload docker image to docker hub repository or azure container registry or elastic container registry etc. There are different ways to TAG docker image. Learn how to tag docker image? What are the best practices for docker image tagging? How to tag docker container image? How to tag and push docker…

View On WordPress
#docker#docker and Kubernetes#docker build tag#docker compose#docker image tagging#docker image tagging best practices#docker tag and push image to registry#docker tag azure container registry#docker tag command#docker tag image#docker tag push#docker tagging best practices#docker tags explained#docker tutorial#docker tutorial for beginners#how to tag and push docker image#how to tag existing docker image#how to upload image to docker hub repository#push docker image to docker hub repository#Tag docker image#tag docker image after build#what is docker
0 notes
Text
🚀 Container Adoption Boot Camp for Developers: Fast-Track Your Journey into Containerization
In today’s DevOps-driven world, containerization is no longer a buzzword—it’s a fundamental skill for modern developers. Whether you're building microservices, deploying to Kubernetes, or simply looking to streamline your development workflow, containers are at the heart of it all.
That’s why we created the Container Adoption Boot Camp for Developers—a focused, hands-on training program designed to take you from container curious to container confident.
🧠 Why Containers Matter for Developers
Containers bring consistency, speed, and scalability to your development and deployment process. Imagine a world where:
Your app works exactly the same on your machine as it does in staging or production.
You can spin up dev environments in seconds.
You can ship features faster with fewer bugs.
That’s the power of containerization—and our boot camp helps you unlock it.
🎯 What You’ll Learn
Our boot camp is developer-first and practical by design. Here’s a taste of what we cover:
✅ Container Fundamentals
What are containers? Why do they matter?
Images vs containers vs registries
Comparison: Docker vs Podman
✅ Building Your First Container
Creating and optimizing Dockerfiles
Managing multi-stage builds
Environment variables and configuration strategies
✅ Running Containers in Development
Volume mounting, debugging, hot-reloading
Using Compose for multi-container applications
✅ Secure & Efficient Images
Best practices for lightweight and secure containers
Image scanning and vulnerability detection
✅ From Dev to Prod
Building container workflows into your CI/CD pipeline
Tagging strategies, automated builds, and registries
✅ Intro to Kubernetes & OpenShift
How your containers scale in production
Developer experience on OpenShift with odo, kubectl, and oc
🔧 Hands-On, Lab-Focused Learning
This isn’t just theory. Every module includes real-world labs using tools like:
Podman/Docker
Buildah & Skopeo
GitHub Actions / GitLab CI
OpenShift Developer Sandbox (or your preferred cloud)
You’ll walk away with reusable templates, code samples, and a fully containerized project of your own.
👨💻 Who Should Join?
This boot camp is ideal for:
Developers looking to adopt DevOps practices
Backend engineers exploring microservices
Full-stack developers deploying to cloud platforms
Anyone working in a container-based environment (Kubernetes, OpenShift, EKS, GKE, etc.)
Whether you're new to containers or looking to refine your skills, we’ve got you covered.
🏁 Get Started with HawkStack
At HawkStack Technologies, we bridge the gap between training and real-world implementation. Our Container Adoption Boot Camp is crafted by certified professionals with deep industry experience, ensuring you don’t just learn—you apply.
📅 Next cohort starts soon 📍 Live online + lab access 💬 Mentorship + post-training support
👉 Contact us to reserve your spot or schedule a custom boot camp for your team - www.hawkstack.com
Ready to take the leap into containerization? Let’s build something great—one container at a time. 🧱💻🚢
0 notes
Text
A Beginner’s Guide to Docker: Building and Running Containers in DevOps
Docker has revolutionized the way applications are built, shipped, and run in the world of DevOps. As a containerization platform, Docker enables developers to package applications and their dependencies into lightweight, portable containers, ensuring consistency across environments. This guide introduces Docker’s core concepts and practical steps to get started.
What is Docker? Docker is an open-source platform that allows developers to: Build and package applications along with their dependencies into containers.
Run these containers consistently across different environments. Simplify software development, deployment, and scaling processes.
2. Why Use Docker in DevOps? Environment Consistency: Docker containers ensure that applications run the same in development, testing, and production.
Speed: Containers start quickly and use system resources efficiently.
Portability: Containers can run on any system that supports Docker, whether it’s a developer’s laptop, an on-premises server, or the cloud.
Microservices Architecture: Docker works seamlessly with microservices, enabling developers to build, deploy, and scale individual services independently.
3. Key Docker Components Docker Engine:
The core runtime for building and running containers.
Images: A blueprint for containers that include the application and its dependencies. Containers: Instances of images that are lightweight and isolated.
Dockerfile: A script containing instructions to build a Docker image.
Docker Hub: A repository for sharing Docker images.
4. Getting Started with Docker
Step 1: Install Docker Download and install Docker Desktop for your operating system from Docker’s official site.
Step 2: Write a Dockerfile Create a Dockerfile to define your application environment.
Example for a Python app:
dockerfile Edit
# Use an official Python runtime as a base image FROM python:3.9-slim
# Set the working directory WORKDIR /app
# Copy project files COPY . .
# Install dependencies RUN pip install -r requirements.txt # Define the command to run the app CMD [“python”, “app.py”]
Step 3: Build the Docker Image Run the following command to build the image:
bash Copy Edit docker build -t my-python-app .
Step 4: Run the Container Start a container from your image:
bash
Edit docker run -d -p 5000:5000 my-python-app
This maps port 5000 of the container to port 5000 on your host machine.
Step 5: Push to Docker Hub Share your image by pushing it to Docker Hub: bash
Edit docker tag my-python-app username/my-python-app docker push username/my-python-app
5. Practical Use Cases in DevOps Continuous Integration/Continuous Deployment (CI/CD):
Docker is commonly used in pipelines for building, testing, and deploying applications.
Microservices:
Each service runs in its own container, isolated from others.
Scalability:
Containers can be easily scaled up or down based on demand.
Testing:
Test environments can be quickly spun up and torn down using Docker containers.
6. Best Practices Keep Docker images small by using minimal base images. Avoid hardcoding sensitive data into images; use environment variables instead.
Use Docker Compose to manage multi-container applications. Regularly scan images for vulnerabilities using Docker’s built-in security tools.
Conclusion
Docker simplifies the development and deployment process, making it a cornerstone of modern DevOps practices. By understanding its basics and starting with small projects, beginners can quickly leverage Docker to enhance productivity and streamline workflows.

0 notes
Text
Understanding Docker Playground Online: Your Gateway to Containerization
In the ever-evolving world of software development, containerization has become a pivotal technology, allowing developers to create, deploy, and manage applications in isolated environments. Docker, a leader in this domain, has revolutionized how applications are built and run. For both novices and seasoned developers, mastering Docker is now essential, and one of the best ways to do this is by leveraging an Online Docker Playground. In this article, we will explore the benefits of using such a platform and delve into the Docker Command Line and Basic Docker Commands that form the foundation of containerization.
The Importance of Docker in Modern Development
Docker has gained immense popularity due to its ability to encapsulate applications and their dependencies into containers. These containers are lightweight, portable, and can run consistently across different computing environments, from a developer's local machine to production servers in the cloud. This consistency eliminates the "it works on my machine" problem, which has historically plagued developers.
As a developer, whether you are building microservices, deploying scalable applications, or managing a complex infrastructure, Docker is an indispensable tool. Understanding how to effectively use Docker begins with getting comfortable with the Docker Command Line Interface (CLI) and mastering the Basic Docker Commands.
Learning Docker with an Online Docker Playground
For beginners, diving into Docker can be daunting. The Docker ecosystem is vast, with numerous commands, options, and configurations to learn. This is where an Online Docker Playground comes in handy. An Online Docker Playground provides a sandbox environment where you can practice Docker commands without the need to install Docker locally on your machine. This is particularly useful for those who are just starting and want to experiment without worrying about configuring their local environment.
Using an Online Docker Playground offers several advantages:
Accessibility: You can access the playground from any device with an internet connection, making it easy to practice Docker commands anytime, anywhere.
No Installation Required: Skip the hassle of installing Docker and its dependencies on your local machine. The playground provides a ready-to-use environment.
Safe Experimentation: You can test commands and configurations in a risk-free environment without affecting your local system or production environment.
Immediate Feedback: The playground often includes interactive tutorials that provide instant feedback, helping you learn more effectively.
Getting Started with Docker Command Line
The Docker Command Line Interface (CLI) is the primary tool you'll use to interact with Docker. It's powerful, versatile, and allows you to manage your Docker containers and images with ease. The CLI is where you will issue commands to create, manage, and remove containers, among other tasks.
To begin, let's explore some Basic Docker Commands that you will frequently use in your journey to mastering Docker:
docker run: This command is used to create and start a new container from an image. For example, docker run hello-world pulls the "hello-world" image from Docker Hub and runs it in a new container.
docker ps: To see a list of running containers, use the docker ps command. To view all containers (running and stopped), you can add the -a flag: docker ps -a.
docker images: This command lists all the images stored locally on your machine. It shows details like the repository, tag, image ID, and creation date.
docker pull: To download an image from Docker Hub, use docker pull. For example, docker pull nginx fetches the latest version of the NGINX image from Docker Hub.
docker stop: To stop a running container, use docker stop [container_id]. Replace [container_id] with the actual ID or name of the container you want to stop.
docker rm: Once a container is stopped, you can remove it using docker rm [container_id].
docker rmi: If you want to delete an image from your local storage, use docker rmi [image_id].
Conclusion
Mastering Docker is a crucial skill for modern developers, and utilizing an Online Docker Playground is one of the most effective ways to get started. By practicing Docker Command Line usage and familiarizing yourself with Basic Docker Commands, you can gain the confidence needed to manage complex containerized environments. As you progress, you'll find that Docker not only simplifies the deployment process but also enhances the scalability and reliability of your applications. Dive into Docker today, and unlock the full potential of containerization in your development workflow.
0 notes
Text
Docker and Kubernetes Training | Hyderabad
How to Store Images in Container Registries?
Introduction:
Container registries serve as central repositories for storing and managing container images, facilitating seamless deployment across various environments. However, optimizing image storage within these registries requires careful consideration of factors such as scalability, security, and performance. - Docker and Kubernetes Training
Choose the Right Registry:
Selecting the appropriate container registry is the first step towards efficient image storage. Popular options include Docker Hub, Google Container Registry (GCR), Amazon Elastic Container Registry (ECR), and Azure Container Registry (ACR). Evaluate factors such as integration with existing infrastructure, pricing, security features, and geographical distribution to make an informed decision.
Image Tagging Strategy:
Implement a robust tagging strategy to organize and manage container images effectively. Use semantic versioning or timestamp-based tagging to denote image versions and updates clearly. Avoid using generic tags like "latest," as they can lead to ambiguity and inconsistent deployments. - Kubernetes Online Training
Optimize Image Size:
Minimize image size by adhering to best practices such as using lightweight base images, leveraging multi-stage builds, and optimizing Dockerfiles. Removing unnecessary dependencies and layers helps reduce storage requirements and accelerates image pull times during deployment.
Security Considerations:
Prioritize security by implementing access controls, image signing, and vulnerability scanning within the container registry. Restrict image access based on user roles and permissions to prevent unauthorized usage. Regularly scan images for vulnerabilities and apply patches promptly to mitigate potential risks. - Docker Online Training
Automated Builds and CI/CD Integration:
Integrate container registries with continuous integration/continuous deployment (CI/CD) pipelines to automate image builds, testing, and deployment processes. Leverage tools like Jenkins, GitLab CI/CD, or GitHub Actions to streamline workflows and ensure consistent image updates across environments.
Content Trust and Image Signing:
Enable content trust mechanisms such as Docker Content Trust or Notary to ensure image authenticity and integrity. By digitally signing images and verifying signatures during pull operations, organizations can mitigate the risk of tampering and unauthorized modifications.
Data Backup and Disaster Recovery:
Implement robust backup and disaster recovery strategies to safeguard critical container images against data loss or corruption. Regularly backup registry data to redundant storage locations and establish procedures for swift restoration in the event of failures or disasters. - Docker and Kubernetes Online Training
Performance Optimization:
Optimize registry performance by leveraging caching mechanisms, content delivery networks (CDNs), and geo-replication to reduce latency and improve image retrieval speeds. Distribute registry instances across multiple geographical regions to enhance availability and resilience.
Conclusion:
By following best practices such as selecting the right registry, optimizing image size, enforcing security measures, and integrating with CI/CD pipelines, organizations can streamline image management and enhance their containerized deployments without diving into complex coding intricacies.
Visualpath is the Leading and Best Institute for learning Docker And Kubernetes Online in Ameerpet, Hyderabad. We provide Docker Online Training Course, you will get the best course at an affordable cost.
Attend Free Demo
Call on - +91-9989971070.
Visit : https://www.visualpath.in/DevOps-docker-kubernetes-training.html
Blog : https://dockerandkubernetesonlinetraining.blogspot.com/
#docker and kubernetes training#docker online training#docker training in hyderabad#kubernetes training hyderabad#docker and kubernetes online training#docker online training hyderabad#kubernetes online training#kubernetes online training hyderabad
0 notes
Text
How to set up command-line access to Amazon Keyspaces (for Apache Cassandra) by using the new developer toolkit Docker image
Amazon Keyspaces (for Apache Cassandra) is a scalable, highly available, and fully managed Cassandra-compatible database service. Amazon Keyspaces helps you run your Cassandra workloads more easily by using a serverless database that can scale up and down automatically in response to your actual application traffic. Because Amazon Keyspaces is serverless, there are no clusters or nodes to provision and manage. You can get started with Amazon Keyspaces with a few clicks in the console or a few changes to your existing Cassandra driver configuration. In this post, I show you how to set up command-line access to Amazon Keyspaces by using the keyspaces-toolkit Docker image. The keyspaces-toolkit Docker image contains commonly used Cassandra developer tooling. The toolkit comes with the Cassandra Query Language Shell (cqlsh) and is configured with best practices for Amazon Keyspaces. The container image is open source and also compatible with Apache Cassandra 3.x clusters. A command line interface (CLI) such as cqlsh can be useful when automating database activities. You can use cqlsh to run one-time queries and perform administrative tasks, such as modifying schemas or bulk-loading flat files. You also can use cqlsh to enable Amazon Keyspaces features, such as point-in-time recovery (PITR) backups and assign resource tags to keyspaces and tables. The following screenshot shows a cqlsh session connected to Amazon Keyspaces and the code to run a CQL create table statement. Build a Docker image To get started, download and build the Docker image so that you can run the keyspaces-toolkit in a container. A Docker image is the template for the complete and executable version of an application. It’s a way to package applications and preconfigured tools with all their dependencies. To build and run the image for this post, install the latest Docker engine and Git on the host or local environment. The following command builds the image from the source. docker build --tag amazon/keyspaces-toolkit --build-arg CLI_VERSION=latest https://github.com/aws-samples/amazon-keyspaces-toolkit.git The preceding command includes the following parameters: –tag – The name of the image in the name:tag Leaving out the tag results in latest. –build-arg CLI_VERSION – This allows you to specify the version of the base container. Docker images are composed of layers. If you’re using the AWS CLI Docker image, aligning versions significantly reduces the size and build times of the keyspaces-toolkit image. Connect to Amazon Keyspaces Now that you have a container image built and available in your local repository, you can use it to connect to Amazon Keyspaces. To use cqlsh with Amazon Keyspaces, create service-specific credentials for an existing AWS Identity and Access Management (IAM) user. The service-specific credentials enable IAM users to access Amazon Keyspaces, but not access other AWS services. The following command starts a new container running the cqlsh process. docker run --rm -ti amazon/keyspaces-toolkit cassandra.us-east-1.amazonaws.com 9142 --ssl -u "SERVICEUSERNAME" -p "SERVICEPASSWORD" The preceding command includes the following parameters: run – The Docker command to start the container from an image. It’s the equivalent to running create and start. –rm –Automatically removes the container when it exits and creates a container per session or run. -ti – Allocates a pseudo TTY (t) and keeps STDIN open (i) even if not attached (remove i when user input is not required). amazon/keyspaces-toolkit – The image name of the keyspaces-toolkit. us-east-1.amazonaws.com – The Amazon Keyspaces endpoint. 9142 – The default SSL port for Amazon Keyspaces. After connecting to Amazon Keyspaces, exit the cqlsh session and terminate the process by using the QUIT or EXIT command. Drop-in replacement Now, simplify the setup by assigning an alias (or DOSKEY for Windows) to the Docker command. The alias acts as a shortcut, enabling you to use the alias keyword instead of typing the entire command. You will use cqlsh as the alias keyword so that you can use the alias as a drop-in replacement for your existing Cassandra scripts. The alias contains the parameter –v "$(pwd)":/source, which mounts the current directory of the host. This is useful for importing and exporting data with COPY or using the cqlsh --file command to load external cqlsh scripts. alias cqlsh='docker run --rm -ti -v "$(pwd)":/source amazon/keyspaces-toolkit cassandra.us-east-1.amazonaws.com 9142 --ssl' For security reasons, don’t store the user name and password in the alias. After setting up the alias, you can create a new cqlsh session with Amazon Keyspaces by calling the alias and passing in the service-specific credentials. cqlsh -u "SERVICEUSERNAME" -p "SERVICEPASSWORD" Later in this post, I show how to use AWS Secrets Manager to avoid using plaintext credentials with cqlsh. You can use Secrets Manager to store, manage, and retrieve secrets. Create a keyspace Now that you have the container and alias set up, you can use the keyspaces-toolkit to create a keyspace by using cqlsh to run CQL statements. In Cassandra, a keyspace is the highest-order structure in the CQL schema, which represents a grouping of tables. A keyspace is commonly used to define the domain of a microservice or isolate clients in a multi-tenant strategy. Amazon Keyspaces is serverless, so you don’t have to configure clusters, hosts, or Java virtual machines to create a keyspace or table. When you create a new keyspace or table, it is associated with an AWS Account and Region. Though a traditional Cassandra cluster is limited to 200 to 500 tables, with Amazon Keyspaces the number of keyspaces and tables for an account and Region is virtually unlimited. The following command creates a new keyspace by using SingleRegionStrategy, which replicates data three times across multiple Availability Zones in a single AWS Region. Storage is billed by the raw size of a single replica, and there is no network transfer cost when replicating data across Availability Zones. Using keyspaces-toolkit, connect to Amazon Keyspaces and run the following command from within the cqlsh session. CREATE KEYSPACE amazon WITH REPLICATION = {'class': 'SingleRegionStrategy'} AND TAGS = {'domain' : 'shoppingcart' , 'app' : 'acme-commerce'}; The preceding command includes the following parameters: REPLICATION – SingleRegionStrategy replicates data three times across multiple Availability Zones. TAGS – A label that you assign to an AWS resource. For more information about using tags for access control, microservices, cost allocation, and risk management, see Tagging Best Practices. Create a table Previously, you created a keyspace without needing to define clusters or infrastructure. Now, you will add a table to your keyspace in a similar way. A Cassandra table definition looks like a traditional SQL create table statement with an additional requirement for a partition key and clustering keys. These keys determine how data in CQL rows are distributed, sorted, and uniquely accessed. Tables in Amazon Keyspaces have the following unique characteristics: Virtually no limit to table size or throughput – In Amazon Keyspaces, a table’s capacity scales up and down automatically in response to traffic. You don’t have to manage nodes or consider node density. Performance stays consistent as your tables scale up or down. Support for “wide” partitions – CQL partitions can contain a virtually unbounded number of rows without the need for additional bucketing and sharding partition keys for size. This allows you to scale partitions “wider” than the traditional Cassandra best practice of 100 MB. No compaction strategies to consider – Amazon Keyspaces doesn’t require defined compaction strategies. Because you don’t have to manage compaction strategies, you can build powerful data models without having to consider the internals of the compaction process. Performance stays consistent even as write, read, update, and delete requirements change. No repair process to manage – Amazon Keyspaces doesn’t require you to manage a background repair process for data consistency and quality. No tombstones to manage – With Amazon Keyspaces, you can delete data without the challenge of managing tombstone removal, table-level grace periods, or zombie data problems. 1 MB row quota – Amazon Keyspaces supports the Cassandra blob type, but storing large blob data greater than 1 MB results in an exception. It’s a best practice to store larger blobs across multiple rows or in Amazon Simple Storage Service (Amazon S3) object storage. Fully managed backups – PITR helps protect your Amazon Keyspaces tables from accidental write or delete operations by providing continuous backups of your table data. The following command creates a table in Amazon Keyspaces by using a cqlsh statement with customer properties specifying on-demand capacity mode, PITR enabled, and AWS resource tags. Using keyspaces-toolkit to connect to Amazon Keyspaces, run this command from within the cqlsh session. CREATE TABLE amazon.eventstore( id text, time timeuuid, event text, PRIMARY KEY(id, time)) WITH CUSTOM_PROPERTIES = { 'capacity_mode':{'throughput_mode':'PAY_PER_REQUEST'}, 'point_in_time_recovery':{'status':'enabled'} } AND TAGS = {'domain' : 'shoppingcart' , 'app' : 'acme-commerce' , 'pii': 'true'}; The preceding command includes the following parameters: capacity_mode – Amazon Keyspaces has two read/write capacity modes for processing reads and writes on your tables. The default for new tables is on-demand capacity mode (the PAY_PER_REQUEST flag). point_in_time_recovery – When you enable this parameter, you can restore an Amazon Keyspaces table to a point in time within the preceding 35 days. There is no overhead or performance impact by enabling PITR. TAGS – Allows you to organize resources, define domains, specify environments, allocate cost centers, and label security requirements. Insert rows Before inserting data, check if your table was created successfully. Amazon Keyspaces performs data definition language (DDL) operations asynchronously, such as creating and deleting tables. You also can monitor the creation status of a new resource programmatically by querying the system schema table. Also, you can use a toolkit helper for exponential backoff. Check for table creation status Cassandra provides information about the running cluster in its system tables. With Amazon Keyspaces, there are no clusters to manage, but it still provides system tables for the Amazon Keyspaces resources in an account and Region. You can use the system tables to understand the creation status of a table. The system_schema_mcs keyspace is a new system keyspace with additional content related to serverless functionality. Using keyspaces-toolkit, run the following SELECT statement from within the cqlsh session to retrieve the status of the newly created table. SELECT keyspace_name, table_name, status FROM system_schema_mcs.tables WHERE keyspace_name = 'amazon' AND table_name = 'eventstore'; The following screenshot shows an example of output for the preceding CQL SELECT statement. Insert sample data Now that you have created your table, you can use CQL statements to insert and read sample data. Amazon Keyspaces requires all write operations (insert, update, and delete) to use the LOCAL_QUORUM consistency level for durability. With reads, an application can choose between eventual consistency and strong consistency by using LOCAL_ONE or LOCAL_QUORUM consistency levels. The benefits of eventual consistency in Amazon Keyspaces are higher availability and reduced cost. See the following code. CONSISTENCY LOCAL_QUORUM; INSERT INTO amazon.eventstore(id, time, event) VALUES ('1', now(), '{eventtype:"click-cart"}'); INSERT INTO amazon.eventstore(id, time, event) VALUES ('2', now(), '{eventtype:"showcart"}'); INSERT INTO amazon.eventstore(id, time, event) VALUES ('3', now(), '{eventtype:"clickitem"}') IF NOT EXISTS; SELECT * FROM amazon.eventstore; The preceding code uses IF NOT EXISTS or lightweight transactions to perform a conditional write. With Amazon Keyspaces, there is no heavy performance penalty for using lightweight transactions. You get similar performance characteristics of standard insert, update, and delete operations. The following screenshot shows the output from running the preceding statements in a cqlsh session. The three INSERT statements added three unique rows to the table, and the SELECT statement returned all the data within the table. Export table data to your local host You now can export the data you just inserted by using the cqlsh COPY TO command. This command exports the data to the source directory, which you mounted earlier to the working directory of the Docker run when creating the alias. The following cqlsh statement exports your table data to the export.csv file located on the host machine. CONSISTENCY LOCAL_ONE; COPY amazon.eventstore(id, time, event) TO '/source/export.csv' WITH HEADER=false; The following screenshot shows the output of the preceding command from the cqlsh session. After the COPY TO command finishes, you should be able to view the export.csv from the current working directory of the host machine. For more information about tuning export and import processes when using cqlsh COPY TO, see Loading data into Amazon Keyspaces with cqlsh. Use credentials stored in Secrets Manager Previously, you used service-specific credentials to connect to Amazon Keyspaces. In the following example, I show how to use the keyspaces-toolkit helpers to store and access service-specific credentials in Secrets Manager. The helpers are a collection of scripts bundled with keyspaces-toolkit to assist with common tasks. By overriding the default entry point cqlsh, you can call the aws-sm-cqlsh.sh script, a wrapper around the cqlsh process that retrieves the Amazon Keyspaces service-specific credentials from Secrets Manager and passes them to the cqlsh process. This script allows you to avoid hard-coding the credentials in your scripts. The following diagram illustrates this architecture. Configure the container to use the host’s AWS CLI credentials The keyspaces-toolkit extends the AWS CLI Docker image, making keyspaces-toolkit extremely lightweight. Because you may already have the AWS CLI Docker image in your local repository, keyspaces-toolkit adds only an additional 10 MB layer extension to the AWS CLI. This is approximately 15 times smaller than using cqlsh from the full Apache Cassandra 3.11 distribution. The AWS CLI runs in a container and doesn’t have access to the AWS credentials stored on the container’s host. You can share credentials with the container by mounting the ~/.aws directory. Mount the host directory to the container by using the -v parameter. To validate a proper setup, the following command lists current AWS CLI named profiles. docker run --rm -ti -v ~/.aws:/root/.aws --entrypoint aws amazon/keyspaces-toolkit configure list-profiles The ~/.aws directory is a common location for the AWS CLI credentials file. If you configured the container correctly, you should see a list of profiles from the host credentials. For instructions about setting up the AWS CLI, see Step 2: Set Up the AWS CLI and AWS SDKs. Store credentials in Secrets Manager Now that you have configured the container to access the host’s AWS CLI credentials, you can use the Secrets Manager API to store the Amazon Keyspaces service-specific credentials in Secrets Manager. The secret name keyspaces-credentials in the following command is also used in subsequent steps. docker run --rm -ti -v ~/.aws:/root/.aws --entrypoint aws amazon/keyspaces-toolkit secretsmanager create-secret --name keyspaces-credentials --description "Store Amazon Keyspaces Generated Service Credentials" --secret-string "{"username":"SERVICEUSERNAME","password":"SERVICEPASSWORD","engine":"cassandra","host":"SERVICEENDPOINT","port":"9142"}" The preceding command includes the following parameters: –entrypoint – The default entry point is cqlsh, but this command uses this flag to access the AWS CLI. –name – The name used to identify the key to retrieve the secret in the future. –secret-string – Stores the service-specific credentials. Replace SERVICEUSERNAME and SERVICEPASSWORD with your credentials. Replace SERVICEENDPOINT with the service endpoint for the AWS Region. Creating and storing secrets requires CreateSecret and GetSecretValue permissions in your IAM policy. As a best practice, rotate secrets periodically when storing database credentials. Use the Secrets Manager helper script Use the Secrets Manager helper script to sign in to Amazon Keyspaces by replacing the user and password fields with the secret key from the preceding keyspaces-credentials command. docker run --rm -ti -v ~/.aws:/root/.aws --entrypoint aws-sm-cqlsh.sh amazon/keyspaces-toolkit keyspaces-credentials --ssl --execute "DESCRIBE Keyspaces" The preceding command includes the following parameters: -v – Used to mount the directory containing the host’s AWS CLI credentials file. –entrypoint – Use the helper by overriding the default entry point of cqlsh to access the Secrets Manager helper script, aws-sm-cqlsh.sh. keyspaces-credentials – The key to access the credentials stored in Secrets Manager. –execute – Runs a CQL statement. Update the alias You now can update the alias so that your scripts don’t contain plaintext passwords. You also can manage users and roles through Secrets Manager. The following code sets up a new alias by using the keyspaces-toolkit Secrets Manager helper for passing the service-specific credentials to Secrets Manager. alias cqlsh='docker run --rm -ti -v ~/.aws:/root/.aws -v "$(pwd)":/source --entrypoint aws-sm-cqlsh.sh amazon/keyspaces-toolkit keyspaces-credentials --ssl' To have the alias available in every new terminal session, add the alias definition to your .bashrc file, which is executed on every new terminal window. You can usually find this file in $HOME/.bashrc or $HOME/bash_aliases (loaded by $HOME/.bashrc). Validate the alias Now that you have updated the alias with the Secrets Manager helper, you can use cqlsh without the Docker details or credentials, as shown in the following code. cqlsh --execute "DESCRIBE TABLE amazon.eventstore;" The following screenshot shows the running of the cqlsh DESCRIBE TABLE statement by using the alias created in the previous section. In the output, you should see the table definition of the amazon.eventstore table you created in the previous step. Conclusion In this post, I showed how to get started with Amazon Keyspaces and the keyspaces-toolkit Docker image. I used Docker to build an image and run a container for a consistent and reproducible experience. I also used an alias to create a drop-in replacement for existing scripts, and used built-in helpers to integrate cqlsh with Secrets Manager to store service-specific credentials. Now you can use the keyspaces-toolkit with your Cassandra workloads. As a next step, you can store the image in Amazon Elastic Container Registry, which allows you to access the keyspaces-toolkit from CI/CD pipelines and other AWS services such as AWS Batch. Additionally, you can control the image lifecycle of the container across your organization. You can even attach policies to expiring images based on age or download count. For more information, see Pushing an image. Cheat sheet of useful commands I did not cover the following commands in this blog post, but they will be helpful when you work with cqlsh, AWS CLI, and Docker. --- Docker --- #To view the logs from the container. Helpful when debugging docker logs CONTAINERID #Exit code of the container. Helpful when debugging docker inspect createtablec --format='{{.State.ExitCode}}' --- CQL --- #Describe keyspace to view keyspace definition DESCRIBE KEYSPACE keyspace_name; #Describe table to view table definition DESCRIBE TABLE keyspace_name.table_name; #Select samples with limit to minimize output SELECT * FROM keyspace_name.table_name LIMIT 10; --- Amazon Keyspaces CQL --- #Change provisioned capacity for tables ALTER TABLE keyspace_name.table_name WITH custom_properties={'capacity_mode':{'throughput_mode': 'PROVISIONED', 'read_capacity_units': 4000, 'write_capacity_units': 3000}} ; #Describe current capacity mode for tables SELECT keyspace_name, table_name, custom_properties FROM system_schema_mcs.tables where keyspace_name = 'amazon' and table_name='eventstore'; --- Linux --- #Line count of multiple/all files in the current directory find . -type f | wc -l #Remove header from csv sed -i '1d' myData.csv About the Author Michael Raney is a Solutions Architect with Amazon Web Services. https://aws.amazon.com/blogs/database/how-to-set-up-command-line-access-to-amazon-keyspaces-for-apache-cassandra-by-using-the-new-developer-toolkit-docker-image/
1 note
·
View note
Text
docker commands cheat sheet free EEC#
💾 ►►► DOWNLOAD FILE 🔥🔥🔥🔥🔥 docker exec -it /bin/sh. docker restart. Show running container stats. Docker Cheat Sheet All commands below are called as options to the base docker command. for more information on a particular command. To enter a running container, attach a new shell process to a running container called foo, use: docker exec -it foo /bin/bash . Images are just. Reference - Best Practices. Creates a mount point with the specified name and marks it as holding externally mounted volumes from native host or other containers. FROM can appear multiple times within a single Dockerfile in order to create multiple images. The tag or digest values are optional. If you omit either of them, the builder assumes a latest by default. The builder returns an error if it cannot match the tag value. Normal shell processing does not occur when using the exec form. There can only be one CMD instruction in a Dockerfile. If the user specifies arguments to docker run then they will override the default specified in CMD. To include spaces within a LABEL value, use quotes and backslashes as you would in command-line parsing. The environment variables set using ENV will persist when a container is run from the resulting image. Match rules. Prepend exec to get around this drawback. It can be used multiple times in the one Dockerfile. Multiple variables may be defined by specifying ARG multiple times. It is not recommended to use build-time variables for passing secrets like github keys, user credentials, etc. Build-time variable values are visible to any user of the image with the docker history command. The trigger will be executed in the context of the downstream build, as if it had been inserted immediately after the FROM instruction in the downstream Dockerfile. Any build instruction can be registered as a trigger. Triggers are inherited by the "child" build only. In other words, they are not inherited by "grand-children" builds. After a certain number of consecutive failures, it becomes unhealthy. If a single run of the check takes longer than timeout seconds then the check is considered to have failed. It takes retries consecutive failures of the health check for the container to be considered unhealthy. The command's exit status indicates the health status of the container. Allows an alternate shell be used such as zsh , csh , tcsh , powershell , and others.
1 note
·
View note
Text
docker commands cheat sheet 100% working 4RXD#
💾 ►►► DOWNLOAD FILE 🔥🔥🔥🔥🔥 docker exec -it /bin/sh. docker restart. Show running container stats. Docker Cheat Sheet All commands below are called as options to the base docker command. for more information on a particular command. To enter a running container, attach a new shell process to a running container called foo, use: docker exec -it foo /bin/bash . Images are just. Reference - Best Practices. Creates a mount point with the specified name and marks it as holding externally mounted volumes from native host or other containers. FROM can appear multiple times within a single Dockerfile in order to create multiple images. The tag or digest values are optional. If you omit either of them, the builder assumes a latest by default. The builder returns an error if it cannot match the tag value. Normal shell processing does not occur when using the exec form. There can only be one CMD instruction in a Dockerfile. If the user specifies arguments to docker run then they will override the default specified in CMD. To include spaces within a LABEL value, use quotes and backslashes as you would in command-line parsing. The environment variables set using ENV will persist when a container is run from the resulting image. Match rules. Prepend exec to get around this drawback. It can be used multiple times in the one Dockerfile. Multiple variables may be defined by specifying ARG multiple times. It is not recommended to use build-time variables for passing secrets like github keys, user credentials, etc. Build-time variable values are visible to any user of the image with the docker history command. The trigger will be executed in the context of the downstream build, as if it had been inserted immediately after the FROM instruction in the downstream Dockerfile. Any build instruction can be registered as a trigger. Triggers are inherited by the "child" build only. In other words, they are not inherited by "grand-children" builds. After a certain number of consecutive failures, it becomes unhealthy. If a single run of the check takes longer than timeout seconds then the check is considered to have failed. It takes retries consecutive failures of the health check for the container to be considered unhealthy. The command's exit status indicates the health status of the container. Allows an alternate shell be used such as zsh , csh , tcsh , powershell , and others.
1 note
·
View note
Text
docker commands cheat sheet trainer NKD!
💾 ►►► DOWNLOAD FILE 🔥🔥🔥🔥🔥 docker exec -it /bin/sh. docker restart. Show running container stats. Docker Cheat Sheet All commands below are called as options to the base docker command. for more information on a particular command. To enter a running container, attach a new shell process to a running container called foo, use: docker exec -it foo /bin/bash . Images are just. Reference - Best Practices. Creates a mount point with the specified name and marks it as holding externally mounted volumes from native host or other containers. FROM can appear multiple times within a single Dockerfile in order to create multiple images. The tag or digest values are optional. If you omit either of them, the builder assumes a latest by default. The builder returns an error if it cannot match the tag value. Normal shell processing does not occur when using the exec form. There can only be one CMD instruction in a Dockerfile. If the user specifies arguments to docker run then they will override the default specified in CMD. To include spaces within a LABEL value, use quotes and backslashes as you would in command-line parsing. The environment variables set using ENV will persist when a container is run from the resulting image. Match rules. Prepend exec to get around this drawback. It can be used multiple times in the one Dockerfile. Multiple variables may be defined by specifying ARG multiple times. It is not recommended to use build-time variables for passing secrets like github keys, user credentials, etc. Build-time variable values are visible to any user of the image with the docker history command. The trigger will be executed in the context of the downstream build, as if it had been inserted immediately after the FROM instruction in the downstream Dockerfile. Any build instruction can be registered as a trigger. Triggers are inherited by the "child" build only. In other words, they are not inherited by "grand-children" builds. After a certain number of consecutive failures, it becomes unhealthy. If a single run of the check takes longer than timeout seconds then the check is considered to have failed. It takes retries consecutive failures of the health check for the container to be considered unhealthy. The command's exit status indicates the health status of the container. Allows an alternate shell be used such as zsh , csh , tcsh , powershell , and others.
1 note
·
View note
Text
What are the resources and the ways to learn Docker and Kubernetes?
There are lots of sources out there about “getting” and mastering Kubernetes. Unfortunately, not all of them are actually helpful, to-the-point and worth your time. As with Docker, the Kubernetes industry is very well-known and moving extremely fast. There’s a lot of disturbance, outdated material, company bias and badly informed advice. Here’s a hand-picked choice of great sources for various factors of getting started with Docker and Kubernetes! 1. There’s a course offering an "Introduction to Kubernetes".
2. The "Kubernetes Fundamentals" program is quite a good and will carry you pretty far in direction of the certification chance. Be sure to generally do the exercises :)
3.“The best way to learn Docker for Free: Play-With-Docker (PWD)”
If you want to Learn Docker and Kubernetes with Real-time Projects with Clear Explanation Contact Visualpath. They will Provide Docker and Kubernetes online and Classroom Training with Real Time Projects.
What Will They Cover In this Course:Docker Engine:Docker OverviewDocker ArchitectureImages and layersUnderlying technology of Docker like namespaces, cgroups etc.,Docker CE Vs Docker EE and supported platformsPulling images from Docker registry The Docker HubDocker Engine Installation on Linux Servers (CentOS/Ubuntu)Docker commandsImages, ps, pull, push, run, create, commit, attach, exec, cp, rm, rmi, login, export, import, pause, unpause, system, volumes, build, rename, save, tag, network, logs, port, search, history Docker network
Container volume managementCreating custom network (bridge)Building custom images using Dockerfile and through container and pushing to the Docker hubCreating containers with limited resources (CPU, memory etc.,)Building apache with mysql database storage using DockerfileAssigning/remove multiple network to the running container.Selecting storage driver for the Docker EngineSetting limit on the resource like CPU, memory for running containerSetup and configure universal control plane(UCP) and docker trusted repository (DTR)Container lifecycleUnderstanding Docker Machine and Docker Swarm (Cluster).Setting up swarm (Configure manager)Setting up nodes (Adding nodes to the manager)Managing applications in Swarm with serviceReplication in SwarmDemonstrate the usage of templates with “docker service create”Identify the steps needed to troubleshoot a service not deployingDescribe How Storage and Volumes Can Be Used Across Cluster Nodes for Persistent Storage Kubernetes Orchestration:Difference between Docker Swarm and Kubernetes OrchestrationKubernetes overviewKubernetes ArchitectureUnderstanding the underlying concept of Kubernetes OrchestrationDesigning a kubernetes clusterhardware and underlying infrastructureService running on manage node and minionsOverview of pods, replication, deployment, service, endpointsDeploying the application through PODsBuilding multiple pods with high availabilityRolling updates of the Pods with the DeploymentKubernetes underlying network like overlay network with flannel, etcd etc.,Storage types in KubernetesUpgrading kubernetes componentsTroubleshooting in kubernetesNote: Practical examples on above scenarios like building applications mysql, wordpress etc.,
1 note
·
View note
Text
Python Docx

Python Docx4j
Python Docx To Pdf
Python Docx Table
Python Docx To Pdf
Python Docx2txt
Python Docx2txt
When you ask someone to send you a contract or a report there is a high probability that you’ll get a DOCX file. Whether you like it not, it makes sense considering that 1.2 billion people use Microsoft Office although a definition of “use” is quite vague in this case. DOCX is a binary file which is, unlike XLSX, not famous for being easy to integrate into your application. PDF is much easier when you care more about how a document is displayed than its abilities for further modifications. Let’s focus on that.
Python-docx versions 0.3.0 and later are not API-compatible with prior versions. Python-docx is hosted on PyPI, so installation is relatively simple, and just depends on what installation utilities you have installed. Python-docx may be installed with pip if you have it available.
Installing Python-Docx Library Several libraries exist that can be used to read and write MS Word files in Python. However, we will be using the python-docx module owing to its ease-of-use. Execute the following pip command in your terminal to download the python-docx module as shown below.
Python has a few great libraries to work with DOCX (python-dox) and PDF files (PyPDF2, pdfrw). Those are good choices and a lot of fun to read or write files. That said, I know I'd fail miserably trying to achieve 1:1 conversion.
Release v0.8.10 (Installation)python-docx is a Python library for creating and updating Microsoft Word (.docx) files.
Looking further I came across unoconv. Universal Office Converter is a library that’s converting any document format supported by LibreOffice/OpenOffice. That sound like a solid solution for my use case where I care more about quality than anything else. As execution time isn't my problem I have been only concerned whether it’s possible to run LibreOffice without X display. Apparently, LibreOffice can be run in haedless mode and supports conversion between various formats, sweet!
I’m grateful to unoconv for an idea and great README explaining multiple problems I can come across. In the same time, I’m put off by the number of open issues and abandoned pull requests. If I get versions right, how hard can it be? Not hard at all, with few caveats though.
Testing converter
LibreOffice is available on all major platforms and has an active community. It's not active as new-hot-js-framework-active but still with plenty of good read and support. You can get your copy from the download page. Be a good user and go with up-to-date version. You can always downgrade in case of any problems and feedback on latest release is always appreciated.
On macOS and Windows executable is called soffice and libreoffice on Linux. I'm on macOS, executable soffice isn't available in my PATH after the installation but you can find it inside the LibreOffice.app. To test how LibreOffice deals with your files you can run:
In my case results were more than satisfying. The only problem I saw was a misalignment in a file when the alignment was done with spaces, sad but true. This problem was caused by missing fonts and different width of 'replacements' fonts. No worries, we'll address this problem later.
Setup I
While reading unoconv issues I've noticed that many problems are connected due to the mismatch of the versions. I'm going with Docker so I can have pretty stable setup and so I can be sure that everything works.
Let's start with defining simple Dockerfile, just with dependencies and ADD one DOCX file just for testing:

Let's build an image:
After image is created we can run the container and convert the file inside the container:
Running LibreOffice as a subprocess
We want to run LibreOffice converter as a subprocess and provide the same API for all platforms. Let's define a module which can be run as a standalone script or which we can later import on our server.
Required arguments which convert_to accepts are folder to which we save PDF and a path to the source file. Optionally we specify a timeout in seconds. I’m saying optional but consider it mandatory. We don’t want a process to hang too long in case of any problems or just to limit computation time we are able to give away to each conversion. LibreOffice executable location and name depends on the platform so edit libreoffice_exec to support platform you’re using.
subprocess.run doesn’t capture stdout and stderr by default. We can easily change the default behavior by passing subprocess.PIPE. Unfortunately, in the case of the failure, LibreOffice will fail with return code 0 and nothing will be written to stderr. I decided to look for the success message assuming that it won’t be there in case of an error and raise LibreOfficeError otherwise. This approach hasn’t failed me so far.
Uploading files with Flask
Converting using the command line is ok for testing and development but won't take us far. Let's build a simple server in Flask.
We'll need few helper function to work with files and few custom errors for handling error messages. Upload directory path is defined in config.py. You can also consider using flask-restplus or flask-restful which makes handling errors a little easier.
The server is pretty straightforward. In production, you would probably want to use some kind of authentication to limit access to uploads directory. If not, give up on serving static files with Flask and go for Nginx.
Important take-away from this example is that you want to tell your app to be threaded so one request won't prevent other routes from being served. However, WSGI server included with Flask is not production ready and focuses on development. In production, you want to use a proper server with automatic worker process management like gunicorn. Check the docs for an example how to integrate gunicorn into your app. We are going to run the application inside a container so host has to be set to publicly visible 0.0.0.0.
Setup II
Now when we have a server we can update Dockerfile. We need to copy our application source code to the image filesystem and install required dependencies.
In docker-compose.yml we want to specify ports mapping and mount a volume. If you followed the code and you tried running examples you have probably noticed that we were missing the way to tell Flask to run in a debugging mode. Defining environment variable without a value is causing that this variable is going to be passed to the container from the host system. Alternatively, you can provide different config files for different environments.
Supporting custom fonts
I've mentioned a problem with missing fonts earlier. LibreOffice can, of course, make use of custom fonts. If you can predict which fonts your user might be using there's a simple remedy. Add following line to your Dockfile.
Now when you put custom font file in the font directory in your project, rebuild the image. From now on you support custom fonts!
Summary
This should give you the idea how you can provide quality conversion of different documents to PDF. Although the main goal was to convert a DOCX file you should be fine with presentations, spreadsheets or images.
Further improvements could be providing support for multiple files, the converter can be configured to accept more than one file as well.
Photo by Samuel Zeller on Unsplash.
Did you enjoy it? Follow me@MichalZalecki on Twitter, where I share some interesting, bite-size content.
This ebook goes beyond Jest documentation to explain software testing techniques. I focus on unit test separation, mocking, matchers, patterns, and best practices.
Get it now!
Mastering Jest: Tips & Tricks | $9
Latest version
Released:
Extract content from docx files
Project description
Extract docx headers, footers, text, footnotes, endnotes, properties, and images to a Python object.
The code is an expansion/contraction of python-docx2txt (Copyright (c) 2015 Ankush Shah). The original code is mostly gone, but some of the bones may still be here.
shared features:
extracts text from docx files
extracts images from docx files
no dependencies (docx2python requires pytest to test)
additions:
extracts footnotes and endnotes
converts bullets and numbered lists to ascii with indentation
converts hyperlinks to <a href='http:/...'>link text</a>
retains some structure of the original file (more below)
extracts document properties (creator, lastModifiedBy, etc.)
inserts image placeholders in text ('----image1.jpg----')
inserts plain text footnote and endnote references in text ('----footnote1----')
(optionally) retains font size, font color, bold, italics, and underscore as html
extract user selections from checkboxes and dropdown menus
full test coverage and documentation for developers
subtractions:
no command-line interface
will only work with Python 3.4+
Installation
Use
Note on html feature:

font size, font color, bold, italics, and underline supported
hyperlinks will always be exported as html (<a href='http:/...'>link text</a>), even if export_font_style=False, because I couldn't think of a more cononical representation.
every tag open in a paragraph will be closed in that paragraph (and, where appropriate, reopened in the next paragraph). If two subsequenct paragraphs are bold, they will be returned as <b>paragraph q</b>, <b>paragraph 2</b>. This is intentional to make each paragraph its own entity.
if you specify export_font_style=True, > and < in your docx text will be encoded as > and <
Return Value
Function docx2python returns an object with several attributes.
header - contents of the docx headers in the return format described herein
footer - contents of the docx footers in the return format described herein
body - contents of the docx in the return format described herein
footnotes - contents of the docx in the return format described herein
endnotes - contents of the docx in the return format described herein
document - header + body + footer (read only)
text - all docx text as one string, similar to what you'd get from python-docx2txt
properties - docx property names mapped to values (e.g., {'lastModifiedBy': 'Shay Hill'})
images - image names mapped to images in binary format. Write to filesystem with
Return Format
Some structure will be maintained. Text will be returned in a nested list, with paragraphs always at depth 4 (i.e., output.body[i][j][k][l] will be a paragraph).
If your docx has no tables, output.body will appear as one a table with all contents in one cell:
Table cells will appear as table cells. Text outside tables will appear as table cells.
To preserve the even depth (text always at depth 4), nested tables will appear as new, top-level tables. This is clearer with an example:
becomes ...
This ensures text appears
only once
in the order it appears in the docx
always at depth four (i.e., result.body[i][j][k][l] will be a string).
Working with output
This package provides several documented helper functions in the docx2python.iterators module. Here are a few recipes possible with these functions:
Some fine print about checkboxes:
MS Word has checkboxes that can be checked any time, and others that can only be checked when the form is locked.The previous print as. u2610 (open checkbox) or u2612 (crossed checkbox). Which this module, the latter willtoo. I gave checkboxes a bailout value of ----checkbox failed---- if the xml doesn't look like I expect it to,because I don't have several-thousand test files with checkboxes (as I did with most of the other form elements).Checkboxes should work, but please let me know if you encounter any that do not.
Release historyRelease notifications | RSS feed
1.27.1
1.27
1.26
Python Docx4j
1.25
1.24
1.23
1.22
1.21
1.19
1.18
1.17
1.16
1.15
1.14
1.13
1.12
1.11
1.2
Python Docx To Pdf
1.1
Python Docx Table
1.0
0.1
Python Docx To Pdf
Download files
Download the file for your platform. If you're not sure which to choose, learn more about installing packages.
Python Docx2txt
Files for docx2python, version 1.27.1Filename, sizeFile typePython versionUpload dateHashesFilename, size docx2python-1.27.1-py3-none-any.whl (22.9 kB) File type Wheel Python version py3 Upload dateHashesFilename, size docx2python-1.27.1.tar.gz (33.3 kB) File type Source Python version None Upload dateHashes
Close
Hashes for docx2python-1.27.1-py3-none-any.whl
Hashes for docx2python-1.27.1-py3-none-any.whlAlgorithmHash digestSHA25651f6f03149efff07372ea023824d4fd863cb70b531aa558513070fe60f1c420aMD54b0ee20fed4a8cb0eaba8580c33f946bBLAKE2-256e7d5ff32d733592b17310193280786c1cab22ca4738daa97e1825d650f55157c
Close
Hashes for docx2python-1.27.1.tar.gz
Python Docx2txt
Hashes for docx2python-1.27.1.tar.gzAlgorithmHash digestSHA2566ca0a92ee9220708060ece485cede894408588353dc458ee5ec17959488fa668MD5759e1630c6990533414192eb57333c72BLAKE2-25684783b70aec51652a4ec4f42aa419a8af18d967b06390764527c81f183d1c02a
0 notes
Text
Avoid unnecessary privileges.Avoid running containers as root. Don’t bind to a specific UID. Make executables owned by root and not writable.
Reduce attack surface.Leverage multistage builds. Use distroless images, or build your own from scratch. Update your images frequently. Watch out for exposed ports.
Prevent confidential data leaks.Never put secrets or credentials in Dockerfile instructions. Prefer COPY over ADD. Be aware of the Docker context, and use .dockerignore.
Others.Reduce the number of layers, and order them intelligently. Add metadata and labels. Leverage linters to automatize checks. Scan your images locally during development.
Beyond image building.Protect the docker socket and TCP connections. Sign your images, and verify them on runtime. Avoid tag mutability. Don’t run your environment as root. Include a health check. Restrict your application capabilities.
0 notes
Text
Deploying dockerized R/Shiny Apps on Microsoft Azure
In this article I show how quickly deploying dockerized R/Shiny Apps on Microsoft Azure. So, we make them available globally within seconds. For an introduction to R, see my other post.
R/Shiny Apps are a great way of prototyping, and visualizing your results in an interactive way while also exploiting the R data science and machine learning capabilities. R/Shiny Apps are easy to build in a local development environment but they are somewhat harder to deploy. As they rely on the Linux-based Shiny server to run.
Often, we don’t want to spin up a whole Linux machine or rely on the RStudio native offerings. I show how to quickly deploy this container on Microsoft’s Azure platform and make your R/Shiny available globally within seconds.
In particular, I show how to set up the right services on Azure and deploy single Docker containers. As such the focus of this article is on getting started and achieving results quickly.
What is Azure and what is an App Service
Since you have read so far, you’re probably already familiar with what Microsoft Azure is (see my other post). Azure is Microsoft’s cloud computing service, that allows to build, deploy and host a number of services in the cloud. From storage, to virtual machines to databases and app services.
While Amazon’s Web Service (AWS) was the first on the market and is now the largest provider of cloud computing services, Azure has been catching up quickly and is particularly appealing to those in larger organizations that already have close alliances with Microsoft’s other products.
When developing the Docker element of our R/Shiny apps our focus is all on images and containers. Azure has offerings for these products as well (think Azure Container Instances). Also, it offers what is called an App Service. The Azure App Service enables you to build and host web apps without managing infrastructure. It offers auto-scaling and high availability. As such we can think of the App Service as a fully managed infrastructure platform. This allows us to focus on getting the R/Shiny app deployed, without focusing too much on the backend.
Prerequisites
For deploying dockerized R/Shiny Apps on Microsoft Azure we need to download and install some tools.
To replicate all steps of this article, you need an Azure account, which you can create here for free. While the account is free, Microsoft will charge for the services you use. With a new account, you will receive a budget for playing around with a number of services for the 12 months. Beyond that, the easiest way forward is to have a pay-as-you-go account and pay for the services you need and when you need them. Azure will only charge you for the period you use the services. The basic version of the services I suggest here should cost you no more than 20 cent per day. To get a sense of the costs, check out the Azure Price Calculator. When you create new resources on Azure, it is always a good idea to follow a naming convention; so, it will be easy to find and organize your resources.
Download Docker
You also need Docker installed on your local machine. If you haven’t done so already, you can download Docker Desktop here. Make sure Docker is running, by checking the Moby icon in your notifications area or going to your command line and typing docker --version .
To interact with Azure through the command line you need to install Azure CLI, which you can download here. Once this is done you will be able to run Azure commands in your command line by typing az followed by the command. Typing az --version in your command line shows that Azure CLI is running and lists out the version you’re using.
You can run all lines of code of this article in your preferred command line interface. However, I personally recommend using Visual Studio Code. It has great Azure, Web App, CLI and Docker extensions, offering code completion and visual control of your containers and Azure services.
Setting up Azure
There are three main ways of interacting with Azure. Firstly, Azure Portal, offers a point-and-click GUI and is a great way to see at a glance what services you have running.
Secondly, the Azure command line built in to the portal and referred to as “Cloud Shell”. Cloud Shell allows you to execute commands within the cloud environment, rather than pointing and clicking.
Thirdly, through the command line on your local machine, which allows you to execute code in the cloud from your local machine. I prefer to use this third option, as it allows me to write and save my commands and also to push locally-created containers seamlessly onto Azure. Since I trust that you can write code as least as well I as do, I will build this article around the command line interaction with Azure.
Now, you have set up an Azure account and know how to interact with it. So, we can log onto the account through the command line, typing
az login
which will take you to the browser to enter your credentials.
Creating the services
For deploying dockerized R/Shiny Apps on Microsoft Azure, we have to create some services.
The first thing we need to do is to create a Resource Group. In Azure, a resource group contains all services and resources that are used to architect a particular solution. It is good practice to create one resource group with all services that share a lifecycle. So, this makes it easier to deploy, update, and delete all related services. To create a resource group, we type
az group create --name shinyapps --location northeurope
The resource group is called shinyapps, and I have asked for the group to be deployed on Azure’s North European server farm. Azure has server centres around the world and it might make more sense choosing another location depending on your requirements.
Larger centers offer a comprehensive set of services. It is worth checking if the required services are available when planning to deploy off the beaten track. Note that even when creating a resource group in one location you can also use services in a different location in that same group.
Azure Container Registry
The next thing we need is a Container Registry, or acr for short. While the container registry is more about images than containers. Although, it’s probably best to think about it as your own Dockerhub within Azure. The acr is the place within your resource group that holds the container images we want to deploy. Registries come in different tiers from Basic to Premium. The amount of memory available to store images is the main difference between the tiers. Some additional features relevant to large-scale production environments are available in the Premium tier. For our purposes Basic will be sufficient. To create the acr, type in your commandline:
az acr create -n shinyimages -g shinyapps --sku Basic
This creates a new acr called shinyimages. Note that it needs to be a unique name. It will be created within the shinyapps resource group and we picked the Basic SKU. Once the acr is created you’ll receive a JSON-style printout confirming your settings and listing the URL your acr can be reached at. Note that this will be important when deploying containers, and that it’s not a public address.
Create a new App Service Plan
The last thing we need is an App Service Plan. Think of the service plan as a plan for your phone or your broadband: a framework of the services you can use. The plan defines a set of compute resources available for your web app to run. Similar to the acr there are different tiers from free to premium: the main difference between the tiers is the way compute power is allocated. Plans running on free (or shared) tiers share resources with other apps from other users and get allocated the free quota of CPU and other resources. Basic, Standard and Premium plans run on dedicated compute resource. We’re just testing here so you might be okay with the free tier, but bear in mind that it will take quite a while to load your app. Simply upgrading to the cheapest Basic plan (B1) speeds things up quite a bit. When you think about taking your app into production a tier with dedicated compute will likely be suitable.
az appservice plan create -g shinyapps -n shinyappplan --sku FREE --is-linux
Similar to creating an acr, we specify the resource group, a name for the plan and the SKU. Importantly, we need to ask for a Linux based plan as the Shiny containers we want to deploy are build on Linux.
Deploying R/Shiny apps
Right, now that we’ve set up our architecture, let’s get ready to deploy our R/Shiny app. So far, we have developed on our local machine and we’re confident it’s ready to go and say “hello world”.
The first thing we need to do is to get the Docker image from our local environment pushed into the cloud. This needs a little bit of prep work. Let’s log on to the acr we created on Azure.
docker login shinyimages.azurecr.io
Doing this will prompt you to enter username and password, or you can add the -u and -p arguments for username and password.
Now we create a tag of the image that already exists to have the full name of the acr slash the name we want our image to have on Azure
docker tag shiny_app shinyimages.azurecr.io/shiny_app
And lastly, push up the image:
docker push shinyimages.azurecr.io/shiny_app
Once everything is pushed, you’ll again receive a JSON-style print in the console. To check which images are in your acr, type:
az acr repository list -n shinyimages
This will list out all the images in there, which is one at the moment.
Deploy the image
The last thing left to do now is to deploy the image. We do this by creating a new webapp that runs our image. We specify the resource group (-g), the app service plan (-p), the image we want to deploy (-i) and give our app a name (-n). Note first that the name of the app needs to be unique within the Azure universe (not just your account). Note second that as soon as the webapp has been created it is available globally to everyone on the internet.
az webapp create -g shinyapps -p shinyappplan -n myshinyapp -i shinyimages.azurecr.io/shiny_app
Once the command has been executed you receive a the JSON-style printout, which among other things includes the URL at which your app is now available. This is the name of your app and the Azure domain: https://myshinyapp.azurewebsites.net
That was easy. You might have a set of containers composed together using docker-compose. Deploying a multi-container setup is similarly simple. Rather than specifying the image we want to deploy, we specify that we want to compose a multi-container app, and which compose file we want to use to build our container set up. Make sure you have all images in your acr and the YAML file in the folder you execute the line from.
az webapp create -g shinyapps -p shinyappplan -n myshinyapp --multicontainer-config-type compose --multicontainer-config-file docker-compose.yml
Summary and Remarks
The chart below summarizes the architecture we have constructed to deploy our R/Shiny apps. Once all the services are running it really is just a two lines of code process to first push the containers onto Azure, and then deploy them as app service.
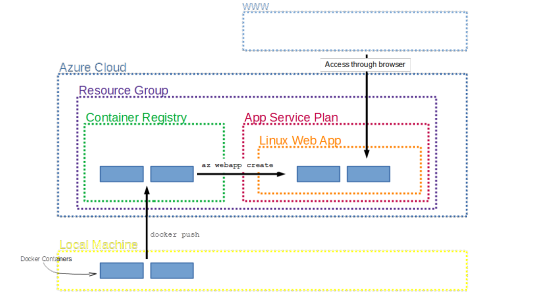
While this was an introduction to get started fast with deploying your R/Shiny app, there are many more features that I have not covered here but that will be useful when taking your app to production. The most important thing to note here is that our app is available to everyone who has access to the internet (and has the link). Using Azure Active Directories, we can restrict access to a limited number of people who we authorize beforehand.
What I have shown here is a manual process of pushing the containers up and then deploying. Azure offers functionalities to build in triggers to quickly rebuild images and ship new versions of the app when, say, you commit a new version to your Git repository.
Finally, I have assumed here that you have admin rights to create each of the services. Working in a larger organization that is likely not the case, so it’s important to watch out for the privileges you have and which you are willing to share when bringing in other people to join your development and deployment process.
Before I let you go, I just want to point out how to clean up when you’re done exploring the functionality. This is good practice and also saves you money for services you are not using. Since we have deployed everything in one resource group, all we have to do is to scrap that group and all services deployed within it will be deleted with it. We do this like so:
az group delete -n shinyapps
Conclusion
In conclusion, this is how deploying dockerized R/Shiny Apps on Microsoft Azure. If you have any question, please use your forum.
The post Deploying dockerized R/Shiny Apps on Microsoft Azure appeared first on PureSourceCode.
from WordPress https://www.puresourcecode.com/programming-languages/r/deploying-dockerized-r-shiny-apps-on-microsoft-azure/
0 notes
Link
Published on 21st of March, 2019 Maybe You Don't Need Kubernetes A woman riding a scooter Illustration created by freepik, Nomad logo by HashiCorp. Kubernetes is the 800-pound gorilla of container orchestration. It powers some of the biggest deployments worldwide, but it comes with a price tag. Especially for smaller teams, it can be time-consuming to maintain and has a steep learning curve. For what our team of four wanted to achieve at trivago, it added too much overhead. So we looked into alternatives — and fell in love with Nomad. The wishlist Our team runs a number of typical services for monitoring and performance analysis: API endpoints for metrics written in Go, Prometheus exporters, log parsers like Logstash or Gollum, and databases like InfluxDB or Elasticsearch. Each of these services run in their own container. We needed a simple system to keep those jobs running. We started with a list of requirements for container orchestration: Run a fleet of services across many machines. Provide an overview of running services. Allow for communication between services. Restart them automatically when they die. Be manageable by a small team. On top of that, the following things were nice to have but not strictly required: Tag machines by their capabilities (e.g., label machines with fast disks for I/O heavy services.) Be able to run these services independently of any orchestrator (e.g. in development). Have a common place to share configurations and secrets. Provide an endpoint for metrics and logging. Why Kubernetes was not a good fit for us When creating a prototype with Kubernetes, we noticed that we started adding ever-more complex layers of logic to operate our services. Logic on which we implicitly relied on. As an example, Kubernetes allows embedding service configurations using ConfigMaps. Especially when merging multiple config files or adding more services to a pod, this can get quite confusing quickly. Kubernetes - or helm, for that matter - allows injecting external configs dynamically to ensure separation of concerns. But this can lead to tight, implicit coupling between your project and Kubernetes. Helm and ConfigMaps are optional features so you don’t have to use them. You might as well just copy the config into the Docker image. However, it’s tempting to go down that path and build unnecessary abstractions that can later bite you. On top of that, the Kubernetes ecosystem is still rapidly evolving. It takes a fair amount of time and energy to stay up-to-date with the best practices and latest tooling. Kubectl, minikube, kubeadm, helm, tiller, kops, oc - the list goes on and on. Not all tools are necessary to get started with Kubernetes, but it’s hard to know which ones are, so you have to be at least aware of them. Because of that, the learning curve is quite steep. When to use Kubernetes At trivago specifically, many teams use Kubernetes and are quite happy with it. These instances are managed by Google or Amazon however, which have the capacity to do so. Kubernetes comes with amazing features, that make container orchestration at scale more manageable: Fine-grained rights management Custom controllers allow getting logic into the cluster. These are just programs that talk to the Kubernetes API. Autoscaling! Kubernetes can scale your services up and down on demand. It uses service metrics to do this without manual intervention. The question is if you really need all those features. You can't rely on these abstractions to just work; you'll have to learn what's going on under the hood. Especially in our team, which runs most services on-premise (because of its close connection to trivago's core infrastructure), we didn't want to afford running our own Kubernetes cluster. We wanted to ship services instead. Batteries not included Nomad is the 20% of service orchestration that gets you 80% of the way. All it does is manage deployments. It takes care of your rollouts and restarts your containers in case of errors, and that's about it. The entire point of Nomad is that it does less: it doesn’t include fine-grained rights management or advanced network policies, and that’s by design. Those components are provided as enterprise services, by a third-party, or not at all. I think Nomad hit a sweet-spot between ease of use and expressiveness. It's good for small, mostly independent services. If you need more control, you'll have to build it yourself or use a different approach. Nomad is just an orchestrator. The best part about Nomad is that it's easy to replace. There is little to no vendor lock-in because the functionality it provides can easily be integrated into any other system that manages services. It just runs as a plain old single binary on every machine in your cluster; that's it! The Nomad ecosystem of loosely coupled components The real power of Nomad lies within its ecosystem. It integrates very well with other - completely optional - products like Consul (a key-value store) or Vault (for secrets handling). Inside your Nomad file, you can have sections for fetching data from those services: template { data = <<EOH LOG_LEVEL="" API_KEY="" EOH destination = "secrets/file.env" env = true } This will read the service/geo-api/log-verbosity key from Consul and expose it as a LOG_LEVEL environment variable inside your job. It's also exposing secret/geo-api-key from Vault as API_KEY. Simple, but powerful! Because it's so simple, Nomad can also be easily extended with other services through its API. For example, jobs can be tagged for service discovery. At trivago, we tag all services, which expose metrics, with trv-metrics. This way, Prometheus finds the services via Consul and periodically scrapes the /metrics endpoint for new data. The same can be done for logs by integrating Loki for example. There are many other examples for extensibility: Trigger a Jenkins job using a webhook and Consul watches to redeploy your Nomad job on service config changes. Use Ceph to add a distributed file system to Nomad. Use fabio for load balancing. All of this allowed us to grow our infrastructure organically without too much up-front commitment. Fair warning No system is perfect. I advise you not to use any fancy new features in production right now. There are bugs and missing features of course - but that's also the case for Kubernetes. Compared to Kubernetes, there is far less momentum behind Nomad. Kubernetes has seen around 75.000 commits and 2000 contributors so far, while Nomad sports about 14.000 commits and 300 contributors. It will be hard for Nomad to keep up with the velocity of Kubernetes, but maybe it doesn’t have to! The scope is much more narrow and the smaller community could also mean that it'll be easier to get your pull request accepted, in comparison to Kubernetes. Summary The takeaway is: don't use Kubernetes just because everybody else does. Carefully evaluate your requirements and check which tool fits the bill. If you're planning to deploy a fleet of homogenous services on large-scale infrastructure, Kubernetes might be the way to go. Just be aware of the additional complexity and operational costs. Some of these costs can be avoided by using a managed Kubernetes environment like Google Kubernetes Engine or Amazon EKS. If you're just looking for a reliable orchestrator that is easy to maintain and extendable, why not give Nomad a try? You might be surprised by how far it'll get you. If Kubernetes were a car, Nomad would be a scooter. Sometimes you prefer one and sometimes the other. Both have their right to exist. Credits Thanks to my awesome colleagues Esteban Barrios, Jorge-Luis Betancourt, Simon Brüggen, Arne Claus, Inga Feick, Wolfgang Gassler, Barnabas Kutassy, Perry Manuk, Patrick Pokatilo, and Jakub Sacha for reviewing drafts of this article. 💡Found an error in this article? Please propose a change on Github. 💬 Comments on Hacker News, Reddit. 📖 Translated into Japanese, Russian.
0 notes
Text
Supercharge your knowledge graph using Amazon Neptune, Amazon Comprehend, and Amazon Lex
Knowledge graph applications are one of the most popular graph use cases being built on Amazon Neptune today. Knowledge graphs consolidate and integrate an organization’s information into a single location by relating data stored from structured systems (e.g., e-commerce, sales records, CRM systems) and unstructured systems (e.g., text documents, email, news articles) together in a way that makes it readily available to users and applications. In reality, data rarely exists in a format that allows us to easily extract and connect relevant elements. In this post we’ll build a full-stack knowledge graph application that demonstrates how to provide structure to unstructured and semi-structured data, and how to expose this structure in a way that’s easy for users to consume. We’ll use Amazon Neptune to store our knowledge graph, Amazon Comprehend to provide structure to semi-structured data from the AWS Database Blog, and Amazon Lex to provide a chatbot interface to answer natural language questions as illustrated below. Deploy the application Let’s discuss the overall architecture and implementation steps used to build this application. If you want to experiment, all the code is available on GitHub. We begin by deploying our application and taking a look at how it works. Our sample solution includes the following: A Neptune cluster Multiple AWS Lambda functions and layers that handle the reading and writing of data to and from our knowledge graph An Amazon API Gateway that our web application uses to fetch data via REST An Amazon Lex chatbot, configured with the appropriate intents, which interacts with via our web application An Amazon Cognito identity pool required for our web application to connect to the chatbot Code that scrapes posts from the AWS Database blog for Neptune, enhances the data, and loads it into our knowledge graph A React-based web application with an AWS Amplify chatbot component Before you deploy our application, make sure you have the following: A machine running Docker, either a laptop or a server, for running our web interface An AWS account with the ability to create resources With these prerequisites satisfied, let’s deploy our application: Launch our solution using the provided AWS CloudFormation template in your desired Region: us-east-1 us-west-2 Costs to run this solution depend on the Neptune instance size chosen with a minimal cost for the other services used. Provide the desired stack name and instance size. Acknowledge the capabilities and choose Create stack. This process may take 10–15 minutes. When it’s complete, the CloudFormation stack’s Outputs tab lists the following values, which you need to run the web front end: ApiGatewayInvokeURL IdentityPoolId Run the following command to create the web interface, providing the appropriate parameters: docker run -td -p 3000:3000 -e IDENTITY_POOL_ID= -e API_GATEWAY_INVOKE_URL= -e REGION= public.ecr.aws/a8u6m715/neptune-chatbot:latest After this container has started, you can access the web application on port 3000 of your Docker server (http://localhost:3000/). If port 3000 is in use on your current server, you can alter the port by changing -p :3000. Use the application With the application started, let’s try out the chatbot integration using the following phrases: Show me all posts by Ian Robinson What has Dave Bechberger written on Amazon Neptune? Have Ian Robinson and Kelvin Lawrence worked together Show me posts by Taylor Rigg (This should prompt for Taylor Riggan; answer “Yes”.) Show me all posts on Amazon Neptune Refreshing the browser clears the canvas and chatbox. Each of these phrases provides a visual representation of the contextually relevant connections with our knowledge graph. Build the application Now that we know what our application is capable of doing, let’s look at how the AWS services are integrated to build a full-stack application. We built this knowledge graph application using a common paradigm for developing these types of applications known as ingest, curate, and discover. This paradigm begins by first ingesting data from one or more sources and creating semi-structured entities from it. In our application, we use Python and Beautiful Soup to scrape the AWS Database blog website to generate and store semi-structured data, which is stored in our Neptune-powered knowledge graph. After we extract these semi-structured entities, we curate and enhance them with additional meaning and connections. We do so using Amazon Comprehend to extract named entities from the blog post text. We connect these extracted entities within our knowledge graph to provide more contextually relevant connections within our blog data. Finally, we create an interface to allow easy discovery of our newly connected information. For our application, we use a React application, powered by Amazon Lex and Amplify, to provide a web-based chatbot interface to provide contextually relevant answers to the questions asked. Putting these aspects together gives the following application architecture. Ingest the AWS Database blog The ingest portion of our application uses Beautiful Soup to scrape the AWS Database blog. We don’t examine it in detail, but knowing the structure of the webpage allows us to create semi-structured data from the unstructured text. We use Beautiful Soup to extract several key pieces of information from each post, such as author, title, tags, and images: { "url": "https://aws.amazon.com/blogs/database/configure-amazon-vpc-for-sparql-1-1-federated-query-with-amazon-neptune/", "img_src": "https://d2908q01vomqb2.cloudfront.net/887309d048beef83ad3eabf2a79a64a389ab1c9f/2020/10/02/VPCforSPARQL1.1.FederatedQueryNeptune2.png", "img_height": "395", "img_width": "800", "title": "Configure Amazon VPC for SPARQL 1.1 Federated Query with Amazon Neptune", "authors": [ { "name": "Charles Ivie", "img_src": "https://d2908q01vomqb2.cloudfront.net/887309d048beef83ad3eabf2a79a64a389ab1c9f/2020/08/06/charles-ivie-100.jpg", "img_height": "132", "img_width": "100" } ], "date": "12 OCT 2020", "tags": [ "Amazon Neptune", "Database" ], "post": "" } After we extract this information for all the posts in the blog, we store it in our knowledge graph. The following figure shows the what this looks like for the first five posts. Although this begins to show connections between the entities in our graph, we can extract more context by examining the data stored within each post. To increase the connectedness of the data in our knowledge graph, let’s look at additional methods to curate this semi-structured data. Curate our semi-structured data To extract additional information from our semi-structured data, we use the DetectEntity functionality in Amazon Comprehend. This feature takes a text input and looks for unique names of real-world items such as people, places, items, or references to measures such as quantities or dates. By default, the types of entities returned are provided a label of COMMERCIAL_ITEM, DATE, EVENT, LOCATION, ORGANIZATION, OTHER, PERSON, QUANTITY, or TITLE. To enhance our data, the input is required to be UTF-encoded strings of up to 5,000-byte chunks. We do this by dividing each post by paragraph and running each paragraph through the batch_detect_entities method in batches of 25. For each entity that’s detected, the score, type, text, as well as begin and end offsets are returned, as in the following example code: { "Score": 0.9177741408348083, "Type": "TITLE", "Text": "SPARQL 1.1", "BeginOffset": 13, "EndOffset": 23 } Associating each of these detected entities with our semi-structured data in our knowledge graph shows even more connections, as seen in a subset in the following graph. When we compare this to our previous graph, we see that a significant number of additional connections have been added. These connections not only link posts together, they allow us to provide additional relevant answers by linking posts based on contextual relevant information stored within the post. This brings us to the final portion of this sample application: creating a web-based chatbot to interact with our new knowledge graph. Discover information in our knowledge graph Creating a web application to discover information in our knowledge graph has two steps: defining our chatbot and integrating the chatbot into a web application. Defining our chatbot Our application’s chatbot is powered by Amazon Lex, which makes it easy to build conversational interfaces for applications. The building block for building any bot with Amazon Lex is an intent. An intent is an action that responds to natural language user input. Our bot has four different intents specified: CoAuthorPosts PostByAuthor PostByAuthorAndTag PostByTag Each intent is identified by defining a variety of short training phrases for that intent, known as utterances. Each utterance is unique and when a user speaks or types that phrase, the associated intent is invoked. The phrases act as training data for the Lex bot to identify user input and map it to the appropriate intent. For example, the PostsByAuthor intent has a few different utterances that can invoke it, as shown in the following screenshot. The best practice is to use 15–20 sample utterances to provide the necessary variations for the model to perform with optimum accuracy. One or more slot values are within each utterance, identified by the curly brackets, which represent input data that is needed for the intent. Each slot value can be required or not, has a slot type associated with it, and has a prompt that used by the chatbot for eliciting the slot value if it’s not present. In addition to configuring the chatbot to prompt the user for missing slot values, you can specify a Lambda function to provide a more thorough validation of the inputs (against values available in the database) or return potential options back to the user to allow them to choose. For our PostsByAuthor intent, we configure a validation check to ensure that the author entered a valid author in our knowledge graph. The final piece is to define the fulfillment action for the intents. This is the action that occurs after the intent is invoked and all required slots are filled or validation checks have occurred. When defining the fulfillment action, you can choose from either invoking a Lambda function or returning the parameters back to the client. After you define the intent, you build and test it on the provided console. Now that the chatbot is functioning as expected, let’s integrate it into our web application. Integrate our chatbot Integration of our chatbot into our React application is relatively straightforward. We use the familiar React paradigms of components and REST calls, so let’s highlight how to configure the integration between React and Amazon Lex. Amazon Lex supports a variety of different deployment options natively, including Facebook, Slack, Twilio, or Amplify. Our application uses Amplify, which is an end-to-end toolkit that allows us to construct full-stack applications powered by AWS. Amplify offers a set of component libraries for a variety of front-end frameworks, including React, which we use in our application. Amplify provides an interaction component that makes it simple to integrate a React front end to our Amazon Lex chatbot. To accomplish this, we need some configuration information, such as the chatbot name and a configured Amazon Cognito identity pool ID. After we provide these configuration values, the component handles the work of wiring up the integration with our chatbot. In addition to the configuration, we need an additional piece of code (available on GitHub) to handle the search parameters returned as the fulfillment action from our Amazon Lex intent: useEffect(() => { const handleChatComplete = (event) => { const { data, err } = event.detail; if (data) { props.setSearchParameter(data["slots"]); } if (err) console.error("Chat failed:", err); }; const chatbotElement = document.querySelector("amplify-chatbot"); chatbotElement.addEventListener("chatCompleted", handleChatComplete); return function cleanup() { chatbotElement.removeEventListener("chatCompleted", handleChatComplete); }; }, [props]); With the search parameters for our intent, we can now call our API Gateway as you would for other REST based calls. Clean up your resources To clean up the resources used in this post, use either the AWS Command Line Interface (AWS CLI) or the AWS Management Console. Delete the CloudFormation template that you used to configure the remaining resources generated as part of this application. Conclusion Knowledge graphs—especially enterprise knowledge graphs—are efficient ways to access vast arrays of information within an organization. However, doing this effectively requires the ability to extract connections from within a large amount of unstructured and semi-structured data. This information then needs to be accessible via a simple and user-friendly interface. NLP and natural language search techniques such as those demonstrated in this post are just one of the many ways that AWS powers an intelligent data extraction and insight platform within organizations. If you have any questions or want a deeper dive into how to leverage Amazon Neptune for your own knowledge graph use case, we suggest looking at our Neptune Workbench notebook (01-Building-a-Knowledge-Graph-Application). This workbook uses the same AWS Database Blog data used here but provides additional details on the methodology, data model, and queries required to build a knowledge graph based search solution. As with other AWS services, we’re always available through your Amazon account manager or via the Amazon Neptune Discussion Forums. About the author Dave Bechberger is a Sr. Graph Architect with the Amazon Neptune team. He used his years of experience working with customers to build graph database-backed applications as inspiration to co-author “Graph Databases in Action” by Manning. https://aws.amazon.com/blogs/database/supercharge-your-knowledge-graph-using-amazon-neptune-amazon-comprehend-and-amazon-lex/
0 notes
Text
300+ TOP DOCKER Interview Questions and Answers
Docker Interview Questions for freshers experienced :-
1. What is Docker? Docker is an open-source lightweight containerization technology. It has gained widespread popularity in the cloud and application packaging world. It allows you to automate the deployment of applications in lightweight and portable containers. 2. What are the advantages of using Docker container? Here, are a major advantage of using Docker. Offers an efficient and easy initial set up Allows you to describe your application lifecycle in detail Simple configuration and interacts with Docker Compose. Documentation provides every bit of information. 3. What are the important features of Docker? Here are the essential features of Docker: Easy Modeling Version control Placement/Affinity Application Agility Developer Productivity Operational Efficiencies 4. What are the main drawbacks of Docker? Some notable drawbacks of Docker are: Doesn't provide a storage option Offer a poor monitoring option. No automatic rescheduling of inactive Nodes Complicated automatic horizontal scaling set up 5. What is Docker image? The Docker image help to create Docker containers. You can create the Docker image with the build command. Due to this, it creates a container that starts when it begins to run. Every docker images are stored in the Docker registry. 6. What is Docker Engine? Docker daemon or Docker engine represents the server. The docker daemon and the clients should be run on the same or remote host, which can communicate through command-line client binary and full RESTful API. 7. Explain Registries There are two types of registry is Public Registry Private Registry Docker's public registry is called Docker hub, which allows you to store images privately. In Docker hub, you can store millions of images. 8. What command should you run to see all running container in Docker? $ docker ps 9. Write the command to stop the docker container $ sudo docker stop container name 10. What is the command to run the image as a container? $ sudo docker run -i -t alpine /bin/bash
DOCKER Interview Questions 11. What are the common instruction in Dockerfile? The common instruction in Dockerfile are: FROM, LABEL, RUN, and CMD. 12. What is memory-swap flag? Memory-swap is a modified flag that only has meaning if- memory is also set. Swap allows the container to write express memory requirements to disk when the container has exhausted all the RAM which is available to it. 13. Explain Docker Swarm? Docker Swarm is native gathering for docker which helps you to a group of Docker hosts into a single and virtual docker host. It offers the standard docker application program interface. 14. How can you monitor the docker in production environments? Docker states and Docker Events are used to monitoring docker in the production environment. 15. What the states of Docker container? Important states of Docker container are: Running Paused Restarting Exited 16. What is Docker hub? Docker hub is a cloud-based registry that which helps you to link to code repositories. It allows you to build, test, store your image in Docker cloud. You can also deploy the image to your host with the help of Docker hub. 17. What is Virtualization? Virtualization is a method of logically dividing mainframes to allow multiple applications to run simultaneously. However, this scenario changed when companies and open source communities were able to offer a method of handling privileged instructions. It allows multiple OS to run simultaneously on a single x86 based system. 18. What is Hypervisor? The hypervisor allows you to create a virtual environment in which the guest virtual machines operate. It controls the guest systems and checks if the resources are allocated to the guests as necessary. 19. Explain Docker object labels Docker object labels is a method for applying metadata to docker objects including, images, containers, volumes, network, swam nodes, and services. 20. Write a Docker file to create and copy a directory and built it using python modules? FROM pyhton:2.7-slim WORKDIR /app COPY . /app docker build –tag 21. Where the docker volumes are stored? You need to navigate: /var/lib/docker/volumes 22. List out some important advanced docker commands Command Description docker info Information Command docker pull Download an image docker stats Container information Docker images List of images downloaded 23. How does communication happen between Docker client and Docker Daemon? You can communicate between Docker client and Docker Daemon with the combination of Rest API, socket.IO, and TCP. 24. Explain Implementation method of Continuous Integration(CI) and Continues Development (CD) in Docker? You need to do the following things: Runs Jenkins on docker You can run integration tests in Jenkins using docker-compose 25. What are the command to control Docker with Systemd? systemctl start/stop docker service docker start/stop 26. How to use JSON instead of YAML compose file? docker-compose -f docker-compose.json up 27. What is the command you need to give to push the new image to Docker registry? docker push myorg/img 28. How to include code with copy/add or volumes? In docker file, we need to use COPY or ADD directive. This is useful to relocate code. However, we should use a volume if we want to make changes. 29. Explain the process of scaling your Docker containers The Docker containers can be scaled to any level starting from a few hundred to even thousands or millions of containers. The only condition for this is that the containers need the memory and the OS at all times, and there should not be a constraint when the Docker is getting scaled. 30. What is the method for creating a Docker container? You can use any of the specific Docker images for creating a Docker container using the below command. docker run -t -i command name This command not only creates the container but also start it for you. 31. What are the steps for the Docker container life cycle? Below are the steps for Docker life cycle: Build Pull Run 32. How can you run multiple containers using a single service? By using docker-compose, you can run multiple containers using a single service. All docker-compose files uses yaml language. 33. What is CNM? CNM stands for Container Networking Model. It is a standard or specification from Docker, Inc. that forms the basis of container networking in a Docker environment. This docker's approach provides container networking with support for multiple network drivers. 34. Does Docker offer support for IPV6? Yes, Docker provides support IPv6. IPv6 networking is supported only on Docker daemons runs on Linux hosts. However, if you want to enable IPv6 support in the Docker daemon, you need to modify /etc/docker/daemon.json and set the ipv6 key to true. 35. Can you lose data when the container exits? No, any data that your application writes to disk get stored in container. The file system for the contain persists even after the container halts. 36. What are a different kind of volume mount types available in Docker? Bind mounts- It can be stored anywhere on the host system 37. How to configure the default logging driver under Docker? To configure the Docker daemon to default to a specific logging driver. You need to set the value of log-driver to the name of the logging drive the daemon.jason.fie. 38. Explain Docker Trusted Registry? Docker Trusted Registry is the enterprise-grade image storage toll for Docker. You should install it after your firewall so that you can securely manage the Docker images you use in your applications. 39. What are Docker Namespaces? The Namespace in Docker is a technique which offers isolated workspaces called the Container. Namespaces also offer a layer of isolation for the Docker containers. 40. What are the three components of Docker Architecture Client Docker-Host Registry 41. What is client? Docker provides Command Line Interface tools to the client to interact with Docker daemon. 42. What is the purpose of Docker_Host? It contains container, images, and Docker daemon. It offers a complete environment to execute and run your application. 43. How do I run multiple copies of Compose file on the same host? Compose uses the project name which allows you to create unique identifiers for all of a project's containers and other resources. To run multiple copies of a project, set a custom project name using the -a command-line option or using COMPOSE_PROJECT_NAME environment variable. 44. Is it a good practice to run stateful applications on Docker? The concept behind stateful applications is that they store their data onto the local file system. You need to decide to move the application to another machine, retrieving data becomes painful. I honestly would not prefer running stateful applications on Docker. 45. Suppose you have an application that has many dependant services. Will docker compose wait for the current container to be ready to move to the running of the next service? yes. Docker compose always runs in the dependency order. These dependencies are specifications like depends_on, links, volumes_from, etc. 46. How will you monitor Docker in production? Docker provides functionalities like docker stats and docker events to monitor docker in production. Docker stats provides CPU and memory usage of the container. Docker events provide information about the activities taking place in the docker daemon. 47. Is it a good practice to run Docker compose in production? Yes, using docker compose in production is the best practical application of docker compose. When you define applications with compose, you can use this compose definition in various production stages like CI, staging, testing, etc. 48. What changes are expected in your docker compose file while moving it to production? These are the following changes you need make to your compose file before migrating your application to the production environment: Remove volume bindings, so the code stays inside the container and cannot be changed from outside the container. Binding to different ports on the host. Specify a restart policy Add extra services like log aggregator 49. Have you used Kubernetes? If you have, which one would you prefer amongst Docker and Kubernetes? Be very honest in such questions. If you have used Kubernetes, talk about your experience with Kubernetes and Docker Swarm. Point out the key areas where you thought docker swarm was more efficient and vice versa. Have a look at this blog for understanding differences between Docker and Kubernetes. You Docker interview questions are not just limited to the workarounds of docker but also other similar tools. Hence be prepared with tools/technologies that give Docker competition. One such example is Kubernetes. 50. Are you aware of load balancing across containers and hosts? How does it work? While using docker service with multiple containers across different hosts, you come across the need to load balance the incoming traffic. Load balancing and HAProxy is basically used to balance the incoming traffic across different available(healthy) containers. If one container crashes, another container should automatically start running and the traffic should be re-routed to this new running container. Load balancing and HAProxy works around this concept. This brings us to the end of the Docker Interview Questions article. With increasing business competition, companies have realized the importance of adapting and taking advantage of the changing market. Few things that kept them in the game were faster scaling of systems, better software delivery, adapting to new technologies, etc. That’s when docker swung into the picture and gave these companies boosting support to continue the race. Docker Questions and Answers Pdf Download Read the full article
0 notes