#how to tag existing docker image
Explore tagged Tumblr posts
Visit Tumblr Blog
Explore Tumblr blogs with no restrictions, modern design and the best experience.
Last Seen Tumblr Blogs


Fun Fact
Tumblr has 16.74 million mobile monthly users in the US.
Text
Docker Tag and Push Image to Hub | Docker Tagging Explained and Best Practices
Full Video Link: https://youtu.be/X-uuxvi10Cw Hi, a new #video on #DockerImageTagging is published on @codeonedigest #youtube channel. Learn TAGGING docker image. Different ways to TAG docker image #Tagdockerimage #pushdockerimagetodockerhubrepository #
Next step after building the docker image is to tag docker image. Image tagging is important to upload docker image to docker hub repository or azure container registry or elastic container registry etc. There are different ways to TAG docker image. Learn how to tag docker image? What are the best practices for docker image tagging? How to tag docker container image? How to tag and push docker…

View On WordPress
#docker#docker and Kubernetes#docker build tag#docker compose#docker image tagging#docker image tagging best practices#docker tag and push image to registry#docker tag azure container registry#docker tag command#docker tag image#docker tag push#docker tagging best practices#docker tags explained#docker tutorial#docker tutorial for beginners#how to tag and push docker image#how to tag existing docker image#how to upload image to docker hub repository#push docker image to docker hub repository#Tag docker image#tag docker image after build#what is docker
0 notes
Text
Deploying Containers on AWS ECS with Fargate

Introduction
Amazon Elastic Container Service (ECS) with AWS Fargate enables developers to deploy and manage containers without managing the underlying infrastructure. Fargate eliminates the need to provision or scale EC2 instances, providing a serverless approach to containerized applications.
This guide walks through deploying a containerized application on AWS ECS with Fargate using AWS CLI, Terraform, or the AWS Management Console.
1. Understanding AWS ECS and Fargate
✅ What is AWS ECS?
Amazon ECS (Elastic Container Service) is a fully managed container orchestration service that allows running Docker containers on AWS.
✅ What is AWS Fargate?
AWS Fargate is a serverless compute engine for ECS that removes the need to manage EC2 instances, providing:
Automatic scaling
Per-second billing
Enhanced security (isolation at the task level)
Reduced operational overhead
✅ Why Choose ECS with Fargate?
✔ No need to manage EC2 instances ✔ Pay only for the resources your containers consume ✔ Simplified networking and security ✔ Seamless integration with AWS services (CloudWatch, IAM, ALB)
2. Prerequisites
Before deploying, ensure you have:
AWS Account with permissions for ECS, Fargate, IAM, and VPC
AWS CLI installed and configured
Docker installed to build container images
An existing ECR (Elastic Container Registry) repository
3. Steps to Deploy Containers on AWS ECS with Fargate
Step 1: Create a Dockerized Application
First, create a simple Dockerfile for a Node.js or Python application.
Example: Node.js DockerfiledockerfileFROM node:16-alpine WORKDIR /app COPY package.json . RUN npm install COPY . . CMD ["node", "server.js"] EXPOSE 3000
Build and push the image to AWS ECR:shaws ecr create-repository --repository-name my-app docker build -t my-app . docker tag my-app:latest <AWS_ACCOUNT_ID>.dkr.ecr.<REGION>.amazonaws.com/my-app:latest aws ecr get-login-password --region <REGION> | docker login --username AWS --password-stdin <AWS_ACCOUNT_ID>.dkr.ecr.<REGION>.amazonaws.com docker push <AWS_ACCOUNT_ID>.dkr.ecr.<REGION>.amazonaws.com/my-app:latest
Step 2: Create an ECS Cluster
Use the AWS CLI to create a cluster:shaws ecs create-cluster --cluster-name my-cluster
Or use Terraform:hclresource "aws_ecs_cluster" "my_cluster" { name = "my-cluster" }
Step 3: Define a Task Definition for Fargate
The task definition specifies how the container runs.
Create a task-definition.js{ "family": "my-task", "networkMode": "awsvpc", "executionRoleArn": "arn:aws:iam::<AWS_ACCOUNT_ID>:role/ecsTaskExecutionRole", "cpu": "512", "memory": "1024", "requiresCompatibilities": ["FARGATE"], "containerDefinitions": [ { "name": "my-container", "image": "<AWS_ACCOUNT_ID>.dkr.ecr.<REGION>.amazonaws.com/my-app:latest", "portMappings": [{"containerPort": 3000, "hostPort": 3000}], "essential": true } ] }
Register the task definition:shaws ecs register-task-definition --cli-input-json file://task-definition.json
Step 4: Create an ECS Service
Use AWS CLI:shaws ecs create-service --cluster my-cluster --service-name my-service --task-definition my-task --desired-count 1 --launch-type FARGATE --network-configuration "awsvpcConfiguration={subnets=[subnet-xyz],securityGroups=[sg-xyz],assignPublicIp=\"ENABLED\"}"
Or Terraform:hclresource "aws_ecs_service" "my_service" { name = "my-service" cluster = aws_ecs_cluster.my_cluster.id task_definition = aws_ecs_task_definition.my_task.arn desired_count = 1 launch_type = "FARGATE" network_configuration { subnets = ["subnet-xyz"] security_groups = ["sg-xyz"] assign_public_ip = true } }
Step 5: Configure a Load Balancer (Optional)
If the service needs internet access, configure an Application Load Balancer (ALB).
Create an ALB in your VPC.
Add an ECS service to the target group.
Configure a listener rule for routing traffic.
4. Monitoring & Scaling
🔹 Monitor ECS Service
Use AWS CloudWatch to monitor logs and performance.shaws logs describe-log-groups
🔹 Auto Scaling ECS Tasks
Configure an Auto Scaling Policy:sh aws application-autoscaling register-scalable-target \ --service-namespace ecs \ --scalable-dimension ecs:service:DesiredCount \ --resource-id service/my-cluster/my-service \ --min-capacity 1 \ --max-capacity 5
5. Cleaning Up Resources
After testing, clean up resources to avoid unnecessary charges.shaws ecs delete-service --cluster my-cluster --service my-service --force aws ecs delete-cluster --cluster my-cluster aws ecr delete-repository --repository-name my-app --force
Conclusion
AWS ECS with Fargate simplifies container deployment by eliminating the need to manage servers. By following this guide, you can deploy scalable, cost-efficient, and secure applications using serverless containers.
WEBSITE: https://www.ficusoft.in/aws-training-in-chennai/
0 notes
Text
Docker and Kubernetes Training | Hyderabad
How to Store Images in Container Registries?
Introduction:
Container registries serve as central repositories for storing and managing container images, facilitating seamless deployment across various environments. However, optimizing image storage within these registries requires careful consideration of factors such as scalability, security, and performance. - Docker and Kubernetes Training
Choose the Right Registry:
Selecting the appropriate container registry is the first step towards efficient image storage. Popular options include Docker Hub, Google Container Registry (GCR), Amazon Elastic Container Registry (ECR), and Azure Container Registry (ACR). Evaluate factors such as integration with existing infrastructure, pricing, security features, and geographical distribution to make an informed decision.
Image Tagging Strategy:
Implement a robust tagging strategy to organize and manage container images effectively. Use semantic versioning or timestamp-based tagging to denote image versions and updates clearly. Avoid using generic tags like "latest," as they can lead to ambiguity and inconsistent deployments. - Kubernetes Online Training
Optimize Image Size:
Minimize image size by adhering to best practices such as using lightweight base images, leveraging multi-stage builds, and optimizing Dockerfiles. Removing unnecessary dependencies and layers helps reduce storage requirements and accelerates image pull times during deployment.
Security Considerations:
Prioritize security by implementing access controls, image signing, and vulnerability scanning within the container registry. Restrict image access based on user roles and permissions to prevent unauthorized usage. Regularly scan images for vulnerabilities and apply patches promptly to mitigate potential risks. - Docker Online Training
Automated Builds and CI/CD Integration:
Integrate container registries with continuous integration/continuous deployment (CI/CD) pipelines to automate image builds, testing, and deployment processes. Leverage tools like Jenkins, GitLab CI/CD, or GitHub Actions to streamline workflows and ensure consistent image updates across environments.
Content Trust and Image Signing:
Enable content trust mechanisms such as Docker Content Trust or Notary to ensure image authenticity and integrity. By digitally signing images and verifying signatures during pull operations, organizations can mitigate the risk of tampering and unauthorized modifications.
Data Backup and Disaster Recovery:
Implement robust backup and disaster recovery strategies to safeguard critical container images against data loss or corruption. Regularly backup registry data to redundant storage locations and establish procedures for swift restoration in the event of failures or disasters. - Docker and Kubernetes Online Training
Performance Optimization:
Optimize registry performance by leveraging caching mechanisms, content delivery networks (CDNs), and geo-replication to reduce latency and improve image retrieval speeds. Distribute registry instances across multiple geographical regions to enhance availability and resilience.
Conclusion:
By following best practices such as selecting the right registry, optimizing image size, enforcing security measures, and integrating with CI/CD pipelines, organizations can streamline image management and enhance their containerized deployments without diving into complex coding intricacies.
Visualpath is the Leading and Best Institute for learning Docker And Kubernetes Online in Ameerpet, Hyderabad. We provide Docker Online Training Course, you will get the best course at an affordable cost.
Attend Free Demo
Call on - +91-9989971070.
Visit : https://www.visualpath.in/DevOps-docker-kubernetes-training.html
Blog : https://dockerandkubernetesonlinetraining.blogspot.com/
#docker and kubernetes training#docker online training#docker training in hyderabad#kubernetes training hyderabad#docker and kubernetes online training#docker online training hyderabad#kubernetes online training#kubernetes online training hyderabad
0 notes
Text
How to set up command-line access to Amazon Keyspaces (for Apache Cassandra) by using the new developer toolkit Docker image
Amazon Keyspaces (for Apache Cassandra) is a scalable, highly available, and fully managed Cassandra-compatible database service. Amazon Keyspaces helps you run your Cassandra workloads more easily by using a serverless database that can scale up and down automatically in response to your actual application traffic. Because Amazon Keyspaces is serverless, there are no clusters or nodes to provision and manage. You can get started with Amazon Keyspaces with a few clicks in the console or a few changes to your existing Cassandra driver configuration. In this post, I show you how to set up command-line access to Amazon Keyspaces by using the keyspaces-toolkit Docker image. The keyspaces-toolkit Docker image contains commonly used Cassandra developer tooling. The toolkit comes with the Cassandra Query Language Shell (cqlsh) and is configured with best practices for Amazon Keyspaces. The container image is open source and also compatible with Apache Cassandra 3.x clusters. A command line interface (CLI) such as cqlsh can be useful when automating database activities. You can use cqlsh to run one-time queries and perform administrative tasks, such as modifying schemas or bulk-loading flat files. You also can use cqlsh to enable Amazon Keyspaces features, such as point-in-time recovery (PITR) backups and assign resource tags to keyspaces and tables. The following screenshot shows a cqlsh session connected to Amazon Keyspaces and the code to run a CQL create table statement. Build a Docker image To get started, download and build the Docker image so that you can run the keyspaces-toolkit in a container. A Docker image is the template for the complete and executable version of an application. It’s a way to package applications and preconfigured tools with all their dependencies. To build and run the image for this post, install the latest Docker engine and Git on the host or local environment. The following command builds the image from the source. docker build --tag amazon/keyspaces-toolkit --build-arg CLI_VERSION=latest https://github.com/aws-samples/amazon-keyspaces-toolkit.git The preceding command includes the following parameters: –tag – The name of the image in the name:tag Leaving out the tag results in latest. –build-arg CLI_VERSION – This allows you to specify the version of the base container. Docker images are composed of layers. If you’re using the AWS CLI Docker image, aligning versions significantly reduces the size and build times of the keyspaces-toolkit image. Connect to Amazon Keyspaces Now that you have a container image built and available in your local repository, you can use it to connect to Amazon Keyspaces. To use cqlsh with Amazon Keyspaces, create service-specific credentials for an existing AWS Identity and Access Management (IAM) user. The service-specific credentials enable IAM users to access Amazon Keyspaces, but not access other AWS services. The following command starts a new container running the cqlsh process. docker run --rm -ti amazon/keyspaces-toolkit cassandra.us-east-1.amazonaws.com 9142 --ssl -u "SERVICEUSERNAME" -p "SERVICEPASSWORD" The preceding command includes the following parameters: run – The Docker command to start the container from an image. It’s the equivalent to running create and start. –rm –Automatically removes the container when it exits and creates a container per session or run. -ti – Allocates a pseudo TTY (t) and keeps STDIN open (i) even if not attached (remove i when user input is not required). amazon/keyspaces-toolkit – The image name of the keyspaces-toolkit. us-east-1.amazonaws.com – The Amazon Keyspaces endpoint. 9142 – The default SSL port for Amazon Keyspaces. After connecting to Amazon Keyspaces, exit the cqlsh session and terminate the process by using the QUIT or EXIT command. Drop-in replacement Now, simplify the setup by assigning an alias (or DOSKEY for Windows) to the Docker command. The alias acts as a shortcut, enabling you to use the alias keyword instead of typing the entire command. You will use cqlsh as the alias keyword so that you can use the alias as a drop-in replacement for your existing Cassandra scripts. The alias contains the parameter –v "$(pwd)":/source, which mounts the current directory of the host. This is useful for importing and exporting data with COPY or using the cqlsh --file command to load external cqlsh scripts. alias cqlsh='docker run --rm -ti -v "$(pwd)":/source amazon/keyspaces-toolkit cassandra.us-east-1.amazonaws.com 9142 --ssl' For security reasons, don’t store the user name and password in the alias. After setting up the alias, you can create a new cqlsh session with Amazon Keyspaces by calling the alias and passing in the service-specific credentials. cqlsh -u "SERVICEUSERNAME" -p "SERVICEPASSWORD" Later in this post, I show how to use AWS Secrets Manager to avoid using plaintext credentials with cqlsh. You can use Secrets Manager to store, manage, and retrieve secrets. Create a keyspace Now that you have the container and alias set up, you can use the keyspaces-toolkit to create a keyspace by using cqlsh to run CQL statements. In Cassandra, a keyspace is the highest-order structure in the CQL schema, which represents a grouping of tables. A keyspace is commonly used to define the domain of a microservice or isolate clients in a multi-tenant strategy. Amazon Keyspaces is serverless, so you don’t have to configure clusters, hosts, or Java virtual machines to create a keyspace or table. When you create a new keyspace or table, it is associated with an AWS Account and Region. Though a traditional Cassandra cluster is limited to 200 to 500 tables, with Amazon Keyspaces the number of keyspaces and tables for an account and Region is virtually unlimited. The following command creates a new keyspace by using SingleRegionStrategy, which replicates data three times across multiple Availability Zones in a single AWS Region. Storage is billed by the raw size of a single replica, and there is no network transfer cost when replicating data across Availability Zones. Using keyspaces-toolkit, connect to Amazon Keyspaces and run the following command from within the cqlsh session. CREATE KEYSPACE amazon WITH REPLICATION = {'class': 'SingleRegionStrategy'} AND TAGS = {'domain' : 'shoppingcart' , 'app' : 'acme-commerce'}; The preceding command includes the following parameters: REPLICATION – SingleRegionStrategy replicates data three times across multiple Availability Zones. TAGS – A label that you assign to an AWS resource. For more information about using tags for access control, microservices, cost allocation, and risk management, see Tagging Best Practices. Create a table Previously, you created a keyspace without needing to define clusters or infrastructure. Now, you will add a table to your keyspace in a similar way. A Cassandra table definition looks like a traditional SQL create table statement with an additional requirement for a partition key and clustering keys. These keys determine how data in CQL rows are distributed, sorted, and uniquely accessed. Tables in Amazon Keyspaces have the following unique characteristics: Virtually no limit to table size or throughput – In Amazon Keyspaces, a table’s capacity scales up and down automatically in response to traffic. You don’t have to manage nodes or consider node density. Performance stays consistent as your tables scale up or down. Support for “wide” partitions – CQL partitions can contain a virtually unbounded number of rows without the need for additional bucketing and sharding partition keys for size. This allows you to scale partitions “wider” than the traditional Cassandra best practice of 100 MB. No compaction strategies to consider – Amazon Keyspaces doesn’t require defined compaction strategies. Because you don’t have to manage compaction strategies, you can build powerful data models without having to consider the internals of the compaction process. Performance stays consistent even as write, read, update, and delete requirements change. No repair process to manage – Amazon Keyspaces doesn’t require you to manage a background repair process for data consistency and quality. No tombstones to manage – With Amazon Keyspaces, you can delete data without the challenge of managing tombstone removal, table-level grace periods, or zombie data problems. 1 MB row quota – Amazon Keyspaces supports the Cassandra blob type, but storing large blob data greater than 1 MB results in an exception. It’s a best practice to store larger blobs across multiple rows or in Amazon Simple Storage Service (Amazon S3) object storage. Fully managed backups – PITR helps protect your Amazon Keyspaces tables from accidental write or delete operations by providing continuous backups of your table data. The following command creates a table in Amazon Keyspaces by using a cqlsh statement with customer properties specifying on-demand capacity mode, PITR enabled, and AWS resource tags. Using keyspaces-toolkit to connect to Amazon Keyspaces, run this command from within the cqlsh session. CREATE TABLE amazon.eventstore( id text, time timeuuid, event text, PRIMARY KEY(id, time)) WITH CUSTOM_PROPERTIES = { 'capacity_mode':{'throughput_mode':'PAY_PER_REQUEST'}, 'point_in_time_recovery':{'status':'enabled'} } AND TAGS = {'domain' : 'shoppingcart' , 'app' : 'acme-commerce' , 'pii': 'true'}; The preceding command includes the following parameters: capacity_mode – Amazon Keyspaces has two read/write capacity modes for processing reads and writes on your tables. The default for new tables is on-demand capacity mode (the PAY_PER_REQUEST flag). point_in_time_recovery – When you enable this parameter, you can restore an Amazon Keyspaces table to a point in time within the preceding 35 days. There is no overhead or performance impact by enabling PITR. TAGS – Allows you to organize resources, define domains, specify environments, allocate cost centers, and label security requirements. Insert rows Before inserting data, check if your table was created successfully. Amazon Keyspaces performs data definition language (DDL) operations asynchronously, such as creating and deleting tables. You also can monitor the creation status of a new resource programmatically by querying the system schema table. Also, you can use a toolkit helper for exponential backoff. Check for table creation status Cassandra provides information about the running cluster in its system tables. With Amazon Keyspaces, there are no clusters to manage, but it still provides system tables for the Amazon Keyspaces resources in an account and Region. You can use the system tables to understand the creation status of a table. The system_schema_mcs keyspace is a new system keyspace with additional content related to serverless functionality. Using keyspaces-toolkit, run the following SELECT statement from within the cqlsh session to retrieve the status of the newly created table. SELECT keyspace_name, table_name, status FROM system_schema_mcs.tables WHERE keyspace_name = 'amazon' AND table_name = 'eventstore'; The following screenshot shows an example of output for the preceding CQL SELECT statement. Insert sample data Now that you have created your table, you can use CQL statements to insert and read sample data. Amazon Keyspaces requires all write operations (insert, update, and delete) to use the LOCAL_QUORUM consistency level for durability. With reads, an application can choose between eventual consistency and strong consistency by using LOCAL_ONE or LOCAL_QUORUM consistency levels. The benefits of eventual consistency in Amazon Keyspaces are higher availability and reduced cost. See the following code. CONSISTENCY LOCAL_QUORUM; INSERT INTO amazon.eventstore(id, time, event) VALUES ('1', now(), '{eventtype:"click-cart"}'); INSERT INTO amazon.eventstore(id, time, event) VALUES ('2', now(), '{eventtype:"showcart"}'); INSERT INTO amazon.eventstore(id, time, event) VALUES ('3', now(), '{eventtype:"clickitem"}') IF NOT EXISTS; SELECT * FROM amazon.eventstore; The preceding code uses IF NOT EXISTS or lightweight transactions to perform a conditional write. With Amazon Keyspaces, there is no heavy performance penalty for using lightweight transactions. You get similar performance characteristics of standard insert, update, and delete operations. The following screenshot shows the output from running the preceding statements in a cqlsh session. The three INSERT statements added three unique rows to the table, and the SELECT statement returned all the data within the table. Export table data to your local host You now can export the data you just inserted by using the cqlsh COPY TO command. This command exports the data to the source directory, which you mounted earlier to the working directory of the Docker run when creating the alias. The following cqlsh statement exports your table data to the export.csv file located on the host machine. CONSISTENCY LOCAL_ONE; COPY amazon.eventstore(id, time, event) TO '/source/export.csv' WITH HEADER=false; The following screenshot shows the output of the preceding command from the cqlsh session. After the COPY TO command finishes, you should be able to view the export.csv from the current working directory of the host machine. For more information about tuning export and import processes when using cqlsh COPY TO, see Loading data into Amazon Keyspaces with cqlsh. Use credentials stored in Secrets Manager Previously, you used service-specific credentials to connect to Amazon Keyspaces. In the following example, I show how to use the keyspaces-toolkit helpers to store and access service-specific credentials in Secrets Manager. The helpers are a collection of scripts bundled with keyspaces-toolkit to assist with common tasks. By overriding the default entry point cqlsh, you can call the aws-sm-cqlsh.sh script, a wrapper around the cqlsh process that retrieves the Amazon Keyspaces service-specific credentials from Secrets Manager and passes them to the cqlsh process. This script allows you to avoid hard-coding the credentials in your scripts. The following diagram illustrates this architecture. Configure the container to use the host’s AWS CLI credentials The keyspaces-toolkit extends the AWS CLI Docker image, making keyspaces-toolkit extremely lightweight. Because you may already have the AWS CLI Docker image in your local repository, keyspaces-toolkit adds only an additional 10 MB layer extension to the AWS CLI. This is approximately 15 times smaller than using cqlsh from the full Apache Cassandra 3.11 distribution. The AWS CLI runs in a container and doesn’t have access to the AWS credentials stored on the container’s host. You can share credentials with the container by mounting the ~/.aws directory. Mount the host directory to the container by using the -v parameter. To validate a proper setup, the following command lists current AWS CLI named profiles. docker run --rm -ti -v ~/.aws:/root/.aws --entrypoint aws amazon/keyspaces-toolkit configure list-profiles The ~/.aws directory is a common location for the AWS CLI credentials file. If you configured the container correctly, you should see a list of profiles from the host credentials. For instructions about setting up the AWS CLI, see Step 2: Set Up the AWS CLI and AWS SDKs. Store credentials in Secrets Manager Now that you have configured the container to access the host’s AWS CLI credentials, you can use the Secrets Manager API to store the Amazon Keyspaces service-specific credentials in Secrets Manager. The secret name keyspaces-credentials in the following command is also used in subsequent steps. docker run --rm -ti -v ~/.aws:/root/.aws --entrypoint aws amazon/keyspaces-toolkit secretsmanager create-secret --name keyspaces-credentials --description "Store Amazon Keyspaces Generated Service Credentials" --secret-string "{"username":"SERVICEUSERNAME","password":"SERVICEPASSWORD","engine":"cassandra","host":"SERVICEENDPOINT","port":"9142"}" The preceding command includes the following parameters: –entrypoint – The default entry point is cqlsh, but this command uses this flag to access the AWS CLI. –name – The name used to identify the key to retrieve the secret in the future. –secret-string – Stores the service-specific credentials. Replace SERVICEUSERNAME and SERVICEPASSWORD with your credentials. Replace SERVICEENDPOINT with the service endpoint for the AWS Region. Creating and storing secrets requires CreateSecret and GetSecretValue permissions in your IAM policy. As a best practice, rotate secrets periodically when storing database credentials. Use the Secrets Manager helper script Use the Secrets Manager helper script to sign in to Amazon Keyspaces by replacing the user and password fields with the secret key from the preceding keyspaces-credentials command. docker run --rm -ti -v ~/.aws:/root/.aws --entrypoint aws-sm-cqlsh.sh amazon/keyspaces-toolkit keyspaces-credentials --ssl --execute "DESCRIBE Keyspaces" The preceding command includes the following parameters: -v – Used to mount the directory containing the host’s AWS CLI credentials file. –entrypoint – Use the helper by overriding the default entry point of cqlsh to access the Secrets Manager helper script, aws-sm-cqlsh.sh. keyspaces-credentials – The key to access the credentials stored in Secrets Manager. –execute – Runs a CQL statement. Update the alias You now can update the alias so that your scripts don’t contain plaintext passwords. You also can manage users and roles through Secrets Manager. The following code sets up a new alias by using the keyspaces-toolkit Secrets Manager helper for passing the service-specific credentials to Secrets Manager. alias cqlsh='docker run --rm -ti -v ~/.aws:/root/.aws -v "$(pwd)":/source --entrypoint aws-sm-cqlsh.sh amazon/keyspaces-toolkit keyspaces-credentials --ssl' To have the alias available in every new terminal session, add the alias definition to your .bashrc file, which is executed on every new terminal window. You can usually find this file in $HOME/.bashrc or $HOME/bash_aliases (loaded by $HOME/.bashrc). Validate the alias Now that you have updated the alias with the Secrets Manager helper, you can use cqlsh without the Docker details or credentials, as shown in the following code. cqlsh --execute "DESCRIBE TABLE amazon.eventstore;" The following screenshot shows the running of the cqlsh DESCRIBE TABLE statement by using the alias created in the previous section. In the output, you should see the table definition of the amazon.eventstore table you created in the previous step. Conclusion In this post, I showed how to get started with Amazon Keyspaces and the keyspaces-toolkit Docker image. I used Docker to build an image and run a container for a consistent and reproducible experience. I also used an alias to create a drop-in replacement for existing scripts, and used built-in helpers to integrate cqlsh with Secrets Manager to store service-specific credentials. Now you can use the keyspaces-toolkit with your Cassandra workloads. As a next step, you can store the image in Amazon Elastic Container Registry, which allows you to access the keyspaces-toolkit from CI/CD pipelines and other AWS services such as AWS Batch. Additionally, you can control the image lifecycle of the container across your organization. You can even attach policies to expiring images based on age or download count. For more information, see Pushing an image. Cheat sheet of useful commands I did not cover the following commands in this blog post, but they will be helpful when you work with cqlsh, AWS CLI, and Docker. --- Docker --- #To view the logs from the container. Helpful when debugging docker logs CONTAINERID #Exit code of the container. Helpful when debugging docker inspect createtablec --format='{{.State.ExitCode}}' --- CQL --- #Describe keyspace to view keyspace definition DESCRIBE KEYSPACE keyspace_name; #Describe table to view table definition DESCRIBE TABLE keyspace_name.table_name; #Select samples with limit to minimize output SELECT * FROM keyspace_name.table_name LIMIT 10; --- Amazon Keyspaces CQL --- #Change provisioned capacity for tables ALTER TABLE keyspace_name.table_name WITH custom_properties={'capacity_mode':{'throughput_mode': 'PROVISIONED', 'read_capacity_units': 4000, 'write_capacity_units': 3000}} ; #Describe current capacity mode for tables SELECT keyspace_name, table_name, custom_properties FROM system_schema_mcs.tables where keyspace_name = 'amazon' and table_name='eventstore'; --- Linux --- #Line count of multiple/all files in the current directory find . -type f | wc -l #Remove header from csv sed -i '1d' myData.csv About the Author Michael Raney is a Solutions Architect with Amazon Web Services. https://aws.amazon.com/blogs/database/how-to-set-up-command-line-access-to-amazon-keyspaces-for-apache-cassandra-by-using-the-new-developer-toolkit-docker-image/
1 note
·
View note
Photo

hydralisk98′s web projects tracker:
Core principles=
Fail faster
‘Learn, Tweak, Make’ loop
This is meant to be a quick reference for tracking progress made over my various projects, organized by their “ultimate target” goal:
(START)
(Website)=
Install Firefox
Install Chrome
Install Microsoft newest browser
Install Lynx
Learn about contemporary web browsers
Install a very basic text editor
Install Notepad++
Install Nano
Install Powershell
Install Bash
Install Git
Learn HTML
Elements and attributes
Commenting (single line comment, multi-line comment)
Head (title, meta, charset, language, link, style, description, keywords, author, viewport, script, base, url-encode, )
Hyperlinks (local, external, link titles, relative filepaths, absolute filepaths)
Headings (h1-h6, horizontal rules)
Paragraphs (pre, line breaks)
Text formatting (bold, italic, deleted, inserted, subscript, superscript, marked)
Quotations (quote, blockquote, abbreviations, address, cite, bidirectional override)
Entities & symbols (&entity_name, &entity_number,  , useful HTML character entities, diacritical marks, mathematical symbols, greek letters, currency symbols, )
Id (bookmarks)
Classes (select elements, multiple classes, different tags can share same class, )
Blocks & Inlines (div, span)
Computercode (kbd, samp, code, var)
Lists (ordered, unordered, description lists, control list counting, nesting)
Tables (colspan, rowspan, caption, colgroup, thead, tbody, tfoot, th)
Images (src, alt, width, height, animated, link, map, area, usenmap, , picture, picture for format support)
old fashioned audio
old fashioned video
Iframes (URL src, name, target)
Forms (input types, action, method, GET, POST, name, fieldset, accept-charset, autocomplete, enctype, novalidate, target, form elements, input attributes)
URL encode (scheme, prefix, domain, port, path, filename, ascii-encodings)
Learn about oldest web browsers onwards
Learn early HTML versions (doctypes & permitted elements for each version)
Make a 90s-like web page compatible with as much early web formats as possible, earliest web browsers’ compatibility is best here
Learn how to teach HTML5 features to most if not all older browsers
Install Adobe XD
Register a account at Figma
Learn Adobe XD basics
Learn Figma basics
Install Microsoft’s VS Code
Install my Microsoft’s VS Code favorite extensions
Learn HTML5
Semantic elements
Layouts
Graphics (SVG, canvas)
Track
Audio
Video
Embed
APIs (geolocation, drag and drop, local storage, application cache, web workers, server-sent events, )
HTMLShiv for teaching older browsers HTML5
HTML5 style guide and coding conventions (doctype, clean tidy well-formed code, lower case element names, close all html elements, close empty html elements, quote attribute values, image attributes, space and equal signs, avoid long code lines, blank lines, indentation, keep html, keep head, keep body, meta data, viewport, comments, stylesheets, loading JS into html, accessing HTML elements with JS, use lowercase file names, file extensions, index/default)
Learn CSS
Selections
Colors
Fonts
Positioning
Box model
Grid
Flexbox
Custom properties
Transitions
Animate
Make a simple modern static site
Learn responsive design
Viewport
Media queries
Fluid widths
rem units over px
Mobile first
Learn SASS
Variables
Nesting
Conditionals
Functions
Learn about CSS frameworks
Learn Bootstrap
Learn Tailwind CSS
Learn JS
Fundamentals
Document Object Model / DOM
JavaScript Object Notation / JSON
Fetch API
Modern JS (ES6+)
Learn Git
Learn Browser Dev Tools
Learn your VS Code extensions
Learn Emmet
Learn NPM
Learn Yarn
Learn Axios
Learn Webpack
Learn Parcel
Learn basic deployment
Domain registration (Namecheap)
Managed hosting (InMotion, Hostgator, Bluehost)
Static hosting (Nertlify, Github Pages)
SSL certificate
FTP
SFTP
SSH
CLI
Make a fancy front end website about
Make a few Tumblr themes
===You are now a basic front end developer!
Learn about XML dialects
Learn XML
Learn about JS frameworks
Learn jQuery
Learn React
Contex API with Hooks
NEXT
Learn Vue.js
Vuex
NUXT
Learn Svelte
NUXT (Vue)
Learn Gatsby
Learn Gridsome
Learn Typescript
Make a epic front end website about
===You are now a front-end wizard!
Learn Node.js
Express
Nest.js
Koa
Learn Python
Django
Flask
Learn GoLang
Revel
Learn PHP
Laravel
Slim
Symfony
Learn Ruby
Ruby on Rails
Sinatra
Learn SQL
PostgreSQL
MySQL
Learn ORM
Learn ODM
Learn NoSQL
MongoDB
RethinkDB
CouchDB
Learn a cloud database
Firebase, Azure Cloud DB, AWS
Learn a lightweight & cache variant
Redis
SQLlite
NeDB
Learn GraphQL
Learn about CMSes
Learn Wordpress
Learn Drupal
Learn Keystone
Learn Enduro
Learn Contentful
Learn Sanity
Learn Jekyll
Learn about DevOps
Learn NGINX
Learn Apache
Learn Linode
Learn Heroku
Learn Azure
Learn Docker
Learn testing
Learn load balancing
===You are now a good full stack developer
Learn about mobile development
Learn Dart
Learn Flutter
Learn React Native
Learn Nativescript
Learn Ionic
Learn progressive web apps
Learn Electron
Learn JAMstack
Learn serverless architecture
Learn API-first design
Learn data science
Learn machine learning
Learn deep learning
Learn speech recognition
Learn web assembly
===You are now a epic full stack developer
Make a web browser
Make a web server
===You are now a legendary full stack developer
[...]
(Computer system)=
Learn to execute and test your code in a command line interface
Learn to use breakpoints and debuggers
Learn Bash
Learn fish
Learn Zsh
Learn Vim
Learn nano
Learn Notepad++
Learn VS Code
Learn Brackets
Learn Atom
Learn Geany
Learn Neovim
Learn Python
Learn Java?
Learn R
Learn Swift?
Learn Go-lang?
Learn Common Lisp
Learn Clojure (& ClojureScript)
Learn Scheme
Learn C++
Learn C
Learn B
Learn Mesa
Learn Brainfuck
Learn Assembly
Learn Machine Code
Learn how to manage I/O
Make a keypad
Make a keyboard
Make a mouse
Make a light pen
Make a small LCD display
Make a small LED display
Make a teleprinter terminal
Make a medium raster CRT display
Make a small vector CRT display
Make larger LED displays
Make a few CRT displays
Learn how to manage computer memory
Make datasettes
Make a datasette deck
Make floppy disks
Make a floppy drive
Learn how to control data
Learn binary base
Learn hexadecimal base
Learn octal base
Learn registers
Learn timing information
Learn assembly common mnemonics
Learn arithmetic operations
Learn logic operations (AND, OR, XOR, NOT, NAND, NOR, NXOR, IMPLY)
Learn masking
Learn assembly language basics
Learn stack construct’s operations
Learn calling conventions
Learn to use Application Binary Interface or ABI
Learn to make your own ABIs
Learn to use memory maps
Learn to make memory maps
Make a clock
Make a front panel
Make a calculator
Learn about existing instruction sets (Intel, ARM, RISC-V, PIC, AVR, SPARC, MIPS, Intersil 6120, Z80...)
Design a instruction set
Compose a assembler
Compose a disassembler
Compose a emulator
Write a B-derivative programming language (somewhat similar to C)
Write a IPL-derivative programming language (somewhat similar to Lisp and Scheme)
Write a general markup language (like GML, SGML, HTML, XML...)
Write a Turing tarpit (like Brainfuck)
Write a scripting language (like Bash)
Write a database system (like VisiCalc or SQL)
Write a CLI shell (basic operating system like Unix or CP/M)
Write a single-user GUI operating system (like Xerox Star’s Pilot)
Write a multi-user GUI operating system (like Linux)
Write various software utilities for my various OSes
Write various games for my various OSes
Write various niche applications for my various OSes
Implement a awesome model in very large scale integration, like the Commodore CBM-II
Implement a epic model in integrated circuits, like the DEC PDP-15
Implement a modest model in transistor-transistor logic, similar to the DEC PDP-12
Implement a simple model in diode-transistor logic, like the original DEC PDP-8
Implement a simpler model in later vacuum tubes, like the IBM 700 series
Implement simplest model in early vacuum tubes, like the EDSAC
[...]
(Conlang)=
Choose sounds
Choose phonotactics
[...]
(Animation ‘movie’)=
[...]
(Exploration top-down ’racing game’)=
[...]
(Video dictionary)=
[...]
(Grand strategy game)=
[...]
(Telex system)=
[...]
(Pen&paper tabletop game)=
[...]
(Search engine)=
[...]
(Microlearning system)=
[...]
(Alternate planet)=
[...]
(END)
4 notes
·
View notes
Text
How can I install Podman on CentOS 8 / RHEL 8 Linux machine?. RHEL 8 / CentOS 8 has dropped official support for Docker as container runtime. Instead, Red Hat has been working on libpod (Podman’s container management library) which provides a library for applications to use the Container Pod concept available in the world of Kubernetes. One of the tools provided as part of libpod project is podman – Used for managing Pods, Containers, and Container Images. Podman can be defined as a tool designed for managing containers and pods without requiring a container daemon. All the containers and Pods are created as child processes of the Podman tool. The Podman’s CLI is based on the Docker CLI. It is easy to install Podman on CentOS 8 or RHEL 8 Linux machine. Most container related tools on CentOS 8 are available on the module called container-tools. For installation on other systems, please check below guides: How To Install Podman on Debian How To Install Podman on Arch Linux / Manjaro How To Install Podman on CentOS & Fedora Install Podman on Ubuntu Follow below guides to install Podman on CentOS 8 / RHEL 8. Step 1: Enable EPEL repository Ensure EPEL repository as some Python packages required are available in EPEL/PowerTools repository. Enable EPEL repository CentOS 8 Ensure PowerTools repo is enabled as well – CentOS 8 only sudo dnf config-manager --set-enabled powertools Step 2: Install Podman on CentOS 8 / RHEL 8 First update your system: sudo dnf -y update The fire the commands below to install Podman on CentOS 8 / RHEL 8 Linux machine. $ sudo dnf module list | grep container-tools container-tools rhel8 [d][e] common [d] Most recent (rolling) versions of podman, buildah, skopeo, runc, conmon, runc, conmon, CRIU, Udica, etc as well as dependencies such as container-selinux built and tested together, and updated as frequently as every 12 weeks. $ sudo dnf install -y @container-tools If the installation was successful, you should be able to check the podman version. $ podman version Client: Podman Engine Version: 4.0.2 API Version: 4.0.2 Go Version: go1.17.7 Built: Sun May 15 19:45:11 2022 OS/Arch: linux/amd64 To check the help page, run the command: $ podman --help Step 3: Using Podman on CentOS 8 / RHEL 8 Now that Podman has been installed in our Linux machine, it’s time to start playing with it. First, check if you can run a basic container. $ podman run -it --rm alpine sh / # cat /etc/os-release NAME="Alpine Linux" ID=alpine VERSION_ID=3.16.0 PRETTY_NAME="Alpine Linux v3.16" HOME_URL="https://alpinelinux.org/" BUG_REPORT_URL="https://bugs.alpinelinux.org/" / # exit Manage Container images To download, list and delete images, use the commands: # Pull image $ podman pull ubuntu $ podman pull centos # List existing images $ podman images REPOSITORY TAG IMAGE ID CREATED SIZE docker.io/library/ubuntu latest 775349758637 3 weeks ago 66.6 MB docker.io/library/alpine latest 965ea09ff2eb 5 weeks ago 5.82 MB docker.io/library/centos latest 0f3e07c0138f 7 weeks ago 227 MB # Delete images $ podman rmi $ podman rmi 775349758637 775349758637aff77bf85e2ff0597e86e3e859183ef0baba8b3e8fc8d3cba51c So as not to repeat our work, I recommend you check our complete guide on how to work with podman. Running Docker Containers using Podman and Libpod Setup Docker Container Registry with Podman & Let’s Encrypt SSL How To Publish Docker Image to Docker Hub with Podman
0 notes
Text
Docker Hub: The Choice for Better Business Outcome
Docker store and store cloud are presently important for Docker Hub which gives a solitary encounter to finding, sharing, and putting away compartment pictures. This obviously implies that docker confirmed and affirmed distributor pictures are presently accessible for download and revelation on docker center point. Docker center presents another client experience.
Thousands of organizations and millions of individual users use Docker Hub, cloud, and store for their container needs. This docker hub is designed to update to carry together the features that users of each product recognize and love the most, meanwhile addressing docker hub requests around repository and group control.
Docker removes redundant, everyday setup assignments and is utilized all through the improvement lifecycle for quick, simple, and versatile application advancement - work area and cloud. Docker's complete start to finish stage incorporates UIs, CLIs, APIs, and security that is designed to cooperate across the whole application conveyance lifecycle.
Docker Business:
With this declaration, Docker presented our new membership levels, including Docker Business–our contribution explicitly for associations who need to scale their utilization of Docker all while keeping up with security and consistency with added undertaking grade the board and control. Already, the base number of seats needed for a Docker Business membership was 50+, which restricted admittance to bigger associations.
In any case, Docker has been hearing from clients who need the additional elements and advantages that accompany Docker Business however don't right now meet the base seats. A few clients are prepared to take the action yet need to keep away from extensive deals and buy request (PO) processes. Others may likewise be keen on "trying out" Docker Business at a more limited size prior to focusing on a bigger rollout.
Indeed, today we've made it much more straightforward and more open than any time in recent memory for our clients to take the action to Docker Business.
Advanced Image Management:
how about we investigate the most recent component of docker expert and group client is the new progressed picture the board dashboard accessible on docker center. the brand new dashboard affords developers with a brand new degree of getting entry to all the content material you have got saved in Docker Hub supplying you with extra quality-grained management over getting rid of antique content material and exploring antique versions of driven images.
Generally in Docker Hub, we have had perceivability into the most recent variant of a label that a client has pushed, however, what has been exceptionally difficult to see or even comprehend is what befallen those old things that you pushed. At the point when you push a picture to Docker Hub, you are pushing a show, a rundown of every one of the layers of your picture, and the actual layers.
So when you want to update an existing tag, only the new layers will be pushed along the new manifest that reference these layers.it will be given a tag that you can specify when you push, such as bengotch/simple whale: latest. one thing you have to remember is that this does not mean that all of the old manifests which present at the previous layer that made up your images are removed from the hub.
This implies you can have many old forms of pictures that your frameworks can in any case be pulling by hash rather than by the tag and you might be uninformed of which old renditions are as yet being used. Alongside this, the main way as of recently to eliminate these old variants was to erase the whole repo and start once more!
We trust that you are energized for the initial step of us giving more prominent knowledge into your substance on Docker Hub, assuming you need to get everything rolling investigating your substance then everything clients can perceive the number of dormant pictures they have and Pro and Team clients can see which labels these used to be related with, what the hashes of these are and begin eliminating these today.
Docker Hub Autobuild :
As a significant number of you know, it has been a troublesome period for organizations offering free cloud processes. Shockingly, Docker's Autobuild administration has been designated by similar troublemakers, so today we are frustrated to report that we will be ending Auto expands on the complementary plan beginning from June 18, 2021.
Over the most recent couple of months, we have seen gigantic development in the number of troublemakers who are exploiting this assistance determined to manhandle it for crypto mining. Throughout the previous 7 years, we have been pleased to offer our Autobuild administration to every one of our clients as the most straightforward method for setting up CI for containerized projects. Just as the expanded expense of running the help, this sort of misuse occasionally impacts execution for paying Autobuild clients and prompts numerous restless evenings for our group.
Get an early advantage on your coding by utilizing Docker pictures to productively foster your own special applications on Windows and Mac. Make your multi-holder application utilizing Docker Compose. Incorporate with your beloved devices all through your advancement pipeline - Docker works with all improvement instruments you use including VS Code, CircleCI, and GitHub. Bundle applications as compact compartment pictures to run in any climate reliably from on-premises Kubernetes to AWS ECS, Azure ACI, Google GKE and that's only the tip of the iceberg.
New Self-Serve Payment Option:
Assuming you are prepared to take the action to Docker Business, you would now be able to buy a base 5 seats through credit/charge card by marking in or making a Docker account. Once bought, you have moment admittance to all the extraordinary administration and security highlights elite to Docker Business clients things like Image Access Management for confining client admittance to explicit pictures (e.g., Docker Official Images and Verified Publisher Images), a brought together administration console for complete perceivability on the entirety of your Docker surroundings, SAML single sign-on for consistent onboarding/offboarding (coming soon), and a whole lot more! Obviously, your designer groups can proceed to work together and keep up with the usefulness of Docker Desktop, our trusted multi-stage engineer apparatus.
What's more, you can without much of a stretch overhaul from your present membership to Docker Business. Essentially do as such by signing into your Docker Hub record and refreshing your charging plan there. Your present membership will be credited for the excess term, and the equilibrium will be applied to the expense of your new Docker Business membership. Another membership period will likewise be set.
Benefits:
Each association is in a pursuit to convey better business results, and top entertainers are utilizing programming development to get it going. Definitely, while overseeing many contending needs, programming pioneers will be confronted with a form versus purchase choice sooner or later. At the point when you consider a few variables including the expense of time, opportunity cost, time to esteem, the expense of safety hazards, and when DIY with OSS seems OK, the information shows that most associations will be in an ideal situation purchasing business programming versus building their own elective arrangements. Offloading the undifferentiated work diminishes interruptions and empowers designers to zero in on conveying worth to clients.
Keep it simple:
Docker eliminates intricacies for designers and assists them with accomplishing more prominent usefulness. We are proceeding to put resources into making mystically straightforward encounters for engineers while likewise conveying the scale and security organizations depend on. Docker offers memberships for designers and groups of each size, including our most current membership: Docker Business.
Move Fast:
Introduce from a solitary bundle to get ready for action in minutes. Code and test locally while guaranteeing consistency among advancement and creation.
Collaborate:
Utilize Certified and local area pictures in your venture. Push to a cloud-based application vault and work together with colleagues.
Conclusion
Docker is a containerization stage that bundles your application and every one of its conditions together as holders in order to guarantee that your application works consistently in any climate, be it an improvement, test, or creation. Docker holders, envelop a piece of programming by a total filesystem that contains all that is expected to run: code, runtime, framework apparatuses, framework libraries, and so on It wraps essentially whatever can be introduced on a server. This ensures that the product will consistently run something very similar, paying little mind to its current circumstance.
Frequently Asked Question?
1. What are Docker Images?
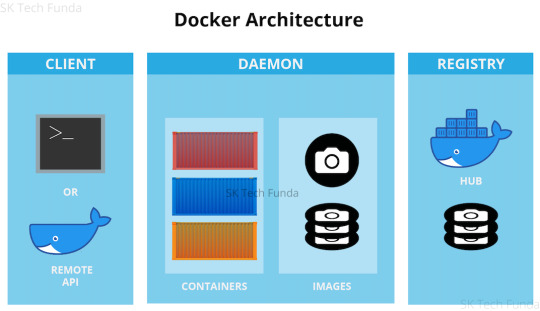
Ans - Docker Images is the wellspring of the Docker compartment. At the end of the day, Docker images are utilized to make holders. At the point when a client runs a Docker picture, a case of a holder is made. These docker pictures can be sent to any Docker climate.
2. What is Docker Hub?
Ans - Docker pictures create docker containers. There needs to be a registry wherein those docker images stay. This registry is Docker Hub. customers can pick up images from Docker Hub and use them to create customized pictures and packing containers. presently, the Docker Hub is the arena’s largest public repository of image containers
3. What is a Dockerfile?
Ans - Docker can assemble Images naturally by perusing the guidelines from a document called Dockerfile. A Dockerfile is a text report that contains every one of the orders a client could approach the order line to gather a picture. Utilizing docker assembler, clients can make a mechanized form that executes a few order line directions in progression.
4. What is Docker Machine?
Ans - A Docker machine is a device that allows you to introduce Docker Engine on virtual hosts. These hosts would now be able to be overseen utilizing the docker-machine orders. Docker machine additionally allows you to arrange Docker Swarm Clusters.
1 note
·
View note
Text
Version 320
youtube
windows
zip
exe
os x
app
tar.gz
linux
tar.gz
source
tar.gz
I had a great week. The downloader overhaul is in its last act, and I've fixed and added some other neat stuff. There's also a neat hydrus-related project for advanced users to try out.
Late breaking edit: Looks like I have broken e621 queries that include the '/' character this week, like 'male/female'! Hold off on updating if you have these, or pause them and wait a week for me to fix it!
misc
I fixed an issue introduced in last week's new pipeline with new subs sometimes not parsing the first page of results properly. If you missed files you wanted in the first sync, please reset the affected subs' caches.
Due to an oversight, a mappings cache that I now take advantage of to speed up tag searches was missing an index that would speed it up even further. I've now added these indices--and your clients will spend a minute generating them on update--and most tag searches are now superfast! My IRL client was taking 1.6s to do the first step of finding 5000-file tag results, and now it does it in under 5ms! Indices!
The hyperlinks on the media viewer now use any custom browser launch path in options->files and trash.
downloader overhaul (easy)
I have now added gallery parsers for all the default sites hydrus supports out the box. Any regular download now entirely parses in the new system. With luck, you won't notice any difference, but let me know if you get any searches that terminate early or any other problems.
I have also written the new Gallery URL Generator (GUG) objects for everything, but I have not yet plugged these in. I am now on the precipice of switching this final legacy step over to the new system. This will be a big shift that will finally allow us to have new gallery 'seachers' for all kinds of new sites. I expect to do this next week.
When I do the GUG switch, anything that is supported by default in the client should switch over silently and automatically, but if you have added any new custom boorus, a small amount of additional work will be required on your end to get them working again. I will work with the other parser-creators in the community to make this as painless as possible, and there will be instructions in next week's release post. In any case, I expect to roll out nicer downloaders for the popular desired boorus (derpibooru, FA, etc...) as part of the normal upcoming update process, along with some other new additions like artstation and hopefully twitter username lookup.
In any case, watch this space! It's almost happening!
downloader overhaul (advanced)
So, all the GUGs are in place, and the dialog now saves. If you are interested in making some of your own, check what I've done. I'm going to swap out the legacy 'gallery identifier' object with GUGs this coming week, and fingers-crossed, it will mostly all just swap out no prob. I can update existing gallery identifiers to my new GUGs, which will automatically inherit the url classes and parsers I've already got in place, but custom boorus are too complicated for me to update completely automatically. I will try to auto-generate gallery and post url parsers, but users will need GUGs and url classes to get working again. I think the best solution is if we direct medium-level users to the parser github and have them link things together manually, and then follow-up with whatever 'easy import' object I come up with to bundle downloader-capability into a single object. And as I say above, I'll also fold in the more popular downloaders into some regular updates. I am open to discuss this more if you have ideas!
Furthermore, I've extended url classes this week to allow 'default' values for path components and query parameters. If that component or parameter is missing from a given URL, it will still be recognised as the URL class, but it will gain the default value during import normalisation. e.g. The kind of URL safebooru gives your browser when you type in a query:
https://safebooru.org/index.php?page=post&s=list&tags=contrapposto
Will be automatically populated with an initialising pid=0 parameter:
https://safebooru.org/index.php?page=post&pid=0&s=list&tags=contrapposto
This helps us with several "the site gives a blank page/index value for the first page, which I can't match to a paged URL that will then increment via the url class"-kind of problems. It will particularly help when I add drag-and-drop search--we want it so a user can type in a query in their browser, check it is good, and then DnD the URL the site gave them straight into hydrus and the page stuff will all get sorted behind the scenes without them having to think about it.
I've updated a bunch of the gallery url classes this week with these new defaults, so again, if you are interested, please check them out. The Hentai Foundry ones are interesting.
I've also improved some of the logic behind download sites' 'source url' pre-import file status checking. Now, if URL X at Site A provides a Source URL Y to Site B, and the file Y is mapped to also has a URL Z that fits the same url class as X, Y is now distrusted as a source (wew). This stops false positive source url recognition when the booru gives the same 'original' source url for multiple files (including alternate/edited files). e621 has particularly had several of these issues, and I am sure several others do as well. I've been tracking this issue with several people, so if you have been hit by this, please let me if and know this change fixes anything, particularly for new files going forward, which have yet to be 'tainted' by multiple incorrect known url mappings. I'll also be adding some 'just download the damned file' checkboxes to file import options as I have previously discussed.
A user on the discord helpfully submitted some code that adds an 'import cookies.txt' button to the review session cookies panels. This could be a real neat way to effect fake logins, where you just copy your browser's cookies, so please play with this and let me know how you get on. I had mixed success getting different styles of cookies.txt to import, so I would be interested in more information, and to know which sites work great at logging in this way, and which are bad, and which cookies.txt browser add-ons are best!
a web interface to the server
I have been talking for a bit with a user who has written a web interface to the hydrus server. He is a clever dude who has done some neat work, and his project is now ready for people to try out. If you are fairly experienced in hydrus and would like to experiment with a nice-looking computer- and phone-compatible web interface to the general file/tag mapping system hydrus uses, please check this out:
https://github.com/mserajnik/hydrusrvue
https://github.com/mserajnik/hydrusrv
https://github.com/mserajnik/hydrusrv-docker
In particular, check out the live demo and screenshots here:
https://github.com/mserajnik/hydrusrvue/#demo
Let him know how you like it! I expect to write proper, easier APIs in the coming years, which will allow projects like this to do all sorts of new and neat things.
full list
clients should now have objects for all default downloaders. everything should be prepped for the big switchover:
wrote gallery url generators for all the default downloaders and a couple more as well
wrote a gallery parser for deviant art--it also comes with an update to the DA url class because the meta 'next page' link on DA gallery pages is invalid wew!
wrote a gallery parser for hentai foundry, inkbunny, rule34hentai, moebooru (konachan, sakugabooru, yande.re), artstation, newgrounds, and pixiv artist galleries (static html)
added a gallery parser for sankaku
the artstation post url parser no longer fetches cover images
url classes can now support 'default' values for path components and query parameters! so, if your url might be missing a page=1 initialsation value due to user drag-and-drop, you can auto-add it in the normalisation step!
if the entered default does not match the rules of the component or parameter, it will be cleared back to none!
all appropriate default gallery url classes (which is most) now have these default values. all default gallery url classes will be overwritten on db update
three test 'search initialisation' url classes that attempted to fix this problem a different way will be deleted on update, if present
updated some other url classes
when checking source urls during the pre-download import status check, the client will now distrust parsed source urls if the files they seem to refer to also have other urls of the same url class as the file import object being actioned (basically, this is some logic that tries to detect bad source url attribution, where multiple files on a booru (typically including alternate edits) are all source-url'd back to a single original)
gallery page parsing now discounts parsed 'next page' urls that are the same as the page that fetched them (some gallery end-points link themselves as the next page, wew)
json parsing formulae that are set to parse all 'list' items will now also parse all dictionary entries if faced with a dict instead!
added new stop-gap 'stop checking' logic in subscription syncing for certain low-gallery-count edge-cases
fixed an issue where (typically new) subscriptions were bugging out trying to figure a default stop_reason on certain page results
fixed an unusual listctrl delete item index-tracking error that would sometimes cause exceptions on the 'try to link url stuff together' button press and maybe some other places
thanks to a submission from user prkc on the discord, we now have 'import cookies.txt' buttons on the review sessions panels! if you are interested in 'manual' logins through browser-cookie-copying, please give this a go and let me know which kinds of cookies.txt do and do not work, and how your different site cookie-copy-login tests work in hydrus.
the mappings cache tables now have some new indices that speed up certain kinds of tag search significantly. db update will spend a minute or two generating these indices for existing users
advanced mode users will discover a fun new entry on the help menu
the hyperlinks on the media viewer hover window and a couple of other places are now a custom control that uses any custom browser launch path in options->files and trash
fixed an issue where certain canvas edge-case media clearing events could be caught incorrectly by the manage tags dialog and its subsidiary panels
think I fixed an issue where a client left with a dialog open could sometimes run into trouble later trying to show an idle time maintenance modal popup and give a 'C++ assertion IsRunning()' exception and end up locking the client's ui
manage parsers dialog will now autosort after an add event
the gug panels now normalise example urls
improved some misc service error handling
rewrote some url parsing to stop forcing '+'->' ' in our urls' query texts
fixed some bad error handling for matplotlib import
misc fixes
next week
The big GUG overhaul is the main thing. The button where you select which site to download from will seem only to get some slightly different labels, but in truth a whole big pipeline behind that button needs to be shifted over to the new system. GUGs are actually pretty simple, so I hope this will only take one week, but we'll see!
1 note
·
View note
Text
What is Docker CE ? | learn how to install Dockers
What is docker
Docker is a computer program which is used to provide a running environment to run all kinds of application which are in docker hub, or created in docker. It creates an image of your application and stores all requirements of files into the container. Whenever we want to run docker application in any system, we have to run a single file without providing any other requirements.
Docker is easy to use in Ubuntu. It also supports Window and Mac operating system. For windows, it runs in Windows10/enterprise only. To use in Windows7/8/8.1 or Windows10 home should use docker toolbox.
There are two kind of docker software for programmers.
Docker CE :- Free community edition :- This is an open source software.
Docker EE :- Docker Enterprise Edition :- This is a paid software design for enterprise development and IT teams who build, ship, and run business-critical applications in production.
Requirements :-
Operating system (ubuntu)
Docker
Steps to install docker . Steps to download docker in ubuntu. 1. Open terminal and follow these command to install docker.
Just type docker and check if docker is in your system or not. $ docker
2. To check the version of operating system. To install Docker CE, we need the 64-bit version of one of these Ubuntu versions: 1. Cosmic 18.10 2. Bionic 18.04 (LTS) 3. Xenial 16.04 (LTS) $ lsb_release -a
3. Update the apt package index. $ sudo apt-get update
4. If requires, then install. $ sudo apt-get install
5. If docker is not in your system then install it. $ sudo apt-get install docker.io
6. Now check the staus of docker. $ sudo systemctl status docker
Steps to add user in docker 1. Why sudo :- We have to use 'sudo' command to run docker commands because docker container run user 'root'. We have to join the docker group, when your system join the docker group after that one can run docker command without sudo.
2. 'USER' is your system name, commands to add user as listed below. $user will pick system user 1. $ sudo groupadd docker 2. $ sudo gpasswd -a $USER 3. $ newgrp docker
3. Second way to add user in docker group. 1. $ sudo groupadd docker 2. $ sudo usermod -aG docker $USER
4. After adding a 'USER' into the docker group, we have to shut down or restart so that we can run docker commands without 'sudo'.
5. Command to uninstall docker. $ sudo apt-get remove docker docker-engine docker.io containerd runc
Docker commands 1.To check Docker version $ docker --version
2. To check Docker and containers info $ docker info
3. Find out which users are in the docker group and who is allowed to start docker containers. 1. $ getent group sudo
2. $ getent group docker
4. 'pull' command fetch the 'name_of_images' image from the 'Docker registry' and saves it to our system. $ docker pull busybox (busybox is name of image)
5. You can use the 'docker images' command to see a list of all images on your system. $ docker images
6. To find the location of the images in the system we need to follow some commands:- $ docker info path of docker:- "Docker Root Dir: /var/lib/docker"
Commands to check the images:-
$ cd /var/lib/docker
$ ls
pardise@pardise-MS-7817:/var/lib/docker$ cd image
bash: cd: image: Permission denied
Permission denied for all users
$ sudo su
$ root@pardise-MS-7817:/var/lib/docker# ls
Now docker info command will provide all details about images and containers
$root@pardise-MS-7817:/var/lib/docker/image/overlay2# docker info
7. Now run a Docker container based on this image. When you call run, the Docker client finds the image (busybox in this case), loads up the container and then runs a command in that container. $ docker run busybox
8. Now Docker client ran the 'echo' command in our busybox container and then exited it. $docker run busybox echo "hello from busybox"
9. Command to shows you all containers that are currently running. $ docker ps
10. List of all containers that one can run. Do notice that the STATUS column shows that these containers exited a few minutes ago. $ docker ps -a CONTAINER ID – Unique ID given to all the containers. IMAGE – Base image from which the container has been started. COMMAND – Command which was used when the container was started CREATED – Time at which the container was created. STATUS – The current status of the container (Up or Exited). PORTS – Port numbers if any, forwarded to the docker host for communicating with the external world. NAMES – It is a container name, you can specify your own name.
11. To start Container $ docker start (container id)
12. To login in Container $ docker attach (container id)
13. To stop container $ docker stop (container id)
Difference between images and containers
Docker Image is a set of files which has no state, whereas Docker Container is the abstract of Docker Image. In other words, Docker Container is the run time instance of images.
Remove images and containers 1. Docker containers are not automatically removed, firstly stop them, then can use docker rm command. Just copy the container IDs. $ docker rm 419600f601f9 (container_id)
2. Command to deletes all containers that have a status of exited. -q flag, only returns the numeric IDs and -f filters output based on conditions provided. $ docker rm $(docker ps -a -q -f status=exited)
3. Command to delete all container. $ docker container prune
4. Command to delete all images. To remove all images which are not referenced by any existing container, not just dangling ones, use the -a flag: $ docker images prune -a
dangling image is an image that is not tagged and is not used by any container. To remove dangling images type:-
$ docker images prune
$ docker rmi image_id image_id......
5. Removing all Unused Objects. It will remove all stopped containers,all dangling images,and all unused network. To remove all images which are not referenced by any existing container, use the -a flag: $ docker system prune -a
You can follow us and our codes at our github repository: https://github.com/amit-kumar001/You can follow us and our codes at our github
#What is docker#learn how to install Dockers#Steps to install docker#Difference between images and containers
0 notes
Text
Python Docx

Python Docx4j
Python Docx To Pdf
Python Docx Table
Python Docx To Pdf
Python Docx2txt
Python Docx2txt
When you ask someone to send you a contract or a report there is a high probability that you’ll get a DOCX file. Whether you like it not, it makes sense considering that 1.2 billion people use Microsoft Office although a definition of “use” is quite vague in this case. DOCX is a binary file which is, unlike XLSX, not famous for being easy to integrate into your application. PDF is much easier when you care more about how a document is displayed than its abilities for further modifications. Let’s focus on that.
Python-docx versions 0.3.0 and later are not API-compatible with prior versions. Python-docx is hosted on PyPI, so installation is relatively simple, and just depends on what installation utilities you have installed. Python-docx may be installed with pip if you have it available.
Installing Python-Docx Library Several libraries exist that can be used to read and write MS Word files in Python. However, we will be using the python-docx module owing to its ease-of-use. Execute the following pip command in your terminal to download the python-docx module as shown below.
Python has a few great libraries to work with DOCX (python-dox) and PDF files (PyPDF2, pdfrw). Those are good choices and a lot of fun to read or write files. That said, I know I'd fail miserably trying to achieve 1:1 conversion.
Release v0.8.10 (Installation)python-docx is a Python library for creating and updating Microsoft Word (.docx) files.
Looking further I came across unoconv. Universal Office Converter is a library that’s converting any document format supported by LibreOffice/OpenOffice. That sound like a solid solution for my use case where I care more about quality than anything else. As execution time isn't my problem I have been only concerned whether it’s possible to run LibreOffice without X display. Apparently, LibreOffice can be run in haedless mode and supports conversion between various formats, sweet!
I’m grateful to unoconv for an idea and great README explaining multiple problems I can come across. In the same time, I’m put off by the number of open issues and abandoned pull requests. If I get versions right, how hard can it be? Not hard at all, with few caveats though.
Testing converter
LibreOffice is available on all major platforms and has an active community. It's not active as new-hot-js-framework-active but still with plenty of good read and support. You can get your copy from the download page. Be a good user and go with up-to-date version. You can always downgrade in case of any problems and feedback on latest release is always appreciated.
On macOS and Windows executable is called soffice and libreoffice on Linux. I'm on macOS, executable soffice isn't available in my PATH after the installation but you can find it inside the LibreOffice.app. To test how LibreOffice deals with your files you can run:
In my case results were more than satisfying. The only problem I saw was a misalignment in a file when the alignment was done with spaces, sad but true. This problem was caused by missing fonts and different width of 'replacements' fonts. No worries, we'll address this problem later.
Setup I
While reading unoconv issues I've noticed that many problems are connected due to the mismatch of the versions. I'm going with Docker so I can have pretty stable setup and so I can be sure that everything works.
Let's start with defining simple Dockerfile, just with dependencies and ADD one DOCX file just for testing:

Let's build an image:
After image is created we can run the container and convert the file inside the container:
Running LibreOffice as a subprocess
We want to run LibreOffice converter as a subprocess and provide the same API for all platforms. Let's define a module which can be run as a standalone script or which we can later import on our server.
Required arguments which convert_to accepts are folder to which we save PDF and a path to the source file. Optionally we specify a timeout in seconds. I’m saying optional but consider it mandatory. We don’t want a process to hang too long in case of any problems or just to limit computation time we are able to give away to each conversion. LibreOffice executable location and name depends on the platform so edit libreoffice_exec to support platform you’re using.
subprocess.run doesn’t capture stdout and stderr by default. We can easily change the default behavior by passing subprocess.PIPE. Unfortunately, in the case of the failure, LibreOffice will fail with return code 0 and nothing will be written to stderr. I decided to look for the success message assuming that it won’t be there in case of an error and raise LibreOfficeError otherwise. This approach hasn’t failed me so far.
Uploading files with Flask
Converting using the command line is ok for testing and development but won't take us far. Let's build a simple server in Flask.
We'll need few helper function to work with files and few custom errors for handling error messages. Upload directory path is defined in config.py. You can also consider using flask-restplus or flask-restful which makes handling errors a little easier.
The server is pretty straightforward. In production, you would probably want to use some kind of authentication to limit access to uploads directory. If not, give up on serving static files with Flask and go for Nginx.
Important take-away from this example is that you want to tell your app to be threaded so one request won't prevent other routes from being served. However, WSGI server included with Flask is not production ready and focuses on development. In production, you want to use a proper server with automatic worker process management like gunicorn. Check the docs for an example how to integrate gunicorn into your app. We are going to run the application inside a container so host has to be set to publicly visible 0.0.0.0.
Setup II
Now when we have a server we can update Dockerfile. We need to copy our application source code to the image filesystem and install required dependencies.
In docker-compose.yml we want to specify ports mapping and mount a volume. If you followed the code and you tried running examples you have probably noticed that we were missing the way to tell Flask to run in a debugging mode. Defining environment variable without a value is causing that this variable is going to be passed to the container from the host system. Alternatively, you can provide different config files for different environments.
Supporting custom fonts
I've mentioned a problem with missing fonts earlier. LibreOffice can, of course, make use of custom fonts. If you can predict which fonts your user might be using there's a simple remedy. Add following line to your Dockfile.
Now when you put custom font file in the font directory in your project, rebuild the image. From now on you support custom fonts!
Summary
This should give you the idea how you can provide quality conversion of different documents to PDF. Although the main goal was to convert a DOCX file you should be fine with presentations, spreadsheets or images.
Further improvements could be providing support for multiple files, the converter can be configured to accept more than one file as well.
Photo by Samuel Zeller on Unsplash.
Did you enjoy it? Follow me@MichalZalecki on Twitter, where I share some interesting, bite-size content.
This ebook goes beyond Jest documentation to explain software testing techniques. I focus on unit test separation, mocking, matchers, patterns, and best practices.
Get it now!
Mastering Jest: Tips & Tricks | $9
Latest version
Released:
Extract content from docx files
Project description
Extract docx headers, footers, text, footnotes, endnotes, properties, and images to a Python object.
The code is an expansion/contraction of python-docx2txt (Copyright (c) 2015 Ankush Shah). The original code is mostly gone, but some of the bones may still be here.
shared features:
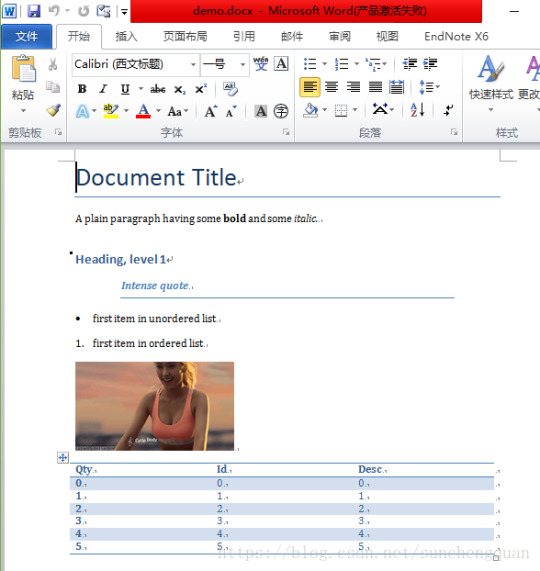
extracts text from docx files
extracts images from docx files
no dependencies (docx2python requires pytest to test)
additions:
extracts footnotes and endnotes
converts bullets and numbered lists to ascii with indentation
converts hyperlinks to <a href='http:/...'>link text</a>
retains some structure of the original file (more below)
extracts document properties (creator, lastModifiedBy, etc.)
inserts image placeholders in text ('----image1.jpg----')
inserts plain text footnote and endnote references in text ('----footnote1----')
(optionally) retains font size, font color, bold, italics, and underscore as html
extract user selections from checkboxes and dropdown menus
full test coverage and documentation for developers
subtractions:
no command-line interface
will only work with Python 3.4+
Installation
Use
Note on html feature:
font size, font color, bold, italics, and underline supported
hyperlinks will always be exported as html (<a href='http:/...'>link text</a>), even if export_font_style=False, because I couldn't think of a more cononical representation.
every tag open in a paragraph will be closed in that paragraph (and, where appropriate, reopened in the next paragraph). If two subsequenct paragraphs are bold, they will be returned as <b>paragraph q</b>, <b>paragraph 2</b>. This is intentional to make each paragraph its own entity.
if you specify export_font_style=True, > and < in your docx text will be encoded as > and <
Return Value
Function docx2python returns an object with several attributes.
header - contents of the docx headers in the return format described herein
footer - contents of the docx footers in the return format described herein
body - contents of the docx in the return format described herein
footnotes - contents of the docx in the return format described herein
endnotes - contents of the docx in the return format described herein
document - header + body + footer (read only)
text - all docx text as one string, similar to what you'd get from python-docx2txt
properties - docx property names mapped to values (e.g., {'lastModifiedBy': 'Shay Hill'})
images - image names mapped to images in binary format. Write to filesystem with
Return Format
Some structure will be maintained. Text will be returned in a nested list, with paragraphs always at depth 4 (i.e., output.body[i][j][k][l] will be a paragraph).
If your docx has no tables, output.body will appear as one a table with all contents in one cell:
Table cells will appear as table cells. Text outside tables will appear as table cells.
To preserve the even depth (text always at depth 4), nested tables will appear as new, top-level tables. This is clearer with an example:
becomes ...
This ensures text appears
only once
in the order it appears in the docx
always at depth four (i.e., result.body[i][j][k][l] will be a string).
Working with output
This package provides several documented helper functions in the docx2python.iterators module. Here are a few recipes possible with these functions:
Some fine print about checkboxes:
MS Word has checkboxes that can be checked any time, and others that can only be checked when the form is locked.The previous print as. u2610 (open checkbox) or u2612 (crossed checkbox). Which this module, the latter willtoo. I gave checkboxes a bailout value of ----checkbox failed---- if the xml doesn't look like I expect it to,because I don't have several-thousand test files with checkboxes (as I did with most of the other form elements).Checkboxes should work, but please let me know if you encounter any that do not.
Release historyRelease notifications | RSS feed
1.27.1
1.27
1.26
Python Docx4j
1.25
1.24
1.23
1.22
1.21
1.19
1.18
1.17
1.16
1.15
1.14
1.13
1.12
1.11
1.2
Python Docx To Pdf
1.1
Python Docx Table
1.0
0.1
Python Docx To Pdf
Download files
Download the file for your platform. If you're not sure which to choose, learn more about installing packages.
Python Docx2txt
Files for docx2python, version 1.27.1Filename, sizeFile typePython versionUpload dateHashesFilename, size docx2python-1.27.1-py3-none-any.whl (22.9 kB) File type Wheel Python version py3 Upload dateHashesFilename, size docx2python-1.27.1.tar.gz (33.3 kB) File type Source Python version None Upload dateHashes
Close
Hashes for docx2python-1.27.1-py3-none-any.whl
Hashes for docx2python-1.27.1-py3-none-any.whlAlgorithmHash digestSHA25651f6f03149efff07372ea023824d4fd863cb70b531aa558513070fe60f1c420aMD54b0ee20fed4a8cb0eaba8580c33f946bBLAKE2-256e7d5ff32d733592b17310193280786c1cab22ca4738daa97e1825d650f55157c
Close
Hashes for docx2python-1.27.1.tar.gz
Python Docx2txt
Hashes for docx2python-1.27.1.tar.gzAlgorithmHash digestSHA2566ca0a92ee9220708060ece485cede894408588353dc458ee5ec17959488fa668MD5759e1630c6990533414192eb57333c72BLAKE2-25684783b70aec51652a4ec4f42aa419a8af18d967b06390764527c81f183d1c02a
0 notes
Text
Docker Machine Xhyve

Elasticsearch will then only be accessible from the host machine itself. The Docker named volumes data01, data02, and data03 store the node data directories so the data persists across restarts. If they don’t already exist, docker-compose creates them when you bring up the cluster. Make sure Docker Engine is allotted at least 4GiB of memory. Docker Engine 1.12 introduced a new swarm mode for natively managing a cluster of Docker Engines called a swarm. Docker swarm mode implements Raft Consensus Algorithm and does not require using external key value store anymore, such as Consul or etcd. If you want to run a swarm cluster on a developer’s machine, there are several options.
« Install Elasticsearch with Windows MSI InstallerInstall Elasticsearch on macOS with Homebrew »
Elasticsearch is also available as Docker images.The images use centos:8 as the base image.
A list of all published Docker images and tags is available atwww.docker.elastic.co. The source filesare inGithub.
This package contains both free and subscription features.Start a 30-day trial to try out all of the features.
Obtaining Elasticsearch for Docker is as simple as issuing a docker pull commandagainst the Elastic Docker registry.
To start a single-node Elasticsearch cluster for development or testing, specifysingle-node discovery to bypass the bootstrap checks:
Starting a multi-node cluster with Docker Composeedit
To get a three-node Elasticsearch cluster up and running in Docker,you can use Docker Compose:
This sample docker-compose.yml file uses the ES_JAVA_OPTSenvironment variable to manually set the heap size to 512MB. We do not recommendusing ES_JAVA_OPTS in production. See Manually set the heap size.
This sample Docker Compose file brings up a three-node Elasticsearch cluster.Node es01 listens on localhost:9200 and es02 and es03 talk to es01 over a Docker network.
Please note that this configuration exposes port 9200 on all network interfaces, and given howDocker manipulates iptables on Linux, this means that your Elasticsearch cluster is publically accessible,potentially ignoring any firewall settings. If you don’t want to expose port 9200 and instead usea reverse proxy, replace 9200:9200 with 127.0.0.1:9200:9200 in the docker-compose.yml file.Elasticsearch will then only be accessible from the host machine itself.
The Docker named volumesdata01, data02, and data03 store the node data directories so the data persists across restarts.If they don’t already exist, docker-compose creates them when you bring up the cluster.
Make sure Docker Engine is allotted at least 4GiB of memory.In Docker Desktop, you configure resource usage on the Advanced tab in Preference (macOS)or Settings (Windows).
Docker Compose is not pre-installed with Docker on Linux.See docs.docker.com for installation instructions:Install Compose on Linux
Run docker-compose to bring up the cluster:
Submit a _cat/nodes request to see that the nodes are up and running:
Log messages go to the console and are handled by the configured Docker logging driver.By default you can access logs with docker logs. If you would prefer the Elasticsearchcontainer to write logs to disk, set the ES_LOG_STYLE environment variable to file.This causes Elasticsearch to use the same logging configuration as other Elasticsearch distribution formats.

To stop the cluster, run docker-compose down.The data in the Docker volumes is preserved and loadedwhen you restart the cluster with docker-compose up.To delete the data volumes when you bring down the cluster,specify the -v option: docker-compose down -v.
See Encrypting communications in an Elasticsearch Docker Container andRun the Elastic Stack in Docker with TLS enabled.
The following requirements and recommendations apply when running Elasticsearch in Docker in production.
The vm.max_map_count kernel setting must be set to at least 262144 for production use.
How you set vm.max_map_count depends on your platform:
Linux
The vm.max_map_count setting should be set permanently in /etc/sysctl.conf:
To apply the setting on a live system, run:
macOS with Docker for Mac
The vm.max_map_count setting must be set within the xhyve virtual machine:
From the command line, run:
Press enter and use`sysctl` to configure vm.max_map_count:
To exit the screen session, type Ctrl a d.
Windows and macOS with Docker Desktop
The vm.max_map_count setting must be set via docker-machine:
Windows with Docker Desktop WSL 2 backend
The vm.max_map_count setting must be set in the docker-desktop container:
Configuration files must be readable by the elasticsearch useredit
By default, Elasticsearch runs inside the container as user elasticsearch usinguid:gid 1000:0.
One exception is Openshift,which runs containers using an arbitrarily assigned user ID.Openshift presents persistent volumes with the gid set to 0, which works without any adjustments.
If you are bind-mounting a local directory or file, it must be readable by the elasticsearch user.In addition, this user must have write access to the config, data and log dirs(Elasticsearch needs write access to the config directory so that it can generate a keystore).A good strategy is to grant group access to gid 0 for the local directory.
For example, to prepare a local directory for storing data through a bind-mount:
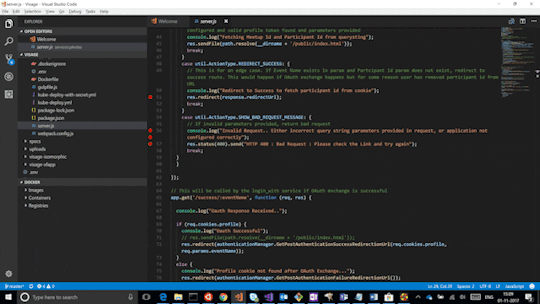
You can also run an Elasticsearch container using both a custom UID and GID. Unless youbind-mount each of the config, data` and logs directories, you must passthe command line option --group-add 0 to docker run. This ensures that the userunder which Elasticsearch is running is also a member of the root (GID 0) group inside thecontainer.
As a last resort, you can force the container to mutate the ownership ofany bind-mounts used for the data and log dirs through theenvironment variable TAKE_FILE_OWNERSHIP. When you do this, they will be owned byuid:gid 1000:0, which provides the required read/write access to the Elasticsearch process.
Increased ulimits for nofile and nprocmust be available for the Elasticsearch containers.Verify the init systemfor the Docker daemon sets them to acceptable values.
To check the Docker daemon defaults for ulimits, run:
If needed, adjust them in the Daemon or override them per container.For example, when using docker run, set:
Swapping needs to be disabled for performance and node stability.For information about ways to do this, see Disable swapping.
If you opt for the bootstrap.memory_lock: true approach,you also need to define the memlock: true ulimit in theDocker Daemon,or explicitly set for the container as shown in the sample compose file.When using docker run, you can specify:
The image exposesTCP ports 9200 and 9300. For production clusters, randomizing thepublished ports with --publish-all is recommended,unless you are pinning one container per host.
By default, Elasticsearch automatically sizes JVM heap based on a nodes’sroles and the total memory available to the node’s container. Werecommend this default sizing for most production environments. If needed, youcan override default sizing by manually setting JVM heap size.
To manually set the heap size in production, bind mount a JVMoptions file under /usr/share/elasticsearch/config/jvm.options.d thatincludes your desired heap size settings.

For testing, you can also manually set the heap size using the ES_JAVA_OPTSenvironment variable. For example, to use 16GB, specify -eES_JAVA_OPTS='-Xms16g -Xmx16g' with docker run. The ES_JAVA_OPTS variableoverrides all other JVM options. The ES_JAVA_OPTS variable overrides all otherJVM options. We do not recommend using ES_JAVA_OPTS in production. Thedocker-compose.yml file above sets the heap size to 512MB.
Pin your deployments to a specific version of the Elasticsearch Docker image. Forexample docker.elastic.co/elasticsearch/elasticsearch:7.12.0.
You should use a volume bound on /usr/share/elasticsearch/data for the following reasons:
The data of your Elasticsearch node won’t be lost if the container is killed
Elasticsearch is I/O sensitive and the Docker storage driver is not ideal for fast I/O
It allows the use of advancedDocker volume plugins
If you are using the devicemapper storage driver, do not use the default loop-lvm mode.Configure docker-engine to usedirect-lvm.
Consider centralizing your logs by using a differentlogging driver. Alsonote that the default json-file logging driver is not ideally suited forproduction use.
When you run in Docker, the Elasticsearch configuration files are loaded from/usr/share/elasticsearch/config/.
To use custom configuration files, you bind-mount the filesover the configuration files in the image.
You can set individual Elasticsearch configuration parameters using Docker environment variables.The sample compose file and thesingle-node example use this method.
To use the contents of a file to set an environment variable, suffix the environmentvariable name with _FILE. This is useful for passing secrets such as passwords to Elasticsearchwithout specifying them directly.
For example, to set the Elasticsearch bootstrap password from a file, you can bind mount thefile and set the ELASTIC_PASSWORD_FILE environment variable to the mount location.If you mount the password file to /run/secrets/bootstrapPassword.txt, specify:
You can also override the default command for the image to pass Elasticsearch configurationparameters as command line options. For example:
While bind-mounting your configuration files is usually the preferred method in production,you can also create a custom Docker imagethat contains your configuration.
Create custom config files and bind-mount them over the corresponding files in the Docker image.For example, to bind-mount custom_elasticsearch.yml with docker run, specify:
The container runs Elasticsearch as user elasticsearch usinguid:gid 1000:0. Bind mounted host directories and files must be accessible by this user,and the data and log directories must be writable by this user.
By default, Elasticsearch will auto-generate a keystore file for secure settings. Thisfile is obfuscated but not encrypted. If you want to encrypt yoursecure settings with a password, you must use theelasticsearch-keystore utility to create a password-protected keystore andbind-mount it to the container as/usr/share/elasticsearch/config/elasticsearch.keystore. In order to providethe Docker container with the password at startup, set the Docker environmentvalue KEYSTORE_PASSWORD to the value of your password. For example, a dockerrun command might have the following options:
In some environments, it might make more sense to prepare a custom image that containsyour configuration. A Dockerfile to achieve this might be as simple as:
You could then build and run the image with:
Some plugins require additional security permissions.You must explicitly accept them either by:
Attaching a tty when you run the Docker image and allowing the permissions when prompted.
Inspecting the security permissions and accepting them (if appropriate) by adding the --batch flag to the plugin install command.
See Plugin managementfor more information.
You now have a test Elasticsearch environment set up. Before you startserious development or go into production with Elasticsearch, you must do some additionalsetup:
Learn how to configure Elasticsearch.
Configure important Elasticsearch settings.
Configure important system settings.
« Install Elasticsearch with Windows MSI InstallerInstall Elasticsearch on macOS with Homebrew »
Most Popular
-->
This section lists terms and definitions you should be familiar with before getting deeper into Docker. For further definitions, see the extensive glossary provided by Docker.
Container image: A package with all the dependencies and information needed to create a container. An image includes all the dependencies (such as frameworks) plus deployment and execution configuration to be used by a container runtime. Usually, an image derives from multiple base images that are layers stacked on top of each other to form the container's filesystem. An image is immutable once it has been created.
Dockerfile: A text file that contains instructions for building a Docker image. It's like a batch script, the first line states the base image to begin with and then follow the instructions to install required programs, copy files, and so on, until you get the working environment you need.
Brew Docker-machine-driver-xhyve
Build: The action of building a container image based on the information and context provided by its Dockerfile, plus additional files in the folder where the image is built. You can build images with the following Docker command:
Container: An instance of a Docker image. A container represents the execution of a single application, process, or service. It consists of the contents of a Docker image, an execution environment, and a standard set of instructions. When scaling a service, you create multiple instances of a container from the same image. Or a batch job can create multiple containers from the same image, passing different parameters to each instance.
Volumes: Offer a writable filesystem that the container can use. Since images are read-only but most programs need to write to the filesystem, volumes add a writable layer, on top of the container image, so the programs have access to a writable filesystem. The program doesn't know it's accessing a layered filesystem, it's just the filesystem as usual. Volumes live in the host system and are managed by Docker.
Tag: A mark or label you can apply to images so that different images or versions of the same image (depending on the version number or the target environment) can be identified.
Multi-stage Build: Is a feature, since Docker 17.05 or higher, that helps to reduce the size of the final images. In a few sentences, with multi-stage build you can use, for example, a large base image, containing the SDK, for compiling and publishing the application and then using the publishing folder with a small runtime-only base image, to produce a much smaller final image.
Docker Machine Xhyve Game
Repository (repo): A collection of related Docker images, labeled with a tag that indicates the image version. Some repos contain multiple variants of a specific image, such as an image containing SDKs (heavier), an image containing only runtimes (lighter), etc. Those variants can be marked with tags. A single repo can contain platform variants, such as a Linux image and a Windows image.
Registry: A service that provides access to repositories. The default registry for most public images is Docker Hub (owned by Docker as an organization). A registry usually contains repositories from multiple teams. Companies often have private registries to store and manage images they've created. Azure Container Registry is another example.
Multi-arch image: For multi-architecture, it's a feature that simplifies the selection of the appropriate image, according to the platform where Docker is running. For example, when a Dockerfile requests a base image mcr.microsoft.com/dotnet/sdk:5.0 from the registry, it actually gets 5.0-nanoserver-1909, 5.0-nanoserver-1809 or 5.0-buster-slim, depending on the operating system and version where Docker is running.
Docker Hub: A public registry to upload images and work with them. Docker Hub provides Docker image hosting, public or private registries, build triggers and web hooks, and integration with GitHub and Bitbucket.
Azure Container Registry: A public resource for working with Docker images and its components in Azure. This provides a registry that's close to your deployments in Azure and that gives you control over access, making it possible to use your Azure Active Directory groups and permissions.
Docker Trusted Registry (DTR): A Docker registry service (from Docker) that can be installed on-premises so it lives within the organization's datacenter and network. It's convenient for private images that should be managed within the enterprise. Docker Trusted Registry is included as part of the Docker Datacenter product. For more information, see Docker Trusted Registry (DTR).
Docker Community Edition (CE): Development tools for Windows and macOS for building, running, and testing containers locally. Docker CE for Windows provides development environments for both Linux and Windows Containers. The Linux Docker host on Windows is based on a Hyper-V virtual machine. The host for Windows Containers is directly based on Windows. Docker CE for Mac is based on the Apple Hypervisor framework and the xhyve hypervisor, which provides a Linux Docker host virtual machine on macOS X. Docker CE for Windows and for Mac replaces Docker Toolbox, which was based on Oracle VirtualBox.
Docker Enterprise Edition (EE): An enterprise-scale version of Docker tools for Linux and Windows development.
Compose: A command-line tool and YAML file format with metadata for defining and running multi-container applications. You define a single application based on multiple images with one or more .yml files that can override values depending on the environment. After you've created the definitions, you can deploy the whole multi-container application with a single command (docker-compose up) that creates a container per image on the Docker host.
Cluster: A collection of Docker hosts exposed as if it were a single virtual Docker host, so that the application can scale to multiple instances of the services spread across multiple hosts within the cluster. Docker clusters can be created with Kubernetes, Azure Service Fabric, Docker Swarm and Mesosphere DC/OS.
Docker Machine Xhyve Tool
Orchestrator: A tool that simplifies management of clusters and Docker hosts. Orchestrators enable you to manage their images, containers, and hosts through a command-line interface (CLI) or a graphical UI. You can manage container networking, configurations, load balancing, service discovery, high availability, Docker host configuration, and more. An orchestrator is responsible for running, distributing, scaling, and healing workloads across a collection of nodes. Typically, orchestrator products are the same products that provide cluster infrastructure, like Kubernetes and Azure Service Fabric, among other offerings in the market.
0 notes
Text
MySQL NDB Cluster Installation Through Docker
In this post, we will see how to setup MySQL NDB Cluster from a docker image. I assume that the reader has some basic understanding of docker and its terminology.Steps to install MySQL NDB Cluster:Let's create a MySQL NDB Cluster with the following environment:MySQL NDB Cluster version (Latest GA version)1 Management Node4 Data Nodes1 Mysqld ServerConfiguration slots for upto 4 additional API nodes Note: Docker software must be installed and running on the same host where we are planning to install MySQL NDB Cluster. Also make sure we have enough resources allocated to docker so that we shouldn’t face any issues later on.Step 1: Get the MySQL NDB Cluster docker image on your hostUsers can get the MySQL NDB Cluster image from github site (link). Then select your required cluster version for download.Note: By default MySQL NDB Cluster 8.0 GA version image docker will pull or by mentioning tag:latest also point to latest cluster image which is 8.0 at the moment. If user wants to pull older versions of cluster images i.e. 7.5, 7.6 then mention that older version in tag (tag:7.5). Cluster version 7.5 onwards supported on docker.Let's run below command to get the latest cluster image: host > docker pull mysql/mysql-cluster:latestOR: host > docker pull mysql/mysql-cluster host> docker pull mysql/mysql-cluster:7.5Let's wait for the download to finish.Cluster image has been pulled successfully by docker. Its always good to check if any older images of same version is also exist. In that case, while pulling the same cluster image, docker will prompt that “Image is up to date ... (look for below image)”.Step 2: Create a docker networkNext step is to create an internal docker network so that all the containers will use it to communicate each other.Host> docker network create cluster_8.0 --subnet=192.168.0.0/16Here, cluster_8.0 is the new internal docker network domain. You can assign any name to it.Let's check whether the above network is created or not: Host> docker network lsThis will list out all the networks exist in the docker. One can see that our network ‘cluster_8.0’ is also listing.Step 3: Prepare the cluster specific configuration files (config.ini, my.cnf)By default docker image will have a minimal configuration files called my.cnf (/etc/my.cnf) and mysql-cluster.cnf (/etc/mysql-cluster.cnf). Let's create our own cluster configuration file (mysql-cluster.cnf) and let docker used it when we start our cluster.A sample custom mysql-cluster.cnf file looks like below:[ndbd default]NoOfReplicas = 2DataMemory= 1G#Below LogLevel settings will help in debugging an issueLogLevelStartup = 15LogLevelShutdown = 15LogLevelConnection = 15LogLevelInfo = 15LogLevelError = 15LogLevelNodeRestart = 15LogLevelCheckpoint = 15[ndb_mgmd]#Management node 1NodeId = 254HostName = 192.168.0.2[ndbd]#Data node 1NodeId = 33HostName = 192.168.0.3[ndbd]#Data node 2NodeId = 34HostName = 192.168.0.4[ndbd]#Data node 3NodeId = 35HostName = 192.168.0.5[ndbd]#Data node 4NodeId = 36HostName = 192.168.0.6[mysqld]#API node 1NodeId = 24[mysqld]#API node 2NodeId = 25[mysqld]#API node 3NodeId = 26[mysqld]#API node 4NodeId = 27Note: One should carefully allocate all memory related configuration parameters like DataMemory, TransactionMemory, SharedGlobalMemory etc based on your host availability free memory (RAM), excessive memory allocation might cause issues in starting cluster. If we are not sure about which config params we should use then we should run cluster with default configuration cluster file, but then it would be a 2 node cluster. Each configuration parameters have some default value so upon doubt, we should just mention the required HostName and NodeId in the cluster config file and leave others parameters as it is (default).Step 4: Start the management server with custom cluster configuration file (mysql-cluster.cnf)Next step is to start the management server (mgmt1). From the below command, HOST_PATH is path of required files on host that are mapped with container files. On my host, HOST_PATH= /Users/sarojtripathy/docker/mysql-tree/8.0HOST> docker run -d --net=cluster_8.0 –ip=192.168.0.2 --volume=HOST_PATH/mysql-cluster.cnf:/etc/mysql-cluster.cnf --volume=HOST_PATH/ndb/node1/mgmt1/ndb_254_cluster.log:/ndb_254_cluster.log --name=mgmt1 mysql/mysql-cluster ndb_mgmd --initialFrom the above image:mysql-cluster.cnf: This is the custom cluster configuration file and is mapped to default cluster configuration file (/etc/mysql-cluster.cnf)ndb_254_cluster.log: This is the file we have to create on the required path (empty file) and then map to internal cluster log file. The idea is to get all the cluster log messages to outside the container so that we can look at the logs during any issues that occurs in cluster. Alternatively we can look at the cluster logs thru docker command: HOST> docker logs -f mgmt_container_nameLet's check the status of the management node from below command: HOST> docker ps -a | grep -i mgmt1We can see that management node container is up. Also we can start the mgmt client (ndb_mgm) to see if management node is up and running or not.HOST> docker run -it --net=cluster_8.0 mysql/mysql-cluster ndb_mgmWe can see that management node (ID:254) is up and running and 4 data nodes are yet to start.Let's open the log file (ndb_254_cluster.log) and check if we can see the cluster logs. I have created a file (ndb_254_cluster.log) on my host to capture cluster logs.Step 5: Start all the data nodesRun the below command in each data node. Make sure we have changed the node id, name for each data node.Data Node 1:HOST> docker run -d --net=cluster_8.0 --name=ndbmtd1 -e '--ndb-connectstring=192.168.0.2:1186' mysql/mysql-cluster ndbmtd --nostart --nodaemonData Node 2:HOST>docker run -d --net=cluster_8.0 --name=ndbmtd2 -e '--ndb-connectstring=192.168.0.2:1186' mysql/mysql-cluster ndbmtd --nostart --nodaemonData Node 3:HOST>docker run -d --net=cluster_8.0 --name=ndbmtd3 -e '--ndb-connectstring=192.168.0.2:1186' mysql/mysql-cluster ndbmtd --nostart --nodaemonData Node 4:HOST>docker run -d --net=cluster_8.0 --name=ndbmtd4 -e '--ndb-connectstring=192.168.0.2:1186' mysql/mysql-cluster ndbmtd --nostart --nodaemonIt is necessary to run all the data nodes with –nodaemon option as running data nodes with daemon option in a docker container is currently not supported. So all the logs generated from data nodes are redirected to stdout. To gather these logs, we have to use docker command: HOST> docker logs -f ndbmtd_container_nameLet's check the status of data nodes from the management client (ndb_mgm).HOST> docker run -it --net=cluster_8.0 mysql/mysql-cluster ndb_mgmThe status ‘not started’, shows that data node processes are running, but are not attempting to start yet. To start a data node process, issue a ‘start’ command from the management client. We can also issue ‘all start’ command to start all the data nodes.We can see that all data nodes are in ‘starting’ state and then its changed to ‘Started’ state. Let's look at the cluster status once again.As data nodes are started with ---nodaemon option so the logs won’t accumulate on any files rather it will redirect to stdout. So the only way to gather these logs into a file is to use docker command.HOST> docker logs -f ndbmtd1 | tee ndbmtd1_logThe above command will create a file called ‘ndbmtd1_log and redirect all the logs into it and at the same time, displays the same logs on the stdout i.e. in host terminal. So we can do the same for all the data nodes that are running. This will help during debugging any issues while cluster is up and running.Step 6: Start the Mysqld ServerRun the below command for the mysqld node(s). Make sure we have changed the ip, name for each mysqld node(s). On my host, HOST_PATH= /Users/sarojtripathy/docker/mysql-tree/8.0/HOST> docker run -d --net=cluster_8.0 -v HOST_PATH/ndb/node1/mysqld_data1:/var/lib/mysql -v HOST_PATH/ndb/node1/mysqld.log:/var/log/mysqld.log --name=mysqld1 --ip=192.168.0.10 -e mysql_random_root_password=true mysql/mysql-cluster mysqld --log-error=/var/log/mysqld.logLike management log file, here I have also created an empty mysqld.log file on my local host and mapped into mysqld container internal log file (/var/log/mysqld.log). Also I have mapped mysql data files ‘/var/lib/mysql’ to local file ‘mysqld_data1’. Let's verify the mysqld logs from the host.Let's check the status of mysqld node(s) from the management client (ndb_mgm):From the above image, we can see that our new cluster is now up and running ... :)Step 7: Start the mysql clientBefore starting the mysql client, we need to get the password that has already generated during mysqld initialisation phase. Then copy this password and pass it to connect the server.HOST> docker logs mysqld1 2>&1 | grep PASSWORDThe above command will show you the password.Then enter above password to connect to the mysqld server.HOST> docker exec -it mysqld1 mysql -uroot -pEnter password: <== Enter the password that we have copied above.Next step is to change the password to our own password. Please look for the below command:mysql> ALTER USER 'root'@'localhost' IDENTIFIED BY 'root123';mysql> exit;Now start the mysql client by logging with new password.Step 8: Create database, table, rows transactions on MySQL NDB ClusterLet's create a database, a table and insert few rows into the table.Let's insert few rows into the table ‘t1’ and then check the rows count.Let's delete one row from the table and check the rows count again.So from the above image, we see that we are able to perform transactions on a table that is reside in MySQL NDB Cluster.At the end, let's check the cluster status after doing all the table operations.We can see that cluster is up and running. This concludes our discussion of MySQL NDB Cluster installation through docker. https://clustertesting.blogspot.com/2021/04/mysql-ndb-cluster-installation-through.html
0 notes
Text
Open-Source App Lets Anyone Create a Virtual Army of Hackintoshes
The average person probably doesn’t think of MacOS as … scalable. It’s intended as a desktop operating system, and while it’s a very functional operating system, Apple generally expects it to run on a single piece of hardware.
But as any developer or infrastructure architect can tell you, virtualization is an impressive technique that allows programmers and infrastructure pros to expand reach and scale things up far beyond a single user. And a Github project that has gotten a bit of attention in recent months aims to make MacOS scalable in ways that it has basically never been.
Its secret weapon? A serial code generator. Yes, just like the kind you sheepishly used to get out of paying for Windows XP or random pieces of shareware back in the day. But rather than generating serials for software, Docker-OSX has the ability to generate serial codes for unique pieces of MacOS hardware, and its main developer, an open-source developer and security researcher who goes by the pseudonym Sick Codes, recently released a standalone serial code generator that can replicate codes for nonexistent devices by the thousands. Just type in a command, and it will set up a CSV file full of serial codes.
“You can generate hundreds and thousands of serial numbers, just like that,” Sick Codes, who used a pseudonym due to the nature of his work, said. “And it just generates a massive list.”
Why would you want this? Easy—a valid serial code allows you to use Apple-based tools such as iMessage, iCloud, and the App Store inside of MacOS. It’s the confirmation that you’re using something seen as valid in the eyes of Apple.
Previously, this process was something of guesswork. Hackintosh users have long had this problem, but have basically had to use guesswork to figure out valid serial codes so they could use iMessage. (In my Hackintoshing endeavors, for example, I just went on the Apple website and … uh, guessed.) Sick Codes said he developed a solution to this problem after noticing that the serials for the client would get used up.
“In the Docker-OSX client, we were always in the same serials,” he said in an interview. “Obviously, no one can log into iMessage that way.”
But when he looked around to see how others were coming up with unique ways to generate product serials, he found more myth than reality. So he went through a variety of tests, uncovering a method to generate consistently reliable serial numbers, as well as a low-selling device that would be unlikely to have a lot of serial numbers in the wild—and landed on the iMac Pro.
“I actually went through, and I've got like 15 iMac Pros in my Apple account now, and it says that they're all valid for iMessage,” he said. “Obviously I was going to delete them after, but I was just testing, one by one, seeing if that's the reason why it does work.”
Beyond making it possible to use iMessage to hold a conversation in a VM, he noted that random security codes like this are actually desirable for security researchers for bug-reporting purposes. Sick Codes adds that it is also an effective tool that could be used as one part of the process for jailbreaking an iPhone.
(At one point, he speculated, possibly in jest, that he might have been the reason the iMac Pro was recently discontinued.)
An Army of Virtual Hackintoshes
On its own, the serial code thing is interesting, but the reason it exists is because MacOS is not currently designed to work at a scale fitting of Docker, a popular tool for containerization of software that can be replicated in a cloud environment. It could—with its use of the Mach kernel and roots in BSD Unix, there is nothing technically stopping it—but Apple does not encourage use of VMs in the same way that, say, Linux does.
A side effect of hacking around Apple’s decision not to directly cater to the market means that it could help making Hackintoshing dead simple.
Let’s take a step back to explain this a little bit. Hackintoshing, throughout its history, has tended to involve installing MacOS on “bare metal,” or on the system itself, for purposes of offering more machine choice or maximizing power.
But virtualization, by its nature, allows end users to work around differences in machines by putting an abstraction layer between the system and its many elements. And virtualization is incredibly sophisticated these days. Docker-OSX relies on kernel-based virtual machines, or KVMs, Linux-based hypervisors that allow virtual machines to get very close to the Linux kernel, able to run at nearly full speed though a common open-source emulator, QEMU.
Comparable to things like Oracle’s Virtualbox or the Parallels virtualization tool on MacOS, they are very technical in the way they work, and are often managed through the command line, requiring a complex mishmash of code that can be hard to figure out. (One common challenge is getting graphics cards to work, as the main interface is already using the resource, requiring something known as a “passthrough.”)
But the benefit of KVMs is that, if you tweak them the right way, you can get nearly the full performance of the main machine, something that has made KVMs popular for, say, letting Linux users play Windows games when the desire strikes. And since they’re disk images on hard drives, backing one up is as easy as duplicating the file.
At the same time, improvements to Hackintoshing have opened up new possibilities for doing things. In the past year or so, the Clover approach of Hackintoshing (as I used in this epic piece) has given way to a new boot tool, OpenCore, and a more “vanilla” approach to Hackintoshing that leaves the operating system itself in a pure form.
The benefit of Docker-OSX is that, while command-line codes are required (and while you’ll still need to do passthrough to take advantage of a GPU), it hides much of the complicated stuff away from the end user both on the KVM side and the Hackintosh side. (And, very important for anything involving a project like this: It is incredibly well-documented, with many use cases covered.) Effectively, if you know how to install Docker, you can whip up a machine. Or a dozen. Or, depending on your workload, a thousand.
Sick Codes explained this to me by whipping up a DigitalOcean image in which he at one point put four separate installs of MacOS on the screen, each using a modest 2 gigabytes of RAM. I was able to interact with them over a VNC connection, which is basically nerd heaven if you’re a fan of virtualization.
“Why is it better than Hackintosh? It’s not Hackintosh, it’s like your own army of virtual throwaway Hackintoshes,” Sick Codes explained.
There are two areas where this approach comes particularly in handy—for programming and compiling code for Apple-based platforms such as iOS and iPad OS, which benefit from scale, and for security research, which has seen a rise in interest in recent years.
With more than 50,000 downloads—including some by known companies—and, in one case, a container so large that it won’t even fit on the Docker Hub website, Docker-OSX has proven a useful choice for installing virtual Macs at scale.
Macs in the Server Room
In a way, Apple kind of set things in motion for an open-source solution like this to emerge, in part because of the unusual (and for a time, unspoken) restrictions that it puts on virtual machines.
For years, a niche of Apple-specific cloud providers, most notably MacStadium, have emerged to help serve the market for development use cases, and rather than chopping up single machines into small chunks, as providers like DigitalOcean do, users end up renting machines for days or weeks at a time—leading to unusual situations like the company buying thousands of 2013 Mac Pros for customers six years after its release.
(MacStadium offers a cloud-based competitor to Docker-OSX, Orka.)
Apple does not sell traditional server hardware that could be better partitioned out in a server room, instead recommending Mac Minis, and with the release of Big Sur, it put in a series of guidelines in its end user license agreement that allowed for virtualization in the way that MacStadium was doing things—but not in the more traditional rent-by-the-hour form. (Competitors, such as Amazon Web Services, have also started selling virtualized Macs under this model.)
Licensing agreements aside, given the disparity between Apple’s devices and how the rest of the cloud industry doles out infrastructure, perhaps it was inevitable someone was going to make something like Docker-OSX. And again, the tool turns things that used to be a headache, like generating unique serial codes for virtual Macs, into something painless.
“If you run a [command-line] tag that says, generate unique, and then set it to true, it will just make your new Mac with a new serial number that you can use to log straight into iMessage,” Sick Codes explained. “If you keep doing that, keep logging in, you'll have like 45 Macs in your account, and they'll all be valid Macs.”
In recent years, companies like Corellium, which sells access to virtualized smartphones to developers and security researchers, have effectively built their services without worrying about EULA limitations and faced lawsuits from Apple over it. Sick Codes, generally working in the open-source community and helping to uncover technical issues, is very much in this spirit.
It’s possible that something might happen to stop the spread of fake iMac Pro serial codes in virtual machines all over the internet—as I started reporting this, MacRumors revealed that, according to an internal support document, Apple is about to redo its approach to serial numbers to make the numbers more random and harder to mimic. (Repair advocates are not happy about this.) But there’s only so much Apple could do about the machines currently on the market, given that there are so many millions of them.
But for people who want to install MacOS on a cheap box somewhere and don’t care about things like Apple Silicon, it’s now as easy as installing Linux, installing Docker, and typing in a couple of commands. Sick Codes noted that, beyond the scalability and security advantages, this opens up opportunities for users who can’t afford the “Apple tax.”
“Feels pretty wholesome knowing anyone can participate in Apple's bug bounty program now, or publish iOS and Mac apps,” Sick Codes said. “App development shouldn't be only for people who can afford it.”
Open-Source App Lets Anyone Create a Virtual Army of Hackintoshes syndicated from https://triviaqaweb.wordpress.com/feed/
0 notes
Text
Version 440
youtube
windows
zip
exe
macOS
app
linux
tar.gz
I had an unfortunately short week, but I did some good work. The tiled renderer has nice fixes.
tiled renderer
I regret the tiled renderer, while good most of the time, had crashes when it did go wrong. To stop this with any new errors that might pop up, the whole block now has an additional layer of error catching around it. If a tile fails to render for any reason, you now get a black square, and if some coordinate space cannot be calculated or a portion of the image is truncated, the system will now print some errors but otherwise ignore it.
A particular problem several users encountered was legacy images that have EXIF rotation metadata but were imported years ago when the client did not understand this. Therefore, hydrus thought some old image was (600x900) when it then loaded (900x600). In the old system, you would have had a weird stretch, maybe a borked rotation, but in my new tiled system it would try to draw tiles that didn't exist, causing our errors-then-crashes. The client now recognises this situation, gives you a popup, and automatically schedules metadata regeneration maintenance for the file.
some misc
You can now set a custom 'namespace' file sort (the 'series-creator-volume-chapter-page' stuff) right on a page. Just click the new 'custom' menu entry and you can type whatever you like. It should save through your session and be easy to edit again. This is prep for some better edit UI here and increased sort/collect control, so if you do a lot of namespace sorting, let me know how you get on!
I prototyped a new 'delete lock' mode, which prohibits deletion of files if they match a criteria. I am starting with if a file is archived. You can turn this mode on under options->files and trash. It mostly just ignores deletes at the moment, but in future I will improve feedback, and maybe have a padlock icon or something, and eventually attach my planned 'metadata conditional' object to it so you'll be able to delete-lock all pngs, or all files with more than four tags, or whatever you can think of.
new builds to test
This is probably just for advanced users. If you would like to help test, make sure you have a backup before you test anything on a real database!
A user has been working hard on replicating the recent macOS build work for the other releases, cribbing my private build scripts together into a unified file that builds on github itself from the source, as well as rolling out a Docker package. I have had a look over everything and we agree it is ready for wider testing, so if you would like to help out, please check out the test v440 builds here:
https://github.com/hydrusnetwork/hydrus/releases/tag/v440-test-build
These should work just like my normal builds above--the scripts are using PyInstaller and InnoSetup as I do on my machines, so it all assembles the same way--but we are interested in any errors you nonetheless encounter. We may need to hammer out some stricter library version requirements for older machines, since until now we've basically been relying on my home dev environments staying static until I next remember to run pip update.
Once we have these working well, I'd like to use this system for the main build. It makes things easier and more reliable on my end, and should improve security since the builds are assembled automatically in clean environments with publicly viewable scripts rather than my random-ass dev machines using my own dlls, batch files, and prayers. Who knows, we may even defeat the anti-virus false positives.
Also, if you would like to try the Docker package, check it out here:
https://github.com/users/hydrusnetwork/packages/container/package/hydrus
I don't know much about Docker, so while I can't help much, I'll still be interested in any feedback. If and when we are ready to switch over here, I'll be updating my help with any appropriate new backup instructions and links and so on.
Please also remember that running hydrus from source is also always an option:
https://hydrusnetwork.github.io/hydrus/help/running_from_source.html
As we went through this process of automating my builds, we've improved the requirements.txts, and I've learned a bit more about automatic environment setup, so I hope I can also add some quick setup scripts for different platforms to make running from source and even building your own release much easier.
full list
tiled renderer:
the tiled renderer now has an additional error catching layer for tile rendering and coordinate calculation and _should_ be immune to to the crashes we have seen from unhandled errors inside Qt paint events
when a tile fails to render, a full black square will be used instead. additional error information is quickly printed to the log
fixed a tile coordinate bug related to viewer initialisation and shutdown. when the coordinate space is currently bugnuts, now nothing is drawn
if the image renderer encounters a file that appears to have a different resolution to that stored in the db, it now gives you a popup and automatically schedules a metadata regen job for that file. this should catch legacy files with EXIF rotation that were imported before hydrus understood that info
when a file completes a metadata regen, if the resolution changed it now schedules a force-regen of the thumbnail too
.
the rest:
added a prototype 'delete lock' for archived files to _options->files and trash_ (issue #846). this will be expanded in future when the metadata conditional object is made to lock various other file states, and there will be some better UI feedback, a padlock icon or similar, and some improved dialog texts. if you use this, let me know how you get on!
you can now set a custom namespace sort in the file sort menu. you have to type it manually, like when setting defaults in the options, but it will save with the page and should load up again nicely in the dialog if you edit it. this is an experiment in prep for better namespace sort edit UI
fixed an issue sorting by namespaces when one of those namespaces was hidden in the 'single media' tag context. now all 'display' tags are used for sort comparison groups. if users desire the old behaviour, we'll have to add an option, so let me know
the various service-level processing errors when update files are missing or janked out now report the actual hash of the bad update file. I am chasing down one of these errors with a couple of users and cannot quite figure out why the repair code is not auto-fixing things
fixed a problem when the system tray gets an activate event at unlucky moments
the default media viewer zoom centerpoint is now the mouse
fixed a typo in the client api with wildcard/namespace tag search--sorry for the trouble!
.
some boring multiple local file services cleanup:
if you have a mixture of trash and normal thumbnails selected, the right-click menu now has separate choices for 'delete trash' and 'delete selected' 'physically now'
if you have a mixture of trash and normal thumbnails selected, the advanced delete dialog now similarly provides separate 'physical delete' options for the trashed vs all
media viewer, preview viewer, and thumbnail view delete menu service actions are now populated dynamically. it should say 'delete from my files' instead of just 'delete'
in some file selection contexts, the 'remote' filter is renamed to 'not local'
next week
I had a run of IRL stuff eating my hydrus time, but I think I am now free. I'll catch up on smaller work and keep grinding at multiple local file services.
0 notes
Text
Deploying dockerized R/Shiny Apps on Microsoft Azure
In this article I show how quickly deploying dockerized R/Shiny Apps on Microsoft Azure. So, we make them available globally within seconds. For an introduction to R, see my other post.
R/Shiny Apps are a great way of prototyping, and visualizing your results in an interactive way while also exploiting the R data science and machine learning capabilities. R/Shiny Apps are easy to build in a local development environment but they are somewhat harder to deploy. As they rely on the Linux-based Shiny server to run.
Often, we don’t want to spin up a whole Linux machine or rely on the RStudio native offerings. I show how to quickly deploy this container on Microsoft’s Azure platform and make your R/Shiny available globally within seconds.
In particular, I show how to set up the right services on Azure and deploy single Docker containers. As such the focus of this article is on getting started and achieving results quickly.
What is Azure and what is an App Service
Since you have read so far, you’re probably already familiar with what Microsoft Azure is (see my other post). Azure is Microsoft’s cloud computing service, that allows to build, deploy and host a number of services in the cloud. From storage, to virtual machines to databases and app services.
While Amazon’s Web Service (AWS) was the first on the market and is now the largest provider of cloud computing services, Azure has been catching up quickly and is particularly appealing to those in larger organizations that already have close alliances with Microsoft’s other products.
When developing the Docker element of our R/Shiny apps our focus is all on images and containers. Azure has offerings for these products as well (think Azure Container Instances). Also, it offers what is called an App Service. The Azure App Service enables you to build and host web apps without managing infrastructure. It offers auto-scaling and high availability. As such we can think of the App Service as a fully managed infrastructure platform. This allows us to focus on getting the R/Shiny app deployed, without focusing too much on the backend.
Prerequisites
For deploying dockerized R/Shiny Apps on Microsoft Azure we need to download and install some tools.
To replicate all steps of this article, you need an Azure account, which you can create here for free. While the account is free, Microsoft will charge for the services you use. With a new account, you will receive a budget for playing around with a number of services for the 12 months. Beyond that, the easiest way forward is to have a pay-as-you-go account and pay for the services you need and when you need them. Azure will only charge you for the period you use the services. The basic version of the services I suggest here should cost you no more than 20 cent per day. To get a sense of the costs, check out the Azure Price Calculator. When you create new resources on Azure, it is always a good idea to follow a naming convention; so, it will be easy to find and organize your resources.
Download Docker
You also need Docker installed on your local machine. If you haven’t done so already, you can download Docker Desktop here. Make sure Docker is running, by checking the Moby icon in your notifications area or going to your command line and typing docker --version .
To interact with Azure through the command line you need to install Azure CLI, which you can download here. Once this is done you will be able to run Azure commands in your command line by typing az followed by the command. Typing az --version in your command line shows that Azure CLI is running and lists out the version you’re using.
You can run all lines of code of this article in your preferred command line interface. However, I personally recommend using Visual Studio Code. It has great Azure, Web App, CLI and Docker extensions, offering code completion and visual control of your containers and Azure services.
Setting up Azure
There are three main ways of interacting with Azure. Firstly, Azure Portal, offers a point-and-click GUI and is a great way to see at a glance what services you have running.
Secondly, the Azure command line built in to the portal and referred to as “Cloud Shell”. Cloud Shell allows you to execute commands within the cloud environment, rather than pointing and clicking.
Thirdly, through the command line on your local machine, which allows you to execute code in the cloud from your local machine. I prefer to use this third option, as it allows me to write and save my commands and also to push locally-created containers seamlessly onto Azure. Since I trust that you can write code as least as well I as do, I will build this article around the command line interaction with Azure.
Now, you have set up an Azure account and know how to interact with it. So, we can log onto the account through the command line, typing
az login
which will take you to the browser to enter your credentials.
Creating the services
For deploying dockerized R/Shiny Apps on Microsoft Azure, we have to create some services.
The first thing we need to do is to create a Resource Group. In Azure, a resource group contains all services and resources that are used to architect a particular solution. It is good practice to create one resource group with all services that share a lifecycle. So, this makes it easier to deploy, update, and delete all related services. To create a resource group, we type
az group create --name shinyapps --location northeurope
The resource group is called shinyapps, and I have asked for the group to be deployed on Azure’s North European server farm. Azure has server centres around the world and it might make more sense choosing another location depending on your requirements.
Larger centers offer a comprehensive set of services. It is worth checking if the required services are available when planning to deploy off the beaten track. Note that even when creating a resource group in one location you can also use services in a different location in that same group.
Azure Container Registry
The next thing we need is a Container Registry, or acr for short. While the container registry is more about images than containers. Although, it’s probably best to think about it as your own Dockerhub within Azure. The acr is the place within your resource group that holds the container images we want to deploy. Registries come in different tiers from Basic to Premium. The amount of memory available to store images is the main difference between the tiers. Some additional features relevant to large-scale production environments are available in the Premium tier. For our purposes Basic will be sufficient. To create the acr, type in your commandline:
az acr create -n shinyimages -g shinyapps --sku Basic
This creates a new acr called shinyimages. Note that it needs to be a unique name. It will be created within the shinyapps resource group and we picked the Basic SKU. Once the acr is created you’ll receive a JSON-style printout confirming your settings and listing the URL your acr can be reached at. Note that this will be important when deploying containers, and that it’s not a public address.
Create a new App Service Plan
The last thing we need is an App Service Plan. Think of the service plan as a plan for your phone or your broadband: a framework of the services you can use. The plan defines a set of compute resources available for your web app to run. Similar to the acr there are different tiers from free to premium: the main difference between the tiers is the way compute power is allocated. Plans running on free (or shared) tiers share resources with other apps from other users and get allocated the free quota of CPU and other resources. Basic, Standard and Premium plans run on dedicated compute resource. We’re just testing here so you might be okay with the free tier, but bear in mind that it will take quite a while to load your app. Simply upgrading to the cheapest Basic plan (B1) speeds things up quite a bit. When you think about taking your app into production a tier with dedicated compute will likely be suitable.
az appservice plan create -g shinyapps -n shinyappplan --sku FREE --is-linux
Similar to creating an acr, we specify the resource group, a name for the plan and the SKU. Importantly, we need to ask for a Linux based plan as the Shiny containers we want to deploy are build on Linux.
Deploying R/Shiny apps
Right, now that we’ve set up our architecture, let’s get ready to deploy our R/Shiny app. So far, we have developed on our local machine and we’re confident it’s ready to go and say “hello world”.
The first thing we need to do is to get the Docker image from our local environment pushed into the cloud. This needs a little bit of prep work. Let’s log on to the acr we created on Azure.
docker login shinyimages.azurecr.io
Doing this will prompt you to enter username and password, or you can add the -u and -p arguments for username and password.
Now we create a tag of the image that already exists to have the full name of the acr slash the name we want our image to have on Azure
docker tag shiny_app shinyimages.azurecr.io/shiny_app
And lastly, push up the image:
docker push shinyimages.azurecr.io/shiny_app
Once everything is pushed, you’ll again receive a JSON-style print in the console. To check which images are in your acr, type:
az acr repository list -n shinyimages
This will list out all the images in there, which is one at the moment.
Deploy the image
The last thing left to do now is to deploy the image. We do this by creating a new webapp that runs our image. We specify the resource group (-g), the app service plan (-p), the image we want to deploy (-i) and give our app a name (-n). Note first that the name of the app needs to be unique within the Azure universe (not just your account). Note second that as soon as the webapp has been created it is available globally to everyone on the internet.
az webapp create -g shinyapps -p shinyappplan -n myshinyapp -i shinyimages.azurecr.io/shiny_app
Once the command has been executed you receive a the JSON-style printout, which among other things includes the URL at which your app is now available. This is the name of your app and the Azure domain: https://myshinyapp.azurewebsites.net
That was easy. You might have a set of containers composed together using docker-compose. Deploying a multi-container setup is similarly simple. Rather than specifying the image we want to deploy, we specify that we want to compose a multi-container app, and which compose file we want to use to build our container set up. Make sure you have all images in your acr and the YAML file in the folder you execute the line from.
az webapp create -g shinyapps -p shinyappplan -n myshinyapp --multicontainer-config-type compose --multicontainer-config-file docker-compose.yml
Summary and Remarks
The chart below summarizes the architecture we have constructed to deploy our R/Shiny apps. Once all the services are running it really is just a two lines of code process to first push the containers onto Azure, and then deploy them as app service.
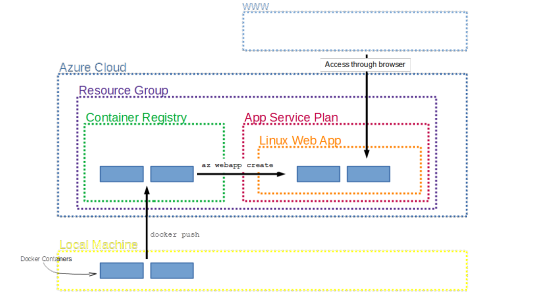
While this was an introduction to get started fast with deploying your R/Shiny app, there are many more features that I have not covered here but that will be useful when taking your app to production. The most important thing to note here is that our app is available to everyone who has access to the internet (and has the link). Using Azure Active Directories, we can restrict access to a limited number of people who we authorize beforehand.
What I have shown here is a manual process of pushing the containers up and then deploying. Azure offers functionalities to build in triggers to quickly rebuild images and ship new versions of the app when, say, you commit a new version to your Git repository.
Finally, I have assumed here that you have admin rights to create each of the services. Working in a larger organization that is likely not the case, so it’s important to watch out for the privileges you have and which you are willing to share when bringing in other people to join your development and deployment process.
Before I let you go, I just want to point out how to clean up when you’re done exploring the functionality. This is good practice and also saves you money for services you are not using. Since we have deployed everything in one resource group, all we have to do is to scrap that group and all services deployed within it will be deleted with it. We do this like so:
az group delete -n shinyapps
Conclusion
In conclusion, this is how deploying dockerized R/Shiny Apps on Microsoft Azure. If you have any question, please use your forum.
The post Deploying dockerized R/Shiny Apps on Microsoft Azure appeared first on PureSourceCode.
from WordPress https://www.puresourcecode.com/programming-languages/r/deploying-dockerized-r-shiny-apps-on-microsoft-azure/
0 notes
Text
Introducing rosetta-bitcoin: Coinbase’s Bitcoin implementation of the Rosetta API
By Patrick O’Grady
In June, we launched Rosetta as an open-source specification that makes integrating with blockchains simpler, faster, and more reliable. There are now 20+ blockchain projects working on a Rosetta implementation (Near, Cardano, Celo, Coda, Neo, Tron, Handshake, Oasis, Cosmos, Decred, Filecoin, Ontology, Sia, Zilliqa, Digibyte, Harmony, Kadena, Nervos, and Blockstack), five in-progress SDKs (Golang, JavaScript, TypeScript, Java, and Rust), and eight teams have made contributions to at least one of the Rosetta repositories on GitHub (rosetta-specifications, rosetta-sdk-go, and rosetta-cli).
Today, we are sharing a key contribution to this growing collection of implementations: rosetta-bitcoin.
Why Bitcoin?
Bitcoin is the bellwether for all of crypto, is the most popular blockchain, has the largest market capitalization, and most blockchain developers know how it works (so it is easier to understand how Rosetta can be implemented for other blockchains).
On another note, the reference implementation for Bitcoin (known as Bitcoin Core) doesn’t provide native support for many of the features integrators want. It is not possible to query account balances and/or UTXOs for all accounts, serve preprocessed blocks to callers so they don’t need to fetch all inputs to parse a transaction, nor to construct transactions without importing private keys onto the node (which isn’t practical for users that never bring private keys online). Often, these missing features drive integrators to run some sort of additional “indexing” software and implement their own libraries to handle transaction construction.
rosetta-bitcoin provides access to all these features, requires no configuration by default, and can be started with a single command. Furthermore, rosetta-bitcoin enables these features exclusively through RPC interaction with Bitcoin Core so we don’t need to maintain a fork of Bitcoin Core to enable this new functionality and easy configuration!
Rosetta API Refresher
rosetta-bitcoin implements both of the Rosetta API core components: the Data API and the Construction API. Together, these components provide universal read and write access to Bitcoin. We’ve included several diagrams below that outline the specific endpoints that any Rosetta API implementation supports. If you are interested in building on top of an implementation, we recommend using rosetta-sdk-go (which abstracts away these flows behind Golang functions).
The Data API consists of all the endpoints used to “get information” about a blockchain. We can get the networks supported by an implementation (which may be > 1 if a blockchain supports sharding or if it is a gateway to multiple networks), the supported operation types on each network, and the status of each network.
The Data API also allows for getting the contents of any block, getting a particular transaction in a block, and fetching the balance of any account present in a block. Rosetta validation tooling ensures that the balance computed for any account from operations in blocks is equal to the balance returned by the node (often called “reconciliation”).
Lastly, the Data API allows for fetching all mempool transactions and for fetching any particular mempool transaction. This is useful for integrators that want to monitor the status of their broadcasts and to inspect any incoming deposits before they are confirmed on-chain.
While the Data API provides the ability to read data from a blockchain in a standard format, the Construction API enables developers to write to a blockchain (i.e. construct transactions) in a standard format. To meet strict security standards, implementations are expected to be stateless, operate entirely offline, and support detached key generation and signing. We can derive an address from a public key (on blockchains that don’t require on-chain origination).
When constructing a transaction generically, it is often not possible to fully specify the result or what may appear on-chain (ex: constructing a transaction that attempts to use a “flash loan”). We call the collection of operations we can specify the transaction “intent” (which is usually a subset of all operations in the on-chain transaction). At a high-level, constructing a transaction with the Construction API entails creating an “intent”, gathering the metadata required to create a transaction with the “intent”, signing payloads from accounts responsible for the “intent”, and broadcasting the transaction created. Before attempting to sign or broadcast a transaction, we confirm that the transaction we constructed has the same “intent” we originally provided when kicking off the construction flow. You can see this entire construction flow in the diagram below:
Once we have a signed transaction (that performs the “intent” of our choosing), we can calculate its network-specific hash and broadcast it.
How it Works
We optimized for package re-use when developing rosetta-bitcoin. If it could be done with an existing package from rosetta-sdk-go, we used it. This has led to upstreaming a few significant performance improvements as we benchmarked and optimized rosetta-bitcoin.
We use Bitcoin Core to sync blocks/broadcast transactions, ingest those blocks using the syncer package, store processed blocks using the storage package, and serve Rosetta API requests using the server package from data cached using the storage package. You can find a high-level view of this architecture below:
To implement the Rosetta API /account/balance endpoint, we had to build a UTXO indexer that provides atomic balance lookups. “Atomic” in this sense means that we can get the balance of an account with the block index and block hash where it was valid in a single RPC call. With our Rosetta Bitcoin implementation, you don’t need to run a separate indexer anymore!
We implemented concurrent block ingestion to speed up block syncing and automatic pruning to remove blocks from Bitcoin Core after we ingest a block to save on space. Concurrent block ingestion allows us to populate multiple blocks ahead of the currently processing block while we wait for the most recently populated block to save (keeping our storage resources busy). Because we store all ingested blocks in our own storage cache, we don’t need to keep duplicate data around in Bitcoin Core’s database.
Last but not least, we implemented stateless, offline, curve-based transaction construction for sending from any SegWit-Bech32 Address. We opted to only support sending from SegWit-Bech32 addresses to minimize complexity in the first release (there are a lot of new moving pieces here). We look forward to reviewing community contributions that add MultiSig, Lightning, and other address support.
Try it Out
Enough with the talk, show me the code! This section will walk you through building rosetta-bitcoin, starting rosetta-bitcoin, interacting with rosetta-bitcoin, and testing rosetta-bitcoin. To complete the following steps, you need to be on a computer that meets the rosetta-bitcoin system requirements and you must install Docker.
First, we need to download the pre-built rosetta-bitcoin Docker image (saved with the tag rosetta-bitcoin:latest):
curl -sSfL https://raw.githubusercontent.com/coinbase/rosetta-bitcoin/master/install.sh | sh -s
Next, we need to start a container using our downloaded image (the container is started in detached mode):
docker run -d --rm --ulimit "nofile=100000:100000" -v "$(pwd)/bitcoin-data:/data" -e "MODE=ONLINE" -e "NETWORK=TESTNET" -e "PORT=8080" -p 8080:8080 -p 18333:18333 rosetta-bitcoin:latest
After starting the container, you will see an identifier printed in your terminal (that’s the Docker container ID). To view logs from this running container, you should run:
docker logs --tail 100 -f <container_id>
To make sure things are working, let’s make a cURL request for the current network status (you may need to wait a few minutes for the node to start syncing):
curl --request POST 'http://localhost:8080/network/status' \
--header 'Accept: application/json' \
--header 'Content-Type: application/json' \
--data-raw '{
"network_identifier": {
"blockchain": "Bitcoin",
"network": "Testnet3"
}
}' | jq
Now that rosetta-bitcoin is running, the fun can really begin! Next, we install rosetta-cli, our CLI tool for interacting with and testing Rosetta API implementations (this will be installed at ./bin/rosetta-cli):
curl -sSfL https://raw.githubusercontent.com/coinbase/rosetta-cli/master/scripts/install.sh | sh -s
We recommend moving this downloaded rosetta-cli binary into your bin folder so that it can be run by calling rosetta-cli instead of ./bin/rosetta-cli). The rest of this walkthrough assumes that you’ve done this.
We also need to download the configuration file for interacting with rosetta-bitcoin:
curl -sSfL https://raw.githubusercontent.com/coinbase/rosetta-bitcoin/master/rosetta-cli-conf/bitcoin_testnet.json -o bitcoin_testnet.json
We can lookup the current sync��status:
rosetta-cli view:networks --configuration-file bitcoin_testnet.json
We can lookup the contents of any synced block (make sure the index you lookup is less than the index returned by the current index returned in sync status):
rosetta-cli view:block <block index> --configuration-file bitcoin_testnet.json
We can validate the Data API endpoints using the the `check:data` command:
rosetta-cli check:data --configuration-file bitcoin_testnet.json
This test will sync all blocks and confirm that the balance for each account returned by the `/account/balance` endpoint matches the computed balance using Rosetta operations.
Lastly, we can validate the Construction API endpoints using the `check:construction` command:
rosetta-cli check:construction --configuration-file bitcoin_testnet.json
This test will create, broadcast, and confirm testnet transactions until we reach our specified exit conditions (# of successful transactions of each type). This test automatically adjusts fees based on the estimated size of the transactions it creates and returns all funds to a faucet address at the end of the test.
When you are done playing around with rosetta-bitcoin, run the following command to shut it down:
docker kill --signal=2 <container_id>
Future Work
Publish benchmarks for sync speed, storage usage, and load testing on both testnet and mainnet
Implement Rosetta API /mempool/transaction endpoint
Add CI test to repository using rosetta-cli (likely on a regtest network)
Support Multi-Sig transactions and multi-phase transaction construction
Write a wallet package (using rosetta-sdk-go primitives) to orchestrate transaction construction for any Rosetta implementation (you can find some early work on this effort here)
If you are interested in any of these items, reach out on the community site.
Work at Coinbase
We are actively hiring passionate developers to join the Crypto team and a developer relations lead to work on the Rosetta project. If you are interested in helping to build this common language for interacting with blockchains, Coinbase is hiring.
This website contains links to third-party websites or other content for information purposes only (“Third-Party Sites”). The Third-Party Sites are not under the control of Coinbase, Inc., and its affiliates (“Coinbase”), and Coinbase is not responsible for the content of any Third-Party Site, including without limitation any link contained in a Third-Party Site, or any changes or updates to a Third-Party Site. Coinbase is not responsible for webcasting or any other form of transmission received from any Third-Party Site. Coinbase is providing these links to you only as a convenience, and the inclusion of any link does not imply endorsement, approval or recommendation by Coinbase of the site or any association with its operators.
All images provided herein are by Coinbase.
Introducing rosetta-bitcoin: Coinbase’s Bitcoin implementation of the Rosetta API was originally published in The Coinbase Blog on Medium, where people are continuing the conversation by highlighting and responding to this story.
from Money 101 https://blog.coinbase.com/introducing-rosetta-bitcoin-coinbases-bitcoin-implementation-of-the-rosetta-api-71323052b32c?source=rss----c114225aeaf7---4 via http://www.rssmix.com/
0 notes