#either that or highly cartoony proportions
Note
Who are your favorite zadr artists and why are they your favorites?
The artist w my favorite style of all times has to be @askzimisdead and neofox on deviantart (U seriously gotta go take a look at their stuff, it’s incredible) followed closely by @0livec0w (formerly secret-alien-stash, I absolutely love the bouncy and dynamic look of their drawings and the ideas were fekin Stellar), @mcfudgie (they mostly post on twitter and are a good friend of mine, plus their ZADR art is *cheff’s kiss*) @bamsara which y’all know and love, @coconutmilkyway whose style I also am fucking in love with, and @mushy-madness also has a very scrappy style I highly dig! . A lot of others that I like are mostly on Twitter like Aaron, Pocket, InvadersInvestigators, Vee, JARED, Umbra... Some others I highly admire here are @inimoose , @izzydrawsforfun, @gwuwwy, @angeban, @whatisgoingonhereman, @truekrisstianity and holy shit I could be here fr hours mentioning all ZADR artists here that I adore dfghgusddgsdg
#ask#the trick of a style I like is many scrappy lines#the scrappier the better#either that or highly cartoony proportions#Anonymous
74 notes
·
View notes
Note
That’s actually a good explanation/headcanon for Eggmans slender arms and legs. Aside from that since Carrey is retiring, if the Sonic Cinematic Universe gets more than three movies and we see that Robotnik lived, he’ll definitely have a 06 appearance mixed with the aesthetic of the movies, moreso than Carrey’s looks. However the big question will be if he’ll be CGI like Sonic or not. Either way, the canon game design shouldn’t be touched for a live action film.
thank you. ^^ well carrey says he's retiring but I highly expect him to make an exception for the third movie. and I guess what they said about how, if carrey won't return to the role they'll simply be no replacement, implying that they'll stop using the main villain of the series in the movies is supposed to be sweet but I was just like wow, really?
if they were being serious, it proves how much they really only saw the character as carrey and wanted him to be classic carrey acting like and resembling in appearance as possible. it doesn't seem to me like they ever really cared about capturing the essence of the character from the second they casted him and a lot of things have continued to insinuate that in my eyes.
but anyway, I would rather him be played by another actor where they don't change the character to shape around the actor like they did with carrey. seeing something closer to the 06 design could be interesting because I actually like it as long as it isn't carrey and it could possibly feel more like Eggman to me when they do more than just mostly carrey looking and acting but just with a big stache and bald cap.
really I would much prefer for him to be CG because I don't think he's the kind of human character that can be captured truly accurately by a real life human in live action because there's no charm of his fun cartoony design, shape, and proportions that way. and I want the whole movie to be CG and for him to be voiced by Mike Pollock but I know it's too big of a dream now. :')
but yeah, either way I don't think they should've changed such an iconic and recognizable character design so drastically for the series' big movies, especially not to the point he wasn't even recognizable as Eggman for 99% of the first one, just spending it being carrey with a mustache wearing black and red. I'm still sad about how little they seemed to want to capture the vastly different essence of the world and characters in the games.
9 notes
·
View notes
Text
Get Out of Your Box: The Piece of Art Advice Everyone Is Afraid to Tell You
This has been on my mind for a VERY good while.
By that I mean at least a YEAR.
DISCLAIMER: This is coming from someone whose art improved at an alarming rate (according to my art major friend who gave me this advice). I also doesn’t know when to stop sometimes, so I apologize if this sounds a little insensitive or condescending. But the ONLY reason I am doing this is because it is the single most influential piece of advice I ever received and I would not be where I am today had it not been given to me.
I’m just kind of frustrated here because I have seen the exact same thing happen to so many people, and it’s always due to the same epidemic that so often plagues beginners. And I almost got caught in it, if it weren’t for aforementioned art major friend.
See, the problem starts with beginner artists looking at fun, cartoony styles and falling in love with them. This is not a bad thing! It’s great to find stuff you like and want to emulate!
The problem starts when they immediately dive into these cartoony styles, thrilled by the notion that they can skip doing hard realistic stuff and just stick with a minimalistic art style without having to learn the basics or how things look like in real life. Because either they shy away from hard stuff, or they have already decided that’s not how they want their art to look.
This is a mistake. They are unknowingly locking themselves inside a box. That is not how style development works.
Do you want to know the secret to how I improved more in the past two and a half years than I did from second grade up to freshman year of college?
My friend told me I could not have my own style without learning and mastering the basics FIRST. And I ACCEPTED AND HEEDED her advice.
I was not advanced enough to have my own style. Not even close. So I sought advice from every source possible. I looked up references. I ditched my cartoony style and focused on how things look in real life. I sent pictures of all my work to my friend and listened to her critiques. I rigorously studied the human anatomy and proportions. I changed and evolved. I tried new things, but never planted myself in a particular style.
This is my first digital piece of art. I am ashamed of it but I will not use other people’s art as examples because it’s beyond cruel.

This was before I accepted I did not have the tools to have my own style.
More early art:

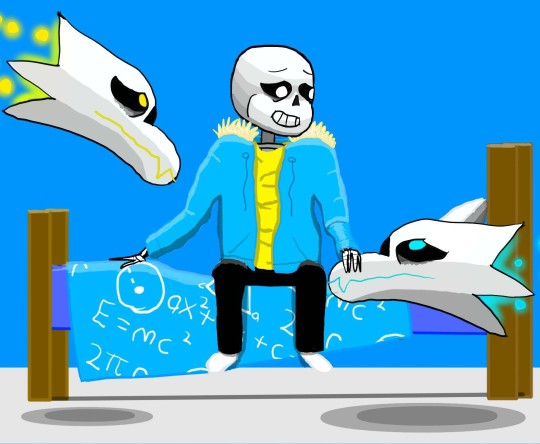
Yes right when I finished Undertale I had a weird obsession with drawing Sans. How is that any different from the next guy?
Now here are some of my more recent pieces, long after I accepted I did not have a style yet:
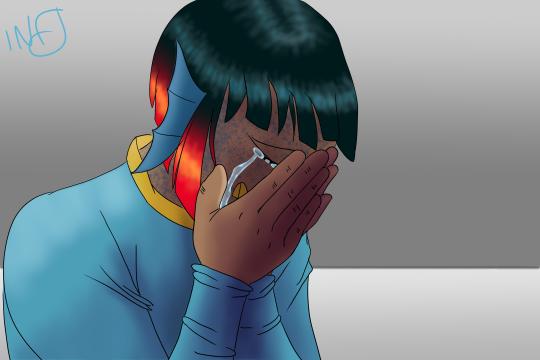


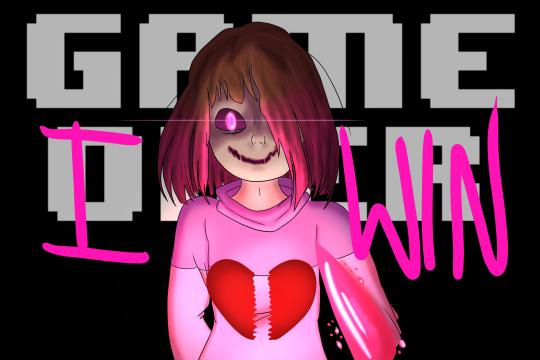
As you can see, I now have an obsession with lighting I have improved immensely.
The reason no one tells you this (or seems not to, I’m not sure, I just see a lot of people with this problem), is because they don’t want to hurt your feelings. They are afraid that they will sound mean and you will be discouraged and stop drawing. Which is a valid point, but at the same time, the problem remains unsolved. The artist remains in their box.
Now, I have tried to tell people this information in the nicest way possible. I notice, however, that so far it has only been in vain. No one has gotten mad at me yet, but whenever I say, “Well maybe you should try this,” the response is almost always “I’m happy with the style that I have, but thanks!”
Okay, that would be all well and good, but as a person who has been at that stage and surpassed it by heeding the advice of others, it’s kinda hard hearing the same response again and again, watching beginning artists trap themselves in this box that they have no idea even exists. They have so much potential, but ironically they deny themselves fast, substantial improvement because they think they don’t need it. This isn’t to say that improvement doesn’t exist, it’s just that the things that need to be fixed either aren’t getting addressed or are being ignored.
I know change is a scary thing. I know the thought of trying new things is unappealing. I know switching from sticking to cartooning to learning realism is a long and tedious process. And it sucks. It really does. But it’s worth it, I promise.
If anyone has made it this far into this accidental essay, I ask you to take a look at your art and ask yourself, “Have I locked myself in a box?” If the answer is yes, I highly recommend you to go back to the basics. Practice drawing how things look in real life, even if you don’t want your style to look like that. Accept critiques, even harsh ones. Step out of your comfort zone and try new things. Look at other people’s art; try to incorporate something you think they did well into your work. Punch a hole in your box, let the light of possibilities shine in. You might be surprised at where it takes you. I was.
#art tips#art advice#art#illustration#my art#my fan art#fan art#digital art#art improvement#cartooning#cartoon#realism#long post#rant#drawing#undertale#ninjago#glitchtale#ninjagotale#art collab#collab#comics#comic#art style#style#art style advice#style advice#coloring#coloring advice#shading advice
102 notes
·
View notes
Note
Did any of you guys go to art college or art school? If so, do you have any advice for that? (Portfolio, applying, all that nonsense.)
Hi anon! Kristen here, this has been sitting in our askbox for a bit and now I finally have time to answer it. Warning this is very long, as are most things I type. I’m also gonna hit up other Artsy IR members to see if they have any thoughts.
I went to art college- Kendall College of Art and Design, starting back in 2008 and graduated in 2012. I went for traditional illustration because I wanted to do children’s books, though I also self-taught myself digital illustration and applied a lot of what I learned to said digital work. I have a Bachelor’s degree, yaaaay.First of all, if you really want to go into art as a career, there are some things you should consider. 10 years out from when I applied to art school, we’re living in a different world. Art school is a lot of money and student loans are a monster I’ll be stuck battling for some time... and now-a-days, that stuff isn’t really necessary. There are a variety of online tutorials and courses you can take for free or for considerably cheaper. There are thousands of art communities, and with hard work and good networking you can make it just as far if not farther than someone with a degree. We’re very much in an age where being a self-made entrepreneur is considerably easier than it ever was before. So you need to throughly consider if the price tag is worth it to you.Art school does do a few things. A good school should have some solid foundational classes that give you the chance to experiment in everything and often force you to do so. If I hadn’t gone to art school, I probably wouldn’t have tried traditional watercolor work at all, and that’s what got me my first serious illustration job. Also a good school should give you access to professors who have been in your industry who can give you solid advice and also, gasp, connections.
Connections are a pretty vital thing, especially depending on what you want to go into. I’m not an expect on animation, but from what I know a lot of people who are currently working in the field got their start at California Institute of the Arts. Depending on where you are in the world, if you’re in a hotspot for whatever industry you want to go into, a big name school can be a major help for you. If you don’t really live in a place where that’s an option, i.e. you’re me and you live in the void Michigan, you’re not paying for as many networking opportunities, so you may want to seriously consider if art school is worth it.
Art school also gives you the benefit to really focus on art hard if you play your cards right. I was able to go it full time due to grants and scholarships, which was intense but definitely pushed me through some major improvements. However, I knew other students who worked full time on top of being in school full time, and they didn’t get as much out of it. The big thing about art school, as is the case with any school, is you really only get what you put into it. Your professor can show you all the techniques in the world, but until you know what that technique feels like in your own hands, it’s useless.If you decide to go for a school, be sure to look into things like post-graduation hiring rates. Also ask current students there how they feel about the school- depending on the department at Kendall, people had very different things to say and they weren’t always positive. Thoroughly consider where you want to specialize, different schools will have different specialities even if they supposedly offer a bit of everything.
If you’re unsure on your speciality, that’s okay! Definitely still take foundational classes either online or perhaps at a community college. The more you experiment, the closer you will get to finding what you want, and that will make art school a lot more useful to you when you decide to enroll.
If you ever take any art class, ever, and it’s something you want to do for a career, take that shit seriously. I know I said up there “you get what you put into it” but I gotta say it again. My first year of art school I was going through a lot (not entirely my fault) but I also took several classes not terribly seriously because I was like “whatever man I don’t want to do this, this isn’t my major.” In retrospect I thoroughly regret not paying more attention in those classes, because those foundations would have helped a lot with struggles I had later on. If you want to do art as a career, you gotta REALLY want it and you gotta really focus.
I can’t really tell you if art school is right for you or not. I personally don’t regret my time there or my slightly scary debt, but I also benefitted from some grants to make my loans at least manageable and a number of other factors have gotten me to the point where I’m a full time freelance illustrator.If you decide to go for art school, check the portfolio requirements for every place you apply to. Different places will have different requirements. For me, I was required to have over half my work showing off my various foundational skills- still lifes are good, life drawing is good, oooh look ma I can use pastels AND I’ve got a tablet and can do digital stuff wowowowowow. I was told to try to keep anything cartoony/stylized down to a few pieces- unless you’ve received A TON of positive feedback about your personal style I wouldn’t use it too much because you’re probably still developing and that style’s gonna change A TON as you go through school.
Keep an eye on the acceptance rate at the school. If it’s EXTREMELY HIGH, that may show a lack of standards. This is actually bad because this means the school is basically letting people show up, taking their money, and then going “welp here’s your degree, good luck somehow getting a job in an EXTREMELY competitive field.”
Another thing you may want to ask is hey, how well does this school prepare you for marketing yourself once you get out of school. Most people I know who graduated from Kendall don’t have art jobs, and the primary reason for this is our teaching for self-marketing was really not great.
Whether you decide to go to art school or not, here’s some stuff you should really be working on if you want to go into art or get better at it:
FIGURE DRAWING plz. Please do figure drawing. Honestly, the more realistic you do with this, the better. “But Kristen I wanna do cartoons!” I get it, I do too. However, learning realistic anatomy actually benefits cartoony stuff a lot. Once you get a feel for how something actually works and is proportioned, it’s easier to exaggerate and adjust proportions without making it look weird. Draw a figure standing enough times and you’ll get a feel for how weight is positioned, and that means when you make those legs noodles they won’t look awkward. This website is a great tool for online figure drawing work for you to practice on your own, I highly recommend it! Or sit down and do it with a friend, it’s fun!“But Kristen, figure drawing is booooori-” Then once you’re done drawing the figure, make it a character. I actually have a lot of figure drawing and gestures that I turned into IR characters because I’m very cool.PRACTICE DIFFERENT BODY SHAPES BOYOPERSPECTIVE This one I am a lot worse at. But this has some good points on perspective. What I like to do is find a photo of a room or something and try to draw it to the best of my ability, then add my OCs to it. I LOATHE the perspective part but it’s good practice and usually at the end you have a nice day-in-the-life kinda feel to things, it’s like “wow my characters exist in a world instead of white space amazing.”Do some COLOR SWATCH CHALLENGES!
Also just... try everything. Even stuff you hate the first time. I hated watercolor when I first did it, but as I said before, that’s what I got my first job doing.
Above all else, make sure you draw every day. If you want to do art as a career or just want to get better at the hobby- the difference between someone who makes this thing a career and someone who doesn’t is the person who cares about it so much that they make time for art even when life is chaos around them.
I have other thoughts but this is long enough as is. Uh, thanks for coming to my TED Talk and I hope you find this useful, haha.-Kristen
38 notes
·
View notes
Text
Transformers: Animated
Transformers: Animated. Because the others weren’t.
But all kidding aside folks, I’ve got a special essay for you today! We’ll be talking about Animated, one of the Transformers toylines with a profoundly revolutionary aesthetic. I’ll be focusing more on general historical trends in this essay, because the line is somewhat small, and the Wiki covers it very well.
Hope you enjoy!
Transformers: Animated was the first cartoon-supporting toyline released in the wake of the first live action film. The aesthetics of the line marked a sharp break with previous media. Where the movie had opted for hyper-complex robots, Animated abandoned many of the more traditional, Gundamesque robot design elements of G1, Armada, and RID. Instead, Animated created a new, hyper-cartoony design vocabulary, “following head character designer Derrick Wyatt's love of ‘rounded squares and squared rounds’” (MSipher) The line built upon the successes of Cybertron and the movie line, heavily emphasizing smaller figures, including the legends class and the new, roughly basic sized alternators. (M Sipher) These features would largely define its legacy. The aesthetic of Animated would serve as a starting point for the decade long journey of design transformations that has, at present, culminated in Transformers: Cyberverse. Similarly, the wide diversity of toy offerings present in Animated and the movie line would give HasTak the tools to redefine what toys were made for who, and would eventually demand they do so.
Unlike the Unicron Trilogy lines, or indeed the movie line itself, Animated lacked an overall gimmick. (M Sipher) Because of this, and the relatively small size of the line, the wiki’s summary page contains a concise and appropriate description of the main features of the toyline to which there is not much to add. For the sake of completeness, the highpoints of this analysis will be recapitulated here. However, the bulk of this essay will focus, not necessarily on the features of the figures themselves, but the larger features of the toyline, in particular the aesthetics and what kinds of toys the line chose to offer.
The wiki highlights several key features of the toyline. First, “Animated has no overarching, line-wide extra play gimmick...the toys have other special features unique and appropriate to the character” (M Sipher) Second,”Hasbro designers, the Cartoon Network design team, and TakaraTomy engineers all worked closely together out of the gate to make sure toy and show-character were as close as possible, to the point where even the characters' transformation schemes were consistent between 2D media and 3D toy” (M Sipher) The wiki also mentions that Animated was the first line since Beast Machines to be canceled, with molds left in design limbo. (M Sipher) Animated also featured many remarkably articulated figures, especially when compared with the sometimes awkward joints of the contemporary movie line. Balljoints made a prominent return. The line contained a remarkable number of figures that had a semi-transforming armor accessory (read three). (M Sipher)
Most crucially for our analysis, the wiki notes “Like the concurrent live-action film toyline, there was a heavy focus on keeping the small core cast —especially the Autobots— available at multiple price points and complexities to get them in as many kids' hands as possible.” (M Sipher) Animated featured the legends class, the traditional run of deluxes, voyagers and leaders, a single Supreme class figure, the activators, Bumper Battlers, simple figures reminiscent of the G1 Battlechargers, which triggered transformation and electronics upon collision, Power Bots, and, of course, Happy Meal toys. (M Sipher) Bumblebee and Optimus Prime, in particular, had figures in every size class or sub-branding. (M Sipher)
While the core of the line was composed of more traditional figures, most of the classes were focused at a younger audience. In particular, the alternators demonstrate something of a visible break from the scout class figures from the Unicron Trilogy or the Real Gear Robots of the movie line. The alternators were not composed of unique characters whose fictional depictions pegged them as smaller than the average Transformer. Rather, the line was populated by members of the main cast, such as Starscream and Optimus Prime. (M Sipher) Moreover, the activators were not simply scout sized figures; they also marked the return of spring loaded auto-transformation after a lengthy hiatus. (M Sipher)
In this sense, the alternators figures were fundamentally different from the scout class that had come before. These figures were not merely a size class smaller than deluxe. Rather, they represented an opportunity for younger children to have a more kid-friendly version of Optimus Prime, a version that didn’t feature the intricate transformation schemes of the movie toyline. Indeed, in Animated, and to some extent the movie line, a clear distinction begins to arise between figures targeted at different age groups. While occasionally the target group of an entire line would shift, (for example, Armada had a somewhat younger target audience than RID or Beast Wars) the lines were largely internally consistent. That is to say, most of the figures in Armada have roughly the same level of complexity, articulation and electronic gimmickry, accounting for differences in size class. This is simply not true in Animated; there is a world of difference between the sophistication of the deluxe figures and the simplicity and electronics of the Bumper Battlers.
As time wore on and the complexity of the movie figures waxed, the conscious division of lines into various groups of figures designed to appeal to various age groups became ever more important. Although not the first to do so, Animated and the movie line dramatically expanded the kind of toy that could be considered a Transformer, or that could at least receive the branding in the case of some of the role play toys. When HasTak eventually began to more fully explore these divisions, they found themselves with precedent, and many tools pioneered by Animated, in the form of size classes, concepts such as one step transformation, more non-traditional converting figures, or even larger action figures that didn’t transform at all. This aspect of Animated is perhaps one of the most influential; all three subsequent cartoon lines would take what had been established and run away with it.
The other significant aspect of Animated was the aesthetic. All the cartoon series previous to Animated that had featured primarily vehicle-based Transformers had relied on a very traditional robot design language. Vents, paneling, and conventional, if blocky, proportions ruled the day. Animated almost completely abandoned these, in favor of designs much more heavily drawn from the world of cartoons at large. Gone were the mostly human proportions of the G1 cartoon. Animated characters “leaned towards the superheroic, with bulky chests jutting out with broad shoulders and large arms”, and “faces were given much more expression than the default "neutral" non-expression of most Transformers lines, with large eyes, smirks, snarls and more as appropriate to the general attitude of the character.” (M Sipher) Character designs featured large blocks of bold primary colors and cell shading. All this was tied together with the unique style of head designer, Derrick J. Wyatt, to create an aesthetic that is instantly recognizable and highly evocative of cartoons in general.
Of course, Transformers as a franchise was no stranger to significant redesigns. Both Beast Wars and the movies had completely reimagined Transformers in directions that had little semblance to that which had come before. What makes Animated significant is the impact it had on what was to come. In many ways, the designs of Animated served as a jumping off point for the next ten years of cartoons. Transformers:Prime and RID (2015) both have very well-defined aesthetics of their own; yet it is inescapable that both owe a great deal to the innovation of Animated. For a somewhat silly example, characters in Animated tended not to have very pronounced noses; many simply had a nosepiece like protrusion from a helmet. Almost no characters have any sort of nose in either Prime or RID (2015); it would not be until Cyberverse that Transformers would again have actual noses in a main-line cartoon.
In many ways, the legacy of Transformers: Animated is one of freedom. HasTak increased the design space in which Transformers could operate, both in terms of physical figures and artistic choices. Before, for all their diversity, many toylines had featured many of the same kinds of figure; ball-jointed, transforming robots from the Gundam school of aesthetics. Animated broke down the door for experimentation with new looks and new kinds of toys. Although the most profound changes in toy offerings would not be for some years, and would occur not in the cartoons but in the movies, every line after Animated borrowed something from the pool of ideas it pioneered. Through these influences, Animated once again breathed new life into our storied franchise.
Works Cited
MSipher et al. “Transformers Animated (Toyline)” TFwiki. https://tfwiki.net/wiki/Transformers_Animated_(toyline) Accessed 10/4/2020
#Optimus Prime#Bumblebee#TFwiki#Transformers#aesthetics#Transformers:Animated#Transformersanimated#transformers animated#animated
1 note
·
View note
Video
youtube
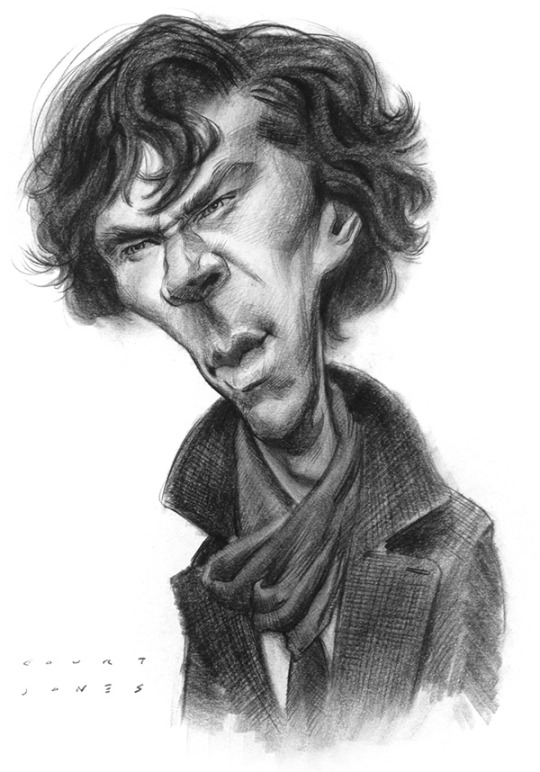
Caricature Essentials by Court Jones
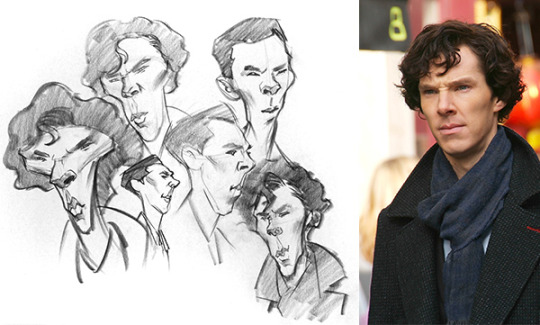
In the previous lessons, I covered the theory of exaggeration and the practical steps of creating caricature portraits. I demonstrated going from concept to finish using several different celebrity faces. In this lesson, we’ll review the whole process using actor Benedict Cumberbatch as our subject.
In order to draw Benadryl Cumbersnatch, I’m going quickly walk through the four basic steps of creating and refining a caricature: Thumbnail Sketch, Rough Sketch, the Abstraction, and Final Drawing. The purpose of breaking the caricature process into separate steps is so you can manage all the variables more easily, focusing on one goal at a time.
Step 1: The Thumbnail Sketch
What we call a “thumbnail sketch“, is a quick small drawing that explores the core concept of your exaggeration. It’s best to do several thumbnail sketches. Even if you think your first thumbnail sketch looks good, keep trying new iterations where you exaggerate the head in different or more extreme ways.
The thumbnail sketch typically takes two to three minutes. But don’t spend more than five minutes on any one sketch. If you do, you might get too attached to it and feel like you have to stick with that one concept rather than explore new original shapes. This stage is all about exaggeration and experimentation. Likeness and structure are not a priority yet. If you think too much about getting a perfect likeness in a thumbnail sketch, it will hold you back from making bold exaggeration choices. At this stage, go crazy. Stay loose and let the subject’s face and persona inspire you. If you think their head looks like an object or an animal, try to put some of that into your sketch. And if you get tired of drawing from one photo, try another photo or head angle. Sometimes a person’s likeness is more obvious from a particular angle or with a certain facial expression. In the case of Bellicose Camelback here, I opted for a look of intensity that almost borders on anger.
Step 2: The Rough Sketch
Select your favorite thumbnail concept sketch and use it to inspire the design of your rough sketch. But now, you need to focus on resolving the likeness and anatomy as best you can. You want to take from your thumbnail sketch what works, and leave behind what doesn’t. And if you feel you can exaggerate even more at this stage, go ahead and try. You can use some simple guidelines in your rough sketch to help align the shapes. But don’t worry too much about that just yet. We will fix any alignment or perspective errors in the next stage. For now, try to keep your rough sketch feeling organic and natural.

Remember, you still need to explore and be creative at this stage. The abstraction that we’ll do in the next step is where we really lock down the shapes and think more like a structural engineer designing the framework of a bridge or a house.
Step 3: The Abstraction
For this step, place a sheet of tracing paper over your rough sketch. The abstraction helps you determine where you made structural errors and where you can make additional improvements to the flow of the shapes. The reasoning behind this is that the simple lines of the Abstraction make it easier to see those errors than just looking at your rough sketch. The abstraction is a wireframe grid that represents your organic drawing.
The individual lines of the abstraction are called “rhythms” because they trace the landmarks of the face and body along a path – sort of like how rhythm in music establishes the structure and pace of the melody. I originally learned to use the abstraction in art school to start my portrait drawings or to make corrections to poorly constructed anatomy. But it works really well to help develop and fix caricatures too.

In the end, your abstraction drawing should be exactly what it sounds like: an abstract drawing! It won’t have much personality. Sometimes, you won’t see much of a likeness in the Abstraction. And other times you may. Either way, don’t worry. We’ll pull the likeness back out in the next step of the final drawing.
Step 4: The Final Drawing
For my personal tastes, I like to think of my goal here to be a realistically rendered and anatomically correct portrait which just happens to be caricatured. You may prefer to render in a more simple graphic or cartoony style. And that’s great. Be your own artist. But I like to include all the anatomical traits present in the photo, including bone structure, musculature, fat pads and the same realistic light and shadow. The only thing to have changed on Bandicoot Denimpatch here is the proportions and relationships of the features. When creating caricatures, my ultimate goal is usually to paint it either in oils, watercolors, or even digitally. So I don’t typically bring my pencil and charcoal drawings to an extremely high degree of finish or photo realism. I put just enough information in there to inform how to arrange my light and dark values in the painting. But if you want to create a highly finished looking pencil or charcoal drawing for yourself, you can invest as much time in it as you want, confident that you’re rendering a well-designed caricature.
Now, I’ve said this before, in previous lessons, but I don’t always go through this entire step by step process when creating a caricature for a fine art piece or for illustration jobs. But it’s good to have a process to fall back on when you’re challenged with a difficult subject, find yourself lacking in inspiration or need help developing the exaggeration. There are some caricature artists out there who seem to be able to draw a fantastic sketch on the very first step. And sometimes, I even get lucky on my first sketch. But more often than not, I need to spend time refining the anatomy to get a better likeness and exaggeration. And that’s where these fundamental skills come into play.
Coming up is the second half of this series on the art of caricature. The lessons will cover more advanced caricature techniques. There will be exercises on how to push your exaggerations, how to be a better observer, how to solve difficult faces and even how to improve your style of drawing in general.
85 notes
·
View notes
Text
Character Design Lesson
Assignments I’ve found online:
From Cedric’s Blog-O-Rama
Lesson 1: Fat Joe
You are to design a concept sketch of Fat Joe based on the play, The Long Voyage Home. Take it as far as you like.
Description:
SCENE—The bar of a low dive on the London water front—a squalid, dingy room dimly lighted by kerosene lamps placed in brackets on the walls At the far end of the bar stands Fat Joe, the proprietor, a gross bulk of a man with an enormous stomach. His face is red and bloated, his little piggish eyes being almost concealed by rolls of fat. The thick fingers of his big hands are loaded with cheap rings and a gold watch chain of cable-like proportions stretches across his checked waistcoat.
Lesson 2: Silhouettes
Our assignment was to take Dr. Jeckyll and Mr. Hyde, and fill a page with little thumbnail silhouettes. We were told to play with shapes, trying to find a simple and clear design for the character. The good thing about doing fast little thumbnails is it forces you to think in broad, general terms and not get hung up on the details. When you are just concerned with the overall shape, your thought process can flow and brainstorm. The goal isn’t to do terrific sketches, its to get a lot of ideas onto the paper so that later you can develop the best ones. It’s a great exercise and I highly recommend it. In the future I hope to make it part of my process when designing characters for clients projects.
Lesson 3: Portrait Study
We were given photos of four different men. First, we had to do a straight-forward sketch of the person, not really pushing the shapes or getting too cartoony. Just do a standard portrait. Then, after finishing the portrait sketch, immediately put it away and get rid of the photo. From memory, draw the person again using three different shapes: a circle, a square, and a triangle.
The goal was not to do a dead-on likeness and squeeze it into the shape, because that would be almost impossible. Rather, we were to take the features that defined that person (i.e. eyes wide apart, big chin, small pointy nose, whatever) and play with those features within the shapes to create three new characters.
Lesson 4: Jekyll and Hyde
Last week we were told to choose one of two stories (Dr. Jeckyll and Mr. Hyde, or Oliver Twist), and start thinking about designs for the main characters. Our first step was to fill up at least one page with thumbnail silhouettes of possible designs, thinking about what we could say about the character with just the overall shape. Stephen then critiqued our thumbnails and told us which ones were the strongest. As the course progresses, we will continue to develop our character(s).
Lesson 5: Hand-y Drawing Exercise
Part 1 was to sketch a page of hands.
Next to the face, the hands are the most expressive part of the body, and therefore one of the most important features in any drawing. Its easy to get lazy with the hands, because they can be so stinkin’ hard to draw. I think there are two reasons so many artists struggle:
1. Hands are incredibly complex. I think there’s something like 27 bones in the hand and 15 joints, not to mention all the little muscles, tendons, etc.
2. Hands are always moving, and they can move a zillion different ways. There is no “standard” hand pose.
Stephen spent a significant portion of his video lecture analyzing the hand and pointing out how to break it down into manageable parts to make it easier to draw. Then he told us to go draw a page of hands, using either our own hands or photos for reference.
Lesson 6: Jekyll and Hyde Clean-Up
Our assignment was to choose one design from our “Jeckyll and Hyde” work and ink it up. Inking is not my strong point, especially digital inking on the Cintiq. The Cintiq is superbly fabulous and awesome….except when it comes to inking. I just can’t seem to get the same line quality that I could on paper, which makes my lines look even more mediocre than they normally would be. Maybe I just need to practice it more.
As part of the class, Stephen gives each student one-on-one feedback on their assignments via internet video. Here’s some pointers he’s given me on my assignments, which I tried to incorporate into this final design:
• Watch out for “parallels” (lines and/or shapes in the design that run parallel to each other).
• Push your shapes more. Use more extreme angles, greater size contrasts, broader curves, etc.
• Work on thinking through the understructure of the drawing (especially in your legs and hands). Don’t just use blobby shapes, make sure there is a real skeleton with real muscles underneath.
• Keep your sizes/proportions consistent (i.e. both hands the same size, both arms the same length, etc.)
• Let your design “breathe”. Pull your arms and legs out and away from the body for clearer poses. Spread out your facial features more (I tend to bunch them up a bit).
Lesson 7: Turnarounds
This week’s assignment was to do rough turnarounds of our character.
In animation, once a character design is approved the next step is to create “turnaround” drawings. The purpose is to make sure the storybaord artists, animators, and/or computer modellers can re-create the character accurately. Turnarounds are a tedious but essential part of any character designer’s job. For major characters, there are generally four to five drawings that need to be done: Front View, 3/4 Front View, Side View, 3/4 Back View, and/or Back View. For minor characters, usually only a Front 3/4 View and a Back 3/4 View are needed.
Turnarounds can be quite challenging. It’s relatively easy to do just one drawing of a character. But drawing the same character from other angles can complicate things. The most common difficulty for the artist is making sure that the character looks appealing and consistent from all angles. Easier said than done.
Turnarounds will also reveal any flaws or weakneses in the design. You may sketch a character that looks great from the side view, but draw him again from the front view and he may suddenly flatten out and get boring.
A good designer must also think about functionality. In animation a character can have crazy proportions, but he/she must still be able to act expressively and perform common tasks. For example, did you know Charlie Brown can only touch his nose if you look at him from the front? If you look at him from the side, his arms are too short to reach around his big head.
The best way to do turnarounds is to start with a 3/4 view and then spin him around in your mind to get the other views.
Lesson 8: Attitudes and Expressions
This week’s lesson was all about model sheets, specifically attitudes and expressions.
A “model sheet” is a page of drawings that animators and storyboard artists will use as a guide when animating a character. A good model sheet will give a sense of both the personality of the character (i.e. how does he react to certain situations?) and the physicality of the character (i.e. how does he walk, move, etc.).
Our assignment was to create a model sheet for our character, consisting of two parts:
1. Six standard expressions (anger, surprise, sadness, happiness, fear, and disgust);
2. Two full-body attitude drawings, which could be whatever we wanted. The only rule was that they give a sense of the character’s personality and/or response to a given situation. I chose to depict Dr. Jeckyll before and after drinking the potion that transforms him into a big, ugly, hulking monster.
Lesson 9: The Importance of Sketchbooks
We had to go to a busy public place and fill a page with observational sketches. The Mall of America is near my house, so I went there to sketch the above page.
I can’t over-emphasize the importance of keeping a daily sketchbook. The only way to get better at drawing is to draw. As Stephen likes to say, “A page a day keeps the competition away”.
A sketchbook isn’t for polished drawings. Rather, it’s a private place where you can stay loose, experiment, stretch yourself, and make mistakes. Lots of them! (Mistakes are the best teachers). If you want to keep growing as an artist, the worst thing you can do is fill your sketchbook with things you already know how to draw.
Going to a busy place to draw real live people is something you should do regularly. (Stephen fills a page every day over his lunch hour). Most people don’t sit still for very long, so it forces you to stay loose, think fast and make bold decisions, which over time will increase your confidence. Don’t sweat the details; focus on the essence of a pose (which can usually be captured in just a few lines). Try to capture the overall physical attitude of the person, which is the foundation that breathes life into a drawing. You can always go back and flesh out the details later.
In his lecture, Stephen talked about what a character designer should focus on as he sketches the people around him (i.e. balance, gesture, line of action, negative space, rhythm, attitude, etc.) He also talked about not just seeing, but studying what you draw. Observe the different ways people walk, talk, and gesture. Notice body types, hairstyles, and clothing choices. Study how fabric clings and hangs around the body, how people position their legs when they sit, how they lean when they carry things, how their posture changes with their attitude (i.e. excited, bored, annoyed, etc.) These are the things that give your drawings personality and character.
Stephen also talked about “frankensteining”, that is, assembling parts of several people into one character. You might start to draw a man reading the paper, but as soon as you rough in his body pose he gets up to leave. Don’t abandon your drawing. Add the profile from another person, maybe the hair from a third person, etc. Frankensteining keeps you from getting frustrted when your models keep moving (or leaving) in mid-drawing, and you might be pleasantly surprised at the new character you’ve created.
The point is that you keep drawing, keep experimenting, keep learning.
Lesson 10: Memory Sketching
“Memory sketching” is an exercise designed to strengthen your observation muscles. It works like this:
Go to a place where there are a lot of people (i.e. a mall, airport, coffee shop, etc.). Choose someone in the crowd to draw. Before you pick up your pencil, spend a few moments studying everything about them (their clothing, their posture, their face, the way they do their hair, their height….everything). Don’t look at them for longer than one or two minutes. If they haven’t walked away by then, turn and face the other direction.
Now, close your eyes and continue to study them in your mind. Analyze as much as you can remember. What was that hairstyle again? How far apart were the eyes? What color were the shoes? What was with that funny walk? (Don’t peek. It will completely destroy the purpose of the exercise.)
Finally, when you’ve got your target burned into your brain and you’ve thought everything through, THEN pick up your pencil to draw. And again, no peeking.
Lesson 11: Fat Joe
Our very first assignment was to design a character based on Fat Joe from the play The Long Voyage Home. We were given this description:
SCENE—The bar of a low dive on the London water front—a squalid, dingy room dimly lighted by kerosene lamps placed in brackets on the walls At the far end of the bar stands Fat Joe, the proprietor, a gross bulk of a man with an enormous stomach. His face is red and bloated, his little piggish eyes being almost concealed by rolls of fat. The thick fingers of his big hands are loaded with cheap rings and a gold watch chain of cable-like proportions stretches across his checked waistcoat.
Now, nine weeks later, we were asked to return to that assignment and do it again, this time with clean-up and color. Since this was our last class, it was a chance to apply everything we’d learned.
0 notes
Last Seen Blogs

johnconnell0
John Connell

letsace5
UNDER COVER

rudraksha-ratna1-blog
Rudraksha Ratna- Living Enlightenment
karenfordonte
Caring For Donte

racheljhaydentx
Digital Marketing By Rachel