#fetchapi
Explore tagged Tumblr posts
Visit Tumblr Blog
Explore Tumblr blogs with no restrictions, modern design and the best experience.
Last Seen Tumblr Blogs


Fun Fact
1,644 Tumblr posts in 1 second.
Text
🔥 Fetch API vs. Axios: A Developer’s Guide 🔥
If you’ve ever made HTTP requests in JavaScript, you’ve probably debated between Fetch API and Axios. Both are powerful, but they handle requests differently.
✨ Fetch API – Built into modern browsers, lightweight, and requires manual JSON parsing. ⚡ Axios – Feature-rich, automatically handles JSON, supports request cancelation & interceptors.
📌 Which one should you use? ✔️ If you want a lightweight, native solution, go for Fetch API. ✔️ If you need better error handling, progress tracking, and browser support, Axios is the winner!
🔗 Read the full comparison here: https://techronixz.com/blogs/fetch-api-vs-axios-comparison
Which one do you use in your projects? Let’s chat in the comments! 🛠️💬
0 notes
Text
How to send data from front-end to back-end using Node JS and fetch API

How to send data from front-end to back-end with Node JS?
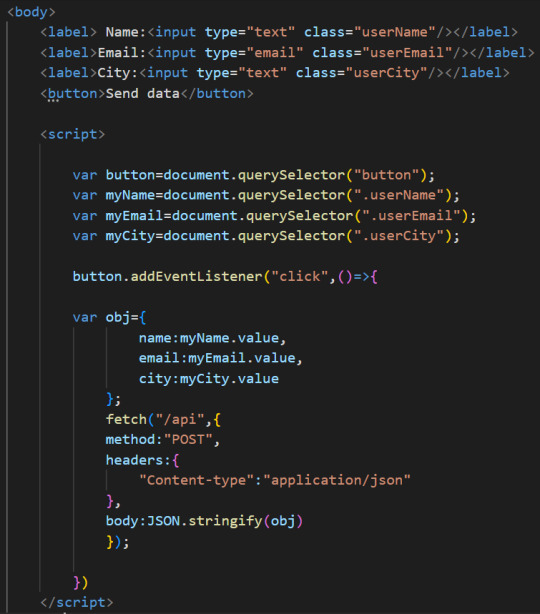
1)-Step 1: Create the HTML file
First, let's create an HTML file named index.html.
Inside this file we'll add 3 input areas: One for the name, one for the email and one for the city and we'll give each of the inputs a class.
Once created we will add some style to the 3 inputs to make them aligned vertically.
Finally we'll add a button to send data at the click of the button.
So the index HTML file will look like this:

And on the browser it will look like this:

2)-Step 2: Specify where to send the data
Now that we have created the HTML file with the inputs in it, it is time to tell the browser where to send the data once the user fills in the inputs.
In other words, let's say I'm the user and I will add my name, my email and my city. So once I add these elements and click on the "send data" button, where will the browser send the data?
To do that we'll add what we call routing. The routing is simply the route the browser will send the data to.
And we can choose any route we want. For example here, I will tell the browser to send data to the /api URL. We can tell the browser to send data to any URL we want, /soccer for example or /basketball or /nature.... Choose any name you want it does not matter.
To do that first let's select our input elements one by one and our button in JavaScript. So we'll add a script tag with the following code:
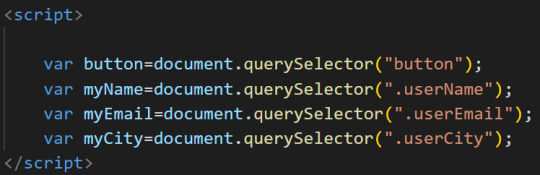
Then, let's add the routing or the URL we talked about and which is /api. So how to add it?
Simply by adding the fetch() syntax.
So the code will be:
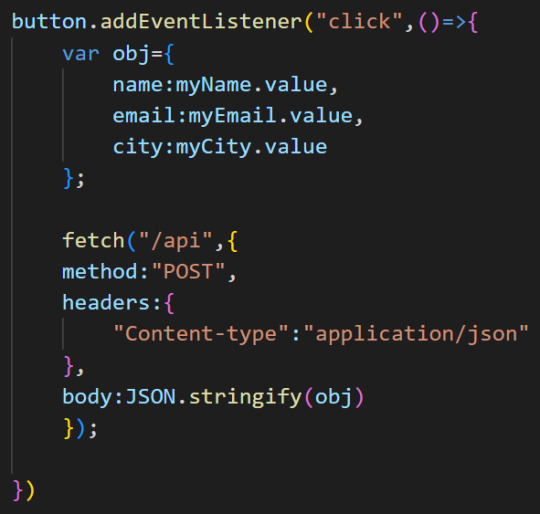
Let's take a closer look at the code.
the first line which is button.addEventlistener("click",()=>{}) tells the browser that at the click of the button, I want you to execute this instruction.
"button" is the element we selected before, "addEventListener" is here to add the event on which the button should behave once triggered, "click" is the type of event we want the button to listen to.
After that we created a variable which is obj because this variable will contain an object. This object is made of:
The name of the user
The email of the user
The city of the user
To access the name or the email or the city of the user we have to access the value of the input element. Hence the syntax myName.value. "myName" is the input we selected and "value" is the value of the input.
So whenever we click the button, we want to create a variable that will contain the value of the inputs.
And then comes the fetch() syntax.
The fetch() method takes 2 arguments: the 1st argument is the URL where to send the data, and we said that the URL is /api. And the second argument is object made of:
The method to be used to send the data, in this case we'll use the "POST" method.
The headers that determine the type of content that will be sent to the backend. So here we have an HTML content, but this HTML is transformed into JSON as the fetch API understands JSON and XML format only.
The body, which in other words mean the data. When sending data to the server, the data has to be string. JSON.stringify() syntax converts the object to be sent to the backend into a string.
So the code in the HTML file becomes:
3)- Step 3: Create the .js file
To read more and access the entire tutorial visit my blog below:
https://purpose-code.com/fetch-api-send-data-from-front-end-to-back-end/
#fetch#fetchapi#nodejs#javascript#backend#frontend#html website#htmlandcss#html5 css3#html5#css#learn css
1 note
·
View note
Link
How to fetch data from an API using fetch() method in React Js?
Now a day, we can't imagine web application without API so one of basic the requirement of any web application is to communicate with servers through HTTP protocol. This can be easily done using Fetch and Axios.
In this post, we are mainly focusing on Fetch. The Fetch API provides a fetch() method defined on the window object. The fetch method has one mandatory argument i.e., URL of the resource to be fetched. This method returns promise object that can be used to retrieve response of the request.
#reactjs#axios#fetch#api#fetchapi#httpprotocol#redux#web#webapp#html#css#vikasprgoramming#programming#ui#uidesign#uiux#ui development#xstate#javascript#javascript framework#bootstrap#tailwind
1 note
·
View note
Text
Fetch API bug: can't GET or SET multiple Set-Cookie Headers

Fetch is a new native JavaScript API that provides an interface for fetching resources (including across the network): according to Google Developers Documentation, "Fetch makes it easier to make web requests and handle responses than with the older XMLHttpRequest", thus applying to be the spiritual successor of the XHR-based approach (widely used by JQuery and the likes). As a matter of fact, Fetch API has been designed to be very familiar to anyone who has used XMLHttpRequest, while providing a more powerful and flexible feature set. The new API provides a generic definition of Request and Response objects, as well as other interface involved with network requests: such approach allow them to be used wherever they are needed in the future, whether it’s for service workers, Cache API, and other similar things that handle or modify requests and responses, or any kind of use case that might require you to generate your responses programmatically. It also defines related concepts such as Cross-Origin Resource Sharing (CORS) and the HTTP Origin header semantics, supplanting their separate definitions elsewhere. I've personally used Fetch API in most of my latest JavaScript projects, such as CORSflare - a pure JS Proxy specifically designed to overcome CORS-related and SameOrigin-based issues: however, today I've stumbled upon a major bug that, for the first time, led me to doubt that such interface is mature enough for production usage. Read the full article
0 notes
Link
#blog#CanliRadyo#HTTP#isteği#Javascript'te#Javascript'tenasılHTTPisteğiyapabilirim?#makale#nasıl#yapabilirim?
0 notes
Video
youtube
Aula 80 - Loja Online - Atualização Ajax CSRF Token
https://www.codigofluente.com.br/aula-80-loja-online-atualizacao-ajax-csrf-token/
Oi pessoal!
Se você está sempre em busca de atualizar suas habilidades em desenvolvimento web, temos uma notícia imperdível para você!
Acabamos de lançar a Aula 80 - Loja Online - Atualização Ajax CSRF Token, um tutorial fundamental para qualquer desenvolvedor web que trabalhe com Django Framework.
Nesta aula, você aprenderá como atualizar o código antigo de anexação do CSRF Token em requisições Ajax para a nova forma utilizada pelo Django, usando a função fetch().
Isso é crucial para manter seu site seguro e proteger suas requisições Ajax contra ataques CSRF.
Na Aula 80, você aprenderá como implementar essa atualização em sua própria loja online, passo a passo, com exemplos práticos e explicações detalhadas de cada etapa do processo.
Não importa se você é um especialista em segurança web ou um iniciante em Django - este tutorial é fácil de seguir e vai ajudá-lo a aprimorar suas habilidades de desenvolvimento web.
Não perca tempo e comece a aprender agora mesmo! Acesse nosso site para conferir a Aula 80 - Loja Online - Atualização Ajax CSRF Token e comece a atualizar suas habilidades de desenvolvimento web.
#django #webdevelopment #onlinestore #ajax #security #csrf #fetchapi"
0 notes
Text
Fetching latest tweets containing "global warming" and "bitcoin" using NodeJS/FetchAPI and the Twitter API
took me long to get there, but I learned a lot
0 notes
Link
アドビ、2020年末でFlashのサポートを終了と発表 (TechCrunch)
Google Chrome安定版がv60に到達 - デベロッパーツールなど開発者向け機能を強化 (窓の杜)
Firefox、1691個のタブを15秒で開く高速処理 (CNET)
電子書籍:IoTエンジニア養成読本 (Kindle版)
使用に注意!UXを低下させてしまうかもしれない2017年のウェブデザイントレンド (フェレット)
ヒーローイメージで印象を大きく変える10のデザイン事例 (TechAcademy)
ワイヤーを制作する時に必ず役に立つまとめ「10 Free & Latest Wireframe Tools and Templates」 (DesignDevelop)
Q&A 文章のトーン&マナーや文章構造で気をつけていること (could)
JSが苦手なウェブデザイナーこそ活用したい、Bootstrapのモーダルをマスター (WPJ)
���ンプルに作られた超軽量なWYSIWYGエディター「PELL」 (かちびと)
はてなブログを自分で出来る範疇で高速化してみる (Webサイトパフォーマンスについて)
カスタムエラークラスを定義して、FetchAPIのエラーハンドリングをする (tanakaworld | Qiita)
Sass: SCSSの基本的な書き方 (Fumio Nonaka)
0 notes
Text
Javascript'te nasıl HTTP isteği yapabilirim?

Javascript'te nasıl HTTP isteği yapabilirim? fetch() işlev veya XMLHttpRequestjavascriptKodu kopyalaÜretmeyi durdurfetch()bir HTTP GET isteği yapmak için nasıl kullanılacağına dair bir örnek: javascriptKodu kopyala fetch('https://example.com/api/data') .then(response => response.json()) .then(data => console.log(data)) .catch(error => console.error(error)); Buhttps://example.com/api/datahttps://example.comthen() yöntem şu şekildedircatch() bir hata varsa yöntem çağrılır. Alternatif olarak, XMLHttpRequestnesneyi yapmak için kullanabilirsiniz javascriptKodu kopyala const xhr = new XMLHttpRequest(); xhr.open('GET', 'https://example.com/api/data'); xhr.responseType = 'json'; xhr.onload = function() { console.log(xhr.response); }; xhr.onerror = function() { console.error('Error making request.'); }; xhr.send(); Bu kodhttps://example.com/api/data ve bir JSON yanıtı bekliyor. onload()Yanıt alındığında işlev çağrılır,onerror() bir hata varsa işlev çağrılır. Yanıt kullanılarak erişilirresponse XMLHttpRequestnesnenin özelliği. XMLHttpRequest nesne veya daha yeni fetchAPI. İşte her yöntemi kullanarak basit bir GET isteğinin nasıl yapılacağına dair bir örnek: Xmlhttprequest'i kullanma: javascriptKodu kopyala const xhr = new XMLHttpRequest(); xhr.open('GET', 'https://jsonplaceholder.typicode.com/posts/1'); xhr.onload = function() { if (xhr.status === 200) { console.log(xhr.responseText); } else { console.error('Request failed. Returned status of ' + xhr.status); } }; xhr.send(); Getirme özelliğini kullanma: javascriptKodu kopyala fetch('https://jsonplaceholder.typicode.com/posts/1') .then(response => { if (!response.ok) { throw new Error('Request failed.'); } return response.json(); }) .then(data => { console.log(data); }) .catch(error => { console.error(error); }); Her iki yöntem de eşzamansızdır, bu nedenle şunları yapmanız gerekirXMLHttpRequest yöntemonload, olay işleyicisini şu şekilde ayarlamanızı gerektirirfetch yöntem, zincirleyebileceğiniz bir Söz döndürürthencatch yanıt veya hataları sırasıyla işleme yöntemleri. Read the full article
0 notes