#fix wp rocket install error
Explore tagged Tumblr posts
Visit Tumblr Blog
Explore Tumblr blogs with no restrictions, modern design and the best experience.
Last Seen Tumblr Blogs


Fun Fact
In Q3 of 2020, 31% of US users access the Tumblr app daily.
Text
10 Easy SEO Tips for WordPress Beginners (That Actually Work in 2025)
So, you’ve launched your WordPress site and you’re wondering… “How do I get more traffic from Google?”
The answer? Search Engine Optimization (SEO). But don’t worry you don’t need to be an expert to start seeing results.
Whether you’re a blogger, small business owner, or running an online store, these 10 beginner-friendly SEO tips will help boost your visibility on Google in 2025.
And yes, we'll also show you how using the right WordPress theme (like those from WPElemento) can make a huge difference.
1. Choose the Right SEO Keywords
Before you create content, know what your audience is searching for.
Tools to try:
Ubersuggest (free & beginner-friendly)
Google Keyword Planner
Ahrefs Free Keyword Generator
👉 Look for long-tail keywords like:
“best WordPress themes for small business”
“how to improve WordPress site speed”
“affordable SEO tools for beginners”
Pro Tip: Focus on keywords with low competition and high intent.
2. Install an SEO Plugin
This is a must for WordPress beginners.
The two best free plugins are:
Yoast SEO
Rank Math
These tools help you:
Optimize title tags and meta descriptions
Create XML sitemaps
Manage canonical URLs
Improve content readability
3. Use a Fast, SEO-Friendly WordPress Theme
Your theme affects your site’s speed, code structure, mobile usability all ranking factors.
🎯 Recommended: WPElemento WordPress Theme Bundle
This bundle includes dozens of responsive, fast-loading themes across niches like:
Business
eCommerce
Education
Photography
Non-profits
All WPElemento themes are:
Built with clean code
Elementor-compatible
Mobile-optimized
Designed for SEO success
4. Optimize Your Site Speed
Google loves fast websites. So do your visitors.
Quick ways to boost speed:
Use a caching plugin (like WP Rocket or W3 Total Cache)
Compress images with ShortPixel or TinyPNG
Choose a fast web host
Minimize external scripts
🛠️ Already using a bloated theme? Switch to one from the WPElemento bundle to improve load times.
5. Write Quality, Human-Friendly Content
Forget stuffing keywords. In 2025, Google prefers content that helps real people.
✍️ Writing Tips:
Use headings (H1, H2, H3) to structure content
Answer questions directly
Keep paragraphs short and readable
Add visuals: images, infographics, and videos
Use internal links to your other pages
6. Make Your Site Mobile-Friendly
With over 60% of traffic coming from mobile, your site must be responsive.
How to check?
Use Google’s Mobile-Friendly Test
Preview your site on various screen sizes
💡 Good news: Every WPElemento theme is mobile-optimized out of the box.
7. Use SEO-Friendly URLs
Keep your URLs short, descriptive, and keyword-rich.
❌ Example of a bad URL: yourwebsite.com/page?id=37482
✅ Example of a good URL: yourwebsite.com/seo-tips-for-wordpress
To fix this:
Go to Settings → Permalinks in WordPress
Choose “Post name” as your default structure
8. Add Alt Text to All Images
Alt text helps Google understand your images. It’s also important for accessibility.
When uploading an image:
Add a short, keyword-rich description in the "Alt Text" field
Keep it relevant (don’t keyword stuff)
Example: Alt text: “Business website WordPress theme by WPElemento”
9. Submit Your Site to Google Search Console
If you want to appear in Google, let them know you exist!
Head over to Google Search Console, add your site, and:
Submit your sitemap (created by Yoast or RankMath)
Monitor which keywords bring traffic
Fix crawl errors
It’s free and gives you real data on how Google sees your site.
10. Keep Updating and Improving
SEO isn’t one-and-done. Keep your site fresh by:
Updating outdated posts
Fixing broken links
Adding new content regularly
Upgrading to better-performing themes (again, check WPElemento)
Final Thoughts
SEO may sound technical, but the basics are simple:
Choose good keywords
Write helpful content
Optimize your speed and design
Stay mobile-friendly
Use the right tools (and the right theme)
Start with the foundation: your WordPress theme. Explore the full range of fast, SEO-ready options in the WPElemento WordPress Theme Bundle and give your website a real edge in 2025.
0 notes
Text
youtube
How to fix Briefly unavailable for scheduled maintenance, please check back in a minute error in wordpress 20025 ?
The "Briefly unavailable for scheduled maintenance. Please check back in a minute." error in WordPress usually occurs when an update is interrupted or incomplete. Here's how to fix it:
1. Delete the .maintenance File
WordPress creates a temporary .maintenance file in the root directory during updates. If the update fails or gets stuck, this file isn't removed, causing the error.
Steps to Fix:
Access Your Website via FTP or File Manager
Use an FTP client like FileZilla or log in to your cPanel and open the File Manager.
Locate the Root Directory
Navigate to the public_html or the folder where your WordPress site is installed.
Find and Delete the .maintenance File
If you don’t see the file, enable "Show Hidden Files" in your file manager settings.
Reload Your Website
Your site should be back online.
2. Manually Complete or Restart the Update
If the issue persists, your update may not have finished properly.
Steps to Fix:
Go to the wp-content/upgrade Folder
Delete any files inside this folder.
Manually Update WordPress, Themes, or Plugins
If a plugin or theme update was interrupted, go to your WordPress Dashboard > Plugins or Appearance > Themes and retry the update.
3. Disable Plugins (If the Error Persists)
If your site still shows the error:
Rename the plugins Folder via FTP
Go to wp-content/ and rename the plugins folder to plugins-old.
Check if your site loads. If it does, a plugin caused the issue.
Rename the folder back and activate plugins one by one to find the culprit.
4. Check File Permissions
Incorrect file permissions can cause WordPress to fail during updates.
Correct Permissions:
Files: 644
Folders: 755
You can adjust these via your File Manager or an FTP client.
5. Increase PHP Memory Limit (If Updates Are Failing)
If the update was interrupted due to low memory:
Edit wp-config.php
Add the following line:phpCopyEditdefine('WP_MEMORY_LIMIT', '256M');
Save the file and try reloading the website.
Final Step: Clear Cache
If your website is still showing the maintenance message after following the above steps:
Clear your browser cache and WordPress cache (if using a caching plugin like WP Rocket or W3 Total Cache).
0 notes
Text
How to fix wp rocket plugin installation error in CPanel
How to fix wp rocket plugin installation error in CPanel
How to fix wp rocket plugin installation error in CPanel ▶️ DON’T CLICK THIS LINK: https://bit.ly/3bEWPsx ▶️ Other videos: • How to Get More Followers on TikTok: https://youtu.be/OdaFkbRG-xQ • How to Add Website on CLOUDFLARE: https://youtu.be/3cF_8dFgpbY • How To Check MTN Phone Number in 3 Simple Ways Using USSD Code: https://youtu.be/4LpJBK4q9Ng • How to limit crawl rate in Google Search…

View On WordPress
#fix php parse error syntax error unexpected#fix wp rocket install error#how to fix wp rocket plugin installation error in cpanel#ktm#parse error#parse error syntax error unexpected#plugin parse error#plugin parse errors#syntax error#update failed plugin wordpress#wordpress plugin#wordpress tutorial#wp#wp plugin install error#wp rocket#wp rocket parse errors#wp rocket plugin parse error#wp rocket settings#wp rocket wordpress plugin#wprocket plugin install error
0 notes
Text
How to use S G Optimizer plugin in wordpress
If you’re looking for the SiteGround SG Optimizer plugin review, you have landed on the right page.
SG Optimizer is a custom caching and performance improvement plugin for WordPress users developed by SiteGround.
This plugin will help you speed up WordPress site within just a few clicks and achieve better scores in Google PageSpeed Insights and GTMetrix.
Recently, the SiteGround team added many features to the SG Optimizer Plugin, including frontend optimization, media optimization, and server environment optimization.
With these changes, it’s now one of the best caching plugins for WordPress users, especially SiteGround customers.
In this article, I have reviewed the SG Optimizer plugin and shared the best settings to achieve better performance.
Table of Contents
SG Optimizer Plugin Review
I used SuccessPixel.com to evaluate the SG Optimizer plugin’s performance, instead of setting a demo site because this site is already hosted on SiteGround hosting.
Currently, I’m using the SiteGround GrowBig plan with GeneratePress Premium and 15 WordPress plugins.
So you can see the real-life performance of SG Optimizer and how it stands against the top caching plugins such as WP Rocket.
SG Optimizer Performance Test
I analyzed the page speed of SuccessPixel.com before and after installing the SG Optimizer plugin, and the results are shocking.
➤ Before
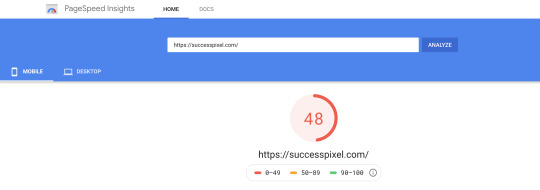
GPSI Mobile Score Before Installing SiteGround SG Optimizer
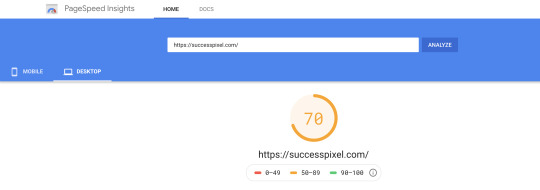
GPSI Desktop Score Before Installing SiteGround SG Optimizer
GTMetrix Score Before Installing SiteGround SG Optimizer
➤ After
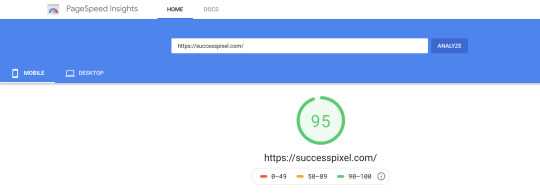
GPSI Mobile Performance Score After Installing SG Optimizer
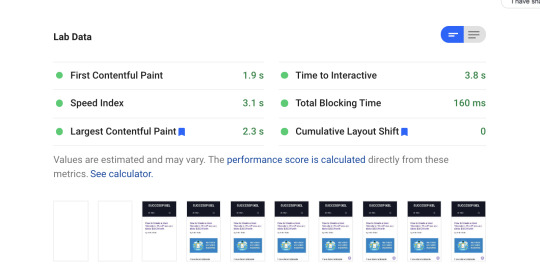
GPSI Mobile Performance Lab Data After Installing SG Optimizer
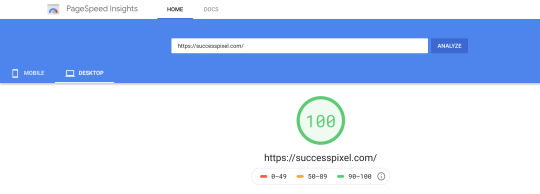
GPSI Desktop Performance Score After Installing SG Optimizer
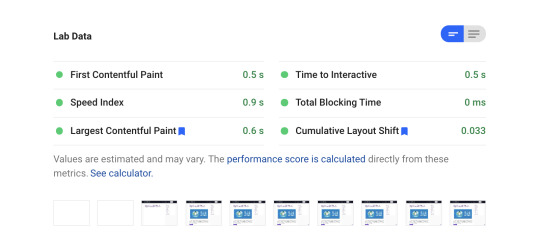
GPSI Desktop Performance Lab Data After Installing SG Optimizer
GTMetrix Score After Installing SiteGround SG Optimizer
You can see a clear difference in the website performance after adding SG Optimizer to my site.
The Best Settings for SG Optimizer Plugin
To ensure the fastest site speed and best user experience, you need to enable a few options in the SG Optimizer plugin.
Don’t worry!
Setting up the SG Optimizer plugin is quite simple.
You just need to toggle the options under each tab to activate the specific modules.
Let’s see how to do that and speed up your WordPress site.
1. SuperCacher Settings
SuperCacher is a custom caching solution developed by SiteGround.
Enabling the SuperCacher improves the site speed and also handles more hits.
SiteGround offers three different levels of caching:
NGINX Direct Delivery
Dynamic Cache
Memcached
The SiteGround Startup plan users can access only the SuperCacher level 1.
However, the GrowBig and GoGeek plan users can access all three levels of SuperCacher.
SiteGround claims that a website using all three levels of SuperCacher can handle 100x more hits than a regular site without a caching mechanism.
If you haven’t a SiteGround user yet, I recommend you to pick either GrowBig or GoGeek plan.Buy SiteGround WordPress Hosting
Now, let’s discuss the best SuperCacher settings for your site.
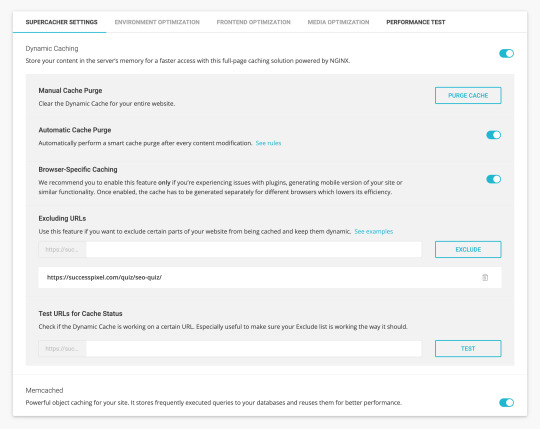
SG Optimizer SuperCacher Settings
Please note that the SuperCacher Level 1, i.e., NGINX Direct Delivery is available on all SiteGround WordPress hosting plans.
With NGINX Direct Delivery SiteGround serves most of the static resources, including images, JS, and CSS on your website directly through NGINX to achieve the fastest page speed possible.
You can enable this option by visiting your SiteGround account and navigating to the Site Tools > Speed > Caching.
The Dynamic Caching and Memcached options are available in the SiteGround account as well as under SG Optimizer SuperCacher Settings.
The dynamic caching is a full-page caching solution powered by NGINX that stores your content in the server’s memory for faster access.
Memcached is an advanced object caching solution that stores frequently executed queries to the databases and reuses them to achieve better performance.
I recommend you to get the benefit of both caching solutions to improve your page loading speed.
2. Environment Optimization
The Server Environment Optimization tab helps you configure various options to ensure the best performance.
➤ Enable HTTPS
This option helps you enable a proper HTTPS configuration and forces a secure connection to the site.

SG Optimizer Enable HTTPS
You can also fix the insecure content errors by rewriting the insecure requests for resources.
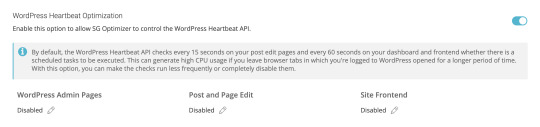
➤ WordPress Heartbeat Optimization
Enabling this option allows the SiteGround SG Optimizer to control WordPress Heartbeat API.
The WordPress Heartbeat API checks for the page edits every 15 seconds or scheduled tasks after every 60 seconds.
Such activities generate high CPU usage when you are logged into the WordPress admin panel or have multiple tabs open for a longer period.
The SG Optimizer WordPress Heartbeat Optimization option allows you to run these checks less frequently or disable them.
SG Optimizer WordPress Heartbeat Optimization
➤ DNS Pre-fetch for External Domains
DNS pre-fetching for external domains saves DNS lookup time for resources loaded from these domains.
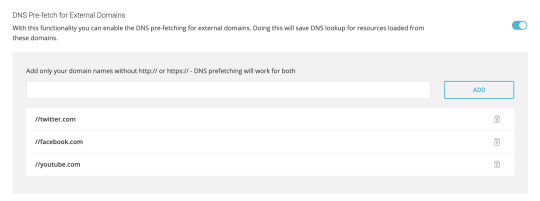
SG Optimizer DNS Pre-fetch for External Domains
If you embed tweets, YouTube videos, Vimeo videos, Facebook Like Box, Amazon affiliate links, or any content that requires external resources to be fetched to render a web page, add these domains under the DNS pre-fetch option without HTTP:// or HTTPS://.
➤ Scheduled Database Maintenance
Enabling the Scheduled Database Maintenance option clean up your database to keep it small and optimized.
If you activate this option, SG Optimizer will execute the following tasks every 48 hours:

SG Optimizer Scheduled Database Maintenance
Perform Database Optimization for MyISAM tables.
Remove all page and post revisions.
Delete all automatically created post and page drafts.
Delete all posts and pages in your Trash permanently.
Delete all comments marked as Spam.
Delete all expired Transients.
You’ll find more options such as PHP Version Selector, Gzip Compression, and Browser Caching.
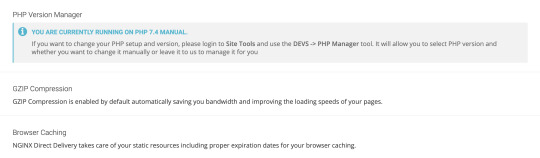
SG Optimizer PHP Version Manager Gzip Compression Browser Caching
By default, SiteGround offers the most stable PHP version and enables Gzip Compression & Browser Caching for every site to ensure the best server environment.
3. Frontend Optimization
This tab allows you to optimize the frontend code to ensure faster speed without compromising on mobile aesthetics.
Here are the best settings for SG Optimizer Frontend Optimization.
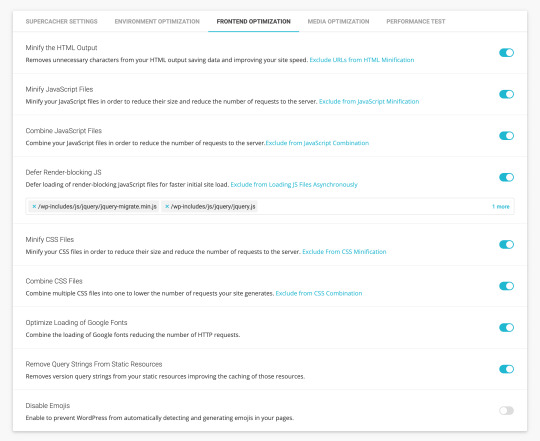
SG Optimizer Frontend Optimization
➤ Minify the HTML Output
This option removes unnecessary characters from the HTML output saving data and enabling faster site loading time.
➤ Minify JavaScript Files
This option helps in the minification of the JavaScript files to reduce their size and the number of requests to the server.
➤ Combine JavaScript Files
Combining the JavaScript files is another great way to reduce the number of requests to the webserver.
➤ Defer Render-blocking JS
You can defer the loading of non-critical render-blocking JavaScript files to ensure faster initial site load.
This way, users don’t need to wait for a long time before the page loads in their browser.
If you find any render-blocking JS file in the Google PageSpeed Insights report, include it under the box provided below the Defer Render-blocking JS option.
➤ Minify CSS Files
Minification of CSS files reduces their size and the number of requests to the server.
➤ Combine CSS Files
If CSS minification breaks your site’s layout, combine multiple CSS files into one file to lower the number of requests to the server.
➤ Optimize Loading of Google Fonts
Adding Google Fonts generate extra HTTP requests.
However, you can combine the loading of Google fonts, reducing the number of HTTP requests.
I recommend you to use system fonts or host Google Fonts locally to improve the website performance.
➤ Remove Query Strings From Static Resources
Enabling this option removes query strings from the static resources improving the caching of those resources.
You don’t need to edit the .htaccess file or install an additional plugin to get this functionality.
➤ Disable Emojis
Disabling emojis prevents WordPress from automatically detecting and creating emojis in your pages.
Since emojis are engaging elements, I suggest turning this option OFF.
4. Media Optimization
This tab allows you to optimize media content, including images and videos, with some advanced features.
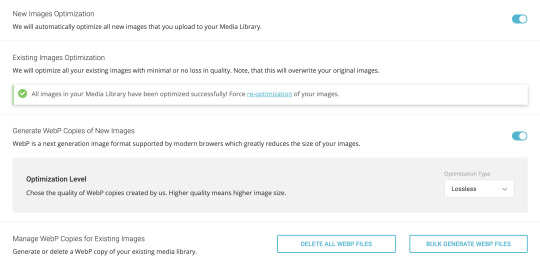
SG Optimizer Image Optimization
➤ New Images Optimization
SG Optimizer plugin automatically compresses all new images that you upload to the Media Library if this feature is turned ON.
As a result, your images consume less space and get downloaded faster when the client requests these images.
➤ Existing Images Optimization
Enabling this option optimizes all existing images on your website with minimal to no loss in quality.
Please note that this action will overwrite your original images.
➤ Generate WebP Copies of New Images
WebP is a next-generation image format with superior lossless and lossy compression. Most modern browsers, including Google Chrome and Safari support WebP.
You can create WebP copies of new images to reduce the image sizes served in the browser.
SG Optimizer allows you to choose the optimization type, i.e., lossless or lossy, depending on the desired image quality and page speed.
➤ Manage WebP Copies for Existing Images
This option allows you to generate or delete WebP copies of your existing media files in bulk.
➤ Lazy Load Media
Lazy loading is a major speed optimization technique that loads images and other media files only when they are needed to be visible in the browser.
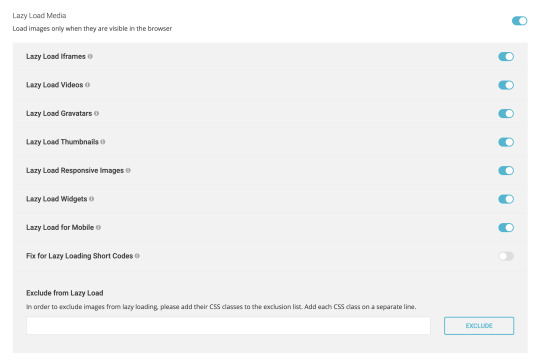
SG Optimizer Lazy Load Media
SG Optimizer plugin allows lazy loading for responsive images, videos, iframes, Gravatars, thumbnails, widgets, and mobile media library.
You can also fix lazy loading for short-codes or exclude images from the lazy load.
5. Performance Test
Once you have optimized your website using the SG Optimizer plugin, you can test its performance with a built-in tool powered by Google PageSpeed.
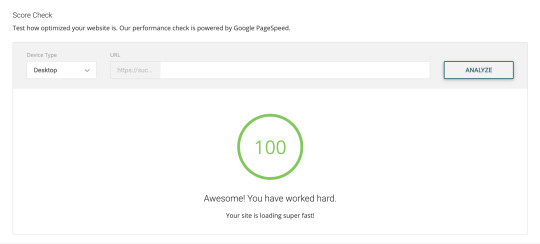
SG Optimizer Performance Score Check
You can analyze the homepage or any URL for desktop vs. mobile speed with this feature.
SG Optimizer vs WP Rocket vs Other Plugins
Adding SG Optimizer plugin to your WordPress site can eliminate a bunch of plugins, including WP Rocket, WP-Optimize, WP Super Cacher, and ShortPixel.
SG Optimizer offers an all-in-one solution for Caching, Environment Optimization, WordPress Heatbeat Optimization, DNS Pre-fetch, Image Optimization, Code Minification, and Frontend Optimization.
Plus, it’s available in the official WordPress plugin library for free of cost.
Non-techies may need to install multiple WordPress plugins to achieve the functionalities mentioned above.
While a few plugins are freely available across the web and in the WordPress plugin library, others come with premium fees.
Overall, SG Optimizer is the best WordPress caching and performance optimization plugin.
Since the SG Optimizer plugin is designed to work best with SiteGround servers, I recommend you to purchase SiteGround WordPress hosting to achieve the best possible performance.
The post How to use S G Optimizer plugin in wordpress appeared first on The Coding Bus.
from WordPress https://ift.tt/2EvbWrP via IFTTT
0 notes
Text
How to Set up W3 Total cache on Your WordPress Website?

Introduction to why you need caching
Caching is a useful technique that makes your website really fast and leads to better SEO scores and greater user satisfaction. Caching stores copies of your web content in your user’s computer memory so that it can be retrieved and displayed more effectively and quickly. Generally, websites are viewed hundreds of times a month. Each time the browser requests for the web page, there puts a lot of burden on the WordPress hosting server may take time in loading all js, CSS, images file requests along with HTML page. Each time the user requests a particular page, It will take a lot of time to load a complete page. To avoid this slow loading, we have a lot of popular WordPress cache plugins available in the market. By using the caching technique, there is no need to process each request separately, you can get the final result of your search, exactly. A proper cache setup will generate greater customer engagement and improve WordPress performance.
How to choose a WordPress caching plugin
When it comes to choosing a WordPress caching plugin, for your website, there is no“one size fits all” solution. If you like to choose the best and free WordPress caching plugin that does a great job, ultimately W3 Total cache is a super and versatile plugin. It is compatible with all types of browsers and benefits all website owners in caching the data. You need to check whether the plugin is updated continuously or not. Go through the rating and reviews and check how many users are using this plugin for their websites. The plugin that is updated regularly and has millions of downloads serves best in the market and for your websites. Apart from the free caching plugins, there are also premium plugins that offer tremendous support and require minimal configuration on your end, one such plugin is WP Rocket cache plugin.
Pre-requisites (things to know before setting up your cache WordPress website with the plugin):
Plugins are very important for the WordPress websites that website owners should opt for. They simply add extra functionality to your Wordpress sites to generate new heights. Before you need to install and activate the plugin for your WordPress website, you need to be aware of a few things, so as to make your website runs with more speed. Check for the plugins that skyrocket your page load time Also, check for the plugins that benefit you in terms of caching your website. Because your web visitors get bored and abandoned if they look at the slow loading pages. If the plugin is not coded well and takes more space on the server, it will increase the size of each webpage which in turn affects your page load performance. You can easily track the page load time by using the tool Pingdom, you can get detailed stats of increasing page load times, and know which plugins are performing well. Check the plugins if there is any malicious code inside Well, the WordPress.org team reviews each and every plugin before it is made available for download to the users of the website. Sometimes, the plugins contain malicious code, which affects your website performance to a great extent. You can get WordPress plugins on other websites also, but plugins from WordPress.org are more likely to be trusted. However, before downloading you need to check the creator of the plugin and the site on which it is hosted. Just purchase the plugins for the trusted author or vendor that comes with a proven track record and a number of positive reviews. Check whether the plugins are inactive state or not You need to check whether the plugins work with the current version of WordPress. Because outdated plugins are no longer compatible with the latest WordPress updates and put in risk. Every second of your downtime affects your website badly. On the right side of the wordpress.org download page of the plugin, there is a message that tells you whether the plugin is tested and compatible with the latest version of WordPress or not. Just pay attention to it and then do download the plugin. Check out a few different caching plugins On the wordpress.org we can find multiple plugins for the same functionality, all may not drive the same result. Some plugins work best for some websites and themes only. So you need to check with a few plugins of the same functionality, test and decide the plugin that you want to put on your website. Just do not settle on the one you find first. Check whether it benefits you or not Install the caching plugin and check whether it benefits your website performance and increase page load times. If not, try out some caching plugins in the market like WP Rocket Caching plugin.
Setting up W3 Total Cache plugin:
W3 Total Cache is a popular WordPress caching plugin. It improves your website performances, SEO and reduces load time by leveraging features like Content Delivery Network(CDN) integration and latest best practices. This plugin improves conversion rates and ranks your top on the search engines. Well, before setting up W3 Total Cache plugin for your WordPress website, you need to make sure to uninstall all other caching plugins. If you don't do this before installing the W3 Total cache plugin, you will face many issues upon activation. Here I will explain in detail, how to set up your Cache WordPress website with W3 Total Cache plugin. Go to your admin dashboard panel, and click on the Plugins>>Add New. Then search for the W3 Total cache plugin and you can see the results as shown below.

Click on the install button and activate the plugin.
Setting and Configuring W3 Total Cache Plugin:
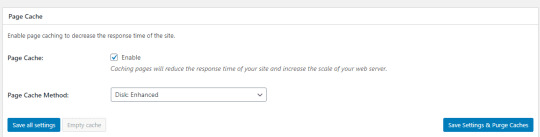
W3 Total Cache plugin is a very powerful plugin with tons of options and features to use. It will be very advantageous for those who know how to use them, it will be very advantageous. Now we will visit each of the options available in detail, so you can set the plugin for your website. Let's start with the general settings option General settings: Go to the general settings page by clicking on the performance menu button in your WordPress admin panel. You need to set up your plugin by configuring basic settings. Then you will see the general settings page tap, just click on it.
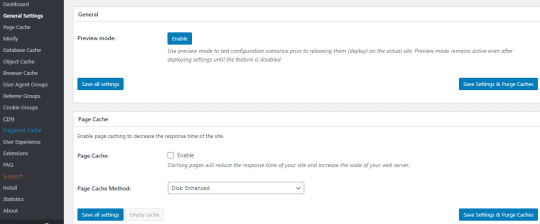
Page cache: In the general settings page, the first option you see is the page cache option. It is responsible for creating the static cache pages for each page that is loaded. You need to turn on your page cache so that it allows you to skip the server load and shows a cached copy page when the user requests it. Also, check with page cache method and select the disk: Enabled option because most of the beginners use it for their shared hosting and save all the settings. This is how all you do page cache for your WordPress websites.
Minification: Minification will reduce the file size of .js and .css files to your website code without affecting the original functionality. You need to minify your code to improve page loads and W 3 Total Cache plugin supports this minification feature. Disable the minify feature as shown in the image below.
Database Cache: Your database is where all your website data is stored, data can be pages or posts, images or anything else. Through database cache, you can improve your website database performances to a great extent. By enabling the database cache, your pages, posts and RSS feeds can be created in a few seconds itself. If you are on shared hosting, I recommend you to leave Database Cache disabled. Because on shared hosting a lot of burdens is put on the server, and finds difficult to fetch output when a user requests.

Object cache: object caching involves storing database queries so that the next time a piece of data is needed, it is delivered from the cache without having to query the database.

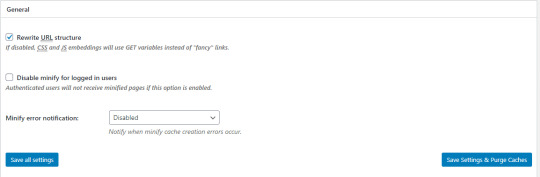
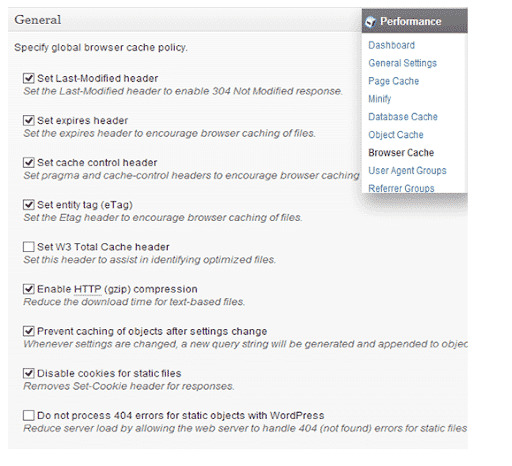
Browser cache: Browser Cache option in W 3 Total Cache plugin has already an expiry time. The browser caching option increases the expiry time so that content is stored in the user browser cache for a longer time period. Simply check the enable option under browser cache and click save all button. You can see in the above image that all the options are pretty much enabled, except the 404 error page. Just save all the settings on that page.
Content Delivery Network(CDN): CDN allows you to serve static content from multiple cloud servers rather than on one hosting server. This enables you to reduce the server load and increase the performance. You need to enable all the options and then click on the Save all settings button.

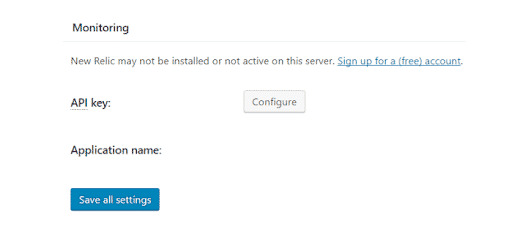
Monitoring: Monitoring is an option that is intended for improving website functionality and management of the site. It is an additional step to speed up your website performance and click on save all settings button.
Licensing: Every plugin with the licensing option can get strong support and plugin updates in future as well. If the software you are working with doesn’t have a license, it will work but you won't get benefits from the updates that might help in fixing bugs, and security.

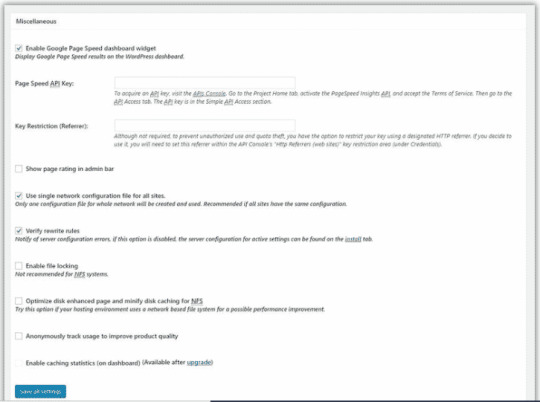
Miscellaneous: Miscellaneous covers a bunch of options. First, you need to enable Google page speed dashboard widget and which requires an API key. However enabling is optional, as you can test pages manually.
Additional tips
Using a cache plugin not only improves user experience but also gives you a tangible positive effect from the bottom line. You need to check whether the plugin is compatible with your WordPress version or not.
Drawbacks of W3 Total Cache
W 3 Total Cache is a great caching plugin but it's not always easy to fix caching problems when you are new to the world of WordPress. W 3Total Cache plugin minify may break some other plugins and themes in your site. You may encounter some problems such as some files appearing to be missing. In that situation, you need to uninstall this plugin and again install it. Sometimes it does not cache certain resources. It might cause error 500 or wp-admin error notification. In such cases, you can go for other alternatives cache plugins in WordPress.
Other popular caching plugins which can be used alternatives
W 3 Total Cache plugin is a good option in terms of caching, but it has its own flaws that can be overtaken by other cache plugins. WP Super Cache Plugin: it is an extremely popular plugin with millions of active installs. It is a very flexible caching plugin with tons of customization options. It is a free plugin and benefits most when you enable the mod_write feature. WP Rocket: WP Rocket is a user-friendly plugin that boosts your website performance to a great extent. It is a very simple configure and you can get reliable customer support, easy to index for SEO and powerful plugin that cut downloading times. WP Fastest Cache: It's another great cache plugin to create the static HTML pages for your WordPress websites. It has tons of customizations options, very reliable and super-fast cache plugin.
Conclusion
Performance of a website plays a crucial role for success and if you are not using a cache plugin for your site, now it's the time to install one such plugin to optimize your site for website speed. To get started use the W 3 Total Cache plugin which I had clearly explained in the above section. If you find any issues, I also described a few alternatives to this plugin. Simply go through it and install the one that suits your requirement to boost your website performance. Read the full article
0 notes
Text
Which SEO plug-in is best for WordPress?
WordPress users are often confused about the best SEO plug-ins they need to use on their website to drive traffic and to rank well in search engines. While we all know that search engines like Google, Bing, and Yahoo are major sources of the traffic of many websites, using the right SEO plug-in to optimize your website can work wonders for your business.
Here comes the next question – which SEO plug-in is the best for WordPress? Honestly, there are many, and the choice can be overwhelming, especially for those with a non-tech background. That is one of the reasons why we have listed the best ones for you. We have highlighted the functionalities of each of them to make a choice easy for you.
Yoast SEO
Unboundedly one of the best SEO plug-ins for WordPress websites development, Yoast SEO offers a complete solution to optimize your blog or website with ease. The plug-in is easy to install and can be used to add descriptions and SEO titles on all the posts, including the pages as well.
The plug-in can also be used to add metadata, and to generate an XML sitemap. These features make it easy for search engines to crawl the blog or the website. If you have used a different plug-in earlier, you can import the data as well using Yoast SEO plug-in.
The plug-in is available in both free and premium versions, and website owners can choose one according to their requirements.
SEMRush
If you are looking for an all-round SEO tool for your WordPress website, SEMRush is the one for you. The plug-in is used by bloggers and by SEO experts as well. One of the best features of the plug-in is the tools it provides to grow your website organically.
The plug-in can be used to find the search terms based on the niche, along with organic keywords that you can rank for with ease. Users can also research to know the keywords of their competitors and create strategies to stay ahead of them.
Google Search Console
If you are looking for a free, yet powerful tool to improve the SEO of your website or blog, you need to check out the Google Search Console. This is a free tool that is offered by Google itself and can be used by website owners to maintain and monitor the presence of their website in search results.
The plug-in provides an alert when the search engine is unable to crawl or index the web pages. It also provides excellent tips to fix such errors. The plug-in can also be used to learn about the keywords your site is ranking for, the impressions being created, and their position. The data obtained can also be used to find new keywords to optimize the content well. In simple words, the keyword data can be used to create new content as well.
Ahrefs
An all-in-one SEO tool, Ahrefs is perfect if you are a beginner. A very popular plug-in, Ahrefs is often used as an alternative to various other SEO tools (most of which are mentioned in the list as well) and boosts of similar features. The plug-in can be used for keyword and backlink research, monitors the rankings, and conducts a thorough competition analysis.
The plug-in also features a content analysis tool that can be used to improve the content on your blog with the help of targeted keywords. The plug-in also helps identify any duplicate content, helping website owners upgrade their websites with the right content.
Rank Math
Known to be a user-friendly SEO plug-in, Rank Math is widely used by bloggers and SEO professionals to optimize the WordPress websites for social media and search engines. The plug-in also includes a setup wizard that provides step-by-step instructions to import data from a different SEO plug-in that is in use. It can also be used to add deceptions, Meta titles, and Open Graph metadata to the blog posts with ease. Users can also generate an XML sitemap and connect their website to Google Search Console using this plug-in.
All in One Schema Rich Snippets
Do you know what your website needs to stand out from the competitors in the search results? It’s Rich Snippets! Website owners can showcase their star ratings, prices of a product, or a video with a description to attract more customers.
Search engines look for the data made available the Schema format for such information, and by using this plug-in, website owners can easily add that metadata to their website. The plug-in can be used to add data about videos, reviews, products, and more.
KeywordTool.io
If you have been looking for a free keyword research tool, your search ends right here. The plug-in is not only easy to install but to use as well. The plug-in can be used to generate ideas using the keyword suggestions you get. The keywords suggested are generated via the autosuggest feature of Google. It can also show keyword suggestions from other search engines like Yahoo, YouTube and more.
The keyword suggestions provided by this plug-in are indeed a treasure. Users can also get data related to search volume, the cost per click, and more once they upgrade their plan.
Broken Link Checker
Broken links can be bad for your website’s SEO. They not only affect the ranking but provide a bad experience to visitors as well. If you have a website or a blog for some time now, you must check for broken links, and this plug-in helps you with just that.
The free plug-in can be used to find broken links on the site, and fix them instantly without the need to edit the posts.
WP Rocket
The speed of your WordPress site can influence your search rankings, and this is one of the many reasons why the performance and the speed of the website need to be monitored. One of the easiest ways to do so is to use the plug-in WP Rocket, which helps you set caching without getting into any technical stuff.
The above mentioned are a few of the SEO plug-ins that are perfect for your WordPress website or blog. If you are a beginner and wish to take your business website or e-commerce store to the next level, do not shy away from taking professional help. Get in touch with an SEO marketing agency today and see your business soar!
0 notes
Text
5 Highly Effective Strategies for Increasing Your Site’s Page Speeds

Why it’s better to hire a web design company in Los Angeles to perform a website audit. Why should you bother spending your heard-earned money to find problems that you can’t even see?
Well, look at it this way:
Did you know most errors are actually invisible?
Do you know how fast your website loads?
Have you ever even thought about it? If not, then you should seriously consider it, starting now. Your site’s page speed matters much more than you might think.
Here are a few website statistics that you should think about:
About 40% of users will leave a web page that takes more than three seconds to load.
When an image doesn’t load or takes too long to load, 39% of people will stop engaging with your site.
62% of companies that designed responsive mobile websites increased their sales. Additionally, 64% of companies that adapted their websites for tablets also improved their sales.
A one-second delay in your site’s page response could result in a 7% reduction in conversion rates.
A slow loading site is more likely to not rank well in search results.
Do you find these statistics surprising? So do many business owners out there, when confronted with reality. So, don’t worry (too much), you’re not alone.
It’s precisely for this reason that you should consider planning and implementing highly effective strategies that will increase your site’s page speeds and overall performance. An excellent web development company in Los Angeles can offer an easy solution and help you to understand the process.
Before you start your search for a web development company that suits your needs, here is a look at some of the work that is involved in increasing your page speed.
1. Image Compression, Sizing, and Optimization
Based on the above statistics, an estimated 40% of your traffic will disappear into thin air if your images take too long to load or fail to load completely. And that is never a good thing. The first thing any good web developer would suggest is that you optimize your images.
Here is what is involved in this process:
Reducing the number of images so that your site is not overloaded (heavy). These images include those that are in your admin but may not be displayed on the front-end of your site.
Reducing the file size of your images so that they are much smaller in size (Megabytes) and more suitable for web display. And this has to be done without compromising the standard image resolution, which is 72dpi.
Sizing your images before you upload. This ensures that when they are uploaded, they are shown in actual size and not shrunk or expanded by the browser.
Remember, the more images you have, and larger the file size, the longer they will take to load. Therefore, cutting down their numbers to only relevant images (with the fixed pixel sizes), and using a photo optimization plugin to reduce their file size will make them much easier and faster to load.
While you may not know how to go about selecting the right images to display or editing the selected images, a reputable company in the website optimization business will know how to help you.
2. Installing Performance-Enhancing Plugins Compatible With The Existing Code
Plugins extend the functionality of your site and can make the user experience much better. Most smart website owners use them for customization purposes. But they can also cause problems…
The plugins that you use on your site can cause your pages to load very slowly or conflict with other plugins or code. The more you have, the slower your site may become. We have already established that slow loading code is terrible for your site and businesses’ bottom line.
So, what would a professional company recommend that you do? Here are a few suggestions you may have to implement:
Limiting the number of plugins as much as possible. Ideally, you should have less than 10-15 for maximum performance.
Remove completely, plugins that you actually do not need. What’s the point of keeping them if you do not use them?
Turning off plugins that you do not use regularly and only turning them on when you need them.
Utilizing plugins that help to boost the overall performance of your site as part of your 10 to 15 options. Web development companies will point you in the right direction. They will be able to show you the most relevant plugins that can increase page speeds. Examples of good plugins include caching plugins that improve web speeds. They include WP Super Cache, WP Rocket, WP Total Cache and many more.
3. Code Optimization, Compression, And Reprioritization
Do consider an experienced web design company. Los Angeles has several of them. But bear in mind the solutions each proposes concerning code optimization, compression, and reprioritization before you make your final decision. Stats show 94% of internet users will judge your website based on how responsive it is. There is no way of getting around that!
When you think about it, the performance of your site depends on the code used in the back-end/admin. And some of them like JavaScript can take a while to load fully. In the meantime, your impatient website visitors will be looking elsewhere. That’s a bad thing because your competition will be the most likely alternative.
Once you have found the right company, they can utilize several strategies to optimize your code. These may include:
Using code to replace a plug-in where possible
Programming a page to load the above-the- fold section first. Meanwhile, the below-the-fold part will continue to load slowly in the background. That ensures your site visitors can begin to interact much faster with what they can view first.
Minimizing and combining the CSS and JavaScript so you end up with fewer files to load.
4. Page Speed Testing And Optimization
Before you invest in hiring the very best web design company in Los Angeles, it would be more helpful to find out just how quick (or slow) your page speeds are. Only then, would you be able to determine if you need help. The firm you call will help you decide which page speed optimization methods you should start with.
There are several online tools that you can use to check your web page speed. Most are capable of providing reports that will enable you to optimize them properly. One tool that is worth checking out is Google Pagespeed Insights. Since the tool is created by Google, you need to pay close attention to its audit.

So How Does Google Pagespeed Insights Work?
Google PageSpeed Insights will analyze your website performance across both desktop and mobile devices. You will then receive suggestions on how to improve the page. One of the easiest things to look for is the performance score. Based on a 1-100 scale. 100 being the best.
If the score is over 90 it’s considered fast, and average if the score is between 50 and 90. Anything below that and your web page is considered slow. That means it’s in desperate need of professional web development intervention.
Achieving a score of over 90 is no easy task. Some can be done in a day, or two, or months to get a score of 100. Sadly, others will never receive a good score without a complete site rebuild.
Google PageSpeed Insights tests the server configuration, JavaScript, CSS, HTML and all files delivered to a browser, as well as the structure. That said, it’s instrumental in giving you the basic idea of how well your site functions.
Other off-site tools that you can use for page speed testing include GT Matrix, Pingdom tools, Yslow, and WebPage Test for load time testing and performance analysis.
We use many of the above, and an on-site plugin library from WPMU DEV. This plugin has a full suite that will continuously tell you everything about the performance of your site, SEO, image optimization, security and even offers a CDN. It’s what was used to achieve that 100 score above.
Your site can then benefit from the optimization strategies below, some of which have been discussed in the above points. Here is a summary:
Installation of caching plugins to enhance web page speeds
Changing web page hosts – you may need to pay more to access higher-quality web hosts that are much faster than what you currently may have
Minimization of HTTP requests – the fewer the requests your site sends to a server, the faster it is likely to be
Image optimization – this includes the aforementioned image compression and reduction of file size
Web page compression via web caching and server caching
Using Content Delivery Networks (CDN)
Minimization, combining and optimization of JavaScript and CSS
5. Comprehensive Site Audit And Testing

It is not enough to run a report. You actually need experience in understanding what and how to solve each problem. It’s best to invest in a comprehensive site audit and testing service. Find the best SEO companythat can help with web design and development. SEO is not just about keywords and backlinks.
You will need all the professional help you can get to use expensive SEO audit tools like SEMrush. While you may be able to access some of its reports free of charge, they are limited in scope. Reading and understanding the report you generate will be difficult for most and impossible for others.
Furthermore, a reputable SEO company will help you to audit your entire site, and check for errors. It pays to have a professional inform you of critical areas to fix so that your site can function properly.
It’s easy to think that you can do it all on your own, but it’s highly unlikely that you’ll succeed. There’s a lot at stake if you don’t have a good understanding of what you’re doing. You can lose your rank quite quickly if you make a mistake. Gaining it back will be an uphill battle. That, in turn, will result in lower conversions and ROI.
For that reason, it pays to invest in a reputable professional optimization firm. It will make a world of difference and help you with the learning curve.
We can create a site audit report, analyze its overall performance, and then implement highly effective strategies to make it load faster and perform at its best. That is why many clients choose a Los Angeles Development firm that has extensive experience solving Page speed issues.
Content is originally posted at https://www.pxmediainc.com/5-highly-effective-strategies-for-increasing-your-sites-page-speeds/
0 notes
Text
17 top plugins and extensions for SEO
There are so many great plugins available, and it’s difficult to choose which are the best for you.
To help you decide which tools will make your work easier and more productive, I’ve asked SEO experts to share what they use.
Per the experts, I compiled this list of 17 of the best plugins and extensions for SEO — and they’re all free.
Here are the top plugins and extensions recommended by experienced SEOs
1. SEO TextOptimizer
Free extension
This plugin is perfect for those who deal with content. SEO TextOptimizer lets you measure the quality of texts you create for your website based on how search engines would evaluate it.
The tool shows you topics you should develop as well as those you’d better eliminate for search robots to understand the text is relevant to the specific queries. The plugin also suggests you a list of words you could add to improve your content. The best thing is that you don’t need great SEO expertise to use it.

2. SEOquake
Free extension
With SEOquake plugin, you can easily analyze your key SEO metrics. Moreover, the tool provides SEO audit, backlinks analysis, and other useful functions.

One of the factors why SEO professionals choose this tool is that you can get a comprehensive analysis of a SERP and even export its results. There’s a bar appearing below each search result which provides you with key metrics such as traffic, Alexa rank, social media shares, etc.
3. BuiltWith
Free extension
This extension lets you find what a website you are visiting at the moment is built with. It’s created to help developers, designers, and researchers to discover the technologies other pages are implementing and choose those they want to use for their sites.
The plugin tracks:
Widgets
Frameworks
Advertising
Publishing
Hosting
Analytics
Content Delivery Network
Document Standards
Experts also say it’s great you can easily get global trends on using specific technologies.

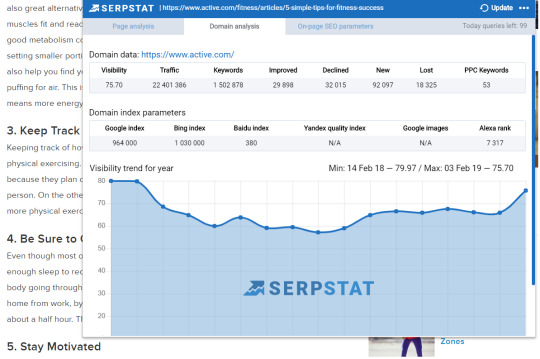
4. Serpstat Plugin
Free extension
It’s an extension which helps you conduct SEO analysis of a page. Serpstat Plugin provides the most critical information on keywords, traffic, and page visibility. You can also get the report on the top 10 keywords for which your page ranks at the top of search results.
Serpstat SEO & Website Analysis Plugin has now three tabs: Page Analysis, On-page SEO parameters, and Domain Analysis. Here are the most crucial parameters you’ll get with the plugin:
Domain’s traffic.
Domain’s visibility trend for a year.
The number of results on Google, Bing, and Baidu.
The number of images on Google Image Search.
Alexa Rank.
Page speed.
Site start date.
Meta tags.
The number of shares on social media networks (Facebook and Pinterest).
The plugin is free, but to use it, you need to create your Serpstat account, if you don’t have one yet.
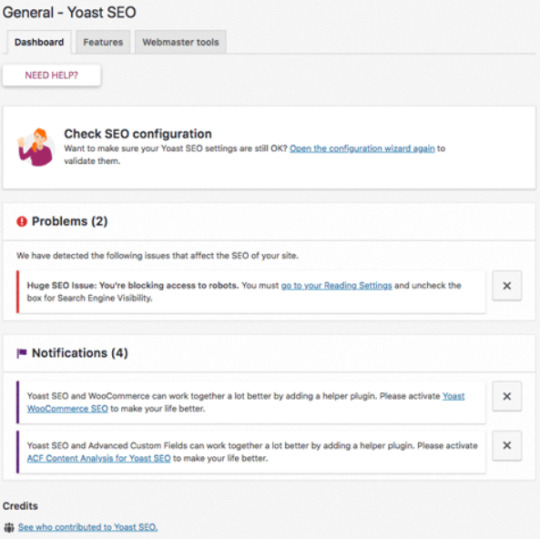
5. WordPress SEO by Yoast
WordPress plugin
This incredibly popular plugin by Yoast helps experts with on-site SEO needs. The tool will let you:
Add meta keywords, title, and description to your posts.
Provide clear site navigation for crawlers and users.
Analyze your on-page SEO. You can check your content, descriptions, and keywords.
See what your snippets will look like.
Create SEO-friendly Facebook Open Graph.
This WordPress plugin has a very quick and easy-to-use interface.
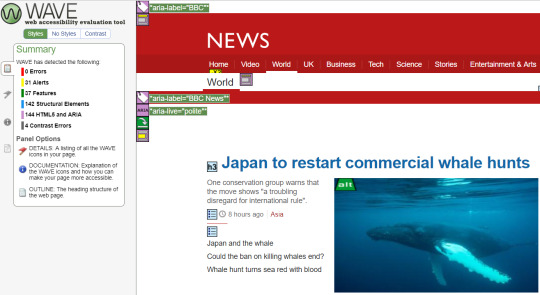
6. WAVE Evaluation Tool
Free extension
This tool evaluates web content accessibility within Chrome and Firefox browsers. WAVE provides 100% secure and private accessibility reporting. The plugin checks password-protected, intranet, sensitive or dynamically generated web pages.
7. Spark Content Optimizer
Free extension
Spark Content Optimizer is a tool designed to help you develop your site’s search experience. The plugin provides you with easy access to such a crucial data as:
Monthly traffic.
The performance of your site for all the keywords.
The technical audit which analyzes more than 40 hard-to-find issues.
Information on backlink authority.

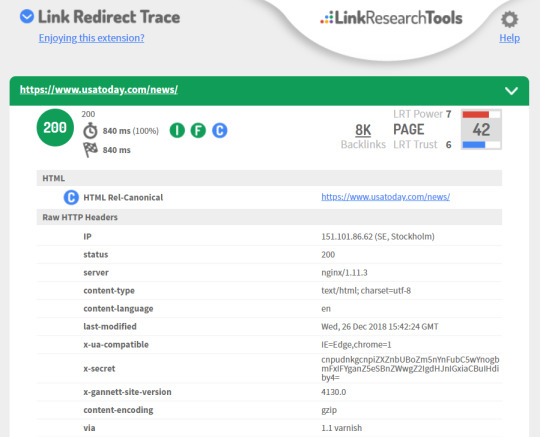
8. Link Redirect Trace
Free extension
It’s a great tool for tracking redirect path. The tool analyzes HTTP Headers, rel-canonicals, robots.txt, link power, etc. You can use Link Redirect Trace extension to analyze your competitors, your on-page and off-page SEO, and other critical factors.
Here are the main tasks this plugin can help you cope with:
Identify and fix problems in your on-page/off-page SEO.
Analyze your competitors’ links.
See the redirect chain and fix problems to make your load time faster.
After your site was redesigned or migrated, you can check your links.
Check links from affiliate and advertising networks.
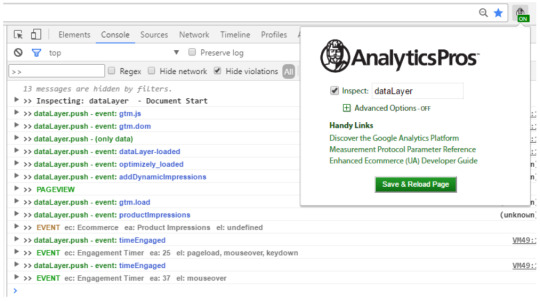
9. Ap – Data Layer Inspector+
Free extension
This plugin is a perfect toolkit for digital analysts. This add-on lets you monitor, debug, get detailed data not having to switch between the page, the code, and the developer console.
With this tool, you can inspect the dataLayer in real time, insert code into the page, analyze GA hits, ignore hits to individual properties, etc.
10. User-Agent Switcher
Free extension
The tool will help you switch quickly between user-agent strings. If you want to test how your page responds to different browsers, this plugin will let you do it. Due to User-Agent Switcher, you can browse with predefined user-agents or add your own ones.
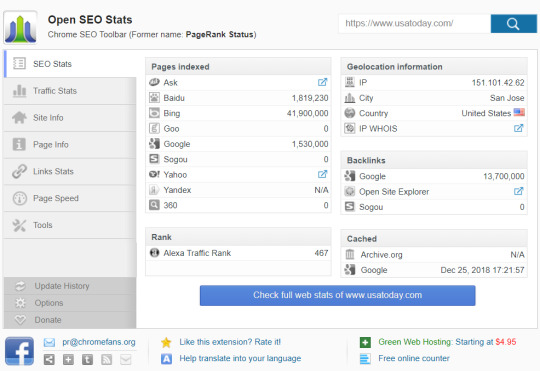
11. Open SEO Stats
Free extension
This extension provides quick access to the most important SEO stats. The tool will show you:
Traffic stats. Graphs from Alexa Rank, Quantcast Rank, Compete Rank.
Information on your backlinks.
Cached pages.
Indexed pages. You’ll see the number of pages indexed in Google, Bing, Yahoo, Baidu, Yandex, etc.
Geolocation information, such as country, city, and IP address.
The shares on social websites.
Meta information, such as title, meta keywords, description, canonical tags, internal links, external links, and more.
12. Velvet Blues
Free WordPress plugin
This plugin will be handy for those who move their WordPress website to another domain and need to update internal links and references to pages. The plugin helps you fix the problem and change old links on your website. Experts say it’s great that you can find and replace any URL in your WordPress database without having to use phpMyAdmin directly.
With Velvet Blues Plugin, you can:
Update links which are embedded in excerpts, content, or custom fields.
Choose whether you want to update links for attachments or not.
View the number of items updated.
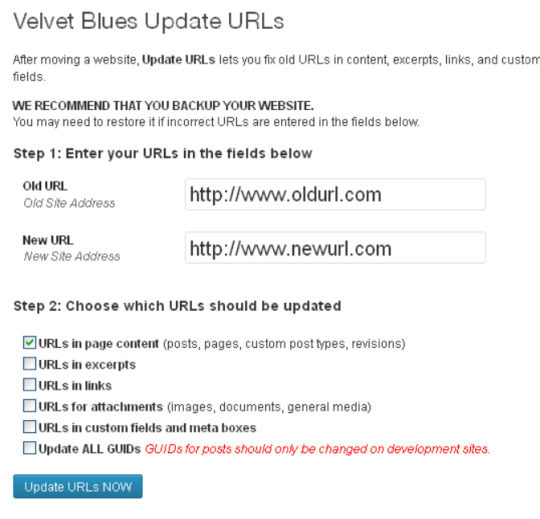
Install it only when you need to fix something and then uninstall it. The plugin treats everything it finds.
13. WP Rocket
Free WordPress plugin
Experts consider this plugin to be one of the best caching tools. Using WP Rocket to cache pages, your page load time decreases, and indexing improves. Moreover, the tool lets users reduce the weight of HTML, CSS, and JavaScript files.
With WP Rocket, you can optimize your images, so that they’ll get loaded only when visitors scroll down the page. Such an action contributes to improving page speed.
14. All In One Schema.org Rich Snippets
Free WordPress plugin
This tool will be useful for those who want to get rich snippets for their web pages. The plugin is created to help you make your page stand out in Google, Bing, and Yahoo search results.
All In One Schema.org Rich Snippets supports most content types released by Schema.org. Here are eight different content types for which you can add schema:
Review
Event
People
Product
Recipe
Software Application
Video
Articles
15. Cloudflare’s plugin for WordPress
Free WordPress plugin
This free plugin helps to accelerate page loading time, improve your SEO, and protect against DDoS attacks.
Cloudflare plugin adds value for SMEs/Medium sized businesses, making it very easy to setup CDNs, DDoS Protection, and allow them to utilize edge SEO technologies like service workers.
16. WhatRuns
Free extension
This extension lets you find out what runs any website. You, ll get all the technologies used on websites you visit:
CMS
WordPress plugins
Themes
Analytics tools
Frameworks
Moreover, you can even get notified when websites start using new tools and services if you follow them.

17. Grammarly
Free extension
There are both free and paid access available for this plugin. The tool underlines your grammar, spelling, or punctuation errors for you to correct them. It also suggests you synonyms for overused words and gives you tips on how you can improve your texts. To get the most out of this plugin, you’d better use a paid version, as it’ll get you access to the most critical issues.
Choose the best for you
Remember that the more extensions you download, the slower your browser becomes. That’s why it’s essential to know which ones exactly are perfect for you.
Free WordPress plugins and Chrome extensions will help you make your work easier, but you may spend quite a significant time looking for those which are really useful for you. So, this list should have helped you circle out the tools you’ll try to implement into your working process.
Want more SEO tools?
Check out these articles as well:
7 social media monitoring tools to check out in 2019
8 free technical SEO tools you probably haven’t heard of
Four tools to discover and optimize for related keywords
What people search for: Tools for trends
The top 10 tools for getting an insight into your website analytics
Tools to assist your SEO check-up
…. And many more!
The post 17 top plugins and extensions for SEO appeared first on Search Engine Watch.
from Digtal Marketing News https://searchenginewatch.com/2019/02/08/17-top-plugins-extensions-seo/
0 notes
Link

Many website owners falsely think that their websites are going to work perfectly forever. However, in reality, all websites eventually break. This happens because sites are running out of date, plugins stop working, or as a result of a cyberattack. If you want to avoid these issues altogether, the solution is rooted in regular digital health checks. In this article, I’ll focus on the simple and inexpensive website health check ways that will help your website run flawlessly!
What is a website health check and why do you need one?
A website health check implies breaking down the anatomy of your website to evaluate the functionality, performance, and design of your web pages. Here’s why it’s important to conduct regular website health checks.
Any change that you make on your pages somehow affects the overall health of your site. Let’s say, you’ve decided to add a second Spanish version of your website. This can influence the speed and overall performance of your site. That’s why designing and implementing a regular website maintenance check is an absolute must.
Not particularly sure where to begin your site’s health check? No worries, we’ve got you covered. Here’s a list of the four essential factors to make sure your website is healthy.
1. Performance testing
Did you know that 53% of users will leave your website if it doesn’t load within 3 seconds? Moreover, studies show that website speed directly impacts business’ profitability.

Image Source: https://storage.googleapis.com/twg-content/original_images/mobile-page-speed-new-industry-benchmarks-01-21.png
This way, your website’s speed and performance are the key factors contributing to the revenue generated and your overall success.
Performance testing is considered a part of a website’s health check and one of the most challenging testings. Performance testing is executed to test the responsiveness, speed, scalability, and throughput of your website.
There are many ways to carry out performance testing. For example, you can use dedicated online tools and browser extensions.
2. SEO testing
Search engine optimization (SEO) is another important aspect of your website. Your site’s ranking and discoverability in search engines can play a major role in the overall success of your website and your business in general. That’s why you want to ensure your SEO is in place as a part of the website health check.
Regular SEO testing will help you identify the best SEO tactics for your business. In the meantime, simple SEO practices will help you keep your site healthy. For example, by regularly updating your web pages and images, you can boost your ranking on Google and get rid of the outdated content.
3. Security checking
As more businesses are operating online, there is a growing threat of cyberattacks. In fact, studies show that 68% of business leaders feel that cybersecurity risks are increasing. That’s why ensuring security is a crucial step towards a healthier website.
As much as we all rely on the web, it’s not exactly the safest place. Your website may be exposed to cyberattacks by accident or by mistake. For example, you can install a plugin without even knowing that it’s carrying malware. In the meantime, the faulty plugin is infecting your website and puts the entire system at risk.
To keep your website safe and keep off cybercriminals, you need to check and update your website regularly. Use website security checking tools that can enable you to do the following:
Detect viruses and malware
Detect phishing attacks, ActiveX attacks, buffer overflow, and other vulnerabilities
Check user IPs against various spammer databases
Detect whether or not your SSL certificate expires soon
Manage regular website updates
4. Broken links testing
Besides performance, SEO, and security checking, there is another aspect commonly overlooked when checking website health – links.
The web consists of a plethora of links that are used to locate and connect pieces of information. A single website can have hundreds and even thousands of links. However, when these links become broken, it will affect your website’s speed and overall performance.
Links do so much more than just sending users to your website. They are accountable for displaying graphics, data, and various applications.
Here’s a list of links you should keep an eye for when checking your website health:
External links to other websites
Internal links to your images
Internal links to pages
Tools for website health checks
Gathering required information that can show you the problem areas is the first step of the website health checking. Once all of the needed data has been collected, the next step is to take the required actions to fix the problems.
Here are some tools you can use to check your website’s health.
Google Search Console

Image Source: https://glimpse.media/wp-content/uploads/2020/04/google-search-console-logo-1200×675.png
Google Search Console is a free tool that helps you monitor, maintain, improve your website’s presence in Google Search results. Since there are no clear guidelines on how Google’s ranking algorithms work, Google Search Console is an invaluable tool that can help you understand and advance how Google sees your website.
Google Search Console allows you to troubleshoot the following issues:
XML sitemap errors
Structured data errors
Broken links
Robots.txt errors
Mobile usability issues
PageSpeed Insights

Image Source: https://hsto.org/webt/tf/l0/na/tfl0nak6tubwbyajdeo-dpqjas0.png
Google PageSpeed Insights is another free tool that allows you to check the page speed of your website. Besides, it shows you various factors affecting the speed, so you know what needs adjustment.
Ahrefs

Image Source: https://templatetester.com/wp-content/uploads/2020/01/ahrefs-logo-3.png
Ahrefs is an SEO toolset that can help you monitor the status of your backlinks and referring domains. The tool enables you to record the number of backlinks and referring domains gained, broken, or lost. This way, you can contact the website to identify and solve the problem with backlinks.
Wrapping it up!
When you build a pro website, it’s important to keep it updated and conduct regular website health checks. Essentially, you have to follow a two-step process that includes collecting all health-check tools and then implementing required fixes.
Before you go, let’s quickly wrap up what you’ve learned today about the four essential ways to check your website’s health:
Performance testing is a fundamental part of any website health check and includes testing the website’s responsiveness, speed, scalability, and throughput.
SEO testing allows you to monitor the status of your site and improve ranking.
Regular security checking can help you identify and troubleshoot malicious threats to your site.
Broken links testing allows you to find faulty links and keep your website updated.
Keeping your website healthy doesn’t have to be rocket science. The key ingredient lies in regular health checks. By following these four practices and using dedicated tools, you can take it a step further and ensure your website’s health at all times!
0 notes
Text
How to Fix WordPress Website Not Updating Right Away
Are you trying to fix your WordPress website not updating right away?
Often users ask us why some changes they make to their site like a new blog post, widget settings, don’t appear right away. It is a common issue and very easy to fix.
In this article, we’ll show you how to easily fix a WordPress website not updating right away.
Why My WordPress Site Not Updating Right Away?
The most common cause of a WordPress site not updating right away is caching.
By default, many WordPress hosting companies enable their own caching systems which store a temporary copy of your pages to improve website speed and reduce server load.
Apart from that, you may also be using a WordPress caching plugin on your own which may not be configured properly.
Last but not the least, your browser may also store a cached version of your pages in temporary storage.
Normally, when you make any change to your WordPress website those cached versions expire, and you get to see your changes right away.
However, sometimes due to some configuration error this may not happen right away. In that case you will see the old version of that page for a while.
The most common symptom of this problem is new posts not appearing on the homepage of your WordPress website.
While you can still view the single post by clicking on the view post link from the WordPress admin area, you are unable to see it on the main page.
That being said, let’s take a look at how to easily fix this issue.
Fixing WordPress Website Not Updating Issue
You’ll start by first clearing the browser cache. For most users, this should fix the issue, and you wouldn’t need to proceed to step 2.
Step 1. Force Browser to Reload or Clear Cache
Sometimes your browser (specially Google Chrome) will show you a cached copy of your website instead of showing the new one.
To resolve this issue, you need to simply hit CTRL + F5 (or Cmd + R in Mac) buttons on your keyboard to reload the page.
This will ask the browser to reload the page by fetching a fresh version. In most cases, this would fix the issue for many users.
However, if that doesn’t work, then the next step is to clear your browser cache. In Google Chrome, click on the three-dot menu in the top right corner. From the menu, you need to go to More Tools » Clear Browsing Data.
For more details, see our guide on how to clear cache in all major browsers.
Step 2. Clear WordPress Cache for Your Website
The second and most likely cause of this issue is poorly configured WordPress caching plugin. Most caching plugins make it super easy to clear your cache with the click of a button.
1. WP Rocket
If you are using WP Rocket on your website, then simply go to the Settings » WP Rocket page and click on the ‘Clear Cache’ button under the dashboard tab.
2. WP Super Cache
If you are using the WP Super Cache plugin, then go to the Settings » WP Super Cache page and click on ‘Delete Cache’ button.
3. Bluehost
Even if you don’t have a WordPress caching plugin installed on your website, many WordPress hosting companies deploy their own caching system by default.
For instance, if you are on the Bluehost hosting platform, then you’ll notice a ‘Caching’ button in the admin toolbar.
Take your mouse over and you’ll see the option to ‘Purge All’ cache. This will delete all cached files from your website.
4. SiteGround
SiteGround is another top WordPress hosting company that offers its own built-in caching system.
You can manage SiteGround cache by installing and activating the SG Optimizer plugin. For more details, see our step by step guide on how to install a WordPress plugin.
Upon activation, you need to click on the Purge SG Cache button in the WordPress admin toolbar.
This will clear up SiteGround cache for your website.
For more hosting companies and caching plugins, see our complete guide on how to clear WordPress cache.
We hope this article helped you fix WordPress website not updating right away issue. You may also want check out our guide on the most common WordPress errors and how to fix them.
If you liked this article, then please subscribe to our YouTube Channel for WordPress video tutorials. You can also find us on Twitter and Facebook.
The post How to Fix WordPress Website Not Updating Right Away appeared first on WPBeginner.
from WPBeginner https://www.wpbeginner.com/wp-tutorials/how-to-fix-wordpress-website-not-updating-right-away/
0 notes
Text
Fast SEO Techniques For Google Rank
SEO Tips To Improve Organic Google Rank
Google Ads & Analytics Certified Consultant Connecticut
Perform a technical SEO audit. Fix warnings and errors that may leak SEO.
Research & analyze competitor keywords. Place keywords throughout your content and bold, italicize and as anchor text.
Add keywords to META titles and descriptions, HTML headers, URLs, internal links, and content. Update content to have at least 1,000 characters. Satisfy the user’s query fully, increase user dwell time.
Add internal links, external links, short URLs with keywords made up of LSI, Synonyms, long-tail keywords, and geo-targeted keywords. Keep adding new content to already created pages and posts. Google loves long fresh and updated content.
Investigate Google Analytics and Google Search Console’s keyword, page, user location, impressions, clicks, and average position on Google to create content based upon keywords that have first-page opportunity.
Local SEO techniques for Fast SEO. Optimization of the Google My Business page and marking yourself on Google Maps will go a long way towards Google’s Top 3 Local SEO Map Pack ranking.
Run website speed reports using GTMetrixor Pingdom. If out Google Page Speed Score is low GTMetrix will explain the fixes you need to score higher and deliver your pages faster. You should install a caching system such as WP-Rocket to serve cached copies of your pages to visitors. WP-Rocket also includes the minification of HTML, JavaScript, and CSS.
Improve WordPress SEO with a plug-in.
Target current pages and keywords that rank at positions 8-15 in Google. If the average monthly search volume and cost per click make those keywords valuable, update and add to your content. Create internal anchor text links to the page and they’ll be to rank higher.
Use professional SEO tools. I use SEMrush.
I should write content for a moderate 6th-8th-grade reading level with screenshots, graphics, videos, and photos. 1000-1800 words.
Use an XML sitemap and submit to Google.
Add Google-recommended SCHEMA & JSON-LD mark-up code used to better classify your content and enable Google to understand and rank your content better.
Create incoming links using various methods including adding a client’s site to local citation directories to assist local SEO. Optimizing the client’s Google My Business page is also a necessity.
For SEO & Certified Google Ads Consulting I charge $50/hour With An Initial 20-Hour Retainer. I do not use “agency style” long-term or locked-in contracts. You may pause the project and restart.
For consulting, contact Bob at 860.659.7135, email [email protected] or fill out his form.
Please enable JavaScript in your browser to complete this form.
Name
First
Last
Email *
Comment or Message *
Message
SEND
More digital marketing posts:
Free SEO Tips For Better Google Rank In 2019
Free SEO And Google AdWords eBooks And White Papers
On-Site SEO Tips To Rank Well In Google
Local SEO Infographics | Improve Google Search Ranking
Expert SEO & Google AdWords Consultant CT
source https://connecticutseoexperts.com/fast-seo/
0 notes
Text
How to Use Autoptimize Plugin to Increase Your Website Speed
On a beautiful day, you suddenly find your website running slowly and your day becomes so overcast. Why and what should you do? Don’t worry, your day can be bright again if you find out a solution. In this article, the solution is using the Autoptimize plugin and I will show you how to use it to optimize your website speed.
Why Is Your Website Slow?
The increasing of your loading time is caused by many reasons, here are some of them:
Your website has too many databases like media items, plugins or themes, …and they’re too heavy.
Your server is so poor that it takes much time to wait.
Your website has a lot of traffic, which causes congestion.
Your code is too “big” and has a lot of unused characters like JS, CSS files that you need to remove.
And there are many other reasons that make the speed of your website so low. To have better performance, you need to find the way out. Using a plugin is one of the solutions. There are many plugins that help you optimize your website speed and Autoptimize is one of the kind.Autoptimize
Author(s): Frank Goossens (futtta)
Current Version: 2.7.7
Last Updated: August 23, 2020
autoptimize.2.7.7.zip94%Ratings1,000,000+InstallsWP 4.9+Requires
Getting Started
Apparently, you have to install and activate the plugin. The free version of Autoptimize is available on WordPress.org. You just need to search for it in the Dashboard and install, activate it normally.
Configure the Autoptimize Plugin to Speed Up Your Website
After Autoptimize is ready to use, you need to configure it. Stay in the Dashboard, go to Plugin and you will see the activated Autoptimize plugin here. Click Settings.
Here is the latest UI of Autoptimize Settings board:
The manipulation is just simple. You just need to put a tick to some of the boxes here. But it’s not just easy like that as you should know which to tick and which not.
JS, CSS and HTML Settings
JavaScript Options Settings
Stay in the JavaScript options, enable the Optimize JavaScript code. After you put a tick on this box, other options in the Java Script Option section will show up like this.
By enabling Optimize JavaScript code, you actually enable the minification of JavaScrip assets to make your website faster. That’s the most important thing to do in this part.
And look at the Aggregate JS-files, it’s also automatically enabled right after you check the Optimize JavaScript code box. This action is highly recommended. This is because when you only minify the JavaScrip assets, they will not be united by default so you will have to select Aggregate JS file for them to be all aggregated and minified.
The Also aggregate inline JS when being enabled will increase your cache size despite giving faster page loading. So, make sure that you frequently clear your cache memory as too much cache is not good for your website. I don’t recommend that option.
Force JavaScript in <head> isn’t recommended, either. It may stop the page from rendering to fix the JS-error, which slows down your loading time.
Exclude scripts from Autoptimize: enter the scripts that you don’t want to aggregate. This will help you normally fix something that wouldn’t work during the optimization.
Add try-catch wrapping: If any files are breaking during the optimization process, you can enable it to troubleshoot. It’s optional for you.
CSS Options Settings
Now scroll down and move to the CSS Options. There are the options you should tick:
The Optimize CSS Code, Aggregate CSS-files, Also aggregate inline CSS and Exclude CSS from Autoptimize are similar to JS options above. You should also enable Also aggregate inline CSS only when you are aware that your cache is growing and delete it.
Inline all CSS shouldn’t be enabled if your website has a lot of traffic because it may slow down the speed. You should only use it to have a better score in PageSpeed Insights when the number of visitors is small. However, as you can’t control the website traffic and it’s obvious that every website owner wants to increase the traffic, I don’t recommend this section.
Inline and Defer CSS: It’s related to code so the author suggests you should check the FAQs page to have further information.
It’s optional to choose Generate data: URIs for images depending on your images’ size. If the images’ sizes are large, Autoptimize will skip them to avoid any problem while rendering.
HTML Options and CDN Options Setting
Enable Optimize HTML Code, the whitespace and some comments of the HTML code of your website will be deleted. This action will compress the line of code to some extent to speed up your website. If you want to keep the comments, put a tick at Keep HTML comments.
It’s optional to enter your CDN (Content Delivery Network) root URL in the CDN Base URL tab. If you have a full CDN set up through any service, you can put the URL they give you here. If you use Cloudflare, you don’t need this action.
Misc Options
Under the CDN Options is the Misc Options here.
Save aggregated script/CSS as static files: You should check this option. For some reason, you only uncheck it if your server has some error about compression and expiry.
Minify excluded CSS and JS files: If you exclude any files from the JS and CSS Options above, uncheck it will mean that you no longer minify the files. It’s optional.
Also optimize for logged-in editors/ administrators: As the author states, you can choose it or not depending on your website. But if you’re using a page builder plugin, leave this unchecked to avoid some of the plugin’s functionalities from stopping working.
After you’ve done with the JS, CSS, and HTML Settings, click Save Changes or Save Changes and Empty Cache. I prefer Save Changes and Empty Cache to remove Cache at the same time.
Image Optimization
If you want to have your image optimized for better performance, move to the Image tab.
Optimize Images: Your image will be compressed by Shortpixel to make your website more lightweight.
Image Optimization Quality: Choose one of the three compressions. This is how they explain each kind so that you can choose one that suits your website.
Load WebP in supported browsers and Lazy-load images are optional to choose. Lazy load images can make your loading time faster, but the image display may be annoying to your visitor.
Finally, click Save Change.
Extra Options
If you want more detailed and extra options, go to the Extra tab and choose some of the boxes here according to your preference. The explanation for each section is quite understandable so you just need to read it carefully. Some of the sections are marked specially for advanced users so if you are a beginner, just ignore them. Don’t forget to click Save Change.
That’s all! After I completed optimizing, my website speed is now much faster than before.
Optimize more
If you want to optimize your website more, the author already suggests some useful plugins in this list.
Critical CSS
Render-blocking CSS files will cause slow performance. To correct this, the author also recommends Autoptimize Critical CSS Power-Up plugin to resolve this problem. Click the button to install it. This is a special technique to display the basic CSS first and then load the other unimportant CSS later, making a sense that your website is loading faster.
Final Words
There are many methods to speed up your website, both using and not using plugins. In the market, Autoptimize, WP Rocket, Jetpack, … are the most popular one. We already have tutorials on using these plugins to do it, you can refer to them to find which plugin is your best choice.
Have fun with a quick website!
The post How to Use Autoptimize Plugin to Increase Your Website Speed appeared first on The Coding Bus.
from WordPress https://ift.tt/3boIQqe via IFTTT
0 notes
Text
10 Silent killers that affect your website speed
Time is the most valuable asset. Nothing is more frustrating than slow page loading. A slow website kills conversions and impacts search rankings. Google stated that it is important to consider website speed when determining search rankings.
Here are some interesting website load statistics:
An Akamai study showed that 47% of customers expect websites to load in a few seconds or less.
One second delay on Amazon could cost $1.6 billion on sales every year.
According to Pingdom, 78% of the top 100 retail websites take under three seconds to load.
One second delay on your page load results in a seven percent reduction in conversions.
The average load time on the desktop is 1.286 and 2.594 seconds on mobile.
Optimizing your website’s speed is not a necessity, but a must-have, especially if you want to beat out the slower competition. Once you notice that your site is loading more than three seconds, it’s time to figure out things that can slow down your website speed and improve the overall performance.
Let’s discover lesser-known causes of website slowdown and find the best solutions to deal with each one.
1. Caching issues
Browser caching is very important for repeat visitors. Every time users come to your website for the first time, their browser stores all the files like images, CSS, and Java files for a specified period. The next time the visitors come back to the web page, browser caching allows these stored files to be served quickly upon the user’s next visit.
Reducing the number of round-trips results in faster page load times and improve user experience. Caching can definitely help you speed your website, but it’s not without its issues. If you don’t set up caching properly, it can hurt user interaction. It’s essential to develop a solid caching strategy to maintain strong user experiences.
If you don’t use WordPress, you can add the Cache-Control and Entity tags (ETags) headers to HTTP response headers. ETags are used to validate whether the client has the recent version of a record. While Cache-control is used to define browser caching policies in client and server responses. As a result, these headers help you reduce the need for visitors to download the same files from the server twice and reduce the number of HPPT requests.
If your website is running on WordPress, you can use cache plugins for better performance. WP Rocket is a great premium cache plugin that includes a lot of extra features like lazy loading, database cleanup, CDN integrations, and many more. You don’t have any technical skills to set it up to have faster websites.
2. Overloaded database
An overloaded database can be a silent killer when it comes to website performance. One of the pitfalls with WordPress websites is that your database is overloaded with multiple post revisions, deactivated plugins, saved drafts, and others. Trackbacks and pingbacks don’t have any practical use in WordPress. Ensure to disable both of them because they clog up your database and increase the number of requests.
Make sure to delete other garbage files like spam and trash folders, transients, and database tables that can also slow down your website. As I mentioned above, WP Rocket is one of the easiest ways to schedule and clean up these files every week. You can optimize your database using the ‘Database’ tab.
Source: Screenshot made by the author
Using WP Rocket, you can also schedule an automatic database cleanup.
3. Outdated CMS
Running an outdated version of your CMS can slow down your website and cause different security vulnerabilities. Most CMS like WordPress, Joomla, or Drupal let you know once any update is available. Having the latest versions of plugins and any software will result in faster load times.
In case you haven’t still updated your CMS or don’t get any notice, run a regular page speed test on different pages of your website to find out whether the latest updates or versions of the software are compatible with your web hosting or available fixes that can improve the overall performance of your website by making them faster to load.
4. Excessive usage of social media scripts
Social media has become a crucial part of every website. No matter how large your website is, you still need to connect social media to your site and make it easier for users to share your posts. The excessive usage of social media scripts and plugins can kill your site’s performance.
Limit the number of social media plugins and scripts that you don’t use at all and find alternate ways to schedule and automate your social media tasks. Zapier is a great website service that can help you automate these tasks and reduce the burden on server resources and your website.
When it comes to sharing options at the end of each post, it’s a great way to easily share your publications, but these options can add a lot of load to your website. Try not to use them at every single page of your website and include only the essentials.
5. The use of chatbots
Chatbots are great for handling customer inquiries. According to Salesforce, 69% of customers want to use chatbots to speed up their communication with a brand. But there are two sides to the coin. Chatbots can hurt your website speed in case the script isn’t implemented properly and can take your website longer to load.
It’s important to ensure that your chatbot is loading asynchronously. I mean when your chatbot performs any action on your website like initiating a conversation with a customer or sending pings, this action should be routed by external servers. So, make sure to use the right code that enables this action. Check whether there is any problem with a chatbot script using Google’s PageSpeed Tools.
For easier set-up and simple communication, you can use an out-of-the-box solution like Tidio that doesn’t require any coding skills and takes only a moment to create a chatbot. The best thing is the ability to communicate with customers in one simple dashboard. The tool also integrates with different third-party apps to provide better customer service.
Source: Screenshot by Tidio
6. Broken links
Broken links are not only a pain for website visitors but a real drain on bandwidth. I’ve recently made a detailed analysis of one of my clients and have detected a lot of 404 errors in Google Webmaster Tools. Once I’ve fixed them, the average load time per user boosted from seven seconds to two seconds, and there was a huge decrease in bounce rate.
So, if you have many broken links on your website, you are just wasting resources. Moreover, they can hurt user behavior metrics and negatively affect your rankings. To detect broken links, I would recommend getting audit reports with the SE Ranking Website Audit. The tool sorts all your web pages by status code to view which ones are 404.
Source: Screenshot by SE Ranking
One of its major benefits is the ability to go deeper than others and find out crawl errors that other tools don’t. Once you get these broken links, you can fix or remove them for good.
7. Render-blocking JavaScript
Every time your website loads in the browser, it sends out calls to every script in a queue. That queue of these scripts should be empty before the website appears in the browser. If this queue is very long, it can slow down your web pages without allowing visitors to fully view the site. These kinds of script queues are called the render-blocking JavaScript and CSS files.
To make your web pages load faster, Google recommends eliminating render-blocking scripts. Before removing them, identify which scripts cause problems using Google’s PageSpeed Insights.
Most website owners use different traffic and conversion analytics platforms to analyze and measure any type of traffic and conversions with one click. Most of them are installed by using JavaScript code that can slow down your website. The best way to track different events is to use Finteza whose main tracking script (downloaded from the Finteza server) doesn’t impact website performance and can be embedded into the page asynchronously.
Source: Screenshot by Finteza
8. Accelerated mobile pages (AMP)
Everyone knows that Accelerated Mobile Pages (AMP) is a Google project created to speed up web pages on mobile devices by adding an “AMP” stamp next to your mobile snippets. While the idea of having a fast mobile website with content sounds like a great idea, there are some challenges when it comes to AMP.
While creating AMP improves website performance, it removes all of the dynamic features that slow down websites. In other words, it changes the design of your website and provides less functionality for your visitors that can result in reducing conversions. According to this case study, Kinsta saw their mobile leads drop by 59% after adding AMP, so they disabled it.
So, use AMP carefully as it can lower your mobile conversions. If you still want to use them, do it properly (more instructions here). Make sure to validate AMP for Google Search and fix any possible issues.
9. Gravatars
While Gravatars offer convenience and easy customization to your user base, there is one drawback, speed. This is not really visible on smaller websites, but if you have a large website with a lot of blog comments, you will notice much of a slowdown. You have some options to fix that:
Disable Gravatars in WordPress
Remove comments that don’t have value
Use caching Gravatars like Harrys or Optimum Gravatar Cache
Reduce your Gravatar image sizes
Paginate comments in WP Disable
10. Invalid HTML and CSS
If you stop using invalid HTML and CSS codes, that will increase the rendering time of web pages and the overall site performance. Make sure to create HTML and CSS that aligns with the W3C standards if you want browsers to interpret your site more consistently.
Check your HTML through the W3C HTML Validator and CSS through the W3C CSS validator. One of the options is to validate HTML with the Grunt HTML validation package and Stylelint.
Bottom line
A slow-loading website is something that will turn your customers away before they can visit your website. To keep your site running well and loading fast, you need to focus on these web performance killers and do the best to prevent these issues and make your site more efficient.
Irina Weber is Brand Manager at SE Ranking. She can be found on Twitter @irinaweber048.
The post 10 Silent killers that affect your website speed appeared first on Search Engine Watch.
from Digital Marketing News https://www.searchenginewatch.com/2020/03/17/10-silent-killers-that-affect-your-website-speed/
0 notes
Text
BoomBox — Viral Magazine WordPress Theme
https://opix.pk/blog/boombox-viral-magazine-wordpress-theme/ BoomBox — Viral Magazine WordPress Theme https://opix.pk/blog/boombox-viral-magazine-wordpress-theme/ Opix.pk LIVE PREVIEWBUY FOR $59 Boombox is all-purpose viral magazine theme with a top-notch design and extremely customisable layout, full of viral snacks and exclusive features, powered by the most powerful viral content builder. Populate news, listicles, polls or quizzes, spread them via social sharing, trending, reactions and up/down voting systems, drive bloggers community and monetise with any type of ads. Go viral right now! IMPORTANT: Boombox V2 Migration Guide Tags lists, gif, viral, social sharing, rtl magazine, blog, quiz, poll, reactions, gallery, trending Extremely Customisable Layout & Design Enhanced WordPress Customiser options Full Width or Boxed layouts Unlimited 2 layer header layout and behaviour variations 2 layer footer with 3 widget area Shape patterns for header and footer (e.g. rags, clouds, grass, none) Advanced sidebars management 8 post listing types with infinite scroll, “load more” or numeric pagination 2 size of post strip slider & 3 types of featured posts area Fully customisable colour scheme, styles & fonts Hide/Show any element on any page Create prototype of BuzzFeed, BoredPanda, 9Gag or any other viral magazine Configurable Posts Ranking System 4 post ranking types: Views, Shares, Upvotes, Comments Configure trending criteria by one of the 4 ranking types Trending (24 hours), Hot (last 7 days) & Popular (last 30 days) Trending, Hot & Popular fancy badges Generate Most Viewed, Most Shared, Most Voted & Most Discussed post lists Create pages of best post lists by any criteria within different period of time Configure all sections of post lists by one of 4 criteria (featured posts, strips, widgets) Engaging Reaction Voting System Let visitors vote with reactions just after reading Highlight 2 most frequent reactions on post Engage other visitors by showing fancy reaction badges Custom colour options for reaction badges 24 reaction emojis – 2 hand handcrafted set Possibility to add custom reaction emojis (svg files) Create post lists by reaction categories Set minimal reaction score for classifying post under that reaction Set maximal reaction types count per vote Restrict voting by login or just by visitor IP Attractive Multipurpose Badges Category badges (e.g. quiz, poll, music, videos etc.) Create any badge with 600+ icons Reaction badges with texts or emojis (e.g. lol, omg, wtf, geeky etc.) 24 reaction emojis – 2 hand handcrafted set Possibility to add custom reaction emojis (svg files) Trending, Hot and Popular badges Independently set custom colours to all type of badges Create badges navigation Disable any type of badges Zombify Front-end Uploader is included Enable frontend submissions & build bloggers community Simple News and Numbered Listicles Open / Ranked Lists with voting Personality Quiz, Trivia Quiz and Polls Audio and Video Formats Social Media Embeds Meme generator and more Moderation System Powerful Social Sharing System Powered by MashShare plugin Clear call to action buttons Fully customisable styles Editable buttons labels Sticky sharing bar Adjustable share buttons positions Fake share counts for easy start 25+ networks possibility via Mashshare add-on (including WhatsApp for mobile) Force to share quiz before seeing result with Viralpress Ads Everywhere with WP QUADS plugin ads injected into post lists ads in sidebar with sticky option ad before/after the header area ad before/after the content area ad before the “You may also like” section ad before the “More from” section ad before the “Don’t miss” section ad before the comments section ad in footer widget area ads in locations like “before the article first paragraph” etc… Other Features SEO optimised W3 valid / semantically correct HTML Code Cross browser compatible (IE 9+, Firefox, Safari, Opera, Chrome etc.) Fully Responsive Design Retina Ready RTL support WPML support Advanced GIF control Upvotes and Downvotes Newsletter with MailChimp subscriptions All Social Media Icons from Font Awesome 600+ Google Fonts Contact Form 7 support FULL CHANGE LOG Migration Guide for Boombox V2 // v2.5.8.1 - 27.12.2018 - Improvement: Gamify plugin: 2 new references for upvote and downvote - Improvement: Easy Social Share Buttons for WordPress: updated to the latest version - Improvement: WPBakery Page Builder: updated to the latest version - Fixed: Multiple minor fixes // v2.5.8 - 05.10.2018 - Improvement: Easy Social Share Buttons for WordPress: updated to the latest version - Improvement: Auto Load Next Post plugin: updated to the latest version - Fixed: WP Rocket plugin: issue related to voting system - Fixed: Multiple minor fixes // v2.5.7.1 - 17.08.2018 - Fixed: Multiple minor fixes // v2.5.7 - 17.08.2018 - Improvement: Wp Quads plugin: added 2 new positions - Sticky Bottom Area (Desktop/Mobile) - Improvement: Added option for opening Article Source and Via link in the new window - Improvement: Gamify plugin: added new hook - Points for every X votes - Fixed: Multiple minor fixes // v2.5.6 - 16.07.2018 - New: Demo - Advertimer - New: separate page with countdown option for downloading item - New: added frontend password reset functionality - Improvement: added password strength meter - Fixed: Multiple minor fixes // v2.5.5.1 - 28.06.2018 - Fixed: Ranking system issue related to LiteSpeed Cache plugin - Fixed: Multiple minor fixes // v2.5.5 - 08.06.2018 - New: Added GDPR compliance options - New: Option for changing color of address bar in mobile browser - Improvement: MyCred plugin: default badge image activated - Fixed: Zombify plugin: audio player doesn't show after uploading file - Fixed: Loco translation plugin doesn't effect to Zombify plugin's texts - Fixed: Multiple minor fixes // v2.5.4 - 31.05.2018 - New: Custom logo for category posts - Improvement: WpBakery plugin: added hide elements options for Boombox listing element - Fixed: Zombify plugin doesn't work with Safari 11 - Fixed: Zombify plugin: issue related to scheduled posts publishing date - Fixed: Single Post: issue related to Gif icon that appeared on the images - Fixed: Multiple minor fixes // v2.5.3.1 - 21.05.2018 - Fixed: BuddyPress plugin: error message on leaderboard and submissions pages - Fixed: Gamify plugin: can’t translate some texts // v2.5.3 - 18.05.2018 - Improvement: Media width option in Zombify plugin settings - Improvement: Sidebar option for Woocommerce product page - Fixed: Wp Quads pro plugin: Before Content Theme Area ad in single post option doesn't work - Fixed: In paginated posts missing featured image is missing in all next pages - Fixed: Can't remove added badge for category - Fixed: Multiple minor fixes // v2.5.2 - 08.05.2018 - Fixed: Facebook plugin - issue related to installation process - Fixed: Update ESSB plugin - issue related to post share function - Fixed: Floating Navbar doesn't deactivate - Fixed: WPBakery doesn't properly work - Fixed: Custom reaction color functions doesn't work - Fixed: Categories filter function doesn't properly work - Fixed: Structured data warning - Fixed: Multiple minor fixes // v2.5.1 - 28.04.2018 - Fixed: Facebook Comments plugin download url doesn't work - Fixed: Infinite scroll option doesn't properly work - Fixed: Sticky bar option doesn't properly work - Fixed: Single post hide elements options don't properly work - Fixed: Multiple post release fixes and improvements // v2.5.0 - 25.03.2018 - New: Single post templates - New: Sponsored Articles - New: WP Galleries with affiliate links - New: Breadcrumbs - New: Post Average Reading time - New: Material cards style - New: Credit / via option for entire article - New: Remember me checkbox in login popup - New: Fontawesome 5 Inegration - New: Custom Activiy Icons Set - New: Support for LiteSpeed Cache plugin - New: Leaderboard filters (Gamify) - Improvement: Post format icon position - Improvement: Single post pagitnation - Improvement: Post formatting styles - Fixed: Product Review Stars Not Showing - Fixed: Multiple minor fixes // v2.1.5 - 20.03.2018 - New: Logo Margin Top / Margin Bottom options - Improvement: Instagram embed video integration on steam / classic lists - Improvement: Option for contributors to delete their own draft posts - Improvement: AMP style size is reduced - Fix: GIFs issue on iOS - Fix: Warning notices on Woocommerce pages - Fix: Missing "Check it out" button for affiliate post in AMP version - Multiple minor fixes // v2.1.4 - 15.02.2018 - Improvement: Corrections in theme activation process - Fixed: NSFW posts view is broken - Fixed: CloudConvert API minor fixes - Fixed: Open lists / new item upload isn't working properly - Minor fixes // v2.1.3 - 13.02.2018 - New: NSFW options (customise->extras->NSFW) - New: Featured Author widget (Gamify plugin) - New: Badge and Rank reward notification popup (Gamify plugin) - Improvement: WooCommerce 3.3.1 support - Fixed: NSFW posts aren't properly hidden - Fixed: CloudConvert lib vulnerability issues - Fixed: Video/mp4 issues uploaded via Zombify - Minor fixes // v2.1.2 - 28.01.2018 - New: Separate burger menu locations - New: Button for regenerating trending, hot and popular lists - New: Separate options to hide related posts sections on AMP - Improvement: WooCommerce cards style integration - Improvement: NSWF posts integration with WPML plugin - Fixed: Videos doesn't load properly - Fixed: Customiser color picker issue - Fixed: Infinite scroll / duplicated posts issue - Fixed: Cards style unwanted margins - Multiple minor fixes // v2.1.1 - 13.01.2018 - Fixed: One Click Demo importer issues - Fixed: Post titles doesn't appear on strip - Fixed: WP Rocket plugin compatibility issues - Fixed: Google Recapcha doesn't work on contact form - Fixed: Visual Composer post listing filters doesn't work - Fixed: Icons alignment issues when Visual Composer is activated - Fixed: Achievements tab pagination (Gamify / Buddypress) - Multiple minor fixes // v2.1.0 - 29.12.2017 (major update) - New: Demo - Gifdom - New: Demo - Buzzy (recreation) - New: gifs integration in Masonry Grid listings - New: gifs integration in Featured Area - New: smart media placeholder (better ux during the page load) - New: "Mixed List" listing type (see Buzzy demo) - New: Single post template card style integration - New: "Hide title" option for posts listings - Major improvement: Zombify AMP styles optimisation (before: 30kb, after: 9kb) - Fixed: Gamify / Buddypress dark mode issues - Multiple minor fixes // v2.0.4 - 22.12.2017 - New: "Before featured area" ad location - New: "After featured area" ad location - New: "Inside header" ad location - Fixed: AMP style size issue - Fixed: Unwanted space on disabled ad areas - Fixed: WP Quad Pro notices - Fixed: Ad areas are missing for Home page - Fixed: Header composition with centred logo doesn't work - Fixed: RTL issues on mobile - Fixed: Some icons are misaligned when VC is used - Multiple minor fixes // v2.0.3 - 15.12.2017 - Fixed: Reaction badges color doesn't apply on AMP pages - Fixed: V2 Trending Icon isn't included on AMP icon pack - Fixed: WP Quad Pro doesn't active on all pages - Fixed: Ad areas are missing for Home page - Fixed: Time interval post loop option is missing for Home page - Fixed: Activation doesn't work if theme is white labeled - Multiple minor fixes // v2.0.2 - 12.12.2017 - Fixed: Error appears during page update - Fixed: Gamify plugin installation issues - Fixed: Multiple minor fixes and adjustments // v2.0.1 - 12.12.2017 - Fixed: boombox_social_links depricated function throw an error - Improvement: Automatic migration process improvement // v2.0.0 - 12.12.2017 (major update) - New: Demo - "Dash" - New: Smart Header Builder (drag & drop) + multiple new options - New: Standalone Mobile Header Builder (drag & drop) + multiple new options - New: Gamify - Advanced myCRED extension (exclusive new plugin) - New: Buddypress Redesign - New: Buddypress: Achievements tab - New: Buddypress: Private leaderboard tab - New: Buddypress: Points history tab - New: WPQUADS PRO - New: AMP Ads - New: Visual Composer - New: bbPress Support - New: Featured Area Types - New: Sidebar Types(including 2 sidebar layouts) - New: Masonry Grid: Boxed - New: Masonry Grid: Stretched - New: Sidebar Navigation Widget - New: Background Style: Cards - New: Featured Labels Navigation - New: Archive Header types - New: Archive filters - New: Page Header types - New: Enhanced Strip Configuration - New: Smart Sticky Header options - New: Theme Activation Process - Major Improvement: Customiser options rebuild - Major Improvement: Enhanced single page meta options - Major Improvement: Optimisation of Boombox core - Major Improvement: Documentation Rewrite (currently in progress) - Improvement: Redesigned UI - Improvement: ESSB 5.2 - Improvement: Zombify: Function to control permission for uploading open list items - Improvement: Zombify: Option for disable open list comments - Fixed: Zombify: Multiple minor fixes // v1.9.5.3 - 05.10.2017 - Improvement: option to disable account activation process in popup registration form - Fixed: image / video files validation issues in Zombify plugin - Fixed: facebook embed video integration on steam / classic lists - Fixed: Zombify plugin default settings aren't set on first activation - Fixed: buddypress registration radio buttons aren't properly aligned - Fixed: Input type trivia quiz - notice appears when quiz result appears - Multiple minor fixes // v1.9.5.2 - 02.10.2017 - Fixed: Zombify post formats titles and descriptions aren't translatable - Fixed: Open list items issues - Fixed: Featured image is removed when you update post via Zombify - Fixed: "Video control" options issues - Fixed: Default meme templates images' sizes is bigger then required // v1.9.5.1 - 30.09.2017 - Fixed: Migration error during theme activation - Fixed: Default meme templates images aren't properly optimised // v1.9.5.0 - 29.09.2017 (major update) Boombox Theme: - New: New demo - "Readly" - New: Video format integration for Classic and Stream listing types - New: WPML support - New: "3 small posts" featured area type - Improvement: Renewed mobile design - Improvement: ESSB v5 support - Improvement: "AMP for WP" plugin v0.5 support - Improvement: View tracking on AMP pages via "amp analytics" extension - Improvement: Instant Articles subtitle support - Improvement: Buddypress user account activation process is integrated with popup registration form - Fixed: Auto Load Next Post plugin integration issues - Fixed: Reactions "max count per vote" option doesn't work - Multiple minor fixes Zombify Frontend Uploader Plugin: - New: Meme templates directory - New: Input type Trivia Quiz - New: Countdown post format - New: Publish date control for Admins and Editors - New: vk.com embed video support - Improvement: Froala editor is updated - Fixed: Paginated list doesn't work with Instant Articles - Multiple optimisations and fixes // v1.9.1.1 - 20.09.2017 - Fixed: WordPress v4.8.2 compatibility // v1.9.1 - 02.08.2017 - New: "Random" posts listing condition - New: Daily limit option of post submitting for contributors (Zombify plugin) - New: "Sign Up" button custom URL option (in customise->authentication) - Improvement: Yoast SEO post words count detection support for Zombify posts - Fixed: Views don't count on AMP pages - Fixed: CloudConverter triggered twice when used "get by url" option - Fixed: Tick icon doesn't appear on AMP polls - Fixed: Quizzes don't share results on Facebook - Fixed: Google plus embed doesn't work stable - Minor fixes. // v1.9.0.2 - 17.07.2017 - Fixed: Facebook Instant Articles custom rules don't apply properly (Zombify) - Fixed: Post Ranking System doesn't fetch current lists until it's regenerated in 24h. - Minor fixes. // v1.9.0 - 15.07.2017 Zombify Frontend Uploader Plugin: - New: AMP Support - New: AMP Polls advanced support - New: AMP Open / Ranked Lists advanced support - New: Facebook Instant Articles Support - New: Enhanced CloudConverter Integration for GIF format (Zombify->Api connect->CloudConvert) - New: Wordfence security plugin support - New: Post format ordering option in plugin settings - New: Buddypress notification (including email) to user when submitted post is published - Fixed: MP4 and MP3 upload - Fixed: MP4 video controls doesn't show up - Fixed: Open list images not always showing up - Fixed: Not all affiliate links has "nofollow" attribute - Fixed: "Submissions" tab's post ordering doesn't apply to all posts - Improvement: JS and CSS files load optimisation - Improvement: Embeds output approach - Overall minor UI / UX improvements Boombox Theme: - New: AMP Support (brand new design) - New: AMP ESSB & Mashshare sharing plugins integration - New: Facebook Instant Articles Support - New: "Views count scale" option - e.g. 1 view counted as 3 ( in Customise->Post Ranking System) - Improvement: Attachment template Previous / Next Buttons - Improvement: Excluding featured area's posts from main post listing - Minor fixes and optimisations // v1.8.2 - 25.05.2017 - New: Daylimotion support in boombox advanced fields "video url" - Improved: WooCommerce 3.0 support improvement - Improved: nofollow is added to affiliate button link - Fixed: Mediaelement js error - Fixed: H1 heading appears twice on post single - Fixed: ESSB plugin error during installation - Fixed: Via field is missing in story / image (Zombify) - Fixed: Image upload via Froala doesn't work properly (Zombify) - Fixed: Open / Ranked lists items template issues (Zombify) - Fixed: "Choose a format" string isn't translatable (Zombify) - Fixed: Multiple conversions during GIF upload (Zombify) - Fixed: Branding colour isn't applied in popup (Zombify) - Minor fixes // v1.8.0 - 29.04.2017 (major update) Zombify Frontend Uploader Plugin: - New: Froala Rich Text Editor advanced integration - New: Complex Stories with Quizzes, Polls, Listicles & other formats (all optional) - New: Instant File Uploading - New: MP4 Upload for Video format (including mp4 file upload size option) - New: MP3 Upload for Audio forma (including mp3 file upload size option) - New: GIF post format with direct MP4 file upload - New: Autosave - New: Excerpt & Preface optional fields - New: Enhanced embeds functionality: facebook, reddit, tumblr, coub, imgur, vidme and more - New: Option for controlling max count of categories & tags on post - New: Options for allowed categories - Improvement: User roles permissions - Improvement: "Items per page" option for Open / Ranked lists - Improvement: Validation errors visibility - Improvement: Better placement for Featured image upload box - Improvement: js files loading optimisations - Fixed: Translation issues - Overall minor improvements and fixes Boombox Theme: - New: Related Posts Widget - New: Separate option for featured posts on front page - New: Icon option for "Boombox pick" widget - Improvement: Option for disabling featured image in post single by categories and tags - Improvement: WooCommerce 3.0 support - Improvement: Structured data better support - Improvement: Multiple minor speed optimisations - Fixed: ESSB plugin integration minor issues - Minor fixes Source
0 notes
Text
24 Useful Tricks To Speed Up WordPress & Boost Performance
Do you want to speed up your WordPress site? Fast loading pages improve user experience, increase your pageviews, and help with your WordPress SEO. In this article, we will share the most useful WordPress speed optimization tips to boost WordPress performance and speed up your website.
Unlike other “X best WordPress caching plugin” lists or generic “X tips to speeding up WordPress” tutorials, this article is a comprehensive guide to WordPress performance optimization.
We tried to cover everything from why speed is important, what slows down your WordPress site, and actionable steps that you can take to improve your WordPress speed immediately.
To make it easy, we have created a table of contents to help you navigate through our ultimate guide to speeding up your WordPress site.
Table of Contents
Basics of WordPress Performance
Why Speed is Important for your WordPress Site?
How to Check Your WordPress Website Speed?
What Slows Down Your WordPress Website?
Importance of Good WordPress Hosting
Speeding Up WordPress in Easy Steps (No Coding)
Install a WordPress Caching Plugin
Optimize Images for Speed
WordPress Performance Optimization Best Practices
Keep Your WordPress Site Updated
Optimize Background Processes
Use Excerpts on Homepage and Archives
Split Comments into Pages
Use a Content Delivery Network (CDN)
Don’t Upload Audio/Video Files Directly to WordPress
Use a Theme Optimized For Speed
Use Faster Plugins
Fine-Tuning WordPress for Speed (Advanced)
Split Long Posts into Pages
Reduce External HTTP Requests
Reduce Database Calls
Optimize WordPress Database
Limit Post Revisions
Disable Hotlinking and Leeching of Your Content
Use Lazy Loading if Needed
Use DNS Level Website Firewall
Fix HTTPS/SSL Errors without Plugin
Use Latest PHP Version
Why Speed is Important for Your WordPress Site?
Studies show that from 2000 to 2016, the average human attention span has dropped from 12 seconds to 7 seconds.
What does this mean for you as a website owner?
You have very little time to show users your content and convince them to stay on your website.
A slow website means users will potentially leave your website before it even loads.
According to a StrangeLoop case study that involved Amazon, Google, and other larger sites, a 1 second delay in page load time can lead to 7% loss in conversions, 11% fewer page views, and 16% decrease in customer satisfaction.
On top of that, Google and other search engines have already started penalizing slower websites by pushing them down in the search results which means lower traffic for slow websites.
To sum it all up, if you want more traffic, subscribers, and revenue from your website, then you must make your WordPress website FAST!
How to Check Your WordPress Website Speed?
Often beginners think that their website is OK just because it doesn’t feel slow on their computer. That’s a HUGE mistake.
Since you frequently visit your own website, modern browsers like Chrome store your website in the cache and automatically prefetch it as soon as you start typing an address. This makes your website load almost instantly.
However, a normal user who is visiting your website for the first time may not have the same experience.
In fact, users in different geographical locations will have a completely different experience.
This is why we recommend that you test your website speed using a tool like IsItWP’s WordPress speed test.
It is a free online tool that allows you to test your website’s speed.
After you run your website speed test, you might be wondering what’s a good website speed that I should aim for?
A good page load time is under 2 seconds.
However, the faster you can make it, the better it is. A few milliseconds of improvements here and there can add up to shaving off half or even a full second from your load time.
[Back to Top ↑]
What Slows Down Your WordPress Website?
Your speed test report will likely have multiple recommendations for improvement. However, most of that is technical jargon which is hard for beginners to understand.
Learning what slows down your website is the key to improving performance and making smarter long-term decisions.
The primary causes for a slow WordPress website are:
Web Hosting – When your web hosting server is not properly configured it can hurt your website speed.
WordPress Configuration – If your WordPress site is not serving cached pages, then it will overload your server thus causing your website to be slow or crash entirely.
Page Size – Mainly images that aren’t optimized for web.
Bad Plugins – If you’re using a poorly coded plugin, then it can significantly slow down your website.
External scripts – External scripts such as ads, font loaders, etc can also have a huge impact on your website performance.
Now that you know what slows down your WordPress website, let’s take a look at how to speed up your WordPress website.
Importance of Good WordPress Hosting
Your WordPress hosting service plays an important role in website performance. A good shared hosting provider like Bluehost or Siteground take the extra measures to optimize your website for performance.
However, on shared hosting you share the server resources with many other customers. This means that if your neighboring site gets a lot of traffic, then it can impact the entire server performance which in turn will slow down your website.
On the other hand, using a managed WordPress hosting service give you the most optimized server configurations to run WordPress. Managed WordPress hosting companies also offer automatic backups, automatic WordPress updates, and more advanced security configurations to protect your website.
We recommend WPEngine as our preferred managed WordPress hosting provider. They’re also the most popular one in the industry. (See our special WPEngine coupon).
[Back to Top ↑]
Speeding Up WordPress in Easy Steps (No Coding)
We know that making changes to your website configuration can be a terrifying thought for beginners, especially if you’re not a tech-geek.
But don’t worry, you’re not alone. We have helped thousands of WordPress users improve their WordPress performance.
We will show you how you can speed up your WordPress site with just a few clicks (no coding required).
If you can point-and-click, then you can do this!
Install a WordPress Caching Plugin
WordPress pages are “dynamic.” This means they’re built on the fly every time someone visits a post or page on your website.
To build your pages, WordPress has to run a process to find the required information, put it all together, and then display it to your user.
This process involves a lot of steps, and it can really slow down your website when you have multiple people visiting it at once.
That’s why we recommend every WordPress site use a caching plugin. Caching can make your WordPress site anywhere from 2x to 5x faster.
Here’s how it works.
Instead of going through the whole page generation process every time, your caching plugin makes a copy of the page after the first load, and then serves that cached version to every subsequent user.
As you can see in the graphics above, when a user visits your WordPress site, your server retrieves information from a MySQL database and your PHP files. It then puts it all together into HTML content which is served to the user.
It’s a long process, but you can skip a lot of it when you use caching instead.
There are a lot of good WordPress caching plugins available, but we recommend using either WP Rocket (premium) or WP Super Cache (free) plugin.
Check out our step by step guide on how to install and setup WP Super Cache on your WordPress site. It’s not difficult to set up, and your visitors will notice the difference.
Many WordPress hosting companies like Bluehost and SiteGround offer caching solutions as well.
SiteGround SuperCacher
If you are using SiteGround then login to hosting cPanel and enable SuperCacher under ‘Site improvement tools’.
After that, you will need to install and activate the SG Optimizer plugin in WordPress to manage SuperCacher settings.
Bluehost Caching
If you are using Bluehost, then go to My Sites » Performance section to turn on caching.
If you’re using a managed WordPress hosting provider, then you don’t need a caching plugin because it is built-in and turned on by default.
Bonus: You can combine caching plugins with a web application firewall like CloudFlare or Sucuri for maximum performance boost.
[Back to Top ↑]
Optimize Images for Speed
Images bring life to your content and help boost engagement. Researchers have found that using colored visuals makes people 80% more likely to read your content.
However, if your images aren’t optimized, then they could be hurting more than helping. In fact, non-optimized images are one of the most common speed issues that we see on beginner websites.
Before you upload a photo directly from your phone or camera, we recommend that you use photo editing software to optimize your images for the web.
In their original formats, these photos can have huge file sizes. But based on the image file format and the compression you choose in your editing software, you can decrease your image size by up to 5x.
At WPBeginner, we only use two image formats: JPEG and PNG.
Now you might be wondering: what’s the difference?
Well, PNG image format is uncompressed. When you compress an image it loses some information, so an uncompressed image will be higher quality with more detail. The downside is that it’s a larger file size, so it takes longer to load.
JPEG, on the other hand, is a compressed file format which slightly reduces image quality, but it’s significantly smaller in size.
So how do we decide which image format to choose?
If our photo or image has a lot of different colors, then we use JPEG.
If it’s a simpler image or we need a transparent image, then we use PNG.
The majority of our images are JPEGs.
Below is a comparison chart of the file sizes and different compression tool that we could have used for the StrangeLoop image used above.
As you can see in the chart, the image format you use can make a HUGE difference in website performance.
For details on exactly how to optimize your images using Photoshop and other popular editing tools, without sacrificing quality, see our step by step guide on how to save images optimized for web.
[Back to Top ↑]
WordPress Performance Optimization Best Practices
After installing a caching plugin and optimizing your images, you’ll notice your site will start loading a lot faster.
But if you really want to keep your website as fast as possible, you’ll need to use the best practices listed below.
These tips aren’t too technical, so you don’t need to know any code to implement them. But using them will prevent common problems that will slow down your website.
Keep Your WordPress Site Updated
As a well maintained open source project, WordPress is updated frequently. Each update will not only offer new features but it will also fix security issues and bugs. Your WordPress theme and plugins may have regular updates, too.
As a website owner, it’s your responsibility to keep your WordPress site, theme, and plugins updated to the latest versions. Not doing so may make your site slow and unreliable, and make you vulnerable to security threats.
For more details on the importance of updates, see our article on why you should always use the latest WordPress version.
[Back to Top ↑]
Optimize Background Processes
Background processes in WordPress are scheduled tasks that run in the background of your WordPress site. Following are some examples of background tasks that run on a WordPress site:
WordPress Backup plugin tasks
WordPress cron jobs to publish scheduled posts
WordPress cron jobs to check for updates
Search engines and other crawlers trying to fetch content
Tasks like cron jobs for scheduled posts and updates have minimal impact on website performance.
However, other background processes like backup plugins and excessive crawling by search engines can slow down a website.
For backup plugins, you need to make sure that your WordPress backup plugin only run during low traffic time on your website. You also need to adjust the frequency of backups and data that needs to be backed up.
For example, if you are creating a complete daily backup while you only publish new content twice a week, then you need to adjust that.
If you want more frequent backups such as real-time backups, then we recommend using a SaaS solution so you’re not taxing your server.
As for crawling, you need to keep an eye on your crawl reports in Google Search console. Frequent crawls that are ending up in errors can cause your website to slow down or become unresponsive.
See our complete Google Search Console guide for beginners to learn how to adjust crawl rate.
[Back to Top ↑]
Use Excerpts on Homepage and Archives
By default, WordPress displays the full content of each article on your homepage and archives. This means your homepage, categories, tags, and other archive pages will all load slower.
Another disadvantage of showing full articles on these pages is that users don’t feel the need to visit the actual article. This can reduce your pageviews, and the time your users spend on your site.
In order to speed up your loading times for archive pages, you can set your site to display excerpts instead of the full content.
You can navigate to Settings » Reading and select “For each article in a feed, show: Summary” instead of “Full Text.”
For more details on the pros and cons of displaying summaries, see our article on full post vs summary (excerpt) in your WordPress archive pages.
[Back to Top ↑]
Split Comments into Pages
Getting lots of comments on your blog posts? Congratulations! That’s a great indicator of an engaged audience.
But the downside is, loading all those comments can impact your site’s speed.
WordPress comes with a built-in solution for that. Simply go to Settings » Discussion and check the box next to the “Break comments into pages” option.
For more detailed instructions, see our guide on how to paginate comments in WordPress.
[Back to Top ↑]
Use a Content Delivery Network (CDN)
Remember how we mentioned above that users in different geographical locations may experience different loading times on your site?
That’s because the location of your web hosting servers can have an impact on your site speed.
For example, let’s say your web hosting company has its servers in the United States. A visitor who’s also in the United States will generally see faster loading times than a visitor in India.
Using a Content Delivery Network (CDN), can help to speed up loading times for all of your visitors.
A CDN is a network made up of servers all around the world. Each server will store “static” files used to make up your website.
These static files include unchanging files such as images, CSS, and JavaScript, unlike your WordPress pages which are “dynamic” as explained above.
When you use a CDN, every time a user visits your website they are served those static files from whichever server is closest to them. Your own web hosting server will also be faster since the CDN is doing a lot of the work.
You can see how it works in this infographic.
We use recommend using StackPath CDN. We have been using MaxCDN on all our websites which is now also part of StackPath.
It works well with WordPress websites and compliments your existing WordPress caching plugins for even faster loading times.
[Back to Top ↑]
Don’t Upload Audio/Video Files Directly to WordPress
You can directly upload audio and video files to your WordPress site, and it will automatically display them in an HTML5 player…
But you should NEVER do that!
Hosting audio and videos will cost you bandwidth. You could be charged overage fees by your web hosting company, or they may even shut down your site altogether, even if your plan includes “unlimited” bandwidth.
Hosting large media files also increases your backup sizes tremendously, and makes it difficult for you to restore WordPress from backup.
Instead, you should use an audio and video hosting service like YouTube, Vimeo, DailyMotion, SoundCloud, etc., and let them take care of the hard work. They have the bandwidth for it!
WordPress has a built-in video embed feature, so you can copy and paste your video’s URL directly into your post and it will embed automatically.
Find out more details on how it works in our guide on embedding videos in WordPress.
If you are making a podcast website with WordPress, then we recommend podcast hosting service Blubrry for the best performance.
[Back to Top ↑]
Use a Theme Optimized For Speed
When selecting a theme for your website, it’s important to pay special attention to speed optimization. Some beautiful and impressive-looking themes are actually poorly coded and can slow your site way down.
It’s usually better to go with a simpler theme than to choose a theme that’s bloated with complex layouts, flashy animations, and other unnecessary features. You can always add those features using quality WordPress plugins.
Premium WordPress theme shops like StudioPress, Themify, CSSIgniter offer themes that are well coded and optimized for speed. You can also check out our article on selecting the perfect WordPress theme for advice on what to look for.
Before you activate your new theme, see our guide on how to properly switch your WordPress theme for a smooth transition.
[Back to Top ↑]
Use Faster Plugins
Poorly coded WordPress plugins often load too much bloat whether your site needs it or not. This increases your page load speed and slows down your site.
To help you choose the best plugins, we often publish our expert pick of best WordPress plugin showcases. We pay special attention to ease of use, user experience, and most importantly performance.
Following are some of our picks for the most common WordPress plugin categories.
WPForms – Fastest and most beginner friendly contact form plugin for WordPress.
Soliloquy – If you want to add sliders to your site, then Soliloquy is the best WordPress slider plugin in terms of performance and features.
Envira Gallery – Photo gallery plugins can also slow down WordPress. We ran the tests and found Envira Gallery to be the fastest photo gallery plugin for WordPress.
Shared Counts – Social media plugins load additional scripts and not so gracefully. Shared Counts is one of the fastest Social media plugins for WordPress.
Apart from our own recommendations, you can run your own tests. Simply run speed tests before and after installing a plugin to compare its impact on performance.
[Back to Top ↑]
Fine-Tuning WordPress for Speed (Advanced)
By using the WordPress optimization best practices and basic speed tips listed above, you should see a big improvement in your site’s loading times.
But every fraction of a second counts. If you want to get the very fastest speed possible, then you’ll want to make a few more changes.
The following tips are a little more technical, with some requiring you to modify your site files or have a basic understanding of PHP. You’ll want to make sure to backup your site first just in case.
Split Long Posts into Pages
Readers tend to love blog posts that are longer and more in-depth. Longer posts even tend to rank higher in search engines.
But if you’re publishing long-form articles with lots of images, it could be hurting your loading times.
Instead, consider splitting up your longer posts into multiple pages.
WordPress comes with built-in functionality to do that. Simply add the <!––nextpage––> tag in your article where you want to split it into next page. Do that again if you want to split the article on to the next page as well.
For more detailed instructions, see our tutorial on post pagination – how to split WordPress posts into multiple pages.
[Back to Top ↑]
Reduce External HTTP Requests
Many WordPress plugins and themes load all kinds of files from other websites. These files can include scripts, stylesheets, and images from external resources like Google, Facebook, analytics services, and so on.
It’s ok to use a few of these. Many of these files are optimized to load as quickly as possible, so it’s faster than hosting them on your own website.
But if your plugins are making a lot of these requests, then it could slow down your website significantly.
You can reduce all these external HTTP requests by disabling scripts and styles or merging them into one file. Here’s a tutorial on how to disable your plugins’ CSS files and JavaScript.
[Back to Top ↑]
Reduce Database Calls
Note: This step is a little more technical and will require basic knowledge of PHP and WordPress template files.
Unfortunately, there are a lot of poorly coded WordPress themes out there. They ignore WordPress standard practices and end up making direct database calls, or too many unnecessary requests to the database. This can really slow down your server by giving it too much work to do.
Even well-coded themes can have code that makes database calls just to get your blog’s basic information.
In this example, every time you see <?php, that’s the start of a new database call:
<html xmlns="http://www.w3.org/1999/xhtml" dir="<?php language_attributes(); ?>"> <head profile="http://gmpg.org/xfn/11"> <meta http-equiv="Content-Type" content="<?php bloginfo('html_type'); ?> charset=<?php bloginfo('charset'); ?>" />
You can’t blame theme developers for that. They simply have no other way to find out what language your site is in.
But if you are customizing your site using a child theme, then you can replace these database calls with your specific information in order to reduce all those database calls.
<html xmlns="http://www.w3.org/1999/xhtml" dir="ltr"> <head profile="http://gmpg.org/xfn/11"> <meta http-equiv="Content-Type" content="text/html; charset=UTF-8" />
Review your parent theme for instances like this that can be easily replaced with static information.
[Back to Top ↑]
Optimize WordPress Database
After using WordPress for a while, your database will have lots of information that you probably don’t need any more. For improved performance, you can optimize your database to get rid of all that unnecessary information.
This can be easily managed with the WP-Sweep plugin. It allows you to clean your WordPress database by deleting things like trashed posts, revisions, unused tags, etc. It will also optimize your database’s structure with just a click.
See our guide on how to optimize and clean up your WordPress database for improved performance.
[Back to Top ↑]
Limit Post Revisions
Post revisions take up space in your WordPress database. Some users believe that revisions can also affect some database queries run by plugins. If the plugin doesn’t specifically exclude post revisions, it might slow down your site by searching through them unnecessarily.
You can easily limit the number of revisions WordPress keeps for each article. Simply add this line of code to your wp-config.php file.
define( 'WP_POST_REVISIONS', 4 );
This code will limit WordPress to only save your last 4 revisions of each post or page, and discard older revisions automatically.
[Back to Top ↑]
Disable Hotlinking and Leaching of Your Content
If you’re creating quality content on your WordPress site, then the sad truth is that it’ll probably get stolen sooner or later.
One way this happens is when other websites serve your images directly from their URLs on your website, instead of uploading them to their own servers. In effect, they’re stealing your web hosting bandwidth, and you don’t get any traffic to show for it.
Simply add this code to your .htaccess file to block hotlinking of images from your WordPress site.
#disable hotlinking of images with forbidden or custom image option RewriteEngine on RewriteCond %{HTTP_REFERER} !^$ RewriteCond %{HTTP_REFERER} !^http(s)?://(www\.)?wpbeginner.com [NC] RewriteCond %{HTTP_REFERER} !^http(s)?://(www\.)?google.com [NC] RewriteRule \.(jpg|jpeg|png|gif)$ – [NC,F,L]
Note: Don’t forget to change wpbeginner.com with your own domain.
You may also want to check our article showing 4 ways to prevent image theft in WordPress.
Some content scraping websites automatically create posts by stealing your content from your RSS feed. You can check out our guide on preventing blog content scraping in WordPress for ways to deal with automated content theft.
[Back to Top ↑]
Use Lazy Loading if Needed
If you add many images, multiple video embeds, and photo galleries to your blog posts, then your site can benefit from lazy loading.
Instead of loading all your images and videos at once, lazy loading downloads only those that will be visible on the user’s screen. It replaces all other images and video embeds with a placeholder image.
As a user scrolls down, your website loads images that are now visible in the browser’s viewing area. You can lazy load images, videos, and even WordPress comments and gravatars.
For images, iframes, and videos, you can use the Lazy Load by WP Rocket plugin. For WordPress comments see our guide on how to lazy load comments in WordPress.
[Back to Top ↑]
Use DNS Level Website Firewall
A WordPress firewall plugin helps you block brute force attacks, hacking attempts, and malware. However, not all firewall plugins are the same.
Some of them run on your website, this means attackers are already able to reach your web server before they get blocked. This is still effective for security, but not optimal for performance.
This is why we recommend using a DNS level firewall like Sucuri or Cloudflare. These firewalls block maclious requests even before they reach your website.
[Back to Top ↑]
Fix HTTPS/SSL Errors without Plugin
If you are switching your site to HTTPS/SSL, then it is likely that you may run across mixed content errors.
The easiest way to fix this is by installing a plugin like Really Simple SSL. However, the problem is that these plugins catch all URLs first, then change them to HTTPS before sending them to user’s browsers.
This has a small but noticeable performance impact. You can reduce this by manually fixing all URLs. For more details see our article on how to fix common SSL issues in WordPress.
[Back to Top ↑]
Use Latest PHP Version
WordPress is mainly written in the PHP programming language. It is a server side language, which means it is installed and runs on your hosting server.
All good WordPress hosting companies use the most stable PHP version on their servers. However, it is possible that your hosting company is running a slightly older PHP version.
The newer PHP 7 is two times faster than its predecessors. That’s a huge performance boost that your website must take advantage of.
You can see which PHP version your site is using by installing and activating the Version Info plugin.
Upon activation, the plugin will show your PHP version in the footer area of your WordPress admin dashboard.
If your website is using a version lower than PHP 7, then ask your hosting provider to update it for you. If they are unable to do so, then it is time to find a new WordPress hosting company.
[Back to Top ↑]
That’s it! We hope this article helped you learn how to improve wordpress speed and performance.
Go ahead and try out these techniques. Don’t forget to test your website speed before and after implementing these best practices. You’ll be surprised these changes will boost your WordPress performance.
If you liked this article, then please subscribe to our YouTube Channel for WordPress video tutorials. You can also find us on Twitter and Facebook.
The post 24 Useful Tricks To Speed Up WordPress & Boost Performance appeared first on WPBeginner.
😉SiliconWebX | 🌐WPBeginner
0 notes
Text
Free download LayerSlider Responsive WordPress Slider Plugin V6.5.7
New Post has been published on https://superhotthemes.com/free-download-layerslider-responsive-wordpress-slider-plugin-v6-5-7/
Free download LayerSlider Responsive WordPress Slider Plugin V6.5.7
LayerSlider Responsive WordPress Slider Plugin V6.5.7
LayerSlider is a premium multi-purpose animation platform. Slideshows & image galleries with mind-blowing effects, gorgeously animated landing pages & page blocks, or even a full website can be created using LayerSlider. Every website can benefit from the capabilities of this plugin.
The drag and drop visual editor makes it really easy for everyone to get started using LayerSlider. No coding or technical skills required. The ever growing selection of importable templates are an ideal starting point for new projects and they cover every common use case from personal to corporate business. They are carefully crafted, aesthetically pleasing and can be easily customize to fit for any needs.
Great support and frequent updates ensure to make the most out of your purchase.
Changes in LayerSlider 6.5.7
This update fixes a PHP debug message displayed when your site has the WP debug mode enabled.
Changes in LayerSlider 6.5.6
Changes of media layers: Autoplaying videos will no longer display the play icon for that brief moment, making background videos and in other cases a perfectly smooth video surface. You now have the option to set the volume of background videos. They are muted by default and there was no way to change that previously. The ‘Controls’ and ‘Show Info’ media layer settings now include an ‘Auto’ option. It is based on the most common use cases and respects settings set by the embed code or HTML attributes. The ‘Controls’ option for media layers was not working as expected in some cases. For example, you can now enable controls for audio layers as well. Media layers are now properly pause and resume playback (based on your settings) when closing/re-opening a Popup slider. Changes in the WPML implementation: When setting up the ‘Dynamic content from posts’ feature, the Post Options screen now shows only the posts belonging to the currently selected language set by WPML. Duplicate entries created as a translation will be filtered out and can be reached by choosing the corresponding language from the WPML menu on the top admin bar. The ‘Dynamic content from posts’ feature now lets WPML to generate the post permalink on its own. This ensures to always have the appropriate URL based on your WordPress and WPML settings. Fixed an issue that could make layers unselectable in the Slider Builder when you used ‘class’ as a custom layer attribute. Fixed an issue that caused Google to index the ‘static’ plugin folder causing unwanted search results. Fixed the OS native fullscreen mode in Firefox. Fixed previewing the Origami transition in the Slider Builder. Fixed an issue in the Dynamic content feature that could break the Slider Builder interface in very rare cases. Increased compatibility by workarounding certain issues in 3rd party plugins and themes. General fixes and improvements under the hood.
Changes in LayerSlider 6.5.5
This update brings smart editing features to the Slider Builder among many other important bug fixes and improvements.
New features Edit in Multiple Selection Mode is here. You can now apply any setting to all selected layers at once. Finding the perfect Font family and Font size is easier than ever. Just hover over the list items and quickly see a real-time preview in the Preview Area. New documented API method: resetSlide. Improvements Improved compatibility with WPML: layer edits no longer show up as new entries in WPML’s String Translation module, instead they are marked as ‘Translation needs update’. Due to backwards compatibility, this new implementation of WPML will only be used in newly created sliders. We’ve also updated the Multilingual Sliders section of this documentation. Multi-selecting layers is now also available in the layers list area (below the preview) by holding the Ctrl/Cmd key and clicking on layers. Added range-select support for the layers list area by holding down the Shift key when selecting layers. You can now also multi-select layers in the right click “overlapping layers” menu by holding the Ctrl/Cmd key and clicking on items. Multiple-selection is now easily dismissible just by clicking on the desired layer again. The whole Preview Area has been made much more fluid, changes are now appearing without delay. The Undo Manager now restores layer selection as well. The System Status now checks for database related issues and an Update Database button has been added for fixing potential issues whenever it’s possible. Bug fixes Fixed a PHP error that effected saving sliders in some cases. Fixed an issue that prevented using multiple LayerSlider plugins (Origami, Popup, etc.) at the same time. Fixed an issue that in some very rare cases caused your sliders to not show up properly. Fixed some rare issues in Undo Manager. System Status now correctly shows Install Location on Windows servers.
Changes in LayerSlider 6.5.1
Fixed a PHP error that might caused HTTP 500 Internal Server Error in some cases with older versions of PHP.
Changes in LayerSlider 6.5.0 Introducing our new premium feature: Popups.
Popups is a completely new way of using LayerSlider and it greatly extends its capabilities and what you can build with the plugin. Combining our strong foundation and the vast number of features we already have with the newly introduced Popup feature makes LayerSlider one of the best choice among popup plugins. Click here for more information and live examples. Thanks to conseillerphytoaroma, the French localization has been updated to cover areas that weren’t translated before. Added new skin: Photo Gallery Added “Change URL hash” advanced option to Slider Settings -> Slideshow. Enable it to update the URL hash as you navigate in the slider based on slide deeplinks. This makes it possible to share URLs that will start the slider with the currently visible slide at any given moment. Added “Prefer Blend Mode” advanced option to Slider Settings -> Misc. Enable this option to avoid blend mode issues with slide transitions. Due to technical limitations, this will also clip your slide transitions regardless of your settings. Greatly enhanced the Global Hover feature introduced in the previous release. The admin UI now uses deeplinking to always open at the same location when you refresh the page. Fixed overflowing issue and improved multiple selection in the new WP text editor “Add LayerSlider” plugin.
Changes in LayerSlider 6.4.0
Bonjour! Thanks to conseillerphytoaroma, LayerSlider is now fully translated into French. Sziasztok! We’ve also added an experimental Hungarian localization in this release. Psst! More languages are on their way! Internationalization in LayerSlider underwent a major overhaul to provide high quality localizations and make translators’ life much easier. The English locale has also been updated. Instead of using typewriter characters, we now have nicely formatted punctuation with curly quotes and apostrophes. Added new Google Fonts script subsets: Arabic, Bengali, Gujarati, Gurmukhi, Hebrew, Kannada, Malayalam, Myanmar, Oriya, Sinhala, Tamil, Telugu and Thai. Welcome, newcomers! 🙂 In cooperation with WPBakery, this update introduce changes to improve compatibility & integration with future versions of Visual Composer. Developers should check our updated Filters reference in the Developer documentation. Added “Important Notice” feature. In cases of important and urgent matters, we can now display a small banner on the admin dashboard to notify everyone. These might be security issues or other justifiable cases. Hopefully, you will never see any of them. 🙂 Entirely new WordPress text editor plugin to insert sliders into your posts and pages. Besides its drastically improved user interface, it also supports keyboard shortcuts, multiple selections and embed options. Added a new premium feature: Global Hover. Create spectacular effects by triggering the Hover Transitions of all layers at once when you hover over the slider with your mouse cursor. A simple example demonstrating this can be found here. Added “Start immediately” option to the Play by Scroll feature. Now it’s possible to automatically start playback and only pause sliders at the first keyframe instead of waiting users to scroll down. Added option to override the starting slide of sliders in the shortcode and widget settings. Added letter spacing option to layer styles so you can change the character density in a line or block of text. Improvements Enabled word wrapping in CodeMirror code editors. The System Status now has better recommendations with providing the ideal values of each setting. While LayerSlider continues to require PHP 5.3.0 or newer, on the global scope it no longer uses language features that is not available in PHP 5.2.4. This ensures better overall compatibility with WordPress on pages where LayerSlider is no being actively used. Updated documentation to fix page jumping issues when deeplinking. Bug fixes Implemented a potential fix for CloudFlare’s Rocket Loader issues. Fixed the image chooser button when using the “Insert image from URL” option. Fixed an isssue that prevented displaying the slider actions popup in some rare cases in the List View. Prevent slider selection (colored highlight) when switching into full screen mode by doubling clicking on the slider. Fixed certain issues with the Outline, Numbers and Rounded Flat skins. Fixed Blend mode with the Origami transition. Fixed alt attributes on the slide thumbnail images. Fixed an issue with the sliderDidRemove event. Fixed a rare issue with the opacity option of the Hover Transition. Countless other bug fixes and improvements throughout the plugin.
Changes is LayerSlider 6.3.0
Introducing a new premium feature: Revisions. Have a peace of mind knowing that your slider edits are always safe and you can revert back unwanted changes or faulty saves at any time. This feature serves not just as a backup solution, but a complete version control system where you can visually compare the changes you have made along the way.
Additional changes: Improved compatibility with *really old* and outdated slider versions. Fixed rare issues when copy-pasting layers across slides and sliders. Improved Auto-fit option in Slider Builder.
Changes is LayerSlider 6.2.2
This update fixes an API issue introduced in the previous release.
Changes is LayerSlider 6.2.1
This update contains important security fixes. We strongly encourage everyone to install it as soon as possible. [Thanks to WpHutte – wphutte.com for reporting.]
New features Added option to choose whether the slide link should be on top or underneath layers. The Template Store can now import slider packs. Stay tuned, they’re arriving soon! The System Status now checks the install location of LayerSlider and warns you about potential issues (if any). Added slide deeplink names to the LayerSlider API. Improvements Lots of improvements in importing sliders. The premium features notification now lists the exact premium features being used in sliders. Bug fixes Important security fixes. Fixed slide linking that has accidentally been broken by our previous update. Fixed an issue in IE11, which caused the browser to jump to the top of the page after slide change in some cases. Fixed video overlay image position preview on the admin interface.
Changes in LayerSlider 6.2.0
New features Introducing a new premium feature: Blend modes. Blend modes are an easy way to add eye-catching effects and is one of the most frequently used features in graphic and print design. The admin UI now warns against potential issues when selecting certain options, which are commonly misunderstood and would result unexpected behavior. Added OSD notifications for certain keyboard shortcuts (e.g. Ctrl/Cmd + S for saving the slider) and a corresponding setting under Screen Options to enable/disable this feature. Added layerslider_root_url filter to override paths. Check the Developer Documentation for more information.
Improvements Improved compatibility with older sliders. Improved handling of font variants when importing Google Fonts from templates. Certain number input fields are now stepping in more appropriate intervals when pressing the arrow buttons. Updated and extended some parts of the documentation.
Bug fixes A massive update for multimedia layers: Fixed video size and positioning issues, which was present in rare edge cases. Fixed occasional playback issues with videos being on the first slide. Fixed the slideshow not progressing forward in cases when there was only one video layer on the slide. Hiding a media layer with the Device support feature will now also disable media playback on the corresponding devices. In addition, background videos will also show the video poster image as a fallback. This enhances user experience on mobile devices that has limited playback capabilities due to OS/browser restrictions. Various minor bug fixes and improvements. Fixed image chooser when using the “Use post image” option. Fixed the “Use post URL” option in linking fields. Fixed the Slider Settings -> Appearance -> Global background image option to always use the appropriate URL. Fixed the “Use GreenSock (GSAP) sandboxing” option not always taking effect. Fixed an issue that could empty your Google Fonts collection when reinstalling the plugin. Fixed a rare issue that affected users trying to change settings in the Advanced Settings section without having sliders. Fixed issues caused by applying text transitions on non-text layers General UI and under the hood improvements and bug fixes
MORE/INFO – DEMO: https://codecanyon.net/item/layerslider-responsive-wordpress-slider-plugin/1362246
LayerSlider Responsive WordPress Slider Plugin V6.5.7 download
Plugin: https://drive.google.com/file/d/0Bx1UscVSDgifVmlGNTlEVDN1YjA/view?usp=sharing
Premium Slider Templates: https://drive.google.com/file/d/0Bx1UscVSDgifNlZyOExPczRzd2c/view?usp=sharing
You can Free download LayerSlider Responsive WordPress Slider Plugin V6.5.7 nulled documentation for educational and testing purpose.If you want to use this for commercial purpose then click on sale page of developer through demo given above.
0 notes