#flushdns
Explore tagged Tumblr posts
Visit Tumblr Blog
Explore Tumblr blogs with no restrictions, modern design and the best experience.
Last Seen Tumblr Blogs


Fun Fact
Celebrities use Tumblr as well.
Text
Kurz notiert: DNS Cache unter macOS Sequoia löschen
→ Terminal öffnen und folgenden Befehlen einfügen: sudo dscacheutil -flushcache; sudo killall -HUP mDNSResponder → anschliessend wird das Admin-Passwort abgefragt und im Anschluss ist den DNS-Cache geleert.
0 notes
Text
Steps to Clear DNS Cache on Chrome
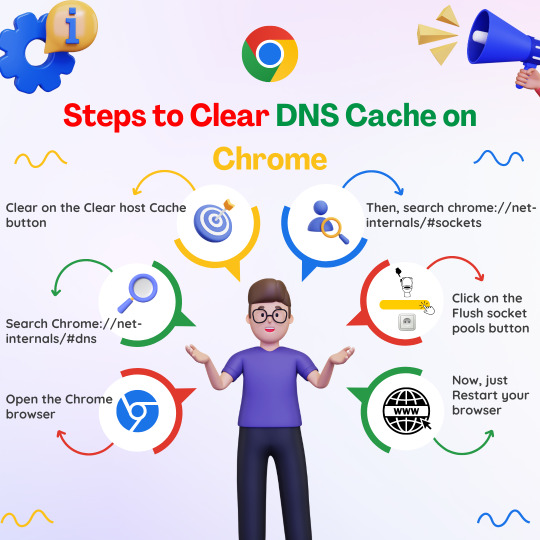
💻🌐 Having trouble accessing websites on Chrome? 🤔💡Try clearing your DNS cache! 🔍💥 Follow these easy steps to get back online in no time! 🌟
#Chrome#DNS#Cache#TechTips#internettips#techhacks#chrometips#browsingtips#computerhelp#slowinternetfix#dnscache#flushdns#chromebrowser#websiteproblems#pageload#helpfultips#didyouknow#savethispost
1 note
·
View note
Text
I've never made a bomb (dry ice and modified fireworks exempted) but one of my biggest pet peeves is everything to do with bombs in films and tv shows. It instantly breaks immersion in an inexcusable way.
Oh cut the red wire? You're sure? Was this bomb manufactured according to strict, standardized schematics?
Oh you're just going to twist those wires together? You're getting paid $10k to manufacture this bomb and you can't afford a soldering iron?
Oh you're going to take down a plane with a piece of pvc pipe filled with black powder and a spark plug? Sure little buddy, you go do that.
I can excuse almost anything else in a movie. When someone takes down the mainframe by typing "ipconfig /flushdns" into a random terminal I can suspend my disbelief because DNS is black magic, but I draw the line at an Arduino duct-taped to drywall.
32 notes
·
View notes
Text
Today I'm having to tell one of the indians that "ipconfig /flushdns" does not """clear the computers of its caches""" and is completely irrelevant to a report of random instant power offs
3 notes
·
View notes
Text

TARI.EXE (Puzzlevision Corruption)
I'm not even kidding, I had a dream where that TV guy and Tari have some sort of connection and kidnapped her so she becomes his property again, forcing the SMG4 gang to go through endless unwanted simulations to entertain him. I've been thinking about that dream repeatedly, and ever since Western Spaghetti I did want there to be some sort of connection. Can't wait to see more of TV Guy (or Puzzlevision as it says on his face). Also, the background text are just command prompt text, or rather Tari's programming. I've been finding so many examples of how to do program writing.... or coding? Idk lol. At some point my brain just stopped working. Anyways, i'll put below what the text says, and if you pay attention to the numbers in the written sequence, you'll see some hidden detail (Hint: The numbers are episode dates).
Background Text:
TASCORP Windows [Version 17.6.02023]
(c) 2023 TASCORP Corporation. All rights reserved.
C: \Users\TARI>ipconfig/flushDNS
Windows IP Configuration
Successfully flushed the DNS Resolver Cache.
C: \>taskkill /f /im TARI.exe
SUCCESS : The process "TARI.exe" with PID 250818 has been terminated.
C: \>winge install "Puzzlevision SIM"
Found Puzzlevision SIM [TASCORP.Puzzlevision SIM] Version 28.10.23
This application is licensed to you by its owner.
TASCORP is not responsible for, nor does it grant any licenses to, third-party packages.
Downloading https://puzzlevisionsiminstall.net.com/stable/smg4/Setup-v28.10.23.exe
90.0 MB / 90.0 MB
Successfully verified installer hash
Starting Package install . . .
Successfully installed
X: \windows\system23>cd C: \Windows\system23
C: \windows\system23>systemreset
PUZZLEVISION SIMUL. Windows
Copyright (C) Puzzlevision Corporation. All rights reserved.
C: \WINDOWS\system23>sfc /scannow
Beginning system scan. This process will take some time.
Beginning verification phase of system scan.
Verification 100% complete.
Puzzlevision Resource Protection found corrupt files and successfully repaired them.
Puzzlevision Resource Protection did not find any integrity violations.
#smg4#smg4 fanart#smg4 tari#tari smg4#smg4 tv adware#tv adware#puzzlevision#mind corruption#tari corruption#tv guy#tari#tari fanart
26 notes
·
View notes
Note
On your laptop clear your dns ( in your search bar on your laptop type " CMD " open up command prompt and type ipconfig/flushdns then hit ENTER and then click the X or type exit to close) they can manipulate or poison the DNS cache on your computer by altering the records that direct traffic to legitimate sites, rerouting them to harmful ones instead. This attack is known as DNS poisoning or DNS spoofing. Flushing the DNS cache clears these potentially compromised records, ensuring that your computer requests fresh and correct DNS information directly from a trusted DNS server rather than relying on corrupted cache entries.
❤️❤️❤️
Thank you so much!!
2 notes
·
View notes
Text
YggTorrent down ? Erreur de connexion ? Voici la solution !
Tu veux te connecter à YggTorrent pour télécharger un film, une série ou un logiciel, mais… impossible d’y accéder ? Le site est inaccessible, la page affiche une erreur 500, une erreur de connexion, ou ne se charge pas du tout ? Pas de stress. Ce genre de problème est courant et, bonne nouvelle : il existe des solutions simples pour y remédier rapidement. Pourquoi YggTorrent est bloqué ou inaccessible ? Avant de chercher une autre plateforme ou de croire que YggTorrent est définitivement down, il faut comprendre pourquoi tu n’arrives pas à accéder au site : 1. L’adresse d’YggTorrent a changé YggTorrent est régulièrement ciblé par des blocages DNS ou des restrictions en France. Pour contourner ces blocages, le site change souvent de nom de domaine. ➡️ Résultat : si tu utilises une vieille URL, tu tomberas sur une erreur 404 ou une page blanche. 2. Les DNS de ton FAI bloquent l’accès Par défaut, ton ordinateur ou ton smartphone utilise les DNS de ton fournisseur d’accès Internet (Orange, Free, Bouygues, SFR…). Et ces DNS filtrent parfois certains sites, notamment les plateformes de téléchargement comme YggTorrent. C’est souvent la cause d’une : Erreur de connexion Connexion expirée Page YggTorrent introuvable 3. Ton navigateur, ton antivirus ou tes extensions bloquent YggTorrent Certains navigateurs ou antivirus peuvent empêcher le site de charger en bloquant des scripts essentiels. Pire encore, des extensions comme uBlock Origin, Adblock Plus ou Privacy Badger peuvent provoquer un blocage de la vérification Cloudflare : tu restes bloqué(e) sur "Checking your browser…" sans jamais arriver au site. Comment débloquer YggTorrent facilement ? Voici les étapes simples et efficaces pour retrouver l’accès à YggTorrent, que tu sois sur PC ou sur mobile : Étape 1 : Trouver la bonne adresse YggTorrent La première chose à faire est de vérifier si le site est vraiment down, ou si c’est simplement l’ancienne URL qui ne fonctionne plus. Et pour trouver la bonne adresse YggTorrent : Voir notre page qui partage la nouvelle adresse à chaque changement -> Nouvelle adresse YggTorrent Étape 2 : Changer ton DNS pour Cloudflare (1.1.1.1) Si YggTorrent reste inaccessible ou affiche une erreur DNS, le problème vient souvent des serveurs DNS de ton FAI qui le bloque. Utilise plutôt Cloudflare, un service gratuit, rapide, et non censuré. 📌 Sous Windows : Windows + R > tape control Réseau et Internet > Centre Réseau et partage Modifier les paramètres de la carte Clic droit sur ta connexion > Propriétés Double-clique sur “Protocole Internet version 4 (TCP/IPv4)” Utiliser les DNS suivants : 1.1.1.1 1.0.0.1 📱 Sur Android/iOS : Télécharge l’appli 1.1.1.1: Faster & Safer Internet Active-la. En un clic, tu contournes les blocages DNS. Étape 3 : Vider le cache DNS de ton système Même après avoir changé de DNS, ton appareil peut garder en mémoire les anciennes informations. Sur Windows : ipconfig /flushdns Puis redémarre ton navigateur. Étape 4 : Utiliser un VPN si nécessaire Si malgré tout, tu n’arrives toujours pas à te connecter à YggTorrent (erreur de connexion persistante, chargement bloqué…), il est temps d’utiliser un VPN fiable. Un VPN : change ton adresse IP, contourne les restrictions géographiques, et te permet de naviguer en toute confidentialité. 🎯 Recommandé : NordVPN. ⚠️ Rappel : télécharge légalement Le téléchargement de contenus protégés par des droits d’auteur via YggTorrent est illégal. Utilise cette plateforme uniquement pour : des fichiers libres de droits, des œuvres tombées dans le domaine public, ou pour du partage légal. Conclusion Si tu vois : "YggTorrent down" "Erreur 500" "Impossible d'accéder à YggTorrent" "Erreur de connexion" … pas de panique. En suivant ces 4 étapes, tu peux rétablir l’accès rapidement : Trouve la bonne URL Change ton DNS Vide le cache DNS Active un VPN si besoin Et surtout : évite les clones malveillants, active un bloqueur de pub et reste dans un cadre légal.
Besoin d’un coup de main ou d’un lien vérifié ? Laisse un commentaire — on s’entraide 😉
0 notes
Text
Wifi từ chối quyền truy cập - Nguyên nhân & cách khắc phục
Lỗi WiFi từ chối quyền truy cập khiến thiết bị không thể kết nối mạng dù mạng vẫn hoạt động. Bài viết này sẽ phân tích nguyên nhân và hướng dẫn cách khắc phục hiệu quả.

WiFi từ chối quyền truy cập là gì?
Đây là tình trạng thiết bị (laptop, điện thoại) không thể kết nối WiFi do router hoặc hệ thống mạng chặn, thường kèm thông báo như "Incorrect password" hoặc "Access denied".
Nguyên nhân WiFi từ chối quyền truy cập
Lỗi này có thể xuất phát từ:
Lỗi thiết bị kết nối: Sai mật khẩu, card WiFi tắt, lỗi phần mềm, hoặc không hỗ trợ chuẩn mã hóa.
Lỗi bộ phát WiFi: Router quá tải, cấu hình DHCP sai, hoặc firmware lỗi thời.
Chặn địa chỉ MAC: Router giới hạn thiết bị theo địa chỉ MAC.
Xung đột IP: Hai thiết bị dùng chung IP hoặc IP bị giới hạn.
Cấu hình DNS sai: DNS không phản hồi hoặc proxy/VPN lỗi.
Virus/phần mềm độc hại: Can thiệp cài đặt mạng, chặn kết nối.
Cách khắc phục
Dưới đây là các bước khắc phục lỗi WiFi từ chối quyền truy cập:
1. Khởi động lại thiết bị và router
Tắt thiết bị và router trong 30 giây, bật lại, đợi 2-3 phút rồi thử kết nối.
2. Kiểm tra chức năng WiFi
Trên điện thoại: Vào Cài đặt > WiFi, đảm bảo WiFi được bật.
Trên Windows: Nhấn Windows + A, bật WiFi nếu tắt.
Trên macOS: Bật WiFi qua biểu tượng trên thanh menu.
3. Đặt lại IP tĩnh
Nhấn Windows + R, nhập ncpa.cpl, chọn WiFi > Properties.
Chọn Internet Protocol Version 4 > Properties, nhập:
IP address: 192.168.1.x (x từ 2-254).
Subnet mask: 255.255.255.0.
Default gateway: 192.168.1.1.
Nhấn OK và thử kết nối lại.
4. Cài đặt lại driver WiFi
Nhấn Windows + X > Device Manager > Network Adapters.
Chuột phải WiFi Adapter, chọn Update driver. Nếu không hiệu quả, chọn Uninstall device, khởi động lại máy.
5. Quét virus
Sử dụng Windows Defender (Windows) hoặc Avast/Bitdefender (điện thoại) để quét và loại bỏ virus/phần mềm độc hại.
6. Kiểm tra và reset router
Kiểm tra đèn tín hiệu router. Nếu nhấp nháy bất thường, tắt 30 giây, bật lại.
Nếu vẫn lỗi, nhấn nút Reset trên router 10-15 giây, sau đó cấu hình lại WiFi.
7. Xóa cache mạng
Android: Vào Cài đặt > Ứng dụng > WiFi, xóa cache/dữ liệu.
iPhone: Vào Cài đặt > Cài đặt chung > Đặt lại cài đặt mạng.
Windows: Chạy Command Prompt (Admin), nhập lệnh: netsh winsock reset, netsh int ip reset, ipconfig /release, ipconfig /renew, ipconfig /flushdns.
Lưu ý
Thử kết nối với mạng khác để xác định lỗi từ thiết bị hay router.
Sao lưu dữ liệu trước khi reset thiết bị.
Tránh chia sẻ mật khẩu WiFi để giảm tải mạng.
Liên hệ nhà cung cấp Internet hoặc VoHoang.vn nếu lỗi kéo dài.
Với các bước trên, bạn có thể tự khắc phục lỗi WiFi từ chối quyền truy cập tại nhà.
1 note
·
View note
Text
someone coming over and running me as administrator and typing ipconfig /release ipconfig /renew and ipconfig /flushdns would fix me
1 note
·
View note
Text
Fix the "dns_probe_finished_nxdomain" Error in Google Chrome
This error means Chrome can’t find the website you’re trying to reach. It usually happens due to DNS issues. Try these fixes. Restart Your Internet Connection Turn off your modem and router. Wait 30 seconds. Turn them back on and check if the issue is resolved. Flush the DNS Cache Press Win + R, type cmd, and press Enter. In the Command Prompt, type: ipconfig /flushdns Press Enter and…
0 notes

Text
you KNOW i'm out here hittin em with that ipconfig /flushdns
0 notes
Text
Otimização Windows 10
As opções em negrito são para serem pesquisadas no windows
Executar: Temp %temp% Deletar e ignorar os que não forem apagados
PLANO DE ENERGIA
Abra o CMD powercfg -duplicatescheme e9a42b02-d5df-448d-aa00-03f14749eb61
Pesquise “Escolher plano de energia” Escolha o plano que deseja
Alterar configurações de energia avançadas: Desligar disco rígido = 0 (Nunca) Configurações de USB = Desabilitado Gerenciamento de energia de processador Estado de desempenho minimo = 0 Video Desligar monitor = 0 (Nunca)
CONFIGURAÇÕES BASICAS NO WINDOWS
Notificação - Desative e desmarque todas
Inicialização - Desative todos os programas desnecessários
Personalização - Cores - Desative a transparência
Aplicativos em segundo plano - Desative
Sistema - Tela - Configurações avançadas de tela - "Taxa de atualização" escolha a maior disponível Modo de jogo - PC antigos Ativado, caso contrario desative

Adicione seus jogos abaixo

Em configurações avançadas do sistema
APARENCIA
Efeitos visuais - "Ajustar apara obter o melhor desempenho" - marque as opções "mostrar miniaturas ao inves de icones" e "Usar fontes de telas com cantos arredondados"
VIRTUALIZAÇÃO DE MEMÓRIA
Avançado - configurações de desempenho Avançado - Memória virtual - Alterar - Selecione o drive para alocação - O primeiro recomendável e o segundo multiplique sua memoria por 1,5 Exemplo: 32g x 1024kbps = 32768 x 1,5 = 49152
Os demais deixe sem paginação ou 10 e 40
ISCL
Campo superior: Sempre 1024
Inferior sempre metade da memoria total: 8gb = 4g = 4096 16gb = 8g = 8196 32gb = 16g = 16000
Para ativar com o Windows basta marcar as duas pequenas caixas abaixo Em timer resolution = 0.50 e ative a caixa "Enabled custom timer resolution*" ISCL poling Rate (ms) Pcs novos = 500 Pcs antigos = 1000 Start e pronto
"Current timer resolution" acima de 0.5 siga os passos abaixo:
abra o CMD bcdedit /set useplatformtick yes bcdedit /set disabledynamictick yes bcdedit /deletevalue useplatformclock
Desfazer: bcdedit /set useplatformclock true bcdedit /set useplatformtick no bcdedit /set disabledynamictick no
Gerenciador dos dispositivos - Dispositivos do sistema - Desative o "Timer de eventos de alta precisão"
SERVIÇOS
que podem ser desativados ou selecionados no ESO
DPS - Serviço de politica de diagnostico Sysmain (Superfetch) WSearch - Windows Search DiagTrack - Experiencia do Usuário de Telemetria (Opcional)
No executável dos seus jogos clique em propriedades - Marque as caixas "Desative a otimização de tela inteira" e "Executar como Administrador" (desmarque caso de algum bug ou o jogo feche) e em Alterar DPI marque "Substituir o ajuste de DPI" selecionando "Aplicativo"

CHROME
Configuração Sistema - Desative as duas opções aceleração de hardware funciona da seguinte forma, ela utiliza um pouco da sua GPU ao invés de forcar sua memória ram, mas isso pode ocasionar perca de pacotes se um jogo for aberto simultaneamente.
Desempenho - Ative a "Economia de memória" e Desative o "Páginas pré-carregadas" Privacidade e Segurança - Privacidade de Anúncios - Desative tudo que encontrar

Desative extensões inutilizadas se possível remova
Index - Avançado - Recriar - ok
INTERNET
exibir conexões de rede - propriedades - configurar - avançado Energia eficiente Ethernet - Desativado Ethernet Verde - Desativado Power Saving - Desativado
Gerenciamento de Energia - Desative
DNS - use o DNS Jumper
GPEDIT.MSC
Modelos Administrativos - Rede - Agendador de pacote QoS - Habilite - Troque o valor para 0
Otimização de entrega - Desative - Opções avançadas

Comandos CMD FlushDNS na ordem exata:
ipconfig /flushdns ipconfig /registerdns ipconfig /release ipconfig /renew netsh winsock reset reiniciar modem
MSCONFIG
Inicialização de Sistema - Opções avançadas… - selecione o numero maximo de processadores
Serviços - oculte serviços da Microsoft e desmarque todos os serviços desnecessários (não desative drivers)
Mixer de Volume antigo
HKEY_LOCAL_MACHINE\SOFTWARE\Microsoft\Windows NT\CurrentVersion\MTCUVC
EnableMTCUVC 0
0 notes
Text
sometimes if a user is being a hassle and a half over a non issue when I have real work to do I'll remote into their computer, give them the ole gpupdate /force, a little bit of ipconfig /flushdns, and a smattering of wmic bios get serialnumber and then leave the event viewer open for a minute so they stop messaging me.
0 notes
Text
Might be fixed with my newest .bat file!
ipconfig /flushdns ipconfig /registerdns ipconfig /release ipconfig /renew netsh winsock reset
Wondering if I can add an automatic reboot?
0 notes
Text
Flush DNS là gì? Vai trò và cách xóa bộ nhớ đệm DNS đơn giản

Khi bạn truy cập một trang web, máy tính của bạn sẽ lưu trữ thông tin này trong bộ nhớ đệm DNS (DNS cache) để tăng tốc độ truy cập trong các lần sau. Tuy nhiên, đôi khi bộ nhớ đệm DNS có thể bị lỗi hoặc chứa các thông tin cũ, dẫn đến việc bạn không thể truy cập được các trang web hoặc gặp phải các vấn đề kết nối. Lúc này, việc "flush DNS" hay xóa bộ nhớ đệm DNS là cần thiết. Bài viết này sẽ giải thích chi tiết về flush DNS và cách thực hiện trên các hệ điều hành khác nhau.
1. Vai trò quan trọng của Flush DNS?
Khắc phục các vấn đề kết nối
Bộ nhớ đệm DNS có thể lưu các thông tin không chính xác hoặc lỗi thời, gây ra các vấn đề kết nối như không thể truy cập trang web hoặc trang web hiển thị không đúng cách. Việc flush DNS giúp xóa bỏ các thông tin lỗi này, giúp máy tính yêu cầu lại thông tin DNS mới và chính xác hơn từ các máy chủ DNS.
Bảo mật
Bộ nhớ đệm DNS cũng có thể bị tấn công b���i các hacker để chuyển hướng bạn đến các trang web giả mạo hoặc độc hại. Việc flush DNS thường xuyên giúp giảm thiểu nguy cơ này bằng cách xóa các thông tin bị thay đổi hoặc không an toàn trong bộ nhớ đệm.
Cập nhật thông tin DNS mới
Khi một trang web thay đổi địa chỉ IP hoặc có các cập nhật liên quan đến DNS, bộ nhớ đệm DNS cũ có thể không nhận diện được sự thay đổi này, gây ra lỗi truy cập. Flush DNS giúp đảm bảo rằng bạn luôn truy cập vào phiên bản mới nhất của trang web.
2 Hướng dẫn Flush DNS trên các hệ điều hành khác nhau
2.1 Windows
Mở Command Prompt với quyền quản trị:
Nhấn tổ hợp phím “Win + R” và nhập "cmd"
Nhập lệnh sau và nhấn Enter:
ipconfig /flushdns
Bạn sẽ nhận được thông báo xác nhận rằng bộ nhớ đệm DNS đã được xóa thành công.
2.2 macOS
Mở Terminal:
Nhấn “Cmd + Space” để mở Spotlight, gõ "Terminal" và nhấn “Enter”.
Nhập lệnh sau và nhấn “Enter”:
sudo dscacheutil -flushcache; sudo killall -HUP mDNSResponder (đối với: Catalina, Big Sur và Monterey)
sudo killall -HUP mDNSResponder (đối với: Mojave và Sierra)
Nhập mật khẩu quản trị nếu được yêu cầu và nhấn Enter. Không có thông báo xác nhận nhưng bộ nhớ đệm DNS sẽ được xóa.
2.3 Linux
Các lệnh để flush DNS trên Linux có thể khác nhau tùy thuộc vào bản phân phối và phiên bản hệ điều hành. Dưới đây là một số lệnh phổ biến:
Ubuntu và Debian:
sudo systemd-resolve --flush-caches
Để xác nhận, bạn có thể kiểm tra số lượng cache trước và sau khi flush bằng lệnh:
sudo systemd-resolve --statistics
CentOS và Fedora:
Mở Terminal, nhập lệnh sau và nhấn Enter:
sudo systemctl restart network.service
Hoặc nếu bạn đang sử dụng systemd-resolved:
sudo systemd-resolve --flush-caches
3. Khi nào nên xóa bộ nhớ đệm DNS
Khi tải trang Web bị lỗi
Nếu một trang web mà bạn thường xuyên truy cập đột nhiên không tải đúng cách hoặc không thể truy cập được, flush DNS có thể giúp khắc phục vấn đề này bằng cách làm mới thông tin DNS của trang web đó.
Khi có sự thay đổi địa chỉ IP của trang Web
Khi một trang web thay đổi địa chỉ IP và bạn vẫn gặp phải vấn đề truy cập trang web với địa chỉ IP cũ, việc flush DNS sẽ giúp máy tính của bạn nhận diện và kết nối với địa chỉ IP mới.
Sau khi xóa phần mềm độc hại
Nếu máy tính của bạn bị nhiễm phần mềm độc hại mà có thể đã thay đổi cài đặt DNS, việc flush DNS sẽ xóa bỏ các thiết lập DNS không an toàn mà phần mềm độc hại đã để lại.
4. Lưu ý quan trọng về Flush DNS
Thực hiện định kỳ
Thực hiện flush DNS định kỳ, đặc biệt nếu bạn thường xuyên gặp vấn đề kết nối hoặc lo ngại về bảo mật, sẽ giúp duy trì một môi trường mạng ổn định và an toàn hơn.
Sử dụng DNS Server tin cậy
Sử dụng các máy chủ DNS đáng tin cậy như Google DNS (8.8.8.8 và 8.8.4.4) hoặc OpenDNS (208.67.222.222 và 208.67.220.220) để đảm bảo tốc độ và tính bảo mật.
Kiểm tra thông tin DNS sau khi xóa bộ nhớ đệm
Sau khi thực hiện flush DNS, bạn có thể kiểm tra thông tin DNS mới bằng cách sử dụng lệnh “nslookup” hoặc “dig” để đảm bảo rằng thông tin đã được cập nhật đúng cách.
Kết Luận
Flush DNS là một bước đơn giản nhưng quan trọng trong việc duy trì hiệu suất và bảo mật cho hệ thống mạng của bạn. Bằng cách xóa bỏ bộ nhớ đệm DNS lỗi thời hoặc không chính xác, bạn có thể giải quyết các vấn đề kết nối, cập nhật thông tin DNS mới và bảo vệ máy tính khỏi các cuộc tấn công mạng. Hãy thường xuyên kiểm tra và thực hiện flush DNS khi cần thiết để đảm bảo mạng của bạn luôn hoạt động tốt và an toàn.
Nguồn: https://suncloud.vn/flush-dns
0 notes