#for exposure and shutter speed and ect ect
Explore tagged Tumblr posts
Visit Tumblr Blog
Explore Tumblr blogs with no restrictions, modern design and the best experience.
Last Seen Tumblr Blogs


Fun Fact
Tumblr was attacked by a cross-site scripting worm deployed by the Internet troll group GNAA on Dec 3, 2012.
Text
Worst part of 35mm is idk if any of this looks like anything until I send this off to get developed
#can i be real. no one ever explains the numbers in a way that makes an actual sense#like i know im a Camera Guy im a Film Guy but like. i have never had training on the hardware that made it actually make sense#like i KNOW what this stuff is in concept. what the fuck do the numbers mean. hey can we slow down why are you using different numbers in#the guide than what the numbers are on the camera but youre pointing the same place. can anyone hear me. hello#are we just going based on vibes. does anyone actually understand this or are we all existing on some level of 'only god and the engineers#know' and all just inputting the numbers we're told should roughly maybe be the correct numbers#for exposure and shutter speed and ect ect
2 notes
·
View notes
Text
A1: SKILL DEVELOPMENT
CAMERA EXPOSURE
Photography in Latin quite literally translates to "drawing with light" or "painting with light" which is very true in the context of learning about photography. Without light there is no photo, just like without paint there is no painting. A camera works with light going through the lense, aperture, shutter then the sensor which then detects the light and creates the photo. How much light hits the sensor is known as exposure. Exposure can be explained by something known as the exposure triangle.

Iso, aperture and shutter speed are the main factors in exposure and all in sync can create perfect exposure. Perfect exposure can help show more detail and lessen editing time after shoots. If you do want to break the rules a bit it is advised to start at perfect aperture then change settings to how you want them.
APERTURE
Aperture is the part of the camera which determine how sharp or soft parts of a photo is going to be (depth of field). This is done by tightening and loosening the aperture of a camera. How tight and how lose the aperture is, is determined by the F/ value (e.g: F/1, F/10 ect). The lower the F/ value the looser the aperture. This results in a smaller depth of field and only certain parts of the photo being sharp. This is the exact opposite when having a larger F/ value. The aperture will be tighter and result in the full photo being sharp and a larger depth of field. The looser the aperture also results in more light being brought through which is why all settings must be in sync to make perfect exposure.

ISO
Iso is the sensitivity of the camera sensor. This in turn means how much light that reaches the sensor is amplified by the Iso value (Iso is shown as iso 100, iso 200 ect). The lower the iso number the less the sensor reacts thus resulting in a darker photo and less noise. This is the complete opposite if you have a higher iso value. The result will be a brighter photo and more noise. Its is advised that during sunny weather where there is good natural lighting to use the lowest iso value like 80 or 100. While in cloudy weather you should use 800 iso and while inside use high iso’s like 2000.

SHUTTER SPEED
shutter speed determines for how long the shutter in the camera will be open and how much light will reach the sensor. The speed of the shutter also determines how blurry a picture may be. For example if you set your shutter speed (shown as fractions e.g 1/200, 1/300) to 1/1 the picture will be more blurry due to how long the shutter has been open and how much light it has allowed in. When using shutter speed it is always advised to use a tripod when using a shutter speed lower than 1/60. This is due to the fact it's almost impossible to hold the camera still for that amount of time.

PERFECT EXPOSURE
Perfect exposure is represented as the exposure metre (or E.V metre). To have perfect exposure the exposure metre must be ar 0.0. If the exposure metre reads -0.1 or below the photo will be darker and under exposed. If the exposure metre reads +0.1 then the photo will be brighter and over exposed. The exposure metre is also accompanied by histograms. If the histogram displays to the left then it will be under exposed. If to the right then over exposed. You can visually see if a photo has perfect exposure if the histogram is neutral or in the middle.

1 note
·
View note
Text
Recycle Technique research
This brief requires me to complete multiple techniques including light painting and multiple exposure. The word photography comes from the Latin word “phos” meaning light and “graphe” meaning drawing/painting. How this can be achieved is that it’s a hand held light source such as a torch, led panel, phone flash ect. All depending on the amount and intensity wanted in the image. The camera must remain in the same place as you photograph in the dark with the hand held light and a long exposure. This in turn created the desired paint like effect. It will consist of multiple Photographs being composited together in the end to create a final image.
According to https://digital-photography-school.com/beginners-guide-to-light-painting/, camera settings should look like:
manual mode (for control over focus)
Raw files (to capture as much information as possible)
white balance generally to tungsten or day light but will experiment with fluorescent too because of the LED panel.
Low ISO, 100 is recommended to avoid any grain.
Shutter speed at f8/f11 to keep as much in focus as possible.
To begin, it is suggested to create a base layer, evenly lit in order to have something to build your layers ontop of. To focus, make sure the camera is set to manual focus and adjust the dial until most of your image, especially the most important subjects. If I'm struggling I can use the depth of field preview button to see how my image will look before I take it. The exposure will then be controlled by having the recommended aperture and ISO, and basing my shutter speed from that.
Some suggested techniques:
Paint from the sides – Don’t just stand behind your camera and wave the light across your image. Painting flat surfaces from the side will allow you to bring out textures.
Use lots of different angles – For instance, when painting the ground, hold the beam low and pan the light along the floor. This will keep the ground from appearing flat, and it’ll bring out all the details of the surface. Also, by adding light from many angles, the resulting image will have an interesting three-dimensional effect.
Don’t stand between the camera and your light source – If you do this, you will show up as a silhouetted ghost in the final photo!
Wear dark, non-reflective clothing and keep moving – Again, you do not want to appear as a ghost in your image!
Don’t shine the light source back at the camera – Otherwise, you’ll create a bright spot in the image.
Use a flashlight with a red filter when you check your camera to make adjustments. The red light will keep you from ruining your night vision.
Different surfaces are going to react to light differently – Wood surfaces may require more light than shiny surfaces such as metal or glass, because rougher surfaces absorb more light than smooth surfaces.
Keep your light moving – Move the beam in slow strokes to add lots of light and make faster strokes in areas where less light is needed.
Paint in up-and-down or side-to-side strokes, just like you’d work with real paint.
Some of these recommendations are more relevant than others but it is definitely something I will take into account.
Here is a video with some tips on light painting: https://youtu.be/BfBjaa5s2mI
0 notes
Text
Look at this! Eric has some words to share! Draht Photography
New Post has been published on http://www.drahtphotography.com/vernon-photography-walks/
Vernon Photography Walks
Saturday marked the last photography walk of the semester. There’s always six classes in total, and two of them are photography walks.
I’ve noticed that I can teach and and teach, but if there isn’t any hands on time, no one remembers what I teach. That’s what’s kept me away from the day courses too – there’s no way of me ensuring what you learn will stick. Here, you practice once on your own time, in the homework section, then again at the photo walk.
At the last one, at BX Dog Park, we talked about how your exposure can change the colours. A little lower, and the sunset comes out as orange. A little higher, and the sunset is bright yellow. Essentially, looking white.
Although the technical parts of an image are important – shutter speed, aperture, focal length, ect, that won’t teach you how to take great pictures. At least, not all by themselves. Composition is key, learning how to create an alluring image that draws the eye. Once you know what you’re looking for, it becomes easy. Then it’s changing around a few settings on the camera to come up with the mood you’re looking for.
Although many aren’t signing up for learning how to take pictures of people, we do discuss posing and placement in regards to light in the second walk. This is important, because everyone at some point in their lives will be in a situation where this could be useful. Perhaps you’d like to take a headshot for your husband. Maybe a friend of yours has a new baby and you’d like to photograph the three of them together. Perhaps you’d like to freeze those day-to-day moments when the kids are running around, before they’re all in college studying to become doctors.
In every environment, there’s beautiful things to capture, and an SLR can do it far better than any phone camera. You can do amazing things with even an entry level SLR, really anything with an interchangeable lens. The key is to pick up a few tricks, and get some experience in a fun, class setting under your belt.
But how much better is an SLR than a phone camera?
At the end of the last session, we do a side by side. One picture with our SLR, and another with our normal camera. Although I labelled the side-by-side, I don’t think it’s necessary here to see how much more flattering a proper photo taken with a proper camera can be.
All of these things play into the final composition – depth, colour, lens, tone, shutter speed, and of course, the most important of all, lighting.
If you’d like learn more about these classes, or sign up, click here.
I’d love if you’d give me a follow on Instagram, or Facebook. Talk to you soon!
8 notes
·
View notes
Text
My Dark Side- Evaluation
For this image I took inspiration from Pinterest from people doing double exposures to make the image of themselves look creepy. I didn't really take many ideas from their poses as I just tried as many different poses as I could till I found ones that work well together- this took many attempts but it worked out better as I found many things wrong with the lighting and shutter speeds ect. To edit this image I opened the first image (non-moving)and edited this appropriately using Camera RAW, I done this by adjusting the contrast, highlights, shadows, blacks and whites- After I was happy with the way that this image looked I opened it into photoshop. I then clicked FILE> PLACE EMBEDDED> SELECTED THE IMAGE and then edited this by manipulating the contrast, highlights, shadows, blacks and whites. After I was happy with the way the image was looking I opened it on top of the original image and changed the blend mode to soft light and kept the opacity at 100%- to blend the images together. After I was happy with this I used the gradient map to convert the image into black and white > I then cropped the image slightly to get rid of some of the negative space. I then opened the adjustment layer of curves to bring more contrast back into the image and to give the image more atmosphere.
0 notes
Photo


Shutter speeds changes the amount of fractions of a second the mirror moves out the way for the sensor to receive the photograph.the longer the second(eg 4″) the image will have either motion blur or become white and hard to see detail as the amount of light allowed in whilst capturing the picture is too much. Changing the shutter speed to eg 1/4000 you can get a normally fast action shot.faster than the human eye and focus on the exact thing you was aiming to capture as the image is very sharp.however it can be underexposed under some circumstances.
i believe i have shown successfully shutter speeds and the affect on images. as i have shown the affect of a long exposure (long shutter speed) showing motion within pictures which also lightens images as its more exposed to light for longer before the image is actually captured. (image 1&2 of trams) however it looses its quality as the camera cannot capture the image in time.However i have also shown how a short exposure (short shutter speed) affects an image (image 3&4) its more focused (as its more sharp and slightly darker making everything slightly bolder) and is able to capture more of single details of water drops as the shutter speed is faster.which shows HOW things move instead of the actual movement itself like the longer shutter speeds.
Shutter speeds are useful for capturing types of movement and in circumstances it’s needed in order to get certain type of photo. for example within automotive photography where you actually want to see in detail the details of the car.So you would make to shutter speed 1/60-1/250 roughly.or if you wanted to exaggerate the speed of something moving you would slow down the shutter speed to 1/10- 40″.Also its a way of making a image lighter/darker.
Photography types which would use fast shutter speeds would be fast action photography such as photography of wildlife,automotive,sports.In order to get detail to the specific item your capturing.candid photography as fast shutter creates sharp photos,documentary photography as you need to capture photos fast in order to create a story/narrative of realism.
Photography types which would benefit from slow shutter speeds is night time photography, slow shutter speed could also be utilized in automotive photography to exaggerate speed.landscape photography at night to exaggerate streetlights ect. and the brightness/energy they bring to the dark streets.It can also be used for light painting.
1 note
·
View note
Text
project evaluation,Exploring light travel
some photographers I looked at during the exploring light travel block where pole such as Linda McCartney, Thomas hopeker and constanine manos. I learned on the main aspects of the photograph process like focal length, aperture and the aspects of photography, like line, rule of thirds ect.
after starting with pinhole photography I had a new found appreciation for the camera lenses and the basic aspects of the camera like the aperture and focal lengths.
we experimented with the focal lengths and how they distort the image and also experimented with he shutter speed to see how they freeze the action or make it blurred.
by getting out and shooting differnet subject by using the shutter speed and aperture, it changed the outcomes every time which was interesting to see.
by looking how light traveled I could see that how it effected the cameras functions like shutterspeed and the aperture, like how it made the image darker and how it made the image crisper.
it has become easier after understanding the exposure triangle and also the aspects of photography like the rule of thirds, by using these things in my photos it makes the picture more pleasing and nicer to look at.
for the pinhole final outcomes teething I like about them is the line and composition of the blurred image, for the shutterspeed it was mainly showing the outcomes when using slow shutter speeds and fast shutter speeds, for the aperture final photos it was showing the blurriness of the background and the depth of field.
I was hoping to create images that showcased me using focal length, aperture, depth of feels and also the pinhole camera and it worked well as they all look different and unique.
I successfully explored the theme as I managed to create different images to what was needed and managed to do it well.
I would have liked to try some quite long exposures to see what I can manage to get
the work was not to personal but it was all my own work. it was just the ones I liked the most that made it to the final submission.
I wanted to show that it was my very first time doing some things like the pinhole so it is just showing my findings on my final submission.
0 notes
Text
The Olympus 35 ECR is a fully automatic, 35mm film camera with a fixed 42mm f/2.8 lens and rangefinder focusing aid which was produced by Olympus in the early 1970s.
Camera Images
Front view showing Zuiko 42mm f/2.8 lens
Side view with wrist strap
Side view with flash sync port
Back of camera
Top of camera
Flash guide number dial
Film Chamber
Fitted with Pentax Flash
My Olympus 35 ECR
I was given my copy of the Olympus 35 ECT by a fellow camera collector, with a note explaining that there were some problems with it. To be honest, that was a couple of years ago now and I can’t remember exactly what is wrong with it, although I seem to have a memory in the back of my mind that it was something to do with the film transport. The only obvious problem is that the light seal would probably need to be replaced before the camera would be light tight.
Irrespective of any mechanical problems, my example is in pretty good physical shape. The only slight issues are a small dent in the top of the camera and the covering material is starting to peel off the camera on the side under the viewfinder. This could be because the glue is ageing, but it’s more likely that it has been removed at some point.
Olympus 35 ECR Description
The camera is a small, light unit intended for carrying about in one’s bag ready for any ‘snap shot’ situation which might arise. In size, it’s pretty similar to the Minolta Hi-Matic F camera and has a similar feature set.
In keeping with its main use, the camera is fully automatic regarding exposure, and is fitted with a fairly wide and fast 42mm f/2.8 lens. All the user needed to do to take a snap is look through the viewfinder and focus, and make sure that the orange light at the top of the viewfinder goes out as you press the shutter button. If it does, the camera will correctly expose the image; If it doesn’t, this indicates that the camera would be setting the shutter speed to a value within the range 1/30th to 4 seconds i.e. too slow for hand held operation. In this situation you need to fit a flash unit to the camera.
When the flash unit is fitted, (because the orange light is showing), the camera will again correctly expose the picture as long as the flash’s guide number is correctly set on a thin dial which runs round the inner portion of the lens barrel. In this situation, as the shutter release is pressed, a small green light comes in in the viewfinder to show that everything is working correctly.
In order to correctly set the light meter, which controls the exposure, the film’s ASA rating is set on a small dial which runs round the lens. As this dial is rotated, the film’s speed is shown in a small window at the bottom of the dial and a filter is moved over the light sensor window at the top of the dial, thereby calibrating the exposure system. The position of the light sensor, within the lens barrel, was common on cameras of this type and meant that any filters fitted to the camera for artistic effect, were automatically compensated for by the exposure system.
When I first looked at the camera I thought it had a self timer because there is a small lever on the front under the shutter release which looks exactly like a self timer winder. This is actually an mechanical lock for the shutter release which stops it being accidentally tripped which the camera is in the owners bag.
Olympus 35 ECR Specifications
Olympus 35 ECR 35mm fixed lens rangefinder camera
Fixed Zuiko 42mm f/2.8 lens
Automatic exposure
Shutter speeds 4sec to 1/800 sec automatically set.
ISO 25 to 800
Light sensor in lens mount
Short throw rangefinder focusing
Hot shoe and cable flash sync socket
Simple thumbwheel film advance
Frame counter
Top of camera battery indicator
In viewfinder exposure control indicator
Framing lines
Shutter release lock
Auto exposure with flash using flash guide number
Powered by two RM-640 batteries
Ser No: 215752
Manual available on-line here
Olympus 35 ECR rangefinder camera The Olympus 35 ECR is a fully automatic, 35mm film camera with a fixed 42mm f/2.8 lens and rangefinder focusing aid which was produced by Olympus in the early 1970s.
0 notes
Text
Simple Guide to Your First Film Camera
Your first Camera
So you want shoot film photography? Great you signed up for your first class or making a return this art of film. You go out find that perfect vintage camera and click away. You go develop this roll of beautifully shot film only to see blurry images, light leaks, under exposure ect. The unfornate reality of film cameras is that the workhorse cameras that have survived through the years will be in need of servicing of some kind. The market will have about 90% cameras in need or repair. This not a horrible thing it's the reality of working in the film medium. The great cameras that last through the years those like my favorite the Canon A series with the metal bodies can last you forever if properly mantained, however, most have lingered away in grandpa's attic.

What should expect to pay?
This can be a tricky. Many sellers online and in store price their camera based on the market but the vintage camera market is a tricky one. For example, many sellers will list their product as tested a working. However, they fail to mention who tested it and their qualifications. Many sellers aren't invested time wise in knowledge about film cameras and test for does the shutter fire and film advance work. Most come from estate sales and are just a quick profit. The only time you should pay market price for a vintage camera is if it has been professionally inspected and refurbished by a technician. If they can't assure you that the camera has a proper inspection, $20-30 is the most should pay for a camera. The reason being is this camera could require and investment in repairs that can end up costing way more than the camera's worth if purchased at market price.
Inspecting your camera?

This is not as hard as you might think. With Ebay never be afraid to question the seller and get clear answers. Here's why if receive your camera and find it is not as seller specified you can request a refund, partial or full. It is always best to take it to a professional technician if you are new to using a film camera. Most technicians will inspect it for free. If there are repairs needed on a camera you bought at market price, I strongly recommend you return the camera or negotiate a partial refund to compensate your repair cost.
The most common questions you should ask or test for in person are as follows:
Does the camera have proper a light shielding? Is the shielding dry, flaking and/or sticky? The shielding will flake in the lens area and appear as black spots on the lens and sometimes cause internal camera damage.
Doess the shutter fire properly at all speeds? Is there a squeal? Does the mirror get stuck when firing? Shutters should be opening and closing properly.
Does the light meter work properly?
Is there corosion in the battery department?
Make sure all knobs and levers are not jammed.
The lens should be tested for fungus, haze or scratches. Test the aperture ring for proper movement. If your lens has auto focus half press your shutter button and lens should smoothly focus in and out.
These are simple test that and questions that can help you avoid bad camera purchases.
I hope this helps you find your perfect camera and enjoy the film experience.
0 notes
Text
Specialist Camera Equipment
Different Cameras
Digital Cameras
- DSLR cameras are the mot versatile and advanced cameras out on the market. They are the biggest of the cameras. Lenses can be changed for different situations. They also create the best quality pictures
Compact Cameras
- Smaller in size. They have a minimum of a 3X zoom lens. These cameras are the best for beginners as they are automatically set. They have a number of scene modes like landscape, nature, fireworks. They cannot be manually adjusted to change shutter speed ect.
Bridge Cameras
-The photographer has more control compared to a compact. There is more control over exposure settings. They have semi-automatic aperture and shutter priority. Compared to a compact they have a much longer zoom range. However lenses cannot be attached.
Mirrorless Cameras
-Very similar to DSLR cameras. However they are much smaller and the same size as a compact camera. There lenses can be changed. They produce same quality images to DSLR
References
-Easy Basic Photography
Available on: http://www.easybasicphotography.com/
[Accessed on 31 Oct. 2017]
0 notes
Text
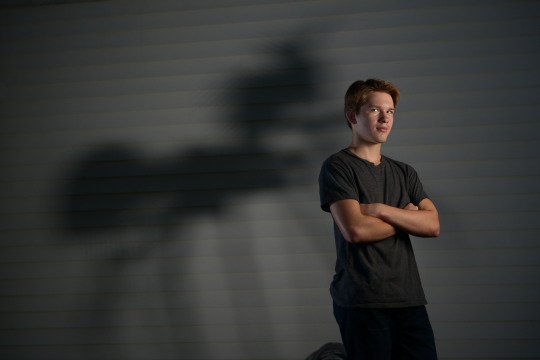
Gavin’s got guts and guts is enough.

Peeps we love SEO so much why not start with some eh? Above in this Senior portrait is Gavin. His portrait was takin by Studio ES in Sanford North Carolina.
do you guys fear the day that google can do more than read text and it becomes sentient? i do.
Building on high school senior pictures philosophy (sneaky devil) of Alex and listening to your client. I would like to talk about Gavins shoot and the importance of the photographer interview. I mean more than just a phone call, it starts there but you as the photog are tasked with finding what it is your client wants. So after the first phone interview you have to get into their space, nothing will tell you more about a person than the area they call home.
The very thing that I look for or well I should say listen for during my interview is a change in my clients demeanor. This is the signal that your on to something. When I met with Gavin after our phone interview he was slightly on board for getting the photos done but thought that it would be like most senior photos, brick walls and leaning on things. I told Gavin that I want to make images that mean something to him. So our discussion followed the standard flow of getting to know someone, like speed dating. Whats your favorite: music, sport, movies, food ect and so fourth. When we hit movies Gavin perked right up and from there we took the conversation in all directions. Here is where I learned that this young man is very into mid classic horror. Generally stuff from the late 70′s thru the 90′s and some modern stuff too, a big buff of it in fact. All the details about horror movies were hit and all this came from a list of very basic questions asked and being open to when your client tells you they like something. Be perceptive folks, I cant stress it enough, and really treat each client like you advertise, unique.
So many words, you know what this blog needs? that’s right a little SEO magic.

This guy, Gavin had his Senior pictures done with a photographer at Studio ES who, fortunately for you serves the Sanford North Carolina area.
I would like to start with Gavins white background work. Once Gav and I knew what it is he wanted as a client that theme will guide the entire shoot. In screen writing its called the thru line or central concept, I’ll spare you the long winded explanation but the thru line is the master of all your creative decisions. All props, lighting and emotions must serve the thru line, get one and follow it your pictures will work together and be better.
Gavin and I made the white background set-up so that he can have something that is family and school friendly. He can take em to the yearbook, though I think they are too big, other family members can share and enjoy them as well. Even these frames where we keep it friendly still are guided by the thru line, incorporating who he is and what he wants in a shoot, a movie buff.
SEO is like the potatoes to your meat. People complain about the carbs but you gotta have it.
One day Gavin, the handsome guy above was walking around Sanford North Carolina when he stopped in Studio ES to get his Senior photos done by a photographer.
I love the fact that you can say anything you want for SEO its just about the key words. It’s going to be a fun ride.
Lets drop right into the horror and the core that is Gavin. He has props baby! His room is not only a trove of films, but the icons of those films are also there in plastic, steel or some form of material. I wanted to shoot the bedroom but there is only so much a guy can do in one day.
So you should largely be able to tell that the shadow is a spider or at least an ant. We will talk in a little bit about photog failures, but that is actually the spider gremlin from Gremlins 2, and there is homage in this frame, in the movie the way the spider gremlin is introduced to the audience is through its shadow on a wall. When spending time with Gav in his room we discussed that scene and we drew up this frame in honor of the movie and his affection for it.
I told Gavin lets go for it I can make that happen like in the movie. Which in a larger look we accomplished our idea. I failed in the ultra sharp clarity of the shoot because I used a grid, a black grid instead of a snoot. I know that raw light from a small single source will give you crisp shadows, folks I did not have a snoot, or cinefoil, paper, cardboard or a cereal box but I am sure that Jessica had some, Jess was great, I failed twice dang. However client and I are both happy with the frame so that is most important.

Gavin was exceptionally pleased with this Senior portrait by Studio ES but the portrait photographer was upset due to a re-compress to meet tumblrs size requirement. We are in Sanford North Carolina and its 2017, size limits, sheesh.
Gavin loves scream. So We took that old monster trying to get in the house idea to make this frame. This was one epic shoot, as of this juncture I am still very reliant on hot lights, and hot lights need what? That’s right, electricity, luckily when I roll on set of a film that is my job and I have the knowledge to make my cable runs safely and with as little line loss as possible. Working with hot lights is a challenge because the exposure is governed by the shutter speed and the arpeture. Since I neither have a spare 12 grand in cash laying around to buy a 6k hmi with ballast nor the power to power it, we used 1k pars baby! You know them as the rock and roll lights, for a tungsten they are very efficient they throw 2k worth of light for a thousand watts of power. Did I loose ya? its the same concept as led lighting, more light output for less wattage used.
Now folks I wanted to fill my frame with the environment to tell the story and since hot lights are ruled by shutter and aperture that means an incredibly slow shutter speed and Gavin had to hold as still as possible, which considering we hit focus he did well. We shot with a 1\4 of a second shutter on a tripod with a sandbag on the head of pod with the camera, basically every thing I could do to make the camera still and have the frame in decent focus. Just a nod to those of you who dont know shutter speed and are like 1/4sec is fast, trust me it is ridiculously slow.
Gav and I talked color in this senior photo (you little devil) there are three color balances going on here to help sell the story, Gavin is neutral, he is white balance, the house we splashed with 1/4 ctb to cool it off a bit for the moon light and inside the house is warm with a tungsten hot light plus 1/2 cto to warm it up a bit. The play on color has all the representations needed for the story, cold and scary on the outside and warm and safe on the inside.
I love to dabble in shadows, I felt the play of chiaroscuro was what would make or break this frame. The frame just wouldn’t work if every detail was lit. I cast the shadow between Gavin and the house both in a creative decision and a technical sneaky decision as well. Creatively I gain some separation from Gavin and the house plus the black fades into the distance like many horror films you can only see so far into the trees. On a sneaky technical note I am hiding two things from you. First the fact that there is a slide attached to the little house. Also I am attempting to soften the fact that it is a play house as well. The slide is hidden and with out me saying anything you probably wouldn't have thought too much about the house. I was mildly successful, next time keep mouth shut.
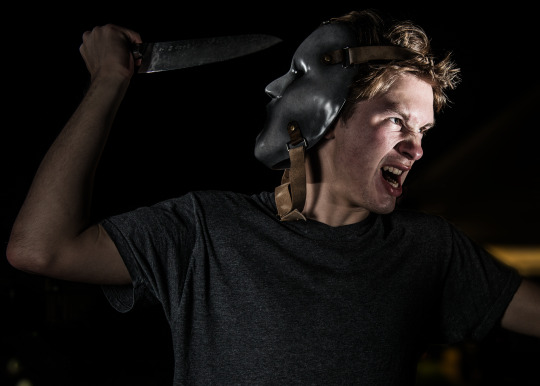
Guys this is a story all about how I was getting my Senior photos done with a photographer from Studio ES. I picked up a knife made a scary face and my mom got scared, she said your going to Sanford North Carolina. Do do do dooo.
SEO song, thanks Will Smith.
Can we give it up selective lighting? yeah or sometimes known as lighting. The power of lighting is this, hey you, look here. That is your goal for every frame you ever create. With Gavin we wanted that horror story feel. Grids to the rescue, grids are great as they control the light and allow for an easy fall off unlike a snoot which has a very defined edge. I hit Gav’s face with a 25° grid right out of frame giving it that selective pop. I also used a 25° grid but a touch further back to hit the mask as well. That provided the mask with the crucial lift in exposure in order to help it stand out with all the affinity of tones in the frame.
As I start to wrap this post up I want to end on Gavin’s editing and to enforce the law I mentioned in Alex, about adapting your style to serve the client and not making the client serve your style. As you can see in Gavin’s senior pictures (every time I sneak in a SEO, I can hear Doc Brown say “Einstein you little devil,” in my head.) we transitioned from light to dark both in lighting and editing. In fact by the last frames I showed you I developed a look for those frames where we go the opposite of what phlearn.com tells you, against the standard cleaning up of skin and photos.
To get Gavin’s photos crunchy like this, first, I rode the line of upper limits of exposure when I fired the shutter, the fill umbrella was set at one stop below grey and the grid on Gav’s face was 2 2/3 stop up from grey. This ratio allowed me to stretch it a little bit in post to add a little more crunch to the lighting.
I zapped a few acne that cluttered up his face. Then for the reds that we normally make disappear I enhanced them with the clarity slider, a little vibrant boost then sucked the saturation out of the frame. Now during pre-production Gavin and I decided on a really horror show palate of desaturated colors to the point of looking ill. We got it.

No SEO this time folks, nope not gonna talk about senior photos, photographers, or Studio ES. I’m done.
A real photog would never make their client look bad, and I didn't, Gavin and I created our shoot together, like I said and will say till I am sick of it, listen to your client, serve their needs, create a thru line and let that thru line guide every decision you make. In the words of Shia LeBeouf, do it.
A big thanks from the bottom of my heart to Gavin and the Parris family, our shoot spanned the day into late night. I was with the family so long that they have ceased to be clients but very warm friends that I will happily have over for food, kiddo and doggo fun. This shoot was amazing and I am still dying to meet Mr. Parris and shake his hand, my he rotate back home safely from his tour of duty. Thanks fam.
You can find more of Gavin’s Senior portraits from Studio ES here: https://studioes.photoshelter.com/portfolio/
#sanford#north carolina#senior portraits#senior photos#senior pictures#portrait#portrait photography#photographer#studio es
0 notes
Text
I have had an iPhone now for 3 years and I do not think I could ever turn back to a different phone, I love how simple and easy it is to use, the way it looks and the packaging is always immaculate. It is amazing how the camera has improved from the iPhone 5 to the iPhone 6 and I am pleased it has improved because my enthusiasm for taking photographs have increased since social networking sites like Instagram and Pinterest are around!
Taking photographs is one of my favourite things to do; I am obsessed with taking pictures of pretty things. This could involve nature or landscapes and recently I have come to love taking pictures of flat lays! I have been experimenting with different niches for both Instagram accounts and trying to find ways to present my images; so they look connected but are completely different. However I am still trying to work out the best way to present my artwork; but I will keep experimenting until I am happy with it.
Here are my top tips for taking iPhone photographs; I have read a few blogs on this and I thought I would do my own version and suggest some new things that I have found along the way!
LIGHTING
Good lighting is one of the key aspects to gaining a quality photograph. Natural light is better so make sure that you are in a room with plenty of light and turn the flash off. It is also better to take pictures when the sun is not shining directly on the objects to decrease shadow.
I definitely prefer photographs light and bright; rather than with a shadow!
IPHONE CAMERA APPS
Find other camera apps in the store of the iPhone, I found one called ProCam 3 and I think it takes amazing photographs; there are more features where you can change the white balance, exposure, shutter speed, ISO and focus! I haven’t worked out how to use it properly yet (I used to have camera+ which is another good app to take photographs) but I will be using this app a lot more, to learn all the features that it comes with.
First play with the camera app; I loved how you could blur the background!
blue flower
COMPOSITION
Starting with a good composition is essential, make sure you have the background you want, the object, person, thing you’re taking the picture off is the way you want it before you start taking pictures; to ensure that you are going to be happy with the outcome of the photograph. This is especially important when planning flat lays because you need to make sure the objects all work well with each other. I love taking pictures of landscapes and nature. I always look for a way to get as much into one picture if it is a landscape; for example getting as high up as possible. When shooting nature shots I tend to focus on one or two flowers because I love seeing the details.
First play at flat lays, I loved experimenting with different objects and angles
holiday packing
quotes
TRIAL AND ERROR
Most photographs are just about trial and error; play around with different angles and compositions to get the one you like the best. You are always going to get photographs that don’t turn out so well and ones that you love; make sure you take multiple photographs of the same things just in case you don’t like the lighting or it comes out blurry! So many times I have gone back to look at my photographs and a potentially good shot comes out blurry it is SO ANNOYING! Therefore I have learnt to take plenty of photos throughout my day; probably why I end up with 500 photographs on my phone and wonder why my storage is full!
nature photographs
PRACTICE
Have a play with your phone see what works and what doesn’t work; I spent hours taking pictures; adjusting the exposure, contrast, angles and it is a good idea to take more than one picture because then you can pick your best ones. What works with one blogger/Instagrammer might not work with your photos and the way you want to present your pictures. I had to experiment for a while before I was happy with mine! Even though I do not have a very high following; keeping to similar photographs and making an effort with my Instagram account has made my followers increase over a short period of time!
landscape photographs
palm trees majorca
EDIT
There are apps in the store that are good at editing photos so you can adjust the brightness, contrast, highlights shadows ect. The apps that I like to use are VSCO cam, Snapseed, Aviary and Facetune depending on what I want to do. More about how I edit photographs on this post here.
photographs I have edited
Any tips I have missed? Leave them in comments!
Thank you for reading!
Emily xox
Art Instagram | Personal Instagram | Pinterest | Twitter
Take Snaps With The iPhone 6 I have had an iPhone now for 3 years and I do not think I could ever turn back to a different phone, I love how simple and easy it is to use, the way it looks and the packaging is always immaculate.
0 notes