#frame by frame screencapping methods
Explore tagged Tumblr posts
Visit Tumblr Blog
Explore Tumblr blogs with no restrictions, modern design and the best experience.
Last Seen Tumblr Blogs


Fun Fact
In Q3 of 2020, 31% of US users access the Tumblr app daily.
Text
TOOL TUTORIAL 4
Screencapping Frames with FFmpeg
FRAME BY FRAME SCREENCAPPING METHODS
Tool type: Command Line tool
Operating systems: Mac, Windows, and Linux
Difficulty: Even if it's your first ever time opening your command line and trying to type anything, I think you can do this! I believe in you! :D
Input: Video files (any video file format).
This tutorial is largely based on instructions provided by u/ChemicalOle as part of their GIMP GIFS 101 tutorial for r/HighQualityGifs.
____________________________________
WINDOWS USERS: CHANGE ALL FORWARD SLASHES IN THIS SCRIPT TO BACK SLASHES!!!
____________________________________
Tutorials I've made so far have covered gif-making methods where video footage is transformed straight to .gif and there is no need to screencap frames. When making gifs in Photoshop (and if you want to make gifs using GIMP) rather than input video straight into the program, you often load a stack of screencaps into the program—one screencap representing every frame. After all, gifs are nothing more than a series of images all stacked together playing one by one in a loop. So lets learn a super faster automated way of screencapping every frame in a video clip automatically. Even if you've never opened your OS's command line interface in your life, I think you can do this!
1. Install FFmpeg
I recommend you install FFmpeg via Homebrew if you're on Mac or Linux by pasting this into your terminal (if/once Homebrew is installed):
brew install ffmpeg
Windows users or other users who don't want Homebrew can follow install instructions on the FFmpeg website.
2. Make a Folder
Make a folder on your desktop called FRAMES and place your video source file in that folder.
I’m going to rename my source video video.mp4 for this tutorial, but you can also just change “video.mp4” to the name of the file in the script below—this includes changing the video file extension in the script below as needed. I don’t think there’s a video file type FFmpeg cannot work with.
3. Determine when the moment you want to gif begins and ends
I’m going to gif a short moment from Season 1 Episode 7 of Supernatural as an example.
According to my video player (I'm using IINA) the exchange I want to gif starts at 8:02.565 and ends at 08:10.156. While you can trim precisely by the millisecond, I’m going to assume your video player doesn’t show milliseconds since many don't.
I'm going to keep the start of my clip at 08:02 but round up the end timestamp 1 second to make sure I get all the milliseconds in that second I want to include. In my case: I need to start capturing at precisely 8.02 and end capturing at 08.11, which is 9 seconds later.
4. Use this script template
You want to use the following template script u/ChemicalOle provided (replacing each # with a number you need):
cd YourFilePathGoesHere ffmpeg -i video.mp4 -r ## -t # -ss ##:## -f image2 frame_%4d.png
video.mp4 is where your video file name goes (including changing the video extension if you need to to .mkv, .mpg, .mov, etc).
-ss ##:## specifies when to start capturing. (I need to put 08:02 here)
-t # specifies how many seconds to spend capturing. (I need to put 9 here)
-r ## tells FFmpeg how many times to capture a .png every second (i.e. the frames per second or FPS). u/ChemicalOle recommends you set this at 30 for a 30 FPS capture.
-f image2 frame_%4d.png tells FFmpeg to output .png images with the name frame_0001.png, frame_0002.png, frame_0003.png, etc.
In my case, my script will look like this:
cd ~/Desktop/FRAMES ffmpeg -i video.mp4 -r 30 -t 9 -ss 08:02 -f image2 frame_%4d.png
The top line starting with cd just tells my terminal to change directories to where my video file is located, and where to dump the frames to be generated (in the FRAMES folder with my video file). (Windows users: change forward slashes to back slashes and that cd command will move you to your FRAMES folder too).
When you input this command into your system shell (Terminal on Mac, Powershell on Windows) and press enter, you you might feel like it’s stalling at first or not working because
"Press [q] to stop, [?] for help"
Will be printed on the screen. It is working though! Just leave it alone for minute and it'll start working. When the cursor prompt reappears, there will be a bunch of PNGs in your FRAMES folder, organized in sequence by number.
8 notes
·
View notes
Text
giffing with screencaps is kind of miserable how do you guys do this 😵💫
#usually i import video into layers but that method doesn't work with my iwtv s1 download#i am suffering#why are there so many steps#screencap with mpv -> delete duplicates -> load files into stack which ends up taking forever AND THEN i can gif as normal#the deleting duplicates thing is what gets me LIKE WHAT DO YOU MEAN MPV DUPLICATES FRAMES#lmao i'm whining bc i'm not used to it but i'm sure any gifmakers reading this are scoffing rn#tbd#daphne.txt
4 notes
·
View notes
Text

i told my friend i would find him some beginner’s giffing tutorials, but all the one’s i could find were either years out of date, used a method that made me go “huh”, or incorporated ready-made actions. all perfectly fine, but if i’m sending someone a tutorial i’d rather it be one for a method i understand enough to help with.
so, here is a beginner’s guide to giffing, as told by cleo, a neurotic, detailed, and organization happy individual. there will be many pictures.
this tutorial will strictly cover the gif making portion of the process, from getting your screencaps to importing in photoshop, resizing/cropping, and sharpening. i was going to briefly go over colouring, but tumblr only allows 30 images and i ran out of space, so i'll have to do a separate colouring tutorial (which also means i can go into more detail, yay).
downloading the videos, whether direct downloads or t*rrents, is also another tutorial. but make sure you’re using at least 1080p, and the bigger the file the better. a single episode of a ~45 minute show should ideally be 2gb at minimum. a full length movie should ideally be at least 5gb. imo 2160p/4k files are not really necessary; the quality increase is negligible, and it takes a lot longer to screencap them. if you do use 2160p/4k files, try and make sure it is not HDR, as those videos are often washed out and require a different screencapping program to fix.
Programs
I am using a cracked version photoshop 2022, but whichever version you use should be pretty much the same
Actions. not a program but a function inside photoshop, where you essentially record a series of steps, and then you can simple play that action when needed and those steps will repeat, which saves considerable time when giffing. I will note which parts of the tutorial are best saved as actions, and explain how to create actions at the end.
For screencapping i use kmplayer it’s free and very simple to use
not at all a necessary program, but i use freecommander instead of the regular windows file explorer as i find the dual panels very helpful when moving the frames around
Screencapping
there are many programs you can use to get the screencaps from a video, a lot are basically the same, some are better suited for particular video file types. kmplayer is a very simple program to use, but afaik the capture function only works on mkv. files (the only other file type i’ve tried is mp4, which plays but does not capture)
once you open your video file in kmplayer, we’re going to open the advanced capture window, found under capture→advanced capture, or alt+v
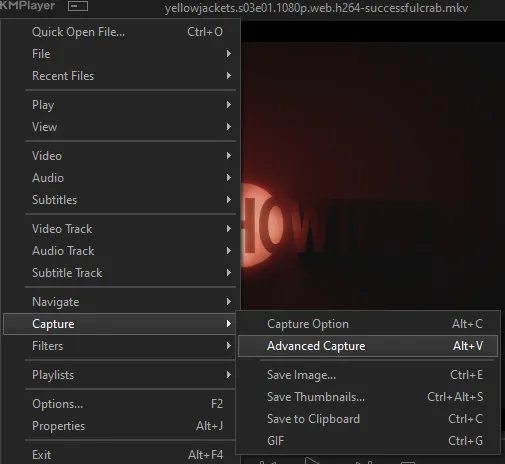
the window should look like this
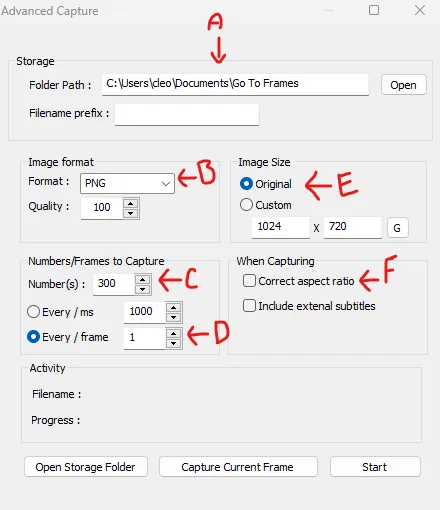
A-this is where all your screencaps will save to. i recommend making a specific folder for all your screencaps
B-make sure this is set to png for best quality
C-this is the number of screencaps you want to take, guesstimate how many you will need, keeping in mind that most videos are approx. 25 frames per second, and you should always cap a bit more than you think just in case
D-make sure “every/frame” is selected and set to 1
E-make sure “original” is selected, resizing will be done in photoshop
F-make sure “correct aspect ratio” is unselected
go to the part of the video you want to gif, and pause it just slightly before that part starts, then select ‘start’. the screencaps will start to save to the file, no need to play the video, and will automatically stop once it has capped the number of frames you have chosen
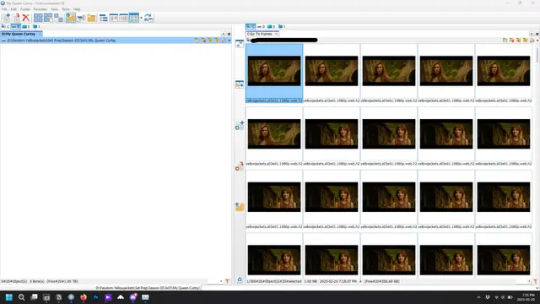
and here is how they look inside freecommander. i have already made a folder for this gifset, which is on the left. now you’re going to make a folder for each individual gif. i’ve decided this one will have four gifs, so create four folders (i just label them gif 01, gif 02, etc) and then move the frames for each gif into their respective folder
while you can always delete frames once the gif is made if it’s too big, i prefer to make sure i have the correct number of frames before i start. the gif limit on tumblr is 10mb, so it’s good to look at the scene/shots you’re giffing and decide approx. what dimensions your gif will be. full size gifs have a width of 540px and your choice of height. if you go for a square gif (540x540) you can usually fit 40-50 frames. if you’re planning for a smaller height (such as 540x400) you can usually fit more around 50-60 frames.
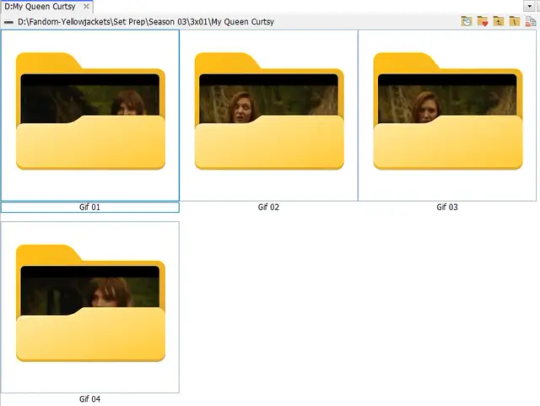
and here are the caps inside the folders. another reason i like freecommander is it’s ability to “multi-rename” files. the default file explorer can do so as well, but you have to do each folder individually and you can’t customize the new names as much. either way, i prefer to rename the files to each gif just to scratch my organization itch.
Introduction to Photoshop
NOTE: i have changed many of my keyboard shortcuts in photoshop to ones i prefer, so any you see listed in the menus of these screenshots are likely not the original shortcuts. you can see and change them yourself under edit→keyboard shortcuts

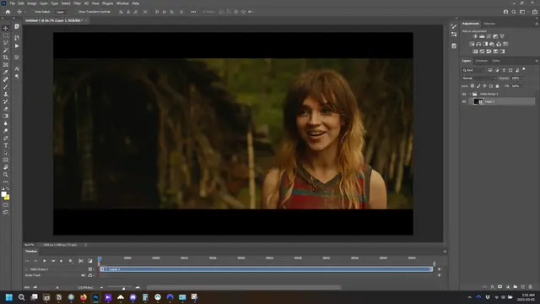
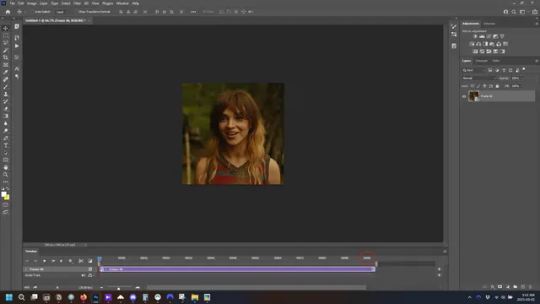
quick run-down of the photoshop interface. i have adjusted placement of some things from the default so this isn’t exactly how your photoshop will look when you open it, but everything is labelled, either on top or by hovering over the element. once you’re more familiar and have your process down i would recommend adjusting the workspace to suit your process.
A-your main tools and colour selector. almost all the tools have either several tools in one, or have alternate options which can be accessed by right-clicking the tool. you can also hover over each tool to get a pop-up with a quick explanation of the tool
B-additional “windows” such as history, properties, actions etc. can be opened from the window menu at the top and moved around with click-and-drag. history and properties should already be there by default, but probably on the right hand side instead. each window opens and closes with a click
C-the timeline window where the gif is made. the white square is a single frame of a gif, and on the row below is the play controls. this will not be there by default and will need to be opened from the window menu
D-adjustment layers for colouring
E-layers box. this is where the screencaps will show, along with adjustment layers, text layers, etc.
Opening Screencaps in Photoshop
go to file → open navigate to the folder for your first gif, select the first screencap, and check the image sequencing, and click open

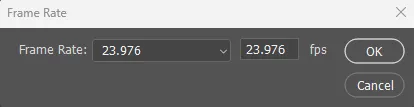
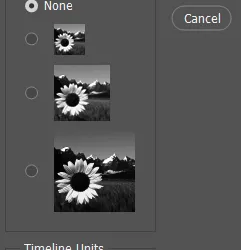
a window will open labelled frame rate. set it to 23.976 and select ok
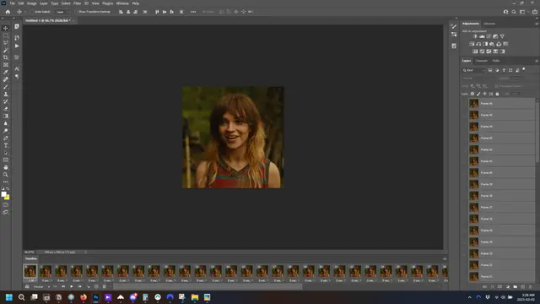
the screencaps will open in the timeline view, seen as the blue panel line at the bottom, and the screencaps are combined into video layer in the layer panel on the right.
Creating Frames
technically, you could go right into your cropping/resizing and sharpening from here, however if you do that directly then you have to keep the screencaps in the folders you have, otherwise if you save and re-open the gif it won’t move.
this next part should be made into an action.
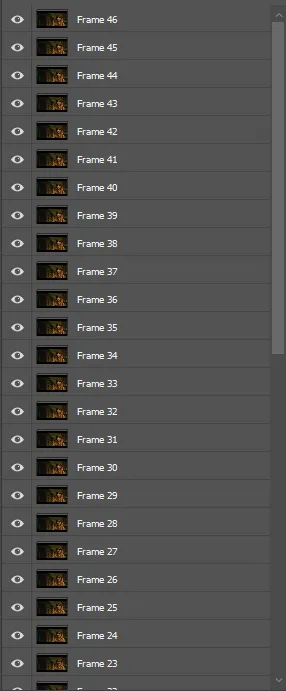
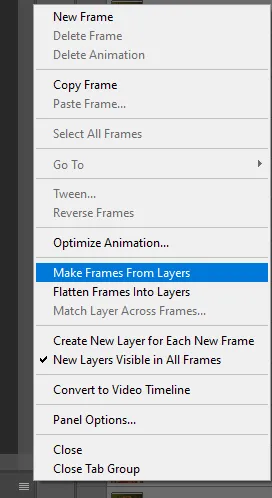
at the top right of the timeline window, click four vertical lines to open the menu and select convert frames → flatten frames into clips. depending on how long the gif is, this can take a minute.

the layers panel should now look like this, each frame of the gif is now its own layer.
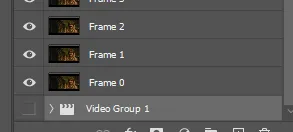
the very bottom layer will be the video group. this can be deleted as we’ve made the frames from it
in same timeline menu as before, right under “flatten frames into clips”, select “convert to frame animation” and the screen should now look like this. this will be the end of this action.
Cropping and Resizing
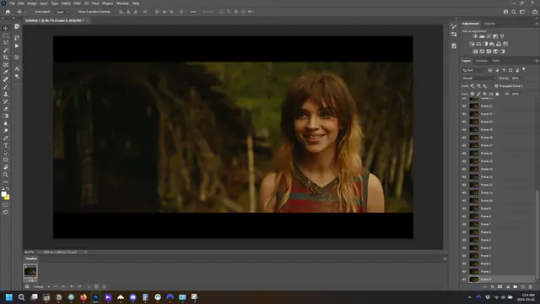
with widescreen footage, sometimes it’s just shorter than 1080p, but most of the time it will have the black bars on the top and bottom, and frustratingly, they’re not always the same size. it’s good to save the most common sizes as actions.
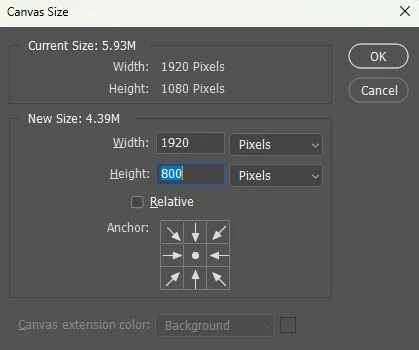
to find the size of the actual screen you turn on the rulers under view→rulers and check the height. then open your canvas size dialogue box under image→canvas size and change the height, making sure pixels are selected in the dropdown. yellowjackets is what i call “xtra wide” which is 800px. “normal” widescreen is 960px.
next we’re going to resize the caps. i also make actions for this, one for each potential gif size. open the image size dialogue box under image→image size and change the height of the image to your desired height plus 4 pixels. these extra pixels are to prevent a line at the top and/or bottom of your completed gif. now re-open the canvas size box, change the width to 540px, and the height to the desired, removing those 4 extra pixels. i have set this one to 540x540. this is where you would end the resizing action.
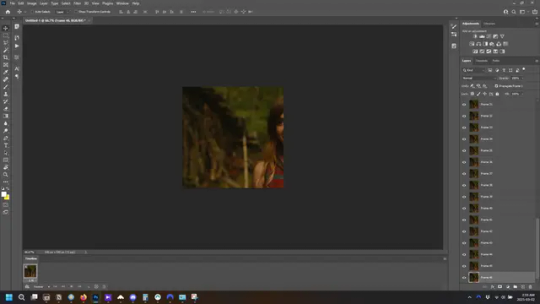
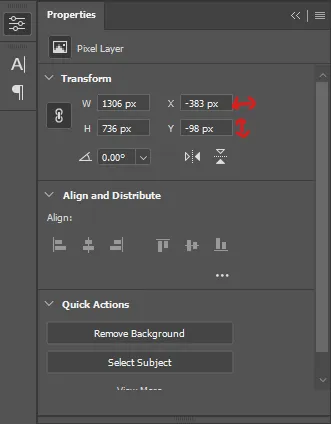
and as you can see she is off-screen. select the top layer, hold down shift and select the bottom layer to select them all, and with the move tool (the very top one) activated, click and drag to move it left to right as needed to centre the figure/s. as you move it a box will appear telling you how far you are moving it in any direction. make sure you are only moving it left or right, not up or down. to be certain of that, open the properties tab.
the y axis is your up/down, x is left/right. for this gif the y needs to stay at -98. you can also manually change the x axis number instead of dragging the image. also helpful for making sure multiple gifs of the same shot are all positioned the same.
the layer are currently ordered with the 1st at the top and the last at the bottom. with all layers still selected, go to layers→arrange→reverse. the last layer will be on top now. if there is movement in your gif, check if you need to alter the position again to make sure the movement properly centred. but once you are satisfied with the position, the layers should be in “reverse” position, of last layer on top. this is to ensure that the gif plays forwards.
Converting Gif
this should also be made into an action, going through sharpening process
in the timeline menu, select “make frames from layers”
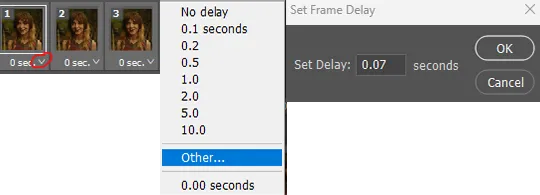
the frames are now populated in animation window. in timeline, click select all frames. go to any of the frames on the bottom and click the little arrow beneath it, select other, and enter 0.07 seconds. this is not a necessary step, as we will have to adjust the frame rate at the end, most likely to 0.05, but if we don’t change the frame rate here, then when we play the gif while working on it to check how it looks, it will play very fast.
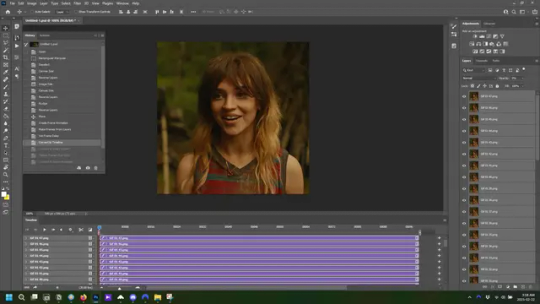
in the same menu at the right of the timeline box, select “convert to video timeline”
then, making sure all layers in the panel on the right are selected, go to filter→convert for smart filters. this turns all the layers into a single smart object.
but if you look where i’ve circled, it says the gif is 99 frames long*, when in fact there are only 47. if you are making regular “scene” gifs, basic colouring and maybe a caption, this is fine and does not need to be fixed, it will play at the same speed. if you want to change it to display (approx.**) the correct number of frames, go to the timeline menu on the right, select “set timeline frame rate” and change it from 30 to 15
*if it does not list a frame number by 4 digits but instead says 5f, 10f, 15f, etc. go to the timeline menu on the right, select panel options, and change timeline units to “frame number”
**the reason why this is only approximate is because the actual frame rate is not a a whole number, so when changing the frame rate it isn’t a 1:1, and 47 frames becomes 50 frames. the extra frames are removed at the very end, but if you are not doing any edits that require working frame by frame, there’s no need to change the frame rate here at all
Sharpening
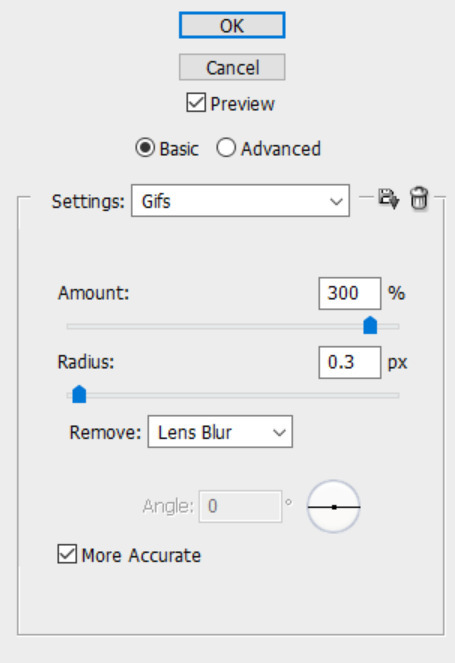
this is, as it sounds, making the gif look sharper. to start go to filter→sharpen→smart sharpen and this window opens. play around with the dials to see what each ones does. the below settings are good for most high quality footage.
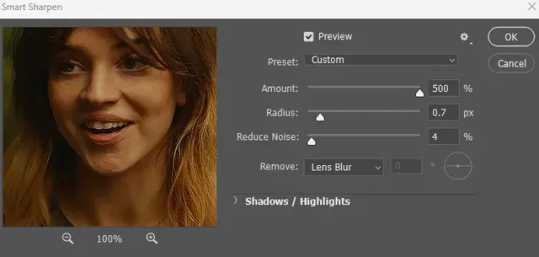
Amount-basically, how sharp do you want it
Radius-hard to explain, but this essentially sets how deep the lines of the sharpness are
Reduce Noise-smooths the pixels
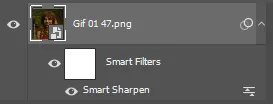
once you click okay your single layer should look like this.
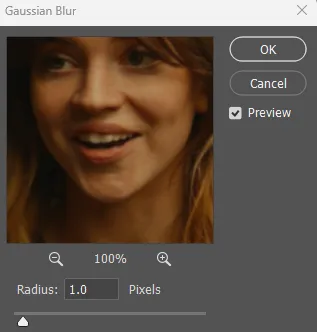
you’re going to then right click the layer and select duplicate layer. with the top layer selected, go to filters→blur→gaussian blur and set the radius to 1.0 pixels.
then change the opacity of the top layer to 10%. this is to essentially soften the sharpening a bit, as if it’s too sharp it can make the colouring wonky. this opacity level can also be changed depending on need.
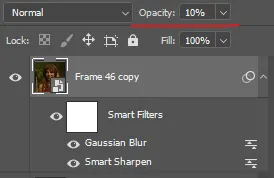
finally, select both layers, right click, and click “group from layers”. your gif is now fully made and sharpened.
Colouring
yeah. ran out of image space. but this is where you would do your colouring and add a caption or any other text.
Converting & Exporting
when all your colouring is done, you’re ready to start saving your gif. you can do it directly from your current file, but that means essentially losing your colouring, as all those layers will be merged together. i am someone who likes to save my psd’s (photoshop files), at least until i’ve posted the gifs, in case i need to fix something in the colouring. if you’d like to keep yours as well, open the history tab and select the first icon at the bottom “create new document from current state”. this will open a copy of the file in a new tab. save the original file and you can close it, continuing all work on the copy file.

select your all your layers, convert them into a smart object from filter->convert for smart filters, then follow the same steps from Creating Frames above. once you're back in frame animation, select Create Frames From Layers, and once again set the frame animation speed.
most people set the speed to 0.05. i personally set it to 0.05 or 0.06 depending on the length of the gif. check how it looks at 0.05, if it seems too fast, try 0.06.
now to save. go to file->export->save for web (legacy). the number is the lower left corner is your gif size, it needs to be under 10mb or else you'll have to delete some frames.

the right panel is your save options. the preset dropdown has some built-in settings, but you won't use them because (at least on my version) the presets only go up to 128 colours, instead of the full 256. the 3 i've highlighted in green are the only one's you'll adjust as needed. the settings below i use for i'd say 90% of my gifs. i'll sometimes change the adaptive dropdown to one of the other options, ocaissionaly the diffusion, and rarely the no transparency dither, but play around with them and see how they change the look of the gif.

when you're satisfied with the look of your gif, click save at the bottom right of the window.
voilà! you now have a gif.
Actions
this is your actions panel. the triangle on the left side is the button to open it. remember, if it's not already there, go to windows->actions to open it.
the buttons on the bottom, left to right, are stop recording, record action, play action, new folder, new action, and delete.

as you can see, i have different folders for my resizing, sharpening, captions, saving, and my 1 step (temporary) actions. to run an action is very simple; click the action, and click play.
to create an action, click the new action button, a box will pop up, give the action a name, and click record. the record button at the bottom of the action window will turn red. now perform all the steps you want it to record, and click stop recording. keep in mind it will record every single thing you do, including in other open files, so if the action you plan to record will have a lot of steps, it might help to write them down first.
to modify an action, select the step in the action above where you'd like the new step to be, hit record, perform the step, stop recording. select the step you'd like to delete, and click the delete button.
steps within the actions can be clicked and dragged, both within that action and moved to other actions. actions can also be moved between folders.
222 notes
·
View notes
Text

COLORING + SHARPENING TUTORIAL
someone asked for a coloring tutorial and my sharpening settings, so here it is! there are also a few tips to achieve more HQ gifs. :)
tutorial under the cut!
FOR HIGH-QUALITY GIFS
FILE SIZES
it doesn’t matter what your sharpening settings are if the file you’re using to gif is too low quality, so i tend to look for the best that i can get when downloading stuff.
usually, movies (+2h) look better if they’re 5GB or more, while an episode (40 min/1h) can look good with even 1GB. the minimum definition i try to find is 1080p, but i gif with 2160p (4k) when available. unfortunately, not every computer can handle 4k, but don’t worry, you can gif with 1080p files just fine if they are big enough. contrary to popular belief, size does matter! which means sometimes a bigger 1080p file is better than a smaller 2160p one, for example.
SCREENCAPPING METHOD
this can too influence the quality of your gifs. as a gifmaker, i’ve tried it all: video frames to layers, directly opening video clips, loading files into stack, and i’ve finally settled down with opening screencaps as an image sequence. with bigger files, it doesn’t matter much what technique you use, but i’ve noticed with smaller files you can do wonders if you screencap (either by loading files into stack or opening as an image sequence) instead of using video clips. for example, this gif’s original video file was only 4GB (so smaller than i’ve usually go for), if you can believe it!

here’s a tutorial for setting up and screencapping with MPV, the media player i use to screencap. again, you can keep using video clips for bigger files, but you’ll find this useful when dealing with dire causes. i don't file loads into stack, though, like the video does. i open as an image sequence (open > screencap folder > select any image > click the image sequence button). just select OK for the speed. this will open your screencaps as a video clip (blue bar) in timeline mode (i'm a timeline gifmaker, i don't know about you). you will need this action pack to convert the clip into frames if you're a frames gifmaker. i suggest you convert them into frames even if you're a timeline gifmaker, just convert them into a timeline again at the end. that way you can delete the screencaps right away, otherwise you will delete the screencaps and get a static image as a "gif".

ATTENTION if you’re a Mac Sonoma user, MPV won’t be an option for you unless you downgrade your system. that is, if you have an Intel chip. if you have M1 Max chip (or even a better one), here’s a fix for MPV you can try while keeping that MacOS, because nowadays MPV is skipping frames in its latest build. or you can use MPlayer instead for less hassle. here are two tutorials for setting and using MPlayer. Windows users are fine, you can use MPV without trouble.
FOR EVEN MORE QUALITY
ADD NOISE
here’s a tutorial for adding noise as a way to achieve more HQ gifs if your original material is too low quality.
REDUCE NOISE WITH CAMERA RAW
instead of adding noise, you can reduce it, especially if your gif is very noisy as it is.
the path is filter > camera raw > detail > nose reduction. i do this before sharpening, but only my video file isn't great to begin with. because it’s a smart filter, you can reduce or increase its opacity by clicking the bars next to its name in the layers panel.
TOPAZ AI
i use Topaz Photo AI to increase the quality of my screencaps when i need to. it’s paid software, but there are… ways to find it for free, usually on t0rrent websites. if someone’s interested, i can make a tutorial solely about it in the future.
SHARPENING SETTINGS
here are my sharpening settings (filter > sharpen > smart sharpen). i sharpen things twice: 500% 0.4px + 10% 10px. here's an action for it, for more convenience. here's a tutorial on how to use Photoshop actions. for animated stuff, i use this action pack.

COLORING
here’s the gif i'm gonna use as a base. it’s already sharpened like the way i always do it.

LIGHTNING THE SHOTS
half of the secret of a good coloring is good lightning. i always useCurves (layers > new adjustment layer > curves) and Brightness & Contrast (layers > new adjustment layer > brightness & contrast). the settings depend on the scene you’re giffing, but i always try make my gifs bright and with high contrast to make the colors pop.
CURVES
besides lighting your scene, the Curves adjustment layer has four automatic options that will color-correct it for you. it’s not always perfect and it doesn’t mean you won’t need to do further coloring, but it’s a great start. it’s a lifesaver for most ridiculously yellow scenes. look at the difference! this gif uses the 3rd automatic option (the screenshot below isn't mine btw so that's why the fourth option is the chosen one), from top to bottom. what automatic option you need to choose depends on the gif.


sometimes i like to tweak my Curves layer. not everybody does that, it’s not that necessary and if you’re not careful, it can screw your gif up. to modify your layer by hand, you will need to click and drag points of that straight line in the position you desire. this is the concept behind it:

basically, the lower part of the line handles the shadows, while the upper part handles the highlights of the image. if you pull a highlight point up, the image’s highlights will be brighter. if you pull it down, it will make them darker. same thing for the shadow points. you should play with it to get a grasp of it, that’s what i did when i first started giffing.
BRIGHTNESS & CONTRAST
then i added a bit of brightness and contrast.

CHANNEL MIXER
the scene looked a bit too yellow, so i used the Channel Mixer (layer > new adjustment layer > channel mixer) adjustment layer. here’s a tutorial of how it works. not every scene needs the Channel Mixer layer though, i mostly use it to remove heavy overall tints. in this particular case, the Curves layer got rid of most of the yellow, but i wanted the gif to be just a bit more blue so the Channel Mixer tweaks are very minimal.

SELECTIVE COLOR
now, this adjustment layer i always use: Selective Color (layer > new adjustment layer > selective color). this is THE adjustment layer to me, alongside the Curves one. this is how it works:

ie, you can separately edit a color this way, giving it tints. for this gif, i wanted to make the colors more vibrant. to achieve that, i edited the selected colors this way:

for the reds, i added even more red in them by moving the first slider to the right, making the color more vibrant. for his hat to have a more warm tint, i added yellow to the reds (third slider, moving it to the right). finally, to make the reds stronger, i moved the last slider to the right (more black).
for the yellows, i made them brighter by adding white to them, thus making the tile wall and Paddington more bright as well.
for the cyans and the blues, i just added the maximum (+100) of black that i could.
i wanted for Paddington's nose to be brighter, so i added more white to the whites.
lastly, i added depth to the blacks by increasing their own blackness.
you should always play with the Selective Colors sliders for a bit, before deciding what you want or need. with time, you will automatically know what to change to correct the color grading. it all takes practice!
HUE/SATURATION
i don’t know if you noticed, but there are some green spots on the blue wall behind Paddington. to correct that, i added a Hue/Saturation adjustment layer (layer > new adjustment layer > hue/saturation) and made the saturation of the greens 0%, making that unwanted green disappear from the background.

while the green spots on the wall are specific for this gif, i use hue/saturation a lot to tweak, well, hue and saturation. sometimes someone’s skin is too yellow, i made it redder by tweaking the reds and the yellows, or vice-versa. the hue bar follows the rainbow bar, so the maximum settings (+100 and -100) give the selected color to change its hue to something more red or pink (the rainbow extremities). changing hue can give pretty whacky results, like turning someone’s skin tone to green, so you will need to play with it to get the hang of it. you can also tweak the opacity of your hue/saturation layer to further improve your gif’s coloring. i didn’t do it in this case, the opacity is still 100%. the reds and the blues had their saturation increased to make them pop just a bit more, without affecting the other colors.
COLOR BALANCE
the highlights of the gif still had a green tint to it due to the automatic correction of the Curves layer, so i used Color Balance. this is how it works: instead of giving specific colors some tints, you can give them to the shadows, highlights, and mid-tones. if your shadows are too blue, you counterbalance them with the opposite color, yellow. same thing with the cyan-red and magenta-green pairings. in my case, i added a bit of magenta.


B&W GRADIENT MAP
now, if this gif was a dish, it’s time for the salt and pepper. i always add a Gradient Map (layer > new adjustment layer > gradient map) (black to white gradient) with the Soft Light blending mode, thus giving my shadows more depth without messing with the mid-tones and highlights. it also doesn’t “deep fry” (you know those memes?) the gif too much by adding even more contrast. usually, the opacity of the layer is between 30% to 70%, it all depends on the gif. it always does wonders, though!

COLOR FILTER
finally, i like to add Color Filters (layer > new adjustment layer > color filter) to my gifs. it’s very handy when giving different scenes for the same minimalistic set because it makes them kind of match despite having completely different colors. in this gif’s case, i added a “deep blue” filter, opacity 50% density 25. you can change the density and the opacity of the layer for further editing, again, it all depends on the gif.

VIBRANCE
if i feel like it, i add a vibrance layer (layer > new adjustment layer > vibrance) to make the colors pop. this can ruin your coloring sometimes, especially when regarding skin color, so be careful. i didn't do it in this gif because i felt i didn't need it.
TA-DA! 🥳
AN OTHER EXAMPLE
the color grading of the original scene it’s pretty good as it is, to be honest. let’s see a worse scenario, a VERY yellow one:


no channel mixer this time because the automatic curves option dealt with the yellowness, but you can see it made the gif too green. i needed to correct that with the following adjustment layers:
curves (automatic option) (gif 2) >> same curves layer (tweaks) (gif 3) >> brightness & contrast (gif 4) >> hue/saturation (tweaked cyan+blue+green) >> selective color >> color balance (gif 5) >> b&w gradient map >> (sepia) filter >> vibrance (gif 6)
i added a hue/saturation layer to remove the blues & greens before my selective color layer because i thought that was more urgent than tweaking the tint of all colors. color balance (gif 4) was the real hero here, though, by removing the green tint. the selective color layer was meant to make the red pop more than anything else, because the rest looked pretty good, especially her skin tone (despite the green tint). you can notice that tweaking the curves layer (small gif 3) also helped A LOT with the green problem.
tl;dr 😵💫😵💫😵💫
here's a list of my go-to's while coloring and lightning gifs. it's not a rule, just a guide. there are gifs in which i don't use all these adjustment layers, or use them in a different order. it all depends!
1. curves (automatic option + tweaks) 2. brightness & contrast 3. channel mixer 4. selective color 5. hue/saturation 6. color balance 7. b&w gradient map 8. color filter 9. vibrance
i'll suggest that you study each adjustment layer listed for more info, either with other Tumblr tutorials or YouTube ones. the YouTube ones focus on images, but you can translate what they teach to gif making very easily. you can ask me to further explain any adjustment layer, too! i was brief to keep this short (which i kinda failed lol).
feel free to ask me for clarification or something else about gifmaking wise, i always like to help. ❤️
#*#*tutorials#gifmaker tag#resources#resource: tutorials#ps help#uservivaldi#tuserjen#userrin#userelio#useralien#userzaynab#userchibi#userbuckleys#usertj#userbess#tuserlucie#useraljoscha#userdavid#usershreyu#usernolan#userhallie#userisaiah#tusergio#tusergeo#userjesslynn
737 notes
·
View notes
Note
hi nic!! do u have a tutorial on making gif packs?? i've been trying to look for tutorials and i think i just overwhelmed myself so i dont know where to start :((
omg hi!! i know a tutorial for this method exists, but i cannot seem to find it 😭 i'll go ahead & make one for you ! beneath the cut, you'll find my gifmaking process + all my favorite gif resources. i think something good to note is that every gifmaker i know does it a little differently, so you may prefer other methods like screencap clipping or video-to-layers. i think these tutorials by pochunts would be super helpful if you wanted to explore other options <3 here's the gif i made in the tutorial btw :p

how to make gifs using photoshop's video timeline (+ extra resources):
(if you want to follow along directly, i'm using this video.)
1) download your video. i use this website (cobalt). for the cleanest final product, try to use videos that are 1080p or higher.
side note: if you're downloading something other than mp4 files, you'll need a file converter- i use handbrake for this. this tends to come up if you're downloading tv shows!!
2) open your video in photoshop. (not import, just regular file > open)
this is what mine looks like now. our layouts may look a little different because mine is tuned to my job too.
if you're new to photoshop, go ahead & pinpoint a few things: your toolbar (yellow), actions panel (pink), adjustments panel (green), layers panel (blue), and video timeline (red). if you don't see these panels, go to window in your topbar & click the names.

general photoshop tip... go to photoshop > settings > preferences and 'up' your number of history stats. this will give you more 'undos' if you mess up rather than hitting a wall :p i have mine set to 75!!

3) convert to smart object. with your base layer protected, right click > convert to smart object, or go to layer > smart objects > convert to smart object. this basically allows you to make changes while keeping the base properties in tact!! you'll notice your timeline change from blue to purple.
bc i use this so often, i made the shortcut cmd+f. you can do the same by going to edit > keyboard shortcuts if you'd like :p


let's focus on that timeline for a moment... get familiar with the split button (red), zoom buttons (yellow), work area (green).
the split button is how we'll divide the video into clips, which will become our gifs. the length of your clip will vary. i just try to fit a completed action into one clip if that makes sense!!
the zoom buttons allow you to move through the video a little easier. this will end up being a personal preference thing. i usually zoom until frames are broken up by 2's (02:00f / 04:00f / etc - shown 2 pics down) but it also depends on the length of the video
the work area defines what will export when you hit save. later on, you'll want to make sure your adjustment layers cover the entire work area.

4) clip your video. skim through your video and pick a scene you'd like to gif. split at the beginning and end by clicking the scissors, so you have something like this. i'll pick three clips for the tutorial.
as a general note, i will clip the entire video in one go, save as a psd, then move onto sizing/coloring/sharpening/etc

go ahead & delete the layers you won't be using as clips. i would rec saving as a psd at this point to save urself the grief of any photoshop crashes since u have now clipped a video to your heart's content!!

5) now, onto sizing your gifs.
first you'll use the crop tool (pink, toolbar). you can input your desired size to keep the scene in ratio (in the pink squared boxes). this is up to personal preference again, i use 260x150.
once you choose a size, you can click the menu the green arrow is pointing to, scroll down, and define a new crop preset.

adjust image size. go to image > image size and type the size you decided. make sure it's set to pixels and that you have the in-ratio button (pink) clicked.

6) next, sharpen your gif.
as you're just starting out, i would suggesting using an action. i have my favorite options in this tag! to keep us on the same pace for this tutorial, i'll use this one by svgarboo.
using an action: click into your actions panel (red), click the options button (yellow) and choose 'load action', use the arrow (green circle) to open your action's folder and choose the playable option (green box). with your layer selected, click the play button (pink).
NOTE: if your play bar isn't over your active layer it won't apply
your video should look a little better & your layer should now look like this over in the layers panel:

if you want to make adjustments, double click the options buttons (pink) and adjust opacity to your liking.
7) coloring your gif. i could not begin to make a coloring tutorial bc i hate how mine turn out 90% of the time </3 BUT there are some beautiful tutorials in here ... I WILL SHOW U HOW TO PLACE THE LAYERS STILL !!!
add a new group (pink) & drag it above video group 1. it will float above your clips on the timeline. this is where your adjustment layers will go! i'm including a screenshot of my adjustment layers so you have an idea.


8) exporting your base gifs. adjust your working area bars to the beginning and end of each clip. go to file > export > save for web. i'll attach a screenshot of my export settings.

WHEN MAKING ADDITIONAL GIFS, REPEAT STEPS 5-8 AS NEEDED. because you used smart objects, you can use ctrl+t/cmd+t on your gif layers to resize instead of cropping each time.
9) adjusting gif speed. open your exported base gifs. you'll see that your video timeline has changed to a frames timeline.
go to options (pink) > select all frames. with all frames selected, click the dropdown arrow (yellow) and adjust your time.
timing will depend on a case-by-case basis. i usually go 0.05, 0.07, or 0.09. play around with speeds until the motion seems fluid and natural. my gif is around 110 frames long so i'm doing 0.05.
10) export again, using the same settings as step 8.
YOU CAN SET UP ACTIONS TO HANDLE STEPS 9 & 10 IN BATCHES. lmk if u would want a tutorial on that :p
now i have 3 finished gifs!!


11) uploading your gif packs. i think hosting directly on tumblr is going to give you the best loading time. and by that i do mean, just uploading gifs to a tumblr page 🙂↕️ if you choose to use alternate hosting sites like imgbb or gifyu, make sure you back your gifs up with a zip file on google drive.
78 notes
·
View notes
Text

tired of waiting a minute for your screencaps to load into stack? try the DICOM method!
this method lets you load even up to 150 frames into photoshop in under 10 seconds.


depending on your hardware loading files into stack can take even longer.. so, let me show you the way of DICOM below, all you have to do is change your .jpg screencaps into .dcm files 🙇🏻♂️🙇🏻♂️

here's how to convert your .jpg or .png screencaps into .dcm files, which is really all you have to do!
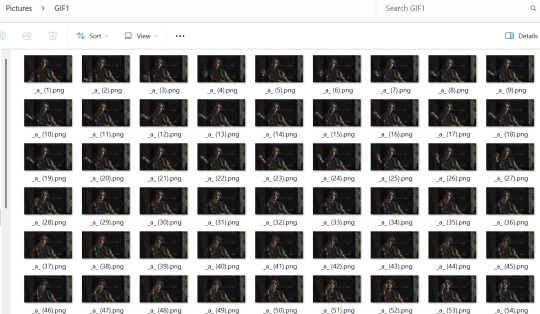
once you've screencapped the scene you want like normal you go into your screencaps folder.
– STEP 1: you click on the little folder icon

– STEP 2: after clicking it it'll look like this:

– STEP 3: type in cmd as below and hit ENTER

– STEP 4: your commad prompt window will open up like below

– STEP 5: type in "ren *.* *.dcm" (without the quotes) and hit ENTER

all done! now your files are .dcm files (below is what they look like) and you can load em into photoshop!

once you have your command prompt open you don't have to keep retyping ren *.* *.dcm for each scene you convert, you can simply press the arrow UP button on your keyboard and hit ENTER again :)
– HOW TO LOAD INTO PHOTOSHOP
– Go into FILE > SCRIPTS > LOAD MULTIPLE DICOM FILES

– choose the folder you have your DICOM files in and click select folder.
it will always say "No items match your search." you do not have to select the DICOM files themselves you ONLY have to click on "Select Folder" even when it says "No items match your search." this is normal!

and thats it! all done :)
#i hope this is readable and helpful! try it i promise itll change ur life#photoshop#photoshop tutorial#photoshop resources#mimotag#*#tutorial
59 notes
·
View notes
Photo
HOW TO: Do a Motion Blur Transition Using Timeline or Frame Animation
Hi! Someone asked me for a tutorial on the transition effect in the second gif of this set (also featured in this set and the text on this set). So, here it is! This is one of the easiest and least tedious of the gif transition effects in my opinion — and I’m going to go over how to do it both in Timeline and Frame Animation (using the screencap method). Disclaimer: This tutorial assumes you have a basic understanding of gif-making in Photoshop.

PHASE 1: PREP
This phase applies to both the Timeline and Frames method!
1.1 – Prepare your caps. (New to gif-making? Check out my basic tutorial here!)
The key to this kind of gif is making sure your final gif, with all the transitions, won’t be too long or too big of a file to post (Tumblr’s limit is 10 MB).
If your gif is going to be big like mine (540x500px), you might want to keep your total frames between 50-60. I decided to try getting away with a whopping 70 frames total... because I like to test fate (spoiler: my final gif ended up being 9.6 MB 🙈). Since my gif is transitioning between two scenes, that means each scene was 35 frames.
If you aren’t doing screencaps like me, just make sure your clips are equal in length. And if you’re transitioning between more than 2 scenes (like the Mando example I linked at the beginning), you’ll have to use shorter clips/fewer frames per scene. In my Mando gif, each scene was 16 frames and my final gif was 64 frames.
1.2 – Crop, sharpen, color, etc. as you would. For this, since you’ll probably have 2 more more sets of coloring, just make sure your coloring is only being applied to the appropriate gifs. The way I do that is by aligning my adjustment layers with my gif as you can see in the screenshot in 1.3 below.
1.3 – Arrange your frames or clips. If you’re working in Timeline, drag the clips/layers of your second gif so they’re immediately after the ones of your first gif. I like to keep things separated in Groups:

Note: I’m keeping my text layers separate because I don’t want the motion blur to affect them. But if you wanted to make your text transition from one word to another, you can either follow the same steps I’m about to show you and apply them to your text layers, or simply merge your text layers with your gif and adjustment layers, so they can all get the motion blur filter applied to them!
If you’re working in Frames, simply paste the frames of your second gif after the frames of your first gif. Again, you can either keep your text separated or part of the motion blur.
METHOD: TIMELINE
T.1 – Divide the Timeline. Using the Scissors Tool, you’ll want to divide each gif so there are 3 small segments at the beginning and end. (3 is my go-to, however, for my Mando gif, I actually only did 2 segments because each section was already so short.)
Now there are two options for this:
OPTION 1: Simplest, 00:01 Seconds Each, Makes Duplicate Frames
You might be wondering, why on earth would I want duplicate frames? You wouldn’t, usually. But this method only causes the duplicates to happen on the blurred frames, so it’s not noticeable at all! However, if you’re like me (read: Type A) — just knowing there are duplicate frames may bother you. If that’s you, go to Option 2.
Each of these segments are the absolute smallest Photoshop will allow, a duration of 00:01.

Sometimes Timeline won’t let you cut things that short (for me, this typically only happens at the end of a clip). So my work around is to cut the segment so it’s 00:02 seconds long, then drag the clip until it’s as small as it can be. Here’s a gif showing that process:

You can see that after I dragged the clip so it would be 00:01, I also dragged the big clip over so it would still continue as normal. Timeline is neat because, even if you divide a clip, each segment can be dragged back to its full length.
OPTION 2: 00:02 / 00:01 / 00:02, No Duplicate Frames
Timeline works in a weird way... when you move forward one frame by clicking the right arrow, you don’t always see movement in your gif. And if you don’t line up the clips properly with the movement, it can create duplicate frames. The easy way to fix this is by making the 3 segments 00:02, 00:01, and 00:02 seconds respectively. This goes for the segments at the beginning and end.
You can see the duration of each segment and an example of how the gif doesn’t move on certain frames in this gif of my workspace:

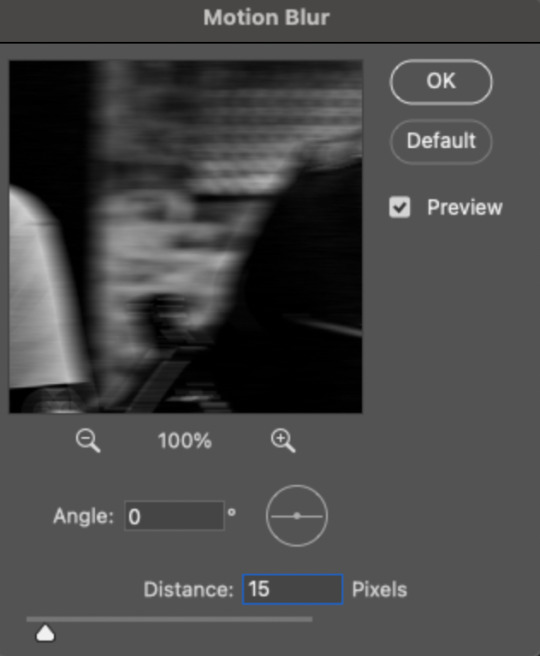
T.2 – Apply the Motion Blur filter in varying distances or strengths. Now that we have all of our segments, it’s time to apply the blur. Motion Blur is under Filter > Blur > Motion Blur!

This is the window you’ll see when you click it:

Note the fields where you can change the angle and distance.
The angle is basically the direction in which you want the blurred effect to stretch. I always do 0 because I want my gifs to blur together horizontally — I just think it looks smooth. You can play around with it if you want to get a different effect!
The distance is what I like to refer to as the strength of the blur. But really, it’s distance because it’s how long the blurred effect is being stretched.
The rule of thumb here is to apply the filter in a gradation. The part at the beginning of one gif should go from strongest (greatest distance) to weakest (least distance). The part at the end of one gif should go from weakest to strongest.
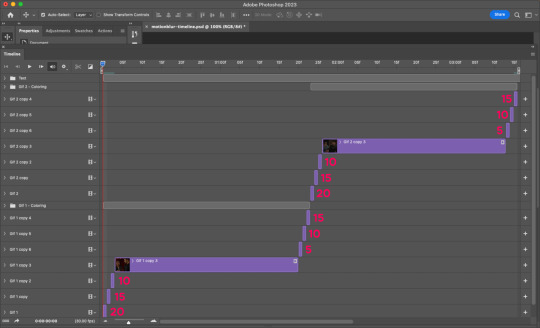
I keep things easy to remember and do 20, 15, 10 for the beginning and 5, 10, 15 for the end. The reason the numbers aren’t the same is because I don’t want the end of Gif 1 (which is blurred 15px distance) to be the same as the beginning of Gif 2 (which is blurred 20px distance). If they’re the same amount of blur, I don’t think the transition looks as smooth.
Here’s my entire timeline and the strength of blur I used for each of the transitional clips:
T.3 – Export That’s it! Convert from Timeline to Frames, export your gif, and there you go!
Reminder, if you decided to do Option 1, you’ll have duplicate frames, and therefore more frames than you started out with when you initially imported caps.
METHOD: FRAMES
F.1 – Apply the Motion Blur filter in varying distances or strengths. In Timeline, we created segments. But in Frames, each frame acts as one of those segments — so we don’t need to divide anything. We can just get straight to the filter!
Now, disclaimer: the way I’m working with Frames right now is with the adjustment layers merged with the frames. I typically work in Timeline, so I colored in Timeline and then converted into Frames for this. However you work, just make sure the coloring from one part of your gif doesn’t affect the other part.
Anyway, here’s where to find Motion Blur again:
And here’s what the window will look like:
Now just apply the filter in increasing and decreasing degrees. In case you didn’t read the Timeline section, I’ll paste exactly what I said there:
Note the fields where you can change the angle and distance.
The angle is basically the direction in which you want the blurred effect to stretch. I always do 0 because I want my gifs to blur together horizontally — I just think it looks smooth. You can play around with it if you want to get a different effect!
The distance is what I like to refer to as the strength of the blur. But really, it’s distance because it’s how long the blurred effect is being stretched.
The rule of thumb here is to apply the filter in a gradation. The part at the beginning of one gif should go from strongest (greatest distance) to weakest (least distance). The part at the end of one gif should go from weakest to strongest.
I keep things easy to remember and do 20, 15, 10 for the beginning and 5, 10, 15 for the end. The reason the numbers aren’t the same is because I don’t want the end of Gif 1 (which is blurred 15px distance) to be the same as the beginning of Gif 2 (which is blurred 20px distance). If they’re the same amount of blur, I don’t think the transition looks as smooth.
Here are all my frames and the strength of the blur I used for each of the transitional frames:

Note: I wanted to mention again that I kept my text layers in a separate group and didn’t apply the transition to them:

F.2 – Export Finished! Easy peasy!
EXPORTING TIP
If you’ve read my other tutorials, you already know this tip — but since I’m part of Discord servers where members are encouraged to share embed links to their creations, I often rearrange the order of my frames before saving them. (This tip is also handy for making sure the best frame of your gif is visible for Tumblr users who turn off auto-playing gifs.) In this case, I made frame 27 my new frame 1 because I didn’t want my embed preview to look like a blurry gif. Everything will still be in the same order, but anywhere your gif is paused, the best frame will be displayed!
Anyway, that’s it! If you have specific questions about this tutorial, my ask box is open. Hope this helps! <3
#gif tutorial#completeresources#usershreyu#useryoshi#userelio#userannalise#userzaynab#userives#usermarsy#usertreena#usercim#userrobin#userkosmos#usersalty#userhella#alielook#userk8#uservivaldi#resource*#gfx*
920 notes
·
View notes
Note
How do you make your gifs such high quality?
first of all, thank you! my giffing method is definitely not the most HQ way to do it, other gifmakers are out there making beautiful stuff from like super-ultra-4k episode downloads, but my method is easy and low effort (and low storage space on my computer since i only record clips rather than downloading entire episodes) while still looking pretty good even if not AS good as others, so i'm content with it haha i will share it below!
required tools (this is the only way i've ever made gifs in my entire life, so if you don't have these tools then unfortunately i can't be of much assistance):
high-quality video source (the highest quality you can get is best, but i myself am content to use just Normal HQ rather than going the extra mile to obtain The Most HQ Version Ever Possible)
screenrecording app (i use the free windows xbox app)
photoshop (i use version CS5)
general knowledge of gifmaking and photoshop. i'm giving a broad overview rather than detailed step-by-step, under the assumption that you're already a gifmaker yourself!
quality of source material is always the biggest contributor to gif quality, in my experience. this is where the super-ultra-4k downloads come into play for other people, but for me, i keep it simple: all i do is screenrecord the show i'm watching using the free windows xbox app
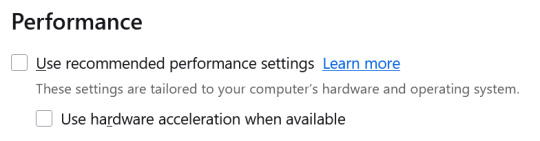
so for WOT for example, i will have the episode up in prime video player and screenrecord it directly from there. unfortunately, they've cracked down on screenrecording & screenshotting, but so far i've been able to get around it by using firefox and unchecking the below firefox browser settings, which are checked off by default. the downside of this method is that without this setting, the picture gets a bit choppy here and there and i might have certain portions of a gif that are unusable because the picture jumped too drastically between one frame and the next, but for the most part it's Fine (i must again emphasize that i follow the Low Effort Giffing Method haha)
next i go into photoshop. i've always used the "import video frames to layers" method for giffing, wherein you select that option in photoshop, pull up the video you're using, and highlight the portion of the video you want to turn into a gif, and then photoshop converts it into individual frames for you (i get the sense that the screencapping method is more popular, but it seems so confusing to me, so i've never tried it!)
the downside of using the "import video frames to layers" method instead of the screencapping method is that it might pull in the occasional duplicate frame, so you have to diligently click through every single frame and delete any dupes, otherwise the gif will look laggy in some places.
for the frame speed, i usually set it at 0.06 seconds (but will make it slower if it's a really tiny gif with a very small number of frames, such that the normal speed makes it look too fast, though this is more of a concern for giffing miniscule shots from trailers rather than normal shots from full episodes!)
once my frames are all set, i click "convert to timeline animation", select all the frames, and do "layer->smart objects->convert to smart object". this makes it so that all the individual frames are condensed into 1 single photoshop layer (while still displaying properly as a series of individual frames in the gif itself; if you convert to smart object BEFORE converting to timeline animation then it will make it so that only the first frame is visible for the whole gif, which we don't want), and that way i can apply sharpening and coloring layers in bulk instead of having to do it frame by frame.
i won't get deep into coloring here since that's less relevant to the picture quality of a gif, but i generally take somewhat of a "less is more" approach to coloring, because i find that the image quality does get pixelated if i alter the shot's natural colors, brightness, and contrast TOO drastically. for example, here is the below gif with and without coloring (but with sharpening for both) - you can see that it's pretty similar, i just enhanced what was already there by increasing the brightness, increasing the vibrance, doing a bit of color manipulation to make it more warm-toned and less green-toned (personal preference), and adding a touch of contrast (though not much since this is already a naturally-shadowy scene; contrast is finicky depending on the original lighting of a shot, sometimes i increase it a little, sometimes i increase it a lot, and sometimes i decrease it). definitely NOT my favorite example of my coloring, good god how i hate white tower interior lighting haha but it was the most recent psd i still had on hand and it gets the point across!

next, these are my sharpening settings (using photoshop's "smart sharpen" filter, applied onto the smart object i just created). the one on the left is my usual setting for gifs, which is a more dramatic sharpening, and the one on the right is my milder sharpening settings, which i tend to use for screencaps/still images. for the more dramatic sharpening, i might sometimes play around with it or decrease the % amount if i'm feeling that it looks too harsh on a particular gif.

for an example, here is that same gif with and without sharpening (but with coloring for both). i used the lefthand more dramatic sharpening settings, although i ended up decreasing to 200% because the 300% looked a little too harsh on this particular gif. but most of the time 300% looks fine to me.

these are the settings i use when saving it as a gif. don't really know what half of them mean, i probably just pulled them off some tutorial years ago!

also, dimensions! the proper tumblr dimensions are:
1 gif across: 540px width, any height
2 gifs across: 268px width each, any height
3 gifs across: 177/178px width each, any height (technically, the right and left gifs should be 177 and the center gif should be 178)
max filesize for tumblr is 10MB
after saving the gif, i open the new gif that was created and readjust the frame speed to 0.06 seconds because converting to timeline animation and then saving will cause the speed to slow down, for whatever reason. so gotta make sure to open the final gif and resave it with the correct speed so that it doesn't turn out too slow.
potentially important tumblr-specific trick! this was years ago that i first heard it so i have NO idea if it's still relevant, but i always do it for every gif just in case: make 1 frame a different speed than all the others, and this (maybe) will prevent tumblr from compressing the gif and decreasing the quality, or something like that. i don't fully remember the purpose of the trick and no clue if it still works or is still needed, but regardless, i always set the entire gif at 0.06 seconds except for one frame, which i instead change to either 0.07 or 0.05. it's not noticeable at all, and it helps avoid tumblr wrecking the quality (if that's still a thing and i'm not just making up random stuff).
25 notes
·
View notes
Text
Making Gifs Part 2: Photopea
This is part 2 of my own personal gifmaking guide. Please read Part 1 to learn about how I capture the sequential screencaps to make my gifs.
Once you have your screencaps, open Photopea. They have a very simple guide on how to make animations in their help guide. I will be going into much more detail.
Note: ***Tumblr has a limit of 10mb for the filesize of each gif, and recommends no wider than 540 pixels. If your gif is wider than 540 pixels Tumblr will resize it, and it will cause the quality to be reduced, and also take much longer for the gif to load in your post.***
1. RENAME CAPS:
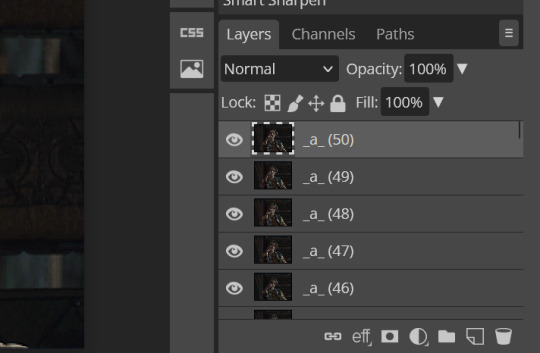
First things first. Rename all of your caps that you will be using for a gif to have the prefix _a_ on your computer. Select all and right-click on the FIRST file and select Rename (windows) and type _a_. Windows will add the numbers.
For most gifs, try not to have more than 60 frames as it will make the gif too large to upload to Tumblr. I usually aim for 45-50 frames max for most of my gifs.
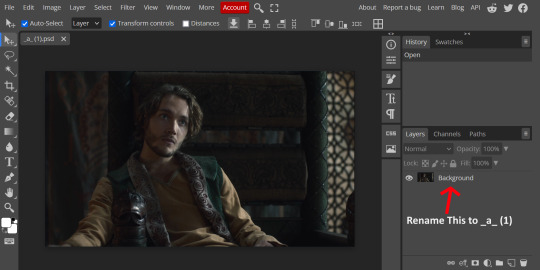
2. IMPORT FRAME #1:
Drag and Drop _a_ (1).png into Photopea. Rename the layer from Background to _a_ (1)
3. IMPORT IMAGES:
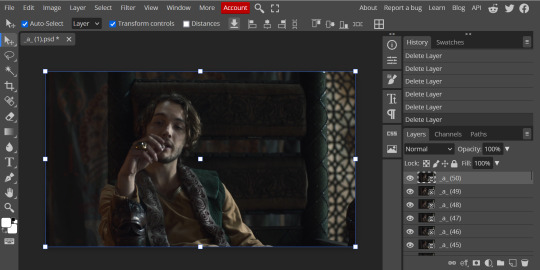
Select all the rest of your images from the folder on your computer, and drag and drop ON TOP OF the image (not the layers section). Make sure the file you grab to drag/drop is the next one in the sequence (so _a_ (2).png in this case. Otherwise they will be out of order. If you do it right, you will see the layers section on the right get populated with your caps in reverse order, with 1 at the bottom and the last one at the top.
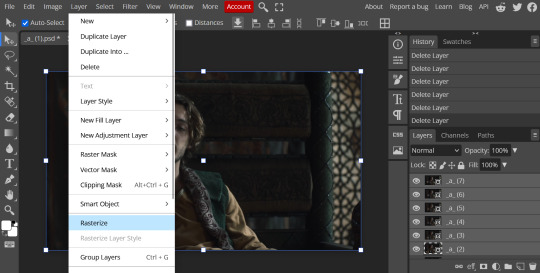
4. RASTERIZE:
Next, select all of the layers (on the right, by holding CTRL and clicking on each layer), go to Layer > Rasterize. They are currently Smart Layers, and if you keep them this way the sharpening will not apply (for some reason, I have no idea why that is)
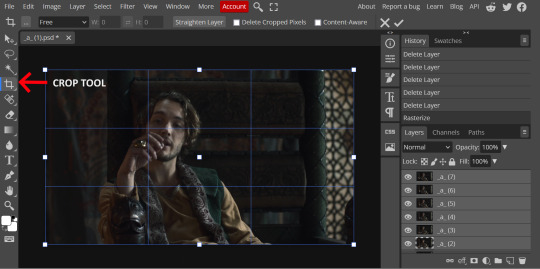
5. CROP:
Next, crop your gif. This tool is on the left menu. You do not have to have all the layers selected for this, it will crop all layers together. Move the blue lines at the edges until the frame is cropped how you like. Be mindful of the character moving in other frames; you may want to check your other layers to make sure nothing important gets cropped off in another frame. Once the blue lines are where you want them, click the checkmark at the top right to finish the crop.
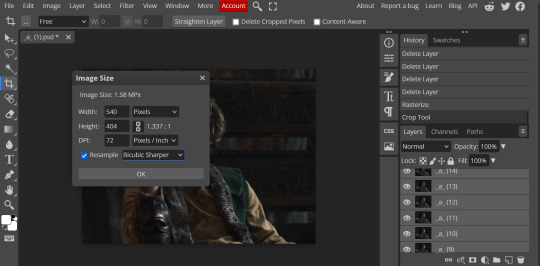
6. RESIZE:
Resize your gif so that it is 540 pixels wide. Go to Image > Image Size in the top menu. Make sure you choose "Bicubic Sharper" as the resample mode. Once this is done, you will see your image is tiny, so go to the Zoom tool (on the left menu, the magnifying glass near the bottom) and select Fit the Area at the top of the screen so you can see what you are doing.
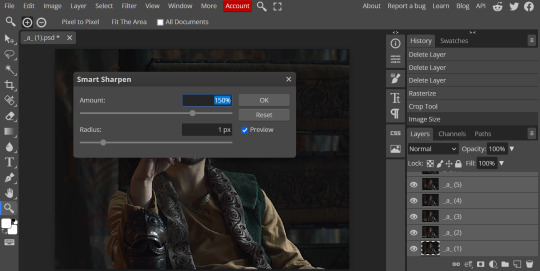
7. SHARPEN:
Next is sharpen. Select all your layers again (on the right), then go to the top menu: Filter > Sharpen > Smart Sharpen. The default settings here are for 150%, and that is good for most things.
8. ADJUSTMENTS
This is the tricky part. You now need to adjust the brightness, contrast, exposure, color balance, and saturation. This will vary from gif to gif how much to adjust these values. I will show how I adjusted this one and you can apply that to whatever gif you are making.
For starters, since this show is SO DARK, you will need to brighten it. There are many ways to do this, but I found the method that works best for me is adjusting the Levels.
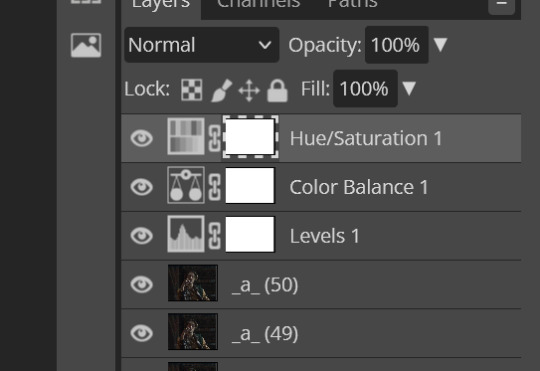
First off, in order to make adjustments, make sure you scroll all the way to the top of your Layers panel and make sure only the TOP LAYER is selected. Otherwise the adjustments will only be applied to whatever is BELOW the selected layer. You want all of them.
8a. ADJUST LEVELS
Next, go to Layer > New Adjustment Layer to pull up all your adjustments. For this first example we will use Levels, which is the second from the top.

You will see a histogram like this one:
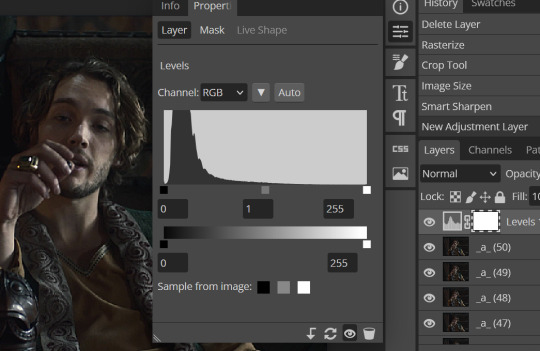
This is a lot of information about the image, but pay attention to where the curve starts and stops. On the left, you see a "0". That is your dark point. This image is slightly washed out so I need to move that adjustment to the right so that the little square is just below where the curve starts. The third number is "255" and this is your bright point. The images are very dark so most of the graph is shifted to the left (dark) so in order to brighten, move the third square (the white one) so that the second square (grey one) is just at the edge of where the curve drops off on the right.
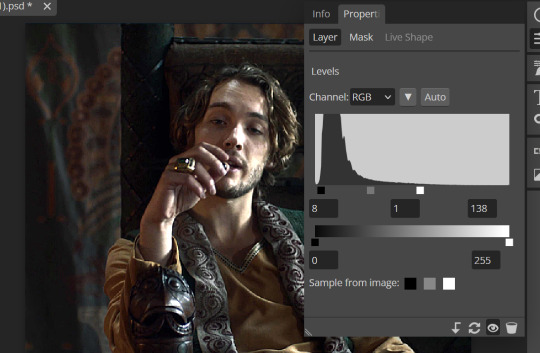
You can now see the numbers changed. Moving the first dark square will enhance your contrast, and moving the THIRD square will enhance your brightness. It is usually not necessary to move the second square, but you can experiment with this by moving things around and seeing how it affects your image. After this, it may be necessary to also increase the Exposure and Brightness if it is still not bright enough, but most of that can be done here.
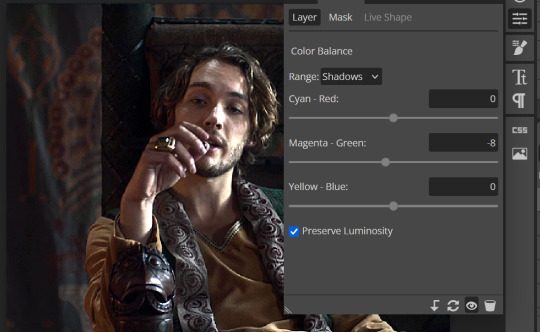
8b. ADJUST COLOR BALANCE
Again go to your Layer > New Adjustment Layer > Color Balance to get this tool. This is a neat one with A LOT of variables, so play around with it to get the colors to look how you want. A lot of the raw video tends to have a bluish or greenish cast to it, so you just move the sliders to get rid of the cast and make the colors look how they are SUPPOSED to.
In this case there is a very slight greenish cast to the pictures so I will adjust that slider to compensate. The Range (at the top) you can select Shadows, Midtones, or Highlights, depending on where the color cast is located. Usually I stick to Shadows but sometimes will use Midtones if the color cast is really bad. Make sure Preserve Luminosity is checked.
8c: ADJUST SATURATION
Layer > New Adjustment Layer > Hue/Saturation. This will brighten up your colors. This tool is VERY COOL in that you can select color families to selectively increase or decrease the saturation of. Under Range you can choose Master, which is all colors, or choose only Red, Yellow, Green, Cyan, Blue or Magenta. The slider at the very bottom (when a single color is selected) allows you to set the range of colors to. I chose Master and increased the saturation of all colors, but be careful as this can make skintones look VERY orange. So select other colors in the Range to adjust single colors only.
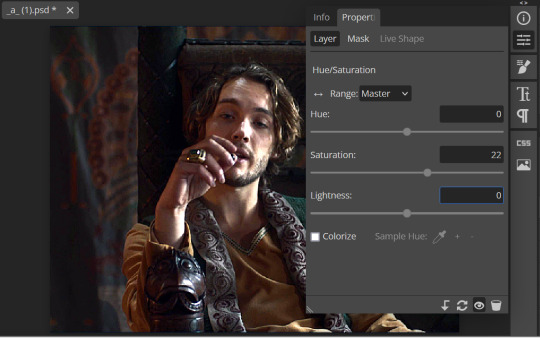
With this tool you can also change the HUE (which is changing the overall colors to a different color, like shifting all the reds to orange) and Lightness (which may or may not be necessary if you did the Levels correctly)
If you need to go back and change something in your adjustment layers, you can do so by clicking on the white box in the Layers section next to whatever you need to adjust.
There are many other Adjustment Layers you can play with, so have fun and experiment!
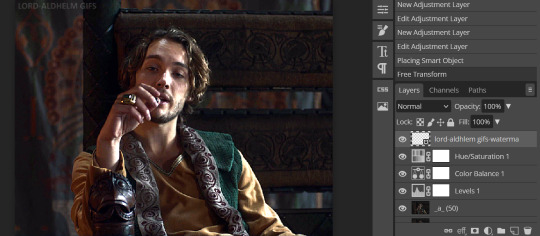
9. ADD YOUR WATERMARK AND TEXT
Next, you can add a watermark if you have a premade file, by dragging and dropping it on the image. Then move it around to where you want it, resize it if needed, and change the opacity if it is too bright. Make sure this layer is the TOP layer.
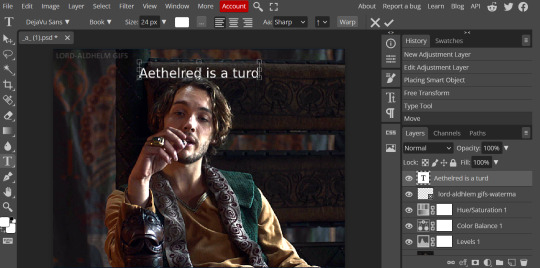
To add text (for subtitles or effects) simply click on the Text icon in the left menu (the T) and click anywhere on the image and start typing. You can change the font, color, size, and style in the menu on the top. Move the text around by using the Select tool (arrow on the left) Again make sure this is the TOP LAYER so that it will be present over the entire gif.
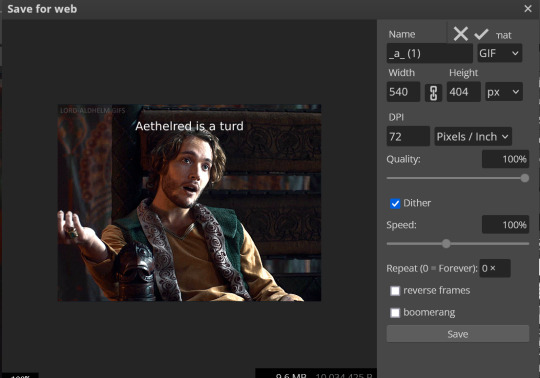
10: EXPORT YOUR GIF
File > Export as > GIF
A pop up dialog will appear and you can change some settings here if you want. I usually don't. Pay close attention to the filesize (at the bottom) and make sure it is under 10mb. Keep the quality at 100%. And most importantly MAKE SURE DITHER is checked! This will prevent compression artifacts from ruining your gif.
Save the file to your computer and VIOLA! Gif!
Have fun!
#gifmaking#gifs#gif makers#gif making resource#gifmakers#gif making#gif#gifmaking resources#gif making resources#my guides#giffing tutorial#gif making tutorial#photopea#photopea tutorial#photopea resources#photopeablr#photopea gifs#long post
58 notes
·
View notes
Text
TOOL TUTORIAL 5
Screencapping Frames On EZgif.com
FRAME BY FRAME SCREENCAPPING METHODS
Tool type: Wed-based GUI
Operating systems: Any
Difficulty: Easy
Input: Video files (supports most video file formats, but file must be 100MB or under).
Very quick and easy here—if you have a video clip you want to turn into a series of frames to make into gifs in a software like PhotoScape X, GIMP, Photopea, etc—if you have a clip of the scene you want to gif that is under 100MB, you can upload it to ezgif.com's Video To PNG Converter and it will render a downloadable zip file of .png clips for you.
There are some limitations given that this is a web-based tool:
The frame rate for the PNG capture maxes out at 20 FPS (which should be fine for TV and movies which are 24 FPS typically)
You are limited to frames 1200 px wide. If your source video frames are larger than that, you can still use this tool, EZgif will simply scale the frames down for you.
You can only grab 10 seconds worth of frames at a time.
NOTE: You can also feed the converter links to video files, but they have to be direct (i.e., the url must end with a .mp4 or other video type extension, which rules out Youtube clips. However, you could download a youtube clip to .mp4 with a tool like 4K Video Downloader then load that into Ezgif).
How To
For this example, I've downloaded a Youtube clip (The Boys season 3 trailer) and I'm going to load that clip into ezgif. After navigating to the file in my file browser and hitting "Open", Ezgif will need a moment to upload my file. When it is finished uploading, this screen will appear. I decided I want a short clip in the middle of this trailer of Kimiko beating the shit out of some dudes.
I just navigate through the video box that ezgif opened for me, and when I get to a little bit before where the scene I want starts, then click the "Use current position" button next to the "Start time (seconds)" dialogue box, it will automatically fill that box with the correct start time. I can do the same for my end time by scrolling through my video clip until after the clip ends.
For best quality in your end result, you probably want to wait to scale down your frames (in the software where you make your frames into a gif instead of here). So select "Original" for the Size. For Frame rate (FPS), select 20 (which is the maximum Ezgif allows).
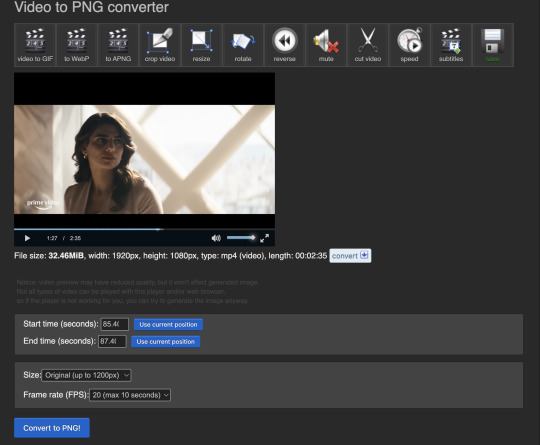
Click "Convert to PNG!" and Ezgif will begin processing the section of video you selected into .png frames. When it's done, all your frames will load down the window. Rather than download each of these PNG files one by one, scroll all the way to the bottom past all the frames and select "Download frames as ZIP".

After downloading that zip file to your computer, unzipping it will reveal all your PNG frames, named in time sequence.

Woohoo!
5 notes
·
View notes
Note
hiiiii vivi do you maybe know of any tutorials on how to start giffing
hello lovely!! thats such a good question and im also so excited to see your gifs if you start! i know it looks incredibly overwhelming at first and like a lot to handle, but just remember to have fun experimenting and trying everything out and very soon it will feel like second nature! and take things step by step, you dont have to have everything figured out immediately.
this here by @hayaosmiyazaki is an amazing and detailed tutorial for beginners! it explains about everything you would want to know when you're starting out. this is another lengthy tutorial that uses the "import video frames to layers" method instead of screencaps, it all depends on what your photoshop can do and what you prefer (if you need a ps link dm me).
when it comes to colouring i think this is a great tutorial on colouring east & southeast asian celebs and how to avoid white-washing. here is also a nice compilation of anti-whitewash tutorials! just in general @usergif is an amazing place when you're looking for resources and tutorials because they have basically everything. here is their resource directory.
this lovely tutorial here is very similar to what i do when it comes to sharpening my gifs.
aaand finally this is a nice compilation of different basic gif making tutorials and resources!
i hope this helps you at least in some way, dont hesitate to reach out if you have questions, and most importantly have fun!!
#WAIT#i thought i had posted this already until i found it in my drafts i am aosososososo sorry#asks.
16 notes
·
View notes
Text
gif pack maker question game! 💕
I've seen a few of these float around for gif/edit makers and some questions apply to us, but I figured I'd make one specifically for gif pack makers! Feel free to send me some or just reblog and get some questions asked yourself! If you think of any other good questions, leave them in the replies and I'll try to add them in the future!
What is your favorite gif pack to date?
Which FC have you made the most gifs of?
What is the largest pack you've ever made?
What is the smallest pack you've ever made?
Who is your favorite gif pack maker? If that's too hard, top 3!
Which gif pack do you think is underrated (should have gotten more attention)?
Which gif pack are you close to deleting?
Have you ever deleted a gif pack?
How did you get started making gif packs?
Post your favorite gif of one of your current projects (or one from each!)
What scenes are the worst to color?
Which scenes are your favorite to color?
What was the worst show you've had to color?
Which show had the best lighting/was the easiest for you to cover?
Would you ever remake a gif pack? If so, which one(s)?
Would you ever do a gif pack collab? (ie, you split a season or movie of the same fc and gif half)
Which gifs do you think are ESSENTIAL for a pack?
Which gifs do you think should never leave the cutting room floor?
Do you have any current projects you want to talk about?
What are you most looking forward to gifing this year? Any upcoming movies or shows?
Do you usually gif a whole pack at once, or split up packs across various days (or weeks, or months... or years...)
What is your favorite expression to gif? Smiles, laughs, incredulous looks, etc
What FC do you wish had more footage for you to gif?
Which gif pack do you regret making? Why?
Any pet peeves when it comes to gifing?
Frames to Layers or Screencaps? Or do you use a different import method?
Frames or Video timeline?
Watermarks or no watermarks? Any reason why?
What is your favorite or standard gif size for packs? Any particular reason why?
Do you save your psds? If so, do you save one per scene and edit it or do you save one for each gif?
Do you save your .gif files after posting them?
What is a gif pack you've seen recently that you think deserves praise?
Are you someone who likes to take suggestions or do you just gif what you feel inspired to make?
Black and white gifs. Worth it?
Free choice! Ask whatever you'd like!
#rpc#rpt#rph#gpntalk#gif pack#if this ends up clogging the gif pack tag tho lmk and I'll remove the tag!#please feel free to reblog WITHOUT sending me an ask#but if you reblog from someone else please do try to send one to them!
61 notes
·
View notes
Text
hi everyone! I've gotten several requests to make a tutorial on how to make gifs for someone just starting out and I finally got around to slapping a tutorial together.
This tutorial will cover:
software recommendations
choosing what to gif
creating a gif step by step with probably a lot of unnecessary detail
some tips and tricks:)
(This particular tutorial will not cover how to find tv and movies to download and gif, or any specific instructions on coloring. only the basic gif making process.)
so for the purposes of this tutorial, we will be using Adobe Photoshop, which is the most common program for making gifs, and the one I recommend. the version you have doesn't make a major difference in terms of capabilities but the interface may be slightly different looking if you have an older version or a different type of device. you cannot make or edit gifs in any mobile version of the photoshop application. Optionally, we will also be using Adobe Premiere Rush/Pro or another video editing software of your choice. wherever you are downloading Photoshop, whether from Adobe or a third party, you should easily be able to acquire Premiere as well. I am aiming to be as detailed as possible in this tutorial, so it may sound more time consuming than it really is. once you get the hang of things, it goes fast. the most time consuming part by far is the editing and coloring. in my opinion, one thing that majorly saves time while giffing is knowing your keyboard shortcuts and using your mouse/trackpad as little as possible. I will be going over these in this tutorial as well.
before we begin, some general tips:
gifs of single shots that do not cut between angles or subjects generally will look the best, barring exceptions
for a single gif set, choosing scenes and shots with similar lighting will be easiest to get to look uniform when compiled together, since editing wildly different looking scenes to have similar coloring and lighting is hard and takes some practice!
avoid shots that will require you to majorly crop or zoom to properly frame the subject, as this will greatly diminish quality
speaking of quality, gifs will look best using 1080p video, but you can get away with 720p as well. I would not recommend giffing with anything lower resolution than that
Tumblr's upload capacity for image and gif files is 10mb. be sure when exporting your finished gif that it is under that size. if it is a bit over, you can try trimming a few frames off your gif in the video timeline.
if you get frustrated, don't give up! giffing is hard and complicated especially if you are new to photoshop. I tried to make this tutorial as detailed as possible so it's easy to understand (although im sure I still forgot some stuff)
ok onto the tutorial!!!
STEP ONE: choose what range of frames you want to gif, and how.
once you have decided what you want to gif, there are two main way to convert your episode into a range of frames to make into a gif. the first is by screencapping. this involves downloading a program like mplayer or vlc which can be used to convert video files into "stacks" of screencaps, which can then be separated into whatever range of frames you want and imported into photoshop. this is seemingly by far the most common method I have seen amongst gifmakers*, but personally I don't care for it and I think it's more confusing and time consuming overall, so I will be explaining the second method: importing video frames to layers.
now, normally what this would mean is opening the full episode in photoshop and using the pathetic little playheads on either end of the scrub bar to trim the file into a clip. this is where your video editing software comes into play.
open whatever episode or movie you want to gif in your program. if it is a large file like a long movie in 1080p, this may take a few seconds. like I said, I am using Premiere Rush. I will be using a random episode of 9-1-1 for my example gif.
in your media browser, hover over whichever episode you want (you can also just add the whole episode to your project and scrub through, but that can take longer unless you know what time stamp you're after). click the fullscreen button by the bottom righthand corner.
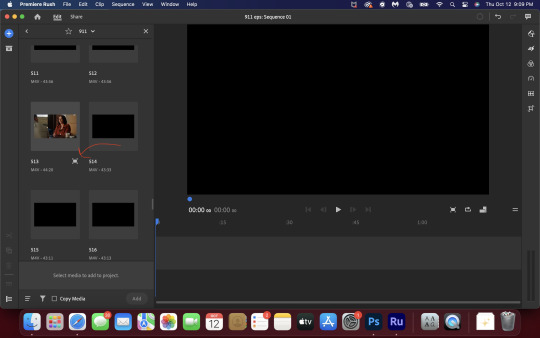
now you can scrub through and trim the episode before you even import it to premiere. this makes trimming your clip even easier.
use the trim bar (yellow outlines) to trim as close as you can around the scene you want to gif.
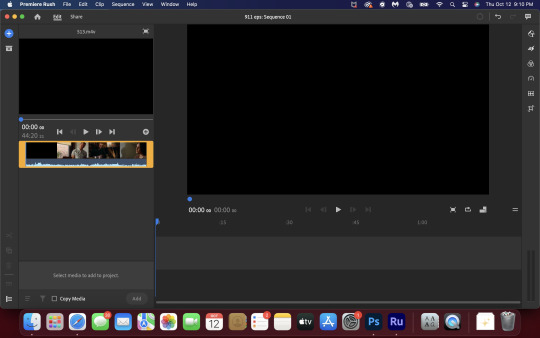
then click this plus, and then "add" below. this will add the clip to your project.
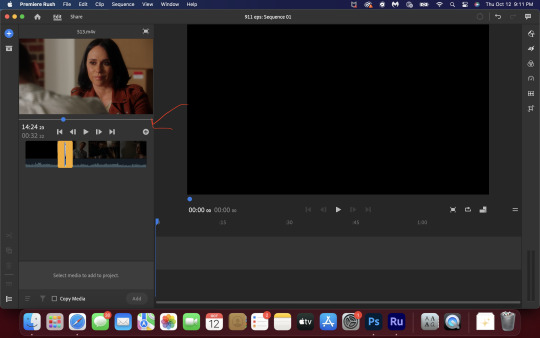
now, move the blue playhead up to the frame you want your gif to start on. then, use the scissors button off to the left to slice the clip. select the portion before the playhead, and delete it.
now move the playhead to where you want the gif to stop. a good length for most gifs is around 1.5-2 seconds in my opinion. some may be shorter depending on how long the shot is, or longer if you plan on making them smaller (remember, the uploading capacity on Tumblr is 10mb per file.) trim again, now delete the portion after the playhead. you can also use the left and right arrows beside the play button to move frame by frame, and you can adjust the side of the horizontal scroll bar below your clip to “zoom” in on it and make scrubbing easier.
once you have your clip, go up to where it says "share". your clip will be rendered, and then you can click export to save it.
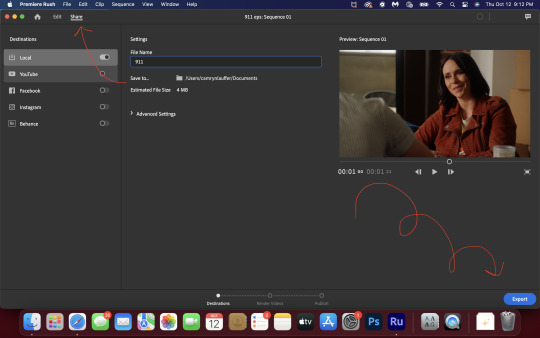
repeat step one as many times as you want for each gif. I know this may sound complicated, but like I said above once you get in the rhythm this step takes only a few seconds.
STEP TWO: create your gif!
close premiere. open photoshop. head to the control bar at the top. select file > import > import video frames to layers.
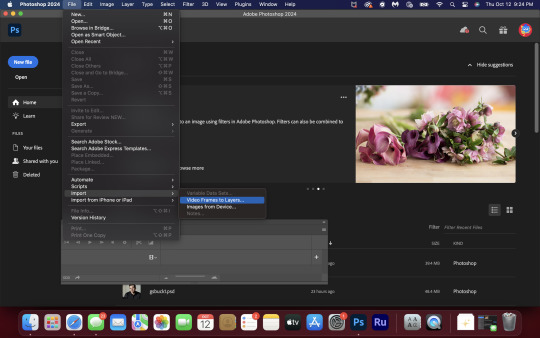
navigate to whatever folder you exported your clip to. select it, and hit enter. a second popup will appear asking you to select your range of frames. since you have already trimmed your clip to your liking, simply hit enter a second time.
now your screen looks like this, and we are going to crop and resize our gif! (troubleshooting: if you do not see the timeline bar at the bottom, select window from the control bar, scroll down, and make sure timeline is selected as part of your workspace. Adjustments and layers should be there automatically but if not add them too).

Tumblr posts are 540px wide, so in order to make my gifs as small as possible while maintaining quality, I typically crop my gifs to be around 550-600px wide, with varying heights depending on what shape I want the gif to be. experiment with this a little and decide what works for you. just don't make the width lower than 540px. once you have the portion of the frame you want inside the cropping grid, hit enter again. sometimes you have to hit it twice.
here are the measurements I am using for this gif
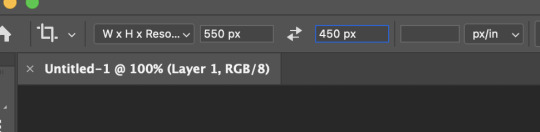
now in your timeline, select frame 1. hold down the shift key and scroll to the end to select the very last frame, thereby highlighting them all. from here we will edit our frame delay rate. photoshop will automatically set it to .03s, which will make your finished gif awkwardly fast. I typically use .05s, or .06s if I want a gif to be subtly slower (this comes in handy if the shot you are trying to gif is very short). anything longer than .06s will look weird though. choose "other" from this menu and type in your delay rate. make sure not to miss the zero after the decimal.
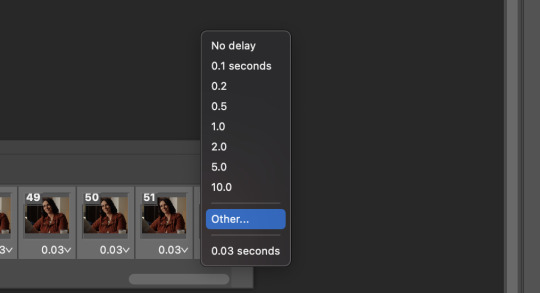
once you've set your frame rate, go to the other end of your timeline and click here to convert your frames into a video timeline.

then press option + command + A (on Mac) or windows + alt + A (on PC) to select all layers. then right click (control + click with a trackpad) on any one of the highlighted layers in your layers tab off to the right. scroll down in the popup menu and select Convert to Smart Object.
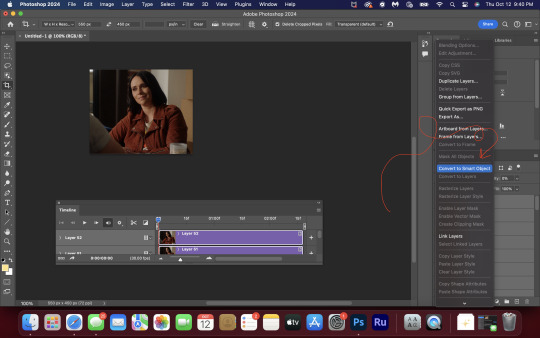
THAT'S IT!! CONGRATULATIONS!!!!! WE HAVE GIF!!!
from here comes the fun part!! you will begin adding action filters like sharpening as well as adjustment layers to color and edit your gif. experiment with different adjustments and styles until you find something you like. too many adjustment layers will up the size of the finished gif though, so I tend to keep mine to 3-4 layers max unless its a really hard to color scene. if anyone is interested in a separate coloring tutorial, please let me know!
once you are finished editing your gif, click file > export > save for web (legacy) OR hit shift + option + command + S. play your gif in the export window to make sure it looks okay, and then hit save!
I hope you guys find this helpful and informative! please hit up my in box if you have any questions or if anything doesn't make sense. happy giffing!!!
*one reason people seem to prefer screencapping to this method, is saving all the individual clips as video files does take up a lot of space on your scratch drive, which in turn can cause your computer to work slowly or crash programs. this can be rectified by making sure to delete the clips from your computer once you are done making the gifs. another space hoarder to look out for is the proxy files of your episodes that will be automatically saved to your hard drive whenever you add an episode to your project in Premiere. Periodically, go through your storage and delete all the .proxy video files. this will not delete the original episode files, only the proxy files created by Premiere.
tagging some mutuals to sb hehe: @shitouttabuck @lover-of-mine @honestlydarkprincess @eddiediaaz @compactdiscmp3 @eddiebabygirldiaz @bigfootsmom @callaplums @athenagranted @firemedicdiaz @sibylsleaves @loserdiaz @buck2eddie @diazass @eddiediaztho @giddyupbuck @monsterrae1 @icecreampotluck @sunflowerdiaiz @swiftfootedachilles @singlethread @aziraaphales @911onabc
144 notes
·
View notes
Text
i was requested by anon to make a tutorial for this gifset and here it is!
DIFFICULTY intermediate/difficult. basic giffing knowledge is definitely required.
while my gifset has a fair amount of animation, the only handmade animations can be found in the second and fifth gif. the rest are assets (the checkmarks, the sharpie circles) (either gifs or videos) i found on the internet and pasted over my gif.
THE BASICS OF TIMELINE GIFFING
if you gif with frames, you will need to use a timeline for the animation to work (keyframes). i’m a timeline giffer anyway so this was another Tuesday for me. if you never used that method of giffing, however, it can be confusing, especially if you never used a video editing software before (the timeline works like video editing).
so, here’s a breakdown of what is the timeline:
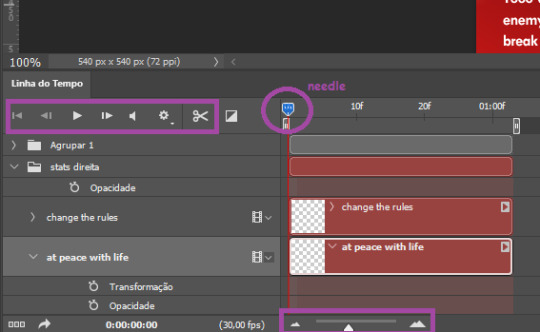
the player icons work like any video/music player in existence. ignore the volume icon.
the gear icon indicates the quality of the reproduction while editing it, not the quality of the end product. think like it’s Youtube reproduction settings on a video in order to save your 4G data, but with RAM power instead. this is very useful if your computer isn’t very powerful to begin with and gifs with VFX are very heavy to handle.
i always click the loop option inside the gear panel because i like to see how the gif will be viewed by the public, i find watching to play only once isn’t very productive. you can stop and restart the reproduction by pressing the space bar on your keyboard.
every layer of your PSD file will have its own bar. the length of the bar means the duration of the gif, so a longer bar means a longer gif and a shorter one, a shorter gif. for everything that isn’t your gif/screencap-based (ie, coloring, typography, lightning, shapes, etc) can be dragged by the extremities as much as you want, making the asset last as long as you want. the only layer that is limited by its maximum duration is naturally your gif, but you can also drag it to make it shorter.
you can also drag a whole layer bar by clicking it and dragging it, making the start and finishing point different from the rest. be careful while doing that otherwise you will end up with blank frames, messing up the looping of your gif completely.
there’s a needle you can drag across the timeline and it works just like on a vinyl disc, the moment the needle drops, it’s the moment/frame Photoshop will show you.
you can also trim your stuff by cutting and deleting snippets of the bar. for that, you will drag your needle to the desired moment, use the scissor tool and then press delete to erase the unwanted bit.
it’s important to point out that the timeline only allows 0.03x or 0.07px speed, no matter what the speed the gif was before converting to that method. if the original speed is closer to 0.03x, then PS will define the new speed as 0.03x. if it’s closer to 0.07x, then it’s 0.07x. i always change the speed to 0.03x before converting to timeline for the sake of not screwing stuff up, which means i see my gif looping while editing in a faster way than Tumblr users will see when the gifset is posted. this takes a while to adjust to if you’re new to timeline giffing, but eventually you don’t think it’s jarring anymore.
that also means you will need to correct the speed after your gif is completely finished. to do that, i use this action.
you can zoom in and zoom out using the little mountain sliding bar. this will be useful later in the tutorial.
if you zoom to the max, you will see all the numbers above your layer bar. these are time marks. the thing is, they seem a bit weird at first. the bigger numbers indicate SECONDS (01:00f, 02:00f, 03:00f, etc), while the smaller and repetitive numbers indicate frames (5f, 10f, 15f, 25f). that means that the smallest drag of your needle possible (from point A to point B) refers to an interval of 1 frame. you will need to take this into consideration while animating stuff.
you can color code your layers, if you think that makes it easier for you to see what you are doing. this is something i do, not only in Photoshop but every Adobe product with a timeline. to change the color of a layer bar (the default is purple), you can right-click on your layer in the layer panel and click the color you want. the colors are the very last thing in the list when you right-click it.
another organization tip is the use of folders. if you create a folder in the layers panel, a folder is created inside the timeline and any layer inside of that folder will disappear from the panel until you click the little arrow next to the name of the folder in the timeline panel. you can color code your folder as well, making every layer inside of it the same color or even different colors.
THE BASICS OF KEYFRAMES
every change related to any property selected (transformation, opacity, style, text warp, position of the layer mask, activation of the layer mask) will be computed in the exact moment in the gif you change it. if that doesn’t happen, you can force Photoshop to do it by clicking the small diamond next to the property name.
let’s say you want an animation to start 0.5 seconds after the gif starts, so you will drag your “needle” to 0.5 seconds and then make the change (making a text bigger, moving a shape, etc).
Photoshop will automatically bridge the gap between the state of the gif at 0 seconds and 0.5 seconds, thus animating your gif.
to start animating, you will need to click the little clock next to the property you want to animate. make sure you click the clock while your needle is at the exact beginning of the gif.
every change (keyframe) will be marked with a small diamond under the layer bar, at the exact moment you changed it. that means if you make jarring changes in a short amount of time/frames, the animation will be quick and abrupt. if the interval is very long, the animation will be slow and smooth.
the selected(s) keyframe(s) will have their diamond painted yellow, while the unselected ones will be grayed out.
you can right-click the diamonds to delete or copy them. if you have many diamonds and want to delete them all, you can click and drag to form a square and select all of them just like when you do to select many files at once on a PC folder. there’s also the option “select all” under the right-click panel.
you can also drag them and change their timing that way. if you have more than one diamond selected, if you drag them, their interval will remain the same, but the starting and finishing point of those two diamonds will change.
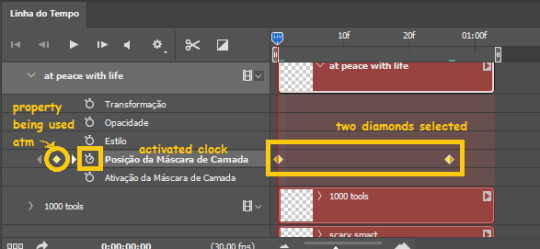
THE SQUARES BAR
the easiest of the two animations. this one doesn’t require keyframe animation, but i put this in the last bit of the tutorial for the sake of its flow.
first, i added the empty squares. they last as long as the gif lasts. after 6 frames, i added the first colored square and made that square last until the end of the gif. i repeated this in a staggered manner (+2 frames delay each colored square) so the colored squares appear at equal intervals.
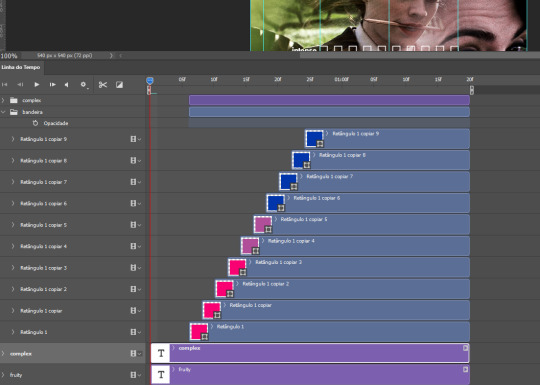
THE STATS BAR
the most difficult of the two, but don’t worry, you got this.
first, you will need to structure your stats, ie, add the text, the dividing line and the pointed lines. that is, if you want to follow the exact design i used in my gif, but you don’t have to if you don’t want to.
next, you will create rectangles that fill the entire stat bars. you will add a layer mask to each one of them and with a layer mask selected, select a rectangle about the size of your original rectangle, then paint it black. you will notice the original rectangle will disappear. if you delete the layer mask, the original rectangle will appear again. that is because you didn’t delete the original rectangle, you just hid it by using a layer mask.
there’s a chain icon between the layer and the layer mask in the layers panel, click it to unlink them.
click the clock next to “layer mask position” with your needle at 0 seconds/frames. drag your needle to the moment you want the stats to end and use the arrow keys to move the layer mask. you will notice the original rectangle will slowly be revealed by you moving the layer mask. you will also notice that a small diamond will appear in the “layer mask position” line in the timeline. you created a keyframe!
if you press play, you will see the animation from the bar going from null to full!
FURTHER READING/VIEWING
this tutorial uses layer mask animation to reveal text too!
a video tutorial for better visualization!
another keyframe tutorial, this time focusing on coloring!
if you still have any questions, feel free to contact me!
and if you (or anyone) else want, i can go in depth in animating each property, i just did a quick overview + explained the stats animation.
#*#*tutorials#completeresources#usergif#useralien#uservivaldi#usereme#userbess#userelio#usershreyu#userisaiah#useraljoscha#usersanshou#usermona#tuserju#userjaelyn#userabs#tusermalina#userbuckleys#tusermimi#tuserlucie#tusermira
267 notes
·
View notes
Note
image sequence method? 👀 faster than load files into stack method?? 👀👀 please do tell me how it works bc i am tired of it taking soooo long make gifs bc of the time it takes to load files into stack 😭😘
omg it will CHANGE your life! basically what you need to do is put all of the screencaps in folders. one folder per gif. then you open photoshop, click open, navigate to the folder, click on any screencap, and tick that "load as image sequence" box, then open. there will be a little window asking you for the frame rate, and you just need to put in 23.976 fps.

it will open the gif as a smart object on a timeline almost instantly that youn can use as is right away. what i do then is i crop, sharpen, color, etc. and then when my gif is done i use an action to flatten into frames, make sure the speed is set to 0.05, and save! it's very easy peasy. you can save directly from the timeline too, but the gif will probably be way too fast (which you can fix with ezgif.com if you want tho! i do that sometimes when i'm very lazy)
the only downside is if you wanna keep the psd file for whatever reason you need to either A) keep the screencaps where they are and not delete them, or B) flatten the smart object into frames before doing anything else, then turn these frames back into a timeline animation for sharpening and stuff. if you dont do either of these and delete the screencaps, then when you open the psd again you will have your coloring layers, but the gif will be frozen.
this method kinda works as a proxy and points to the screencaps in the folders instead of loading them as a stack. it's much much faster and for scene gifs it's PERFECT, or for anyone who doesn't save psds often like me haha. but yeah i really wished i found out about this before! life changing for real
35 notes
·
View notes
Text
I'm putting this here so that you can read it, get familiar with the terms &catch phrases, see into/behind them, and know what we're going to be dealing with now that HR 7 2025 has passed hurdle #1


Here's screencaps of the brochure disseminated by the Pro-Women's Healthcare Center Consortium named in HR 7 2025. Please note the incredible blondeness of the representative Women who are so very, very happy about said Healthcare


A few snippets stand out as particularly sinister & disingenuous.

Portraying women's present freedom as being actually imprisoning or limiting, and REAL choice and empowerment as 'no other choice' or the 'opposite of choice' Characterizing motherhood and adoption as plausible for women who clearly feel otherwise but might be persuadable if they receive 'comprehensive care' (sustained bullying, pressure, fear/guilt tactics) Framing abortion as essentially an oppression of UNBORN women ("many of whom are females"), implying that you can't call yourself a feminist if you would support the endangerment of a woman who does not in fact exist... even as HR7 2025 endangers women that DO

Notice that 'women' come second to 'men' in this discussion of women's health care

OK, so I practiced strict fertility awareness method (FAM) for 15 years, with the goal of never, ever, EVER getting pregnant. I WAS empowered to understand my body's natural fertility, and it certainly DID result in empowering and effective family planning... but probably not in the way the PWHC Consortium intends. Because there is no way FAM can work if the woman in the equation is not 10000% the lead player in the process. She can't ask her man's permission-- he must ask hers, and her answer is sacrosanct.
Though my spouse & I practiced FAM together, MY body was the source of all our data, and MY body was the one that would host an unwanted embryo if we slipped up. I made goddamn sure we didn't slip up. All I had to do was remember my mother who had four kids she didn't want because the "rhythm method" prescribed by the priest was deliberately misstated to cause more pregnancy than it prevented... or her mother, my grandmother, who birthed a baby nearly every year of her marriage and died of heart failure with Number Six in her belly... Something tells me that the FAM taught by Pro Women Health Centers is DESIGNED to produce the same results. A baby a year until you drop, at which point you know which one of you they'll save.
I want every single woman on this earth to have access to HER choice of contraception-- the easiest, safest, simplest, most accessible, societally supported and governmentally guaranteed birth control that SHE ALONE CHOOSES, and it should be FREE OF CHARGE. Her method, her way. Not any other way but that.
#HR 7 2025#HR7 2025#House Resolution 7 2025#women's rights#reproductive rights#reproductive freedom#bodily autonomy#pro choice
6 notes
·
View notes