#free tutorials
Explore tagged Tumblr posts
Visit Tumblr Blog
Explore Tumblr blogs with no restrictions, modern design and the best experience.
Last Seen Tumblr Blogs


Fun Fact
Tumblr has 411 employees.
Text
Free crochet pattern here! 🌟💙🙌
#yarn#fiber#fiber art#fiber arts#fiber artist#fiber artists#crochet#crocheting#crocheted#crochet pattern#crochet patterns#free crochet tutorials#free crochet patterns#free crochet pattern#diy#how to#free tutorials#free tutorial#craft#crafts#crafting#crafty#handmade#handmade blog#handmade love#crochet blog#crochet love#yarn blog#yarn love#fiber blog
65 notes
·
View notes
Text
#crochet pattern#free crochet pattern#crocheting#free patterns#amigurumi#crochet#free#crafts#crochet art#mushroom ideas#free tutorials
4 notes
·
View notes
Text


WE DON’T GATEKEEP WEAVING TECHNIQUES IN THIS HOUSEHOLD!
So to start this is double cloth (meaning I have two different warps, they’re threaded on 4 frames and each slot in the reed has two strings, one from each warp)

Step one: lift up the entirety of one warp (for me, pedals 2 and 4), then select the design with a pickup stick/sword/the fiber only thingy

Step 2: Go to your OTHER warp (1 and 3 for me) with the stick still in and do a back and forth of plain weave, take the stick out to beat

Step 3: Pick up the background with the stick (aka anything you didn’t pick up before, 1 and 3 for me)

Step four: Plain weave with the other warp AND a different weft (2 and 4 for me) take out the stick and beat

Step 5: Repeat! You can do this with any pixel designs, provided you have enough warp strings to have 2 per square
Fair warning, be EXTREMELY careful with your selvages (edges of the warp), they pull in the sides a lot more than regular plain weave. Happy weaving!
#shoutout to the tour that dropped by the studio while I was working#I was wearing a merch shirt that belongs to an entirely different school#free advertising?#artwork#artists on tumblr#art#fiber art#fiber crafts#dragon art#hand weaving#loom weaving#weaving#tutorial
492 notes
·
View notes
Note
Heyy!! I love your carrds so so much they're so pretty!! Can you please make a f2u non pro discord nitro themed carrd please please please
HELLO HOPE THIS IS GOOD!
non pro freindly discord nitro themed carrd
get the carrd here look at it here! here is also the image i used for the nitro badges!
REQS ARE OPEN FOR CARRDS!! only req i have is to be following me to ask for a carrd! and I DO CARRD COMMS!! so if you have a specific carrd you want made message abt my prices and what i take!! use my referral code also to help donate and get some money off on buying pro here / use the code manually HXYLIN !
#carrd commissions#carrd stuff#aesthetic#carrd templates#carrd icons#carrd inspo#carrd moodboard#carrd theme#carrd material#carrd packs#carrd req#discord chat#discord server#discord app#discord mobile#carrd template#request#carrd tutorial#free carrd template#carrd profile#strawberry#cutecore#commission#taking commisions#f2u
1K notes
·
View notes
Text
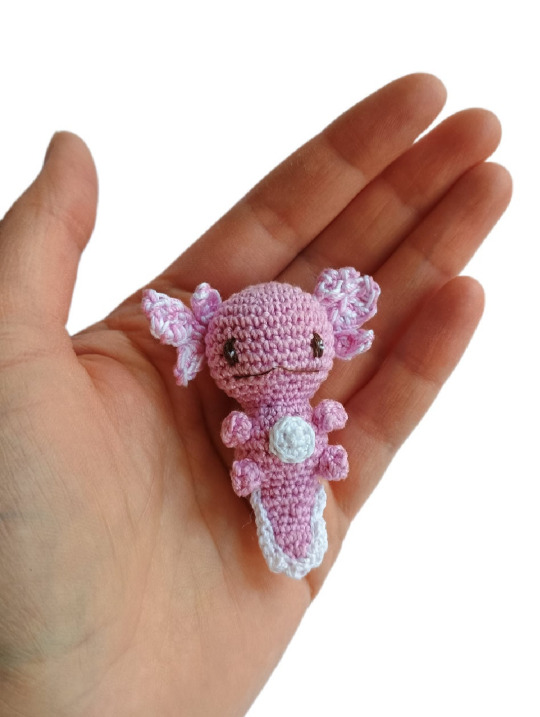
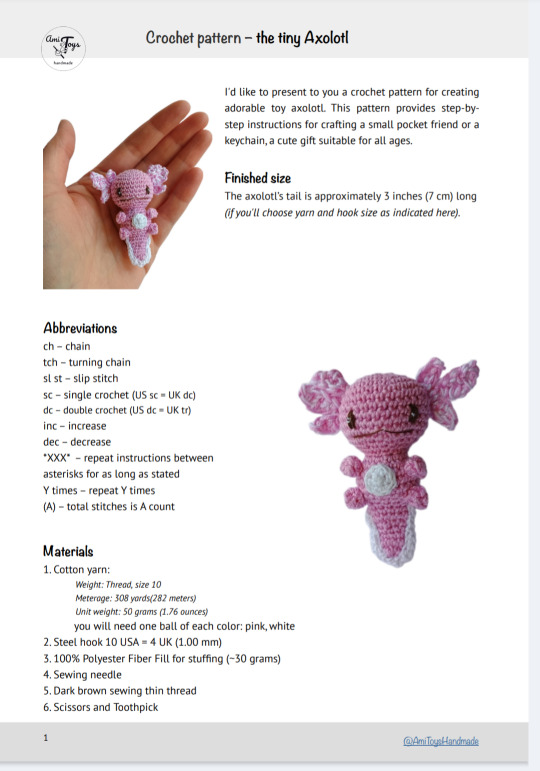

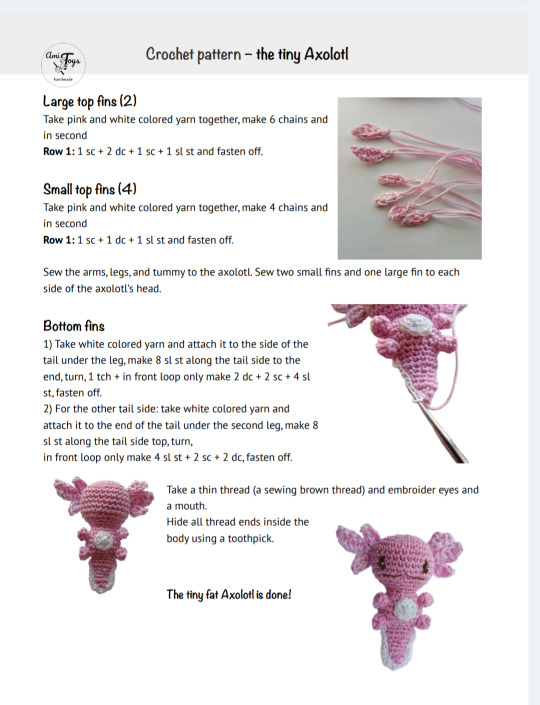
Crochet pattern: Axolotl
#axolotol#crochetpattern#crocheting#crochet#pattern#amigurumis#crochet axolotl#crochet free pattern#freerochetpattern#crochet pattern#amigurumi#miniature#crochet keychain#keychain#free tutorial
705 notes
·
View notes
Text


Hi *flashbangs you with Flatland fanart*
#flatland#flatland fanart#feel free to draw my designs :0#if someone reads this please send me a image ID tutorial I have no idea how they work and I´d hate to mess it up :^]c#my art
733 notes
·
View notes
Text
🌟Tofu's Free Stuff Megapost🌟
Palettes
Moonlight GB (4 colours)
Supernova (8 colours) (eyestrain warning)
Tofu20k (35 colours)
Desktop Wallpapers
Ghibli Bundle (4k)
Yellow Bentley (Good Omens)
Spirit of the Forest
Froggy Island
Purple Mountain
Dark Moon Greatsword (animated)
Mobile Wallpapers
Dark Moon Greatsword (animated)
Shroomsplosion
Middle finger pattern
Little Star in Moonlight (Astarion BG3)
Wildflowers
Froggy Island
Mushroom Night Light
Heart cloud
1bit sky (3 colours)
Cross-Stitch patterns
Matcha in the Flowers (10 colour, DMC)
Heart eyes cat (10 colour, DMC)
Mushroom Night Light
Witch's Treehouse (12 colour, ANC)
Tutorials
BIG pixel art guide
Weird static effect in Aseprite (eyestrain warning)
Tree (old- 2021)
VERY simple cloud
Other Stuff
Panda Dumpy (free Twitch/Discord animated emote)
Gummy Sweets Twitch badges
Cute Cats Twitch badges
Baked Goods Twitch badges
Enjoy :--3
#wallpapers#tutorials#tutorial#pixel art tutorial#free#cross-stitch#cross stitch#cross stitch pattern#background#palette#color palette#resources#art resources#free stuff
1K notes
·
View notes
Text
Free crochet pattern here! 👀✨😊
#yarn#fiber#fiber art#fiber arts#fiber artist#fiber artists#crochet#crocheting#crocheted#crochet pattern#crochet patterns#free crochet tutorials#free crochet patterns#free crochet tutorial#free crochet pattern#crochet tutorials#crochet tutorial#free tutorials#free tutorial#diy#how to#craft#crafts#crafting#crafty#handmade
43 notes
·
View notes
Text
how to grub your karkat
or you can use this for any other plush or if you wanna make a whole new plush entirely or whatever

disclaimer im not a professional in any sense of the word and theres anything technical im doing wrong or you think you can do it better by all means dont hold back
Things you’ll need
sewing machine unless youre really dedicated but doing it by hand is gonna be an agonizing feat i promise. I just used a straight stitch for everything
Fabrics: for the main body i suggest a minky or something soft, for the inner lining something in the same color as the main body and ideally with some stretch, and anything black for the legs. Less than a yard of each will do
if youre using minky or anything furry get a lint roller. Trust me
stuffing, i used polyfil
threads that match your fabrics
good fabric scissors
sewing needle for hand sewing/fixes
karkat plush (optional)

Heres the pattern i came up with! They are numbered for your convenience and pieces with the same numbers are going to be part of the same row of segments. cut everything out on the black lines (Make sure when you’re printing to fit the image to the page size.) on the left we have the belly pieces, the right is the main body, and we have the foot in between
Im using a relatively thin minky fabric, im sure you can use whatever but something with some fluffiness kinda helps to mask any imperfections in the sewing. When drawing out your patterns keep in mind what direction your fibers settle in and try to keep it consistent
On the wrong side of the fabric measure out at least a half inch seam allowance around each piece of the pattern, i used a centimeter and that worked but had me sweatin a bit.

For the main body pieces fold your fabric in half before you cut so you can have 2 of each segment that are mirrored to each other, i also extended all of the #1 pieces an additional centimeter/half inch at the top so we can fold them over at the very end. I highly suggest numbering the insides of all the cut pieces, especially in a way where you will remember what direction they are each meant to sit

After you’ve numbered all your pieces, set them aside and start making your feet!
Each of the 6 legs is made of two pieces, but i because i only had a swatch of the black minky i made up for the rest with some random black scrap fabric from an old project. Try to keep your fabric consistent if you can lol
I didnt give these pieces any more seam allowance on the fabric but i recommend adding a centimeter or half inch to the base of it to extend the length and have some more wiggle room

like so
Instead of cutting out 12 individual pieces and struggling to stitch them all together i started with 6, then pinning each piece real tight with the right/furry side down onto my secondary fabric, and slowly stitching around the shape real close to the edges- DO NOT CLOSE THE FLAT SIDE as we are going to stuff the feet through here

Now cut the shape out of the fabric and repeat till you have 6 feet

Now flip those bad boys inside out, stuff up, and if you wanna you can match them to their best pairs

now grab a pair of feeties and your #1 pieces and line them up, in this picture my belly #1 piece is shorter bc i forgot to add the extra centimeter and i recut that once i realized. Line those sides up with the right/furry parts touching and with the feet in between, flip it around to make sure everything's sitting the way you want it

Note. i didnt realize until later but i sewed my feet in upside down. save yourself the time it takes to fix it and dont make the same mistake
Straight stitch these layers together and repeat with the next two segments our good friends #2 & #3

Repeat this for the #2 and #3 sections but NOT THE #4, that part doesnt need feet! just line those edges up right/furry sides together and sew


the secret to the squish of the suit is making this inner lining from another fabric and stuffing it! I used what i had leftover from a stretchy red fabric for a kanaya skirt. For this we need to make a new pattern for each section, making sure it follows the curve of the round edge but the piece itself is shorter, almost like youre removing the seam allowance you added. Mine is a centimeter shorter on the top and on the bottom and reaches to the middle

Make one of these for each numbered segment,you only need to make half the pattern and you can fold your fabric in half on a crease and you end up with one symmetrical piece (bars)

Now you need to pin these pieces right on top of the wrong side of your numbered furry sections and line up the straight edges like so (disclaimer for LOTS OF SCARY NEEDLES !!)

Admittedly i didnt estimate how long these pieces needed to be very accurately and overshot it a bit, if you start pinning it from the middle and continue outwards on either side thatll ensure its not too lose and you can cut off any excess after
The only exception is piece #1, if you recall we gave this #1 section extra seam allowance. This is so we can sew down that excess at the neck later and hide any of the inside that might show once its all put together. Do not connect the top edge to the inner lining! Since i added an extra centimeter earlier im gonna leave that hanging and pin + sew down the inner lining a centimeter lower than the top edge. LEAVE THE CURVED EDGES OPEN! DONT SEW THEM TOGETHER! those stay open to stuff

Straight stitch the lined up edges together

Now you have all these skinned pieces of little freak and we need to connect all these segments together making sure to sew UNDER the existing stitches so we dont see those on the outside when its all put together


Inside looks like a bit of a mess but thats fine bc its not the part that matters
Now stuff it! you might need a stick or pencil or something long and thin to get stuffing into the middle bits

Now thats its stuffed you can finally close those curved edges. Try not to sew over a thick mound of stuffing, push it in a little further to give yourself some space and you can fluff it back out after everythings closed. I cut off that excess lining fabric after sewing

Ough… they filleted my boy…
Finally, match up all the edges and lines and HAND SEW them right sides together. You will destroy your machine trying to work around that stuffing i promise. You also have an excuse to get up from your work desk and sew on a couch or smth. I used a standard backstitch for a tight finish and again, make sure you sew under any existing stitches so they arent visible on the outside!

Speaking of the outside, once you stitch everything together you can very gently flip this sucker inside out

This is @hatamonu’s cat Cocaina, aka Coco. Her perfectly square figure made it into my grub files somehow so shes essential to the tutorial

Check the fit and all thats left to do is roughly baste stitch down that excess neck fabric onto the stuffed lining and youre set! I gave the thread slight tugs as i went to tighten the opening a bit put dont tighten it too much

tadaaaaa

It fits pretty snug but starts to slip a bit with motion. Heres a bounce test

If you do shake your baby make sure to safety pin the plush to the suit so he doesnt prematurely shed his exosekeleton
Now spread that baby fever and show your baby to the world


pics from the ALA 2025 homestuck meetup and supplied by para.dox.cos
Tysm for coming along this ride with me especially if you followed the prototype journey on twitter, much thanks to my more sewing savvy friend for the solution to my grub dilemma and for helping me design and build my dolorosa cosplay <3 much love and hopefully many more homestuck cosplays and meetups to come in the future!
#homestuck#homestuck cosplay#karkat plush#karkat#karkat vantas#cosplay#tutorial#homestuck grub plush#plush pattern#long post#ALA 2025#anime los angeles#dolorosa#the dolorosa#apologies if this is hard to follow or utterly incomprehensible please note i am making shit up as i go and results may vary#feel free to ask any clarifying questions and ill do my best to answer#no i will not be selling these#technically i have more minky left than i know what to do with but the cost would have to justify the pain in the ass it all was to complet#and i dont think anyone will pay that price#send me suggestions of red characters to make plushes out of
401 notes
·
View notes
Text
I finally learned how to edit, guys!
#persona 5#persona 5 strikers#zenkichi hasegawa#ryuji sakamoto#joke post#This joke has been living in my head rent-free for over a year now (thanks Felds)#I finally worked up the courage to dabble with Vegas#A ton of screwing around with features and a few tutorials later-#Here are the results
213 notes
·
View notes
Text

Howdy everyone! How's the year going? I thought I'd start this January by comparing my new art to my old art, and thus I made this! I am quite happy with it, but I know I can do better in the future! Let's dust the artbooks and study hard this year!!
This is a redrawing of this old thing that I made back in 2016! It's been 9 years (wow, that's a lot) and I feel the improvement is majestic B)
And as a big bonus!
I made a TUTORIAL of the drawing process, plus some tips to help you with composition!! All my Patreon members, both paid AND free can have access to it. It's nothing fancy, but if you wanna check it out, you can just join my Patreon for free!
#free tutorial on my patreon#I hope you guys like it!#redraw#underfell#frisk#flowey#kaitogirl#digital art#illustration#redraw challenge#redraw of old art#my artwork#no ai#chara#asriel#flowey my boy I miss drawing you
233 notes
·
View notes
Text


🚨 [FREE PATTERN] 🚨
Hello, dear friends! 🤗
Valentine’s Day is coming up soon, and I thought you might want to share a few extra hearts! So here you go – a FREE crochet pattern for a Kawaii Heart! 💖🥰
This is a quick and easy project, perfect as a cute little gift for your loved ones or a stylish keychain! 😊
The pattern is available in six languages: English, German, Spanish, Italian, Dutch, and Portuguese! Browse through the gallery to see all the available translations!
This project has been proofread, tested, and translated by my wonderful friends: Celine, MJ, Clarissa, Sabrina, Roberta, Sarah, and Liubov! Thank you so much! 🤗
Happy crocheting, and have a wonderful weekend, dear friends! 💛💙
#aradiyatoys#olka novytska#diy#adorable#cute#crochet#handmade#amigurumi#crochet pattern#kawaii#free crochet pattern#crochet free pattern#free pattern#st. valentine's day#valentines day#happy valentines#hearts#valentines aesthetic#heart shaped#amigurumi pattern#aww#free crochet tutorial#craft#crafts#crafty
153 notes
·
View notes
Text
BASIC ACC FREINDLY LIGHT PINK MINIMAL CARRD
Hiii guys, to the comments and everyone i apologize for the inconvenience of the title and everything, the carrd was free at one point but many people kept stealing the carrd and removing creds and giving copies of the carrd and saying they made it. I had sent out posts on here and my discord server letting everyone know if it didn't stop i would start charging for the carrd or just take it away all together and it got progressively worse so i decided to change it to a paid carrd and realized after a couple comments about it on this post that i forgot to change the post and take away the parts where i said free, if you would like the carrd for free there is a tut up on my youtube channel (linked in my pinned post or comms carrd i believe) for it but i won't be giving out copies or temps of it anymore besides the paid one thank you!!
HIIII everyone here's a new carrd! obtain it here look at it here!
REQS ARE OPEN FOR CARRDS!! only req i have is to be following me to ask for a carrd! and I DO CARRD COMMS!! so if you have a specific carrd you want made message abt my prices and what i take!! Donate tips to me so im able to continue making free carrds here! use my referral code also to help donate and get some money off on buying pro here / use the code manually HXYLIN !
#carrd commissions#carrd stuff#aesthetic#carrd templates#carrd icons#carrd inspo#carrd moodboard#carrd theme#carrd material#carrd packs#carrd req#discord chat#discord server#discord app#discord mobile#carrd template#request#carrd tutorial#free carrd template#carrd profile#strawberry#cutecore#commission#taking commisions#f2u#f2ucarrd
1K notes
·
View notes
Text
Bookbinding: The New Deal by Closer
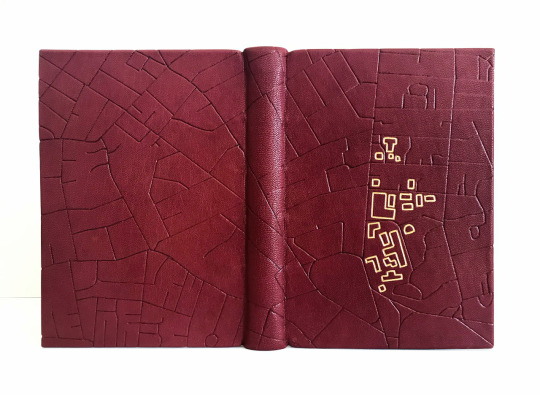


Moar bookbinding! This one is a Suits fanfic that I bound for @brambleberrycottage's birthday (pictures shared with the author's permission).
[Same disclaimer as always applies: I do this for fun; no money has been made from this project!]
Notes on the binding: This was my third leather book, but my first time sewing on cords (my previous leather books were both split boards). The actual sewing process was definitely...something. Sewing is usually my favorite step of a bind, but not this time. (Possibly because I was sitting on the floor at the base of the stairs sewing the book on a shelf under my desk, as that was the easiest sewing frame hack I could come up with - once I rig something that will allow me to sit up like a human being and not be scrunched up like a hermit crab, I am sure I will enjoy the process more.)
So the sewing itself was a bit painful, but I did really love how the board attachment played out in the end, with the cords laced into the boards. It is SO satisfying not to be doing case bindings anymore! It's the same feeling of relief I had when I first learned how to do split board bindings - you have so much more control over the placement of the cover boards, so much less opportunity for skew, so much more stability. No more casing-in anxiety necessary. (You do acquire all-new steps to be anxious about, but for me, it's worth it).
Notes on the design: I've never actually watched Suits, but the fic itself takes place in and around Harvard Law, so I used that as my inspiration for the book's design. The book is covered in crimson leather from Siegel. Endbands are handsewn with metallic red and gold threads. The blind tooling on the cover is a street map of Cambridge, MA, which I drew onto tracing film and then tooled through the film onto the leather. (So far I've only used a foil quill heat pen to do this, because brass tools are expensive. I'm taking a class on traditional tooling soon and I'm VERY excited for it, but for now, this is what I have access to.)
The gold outlines in the design highlight the buildings of Harvard Law. (These lines are also not actual gold tooling - paint pen for now.)
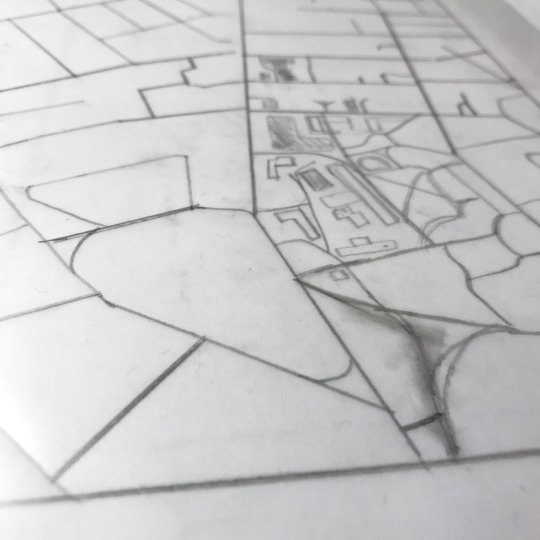
^ early design work, featuring unsightly eraser smudges.
I followed a similar theme/color scheme for the interior. For the endpapers, I used acrylic paints and a dry sponge to make a crimson and gold pattern:

For the title page, I modified an image of Harvard's Veritas shield to display the fic's title and author.

The chapter headers may not immediately ping an association for anyone who doesn't live here/spend a lot of time on the T, but they were the first thing I came up with - they're designed to look like the signage for the Red Line, which is the subway route that serves Harvard Square.


Notes for future me: The one thing that went "wrong" with this bind was that the endpapers ended up being short at the foreedge. I knew this was going to happen before I pasted them down, but I had to make a choice between two undesirable results - the boards were already VERY slightly curved inwards after doing the fill-in, and if I used paste on the endpapers (so they would stretch), I was worried it would pull too hard as it dried and make the boards curve too much. But if I used PVA, the endpapers wouldn't stretch enough and would end up being short. I decided I would rather have short endpapers than warped boards, so that's what I went with, but next time I might try doing one less lining inside the boards and hope that the pastedown will handle more of the counterpull.
Despite little things like that, I had a great time with this! Every time I make something I learn new things, and every time something goes "wrong" it's good to look back and be like "ten years ago I was duct taping the spines of loose pages that I covered in cardstock! i'm doing fine, actually." Lots of progress has happened and lots of fun has been had, which is ultimately the point.
Big thank yous are owed to @brambleberrycottage for letting me send her all my bookbinding experiments, and also to Closer for a) writing this fic in the first place and b) okay'ing the sharing of photos! Much appreciation goes out to both of you :)
#i love how much i've been able to learn with the resources that are out there now#it has helped me so much!#wild to look back and remember that these things did not exist when i started doing this#there was no discord#there was no das (imagine...what a world)#every time i look at my older stuff and want to be like 'this looks it was made by a toddler' i have to check myself like#'ok but back then there was no incredibly endearing australian guy making in-depth tutorials for free' XD#bookbinding
94 notes
·
View notes
Text
Free Sewing Pattern: Janet Vest via Mood Fabrics


Written by Shavonne Cruz for Mood Fabrics, this vest pattern is modeled after Janet from The Good Place. The pattern is offered free via email subscription, and the tutorial provides detailed instructions. You can check it out here!
The CovidSafeCosplay blog and its admin are unaffiliated with the patternmaker or Mood Fabrics, and are simply sharing the resource. Blog admin has not personally tested this pattern. Please thoroughly read the pattern and tutorial for full instructions.
Do you have a favorite free pattern resource? Share in the comments or via a reblog! Bonus points for those that are free, include image descriptions, or contain detailed tutorials for newbies to follow.
#the good place#cosplay#sewing patterns#sewing pattern#free sewing pattern#free sewing patterns#vests#vest#the good place janet#janet the good place#sewing tutorials#mood fabrics#id in alt text
154 notes
·
View notes
Text

Wolf, a crochet applique pattern designed by Kerri Brown on Ravelry. Find the free pattern and video tutorial here!
#full pattern#crochet#crochet pattern#free crochet pattern#video tutorial#fiber art#fiber crafts#applique#wolf
165 notes
·
View notes