#generated a new html file from the sheet in like 2 seconds
Explore tagged Tumblr posts
Visit Tumblr Blog
Explore Tumblr blogs with no restrictions, modern design and the best experience.
Last Seen Tumblr Blogs


Fun Fact
The most popular pages on Tumblr are about Minecraft, GIFs, and David J. Peterson.
Text
trying to update my hatchling probability tool again from a different device than usual, accessing the online editor is such a giant hassle every time somehow
#tütensuppe#ggle does NOT want you to access this thing#i ended up finding a link in the docs but going there from your project overview? good luck#just brought the sheet up to date earlier today and the py script still works like a charm.#generated a new html file from the sheet in like 2 seconds#SUCH an upgrade from making all the changes by hand damn
2 notes
·
View notes
Text
This, Charlotte, is the internet ...

It was September 30th: day one, week one.
I cycled across Bristol that Monday morning with a mixture of excitement and trepidation. I am not a seasoned city cyclist, so crossing the leviathan of roadworks at rush-hour was my first test.
Arriving at the DevelopMe offices unscathed, I quickly found my seat. Although we’d all met the week before at a social event organised by DevelopMe (a brilliant idea because I was less nervous having already met some of my fellow classmates) the room was very quiet and you could feel the tension of 12 career-changers psyching themselves up for what was ahead.
Our teacher for the week was Keir, whose enthusiasm and sense of humour made us all feel relaxed and at home very quickly.
We started with a brief introduction to the internet.
Now, I knew that the internet was not contained in a small black box à la the IT Crowd, but I had never really considered its complexity: a global network of computers that can communicate with one another at sub-second speeds is something that takes a while to get your head around.
Although the fundamentals of the internet are fairly easy to digest, thinking about it too much at this point in my understanding is like thinking about the expanding universe - enough to make my brain explode and ooze out of my ears. So, we’re gonna leave that one for another day.
In the meantime, let’s talk about HTML and CSS, our topics for the first fortnight. This post will be an overview of what we learnt, I’ll get into the details in separate posts later on.
HTML (Hypertext Markup Language)
The phrase that has stuck in my mind from our first week at bootcamp is ‘Progressive Enhancement and Graceful Degradation’ - which sounds suspiciously like a general life lesson, or an advert for a skincare range. For our purposes, it’s a way of making sure that every user can access the fundamental parts of your website no matter what browser they use or how slow their internet connection.
The first few days concentrated on writing HTML, which contains the important ‘content’ of the webpage. CSS is used to make it look good and also deals with accessibility. We’ll get into Javascript later, but that allows user interactivity. All three together constitute Front End development. My beginners understanding of this is that a Front End specialist works on the client-side stuff you see and interact with - whilst a Back End specialist works on the server-side stuff you don’t. A Full Stack developer does both.
In terms of HTML, you can split your code up like a human body: at the top is a <head> tag wherein you store all the metadata. Just like a human head, you can’t see what’s going on in there on the webpage itself, but it contains important behind-the-scenes information. The part of the page you see online is the <body> and you can dress this up however you want using CSS.
Within the body you’ll probably have a <header>, a <main> and a <footer>, which are fairly self-explanatory ways to break up a page. A lot of this stuff comes from traditional methods in printing, so if you imagine your page layout a bit like a newspaper, then considering how to split it up seems logical: for instance, you’ll probably further divide your page up into articles, sections and asides.
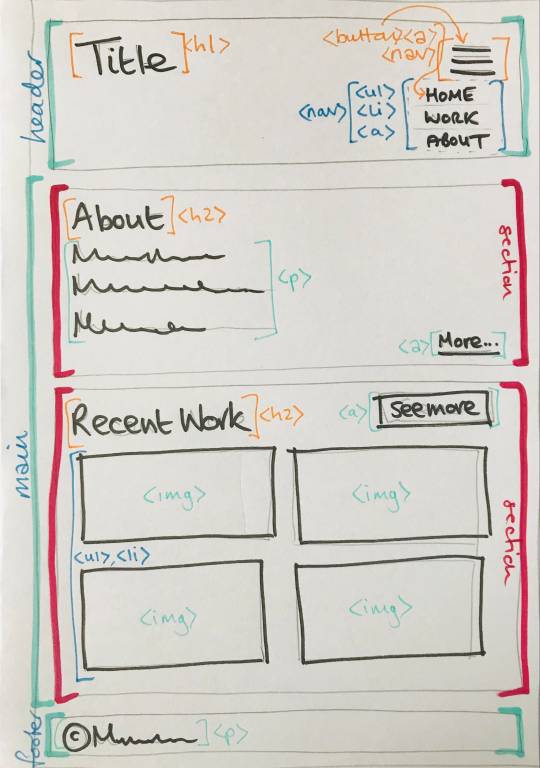
Within these sections you’ll have tags for various elements like paragraphs <p>, images <img/>, links <a>, headings <h1>, <h2>, buttons <button> and so on: again, it’s all wonderfully logical. Here’s some I wrote earlier - this is just part of the <header> on my home page:


The above example is also styled and for the majority of the first fortnight of bootcamp we got to grips with CSS.
CSS (Cascading Style Sheets)
CSS is a little trickier, mainly because there are SO MANY THINGS and you have to think about accessibility and responsiveness (i.e how a screen-reader will understand your code and what it will look like on desktop and mobile devices - this requires the use of @media queries, which I’ve grown to really like because it is SO satisfying when they work properly).
Potentially one of the biggest challenges I found in CSS was positioning things evenly. When you start fiddling about with margins and padding, and forgetting what you’ve fiddled with, you start seeing issues arising on the page: maybe it’s an <h2> that just won’t align with the image underneath; or maybe it’s a <nav> bar that is squishing all the menu items too close together, and pushing them all a little off-centre.
Now, I’m mildly neurotic when it comes to visuals. I’m trained in visual analysis and I’ve spent the best part of the last decade explaining the composition of paintings and other images - why they have a central focal point, or why they don’t etc. etc. Positioning stuff correctly and with meaning is important to me.
So I became particularly enamoured with flexbox and CSS grid (and not just because I enjoyed playing Flexbox Froggy and Grid Garden). These do a large percentage of the positioning legwork for you and I found myself using them a lot for the project work that we did in the second week.
Some excellent resources for these can be found here:
https://css-tricks.com/snippets/css/a-guide-to-flexbox/
https://css-tricks.com/snippets/css/complete-guide-grid/
Week 2: More CSS and SASS
In week 2 we worked on a sample project.
The brief was to practice our HTML and CSS skills by building a pretend portfolio site for a commercial photographer. Our teacher this week was Ruth, who was also super cool and put us all at ease instantly.
The project consisted of a home page with a grid of featured photos and a nav that turned into a burger menu when reduced to a small screen. We also had to create a gallery page, a blog page (and a sample page for one blog post) and a contact page (to practice HTML forms).
One of the main focuses of week 2 was using SASS to organise our code so that we didn’t have to repeat ourselves throughout the site.
At first I didn’t get on with SASS (it felt complicated). But being a fan of flexboxes, I spent some time creating a mixin that I was particularly proud of so that I didn’t have to create new flexboxes all the time (a mixin is like a function that can be reused by passing values into the variables - in this case, $justify, $align and $flexDirection):
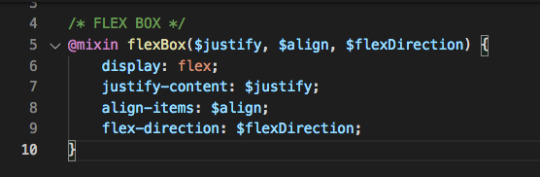
Turns out SASS is super useful.
And being a bit of a neat freak, I enjoyed putting all my code into separate files and tidying everything up.
I was pretty proud of my site by the end of the week:
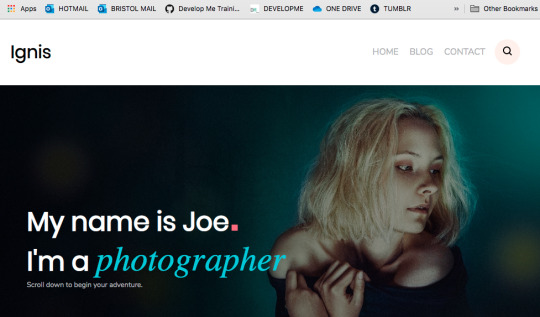
home page ... big screen
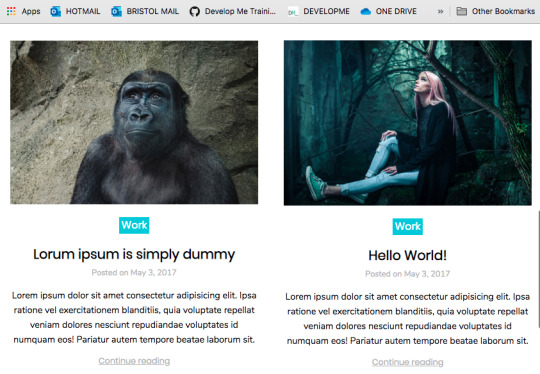
two sample posts on the blog page ...
Every Friday, we have an individual review with one of the course organisers so that we can discuss how we are getting on. Both weeks I mentioned that I was tired, but in a good way! I was getting great feedback from my teachers too.
So far, so good.
Downtime
Learning new information day after day is super tiring and it’s important to have a break at the weekends.
So I’ve been kind to myself and made sure I get out into nature on Saturdays and Sundays and away from my desk. The temptation just to work through is there all the time - I love what I’m doing, so it doesn’t feel like work and I have to drag myself away from it in the evenings and at weekends. This can only be a good thing though, right?!
The entire cohort are so friendly and everyone gets on really well. A few of us finished the first fortnight with a celebratory drink at Bocabar.

Next week ... Javascript ... bring it on!
9 notes
·
View notes
Text
[Second week of 2019.9] White Spirit devlog - Story about me and Unity Custom Editor

Hi, there!
I think I finished 75% of the event editor v2 from two weeks ago to today. The rest is left to port the actual behavior and the previous version of the event. So next week I’ll be implementing a new game tactical mechanism and Poi’s animation work.
This time, let’s talk about the experiences that went through making the event editor v2.
Why I start rework the editor
It was when I moved my camera system to the Cinemachine. And now I was working on adding a new feature to the event editor that I created. However…
Up to this point, the editor I created was too dependent on one class, which was a problem with the scalability of IMGUI. The problem was laying out the layout by executing commands in the code. In addition, the actual data of the event was very difficult to store and manage. So this time, I decided to start building an editor that was fully scalable.
—————
Things to consider while creating a new editor
I wanted to have event data stored and managed in the scene again. So I used data management via SerializedObject in a custom editor.
Unity Editor stores and manages the data for the game. For example, values written in everything in the scene and in the various components of the game object. I call Unity Serializer the way Unity Editor stores and manages data.
Unity Serializer also plays an important role in custom editors. However, while using the Unity Serializer, I encountered many difficulties. Below are some of the things I had to consider big.
1. Only simple types can be stored.
For example, only arrays and List types that are simple types, such as bool, int, float, and string, to Unity’s simple Vector types, etc.
2. Must be a field of accessible instance.
The Unity Serializer can serialize only with a public field or [SerializeField] attribute. So static and const fields cannot be serialized. Instead, I recommended to use public data using ScriptableObject.
3. To serialize the class, add the [Serializable] attribute.
You must use the Serializable attribute of System, the .NET default namespace, for the class you want to serialize. However, the fields in the class must meet the above conditions for serialization.
4. It does not support class polymorphism.
Because of this, Unity’s Serializer only serializes to its parent class. It’s doesn’t do serialize as a child type.
5. Nested data cannot exceed 7 levels deep.
Unity Serializer does not serialize data beyond 7 levels of depth for faster load and optimization. Some example, when a serializable Node class, and it’s have a field of type Node in it, you will see this warning. You can store a Node in a Node field, but you can’t do this more than seven times.
- Node field ㄴ Node field ㄴ Node field ㄴ Node field ㄴ Node field ㄴ Node field ㄴ Node field X Node field
Because of this problem, I even refactored my new editor three times…
Also there are other limitations as well, so I recommend reading the official documentation for this.
https://docs.unity3d.com/Manual/script-Serialization.html
—————
I’ll use polymorphism somehow!
I wanted to use polymorphism somehow to put information into the event list and use it. Older Event editors had to put arrays into serialized data and parse them by number directly because of this problem.
This time I used Json.
And here is Json.NET, the familiar Json utility library for .NET.
My team homepage server apps, which is currently running, also uses Json.NET.
https://www.newtonsoft.com/json
…in fact, it’s a library natively provided by ASP.NET Core.
https://assetstore.unity.com/packages/tools/input-management/json-net-for-unity-11347
I have taken advantage of three features of Json.NET to store and process various values in the Unity Serializer. JToken(JObject, JArray) and JsonConvert’s SerializeObject and PopulateObject.
—————
Polymorphism and Json.NET
I first created the top-level class of the event for polymorphic implementation, and added a ‘type’ string field to distinguish it when parsing with Json.NET.
I implemented the process of getting the 'type’ field first using JToken and then unboxing it with an instance of the type using the ToObject method.
Oh… so, how do I tell which event types are there?
I was in trouble for a while.
I had to build an environment that would work the same in the editor, the test play, and even after the build.
First of all, I needed to work in three different environments, so I started looking for features that could be run first.
In the Unity Editor, there was an attribute that could attach to a static method called InitializeOnLoad…
https://docs.unity3d.com/ScriptReference/InitializeOnLoadMethodAttribute.html
At runtime (test, build), I found an attribute called RuntimeInitializeOnLoadMethod.
It can also be attached to static methods.
The parameter was able to decide whether to run before and after the scene was loaded.
I used RuntimeInitializeLoadType.BeforeSceneLoad because I wanted it to run first.
https://docs.unity3d.com/ScriptReference/RuntimeInitializeOnLoadMethodAttribute-ctor.html
But that’s not done here yet, because I guesses the editor namespace will gone after the build, so I’ve come up with an odd class design in anticipation of throwing an exception.

The RegisterEventType method is a singleton static Dictionary field that has a type character for the key and a generic type for the value.
This will register the event for global use.

So I could use JToken to parse polymorphic classes in any environment (Editor, Test, Build).
—————
Put the data in Unity!
The event system I’m going to use requires the Json string (value), the reference array to be used by the event, and information for nested events, because of the polymorphic implementation above.
Nested events are used for forms such as conditional statements and options dialogues.
Initially I wanted to implement nested events through several List, but this was not possible due to the 7-level depth limitation of the Unity Serializer, so I fixed it by keeping the branch offsets (layerOffsets) in one-dimensional arrays (values).

And now I have make some sample event data pre-loaded for display and testing in the editor.
It helped me moderately(…) to write the sample data using the implicit operator.

—————
Unity UIElements
I decided to use UIElements this time.
UIElements is a new editor feature added since 2019.1.
https://blogs.unity3d.com/2019/04/23/whats-new-with-uielements-in-2019-1/
This allows Unity to write layout code (uxml), style sheets (uss) and decorate the editor just like WPF or web development.
And the editor of the event system began to devise several backend designs to overcome the difficulties of scaling.
—————
Basics of UIElements
UIElements consist of layout and code like HTML or WPF.
And it can dynamically manage UI elements in code.

Unity begins by importing the layout and stylesheets from the code and sending them to editor.
The above code is the code to build the layout through the file path of uxml and uss.
The reason for using pattern matching style in uss is that we have an attribute that returns null if there is a code error in uss.

And dynamic parts of the UI can use the Manifulator to manage UI events.
When creating an event, the Manifulator class is inherited and configured. This class is implemented by instantiating a parameter with the AddManifulator method on the VisualElement that you want to register.
VisualElement is the top level UI element of UIElements.
The above code is the code that calls the SelectEvent method when the UI element is clicked.
—————
My layout representation rules

First of all, to express the list of events, I expressed only Unity’s basic type, and realized that VisualElement, the basic type of UIElements element, is an inheritable type. EventListItemElement and EventListItemLayerElement were inherited.
Each was an element class to represent a single element of an event and a subelement of a nested event.
When I realized that VisualElement was inheritable, I started to extend the functionality of the element.
EventListItemElement manages the detailed data of the event and EventListItemLayerElement checks the child event elements and creates the EventListItemElement.
I created a structure to track the data so that it can be seen correctly by the user. (Green, red lines)
JsonConvert.SerializeObject is used when data is updated, and JsonConvert.PopulateObject is used when data is changed internally (Undo [Ctrl + Z], Redo [Ctrl + Y], etc).
Now I just need to build a layout that allows you to modify the event’s information.
By the way, the initial form of event code I mentioned in Polymorphism and Json.NET part had a comment in code that says ‘Editor specific features…’.
If you haven’t seen it, scroll up and check it out!
There, when the EventListItemElement clicks itself, the code inside it implements the inspector.
Designing like this means that when I add or modify an event, simply edit the code in the actual event class!
I confirmed this by creating a Helloworld event as a test.

Fixing the data and undoing and redoing also worked well.

So after confirming that everything worked well, I started to implement the rest of the editor. Add, delete, copy, paste, cut events…

The add event button allows the user to position where the user wants to add the event via the cursor position.
The placing 'Create event’ button was implemented by calling each EventListItemElement.

However, because UIElements events is called from bottom to top, I registered TrickleDown to face down so that when I register UI events, it works from top to bottom.
I used GenericMenu for add event function. And to organize the list, we used the event registration function that we created earlier to organize the menu.
So that’s all I did to create the event list layout. It’s a very long journey…
—————
What to do next…

UIElements was a new feature that I felt familiar with while developing web development and WPF apps. But working with other limitations of Unity wasn’t easy.
From next week onwards, I’ll be porting the previous event every minute and spending the rest of the time drawing the background and Poi’s flying animation.
And implementing new flight techniques.
I started this on July 7, and it was pretty hard but it was over.
Phew…
See you in next week.
1 note
·
View note
Text
This Is How Website Building Will Look Like In 10 Years Time.
A Beginner's Guide for CSS CSS stands as Cascading styles Sheets. It's a computer language which defines how HTML documents should be presented. The CSS language provides the foundation for the World Wide Web and JavaScript Web. This article will provide an overview of some of the key CSS topics. This article will provide a brief overview of CSS and give tips for beginners on how they can make the most of it. This article will teach you the basics about CSS. CSS was established in 1996. However, the standard wasn't created until December 1996. The specification was never completed, and some web servers were serving CSS files as application/x-pointplus. However, CSS3 was approved by the CSS Working Groups. There were other styles sheets, such as XHTML/XML, that were being studied at the time. Selectors have been used in the past to create simple elements like buttons. CSS is now an industry norm. The use of CSS was not common in the past. Most web designers today know CSS basics well and have some basic understanding. Below are some key points about CSS and how it is important in web design. It is vital to understand how CSS works. CSS uses English keywords to define style properties. Multiple web pages can share formatting and other attributes. The CSS code is stored in an external CSS folder. One CSS file can be used to modify the appearance or feel of your site. The style sheets can be cached to save changes to your site's look and feeling. You can also reuse the same stylesheets for multiple websites. CSS should always be used. It's an indispensable feature for web development. Without it, your content won't look customized. As a web designer, it is important that your website is accessible on all platforms. These tips will make sure that your website can be accessed from all browsers and devices. These tips will help create an attractive, user-friendly website. CSS was first used for defining colours and fonts. This was helpful for large websites that required color information along with fonts on every webpage. This led to confusion for website owners. The World Wide Web Consortium determined that style tags were able to be added and removed. The first CSS level 2-revision, known as 2.1 was adopted on the 13th June 2005. This revision introduced new features in the language and made it easier manageable. CSS can be broken down to multiple levels. The first level can be used to define the font size. The font colour is the second. You can match different styles with one or more colors. This allows you the ability to apply multiple typefaces and color combinations to elements. You can create beautiful and intricate websites by adding layers. CSS lets you change the appearance and feel of your website. It is easier to develop attractive and sophisticated designs. CSS is the 2nd level. It is used in creating layouts and structural elements. It can also help you create fonts. CSS, however, doesn't allow for fonts. It is based upon a document tree, which is a list that contains elements. To create HTML, it uses this tree to generate HTML. One element will inherit characteristics of its parent if there's no hierarchy. CSS features include inheritance. This allows for global styling changes, which is very helpful for web developers. CSS's main component is the style body. This is where the text styles are defined. You could also include sound and media styles in the style body. You could also use video formats to create a style for your website. If you want to display the exact same video in film, then you can insert it into the CSS file. The CSS rules will automatically convert to the media. The same text can appear in different formats if they are the same.
0 notes
Text
Seven Questions About Website Building You Should Answer Truthfully.
A Beginner's Guide for CSS CSS stands as Cascading styles Sheets. It's a computer language which defines how HTML documents should be presented. The CSS language provides the foundation for the World Wide Web and JavaScript Web. This article will provide an overview of some of the key CSS topics. This article will provide a brief overview of CSS and give tips for beginners on how they can make the most of it. This article will teach you the basics about CSS. CSS was established in 1996. However, the standard wasn't created until December 1996. The specification was never completed, and some web servers were serving CSS files as application/x-pointplus. However, CSS3 was approved by the CSS Working Groups. There were other styles sheets, such as XHTML/XML, that were being studied at the time. Selectors have been used in the past to create simple elements like buttons. CSS is now an industry norm. The use of CSS was not common in the past. Most web designers today know CSS basics well and have some basic understanding. Below are some key points about CSS and how it is important in web design. It is vital to understand how CSS works. CSS uses English keywords to define style properties. Multiple web pages can share formatting and other attributes. The CSS code is stored in an external CSS folder. One CSS file can be used to modify the appearance or feel of your site. The style sheets can be cached to save changes to your site's look and feeling. You can also reuse the same stylesheets for multiple websites. CSS should always be used. It's an indispensable feature for web development. Without it, your content won't look customized. As a web designer, it is important that your website is accessible on all platforms. These tips will make sure that your website can be accessed from all browsers and devices. These tips will help create an attractive, user-friendly website. CSS was first used for defining colours and fonts. This was helpful for large websites that required color information along with fonts on every webpage. This led to confusion for website owners. The World Wide Web Consortium determined that style tags were able to be added and removed. The first CSS level 2-revision, known as 2.1 was adopted on the 13th June 2005. This revision introduced new features in the language and made it easier manageable. CSS can be broken down to multiple levels. The first level can be used to define the font size. The font colour is the second. You can match different styles with one or more colors. This allows you the ability to apply multiple typefaces and color combinations to elements. You can create beautiful and intricate websites by adding layers. CSS lets you change the appearance and feel of your website. It is easier to develop attractive and sophisticated designs. CSS is the 2nd level. It is used in creating layouts and structural elements. It can also help you create fonts. CSS, however, doesn't allow for fonts. It is based upon a document tree, which is a list that contains elements. To create HTML, it uses this tree to generate HTML. One element will inherit characteristics of its parent if there's no hierarchy. CSS features include inheritance. This allows for global styling changes, which is very helpful for web developers. CSS's main component is the style body. This is where the text styles are defined. You could also include sound and media styles in the style body. You could also use video formats to create a style for your website. If you want to display the exact same video in film, then you can insert it into the CSS file. The CSS rules will automatically convert to the media. The same text can appear in different formats if they are the same.
0 notes
Photo

SEO is easy. The EXACT process we use to scale our clients' SEO from 0 to 200k monthly traffic and beyond https://www.reddit.com/r/SEO/comments/hqgden/seo_is_easy_the_exact_process_we_use_to_scale_our/
Hey guys!
There's a TON of content out there on SEO - guides, articles, courses, videos, scams, people yelling about it on online forums, etc etc..
Most of it, however, is super impractical. If you want to start doing SEO TODAY and start getting results ASAP, you'll need to do a TON of digging to figure out what's important and what's not.
So we wanted to make everyone's lives super easy and distill our EXACT process of working w/ clients into a stupid-simple, step-by-step practical guide. And so we did. Here we are.
A bit of backstory:
If you guys haven't seen any of my previous posts, me and my co-founder own an SEO/digital marketing agency, and we've worked w/ a ton of clients helping them go from 0 to 200k+ monthly organic traffic. We've also helped some quite big companies grow their organic traffic (from 1M to over 1.8M monthly organic), using the exact same process.
So without further ado, grab your popcorn, and be prepared to stick to the screen for a while, cause this is going to be a long post. Here's everything I am going to cover:
Get your website to run and load 2x - 5x faster (with MINIMAL technical know-how)
Optimize your landing pages to rank for direct intent keywords (and drive 100% qualified leads)
Create amazing, long-form content that ranks every time
How we get a TON of links to our website with ZERO link-building efforts
How to improve your content’s rankings with Surfer SEO
Step #1 - Technical Optimization and On-Page SEO
Step #1 to any SEO initiative is getting your technical SEO right.
Now, some of this is going to be a bit technical, so you might just forward this part to your tech team and just skip ahead to "Step #2 - Keyword Research."
If you DON'T have a tech team and want a super easy tl;dr, do this:
Use WP Rocket. It's a WordPress plugin that optimizes a bunch of stuff on your website, making it run significantly faster.
Use SMUSH to (losslessly) compress all the images on your website. this usually helps a TON w/ load speed.
If you’re a bit more tech-savvy, though, read on!
Technical SEO Basics
Sitemap.xml file. A good sitemap shows Google how to easily navigate your website (and how to find all your content!). If your site runs on WordPress, all you have to do is install YoastSEO or Rankmath SEO, and they’ll create a sitemap for you. Otherwise, you can use an online XML Sitemap generation tool.
Proper website architecture. The crawl depth of any page should be lower than 4 (i.e: any given page should be reached with no more than 3 clicks from the homepage). To fix this, you should improve your interlinking (check Step #6 of this guide to learn more).
Serve images in next-gen format. Next-gen image formats (JPEG 2000, JPEG XR, and WebP) can be compressed a lot better than JPG or PNG images. Using WordPress? Just use Smush and it’ll do ALL the work for you. Otherwise, you can manually compress all images and re-upload them.
Remove duplicate content. Google hates duplicate content and will penalize you for it. If you have any duplicate pages, just merge them (by doing a 301 redirect) or delete one or the other.
Update your ‘robots.txt’ file. Hide the pages you don’t want Google to index (e.g: non-public, or unimportant pages). If you’re a SaaS, this would be most of your in-app pages. ]
Optimize all your pages by best practice. There’s a bunch of general best practices that Google wants you to follow for your web pages (maintain keyword density, have an adequate # of outbound links, etc.). Install YoastSEO or RankMath and use them to optimize all of your web pages.
If you DON’T have any pages that you don’t want to be displayed on Google, you DON’T need robots.txt.
Advanced Technical SEO
Now, this is where this gets a bit more web-devvy. Other than just optimizing your website for SEO, you should also focus on optimizing your website speed.
Here’s how to do that:
Both for Mobile and PC, your website should load in under 2-3 seconds. While load speed isn’t a DIRECT ranking factor, it does have a very serious impact on your rankings.
After all, if your website doesn’t load for 5 seconds, a bunch of your visitors might drop off.
So, to measure your website speed performance, you can use Pagespeed Insights. Some of the most common issues we have seen clients facing when it comes to website speed and loading time, are the following:
Images being resized with CSS or JS. This adds extra loading time to your site. Use GTMetrix to find which images need resizing. Use an online tool (there are a ton of free ones) to properly resize images (or Photoshop even), and re-upload them.
Images not being lazy-loaded. If your pages contain a lot of images, you MUST activate lazy-loading. This allows images that are below the screen, to be loaded only once the visitor scrolls down enough to see the image.
Gzip compression not enabled. Gzip is a compression method that allows network file transfers to happen a ton faster. In other words, your files like your HTML, CSS, and JS load a ton faster.
JS, CSS, and HTML not minified/aggregated/in-lined. If your website is loading slowly because you have 100+ external javascript files and stylesheets being requested from the server, then you need to look into minifying, aggregating, and inlining some of those files.
Use Cloudflare + BunnyCDN Why the combo? Why not just Cloudflare? Well, I won't get into details, I've experimented a bit with it, and if you are looking for something cheap and fast this is the best combo. Cloudflare you can opt in for the free account. BunnyCDN on the other hand is on a pay-as-you-go basis, and unless you are getting over 100K+ visits a month, you'll likely never go above their minimum monthly threshold of $1.
Want to make your life easier AND fix up all these issues and more? Use WP Rocket. The tool basically does all your optimization for you (if you’re using WordPress, of course).
Step #2 - Keyword Research
Once your website is 100% optimized, it’s time to define your SEO strategy.
The best way to get started with this is by doing keyword research.
First off, you want to create a keyword research sheet. This is going to be your main hub for all your content operations.
You can use the sheet to:
Prioritize content
Keep track of the publishing process
Get a top-down view of your web pages
And here’s what it covers:
Target search phrase. This is the keyword you’re targeting.
Priority. What’s the priority of this keyword? We usually divide them by 1-2-3…
Priority 3 - Top priority keywords. These are usually low competition, high traffic, well-converting, or all 3 at the same time.
Priority 2 - Mid-priority keywords.
Priority 1 - These are low priority.
Status. What’s the status of the article? We usually divide them by…
1 - Not written
2 - Writer has picked up the topic for the week
3 - The article is being written
4 - The article is in editing phase
5 - The article is published on the blog
Topic cluster. The category that the blog post belongs to.
Monthly search volume. Self-explanatory. This helps you pick a priority for the keyword.
CPC (low & high bid). Cost per click for the keyword. Generally, unless you’re planning to run search ads, these are not mandatory. They can, however, help you figure out which of your keywords will convert better. Pro tip: the higher the CPC, the more likely it is for the keyword to convert well.
Now that you have your sheet (and understand how it works), let’s talk about the “how” of keyword research.
How to do Keyword Research (Step-by-Step Guide)
There are a ton of different ways to do that (check the “further readings” at the end of this section for a detailed rundown).
Our favorite method, however, is as follows…
Start off by listing out your top 5 SEO competitors.
The key here is SEO competitors - competing companies that have a strong SEO presence in the same niche.
Not sure who’s a good SEO competitor? Google the top keywords that describe your product and find your top-ranking competitors.
Run them through SEMrush (or your favorite SEO tool), and you’ll see how well, exactly, they’re doing with their SEO.
Once you have a list of 5 competitors, run each of them through “Organic Research” on SEMrush, and you'll get a complete list of all the keywords they rank on.
Now, go through these keywords one by one and extract all the relevant ones and add them to your sheet.
Once you go through the top SEO competitors, your keyword research should be around 80%+ done.
Now to put some finishing touches on your keyword research, run your top keywords through UberSuggest and let it do its magic. It's going to give you a bunch of keywords associated with the keywords you input.
Go through all the results it's going to give you, extract anything that’s relevant, and your keyword research should be 90% done.
At this point, you can call it a day and move on to the next step. Chances are, over time, you’ll uncover new keywords to add to your sheet and get you to that sweet 100%.
Step #3 - Create SEO Landing Pages
Remember how we collected a bunch of landing page keywords in step #2? Now it’s time to build the right page for each of them! This step is a lot more straightforward than you’d think. First off, you create a custom landing page based around the keyword. Depending on your niche, this can be done in 2 ways:
Create a general template landing page. Pretty much copy-paste your landing page, alter the sub-headings, paraphrase it a bit, and add relevant images to the use-case. You’d go with this option if the keywords you’re targeting are very similar to your main use-case (e.g. “project management software” “project management system”).
Create a unique landing page for each use-case. You should do this if each use-case is unique. For example, if your software doubles as project management software and workflow management software. In this case, you’ll need two completely new landing pages for each keyword.
Once you have a bunch of these pages ready, you should optimize them for their respective keywords.
You can do this by running the page content through an SEO tool. If you’re using WordPress, you can do this through RankMath or Yoast SEO.
Both tools will give you exact instructions on how to optimize your page for the keyword.
If you’re not using WordPress, you can use SurferSEO. Just copy-paste your web page content, and it’s going to give you instructions on how to optimize it.
Once your new landing pages are live, you need to pick where you want to place them on your website. We usually recommend adding these pages to your website’s navigation menu (header) or footer.
Finally, once you have all these new landing pages up, you might be thinking “Now what? How, and when, are these pages going to rank?”
Generally, landing pages are a tad harder to rank than content. See, with content, quality plays a huge part. Write better, longer, and more informative content than your competition, and you’re going to eventually outrank them even if they have more links.
With landing pages, things aren’t as cut and dry. More often than not, you can’t just “create a better landing page.”
What determines rankings for landing page keywords are backlinks. If your competitors have 400 links on their landing pages, while yours has 40, chances are, you’re not going to outrank them.
Step #4 - Create SEO Blog Content
Now, let’s talk about the other side of the coin: content keywords, and how to create content that ranks.
As we mentioned before, these keywords aren’t direct-intent (the Googler isn’t SPECIFICALLY looking for your product), but they can still convert pretty well. For example, if you’re a digital marketing agency, you could rank on keywords like…
Lead generation techniques
SaaS marketing
SEO content
After all, anyone looking to learn about lead gen techniques might also be willing to pay you to do it for them.
On top of this, blog post keywords are way easier to rank for than your landing pages - you can beat competition simply by creating significantly better content without turning it into a backlink war.In order to create good SEO content, you need to do 2 things right:
Create a comprehensive content outline
Get the writing part right
Here’s how each of these work...
How to Create a Content Outline for SEO
A content outline is a document that has all the info on what type of information the article should contain Usually, this includes:
Which headers and subheaders you should use
What’s the optimal word count
What information, exactly, should each section of the article cover
If you’re not using Yoast or Rankmath, you can also mention the SEO optimization requirements (keyword density, # of outbound links, etc.)
Outlines are useful if you’re working with a writing team that isn’t 100% familiar with SEO, allowing them to write content that ranks without any SEO know-how.
At the same time, even if you’re the one doing the writing, an outline can help you get a top-down idea of what you should cover in the article.
So, how do you create an outline? Here’s a simplified step-by-step process…
Determine the target word count. Rule of thumb: aim for 1.5x - 2x whatever your competitor wrote. You can disregard this if your competition was super comprehensive with their content, and just go for the same length instead.
Create a similar header structure as your competition. Indicate for the writer which headers should be h2, which ones h3.
For each header, mention what it’s about. Pro tip - you can borrow ideas from the top 5 ranking articles.
For each header, explain what, exactly, should the writer mention (in simple words).
Finally, do some first-hand research on Reddit and Quora. What are the questions your target audience has around your topic? What else could you add to the article that would be super valuable for your customers?
How to Write Well
There’s a lot more to good content than giving an outline to a writer. Sure, they can hit all the right points, but if the writing itself is mediocre, no one’s going to stick around to read your article.
Here are some essential tips you should keep in mind for writing content (or managing a team of writers):
Write for your audience. Are you a B2B enterprise SaaS? Your blog posts should be more formal and professional. B2C, super-consumer product? Talk in a more casual, relaxed fashion. Sprinkle your content with pop culture references for bonus points!
Avoid fluff. Every single sentence should have some sort of value (conveying information, cracking a joke, etc.). Avoid beating around the bush, and be as straightforward as possible.
Keep your audience’s knowledge in mind. For example, if your audience is a bunch of rocket scientists, you don’t have to explain to them how 1+1=2.
Create a writer guideline (or just steal ours! -> edit: sorry had to remove link due to posting guidelines)
Use Grammarly and Hemingway. The first is like your personal pocket editor, and the latter helps make your content easier to read.
Hire the right writers. Chances are, you’re too busy to write your own content. We usually recommend using ProBlogger or Cult of Copy Job Board (Facebook Group) to source top writing talent.
Step #5 - Start Link-Building Operations
Links are essential if you want your content or web pages to rank.
If you’re in a competitive niche, links are going to be the final deciding factor on what ranks and what doesn’t.
In the VPN niche, for example, everyone has good content. That’s just the baseline. The real competition is in the backlinks.
To better illustrate this example, if you Google “best VPN,” you’ll see that all top-ranking content pieces are almost the same thing. They’re all:
Well-written
Long-form
Easy to navigate
Well-formatted (to enhance UX)
So, the determining factor is links. If you check all the top-ranking articles with the Moz Toolbar Extension, you’ll see that on average, each page has a minimum of 300 links (and some over 100,000!).
Meaning, to compete, you’ll really need to double-down on your link-building effort.
In fact, in the most competitive SEO niches, it’s not uncommon to spend $20,000 per month on link-building efforts alone.
Pro Tip
Got scared by the high $$$ some companies spend on link-building? Well, worry not!
Only the most ever-green niches are so competitive. Think, VPN, make money online, health and fitness, dating, CBD, gambling, etc. So you know, the usual culprits.
For most other niches, you can even rank with minimal links, as long as you have top-tier SEO content.
Now, let’s ask the million-dollar question: “how do you do link-building?”
4 Evergreen Link Building Strategies for Any Website
There are a TON of different link building strategies on the web. Broken link building, scholarship link building, stealing competitor links, and so on and so on and so on.
We’re not going to list every single link building strategy out there (mainly because Backlinko already did that in their link building guide).
What we are going to do, though, is list out some of our favorite strategies, and link you to resources where you can learn more:
Broken link building. You find dead pages with a lot of backlinks, reach out to websites that linked to them, and pitch them something like “hey, you linked to this article, but it’s dead. We thought you’d want to fix that. You can use our recent article if you think it’s cool enough.”
Guest posting. Probably the most popular link building strategy. Find blogs that accept guest posts, and send them a pitch! They usually let you include 1-2 do-follow links back to your website.
“Linkable asset” link building. A linkable asset is a resource that is so AWESOME that you just can’t help but link to. Think, infographics, online calculators, first-hand studies or research, stuff like that. The tl;dr here is, you create an awesome resource, and promote the hell out of it on the web.
Skyscraper technique. The skyscraper technique is a term coined by Backlinko. The gist of it is, you find link-worthy content on the web, create something even better, and reach out to the right people.
Most of these strategies work, and you can find a ton of resources on the web if you want to learn more.
However, if you’re looking for something a bit different, oh boy we have a treat for you! We’re going to teach you a link-building strategy that got us around:
10,000+ traffic within a week
15+ leads
50+ links
...And so much more, all through a single blog post.
Link-Building Case Study: SaaS Marketing
“So, what’s this ancient link-building tactic?”
I hear you asking. It must be something super secretive and esoteric, right?
Secrets learned straight from the link-building monks at an ancient SEO temple…
“Right?”
Well, not quite.
The tactic isn’t something too unusual - it’s pretty famous on the web. This tactic comes in 2 steps:
Figure out where your target audience hangs out (create a list of the channels)
Research the type of content your audience loves
Create EPIC content based on that research (give TONS of value)
Promote the HELL out of it in the channels from step 1
Nothing too new, right?
Well, you’d be surprised how many people don’t use it.
Now, before you start throwing stones at us for overhyping something so simple, let’s dive into the case study:
How we PR’d the hell out of our guide to SaaS marketing (can't add a link, but it's on our blog and it's 14k words long), and got 10k+ traffic as a result.
A few months back when we launched our blog, we were deciding on what our initial content should be about.
Since we specialize in helping SaaS companies acquire new users, we decided to create a mega-authority guide to SaaS marketing (AND try to get it to rank for its respective keyword).
We went through the top-ranking content pieces, and saw that none of them was anything too impressive.
Most of them were about general startup marketing strategies - how to validate your MVP, find a product-market fit, etc.
Pretty “meh,” if you ask us. We believe that the #1 thing founders are looking for when Googling “saas marketing” are practical channels and tactics you can use to acquire new users.
So, it all started off with an idea: create a listicle of the top SaaS marketing tactics out there:
How to create good content to drive users
Promote your content
Rank on Google
Create viral infographics
Create a micro-site
...and we ended up overdoing it, covering 41+ different tactics and case studies and hitting around 14k+ words.
On one hand, oops! On the other hand, we had some pretty epic content on our hands. We even added the Smart Content Filter to make the article much easier to navigate.
Once the article was up, we ran it through some of our clients, friends, and acquaintances, and received some really good feedback.
So, now we knew it was worth promoting the hell out of it.
We came up with a huge list of all online channels that would appreciate this article:
r/ entrepreneur and r/ startups (hi guys!). The first ended up loving the post, netting us ~600 upboats and a platinum medal. The latter also ended up loving the post, but the mods decided to be assholes and remove it for being “self-promotional.” So, despite the community loving the content, it got axed by the mods. Sad. (Fun fact - this one time we tried to submit another content piece on r/ startups with no company names, no links back to our website, or anything that can be deemed promotional. One of the mods removed it for mentioning a link to Ahrefs. Go figure!)
Hacker News. Tons of founders hang out on HN, so we thought they’d appreciate anything SaaS-related. This netted us around ~200+ upvotes and some awesome feedback (thanks HN!)
Submit on Growth Hackers, Indie Hackers, and all other online marketing communities. We got a bunch of love on Indie Hackers, the rest were quite inactive.
Reach out to all personal connects + clients and ask for a share
Run Facebook/Twitter ads. This didn’t particularly work out too well for us, so we dropped it after 1-2 weeks.
Run a Quuu promotion. If you haven’t heard of Quuu, it’s a platform that matches people who want their content to be shared, with people who want their social media profiles running on 100% auto-pilot. We also got “meh” results here - tons of shares, next to no likes or link clicks.
Promoted in SaaS and marketing Facebook groups. This had awesome results both in terms of traffic, as well as making new friends, AND getting new leads.
Promoted in entrepreneur Slack channels. This worked OK - didn’t net us traffic, but got us some new friends.
Emailed anyone we mentioned in the article and asked for a share. Since we mentioned too many high profile peeps and not enough non-celebs, this didn’t work out too well
Emailed influencers that we thought would like the article / give it a share. They didn’t. We were heart-broken.
And accordingly, created a checklist + distribution sheet with all the websites or emails of people we wanted to ping.
Overall, this netted us around 12,000 page views in total, 15+ leads, 6,000 traffic in just 2 promotion days.
As for SEO results, we got a bunch of links. (I would have added screenshots to all of these results, but don't think this subreddit allows it).
A lot of these are no-follow from Reddit, HackerNews, and other submission websites, but a lot of them are also pretty authentic.
The cool part about this link-building tactic is that people link to you without even asking. You create awesome content that helps people, and you get rewarded with links, shares, and traffic!
And as for the cherry on top, only 2 months after publishing the article, it’s ranking on position #28. We’re expecting it to get to page 1 within the new few months and top 3 within the year.
Step #6 - Interlink Your Pages
One of Google's ranking factors is how long your visitors stick around on your website.
So, you need to encourage users reading ONE article, to read, well, the rest of them (or at least browse around your website). This is done through interlinking.
The idea is that each of your web pages should be linked to and from every other relevant page on your site.
Say, an article on "how to make a resume" could link to (and be linked from) "how to include contact info on a resume," "how to write a cover letter," "what's the difference between a CV and a resume," and so on.
Proper interlinking alone can have a significant impact on your website rankings. NinjaOutreach, for example, managed to improve their organic traffic by 40% through better interlinking alone.
So, how do you do interlinking “right?”
First off, make it a requirement for your writers to link to the rest of your content. Add a clause to your writer guidelines that each article should have 10+ links to your other content pieces.
More often than not, they’ll manage to get 60-70% of interlinking opportunities. To get this to 100%, we usually do bi-annual interlinking runs. Here’s how that works.
Pick an article you want to interlink. Let’s say, for example, an article on 'business process management'.
The goal here is to find as many existing articles on your blog, where ‘business process management�� is mentioned so that we can add a link to the article.
Firstly, Google the keyword ‘business process management’ by doing a Google search on your domain. You can use the following query:
site:yourwebsite.com "keyword"
In our case, that’s:
site:example.com “business process management”
You’ll get a complete list of articles that mention the keyword “business process management.
Now, all you have to do is go through each of these, and make sure that the keyword is hyperlinked to the respective article!
You should also do this for all the synonyms of the keyword for this article. For example, “BPM” is an acronym for business process management, so you’d want to link this article there too.
Step #7 - Track & Improve Your Headline CTRs
Article CTRs play a huge role in determining what ranks or not.
Let’s say your article ranks #4 with a CTR of 15%. Google benchmarks this CTR with the average CTR for the position.
If the average CTR for position #4 is 12%, Google will assume that your article, with a CTR of 15% is of high quality, and will reward you with better rankings.
On the other hand, if the average CTR is 18%, Google will assume that your article isn’t as valuable as other ranking content pieces, and will lower your ranking.
So, it’s important to keep track of your Click Through Rates for all your articles, and when you see something that’s underperforming, you can test different headlines to see if they’ll improve CTR.
Now, you’re probably wondering, how do you figure out what’s the average CTR?
Unfortunately, each search result is different, and there's no one size fits all formula for average CTR.
Over the past few years, Google has been implementing a bunch of different types of search results - featured snippet, QAs, and a lot of other types of search results.
So, depending on how many of these clutter and the search results for your given keyword, you’ll get different average CTRs by position.
Rule of thumb, you can follow these values:
1st position -> ~31.73% CTR
2nd pos. -> ~24.71%
3rd pos. -> 18.66%
4th pos. -> 13.60%
5th -> 9.51%
6th -> 6.23%
7th -> 4.15%
8th -> 3.12%
9th -> 2.97%
Keep in mind these change a lot depending on your industry, PPC competitiveness, 0-click searches, etc...
Use a scraping tool like Screaming Frog to extract the following data from all your web pages:
Page title
Page URL
Old Headline
Delete all the pages that aren’t meant to rank on Google. Then, head over to Google Search Console and extract the following data for all the web pages:
CTR (28 Day Range)
Avg. Position
Add all of this data to a spreadsheet.
Now, check what your competition is doing and use that to come up with new headline ideas. Then, put them in the Title Ideas cell for the respective keyword.
For each keyword, come up with 4-5 different headlines, and implement the (seemingly) best title for each article.
Once you implement the change, insert the date on the Date Implemented column. This will help you keep track of progress.
Then, wait for around 3 - 4 weeks to see what kind of impact this change is going to have on your rankings and CTR.
If the results are not satisfactory, record the results in the respective cells, and implement another test for the following month. Make sure to update the Date Implemented column once again.
Step #8 - Keep Track of Rankings & Make Improvements On-The-Go
You’re never really “done” with SEO - you should always keep track of your rankings and see if there’s any room for improvement.
If you wait for an adequate time-frame after publishing a post (6 months to a year) and you’re still seeing next to no results, then it might be time to investigate.
Here’s what this usually looks like for us:
Audit the content
Is your content the adequate word count? Think, 1.5-2x your competitors.
Is the content well-written?
Do the images in your article add value? E.g. no stock or irrelevant images.
Is the content optimized for SEO? Think, keyword density, links to external websites, etc.
Audit internal links
Does the content link to an adequate number of your other articles or web pages?
Is the article linked to from an adequate number of your web pages or blog posts? You can check this on Search Console => Links => Internal Links. Or, if you’re using Yoast or RankMath, you can check the # of internal links a post has in the WordPress Dashboard -> Posts.
Audit the backlinks
Do you have as many backlinks as your competitors?
Are your backlinks from the countries you want to rank in? If you have a bunch of links from India, but you want to rank in the US, you’d need to get more US links.
Are your links high quality? More often than not, low DA / PA links are not that helpful.
Did you disown low-quality or spam links?
Audit web page
Does the web page load too slow? Think, 4+ seconds.
Did you enable lazy loading for the images?
Did you compress all images on the web page?
...And that's it.
Hope you guys had a good read and learned a thing or two :) HMU if you have any questions.
Can't add a link to the blog post (for better readability) due to posting guidelines, sorry.
submitted by /u/malchik23 [link] [comments] July 13, 2020 at 08:07PM
0 notes
Text
Gold Standard Trivia Pub Quiz Questions And Answers
New Post has been published on https://autotraffixpro.app/allenmendezsr/gold-standard-trivia-pub-quiz-questions-and-answers-3/
Gold Standard Trivia Pub Quiz Questions And Answers

Buy Now


Are you tired of using dull, unimaginative, straightforward questions in your trivia and pub quiz competitions?
If so, then we have the ANSWER! Announcing the GOLD STANDARD in Trivia Quizzes …
Thousands of fantastic quiz questions & answers from one of the greatest minds in trivia
So well-researched… So entertaining… And at times, so Downright Evil…

You’ll leave them yearning for more, more, MORE!
Say goodbye…
to those crappy easy-peasy quiz questions sites giving away or selling quiz questions that even a ten year-old could answer
Say goodbye…
to those days of spending hours & hours writing witty, intelligent, thought-provoking questions to keep your teams focused
We offer thousands of great quiz questions AND answers all written & researched by our experienced Quiz Master and tried-and-tested in hundreds of bars around the world
Uses for our Quiz Questions
Pub Quiz Events at a Local Bar Fun Nights in With Family or Friends Charity or Fund-Raising Events Office Team-Building Events or Parties Mobile Phone Applications Internet Quiz Games
Ask Yourself:
How long does it take to write and research thousands of questions?
AND MORE IMPORTANTLY, HOW LONG DOES IT TAKE TO WRITE GOOD QUESTIONS?
You could save all that time and energy if you were to download our SATISFACTION-GUARANTEED Quiz Packs
WHAT DO YOU GET WHEN YOU ORDER FROM US?

Pack 1
1,700+ Gold Standard Quiz Questions and Answers, of course
Over 150 Printable Pages Of Content In Multiple Formats (see below)
Additional Bonus Items
Download Quiz Pack 1

Pack 2
1,900+ Gold Standard Quiz Questions and Answers
Over 125 Printable Pages Of Content In Multiple Formats (see below)
+ Unbranded Printable Answer Sheets
Download Quiz Pack 2

Pack 3
2,000+ Gold Standard Quiz Questions and Answers
Over 125 Printable Pages Of Content In Multiple Formats (see below)
+ Unbranded Printable Answer Sheets
Download Quiz Pack 3

Pack 4
Our Best Selection Of Questions!
2,100+ Gold Standard Quiz Questions and Answers
Over 140 Printable Pages Of Content In Multiple Formats (also includes ePub format for iPad etc)
Download Quiz Pack 4
OUR PROMISES TO YOU
Easy To Print Out:
None of our quiz formats are print or edit protected, so you can print them as many times as you like, even remove questions as you have used them.
Split Into Convenient Sections:
All our questions have been sorted into convenient sections so that you can find them easily. For example, 100 geography answers would follow 100 geography questions, all numbered in the same way. Then 100 history questions would follow those, and so on.
A table of contents is also included in the quiz pack and page numbers can be found at the bottom of each page.
So Many Pages, Surely You Use Large Fonts?
No, we use Arial font size 10 for questions and answers
Multiple Formats To Choose From:

Not all computers are the same and not everybody has the same software installed. That is why when you order one of our quiz packs, you may choose from the following file formats when downloading (you can even download the quiz pack in all formats if you so wish):
Microsoft Word™ format
Adobe Acrobat™ Reader PDF format
Standard HTML format
Standard Text format
Microsoft Excel™ format
Is Your Preferred Format Not Listed?
No problem, simply send us an email and we will try our best to convert our quiz pack to your preferred file format
Instant Download
As soon as your payment is complete, which takes only a matter of seconds, you’ll be taken to your download page for the chosen product.
All products can be downloaded instantly – no waiting for an email is required.
Our payment system generates a personal download page for you, that you may bookmark for further downloads.
Can I See Some Sample Questions?
Yes of course you can, we have a free question and answer sample pack. Simply download the pack by clicking on the button below:
Download the sample.zip file
What’s In Each Pack?
Pack 1
169 Geography Questions 187 Sport Questions 141 Science & Medicine Questions 143 History Questions 174 Music & Lyrics Questions 245 General Knowledge Questions 146 TV, Cinema & Radio Questions 121 Animals, Plants & Botany Questions 108 Arts Questions 90 Words & Language Questions 60 Food & Drink Questions 50 Mythology & Astrology Questions 49 Literature Questions 21 Maritime Questions 24 Aviation & Space Travel Questions Total = over 1,700 Questions (with Answers of course)
Download Quiz Pack 1
Pack 2
283 General Knowledge Questions 176 Sport Questions 165 TV & Film Questions 182 Food & Drink Questions 167 Geography Questions 162 Music Questions 146 Language & Literature Questions 155 Science & Nature Questions 142 History Questions 90 Entertainment Questions 65 Letters & Numbers Questions 28 Christmas Questions 21 Missing Link Questions 90 Tougher & Small Themes Questions + Beatles, Bible, Football Questions Total = over 1,900 Questions (with Answers of course)
Download Quiz Pack 2
Pack 3
200 General Knowledge Questions 200 Music Questions 200 Geography Questions 200 History Questions 200 TV & Film Questions 160 Food & Drink Questions 155 Sport Questions 150 Art, Literature & Culture Questions 145 Science, Technology & Nature Questions 107 People Quiz Questions 100 Words & Language Questions 61 Clothes & Fashion Questions 61 Numbers Quiz Questions 59 Seasonal Themed Quiz Questions 52 Mythology, Beliefs & Ideas Questions 45 Boats, Seas, Oceans and Waterways Questions Total = over 2,000 Questions (with Answers of course)
Download Quiz Pack 3
Pack 4
280 Art, Literature, Movies & TV Questions 233 Geography Questions 200 General Knowledge Questions 175 Food & Drink Questions 158 Sport & Games Questions 167 Music Questions 130 Language Questions 125 Science, Technology & Nature Questions 171 History Questions 110 Human Body Questions 52 Multiple Choice Questions 60 Law & Order Questions 65 Albums Questions 21 Tough True or False Questions 20 Fuel & Energy Questions + 9 Further Categories of Questions Total = over 2,100 Questions (with Answers of course)
Download Quiz Pack 4

Our quiz questions have been written by a VERY experienced Pub Quiz Master. The Quiz Master has been writing Pub Quiz Questions for twenty years and knows the game VERY well, nothing gets past him. Having lived in the United Kingdom, Canada and Germany he is well-travelled and well-read, boasting a natural love for information and trivia.
When someone loves trivia and information this much, you just know his questions are going to be entertaining!
Every single question in these packs has been tried-and-tested on a pub quiz audience. We only include the best questions from our expert question writer in our products.
I am very happy with the quiz pack…
… and I had no problems downloading despite being on a Mac computer. The price is more than reasonable for so many good questions. All in all I am very impressed with your service, wish I had discovered the site before, I just found it by pure accident on Google. Many thanks.
June Fraser, UK
Wow! What can I say!!! Your questions are a breath of fresh air.
I have searched for years to find decent questions for my weekly pub quiz and finally I have found quiz questions that not only meet the level of my quiz players, but also entertain them and bring them back for more … and there’s so many to choose from. Thanks again
Peter Martens, UK
Top Quality Quiz Questions
I have bought lots of questions from other websites similar to yours but I have never found such a consistently good set, until I found this one that is. Thank you for taking the time and effort to share your knowledge. For that price I expected low quality, easy questions but your quiz pack has really blown me away.
Joel Gottlieb, United States
Great questions, that’s for sure.
I bought your quiz pack when you only had 1000 questions and was pretty pleased with the product. Now I check back and see that I can download the updated pack with 1700 of the critters! Thanks for your great service, highly recommended, I will be back, let me know when you have another pack for sale!
Paul Bartos, United States
My Quiz Teams love the questions.
Having ummed-and-arred over whether or not to buy your first quiz pack, I finally decided to take the plunge. I run a pub quiz in Melbourne every Monday night. Prior to buying your product we managed to half-fill the pub, now the pub is packed week after week, all regular players. Anyway, I have since bought your second quiz pack too. Witty questions, pitched at just the right level for my regulars. Cheers Guys, great job!
Mike Parsons, Australia
OUR QUESTIONS
Not too easy – not too hard AND very well researched:
Most of the questions can be solved by a mixed-ability quiz team, given time and the right thought process. None of them are straight-forward, but who wants to be given straight-forward questions to solve?
Written in English – but not just for Brits or just for Americans:
We’ve written our questions specifically with a worldwide audience in mind. You won’t find questions about British soap operas that an American could not answer in the same way as you won’t find questions about American football, that only Americans could answer.
Our customer base includes many happy buyers from North America, the UK and Mainland Europe, Australia, India, Thailand and basically anywhere in the world where a quiz can be presented in English.
Important Information
After your order has been verified, you will be immediately directed to a download page where you can download your quiz pack and the bonus quizzes. All download formats are shown on that page and you may bookmark that page in your browser for return visits.
Your credit card or bank statement will show a charge made by either ClickBank or CLKBANK*COM, since ClickBank process payments for us.
PayPal lets you send money to anyone with email. PayPal is free for consumers and works seamlessly with your existing credit card and checking account.
Microsoft Word™ version 97, 2000, XP, 2003, 2007, 2010 or 2013 is required to view the Microsoft Word™ format download. If you do not have Microsoft Word™, you can either download the viewer free from Microsoft, download the excellent free OpenOffice.org™ software, use Apple Pages™ or simply download a different format of the Quiz!
Adobe Acrobat™ PDF format requires the free plugin from Adobe.com in order to view
If you need another format, then simply contact us, we will be happy to make a conversion, where possible.
Click one of the download buttons below to see prices in your local currency
Download Quiz Pack 1
For £15.00 *
* Click button above to see in your local currency
Download Quiz Pack 2
For £15.00 *
* Click button above to see in your local currency
Download Quiz Pack 3
For £15.00 *
* Click button above to see in your local currency
Download Quiz Pack 4
For £15.00 *
* Click button above to see in your local currency
Special Bonus
+ 10,000 Bonus Quiz Questions
For the special discount price of £47.00, a saving of £13.00 off the price of buying them at our usual prices above.
£47.00 * including 10,000 FREE Questions
* Click button above to see in your local currency

So, for just £47.00, you can get your hands on our four gold-standard trivia quiz packs plus receive a bonus 10,000 trivia Questions and Answers on-the-house!
100% Secure Payments, strong encryption used throughout
You’ll receive your order instantly even if it’s 3 am!
To Your Quiz Night’s Success,

David Small ChanceToLearn.com
* Even though our prices are in British Pounds, you can pay in any currency you wish, without extra charges incurred. All major credit cards are accepted, as is Paypal. Your payment is secure (via Clickbank’s secure server) and we do not store or share your personal information.
0 notes
Text
How to Work with M-Query in Power BI?
In today’s blog, we will discuss Data Analytics, Power BI, and M-Query.
The amount of data we produce every day is truly mind-boggling. There are 2.5 quintillion bytes of data created each day at our current pace, but this pace is only accelerating with the growth of the Internet of Things (IoT).

To process this much amount of data, we have some good data visualization tools such as Microsoft Power BI, Google Data Studio, Tableau, etc. M-Query is the language of Power BI which is used to get the data, transform it, model it, etc.
Following points that will be discussed in this blog:
Brief about the data analytics
Power BI visualization tool
M-Query
What is M-Query?
Where can we use it?
The basic function of M-Query
Examples using M-Query
Data Analytics
Data analytics is the study of breaking down crude information to make decisions about that data. Its methods can uncover patterns and measurements that would some way or another be lost in the mass of data. This data would then be utilized to enhance procedures to expand the general effectiveness of a business or framework.
It is also known as “information investigation.”
Data analytics is a very vast field. In this, we extract the information from the data and show the result in the form of charts and KPI cards.
It involves various procedures as below:
Extraction
Understanding
Modeling
Visualization
Data Extraction
In this process, we get the data either via scraping the website or via databases or Excel, CSV, etc.
Data Understanding
Once we get the data using the extraction process now its time to understand the data. In this step, we analyze the type of data and try to understand what KPI we can show using this data.
Data Modeling
In this step, we transform the data according to our requirements. Here, we perform multiple methods like pivot, unpivot, or creation of new fields based on our needs. We can do this at the source side of the destination side both.
Data Visualization
In this, we use multiple software to show insight using Charts, KPI cards, etc. Therefore, to show insights based on the client requirement we are using three software such as Power BI, Tableau, and Google Data Studio.
Visualization Tool (Power BI)
Power BI is an assortment of programming administrations, applications, and connectors that work together to transform your irrelevant wellsprings of information into intelligent, outwardly vivid, and intuitive bits of knowledge. Your information might be an Excel spreadsheet, or an assortment of cloud-put together and concerning premises half and half information distribution centers. Power BI lets you effectively interface with your information sources, picture and find what’s significant, and share that with anybody or everybody you need.
M-Query
What Is M-Query?
In summary, Microsoft Power Query gives an amazing information import experience that includes numerous highlights. Power Query works with Analysis Services, Excel, and Power BI exercise manuals. A center ability of Power Query is to channel and join, that is, to concoction information from at least one of a rich assortment of bolstered information sources. Any such information mashup is communicated utilizing the Power Query M Formula Language. It’s a practical, case touchy language like F#.
Where Can We Use It?
We can use M-Query in Power BI advance editor to get the data inside Power BI. We can transform or modify our data using Power Query (M). It is not very easy to understand but if you try to understand it then you can learn it.
Function of M-Query
There are so many functions that can help you out in your test cases.
Accessing data functions
Binary functions
Combiner functions
Comparer functions
Date functions
DateTime functions
DateTimeZone functions
Duration functions
Error handling
Expression functions
Function values
List functions
Lines functions
Logical functions
Number functions
Record functions
Replacer functions
Splitter functions
Table functions
Text functions
Time functions
Type functions
Uri functions
Value functions
Furthermore, this blog explains some of the functions in this blog and the rest of the function will explain in the next blog.
Accessing Data Functions
These functions are responsible for fetching the data. Data can be either in CSV, Excel, HTML, or Databases, etc. Below are the functions to get the data:
Fetching Data Using CSV Files
let Source = Csv.Document(File.Contents("C:\Users\Prashant\Desktop\projects\flights.csv\flights.csv"),[Delimiter=",", Columns=31, Encoding=1252, QuoteStyle=QuoteStyle.None]), #"Promoted Headers" = Table.PromoteHeaders(Source, [PromoteAllScalars=true]), #"Changed Type" = Table.TransformColumnTypes(#"Promoted Headers",{{"YEAR", Int64.Type}, {"MONTH", Int64.Type}, {"DAY", Int64.Type}, {"DAY_OF_WEEK", Int64.Type}, {"AIRLINE", type text}, {"FLIGHT_NUMBER", Int64.Type}, {"TAIL_NUMBER", type text}, {"ORIGIN_AIRPORT", type text}, {"DESTINATION_AIRPORT", type text}, {"SCHEDULED_DEPARTURE", Int64.Type}, {"DEPARTURE_TIME", Int64.Type}, {"DEPARTURE_DELAY", Int64.Type}, {"TAXI_OUT", Int64.Type}, {"WHEELS_OFF", Int64.Type}, {"SCHEDULED_TIME", Int64.Type}, {"ELAPSED_TIME", Int64.Type}, {"AIR_TIME", Int64.Type}, {"DISTANCE", Int64.Type}, {"WHEELS_ON", Int64.Type}, {"TAXI_IN", Int64.Type}, {"SCHEDULED_ARRIVAL", Int64.Type}, {"ARRIVAL_TIME", Int64.Type}, {"ARRIVAL_DELAY", Int64.Type}, {"DIVERTED", Int64.Type}, {"CANCELLED", Int64.Type}, {"CANCELLATION_REASON", type text}, {"AIR_SYSTEM_DELAY", Int64.Type}, {"SECURITY_DELAY", Int64.Type}, {"AIRLINE_DELAY", Int64.Type}, {"LATE_AIRCRAFT_DELAY", Int64.Type}, {"WEATHER_DELAY", Int64.Type}}) in #"Changed Type"
In the first step, we have fetched the data from the CSV file and then promoted the first row as a header. In the next step, we have transformed the datatype of each column and then return the changed data type columns with underlying data.
If we can see the first line here we used file. So then, Contents function to fetch the data from URL and then parse that data using CSV.Document function.
Fetching Data Using Excel
let Source = Excel.Workbook(File.Contents("C:\Users\Prashant\Desktop\studentv1.xlsx"), null, true), Sheet1_Sheet = Source{[Item="Sheet1",Kind="Sheet"]}[Data], #"Promoted Headers" = Table.PromoteHeaders(Sheet1_Sheet, [PromoteAllScalars=true]), #"Changed Type" = Table.TransformColumnTypes(#"Promoted Headers",{{"Date", type text}, {"Column2", type text}, {"Name", type text}, {"Roll No.", Int64.Type}, {"Guardian's name", type text}, {"Class", type text}, {"Section", type text}, {"Attendance(%)", Int64.Type}, {"Half yearly result", Int64.Type}, {"Final term result", Int64.Type}, {"Yearly result", type number}, {"Class Rank", Int64.Type}, {"Class And Section Rank", Int64.Type}, {"Section Rank", Int64.Type}, {"Chosen Sport", type text}, {"House", type text}, {"Class Teacher", type text}, {"Status", type text}}) in #"Changed Type"
In the above example, an excel file is considered to fetch the data in which Excel.Workbook is used instead of CSV.Document. Also, in the excel file there is a possibility of multiple data tabs so, first, the Data tab is selected. In the second step, sheet1 as a data tab is selected. The next step is the same as in the case of CSV files.
Date Manipulation Functions
Considering the above example and some Date manipulation function in that code is performed. Below is the combined code:
let Source = Excel.Workbook(File.Contents("C:\Users\Prashant\Desktop\studentv1.xlsx"), null, true), Sheet1_Sheet = Source{[Item="Sheet1",Kind="Sheet"]}[Data], #"Promoted Headers" = Table.PromoteHeaders(Sheet1_Sheet, [PromoteAllScalars=true]), #"Changed Type" = Table.TransformColumnTypes(#"Promoted Headers",{{"Date", type text}, {"Column2", type text}, {"Name", type text}, {"Roll No.", Int64.Type}, {"Guardian's name", type text}, {"Class", type text}, {"Section", type text}, {"Attendance(%)", Int64.Type}, {"Half yearly result", Int64.Type}, {"Final term result", Int64.Type}, {"Yearly result", type number}, {"Class Rank", Int64.Type}, {"Class And Section Rank", Int64.Type}, {"Section Rank", Int64.Type}, {"Chosen Sport", type text}, {"House", type text}, {"Class Teacher", type text}, {"Status", type text}}), #"Removed Other Columns" = Table.SelectColumns(#"Changed Type",{"Status", "Class Teacher", "House", "Chosen Sport", "Section Rank", "Class And Section Rank", "Class Rank", "Yearly result", "Final term result", "Half yearly result", "Attendance(%)", "Section", "Class", "Guardian's name", "Roll No.", "Name", "Column2", "Date"}), #"Renamed Columns" = Table.RenameColumns(#"Removed Other Columns",{{"Column2", "Email"}}), #"Split Column by Delimiter" = Table.SplitColumn(#"Renamed Columns", "Date", Splitter.SplitTextByDelimiter("-", QuoteStyle.Csv), {"Date.1", "Date.2"}), #"Changed Type1" = Table.TransformColumnTypes(#"Split Column by Delimiter",{{"Date.1", Int64.Type}, {"Date.2", Int64.Type}}), #"Removed Columns" = Table.RemoveColumns(#"Changed Type1",{"Date.1"}), #"Changed Type2" = Table.TransformColumnTypes(#"Removed Columns",{{"Date.2", type date}}), #"Removed Blank Rows" = Table.SelectRows(#"Changed Type2", each not List.IsEmpty(List.RemoveMatchingItems(Record.FieldValues(_), {"", null}))), #"Duplicated Column" = Table.DuplicateColumn(#"Removed Blank Rows", "Date.2", "Date.2 - Copy"), #"Renamed Columns1" = Table.RenameColumns(#"Duplicated Column",{{"Date.2", "Date"}, {"Date.2 - Copy", "EOM"}}), #"Calculated End of Month" = Table.TransformColumns(#"Renamed Columns1",{{"EOM", Date.EndOfMonth, type date}}), #"Duplicated Column1" = Table.DuplicateColumn(#"Calculated End of Month", "Date", "Date - Copy"), #"Renamed Columns2" = Table.RenameColumns(#"Duplicated Column1",{{"Date - Copy", "SOM"}}), #"Calculated Start of Month" = Table.TransformColumns(#"Renamed Columns2",{{"SOM", Date.StartOfMonth, type date}}), #"Duplicated Column2" = Table.DuplicateColumn(#"Calculated Start of Month", "Date", "Date - Copy"), #"Renamed Columns3" = Table.RenameColumns(#"Duplicated Column2",{{"Date - Copy", "Quarter"}}), #"Calculated Quarter" = Table.TransformColumns(#"Renamed Columns3",{{"Quarter", Date.QuarterOfYear, Int64.Type}}), #"Duplicated Column3" = Table.DuplicateColumn(#"Calculated Quarter", "Date", "Date - Copy"), #"Renamed Columns4" = Table.RenameColumns(#"Duplicated Column3",{{"Date - Copy", "WOY"}, {"Quarter", "QOY"}}), #"Calculated Week of Year" = Table.TransformColumns(#"Renamed Columns4",{{"WOY", Date.WeekOfYear, Int64.Type}}), #"Duplicated Column4" = Table.DuplicateColumn(#"Calculated Week of Year", "Date", "Date - Copy"), #"Renamed Columns5" = Table.RenameColumns(#"Duplicated Column4",{{"Date - Copy", "WOM"}}), #"Calculated Week of Month" = Table.TransformColumns(#"Renamed Columns5",{{"WOM", Date.WeekOfMonth, Int64.Type}}) in #"Calculated Week of Month"
In the above example, many functions have been used that will help you to understand the M-Query. Below is the explanation of each of them.
Table.PromoteHeaders: Though, by using this function we have set the header name of each column. Here you need to set some of the parameters that have been mentioned in the above example.
Table.TransformColumnTypes: This formula helps you to change the data type of existing columns. Please refer to the above example.
Table.SelectColumns: Using this formula you can select whatever the columns you needed.
Table.RenameColumns: This formula helps you to rename the column name. Please refer to the above example.
Table.SplitColumn: If you want to split the value based on the Delimiter use this formula. Please refer to the above example.
Table.RemoveColumns: Therefore, to remove unwanted columns use this formula as we have removed some extra columns that came while fetching the data. Furthermore, please, refer to the above example.
Table.SelectRows: Here we have used this function in a combination of each and list function to remove the blank or null value rows. Please refer to the above example.
Table.DuplicateColumn: We can use this function to duplicate the columns. Please refer to the above example.
Table.TransformColumns: We have used this function to create the start of the month, end of the month, quarter of the year, week of the month, and week of the year. Please refer to the above example.
The rest of the functions will be covered in some other blog later.
Conclusion
This blog is just to spread the knowledge about data analytics, visualization tool, and M-Query. In upcoming years this data analytics field will boom in terms of a career. This blog, explained Data Analytics, Power BI Tool, and the most useful language in Power BI which is M-Query. If you have any questions or suggestions then please comment down in the comment box.
To know more about our services please visit: https://www.loginworks.com/index
0 notes
Text
WordPress and HTTP2: You should know that

In May 2015, HTTP / 2 was released as a new standard to replace HTTP / 1.1 version. The potential benefits of HTTP / 2 are enormous, but the usability is not quite as easy as intended. In this article, we'll briefly discuss the benefits that the standard can offer to site owners, and the requirements for using WordPress and HTTP / 2. How many articles have you read about WordPress and the speed of a website? If you love technology and knowledge, I guest probably many. In addition, here I have Dr. med. Web already published some articles about it. An important part of a performance optimisation is the server, without a reasonable, equipped with IT equipments and no optimisation works.
What is HTTP and what do you need it for?
Basically, HTTP (Hypertext Transfer Protocol) is one way a web server and a browser communicate with each other. So HTTP is the language in which servers and browsers communicate with each other. It likes 2 persons interact together via Phone I will not dive deep into the subject in this article, if you want to know more about it, check out the article on Wikipedia or searching many topics using Google. For the first time, HTTP appeared in 1991 as version 0.9, so to speak in the law of the Internet. In the past, the websites consisted of little more than a bit of background color, one or two graphics linked to the HTML and lots of text. The websites were only a few KB in size, but today the websites are heavyweights, sometimes with a few MBs. At present time, the actual number of files that together make up a website has risen dramatically. In the past only a few files had to be loaded, today there are dozens to load. This progress exacerbates the limitations of the old HTTP / 1 protocol. The result is an increased latency - or slowness of a modern website. That in turn required the development of HTTP / 2. HTTP / 2 can be seen as an evolution of the old protocol, because the main goal was to reduce latency and increase the speed of loading with modern web browsers.
The limitation of HTTP / 1
Today, browsers need to load dozens, sometimes hundreds, of files to display a web site so that a web site can be displayed. The following is loaded for display: The HTML of the website The style sheets (CSS) The JavaScript The pictures The videos External files for Google Analytics, advertising and the like Social sharing solutions The big problem with HTTP / 1 is that the browser makes a request for every single file mentioned in the HTML, CSS and JavaScript. That could well be hundreds of inquiries and connections. Hundreds of HTTP requests have to be done, which can make a website pretty slow. Speed optimization under HTTP / 1 From this limitation, a special concept was created how to make websites faster despite these limitations. Files were bundled to reduce queries, the size was reduced by compression methods, and graphics were combined into one sprite. HTTP / 2 should solve these problems and offer other ways.
The difference between HTTP / 1 and HTTP / 2
For the exact specification of HTTP / 2, please visit the HTTP / 2 GitHub FAQ . HTTP / 2 is designed to be read by machines and not by humans. Therefore, the new protocol is also binary because it optimizes the process of communication between the browser and the server. It's also less prone to errors and can better interpret things like spaces, blank lines, end-of-line, uppercase and the like. The big difference between the two protocols, however, are the connections. HTTP / 1 allows only a single connection at a time, but HTTP / 2 can handle multiple connections at the same time, because it works according to the multiplexing method. HTTP / 1 must make a request for each file HTTP / 1 loads one file after another HTTP / 2, on the other hand, can load many files with one connection HTTP / 2 allows multiple connections at the same time The Push Technology or (Server Push) method of HTTP / 2 The push technology process is a function in which the server actually knows which files the browser needs before actually requesting the files. The server then pushes the files to the browser without waiting for the browser to ask them. This makes the whole process of displaying a website much faster than before. For more information , see Apache.org/Server Push If you would like to experiment with the server push process, you will find a free WordPress plugin here: HTTP / 2 server push HTTP/2 Push, Async JavaScript, Defer Render Blocking CSS, HTTP2 server push If your website using Javascript and CSS, the second option is the best bet that you should bet on. If not using Javascript, the first option is better just because it's light in size. That's why HTTP / 2 is much more efficient

It can generate the connection between the client and the server faster The connection between browser and server is more efficient and thus faster Files and resources are transferred simultaneously Files can be pushed to the browser via server push More files can be loaded and displayed at the same time The online demo: the difference between HTTP / 1 and HTTP / 2 You will see the load times of HTTP / 2 is absolutely better than HTTP/1, even though the latency of both is different.
How can I use HTTP / 2 with my website?
Whether you can already use HTTP / 2 depends entirely on your web host. The new protocol is a part of the server operating system (Apache, NGINX or ILS) and therefore needs to be maintained by your host. If you have your own server, then you can upgrade to HTTP / 2 at any time and keep yourself up to date. Of course, there are now some hosts who already support and offer HTTP / 2. But that seems to be an exception. You can even test whether your web server or hosting package already provides the new Turbo-HTTP. Our test:

We recommend 2 web-hostings that support this feature that we have already used and currently they offer good prices. If you already have your own, you can check this feature via the tool below: Use the online tool from KeyCDN: HTTP / 2 test tool
How to use HTTP / 2 with your website
Theoretically, HTTP / 2 should be usable with any browser without special configurations. So far the theory. In practice, this looks quite different, unfortunately, because the major browser manufacturers have decided to provide support for the new protocol only via TLS (HTTPS). Here is a recent list of browsers that already support HTTP / 2:

Browser support for HTTP / 2. Green means that the protocol is supported. So you need an SSL certificate for your domain , because only with an SSL encryption you will enjoy the high-speed protocol. Test: Which website has HTTP / 2 already in use Google Chrome has an extension that lets you see at a glance which site already has HTTP / 2 in daily use. The extension sits next to the address bar of the browser and gives you feedback on the colors used, whether the protocol is used or not. A blue flash means that the website uses HTTP / 2 actively. Gray means that there is no support. New ways to optimize speed The old ways of speed optimization no longer work when using HTTP / 2, you would give away potential. However, the daily use of the protocol does not mean that no more files should be summarized, but only that it should be carefully considered, which files are not summarized. The potential benefit of concurrently loading many resources can also lead to a slower website if all files are simply not pooled and compressed. JavaScript in a file compressed by - for example - to let autoptimize deliver results in a faster load time, because the file is loaded by optimised caching only once, if there is a corresponding .Htaccess file . As optimal has proved after extremely many tests my way for advanced users to speed optimization. Here are the links to the series: High Speed: Making WordPress Websites Really Fast - High Speed: Making WordPress Websites Really Fast - High Speed: Making WordPress Websites Really Fast - High Speed: Making WordPress Websites Really Fast - High Speed: Making WordPress Websites Really Fast -
Conclusion
The use of HTTP / 2 is definitely worth it, even if you need to purchase an SSL certificate for the website. However, a free Let's Encrypt certificate is also sufficient . The speed increase can be enormous, depending on the existing concept for speed optimization. However, with heavily trimmed sites whose servers are already using PHP 7, Speed's growth is marginal despite splitting of files to load. Read the full article
0 notes
Text
10 Ways Coding Can Help Your SEO
Too many webmasters think of SEO in terms of things you do after a website is created, whether that’s optimizing specific on-page variables in order to maximize the odds of being ranked for particular keywords or the process of soliciting backlinks from qualified sources to power off-page SEO.
However, ignoring the important role that your site’s coding can play in its overall optimization is essentially the same as building your home on an unstable foundation. Consider all of the following ways that coding can help your site’s SEO in order to avoid missing out on these critical benefits.
Tip #1 – Validate your code for search engine spider accessibility.
Keep in mind that the search engine spider programs have some serious limitations when it comes to crawling and indexing your site. Since they really only read text effectively, other elements on your site, including image, audio, video, and script files, can all prevent important site text from being crawled and indexed appropriately.
To see for yourself exactly how the search engines interpret your pages, use the Webconfs “Search Engine Spider Simulator” tool to review your website. If you notice that chunks of text are missing from your pages, validate your code correctly so that the search engines are able to find your information.
Tip #2 – Use coding to create SEF URL rewrites.
Creating search engine friendly (SEF) URLs is beneficial from both an SEO perspective and in terms of the user experience. The specific way you’ll need to modify your site’s code in order to minimize the number of extraneous characters and codes that are present in your URL will depend on the specific platform your site runs on. If you use WordPress, Joomla, or any other CMS, you should have access to plugins or internal dashboard settings that will allow you to make the necessary changes. In some other cases, particularly when it comes to open source ecommerce platforms, you may need to address your permalink structure within your .htaccess file.
Tip #3 – Clean your code to facilitate site speed improvements.
Although your site’s code might start out “clean,” over time, it’s common for website modifications to result in a number of different errors that can slow down your site’s operation. For this reason, it’s a good idea to perform regular checks that account for all of the following issues:
Eliminate excess whitespace, while still keeping your code readable
Use an HTML validator to eliminate broken and unpaired tags
Use a broken link checker tool to remove invalid URLs
Tip #4 – Serve text-based alternative to on-page scripts.
As mentioned in Tip #1, the search engines can’t usually access information that’s contained within image, video, or script files. However, as these elements can go a long way towards improving the user experience on your site, it isn’t a good idea to eliminate them entirely.
Instead, a better alternative from a coding perspective is to serve up alternate, text-based versions of the information you’d like the search engines to index. As an example, when serving up Flash files, consider using the SWFObject2 library, which will automatically deploy alternate text-based content whenever it detects users or search engine spiders that can’t process these file types correctly.
Tip #5 – Set up “noindex” tags on your robots.txt file.
While there’s no way to control the behavior of the search engine spiders with 100% accuracy, telling them not to index certain pages on your site through the use of “noindex” tags on your robots.txt file can be useful from an SEO perspective. This tag should be added to your robots.txt file for any pages that shouldn’t appear in the search results, including:
Shopping cart and checkout pages
User dashboard pages
Archive pages
Contact pages
Tip #6 – Use “rel=canonical” to deal with duplicate content issues.
If you use a CMS program like WordPress, Magento, or Joomla to build your site, chances are you’ve got duplicate content issues that result from the way these platforms create URLs. Whenever you add a new post to your website, it’s not uncommon for these systems to automatically generate any or all of the following options:
Yoursite.com/post-name.html
Yoursite.com/category1/post-name.html
Yoursite.com/category2/post-name.html
Yoursite.com/archive/date/post-name.html
Because all of these different URLs redirect to the same page, you risk being subjected to duplicate content filters within the search engines if you don’t specify exactly how each of these URL variations should be treated.
The best way to instruct the search engines on how to handle your URLs is through the use of the “rel=canonical” tag. This feature can be added to the <head> section of your website either by hand or through the use of a plugin and tells the search engines to disregard, redirect, or index a given page for the specified URL.
SEO PowerSuite. FREE SEO Tools That Deliver Results. Easy-to-use. Effective. Reliable. Improve your website rankings with SEO PowerSuite.
DOWNLOAD FREE
ADVERTISEMENT
Tip #7 – Set up 301 redirects to ensure proper PageRank flow.
When it comes to setting up proper 301 redirects, there are two coding situations you’ll want to consider from an SEO perspective. First, use this code to inform the search engines that both www and non-www versions of your URLs should be treated the same.
Second, if you ever move content within your site (for example, if you change the title and permalink of a blog article), create a 301 redirect to inform the search engine spiders of the move. Doing so will minimize the potential loss of PageRank that can occur when backlinks no longer resolve to your former URLs.
Tip #8 – Use microdata to create rich snippets.
One recent addition to the SEO developer’s toolbox is microdata, a new language that allows you to add several levels of clarifying data to your site’s HTML tags. Not only can these elements help your site to be indexed and ranked correctly, they can also boost your clickthrough rates from the SERPs through the creation of enhanced search result listings known as “rich snippets.”
As there’s some speculation that overall clickthrough rates from the Google SERPs are being weighted as a ranking factor, adding these new features may help a site’s SEO in addition to driving extra traffic from the search results.
For more information on what rich snippets are and how to create them through the use of microdata, check out Schema.org.
Tip #9 – Combine script files to speed up load times.
Recently, site loading speed has gained significant importance as a search engine ranking factor, based on Google’s stated desire to reward fast sites in the search results.
Unfortunately, if you’ve built out your site using tons of different scripts in order to provide additional functionality for your visitors, loading all of these various code files at once can bring down your site’s performance substantially. By combining these individual code sheets into a smaller number of files, you’ll minimize the long load times caused by excess script demands and improve your site’s overall SEO.
Tip #10 – Utilize CDNs to minimize necessary launch resources.
Finally, if you’ve made all of the possible modifications to your website’s code, and you still haven’t been able to achieve measurable improvements in your site’s load times, consider utilizing a content delivery network (CDN) to serve up content from external websites in order to minimize the total resources needed to launch your site.
CDNs like Amazon’s popular S3 service or RackSpace are an especially good idea if you host a large number of images, audio files, or video files on your site. If you feel that excess file demands may be dragging down your launch times, look into serving up remote content via CDN services. They’re often quite cost-effective to use, and they can make a big difference in terms of your site’s overall SEO.
#SEO Plugin#Plugin#WordPress#Tag Archives#WordPress SEO#Analytics#How to#Seo Online#Updates#seo#seo tools#seo web#seo 2018#seo google#seo hack#discount codes#coupon codes#code#code seo#seo code#plugins#HERFLANG
4 notes
·
View notes
Note
Hi! How is your day? Would you mind explaining (or linking to) how to create a character page? I'm not very good with themes and pages. :(
Hi! Ofcourse i can explain how to make a char page!Under a read more cause it’s pretty long
First you’ll have to go to Account < Edit appearance < Edit themeThen scroll completely down until you see the option ‘Add page’

You’ll be taken to a new page. Here you’ll have to change the layout setting to custom layout. This way you can use a completely different HTML code then the one you’re using for your tumblr.

Give the page a name, so your page will have an URL ‘www.yourusername.tumblr.com/yourpagename’
Then it’s time to go look for a character page theme. I got mine from here and she has a lot more! But a quick google can give you a lot of results too!
Once you found one, copy the code for it and paste it into your page.First we’ll set the name that appears on your tab. So search for something that looks like this:

It’s usually in the beginning of the code. Between the
tags you fill in the name you want to appear on your tab.Next up styling!Every theme starts with the CSS ( or custom styling sheet) of a theme. This is where you decide how the page will look (colors, background, outlining, etc)
Example

The block that starts with ‘body,html’ states that every styling code written between the 2 brackets will have affect on the HTML code that is between the body and html tags.The second block is slightly different. There is starts with ‘.sidebar’. This means that somewhere in the code, some tags have gotten a class. By giving certain tags classes, you can filter them and make unique styles. In the html code you’ll most likely find something like this
…
So the code in this style block will only affect all the tags that have got the class ‘sidebar’It’s possible that you’ll also see a block that starts with ‘#name’. This means that ONE tag has gotten an ID, to make it really unique. ID’s can only be used once. So if you ever write your own code, prefer to use classes, as they are reusable.Note: Styles can be overwritten. If 2 blocks change the same attribute, then the last code in the file will take effect. Besides that, blocks with the most specific identifiers will take effect over less specific ones. So if you code, put your ‘general’ styling at the beginning, and the more specific ones as last.Some attribute examples:Background-color needs a hex code to set the background of an object, depending on the tag.Background can either be a hex code, color name or an image.Margin and padding can create an offset or place the certain object on specific spot on the page. This value can either be in %, px or strict name values.Font-size sets the size of the fontsFor more information on specific attributes, check out this websiteNow for the HTMLThis all depends on your theme.Usually theme creators add comments in their code to show you how it works. So it’s up to you to check it out and read it.Comments are greyed out and start with <!– and end with –>For most character themes, you’ll have to copy one certain block of code and paste it multiple times and fill in the details for your character.

Some info on html tags:div’s are just invisible boxes that boxes other codes. This is to easily style it and keep it organized.the
tag states that the text between the 2 tags is just plain text.
stands for ‘unorganized list.You state that you’ll do a enumeration.Per item you list, you start with
and end with
When you’re done listing. You write the ending
tag.You can also do a ordered list, which means the dots before the text will be numbers. It works the same:
..
..
For more info on certain HTML tags check out this websiteThat’s all I can tell about this, as it depends from code to code, but if you have specific questions, feel free to message me!
11 notes
·
View notes
Text
Introduction to Client-Side Development
Introduction to client-side elements
Distributed systems use client-side elements, so that users can interact with.
The client-side elements include,
Views – what user see
Controller – contain event handlers for the views
Client-model – business logic and data
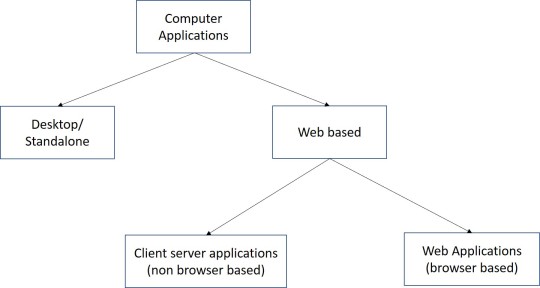
View Development
Browser-based clients’ Views comprises two main elements
Content – HTML
Formatting – CSS
HTML
HTML Elements
o Structural elements – header, footer, nav, aside
o Text elements – headings, paragraphs, line breaks
o Images
o Hyperlinks
o Data representational elements – Lists, Tables
o Form elements – Input, Radio buttons, Check boxes, Buttons
CSS (Cascading Style Sheets)
Used to decorate or format content.
Advantages:
Reduce HTML formatting tags
Easy modification
Faster loading
Save lot of work and time
Three main selectors of CSS
Element Selector
- Selects elements based on the name
ID Selector
- Uses the id attribute of HTML element to select a specific element
Class Selector
- Selects elements with a specific class attribute

Advanced selectors
Pseudo Classes Pseudo Elements
:link first-letter
:visited first-line
:hover first-child
Specificity:
Specificity is, which browser decide which css property values are the most relevant to an element and, therefore, will be applied.
Specificity is a weight that is applied to a given css declaration determined by the number of each selector type in the matching selector.
The following list of selector types increases by specificity
1. Type selector and pseudo elements
2. Class selectors, attribute selectors and pseudo classes
3. ID selectors
CSS Advanced features
Web fonts - Allow you to use custom fonts other than device fonts
Colors, gradients, backgrounds
Transformations and animations
Media
Media queries
Media queries can be used to check many things.
- Width and height of the viewport
- Width and height of the device
- Orientation
- Resolution
Can be used as
o Inline CSS
o Internal CSS sheets
o External CSS sheets
Inline CSS
Advantages:
Inline CSS can be used for many purposes, some of which include:
Testing: Many web designers use Inline CSS when they begin working on new projects, this is because its easier to scroll up in the source, rather than change the source file. Some also using it to debug their pages, if they encounter a problem which is not so easily fixed. This can be done in combination with the Important rule of CSS.
Quick-fixes: There are times where you would just apply a direct fix in your HTML source, using the style attribute, but you would usually move the fix to the relevant files when you are either able, or got the time.
Smaller Websites: The website such as Blogs where there are only limited number of pages, using of Inline CSS helps users and service provider.
Lower the HTTP Requests: The major benefit of using Inline CSS is lower HTTP Requests which means the website loads faster than External CSS.
Disadvantages
Inline CSS some of the disadvantages of which includes:
Overriding: Because they are the most specific in the cascade, they can over-ride things you didn’t intend them to.
Every Element: Inline styles must be applied to every element you want them on. So if you want all your paragraphs to have the font family “Arial” you have to add an inline style to each <p> tag in your document. This adds both maintenance work for the designer and download time for the reader.
Pseudo-elements: It’s impossible to style pseudo-elements and classes with inline styles. For example, with external and internal style sheets, you can style the visited, hover, active, and link color of an anchor tag. But with an inline style all you can style is the link itself, because that’s what the style attribute is attached to.
Internal CSS
Advantages
Since the Internal CSS have more preference over Inline CSS. There are numerous advantages of which some of important are an under:
Cache Problem: Internal styles will be read by all browsers unless they are hacked to hide from certain ones. This removes the ability to use media=all or @import to hide styles from old, crotchety browsers like IE4 and NN4.
Pseudo-elements: It’s impossible to style pseudo-elements and classes with inline styles. With Internal style sheets, you can style the visited, hover, active, and link color of an anchor tag.
One style of same element: Internal styles need not be applied to every element. So if you want all your paragraphs to have the font family “Arial” you have to add an Inline style <p> tag in Internal Style document.
No additional downloads: No additional downloads necessary to receive style information or we have less HTTP Request
Disadvantages
Multiple Documents: This method can’t be used, if you want to use it on multiple web pages.
Slow Page Loading: As there are less HTTP Request but by using the Internal CSS the page load slow as compared to Inline and External CSS.
Large File Size: While using the Internal CSS the page size increases but it helps only to Designers while working offline but when the website goes online it consumers much time as compared to offline.
External CSS
Advantages
There are many advantages for using external CSS and some of are:
Full Control of page structure: CSS allows you to display your web page according to W3C HTML standards without making any compromise with the actual look of the page.
Reduced file-size: By including the styling of the text in a separate file, you can dramatically decrease the file-size of your pages. Also, the content-to-code ratio is far greater than with simple HTML pages, thus making the page structure easier to read for both the programmer and the spiders.
Less load time: Today, when Google has included the Loading time in his algorithm, its become more important to look into the page loading time and another benefit of having low file-size pages translates into reduced bandwidth costs.
Higher page ranking: In the SEO, it is very important to use external CSS. In SEO, the content is the King and not the amount of code on a page. Search engines spider will be able to index your pages much faster, as the important information can be placed higher in the HTML document. Also, the amount of relevant content will be greater than the amount of code on a page. The search engine will not have to look too far in your code to find the real content. You will be actually serving it to the spiders “on a platter”.
There are many frameworks/libraries/plugins to support view development
o They dynamically generate HTML+CSS code
o In server and/or client side
o May have JS-based advanced interactive features
Other tools
jQuery - A JS library, but can be seen a framework too
jQuery UI - Focus on GUI development
Bootstrap - To rapidly design and develop responsive web pages and templates
Angular - A JS framework/platform to build frontend applications
React – A JavaScript library for building user interfaces
Templates are used to maintain consistency across pages in the web site/application.
Template engines are available for both server and client sides
Client-side (JS-based) template engines - NUNJUCKS, PUG, MUSTACHE.JS, HANDLEBARS
Server-side template engines - Twig, jTwig, Thymeleaf, Apache Velocity
Plug-ins
Plug-ins are mainly to add widgets to the Views
Component Development
Browser-based clients’ components comprises two main aspects
Controllers
Client-model
The components of browser-based clients are developed using JS/JS-based frameworks, libraries, and plugins.
Main features of client-side development tools
o DOM processing (dynamic content generation, change, removal)
o Data processing
o Data persistence
o Session management
o Communication
JS6 (JavaScript6)
Also called ECMAScript6
New features
JavaScript let
- The let statement allows you to declare a variable with block scope.
JavaScript const
- The const statement allows you to declare a constant
Exponentiation (**)
- The exponentiation operator (**) raises the first operand to the power of the second operand.
Default parameter values
- Default parameter values allows function parameters to have default values.
Array.find()
- The find() method returns the value of the first array element that passes a test function.
- function takes 3 arguments:
The item value
The item index
The array itself
Array.findIndex()
- The findIndex() method returns the index of the first array element that passes a test function.
- function takes 3 arguments:
The item value
The item index
The array itself
Web workers
This API is meant to be invoked by web application to spawn background workers to execute scripts which run in parallel to UI page
Web storage / Session storage
This is for persistent data storage of key-value pair data in Web clients.
GeoLocation
Identify the device location
File API
Handle the local files
Image capturing
Use local hardware
Top JS frameworks/ libraries
jQuery - Basic and simple. Cover the complexity of JS and provides cross-browser compatibility.
React - powers Facebook, Ease of Learning, DOM Binding, Reusable Components, Backward Compatibility
Angular - Support for Progressive Web Applications, Build Optimizer, Universal State Transfer API and DOM, Data Binding and MVVM
Vue – light weight, with a much-needed speed and accuracy
Generic client-side features
Form/ data validation
Dynamic content generating/updating
Some business logic
Delta communication
References
https://www.w3schools.com/css/css_syntax.asp
https://developer.mozilla.org/en-US/docs/Web/CSS/Specificity
https://www.w3schools.com/cssref/css3_pr_mediaquery.asp
https://vineetgupta22.wordpress.com/2011/07/09/inline-vs-internal-vs-external-css/
https://www.w3schools.com/js/js_es6.asp
0 notes
Text
The popularity of free web hosting has exploded in recent years.
And it’s easy to see why – with all the different expenses required to run a successful website, it’s tempting to try and cut costs wherever possible to stay within your budget.
And what’s more budget-friendly than top free domain hosting 2020, right?
Well, not exactly…
Free web hosts aren’t always what they market themselves to be. Tight restrictions they place on bandwidth, storage capacity, server speed, and uptimes can make your new site all but unusable.
But don’t worry, if you really have no budget – we’ve done the heavy lifting for you. In this review, we compare 7 free domain hosting options to help you find the best fit for your site.
Let’s dive in:
1. Hostinger.com
The Best “Almost-Free” Hosting ($0.99/mo)
After nearly 16 years in business and a client base of more than 29,000,000 people spread across 178 countries, Hostinger has become one of the free web hosting industry’s most dominant players.
Ok, so they aren’t technically “free”…
… But at only $0.99/month for their limited shared hosting plan they’re still one of the most budget-friendly web hosts on the market.
With average load times of only 355ms (the second-best we’ve ever recorded), they’re also one of the fastest.
But that’s just the tip of the iceberg.
Even their most basic plan comes armed to the teeth with a whole bag of goodies including:
1 MySQL database
1 FTP user
Access to their website builder
One-click install of WordPress or other CMS
24/7 customer support (seriously, it’s one of the best)
100GB of Bandwidth and 10GB of Disk Space
One free email account
And, if the needs of your site outgrow the limits of their basic hosting plan, you can always upgrade to their premium shared hosting plan.
Which include:
Unlimited websites
Unlimited email accounts
Unlimited bandwidth
Weekly memory backups
Free domain
Limitations
One of the only major annoyances we had while reviewing Hostinger is that their user interface doesn’t give you access to a classic cPanel…
Instead, you’ll get a slightly downgraded made-in-house interface called the hPanel.
It’s not our favorite user interface, but – considering the exceptional speeds, customer support, and features – we’re hard-pressed not to hold it against them.
Hostinger’s “shared plan” average uptime and load time in 2019:
Hostinger’s uptime and speed 2019
With some of the fastest speeds we’ve ever seen and uptimes on par with those of HostGator’s Cloud, Hostinger is the best “almost free” host that we’ve ever reviewed.
Visit Hostinger.com
…or read our full Hostinger review here.
2. 000WebHost.com
$0/mo – But 2 Hours Offline Every Month
“Zero cost web hosting with PHP, MySQL, cPanel, and no ads!”.
That’s the marketing slogan of 000webhost.com, Hostinger’s partner company, and one of the top-rated free web hosts in the world.
Now, if it sounds just a little too good to be true – IT IS!
Yes, 000WebHost offers impressive speeds (especially for a shared free host), and their no-ads policy makes for a much cleaner and friendlier user experience.
Unfortunately, these two factors alone simply aren’t enough to compensate for the myriad of other limitations.
*Note: It’s worth mentioning that 000WebHost experienced a massive security breach back in 2015 where the private information of more than 13,000,000 customers was leaked.
Limitations
Of the many problems that we experienced while reviewing 000WebHost, none was more prevalent or frustrating than their utterly unusable uptimes.
With an average uptime of only 99.70%, you can expect to experience at least an hour of downtime every other week on your site. Think of all the traffic and sales you might lose every single month.
To make matters worse, you’re also limited to a mere 3GB of bandwidth, 300MB of disk space. To top it off, there is no email or live chat customer support to assist you in the (all but certain) event you encounter a problem with their service.
Here’s 000WebHost free plan average uptime and load time in 2019:
00WebHost’s uptime and speed 2019
Despite having admittedly impressive speeds, with such horrible uptimes and heavy limitations, we cannot recommend 000WebHost to anyone unless it’s an absolute necessity.
3. InfinityFree.net
Most Unlimited Features
With only over 300,000 customers, InfinityFree is a relatively small player in the web hosting game.
Despite their small client base, they’ve managed to carve out a reputation for themselves as the most feature-rich free web host on the market.
Even though you will undoubtedly experience some problems with their service, this reputation is well earned.
InfinityFree comes with the following:
Free SSL certificate with all plans (a very nice bonus)
No front-end ads
Free Cloudflare CDN
1 FTP account
Unlimited bandwidth and storage space
400 MySQL databases.
It’s safe to say that InfinityFree gives you a big bang for your unpaid buck.
But when you skim through their terms of service and acceptable use policies, things start to get a little more “interesting.”
Limitations
What InfinityFree doesn’t advertise on their website is that their offers of “unlimited” bandwidth and storage space come with some seriously limited restrictions.
In their terms of service, they place significant and ambiguous restrictions on the types of content and files you’re allowed to upload. Also, the amount of the so-called “unlimited” bandwidth on offer is also questionable.
And the best part?
The penalty for non-compliance with the limitations on their “unlimited” offer is the suspension or elimination of your website and data – Ouch!
It’s also worth mentioning that InfinityFree doesn’t offer email accounts anymore. They used to have 10 email accounts included in their features but recently they disabled it due to being very limited to begin with and having multiple issues (only 10MB of storage per account, emails not getting sent due to bad IP reputation, etc.).
Here’s InfinityFree’s free plan average uptime and load time in 2019:
InfinityFree uptime and speed 2019
Generally, their uptime is pretty good, but this January, for example, we experienced over 40 hours of downtime.
4. Sites.Google.com
Great For Personal and Small Business Websites
Despite being very well known for its search engine and other online products such as Sheets, Docs, and Gmail, they also offer a free website builder since 2008. The website builder got a complete rebuild in 2016 and currently hosts over 70,000 live websites.
Just like most other Google products, it is entirely free to use.
They offer responsive templates, drag and drop editing, embedding HTML and Javascript, and integrations with most of their other services(Drive, Maps, Calendar, and more).
You also get a free subdomain with an SSL certificate, and Google Sites features no ads on your website.
Limitations
It’s not all good though; the styling options are very limited. There is no way to add custom CSS or to even add fonts from their own Goole Fonts catalog.
The SEO options are also limited, and you cannot host Google Adsense advertisements.
Although we are still running our own tests to gather more concrete data on the real uptimes and load times of GoogleSites hosting, a superficial glance at the other reviews around the web suggests that it’s reliable and fast.
5. AwardSpace.com
Free web hosting that sounds too good to be true because it is.
With over 2.5+ million customers and 17 years in the web hosting business, AwardSpace has carved out a name for itself as one of the top free hosting providers available.
Some of their best features include:
100% ad-free hosting to the MySQL database
24/7 customer service (an admittedly enticing bonus)
One-click CMS (WordPress/Joomla) installation
99% uptime guarantee
Everything looks amazing, right?
Unfortunately, a closer look will reveal questionable features.
Limitations
Although AwardSpace does a few things well, there are several glaring issues with their free hosting, which prevent them from serving as a viable option for any serious webmasters.
For starters, free users are limited to only 1 GB of disk space and 5GB of bandwidth. It means that your new site will be little more than a glorified “demo” of AwardSpace’s premium hosting packages.
There are also a few disconcerting lines of legal jargon in their TOS that seem to permit them to sell off your data to third-party vendors.
None of it really matters since the biggest problem with AwardSpace is the abysmally big downtime which on average is more than an hour a week.
Here’s AwardSpace free plan average uptime and load time in 2019:
AwardSpace’s uptime and speed 2019
6. FreeHosting.com
Slow speed and no sub-domain
With a decade in the web hosting business and 15,000 customers, a European company, FreeHosting.com has grown exponentially. Nonetheless, as we’ve seen time and time again – popularity and performance aren’t always correlated.
Equipped with unmetered bandwidth (granted your website complies with their rather stringent acceptable use policy), you also get the following
A multilingual cPanel
10 GB of disk space, one email account
A MySQL database
FreeHosting.com seems like one of the better free hosts available.
As is self-evident with free web hosts, the endless stream of technical issues posed by FreeHosting’s service makes it all but unusable.
Limitations
With abysmally slow load times that border on the 2-second mark – it’s one of the worst uptimes we’ve ever seen and countless customer complaints of deleted websites and non-responsive customer service, FreeHosting.com is yet another web host that makes big promises but ultimately fails to uphold any of them.
Here’s FreeHosting free plan average uptime and load time in 2019:
FreeHosting’s uptime and speed 2019
With some of the worst uptimes and slowest speeds we’ve ever recorded, we recommend that you avoid FreeHosting.com at all costs.
7. Freehostia.com
Low disk space and bad speed & uptime.
Freehostia sets itself apart from the competition with its unique plan names (who knew you could buy “Chocolate” web hosting?). In addition, they also have load-balanced server clusters – which allows for increased load times across the company’s assets.
However, these unique “features” don’t do very much to improve the quality of their hosting.
Their customer service has earned many glowing recommendations in recent years, they offer 3 free email accounts and up to 5 hosted domains (a rarity in the free web hosting space). Yet, these enticing offers aren’t nearly enough to offset the hefty restrictions and performance issues with which you’ll be faced.
Limitations
The biggest problem with Freehostia’s free hosting is the restrictions they place on your storage and bandwidth.
With a paltry 250MB of storage and 6GB of bandwidth, even the most minimalist of webmasters will struggle to build a site that contains more than a few images and a line or two of plain text.
However, the real nails in the coffin are the unreliable uptimes and incredibly slow speeds.
Freehostia might work for hosting a simple test site or low traffic blog… Nevermind – even that might be pushing it.
FreeHostia’s uptime and speed 2019
Here’s Freehostia free plan average uptime and load time in 2019:
Although the uptimes and load times aren’t the worst we’ve seen (they’re still pretty bad), there’s no reason to use a company like Freehostia when you have so many other decent service providers available.
Why We Recommend Avoiding Free Hosting Services
Although the providers we’ve shared are among the best (which sadly isn’t saying much), even the most reputable ones struggle to live up to their promises. Instead, they present their “customers” with slow, and often unusable websites with no chance of succeeding in today’s competitive online space.
Also, they can delete your website (or online business) within seconds, leaving you no control…
So, does this mean that hope is lost for the low-budget webmaster-to-be?
Not quite…
Best Alternatives for Free Web Hosting 2020
Free hosts might talk a big game, but at the end of the day will leave you with a shell of a site. All their services are unable to meet even the most basic standards required to run a successful business website.
Even with the tight restrictions on bandwidth, storage, and basic features like email accounts and website installations.
However, you can secure fast and reliable hosting with truly unlimited bandwidth and storage for pennies on the dollar. This is thanks to advances in technology and competition in the marketplace.
In fact, with the plethora of new-customer discounts and other offers, you can easily buy 2-3 years of web hosting for less than $100.
So if you didn’t find anything useful on this list, we recommend browsing our Free Web Host.
0 notes
Text
SEO is easy. The EXACT process we use to scale our clients' SEO from 0 to 200k monthly traffic and beyond
Hey guys!
There's a TON of content out there on SEO - guides, articles, courses, videos, scams, people yelling about it on online forums, etc etc..
Most of it, however, is super impractical. If you want to start doing SEO TODAY and start getting results ASAP, you'll need to do a TON of digging to figure out what's important and what's not.
So we wanted to make everyone's lives super easy and distill our EXACT process of working w/ clients into a stupid-simple, step-by-step practical guide. And so we did. Here we are.
A bit of backstory:
If you guys haven't seen any of my previous posts, me and my co-founder own an SEO/digital marketing agency, and we've worked w/ a ton of clients helping them go from 0 to 200k+ monthly organic traffic. We've also helped some quite big companies grow their organic traffic (from 1M to over 1.8M monthly organic), using the exact same process.
So without further ado, grab your popcorn, and be prepared to stick to the screen for a while, cause this is going to be a long post. Here's everything I am going to cover:
Get your website to run and load 2x - 5x faster (with MINIMAL technical know-how)
Optimize your landing pages to rank for direct intent keywords (and drive 100% qualified leads)
Create amazing, long-form content that ranks every time
How we get a TON of links to our website with ZERO link-building efforts
How to improve your content’s rankings with Surfer SEO
Step #1 - Technical Optimization and On-Page SEO
Step #1 to any SEO initiative is getting your technical SEO right.
Now, some of this is going to be a bit technical, so you might just forward this part to your tech team and just skip ahead to "Step #2 - Keyword Research."
If you DON'T have a tech team and want a super easy tl;dr, do this:
Use WP Rocket. It's a WordPress plugin that optimizes a bunch of stuff on your website, making it run significantly faster.
Use SMUSH to (losslessly) compress all the images on your website. this usually helps a TON w/ load speed.
If you’re a bit more tech-savvy, though, read on!
Technical SEO Basics
Sitemap.xml file. A good sitemap shows Google how to easily navigate your website (and how to find all your content!). If your site runs on WordPress, all you have to do is install YoastSEO or Rankmath SEO, and they’ll create a sitemap for you. Otherwise, you can use an online XML Sitemap generation tool.
Proper website architecture. The crawl depth of any page should be lower than 4 (i.e: any given page should be reached with no more than 3 clicks from the homepage). To fix this, you should improve your interlinking (check Step #6 of this guide to learn more).
Serve images in next-gen format. Next-gen image formats (JPEG 2000, JPEG XR, and WebP) can be compressed a lot better than JPG or PNG images. Using WordPress? Just use Smush and it’ll do ALL the work for you. Otherwise, you can manually compress all images and re-upload them.
Remove duplicate content. Google hates duplicate content and will penalize you for it. If you have any duplicate pages, just merge them (by doing a 301 redirect) or delete one or the other.
Update your ‘robots.txt’ file. Hide the pages you don’t want Google to index (e.g: non-public, or unimportant pages). If you’re a SaaS, this would be most of your in-app pages. ]
Optimize all your pages by best practice. There’s a bunch of general best practices that Google wants you to follow for your web pages (maintain keyword density, have an adequate # of outbound links, etc.). Install YoastSEO or RankMath and use them to optimize all of your web pages.
If you DON’T have any pages that you don’t want to be displayed on Google, you DON’T need robots.txt.
Advanced Technical SEO
Now, this is where this gets a bit more web-devvy. Other than just optimizing your website for SEO, you should also focus on optimizing your website speed.
Here’s how to do that:
Both for Mobile and PC, your website should load in under 2-3 seconds. While load speed isn’t a DIRECT ranking factor, it does have a very serious impact on your rankings.
After all, if your website doesn’t load for 5 seconds, a bunch of your visitors might drop off.
So, to measure your website speed performance, you can use Pagespeed Insights. Some of the most common issues we have seen clients facing when it comes to website speed and loading time, are the following:
Images being resized with CSS or JS. This adds extra loading time to your site. Use GTMetrix to find which images need resizing. Use an online tool (there are a ton of free ones) to properly resize images (or Photoshop even), and re-upload them.
Images not being lazy-loaded. If your pages contain a lot of images, you MUST activate lazy-loading. This allows images that are below the screen, to be loaded only once the visitor scrolls down enough to see the image.
Gzip compression not enabled. Gzip is a compression method that allows network file transfers to happen a ton faster. In other words, your files like your HTML, CSS, and JS load a ton faster.
JS, CSS, and HTML not minified/aggregated/in-lined. If your website is loading slowly because you have 100+ external javascript files and stylesheets being requested from the server, then you need to look into minifying, aggregating, and inlining some of those files.
Use Cloudflare + BunnyCDN Why the combo? Why not just Cloudflare? Well, I won't get into details, I've experimented a bit with it, and if you are looking for something cheap and fast this is the best combo. Cloudflare you can opt in for the free account. BunnyCDN on the other hand is on a pay-as-you-go basis, and unless you are getting over 100K+ visits a month, you'll likely never go above their minimum monthly threshold of $1.
Want to make your life easier AND fix up all these issues and more? Use WP Rocket. The tool basically does all your optimization for you (if you’re using WordPress, of course).
Step #2 - Keyword Research
Once your website is 100% optimized, it’s time to define your SEO strategy.
The best way to get started with this is by doing keyword research.
First off, you want to create a keyword research sheet. This is going to be your main hub for all your content operations.
You can use the sheet to:
Prioritize content
Keep track of the publishing process
Get a top-down view of your web pages
And here’s what it covers:
Target search phrase. This is the keyword you’re targeting.
Priority. What’s the priority of this keyword? We usually divide them by 1-2-3…
Priority 3 - Top priority keywords. These are usually low competition, high traffic, well-converting, or all 3 at the same time.
Priority 2 - Mid-priority keywords.
Priority 1 - These are low priority.
Status. What’s the status of the article? We usually divide them by…
1 - Not written
2 - Writer has picked up the topic for the week
3 - The article is being written
4 - The article is in editing phase
5 - The article is published on the blog
Topic cluster. The category that the blog post belongs to.
Monthly search volume. Self-explanatory. This helps you pick a priority for the keyword.
CPC (low & high bid). Cost per click for the keyword. Generally, unless you’re planning to run search ads, these are not mandatory. They can, however, help you figure out which of your keywords will convert better. Pro tip: the higher the CPC, the more likely it is for the keyword to convert well.
Now that you have your sheet (and understand how it works), let’s talk about the “how” of keyword research.
How to do Keyword Research (Step-by-Step Guide)
There are a ton of different ways to do that (check the “further readings” at the end of this section for a detailed rundown).
Our favorite method, however, is as follows…
Start off by listing out your top 5 SEO competitors.
The key here is SEO competitors - competing companies that have a strong SEO presence in the same niche.
Not sure who’s a good SEO competitor? Google the top keywords that describe your product and find your top-ranking competitors.
Run them through SEMrush (or your favorite SEO tool), and you’ll see how well, exactly, they’re doing with their SEO.
Once you have a list of 5 competitors, run each of them through “Organic Research” on SEMrush, and you'll get a complete list of all the keywords they rank on.
Now, go through these keywords one by one and extract all the relevant ones and add them to your sheet.
Once you go through the top SEO competitors, your keyword research should be around 80%+ done.
Now to put some finishing touches on your keyword research, run your top keywords through UberSuggest and let it do its magic. It's going to give you a bunch of keywords associated with the keywords you input.
Go through all the results it's going to give you, extract anything that’s relevant, and your keyword research should be 90% done.
At this point, you can call it a day and move on to the next step. Chances are, over time, you’ll uncover new keywords to add to your sheet and get you to that sweet 100%.
Step #3 - Create SEO Landing Pages
Remember how we collected a bunch of landing page keywords in step #2? Now it’s time to build the right page for each of them! This step is a lot more straightforward than you’d think. First off, you create a custom landing page based around the keyword. Depending on your niche, this can be done in 2 ways:
Create a general template landing page. Pretty much copy-paste your landing page, alter the sub-headings, paraphrase it a bit, and add relevant images to the use-case. You’d go with this option if the keywords you’re targeting are very similar to your main use-case (e.g. “project management software” “project management system”).
Create a unique landing page for each use-case. You should do this if each use-case is unique. For example, if your software doubles as project management software and workflow management software. In this case, you’ll need two completely new landing pages for each keyword.
Once you have a bunch of these pages ready, you should optimize them for their respective keywords.
You can do this by running the page content through an SEO tool. If you’re using WordPress, you can do this through RankMath or Yoast SEO.
Both tools will give you exact instructions on how to optimize your page for the keyword.
If you’re not using WordPress, you can use SurferSEO. Just copy-paste your web page content, and it’s going to give you instructions on how to optimize it.
Once your new landing pages are live, you need to pick where you want to place them on your website. We usually recommend adding these pages to your website’s navigation menu (header) or footer.
Finally, once you have all these new landing pages up, you might be thinking “Now what? How, and when, are these pages going to rank?”
Generally, landing pages are a tad harder to rank than content. See, with content, quality plays a huge part. Write better, longer, and more informative content than your competition, and you’re going to eventually outrank them even if they have more links.
With landing pages, things aren’t as cut and dry. More often than not, you can’t just “create a better landing page.”
What determines rankings for landing page keywords are backlinks. If your competitors have 400 links on their landing pages, while yours has 40, chances are, you’re not going to outrank them.
Step #4 - Create SEO Blog Content
Now, let’s talk about the other side of the coin: content keywords, and how to create content that ranks.
As we mentioned before, these keywords aren’t direct-intent (the Googler isn’t SPECIFICALLY looking for your product), but they can still convert pretty well. For example, if you’re a digital marketing agency, you could rank on keywords like…
Lead generation techniques
SaaS marketing
SEO content
After all, anyone looking to learn about lead gen techniques might also be willing to pay you to do it for them.
On top of this, blog post keywords are way easier to rank for than your landing pages - you can beat competition simply by creating significantly better content without turning it into a backlink war.In order to create good SEO content, you need to do 2 things right:
Create a comprehensive content outline
Get the writing part right
Here’s how each of these work...
How to Create a Content Outline for SEO
A content outline is a document that has all the info on what type of information the article should contain Usually, this includes:
Which headers and subheaders you should use
What’s the optimal word count
What information, exactly, should each section of the article cover
If you’re not using Yoast or Rankmath, you can also mention the SEO optimization requirements (keyword density, # of outbound links, etc.)
Outlines are useful if you’re working with a writing team that isn’t 100% familiar with SEO, allowing them to write content that ranks without any SEO know-how.
At the same time, even if you’re the one doing the writing, an outline can help you get a top-down idea of what you should cover in the article.
So, how do you create an outline? Here’s a simplified step-by-step process…
Determine the target word count. Rule of thumb: aim for 1.5x - 2x whatever your competitor wrote. You can disregard this if your competition was super comprehensive with their content, and just go for the same length instead.
Create a similar header structure as your competition. Indicate for the writer which headers should be h2, which ones h3.
For each header, mention what it’s about. Pro tip - you can borrow ideas from the top 5 ranking articles.
For each header, explain what, exactly, should the writer mention (in simple words).
Finally, do some first-hand research on Reddit and Quora. What are the questions your target audience has around your topic? What else could you add to the article that would be super valuable for your customers?
How to Write Well
There’s a lot more to good content than giving an outline to a writer. Sure, they can hit all the right points, but if the writing itself is mediocre, no one’s going to stick around to read your article.
Here are some essential tips you should keep in mind for writing content (or managing a team of writers):
Write for your audience. Are you a B2B enterprise SaaS? Your blog posts should be more formal and professional. B2C, super-consumer product? Talk in a more casual, relaxed fashion. Sprinkle your content with pop culture references for bonus points!
Avoid fluff. Every single sentence should have some sort of value (conveying information, cracking a joke, etc.). Avoid beating around the bush, and be as straightforward as possible.
Keep your audience’s knowledge in mind. For example, if your audience is a bunch of rocket scientists, you don’t have to explain to them how 1+1=2.
Create a writer guideline (or just steal ours! -> edit: sorry had to remove link due to posting guidelines)
Use Grammarly and Hemingway. The first is like your personal pocket editor, and the latter helps make your content easier to read.
Hire the right writers. Chances are, you’re too busy to write your own content. We usually recommend using ProBlogger or Cult of Copy Job Board (Facebook Group) to source top writing talent.
Step #5 - Start Link-Building Operations
Links are essential if you want your content or web pages to rank.
If you’re in a competitive niche, links are going to be the final deciding factor on what ranks and what doesn’t.
In the VPN niche, for example, everyone has good content. That’s just the baseline. The real competition is in the backlinks.
To better illustrate this example, if you Google “best VPN,” you’ll see that all top-ranking content pieces are almost the same thing. They’re all:
Well-written
Long-form
Easy to navigate
Well-formatted (to enhance UX)
So, the determining factor is links. If you check all the top-ranking articles with the Moz Toolbar Extension, you’ll see that on average, each page has a minimum of 300 links (and some over 100,000!).
Meaning, to compete, you’ll really need to double-down on your link-building effort.
In fact, in the most competitive SEO niches, it’s not uncommon to spend $20,000 per month on link-building efforts alone.
Pro Tip
Got scared by the high $$$ some companies spend on link-building? Well, worry not!
Only the most ever-green niches are so competitive. Think, VPN, make money online, health and fitness, dating, CBD, gambling, etc. So you know, the usual culprits.
For most other niches, you can even rank with minimal links, as long as you have top-tier SEO content.
Now, let’s ask the million-dollar question: “how do you do link-building?”
4 Evergreen Link Building Strategies for Any Website
There are a TON of different link building strategies on the web. Broken link building, scholarship link building, stealing competitor links, and so on and so on and so on.
We’re not going to list every single link building strategy out there (mainly because Backlinko already did that in their link building guide).
What we are going to do, though, is list out some of our favorite strategies, and link you to resources where you can learn more:
Broken link building. You find dead pages with a lot of backlinks, reach out to websites that linked to them, and pitch them something like “hey, you linked to this article, but it’s dead. We thought you’d want to fix that. You can use our recent article if you think it’s cool enough.”
Guest posting. Probably the most popular link building strategy. Find blogs that accept guest posts, and send them a pitch! They usually let you include 1-2 do-follow links back to your website.
“Linkable asset” link building. A linkable asset is a resource that is so AWESOME that you just can’t help but link to. Think, infographics, online calculators, first-hand studies or research, stuff like that. The tl;dr here is, you create an awesome resource, and promote the hell out of it on the web.
Skyscraper technique. The skyscraper technique is a term coined by Backlinko. The gist of it is, you find link-worthy content on the web, create something even better, and reach out to the right people.
Most of these strategies work, and you can find a ton of resources on the web if you want to learn more.
However, if you’re looking for something a bit different, oh boy we have a treat for you! We’re going to teach you a link-building strategy that got us around:
10,000+ traffic within a week
15+ leads
50+ links
...And so much more, all through a single blog post.
Link-Building Case Study: SaaS Marketing
“So, what’s this ancient link-building tactic?”
I hear you asking. It must be something super secretive and esoteric, right?
Secrets learned straight from the link-building monks at an ancient SEO temple…
“Right?”
Well, not quite.
The tactic isn’t something too unusual - it’s pretty famous on the web. This tactic comes in 2 steps:
Figure out where your target audience hangs out (create a list of the channels)
Research the type of content your audience loves
Create EPIC content based on that research (give TONS of value)
Promote the HELL out of it in the channels from step 1
Nothing too new, right?
Well, you’d be surprised how many people don’t use it.
Now, before you start throwing stones at us for overhyping something so simple, let’s dive into the case study:
How we PR’d the hell out of our guide to SaaS marketing (can't add a link, but it's on our blog and it's 14k words long), and got 10k+ traffic as a result.
A few months back when we launched our blog, we were deciding on what our initial content should be about.
Since we specialize in helping SaaS companies acquire new users, we decided to create a mega-authority guide to SaaS marketing (AND try to get it to rank for its respective keyword).
We went through the top-ranking content pieces, and saw that none of them was anything too impressive.
Most of them were about general startup marketing strategies - how to validate your MVP, find a product-market fit, etc.
Pretty “meh,” if you ask us. We believe that the #1 thing founders are looking for when Googling “saas marketing” are practical channels and tactics you can use to acquire new users.
So, it all started off with an idea: create a listicle of the top SaaS marketing tactics out there:
How to create good content to drive users
Promote your content
Rank on Google
Create viral infographics
Create a micro-site
...and we ended up overdoing it, covering 41+ different tactics and case studies and hitting around 14k+ words.
On one hand, oops! On the other hand, we had some pretty epic content on our hands. We even added the Smart Content Filter to make the article much easier to navigate.
Once the article was up, we ran it through some of our clients, friends, and acquaintances, and received some really good feedback.
So, now we knew it was worth promoting the hell out of it.
We came up with a huge list of all online channels that would appreciate this article:
r/ entrepreneur and r/ startups (hi guys!). The first ended up loving the post, netting us ~600 upboats and a platinum medal. The latter also ended up loving the post, but the mods decided to be assholes and remove it for being “self-promotional.” So, despite the community loving the content, it got axed by the mods. Sad. (Fun fact - this one time we tried to submit another content piece on r/ startups with no company names, no links back to our website, or anything that can be deemed promotional. One of the mods removed it for mentioning a link to Ahrefs. Go figure!)
Hacker News. Tons of founders hang out on HN, so we thought they’d appreciate anything SaaS-related. This netted us around ~200+ upvotes and some awesome feedback (thanks HN!)
Submit on Growth Hackers, Indie Hackers, and all other online marketing communities. We got a bunch of love on Indie Hackers, the rest were quite inactive.
Reach out to all personal connects + clients and ask for a share
Run Facebook/Twitter ads. This didn’t particularly work out too well for us, so we dropped it after 1-2 weeks.
Run a Quuu promotion. If you haven’t heard of Quuu, it’s a platform that matches people who want their content to be shared, with people who want their social media profiles running on 100% auto-pilot. We also got “meh” results here - tons of shares, next to no likes or link clicks.
Promoted in SaaS and marketing Facebook groups. This had awesome results both in terms of traffic, as well as making new friends, AND getting new leads.
Promoted in entrepreneur Slack channels. This worked OK - didn’t net us traffic, but got us some new friends.
Emailed anyone we mentioned in the article and asked for a share. Since we mentioned too many high profile peeps and not enough non-celebs, this didn’t work out too well
Emailed influencers that we thought would like the article / give it a share. They didn’t. We were heart-broken.
And accordingly, created a checklist + distribution sheet with all the websites or emails of people we wanted to ping.
Overall, this netted us around 12,000 page views in total, 15+ leads, 6,000 traffic in just 2 promotion days.
As for SEO results, we got a bunch of links. (I would have added screenshots to all of these results, but don't think this subreddit allows it).
A lot of these are no-follow from Reddit, HackerNews, and other submission websites, but a lot of them are also pretty authentic.
The cool part about this link-building tactic is that people link to you without even asking. You create awesome content that helps people, and you get rewarded with links, shares, and traffic!
And as for the cherry on top, only 2 months after publishing the article, it’s ranking on position #28. We’re expecting it to get to page 1 within the new few months and top 3 within the year.
Step #6 - Interlink Your Pages
One of Google's ranking factors is how long your visitors stick around on your website.
So, you need to encourage users reading ONE article, to read, well, the rest of them (or at least browse around your website). This is done through interlinking.
The idea is that each of your web pages should be linked to and from every other relevant page on your site.
Say, an article on "how to make a resume" could link to (and be linked from) "how to include contact info on a resume," "how to write a cover letter," "what's the difference between a CV and a resume," and so on.
Proper interlinking alone can have a significant impact on your website rankings. NinjaOutreach, for example, managed to improve their organic traffic by 40% through better interlinking alone.
So, how do you do interlinking “right?”
First off, make it a requirement for your writers to link to the rest of your content. Add a clause to your writer guidelines that each article should have 10+ links to your other content pieces.
More often than not, they’ll manage to get 60-70% of interlinking opportunities. To get this to 100%, we usually do bi-annual interlinking runs. Here’s how that works.
Pick an article you want to interlink. Let’s say, for example, an article on 'business process management'.
The goal here is to find as many existing articles on your blog, where ‘business process management’ is mentioned so that we can add a link to the article.
Firstly, Google the keyword ‘business process management’ by doing a Google search on your domain. You can use the following query:
site:yourwebsite.com "keyword"
In our case, that’s:
site:example.com “business process management”
You’ll get a complete list of articles that mention the keyword “business process management.
Now, all you have to do is go through each of these, and make sure that the keyword is hyperlinked to the respective article!
You should also do this for all the synonyms of the keyword for this article. For example, “BPM” is an acronym for business process management, so you’d want to link this article there too.
Step #7 - Track & Improve Your Headline CTRs
Article CTRs play a huge role in determining what ranks or not.
Let’s say your article ranks #4 with a CTR of 15%. Google benchmarks this CTR with the average CTR for the position.
If the average CTR for position #4 is 12%, Google will assume that your article, with a CTR of 15% is of high quality, and will reward you with better rankings.
On the other hand, if the average CTR is 18%, Google will assume that your article isn’t as valuable as other ranking content pieces, and will lower your ranking.
So, it’s important to keep track of your Click Through Rates for all your articles, and when you see something that’s underperforming, you can test different headlines to see if they’ll improve CTR.
Now, you’re probably wondering, how do you figure out what’s the average CTR?
Unfortunately, each search result is different, and there's no one size fits all formula for average CTR.
Over the past few years, Google has been implementing a bunch of different types of search results - featured snippet, QAs, and a lot of other types of search results.
So, depending on how many of these clutter and the search results for your given keyword, you’ll get different average CTRs by position.
Rule of thumb, you can follow these values:
1st position -> ~31.73% CTR
2nd pos. -> ~24.71%
3rd pos. -> 18.66%
4th pos. -> 13.60%
5th -> 9.51%
6th -> 6.23%
7th -> 4.15%
8th -> 3.12%
9th -> 2.97%
Keep in mind these change a lot depending on your industry, PPC competitiveness, 0-click searches, etc...
Use a scraping tool like Screaming Frog to extract the following data from all your web pages:
Page title
Page URL
Old Headline
Delete all the pages that aren’t meant to rank on Google. Then, head over to Google Search Console and extract the following data for all the web pages:
CTR (28 Day Range)
Avg. Position
Add all of this data to a spreadsheet.
Now, check what your competition is doing and use that to come up with new headline ideas. Then, put them in the Title Ideas cell for the respective keyword.
For each keyword, come up with 4-5 different headlines, and implement the (seemingly) best title for each article.
Once you implement the change, insert the date on the Date Implemented column. This will help you keep track of progress.
Then, wait for around 3 - 4 weeks to see what kind of impact this change is going to have on your rankings and CTR.
If the results are not satisfactory, record the results in the respective cells, and implement another test for the following month. Make sure to update the Date Implemented column once again.
Step #8 - Keep Track of Rankings & Make Improvements On-The-Go
You’re never really “done” with SEO - you should always keep track of your rankings and see if there’s any room for improvement.
If you wait for an adequate time-frame after publishing a post (6 months to a year) and you’re still seeing next to no results, then it might be time to investigate.
Here’s what this usually looks like for us:
Audit the content
Is your content the adequate word count? Think, 1.5-2x your competitors.
Is the content well-written?
Do the images in your article add value? E.g. no stock or irrelevant images.
Is the content optimized for SEO? Think, keyword density, links to external websites, etc.
Audit internal links
Does the content link to an adequate number of your other articles or web pages?
Is the article linked to from an adequate number of your web pages or blog posts? You can check this on Search Console => Links => Internal Links. Or, if you’re using Yoast or RankMath, you can check the # of internal links a post has in the WordPress Dashboard -> Posts.
Audit the backlinks
Do you have as many backlinks as your competitors?
Are your backlinks from the countries you want to rank in? If you have a bunch of links from India, but you want to rank in the US, you’d need to get more US links.
Are your links high quality? More often than not, low DA / PA links are not that helpful.
Did you disown low-quality or spam links?
Audit web page
Does the web page load too slow? Think, 4+ seconds.
Did you enable lazy loading for the images?
Did you compress all images on the web page?
...And that's it.
Hope you guys had a good read and learned a thing or two :) HMU if you have any questions.
Can't add a link to the blog post (for better readability) due to posting guidelines, sorry.
REPOST FROM - https://www.reddit.com/r/SEO/comments/hqgden/seo_is_easy_the_exact_process_we_use_to_scale_our/
0 notes
Text
SEO is easy. The EXACT process we use to scale our clients' SEO from 0 to 200k monthly traffic and beyond
Hey guys! There's a TON of content out there on SEO - guides, articles, courses, videos, scams, people yelling about it on online forums, etc etc.. Most of it, however, is super impractical. If you want to start doing SEO TODAY and start getting results ASAP, you'll need to do a TON of digging to figure out what's important and what's not. So we wanted to make everyone's lives super easy and distill our EXACT process of working w/ clients into a stupid-simple, step-by-step practical guide. And so we did. Here we are. A bit of backstory: If you guys haven't seen any of my previous posts, me and my co-founder own an SEO/digital marketing agency, and we've worked w/ a ton of clients helping them go from 0 to 200k+ monthly organic traffic. We've also helped some quite big companies grow their organic traffic (from 1M to over 1.8M monthly organic), using the exact same process. So without further ado, grab your popcorn, and be prepared to stick to the screen for a while, cause this is going to be a long post. Here's everything I am going to cover: Get your website to run and load 2x - 5x faster (with MINIMAL technical know-how) Optimize your landing pages to rank for direct intent keywords (and drive 100% qualified leads) Create amazing, long-form content that ranks every time How we get a TON of links to our website with ZERO link-building efforts How to improve your content’s rankings with Surfer SEO Step #1 - Technical Optimization and On-Page SEO Step #1 to any SEO initiative is getting your technical SEO right. Now, some of this is going to be a bit technical, so you might just forward this part to your tech team and just skip ahead to "Step #2 - Keyword Research." If you DON'T have a tech team and want a super easy tl;dr, do this: Use WP Rocket. It's a WordPress plugin that optimizes a bunch of stuff on your website, making it run significantly faster. Use SMUSH to (losslessly) compress all the images on your website. this usually helps a TON w/ load speed. If you’re a bit more tech-savvy, though, read on! Technical SEO Basics Sitemap.xml file. A good sitemap shows Google how to easily navigate your website (and how to find all your content!). If your site runs on WordPress, all you have to do is install YoastSEO or Rankmath SEO, and they’ll create a sitemap for you. Otherwise, you can use an online XML Sitemap generation tool. Proper website architecture. The crawl depth of any page should be lower than 4 (i.e: any given page should be reached with no more than 3 clicks from the homepage). To fix this, you should improve your interlinking (check Step #6 of this guide to learn more). Serve images in next-gen format. Next-gen image formats (JPEG 2000, JPEG XR, and WebP) can be compressed a lot better than JPG or PNG images. Using WordPress? Just use Smush and it’ll do ALL the work for you. Otherwise, you can manually compress all images and re-upload them. Remove duplicate content. Google hates duplicate content and will penalize you for it. If you have any duplicate pages, just merge them (by doing a 301 redirect) or delete one or the other. Update your ‘robots.txt’ file. Hide the pages you don’t want Google to index (e.g: non-public, or unimportant pages). If you’re a SaaS, this would be most of your in-app pages. ] Optimize all your pages by best practice. There’s a bunch of general best practices that Google wants you to follow for your web pages (maintain keyword density, have an adequate # of outbound links, etc.). Install YoastSEO or RankMath and use them to optimize all of your web pages. If you DON’T have any pages that you don’t want to be displayed on Google, you DON’T need robots.txt. Advanced Technical SEO Now, this is where this gets a bit more web-devvy. Other than just optimizing your website for SEO, you should also focus on optimizing your website speed. Here’s how to do that: Both for Mobile and PC, your website should load in under 2-3 seconds. While load speed isn’t a DIRECT ranking factor, it does have a very serious impact on your rankings. After all, if your website doesn’t load for 5 seconds, a bunch of your visitors might drop off. So, to measure your website speed performance, you can use Pagespeed Insights. Some of the most common issues we have seen clients facing when it comes to website speed and loading time, are the following: Images being resized with CSS or JS. This adds extra loading time to your site. Use GTMetrix to find which images need resizing. Use an online tool (there are a ton of free ones) to properly resize images (or Photoshop even), and re-upload them. Images not being lazy-loaded. If your pages contain a lot of images, you MUST activate lazy-loading. This allows images that are below the screen, to be loaded only once the visitor scrolls down enough to see the image. Gzip compression not enabled. Gzip is a compression method that allows network file transfers to happen a ton faster. In other words, your files like your HTML, CSS, and JS load a ton faster. JS, CSS, and HTML not minified/aggregated/in-lined. If your website is loading slowly because you have 100+ external javascript files and stylesheets being requested from the server, then you need to look into minifying, aggregating, and inlining some of those files. Use Cloudflare + BunnyCDN Why the combo? Why not just Cloudflare? Well, I won't get into details, I've experimented a bit with it, and if you are looking for something cheap and fast this is the best combo. Cloudflare you can opt in for the free account. BunnyCDN on the other hand is on a pay-as-you-go basis, and unless you are getting over 100K+ visits a month, you'll likely never go above their minimum monthly threshold of $1. Want to make your life easier AND fix up all these issues and more? Use WP Rocket. The tool basically does all your optimization for you (if you’re using WordPress, of course). Step #2 - Keyword Research Once your website is 100% optimized, it’s time to define your SEO strategy. The best way to get started with this is by doing keyword research. First off, you want to create a keyword research sheet. This is going to be your main hub for all your content operations. You can use the sheet to: Prioritize content Keep track of the publishing process Get a top-down view of your web pages And here’s what it covers: Target search phrase. This is the keyword you’re targeting. Priority. What’s the priority of this keyword? We usually divide them by 1-2-3… Priority 3 - Top priority keywords. These are usually low competition, high traffic, well-converting, or all 3 at the same time. Priority 2 - Mid-priority keywords. Priority 1 - These are low priority. Status. What’s the status of the article? We usually divide them by… 1 - Not written 2 - Writer has picked up the topic for the week 3 - The article is being written 4 - The article is in editing phase 5 - The article is published on the blog Topic cluster. The category that the blog post belongs to. Monthly search volume. Self-explanatory. This helps you pick a priority for the keyword. CPC (low & high bid). Cost per click for the keyword. Generally, unless you’re planning to run search ads, these are not mandatory. They can, however, help you figure out which of your keywords will convert better. Pro tip: the higher the CPC, the more likely it is for the keyword to convert well. Now that you have your sheet (and understand how it works), let’s talk about the “how” of keyword research. How to do Keyword Research (Step-by-Step Guide) There are a ton of different ways to do that (check the “further readings” at the end of this section for a detailed rundown). Our favorite method, however, is as follows… Start off by listing out your top 5 SEO competitors. The key here is SEO competitors - competing companies that have a strong SEO presence in the same niche. Not sure who’s a good SEO competitor? Google the top keywords that describe your product and find your top-ranking competitors. Run them through SEMrush (or your favorite SEO tool), and you’ll see how well, exactly, they’re doing with their SEO. Once you have a list of 5 competitors, run each of them through “Organic Research” on SEMrush, and you'll get a complete list of all the keywords they rank on. Now, go through these keywords one by one and extract all the relevant ones and add them to your sheet. Once you go through the top SEO competitors, your keyword research should be around 80%+ done. Now to put some finishing touches on your keyword research, run your top keywords through UberSuggest and let it do its magic. It's going to give you a bunch of keywords associated with the keywords you input. Go through all the results it's going to give you, extract anything that’s relevant, and your keyword research should be 90% done. At this point, you can call it a day and move on to the next step. Chances are, over time, you’ll uncover new keywords to add to your sheet and get you to that sweet 100%. Step #3 - Create SEO Landing Pages Remember how we collected a bunch of landing page keywords in step #2? Now it’s time to build the right page for each of them! This step is a lot more straightforward than you’d think. First off, you create a custom landing page based around the keyword. Depending on your niche, this can be done in 2 ways: Create a general template landing page. Pretty much copy-paste your landing page, alter the sub-headings, paraphrase it a bit, and add relevant images to the use-case. You’d go with this option if the keywords you’re targeting are very similar to your main use-case (e.g. “project management software” “project management system”). Create a unique landing page for each use-case. You should do this if each use-case is unique. For example, if your software doubles as project management software and workflow management software. In this case, you’ll need two completely new landing pages for each keyword. Once you have a bunch of these pages ready, you should optimize them for their respective keywords. You can do this by running the page content through an SEO tool. If you’re using WordPress, you can do this through RankMath or Yoast SEO. Both tools will give you exact instructions on how to optimize your page for the keyword. If you’re not using WordPress, you can use SurferSEO. Just copy-paste your web page content, and it’s going to give you instructions on how to optimize it. Once your new landing pages are live, you need to pick where you want to place them on your website. We usually recommend adding these pages to your website’s navigation menu (header) or footer. Finally, once you have all these new landing pages up, you might be thinking “Now what? How, and when, are these pages going to rank?” Generally, landing pages are a tad harder to rank than content. See, with content, quality plays a huge part. Write better, longer, and more informative content than your competition, and you’re going to eventually outrank them even if they have more links. With landing pages, things aren’t as cut and dry. More often than not, you can’t just “create a better landing page.” What determines rankings for landing page keywords are backlinks. If your competitors have 400 links on their landing pages, while yours has 40, chances are, you’re not going to outrank them. Step #4 - Create SEO Blog Content Now, let’s talk about the other side of the coin: content keywords, and how to create content that ranks. As we mentioned before, these keywords aren’t direct-intent (the Googler isn’t SPECIFICALLY looking for your product), but they can still convert pretty well. For example, if you’re a digital marketing agency, you could rank on keywords like… Lead generation techniques SaaS marketing SEO content After all, anyone looking to learn about lead gen techniques might also be willing to pay you to do it for them. On top of this, blog post keywords are way easier to rank for than your landing pages - you can beat competition simply by creating significantly better content without turning it into a backlink war.In order to create good SEO content, you need to do 2 things right: Create a comprehensive content outline Get the writing part right Here’s how each of these work... How to Create a Content Outline for SEO A content outline is a document that has all the info on what type of information the article should contain Usually, this includes: Which headers and subheaders you should use What’s the optimal word count What information, exactly, should each section of the article cover If you’re not using Yoast or Rankmath, you can also mention the SEO optimization requirements (keyword density, # of outbound links, etc.) Outlines are useful if you’re working with a writing team that isn’t 100% familiar with SEO, allowing them to write content that ranks without any SEO know-how. At the same time, even if you’re the one doing the writing, an outline can help you get a top-down idea of what you should cover in the article. So, how do you create an outline? Here’s a simplified step-by-step process… Determine the target word count. Rule of thumb: aim for 1.5x - 2x whatever your competitor wrote. You can disregard this if your competition was super comprehensive with their content, and just go for the same length instead. Create a similar header structure as your competition. Indicate for the writer which headers should be h2, which ones h3. For each header, mention what it’s about. Pro tip - you can borrow ideas from the top 5 ranking articles. For each header, explain what, exactly, should the writer mention (in simple words). Finally, do some first-hand research on Reddit and Quora. What are the questions your target audience has around your topic? What else could you add to the article that would be super valuable for your customers? How to Write Well There’s a lot more to good content than giving an outline to a writer. Sure, they can hit all the right points, but if the writing itself is mediocre, no one’s going to stick around to read your article. Here are some essential tips you should keep in mind for writing content (or managing a team of writers): Write for your audience. Are you a B2B enterprise SaaS? Your blog posts should be more formal and professional. B2C, super-consumer product? Talk in a more casual, relaxed fashion. Sprinkle your content with pop culture references for bonus points! Avoid fluff. Every single sentence should have some sort of value (conveying information, cracking a joke, etc.). Avoid beating around the bush, and be as straightforward as possible. Keep your audience’s knowledge in mind. For example, if your audience is a bunch of rocket scientists, you don’t have to explain to them how 1+1=2. Create a writer guideline (or just steal ours! -> edit: sorry had to remove link due to posting guidelines) Use Grammarly and Hemingway. The first is like your personal pocket editor, and the latter helps make your content easier to read. Hire the right writers. Chances are, you’re too busy to write your own content. We usually recommend using ProBlogger or Cult of Copy Job Board (Facebook Group) to source top writing talent. Step #5 - Start Link-Building Operations Links are essential if you want your content or web pages to rank. If you’re in a competitive niche, links are going to be the final deciding factor on what ranks and what doesn’t. In the VPN niche, for example, everyone has good content. That’s just the baseline. The real competition is in the backlinks. To better illustrate this example, if you Google “best VPN,” you’ll see that all top-ranking content pieces are almost the same thing. They’re all: Well-written Long-form Easy to navigate Well-formatted (to enhance UX) So, the determining factor is links. If you check all the top-ranking articles with the Moz Toolbar Extension, you’ll see that on average, each page has a minimum of 300 links (and some over 100,000!). Meaning, to compete, you’ll really need to double-down on your link-building effort. In fact, in the most competitive SEO niches, it’s not uncommon to spend $20,000 per month on link-building efforts alone. Pro Tip Got scared by the high $$$ some companies spend on link-building? Well, worry not! Only the most ever-green niches are so competitive. Think, VPN, make money online, health and fitness, dating, CBD, gambling, etc. So you know, the usual culprits. For most other niches, you can even rank with minimal links, as long as you have top-tier SEO content. Now, let’s ask the million-dollar question: “how do you do link-building?” 4 Evergreen Link Building Strategies for Any Website There are a TON of different link building strategies on the web. Broken link building, scholarship link building, stealing competitor links, and so on and so on and so on. We’re not going to list every single link building strategy out there (mainly because Backlinko already did that in their link building guide). What we are going to do, though, is list out some of our favorite strategies, and link you to resources where you can learn more: Broken link building. You find dead pages with a lot of backlinks, reach out to websites that linked to them, and pitch them something like “hey, you linked to this article, but it’s dead. We thought you’d want to fix that. You can use our recent article if you think it’s cool enough.” Guest posting. Probably the most popular link building strategy. Find blogs that accept guest posts, and send them a pitch! They usually let you include 1-2 do-follow links back to your website. “Linkable asset” link building. A linkable asset is a resource that is so AWESOME that you just can’t help but link to. Think, infographics, online calculators, first-hand studies or research, stuff like that. The tl;dr here is, you create an awesome resource, and promote the hell out of it on the web. Skyscraper technique. The skyscraper technique is a term coined by Backlinko. The gist of it is, you find link-worthy content on the web, create something even better, and reach out to the right people. Most of these strategies work, and you can find a ton of resources on the web if you want to learn more. However, if you’re looking for something a bit different, oh boy we have a treat for you! We’re going to teach you a link-building strategy that got us around: 10,000+ traffic within a week 15+ leads 50+ links ...And so much more, all through a single blog post. Link-Building Case Study: SaaS Marketing “So, what’s this ancient link-building tactic?” I hear you asking. It must be something super secretive and esoteric, right? Secrets learned straight from the link-building monks at an ancient SEO temple… “Right?” Well, not quite. The tactic isn’t something too unusual - it’s pretty famous on the web. This tactic comes in 2 steps: Figure out where your target audience hangs out (create a list of the channels) Research the type of content your audience loves Create EPIC content based on that research (give TONS of value) Promote the HELL out of it in the channels from step 1 Nothing too new, right? Well, you’d be surprised how many people don’t use it. Now, before you start throwing stones at us for overhyping something so simple, let’s dive into the case study: How we PR’d the hell out of our guide to SaaS marketing (can't add a link, but it's on our blog and it's 14k words long), and got 10k+ traffic as a result. A few months back when we launched our blog, we were deciding on what our initial content should be about. Since we specialize in helping SaaS companies acquire new users, we decided to create a mega-authority guide to SaaS marketing (AND try to get it to rank for its respective keyword). We went through the top-ranking content pieces, and saw that none of them was anything too impressive. Most of them were about general startup marketing strategies - how to validate your MVP, find a product-market fit, etc. Pretty “meh,” if you ask us. We believe that the #1 thing founders are looking for when Googling “saas marketing” are practical channels and tactics you can use to acquire new users. So, it all started off with an idea: create a listicle of the top SaaS marketing tactics out there: How to create good content to drive users Promote your content Rank on Google Create viral infographics Create a micro-site ...and we ended up overdoing it, covering 41+ different tactics and case studies and hitting around 14k+ words. On one hand, oops! On the other hand, we had some pretty epic content on our hands. We even added the Smart Content Filter to make the article much easier to navigate. Once the article was up, we ran it through some of our clients, friends, and acquaintances, and received some really good feedback. So, now we knew it was worth promoting the hell out of it. We came up with a huge list of all online channels that would appreciate this article: r/ entrepreneur and r/ startups (hi guys!). The first ended up loving the post, netting us ~600 upboats and a platinum medal. The latter also ended up loving the post, but the mods decided to be assholes and remove it for being “self-promotional.” So, despite the community loving the content, it got axed by the mods. Sad. (Fun fact - this one time we tried to submit another content piece on r/ startups with no company names, no links back to our website, or anything that can be deemed promotional. One of the mods removed it for mentioning a link to Ahrefs. Go figure!) Hacker News. Tons of founders hang out on HN, so we thought they’d appreciate anything SaaS-related. This netted us around ~200+ upvotes and some awesome feedback (thanks HN!) Submit on Growth Hackers, Indie Hackers, and all other online marketing communities. We got a bunch of love on Indie Hackers, the rest were quite inactive. Reach out to all personal connects + clients and ask for a share Run Facebook/Twitter ads. This didn’t particularly work out too well for us, so we dropped it after 1-2 weeks. Run a Quuu promotion. If you haven’t heard of Quuu, it’s a platform that matches people who want their content to be shared, with people who want their social media profiles running on 100% auto-pilot. We also got “meh” results here - tons of shares, next to no likes or link clicks. Promoted in SaaS and marketing Facebook groups. This had awesome results both in terms of traffic, as well as making new friends, AND getting new leads. Promoted in entrepreneur Slack channels. This worked OK - didn’t net us traffic, but got us some new friends. Emailed anyone we mentioned in the article and asked for a share. Since we mentioned too many high profile peeps and not enough non-celebs, this didn’t work out too well Emailed influencers that we thought would like the article / give it a share. They didn’t. We were heart-broken. And accordingly, created a checklist + distribution sheet with all the websites or emails of people we wanted to ping. Overall, this netted us around 12,000 page views in total, 15+ leads, 6,000 traffic in just 2 promotion days. As for SEO results, we got a bunch of links. (I would have added screenshots to all of these results, but don't think this subreddit allows it). A lot of these are no-follow from Reddit, HackerNews, and other submission websites, but a lot of them are also pretty authentic. The cool part about this link-building tactic is that people link to you without even asking. You create awesome content that helps people, and you get rewarded with links, shares, and traffic! And as for the cherry on top, only 2 months after publishing the article, it’s ranking on position #28. We’re expecting it to get to page 1 within the new few months and top 3 within the year. Step #6 - Interlink Your Pages One of Google's ranking factors is how long your visitors stick around on your website. So, you need to encourage users reading ONE article, to read, well, the rest of them (or at least browse around your website). This is done through interlinking. The idea is that each of your web pages should be linked to and from every other relevant page on your site. Say, an article on "how to make a resume" could link to (and be linked from) "how to include contact info on a resume," "how to write a cover letter," "what's the difference between a CV and a resume," and so on. Proper interlinking alone can have a significant impact on your website rankings. NinjaOutreach, for example, managed to improve their organic traffic by 40% through better interlinking alone. So, how do you do interlinking “right?” First off, make it a requirement for your writers to link to the rest of your content. Add a clause to your writer guidelines that each article should have 10+ links to your other content pieces. More often than not, they’ll manage to get 60-70% of interlinking opportunities. To get this to 100%, we usually do bi-annual interlinking runs. Here’s how that works. Pick an article you want to interlink. Let’s say, for example, an article on 'business process management'. The goal here is to find as many existing articles on your blog, where ‘business process management’ is mentioned so that we can add a link to the article. Firstly, Google the keyword ‘business process management’ by doing a Google search on your domain. You can use the following query: site:yourwebsite.com "keyword" In our case, that’s: site:example.com “business process management” You’ll get a complete list of articles that mention the keyword “business process management. Now, all you have to do is go through each of these, and make sure that the keyword is hyperlinked to the respective article! You should also do this for all the synonyms of the keyword for this article. For example, “BPM” is an acronym for business process management, so you’d want to link this article there too. Step #7 - Track & Improve Your Headline CTRs Article CTRs play a huge role in determining what ranks or not. Let’s say your article ranks #4 with a CTR of 15%. Google benchmarks this CTR with the average CTR for the position. If the average CTR for position #4 is 12%, Google will assume that your article, with a CTR of 15% is of high quality, and will reward you with better rankings. On the other hand, if the average CTR is 18%, Google will assume that your article isn’t as valuable as other ranking content pieces, and will lower your ranking. So, it’s important to keep track of your Click Through Rates for all your articles, and when you see something that’s underperforming, you can test different headlines to see if they’ll improve CTR. Now, you’re probably wondering, how do you figure out what’s the average CTR? Unfortunately, each search result is different, and there's no one size fits all formula for average CTR. Over the past few years, Google has been implementing a bunch of different types of search results - featured snippet, QAs, and a lot of other types of search results. So, depending on how many of these clutter and the search results for your given keyword, you’ll get different average CTRs by position. Rule of thumb, you can follow these values: 1st position -> ~31.73% CTR 2nd pos. -> ~24.71% 3rd pos. -> 18.66% 4th pos. -> 13.60% 5th -> 9.51% 6th -> 6.23% 7th -> 4.15% 8th -> 3.12% 9th -> 2.97% Keep in mind these change a lot depending on your industry, PPC competitiveness, 0-click searches, etc... Use a scraping tool like Screaming Frog to extract the following data from all your web pages: Page title Page URL Old Headline Delete all the pages that aren’t meant to rank on Google. Then, head over to Google Search Console and extract the following data for all the web pages: CTR (28 Day Range) Avg. Position Add all of this data to a spreadsheet. Now, check what your competition is doing and use that to come up with new headline ideas. Then, put them in the Title Ideas cell for the respective keyword. For each keyword, come up with 4-5 different headlines, and implement the (seemingly) best title for each article. Once you implement the change, insert the date on the Date Implemented column. This will help you keep track of progress. Then, wait for around 3 - 4 weeks to see what kind of impact this change is going to have on your rankings and CTR. If the results are not satisfactory, record the results in the respective cells, and implement another test for the following month. Make sure to update the Date Implemented column once again. Step #8 - Keep Track of Rankings & Make Improvements On-The-Go You’re never really “done” with SEO - you should always keep track of your rankings and see if there’s any room for improvement. If you wait for an adequate time-frame after publishing a post (6 months to a year) and you’re still seeing next to no results, then it might be time to investigate. Here’s what this usually looks like for us: Audit the content Is your content the adequate word count? Think, 1.5-2x your competitors. Is the content well-written? Do the images in your article add value? E.g. no stock or irrelevant images. Is the content optimized for SEO? Think, keyword density, links to external websites, etc. Audit internal links Does the content link to an adequate number of your other articles or web pages? Is the article linked to from an adequate number of your web pages or blog posts? You can check this on Search Console => Links => Internal Links. Or, if you’re using Yoast or RankMath, you can check the # of internal links a post has in the WordPress Dashboard -> Posts. Audit the backlinks Do you have as many backlinks as your competitors? Are your backlinks from the countries you want to rank in? If you have a bunch of links from India, but you want to rank in the US, you’d need to get more US links. Are your links high quality? More often than not, low DA / PA links are not that helpful. Did you disown low-quality or spam links? Audit web page Does the web page load too slow? Think, 4+ seconds. Did you enable lazy loading for the images? Did you compress all images on the web page? ...And that's it. Hope you guys had a good read and learned a thing or two :) HMU if you have any questions. Can't add a link to the blog post (for better readability) due to posting guidelines, sorry. submitted by /u/malchik23 [link] [comments] https://www.reddit.com/r/SEO/comments/hqgden/seo_is_easy_the_exact_process_we_use_to_scale_our/
0 notes
Link
When you build a bar chart race, you're creating many discrete pages of bar charts and then stringing them together. This is just like how traditional cartoon animation works.
In December 2019, Tableau released version 2020.1 beta with a new Animations feature for dynamic parameters. This means that the bar chart race below is now very easy to build.

Watch it in action: https://www.youtube.com/watch?v=3iZrMkZ3948
Pre-requisites
Download and install Tableau Public (version 2020.1.2 onward). It is totally free and has full functionality. The only snag that all of your work can only be published on the Tableau Public server, and not saved locally to your Desktop. This is alright if the data is not sensitive or private.
Download the latest COVID-19 data (in *.xlsx format) from the European Centre for Disease Prevention and Control website, and rename it using a generic filename like “COVID-19-geographic-distribution-worldwide.xlsx”. You can replace this file with updated data later, using the same filename.
Open the Tableau Public app, and on the "Connect" menu, click on “Microsoft Excel” and select the data file you downloaded. Click on the “Sheet 1” tab at the bottom left.

Connect Tableau Public to dataset
Identify the Quantity to Race
There are 2 useful quantities you can choose to race in this dataset:
Daily Infected Cases, or
Daily Deaths Cases.
To choose the race quantity as daily infected cases, drag “Cases” to Columns.
To label the bar chart with country names, drag “Countries And Territories” to Label.
To have the bars in various colors, drag “Countries And Territories” to Color.
Create Rank for Countries
This section requires a simple programming line of code.
Click on Dimensions → drop-down menu → Create Calculated Field. Create a new field “Rank”, and key in the code below:
RANK_UNIQUE(Sum([Cases]))

To code for Calculated Field “Rank”
Click on “Apply” to ensure that calculation is valid, then click “OK”.
Drag “Rank” to Rows. Click on (Rows) Rank → drop down menu → Discrete. Click on (Rows) Rank → drop down menu → Compute Using → “Countries And Territories”.
Configure Animation (New Feature for Version 2020.1)
To create a snapshot of animation frames, drag “Date Rep” to Pages. Click on (Pages) Date Rep → drop down menu → Exact Date.
Turn on animations, select Format → Animations → On. To set the transition duration: Duration → “1.00 seconds (Slow)”. Close the Animations window by clicking “X”.
Look for a little Animations control which appears when the animations feature is turned on, then click the “forward play” icon. Drag the slider bar to a different date or use the left/right button to choose a date.

Animations control
Add Simple Customization
To improve colors:
Click on Label → ensure “Show mark labels” is checked. Click on Color → Edit Colors -> replace similar colors if any. (I have replaced the colors for USA, Spain, Italy)
You can hide the Countries legend card – no need for it anymore.
To add additional labels for the number of cases to the bars:
Drag “Cases” to Label. Click on Label → Text → click on “3 dots”. This opens up the label editor. Arrange labels to 1 line only. Underline <Countries And Territories>. Bold <SUM(Cases)>, and use red font. Click on “OK”.

Label editor
To change the name of the sheet:
Double-click on “Sheet 1” and change it to “COVID-19 Daily Infected Cases”.
To change X-axis limits:
Double-click on the X-axis. This brings up the Axis menu. Choose the Range to be “Fixed”: Fixed start=0, Fixed end=40,000.
To display only the top 15 countries:
Drag “Rank” to Filters → click on “OK”. Click on (Filters) Rank → drop down menu → Compute Using → “Countries And Territories” . Replace “206” with “15”, and click on “OK”. Change the Standard view to “Fit Height”.

View chart using ‘Fit Height’
To increase the font size of the labels:
Click on Label → Font → drop down menu → change the font size to “15”.
To add a date label to the chart:
Right-click on the empty chart area → Annotate → Area. This brings up the annotation editor. Key in <Page Name>, and increase font size to “20”. Click on “OK”.
Now that the date label was created, resize and move it to the bottom.

Annotation editor
Publish Visualization
When you are satisfied with the customization, the visualization is then ready to be published.
Click on File → Save to Tableau Public.
The work is now published on the Tableau Public server. You can then share it using the available link.
Here’s a video tutorial with a step-by-step guide for the entire process:
A bar chart race becomes very simple to build using the new Animations feature in Tableau Version 2020.1 onward. You can now try it on other country data with date/time series: GDP, Population, Life Expectancy, and so on.
Let your creativity flow!
0 notes