#geometric progression tutorial
Explore tagged Tumblr posts
Visit Tumblr Blog
Explore Tumblr blogs with no restrictions, modern design and the best experience.
Last Seen Tumblr Blogs


Fun Fact
The Tumblr app for Google Glass was released on May 16, 2013.
Text

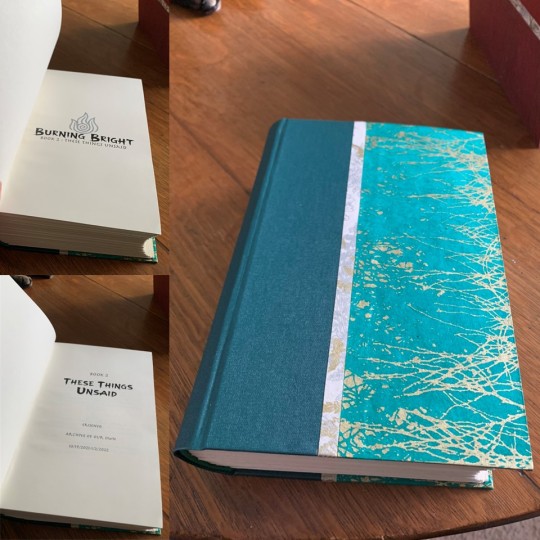
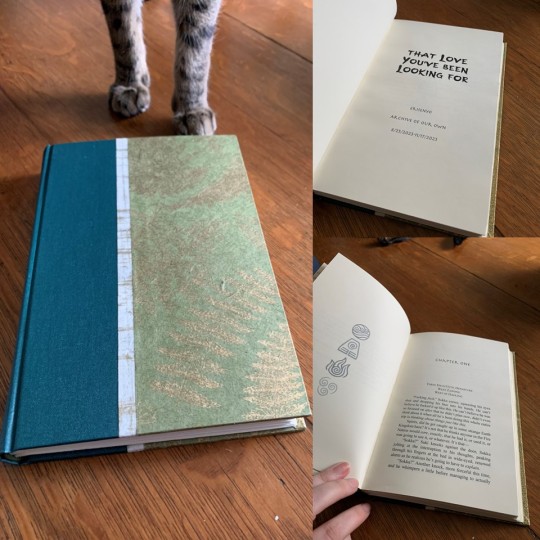
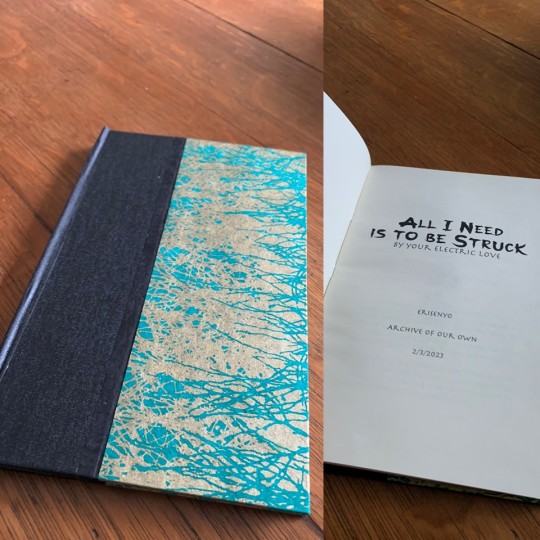
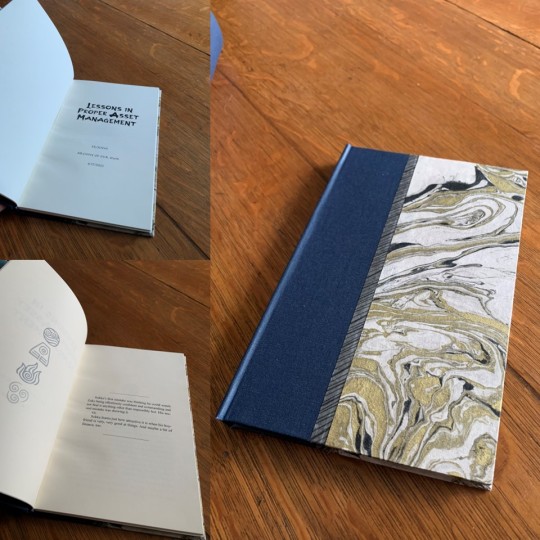
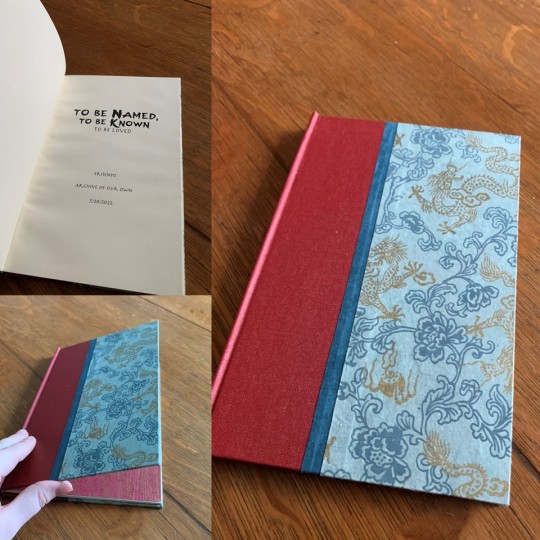
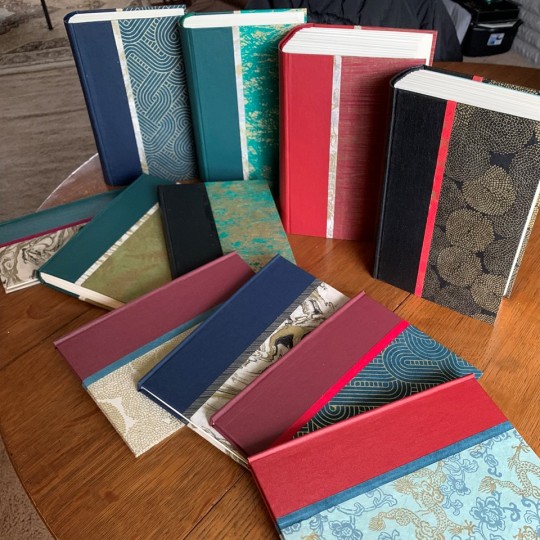
First bookbinding project a success. I think that my cat approves because he would not stay out of my photos. Five months in the making, but I couldn't be more pleased with the results.
I started with @armoredsuperheavy's amazing fanbinding tutorial to create a typeset of each work in @erisenyo's Burning Bright AU published on Ao3. Then had to reread the works in the new format and edit as I went to make sure everything was formatted correctly, (combined word count somewhere around 1.3 million) that took over a month all by itself.
I picked up a copy of Introduction to Bookbinding & Custom Cases by Tom and Cindy Hollander from my local library, to look at some detailed how to images and get multiple perspectives on construction methods. Excellent book, I do recommend.
My hunt for materials included a trip to Detroit with a side stop at Blick to look at decorative papers in person. Blick and the fine people at Hollander’s ended up having everything I needed to make covers. So between my brother kindly 3d printing me a punch cradle, making a DIY sewing frame of my own invention (courtesy of scrap lumber and a trip to the Lowe's hardware department), and three reams of late night printing, I managed to amass all my supplies.
Folding three reams of paper into signatures (the little bundles you sew together) takes about five days if you don't want to lose your mind or your place, and longer if you discover you need to fix things because that definitely happened. Then you get to unfold them to stab holes in them which is as terrifying at first and therapeutic by the end as it sounds.
Next came weeks of sewing books together, a magical process. I learned three new knots, repeatedly stabbed myself (because all forms of creation forcibly demand blood sacrifice) , and felt like I was roleplaying a monastic librarian from the time of Gutenburg. That's 600 years ago, 24ish generations, over 8million ancestors since then (by geometric progression, which excludes the possibility that any of my peasant ancestry is from small towns which is you know likely but I digress) and here I sat sewing pages together in a basement because story is the most sacred of human arts as it binds communities together and shapes perceptions of the self and our brethren, of outsiders allies and enemies, of the world as we know it and as it may come to be. Did I mention sewing books felt magical.
Then came the glue. So much glue. Multiple types of glue. All sticky. all stuck to me. I smeared glue with my fingers like a child.
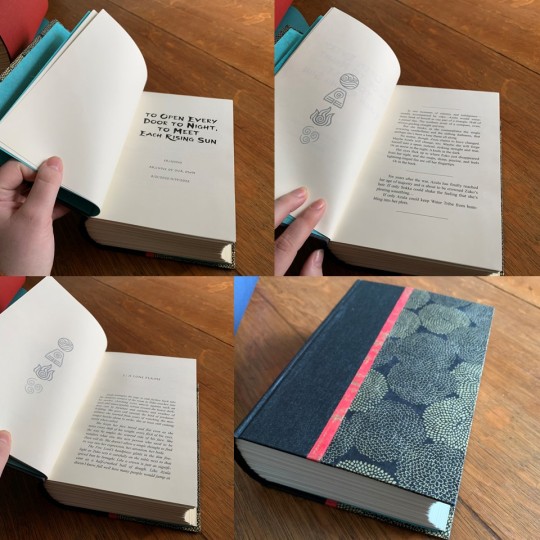
At last it was time for the covers. Choosing combinations of the decorative papers and bookcloth and making sure I could get enough out of each material for what I needed. Precise cutting so many thanks to the architecture school professors who showed me how to properly cut chipboard. Then measuring and gluing, and more measuring, and more gluing. At last press a little groove by the spine and repeat eleven times.
Then I get to impress all my people with my latest and possibly coolest maker skill unlock, I am a book binder.

Bottom to top in the stack or left to right at the bottom are: These Things Written These Things Unsaid with Without Consent These Things Known with A Third Chance (or a First) Oh, The Way Your Makeup Stains My Pillowcase That Love You've Been Looking For All I Need Is To Be Struck (By Your Electric Love) To Open Every Door to Night, To Meet Each Rising Sun (my favorite) Love Is In the Hair (fanart of this one originally lead me to read the series, thanks @ash-and-starlight) Lessons in Proper Asset Management Tangled Up With You To Be Named, To Be Known (To Be Loved)


#fandom#fanbinding#book binding#book making#zukka#zukka nation#zukka fanfic#avatar#atla#atla azula#atla sokka#atla zuko#ao3#ao3 fanfic#erisenyo
168 notes
·
View notes
Text
nero plushie progress ramble [speedrunning this project i have like 3 weeks left lol] :
havent measured it in full but it will be BIG for my standards at least 40cm when standing. basing it on my simpler artstyle so the head is bigger you know how it is with humanoid plushies
not following any tutorial im following my heart . planned out almost everything for the body i need to measure some things and imagine them in 3d to understand if i need additional material in some places other than that its going great. im not fully sure how im going to layer the hair and getting its shape might be hard?
my nero design has very cartoony geometrical hair. idk how to explain it just look at how i draw it. and that fuckass swirl idk what to do with it i might just embroider it onto the fabric? like its impossible to do it in 3d whenever people with more complicated artstyles want to draw my nero i tell them not to worry about the hair because what the fuck are they supposed to do there. i drew his hair like that 4 years ago and said yuup it will stay like this. and it did
ok aside from the hair. im worried about making the clothes since i will have to replicate an actual sewing pattern but in a smaller scale and modify it and then do embroidery for golden elements. and idk how i will stylize shoes they might be totally flat fabric if shaping it into a shoe looks akward with the rest of the simple body. but im excited about the clothes and i hope i get to make more outfits later and dress him up all cutesy
3 notes
·
View notes
Text
Learn Online Mehndi Course With Arun Mehndi Classes

Learning Online Mehndi Course is a fruitful and innovative experience. If you want to start a hobby or a career, it will help you move in the right direction. Here is a step-by-step guide on how to learn henna design through Arun Mehndi classes in Swastik House, 1st Floor Swami Vivekananda Road Mumbai, Maharashtra 400067:
Choose the Right Online Class: There are several websites offering henna classes, including YouTube, Udemy, Skillshare, and personal websites. Choose classes according to your learning requirements, whether beginner, intermediate, or advanced. Ensure the class provides good instructions, demonstrations, and a learning process.
Invest in Good Quality Tools: Practice henna requires good quality materials. Begin with cones or tubes of henna, preferably well-known brands. Good quality henna paste will take longer for your design time and stain the skin well. Practice sheets, stencils, and a fine-tip brush are also helpful tools that will make you more accurate.
Begin with the Basics: To learn henna, one must first learn the basics. Learn to make basic designs like dots, lines, swirls, and flowers. Online tutorials begin with these basics before moving on to more complex designs. Master each technique gradually to build muscle memory.
Practice and Observe: Henna art is all about daily practice. Observe web tutorials and attempt to reproduce the designs step by step. Practice every day and do your best to practice different designs. Make sure to practice your strokes, spacing, and symmetry. The more you practice, the less you will struggle when using the cone.
Understand Henna Design Styles: There are some henna styles such as Arabic, Indian, Moroccan, and Pakistani. Look for these different styles on the internet and practice them so that you can see what works for you. As you progress, you will start to come up with your own style by mixing things from each tradition.
Get Feedback: Become a member of online henna forums, Facebook groups, or communities where you can post your work and get feedback. Useful criticism will guide you to adjust and improve your skills.
Practice with Designs: Practice the basic techniques once you are comfortable with them. Practice using more intricate designs. Try using themes such as mandalas, peacocks, flowers, and geometric shapes. You can even master using henna on hands and feet and even on other material such as paper and cloth.
Practice Regularly: As any other type of art, henna also requires regular practice. Spend some minutes daily or weekly practicing. In time, the difference will be huge in your designs.
Follow these steps and with regular studies and practice, by taking a booking with Arun Mehndi classes on +91 9930000676, and you will be well on the path to being a henna art online guru.
URL: https://arunmehndiclasses.com/course-category/online-mehndi-course/
0 notes
Text
CAS post for February for creativity by Natalia Wroniecka
Learning how to draw hands for Creativity for CAS in February.
Reflection
In February I decided to continue the process of learning how to draw hands. This time I also used a tutorial because I believe that using different sources to learn is the best method to get better. This months outcome was as far the most satisfying and successful one. It was really challenging to get the drawings to look as I wanted them to but the final result was very rewarding and I am happy that I took a lot of time to do them perfectly. Beside the challenging parts I really enjoyed seeing how my drawings got better and better with every try. You can see the progress in my drawings while watching my first drawings and comparing them with these. I also learned that it is good to use geometrical shapes to get a drawing of a hand that has accurate anatomy and proportions. I am really motivated to continue this process of learning and one day being able to draw perfect hands in every possible perspective.

0 notes
Text
Task 07: Screen Design and Game Graphics
What information does the player need to see? (e.g., score, progress, health, location, inventory, etc.)
PROGRESS
Era/Timeline: Show the current time period (“Maya Civilization – 900 AD”).
Mission Progress: Visual representation of how far they are in the level or quest (percentage or milestone markers)
LOCATION
Current Location: Name of the historical site or city (“Tikal, Guatemala”).
STATUS
Score/Knowledge Points: Points earned for completing tasks, answering questions, or exploring.
INVENTORY SLOTS
Display collected items, artifacts, or tools relevant to solving puzzles or completing missions (e.g., ancient codices, tools for excavation).
Number of available actions (aka Jokers).
INTERACTIVE ELEMENTS
Objective/Tasks: Short reminders of the current goal (“Get the key”)
Dialogue Boxes: Interactions with NPCs or historical figures in a dialogue box
TIME TRAVEL MECHANICS
A Time Dial/Portal Meter showing where the player is in the timeline.
CRICKET
Cricket as tutorial guide aka dialogue boxes.
PLAYER
Avatar: Show a character icon or name to reinforce their role
Customization: Allow the player to see and modify their appearance or equipment.
How can you present this information in a clear, creative, and visually appealing way?
Through Overall Design Theme aka Style, Font, Background.
Style: Use a design inspired by the Maya culture, such as intricate geometric patterns, earthy colors representing the Maya, and symbols.
Font: A font, that reflects historical authenticity, but it is still easy to read.
Background: Subtle textures resembling stone carvings, parchment, or temple walls, cohering with the Maya theme.
Player: Show the player avatar as a small icon on the HUD for customization. Use stylized icons for equipped items, tools, or outfits.
Cricket: The cricket in a visible corner as a small animated character. When it speaks, use speech bubbles shaped like scrolls or stone carvings. Occasionally, the cricket move or react to the environment, adding life to the design.
0 notes
Text
Mastering the Art of Indian Instruments: How to Draw a Sitar
The sitar, an iconic string instrument, represents the rich cultural heritage of India. Its melodious sound has captivated audiences worldwide, transcending borders and genres. Artists like Ravi Shankar have popularized this instrument, but beyond its musical allure, the sitar's intricate design makes it a fascinating subject for art. If you're keen to learn how to draw a sitar, this article will guide you through the process, blending artistic techniques with cultural insight. Along the way, we'll explore complementary tools and platforms, such as a reliable album cover generator free, which can add a creative edge to your artwork.
The Sitar: A Brief Overview
Before diving into the drawing process, it’s important to understand the sitar's anatomy. This helps ensure accuracy and appreciation of the design. A sitar typically consists of the following parts:
Gourd (Resonator): The large, rounded base that amplifies sound.
Neck: The long, slender portion adorned with frets.
Strings: The sitar has main strings for melody and sympathetic strings for resonance.
Decorative Inlays: Beautiful carvings and patterns make each sitar unique.
Appreciating these elements deepens your connection to the art and provides inspiration when sketching intricate details.
Tools You’ll Need
To create a realistic drawing of a sitar, gather the following materials:
Sketching pencils (HB for outlines, 4B/6B for shading).
Erasers for detailing.
A ruler for precision.
Reference images or online tutorials, like those found in guides on how to draw a sitar.
Step-by-Step Guide: Drawing a Sitar
1. Outlining the Shape
Start by drawing a large oval for the gourd and a long rectangle for the neck. These shapes serve as the foundation of the instrument. Use a ruler to ensure the neck is straight and proportional to the gourd.
2. Adding the Frets
The frets, which appear as evenly spaced lines along the neck, give the sitar its signature look. Carefully measure the gaps between frets, keeping them progressively closer towards the neck's end.
3. Sketching the Strings
Draw parallel lines running along the neck, representing the main and sympathetic strings. Vary their thickness slightly for realism.
4. Detailing the Gourd
The gourd often features intricate carvings and patterns. Use light, curved strokes to emulate its texture. Refer to online resources for authentic designs to incorporate.
5. Final Shading and Highlights
Add depth with shading. Darken areas under the strings and inside the gourd to create a three-dimensional effect. Erase selectively to highlight key areas, giving the drawing a polished look.
Artistic Enhancements
Once your sitar sketch is complete, consider integrating it into a broader creative project. For instance, musicians or fans of Indian classical music can use this artwork as part of an album design. Using tools like an album cover generator free allows you to experiment with color schemes and layouts.
Broader Applications of Sitar Drawings
1. Digital Media
Your sitar artwork can become a unique feature on digital platforms. Share it during a Spotify group session, where friends or collaborators can appreciate your artistic take while enjoying music.
2. Cultural Representation
By drawing the sitar, you contribute to preserving and celebrating Indian culture. It’s a meaningful way to introduce this art form to global audiences.
3. Inspiration from World Creators
If you're seeking inspiration, look to the world most subscriber accounts on platforms like YouTube. Many artists and educators share detailed tutorials and tips that can refine your skills further.
Common Mistakes and How to Avoid Them
Skipping Proportions: The sitar's long neck can be tricky to draw proportionally. Always start with basic geometric shapes to guide your measurements.
Overcomplicating Details: While intricate, the sitar's carvings should not overshadow its form. Strike a balance between detail and simplicity.
Ignoring References: Always have a clear visual reference. Whether it's an image or a video tutorial on how to draw a sitar, this ensures your drawing stays true to the instrument’s design.
Conclusion Drawing a sitar is more than an artistic endeavor; it’s a journey into cultural appreciation and creativity. By mastering its intricate details, you not only enhance your skills but also pay homage to an instrument that embodies India's rich musical tradition. Whether you aim to use your artwork in an album cover generator free or share it during a Spotify group session, the possibilities are endless.
0 notes
Text
All the things we did before the tutorial
I am unfortunately writing this after the creation of the entire opening tutorial level so my memory may be fuzzy so I'll quickly list off the major additions and changes we made before moving to the tutorial. Our first addition of these were jump-pads, shown here in their current state after the design overhaul I'll go into in my next post.

these take the players direction and along with an equation, use a node to add impulse, which can give the player height and momentum, which can be manually adjusted for each pad in the editor for level design convenience.

Next up was the load next level point, which is also shown in it's current post-overhaul state.

This is much simpler and just loads a specified level when stepped on. You may notice some of the shapes used for the overhauled versions are a little more complex than I have previously achieved. This is due to that at this point, we began some relatively simple experiments with UE5's modelling mode. using this, we were able to create and adjust specific shapes, extrude our own shapes, and mess around with a number of other tools, allowing us to cut, bend, mold, and further adjust them to our needs and liking, with a good example being the 3D geometric Heart Icon I started using as a motif in levels.

around this point we also created some temporary code for the reset level button in the pause menu which allowed us to reset the tutorial level specifically, with a readjustment to come later. The rest of my progress this week will be work on the tutorial.
0 notes
Text
DIY Diamond Accent Wall: Step By Step Tutorial
DIY Diamond Accent Wall: Step By Step Tutorial - https://www.craftez.co.uk/2024/08/12/diy-diamond-accent-wall-step-by-step-tutorial/ - Advertisement Yesterday I gave you guys a sneak peek at the progress we’ve made in our office, and I showed you the diamond accent wall we created in the space. Well today I want to dive into how we created the geometric pattern without any stenciling or painting (& for - https://www.craftez.co.uk/2024/08/12/diy-diamond-accent-wall-step-by-step-tutorial/
0 notes
Text
Comprehensive Guide to CUET Maths Previous Year Questions

Mastering CUET Maths: Your Guide to Previous Year Questions
The CUET (Central Universities Entrance Test) is a highly competitive examination that plays a crucial role in the academic journey of countless students. Among the various subjects tested, Maths is often considered one of the most challenging. However, with the right resources and study strategies, you can ace the CUET Maths section. One of the most effective ways to prepare is by practicing CUET Maths previous year questions. In this comprehensive guide, we will explore the importance of these questions, how to use them effectively, and provide insights into some of the most commonly asked questions in the CUET Maths exam.
Why CUET Maths Previous Year Questions Matter
Practicing CUET Maths previous year questions is a proven method to enhance your preparation. Here are some key reasons why these questions are invaluable:
Understanding the Exam Pattern: Previous year questions help you get acquainted with the exam pattern, the types of questions asked, and the distribution of topics. This familiarity can significantly reduce anxiety on the exam day.
Identifying Important Topics: By analyzing previous years' questions, you can identify recurring topics and prioritize them in your study plan. This ensures that you focus on areas that are more likely to be tested.
Improving Time Management: Solving past papers under timed conditions helps you develop effective time management skills. This is crucial, as the CUET Maths section requires both speed and accuracy.
Boosting Confidence: Regular practice with previous year questions builds confidence. As you become more comfortable with the question format and difficulty level, you'll approach the exam with a positive mindset.
Learning from Mistakes: Reviewing your answers and understanding where you went wrong helps you learn from your mistakes. This iterative process of practice and review is essential for continuous improvement.
How to Use CUET Maths Previous Year Questions Effectively
To maximize the benefits of practicing CUET Maths previous year questions, follow these strategies:
Create a Study Schedule: Allocate specific time slots for practicing previous year questions. Consistent practice is key to mastering the subject.
Simulate Exam Conditions: Solve past papers in a timed, distraction-free environment. This helps you get used to the pressure of the actual exam.
Analyze Your Performance: After completing each set of questions, thoroughly analyze your performance. Identify your strengths and weaknesses and adjust your study plan accordingly.
Focus on Weak Areas: Spend extra time on topics where you struggle. Use additional resources, such as textbooks or online tutorials, to strengthen your understanding.
Review Solutions: Carefully review the solutions provided for each question. Understanding the methodology and logic behind the answers is crucial for mastering similar problems in the future.
Commonly Asked CUET Maths Questions
To give you a head start, here are some types of questions that frequently appear in the CUET Maths section:
Algebra
Quadratic Equations: Questions often involve solving quadratic equations, finding the roots, or applying the quadratic formula. For example, you might be asked to solve ( ax^2 + bx + c = 0 ) for given values of ( a ), ( b ), and ( c ).
Progressions: Arithmetic and geometric progressions are common topics. You may need to find the nth term or the sum of a series. For instance, calculating the sum of the first 20 terms of an arithmetic progression with a given first term and common difference.
Calculus
Differentiation: Questions on differentiation may include finding the derivative of a function, applying the chain rule, or solving problems involving rates of change. For example, finding ( \frac{dy}{dx} ) if ( y = \sin(x^2) ).
Integration: Integration problems often involve finding the integral of a function, using integration by parts, or solving definite integrals. You might be asked to evaluate ( \int (x^2 \cdot e^x) \, dx ).
Geometry and Trigonometry
Circle Theorems: Questions may involve properties of circles, such as finding the length of a chord, the radius, or the area of a sector. For example, calculating the area of a sector with a central angle of 60 degrees in a circle with a radius of 10 cm.
Trigonometric Identities: You may need to simplify expressions using trigonometric identities or solve trigonometric equations. For instance, proving that ( \sin^2(\theta) + \cos^2(\theta) = 1 ).
Statistics and Probability
Probability: Probability questions might include calculating the likelihood of an event, understanding conditional probability, or using Bayes' theorem. An example question could be finding the probability of drawing two aces from a deck of cards.
Descriptive Statistics: These questions often involve measures of central tendency (mean, median, mode) or dispersion (range, variance, standard deviation). For example, calculating the mean and standard deviation of a given data set.
Tips for Success
Here are some additional tips to help you excel in the CUET Maths exam:
Stay Consistent: Consistent study and practice are key to success. Make sure to dedicate regular time to maths preparation.
Use Quality Resources: In addition to CUET Maths previous year questions, use quality textbooks, online courses, and tutorials to strengthen your understanding.
Seek Help When Needed: If you're struggling with a particular topic, don't hesitate to seek help from teachers, tutors, or online forums.
Stay Positive and Confident: Maintain a positive attitude and believe in your ability to succeed. Confidence can significantly impact your performance.
Take Care of Your Health: Ensure you get enough sleep, eat healthily, and take breaks during your study sessions. A healthy body supports a sharp mind.
Conclusion
Practicing CUET Maths previous year questions is an essential part of your exam preparation strategy. These questions not only help you understand the exam pattern and important topics but also enhance your problem-solving skills and time management. By following the strategies and tips outlined in this guide, you can maximize the benefits of these practice questions and approach your CUET Maths exam with confidence and competence.
Remember, success in the CUET Maths exam is a combination of consistent practice, effective study techniques, and a positive mindset. Utilize the resources available to you, stay focused, and believe in your ability to achieve your academic goals. Good luck!
0 notes
Text
Creative Wallpaper Designs That Will Inspire Your Next Bedroom Makeover
When considering a bedroom makeover, the importance of a new design wallpaper must be considered. A well-chosen wallpaper can affect mood, reflect personal style, and set the tone for the space. Many alternatives are available, ranging from delicate watercolour designs to aggressive geometric patterns. This tutorial looks at many imaginative wallpaper patterns to get you started on your next bedroom makeover.
Abstract Wall Art: Unleash Your Space's Creativity
Abstract art wallpaper is ideal for people who value art in their living spaces since it adds a pop of modernism and originality. Unpredictable patterns and various hues are common elements of abstract designs, which can complement any bedroom motif. Abstract wallpaper, whether muted swirls or bold splashes, adds sophistication to any bedroom.

Geometric Wallcoverings: Introducing Style and Structure
Well-defined lines and recurring patterns of squares, triangles, and hexagons characterize geometric wallpaper. For people who prefer a tidy and orderly space, this kind of wallpaper for bedrooms can help establish a sense of order and harmony. In addition to lending an air of refinement, geometric patterns can blend in with traditional and modern interior design.
Graffiti Wall Art: A Modern Touch for Your Sleep Space
Graffiti wallpaper infuses your room with street art's vivid, unadulterated spirit. It's ideal for creating a big impression and looks great in a teenager's bedroom or anyone who enjoys modern, edgy design. Graffiti wallpaper is an excellent way to add artistic expression to a plain wall because of its vibrant colours and eye-catching graphics.

Watercolour Wall Art: Calm and Comforting Styles
It's like having a hand-painted mural in your bedroom with watercolour wallpaper. This design, well-known for its gentle, flowing colour transitions, can give your bedroom a serene and creative atmosphere. It's especially appropriate for people who want a softer, more muted aesthetic for their bedroom design.
Art Wallpaper: Give Your Bedroom a Gallery Feel
Art fans can showcase their favourite pieces of artwork on a bedroom wall by selecting art wallpaper. This might vary, based on personal preference, from modern artwork to prints from the ancient era. By fostering a sense of intimacy, art wallpaper transforms your bedroom into a showcase for your appreciation of many cultures.

Wallpaper with a chino style: exotic elegance
East Asian art inspires the elaborate patterns and artwork found in chinoiserie wallpaper. This kind of wallpaper is distinguished by its intricate depictions of natural scenes, including blossoming flowers, birds, and picturesque landscapes. Chinoiserie offers both classic style and visual appeal, bringing an exotic and opulent air to your bedroom.
Wallpaper with ombre colours: a gentle colour shift
The gradient effect of ombre wallpaper sets it apart as the colours progressively meld together. This might produce a tranquil atmosphere that is perfect for a bedroom. When the colours flow smoothly from one to the next, a space can seem larger and airier.

Wall Murals: Customize Your Environment
Bedroom wall murals are ideal for anyone who wants to display large-scale artwork and express their unique style. A wall mural is a feature that makes a space stand out, either by depicting a cityscape, a beautiful landscape, or an abstract design that changes the room's entire appearance and atmosphere.
Conclusion
Your bedroom's look and ambience can be greatly influenced by your chosen wallpaper design. The ideal wallpaper may enrich and compliment your bedroom area, regardless of your preference for the tranquillity of watercolour designs, the boldness of graffiti, or the elegance of geometric patterns. Think about how these wallpaper choices complement your own style and make your bedroom a more inspiring and pleasurable place to live as you plan your remodel.
0 notes
Text
Western Calligraphy Variations: From Classic to Modern

Western Calligraphy Variations Unveiled: Discover the Art from Timeless Classics to Contemporary Styles!
Western calligraphy is a captivating art form that encompasses a wide range of styles and techniques. From classic scripts to modern interpretations, calligraphy offers a rich variety of expressive possibilities. Whether you are a beginner or an experienced calligrapher, exploring the world of Western calligraphy can be a rewarding and fulfilling creative journey. Key Takeaways: - Western calligraphy encompasses a variety of styles, from classic to modern. - Classic calligraphy includes scripts like Roman capitals and Blackletter. - Modern calligraphy allows for creative expression and experimentation. - Calligraphy can be therapeutic and serve as a means of self-expression. - There are various resources available for learning calligraphy, including workshops and online tutorials.
The Origins and Evolution of Western Calligraphy

Western calligraphy has a rich history that dates back to ancient civilizations and has undergone significant evolution over time. Understanding the origins and evolution of Western calligraphy provides valuable insights into the art form's development and its diverse range of styles. The origins of calligraphy in the Western world can be traced back to ancient civilizations such as the Roman Empire. During this period, scripts like Roman Square Capitals and Rustic Capitals were widely used for formal inscriptions, showcasing their geometric precision and elegance. Calligraphy continued to evolve during the Middle Ages, influenced by Irish Christianity. Scripts like Uncial and Insular emerged, characterized by their distinctive letterforms and intricate designs. The Renaissance period witnessed a revival of classical scripts, with artists and scribes emulating the elegant styles of ancient Rome. Evolution of Western Calligraphy Styles: Calligraphy Period Key Features Ancient Rome Scripts like Roman Square Capitals and Rustic Capitals characterized by geometric precision Middle Ages Emergence of scripts like Uncial and Insular influenced by Irish Christianity Renaissance Revival of classical scripts, emulating ancient Roman styles The Baroque era brought forth ornate and elaborate calligraphy styles, reflecting the grandeur of the time. Intricate flourishes and embellishments adorned the scripts, creating visually stunning letterforms. As calligraphy continued to evolve into modern times, advancements in tools and mediums, such as the introduction of brush pens, allowed for new and innovative styles to emerge. The evolution of Western calligraphy showcases the art form's adaptability and ability to fuse tradition with contemporary expression. By understanding the origins and progression of calligraphy, one can gain a deeper appreciation for the diverse range of styles and techniques that exist today.
Classic Calligraphy Styles: From Roman Capitals to Blackletter

Roundhand, also known as Copperplate script, emerged during the 17th and 18th centuries and quickly gained popularity. This style is characterized by its flowing and rhythmic letterforms, created with a pointed pen and delicate nib. Roundhand is renowned for its graceful curves, thin-thick strokes, and beautifully executed flourishes. It is widely used in formal invitations, certificates, and elegant correspondence. Blackletter (Gothic Script) Example of Blackletter (Gothic Script) Blackletter, also known as Gothic script, emerged during the medieval period and is famous for its bold and angular letterforms. Its distinctive style features heavy, vertical strokes combined with sharp, spiky serifs. Blackletter calligraphy evokes an air of mystery and historical charm, often associated with medieval manuscripts and gothic architecture. While less commonly used today, it still holds a special place in the world of calligraphy and is often seen in decorative applications, such as certificates, invitations, and formal signage. These classic calligraphy styles are just a glimpse into the rich heritage of Western calligraphy. Each style has its unique characteristics and historical significance, making them fascinating subjects of study for calligraphy enthusiasts.
Modern Calligraphy: A Creative Twist on Tradition

Modern calligraphy offers a fresh and innovative approach to a traditional art form. It embraces the concept that calligraphy is not limited to strict rules and conventions, but rather a medium for personal expression and creativity. With modern calligraphy, you can break free from the constraints of traditional styles and explore new techniques and styles that reflect your unique artistic vision. One popular form of modern calligraphy is brush pen calligraphy. This technique involves using a brush-like pen instead of a traditional nib and ink. The brush pen allows for more fluid and expressive letterforms, creating a dynamic and contemporary look. With brush pen calligraphy, you can achieve a wide range of styles, from bold and expressive to delicate and graceful. "Modern calligraphy breaks the traditional rules of calligraphy and allows for more creative expression." Contemporary calligraphy is another branch of modern calligraphy that often incorporates elements of traditional scripts but with a modern twist. Calligraphers experiment with unique lettering techniques, mixing different styles and adding their own artistic flair. This fusion of old and new creates captivating compositions that push the boundaries of traditional calligraphy. Whether you choose brush pen calligraphy or explore contemporary styles, modern calligraphy opens up a world of possibilities for artistic expression. It allows you to infuse your personality into your lettering, creating pieces that are not only visually stunning but also deeply personal. So grab your brush pen or dip pen, and let your creativity flourish with the modern art of calligraphy. Examples of Modern Calligraphy Styles Style Description Minimalist Calligraphy A clean and simple style characterized by minimal embellishments and focus on letterform shapes. Watercolor Calligraphy Combines calligraphy with watercolor painting, creating beautiful gradients and blending effects. Typography-inspired Calligraphy Mixes calligraphy with typography elements, playing with different fonts and layout designs. Experimental Calligraphy Pushes the boundaries of traditional calligraphy with unconventional techniques and materials. These are just a few examples of the diverse range of modern calligraphy styles. As you dive into the world of modern calligraphy, you'll discover countless possibilities to explore and make your mark as a calligraphy artist.
Exploring Letterform Variations in Calligraphy
https://www.youtube.com/watch?v=2SOqI88SCUw Calligraphy is a versatile art form that allows for endless possibilities when it comes to letterform variations. With different scripts, styles, and techniques at your disposal, you can create unique and decorative calligraphy that showcases your creativity and personal touch. Let's explore some of the fascinating ways you can experiment with letterforms in calligraphy. Decorative Calligraphy Styles One of the exciting aspects of calligraphy is the opportunity to embellish your letterforms with decorative elements. Flourished calligraphy, for example, involves adding intricate loops, swirls, and extensions to the letters, creating a sense of elegance and flair. This style can be particularly effective for formal invitations, certificates, or other special occasions where a touch of sophistication is desired. Another way to enhance your calligraphy is through the use of different scripts and lettering styles. By combining elements from various classic and modern scripts, you can develop your own unique letterforms that capture the essence of both tradition and innovation. This fusion of styles can result in visually striking and aesthetically pleasing calligraphy that stands out from the crowd. Calligraphy Lettering Techniques Exploring different lettering techniques is another avenue for creating captivating letterform variations in calligraphy. Pointed pen calligraphy, for instance, utilizes a flexible nib that allows for delicate and precise lines. This technique is commonly used in Copperplate script and offers the opportunity to emphasize the contrast between thin and thick strokes, adding depth and dimension to your letterforms. Additionally, calligraphers can experiment with variations in size, spacing, and slant of the letters. By adjusting these parameters, you can create different moods and visual effects in your calligraphy, whether it's conveying a sense of elegance and formality with tight spacing and a slight slant, or a more casual and modern vibe with loose spacing and a playful slant. Letterform Variation Techniques Description Flourished Calligraphy Adding decorative loops, swirls, and extensions to letterforms for a sophisticated and elegant look. Fusion of Styles Combining elements from different scripts and lettering styles to create unique and visually striking calligraphy. Pointed Pen Technique Utilizing a flexible nib to achieve delicate and precise lines, emphasizing contrast between thin and thick strokes. Adjusting Size, Spacing, and Slant Experimenting with letterform parameters to create different moods and visual effects in calligraphy. As you delve into the world of calligraphy, don't be afraid to push the boundaries and explore your creativity. With letterform variations, you can infuse your calligraphy with personal style, breathing life into your compositions and showcasing your unique artistic voice.
The Role of Calligraphy in Different Artistic Fields
Calligraphy plays a significant role in various artistic fields, adding a touch of elegance and creativity to different mediums. Let's explore how calligraphy is used in graphic design, branding, and book arts. Calligraphy in Graphic Design "Calligraphy in graphic design brings a unique and personalized touch to typography." In the world of graphic design, calligraphy is employed to create visually appealing typography for logos, advertisements, and branding materials. Calligraphic lettering adds a sense of artistry, making the design stand out and leaving a lasting impression on the viewer. Whether it's a modern script or a classic calligraphy style, incorporating calligraphy in graphic design projects adds a touch of elegance and sophistication. Calligraphy in Branding "Calligraphy adds a sense of authenticity and craftsmanship to brand identities." Branding is all about creating a unique identity for a company or product. Calligraphy is often used in branding to evoke a sense of authenticity and craftsmanship. By incorporating calligraphic elements in logos, packaging, and marketing materials, brands can communicate their values, heritage, and attention to detail. Calligraphy adds a personal touch that resonates with customers and sets a brand apart from its competitors. Calligraphy in Book Arts "Calligraphy brings beauty and grace to the pages of books." In the realm of book arts, calligraphy is cherished for its ability to transform words into works of art. Calligraphers are often commissioned to create decorative lettering for chapter headings, initial letters, and illuminated manuscripts. Their skillful handiwork adds beauty and grace to the pages, elevating the reading experience and turning books into cherished treasures. Calligraphy in book arts also serves as a bridge between the past and the present, paying homage to the artistry of ancient scribes while embracing contemporary design aesthetics. The role of calligraphy extends beyond graphic design, branding, and book arts. It finds its place in various other artistic fields, including interior design, fashion design, product packaging, and cultural projects. Calligraphy's versatility and timeless allure ensure its continued presence and impact in the world of art and design.
The Therapeutic Benefits of Calligraphy
Calligraphy is not just a form of artistic expression; it can also have therapeutic benefits for those who practice it. Engaging in calligraphy can be a calming and meditative experience, allowing you to focus your mind and find a sense of inner peace. The rhythmic movements of the pen on paper can help quiet the mind, reduce stress, and promote relaxation. Creating beautiful letterforms through calligraphy can also be a form of self-expression. It allows you to convey your thoughts and emotions in a unique and personal way. Through the careful selection of lettering styles, colors, and compositions, you can infuse your calligraphy with your own personality and create pieces that truly reflect your individuality. Many people find solace in using calligraphy as a form of journaling. By combining the art of calligraphy with the practice of writing down your thoughts and experiences, you can create a deeply personal and meaningful record of your life. The act of putting pen to paper and seeing your thoughts materialize in beautifully crafted letters can be incredibly cathartic and therapeutic. Whether you are a beginner or an experienced calligrapher, embracing calligraphy as a therapeutic and personal art form can bring a sense of joy and fulfillment to your life. Through calligraphy, you can find an outlet for your creativity, a means of self-expression, and a way to cultivate mindfulness and inner peace. So pick up your pen, let your thoughts flow through your fingertips, and embark on your own journey of therapeutic calligraphy.
Learning Calligraphy: Workshops, Tutorials, and Online Resources
Ready to embark on your calligraphy journey? There are various avenues available to help you learn and improve your calligraphy skills. Whether you prefer hands-on instruction or the flexibility of online tutorials, there are resources tailored to suit your learning style and preferences. Calligraphy Workshops Attending calligraphy workshops is a great way to immerse yourself in the world of calligraphy and receive expert guidance. These workshops offer a hands-on approach, allowing you to learn and practice under the supervision of experienced calligraphers. You can explore different calligraphy styles and techniques, ask questions, and receive personalized feedback. Many workshops also provide all the necessary materials, so you can dive right into your calligraphy practice. Online Calligraphy Tutorials If you prefer the convenience of learning from the comfort of your own home, online calligraphy tutorials are a fantastic option. These tutorials provide step-by-step instructions and demonstrations for various calligraphy styles. You can watch videos, follow along with exercises, and learn at your own pace. Online tutorials often cover different topics, from basic lettering techniques to advanced compositions, so you can gradually build upon your skills and knowledge. Calligraphy Resources In addition to workshops and online tutorials, there are numerous websites, forums, and social media groups dedicated to calligraphy. These platforms serve as valuable resources where you can find inspiration, connect with fellow calligraphers, and access useful tips and techniques. You can join online communities, participate in challenges, and share your work for feedback and encouragement. Exploring these resources allows you to expand your calligraphy network and stay up-to-date with the latest trends and developments in the calligraphy world. Resource Description Calligraphy Workshops Hands-on instruction and guidance from experienced calligraphers. Online Calligraphy Tutorials Step-by-step instructions and demonstrations for various calligraphy styles. Websites, Forums, and Social Media Groups Online platforms dedicated to calligraphy, offering inspiration, tips, and networking opportunities. Remember, learning calligraphy is a journey that requires patience, practice, and a willingness to experiment. Whether you choose to attend workshops, follow online tutorials, or explore calligraphy resources, the key is to dedicate regular time to hone your skills. So, grab your pen, explore the world of calligraphy, and let your creativity flow!
Calligraphy Supplies and Tools for Beginners and Professionals
When it comes to calligraphy, having the right supplies and tools can make all the difference in your practice. Whether you're a beginner or a seasoned professional, here are some essential items you'll need to create beautiful lettering artworks. Calligraphy Pens Calligraphy pens are the foundation of your writing tool kit. There are various types of pens, each offering a unique writing experience. Some popular options include: - Dip Pens: These pens have interchangeable nibs, allowing you to experiment with different line widths and styles. They require dipping into ink regularly. - Fountain Pens: The smooth flow of ink from a fountain pen makes it a popular choice for beginners. They are easy to use and maintain. - Brush Pens: Brush pens have flexible bristles that mimic the look of traditional brush calligraphy. They are perfect for creating thick and thin strokes effortlessly. Calligraphy Inks Choosing the right ink is crucial for achieving desired results in calligraphy. Here are a few types of inks you may consider: - Sumi Ink: A traditional black ink used by Japanese and Chinese calligraphers. It provides a rich black color and flows smoothly. - Watercolor Inks: These inks come in a wide range of colors and can be mixed to create custom shades. They are versatile and can be diluted for various effects. - Metallic Inks: Metallic inks add a touch of glamour to your calligraphy. They come in gold, silver, and other metallic shades, perfect for special occasions or decorative purposes. Calligraphy Paper The right paper can greatly impact your calligraphy work. Look for papers that are smooth, durable, and bleed-resistant. Some popular choices include: - Practice Pads: Practice pads are ideal for beginners as they offer guidelines to help you maintain consistent letter heights and angles. - Parchment Paper: Parchment paper is a classic choice for calligraphy. It has a smooth surface that allows ink to dry quickly and prevents smudging. Read the full article
0 notes
Text
CAS post for December for creativity by Natalia Wroniecka
Learning how to draw hands for Creativity for CAS in December.
Reflection
In December I decided to continue the process of learning how to draw hands. This time I used a tutorial because I believe that using different sources to learn is the best method to get better. This months outcome was as far the most satisfying and successful one. It was really challenging to get the drawings to look as I wanted them to but the final result was very rewarding and I am happy that I took a lot of time to do them perfectly. Beside the challenging parts I really enjoyed seeing how my drawings got better and better with every try. You can see the progress in my drawings while watching my first drawings and comparing them with these. I also learned that it is good to use geometrical shapes to get a drawing of a hand that has accurate anatomy and proportions. I am really motivated to continue this process of learning and one day being able to draw perfect hands in every possible perspective.
youtube

0 notes
Text
"Mastering Portrait Rangoli: Learn Online rangoli art with certificate"

Introduction:
Rangoli, a traditional Indian art form, has been celebrated for centuries for its vibrant colors, intricate patterns, and cultural significance. While traditional rangoli designs often feature geometric shapes and motifs, there has been a growing interest in portrait rangoli, which involves creating intricate portraits using colored powders or grains. With the rise of online education platforms, enthusiasts and artists can now explore the art of Leanr online portrait rangoli art with certificate through specialized online classes offered in India.
Exploring Portrait Rangoli Online Classes:
Curriculum: Portrait rangoli online classes typically offer a structured curriculum designed to teach students the fundamentals of creating portrait rangoli. From understanding color theory and composition to mastering the techniques of shading and detailing, these classes cover a wide range of topics aimed at honing students' skills and creativity.
Interactive Sessions: Through live demonstrations, video tutorials, and interactive sessions with experienced instructors, students have the opportunity to learn and practice portrait rangoli techniques in real-time. These sessions provide personalized guidance, feedback, and troubleshooting, allowing students to progress at their own pace and level of proficiency.
Hands-on Projects: Online classes often include hands-on projects and assignments that encourage students to apply their newfound knowledge and skills. From simple portraits to more complex designs, students are encouraged to experiment, innovate, and express themselves creatively through their rangoli creations.
Community Engagement: Many online platforms foster a sense of community among students through discussion forums, social media groups, and virtual meetups. This sense of camaraderie allows students to share their work, seek inspiration, and collaborate with fellow enthusiasts, fostering a supportive and encouraging learning environment.
Benefits of Learn Portrait Rangoli Online Classes with certificate in India:
Accessibility: Online classes make portrait rangoli education accessible to individuals across India, regardless of geographical location or physical proximity to traditional art schools. All that's needed is an internet connection and a passion for learning.
Flexibility: Online classes offer flexibility in terms of scheduling, allowing students to learn at their own pace and convenience. Whether you're a busy professional, a student, or a homemaker, you can pursue your passion for portrait rangoli without disrupting your daily routine.
Expert Instruction: Online classes are often taught by experienced artists and instructors who possess in-depth knowledge and expertise in portrait rangoli. Their guidance and mentorship ensure that students receive high-quality instruction and support throughout their learning journey.
Cultural Preservation: By promoting the art of portrait rangoli, online classes contribute to the preservation and celebration of India's rich cultural heritage. Through this ancient art form, students not only learn valuable artistic skills but also gain a deeper appreciation for Indian culture and traditions.
Conclusion:
In conclusion, portrait rangoli online classes in India offer a unique opportunity for individuals to explore and master this traditional art form from the comfort of their homes. With expert instruction, interactive sessions, and a supportive community, students can unleash their creativity, express themselves artistically, and celebrate the beauty of Learn portrait rangoli art with certificate. Whether you're a novice seeking to learn the basics or a seasoned artist looking to refine your skills, these online classes provide the perfect platform to embark on a colorful and fulfilling artistic journey.
for more information
0 notes
Text
Unit 2 Reflective Journal - Lim Lin Year 1 Production Arts for Screen
For the next unit, we are introduced to designing and making. For the next five weeks, I will be recording my progress and reflections for both the 2D and 3D components of this project.
During the first lesson of the 2d component of this unit, we were taught how to convey storytelling in a scene, in which the setting allows the audience to know the story. Several factors such as the angle, atmosphere and shape language create a scene in which the character, personality and time can be shown. An important part to take note of is to ensure that the viewer knows what the drawing is about, and to do so we should plan the artwork with a story in mind and use different design elements to create context and meet the audience's expectations through the medium. For the practice we had this lesson, we had to redraw a child’s bedroom into one of a spiteful 90-year-old.

I decided to change the bed frame to a hard metal frame, replaced the small tv with a larger one, removed the posters while leaving marks of it that were stuck to the wall, and added a few old storage boxes to imply that the elderly person has grown out of their past hobbies. I also tried to show the age of the elderly person with several other changes such as changing the furniture to more antique ones and adding props like the floor fan.
The next tutorial for 2d drawing taught us how to create appealing and leading compositions. A point heavily emphasized was that the environment provides a stage for the action. The practice given tasked us with doing a room drawing with all the props given, while making the fishbowl the focus of the composition.
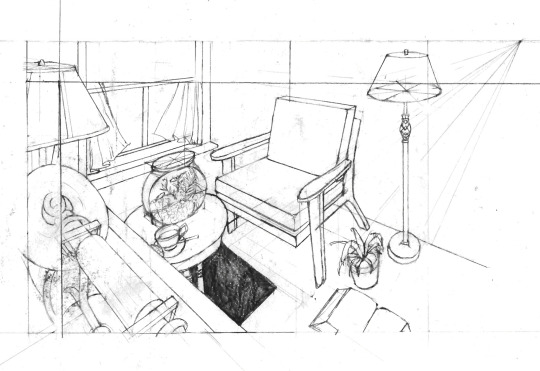
Although it was not obvious in the rough sketches I made, the different props ended up appearing very cramped in the final drawing, so the fishbowl did not appear as the focus of the shot. I would have to consider when working on the final hand in's line drawing component.
The third tutorial was for the drawing practice which involves outdoor compositions. For environments consisting of organic forms, finding the horizon line is important when drawing them and take note that the large land masses are still on the ground. For this practice, we had to draw an image of a forest given in another camera angle.
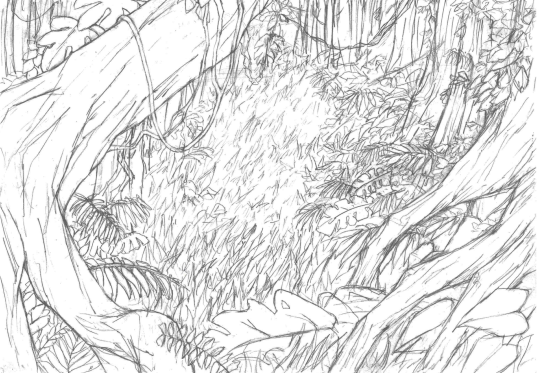
For this drawing, I started with the closer trees as a frame then struggled when working on details such as the grass and weeds. I should have controlled the number of details in different areas of the shot to lead to eyes to the centre of the image.
Lastly, to make the settings appear more charming to the audience, our tutor explained ways to make the backgrounds look more captivating rather than informational. To do so, the advice given is to have solid perspective drawing and to research on details, as well as to vary line weight to create a sense of depth. I realised after this tutorial that many of my previous perspective drawings have this issue as the ones with many geometric forms appear too mechanical. As such, I tried following the guidelines given when working on the line drawing, then cleaned it digitally for the final hand in.

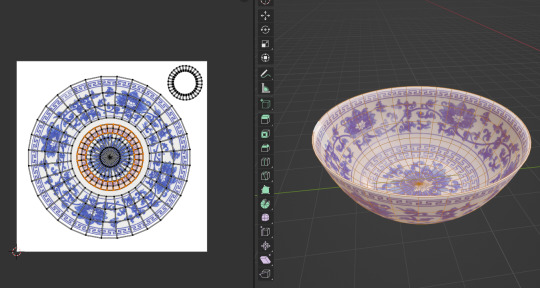
The second part of this unit was the 3d component and it began with an introduction to blender. For the next 3d tutorials throughout the unit, we were guided on how to model a realistic eyeball which will then be used for the final 3d render. I tried using blender a few times in the past but struggled a lot because I was not sure how the different tools work. These tutorials helped to familiarise me with several functions that are used often in modelling, such as proportional editing and extrusion. The types of texture maps used were explained clearly and this later helped me a lot when creating my own materials.

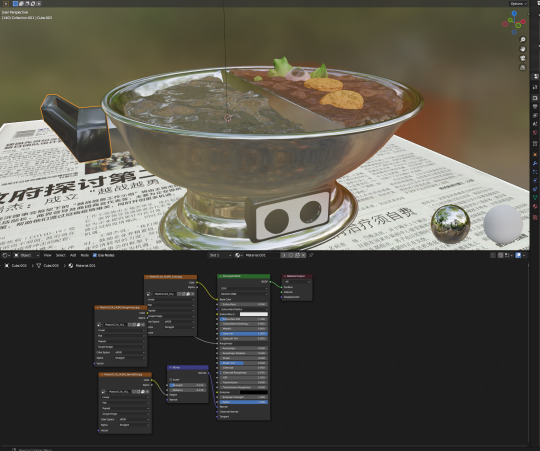
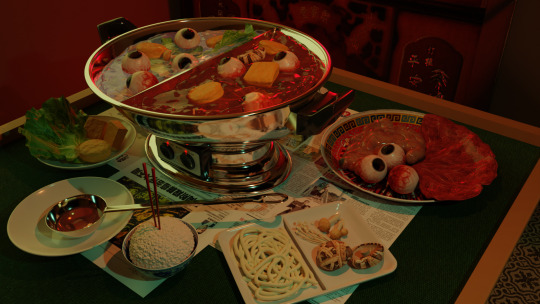
For the “Eyeball Soup” project, I wanted to create a scene which depicts a cannibalistic family having a hotpot dinner. The inspiration of this came from various horror games which have this storyline as a reason for body parts to be found in meals. I also wanted to play with the cultural aspect of this project as I find the many ways to incorporate this grotesque subject matter into Chinese superstitions to be interesting to research on.
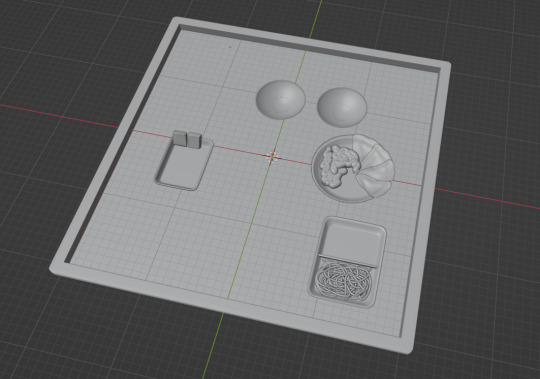
The first items I modelled besides the eyeball are simple items such as bowls, plates, and trays, then working on more complex objects like the hotpot. While they are all made of similar shapes, I struggled a lot with modelling the bottom half of the hotpot as I was still not familiar with using the extrusion and other editing tools. I had to redo the modelling several times before ending up with this result.

The handle was also challenging to model. The use of the mirror and subdivision surface modifiers made it difficult to bevel the edges of the handle. I decided to try working on other parts first, so I started looking up fluid simulation tutorials for the soup broth. I wanted to use a fluid simulation for this as I wanted the soup to appear as if it was boiling.


On a separate blender files, I began to model the mahjong table and food items that I want to include in the scene.
For tubular forms such as the organs and noodles, I used the Beizer curve tool to make the process more efficient. While the noodles were made without textures, I struggled to map out the texture for the organs. I ended up using the “Project from view” function to make the texture appear less out of place.

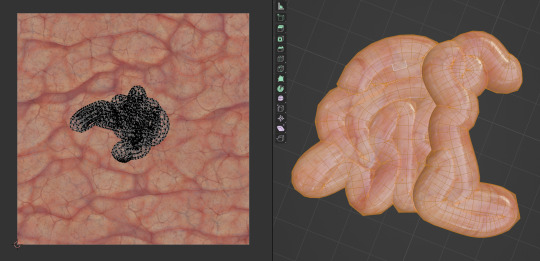
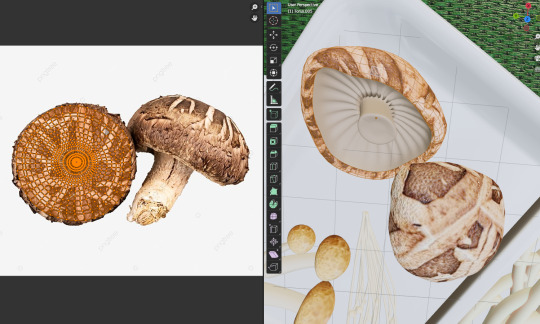
For more complicated organic forms such as lettuce leaves, I followed a tutorial to learn how to create believable folds using sculpt mode. By adjusting the radius and origin offset of the boundary forms, I was able to create a shape that resembles the references I used.

UV mapping was more challenging as I had to fit the mesh into the image texture.

After a while, I was able to familiarise myself with modelling objects and adding textures. The key issues I had were still the accuracy of the models and the quality of the textures I used. Although the image quality was not obvious in this project, I would have to consider this in the future when modelling items that require close-up shots.
I also wanted to add a rice bowl with chopsticks sticking into it as this act is seen as a major taboo across Asian countries, since it resembles incense used in funerals and offerings. To create the rice, I followed a rice modelling tutorial and adjusted the amount of rice on the sphere.

A tedious step I had to do was to split the fluid domain in half. I ended up needing to redo the fluid simulation twice on two separate “bowls” in the hotpot. While it was very time consuming, I was still thankfully able to finish it in time and converted the domains to mesh for the material setup. I also added a few planes with newspaper as textures as it is common to use newspapers to prevent broth from spilling onto the table.
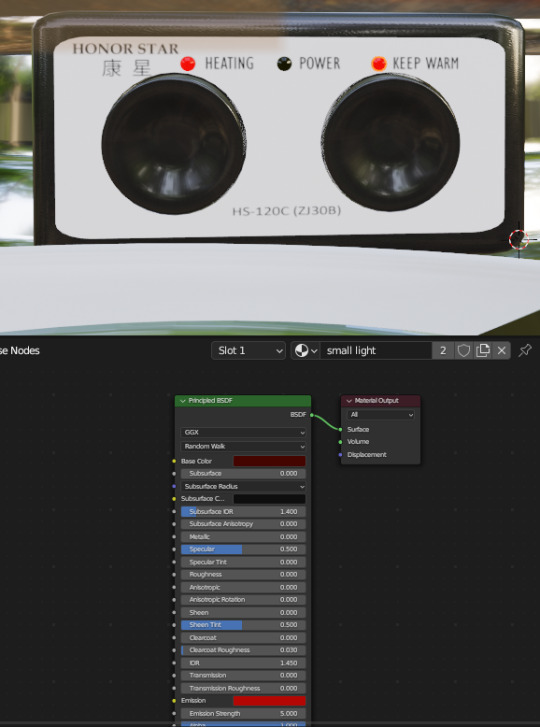
For extra detail, I also added text into the switch panel and added small spheres which emit red light.
The handle was also fixed with more precise use of the bevel tool.

After a while, I was finally able to finish modelling all the objects and adding textures onto them, then appended them together into one blender file.

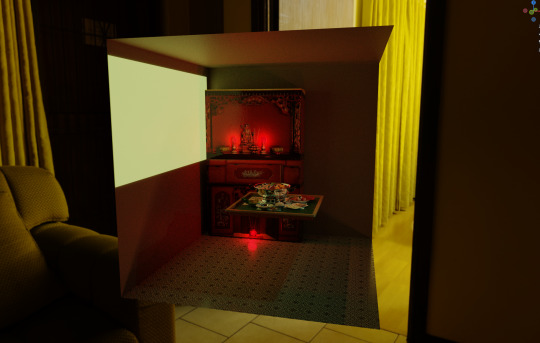
Afterwards, I modelled parts of the room that are visible in the shot and added lighting to the scene. I used a tile pattern for the floor and added a “window” which emits light. The altar was an image UV mapped into a cuboid as I had no time to model the entire thing but added some lights and roughness map to make it look more believable.

The last step was to set up the HDRI and adjust the rendering settings for the final render. The alternative angles and close-up shots I chose for the final submission are in the file uploaded to Moodle.
Overall, I was satisfied with the result as I managed to work outside of my comfort zone for this unit. I would like to use what I learned in the 2d component to have a stronger foundation in perspective drawing and hope to learn more about blender and 3d modelling for future projects.
0 notes
Text
11 Reasons why Minecraft is Educational for Kids
Minecraft helps kids learn problem-solving techniques
The ability to problem-solve dictates how well a child can navigate obstacles, both hypothetical and in real life. Minecraft can encourage and expand this type of thinking.
As an example, we can look to the game’s “survival mode”. In it, the player must maintain their hunger and health levels in the face of dangerous monsters and other obstacles. They’ll have to quickly figure out how escape, find cover and learn to survive in these quick 10-minute scenes.
This can encourage critical thinking and teach your child how to react quickly and efficiently to solve real-world problems.
Minecraft can support reading and writing skills
It is commonly understood that children best learn when having fun, and with Minecraft that’s exactly what they do.
If a child is motivated to advance in the game of Minecraft, they’ll need to have a good understanding of the written guides that appear on-screen.
If they’re also playing with classmates, they’ll need to use the chat function to read and write messages back and forth as part of team play.
Minecraft supports a curious mind
After a Minecraft session, you might find that your child gets a lot more curious. Maybe they even want to research things for themselves.
Part of the game requires children to overcome challenges. To progress, they’ll need to find hints and tricks to help them.
That could mean online research, such as Wikipedia or YouTube, or even a trip to the local library! There are many books on Minecraft tutorials out there. Your child will have to analyse it all to find the best information.
It almost sounds like the kind of thing you’d do for a school project or paper, doesn’t it?
Minecraft helps kids with math problems
Minecraft is already being used in classrooms to support learning in maths.
Here’s just one example from a teacher in the United States who used Minecraft to give his students a boost. This is what he had to say about the educational benefits of Minecraft:
“I was teaching third grade that year in inner-city Los Angeles and was determined to teach math with Minecraft. I was glad I did. Over a span of six months, my class’s benchmark test scores shot up from 18 percent to 84 percent in math and from 24 percent to 81 percent in English.”
When playing Minecraft, children develop complex shapes, tackle geometric problems, and manipulate blocks. All of these are key mathematical concepts that will form part of your child’s curriculum.
Minecraft teaches children how to manage resources
In Minecraft, children learn how to calculate how much things cost, and the time required for certain tasks.
For example, they could have to gather wood to build part of a dwelling. They could do it by hand, but using an axe is quicker… The only problem is that the axe will need to be paid for and will eventually become blunt.
Learning how to pay for and use resources efficiently is a key aspect to a child’s educational and practical development.
Minecraft teaches kids the benefits of teamwork
Minecraft games involve collaboration with other children and teammates. In fact, sometimes it’s the only way a player can achieve certain goals.
By pooling and sharing resources whilst they plan together, children will learn to rely on each other. They’ll have to work together positively to achieve their common goal!
Minecraft can help to improve a child’s confidence
There’s every chance Minecraft could help to improve how confident your child is. Once they’ve learned impressive Minecraft skills they can share this with friends and forge new friendships!
Minecraft can help kids learn about history
Reconstructing famous and historical landmarks in Minecraft is a popular educational use of the game.
Children can complete tasks involving a huge amount of research into history. This includes understanding the major points in human civilisation, mapping locations and recreating famous events.
Your child will need to understand maths and scale as they populate these landmarks with the experiences that took place over time.
For example, in 2016 the Museum of London used Minecraft to recreate the Great Fire of 1666. You can see how they did it on their website and this YouTube video for a walkthrough on the scene.
Minecraft can improve a child’s creativity and imagination
Minecraft truly excels in the limits of the game – there are none!
If your child wants to build an amusement park, then they can do it. Or perhaps they want to build a 100-foot high version of their grandma… it’s all possible – the Minecraft world is an unlimited one.
The Minecraft platform lets children imagine and build anything that they want, real or not. The only restriction is that it needs to be created with small building blocks.
Minecraft can help a child learn to code
Minecraft contributes into this potentially key learning skill with its huge degree of customisation. Children can edit the original Minecraft code as mods to make the game behave in different ways. This can be as small as altering the weather or as huge as creating an invincible flying squid! This is all possible using Minecraft’s command blocks.
If they want to take it further, your child can modify the program using Java code. They can also develop further coding skills such as de-bugging. Once they’re finished, they can share those mods with their friends and teammates for a totally unique, sharable experience.
Minecraft offers valuable future work skills
All of the educational aspects we’ve spoken about will no doubt put your child in good stead for their future employment prospects.
The elements involved with Minecraft can help to teach not just technical skills, but also simulate business skills including trading and relationship-building.
Used the correct way, Minecraft could help give your child a solid background in core STEM (science, technology, engineering and mathematics) subjects; all of which are critical in the 21st century workplace.
When you also consider the social skills that Minecraft can help develop, your child could also become very proficient at negotiation, project planning and teamwork. These are all skills which employers today, and in the future, will always be looking for.
✨ HELP NEEDED WITH ARGUMENTS FOR CONVINCING STICT MOM TO LET ME HAVE MINECRAFT ✨
reblog to help me get more fodder for the war
✨ HELP NEEDED WITH ARGUMENTS FOR CONVINCING STICT MOM TO LET ME HAVE MINECRAFT ✨
So guys, I need your help. I’m going to finally be asking my suuuper strict mom if we can get Minecraft. Please, I need all your best and most convincing arguments, because this will be a fricking battle. Give me any net positive’s about Minecraft that could convince her, please!
40 notes
·
View notes
Link
Properties and formulas of geometric progression, arithmetic and geometric progression question and answers, nth term of gp, sum of gp formula
#sum of gp formula#properties of geometric progression#Arithmetic progression#Geometric progression#geometric progression tutorial#allmathtricks
0 notes