#github account creation
Text
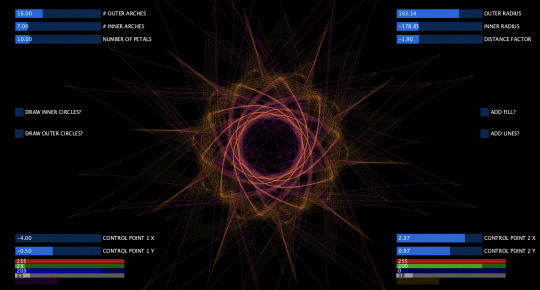
Animated Mandalas (With Code!)
In some of the rare times where I create something small and cool, I love sharing it with other people :)
For context, I've been working on a video game and started looking into some loading screens. I got carried away a bit, but I loved the capabilities and parameters I could experiment with here!
Since my game is set in a Mystery Solarpunk world, I was aiming for brighter and lighter color schemes :).
I was surprised with how beautiful all the parameter combinations can be!

Code
So if you want to try it yourself, feel free to check out the following repo:
https://github.com/AB3000/processing-fun/tree/main/MandalaRunner
You will need to download Processing in order to run it. It's a nice open-source sketchbook language built on top of Java to draw some cool visuals :)).
If you end up creating something with it, please tag me so I can see your creations! B)
Also, if you happen to have a GitHub account, I would love it if you could star the repo as well (but no pressure on this!) :))
More Inspiration?
Want some more inspiration? Check out the examples here! :)
youtube
#animation#2danimation#art#fractals#mandalas#programming#stem#geometric patterns#geometry#engineering#colors#tumblr#mandala#abstract#Youtube#women in stem#female engineer
140 notes
·
View notes
Text
Disco Elysium Fandom Masterpost
Decided to compile all the cool projects fans have made for Disco Elysium! This includes game resources, fan games, and fun collaboration events!
If you want to be notified of any updates, you can click on 'subscribe to conversation' for this post!
If you've got any corrections/updates/suggestions, reach out to let me know! ((Last updated: January 29th, 2023))
Game Information/Archives/Resources
Disco Elysium Wiki (Literally contains most everything you'd want to know about the game, including a ton of image resources)
FAYDE On-Air by Morgue, Pieartsy, and Sphinx111 (Search engine tool to easily find any in-game dialogue)
Disco Reader by xyrilyn + Guide on how to use it (Search engine AND text visualization tool. You can see the full dialogue trees as flowcharts)
Disco Elysium Explorer by Leerion + Github (Inspired by Disco Reader. It works much the same way but it ALSO includes the audio clips for every piece of dialogue!! + the text for every language released so far)
Disco Elysium Checklist compiled by MentalPrinciple0 (Includes all red/white checks, their difficulty level, all possible modifiers, as well as items, tasks, thoughts, and their modifiers)
Complete OST + Ambient Mix compiled by OnlySheStandsHere (Includes everything added for The Final Cut)
High Quality Full Map of Martinaise compiled by For Lack Of A Title
Map of Revachol West vectorized by freezebobs + svg file
Disco Elysium: Country/Cultural Mappings compiled by Limey (List of all the geographical places named in-game, what we know about them, and what some real-world parallels are)
Disco Elysium: A Timeline compiled by six and brenn (A complete timeline of every event mentioned in the game, from the creation of the universe to the events of The Hanged Man case)
Theoretical Entroponetics by 57sfinest (Everything we know about The Pale + OP's own theory)
Fanworks
Fandom Collaboration Projects
((since these are big collaboration projects, I unfortunately can't properly list the credits on this post. Make sure to check out the respective credit pages of the projects!! So many talented peeps!!!))
Disco Elysium Fan Colouring Book (SFW)
Disco Elysium Fan Colouring Book (NSFW) [[18+]]
Social media tag: #EspritDeCouleur
Fire Escape in The Sea Montage-Disco Elysium
Social media tag: #FEITSmontage
Disco Elysium Montage/Cleaning Out The Rooms
Social media tag: #COTRmontage
Disco Elysium Secret Santa 2022
Ao3 Collection
Bonus Round! Prompt List is open for anyone to fill if something grabs your interest!
Social media tag: #DESecretSanta2022
Disco Elysium Rarepair Fanworks Exchange
Ao3 Collection
Prompt List! Open for anyone to fill if something grabs your interest!
((There's no tag, everything is compiled on the twitter account. If you post anything new, make sure to @ the account to be RTed!))
Disco Elysium Tarot, the Major Arcana
Social Media tag: #DiscoTarot
An art challenge to recreate famous paintings into something Disco Elysium themed! Feel free to join in!
Social media tag: #DiscoElysiumArtClassic
Fan Games
After the Mind, the World Again by Pieartsy (TTRPG)
Disco Elysium: Game Boy Edition by BloodyStapler
Disco Dating by Slugandthorn, Capreola, Frankie, and Joe/BerlinChild (Visual Novel)
The Cryptokiller, project lead Arthur Stahlschmidt (Visual Novel) ((Make sure to check the itch.io page for a full list of the team!!))
Mystery Miniaturist by Jasmine "Katy133" Osler (Visual Novel) ((Make sure to check the itch.io page for the full list of credits!!))
WE GOT A CODE 31 by Slugandthorn (Dancing Penguin Kim. WHAT MORE DO YOU WANT ME TO SAY!!)
Mini Mini Disco by OinkOink!Studio (a collection of mini-games! The links on the main page might be broken, so here they are just in case:
Nod match with Kim
Pretty Jean Jean
Beg Money)
Disco Elysium: Signature Skill Selection by FeigningIntelligence (Take this quiz and find out what your signature skill is!)
Twine Games/Fics
Re-Hearsed by Apepers
Requiem for the Apostle by Alphawave
Sweeter Kind of Fire [[18+]] by Kawa
Disco Elysium: Insomnia [[18+]] by mouseoverlord, Booboboobo, cyaber5, LoveSplean, and Aila
One Day in Jamrock [[18+]] by CeaserAmarelo
Fan Skins
((Want to write a fic/make a game that looks like Disco Elysium? These cool peeps got you covered!))
Disco Days Workskin by abyssalcaptain (Ao3)
Disco Elysium Workskin by Cunticuss (Ao3)
Disco Elysium Twine Macros by Apepers and Pieartsy (Twine)
Disco Elysium Framework for Ren'Py by Katy133 (Ren'Py)
AI
Uberduck Voice AI for Kim Kitsuragi by emmash527 and justinjohn-03
Uberduck Voice AI for Cuno by TheTiagoFire
Disco-Narrator Voice AI which includes: Kim Kitsuragi, The Narrator, and Joyce Messier [[Unfortunately it's been down for a long time now]]
Character.AI (You can make your own characters pretty easily, and there's a bunch of ones for Disco Elysium, including Kim, Jean, Trant, and Cuno last I checked)
Misc.
Disco Elysium Mods
Disco Elysium Item Card Creator by ColorfulTie (fun lil tool to create your own items with stats in the style of the game)
Disco Elysium fan music by Aila :
Insomnia Vol 1
Rain in Revachol
282 notes
·
View notes
Text
Project64 Legacy (v1.6 fork) v1.6.4 - [The End] released
Released on June 22nd, 2024, named The End. (mean it this time!)
Changes:
Application:
Fix for Icepir8's Legacy RSP Plugin Ver: 0.2.2e support
TLB extra checks for overflow buffer mapping for user TLB entries
Enabled Advance Mode by default
Pause Emulation disabled by default
Icepir8's Legacy RSP Plugin Ver: 0.2.2e
Interpreter Core fix.
Save state loading fix.
Reset without crashing in window & full screen modes.
Icepir8's Legacy LLE Video Plugin (Final) Ver: 0.3.2e
Vsync disabled by default.
Fixed zombie creation in procuress issue.
Azimer's Legacy Audio Plugin (Final) Ver: 0.70.10c
Replaced Windows INI Functions with SimpleINI.
Removed Volume, Driver, DisallowSleep from Rom Specific
Removed validation checks to DS8 to prevent JaboSound issues
CoInit changes in an attempt to bring stability
A Patch to address load state delay
Updated configuration to only save to general section for driver, volume, sleeps.
Also forced defaults and config save when config does not exist.
Fix BOOL to bool
2 notes
·
View notes
Text
A more detailed ask.
I am asking for any ffxiv rpers to help me beta test my website which could act as a repository for roleplayers that can be browsed. A few pictures to showcase what I mean.
Been doing this in my free time for fun but i figure I'd actually give it an opportunity to be fully functional and available to the public, especially if I can get it to a place where it can function without me constantly having to manage it.


The current people you see are some volunteers I've gotten (some friends and friends of friends). But I need more to test. I've gotten a report system in for inappropriate content, profile pages, a rating system, a functioning search, and so on and so forth.
Because of the framework I'm using, however, I am testing to see what the scalability is on resources and potential cost so character creation is blocked behind a token and each account has the ability to make one character per account. I'm currently working on some more feedback I've gotten already (Like the ability to add more information to profile and a report system that was suggested and now implemented).
So those that would like to help out or try it out just need to let me know and I can give you a token to create a character, try the experience and leave feedback. You do need to have a discord or github account to login, so that right now is the only blocker. If you dont have one or the other, you can't sign in. (I do have plans to add gmail).
You can check it out here.
If you're interested, you can dm me or send a reply and ill DM u (make sure your DMs are open).
2 notes
·
View notes
Text
TL;DR, grab the source if you want it, they're taking everything down due to legal threats from the company that runs Tapas.
Full text copied below:
It's joever
tl;dr
Tachiyomi will no longer be actively developed. It may continue to work for you for the foreseeable future but there will be no support for it nor the official extensions.
I'm sad to announce that, with unanimous support from the fellow core contributors and support staff, the core Tachiyomi project will no longer be under active development due to recent events involving Kakao Entertainment Corp's threats to both myself and others that have been involved with the project.
While many will be understandably angry or disappointed in our lack of backbone or perceived selfishness, please understand that this project has merely served as a simple hobby to many of us with no financial incentive and such events have proved unworthy of investing additional time and effort.
Personally, I've learned a lot while working on Tachiyomi:
Various facets of Android development including its hellscape of rapidly changing languages, libraries, and APIs.
Considerations when developing an app used by millions of people yet working with very little data on how they use it, and how to shape user behavior in a longer-term more sustainable fashion.
How to design things to make things accessible to the average, not necessarily tech-literate, user.
No matter what you used Tachiyomi for, I hope it gave you some happier times. I sincerely hope to see a future where content will be more accessible to fans around the world and that creators can truly share their creations in a sustainable and healthy manner for them.
I want to take the time to thank everybody who has been involved:
The hundreds of global contributors, including to the app, extensions, website, and translations.
The volunteers who helped manage/moderate Discord, GitHub, and the social media accounts; you all have ridiculous patience.
Anybody who submitted feedback or bug reports, helping further improve the project.
And also a huge sorry to anybody who had pull requests that were left open, I was hoping to get to those at some point.
In the upcoming days:
Our core GitHub repositories will be taken down.
The official social media accounts will be closed.
The official Discord server will be repurposed into a general community for those who are interested in staying.
Note that existing installations cannot be affected by us. Anything new called Tachiyomi or claiming to be its successor have no relation to the original developers. Always practice caution when downloading or installing anything from unknown sources.
As always, directly support your favorite content creators if you are in a position to do so.
Thank you,
— arkon
P.S. There's an earlier post about the extensions being removed in case you missed it.
P.P.S. I think someone on Reddit owes someone else $100 now.
These recent posts are also archived on Pastebin: https://pastebin.com/ScYsKtia
Last updated: January 13, 2024 at 2:34 PM
#tachiyomi#Kakao Entertainment Corp#Kakao Entertainment#tapas#comics#scanlations#copyright#manga#coding
4 notes
·
View notes
Text
201 Days
Day 201 - May 24th, 12.024
Yes, I didn't notice that yesterday was the day 200 of the daily blogs.
Past Promises
If you are reading this since the first months of this personal challenge, you probably are wondering what happened to the projects like Hobbiest Monologue and the Elementria comics that I presented on the comemoration for 100
days. Well, I pretty much forgot about them. It is somewhat disappointing, but I kinda learned that it is better to do things before
promising them, not only because it helps with not disappointing people, but also to keep your motivation and the urge to keep doing said thing.
Will I make said projects in the future? Maybe, the YouTube channel for Hobbiest Monologue is done, and both of them also have their respective logos and brands made. However, I'm not really focused on creating more content besides these blogs. Maybe one day when I have a professional job and a good enough workflow and tools to help mitigate the time and energy that these projects need, I will go back to the ideas. I do still love video creation and art, but I have other focus now. And it isn't like I won't make anything related to these topics, but a long-term project is not a good idea for now.
Past Achievements
Besides, I was able to do some projects. The main idea of "The System" wasn't really made into reality, since the whole idea of it were somewhat broken. However, said idea made me do a lot in the process.
I have finally started to
learn, and completed a
project with the
Rust programming language! It is a simple
project, and I didn't really make everything that I have planned, but it is good to have a CLI tool to manipulate markdown, which I am actively using in scripts on my Obsidian vault, and hopefully said project will grow and stabilize to be used by other people in their files. For now, I don't know how much about Rust I will continue. The main focus for me with the language is CLI tools and AST manipulation, since it feels to be a good use of it and in general I had a better experience (compared to something like JavaScript for AST manipulation). Yes, I could learn more about async and lifetimes, but I have already wasted a lot of my years just learning stuff, so if I need to in a project, I will learn them, I just don't want to actively be just studying concepts and syntaxes.
Talking about actually doing stuff. I really learned to not step too close into the
sun, and stop abstracting even my fucking NixOS configuration. Programmers do love making abstractions before they are necessary, but fucking god, having anxiety and trying to predict every outcome of the program because of it, really takes it into the next level. And that's why I'm learning Go.
Like Rust, I was influenced by ThePrimeagen to learn Go, and HTMX (with some sprinkles of AlpineJS maybe), for server-side and web development in general. And it is being a great experiment, it is also funny how I haven't even read the docs of Go, and still am able to create a working website and server, without any dependencies. It is a breath of fresh air after learning so many JavaScript frameworks, build tools, libraries, etc. Nonetheless, learning the language can also help to find a job, it feels like it's starting to have more attention and opportunities, and besides I'm not "just another JavaScript developer" at least.
And hopefully the continuous task of improving my GitHub and LinkedIn
profiles, improving my portifolio, getting
certificates, and just trying to be more active on my accounts, can also help. I already send more than 70 applications, without any feedback whatsoever, but I will not give up, because I want to be able to hug my girlfriend and have a house with her in the future.
Past Chaos
Besides all what I somehow achieved, these last three months were a lot harder than I expected. Actually, I couldn't even predict what happened, and it feels like time passed by without I'm even noticing. I'm surprised that I even managed to complete anything.
I do not want to give a lot of personal information on the internet, even less if it is related to family and nothing to do with creative process or work. But as you probably noticed on a past blog
post, I lost my (grand) grandmother, the person who raised my dad, that my mom took care of for pretty much 16 years, someone who lived until 99 years old with an incredible health to her age. My dad's family has a lot of issues, every family has, and my parents sacrificed a lot of themselves, since others didn't do anything better to take care of her. However, said sacrifices started to hit a lot this year, and my parent's mental health were in the limit, as my grand grandmother's health as also hitting the limit. I didn't work a lot during the time, since I wanted to be with my parents, not just to give some support, but also strength to fight, so others would take some action. And they did, but it didn't last that long.
Something that I want to be clear, you do not know what really was happening these three months, even less these 16 years, it may be my anxiety kicking right now, but I do not want no one to judge, make assumptions, say what we should have done, anything like that, now or in the future. You don't know me, I don't know you. She lived a healthy and long life, and my parents now can rest and are better thankfully, and this is what I care about.
The only thing that I want you to take from this, is to take care of the people that you love, they can be parents, grandparents, partners, friends, I don't care, take care and be with them when they need, the same way they were when you needed it. And know, independently of what happens, you will be okay in the end, do not let chaos make you give up, I beg you. I may be just 19 at the time of writing, but I gave up on so many things for so little, that these three months really showed me how much stronger I can be, mostly because of the people that are around me. So I ask, I beg, whatever you want to make in life, do not give up easily, be strong, be there, for you, and for the people that you love.
---
Thanks for reading, hopefully the next 100 days will be better. And besides, whatever happens, I hopefully will meet you tomorrow, and every day until day 300.
- Someone who's trying to improve.
Today's artists & creative things
Music: You Will Be Okay - by Caleb Hyles
© 2024 Gustavo "Guz" L. de Mello. Licensed under CC BY-SA 4.0
6 notes
·
View notes
Text
Update on my 'Login Details Creation App'

🍧 Monday 11th July 2022 🍧
First of all, I am terrible with naming projects, variables, methods etc. so if the name is like "what are they talking about??" or "that could have been worded/named differently..." I'm sorry! I don't know what fits right.
As I promised myself, I made a 'setup.exe' for my application. I've never done this before and it worked out great! The build failed a total of 2 time but I had to start from sketch multiple times because I kept forgetting one step from the the tutorial I was watching (link) however all things ended well and I'm extremely happy! It even has a little logo with it!
I think the next application I am going to do is something on the lines of a BMI calculator? A Pomodoro timer? Maybe look online to make a much pretty and modern UI? Yeah I want to do that! And research what the hell is WPF?? I still want to finish making the webpage version of this
Lastly, I need to make a proper GitHub account and use it properly.
#csharp study#programming#coding#studyblr#100 days of code#comp sci#developer#dotnet#study aesthetic#studying#login creation app project
14 notes
·
View notes
Text
The Timely Mastodon Primer

Updated 11082022-231601
GitHub Issue
WTF
Local
Ulysses
Draft
https://davidblue.bio/mastodon-primer
Things
Social
figure I might as well do a nice, undying, bigass, crossposted thread one more time for the sake of
E͟s͟s͟e͟n͟t͟i͟a͟l͟ M͟a͟s͟t͟o͟d͟o͟n͟/F͟e͟d͟e͟r͟a͟t͟e͟d͟ S͟o͟c͟i͟a͟l͟ R͟e͟s͟o͟u͟r͟c͟e͟s͟ f͟o͟r͟ N͟o͟r͟m͟l͟o͟r͟d͟s͟
I started a repository, even! https://t.co/62WKQvBK3u
— 𝗗 𝗔 𝗩 𝗢 𝗗 (@NeoYokel) November 9, 2022
Twitter Thread
Typefully
Telegram
Extratone Discord
Hacker News
r/Twitter
figure I might as well do a nice, undying, bigass, crossposted thread one more time for the sake of E͟s͟s͟e͟n͟t͟i͟a͟l͟ M͟a͟s͟t͟o͟d͟o͟n͟/F͟e͟d͟e͟r͟a͟t͟e͟d͟ S͟o͟c͟i͟a͟l͟ R͟e͟s͟o͟u͟r͟c͟e͟s͟ f͟o͟r͟ N͟o͟r͟m͟l͟o͟r͟d͟s͟ I started a repository, even! https://github.com/extratone/mastodon-init
there's nothing there, at the moment, but I would love it if any of y'all'd be interested in collaboration! I still don't know how tf to go about doing that on GitHub, though.
the first thing to know, for many of you (both Android and iOS users,) is that Mastodon's "official" app is absolutely THE best way to create an account. (the very first app link embeds on this page.) https://joinmastodon.org/apps
if for whatever reason you are one of those folks who won't download a free app to try it even if it's very small (still just 33.7mb on iOS/iPadOS,) well... here's a video demonstration of the actual process as it was at launch. https://youtu.be/bD8GQvNrE7E
if you absolutely despise the whole idea of mobile credential creation (same tbh) or something and you must do the desktop thing, the "official" site has a relatively new server search tool... https://joinmastodon.org/servers
but it's hard to beat the tried and true instances.social tool. either start at the root to use its wizard (I really hate wizards, personally lmao) or use this URL to quick jump to a list of English-speaking servers with greater than 2000 members. https://davidblue.wtf/instance
I would suggest immediately sorting that list by Registration . please note that at this particular moment, the whole of the fediverse is experiencing its greatest concentrated server loads, ever, because y'all so (???) that you waited out SIX YEARS of my begging.
my usual advice (to just start on mastodon.social ) doesn't exactly apply considering we're at closed registration right now. nor does it for my second choice, mastodon.online.
I know that I find looking through instances utterly fascinating, but if you arrive at this point and are still struggling to find where to go, please contact me! we can walk through it. https://davidblue.wtf/contact
2 notes
·
View notes
Text
How to Connect GitHub to Your EC2 Instance: Easy-to-Follow Step-by-Step Guide

Connecting GitHub with AWS EC2 Instance
Are you looking to seamlessly integrate your GitHub repository with an Amazon EC2 instance? Connecting GitHub to your EC2 instance allows you to easily deploy your code, automate workflows, and streamline your development process.
In this comprehensive guide, we'll walk you through the step-by-step process of setting up this connection, from creating an EC2 instance to configuring webhooks and deploying your code.
By the end of this article, you'll have a fully functional GitHub-EC2 integration, enabling you to focus on writing great code and delivering your projects efficiently.
Before you begin
Before we dive into the process of connecting GitHub to your EC2 instance, make sure you have the following prerequisites in place:
View Prerequisites
1️⃣ AWS Account:
An AWS account with access to the EC2 service
2️⃣ GitHub Account:
A GitHub account with a repository you want to connect to your EC2 instance
3️⃣ Basic KNowledge:
Basic knowledge of AWS EC2 and GitHub
With these prerequisites in hand, let's get started with the process of creating an EC2 instance.
Discover the Benefits of Connecting GitHub to Your EC2 Instance
1. Automation:Connecting your GitHub repository to your EC2 instance enables you to automate code deployments. Changes pushed to your repo can trigger automatic updates on the EC2 instance, making the development and release process much smoother.
2. Centralized Code:GitHub acts as a central hub for your project code. This allows multiple developers to work on the same codebase simultaneously, improving collaboration and code sharing.
3. Controlled Access: pen_spark:GitHub's access control mechanisms let you manage who can view, modify, and deploy your code. This helps in maintaining the security and integrity of your application.
Creating an EC2 Instance
The first step in connecting GitHub to your EC2 instance is to create an EC2 instance. Follow these steps to create a new instance:- Login to your AWS Management Console. and navigate to the EC2 dashboard.
- Click on the "Launch Instance" button to start the instance creation wizard.
- Choose an Amazon Machine Image (AMI) that suits your requirements. For this guide, we'll use the Amazon Linux 2 AMI.
- Select an instance type based on your computational needs and budget. A t2.micro instance is sufficient for most basic applications.
- Configure the instance details, such as the number of instances, network settings, and IAM role (if required).
- Add storage to your instance. The default settings are usually sufficient for most use cases.
- Add tags to your instance for better organization and management.
- Configure the security group to control inbound and outbound traffic to your instance. We'll dive deeper into this in the next section.
- Review your instance configuration and click on the "Launch" button.
- Choose an existing key pair or create a new one. This key pair will be used to securely connect to your EC2 instance via SSH.
- Launch your instance and wait for it to be in the "Running" state.Congratulations! You have successfully created an EC2 instance. Let's move on to configuring the security group to allow necessary traffic.
Configuring Security Groups on AWS
Security groups act as virtual firewalls for your EC2 instances, controlling inbound and outbound traffic. To connect GitHub to your EC2 instance, you need to configure the security group to allow SSH and HTTP/HTTPS traffic. Follow these steps:
Easy Steps for Configuring Security Groups on AWS
- In the EC2 dashboard, navigate to the “Security Groups” section under “Network & Security.”
- Select the security group associated with your EC2 instance.
- In the “Inbound Rules” tab, click on the “Edit inbound rules” button.
- Add a new rule for SSH (port 22) and set the source to your IP address or a specific IP range.
- Add another rule for HTTP (port 80) and HTTPS (port 443) and set the source to “Anywhere” or a specific IP range, depending on your requirements.
- Save the inbound rules.
Your security group is now configured to allow the necessary traffic for connecting GitHub to your EC2 instance.
Installing Git on the EC2 Instance
To clone your GitHub repository and manage version control on your EC2 instance, you need to install Git. Follow these steps to install Git on your Amazon Linux 2 instance:- Connect to your EC2 instance using SSH. Use the key pair you specified during instance creation.
- Update the package manager by running the following command:sudo yum update -y
- Install Git by running the following command:sudo yum install git -y
- Verify the installation by checking the Git version:git --version
Git is now installed on your EC2 instance, and you're ready to clone your GitHub repository.
Generating SSH Keys
To securely connect your EC2 instance to GitHub, you need to generate an SSH key pair. Follow these steps to generate SSH keys on your EC2 instance:
- Connect to your EC2 instance using SSH.
- Run the following command to generate an SSH key pair:ssh-keygen -t rsa -b 4096 -C "[email protected]"
Replace [email protected] with your GitHub email address.
- Press Enter to accept the default file location for saving the key pair.
- Optionally, enter a passphrase for added security. Press Enter if you don't want to set a passphrase.
- The SSH key pair will be generated and saved in the specified location (default: ~/.ssh/id_rsa and ~/.ssh/id_rsa.pub).
Add SSH Key to GitHub account
To enable your EC2 instance to securely communicate with GitHub, you need to add the public SSH key to your GitHub account. Follow these steps:- On your EC2 instance, run the following command to display the public key:cat ~/.ssh/id_rsa.pub
- Copy the entire contents of the public key.
- Log in to your GitHub account and navigate to the "Settings" page.
- Click on "SSH and GPG keys" in the left sidebar.
- Click on the "New SSH key" button.
- Enter a title for the key to identify it easily (e.g., "EC2 Instance Key").
- Paste the copied public key into the "Key" field.
- Click on the "Add SSH key" button to save the key.Your EC2 instance is now linked to your GitHub account using the SSH key. Let's proceed to cloning your repository.
Cloning a Repository
To clone your GitHub repository to your EC2 instance, follow these steps:- Connect to your EC2 instance using SSH.
- Navigate to the directory where you want to clone the repository.
- Run the following command to clone the repository using SSH:git clone [email protected]:your-username/your-repository.git
Replace "your-username" with your GitHub username and "your-repository" with the name of your repository.
- Enter the passphrase for your SSH key, if prompted.
- The repository will be cloned to your EC2 instance.You have successfully cloned your GitHub repository to your EC2 instance. You can now work with the code locally on your instance.
Configure a GitHub webhook in 7 easy steps
Webhooks allow you to automate actions based on events in your GitHub repository. For example, you can configure a webhook to automatically deploy your code to your EC2 instance whenever a push is made to the repository. Follow these steps to set up a webhook:- In your GitHub repository, navigate to the "Settings" page.
- Click on "Webhooks" in the left sidebar.
- Click on the "Add webhook" button.
- Enter the payload URL, which is the URL of your EC2 instance where you want to receive the webhook events.
- Select the content type as "application/json."
- Choose the events that should trigger the webhook. For example, you can select "Push events" to trigger the webhook whenever a push is made to the repository.
- Click on the "Add webhook" button to save the webhook configuration.Your webhook is now set up, and GitHub will send POST requests to the specified payload URL whenever the selected events occur.
Deploying to AWS EC2 from Github
With the webhook configured, you can automate the deployment of your code to your EC2 instance whenever changes are pushed to your GitHub repository. Here's a general outline of the deployment process:- Create a deployment script on your EC2 instance that will be triggered by the webhook.
- The deployment script should perform the following tasks:- Pull the latest changes from the GitHub repository.
- Install any necessary dependencies.
- Build and compile your application, if required.
- Restart any services or application servers.
- Configure your web server (e.g., Apache or Nginx) on the EC2 instance to serve your application.
- Ensure that the necessary ports (e.g., 80 for HTTP, 443 for HTTPS) are open in your EC2 instance's security group.
- Test your deployment by making a change to your GitHub repository and verifying that the changes are automatically deployed to your EC2 instance.The specific steps for deploying your code will vary depending on your application's requirements and the technologies you are using. You may need to use additional tools like AWS CodeDeploy or a continuous integration/continuous deployment (CI/CD) pipeline to streamline the deployment process.
AWS Official Documentation
Tips for Troubleshooting Common Technology Issues While Connecting GitHub to your EC2 Instance
1. Secure PortEnsure that your EC2 instance's security group is configured correctly to allow incoming SSH and HTTP/HTTPS traffic.
2. SSH VerificationVerify that your SSH key pair is correctly generated and added to your GitHub account.
3. Payload URL CheckingDouble-check the payload URL and the events selected for your webhook configuration.
4. Logs on EC2 InstanceCheck the logs on your EC2 instance for any error messages related to the deployment process.
5. Necessary Permissions Ensure that your deployment script has the necessary permissions to execute and modify files on your EC2 instance.
6. Check DependenciesVerify that your application's dependencies are correctly installed and configured on the EC2 instance.
7. Test Everything Locally FirstTest your application locally on the EC2 instance to rule out any application-specific issues.
If you still face issues, consult the AWS and GitHub documentation (Trobleshotting Conections) or seek assistance from the respective communities or support channels.
Conclusion
Connecting GitHub to your EC2 instance provides a seamless way to deploy your code and automate your development workflow. By following the steps outlined in this guide, you can create an EC2 instance, configure security groups, install Git, generate SSH keys, clone your repository, set up webhooks, and deploy your code to the instance.Remember to regularly review and update your security settings, keep your EC2 instance and application dependencies up to date, and monitor your application's performance and logs for any issues.With GitHub and EC2 connected, you can focus on writing quality code, collaborating with your team, and delivering your applications efficiently.
Read the full article
0 notes
Text
A Guide to Building Your Career in Digital Marketing
BY DIGITHOMEAPRIL 23, 2024UNCATEGORIZED

In today’s digital era, the realm of marketing has transcended traditional boundaries, paving the way for a dynamic and ever-evolving field known as digital marketing. With its vast array of channels, strategies, and technologies, digital marketing offers a multitude of opportunities for individuals aspiring to carve out a successful career. If you’re eager to embark on this exhilarating journey, here’s a comprehensive guide to help you navigate the path to a flourishing career in digital marketing.
1. Lay the Foundation: Educate Yourself
Before diving headfirst into the world of digital marketing, it’s essential to acquire a solid understanding of its fundamental concepts and principles. Start by immersing yourself in online resources, courses, and tutorials that cover key areas such as search engine optimization (SEO), pay-per-click (PPC) advertising, social media marketing, email marketing, content creation, and analytics. Platforms like Coursera, Udemy, and Google Digital Garage offer a wealth of educational materials to help you get started.
2. Get Hands-On Experience
Theory alone will only take you so far. To truly excel in digital marketing, you need practical experience. Look for internships, freelance opportunities, or even volunteer work that will allow you to apply your newfound knowledge in real-world scenarios. Whether it’s managing social media accounts, creating compelling ad campaigns, or optimizing website content for search engines, hands-on experience is invaluable in honing your skills and building your portfolio.
3. Specialize and Differentiate Yourself
Digital marketing encompasses a wide range of disciplines, from social media management to data analytics. Consider specializing in a specific area that aligns with your interests and strengths. Whether you choose to focus on SEO, content marketing, paid advertising, or email automation, carving out a niche for yourself will not only set you apart from the competition but also position you as an expert in your chosen field.
4. Build Your Digital Presence
In the world of digital marketing, your online presence is your calling card. Create and optimize your professional profiles on platforms like LinkedIn, Twitter, and GitHub to showcase your skills, experience, and achievements. Additionally, consider starting your own blog, YouTube channel, or personal website where you can share valuable insights, industry trends, and case studies to establish yourself as a thought leader in the field.
5. Network, Network, Network
They say it’s not just what you know, but who you know. Networking plays a crucial role in advancing your career in digital marketing. Attend industry events, webinars, and conferences to connect with fellow professionals, influencers, and potential mentors. Join online communities, forums, and LinkedIn groups where you can engage in meaningful conversations, share knowledge, and stay updated on the latest trends and developments in the field.
6. Stay Ahead of the Curve
In the fast-paced world of digital marketing, staying ahead of the curve is essential. Make it a priority to continuously expand your knowledge and skill set by staying updated on industry trends, emerging technologies, and best practices. Subscribe to industry newsletters, follow thought leaders on social media, and invest in ongoing training and certifications to ensure that you remain competitive and relevant in the ever-evolving landscape of digital marketing.
7. Embrace Lifelong Learning
Finally, remember that learning is a lifelong journey. The field of digital marketing is constantly evolving, with new strategies, tools, and platforms emerging on a regular basis. Embrace a growth mindset and approach each day as an opportunity to learn something new, experiment with different tactics, and refine your craft. By remaining curious, adaptable, and open to change, you’ll be well-equipped to navigate the twists and turns of your digital marketing career journey.
In Conclusion, Building A Successful Career In Digital Marketing Requires A Combination Of Education, Experience, Specialization, Networking, And Continuous Learning. By Laying A Strong Foundation, Gaining Hands-On Experience, Specializing In Your Chosen Field, Building Your Digital Presence, Networking With Industry Peers, Staying Ahead Of The Curve, And Embracing Lifelong Learning, You’ll Be Well On Your Way To Achieving Your Goals And Thriving In The Exciting World Of Digital Marketing. So, Roll Up Your Sleeves, Embrace The Journey, And Let Your Passion For All Things Digital Propel You Towards A Fulfilling And Rewarding Career Path.
1 note
·
View note
Text
Hey fellow tech enthusiasts,
Ever wondered about the intricacies of automating tasks on the web? As someone deeply immersed in the world of web automation, I've recently delved into the realm of Instagram account creation using Puppeteer, and I'm excited to share my journey with you.
But before we dive in, let me make one thing clear: this exploration is purely educational. The use of automation tools like Puppeteer should always be approached with responsibility and ethical considerations in mind.
Now, let's talk about the challenge at hand. Instagram, like many other platforms, continuously evolves its interface to deter automated activities. This poses a significant hurdle for developers aiming to create seamless automation scripts. After reviewing numerous scripts on GitHub, I noticed a common trend – while many attempted to tackle the Instagram account creation process, most fell short due to the platform's ever-changing structure.
This led me to develop my solution, leveraging Puppeteer with a set of unique functions tailored specifically for Instagram account creation. Here's a glimpse into what sets my solution apart:
Console Event Listeners: One of the core functionalities of my script is the use of console event listeners. By attaching these listeners to both the temporary email page and the Instagram signup page, I'm able to meticulously track and log all console messages. This not only helps in debugging but also provides valuable insights into the automation process.
Integration with Temporary Email Service: To ensure seamless account creation without the hassle of managing multiple email accounts, my script interfaces with a temporary email service (tempmail.email). This allows for the dynamic generation of email addresses, eliminating the need for manual intervention.
Custom Functions for Data Generation: Creating a believable profile is crucial to avoid detection by Instagram's algorithms. To achieve this, my script includes several smaller functions responsible for generating realistic first names, last names, states, and hobbies. This meticulous attention to detail significantly enhances the authenticity of the created accounts.
Now, you might wonder why bother with such complexity? The answer lies in the importance of maintaining account longevity and avoiding suspension. By carefully crafting account profiles that mimic real users, we can mitigate the risk of detection and ensure a smooth user experience.
But this is just the beginning. In future iterations, I plan to expand upon this foundation by incorporating additional functionalities such as profile population and image scraping from sources like unrealperson.com.
While the road may be fraught with challenges, it's the thrill of overcoming them and pushing the boundaries of what's possible that drives us forward.
Stay tuned for more updates on my automation endeavors, and remember, always code responsibly.
Happy coding!
Checkout my other blog, https://www.josephcharnin.com.
Looking for SEO help, or a local SEO Agency in South FL? Check us out: https://southflseo.com
0 notes
Text
Twilio Migration Guide: IOS SDK
Introduction
This tutorial will help you convert from your existing Twilio Video configuration to the EnableX iOS Video SDK instructions. We recommend that anyone starting a new project refer to the EnableX Video SDK manual for advice. We guarantee a smooth transition for all Twilio users wishing to transfer to a dependable alternative with no fuss. Begin with a free trial to see for yourself how easy integration is.
Quick Start: EnableX Android Video Sample Applications
Explore a range of example programs designed for diverse programming environments, such as Java and Kotlin. Each sample app is accessible on GitHub, and it provides realistic examples to help you get started with your video calling project.
Video Calling QuickStart documentation for iOS
Step 1: Begin with EnableX
Start Your Free Trial in Minutes
We’ve got you covered with a migration path that feels familiar yet innovative.
Sign Up Easily: Go to the EnableX portal and select Try for Free.
Quick Registration: Provide your details; name, phone number, company, email and agree to the Terms of Service.
Account Verification: Check your email and click the verification link.
Step 2: Set Up Your Video Calling Project
Login to the EnableX Portal with the credentials.
Creating Your First Video Project with EnableX
Create a New Project: Launch your video project with our user-friendly dashboard.
Enable Video Service: Activate video capabilities in one simple step within your project settings.
Secure Your Application: App ID and App Key
Before diving into development, you'll need to secure your application with EnableX's authentication credentials. Here's how to get started:
Obtain API Credentials: After project creation, we'll email your App ID and App Key.
Reset or Resend: Easily manage your credentials within the portal, under 'Project Credentials'.
Implementation: Use these credentials in the HTTP Basic Authentication Request Header for secure API calls.
Step 3: Integrate EnableX on the Client Side
Developer's Corner: Build Your Way
For integrating EnableX SDKs into your Android app:
Remove Twilio SDK: First, remove the Twilio SDK from your project, including any related code and tags.
Download and Extract EnableX SDKs: Download the EnableX iOS SDK and iOS Web RTC Library. Extract the files from the zip packages.
Install EnableX SDK via CocoaPods
Install CocoaPods following the instructions on the CocoaPods website.
In your project directory, run pod init in the terminal.
Add pod ' EnxRTCiOS' to your Podfile to integrate the EnableX iOS SDK.
Run pod install in the terminal.
Reopen your project in Xcode using the new .xcworkspace file.
Include Socket.IO-Client-Swift
Add pod Socket.IO-Client-Swift(15.0.0) in your Podfile as it Is required for EnableX iOS SDK.
'Socket.IO-Client-Swift', '~> 15.0.0'
Step 4: Start and Join Sessions
Twilio
let connectOptions = ConnectOptions(token: accessToken) { (builder) inbuilder.roomName = "existing-room"}let room = TwilioVideoSDK.connect(options: connectOptions, delegate: self)
Start and join Session with EnableX
1. Initialize and Join Room
Initialize the EnxRtc object.
var enxRtc = EnxRtc()
2. Join Room
Use enxRtc to join a room with the required token, stream, and room information.
2. guard let stream = enxRtc.joinRoom(token, delegate: self,3. publishStreamInfo: localStreamInfo, roomInfo: roomInfo, advanceOptions:nil) else { return }
3. Publish Stream
On the didConnect callback, publish your local stream.
enxRoom.publish(localStream)
4. Attach Renderer to Local Stream
Attach EnxPlayerView to the local stream.
localStream.attachRenderer(EnxPlayerView)
5. Subscribe to Remote Streams
Subscribe to remote streams when didAddedStream callback is received.
enxRoom.subscribe(stream)
6. Handle Active Talkers
Use the Active Talker APIs to manage the display of active talkers.
func room(_ room: EnxRoom?, didActiveTalkerList Data: [Any]?)func room(_ room: EnxRoom?, didActiveTalkerView view: UIView?)
7. End or Destroy the Call:
Use room.disconnect () or room.destroy () to end the session as needed.
For detailed information on the features and implementation of the EnableX iOS Video SDK, please refer to the EnableX iOS Video SDK Documentation. This resource offers comprehensive insights into the capabilities of the SDK, enabling the development of sophisticated and feature-rich video conferencing solutions. If you have specific feature needs, the documentation offers valuable instructions and support.
0 notes
Text
Self-Assessment
Capstone, Week 5
Topic, resources, means of creation, and proposed components for messaging will be discussed and examined for a level of rigor appropriate for completion of the master's degree.
I believe that I have selected an appropriate topic with real potential for real world implementation beyond this course and program.
The project will be program-encompassing and representative of the Master of Arts in Graphic and Web Design.
So far I have utilized a wide variety of the skills we've been honing throughout the MAGWD program and that my final presentation will include components that include printed materials, a motion design video, and a micro website.
Research and collected data must be accurate and verifiable, with sources listed and accessible.
I think I started off with a strong understanding of what research I need to delve into and where to find based off my current work with Flip the Script. I've been able to identify and contact past and current leaders/stakeholders who can share their lived experiences and informed responses to my project as it develops.
I've got quite a few saved tabs that I need to translate more of my research to my archive though!
Consistent documentation of process to further articulate intentions of what you're making.
I have done a good job of making a couple new blog entries to my Tumblr account each week to document my process. I think it has been a perfect platform for me to not only catalog images, videos and presentation decks, but to also take some time to capture my state of mind in response to each week's lesson, feedback, and what I've achieved.
It definitely serves a great reminder of how much has already been done in the first 5 weeks of the course. I think there is space for me to make additional, smaller, updates outside of the schedule assignments deadlines.
In addition to other exhibition offerings and presentations, the final project, along with its process, will be accessible and discoverable for viewing as an online gallery.
This portion had been a bit of an uncertainty to me until this last week. I can now picture how my project can live as a micro website that will both function as a component for presenting my prototype video, and additional designed assets, as well as sharing the story of my process. I am really looking forward to learning more about how the Github hosted sites work this week. I haven't used it previously.
The project should allow for community engagement and partnership.
I am already in contact with several past and current community leaders whose work is directly connected to my project. I believe that it highly likely that my work with be able to used to support the current community efforts to establish a physical Queer Community Center. Even if the final version of my project isn't exactly the right fit, it is already a stepping stone toward determining how I can utilize my design skills to further support current and future efforts towards making this space a reality.
It has been taking longer than I thought it would to schedule my next to calls, but I am very confident that I'll be able to set them on my calendar in the next 2 weeks.
0 notes
Text
Super Stoner 420:

"Super Stoner 420" is a creation borne out of a spirit of humor and light-heartedness, designed to entertain rather than offend or harm. The game, crafted as a playful project, embodies a comedic take on video game archetypes, with its gameplay intentionally designed to be tedious and demand concentration from its players. This design choice serves to parody and satirize certain aspects of gaming culture and mechanics, encouraging players to engage with the game on a level that acknowledges its jest.
The character of Super Stoner, conceptualized as an anti-hero, is not meant to be taken seriously. This character is a deliberate exaggeration, created to invoke laughter and highlight the absurdities within the game and, by extension, certain facets of society and pop culture. The use of an anti-hero figure emphasizes the game's overarching theme of humor and satire, inviting players to view Super Stoner through a lens of irony and lighthearted critique.
It's paramount to understand that the essence of "Super Stoner 420" lies in its ability to entertain and provoke thought through satire and exaggerated scenarios. The game is a medium for comedy and should not be interpreted as a vehicle for negative messages or intentions. As the creator, the aim was never to demean or upset but rather to offer an escape into a world where the rules are deliberately skewed for comedic effect.
In sharing "Super Stoner 420," the hope is to foster an environment of fun and laughter, where the game becomes a source of amusement and a topic for friendly discussion. It is an invitation to not take things too seriously and to remember the value of humor in our lives, especially in contexts that might otherwise seem mundane or overly serious.
0 notes
Text
Handcurated resources
Just some suggestions for developement ideas tbh.
0 notes
Text
Exploring the Pinnacle of CSS Animations

Introduction
Welcome to a world of boundless creativity and dynamic user experiences! In this blog post, we embark on a journey to explore the pinnacle of CSS animations and discover how they elevate the web development landscape. As we delve into the mesmerizing realm of CodePen, a powerful platform for showcasing and experimenting with CSS animations, we'll unravel the magic behind captivating web elements that engage and delight users.
The Power of CSS Animations

CSS animations have revolutionized the way we interact with websites, bringing them to life with dynamic and visually appealing elements. Let's dive into the reasons why CSS animations are a game-changer in the world of web development.
1. Enhanced User Experience:
One of the primary advantages of CSS animations is their ability to enhance user experience. Animations, when used thoughtfully, can guide users through a website, provide visual feedback, and make the overall interaction more intuitive. From subtle hover effects to smooth page transitions, CSS animations contribute to a more engaging and enjoyable browsing experience.
2. Expressive and Creative Design:
CSS animations empower designers to unleash their creativity and add a layer of expressiveness to web interfaces. With animations, designers can convey emotions, tell stories, and establish a unique brand identity. From attention-grabbing loading animations to innovative navigation transitions, the possibilities for creative expression are vast.
3. Improved User Engagement:
Dynamic and interactive content tends to capture and retain user attention more effectively. CSS animations play a crucial role in creating engaging interfaces that encourage users to explore, interact, and spend more time on a website. Whether it's a product showcase or a storytelling element, animations contribute to higher user engagement metrics.
4. Seamless Page Transitions:
CSS animations enable the creation of seamless page transitions, providing a smooth and visually pleasing journey between different sections of a website. This not only adds a professional touch to the overall design but also contributes to a sense of continuity, reducing the perceived loading time and keeping users immersed in the content.
5. Cross-Browser Compatibility:
Modern browsers have robust support for CSS animations, ensuring a consistent experience across different platforms. This cross-browser compatibility allows developers to implement animations with confidence, knowing that they will function reliably for a broad audience.
In summary, the power of CSS animations lies in their ability to transform static web pages into dynamic, expressive, and user-centric experiences. Whether you're a designer aiming for creative flair or a developer focused on improving user engagement, mastering CSS animations is an essential skill in today's web development landscape.
Getting Started with CodePen

Welcome to the exciting world of CodePen – your gateway to creating, sharing, and exploring incredible CSS animations. Whether you're a seasoned developer or a curious beginner, getting started with CodePen is a breeze. Let's walk through the key steps to set up your account and dive into the magic of CSS animations.
1. Creating Your CodePen Account:
The first step is to create a CodePen account. Visit the CodePen website and click on the "Sign Up" button. You can sign up using your email address or log in with your existing GitHub or Google account for added convenience. Once registered, you'll have access to a personalized dashboard where you can manage your projects and explore the work of other CodePen users.
2. Navigating the CodePen Interface:
Upon logging in, you'll find yourself in the CodePen editor – a feature-rich environment for creating and editing your CSS animations. Familiarize yourself with the layout, which includes HTML, CSS, and JavaScript panels. The real-time preview pane allows you to see the results of your code instantly, facilitating a seamless and interactive development process.
3. Creating Your First CSS Animation:
Let's embark on your first CSS animation project. Use the HTML panel to structure your document, the CSS panel to define your animations, and the JavaScript panel if needed for additional interactivity. CodePen provides helpful preprocessor support and libraries to streamline your workflow, allowing you to focus on unleashing your creativity.
4. Exploring CodePen Features:
Take advantage of CodePen's extensive features, including the ability to fork and remix projects, collaborate with other users, and explore a vast collection of pens for inspiration. The platform also supports the use of external libraries and frameworks, opening up endless possibilities for your CSS animation projects.
5. Saving and Sharing Your Work:
Once you've crafted your masterpiece, it's time to save and share. CodePen makes it easy to save your projects, making them accessible from your dashboard. You can also share your creations with the world by generating a unique project URL or embedding them directly into your website or blog.
Now that you've taken your first steps into the CodePen universe, the possibilities for creating and exploring CSS animations are limitless. Whether you're refining your skills, collaborating with others, or seeking inspiration, CodePen is a dynamic playground for web developers and designers alike.
Showcasing CSS Animation Projects
See the Pen
Floating Animation - CSS by Mario Duarte (@MarioDesigns)
on CodePen.
Prepare to be inspired as we explore a curated collection of mesmerizing CSS animation projects on CodePen. From subtle micro-interactions to immersive storytelling, these projects exemplify the incredible versatility and creativity that CSS animations bring to the web development landscape.
1. Diverse Range of Animations:
CodePen hosts a vast array of CSS animation projects, showcasing the diversity of styles and effects that can be achieved. From elegant text animations and image transitions to complex 3D transformations, the platform serves as a treasure trove of inspiration for developers and designers looking to push the boundaries of what is possible with CSS.
2. Interactive User Interfaces:
Explore projects that go beyond static visuals and incorporate interactive user interfaces. CSS animations play a pivotal role in creating engaging and user-friendly interactions, such as interactive forms, navigation menus, and dynamic content displays. These examples demonstrate how animations can elevate the user experience to new heights.
3. Innovative Loading Animations:
Witness the creativity of developers in reimagining loading animations. From whimsical spinners to intricately designed loaders, these projects prove that even the waiting time can be turned into a delightful and engaging experience. Innovative loading animations not only entertain users but also provide visual feedback, indicating that something is happening behind the scenes.
4. Seamless Transitions Between Pages:
Projects on CodePen often showcase seamless transitions between pages, demonstrating how CSS animations can be used to create a cohesive and fluid browsing experience. Whether it's a single-page application or a multi-page website, these transitions add a professional and polished touch to the overall design, enhancing the user's journey.
5. Educational and Experimental Animations:
Some CodePen projects serve as educational resources, providing insights into the techniques used to create specific animations. Developers frequently share experimental projects that push the boundaries of CSS animations, inspiring others to explore and innovate in their own work. These projects contribute to a collaborative and knowledge-sharing community on CodePen.
6. Accessibility Considerations:
Many showcased projects on CodePen also demonstrate a commitment to accessibility. Developers incorporate thoughtful design choices and code practices to ensure that CSS animations enhance, rather than hinder, the user experience for individuals with disabilities. These considerations underscore the importance of creating inclusive and user-friendly web animations.
As we navigate through these showcased CSS animation projects on CodePen, it becomes evident that the platform is not just a gallery but a dynamic space for learning, experimentation, and inspiration. Whether you're a beginner seeking ideas or an experienced developer looking to stay on the cutting edge, CodePen's showcase of CSS animations is a testament to the limitless possibilities that await in the world of web development.
Tips and Tricks for Mastering CSS Animations
Embarking on the journey of mastering CSS animations can be both exciting and challenging. Here, we've compiled a set of valuable tips and tricks to help you elevate your skills and create seamless, eye-catching animations that captivate your audience.
1. Plan Your Animations:
Before diving into coding, take the time to plan your animations. Clearly define the purpose and desired effect of each animation. Consider the user experience and how animations will enhance the overall design. Planning helps you avoid unnecessary complexity and ensures a cohesive and intentional animation strategy.
2. Use Keyframes Wisely:
Keyframes are the building blocks of CSS animations. Utilize them judiciously to control the timing, duration, and easing of your animations. Experiment with different keyframe percentages and easing functions to achieve the desired motion. Leverage the power of keyframes to create smooth and natural animations that seamlessly integrate into your design.
3. Optimize for Performance:
Optimizing your CSS animations for performance is crucial, especially for web applications. Minimize the use of expensive properties like 'box-shadow' and 'transform' where possible. Consider using the 'will-change' property for elements that will be animated, and explore hardware acceleration for smoother animations. Strive for a balance between visual appeal and optimal performance.
4. Explore CSS Animation Libraries:
Take advantage of CSS animation libraries to streamline your workflow and access pre-built animations. Libraries like Animate.css and Magic.css offer a variety of ready-to-use animations that you can easily integrate into your projects. This not only saves time but also allows you to explore and experiment with a diverse range of animation styles.
5. Experiment with Delay and Stagger Effects:
Add depth and complexity to your animations by incorporating delays and stagger effects. By carefully orchestrating the timing of multiple animations, you can create visually appealing sequences that draw attention to specific elements. Experiment with different delay values to find the perfect rhythm for your animations.
6. Responsive Design Considerations:
Ensure that your CSS animations are responsive and adapt well to different screen sizes. Use relative units like percentages and 'em' instead of fixed pixel values. Test your animations on various devices to guarantee a consistent and enjoyable experience for users across desktops, tablets, and smartphones.
7. Debugging and Testing:
Mastering CSS animations involves effective debugging and testing. Familiarize yourself with browser developer tools to inspect and troubleshoot your animations. Test your animations on different browsers to ensure cross-browser compatibility. Solicit feedback from peers and iterate on your designs based on their insights.
8. Stay Updated on Trends:
Keep abreast of the latest trends and techniques in CSS animations. Follow industry blogs, attend web development conferences, and engage with the vibrant online community. Staying informed allows you to integrate contemporary styles into your animations and continuously evolve your skill set.
By incorporating these tips and tricks into your CSS animation workflow, you'll be well-equipped to create polished and engaging animations that leave a lasting impression. Remember, mastering CSS animations is an ongoing journey of exploration and refinement, so embrace the learning process and enjoy the creative possibilities at your fingertips.
Advanced Techniques and Experimentation
Prepare to push the boundaries of CSS animations as we delve into advanced techniques and encourage a spirit of experimentation. Unleash your creativity and explore the possibilities that go beyond the basics, as we showcase the potential of CSS animations in creating truly innovative and immersive web experiences.
1. 3D Transformations:
Elevate your animations by venturing into the realm of 3D transformations. Use properties like 'rotateX,' 'rotateY,' and 'rotateZ' to add depth and perspective to your elements. Experiment with combinations of these transformations to create captivating 3D effects that bring a sense of realism to your designs.
2. Particle Animations:
Dive into the world of particle animations, where individual elements move independently, creating visually stunning effects. Whether it's a starry night sky or a dynamic particle explosion, CSS allows you to simulate intricate particle movements without relying on external libraries or JavaScript.
3. SVG Animations:
Combine the power of CSS animations with Scalable Vector Graphics (SVG) for intricate and responsive animations. Animate SVG paths, shapes, and gradients to craft sophisticated visual storytelling elements. SVG animations offer a scalable and lightweight solution for creating complex and dynamic graphics.
4. Morphing Animations:
Experiment with morphing animations that seamlessly transform one shape or object into another. Utilize CSS transitions and keyframes to achieve smooth and fluid morphing effects. This technique is particularly effective for creating attention-grabbing transitions between different sections of a website.
5. Interactive Animations with JavaScript Integration:
Combine the power of CSS animations with JavaScript for interactive and dynamic effects. Use JavaScript to trigger animations based on user interactions, scroll events, or other custom triggers. This integration opens the door to creating sophisticated and personalized user experiences that respond to user input in real-time.
6. Experimental Timing Functions:
Go beyond the standard easing functions and experiment with custom timing functions. Craft your own Bézier curves to control the acceleration and deceleration of animations, adding a unique and personalized touch to your designs. Fine-tuning timing functions allows for precise control over the motion and feel of your animations.
7. Advanced CSS Filters and Blending:
Enhance the visual appeal of your animations by incorporating advanced CSS filters and blending modes. Experiment with effects like blur, brightness, and contrast to create dreamy or futuristic aesthetics. Explore blending modes to overlay and combine elements in innovative ways, adding depth and complexity to your animations.
8. CSS Animation Performance Optimization:
As you delve into advanced techniques, pay attention to performance optimization. Minimize the use of expensive properties, optimize animations for GPU acceleration, and consider lazy loading for complex animations. Balancing creativity with performance ensures that your animations remain smooth and responsive across various devices.
Embarking on advanced techniques and experimentation with CSS animations opens up a world of creative possibilities. Whether you're crafting immersive storytelling experiences or pushing the limits of visual effects, the combination of advanced CSS techniques and experimentation allows you to redefine the boundaries of web animation.
FAQ
Explore the frequently asked questions about CSS animations and CodePen to address common queries and provide valuable insights for users at every skill level.
Q1: What is the significance of CSS animations in web development?
A1: CSS animations play a crucial role in enhancing user experience by bringing dynamic and visually appealing elements to web interfaces. They contribute to improved engagement, creative design expression, and seamless user interactions.
Q2: How do I create a CodePen account?
A2: Creating a CodePen account is simple. Visit the CodePen website, click on "Sign Up," and follow the prompts to register using your email or log in with your GitHub or Google account. Once registered, you gain access to a user-friendly platform for showcasing and experimenting with CSS animations.
Q3: Can I collaborate with others on CodePen projects?
A3: Yes, CodePen supports collaboration. You can share your projects with others, allowing for collaborative editing and feedback. This feature fosters a sense of community and enables developers and designers to work together on creative projects.
Q4: Are there tutorials available for mastering CSS animations on CodePen?
A4: Absolutely! CodePen has a wealth of tutorials and educational resources to help users master CSS animations. Explore the platform's documentation, blog posts, and community discussions to access valuable insights and tips for honing your animation skills.
Q5: How can I share my CSS animation projects from CodePen?
A5: Sharing your projects on CodePen is easy.
Read the full article
0 notes
Last Seen Blogs

rougethebat69
mwah

crescairis
INDEFINITE HIATUS

gatarifficgata-archive
Sorry, We're Closed

deadric-diggory0624
Yay Fanfics!

tagatablog-blog
Tagata Blog