#google html template and copy and paste that in
Explore tagged Tumblr posts
Visit Tumblr Blog
Explore Tumblr blogs with no restrictions, modern design and the best experience.
Last Seen Tumblr Blogs


Fun Fact
Tumblr has 411 employees.
Note
character page tutorial when 😳
anon i'm so sorry my character page is held together by glitter glue and twigs. i don't actually know what any of the code means i just googled and wrote down what it said to do 😭 my best advice is to hope for a miracle
#my actual steps:#google html template and copy and paste that in#then google how to put an image in#then struggle for 40 minutes trying to get one image to show up#it'll eventually work so then add in a second image#that second image you add in will mess up the whole page and you'll struggle for 40 more minutes trying to fix it#repeat for each image#then try to add a button and have all your images disappear#spend 2 days fighting it over and over#then voila!#you have your character page#sorry i can't help#ask
19 notes
·
View notes
Text
hey you, make your own website.
sure you can use neocities or carrd or strawpage or whatever whatever but also. make your own from scratch!
there's plenty of free website hosters, github(owned by microsoft), gitlab, and cloudflare have "pages" services which are all free and you can just host whatever html pages even use things like static site generators as well to help yourself from copying and pasting.
if you have your own domains you can also use those, and other than digging deep into web requests or stupid shit there's no way to know you're not hosting it yourself.
i use cloudflare pages, but github/gitlab pages is probably much easier, and if you dont like it, you can just pick it up and move it somewhere else. if you have a custom domain as well you dont even have to tell people "move to the new website". you're not tied down to any service and the site is what you have
It's very flexible too! for beginners you can just put raw html and css and upload it and it'll show, if you need more than this, you can just add more.
my website, ranid.space, also uses cloudflare pages (it can be easily done on the other two), and it's generated using Astro with templates i've created, it has a [shitty] blog Content Management System with an Atom feed, there's pages with javascript, and i even have SEO optimizations (i was really bored okay i really dont care if i show up on google).
it is as simple or as complex as you want it to be.
it is literally JUST hosting your own website you have full and entire control over. note it's a static website so you cant really do things like live updates without connecting it to another server, however for posting to a blog once in a while it's perfectly fine
i've not used gitlab pages, it seems to be a bit more manual setup than github pages, but i think beyond that first setup it's the same
329 notes
·
View notes
Text
GIT Font and PNG Generator

This post by @pichikui was the spark of inspiration for this whole project.
I'm super excited to share this project (though it's in beta stage) The first part is a font family based off of the glitch in time ghost speak codex.
The second part is PNG Image Generator that can copy the GIT font to the system clipboard as PNG, download it as PNG, and copy an HTML template to paste into AO3. If you are unsure how to embed images into AO3, please consult this tutorial on the topic.
As I previously stated, this project is still in beta, so if you guys find any bugs or issues, feel free to reach out. I'm also open to collab as well.

535 notes
·
View notes
Text

Advice; Where to Make Rules and About Pages
If you've read my advice post about the difference between about and rules pages and why they're both important, you may not be wondering the best way to make them. The good news is, there are plenty of options!
Tumblr
The simplest choice. In the past, people would make custom pages on their theme. However, since dash view has become popular (and you can't view custom pages via it, nor can you view them on mobile), most people simply post their about/rules page as a normal text post, and link to it in their pinned post. If you have a custom theme, make sure to link the pages in the navigation bar too!
Using a plain Tumblr post increases your page's readability, but reduces the amount of formatting you can do. If you make your pages elsewhere, you will be able to customise them a lot more.
Carrd
A free website maker. You can make a small site with a free account, and the prices are pretty reasonable if you need to make a bigger site. Carrd has a minimalist aesthetic, and it will also adjust what you make to fit a mobile browser (though this may break your formatting if you have designed something complicated).
Carrd is easy to use, but it is best used for simple designs. If you want to do something more complicated than a basic Carrd layout, you're going to spend a lot of time trying to make the formatting work. If you want multiple pages for your site, you're also going to spend a lot of time formatting as you can't clone pages, therefore have to recreate each one every time instead.
It uses markdown for formatting text. If you're familiar with it, this can speed up writing, but it may slow you down if you've never used it before.
One of the benefits of Carrd is that there are lots of free templates available within the rpc! Here are resources I found with a quick Google search, but there are plenty more out there if you look for them: [x] [x] [x]
Weebly
Another free website maker. You can make more for free here than you can on Carrd. Weebly sites should adapt to work on a mobile browser.
I've never seen anybody use Weebly for about/rules pages, but I do recommend it! It's very easy to use, and, unlike Carrd, you can copy and paste entire pages. This makes it ideal if you have lots of muses that you want to make individual about pages for.
It uses a more typical text editor than Carrd. Instead of markdown, it's more like Microsoft Word - where you highlight text and click buttons to add formatting. You also have HTML/CSS options.
Weebly does offer some free templates, but you're likely to want to edit them to suit your needs more. This is okay! It isn't difficult to do!
Google Docs
A popular, completely free option. As with Carrd, there are plenty of templates and resources within the rpc (here are three examples: [x] [x] [x]). These pages will be viewable on a mobile browser, but the theme may not translate well. Keep readability in mind if you use this option.
If you use this option, also make sure the link you share is viewer only and doesn't have editor permissions!
Other Options (WordPress, Self-Hosting, etc)
Don't feel you have to follow the crowd. If you like to use WordPress, use WordPress. You could also use Neocities, or any other website builder!
Personally, I already own a web domain because I have websites for other online activities, so I use about pages that I've coded from scratch and host them myself. For my rules page, I just use a Tumblr text post that's linked in my pinned post. In the past, I've used Carrd and Tumblr pages for about pages.
If you want to write your site using HTML, some free website hosters will allow you to do this (Neocities, for example). If you're interested in coding, I do recommend this! It allows you to have full customisability, and coding can be a really useful skill. However, one downside of this is it can make your pages hard to read on a mobile browser. It's up to you to decide how important this is.
If you're interested in learning HTML (as well as CSS, JavaScript, and other coding languages), this site is a great resource!
41 notes
·
View notes
Text
Fanbinding Process 1: Typesetting
Someone asked me to chronicle a fanbinding project a while back and now that I'm in the starting stages I figured "oh yeah I should do that!"
Disclaimer: still new at this. Please don't judge me. And also this is just what I do and really when it comes to some of the smaller details, that's personal choice and stuff you'll decide once you get going and know what you wanna do with it!
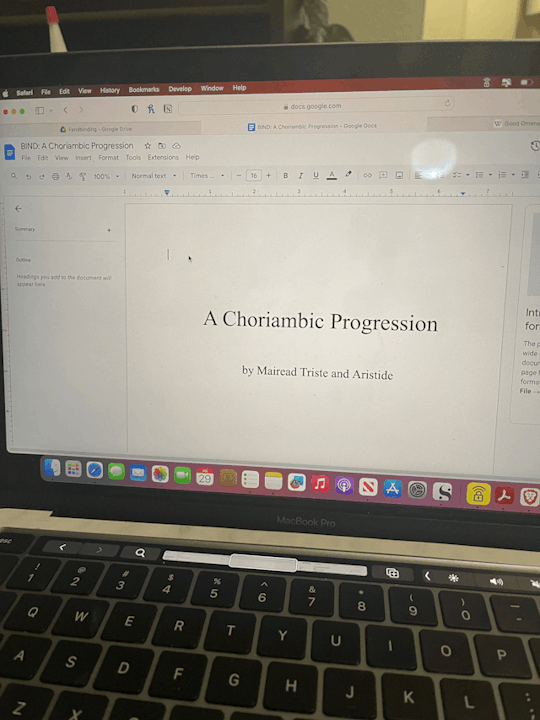
Anyway current project: A Choriambic Progression (one of my faves!) (I'm also doing In Between Days at the same time but I'm further along in that one so it's not a good one to really show.)
Step 1: Gotta save the fic! I'll say ahead of time how I do this with AO3 fic, even though A Choriambic Progression isn't on AO3. With that, I go to Download > HTML. I've found that way will copy over all the formatting whereas the other ones didn't for me. Then I open the HTML file and copy paste into Google Docs.
Instead with A Choriambic Progression I just went to the Wayback Machine link and copy/pasted all of that.
Step 2: I do my page setup before fixing the body of the work, so I inserted a few pages above the work. I consulted a few books on hand to decide the layout. Page 1 is a simple title page:
I know when I print, odd numbered pages will show up on the right and even numbers will be on the left. So when I first open the book, the simple title page will be face up.
Step 3.) Which means for Page 2 I do the copyright page:
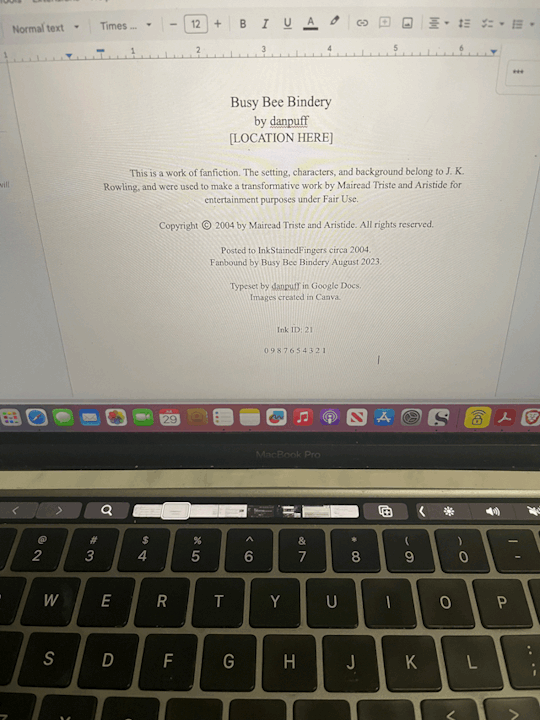
I temporarily removed my actual location for this, but: I made a name for my bindery. Most I've seen have the location of the publishing company, so I have my location in that section. Most copyright pages vary in the setup and even some information, so I borrowed what I liked! A lot have like "First Printing: Date, Second Printing: Date" so I list where all I've found the work, plus when I'm binding it. Even though it's July right now, I figure most of my work on this will be in August so I put August 2023 for that.
For ISBN I usually will put AO3 ID: and the work ID #. Since this was originally posted to Ink Stained Fingers I used Ink ID instead and it's ID # (which is 21???? Very cool.) Also since this fic is old and not really anywhere else, I had to do my best guessing on the date, which as best as I can figure was sometime 2004? And the print line for funsies! Though I don't think I'll do more than this one printing of it, but who knows!
Step 4.) Images in Canva. Which is just....me creating whatever icons and images I want to use in Canva, which is at least a title image. In Canva I opened an Instagram Post sized template. I threw in the title + artist. I had no idea what sort of art I wanted, so I just typed in "magic" and found this crystal & plant art I liked. I fixed up the font how I liked and then went to Share > Download > check Transparent Background > Select Pages: 19 (to just save page 19) > Download.

I also went into another Canva project for smaller images that i call "icons" to make my bindery icon and also a simple image I want to have at the top of the first page and downloaded both of those.
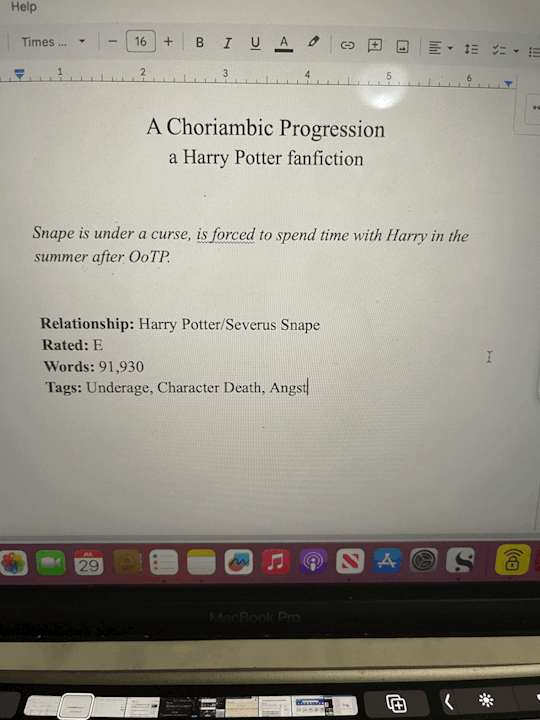
Step 5.) Back in Google Docs aaaand....I knew I'd need some pages before my title image so on Page 3 I added the "archive information" (which is where I'll normally pull the info from AO3, but I did the same basic idea here.)
Then Step 6.) I inserted another blank page (CTRL + Enter) and on Page 6 I went to Insert > Image > Upload from Computer and added my title image. Below it I added my bindery icon and spent over fiddling with it to get it properly centered. (It never wants to center correctly.) Iirc I went into Format > Align & Indent and played with "center" and "increase/decrease indent" until it behaved itself.
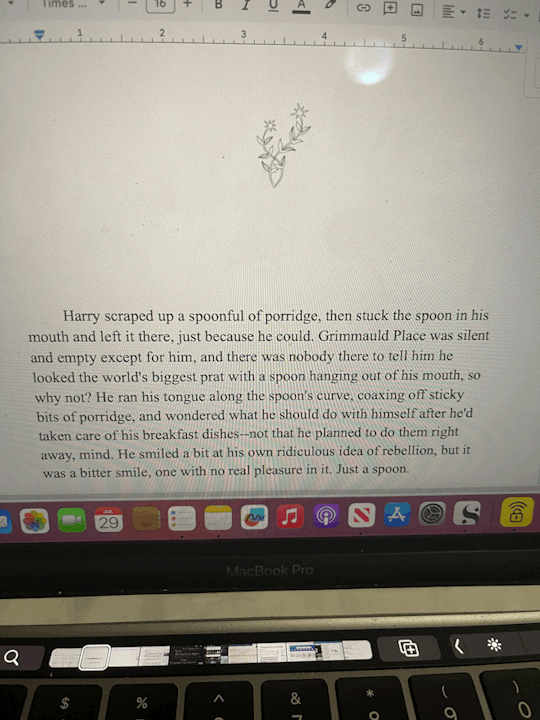
Step 7.) CTRL + Enter for another blank page. Then I make sure the start of the fic is on an odd page (though I can always fix this later in Acrobat.) I inserted my cute lil story icon above the start of the story:
Step 8.) I realized I had a problem in that I did all this setup BEFORE setting my font. So I had to CTRL + A to select it all and set it to Times New Roman 16, which I know will print in a way I like.
Next I'll say, I like to keep the space between paragraphs in an ode to fanfic-y ways. But I also like indented paragraphs. So this is a personal choice, but with everything still selected I went to:
Format > Align & Indent > Indention Options > set Left & Right to 0. Then select Special Indent > First Line > set to .5.
THEN I had to go back and fix my title, copyright, and archive pages, but it's less annoying to do that than it would be to try to highlight over 300 pages to do this for JUST the fic. I later added some extras (such as the poem at the end, the author's note, and some review/recommendations for the fic that I wanted to format differently.)
....Basically just figure out how you want to format it.
Step 9.) CTRL + F. This fic was a NIGHTMARE to fix up, ngl. I did all of this last night but basically...I had to find all the scene breaks by going CTRL + F and searching "***" so I could replace those with a horizontal line (Insert > Horizontal Line.) But a few places had tildes instead so I had to do an extra CTRL + F: "~~~~" That wasn't so bad.
The bad part was realizing how much had to be italicized. Regular italic words had a "*" on either side, while correspondence began and ended with an underscore. So I had to CTRL + F: "_" and then highlight and italicize all the letters. Then CTRL + F: "*" to find all the italicized words of which there were like 200. Very tedious.
Step 10.) File > Download > PDF Document
Step 11.) I opened the PDF in Adobe Acrobat for my final stages. Mostly here I make sure all of the pages are in an order I like and make sure all of my pages that need to end up on the right are odd numbers. And if not, I can go to the sidebar on the right and go to "Organize Pages"...there I can reorganize or add blank pages where needed.
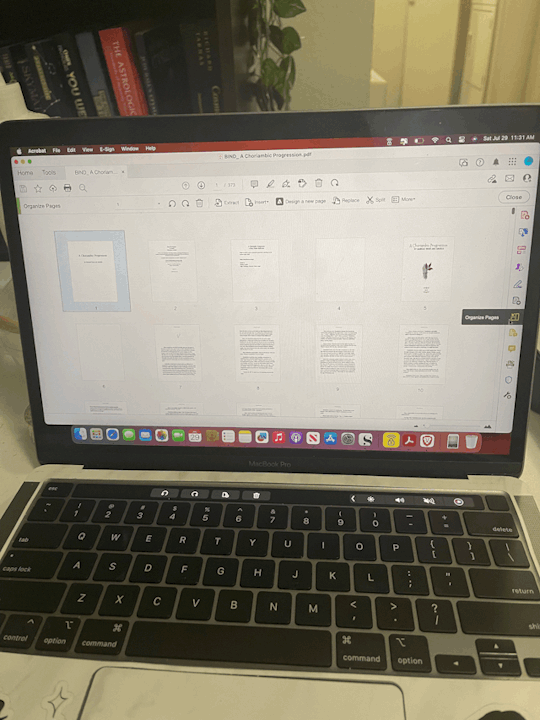

Step 12.) Page Numbers & Headers! Again this is personal preference but I can show you how I did it and you can make your own decisions about how you want to do it.
Close out of Organize Pages. Then from the sidebar I chose "Edit PDF." Then at the top toolbar I click on "Headers & Footers" and select "Add."
For me, I wanted the title as a header, and I wanted to insert page numbers. So in "Header Center" I wrote the title and in "Footer Center" I clicked on "Insert Page Numbers."
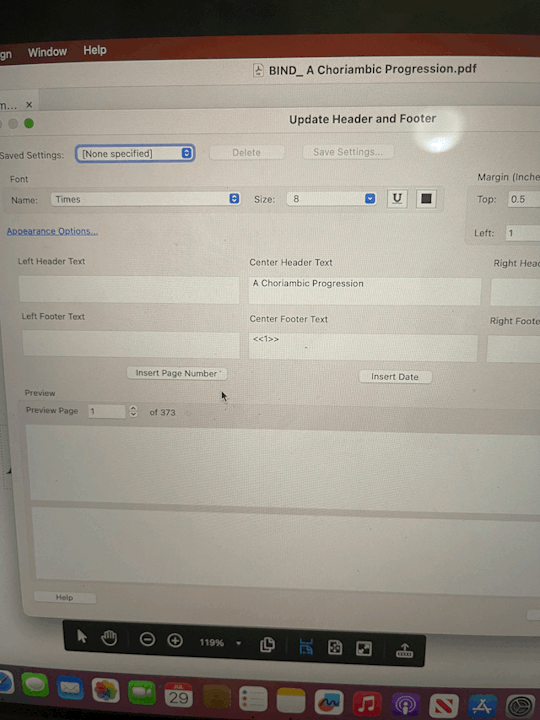
Then because I want my page numbering to start on Page 3 (I like to start numbering at the Archive Information page) I click on "Page Range Options" and in "Pages From:" I changed "1" to "3."

Note, if you fiddle with the pages later on and reorganize or add new blank pages, Adobe won't adjust the page numbers for you, which is why I make sure my pages are all in order first.
Step 13.) My least favorite part is REMOVING headers & footers from pages I don't want them on. So on all blank pages I took off the title & page number. I took the title off of the Archive information and the Title Image page. I took the title off of the "Recommendations" pages later on, too. It's not only tedious but Acrobat likes to be difficult about letting me select the page numbers so it takes a few tries of me getting the page just so before I can select and delete the page number.
Anyway at that point it's ready to go so I make sure to save it to my Fanbinding folder and next up I can print! So...we can do printing & page folding and maybe page cutting in Part 2.
You know...if I remember. 😬
#danpuff binds#progress pics#step by step#wow this is a lot#whoever asked for this i hope you're happy 😂
19 notes
·
View notes
Note
Heyo how r u :3 ? I was thinking of making a neocities and I rlly like yours, got any tips on how to make one for beginners???? Or just reply with a fun fact from your day idk ^_^
hey!!!!! i’m doing pretty cool, hbu?
i am Not Good at html, i looked up a template and copy pasted into my code lmao. so highly recommend that. and googling things 👍 neocities also has a quick beginners course on coding.
but the main thing is just fuck around and find out lmao that is what i have done
gracie also knows a fair bit abt code and his site is really cool if you want to ask him abt it :)
4 notes
·
View notes
Text
A Complete Guide to Cold Email Outreach
Inhaltverzeichnis
Cold Email Marketing: Everything from the basics to best practices and tools
Chances are if you’re reaching out to someone for the purpose of networking, they’re successful — and busy. However, because your subject line is the first thing your recipient will see, and they need to click through before ever reading your email, it’s not something to brush off. By doing that, you can most accurately craft your subject line around your email content — content which may change slightly as you sit down to write cold outbound it.
Cold Email Marketing: Everything from the basics to best practices and tools
It shows your prospects that you put in time and effort to get to know who they were before you reached out. Even if recipients don’t convert immediately, their responses (or lack thereof) can provide valuable feedback and insights into your target audience’s needs and pain points. As time passes, you’ll begin to see your cold outreach campaign succeed and grow. In each of these scenarios, the effectiveness of cold emailing hinges on personalization, relevance, and respect for the recipient’s time and interest. Crafting compelling subject lines and personalized content can help, but overall engagement rates are usually modest.
A great email subject line is critical to grabbing recipients’ attention and compelling them to open the email. The right email “from” line depends on your target audience, the context of your message, and the goal you want to accomplish with the email. 78% of decision-makers report that a cold email has led to a face-to-face meeting, phone call, or event attendance. Many such meetings or conversations create relationships that secure the email recipient as a client. You wouldn’t immediately start pitching when you approach a stranger in the offline world. For the person to warm up to you, you may need to say something nice even before you greet them and introduce yourself.
Cold emailing is a low-cost marketing strategy compared to traditional methods like direct mail or advertising. The best day to send a cold email varies, but midweek days like Tuesday and Wednesday are generally effective. Keeping it concise helps maintain the reader’s attention and increases the likelihood of a response.
youtube
This is a good way to encourage your recipients to actually open your cold email and read at least the beginning to find the answer. This should go without saying, but make sure the cold email from Kate is not sent from the address. Use our battle-tested templates to quickly put together convincing messages. These proven cold email tips can help you beat spam filters and comply with Google and Yahoo’s latest updates that are set to roll out in February 2024. After you’re satisfied with the visual appeal of your email, you can paste the email copy into htmlwasher.com. It will remove any links and HTML/hidden junk code that could trigger the ESPs’ spam filters.
It can make or break whether they open your email or not. It can also be the most challenging part of writing an email.The biggest reason? You overthink it.A subject line is more likely to hurt you than it is to help you.While getting creative with it is fun, you need to be careful. Your buyer categorizes what they believe your message is before they open it.
When sending a cold email, you want to increase the chances that the recipient will read it in full as much as possible.
Stating the purpose early on signifies that you respect the reader’s time.
They are quite helpful if your prospect size is large to save you time.
It might also mean sharing something that you might otherwise charge for, an eBook, a demo, or a free trial.
Cold email marketing is still an effective way to grow your business if you do it right.
Provide value to the prospect with a free tool
A cold email template helps you build a connection with a potential customer when reaching out for the first time through cold emailing. As you’ve never met your potential customer before, it’s a great way to get in touch for the first time and start building a relationship. Although the immediate goal of cold mail outreach is a response, it’s important to remember that many more people will read your email than will respond to it. The cold email that really works should consist of a few parts. Before you send your message, remember to edit the “from” line. We don’t know each other and the “from” line is a good place to start an introduction.

Customer feedback analysis: Overview, steps, + template
When your email sends, the attributes will populate using the information from your spreadsheet. The third pillar of good email deliverability is your email template. If the email you’re planning to contact isn’t verified, it’ll be flagged and automatically removed from your campaign. For this, you’ll need to use an email verification tool like NeverBounce or ZeroBounce. As well as importing via a CSV file, you can also connect QuickMail with a Google Sheet and have prospects automatically imported into QuickMail.

Better yet, make it a flattering question or something close to an area they enjoy, and build the relationship first while simultaneously getting qualifying info. When you’re building or refining your own email prospecting strategy, it helps to see first-hand how others have done it successfully. Even if your prospect read and enjoyed your first cold email, they will likely forget about it in the sea of more pressing work commitments. Marketers who don’t follow up will likely have an almost 100% fail rate. Without incorporating social proof into your cold email, you are essentially telling the reader that working with your business could potentially benefit them.
Save time and stay focused with the Streak command palette. Quickly find CRM data, access recent work, and take action with just one keyboard shortcut. A/B testing is the process of splitting your email list into equal parts and sending each group a variation of the same email to see which performs best.
Many of these require a cold email tool, especially automated tasks, but if you’re thinking about an advanced strategy, chances are you’ve already selected a tool to work with. This should be a small, easy-to-complete task at the bottom of every email. This could be as simple as asking them to visit a specific page on your website, or you might ask them to sign up for a free trial or demo of your product/service.
0 notes
Text
tbh the way i learned how to code was by a lot of trial and error, and a LOT of inspect-element-ing other peoples' cool pages -> copying what they'd done -> googling keywords on w3schools until they made sense. (genuinely, i think the best advice i can give is to inspect element on people's sites, and then change stuff around in the editor and see what happens!)
there are probably a lot of free lessons out there (mozilla firefox's are good, but are very comprehensive and therefore wordy), but i like figuring out stuff by doing. just depends on how you learn!!
I would recommend sadgrl.online's beginners guide to neocities: https://goblin-heart.net/sadgrl/learn/articles/beginners-guide-neocities or googling "neocities template", finding one that appeals, and pasting it in and messing until it looks nice.
and her html guides in general: https://goblin-heart.net/sadgrl/learn/sections/html-and-css
you can use https://codepen.io/ for a live editing enviroment, but tbh i just use the neocities editor and spam save -> refresh the page. i don't necessarily recommend this.
the way i started learning HTML is by modifying toyhouse codes using the playhou.se live editor - toyhouse uses bootstrap, which is basically a shortcut with a lot of CSS styling templates for things like boxes and buttons. if you feel comfortable with that framework, you can totally put bootstrap on your page and use those - that's what i did until i got comfortable with CSS!
it's definitely super intimidating, but i say mess around a whole lot and try to have fun with it!!!! i've made three different sites with different aesthetics and have had a lot of fun with it. i love having a space to ramble about whatever i want.
but also don't underestimate how long it takes to make these - most of my site was made in like two six-hour binges in the past couple days. it's a process! but it's fun. once you have the framework, you can spend your time talking into the void.
i also link a bunch of things on my site's about page that i use - mostly for graphics and fun things.
this tumblr post also has some good advice!
this was a bit disorganized - i will probably write up something cleaner in the next couple weeks. :)
i wanna make a neocities but idk how to code
#yellings#and u can of course message me any time if u have questions/want to do a specific thing/want to know how i did something. :)#if anyone else has good resources lmk!
30 notes
·
View notes
Text
Embedding images on AO3: A Guide
Since AO3 doesn't host images themselves, we'll just have to host them elsewhere.
In this guide we will use Google Drive, https://postimages.org/, or Tumblr as possible choices to host our images.
Step One: Grabbing the URL
Google Drive:
In google drive create a new folder where the image(s) or sub folders for further organization.

Right click and select New Folder, name this folder what ever you what.
Now upload your image(s)
Right click on your image and hit share

Under General Access ensure it is set to Anyone with the link
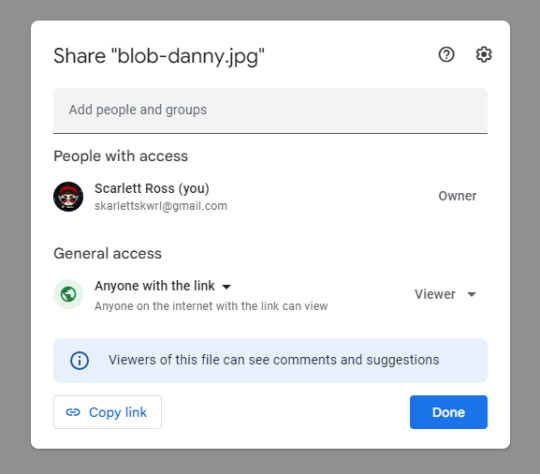
Hit Copy link
The link you have should look something like this
**https://drive.google.com/file/d/1mzOp9pOYhaWahgJP6yVFXbtYagCQ_0Up/view?usp=sharing **
But as is it won't work! We need to modify it first!
Copy the string of random numbers and letters after /d/ and before /view?
1mzOp9pOYhaWahgJP6yVFXbtYagCQ_0Up
Here's a template https://drive.google.com/uc?id=
paste your string after id=
your new link should look some thing like this...
https://drive.google.com/uc?id=1mzOp9pOYhaWahgJP6yVFXbtYagCQ_0Up
Now, you have a working link from Google Drive ready to use.
This Google Drive portion was from this guide here: https://archiveofourown.org/works/28132845
Now, you have a working link from Google Drive ready to use.
Using a image hosting service like https://postimages.org/
https://postimages.org/
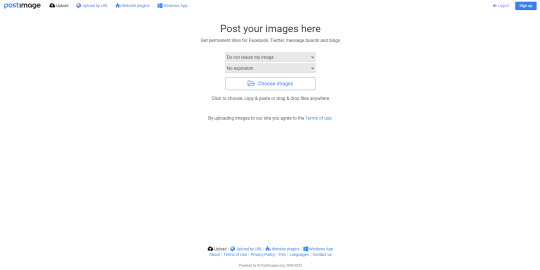
You can create an account for free with this one. This is pretty straightforward so I’ll gloss over. Hit the sign up button. Then, enter your desired email

Once logged in you will be presented with this page
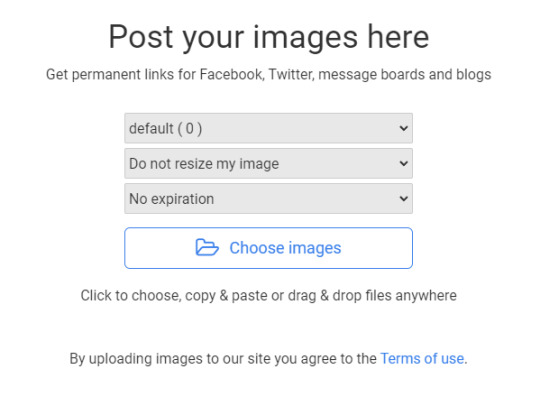
Upload your image, and you will be taken to this page.

Copy Direct link
Now you have a working link from postimg.cc ready to use.
Tumblr (mobile):
Tumblr is not always the best to use as blogs can get deleted or URLs can change here. But I’ll include it here anyway.
Long tap the image you wish to use in a post.
You will be presented with this menu.
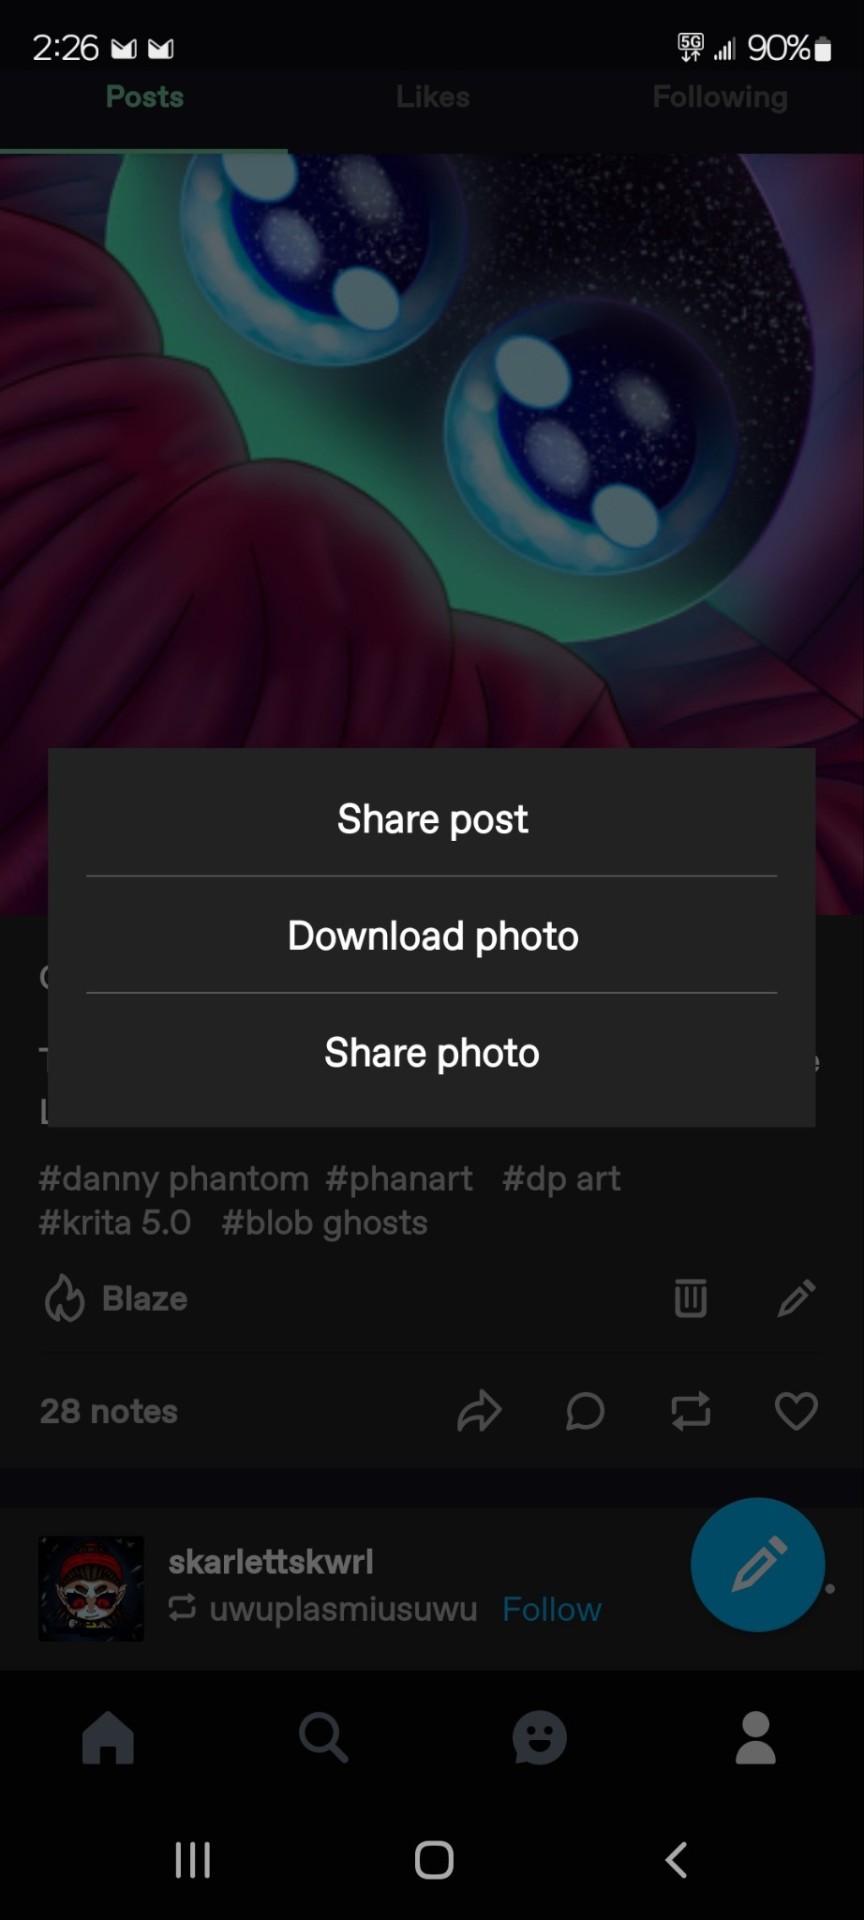
Tap share photo.
Then you will be presented with another menu.

Tap Copy URL
On Desktop (Google Chrome Browser)
Right on the image in the post.
You will be presented with this menu...
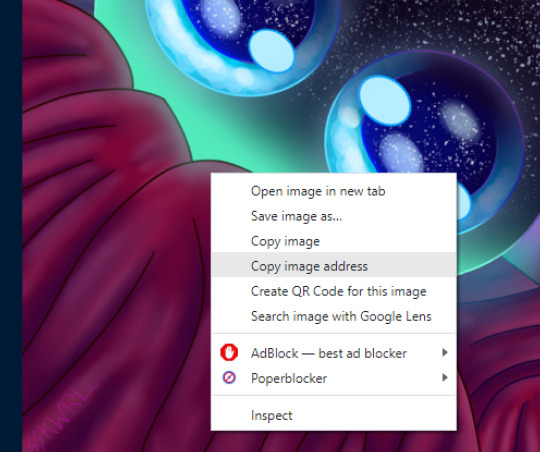
Click copy the image address.
Now you have a working link from Tumblr ready to use.
Now, you are ready to embed.
Step 2: Inserting and fitting the image
Go to the new/ existing chapter you wish to be embed.
HTML OPTION:
Make sure in the HTML editor view.

This is located next to the rich text button in the Worktext section, as shown.
Now, find the place in the text where the image should go...

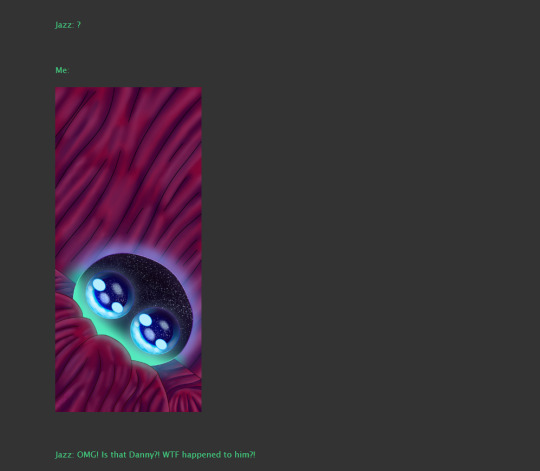
<p> <img src="https://i.postimg.cc/8zG9ZNMw/blob-danny.jpg" width="270" height="600" /> </p>
For this image, it was much too large. So, I modified it with the width and height modifiers.
**First you must find the dimensions of the image. **
This can be done with the same image URL from earlier. With this online tool.
http://myfreeonlinetools.com/get-image-size-and-dimensions/
In this example, my image is 1080x2400
Once you have the dimensions, you can find the aspect ratio.
Use this calculator:
https://www.digitalrebellion.com/webapps/aspectcalc
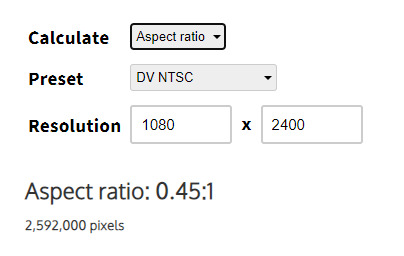
Once have the aspect ratio, you can half or quarter the height or width and calculate for the one you don't have.
Example I've quartered my height as halving it was still to big.
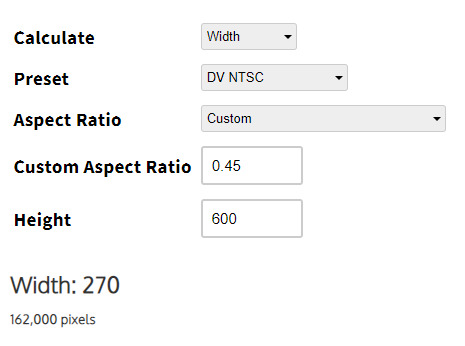
In my case the dimensions are now 600 by 270 which fits the page much better.
These will be your new dimensions.
Record them.
Here is a blank template to paste in.
<p>
<img src="" alt="" width="" height=""/>
</p>
src is the path to the URL.
alt is the alternative text for the image. This is used for accessibility as well as be a modern web standard.
width is the image width in pixels
height is the image height in pixels
You insert your values in between the double quotes.
_*remember to close your quote _
*remember to close your image tag
RICH TEXT OPTION
Make sure in the Rich Text editor view.

Set the cursor where you want the image. Click image icon.

Set the values in this form.
Use the URL we generated in one of the previous 4 options.
Set the Image description
The width and height may be input automatically, if not consult the HTML OPTION for finding the dimensions and aspect ratio of the image.

Here’s how it looks after posting
Shout out to @playedcrowd5610 for inspiring me to make this guide.
262 notes
·
View notes
Text
Rec Blog Template Creator (For General Use)
A lot of the appeal of hosting a rec blog with other people is sharing the work. I don’t have to spend more than five to ten minutes a week writing anything up, and I automated the formatting, so that’s another five to ten minutes.
But it occurred to me that I could just, like, fill out a single-user version of the google form and just publish it when I got enough responses, or once a month, or something else. And if I filled it out at the same time I wrote a comment, I wouldn’t really have to spend much time thinking about what to write.
So, I modified the google docs I created for @aeor-is-for-reccing to be suitable for one person (taking out the themes randomizer, removing some of the duplication work, and adding a pairing field), and I thought I’d share it with everyone else. You can see the original explanation here (or just go to aeor is for reccing, you can see it).
Short version remains: google form -> google sheet -> mail merge to now-html format -> copy and paste to tumblr
We still need four documents for this:
1. The Google Form. This is a copy of the form I use, you can create something that looks like it. Just go to google drive and create a new form.
2. A Google Sheet with all the responses. The easiest way to create this is to make a copy of this sheet into your own directory, then under google form, select Responses. There should be an option at the top right to connect or link to a sheet, and then select an already existing sheet - the copy of this sheet you made onto your own drive. You’ll have to reconnect all of the formulas onto your own responses sheet, but there’s an explanation of all of the formulas in the explanation tab to make this easier.
3. A google doc with whatever formatting you want to use. Here's a copy of what I'm using. If you're doing mail merge a different way, you might not need this one.
4. A second google doc that's going to hold the output from the mail merge. It's a blank google doc. Just open up a new one and save it something you'll remember in the future. (used for mail merge, might not be needed if you do it a different way).
The Scariest Part - Formatting
I’m formatting these using mail merge, and I wrote my own code to make it work. You can use extensions that do the same thing! I just don’t know which google office suite mail merge extensions are actually designed for creating formatting and not sending mail, and it was faster for me to code than figure that out.
You can find the script under the script for mail merge tab in the google sheet. Copy your forms’ ID where appropriate (it’d be the part after /d/ in the URL - for example the sample google sheet’s ID starts with a 1 and ends with an 8), make any other changes you need to, and then copy the script into the pop up window that shows up with Extensions -> apps script.
The first time you try to run it, google will send you a warning that this is an unverified script - go under advanced options and then read the fine print at the bottom. If it makes you feel any better, here's a youtube video that explains the entire script from start to finish.
Once it’s set up, how to use:
1. Set a category - doesn’t matter what, into both Question 1 of the google form and Formatting!B2 2. Fill out the form for a while, just when you comment or bookmark on something, whenever you think about it. 3. When ready to post, open up the google sheet and run the mail merge script 4. Open a tumblr post, click the gear in the top right and change the formatting type to html 5. Paste what’s in the output google doc (doc #4) into tumblr 6. Add tags, any graphics you want, a cut, ect, and post! 7. Repeat step 1 with a new category
And that’s it!
#fic recs#fandom tools#I couldn't decide between just linking to the older post and copying and pasting so instead I just rewrote it?#and it turns out it's pretty much the same
10 notes
·
View notes
Text
These are all great recommendations (I'm a Scrivener guy myself, but Campfire in particular looks awesome).
I'd like to add a couple more straightforward online options, just in case the motivation for writing in AO3 draft box is "I want a website, not software." Here are a couple websites that are designed to write drafts in, with autosave functions, multiple files, etc.:
750words.com has a great, minimalistic structure where you get a different file every day and can write whatever you want in it, "morning pages" style.
4thewords.com has a more robust—but, trade-off, more complicated—file system, as well as more options for gamifying your writing experience. (It's got a lower streak goal of 444 words a day, which is also less prominent overall.)
Both these sites have exports to multiple common filetypes that can then be pasted over to AO3, though the formatting may be tricky.
While browsers are notoriously fickle and a lot can go wrong writing in one (especially if your Internet connection is less than stable!), these have worked reasonably well for me over the years. Pro tip, though: back up anything you write on a site like this elsewhere as you go if at all possible. If you're like me, just the chore of wading through a mess of files is going to be a daunting hurdle to ever seeing your stuff again, to say nothing of cloud failures or other catastrophes.
(Another caveat: both of these have prominent streak tracker features and are also paywalled, so if anyone knows of any free options with less emotional/economic pressure, they would be a great additions!)
Also, though!
If the reason for doing this is formatting, I can almost understand the rationale. It's a huge pain to get everything just right in one window, just have to do it all over, and most methods of posting don't carry it over correctly. Not to mention most of the best options listed so far are behind a paywall.
If you want a free option that handles most (if not all) of the formatting for you, there's an unofficial Google Doc template listed on AO3 itself that you can copy into your Google Drive, write in, and then convert to html to copy-paste over (in AO3's html window, not the rich text one). It's free, it works in-browser or through the Docs app, and it's frankly incredibly cool.
The only real downside to this option is that it uses GSuite, which is a valid hang-up for a number of reasons. But if I weren't a weirdo who kind of enjoys doing my html by hand, I would be willing to make a throwaway account just to use this method. It rocks.
as a reminder to literally anyone and everyone who even so much as considers this: AO3 has NO autosave ability when you're making drafts, so PLEASE do not use it instead of a writing program.
If their server goes down, if you hit a wrong button and refresh the page or go back to the previous page, if you accidentally close the browser, if your browser or device crashes, etc etc etc you are shit out of luck. Your work is gone forever, it didn't backup to anywhere and there is NO recovery option. Even TUMBLR's drafting ability is supposed to autosave and often does.
If you want to avoid gdocs that's fine- there's other text editors with simple autosave options, like Online Notepad or Digital Scholar's notepad, or there's still local-drive writing programs that are free and open source, like LibreOffice. PLEASE do not use AO3 to write your stories into directly. It has NOTHING.
#writing advice#not to yuck anyone's yum#but writing in the AO3 is absolutely playing with fire#paying the GDocs one forward because I only heard about it recently too#writing tools
7K notes
·
View notes
Note
how do you have different font and colours on your navi? usually tumblr only allows n or the other
hi there, anon! i tried my best to explain as best as i can, so bear with me here ;^;
for the fonts, the ones that you say tumblr allow (which i assume are quote, lucille, chat etc.) are only what tumblr itself provides; this doesn't stop you from copy pasting any fonts you'd like from another site. i personally use the igfonts.io site to change my font to different ones! >:)
as for the colors, it has a little something to do with HTML and i promise you this before you give up — you do not need to know how to code in order to use HTML for changing colors because i, for one, don't know how to code to save my life but can still do it!
firstly, you need to go on desktop and manually change your settings from "Rich Text" to "HTML" on your post (you can search up tutorials on google but make sure to specify "on tumblr"), then you can find a template code for changing font colors and just copy paste it into the code anywhere you'd like. iirc, the template code is:
<span style='color:[insert color hex code e.g. #D4002A]'>[insert the word/sentence you want]</span> — and that is it!
i personally use this text colorizer site; there, you just have to type in whatever and choose the colors you want (it also allows different gradients) and it'll write the code for you! BUT when you copy paste it into your tumblr codes, you need to erase the semicolon (the ; symbol) after the color and you're done!
for more elaboration in case you want to use this site, it adds a semicolon after the color in the code given to you initially. so it'll be like this:
<span style='color:[insert color hex code like #D4002A];'>[insert word/letter]</span>
do you notice the blue semicolon after [insert color] and between that quotation mark i highlighted? yeah, get rid of that one thing and you're good to go!
#i sound so much like a nerd here#but i hope this helps! feel free to ask again if you're still confused <3#ask box! 📬#anon visitors! 🔎
16 notes
·
View notes
Note
Where are u writin your fics? R U writing them here on tumblr so they get saved as drafts and the formatting is okay or are you using other apps (ms word, ios notes app etc.) and then copy them here?
this is quite a convoluted process lmao but i usually write them in Google Docs, then copy it all to a presaved AO3 template, save, convert it to HTML, copy the HTML text, and then paste in a tumblr text with HTML format. then i save it, and edit in tumblr as needed. post.
i really dislike tumblrs editor, and since i use such heavy italics and weird spaces (esp between paragraphs with maybe a word, or two), it tends to get all messed up when i copy and paste it directly from Docs to text in tumblr. either my spaces are all weird, or my italics disappear. or tumblr crashes and nothing gets saved.
it sounds quite arduous, but it's a neater process for me to use. though HTML does add extra spaces between italicised words so it's not perfect. i've just gotten really adept at using this format. it def might not work for everyone!
i hope this helps!! 🖤
11 notes
·
View notes
Text
Trivandrum’s Digital Pulse: Meet Innovatio – Your Local Growth Partner

Hey there, business owners and digital dreamers!
Let’s talk about something super important today: getting your business seen by the right people at the right time. And if you're in or around Trivandrum, we’ve got just the name for you — Innovatio
What is Innovatio?
Innovatio is a full-on digital marketing agency based in Trivandrum that’s changing the game for local businesses. Whether you’re a cozy café, a busy salon, or a service provider trying to reach more customers — they’re here to make sure people find you.
And their secret weapon?
Google Business Promotion
This is their main service — and it’s
You know when you search “best biryani near me” and some businesses pop up on Google Maps? That’s no accident. Innovatio helps businesses rank high, look great, and stand out in those local search results.
Get discovered on Google Maps Attract more calls, messages, and visits Show off your reviews and photos Stay updated and visible to real customers
So if you’re not showing up in local searches yet… Innovatio’s got your back.
But wait — there's more...
Innovatio doesn’t stop at maps and listings. They’re your one-stop digital shop, offering everything you need to build your brand online:
SEO (Search Engine Optimization) Social Media Management & Ads Google Ads & Pay-Per-Click Campaigns Content Writing & Blogging Web Design & Development Branding & Graphic Design
Basically: if it lives online, they do it.
💬 Why go with Innovatio?
Because they get Trivandrum. They know the local vibe, the market, and how to blend creative + strategy to help small and medium businesses grow organically and affordably.
No copy-paste packages. No vague promises. Just real results that help you connect with the people who matter.
TL;DR
If you're in Trivandrum and your business isn't getting the online attention it deserves — it’s time to call Innovatio.
Local experts Google Business champions Full-suite digital services Real growth, real results
Ready to glow up your digital game? Hit up Innovatio and let them help you shine online.
1 note
·
View note
Text
Cek Kode Verifikasi Google di Webmaster Tools
Kode Verifikasi Google Webmaster biasanya digunakan agar Blog bisa mudah dicari di Search Engine Google. Setiap Blog yang didaftarkan melalui Blogspot biasanya sudah otomatis memiliki Kode Verifikasi Google Webmaster meskipun tanpa harus didaftarkan di Google Webmaster. Jadi sebenarnya untuk blogspot tidak perlu lagi ditempatkan di dalam tag HTML nya. Kode ini biasanya disisipkan sebagai meta tag di bagian antara <head> </head> template blog. Untuk Blog lain yg memiliki domain serta hostingan sendiri dengan fasilitas Wordpress, berikut cara melakukan verifikasinya:
Login ke akun Google
Lalu buka URL berikut ini: https://www.google.com/webmasters/verification/home?hl=en
Di halaman tersebut sudah terdapat blog yang sudah terdaftar di Google Webmaster
Klik verification details disamping blog yang diinginkan
Klik Verify using a different method
Pilih HTML tag, copy kode yang muncul. Kemudian klik tombol Verify di bagian bawah
Masuk ke dashboard Blog, pilih Template > Edit HTML
Cari kode ]]<b:skin>
Paste kode verifikasi google webmaster yang anda copy tadi pas diatas kode ]]<b:skin><
After a few years of trial and error, I think I've finally found the perfect organization method.
In the early years of high school, I had a bullet journal. I was an artsy kid who found a way to combine art with organization in a way that benefited other parts of my life.
However, as I approached the end of high school, my schedule got busier, and I was involved in a lot more things, so owning a bullet journal was less practical. Because of that, I switched to an app called Edo Agenda.
I continued with digital planning in college since I knew I wasn't going to have as much time. But all the apps I tried out—Taskade, Actions by Moleskine, Any.do, Todoist, Wunderlist—weren't suited to my planning and organizational needs. They didn't have the specific functions I required and didn't incorporate an organization system I liked to use. The predefined apps were too restraining, but the more customizable apps weren't customizable enough.
So then I switched to a bare bones, uber minimalist bullet journal method. That worked pretty well my second semester. It was simple, portable, and most importantly, flexible—all the things one could wish for in a planning system. However, it wasn't always the most convenient to use since I couldn't effectively integrate all the different aspects of my life, which, to no surprise, is mostly recorded digitally.
There was just one huge problem with my digital organization system that made me hesitant to switch back in the first place: everything was fragmented. Notes were in Google Docs. Financial records were in Google Sheets. To-Do Lists were in my bullet journal. Team projects were in Trello. My poetry was on Bear. Things I wanted to try are carelessly pinned to random pinterest boards or added to my YouTube "watch later" playlist. It was a mess.
Over the summer, I found out about Notion from a friend, and I thought, this has so much potential, it could even be exactly what I need. It's essentially like an empty notebook on your computer with functions that make it 10x more powerful. Notion allows you to integrate all aspects of your life and work into one app. Some of the advantages that have made me partial to Notion are:
Even greater customization level. Notion is a blank canvas with tons of predefined blocks and different file types. You can make databases, spreadsheets, Kanban boards, to do lists, etc. Also, you can remain connected to other digital services. You can link websites, collaborate with other users, use different structures (e.g. documents, databases, tasks), embed images and videos, etc. There are also tons of formatting options, e.g. text color, highlight, heading v. body text.
Better organization. Notion allows you to have pages within pages within pages within pages—an infinite hierarchy that you can organize with tables of contents. These pages are made of blocks, e.g. tables, checklists, boards, databases. Both pages and blocks can be rearranged by simply dragging and dropping them to where you want them to be. In other words, I guess it's kind of like building a website to organize your life. Plus, their database feature is especially powerful as it allows you to connect all your data and get into as much detail as you wish (each entry in a database is its own page).
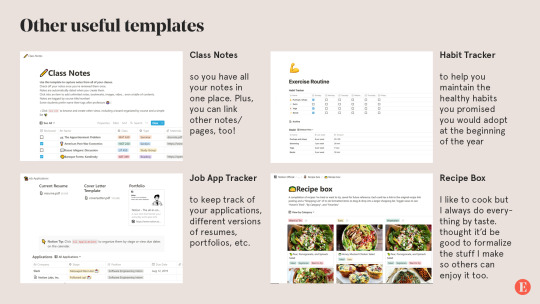
Templates. There are tons of templates created by both Notion and the community that you can use. These are especially helpful in the beginning since Notion does have a rather steep learning curve. There are template for almost every category: personal, planning, finance, job applications, design roadmap, etc. Check out their template gallery, this medium article called "10 Notion templates to inspire your use", or read on for my own examples!
Shortcuts. This makes typing and documenting so much faster. Notion uses Markdown, which is a text-to-HTML conversion tool, e.g. # = Heading 1, *, - = bullet point, etc.
Notion has some pretty awesome features, but how does one actually use it? Personally, I have four top-level pages: my planner, my personal journal, songwriting, and blogging.
Planner
I've been using my planner to, well, plan and track my day to day activities as well as my week and month. The way I've structured it is a calendar or monthly overview with links to pages of weekly overviews, and if needed, daily overviews within the weekly overview. This links things up so nicely, i.e. I don't have to be constantly flipping pages in my physical bullet journal or planner to find what I need.
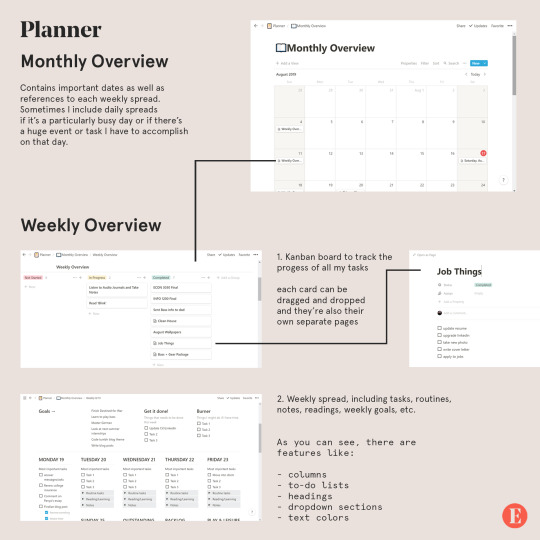
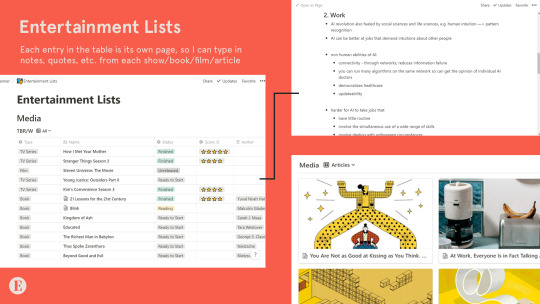
I also have entertainment lists, which is mainly a table with all the shows I want to watch, the books I want to read, etc. I keep track of whether or not I've watched them, as well as my personal ratings. What I love most about this is that each entry is its own page, so I can type my notes for each book, show, or film and easily find them in the future. (Also the reason why I have plural “lists” instead of just one entertainment list is because you can filter entries by type of entertainment, e.g. movies, tv shows, books, articles.)
Personal
For personal notes, goals, journal entries, etc. This is kind of like an extension of my daily journal and just where I dump all my thoughts and keep track of the different aspects of my life: mental, emotional, spiritual, social, physical, and travel.
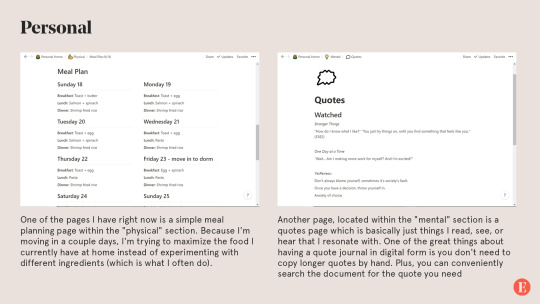
Another page I have is called "Stray Thoughts" and, well, it's pretty self explanatory. It's a lot easier to dump all my thoughts as they come and reorganize them later. Of course, this requires sacrificing the rawness of journaling, i.e. when the thoughts come and how you process them, which is why I still keep a regular journal that I write in daily.
Songwriting
I've been writing a lot of music over the summer and it's often hard to keep track of all of my songs and how far I've gotten in the songwriting process. So I created a table of songs - each entry of a song is a page with its lyrics. These are then tagged with the status of the lyrics (i.e. completed, in progress) and the status of the music itself (i.e. melody only, instrumental, mixing, mastering, revised). Eventually, I'll include demos in the database by embedding audio files in the document.
I have a separate section for inspiration and ideas, which is a kind of brain dump, e.g. words I think would make a good song, a certain theme for a song, a melody that's been stuck in my head, a vibe I'd like to try out, etc.
I've also been watching a lot of tutorials for music production and there's a section where I write my notes for that.
Eintsein
The last section of my Notion app is for this blog. Which has pages for
New posts. These are ideas for future posts, asks that I think would need longer answers, as well as posts that are currently in the draft stage (like this one was before I posted it)
Design assets. This is where I put all the visual branding material for Eintsein.com to be used in posts and any visual material on the blog.
FAQ. Having an FAQ document just makes it so much easier to make changes to your existing FAQ. Plus, if you ever change your FAQ theme, you just have to copy and paste what you already have.
Post directory. I keep track of all my previous masterposts, infographics, and generally longer and more comprehensive posts. It's the exact same as what you see on my Navigation page. And yes, the document contains direct links to the post.
New theme. A project I've been working on the past couple days is trying to create my own theme for my blog. This is where I put all my outlines, brainstorming notes, design inspiration, code snippets, etc.There are some pretty awesome features I’ve made use of in this page:

As you can probably tell, I'm absolutely obsessed with Notion since it has such awesome features and endless possibilities for customization. So far I've been using Notion for personal projects, which, since they are quite big in scale and have no set deadline, are important to organize well. My summer courses were only 6 weeks and weren't difficult to organize.
The formats above are just how I personally use notion. You could make some of your own, or if you don't think you want to build your pages from scratch, there are tons of templates to choose from. Here are some I think I'll be using in the near future and may be helpful for others as well, especially students like myself:
One drawback, however, is that Notion has a rather steep learning curve, but there are tons of tutorials online (especially YouTube) and I guarantee you it's all worth it.
Notion is not just a productivity app. It's a way to concretize your entire life.
Notion is free to use, but there are higher tiers that allow for more blocks, greater file size, etc. I use a personal account, which is $4 per month with unlimited block storage and no file upload limit (although I got it for $33/year). Personally I think the free plan would suit most people's needs, especially if you're not uploading large files.
#mine#eintsein#mymp#notion#apps#productivity#studyblr#studyspo#study hard#organization#document#graphic#design#infographic#masterpost#advice#tips
5K notes
·
View notes