#how to create an optical illusion in adobe illustrator
Explore tagged Tumblr posts
Visit Tumblr Blog
Explore Tumblr blogs with no restrictions, modern design and the best experience.
Last Seen Tumblr Blogs


Fun Fact
1,644 Tumblr posts in 1 second.
Text
youtube
#cover designer#how to create b&w letters#how to create block letters#how to create a font logo#how to create letter logo#s optical illusion tutorial adobe illustrator#adobe illustrator optical illusion tutorial#optical illusion adobe illustrator#how to create an optical illusion in adobe illustrator#op art tutorial illustrator#how to create optical illusions in illustrator#optical illusion in illustrator#how to make optical illusions in illustrator#s#blend tool tutorial#adobe illustrator#blend tool in illustrator#how to use blend tool in illustrator#3d type in adobe illustrator#Youtube
2 notes
·
View notes
Text
Top Graphic Design Institute: Dehradun
Explore a Diverse Range of Graphic Designing Courses at Leading Institute in dreamzone Dehradun
The best graphic designing institute in Dreamzone Dehradun will focus on providing candidates with all the skills required to create a design. This process will include ideation, digital application and rending of the design. Graphic Design course also gives candidates a chance to work with various applications from scratch. Through the program, you will learn about the essential aspects of Graphic Design for web and print media. You will also learn the creative aspect of the subject vehemently. You can create Vector based artwork and image composition and manipulation. The enrolled candidates will also get an opportunity to work with real-time projects to help them enhance their design skills.
Basic of Design and Graphics
Graphic design is the art of creating exciting visual content using computer software to communicate messages that inform, inspire, and meet the target audience’s attention. The graphic design program combines art and technology to communicate ideas by using a variety of design elements to achieve artistic or decorative effects with the help of interactive media. By using the visual structure and page layout methods, designers use typography and pictures to meet users’ specific needs and focus on the logic of displaying elements in interactive designs, to optimize the user experience. The core graphic design principles are Contrast, proportion, Rhythm, color, Visual Hierarchy, and Proximity.
Process to Create a Design:
Research about the project
Planning
Dealing with multiple ideas
Time management
Attention to detail
Types of Graphic Design:
Brand Identity Design
Marketing & Advertising Design
User Interface Design
Product Design
Publication Design
Packaging Design
Typeface Design
Motion Graphic Design
Illustration Design
Learning objectives of Graphic Design Course in Dreamzone Dehradun
The learning outcomes for this course are as follows:
All the essential elements and concepts involved in the design
Knowing about the aspects of print advertising
Learning about imagery and visualization techniques
Getting know-how about typography, color theory and its scope, importance, and applications
Learning about retouching and image editing
Designing the layouts for brochures and magazines
Understanding grid systems and layouts
Learning how to use raster and vector graphics
Graphic Design Course Modules
Graphic design training classes in Dreamzone Dehradun, combine creativity with technology to teach students in a clear and effective way. Below are the curriculum followed during the training:
Introduction
Basics of Graphic Designing Web Designing G-Codes M-Codes Design process Color models Understanding resolution Types of Image formats Typograph Overview of popular software used Designing of brand identities Animation and 3D images Color balancing
Elements of Graphic Design are:
Shape Color Space Form Line Value Texture
Graphic Design Software Tools:
Adobe Photoshop Adobe InDesign CorelDraw Graphics Suite Adobe Illustrator Inkscape Sketch Affinity Designer Xara Designer Pro X Gravit Designer Photoscape
Jobs for Graphic Designers in Dehradun:
Graphic Artist Digital Illustrator Art Director Creative Director Package Designer Visual Image Developer Visual Journalist Logo Designer Broadcast Designer Interface Designer Web Designer Multimedia Developer Flash Designer Layout Artists Photoshop Artists
Top Graphic Design Trends in 2024 are:
3D Design Emoji Design Optical Illusion Design Nature-Inspired Design 3D Typography Design Cartoon Illustrations in Design Voxel Art Design Monochrome & Duotone Design
0 notes
Video
youtube
Optical Illusion 3D Logo Design Tutorial: Abstract Geometric Shapes in Adobe illustrator.
Learn how to create an Optical Illusion 3D Logo Design using Abstract Geometric Shapes in Adobe Illustrator 🤩 This tutorial is perfect for graphic designers and anyone interested in logo design! Join me as I walk you through the step-by-step process of creating this stunning logo design.
#logo#logodesign#logodesigner#logomaker#logomaster#freelogomakingapp#kavucreative#adobeillustraor#illustrator#vectorart#vector
2 notes
·
View notes
Text
Graphic design workshop


In the first workshop today we had to create a simple pattern from what we already had from movement. I focused on my fire painting, my cloudy painting and my pose and motion studies. I couldn’t use a few of the designs as they were too detailed so I simplified my favourite ones. I was basing my pieces of optical illusions.
I decided to make the first one as it had more votes but in hindsight i would have preferred to do the triangle pattern.

In the second workshop we learned how to use adobe illustrator to create more patterns. I had a bit of difficulty using it but made some interesting visuals.


4 notes
·
View notes
Photo
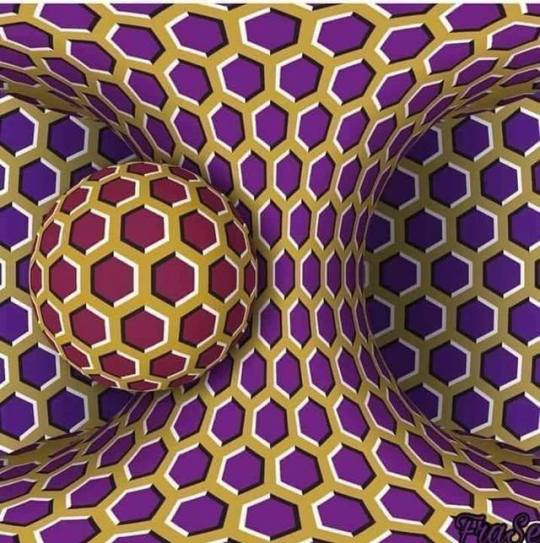
“This still image was created by Yamamoto, a Japanese neurology professor, and he told the instructions below,” the original post reads. “If it’s not moving, or just moving a little, you are healthy and have slept well. If it’s moving slowly, you are a bit stressed or tired. If it’s moving continuously, you are over-stressed and might have mental problems.”
But here's the thing: that's all fake. The image was really created by Yurii Perepadia, a 50-year-old designer from Oleksandriya in Ukraine. He drew it in 2016 and it took him about two hours to complete. And most importantly, he says the image has nothing to do with how stressed you're feeling. -- “I drew this optical illusion in Adobe Illustrator on September 26, 2016,” he writes. “To create it, I used the effect of Akiyoshi Kitaoka. This is a white and black stroke on a coloured background… which sets in motion the focus of vision and it seems to a person that the details of the image are moving.”
30 notes
·
View notes
Text
EVALUATION
This project was like a roller coaster. There was a lot of unutilised ideas but using mind maps, research aesthetic inspiration and peer feedback, I came to an conclusion.
I started off by doing workshops were I learnt how to use different tools in Adobe Illustrator,Photoshop and After Effect. I learned how to create 3D vases in Adobe Illustrator, create gifs using different tools, such as the mask tool in Adobe photoshop and created 3D bubble text in Abode illustrator using the blend tool. Most of these workshops were easy to produce but they only became more easier once I picked the topic for my FMP.
The topic for my FMP was ‘The world is not real’. This topic stood out to me because I feel like it seeps into the topic of dissociation. This is because when certain people with dissociative disorder, dissociate from the world they feel like things around them are not real, like they are seeing the world as lifeless and foggy, which I want to portray through my FMP.
For my FMP I sketch out a few ideas. Then I thought the best way to portray this would be using the content aware videos I made earlier on in the unit. I created these content awarded videos using Adobe Photoshop, After Effects and Premier Pro. The process of making this was long and some of the PNG sequences did not content aware, so I had to delete some of the video files. In order for it to look like a cctv footage I added glitches too my video and turned the image black and white in Adobe After Effects. The video turned out the way how I wanted them too and I don’t think I would change anything.
However, I felt like the video alone was not enough for my FMP, so I decided to created an awkward and weird atmosphere using objects. I took inspiration from backrooms. This is because I want the viewers to feel like they have walked into a alternate reality. I wanted to create a waiting room that feels out of place. The objects that I included in this waiting room is a backwards handle mug, a off cut piece of carpet, two small chairs, a framed picture, a tall table and a out of place shadow.
The process of making these objects was quite easy. The only problem I had was the shadow. Getting the correct measurements to match the chair was really hard. So, instead I decided to just trace a students shadow in the studio on a 10 pieces of A3 paper, which ended matched the chair perfectly .
I researched artists such as Cornelia Parker for shadow inspiration and looked at how she uses material and makes them appear as human shadows. Also, I research other artist that specialised in optical illusions for inspiration. It was hard to find an artist surround the object for my FMP because a lot of the artists that I looked at was not doing the same type of objects as me. However, I did find an chair optical illusion artist called Jean Beuchet. His chair tricks the human brain into perceiving the person on the chair is small, by having the base of the chair far away from the leg. The research that I did helped me to produce and interesting instillation for my FMP.
Overall, I enjoyed producing everything for my FMP. However, in the future I will try to manage my time better by created a better week plan. Also I would try to experiment more with my physical art.
0 notes
Text
New video - Photoshop Daily Creative Challenge - Custom Brush on @YouTubeNew video – Photoshop Daily...
New video - Photoshop Daily Creative Challenge - Custom Brush on @YouTube
New video – Photoshop Daily Creative Challenge – Custom Brush on @YouTube
Via Adobe Creative Cloud Challenge: Create an optical illusion illustration using custom brushes. Get the starter file here: https://bit.ly/psdcc6-21-7 Join your host each morning at 9:00am PT to learn how to approach each challenge using Photoshop. Complete 9 challenges by Friday, July 2nd and you’ll be on your way to sharpening your skills. Get your questions answered, see what the community…
View On WordPress
from hip hop news source https://ift.tt/2UTIiEB via what is social marketing
0 notes
Video
youtube
Use Optical Illusions to Create a Unique 3D Arrow Logo in Adobe illustrator with @KAVUCREATIVE
"Unleash the Power of Optical Illusions: Design Your Own 3D Arrow Logo" ✨🎯 Step into a world where illusions come alive and dive into the realm of mesmerizing 3D arrow logos! 🌈✍��� In this tutorial, we'll reveal the secrets behind incorporating optical illusions into your designs. Discover how to wield geometric shapes, play with perspectives, and create an arrow logo that defies expectations. 🌀🖌️ Unleash your creative prowess as we guide you through each enchanting step, unlocking a new dimension of design possibilities. Join us on this journey and let your imagination soar! 🚀🎨💥
1 note
·
View note
Photo

Op Art in Adobe Illustrator. Tutorial link : https://www.vividesigning.com/2020/06/how-to-create-op-art-in-adobe.html #vividesigning #adobeillustrator #graphicdesign #opticalart #opart #opticalillusion #optical #visualart #visual #illusion #illusioneffect #adobeeffects #vectorart #artwork #artist #artistoninstagram #artoftheday #postoftheday #illustratorart #art #abstractart #GraphicDesignersGroup #graphicdesigner #IAClub #designer #indianartist #3d #3deffect https://www.instagram.com/p/CA8ck-rjGGl/?igshid=1rbyxxworf8l
#vividesigning#adobeillustrator#graphicdesign#opticalart#opart#opticalillusion#optical#visualart#visual#illusion#illusioneffect#adobeeffects#vectorart#artwork#artist#artistoninstagram#artoftheday#postoftheday#illustratorart#art#abstractart#graphicdesignersgroup#graphicdesigner#iaclub#designer#indianartist#3d#3deffect
0 notes
Text
personal statement
My main interest in art began with my interest in visual mediums, such as graphics and illustration. My love for illustration and reading graphic novels lead me to discover my enjoyment for film; specifically the book 'Signal to Noise' by Gaiman and McKean. This graphic novel shows a filmmaker who is dying and is trying to complete his film before he dies, which ends up being a film that only the reader will witness. This graphic novel ties in the visual aspects of both film and illustration with the pleasing layout patterns that films follow, and gritty and textured drawings that tie the narrative together.
I love to use my humour in and outside of my work. I am currently in an 'illusion band' called ULCER. My bandmate and I create a façade that we are producing music but we have yet to release a song. Even without a song, we have made an album and singles with covers with the hopes that we might finally, one day, release a song. We describe our music to be 80's pop-synth-rap with undertones of Russian classical music, and as of now we have only planned our future gigs to take place in Portland (Weymouth, not Oregon).
I think that I am benefitting a lot from the foundation course I am doing at AUB. Having started in the art and design side of the course, I was using more hands-on techniques to creating pieces of art which is something that I enjoy a lot. I had decided to pursue film for my pathway because it was something that I was not too familiar working with, and I am always looking for new techniques to learn in different forms of art. One thing that interests me the most about film is the technical side to it; I understand how useful it is to be able to use Photoshop and other Adobe software to a professional level, as it has helped me a lot to be able to make high quality pieces of art.
I have a specialist interest in sound and sound design. My understanding of sound is that it is not just about what you hear, but about what you can feel from it. Vibrations from sounds and the repetitive nature of music have helped people around me begin to overcome their disabilities which is where my interest in sound design started. I have also grown up playing and listening to different genres of music.
A composer who interests me the most is Basinski. Before discovering Basinski, I had thought that music and sounds were very controlled; after listening to his "Disintegration Loops" I had realised that sound was something quite abstract and that it could not be controlled.
I am also fascinated by "The McGurk effect"- an audio and optical illusion that causes someone to hear a different sound when the visual component of the sequence is changed. In the McGurk effect, the visual parts of the sequence will always dominate over the audio part of it in our brains.
I am really interested in taking this course so that I can learn more specialised skills, and how to incorporate the sound aspects to visuals that I will create. Coming from a multicultural background, I am always keen to meet new people who share the same enthusiasm for the subject as me and to also show my enjoyment for sound and film. I will also bring an aspect of humour and a willingness to collaborate with other people on the course.
0 notes
Text
New video - Photoshop Daily Creative Challenge - Custom Brush on @YouTubeNew video – Photoshop Daily...
New video – Photoshop Daily Creative Challenge – Custom Brush on @YouTubeNew video – Photoshop Daily…
New video – Photoshop Daily Creative Challenge – Custom Brush on @YouTube New video – Photoshop Daily Creative Challenge – Custom Brush on @YouTube Via Adobe Creative Cloud Challenge: Create an optical illusion illustration using custom brushes.Get the starter file here: https://bit.ly/psdcc6-21-7Join your host each morning at 9:00am PT to learn how to approach each challenge using Photoshop.…
View On WordPress
0 notes
Text
What did you do this week? Today, we’ve looked up to program called Adobe Illustrator, which is a program similar to Photoshop, but offers you different options much more interface in my opinion. We were task to experiment and create random shapes using “Op Art” techniques.
What did you learn? I have learned interesting facts about “Op art” and how it’s used to create an optical illusion.
How do you feel about the work you have produced? In fact, this was my first experience using this program, so I do not feel as confident as if I was familiar with it, It was just the first lesson though, I will get better next time. the more time I spend using it the better I get.
What is left do? As it was just disposable task, I am not sure what is there left to do.
How could you add to this /what extra work or research could you do?
My favourite YouTube tutorials are always pretty helpful and educative in terms of this section.
0 notes
Text
“Place of Words” project evaluation
When first being given my two words: “play” and “political” my initial research was kick started by an exercise used to join ideas for the separate words. I came up with three main pathways- mind games, optical illusion and different types of politics. I swayed towards different types of politics and began to start looking at an idea I came up with called “playground politics”. This was the idea of children opinions on Politics and how humorous it is. When I started to look into this, I found so many videos online of specifically children’s opinions on Trump. This is what sparked my whole project- I wanted to ridicule Trump just like the children were through my book. I then started conducting research on Trump and his presidency, as well as children opinions, Celebrity opinions and shocking statements Trump has made himself in order to inform the content I was going to use in my book. As well as academic research I conducted visual research into an artist called Hannah Hoch who really informed my image making style for my book (photomontage). Moreover, I used Pinterest to influence my layout ideas and I also gathered inspiration for my handwritten typography that worked well in the end.
My project has gone through many changes and development over the term, it originally started off as a book of children’s opinions on Trump and his choices. However, as I began to collect more articles about him that had a more serious undertone- I chose to change my content idea to a serious book on the issues of Trump reinforced by his own absurd comments which instantly made the book more shocking opposed to just funny. Visually, my book has changed, the layouts were untidy and the titles all varied in alignment. I changed more larger quotes to hand written quotes as I felt it communicated the message more effectively. I also experimented with two types of image making: illustration and photomontage- in the end I chose photomontage as it looked creepier and more disturbing and illustration was better suited to my previous book idea. Lastly, towards the end of the project I was constantly changing the page layouts of my book, colour images or black and white images, colour of the typography etc.
I think I did manage my time well throughout the project, completing my book to the best of my ability a couple days before the deadline and always providing new and exciting content for the tutorials throughout the unit. I made sure to keep the project moving at a steady pace without rushing my work.
Overall, I believe I responded well to my feedback given to me in tutorials, whenever issues with the typography handling were made obvious to me I understood why it was wrong and was quick to make the changes. For example, I believed that the small insert page was going to work well however, once printed it was highlighted by the course leaders that it in-fact wasn’t that effective and after taking a closer look at it, I realised this too. Moreover, one huge piece of feedback that I had was that the black type was hard to read on the red paper. I personally really liked the black on the red and even though I didn’t want to change it, I did experiment with white, grey and a different type face providing alternate solutions. I came to the conclusion that despite the feedback, the black worked best and I was going to stick with it as ultimately I am the one who must be happy with the book.
I think there definitely are areas of my design process that need more work. For me, even though I did conduct both primary and secondary research into my ideas, I think I could have done a little more to inform my design designs that little bit better. Maybe I could have took a look into more scholarly articles about Politics as I didn’t know much about the topic before my project and still think there is much more I could learn. As well as this the actual creation of my book on indesign could use improving but that will occur with practice and time- for my first time properly using Indesign as a software I think I picked it up quite quickly.
This project has taught me a lot along side the use of Adobe software. It has introduced me to new skills such photomontage / collage, book binding, Typographic handling, using a grid effectively as well as other skills learnt in the workshops, for example how to convey emotion through type. Overall, this project really has allowed me to pin down the most fundamental skills a visual Communicator needs in order to engage and effectively convey messages to an audience.
On reflection, I think I could have possibly experimented with a few more completely different book designs, I seemed to be slightly set on an idea I wanted to create and although I was focused and have produced something I really feel proud of. It would have been good to see some drastic differences between mock ups as it would have allowed me to get more experimental with my design. However I think the final book has a nice aesthetic and if there was one thing I would change it might be the type of pen I used to write the hand written quotes as a more rough and patchy marker pen may signify harshness and character better. I also think I could have experimented with the book being square, despite this I really like the size I chose as it appears formal but shocks the readers with its design inside.
I am really pleased with the outcome of my book and the journey I took to get there, I think I have learnt a lot of skills during this project that I will be able to use throughout the three years at uni and later life. It has been really nice to have an idea of what I wanted to create and actually be able to produce that image to the best of my ability.
0 notes
Text
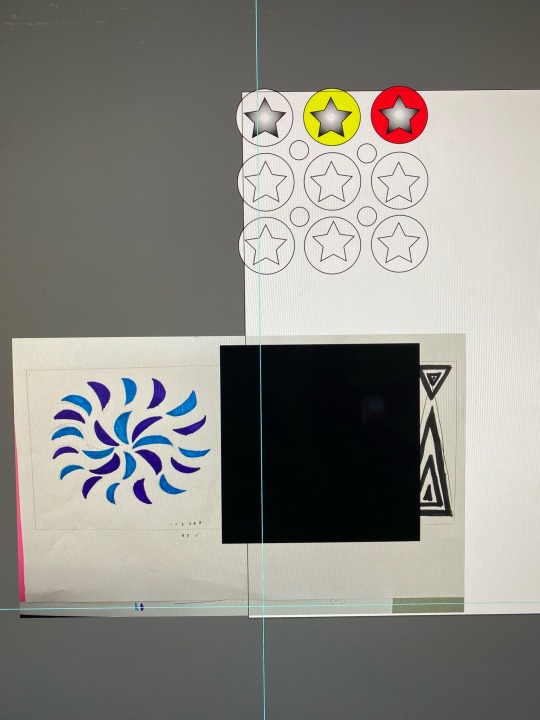
Op Art
What is op art?
Op art is shorten for optical art and it’s the kind of art that are abstract and gives the idea to the viewers of the illusion of movements; It’s mainly used of simple lines and shapes to create the effects. The effects is created by precise patterns, colors or multiple lines that are overlapping each others to create the illusion that it’s moving.
Many people have regarded Victor Vasarely to be one of the first op artist. This can be shown by one of his earliest example in 1930s, entitled Zebra. Op art really began to show its success in 1965 when the Museum of Modern Art showcasing 123 paintings and sculptures by variety of artists, such as Victor Vasarely, Bridget Riley, Frank Stella, Carlos Cruz-Diez, Jesus Rafael Soto, and Josef Albers.
What tools and techniques did I used?
Tools that I’ve used:
Star tool
Ellipse tool
Rounded rectangle tool
Artboard tool
Step 1: I started create my own version of op art by opening a new document in Adobe Illustrator. I then selected an A4 size document, horizontally.

Step 2: To begin creating my op art, I’ve decided to use mainly black and white because these are the two colors that stands out and would definitely creates the illusion of movement effects.
I used the rectangle tool and select black to create the background. I then lock the background layer so I don’t accidentally move it.

Step 3: I then selected the star tool to create a distorted looking hexagon shape in the final look. To do this, I pressed the down button one time while still using the star tool. It will remove one of the vertices of the shape and by pressing up, it does the opposite.I then pressed and hold the control key while moving the mouse in an up and down motion, it will control how sharp the shape is going to be.

Step 4: Once I am content with the shape, there is multiple ways of making multiple lines and shapes which is to press the ‘@’ key on the keyboard. This will create the selected shapes or lines in one time. However, there is a multiple ways to approach this. This is to use the combination of the ‘alt’, ‘shift’ and the ‘@’ key as it will create a different types of effects. For example, alt key will make the shape starts at the centre of the shape instead of the corner, the shift key will make the shape equally accurate and the ‘@’ key is as mentioned - it creates multiple lines and shapes at once.
Step 5: I then begin to create the shape by holding the shift + alt and @ key. I did this by moving the mouse in a downward motion to expand the shape as it creates more lines.

Step 6: Once I am content with the first shape, I duplicated the shape by using the alt key and reflected it horizontally.

Step 7: It will create a shape that looks like number eight. However, that’s not the effect that I was going for; I then group both of the shapes and duplicated it again and rotate it by 90° to get the final results.

Final results:

Another project I worked on:


I believe op art can be used as design-based products such as T-shirt designs, album cover and posters. For this final results, I am content with the way that it turned out because not only that I’ve learned what is op art and when it was invented, but I’ve also learned how to make it.
0 notes
Text
3D Graphic Designer in Dubai How to draw 3D artwork Shadow by http://www.jojitdelapena.com/3d-graphic-designer-in-dubai-how-to-draw-3d-artwork-shadow/
3D Graphic Designer in Dubai How to draw 3D artwork Shadow by http://www.jojitdelapena.com/3d-graphic-designer-in-dubai-how-to-draw-3d-artwork-shadow/
3D Graphic Designer in Dubai How to draw 3D artwork Shadow
3D Graphic Designer in Dubai How to draw 3D artwork Shadow
3D Graphic Designer in Dubai How to draw 3D artwork Shadow
3D Graphic Designer in Dubai How to draw 3D artwork Shadow
It’s very common for painting tutorials to treat light as an addition to the picture, an atmosphere-maker. We can easily get the impression that the object has a universal form, and then with proper lighting we can change the mood of the picture. The truth is without light there would be nothing to paint! Until you realize that, you’re shooting blind.
In the first tutorial of this short series, I’ll introduce you to the art of seeing light, shadows, reflections and edges.
How Can We See?
3D Graphic Designer in Dubai How to draw 3D artwork Shadow
As an artist, have you ever tried to answer this question? If not, that’s a big mistake. Everything you draw is a representation of seeing, just like the laws of physics are a representation of real processes. There’s even more to it—what we draw is not reality, or an objective image of reality. It’s an image created by your brain, an interpretation of signals caught by your eyes. Therefore, the world as we see it is only an interpretation of reality, one of many—and not the truest or most perfect of them all. Only good enough for our species to survive.
Why am I talking about this in a painting tutorial? Painting itself is an art of darkening, lightening and coloring certain parts of paper (or screen) to create an illusion of looking at something real. In other words, an artist tries to recreate an image that could be created by our brain (it makes it easy for us, since we think in patterns—we tend to look for familiar shapes in abstract pictures).
If a picture is similar to what we see in our minds, we say it’s realistic. It may be realistic despite not having any recognizable shapes or outlines—all you need are a few patches of color, light and shadow to bring something familiar to mind.
To create a convincing picture similar to one created by the brain, first you need to know how the brain does it. When reading this article you’ll find most of the processes quite obvious, but you may be surprised at how closely science can relate to painting. We tend to see optics as a part of physics, and painting as a part of metaphysical art, but that’s a mistake—art is a reflection of reality seen through our eyes. In order to imitate reality, first you need to know what our minds find real.
So What Is Seeing?
3D Graphic Designer in Dubai How to draw 3D artwork Shadow
Let’s go back to the fundamentals of optics. A light ray hits an object and bounces to your eye. Then the signal is processed by your brain and the image is created. That’s pretty well-known, right? But do you realize all the consequences that stem from that process?
Here comes the first, the most important rule of painting: light is the only thing we can see. It’s not an object, not a color, not a perspective, not a shape. We can see only light rays, reflected from a surface, disturbed by the properties of the surface and our eyes. The final image in our head, one frame of the never-ending video, is a set of all the rays hitting our retina at that one moment. This image can be disturbed by differences between the properties of every ray—every one of them comes from a different direction, distance, and they may have hit a lot of objects before hitting your eye last.
That’s exactly what we’re doing when painting—we imitate rays hitting different surfaces (color, consistency, gloss), the distance between them (the amount of diffuse color, contrast, edges, perspective), and most certainly we don’t draw things that don’t reflect or emit anything to our eyes. If you “add light” after the picture is almost done, you’re doing it wrong—everything on your painting is light.
What is Shadow?
3D Graphic Designer in Dubai How to draw 3D artwork Shadow
To put it simply, shadow is an area untouched by direct light. When you’re staying in shadow, you’re not able to see the source of light. That’s obvious, right?
Article: 3D Graphic Designer in Dubai How to draw 3D artwork Shadow
http://www.jojitdelapena.com/designer-dubai-background-manipulation-and-blending/
http://www.jojitdelapena.com/10-great-free-mac-applications-for-graphic-designers/
http://www.jojitdelapena.com/10-adobe-illustrator-tricks-and-tools-to-know/
http://www.jojitdelapena.com/top-5-hidden-features-of-adobe-illustrator/
Jojit Dela Pena | Graphic Designer in Dubai | Graphic Designer Dubai
http://graphicdesignertipsonline.blogspot.com https://jojitdelapena.blogspot.com
via Graphic Designer in Dubai
#3D Designer in Dubai#Filipino Graphic Designer in Dubai#Freelance Graphic Designer in Dubai#graphic design companies in dubai#Graphic Design Jobs in Dubai#graphic designer jobs in dubai
0 notes
Text
Syllabus
2D Design/Color Theory
Caitlin Cocco
Course Description This course will provide a foundation in the fundamentals of pictorial design. Visual elements such as figure/ground relationships, scale and proportional transformation, patterning, composition, value, color, and spatial illusion will be investigated through hands-on and digital assignments. In addition to introducing formal design strategies, the course emphasizes content issues and the historical and cultural context in which works of art are produced. Regular slide lectures and critiques encourage dialog and provide the student with an opportunity to verbally communicate complex visual ideas.
Course Materials Lots of magazines with photos X-acto knife and extra blades Metal 12” ruler with cork backing Small vinyl cutting board (12x18” or larger) – Check Dick Blick Art Supply 2 Glue Sticks (Scotch Craft Stick preferably) – available at Michaels Scissors Pad of Bristol 11 x 14” (100lbs. 20 sheets) buy the least expensive in this size Pencils 2B Group of micron pens sizes 02 (.30mm) 03 (.35mm) 05 (.45mm) and 08 (.50mm)
Large Sharpie with thick tip
Regular Sharpie 2 Flash drives 8-16 GB
Course Requirements Students are required to complete a number of in-class assignments and homework assignments that utilize the skills introduced in this course. Students will also be required to complete several written assignments. In addition, students will be required to keep a blog notebook featuring class work and homework as well as document active looking in the world. Along with the lessons and projects students are required to attend at least three department Visiting Artist and Scholars Events as well as Brown Bag lectures. Students can submit lecture write-ups on the class blog for extra credit.
Course Purposes & Learning Goals • Develop hands-on and digital comprehension of the basic principles of 2D design and color
• Develop the skills to verbally analyze visual elements
• Develop a broader understanding of art and design, its historical importance and contemporary
concerns
• Develop basic understanding of Adobe Creative Cloud programs including Photoshop, Illustrator
and InDesign
Course Schedule
Schedule is subject to change at professor discretion
* All tutorials must be viewed before the following class. Students are not allowed to view tutorial during class time, their will be review of tutorial information if needed.
Week 1 Introduction/Line
8/30 Introduction: What is 2D design?
Design and publish blog (tumblr)
Converting files for Tumblr
Blogging with Tumblr
Blog requirements and daily posting
File saving/File formats Raster vs. Vector
How to print in lab
Integrating the hands on and digital
Line lesson Type of Lines Line direction & emotiveness Line as accumulation
Drawing Lines
Emotive Lines
Watch: Illustrator CC Essential Training (2015) with Justin Seeley
Sections: Getting Started
Navigating Your Document
Working with Artboards
Working with Layers
Drawing Basic Shapes
Watch: Photoshop CC Essential Training (2015) with Julieanne Kost
Sections: Photoshop Interface Essentials
Digital Image Essentials
Cropping and Straightening
Working with Layers
Transforming, Distorting, and Warping Images
Class assignment: Email instructor blog link, Line analysis of famous work of art (post on blog). Homework: Emotional Line project Due 9/6, Line analysis of advertisement Due 9/6
Week 2
9/5 Balance & Unity
Types of Balance and Unity
Searching & Sampling Copyright/Fair Use/Appropriation
Advanced Google searching Image size/file size
Image Transfer w/matte medium
Watch: Introduction to Photo Compositing with Julieanne Kost (Photoshop)
Sections: Combining Photographs
Selectively Blending One Image with Another
Putting All Together
9/6 Critique Line Project Cropping and isolating images Basic compositing
Image Acquisition and Resolution
Screen resolution/printing
Image size/file size/file formats
Class assignment: Photoshop isolation and cropped image practice (post on blog)
Homework: Balance/Unity project due 9/13, Re-bloging Unity – post on blog due 9/13
Watch: Illustrator CC Essential Training (2015) with Justin Seeley
Sections: Working with Fills and Strokes
Working with Color
Using the Appearance Panel
Creating Complex Shapes
Working with the Pen Tool
Week 3
9/11 Shape & Volume
Shape lesson Shape study concept
Hands on Collage basics
Watch: Photoshop CC Essential Training (2015) with Julieanne Kost
Sections: Working with Smart Objects
Working with Layer Maks
Making selections
Essential Blend Modes
Adjusting Layer Essentials
Creative Adjustment Layer Techniques
Combining Multiple Images
9/13 Critique Balance & Unity Project
Layering and Collage
Space Lesson
Complete Space storyboard Watch: Photoshop CC Essential Training (2015) with Julieanne Kost
Sections: Essential Filters: Flowers
Artistic Filters
Filters That Create Content
Essential Layer Effects and Styles
Basic Shape Layers
Painting Essentials
Class assignment: Shape project, Space storyboard (post on blog) Homework: Shape Series Due 9/20
Week 4
9/18 Space & Rhythm
Space lesson
Space Practice
Choose scenes and refine for Space Tryptich Project
Watch: Illustrator Insider Training: Rethinking the Essentials with Mordy Golding
Sections: Grasping Core Vector Concepts
Deconstructing Appearances
Harnessing the Power of Groups
Taking Control with Layers
9/20 Critique Shape Series
Space Triptych Project
Rhythm Lesson
Using Illustrator for Rhythm project
Vector Drawing in Illustrator
Class assignment: Dealing with space, Vector Drawing in Illustrator (post on blog)
Homework: Space Triptych Project Due 9/27
Week 5
9/25 Rhythm/Introduce Midterm Project
Rhythm lesson
Complete work on Rhythm project
Midterm Introduction and research
Watch: Illustrator CC Essential Training (2015) with Justin Seeley
Sections: Working with Type
9/27 Space Triptych Project Critique
Thumbnail process
Symbolism within your work
Using the grid
Class assignment: Rhythm & Text practice (post on blog) Homework: Rhythm Project Due 10/4
Week 6
10/2 Midterm Project Text/Grid
Work on Midterm project
Midterm printing
10/4 Critique Rhythm Projects
Work on Midterm project
Preparing file for printing
Midterm printing
Putting together midterm project
Class assignment: Post midterm ideas, myth, thumbnails (blog)
Homework: Work on Midterm project due 10/12
Week 7
10/9 NO CLASS
Homework: Myth/Text Midterm Project Due 10/12
10/12 Work on Midterm project
Midterm printing
Putting together midterm project
Week 8
10/16 Midterm Crit
10/18 Value
Grey Scale
Middle Grey
Class assignment: Grey scale, Middle grey classwork (post on blog)
Homework: Value Project Due 10/25
Week 9
Color – Value
10/23 Value Lesson
Grey Scale
Albers experiments
Begin Color into value project
Color Heritage
Color Characteristics
Value Critique
Color Interpretation Critique
10/25 Color Characteristics
Color wheel Properties of color
Gridded Painting Class assignment: Color interpretation studies (post on blog) Homework: Color Heritage project Due 11/1. Bring in a picture for self portrait or portrait project
Week 10 Using Color
10/30 Work on optical mixing portrait
Homework: Complete part 1 of Optical mixing portrait project
11/1 Color Heritage Critique
Working with color in Photoshop/Illustrator
Color schemes Color and space Color Discord Color Use
Digital color wheel
Berzold Effect
Designing w/color wheel Class assignment: Berzold Effect, Designing with color wheel & digital color experiments
Homework: Portrait-Optical mixing Due 11/8
Week 11 Texture
11/06 Tactile Texture Visual Texture Texture through Pattern
11/08 Optical Mixing Portrait Critique
Texture in the digital space
Continue work on Texture/Pattern Project
Class assignment: Texture Studies (post on blog) Homework: Texture project Due 11/15
Week 12 Emphasis & Focal Point
11/13 Emphasis/Focal point lesson
Emphasis project
11/15 Texture Critique
Focal point project
Watch: Indesign CC Essential Training (2015) with David Blatner
Sections: Learn InDesign in 30 Minutes
Working with Indesign Documents
Creating a Document
Managing Pages
Text
Homework: Emphasis/Focal point project Due 11/27
Week 13 Scale & Proportion
11/20 Scale & Proportion lesson
Work on Scale and Proportion projects
Introduce InDesign
Continue work on Scale and Proportion PSA
Homework: Scale and Proportion PSA posters Due 11/29
11/22 NO CLASS
Watch: Indesign CC Essential Training (2015) with David Blatner
Sections: Graphic
Formating Objects
Color
Frames and Paths
Managing Objects
Transforming Objects
Character Formatting
Paragraph Formatting
Week 14 Introduce Final Project
11/27 Emphasis/Focal Point Project Critique
What is a book/Design concepts
Book layout in Indesign
Bringing together of all program platforms A combination of hands on and digital work
11/29 Final Accordion Book Project
Scale & Proportion Critique
Continue work on final
Watch: Indesign CC Essential Training (2015) with David Blatner
Sections: Styles
Tables
Interactive Documents
Homework: Complete Indesign layout and final project
Week 15
5/03/16 Continue work on final
5/06/16 Continue work on final
Homework: Complete Indesign layout and final project
Final Exam TBD
Visual Assignments
60%
Class Work
20%
Emotional Line Project
4
Lines in Illustrator
1.5
Balance & Unity
3
Artwork Line Analysis
1.5
Creating Sapce
3
Photoshop Isolation/Cropping
1.5
Shape Series
4
Creating Space
1.5
Rhythm Project
3
Grey Scale/Middle Grey
1.5
Midterm
10
Albers Color Study
1.5
Color to Value
4
Gridded Painting
1.5
Optically Mixed Portrait
4
Color Wheel and Design
1.5
Texture & Pattern
4
Berzold Effect
1.5
Emphasis & Focal Point
3
Texture Studies
1.5
Scale & Proportion PSA
3
Vector Drawings Illustrator
1.5
Final
15
InDesign Layout
2
Written Assignments
10%
Blog
10%
Line analysis of advertisement
2
Demonstration of active looking in the world through 2 posts per class topic
5%
Rebloging Balance or Unity
2
Ability to connect class topics to images not discussed in class
5%
Color Heritage
3
Scale & Proportion in ads
3
Grading
(A) = A remarkable achievement which evidences extraordinary initiative, original thought and extra effort; demonstrated leadership in the class; mastery of formal, technical, and conceptual skills.
(B) = All assignments have been completed at level above average. The work shows initiative, is very well presented and demonstrates a clear understanding of the assignments and class participation raised the level of the class. (C) = All assignments have been completes on time. The level of success, attendance and class participation is average. (D) = Most assignments have been completed. The level of success and/or class participation is below average. (F) = One third of the course assignments have not been successfully competed. The level of participation is not acceptable for university study.
Selected TCNJ Policies
TCNJ’s final examination policy is available on the web: http://www.tcnj.edu/~academic/policy/finalevaluations.htm
Attendance Every student is expected to participate in each of his/her courses through regular attendance at lecture and laboratory sessions. It is further expected that every student will be present, on time, and prepared to participate when scheduled class sessions begin. At the first class meeting of a semester, instructors are expected to distribute in writing the attendance policies, which apply to their courses. While attendance itself is not used as a criterion for academic evaluations, grading is frequently based on participation in class discussion, laboratory work, performance, studio practice, field experience, or other activities, which may take place during class sessions. If these areas for evaluation make class attendance essential, the student may be penalized for failure to perform satisfactorily in the required activities. Students who must miss classes due to participation in a field trip, athletic event, or other official college function should arrange with their instructors for such class absences well in advance. The Office of Academic Affairs will verify, upon request, the dates of and participation in such college functions. In every instance, however, the student has the responsibility to initiate arrangements for make-up work.
Students are expected to attend class and complete assignments as scheduled, to avoid outside conflicts (if possible), and to enroll only in those classes that they can expect to attend on a regular basis. Absences from class are handled between students and instructors. The instructor may require documentation to substantiate the reason for the absence. The instructor should provide make-up opportunities for student absences caused by illness, injury, death in the family, observance of religious holidays, and similarly compelling personal reasons including physical disabilities. For lengthy absences, make-up opportunities might not be feasible and are at the discretion of the instructor. The Office of Academic Affairs will notify the faculty of the dates of religious holidays on which large numbers of students are likely to be absent and are, therefore, unsuitable for the scheduling of examinations. Students have the responsibility of notifying the instructors in advance of expected absences. In cases of absence for a week or more, students are to notify their instructors immediately. If they are unable to do so they may contact the Office of Records and Registration. The Office of Records and Registration will notify the instructor of the student’s absence. The notification is not an excuse but simply a service provided by the Office of Records and Registration. Notifications cannot be acted upon if received after an absence. In every instance the student has the responsibility to initiate arrangements for make-up work.
TCNJ’s attendance policy is available on the web: http://www.tcnj.edu/~recreg/policies/attendance.html
77Academic Integrity Policy Academic dishonesty is any attempt by the student to gain academic advantage through dishonest means, to submit, as his or her own, work, which has not been done by him/her or to give improper aid to another student in the completion of an assignment. Such dishonesty would include, but is not limited to: submitting as his/her own a project, paper, report, test, or speech copied from, partially copied, or paraphrased from the work of another (whether the source is printed, under copyright, or in manuscript form). Credit must be given for words quoted or paraphrased. The rules apply to any academic dishonesty, whether the work is graded or ungraded, group or individual, written or oral.
TCNJ’s academic integrity policy is available on the web: http://www.tcnj.edu/~academic/policy/integrity.html.
Americans with Disabilities Act (ADA) Policy Any student who has a documented disability and is in need of academic accommodations should notify the professor of this course and contact the Office of Differing Abilities Services (609-771-2571). Accommodations are individualized and in accordance with Section 504 of the Rehabilitation Act of 1973 and the Americans with Disabilities Act of 1992.
TCNJ’s Americans with Disabilities Act (ADA) policy is available on the web: http://www.tcnj.edu/~affirm/ada.html.
SYLLABUS IS SUBJECT TO CHANGE.
0 notes