#how to open php file
Explore tagged Tumblr posts
Visit Tumblr Blog
Explore Tumblr blogs with no restrictions, modern design and the best experience.
Last Seen Tumblr Blogs


Fun Fact
Tumblr posted its first advertisements in May 2012 and subsequently earned $13M in revenue.
Text
This blog shares the secret of creating a phpinfo file, viewing its information, & comprehending the significance of settings & variables.
0 notes
Text
Low key tearing up because I found yet another screen reader inaccessible ebook website. I just want to read. Is that too much to ask? All I want is to be able to open a website and be able to read it.
Making text screen reader accessible is the easiest thing in the world. You have to do literally nothing. It’s text. Screen readers are literally build to read text on a screen.
If you’re a total noob who knows nothing about HTML and you just put your text in your document, nothing else, it’s accessible. You put it in a <p> tag? Accessible. Span? Div? All accessible. You can fucking echo it in a PHP file and it will be accessible.
Text is literally accessible by default. How do all these people manage to fuck it up so bad????? I wouldn’t be able to do that if I tried!
The only consistently accessible literature website, if you can call it that, is AO3. Fan fiction is great. I love fan fiction, but I don’t want to read only fan fiction. There’s a long list of books I want to read – fiction, but especially non fiction.
And there’s a long list of websites where these books are available, both legitimate and piracy. And yet! And yet I cannot read them, because I am disabled. Because I do not read with my eyes, but with my screen reader. Because nobody cares about us enough to even consider us when building and formatting a website. Because nobody cares about us enough to do a single manual test or run a free accessibility checker extension.
I just want to read. Is that too much to ask?
#vent#accessibility#screen reader#actually disabled#visually impaired#accessibility tag#I'm the OP#ableism#software development
16 notes
·
View notes
Text
Vibecoding a production app
TL;DR I built and launched a recipe app with about 20 hours of work - recipeninja.ai
Background: I'm a startup founder turned investor. I taught myself (bad) PHP in 2000, and picked up Ruby on Rails in 2011. I'd guess 2015 was the last time I wrote a line of Ruby professionally. I've built small side projects over the years, but nothing with any significant usage. So it's fair to say I'm a little rusty, and I never really bothered to learn front end code or design.
In my day job at Y Combinator, I'm around founders who are building amazing stuff with AI every day and I kept hearing about the advances in tools like Lovable, Cursor and Windsurf. I love building stuff and I've always got a list of little apps I want to build if I had more free time.
About a month ago, I started playing with Lovable to build a word game based on Articulate (it's similar to Heads Up or Taboo). I got a working version, but I quickly ran into limitations - I found it very complicated to add a supabase backend, and it kept re-writing large parts of my app logic when I only wanted to make cosmetic changes. It felt like a toy - not ready to build real applications yet.
But I kept hearing great things about tools like Windsurf. A couple of weeks ago, I looked again at my list of app ideas to build and saw "Recipe App". I've wanted to build a hands-free recipe app for years. I love to cook, but the problem with most recipe websites is that they're optimized for SEO, not for humans. So you have pages and pages of descriptive crap to scroll through before you actually get to the recipe. I've used the recipe app Paprika to store my recipes in one place, but honestly it feels like it was built in 2009. The UI isn't great for actually cooking. My hands are covered in food and I don't really want to touch my phone or computer when I'm following a recipe.
So I set out to build what would become RecipeNinja.ai
For this project, I decided to use Windsurf. I wanted a Rails 8 API backend and React front-end app and Windsurf set this up for me in no time. Setting up homebrew on a new laptop, installing npm and making sure I'm on the right version of Ruby is always a pain. Windsurf did this for me step-by-step. I needed to set up SSH keys so I could push to GitHub and Heroku. Windsurf did this for me as well, in about 20% of the time it would have taken me to Google all of the relevant commands.
I was impressed that it started using the Rails conventions straight out of the box. For database migrations, it used the Rails command-line tool, which then generated the correct file names and used all the correct Rails conventions. I didn't prompt this specifically - it just knew how to do it. It one-shotted pretty complex changes across the React front end and Rails backend to work seamlessly together.
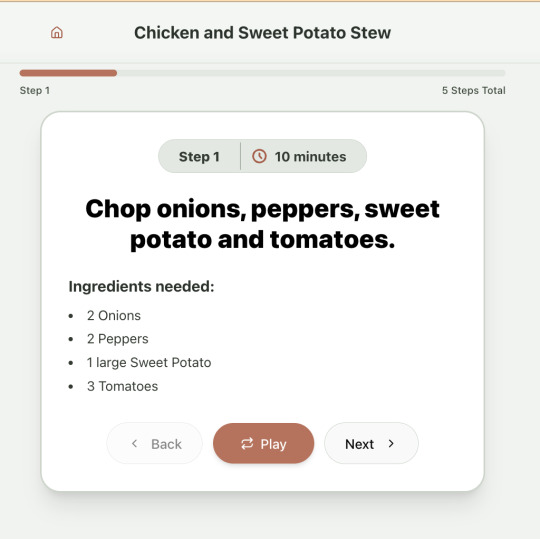
To start with, the main piece of functionality was to generate a complete step-by-step recipe from a simple input ("Lasagne"), generate an image of the finished dish, and then allow the user to progress through the recipe step-by-step with voice narration of each step. I used OpenAI for the LLM and ElevenLabs for voice. "Grandpa Spuds Oxley" gave it a friendly southern accent.
Recipe summary:
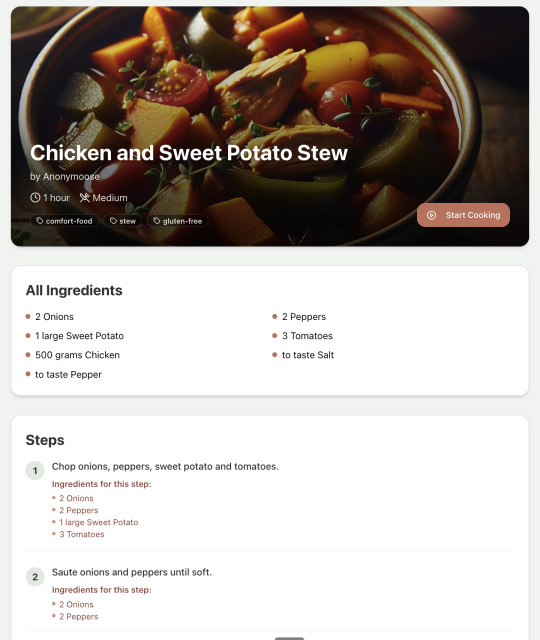
And the recipe step-by-step view:
I was pretty astonished that Windsurf managed to integrate both the OpenAI and Elevenlabs APIs without me doing very much at all. After we had a couple of problems with the open AI Ruby library, it quickly fell back to a raw ruby HTTP client implementation, but I honestly didn't care. As long as it worked, I didn't really mind if it used 20 lines of code or two lines of code. And Windsurf was pretty good about enforcing reasonable security practices. I wanted to call Elevenlabs directly from the front end while I was still prototyping stuff, and Windsurf objected very strongly, telling me that I was risking exposing my private API credentials to the Internet. I promised I'd fix it before I deployed to production and it finally acquiesced.
I decided I wanted to add "Advanced Import" functionality where you could take a picture of a recipe (this could be a handwritten note or a picture from a favourite a recipe book) and RecipeNinja would import the recipe. This took a handful of minutes.
Pretty quickly, a pattern emerged; I would prompt for a feature. It would read relevant files and make changes for two or three minutes, and then I would test the backend and front end together. I could quickly see from the JavaScript console or the Rails logs if there was an error, and I would just copy paste this error straight back into Windsurf with little or no explanation. 80% of the time, Windsurf would correct the mistake and the site would work. Pretty quickly, I didn't even look at the code it generated at all. I just accepted all changes and then checked if it worked in the front end.
After a couple of hours of work on the recipe generation, I decided to add the concept of "Users" and include Google Auth as a login option. This would require extensive changes across the front end and backend - a database migration, a new model, new controller and entirely new UI. Windsurf one-shotted the code. It didn't actually work straight away because I had to configure Google Auth to add `localhost` as a valid origin domain, but Windsurf talked me through the changes I needed to make on the Google Auth website. I took a screenshot of the Google Auth config page and pasted it back into Windsurf and it caught an error I had made. I could login to my app immediately after I made this config change. Pretty mindblowing. You can now see who's created each recipe, keep a list of your own recipes, and toggle each recipe to public or private visibility. When I needed to set up Heroku to host my app online, Windsurf generated a bunch of terminal commands to configure my Heroku apps correctly. It went slightly off track at one point because it was using old Heroku APIs, so I pointed it to the Heroku docs page and it fixed it up correctly.
I always dreaded adding custom domains to my projects - I hate dealing with Registrars and configuring DNS to point at the right nameservers. But Windsurf told me how to configure my GoDaddy domain name DNS to work with Heroku, telling me exactly what buttons to press and what values to paste into the DNS config page. I pointed it at the Heroku docs again and Windsurf used the Heroku command line tool to add the "Custom Domain" add-ons I needed and fetch the right Heroku nameservers. I took a screenshot of the GoDaddy DNS settings and it confirmed it was right.
I can see very soon that tools like Cursor & Windsurf will integrate something like Browser Use so that an AI agent will do all this browser-based configuration work with zero user input.
I'm also impressed that Windsurf will sometimes start up a Rails server and use curl commands to check that an API is working correctly, or start my React project and load up a web preview and check the front end works. This functionality didn't always seem to work consistently, and so I fell back to testing it manually myself most of the time.
When I was happy with the code, it wrote git commits for me and pushed code to Heroku from the in-built command line terminal. Pretty cool!
I do have a few niggles still. Sometimes it's a little over-eager - it will make more changes than I want, without checking with me that I'm happy or the code works. For example, it might try to commit code and deploy to production, and I need to press "Stop" and actually test the app myself. When I asked it to add analytics, it went overboard and added 100 different analytics events in pretty insignificant places. When it got trigger-happy like this, I reverted the changes and gave it more precise commands to follow one by one.
The one thing I haven't got working yet is automated testing that's executed by the agent before it decides a task is complete; there's probably a way to do it with custom rules (I have spent zero time investigating this). It feels like I should be able to have an integration test suite that is run automatically after every code change, and then any test failures should be rectified automatically by the AI before it says it's finished.
Also, the AI should be able to tail my Rails logs to look for errors. It should spot things like database queries and automatically optimize my Active Record queries to make my app perform better. At the moment I'm copy-pasting in excerpts of the Rails logs, and then Windsurf quickly figures out that I've got an N+1 query problem and fixes it. Pretty cool.
Refactoring is also kind of painful. I've ended up with several files that are 700-900 lines long and contain duplicate functionality. For example, list recipes by tag and list recipes by user are basically the same.
Recipes by user:

This should really be identical to list recipes by tag, but Windsurf has implemented them separately.
Recipes by tag:

If I ask Windsurf to refactor these two pages, it randomly changes stuff like renaming analytics events, rewriting user-facing alerts, and changing random little UX stuff, when I really want to keep the functionality exactly the same and only move duplicate code into shared modules. Instead, to successfully refactor, I had to ask Windsurf to list out ideas for refactoring, then prompt it specifically to refactor these things one by one, touching nothing else. That worked a little better, but it still wasn't perfect
Sometimes, adding minor functionality to the Rails API will often change the entire API response, rather just adding a couple of fields. Eg It will occasionally change Index Recipes to nest responses in an object { "recipes": [ ] }, versus just returning an array, which breaks the frontend. And then another minor change will revert it. This is where adding tests to identify and prevent these kinds of API changes would be really useful. When I ask Windsurf to fix these API changes, it will instead change the front end to accept the new API json format and also leave the old implementation in for "backwards compatibility". This ends up with a tangled mess of code that isn't really necessary. But I'm vibecoding so I didn't bother to fix it.
Then there was some changes that just didn't work at all. Trying to implement Posthog analytics in the front end seemed to break my entire app multiple times. I tried to add user voice commands ("Go to the next step"), but this conflicted with the eleven labs voice recordings. Having really good git discipline makes vibe coding much easier and less stressful. If something doesn't work after 10 minutes, I can just git reset head --hard. I've not lost very much time, and it frees me up to try more ambitious prompts to see what the AI can do. Less technical users who aren't familiar with git have lost months of work when the AI goes off on a vision quest and the inbuilt revert functionality doesn't work properly. It seems like adding more native support for version control could be a massive win for these AI coding tools.
Another complaint I've heard is that the AI coding tools don't write "production" code that can scale. So I decided to put this to the test by asking Windsurf for some tips on how to make the application more performant. It identified I was downloading 3 MB image files for each recipe, and suggested a Rails feature for adding lower resolution image variants automatically. Two minutes later, I had thumbnail and midsize variants that decrease the loading time of each page by 80%. Similarly, it identified inefficient N+1 active record queries and rewrote them to be more efficient. There are a ton more performance features that come built into Rails - caching would be the next thing I'd probably add if usage really ballooned.
Before going to production, I kept my promise to move my Elevenlabs API keys to the backend. Almost as an afterthought, I asked asked Windsurf to cache the voice responses so that I'd only make an Elevenlabs API call once for each recipe step; after that, the audio file was stored in S3 using Rails ActiveStorage and served without costing me more credits. Two minutes later, it was done. Awesome.
At the end of a vibecoding session, I'd write a list of 10 or 15 new ideas for functionality that I wanted to add the next time I came back to the project. In the past, these lists would've built up over time and never gotten done. Each task might've taken me five minutes to an hour to complete manually. With Windsurf, I was astonished how quickly I could work through these lists. Changes took one or two minutes each, and within 30 minutes I'd completed my entire to do list from the day before. It was astonishing how productive I felt. I can create the features faster than I can come up with ideas.
Before launching, I wanted to improve the design, so I took a quick look at a couple of recipe sites. They were much more visual than my site, and so I simply told Windsurf to make my design more visual, emphasizing photos of food. Its first try was great. I showed it to a couple of friends and they suggested I should add recipe categories - "Thai" or "Mexican" or "Pizza" for example. They showed me the DoorDash app, so I took a screenshot of it and pasted it into Windsurf. My prompt was "Give me a carousel of food icons that look like this". Again, this worked in one shot. I think my version actually looks better than Doordash 🤷♂️
Doordash:
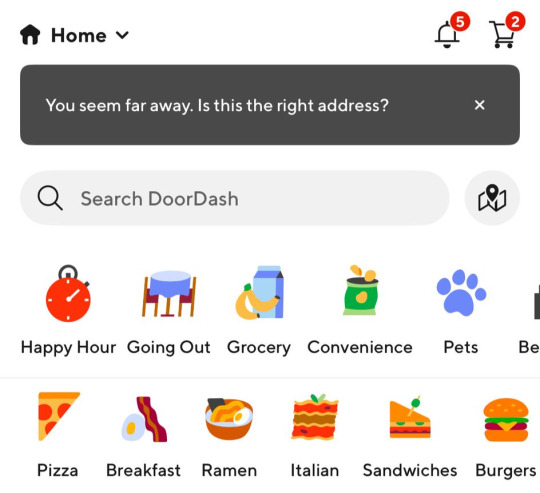
My carousel:

I also saw I was getting a console error from missing Favicon. I always struggle to make Favicon for previous sites because I could never figure out where they were supposed to go or what file format they needed. I got OpenAI to generate me a little recipe ninja icon with a transparent background and I saved it into my project directory. I asked Windsurf what file format I need and it listed out nine different sizes and file formats. Seems annoying. I wondered if Windsurf could just do it all for me. It quickly wrote a series of Bash commands to create a temporary folder, resize the image and create the nine variants I needed. It put them into the right directory and then cleaned up the temporary directory. I laughed in amazement. I've never been good at bash scripting and I didn't know if it was even possible to do what I was asking via the command line. I guess it is possible.

After launching and posting on Twitter, a few hundred users visited the site and generated about 1000 recipes. I was pretty happy! Unfortunately, the next day I woke up and saw that I had a $700 OpenAI bill. Someone had been abusing the site and costing me a lot of OpenAI credits by creating a single recipe over and over again - "Pasta with Shallots and Pineapple". They did this 12,000 times. Obviously, I had not put any rate limiting in.
Still, I was determined not to write any code. I explained the problem and asked Windsurf to come up with solutions. Seconds later, I had 15 pretty good suggestions. I implemented several (but not all) of the ideas in about 10 minutes and the abuse stopped dead in its tracks. I won't tell you which ones I chose in case Mr Shallots and Pineapple is reading. The app's security is not perfect, but I'm pretty happy with it for the scale I'm at. If I continue to grow and get more abuse, I'll implement more robust measures.
Overall, I am astonished how productive Windsurf has made me in the last two weeks. I'm not a good designer or frontend developer, and I'm a very rusty rails dev. I got this project into production 5 to 10 times faster than it would've taken me manually, and the level of polish on the front end is much higher than I could've achieved on my own. Over and over again, I would ask for a change and be astonished at the speed and quality with which Windsurf implemented it. I just sat laughing as the computer wrote code.
The next thing I want to change is making the recipe generation process much more immediate and responsive. Right now, it takes about 20 seconds to generate a recipe and for a new user it feels like maybe the app just isn't doing anything.
Instead, I'm experimenting with using Websockets to show a streaming response as the recipe is created. This gives the user immediate feedback that something is happening. It would also make editing the recipe really fun - you could ask it to "add nuts" to the recipe, and see as the recipe dynamically updates 2-3 seconds later. You could also say "Increase the quantities to cook for 8 people" or "Change from imperial to metric measurements".
I have a basic implementation working, but there are still some rough edges. I might actually go and read the code this time to figure out what it's doing!
I also want to add a full voice agent interface so that you don't have to touch the screen at all. Halfway through cooking a recipe, you might ask "I don't have cilantro - what could I use instead?" or say "Set a timer for 30 minutes". That would be my dream recipe app!
Tools like Windsurf or Cursor aren't yet as useful for non-technical users - they're extremely powerful and there are still too many ways to blow your own face off. I have a fairly good idea of the architecture that I want Windsurf to implement, and I could quickly spot when it was going off track or choosing a solution that was inappropriately complicated for the feature I was building. At the moment, a technical background is a massive advantage for using Windsurf. As a rusty developer, it made me feel like I had superpowers.
But I believe within a couple of months, when things like log tailing and automated testing and native version control get implemented, it will be an extremely powerful tool for even non-technical people to write production-quality apps. The AI will be able to make complex changes and then verify those changes are actually working. At the moment, it feels like it's making a best guess at what will work and then leaving the user to test it. Implementing better feedback loops will enable a truly agentic, recursive, self-healing development flow. It doesn't feel like it needs any breakthrough in technology to enable this. It's just about adding a few tool calls to the existing LLMs. My mind races as I try to think through the implications for professional software developers.
Meanwhile, the LLMs aren't going to sit still. They're getting better at a frightening rate. I spoke to several very capable software engineers who are Y Combinator founders in the last week. About a quarter of them told me that 95% of their code is written by AI. In six or twelve months, I just don't think software engineering is going exist in the same way as it does today. The cost of creating high-quality, custom software is quickly trending towards zero.
You can try the site yourself at recipeninja.ai
Here's a complete list of functionality. Of course, Windsurf just generated this list for me 🫠
RecipeNinja: Comprehensive Functionality Overview
Core Concept: the app appears to be a cooking assistant application that provides voice-guided recipe instructions, allowing users to cook hands-free while following step-by-step recipe guidance.
Backend (Rails API) Functionality
User Authentication & Authorization
Google OAuth integration for user authentication
User account management with secure authentication flows
Authorization system ensuring users can only access their own private recipes or public recipes
Recipe Management
Recipe Model Features:
Unique public IDs (format: "r_" + 14 random alphanumeric characters) for security
User ownership (user_id field with NOT NULL constraint)
Public/private visibility toggle (default: private)
Comprehensive recipe data storage (title, ingredients, steps, cooking time, etc.)
Image attachment capability using Active Storage with S3 storage in production
Recipe Tagging System:
Many-to-many relationship between recipes and tags
Tag model with unique name attribute
RecipeTag join model for the relationship
Helper methods for adding/removing tags from recipes
Recipe API Endpoints:
CRUD operations for recipes
Pagination support with metadata (current_page, per_page, total_pages, total_count)
Default sorting by newest first (created_at DESC)
Filtering recipes by tags
Different serializers for list view (RecipeSummarySerializer) and detail view (RecipeSerializer)
Voice Generation
Voice Recording System:
VoiceRecording model linked to recipes
Integration with Eleven Labs API for text-to-speech conversion
Caching of voice recordings in S3 to reduce API calls
Unique identifiers combining recipe_id, step_id, and voice_id
Force regeneration option for refreshing recordings
Audio Processing:
Using streamio-ffmpeg gem for audio file analysis
Active Storage integration for audio file management
S3 storage for audio files in production
Recipe Import & Generation
RecipeImporter Service:
OpenAI integration for recipe generation
Conversion of text recipes into structured format
Parsing and normalization of recipe data
Import from photos functionality
Frontend (React) Functionality
User Interface Components
Recipe Selection & Browsing:
Recipe listing with pagination
Real-time updates with 10-second polling mechanism
Tag filtering functionality
Recipe cards showing summary information (without images)
"View Details" and "Start Cooking" buttons for each recipe
Recipe Detail View:
Complete recipe information display
Recipe image display
Tag display with clickable tags
Option to start cooking from this view
Cooking Experience:
Step-by-step recipe navigation
Voice guidance for each step
Keyboard shortcuts for hands-free control:
Arrow keys for step navigation
Space for play/pause audio
Escape to return to recipe selection
URL-based step tracking (e.g., /recipe/r_xlxG4bcTLs9jbM/classic-lasagna/steps/1)
State Management & Data Flow
Recipe Service:
API integration for fetching recipes
Support for pagination parameters
Tag-based filtering
Caching mechanisms for recipe data
Image URL handling for detailed views
Authentication Flow:
Google OAuth integration using environment variables
User session management
Authorization header management for API requests
Progressive Web App Features
PWA capabilities for installation on devices
Responsive design for various screen sizes
Favicon and app icon support
Deployment Architecture
Two-App Structure:
cook-voice-api: Rails backend on Heroku
cook-voice-wizard: React frontend/PWA on Heroku
Backend Infrastructure:
Ruby 3.2.2
PostgreSQL database (Heroku PostgreSQL addon)
Amazon S3 for file storage
Environment variables for configuration
Frontend Infrastructure:
React application
Environment variable configuration
Static buildpack on Heroku
SPA routing configuration
Security Measures:
HTTPS enforcement
Rails credentials system
Environment variables for sensitive information
Public ID system to mask database IDs
This comprehensive overview covers the major functionality of the Cook Voice application based on the available information. The application appears to be a sophisticated cooking assistant that combines recipe management with voice guidance to create a hands-free cooking experience.
2 notes
·
View notes
Text
What Is Linux Web Hosting? A Beginner's Guide
In the ever-evolving digital landscape, the choice of web hosting can significantly impact your online presence. One of the most popular options available is Linux web hosting. But what exactly does it entail, and why is it so widely preferred? This beginner’s guide aims to demystify Linux web hosting, its features, benefits, and how it stands against other hosting types.
Introduction to Web Hosting
Web hosting is a fundamental service that enables individuals and organisations to make their websites accessible on the internet. When you create a website, it consists of numerous files, such as HTML, images, and databases, which need to be stored on a server. A web host provides the server space and connectivity required for these files to be accessed by users online.
There are several types of web hosting, each designed to cater to different needs and budgets. Shared hosting is a cost-effective option where multiple websites share the same server resources. Virtual Private Server (VPS) hosting offers a middle ground, providing dedicated portions of a server for greater performance and control. Dedicated hosting provides an entire server exclusively for one website, ensuring maximum performance but at a higher cost. Cloud hosting uses multiple servers to balance the load and maximise uptime, offering a scalable solution for growing websites.
Web hosting services also include various features to enhance the performance and security of your website. These can range from basic offerings like email accounts and website builders to more advanced features like SSL certificates, automated backups, and DDoS protection. The choice of web hosting can significantly influence your website’s speed, security, and reliability, making it crucial to choose a solution that aligns with your specific requirements.
Understanding the different types of web hosting and the features they offer can help you make an informed decision that suits your needs. Whether you are running a personal blog, a small business website, or a large e-commerce platform, selecting the right web hosting service is a critical step in establishing a successful online presence.
What Is Linux Web Hosting?
Linux web hosting is a type of web hosting service that utilises the Linux operating system to manage and serve websites. Renowned for its open-source nature, Linux provides a stable and secure platform that supports a wide array of programming languages and databases, making it a favoured choice amongst developers and businesses. This hosting environment typically includes support for popular technologies such as Apache web servers, MySQL databases, and PHP scripting, which are integral to modern website development.
One of the distinguishing features of Linux web hosting is its cost-effectiveness. As an open-source system, Linux eliminates the need for costly licensing fees associated with proprietary software, thereby reducing overall hosting expenses. This makes it an attractive option for individuals and organisations operating on a budget.
Moreover, Linux is celebrated for its robust performance and high stability. Websites hosted on Linux servers experience less downtime and faster loading times, which are critical factors for maintaining user engagement and search engine rankings. The operating system’s extensive community of developers continuously works on updates and improvements, ensuring that Linux remains a cutting-edge choice for web hosting.
Linux web hosting also offers considerable flexibility and customisation options. Users have the freedom to configure their hosting environment to meet specific needs, whether they are running simple static websites or complex dynamic applications. This versatility extends to compatibility with various content management systems (CMS) like WordPress, Joomla, and Drupal, which often perform optimally on Linux servers.
In summary, Linux web hosting provides a reliable, secure, and cost-effective solution that caters to a diverse range of web hosting requirements. Its compatibility with essential web technologies and its inherent flexibility make it a preferred choice for many web developers and site owners.
Key Benefits of Linux Web Hosting
Linux web hosting offers several compelling advantages that contribute to its widespread adoption. One of its primary benefits is cost-effectiveness. The open-source nature of Linux eliminates the need for expensive licensing fees, allowing users to allocate their resources more efficiently. This makes it an ideal choice for individuals and organisations with budget constraints. Additionally, Linux is celebrated for its high stability and robust performance. Websites hosted on Linux servers often experience minimal downtime and faster loading speeds, which are essential for maintaining user engagement and achieving favourable search engine rankings.
Another significant benefit is the extensive community support that comes with Linux. The active community of developers and enthusiasts continuously works on updates, patches, and security enhancements, ensuring that Linux remains a secure and reliable platform for web hosting. This ongoing development also means that any issues or vulnerabilities are promptly addressed, offering peace of mind for website owners.
Flexibility is another key advantage of Linux web hosting. The operating system supports a wide range of programming languages, including PHP, Python, and Ruby, making it suitable for various types of web applications. Additionally, Linux servers are highly customisable, allowing users to configure their environment to meet specific needs, whether they are running simple static sites or complex dynamic applications.
Moreover, Linux web hosting is highly compatible with popular content management systems (CMS) like WordPress, Joomla, and Drupal. This compatibility ensures that users can easily deploy and manage their websites using these platforms, benefiting from their extensive plugin and theme ecosystems.
Lastly, Linux's superior security features are worth noting. The operating system is inherently secure and offers various built-in security measures. When combined with best practices such as regular updates and strong passwords, Linux web hosting provides a highly secure environment for any website.
Understanding Linux Distributions in Web Hosting
Linux comes in a variety of distributions, each tailored to meet specific needs and preferences. Among the most popular for web hosting are Ubuntu, CentOS, and Debian. Ubuntu is celebrated for its ease of use and extensive community support, making it a great choice for those new to Linux. CentOS, a favourite in enterprise environments, offers impressive stability and long-term support, which ensures a dependable hosting experience. Debian stands out with its robust package management system and commitment to open-source principles, providing a reliable and secure foundation.
Each distribution brings its own strengths to the table. For example, Ubuntu’s frequent updates ensure access to the latest features and security patches, while CentOS’s extended support cycles make it a solid choice for those requiring a stable, long-term hosting environment. Debian’s extensive repository of packages and minimalistic approach offers flexibility and customisation, catering to the needs of experienced users.
Selecting the right Linux distribution largely depends on your specific requirements and technical expertise. If you prioritise user-friendliness and a wealth of resources for troubleshooting, Ubuntu might be the ideal pick. On the other hand, if you need a rock-solid, stable platform for an enterprise-level application, CentOS could be more appropriate. For those seeking maximum control and a commitment to open-source principles, Debian is a compelling option.
Ultimately, understanding the nuances of these distributions will enable you to choose a Linux environment that aligns with your web hosting needs, ensuring optimal performance and reliability.
Linux Hosting vs Windows Hosting: A Comparative Analysis
When evaluating Linux hosting against Windows hosting, several critical factors come into play. Cost is a significant differentiator; Linux hosting is generally more affordable due to its open-source nature, which eliminates the need for expensive licensing fees. In contrast, Windows hosting often incurs additional costs related to proprietary software licenses.
Compatibility is another important aspect to consider. Linux hosting is renowned for its compatibility with a broad array of open-source software and applications, including popular content management systems like WordPress, Joomla, and Magento. These platforms typically perform better on Linux servers due to optimised server configurations. On the other hand, Windows hosting is the go-to option for websites that rely on Microsoft-specific technologies such as ASP.NET, MSSQL, and other .NET frameworks.
Performance and stability are also crucial elements in this comparison. Linux hosting often provides superior uptime and faster loading speeds due to the lightweight nature of the Linux operating system. The robust performance of Linux servers is further enhanced by the active community that continuously works on optimisations and security patches. Windows hosting, while also reliable, can sometimes be more resource-intensive, potentially affecting performance.
Customisation and control levels differ significantly between the two. Linux offers greater flexibility and customisation options, allowing users to tweak server settings and configurations extensively. This level of control is particularly beneficial for developers who need a tailored hosting environment. Conversely, Windows hosting is typically easier to manage for those familiar with the Windows operating system but may offer less flexibility in terms of customisation.
Security measures also vary between Linux and Windows hosting. Linux is often praised for its strong security features, which are bolstered by a large community dedicated to promptly addressing vulnerabilities. While Windows hosting is secure, it may require more frequent updates and maintenance to ensure the same level of protection.
Common Use Cases for Linux Web Hosting
Linux web hosting is versatile and caters to a broad range of applications, making it a popular choice across various sectors. One of the most common use cases is hosting blogs and personal websites, particularly those built on platforms like WordPress. The open-source nature of Linux and its compatibility with PHP make it an ideal environment for WordPress, which powers a significant portion of the web.
E-commerce websites also benefit greatly from Linux web hosting. Solutions like Magento, PrestaShop, and OpenCart often perform better on Linux servers due to their need for a robust, secure, and scalable hosting environment. The flexibility to configure server settings allows online store owners to optimise performance and ensure a smooth shopping experience for their customers.
Content Management Systems (CMS) such as Joomla and Drupal are another prime use case. These systems require reliable and flexible hosting solutions to manage complex websites with large amounts of content. Linux's support for various databases and scripting languages ensures seamless integration and optimal performance for CMS-based sites.
Developers frequently turn to Linux web hosting for custom web applications. The operating system supports a variety of programming languages, including Python, Ruby, and Perl, making it suitable for a wide array of development projects. Its command-line interface and extensive package repositories allow developers to install and manage software efficiently.
Additionally, Linux web hosting is commonly used for educational and non-profit websites. The low cost and high reliability make it a practical choice for schools, universities, and charitable organisations that need a dependable online presence without breaking the bank.
Setting Up a Linux Web Hosting Environment
Setting up a Linux web hosting environment can be straightforward with the right approach. Begin by selecting a reputable hosting provider that offers Linux-based plans. After signing up, you'll typically be granted access to a control panel, such as cPanel or Plesk, which simplifies the management of your hosting environment. Through the control panel, you can manage files, databases, email accounts, and more.
Next, if you're using a content management system (CMS) like WordPress, Joomla, or Drupal, you can often find one-click installation options within the control panel. This feature makes it easy to get your website up and running quickly. Additionally, ensure that you configure your domain name to point to your new hosting server, which usually involves updating your domain's DNS settings.
For those who prefer more control or are comfortable using the command line, you can manually set up your web server using SSH access. This method allows you to install and configure web server software like Apache or Nginx, as well as databases such as MySQL or PostgreSQL.
Regardless of the setup method you choose, it's crucial to secure your server from the outset. This includes setting up a firewall, enabling SSH key authentication for secure access, and regularly updating all software to protect against vulnerabilities. Regularly monitoring your server's performance and security logs can help you stay ahead of potential issues, ensuring a stable and secure hosting environment for your website.
Security Best Practices for Linux Web Hosting
Securing your Linux web hosting environment is paramount to safeguarding your website against potential threats. Begin by ensuring your server software and all installed applications are up to date. Regular updates often include patches for security vulnerabilities, making this a critical step. Utilise strong, unique passwords for all user accounts, and consider employing SSH key authentication for added security when accessing your server remotely.
Setting up a firewall is another essential measure. Tools like iptables or firewalld can help you configure firewall rules to control incoming and outgoing traffic, thereby reducing the risk of unauthorised access. Implementing intrusion detection systems (IDS), such as Fail2Ban, can provide an additional layer of security by monitoring and blocking suspicious activities.
Consider deploying an SSL certificate to encrypt data transmitted between your server and users' browsers. This not only enhances security but also boosts user trust and can improve your search engine rankings. Additionally, limit the use of root privileges; create separate user accounts with the necessary permissions to minimise potential damage in the event of a breach.
Regularly backup your data to mitigate the impact of data loss due to hardware failure, cyber-attacks, or human error. Automated backup solutions can simplify this process, ensuring your data is consistently protected. Monitoring your server's logs can also be invaluable for identifying unusual activity early. Tools like Logwatch or the ELK Stack can assist in log management and analysis, enabling you to take swift action if anomalies are detected.
Common Challenges and How to Overcome Them
Setting up and maintaining a Linux web hosting environment can present various challenges, especially for those new to the platform. One frequent issue is navigating the command line, which can be daunting for beginners. Engaging with online tutorials, forums, and communities like Stack Overflow can be invaluable for learning the basics and troubleshooting problems. Another common challenge is software incompatibility. Ensuring your web applications are compatible with the Linux distribution you choose is crucial; consulting documentation and support resources can help mitigate these issues.
Security configuration can also be a complex task. Implementing best practices such as setting up firewalls, regular updates, and using strong authentication methods requires a good understanding of Linux security principles. Managed hosting services can offer a solution here by handling these technical aspects for you, allowing you to focus on your website content.
Resource management is another area where users might struggle. Monitoring server performance and managing resources effectively ensures your website runs smoothly. Utilising monitoring tools and performance optimisation techniques can help you stay ahead of potential issues. Lastly, when it comes to server backups, regular, automated solutions are essential to prevent data loss and minimise downtime. Being proactive in addressing these challenges will ensure a more seamless and secure Linux web hosting experience.
Popular Control Panels for Linux Web Hosting
Control panels are invaluable for simplifying the management of your Linux web hosting environment. Among the most popular are cPanel, Plesk, and Webmin. cPanel is renowned for its intuitive interface and extensive feature set, making it a favourite among users who need a straightforward yet powerful management tool. Plesk offers robust functionality and supports both Linux and Windows servers, providing versatility for those who manage multiple server environments. Webmin stands out as a free, open-source option that allows comprehensive server management through a web interface, catering to those who prefer a customisable and cost-effective solution. Each control panel brings unique strengths, helping to streamline tasks such as file management, database administration, and security configurations.
Choosing the Right Linux Web Hosting Provider
Choosing the right Linux web hosting provider involves several key considerations. Firstly, evaluate the quality of customer support offered. Responsive and knowledgeable support can be invaluable, especially when troubleshooting technical issues or during the initial setup phase. Check if the provider offers 24/7 support and multiple contact methods such as live chat, email, and phone.
Another crucial factor is the security measures in place. Opt for providers that offer robust security features, including regular backups, SSL certificates, firewalls, and DDoS protection. These features help safeguard your website against potential threats and ensure data integrity.
Reliability and uptime guarantees are also vital. Aim for providers that offer at least a 99.9% uptime guarantee, as frequent downtimes can significantly affect your website’s accessibility and user experience. Additionally, look into the provider’s data centre infrastructure and redundancy measures, which can impact overall performance and reliability.
Scalability is another important aspect to consider. As your website grows, you’ll need the flexibility to upgrade your hosting plan seamlessly. Check if the provider offers scalable solutions, such as easy transitions to VPS or dedicated hosting, without causing disruptions to your site.
Lastly, consider the hosting plans and pricing structures available. While cost-effectiveness is a significant benefit of Linux web hosting, ensure the plans align with your specific needs. Compare the features, storage, bandwidth, and other resources included in different plans to find the best value for your money.
Reading customer reviews and seeking recommendations can also provide insights into the provider’s reputation and service quality. By carefully evaluating these factors, you can choose a Linux web hosting provider that meets your requirements and supports your online endeavours effectively.
Conclusion and Final Thoughts
Linux web hosting stands out as an optimal choice for both beginners and seasoned web developers. Its open-source nature provides an affordable, highly customisable, and secure environment, suitable for a diverse range of websites, from personal blogs to large e-commerce platforms. The extensive community support ensures ongoing improvements and prompt resolution of issues, contributing to its reliability and performance. Choosing the right hosting provider is crucial; look for robust security measures, excellent customer support, and scalability to accommodate your website's growth. By leveraging the strengths of Linux web hosting, you can build a resilient and efficient online presence that meets your specific needs and goals.
4 notes
·
View notes
Text
Timesheets & Leave for Perfex CRM Nulled Script 1.1.8

Boost Productivity with the Timesheets & Leave for Perfex CRM Nulled Script If you’re looking for a powerful, reliable, and user-friendly solution to manage your team's attendance and time tracking, theTimesheets & Leave for Perfex CRM Nulled Script is your ultimate answer. This advanced module integrates seamlessly with Perfex CRM, offering an intuitive system to manage employee work hours, timesheets, and leave requests—all in one place. What is the Timesheets & Leave for Perfex CRM Nulled? The Timesheets & Leave for Perfex CRM Nulled Script is an essential tool for organizations that use Perfex CRM. It simplifies HR and time management by providing comprehensive tracking of working hours and leave records. Whether you’re managing a remote team or an in-house department, this module empowers your business with better oversight and smoother workflows. Technical Specifications Compatible With: Latest versions of Perfex CRM Built With: PHP, MySQL, and CodeIgniter Framework License: GPL (Open-source and free to use) Installation: One-click module installation Core Features and Benefits 1. Efficient Time Tracking Track employee hours with precision. The system logs start and end times, breaks, and overtime automatically. This reduces administrative workload and eliminates manual errors. 2. Streamlined Leave Management Employees can easily submit leave requests which managers can approve or reject with just a few clicks. This module supports all leave types—paid, unpaid, sick leave, and more—ensuring complete transparency. 3. Seamless Integration Fully integrates with Perfex CRM’s existing HRM modules. No extra configuration is needed. Get started instantly after activation. 4. Reporting and Analytics Generate detailed reports on employee attendance, overtime, and leave patterns. These insights help managers make data-driven decisions for better workforce planning. 5. Responsive and User-Friendly Interface The interface is sleek and mobile-responsive, allowing team members to log time and manage leaves from any device, anytime. Popular Use Cases Startups and Small Businesses: Efficiently manage small teams without the need for complex HR software. Freelancers: Track billable hours and manage time logs for clients. Agencies and IT Firms: Monitor project timelines and employee productivity effortlessly. Remote Teams: Maintain oversight of distributed teams with real-time attendance data. How to Install the Module Log in to your Perfex CRM admin dashboard. Navigate to Setup > Modules. Upload the module zip file and click "Install". Once installed, configure the settings under HRM > Timesheets. Start tracking time and managing leaves with ease! FAQs Is this module free to download? Yes! You can download the Timesheets & Leave for Perfex CRM Nulled Script completely free from our website. No hidden charges, no subscriptions. Does it work with the latest Perfex CRM version? Absolutely. The module is regularly updated to ensure compatibility with the latest Perfex CRM releases. Can I use this module on multiple domains? Yes, since it’s a nulled version under GPL licensing, you can use it across multiple installations. Are there any risks in using a nulled module? Our modules are scanned and tested for performance and security. You can safely use them to enhance your CRM without any worries. Why Choose Us? We provide premium tools and scripts for free, empowering developers, startups, and freelancers. You don't have to spend a fortune on CRM modules when you can download fully functional versions directly from us. Get the Timesheets & Leave for Perfex CRM Nulled Script today and streamline your workflow like never before. Need more powerful tools? Explore our other solutions like the elementor nulled pro for ultimate web design freedom. Or, discover hundreds of useful resources on Nulled Plugin for even more tools to boost your development projects.
0 notes
Text
Fixing WordPress Update Issues Made Easy: A Beginner’s Guide to Smooth Website Maintenance

Keeping your WordPress website updated is one of the smartest things you can do for better security, performance, and features. But what happens when those updates don’t go as planned?
If you’ve ever seen your website freeze, crash, or show strange errors after clicking "Update," don’t worry—you’re not alone, and you don’t need to be a developer to fix it.
In this guide, we’ll explain why WordPress updates fail and share simple, beginner-friendly solutions to get your website back on track—quickly and safely.
⚠️ Common Reasons Why WordPress Updates Fail
WordPress is built on multiple moving parts—your core WordPress files, themes, and plugins. An update may fail if just one part doesn’t play nicely with the others.
Here are the top reasons why updates might not go through:
🌐 Weak or unstable internet connection
🔌 Plugin conflicts that interfere with the update
🎨 Themes that aren’t compatible with the latest WordPress version
🧠 Low server memory or execution time limits
🔒 Incorrect folder or file permissions
📁 Corrupted or incomplete update downloads
🛠️ Simple Fixes for WordPress Update Problems
✅ Step 1: Always Back Up Your Website
Before making any changes, install a backup plugin like UpdraftPlus or BackupBuddy and save a complete version of your site. This ensures that if something goes wrong, you can restore your site in minutes.
✅ Step 2: Clear Your Cache
Sometimes, the issue isn’t with the update—it’s with what your browser is showing.
Clear your browser cache (Ctrl+Shift+R or Command+Shift+R)
If you use a caching plugin (like WP Super Cache or W3 Total Cache), clear your site’s cache from the plugin dashboard
Then, try the update again.
✅ Step 3: Troubleshoot Plugin Conflicts
If an update causes your site to break, the issue might be a plugin.
Here’s how to find out:
Install the Health Check & Troubleshooting plugin.
Enable “Troubleshooting Mode”—this temporarily disables all plugins for you only.
Try running the update again.
If the update works now, reactivate your plugins one at a time. The one that breaks the update is your troublemaker.
✅ Step 4: Check Hosting Limits
Your hosting environment might be too limited for updates to complete properly.
Ask your hosting provider these questions:
Is my PHP memory limit at least 256MB?
Is my maximum execution time at least 300 seconds?
Can these settings be increased if needed?
If not, consider upgrading to a better hosting plan for smoother WordPress performance.
✅ Step 5: Perform a Manual WordPress Update
When automatic updates fail, a manual update is a reliable workaround:
Download the latest WordPress version from WordPress.org
Unzip the files on your computer
Use FTP software (like FileZilla) to access your site files
Replace the wp-admin and wp-includes folders with the new versions
Leave the wp-content folder as-is (it holds your themes and plugins)
Open your site and follow any update prompts for the database
This process ensures a clean, fresh installation—without losing content or settings.
✅ Step 6: Fix File Permissions
Improper file permissions can block updates.
Use a plugin like WP File Manager or ask your host to set:
All folders to 755
All files to 644
These settings help WordPress update safely without risking your site’s security.
✅ Step 7: Remove Stuck Maintenance Mode
If you see the message:
“Briefly unavailable for scheduled maintenance. Check back in a minute.” …your site update was interrupted and left in maintenance mode.
Here’s how to fix it:
Access your site files through FTP or your hosting file manager (like cPanel)
Go to your website’s root folder
Delete the file called .maintenance
Refresh your site—it should be back to normal
This takes less than a minute and often solves the issue instantly.
💡 When to Call in the Pros
If these solutions don’t work—or if you feel unsure about any step—don’t hesitate to get help from professionals.
Here are your options:
Contact your web hosting support
Hire a trusted WordPress expert
Reach out to a reputable company like Websenor for quick, affordable help
🎯 Final Word: Let Websenor Handle Your WordPress Maintenance
WordPress update problems are common—but they don’t have to be stressful. With some basic know-how and a methodical approach, you can often fix these issues yourself.
But if you'd rather skip the hassle, Websenor is here to help. Our team specializes in:
WordPress core and plugin updates
Website backups and security
Speed optimization and error fixes
We'll keep your website running smoothly, so you can focus on your business, not your backend.
👉 Ready to stop worrying about WordPress updates? Contact Websenor today and let us take care of everything behind the scenes.
0 notes
Text
Adobe Commerce Developer Expert AD0-E725 Practice Exam
The Adobe Commerce Developer Expert (AD0-E725) certification is a prestigious credential that validates your advanced skills in implementing, customizing, and managing Adobe Commerce solutions. Designed for developers with deep expertise in Adobe Commerce (formerly Magento), this exam is a stepping stone to enhancing your career in e-commerce development. This article provides a comprehensive guide to preparing for the AD0-E725 exam, including recommended knowledge, exam objectives, study tips, and an introduction to the Cert007 Adobe Commerce Developer Expert AD0-E725 Practice Exam as a key preparation tool.
Why Pursue the AD0-E725 Certification?
Earning the Adobe Commerce Developer Expert certification demonstrates your ability to leverage Adobe Commerce to its fullest potential, making you a valuable asset to employers and clients. According to industry surveys, certified Adobe Commerce professionals can earn up to 25% more than their non-certified peers, and the certification opens doors to senior roles in e-commerce and web development. Whether you're a developer aiming to stand out in a competitive job market or a consultant seeking to build client trust, the AD0-E725 exam is a worthy investment in your professional future.
Recommended Knowledge and Skills
To excel in the AD0-E725 exam, candidates should possess a robust skill set and practical experience. Here are the key areas of expertise required:
Experience: At least 2 years of hands-on experience with Adobe Commerce, including real-world projects involving customization and optimization.
Programming Proficiency: Strong programming skills, particularly in App Builder, and adherence to Adobe Commerce Coding Standards Technical Guidelines.
Database and Web Knowledge: Familiarity with relational databases (e.g., MySQL) and an understanding of how web browsers and servers interact.
Performance and Delivery: Skills in performance optimization, software analysis, and the build/delivery process for Adobe Commerce solutions.
Feature Utilization: Experience leveraging built-in features to enable solutions without extensive custom development.
Full-Stack Competence: Proficiency in front-end (HTML, CSS, LESS, JavaScript) and back-end (PHP, XML, MySQL) technologies.
These skills form the foundation for tackling the exam’s technical challenges and applying Adobe Commerce in practical scenarios.
Exam Objectives and Content Breakdown
The AD0-E725 exam is structured into four key sections, each focusing on critical aspects of Adobe Commerce development. Understanding the weight of each section helps prioritize your study efforts. Below is the content breakdown:
Section 1: Architecture (38%)
This section carries the highest weight and tests your understanding of Adobe Commerce’s core architecture. Key objectives include:
Effectively using cache in Adobe Commerce.
Demonstrating knowledge of components (e.g., plugins, preferences, observers).
Configuring multiple sites on a single instance and understanding effects/constraints.
Explaining Git patches and Composer file-level modifications.
Understanding security features (e.g., CSP, escaping, form keys, sanitization, reCAPTCHA, input validation).
Explaining the CRON scheduling system and index functionality.
Section 2: External Integrations (14%)
This section focuses on integrating Adobe Commerce with external systems. Objectives include:
Customizing data flow with SaaS services.
Utilizing App Builder and Adobe I/O events/Webhooks.
Section 3: Customizations (32%)
Customization is a core competency for Adobe Commerce developers. This section covers:
Customizing the catalog, checkout, and sales operations.
Programmatically manipulating entity types.
Customizing the admin panel and APIs.
Leveraging message queues (existing and new) and writing integration tests.
Section 4: Cloud (16%)
This section addresses Adobe Commerce Cloud-specific knowledge. Objectives include46:
Explaining Adobe Commerce Cloud architecture.
Setting up and configuring Adobe Commerce Cloud.
Using the Adobe Commerce Cloud CLI tool.
The exam consists of approximately 60 multiple-choice and multiple-select questions, with a passing score of around 62% (37/60). It lasts 1 hour 40 minutes and costs $225 USD.
Study Tips to Pass the AD0-E725 Exam
Preparing for the AD0-E725 exam requires a strategic approach that combines theoretical study, hands-on practice, and community engagement. Here are proven tips to help you succeed:
Review the Official Exam Guide: Start by downloading Adobe’s official blueprint from the Adobe Certification website. This guide outlines each topic area and its weight, helping you focus on high-impact sections like Architecture (38%) and Customizations (32%).
Use Hands-On Practice: Set up a local development environment or use a demo Adobe Commerce instance to practice concepts like plugin development, API customization, and performance optimization. Real-world scenarios solidify your understanding.
Study Adobe Documentation: Dive into Adobe’s official documentation for in-depth knowledge of coding standards, security features, and Cloud architecture. This is especially critical for topics like CRON scheduling and index functionality.
Practice with Realistic Questions: Simulate the exam environment with high-quality practice tests. The Cert007 Adobe Commerce Developer Expert AD0-E725 Practice Exam is an excellent resource (more details below).
Introducing the Cert007 Adobe Commerce Developer Expert AD0-E725 Practice Exam
To boost your confidence and readiness, the Cert007 Adobe Commerce Developer Expert AD0-E725 Practice Exam is a highly recommended preparation tool. Designed to mirror the actual exam, Cert007’s practice tests offer:
Realistic Questions: Questions align with the AD0-E725 exam objectives, covering Architecture, External Integrations, Customizations, and Cloud topics.
Detailed Explanations: Each question includes comprehensive explanations to clarify concepts and reinforce learning.
Simulated Exam Environment: Practice under timed conditions to improve time management and reduce exam-day anxiety.
Up-to-Date Content: Cert007 regularly updates its question bank to reflect the latest Adobe Commerce features and exam changes.
Performance Tracking: Detailed results highlight your strengths and areas needing improvement, allowing you to focus your study efforts effectively.
Final Thoughts
The Adobe Commerce Developer Expert (AD0-E725) exam is a challenging but rewarding opportunity to showcase your expertise in one of the world’s leading e-commerce platforms. By building a strong foundation in the recommended skills, aligning your study with the exam objectives, and leveraging high-quality resources like the Cert007 AD0-E725 Practice Exam, you can approach the exam with confidence. Start your preparation today by reviewing the official exam guide, setting up a practice environment, and incorporating Cert007’s realistic practice tests into your study plan. With dedication and the right tools, you’ll be well on your way to earning the Adobe Commerce Developer Expert certification and advancing your career in e-commerce development.
0 notes
Text
The Evolution of the Full Stack Web Developer: Then vs. Now
Technology is moving at lightning speed, and so are the people who build it. One such pivotal role in the digital space is that of the full stack developer—a professional who juggles both the front-end and back-end of web applications. But like all things in tech, the role of the full stack developer has undergone massive transformation over the past two decades.
So, how did we get from the simple websites of the early 2000s to today’s complex, cloud-integrated, API-driven web apps? Let’s walk through the evolution of the full stack web developer: then vs. now.
Back Then: Simpler Times, Simpler Stacks
In the early days of the internet, being a full stack developer meant you were a jack-of-all-trades—but the stack was far less complicated. Websites were relatively static, and the tools were limited but manageable.
What defined a full stack developer then?
HTML, CSS, and a bit of JavaScript: These were the core technologies for building any web interface.
Backend scripting with PHP or ASP.NET: Most developers used server-side languages like PHP for form processing and basic database interactions.
Databases like MySQL: Relational databases were the go-to for storing content.
Little to no version control: Most code was shared via ZIP files or FTP uploads.
Solo development: Often, a single developer managed the entire website—from writing HTML to setting up servers.
This era was defined by simplicity, but also by limitations. Sites were slower, less interactive, and rarely mobile-friendly. Yet, in those early days, one developer could manage it all.
Now: Complexity, Collaboration, and Constant Learning
Fast forward to today, and the web is a different beast. Users expect speed, responsiveness, personalized experiences, and seamless integration with other apps. To meet these expectations, the full stack developer has had to evolve dramatically.
What does a full stack developer look like now?
Front-End Frameworks: React, Angular, or Vue are commonly used for building dynamic user interfaces.
Back-End Powerhouses: Node.js, Django, Ruby on Rails, or even serverless functions on AWS or Azure.
Cloud & DevOps: Modern full stack developers often deploy on cloud platforms and manage CI/CD pipelines.
APIs and Microservices: Today’s applications are modular, and developers must work with RESTful APIs and sometimes GraphQL.
Database Variety: From SQL to NoSQL (MongoDB, Firebase), data storage is more versatile.
Version Control and Collaboration Tools: Git, GitHub, GitLab, and platforms like Jira and Slack are essential.
Security & Performance: Awareness of cross-site scripting, data encryption, and performance optimization is critical.
Modern full stack developers don’t just write code—they’re architects, problem-solvers, and collaborators.
The Human Side of the Evolution
Let’s not forget the human element. Twenty years ago, being a full stack developer often meant learning by doing. There were fewer formal resources, and “Googling it” wasn’t even a thing. Now, developers have access to endless online courses, forums, and bootcamps—but they also face constant pressure to keep up.
Challenges modern full stack developers face:
Burnout from constant learning
Juggling too many technologies
Unclear job definitions in some companies
Need to balance depth vs. breadth of skills
However, despite the complexity, today’s developers are part of a global community. They share code, contribute to open source, and support one another. That’s something that has only grown stronger over time.
The Stack Is Evolving—And So Is the Developer
The definition of a full stack developer continues to shift. Some developers specialize more in either front-end or back-end, while still understanding both. Others become tech leads, DevOps engineers, or product-focused developers. But at its core, the role is about versatility and adaptability.
Key skills of a modern full stack developer:
Proficiency in multiple languages and frameworks
Problem-solving mindset
Understanding of UI/UX principles
Ability to work with databases, APIs, and cloud infrastructure
Strong communication and teamwork skills
Conclusion: From Hackers to Architects
The journey from the humble beginnings of web development to today’s sophisticated tech stacks is a fascinating one. The full stack developer of the past may have worked alone, but the modern developer thrives in collaboration, supported by tools, teams, and an ever-growing tech ecosystem.
The evolution of the full stack web developer: then vs. now reminds us that while tools and technologies will continue to change, the heart of development—curiosity, creativity, and code—remains the same.
0 notes
Text
Computer Service Management System Using PHP and MySQL
In this project, we use PHP and MySQL database. It has two modules
Admin
Users
Admin Module
Admin is the superuser of the website who can manage everything on the website. Admin can log in through the login page.
Dashboard: In this section, admin can view all the detail in brief like total services, total users, and total invoices.
Services: In this section, admin can manage services(add/update/del).
Pages: In this section, admin can manage about us and contact us pages.
Customer List: In this section, admin can view registered user’s details and generate invoices.
Invoices: In this section, admin can view the customer’s invoices which are generated by him/her.
Reports: In this section, admin can generate between dates reports of invoices.
Search Invoices: In this section, admin can search invoice details with the help invoice number.
Click: https://phpgurukul.com/computer-service-management-system-using-php-and-mysql/
Admin can also update his profile, change the password and recover the password.
User Module
Dashboard: It is a welcome page for users.
Invoices: In this section, the user can view his/her own invoices which are generated by the admin.
Search Invoices: In this section, users can search his/her own invoices details with the help invoice number.
User can also update their profile, change the password and recover the password
How to run the Computer Service Management Project Using PHP and MySQL
Download the zip file
Extract the file and copy comsms folder
Paste inside root directory(for xampp xampp/htdocs, for wamp wamp/www, for lamp var/www/html)
Open PHPMyAdmin (http://localhost/phpmyadmin)
Create a database with name comsmsdb
Import comsmsdb.sql file(given inside the zip package in SQL file folder)
Run the script http://localhost/comsms
Admin Credential Username: admin Password: Test@123
User Credential Username: [email protected] Password: Test@12345
Or Register a new User.
View Demo
PHP Gurukul
Welcome to PHPGurukul. We are a web development team striving our best to provide you with an unusual experience with PHP. Some technologies never fade, and PHP is one of them. From the time it has been introduced, the demand for PHP Projects and PHP developers is growing since 1994. We are here to make your PHP journey more exciting and useful.
Website : https://phpgurukul.com
0 notes
Text
Fix Security Misconfigurations in Symfony Easily
Symfony is a powerful PHP framework used by developers worldwide. But like all platforms, it's vulnerable to security misconfigurations if not set up correctly. These misconfigurations can expose your app to serious threats like unauthorized access, data leakage, and more.

In this guide, we’ll walk you through how security misconfigurations happen in Symfony, how attackers exploit them, and how you can fix them—along with real coding examples.
And the best part? You can use our free website vulnerability scanner online to instantly detect misconfigurations and other vulnerabilities in your web apps.
🔎 What is Security Misconfiguration?
Security misconfiguration happens when:
Unnecessary services are enabled.
Default credentials are used.
Error messages leak sensitive data.
Debug mode is active in production.
In Symfony apps, this often includes exposed .env files, open profiler tools, or misconfigured firewalls.
⚠️ Common Symfony Misconfiguration Examples (and Fixes)
Let’s look at some real-world Symfony misconfiguration examples—and how to fix them fast.
✅ 1. Disabling Symfony Debug Mode in Production
Issue: When debug mode is enabled in production, detailed error messages expose internal files and paths.
Misconfigured Code (in .env):
APP_ENV=dev APP_DEBUG=1
Fixed Configuration:
APP_ENV=prod APP_DEBUG=0
Pro Tip: Never commit .env files with debug settings to version control.
✅ 2. Securing the Profiler Tool
Issue: The Symfony Profiler gives deep app insights but should never be exposed in production.
Risk: Attackers can view routing, services, and database queries.
How to Disable Profiler in Production:
# config/packages/prod/web_profiler.yaml web_profiler: toolbar: false intercept_redirects: false framework: profiler: enabled: false
✅ 3. Harden HTTP Headers
Misconfiguration: Default Symfony headers don’t include secure settings.
Solution (Using a Response Event Listener):
// src/EventListener/SecurityHeaderListener.php namespace App\EventListener; use Symfony\Component\HttpKernel\Event\ResponseEvent; class SecurityHeaderListener { public function onKernelResponse(ResponseEvent $event) { $response = $event->getResponse(); $response->headers->set('X-Frame-Options', 'DENY'); $response->headers->set('X-Content-Type-Options', 'nosniff'); $response->headers->set('Referrer-Policy', 'no- referrer'); } }
Register Listener in Services.yaml:
services: App\EventListener\SecurityHeaderListener: tags: - { name: kernel.event_listener, event: kernel.response }
🛡️ Prevent Directory Listings
Exposing directory indexes can leak source files or configuration data.
Apache Fix:
Options -Indexes
Nginx Fix:
location / { autoindex off; }
🖼️ Screenshot: Our Free Website Security Checker Tool

Screenshot of the free tools webpage where you can access security assessment tools.
Use our website vulnerability scanner to instantly check if your Symfony app is misconfigured or vulnerable. It’s fast, simple, and doesn’t require installation.
📄 Screenshot: Sample Vulnerability Assessment Report

An Example of a vulnerability assessment report generated with our free tool, providing insights into possible vulnerabilities.
You’ll receive a detailed report like this to check Website Vulnerability, highlighting every vulnerability—including misconfigurations, XSS, SQLi, and more—so you can fix them before attackers find them.
🔁 Extra Tips to Avoid Symfony Misconfigurations
Disable unused bundles.
Validate permissions in security.yaml.
Sanitize file uploads.
Never expose sensitive routes like /phpinfo() or /admin/.
🧪 Test Your Symfony App Now – It’s Free
Don’t wait for attackers to find your security flaws. Use our free vulnerability scanner to detect weaknesses in your Symfony-based apps in minutes.
Looking for more cybersecurity insights? Visit our main blog at Pentest Testing Corp. where we regularly share vulnerability breakdowns, tools, and remediation tips.
📌 Final Thoughts
Symfony is secure by design—but only if configured correctly. Always sanitize your environment, remove default settings, and test thoroughly. Misconfiguration is one of the top OWASP vulnerabilities and can be avoided with basic hygiene.
1 note
·
View note
Text
my search for the perfect twitter bookmarks manager (aka i tried 4 twitter paid manager apps and i still can't choose bc they're all expensive as hell)
i want to leave twitter ASAP BUT
i don't know how to do it
i've been collecting and organizing my bookmarks with "twillot" a freemium twitter bookmark web organizer. it costs 581 php/month (368 php/month if you do annual billing But you will be charged 4416 php right away.)
I have 3 candidates for my twitter bookmarks organizer, the main drawback for each is that i have to depend on them? but the monthly fee is wayyy too expensive, that's like 2-3 days of meals for me, and it's already 3% of my salary, and i have to make space to buy kpop stuff.
so far, i paid for 1 month of twillot basic plan which yeeted out 581 pesos from my credit card. ouch
so it's either find a higher paying job (i plan to leave my job by October so start applying around August) so i can afford to lose 600 pesos per month (that's like 30 pesos per working day. ouch!)
so the options are:
1. TWEETSMASH
PRICING: - $49 - exports pass (one time payment) - can export and auto sync bookmarks, organize into "smart" folders - reader pass: $14 monthly or $84 yearly (6 months off or $7 monthly) - can turn into newsletters, no export to pdf option - yearly pass: $99 yearly ($8.25 monthly) - full experience PROS: woman made #womenintech, can open in tablet browser ✅, it looks similar to notion so somewhat cleaner looking than dewey CONS: no nested folders?, and it's selling AI too much?
2. DEWEY
PRICING: - $50 - 48 hour export pass - all features for 48 HOURS ONLY - pro monthly: $10 monthly = $120 yearly - no export, notion & gsheet integration) - pro yearly: $7.50 monthly or $90 yearly (3 months off) - all features - last black friday they offered 30% off, then christmas they offered 35% off, then on new year they offered 25% off, so i'm waiting this year for either black friday or christmas for at least a 25% off discount (i'm talking $63 yearly which is still a lot but hopefully i'm $63 richer by november LOL)
PROS: nested folder, can open in tablet browser ✅, almost same interface as tweetsmash, i think this was the one i tried exporting to pdf and it came out nice, has an option to save the whole thread, auto groups by year and month CONS: interface is too noisy (too many gradients), the export pass is limited for 48 hours why why why, also the limited features when you do monthly billing instead of yearly billing is so nasty, when i first did their AI auto categorization it just threw out 200 different folders and that sucked, they
3. TWILLOT
PRICING - basic - $10 monthly or $78 yearly (3.5 months off or $6.5 monthly) - export 50000 tweets, up to 50000 bookmarks - pro - $20 monthly or - unlimited bookmarks PROS: prettiest interface (it looks like an excel file but cleaner), easy to tag tweets into folders, promises local backup (better than export to csv imo) but i tried it and it doesn't work so. CONS: idk if i want my money to go to a chinese dev and indirectly to the ccp lol, no sorting by date, doesn't open in tablets because it's a google web extension. (sad) ❌ but also, it's newer than the first 2 apps so i will give it some slack, the export to pdf doesnt put the username for some reason? but it numbers the tweets, and the images come out really HD, so that's nice.
4. FAVOURITES IO
PROS: cheap CONS: limited features, only search and tags, no export
i really want to like twillot but it was too late for me to get the early bird discounted subscription, and it's a younger app.
so i'm thinking of unsubbing to twillot after the 1 month, then waiting for the black friday/ christmas/ new year discount and subscribe to a dewey yearly plan; or if there's no discount, getting the tweetsmash 1 time export pass and hopefully it doesn't have a time limit like dewey has.
so far i've organized 833 tweets into folders (2%) in twillot, so i've wasted some time, but it's part of the exploration.
i want to do like a youtube video on this so i can monetize it a bit LOL but maybe i should send feedback to the devs first).
what's really cool is that both the tweetsmash and twillot devs are on twitter and reddit (they advertise their apps on there and seek advice and stuff). i think the dewey team are also on there. what i mean is you can see they built these apps because they were sick of seeing this problem and were like "fine, i'll do it myself!" which is inspiring as someone who once dreamed of building an app (for what? idk? like my own personal assistant on the phone lol). and they did it and these apps are running, albeit not perfectly, but they built it! and people pay for their apps! that's cool!
so my takeaway is maybe i want to shift my career to tech soon bc that's where the money is still at (pls don't flop soon)
0 notes
Text
How to Develop a Website Using PHP
How to Develop a Website Using PHP
In today's digital era, websites play a crucial role in business growth and online presence. One of the most widely used server-side scripting languages for web development is PHP (Hypertext Preprocessor). It is open-source, easy to learn, and widely supported by web servers and databases. This guide will walk you through the step-by-step process of developing a website using PHP.

Why Choose PHP for Web Development?
Before diving into the development process, let’s explore some key reasons why PHP is a great choice for website development:
1. Open-Source: PHP is free to use, making it cost-effective for developers.
2. Cross-Platform Compatibility: Runs on Windows, Linux, and macOS without compatibility issues.
3. Database Support: Easily integrates with MySQL, PostgreSQL, and other databases.
4. Scalability: Suitable for both small websites and large-scale web applications.
5. Large Community Support: Extensive documentation and active developer communities for troubleshooting and learning.
Prerequisites for PHP Web Development
To develop a website using PHP, you need the following tools:
1. Text Editor or IDE: VS Code, Sublime Text, or PHPStorm.
2. Local Server: XAMPP, WAMP, or MAMP for running PHP scripts.
3. Database System: MySQL or PostgreSQL for data storage.
4. Web Browser: Chrome, Firefox, or Edge for testing the website.
Step-by-Step Guide to Developing a Website Using PHP
1. Setting Up Your Development Environment
To begin developing a PHP website, follow these steps:
· Install XAMPP (or WAMP/MAMP) to create a local server.
· Using the XAMPP Control Panel, launch Apache and MySQL.
· Navigate to htdocs in the XAMPP directory to store PHP project files.
2. Creating the Project Structure
Organizing your files properly enhances maintainability. A typical PHP project structure:
project-folder/
│-- index.php
│-- config.php
│-- assets/
│ ├── css/
│ ├── js/
│ ├── images/
│-- includes/
│ ├── header.php
│ ├── footer.php
│-- pages/
│ ├── about.php
│ ├── contact.php
│-- database/
│ ├── db_connect.php
3. Writing Your First PHP Script
Create an index.php file and add the following code:
<?php
echo "Welcome to My PHP Website!";
?>
Save the file and access it in the browser by navigating to http://localhost/project-folder/.
4. Connecting PHP with MySQL Database
To manage dynamic content, connect PHP with a MySQL database.
Create a Database
1. Open phpMyAdmin from XAMPP.
2. Create a new database, e.g., my_website.
3. Add a users table with fields id, name, email, and password.
Database Connection Code (db_connect.php)
<?php
$servername = "localhost";
$username = "root";
$password = "";
dbname = "my_website";
$conn = new mysqli($servername, $username, $password, $dbname);
if ($conn->connect_error) {
die("Connection failed: " . $conn->connect_error);
}
?>
5. Creating a User Registration System
A simple user registration form using PHP and MySQL.
Registration Form (register.php)
<form method="POST" action="register.php">
<input type="text" name="name" placeholder="Full Name" required>
<input type="email" name="email" placeholder="Email" required>
<input type="password" name="password" placeholder="Password" required>
<button type="submit" name="register">Register</button>
</form>
Handling User Registration (register.php)
<?php
include 'database/db_connect.php';
if(isset($_POST['register'])) {
$name = $_POST['name'];
$email = $_POST['email'];
$password = password_hash($_POST['password'], PASSWORD_BCRYPT);
$sql = "INSERT INTO users (name, email, password) VALUES ('$name', '$email', '$password')";
if ($conn->query($sql) === TRUE) {
echo "Registration successful!";
} else {
echo "Error: " . $conn->error;
}
}
?>
6. Implementing User Login System
Login Form (login.php)
<form method="POST" action="login.php">
<input type="email" name="email" placeholder="Email" required>
<input type="password" name="password" placeholder="Password" required>
<button type="submit" name="login">Login</button>
</form>
Handling Login Authentication (login.php)
<?php
session_start();
include 'database/db_connect.php';
if(isset($_POST['login'])) {
$email = $_POST['email'];
$password = $_POST['password'];
$result = $conn->query("SELECT * FROM users WHERE email='$email'");
$user = $result->fetch_assoc();
if(password_verify($password, $user['password'])) {
$_SESSION['user'] = $user;
echo "Login successful!";
} else {
echo "Invalid credentials!";
}
}
?>

7. Adding Navigation and Styling
· Use Bootstrap or CSS frameworks to improve UI.
· Include a header.php and footer.php for better navigation.
8. Deploying the PHP Website
Once development is complete, deploy your PHP website using:
· Shared Hosting with cPanel for easy management.
· Cloud Hosting (AWS, DigitalOcean) for high performance.
· Domain & SSL Certificate for a secure and professional website.
Conclusion
Developing a website using PHP is an efficient way to create dynamic and interactive websites. By following this step-by-step guide, you can build a PHP-based website from scratch, implement database interactions, user authentication, and deploy your project successfully. Start your PHP development journey today and create powerful web applications!
#web development#seo services#web designing#social media marketing#graphic design#digital marketing#digitalmarketing#marketing#digitalindia#seo
1 note
·
View note
Text
Laravel customized portal development services
Laravel Custom Portal Development Solutions by Config Infotecht With the ever-changing digital landscape of today, companies are resorting more and more to customized web portals in order to enhance operations, offer better user experience, and upgrade overall functionality. Laravel, one of the strongest and most dynamic PHP frameworks, is one of the finest frameworks for creating custom portals that can cater to special business requirements. At Config Infotecht, we have expertise in delivering customized Laravel portal development services that ensure businesses enjoy a strong, secure, and scalable portal perfectly suited to their objectives.
Why Laravel for Custom Portal Development? Laravel is a highly praised open-source PHP framework recognized for its elegant syntax, simplicity, and extensive array of features. In building custom web portals, Laravel has many advantages, which make it the best for developers and companies too.
Effective Development Process: With Laravel's pre-installed tools, such as a simple routing system, migration tools, and artisan commands, development is accelerated. Whether developing user-friendly dashboards, customer portals, or admin panels, Laravel's structure saves developers time while ensuring high-quality code.
Scalability: Business requirements change as businesses scale. Laravel is built for scalability, such that your bespoke portal can accommodate more traffic, more features, and intricate business processes. Config Infotecht provides solutions that are flexible and future-ready, enabling easy scalability as your business grows.
Security: Security is a major concern in any web application. Laravel provides inbuilt security measures such as CSRF protection, XSS protection, and password hashing that shield the portal from potential threats and vulnerabilities. At Config Infotecht, security is a major concern for us, and we ensure that each custom portal we develop is very secure and well-protected against possible cyberattacks.
Seamless Integration: Laravel facilitates integration with third-party applications and services, including CRM systems, payment gateways, and ERP solutions. This simplifies the process of developing a fully integrated portal that integrates seamlessly with existing business systems. Whether you want to integrate with external APIs or internal systems, Laravel offers the flexibility to do so.
Customization and Flexibility: Perhaps the most impressive aspect of Laravel is its flexibility when it comes to customization. With Laravel, companies can have a fully customized portal that aligns with their specific workflows, branding, and functionality requirements. From customer portals with sophisticated search capabilities to intricate admin dashboards with real-time analytics, Laravel provides limitless customization options.
Community Support and Ecosystem: Laravel has a vibrant, large base of developers supporting it, as well as actively contributing to it, to continue improving it day by day. It also includes a rich ecosystem with packages to support different functionalities such as emailing, file upload, and payments. Config Infotecht is utilizing this ecosystem to provide robust solutions, hence our clients avail themselves of web development advancements made on a timely basis.
Config Infotecht's Approach to Laravel Customized Portal Development At Config Infotecht, we recognize that each business is different. Our Laravel portal development process is focused on understanding the particular needs of our clients and providing highly personalized solutions that deliver results. Here's how we do it:
Consultation and Analysis: To begin with is comprehending your business needs, goals, and challenges. We spend time going over your needs, such as the functionality you desire in your portal and the user experience you want to deliver. We analyze your current systems and infrastructure too to guarantee integration without hiccups.
Custom Design: With a clear idea of your objectives, our experts then develop a custom design that presents your brand personality while being an intuitive, user-friendly interface. Whether you're looking at a customer portal or an internal admin panel, we make sure that the design is responsive, good-looking, and easy to use.
Development and Testing: Once the design is completed, we move on to the development stage, where we implement the portal in accordance with Laravel's best practices. Our development cycle involves intense testing to confirm that the portal works as designed, handles high loads well, and is devoid of bugs or vulnerabilities.
Deployment and Maintenance: After the portal is designed and thoroughly tested, we take care of the deployment process to have a smooth roll-out. But that's not all our support covers—Config Infotecht provides regular maintenance and updates to keep your portal secure, current, and performance-optimized.
Key Features of Laravel Customized Portals User Management: We offer simple-to-deploy user management solutions, enabling companies to manage user registration, authentication, role-based access controls, and other user-administration tasks with ease.
Dashboard and Analytics: Real-time analytics and reporting enabled custom dashboards enable companies to track performance, monitor KPIs, and make data-driven decisions out of their data.
Advanced Search and Filtering: With the powerful search ability of Laravel, we create portals that enable the user to efficiently filter and search for content with a smooth experience even when data is in great quantity.
Multilingual Support: For companies who have a worldwide audience, the multilingual facility of Laravel supports creating portals where multiple languages can be supported so that your portal can be viewed by users around the globe.
Third-Party Integrations: We integrate your portal with external services, APIs, and payment gateways, making it operate in harmony with other business systems and platforms.
Conclusion If you want a powerful, secure, and scalable custom web portal, Config Infotecht has the experience and expertise to provide a high-quality solution. By tapping into the potential of Laravel, we create and implement portals that not only satisfy your business needs but also provide better user experiences and long-term viability. Reach out to us today to see how we can assist you in driving your business forward with our Laravel customized portal development services.
0 notes
Text
youtube
How to fix Briefly unavailable for scheduled maintenance, please check back in a minute error in wordpress 20025 ?
The "Briefly unavailable for scheduled maintenance. Please check back in a minute." error in WordPress usually occurs when an update is interrupted or incomplete. Here's how to fix it:
1. Delete the .maintenance File
WordPress creates a temporary .maintenance file in the root directory during updates. If the update fails or gets stuck, this file isn't removed, causing the error.
Steps to Fix:
Access Your Website via FTP or File Manager
Use an FTP client like FileZilla or log in to your cPanel and open the File Manager.
Locate the Root Directory
Navigate to the public_html or the folder where your WordPress site is installed.
Find and Delete the .maintenance File
If you don’t see the file, enable "Show Hidden Files" in your file manager settings.
Reload Your Website
Your site should be back online.
2. Manually Complete or Restart the Update
If the issue persists, your update may not have finished properly.
Steps to Fix:
Go to the wp-content/upgrade Folder
Delete any files inside this folder.
Manually Update WordPress, Themes, or Plugins
If a plugin or theme update was interrupted, go to your WordPress Dashboard > Plugins or Appearance > Themes and retry the update.
3. Disable Plugins (If the Error Persists)
If your site still shows the error:
Rename the plugins Folder via FTP
Go to wp-content/ and rename the plugins folder to plugins-old.
Check if your site loads. If it does, a plugin caused the issue.
Rename the folder back and activate plugins one by one to find the culprit.
4. Check File Permissions
Incorrect file permissions can cause WordPress to fail during updates.
Correct Permissions:
Files: 644
Folders: 755
You can adjust these via your File Manager or an FTP client.
5. Increase PHP Memory Limit (If Updates Are Failing)
If the update was interrupted due to low memory:
Edit wp-config.php
Add the following line:phpCopyEditdefine('WP_MEMORY_LIMIT', '256M');
Save the file and try reloading the website.
Final Step: Clear Cache
If your website is still showing the maintenance message after following the above steps:
Clear your browser cache and WordPress cache (if using a caching plugin like WP Rocket or W3 Total Cache).
0 notes
Text
How to Install XAMPP for Windows 10 - XAMPP WordPress For Beginners
To install XAMPP on Windows 10 and set it up for WordPress, follow these steps:
Step 1: Download XAMPP
Go to the official XAMPP website.
Click on the "XAMPP for Windows" button.
Once the installer is downloaded, locate the .exe file (usually in the Downloads folder).
Step 2: Install XAMPP
Double-click the .exe file to start the installation process.
Choose the components you want to install. For WordPress, you need at least Apache, MySQL, and PHP. These are selected by default, so you can leave them as is.
Choose the installation folder (default is usually fine).
Click "Next" and follow the prompts.
During installation, the installer may ask if you want to start the XAMPP Control Panel. Leave it checked and click "Finish."
Step 3: Start Apache and MySQL
Open the XAMPP Control Panel (it should have opened automatically, or you can search for it in the Start menu).
Click the "Start" button next to Apache (this will run the web server).
Click the "Start" button next to MySQL (this will start the database server).
Make sure both Apache and MySQL show "Running" in green.
Step 4: Install WordPress
Download the latest version of WordPress from the official WordPress website.
Extract the WordPress ZIP file.
Move the extracted folder (the WordPress folder) into the htdocs folder of your XAMPP installation (usually located at C:\xampp\htdocs).
Step 5: Create a Database for WordPress
Open your browser and go to http://localhost/phpmyadmin/.
In the phpMyAdmin dashboard, click on "Databases."
Create a new database for WordPress. Give it a name (e.g., wordpress_db) and click "Create."
Step 6: Configure WordPress
Open your browser and go to http://localhost/wordpress (or the folder name you chose).
The WordPress installation screen should appear.
Select your language and click "Continue."
On the next screen, enter your database details:
Database Name: The name you created (e.g., wordpress_db).
Username: root (default for XAMPP).
Password: Leave this blank (default for XAMPP).
Database Host: localhost (default).
Table Prefix: Leave as wp_ unless you want to change it.
Click Submit and then Run the Install.
Step 7: Complete the WordPress Setup
Fill in the site details (site title, admin username, password, and email).
Click "Install WordPress."
Once the installation is complete, you’ll see a success message. You can now log in to your WordPress dashboard at http://localhost/wordpress/wp-admin.
Final Notes
To stop your server, go to the XAMPP Control Panel and click "Stop" for Apache and MySQL.
If you need to make your local WordPress site public, you'll have to configure port forwarding or use a tool like Local by Flywheel or XAMPP for public access.
#installxampp#xamppforbeginners#xamppwindows10#wordpressinstallation#localserversetup#runwordpresslocally#xamppwordpress#webdevelopment#phpdevelopment#wordpressforbeginners#tutorial2025#localwordpress#xamppsetup#installingwordpress#wordpresssetup#beginnerfriendly#xamppguide#developmenttutorial#learnwordpress#wordpresslocally
0 notes
Text
Maildoll Nulled Script 6.10.3

Discover the Power of Maildoll Nulled Script – Your Ultimate Email & SMS Marketing Solution In today's competitive digital landscape, effective communication with your audience is essential. If you're looking for a dynamic marketing platform that combines both email and SMS campaigns with ease, the Maildoll Nulled Script is the perfect solution. This powerful tool empowers businesses and marketers to streamline their marketing strategies, all while saving on costly licensing fees. Download it now and unlock premium features completely free. What is Maildoll Nulled Script? Maildoll Nulled Script is a comprehensive email and SMS marketing application that allows you to manage campaigns, subscribers, templates, and automation workflows effortlessly. Built for efficiency and scalability, it provides everything you need to create engaging marketing campaigns without relying on third-party platforms. Whether you're a solo entrepreneur, digital marketer, or a small business owner, Maildoll offers a cost-effective and user-friendly interface to keep your customers engaged. And with the nulled version, you get unrestricted access to all premium functionalities—completely free. Technical Specifications Language: PHP, Laravel Framework Database: MySQL Compatibility: PHP 7.3+, Apache/Nginx, MySQL 5.7+ Frontend: Bootstrap, HTML5, CSS3 SMS Gateways Supported: Twilio, Nexmo, and more Email Integrations: SMTP, SendGrid, Mailgun Top Features and Benefits of Maildoll Nulled Script Multi-Channel Marketing: Run synchronized email and SMS campaigns with high delivery rates. Advanced Analytics: Get detailed insights into open rates, click-through rates, and conversions. Template Builder: Use the drag-and-drop editor to create stunning templates with ease. Subscriber Management: Import, export, and segment your audience for targeted messaging. Campaign Automation: Automate follow-ups and schedule broadcasts to increase engagement. Developer-Friendly: Built on Laravel, making customization simple and effective. Use Cases of Maildoll Nulled Script The Maildoll Nulled Script is ideal for: Startups aiming to build a loyal customer base through email outreach. Affiliate marketers managing large subscriber lists across niches. eCommerce businesses sending transactional and promotional messages. Agencies offering white-labeled email marketing services to clients. How to Install Maildoll Nulled Script Installing the Maildoll is simple and requires minimal technical knowledge. Here's a quick guide: Download the script from nulled club. Upload the files to your server using cPanel or FTP. Set up your MySQL database and configure the .env file with the correct credentials. Run the installation wizard from your browser and follow the step-by-step instructions. Log in to your admin dashboard and start creating your campaigns. Frequently Asked Questions (FAQs) Is the Maildoll Nulled Script safe to use? Yes, as long as you download it from a trusted source like nulled club, you can safely use the script without worrying about malicious code. Can I use it for commercial projects? Absolutely. The Maildoll Nulled Script is versatile and suitable for both personal and commercial projects. You can even offer marketing services using this tool. Are updates available for the nulled version? While automatic updates may not be available, you can manually update the script by downloading the latest version from trusted platforms. How does it compare to other marketing tools? Compared to other paid tools, Maildoll offers similar—if not better—functionality without recurring costs. It’s a one-time setup that gives you lifetime access. Where can I find similar tools? If you're looking for more powerful tools like this, check out kallyas NULLED for a premium WordPress theme to match your marketing efforts. Final Thoughts The Maildoll is a game-changer for digital marketers and businesses looking to scale their outreach without breaking the bank.
With powerful automation, deep analytics, and easy integration, this tool ensures that your message reaches the right audience at the right time. Download it today and transform your email and SMS marketing like a pro.
0 notes