#how to use a cricut maker
Text
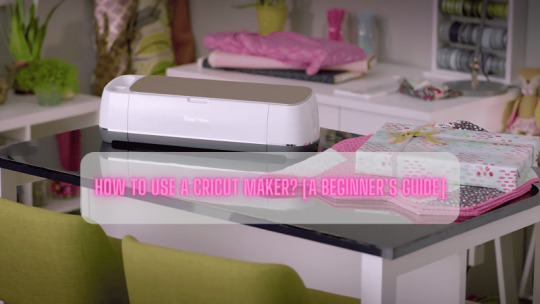
How to Use a Cricut Maker? [A Beginner’s Guide]
Crafters and DIYers widely use Cricut’s products to showcase their creativity. The reason why users like Cricut machines is because they offer cutting-edge machines that cut with high precision. Even though there are various Cricut models available in the market, Cricut Maker is the latest version of the Cricut models. It offers a wide range of adaptive tools and faster performance that complete the crafting tasks quickly. Also, the machine is so simple that a newbie can easily use it without someone’s help. Since Cricut Maker can offer more than you expect, it is the first choice for every crafter.
Most beginners require an easy tutorial so that they can get started with the machine quickly. Thus, the blog is dedicated to teaching you the proper use of Cricut Maker with a step-by-step guide. Let us start with the features of the machine.
Key Features of Cricut Maker
Coming to the feature of Maker, crafters can cut soft materials or hard materials easily with precision. However, the materials that you can cut on Maker are fabric, paper, chipboard, leather, vinyl, and balsa wood.
Here are the significant features of Maker you must know:
Compared to its predecessor, it is faster and more powerful.
It can cut more than 300 materials at 10x speed.
For charging the tablet, you will get an additional USB port in Maker.
Materials You Can Cut With Cricut Maker
There are a massive number of materials available that you can use with Maker cutting machines. The Maker can easily cut both software and more rigid materials in one go.
Here are the materials that you can cut with Cricut Maker:
Iron-On Vinyl
Removable Vinyl
Aluminium Foil
Glitter Cardstock
Cardstock
Washi Tape
Faux Leather
Craft Foam
Butcher Paper
Chalkboard Vinyl
Magnetic Sheet
How to Use a Cricut Maker?
Before using a Maker device, you first need to set it up with your computer or phone. However, the setup process is quite simple, making it easy for beginners to setup quickly. For this, you will need to download the Cricut app, i.e., Design Space, to your system. Let us start with the first method to setup Maker.
Step 1: Setting up Cricut Maker
To setup the device, go to cricut.com/setup. Then, download and install Cricut Design Space on your PC. The app is compatible with Windows, Mac, Android, and iOS, so you can easily install it on computers as well as mobile devices.
Step 2: Updating the Firmware
When you unbox the new Cricut Maker machine, the first thing you should do is update the firmware. The process is exactly the same as the above Cricut setup.
To update the firmware, you must connect your device via USB or Bluetooth:
Now, visit the official website of Cricut.
From there, you need to download the Design Space app.
After downloading the app, you need to create a Cricut ID.
Afterward, you can complete the Cricut setup.
Further, the Cricut app will detect the Cricut Maker and ensure the firmware update.
On-screen, you will also find the list of firmware versions.
Next, hit the Update button.
After this, the firmware will be updated.
Step 3: Choosing Compatible Tools
Cricut Maker uses a special type of blade for cutting, engraving, and embossing the materials. In addition, the cutting blades compatible with other Cricut machines may not be compatible with Maker. Therefore, as a user, you must select apt tools for making a Cricut project.
Step 4: Cutting Your First Designs
Once you have selected the suitable tool for your Cricut Maker, then you must proceed with loading the materials into the machine. Then, take off the cutting mat and place it into the Maker machine. After this, you have to locate the materials on the mat and stick them together so that the material will not slip during cuts.
Further, load the mat and materials into the Maker machine. Finally, the machine will make cuts according to the instructions you have given. Ensure you have attached the correct tools.
Step 5: Weeding the Extra Materials
This step is essential when you have finished the cutting. After cutting the designs, there is a lot of debris and leftovers stuck to the mat that need to be removed. Plus, you must remove the extra materials from your design using a weeding tool. Users also prefer using Cricut BrightPad to get clear visibility of fine cuts.
Conclusion
Now, it’s easy to bring your creativity to reality with this complete guide. This blog explored the features and materials that are compatible with the Cricut Maker. Also, we discussed things like how to use a Cricut Maker for beginners. Aside from usage, the Cricut setup process is a necessary step to get started. On top of that, we also talked about compatible tools and weeding methods for designs. So start making your new designs today and move forward in your crafting career!
FAQs
Can I engrave glasses with Cricut Maker?
Unfortunately, Cricut has not developed any such tool that can engrave the glasses. Since it is not designed to engrave the glass, engraving is not possible on the glass materials. Besides, users can use the Maker to create the stencil and etch the glass. However, you can use the etching tool to etch the glasses.
Is the Cricut Maker machine for beginners?
The Maker machine is a user-friendly device that is simple to use for every beginner. Even though the mechanism looks complex, its overall design will help you operate it easily on your first go. Besides, the machine uses the Design Space app, which has a straightforward interface, allowing you to design anything effortlessly.
Should I buy Cricut Maker?
For avid crafters, the Maker series is the best device for getting faster speed and precise cuts. Whether it is custom quilts or card making, the Maker can handle them effortlessly. Plus, the cutting materials capability is also high, which makes it a versatile machine among all Cricut machines.
For more information visit: Cricut.com setup mac
Cricut Machine Setup
install cricut design space app
cricut explore air 2 setup
#how to use a cricut maker#Cricut Maker#cricut maker setup#Cricut.com/setup#Cricut.com setup mac#install cricut design space app#install Cricut Explore Air 2#Cricut.com setup
1 note
·
View note
Text
How to Use Cricut Maker: Create a Siser Easy Color DTV Project!
Have you just bought a new Cricut Maker and are wondering how to use Cricut Maker? This brilliant Cricut machine may be overwhelming for beginners, but it is simpler than you think. You get many amazing features with this crafting machine. Let’s get ready to use it and make creative DIY projects with it. I will tell you how to prepare a desired project using this Cricut cutting machine.
Cricut Maker offers various adaptive features that help you create unique and beautiful projects effortlessly. Plus, you get a slot for inserting pens and a number of Cricut tools and supplies. It will be all fun to create something with this ultimate machine. Here, I’ll tell you the best methods to prepare personalized apparel using Siser EasyColor DTV. You’ll learn more about it later in this blog. So, let’s get started.
Supplies and Tools You Will Need for Your Cricut Project
Before we get started to learn how to use Cricut Maker, you must gather some important accessories. I’m listing all of the best accessories here. Use them and follow my step-by-step instructions to create your own project. Check the steps below.
● Brand new Cricut Maker or Explore
● Siser EasyColor DTV
● Siser Easy Mask
● An inkjet printer
● Cricut StandardGrip mat
● A weeding tool
● A Cricut EasyPress
● A Cricut scraper tool
Let me tell you what a Siser EasyColor DTV is. It is an iron-on vinyl type that is typically used on lighter blanks such as garments, T-shirts, etc. This unique vinyl is very convenient and useful for creating better designs and sublimation projects. Let’s check the complete method to create the best project.
How to Use Cricut Maker to Make Personalized Apparel?
Finally, we are here to learn the process of creating personalized T-shirts. So, before we move on to the final steps, measure your blank so that you can create an appropriate design. So, let’s check how to use Cricut Maker for beginners.
Step 1: Upload an SVG File to Cricut Design Space
In the first and foremost step, you’ll need to upload your SVG design file to the Cricut software. If you want, you can create a design manually as well. Once you’re ready, just resize your design and make it fit to your blank.
As you’ll have to print this image, ensure that your Cricut machine will recognize it as a printable file and not a file to be cut. To ensure this, choose your image and hit the Flatten option beneath the Layers Panel.
After that, your Cricut machine will show a preview of the image. When you’re ready, just click the Make It button. And now, this design will go through a Print Then Cut feature. To access it, hit the Continue button.
In the next step, you’re allowed to send that image to your inkjet printer and select the paper type you want to print on. I prefer specialty matte. You can select one based on your printer. Get ready with your printer and insert the Siser EasyColor DTV into it.
Step 2: Start Cutting the Siser EasyColor DTV
In the following step, you’ll need to cut your material. On your Cricut machine, select your material as Premium Vinyl Permanent Glossy and set the pressure to More using the drop-down menu.
Next, load your vinyl material on the Cricut mat at the left-side corner and make it stick to the mat using a brayer tool. Now, load the mat with vinyl into the Cricut machine and hit the Play button to allow your Cricut to cut the image. Continue with the steps to learn how to use Cricut Maker.
Once the cut is done, take off the paper sheet from your mat, turn the mat over, and take the mat away from your DTV. Please note that you don’t have to peel off the DTV from the mat. You can also use a pair of scissors to cut the design if necessary.
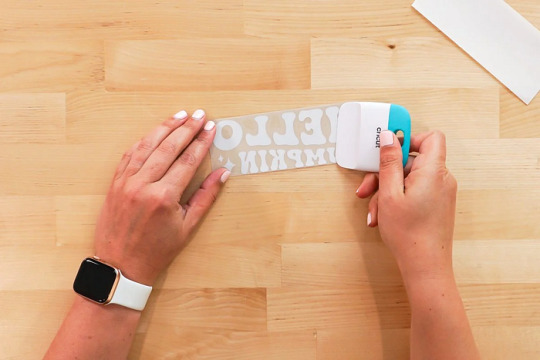
Step 3: Weed Out the Excess Vinyl
Once you cut your design, you should weed out the excess vinyl from your design. Do this carefully, so that your design doesn’t ruin. This step will add more detail to your project.
Step 4: Cover Your Image With a Mask
Moving forward, cut your mask to the size of your design. Now, take off the transparent film from the mask and then apply the mask alone to your DTV image. Moreover, ensure that the final design is flat and that there are no air gaps between the mask and the design.
Step 5: Transfer Your Design to Apparel

This design is so amazing; I love making it. This is how to use Cricut Maker to reap good results. All the best to all of you who are keen to make something unique and precise.
FAQs
How to Use a Cricut Maker to Make Shirts?
To create a shirt with your Cricut cutting machine, you’ll need to use the Cricut Design Space and a heating press to create a desired design. Get started with the Cricut software, make a design, resize it, and then print and cut it with your Cricut machine. Now, weed away the excess vinyl, and then preheat it with your Cricut heat press, and give a final heat to it.
Which Heat Press Is Suitable for Making an Iron-on Cricut Project?
As there are many options to create an iron-on Cricut project, you can use any of them depending on your requirements. So, the common machines are Cricut EasyPress, Cricut EasyPress 2 & 3, Cricut EasyPress Mini, etc. You can utilize a heat press to transfer the design to your apparel effortlessly.
Can You Use Regular Iron With a Cricut Machine?
Yes, you can. A regular iron is also effective for your minimalist iron-on projects. However, a regular iron may not deliver the results you want and not give a permanent design. Overall, we can say you can use a household iron for normal, sensitive projects but not for complex projects.
Read more: install cricut design space app
cricut.com/setup
cricut.com/setup mac
Source: How to Use Cricut Maker
#How to Use Cricut Maker#How to use cricut maker for beginners#how to use a cricut maker to make shirts#cricut.com/setup mac#cricut explore 3#www.cricut.com setup login#cricut design space#cricut explore air 2#cricut.com/setup#cricut new machine setup#cricut.com setup mac#cricut setup on computer
0 notes
Text
How to Use Cricut Maker for DIY Crafting Magic?
Again, I am ready with my new tool, Cricut Maker. Using this machine, I am going to teach you how to use Cricut Maker to create your own shirt in a couple of minutes. At one time, I was also a beginner, and it was not easy for me to learn it. Somehow, I learned it from the internet. However, it took me a lot of time to gain practical expertise on this tool but believe me, it was worth learning.
Moreover, the machine is very easy to use, and it has a simple setup process, which I have already covered in this blog. My intention in writing this blog is for beginner crafters who have just bought the machine and want to learn how to use it from the beginning. So, are you ready to join me on this journey of learning about the Cricut Maker from the ground up? If yes, let’s get started!
The Process to Setup a Cricut Maker Machine
When I got my new Maker machine, I was too excited to unbox it. But after unboxing, I had to set it up. In the beginning, I was nervous as hell! I really didn’t want to make any mistake that would cause a technical problem. But the Cricut’s guide finally helped me. In addition, the setup is also easy for different platforms like Windows, iOS, Mac, and Android.
To learn how to setup Cricut Maker on computer and mobile device, follow the instructions given below:
First of all, plug the power cable into the back of the machine and connect it to the power source.
Next, you have to connect the machine to the computer. Here, you can either use a USB cord or Bluetooth feature.
Now, open a browser such as Chrome and search for cricut.com/setup.
On the next page, you will need to download the Design Space and then install it.
Here, you can simply follow the instructions available to you on the screen and set up your account.
Finally, you will be notified about the completion of the Cricut setup.
As soon as we complete our setup, we are always prompted to perform a test cut. This is easy, and you can do it by following the steps given to you on the screen.
What Supplies Will I Need to Make a Custom Shirt?
Before I teach you how to use Cricut Maker, let’s discover some of the essential Cricut supplies needed for making a shirt. Here is what you need to make your own shirt on Maker:
Iron-on Vinyl Material
Cotton Blank T-shirt
Cricut Maker (or any other cutting machine)
LightGrip cutting mat (or Standard Grip mat)
Weeding tools
EasyPress
EasyPress Mat
I have specifically chosen the cotton shirt, which has smooth textured and high-quality cotton. It really works well with Iron-on vinyl.
Important Note: I would recommend pre-washing your blank shirt before applying the vinyl on it. In this way, your vinyl won’t crack if the shirt shrinks. In addition, pre-washing will help you remove the dirt or any impurity that can hinder the ability to adhere to vinyl on the shirt.
How to Use Cricut Maker for the First Time?
So, are you ready to learn the process of making a shirt on the Maker machine? If yes, follow the steps one by one:
Step 1: Create a New Design or Upload
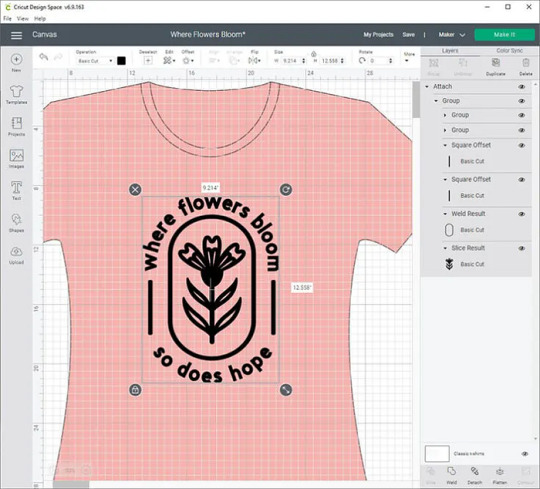
Step 2: Load the Vinyl and Cricut Mat
Now, you need to place the material on the mat for cutting. For this, you need to load the vinyl onto the mat. Make sure you are using the mat that has lost its stickiness a little bit. After that, you have to use the brayer tool to flatten and adhere the vinyl to the cutting mat.
Remember: The shiny side of the vinyl should be facing down. For patterned vinyl, the pattern side should be down.
Once done, you are ready to tap on the Load button to start the loading process of the cutting mat into the Maker machine. Next, you will need to send your design to the Cricut Maker.
Step 3: Send Your Design to the Cricut Machine
Navigate to the Cricut app and click on the Make It button in the top-right corner.
Next, select the toggle button to turn on the Mirror.
Afterward, you will be moved to the next screen, where you need to choose the base material. Choose the Everyday Iron-on from the list.
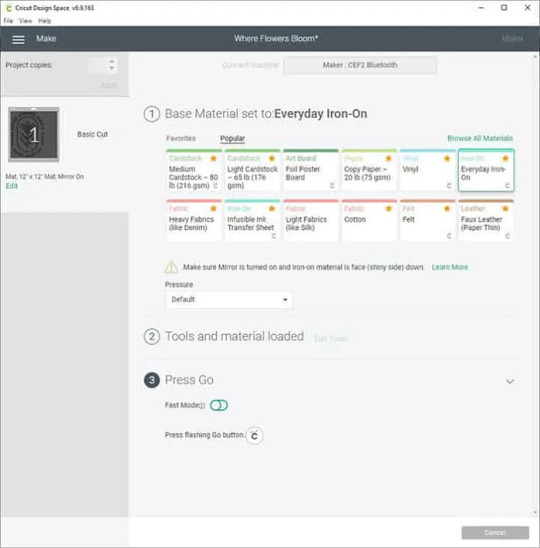
Step 4: Cut and Weed Out the Design
After choosing the material, you need to load the Fine-Point blade and the mat.
To start cutting, you need to press the Go button to cut the design.
Once cutting is done, unload the mat and weed the design using the weeding tools.
Step 5: Transfer Your Design
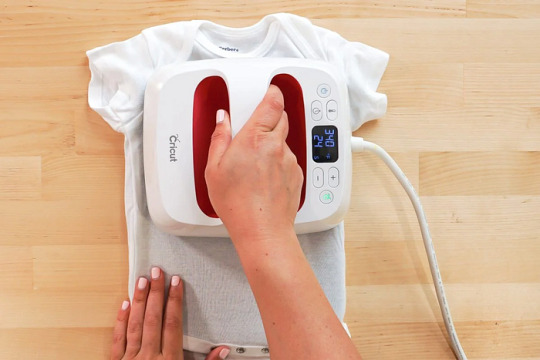
This is the step where your EasyPress comes into play. Preheat the blank shirt and then place your design on it. After that, set the recommended temperature and press gently on the design.
Wrapping Up
In this blog, I have explained to you how to use Cricut Maker along with the full setup process. This guide not only explores the setup process but also how to make a shirt using it. The process is easy for both setup and shirts. However, this guide can also help you if you want to add your design to a tote bag or any other fabric. The process will be almost the same for every project.
FAQs
Question 1: How to use smart vinyl with Cricut Maker?
Answer: Smart Materials doesn’t require you to use a cutting mat, making it easy to use. Below are the steps given that explain the usage of vinyl.
First, you need to load the material and ensure a 10-inch gap behind the machine.
Next, try to position the material. For example, keep the color side facing up.
Then, feed the material into the guides.
Now, you have to press the Load button and gently push the material forward.
Finally, it’s time to apply the vinyl on the clean, blank surface.
Question 2: How to use Cricut Maker for stickers?
Answer: Find the steps below to create amazing stickers using the Maker machine.
First, you need to create a sticker design on Design Space.
After that, print the image using a compatible printer.
Once you have printed the image, set the materials on the Cricut app.
Next, you should load the mat into the cutting machine.
After that, press the Go button to cut stickers.
Once the sticker is cut, unload the mat and remove the stickers.
Question 3: How to use pens with Cricut Maker?
Answer: In order to use the pens with Cricut Maker, you have to follow the instructions provided below:
First, you need to place the laser copy paper on a LightGrip mat and then load it.
On Design Space, create the design that fits your blank and assign a Cricut pen color.
Also, you must Mirror your design.
Then, browse all materials and then choose Copy Paper.
Insert your Infusible Ink Pen into Clamp A and hit the flashing Go button.
Once the design is done, you can unload the mat.
Read more: install cricut design space app
how to setup cricut maker
Cricut Design Space Login
Source: how to use Cricut Maker
#how to use Cricut Maker#Cricut Design Space Login#cricut design space#cricut.com/setup#cricut.com/create#how to setup cricut maker#install cricut design space app#cricut new machine setup#cricut.com sign in#www.cricut.com/setup login#cricut setup
0 notes
Text
How to Use Cricut Venture: Your Guide to Getting Started

Did you recently hear big news from Cricut? If yes, then you must be aware of what I am talking about. The company launched Cricut Venture for its customers, which offers more services than other models. Hello there, I am Reggie Mantle, and I am glad to welcome you again. Today, I am going to show you how to use Cricut Venture and step into the world of crafting.
Ever since this craft machine came out in the market, I had no chance and bought it immediately. Along with this model, I also received various supplies that will help me mold the project to my liking. Are you a new Cricut Venture owner but have no idea how to access it? Well! You have to save this guide and collect all kinds of info revolving around it.
How to Setup Cricut Venture on a Computer?
Before learning how to use Cricut Venture for the first time, it’s necessary for you to set up this craft machine with your PC. To help you out with the process, I have shared the steps that need to be taken while performing it:
Begin the process by turning on the machine and plugging it in with a suitable wall socket.
Next, connect both devices using a USB cable or pair it via Bluetooth.
After doing that, open your web browser and go to the Cricut setup page.
Now, tap the Smart cutting machine option and choose Cricut Venture from the list.
Following this, you need to download and install Design Space from the official website.
Also, follow the steps appearing on the screen and sign in or create your Cricut ID.
After filling in the basic details, you need to set up a new machine and hold on till the setup is going on.
Finally, when the setup is complete, you need to do a test cut and check whether the setup has been done correctly or not.
Following the finalization of the setup process, it is crystal clear that you need to have compatible supplies during the how to use Cricut Venture. Go through the below section of the blog and come across the supplies.
What Supplies Come Inside the Cricut Venture Box?
To give perfect formation while making do-it-yourself out of this crafting machine, all the DIYers need to ensure that they’ve all the supplies with them. Each supply plays a vital role in making the personalized project from the Venture cutting machine. In case you aren’t aware of the supply name, then take a look at the bullet pointers below:
Cricut Venture machine
Performance Fine-Point Blade
Cutting mat
Cleaning Tools
Cutoff tool
Roll supports USB Cable A & C
Mat support extension
Cricut Access 1-month free trial (for new subscribers)
50 ready-to-make projects
Smart Vinyl: Removable 13 in x 30 in (33 cm x 76.2 cm) in Black
Smart Vinyl: Removable 25 in x 6 ft (63.5 cm x 1.8 m) in White
All the crafters are highly advised to consider these products before using them for crafting purposes.
How to Use Cricut Venture to Make Custom Posters?
By referring to the earlier-said details, it is high time to introduce you to the technique required for making customized projects. In order to do so, refer to the information given in the paragraph below:
Step 1: Log in to Design Space and Draw a Design
Start your first customized project on this Cricut product by logging in to Design Space using your Cricut ID & password. After doing that, press the New Project option and choose any shape from the Shape panel. Next, unlock the size lock ratio and then set my shape using the arrow.
Following this, you need to press the Text toolbar and enter the text inside the blank. After entering the text, change your font style and create an offset of my design. To apply the offset, I am going to open the Offset tool section, make the changes, and tick the Apply button.
Furthermore, select the Ungroup option and change your text color depending on your preference. Now, add more shapes by pressing the Upload option and upload your chosen design from the Recently Uploads section. Afterward, I am going to ungroup and delete the additional part of the design. Now, resize the design and press the Duplicate optionto make extra copies of your design. You can also duplicate the design by pressing the command D on your system.
Following this, you need to increase your cake design > select the whole design, and press the Weld button. After doing that, you duplicate the cake design and change the color of the design from the Color Dropbox.
Next, press the Make It option, and you will get connected to the new web page of the Design Space. Following this, choose the On Mat, select mat size, and then tick the Confirm option. Afterward, tick the Continue option mentioned at the bottom right side of your screen.
Step 2: Load Your Material & Start the Cutting Process
In this how to use Cricut Venture step, change the pressure to Default and cross-check that all the tools and other accessories are loaded correctly. Now, install the support into your machine inside the back of the machine. After doing that, load your material > lower the lever, and press the Go button. Your machine will begin to cut the material and, after a few minutes, weed out the design from the mat.
Step 3: Stick Your Design on the Offset
After weeding out the design, take an adhesive gun, place it on the back of your design, and stick it on your offset. Press the design on the offset using the brayer tool, scraper, or with your hand, depending upon your choice. In addition, you are instructed to be careful while sticking to the design and avoid any kind of bubbles.
Step 4: Place Your Final Design on the Yard
In the last step of creating a customized project with this craft plotter, stick the letters on the yardstick using strong adhesive tape. After attaching all the designs, move out your sticks and start placing them in your yard, depending on your yard size. While placing the sticks, ensure that all the designs are aligned properly. Lastly, you can also decorate the design by hanging lights around your craft.
Conclusion
Whether you are a newbie or an experienced crafter, Cricut Venture is an advanced technology cutting tool that allows you to cut a variety of materials with precision at commercial speed. Wasn’t it amazing to see how to use Cricut Venture and make an amazing personalized project out of it? With this crafting machine by your side, you are capable enough to discover your hidden talent for crafting and share it with your friends, family and even in the community.
For more information visit: Cricut.com setup mac
cricut explore one setup
set up cricut machine
install Cricut Explore Air 2
Source: How to Use Cricut Venture
#how to use cricut venture#Cricut Venture#Cricut Setup#cricut machine setup#cricut.com setup mac#cricut maker setup#design.cricut.com#install cricut design space app
0 notes
Text
Cricut Joy: Your Guide to Compact Crafting Delight

Cricut Inc. has launched a ton of cutting machines for crafters, but the Cricut Joy is one of my favorite models. This small, compact, and portable tool hit the market in 2020. Don’t judge this mini machine, as it can cut 50+ different materials from delicate paper to artboard.
I have been using this Cricut machine for the past 7 months, and there’s no way I’m going back from it now. Of course, I am now obsessed with it and love to create countless customized crafts from it. As an expert, I will lead you to the right path to learning all you need to know about this Cricut Joy cutting machine.
What Are the Salient Features of Cricut Joy?
Before including this crafting machine in the craft room, it’s evident for me to ensure that you are well aware of this Cricut model. After I will make you across the features, you get to make a clear picture of what precisely the Cricut Joy machine is.Without wasting any more time, let’s begin by learning about its features:
To begin, this craft plotter is smaller in size and lightweight compared to the Explore and Maker series. Due to this reason, it gets easier to store in a tight place without damaging its corners.
Since it is lightweight, it gets easier to carry it anywhere, either while going on a trek or going to someone’s home. Now, to keep it safe while traveling, you can keep it inside its tote bag.
In addition, this Cricut Joy comes with fewer supplies, making it easier for the DIYer to transform their DIY creative ideas into the real world.
Equally important, it supports Smart Materials, which means that you won’t need any cutting mat while using this material.
On the other hand, this craft plotter has its app, known as the Cricut Joy app, which helps the user connect mobile devices with this machine via Bluetooth feature.
After grabbing this Cricut cutting machine’s essential features, it is time to make you learn about how you can use Cricut Joy to create a do-it-yourself project.
Easy Guide: How to Use Cricut Joy?
Further adding to the blog, I am going to make you learn about how to utilize this cutting machine and create a personalized project of your choice. Let’s begin the process of how to use the Cricut Joy by going through the below steps:
Step 1: Open the Cricut Joy App and Choose a Design
First, I will turn on my mobile device and open the app. In case you don’t have the app, then get it for free from the App Store or Play Store.
After opening the app, I am going to press the Start option given under the Quick Labels section.
Now, press the Start Making button, select the label of your choice, and tap the Next option.
Next, I will change the size of your label and enter the text inside the Enter Text blank.
After making the necessary modifications, tick the Next option given on the top right side of a new page.
Step 2: Load the Material to Your Cricut Joy
Now, I am going to select the compatible materials from the Select Material screen.
Following this, press the Make It button appearing on the right side of your Cricut Joy app.
Afterward, unbox your smart material and gently insert it inside your machine.
Next, connect your craft plotter with your mobile phone via Bluetooth and wait till the wireless connection process is going on.
Step 3: Start the Cutting Process
After the connection process comes to an end, I will insert the pen inside the clamp and Cricut Joy.
Now, turn on the craft plotter, and it will begin to draw the label on the smart material.
Following the completion of drawing the design, I will remove the pen and again insert the blade in the same clamp.
Next, I will press the Go button on the app to proceed toward the final step.
After the drawing and cutting process will come to an end, I am going to unload the mat slowly.
Step 4: Peel Off Your Design
After unloading the mat from the craft plotter, I will cut the extra mat using a Cricut scissor and save it for future projects.
Now, I will peel off the final design from the cutting mat and place it in the center of your jar in a proper alignment.
Lastly, I am going to use a scraper tool to get rid of any bubbles or wrinkles on the label.
Summing up this post, as an expert, it was my responsibility to introduce you to the Cricut Joy machine as well as its features and how it works. By considering the above-said details, it will likely get more straightforward for you to access this cutting machine and create different personalized projects within minutes.
Final Words
Through this blog, I covered most of the things that were helpful in learning more about this craft plotter. This ultra-compact smart cutting machine can make fun and functional projects within 15 minutes or less. Besides, the Cricut Joy is compatible with all materials as well as Smart Materials. Some of the famous DIYers love to make various projects out of this craft plotter.
For more information visit: cricut.com/setup joy
cricut maker setup
download cricut design space
Source: Cricut Joy
#cricut.com/setup joy#cricut maker setup#design.cricut.com#cricut machine setup#cricut joy machine#cricut joy cutting machine#cricut joy app#how to use cricut joy#cricut joy#cricut joy xtra
1 note
·
View note
Text
How to Use a Cricut Mug Press? [A Comprehensive Guide]
Are you curious to learn how to use a Cricut Mug Press? Well, this guide explores everything you need to know about the use of this machine. With this ultimate guide, you will be ready to use the Cricut Mug Press easily without anyone’s help. However, the Cricut Mug Press is a perfect choice for people who want to create a customized mug with pro quality.
This fantastic tool is compatible with markers, pens, and Infusible Ink transfer sheets. You also need a Cricut Design Space to create a design that can be further cut on the Cricut cutting machine. Moreover, you will need different materials, such as HTV and Infusible ink, to get desirable designs on mugs. After that, we will learn the process of using the Mug Press with step-by-step instructions. Let’s dive into it.
Step 1: Supplies You Need to Use Cricut Mug Press
Before learning how to use a Cricut Mug Press, you first need to know the requirements of supplies. These supplies are essential for using the Cricut Mug Press.
A desktop or laptop for setting up your Mug Press.
You can use any Cricut machine (Maker series, Explore series, and Joy).
Cricut Blank Ceramic Mug
Lint Roller
Butcher Paper
EasyPress mat or heat-resistant surface.
Infusible Ink Transfer Sheets and Infusible Ink Markers/Pens.
Oven Glove
Heat Resistant Tape
Laser copy paper
Step 2: Set Up Your Cricut Mug Press
In order to learn how to use a Cricut Mug Press, you must know about the Cricut Mug Press setup.
Follow the steps carefully to set up the Cricut Mug Press:
Insert the power cable into the back of your Cricut Mug Press, followed by a USB cable. Insert one end into your machine and another end into the computer.
Open the Cricut Design Space on your computer or laptop.
Then, select New Product Setup from the right-side menu.
Afterward, select Heat Press, followed by Mug Press.
You can follow the displayed instructions on the screen to download any updates you need.
While following the instructions, you will need to continue the Activate button to activate your Mug Press.
After this, the update will be completed.
Then, you can unplug the USB cable.
Now, your Mug Press is ready to use. Let’s learn how to use a Cricut Mug Press.
Step 3: Use the Cricut Mug Press
The Mug Press is relatively easy to use. After setting up, you can easily create a pro-customized mug. You can choose the design from Cricut Design Space. Always ensure that you choose the design with the exact size that fits your mug.
Once you have selected the designs, start cutting them using your cutting machine. Make sure your design is mirrored before the cut. You can follow the design given below.
After cutting the material, weed the unwanted materials.
Ensure your mug is clean and there is no dust present on it.
Then, place the design around the mug.
Afterward, you have to place the Cricut Mug Press on an easy press mat or any other heat-resistant surface you have.
Press the power button in your Mug Press, and the button will light the green color.
After that, you will hear the beep sound, meaning it is ready to use. However, you don’t need to set any temperature as it is already smart enough to set the temperature automatically.
Then, put the mug into the press.
It will take 6 minutes to sublimate the design onto the mug.
Finally, it will beep when it is done.
Turn off the device and take out the mug using gloves.
Final Words
In short, you should understand that a Mug Press alone can’t help you customize your mug. For this, you need various types of supplies that we have already mentioned in this post. Once you have all these items, you can proceed with the setup process. For this setup, you need a laptop or computer with a Cricut Design Space. When you are done with your setup, your Mug Press will be ready to use. Finally, you can design your mug like a pro!
FAQs
Question 1: How much time does a Cricut Mug Press take to heat up?
Answer: The only time your Mug Press will take to heat up is 5 minutes. After placing your mug into the press, it will take approx 6 minutes to finish it. However, the Mug Press produces a beep sound when it has finished its task. When you finally take out the mug from the press, it takes 15 to 30 minutes to cool down. Therefore, you must be cautious while taking it outside.
Question 2: Do I need a computer to use the Cricut Mug Press?
Answer: Well, you don’t have to rely entirely on a computer to use the Mug Press. Still, a computer is needed when you want to set up or activate your Cricut Mug Press. Also, you can update your firmware using your computer or laptop. All this is done when you connect your computer to your Mug Press via a USB cable.
Question 3: Is a regular mug compatible with the Cricut Mug Press?
Answer: There is no issue using your regular mug until it is made up of ceramic. Other than this, no materials should be used, such as stainless steel, plastic, etc.). Plus, the mug must be coated with sublimation material, which is suitable for your printer’s sublimation ink and Infusible ink. In short, the regular you buy from a local store is not going to work with the Cricut Mug Press.
Visit - Cricut.com/setup
Cricut Design Space Login
Cricut maker setup
Cricut Mug Press
Cricut Maker Machine
#Cricut Maker Machine#Set Up Cricut Machine#Cricut Mug Press#How to Use a Cricut Mug Press?#How to Use a Cricut#How to Set Up Cricut Maker Machine
0 notes
Text
Binderary 2024 wrap-up
When Binderary started, I hadn't touched any bookbinding since August when I broke my foot. Step one was getting my crafting space cleaned up enough to let me walk through it with crutches.
So my original goal was to get one single book done in the month, with a stretch goal of 4 total books, aka peaceful mode of the challenge.
I finished with seven total books, if you include the leather cover I made for my dnd notebook (which I do, it was complicated.)
Here are all my full books from this month on my shelf

I'm obviously most proud of my two large projects: the 999 script and the Planescape: Torment novelization. They were both involved typesets, and Torment was an experiment in binding style.
This month was about learning new techniques. From the entire k118 binding style, which I learned mostly from a couple blog posts, @spockandawe's advice, and at the end from the fantastic Binderary workshop on it. Plus I was using a guillotine for the first time, which I'm still getting used to.
And I very impulsively bought a Cricut Maker which arrived halfway through the month (thanks to enabling from Renegade folks and finding a used one for a good price.) So I had to learn entirely from scratch how to use that. My experiences with HTV Foil were BAD, but regular HTV is much easier. I then started working with stencil vinyl and paint, which was its own learning process, but worked pretty well on my leather books.
Meanwhile, I was also going through physical therapy for my foot and went from crutches to being able to walk unsupported in my boot, which is huge progress and made working on books much easier as the month went on. So this Binderary was a big time of growth and progress for me personally.
I also really love that Binderary is February because I get in a real creative slump in winter, and after two months of no creative impulses, Binderary always shocks me into high speed creation in a really nice way.
Thanks and love to everyone involved in planning and running this great event and everyone hanging out in the discord and workshop chats.
83 notes
·
View notes
Text


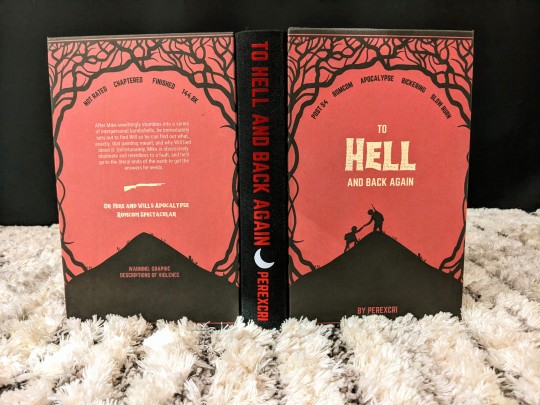
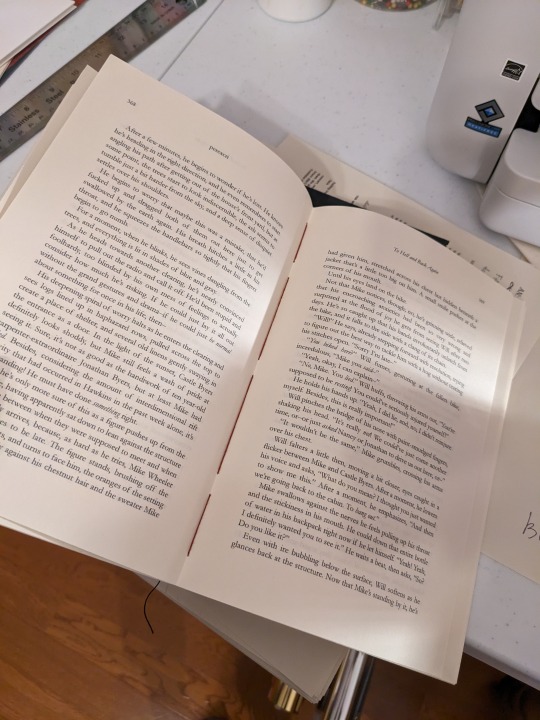
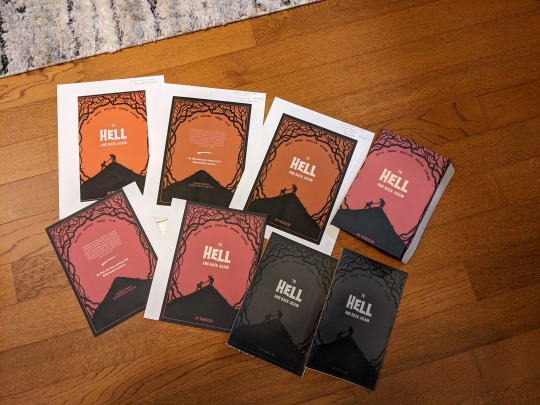
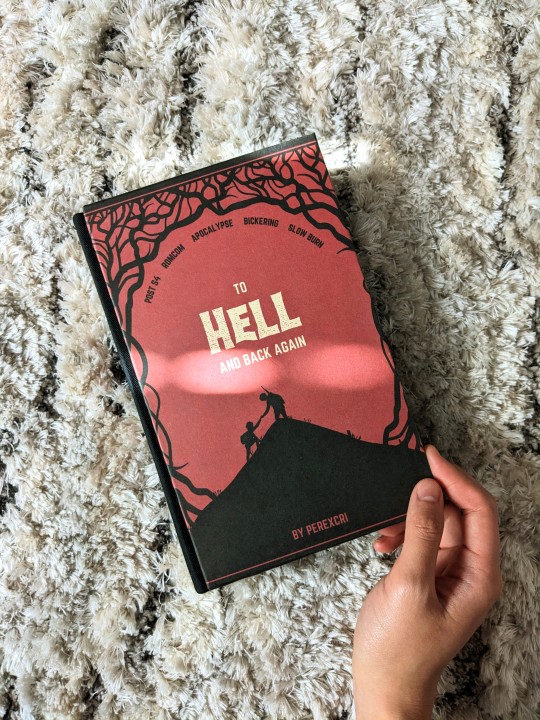
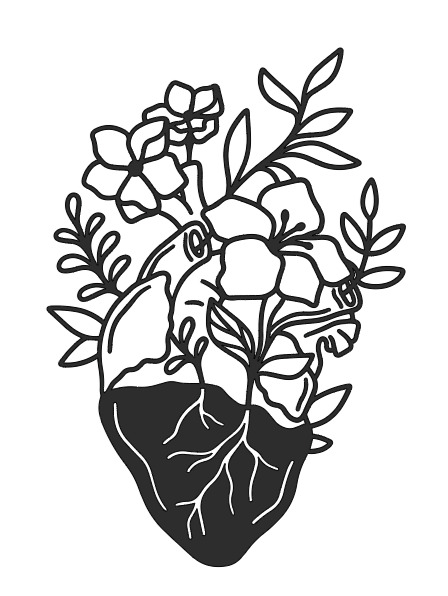
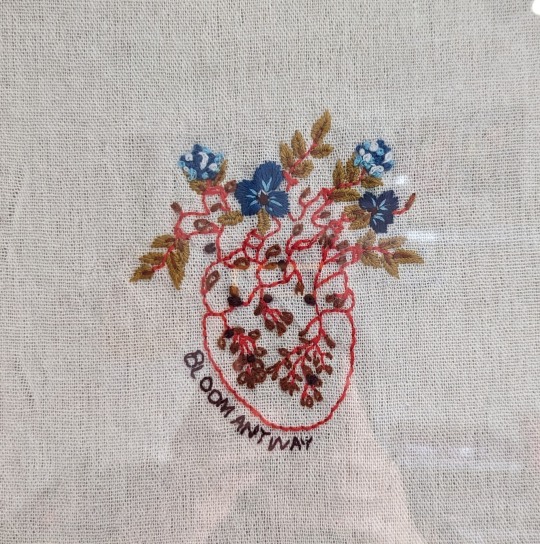
GUESS WHOSE BOOK ARRIVED TODAYYYYYY SO NOW I GET TO POST PICS!!!!
This is To Hell and Back Again, by dear dear @perexcri. Cover design by @byierficrecs (thank you SO much for letting me use your design!). Binding by me!
I'm not in ST fandom, but I had the pleasure of skimming this fic while I was typesetting, and can I just say? I'm rooting for these kids SO hard. I'd go to hell and back again for them--[GUNSHOT]
But in all seriousness, Leah's writing is whip-smart, sincere, and funny as hell. I cannot recommend it enough to anyone who is a fan of these crazy kids. Her ao3 is a veritable treasure trove of excellent byler stories, which you should absolutely check out right now go do it!!!
As usual, process chatter and more pics, under the cut! <3
WORD COUNT: 144k
FONTS:
Title: Hellprint
Heading/Chapter Headings/Spine Titling: Norwester
C4 Summary: Roboto Condensed
Main Body Text: Garamond
COVER MATERIAL: Epson Premium Presentation Paper Matte, printed on my Epson Ecotank (more on that later baha)
HEADBANDS: Trebizond silk thread in the colors Garnet and Black
EDGE PAINTING: Acrylic paint in Crimson and Black
TITLING: Red iron-on foil for the text and white HTV for my maker's mark. Cut by Charlotte, my Cricut!
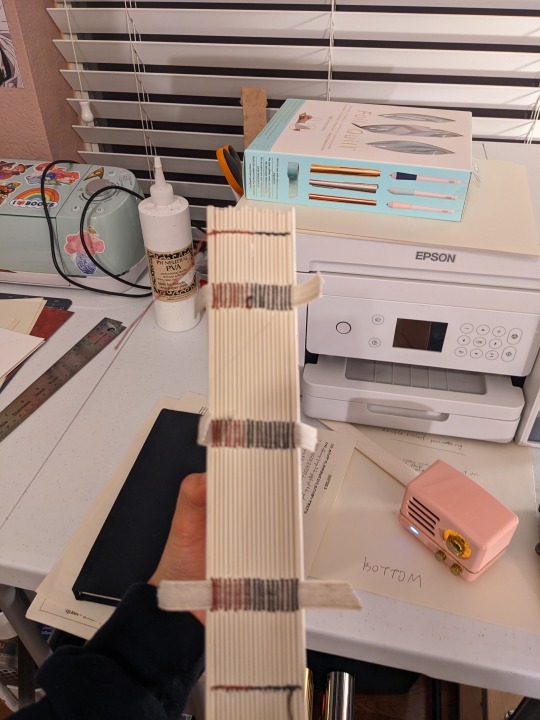
BINDING:
This was my first go at a German Bradel binding! I've seen lots of Renegade folks use this method and am so psyched I got around to trying it myself. I modified DAS's approach a bit and tipped on endpapers instead of sewing them in (there were a lot of new things to learn so I decided to shelve sewn endpapers for the next binding XD). I also only had 2.0 mm bookboard instead of 1.0 mm, so instead of layering two of the same boards like DAS did, I instead used one 2.0 mm board and one very thin piece of cardboard to create the groove for the hinge. The original article that DAS bases his video on actually uses boards of two different sizes too--a "thick" board and a "thin" board--but I still want to experiment with DAS's way of doing it, especially since I think it'll be easier to do cutouts on thinner board.
As far as matching the groove with the hinge, I think I did pretty okay for my first try! One board is definitely better fitting than the other though baha. There's always room for improvement, but hey that's where half the fun is anyway (and also you can't tell after the case-in whew), so I'm not stressed about it :D

COLOR SCHEME:
Nearly all of my design decisions for the color scheme were based off of @byierficrecs's gorgeous cover design! They were so generous in letting me use their cover and answering my questions about fonts, for which I can't thank them enough. And with so many wonderful elements to work with, it was so much fun to tease out the elements I loved from their work!
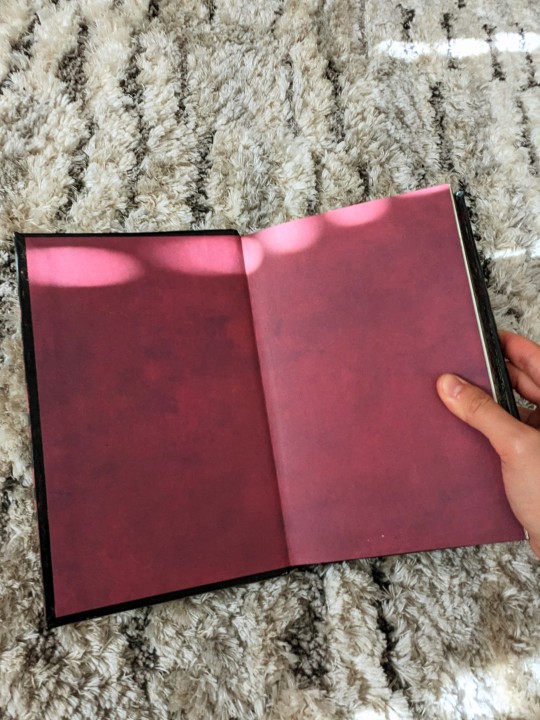
I decided to keep with the theme of red/black, which I also thought was fitting for a ST fic set largely in the Upside Down. Thus, black painted edges with red vines, as a kind of inverted, "upside down" continuation of the cover:
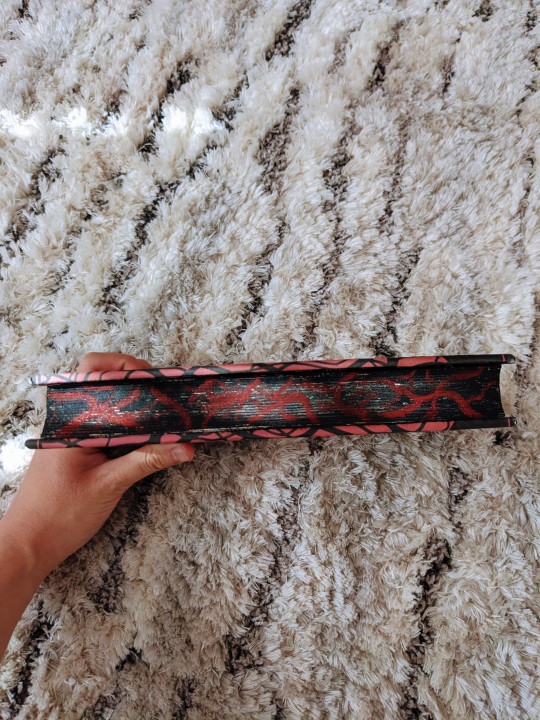

Even the thread I used to sew the signatures is red/black! :3 (please also ignore how the picture of the textblock is not focused on the actual textblock ajsldkfjs it was very late when I took that photo)
COVER PRINTING:
This was my first time printing a cover on my new printer (!!!), and BOY oh boy was it an adventure. Figuring out the dimensions took a second, but not as long as it took me to figure out what settings produced something I was happy with. Behold, all my test prints:
Very long story short, let's just say now I understand why being a prepress color specialist is literally a career you can have in publishing LOL.
Also, for some reason I could only sometimes get the bleed to work? Basically what I ended up doing was painting over the parts where the design didn't quite extend over the turn-ins, using with the same black acrylic paint I used for the edges. You can see this more clearly in the photos I took of the groove, and the endpapers covered the messy bits when I cased in:

THE MAIN INGREDIENT: LOVE
Finally!! The most important part of the process!!! HI LEAH ILY!!!! This fic is special for a lot of personal reasons, but chief among them is LOVE!!!! Your A/N's made me tear up when I first read it, because AH! You read my words of love!!! And went and wrote hundreds of thousands of your own words of love!!! And now I hope I've given that love back once again :3 And on and on we go, ad infinitum, until we are relieved of the curse of literacy and greet whatever comes after all this, thanks be to Todd. But until then, I'm so glad I get to shoot holes out of bagels and scream about radioactive tumblr posts and cry over fake people with you, friend :] Truly, peace and love on FUCKING Planet Earth. We are making it and we will all go together when we--[ANOTHER GUNSHOT]
I'm so excited to see where we're going, and what other stories we have to tell. But for now: EEEEEEEE YOU WROTE A BOOK!!!!!!!
<33333!!!
#Stranger Things#Byler#bookbinding#fanbinding#ficbinding#To Hell and Back Again#perexcri#friend fic!#<333
313 notes
·
View notes
Text

So I painted my yoga mat... I'm including the process and credits below the cut.
So, I have been wanting a cork yoga mat for a while. Do I need one? No. Will I pick up yoga again for a month and then quit? Hopefully not, but likely yes.
Every time I get back into yoga, I start looking at cork yoga mats because they're grippier and also very very pretty. The only problem is... they are friggin' expensive.

I first was attracted to cork yoga mats because of some of the really amazing designs, but I can't afford this shit. Instead, I settled for a cheaper cork yoga mat that is plain, and I thought that if I saved up enough money and still cared about yoga enough to buy a fancy one, I would.
But then I got to thinking... could I paint my yoga mat? And the answer is yes, yes I can.
I originally got the idea when I read online of other people doing this to their rubber and PVC mats, so you do not need a cork mat to do this!
Buying the Mat
Even an inexpensive cork yoga mat is still far more than I've ever spent on one before, so I had to choose wisely. I ended up choosing the Gaiman cork yoga mat, which is about 5mm in thickness. It's roughly 68 x 24 inches. One thing I had read is that cork mats can get quite heavy, but this one is pretty lightweight while still being cushy. I was really tempted to use it right away, but I didn't want it to get dirty or oily before I painted it.
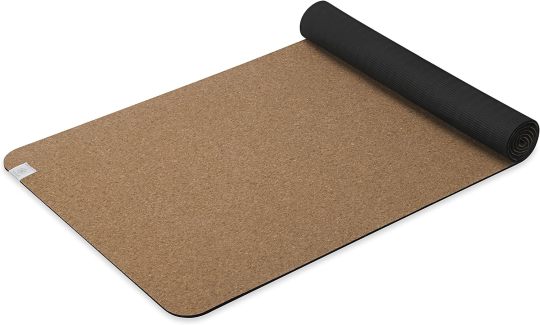
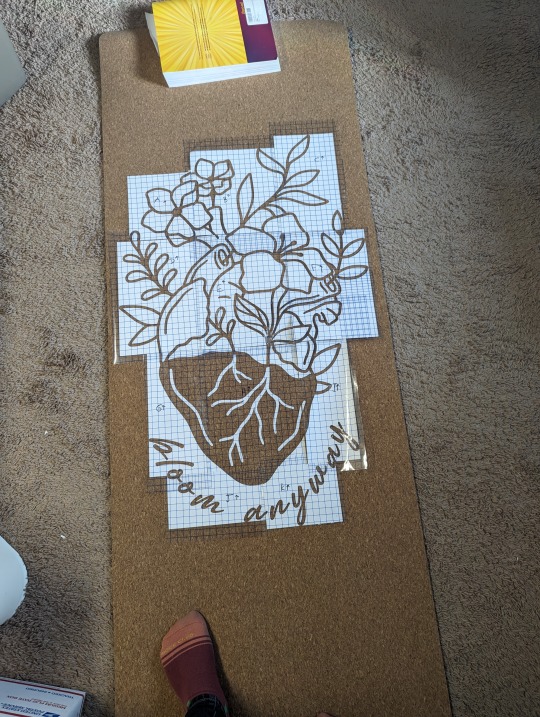
The Design
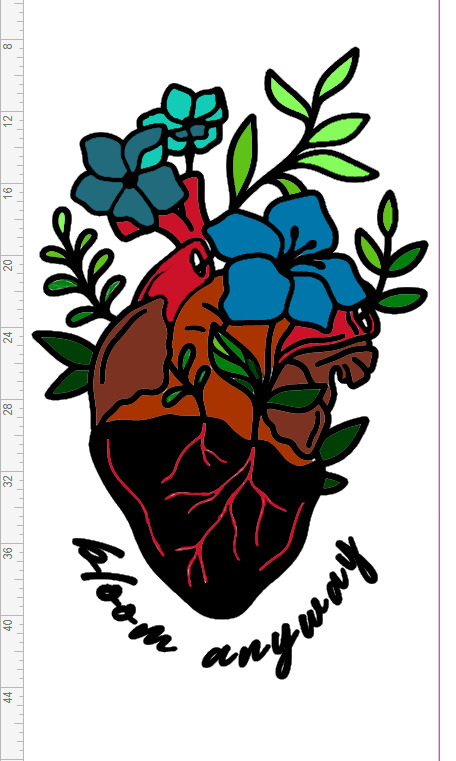
I am not an artist. I cannot draw well enough to freehand something confidently. What I do have is a Cricut Maker. If you don't know what a Cricut Maker is, it's an ill-advised purchase that I got secondhand and is actively ruining my budget. Depending on the model, it can cut out designs on a variety of materials, such as vinyl or infusible ink and can even tool leather. I used cardstock for this project to cut out stencils.
There are many free SVG templates out there as well as images created by other Cricut Makers that are only .99 each. There are many, many other places where you can purchase designs as well, or you can create your own! I am not talented enough to create my own design.
I tried several free SVGs, didn't like them, and then stumbled on this on Design Space, the Circut Maker program/shop. To quote Macklemore, "But shit, it was 99 cents!"
The image was designed by GlamSVG by Emylia and the inspiration came from an embroidery pattern by Emily June, which you can find HERE. I went through an embroidery phase during quarantine, and I have mine hung on the wall. I look at it daily.
I had to resize this image to fit my yoga mat, which ended up being 24 x 36". Because I cut the stencil out of cardstock, I had to segment everything into 8.5x11 pieces, cut, weed, and then piece it all back together on the mat. Once I had all the pieces, I stuck them to transfer paper to keep the floating segments in place. I organized and labeled everything so I could put it back together again easily. It looked like this:
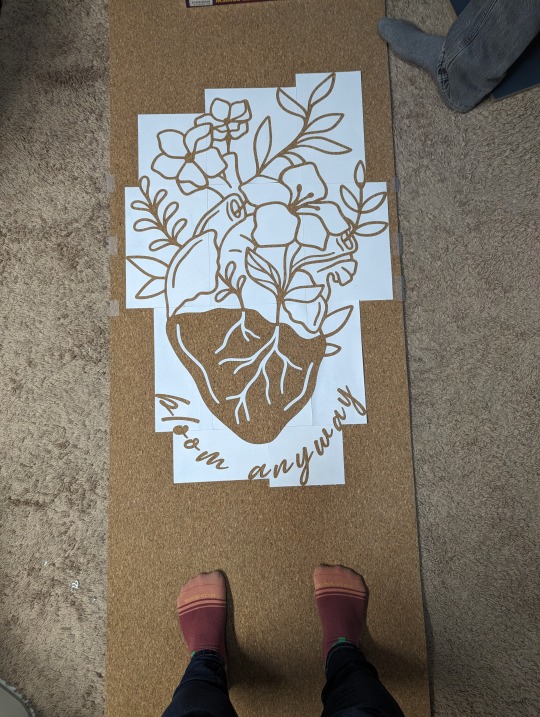
Once it was assembled, I sprayed the backs with temporary adhesive so the stencils would stay down. I removed the transfer paper and began painting the outline. I did end up losing a couple of the floating pieces (see the letter O and the leaf on the far right side), so I had to freehand some of it. Overall, the stencil turned out great!
I had a variety of success with the temporary adhesive. Because I bought a more inexpensive mat, I soon discovered how not durable it is. The 'temporary' adhesive pulled up small pieces of cork after I removed the stencil. This was partially my fault, since I didn't pull up the stencil as I went. Still, there were pieces that were going to lift anyway. This revealed that the cork is only one layer, but fortunately, each piece of cork that lifted was quite small and unnoticeable, and the thread behind it matched in color. It wasn't ideal, but I could live with it.
Some of the cardstock became permanent fixtures on the mat, which I then had to paint over. Also, some of the stencil didn't stick at all, so I had minor bleed through. Problems all around! But it still turned out nicely!
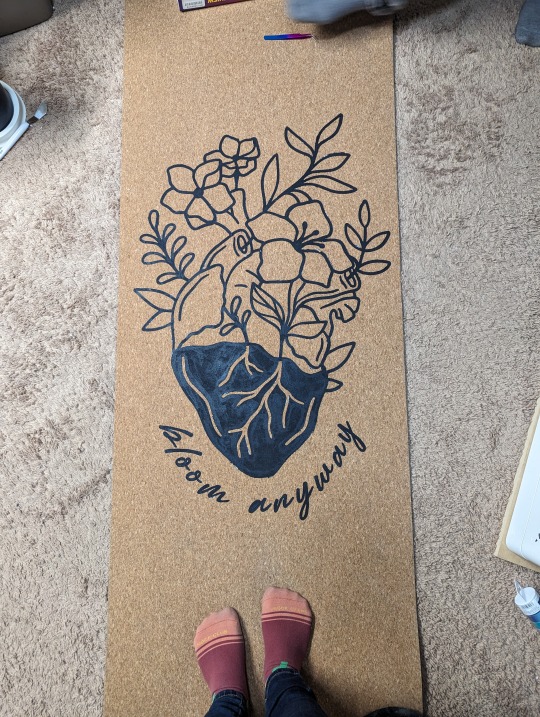
I need to preface that I have never painted anything before. Well, that's a lie. I've painted a wall, and six years ago I had a Bob Ross themed birthday party. The SO, however, is the son of an artist and taught me about mixing acrylic. His first tip was to test out colors. I used Paint.Net and came up with this mock-up:
I knew I wanted the heart anatomy to be shades of red, so that was easy. The flowers were harder. I tried my favorite colors, like yellow and purple, but it didn't sit right visually. I turned to Canva Color Wheel to help me find complementary colors to the shades of red I wanted to use. That's how I came up with the pretty blues. To mix the colors, I used ColorHexa to show me the percentage of CYMK I needed.
Here are some progress shots:
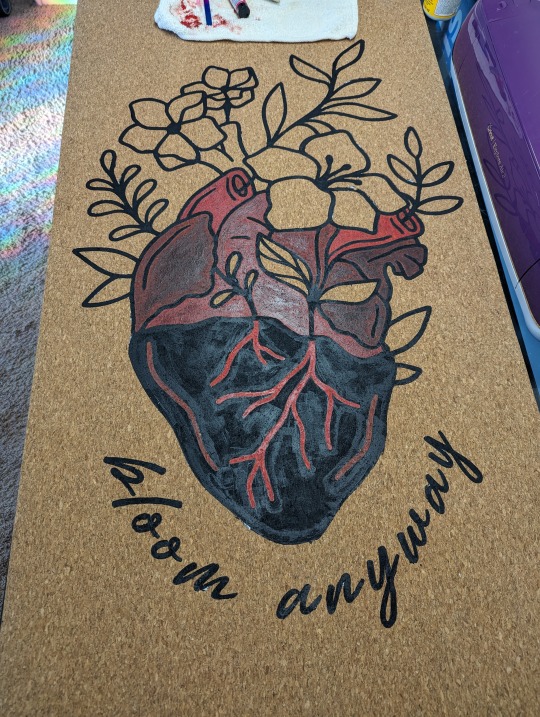
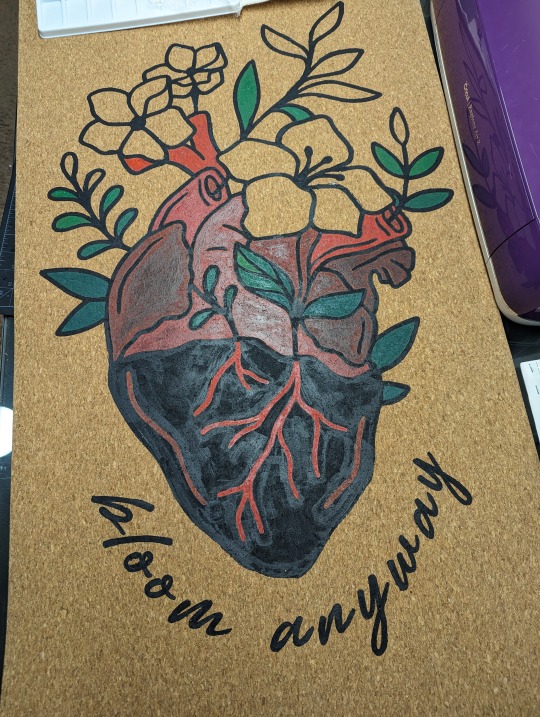
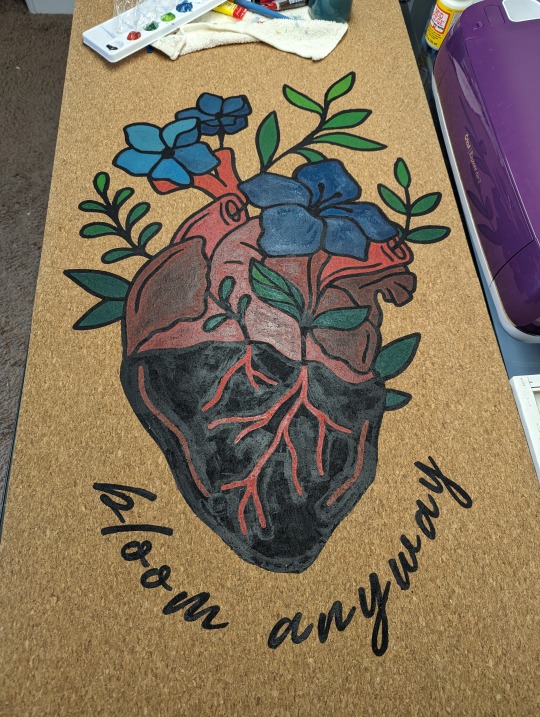
I'm super happy with how it turned out! My color mixing didn't turn out exactly like the mock up, but I love the results. The last step was to let it dry for at least 48 hours. Then I set it with Mod Podge Acrylic Sealer.
I chose Mod Podge since it's non-toxic, and I will be putting my face on it. Also, my dogs walk on it while I do yoga. They think it belongs to them. :) Knowing now that there is only 1 layer of cork, I do worry how it'll hold up to dog nails over time.
Lastly, the real test was to see if it would roll, and it does! So now I just need a yoga strap, and I'm good to go!
17 notes
·
View notes
Note
Hi! I saw your binding of "clear and muddy loss of love". And listen I'm not familiar with the work and all that, but how did you do that fantastic foiling if you don't mind me asking? Is it hot foil, or glued foil? And how did you get it to be so even! Did you maybe use the method with a laminator? Because I didn't know you could do that onto bookcloth, thought it was paper only? I have only a single line tool and its really difficult to get thicker text/patterns
It's no problem at all!!! So, almost all of the foil work I've done in bookbinding is through a medium of a cricut and a hot iron. I've got a foil pen as well that I'm trying to improve with, but I think I've done only one color there so far, and I don't know if it'll ever reach the crispness of what the cricut is able to do for me (though I'm not so sure about that after seeing some of the other work people have done with it!), but I'll elaborate on what I know about options really quick.
I'm not sure if the cricut foil exaaaactly fits into either the hot foil or the glued foil categories, because it's not just foil, it's foil with a heavy vinyl injection. It does have a heat-activated adhesive binding, but at one point, I tried using it to foil the edge of a book, just to see what would happen, and it FUSED the edges of that sucker together. It had definite stretch to it as I attempted to pull the thing apart, and was generally stronger and held its shape more aggressively than the true foils I've tried.
The cricut method is really easy for getting that crisp effect, but it is a bit tricky in terms of expense, if you don't have access to one. I usually use my system fonts to determine the shape of the letters I want it to cut out. For the front covers on this binding, I arranged the chinese characters for the title, volume, and author in a space the size of the measured covers, and was able to tell my machine to cut it out of the foil. Then I weeded out the bits I didn't want, and ironed the rest onto my bookcloth. I did a similar thing for the spines. It means everything was precisely shaped according to the nice vectors on the computer, all I had to do was remove the bits that I didn't want and iron it on in the right place.
It's not totally foolproof! I have some early books where I went WAY overboard with the heat and melted some of the plastic cover into my bookcloth. If you don't fully iron everything and move too quickly, you can stretch or twist half-ironed characters or leave awkward marks. And it's not a problem I've had, but I hearrrrr some people have had trouble getting the foil to stick to certain bookcloths.
It's expensive to purchase a cricut, but the silhouette is a comparable brand of 2-d cutting machine that runs a bit cheaper (but has basically the same functionality), and the cricut joy is smaller and cheaper than the big maker models. If you have a friend with a cricut, they might be able to letting you use it if you bring your own foil, maker spaces frequently stock cricuts, and at least some libraries in the us have started carrying them.
And I can't speak to laminators at all (some people print on bookcloth, so using toner-activated foil, it... might work? but i'd be worried about how evenly it would adhere). But foil pens! Part of what intimidated me bad about these was the prospect of using them to freehand what I wanted to draw. But when I went to scope out some demo videos on youtube, it turns out that the bible journaling community specifically has a lot of interesting content on their capabilities. Bible rebinders are also the best resource i've found for yapp edges, so i don't know what it is about these places that fills them with niche information useful to me specifically XD
But if you check out this video where I've started it (shortly after the three minute mark)
youtube
It works PRETTY well to use these heat-activated foils through a layer of printer paper for tracing. That's how I did the cover for 'i'm gonna love you with my hands tied,' which was... basically my first time using the foil pen for anything! It's not super crisp, partly because I picked a VERY detailed image with zero experience, and partly because I was lazy and didn't glue my layers in place well, but I've seen people get MUCH more striking results than mine with a little more practice and patience. It takes some time to fill in big surface areas, but for something like titling, printing the layout on a piece of paper and tracing it with the foil pen can take you to some good places!
With my equipment options, the cricut is usually the easiest by far, which is why I've made very little progress with the foil pen or gold tooling. But there are other choices without having to plonk down money for a big fancy machine! Hopefully something in all that rambling is useful to you, haha. Best of luck!!
30 notes
·
View notes
Text
This is probably like. A weird thing to be concerned about, but like. The degree of polish and like. Quality in some of the recent entries to the V/H/S franchise sometimes is like… intimidating and feels like. I mean I don’t wanna tell people specifically to be worse at film making or anything, and it’s not like I think anyone broke rules making their entries I don’t think. But I think I mostly mean this to say towards audience members sometimes, ‘cause a lot of V/H/S is kinda *supposed* to be lower budget and experimental in comparison to blockbuster movies or whatever. That’s why the first one has that like “what the fuck?” Aspect to some of the shorts, they kinda feel like student films, because they were like… “gather some people up, get some relatively affordable equipment you can maybe rent, and go film on a rented set or out in the woods which is mostly free”
It feels cheap because it is cheap, and the cheapness makes it have that exact kind of horror vibe it was going for by being VHS. The more polished and high budget and impressive it gets, the less it feels like an experiment in cheapness.
I think there’s a really strong charm to the shorts that feel a little like “film makers create a student film” and I’m not using student film as an insult because I think there’s something really interesting and raw to the like. Sets and characters and costumes put together when you’ve got really really passionate, but broke and unpolished creators? When you’ve got like the cameras and equipment rented from the school and you’re filming it in the weird woods by your old house because you always thought they looked cool and wrote a lot of stories there anyway and now you’re trying to make one of them into a reality and the makeup person might just be your friend who spends too much money at Sephora so everyone voted them to be in charge of makeup and now they’re having a nervous breakdown because they only know how to do their own makeup and they’re looking up tutorials online for blood effects and actually really pulling it off and maybe figuring out something new about themselves.
One of the biggest personal expenses turns out to be a Cricut machine for the prop department but then the fact you don’t have to worry about carpal tunnel taking out your prop and costume department does make up for it eventually. Also someone made you a custom graphic T and you stop grumbling about the budget for a while.
Chances are also probably good you made a deal with the local produce shops to take the cabbage and melons that go bad for reduced price if you’re making a movie with violence, for all the free sound effects available online, it helps to have something live on the day. And head of cabbage or a melon works good on a low budget set.
It has been like two decades since I’ve been anywhere near even a low budget TV/Film set in Canada and I think some of these might be stage tricks instead. But still. There’s so much charm to them??? And it’s why I think a lot of horror fans love low budget horror.
(Also I should note, I was like. A youth working as an extra on a couple filming projects and took independent personal acting/filmmaking classes that taught me about aspects of the industry and tricks of the trade, but I never got super deep into anything. I saw how stuff was done and did some amateur filming projects which is how I learned how to fake things, but I never learned how big budget things were made. Everything I ever learned was cheap corner cutting for people making things on grants or for the passion of arts, not… uh. Millions or hundreds of thousands of dollars. I learned small Canadian Arts Film, not Hollywood Filmmaking. They were… not all encompassing and I am not positioning myself as an expert in anything… just… running my mouth like a know-it-all honestly.)
And like. I think most of V/H/S still accomplishes a lot of it. Praise Ratma.
It’s probably just a couple like… big sensational show stopping shorts by directors who really know how to work with their budgets more than like… any kind of change to the system. And the fact that I like it when it’s kinda messy and sloppy and shows the seams and the actors aren’t super great and the premise feels a little half baked? Not… fully bad because that “actually the cult was fake and the raid was a ploy by us, the sexy lady cops who are actually… big name sexy snuff film peddlers who’ve been profiting from all the sick twisted videos you’ve been watching and we’re gonna make out while killing you” was like. Running a full sprint into a wall, like they almost made it and then they just made a really bafflingly bad decision in the final moments to like. Completely derail that train at the station and I don’t think anyone was satisfied with how that ended.
I don’t think I have the most solid of a point, really, except that a lot of films are very big and polished and expensive lately. And horror is one of those last bastions of “no budget? No problem.” Mindsets. And I kinda love it for that. And I wanna see it continued. I wouldn’t mind it catching on to other genres again because too much of everything has to look and feel and seem high quality making the barrier to entry nearly impossible to pass. But, I hope V/H/S maintains its cheapness because it’s kinda integral to keeping horror accessible. It’s good, it’s fun, it’s experimental, it creates access to new voices.
Yeah going back to the early entries some of it is like “wow that’s pretty gross” but like. There’s a reason most of those characters died horrible deaths. They were shitty garbage trash people on purpose and you were supposed to hate them so when they were brutally murdered you didn’t feel too bad about being like “ohh my got holy shit” and probably doing the mix of laughing and wincing and screaming when the rapist gets his dick literally ripped off and thrown across the room you don’t really feel that terrible about your fear response also being kinda giddy and giggly.
I am overthinking this. Idk. I love this franchise. I hope it lives in cheap gritty gross weird glory forever. Anthology Horror is such a good genre.
#v/h/s#pointless navel gazing#I don’t know I just love weird shit#I wish more people were able to make more weird shit#I wish more people funded cheap horror anthologies and put them on large platforms#I need more small creators to get the chance to be experimental without huge risks#anthologies are perfect for that because you don’t have to have the whole thing riding on you
2 notes
·
View notes
Text
7 Cricut Maker 3 Leather Projects to Enhance Your Style

Hey, are you looking for some unique Cricut Maker 3 leather projects? Look no further than this guide! In this post, I am going to tell you the best DIY projects that you can create with leather. About 3 weeks ago, I finished my Cricut leather projects. I have aimed to make a few projects so that I could write this blog diligently. But do you know what was the most difficult part of this project? Cutting intricate designs on leather. Yes, it might not be easy to cut, but they require patience during both cutting and weeding such designs.
Without any further delay, let’s get straight into this blog to find out the most amazing ideas for creating leather Cricut projects.
1. Bracelets
Do you love bracelets? If so, you must give it a shot! When I was looking for ideas for Cricut Maker 3 leather projects, it had been on my mind for a long time. Finally, I gave it a try and saw how beautiful it looked. If you have any friends you want to give this bracelet to, it would be great!
2. Hair Accessories
Do you want something for your hair? You might wonder what I can make for my hair or other beauty stuff. Well, this leather accessory is also made with leather. As you can see, it might look a little tedious, but it is a piece of cake. Start diving into your Crafting journey and create what you need the most.
I gave it a flower shape, and if you are a little bit familiar with Cricut Maker 3 Setup, then it is a breeze for Maker 3 to cut such designs.
3. Earrings
I love leather earrings, as they enhance my beauty and are easy to create. Beginners who are looking for the best Cricut Maker 3 leather projects should try them out! Why? Because they are really easy to make. I also wanted to make them a little unique, so I added some glittery effects. This is what I needed, and hence, I made them.
4. Keychains
If you want personalized keychains, then here I have something for you! Whether you are a novice crafter or a pro, this keychain is easy to make. All I did was add some texts with different font styles to my Design Space.
Finally, after finishing my design, I started my Cricut Maker 3 and cut all the words Daddy and Daniel to make keychains. I handed it to my dad, my brother, and my dinner.
5. Crossbody Bag
Today, everyone wants to use a body bag, and what if you have a personalized one? Sounds like a great idea, no? I created this simple bag for myself as I am not much into personalized stuff. But you can have one if you want. The process of making this bag is easier, and you will need iron-on vinyl to make such a beautiful crossbody bag.
6. Monogram Keyring
Looking for super easy-to-make Cricut Maker 3 leather projects? Here is the monogram keyring that is most widely useful, and it would be great if you could give it a shot! This is a great beginner project, and any beginner should try to make something unique. I also used paint to color it to make it look stunning! Lastly, you can see the result in the picture, like how elegant it looks.
7. Cord Organizers
Every one of us uses earphones or a charger, but sometimes managing those clumsy wires is boring and tedious. So, I decided to create something that could organize my cords or wires. Here, you go with leather cord organizers, which I created using my Cricut. There are many cuts that I had to make, and I preferred my Cricut Maker to cut them as they are faster and provide precise cuts, making them look professional rather than handmade.
FAQs
Can I cut leather with Cricut Maker 3?
Yes, leather can be easily cut with Cricut Maker 3. It can also cut other materials such as fabric, paper, and balsa wood without any problem. In order to cut the leather, you have to use a knife blade, and the thickness of the leather should be up to 2.4 mm or 3/32 mm thick. However, you have to use a clean cutting mat with a sharp blue edge for better results.
What are the essential Cricut tools for cutting leather?
There are some common tools that you can use to cut leather. They are as follows:
Utility knife: This sharp knife is considered a versatile tool for cutting your leather.
Rotary cutter: This is a tool that comes with a wheel-shaped blade. Ideal for long and straight cuts.
Leather shears: A kind of specialized scissors idea for cutting thick and tough leather.
Round knife: It is a popular tool that is most widely used for cutting leather.
How thick can I cut leather with Cricut Maker 3?
If you want to cut the leather on Cricut Maker 3, you can cut up to 7 oz thick. The best thing about the Maker 3 machine is that it cuts anything precisely. In addition, cutting the leather is a breeze. You will also have to use a knife blade for all these leather Cricut projects.
Wrapping Up
As you went through the 7 Cricut Maker 3 leather projects, you might have found them easy to make. The best thing about these leather projects is that they are beginner-friendly. So, you will not need to worry about the complexity of the projects; just turn on the Cricut Maker 3 and prepare the leather that you want to cut. After cutting, the result will be fantastic and will stand out!
For more information and visit: www.cricut.com/setup login
cricut.com/create
Cricut Design Space App
Source: Cricut Maker 3 Leather Projects
#Cricut Maker 3 leather projects#leather Cricut projects#cricut design space download#Cricut maker setup#cricut maker 3 setup#Cricut Design Space Login#Cricut Design Space App#Cricut New Machine Setup
2 notes
·
View notes
Text
How to Make Gift Card Holder With Cricut: Full Tutorial
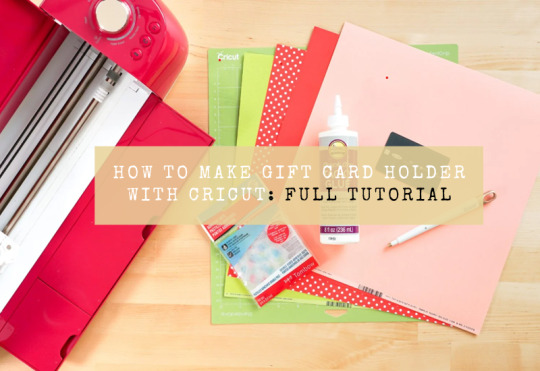
Are you curious to explore how to make gift card holder with Cricut? Here, I am introducing you to the complete tutorial on how to create beautiful card holders. This card holder will make your card-giving experience even more special!
For the last few weeks, I have been looking for Cricut project ideas, and finally, this cardholder idea suddenly came to my mind. One of my school friends, Olivia, moved to Germany last year for her higher education. Since then, I haven’t sent her any gifts, and her birthday is coming up soon. So, I am planning to write something on the card and also send a gift.
For that reason, I am going to make this gift card holder. Do you want to learn how to make it for yourself? Below are the steps given for making this amazing gift card holder. Let’s get started!
Supplies and Tools for Creating a Cricut Card Holder
So, are you ready to learn how to make gift card holder with Cricut? If yes, then gather the supplies I have provided below. Make sure you have essential materials or machines before starting your project.
Cricut Explore Setup or Maker
Scrapbook paper or cardstock (in four different colors)
Craft Glue
Blue LightGrip Mat
Gift Card
Gift Card Holder SVG File
Fine Point Blade
Scoring Stylus or Scoring Wheels (For Maker Only)
How to Make Gift Card Holder With Cricut Machine: 3 Easy Steps
So, let me take you to the steps below to help you create a gift card holder using the Cricut cutting machine. Before this, you must be ready with all the tools and accessories required to make this project. Now, let me introduce you to making a gift card holder with Cricut in a stepwise manner.
Step 1: Add a Gift Card SVG to Cricut Design Space
Look for the gift card holder SVG file from the internet or on Design Space itself. Then, add this to your Design Space. To add the SVG to your Cricut software, you have to follow the simple steps given below:
Launch the Cricut Design Space app on your compatible device.
On the lower left corner, you have to go to the Upload icon.
Then, choose your downloaded SVG file for your Design Space.
Now, I have added my SVG file to my Cricut app. As you can see in the picture below, this file includes the scoring lines.
Let’s click the Make It button in the upper right corner of Design Space. After that, you will see a Prepare Screen. Click Continue to proceed.
Step 2: Choose Your Material on Design Space
As you press the Continue button, you move to the Maker Screen, where you can choose the materials you use. In my project, I am using both scrapbook paper and cardstock. Besides, I have inserted the Scoring wheel into my Cricut machine setup.
After that, follow the screen’s instructions to cut all the different layers of your designs.
Step 3: Assemble the Gift Card Holder
Now, it’s time to bring all the cut pieces together and assemble them. You should first start by folding the paper along with the score lines.
I also used some glue to adhere to each side properly. I made it like an envelope.
Plus, I glued the gift card to the insert piece using glue. However, you can use the tape or another glue that you prefer. There is no specific glue that you will need to use in this project.
After that, I slide the insert card into my envelope.
Then, here’s the final touch.
Finally, here you go! It is done. Wasn’t that easy to make?
Now, you know how to make gift card holder with Cricut. By following these simple steps, you can make your own card older, too. This is a friendly craft, so everyone can easily create it.
FAQs
Can I make a Cricut card holder on Cricut Joy?
Obviously, yes! If your design is small in size, then you can prefer Cricut Joy for your card holders. You can go to the Design Space and search for the “Tear-Away Gift Card Holder” design from the free folder. Also, you will need materials such as a pen and marker that fit your cutting Joy. In addition, you need a blue LightGrip cutting mat.
What is the best method to create a gift card holder?
To create a simple gift card holder, you need to follow the methods below:
First, select a design from the Cricut Design Space or create one yourself.
Then, choose cardstock or paper to make your design on.
Then, lay it down on your Cricut cutting mat.
Start your Cricut machine to cut out the design
Next, fold and assemble the holder according to your design.
Finally, insert the gift card into the holder.
Which is the best Cricut cutting machine for cards?
I prefer using Cricut Joy as it comes with a special card mat. This is the only machine that uses this card mat, making it easier for all crafters to create cards effortlessly in less time. Also, Joy is famous for its compact and small design. Due to this feature, it is more portable and can be carried anywhere hassle-free.
Final Words
So, I assume you have learned how to make gift card holder with Cricut. In this easy-to-follow tutorial, I tried to explain everything using pictures so that everyone, including beginners, could understand what I was talking about. So, get all the supplies or tools mentioned above and start following the 3 steps I have provided in this tutorial. Only 3 steps are required to complete your gift card holder.
For More Information Visit: www.cricut.com/setup login
Cricut Design Space Desktop
install cricut explore air 2
Source: How to Make Gift Card Holder With Cricut
#how to make gift card holder with Cricut#cricut project ideas#cricut design space download#cricut design space login#design.cricut.com#cricut machine setup#cricut explore 3 setup#Cricut maker setup
2 notes
·
View notes
Note
hi there, i'm a fanfic-bookbinder, myself and i was wondering how you made the pretty cover with the golden letters in your post /715175729057382400/its-done-babys-first-bookbindingfanbinding :) the whole book looks really amazing and i'm always learning more and more. you mentioned a cricut in another post about the cover, and since i just got a silhouette, myself, i was trying to figure out, what exactly you used. :D anyway - it's so pretty!!
yes, i used a cricut maker! i just used the cricut design program to set up the text i wanted and used the machine to cut it from a sheet of adhesive foil
11 notes
·
View notes
Text
Lots of progress this weekend.
Firstly, the shoes are finished. I'd love it if I never have to make gladiator sandals again, personally. I had to redo the top of each one several times for fit, and I completely depleted the scrap fabric I was using to make these.
I also went ahead and finished the necklace. I've have the prism part done since about November or so but I was putting off doing the necklace because I hate foamwork. I really love the resin gem. I added glitter to the bottom when I cast it which creates a nice depth when the light hits it.
I managed to get it to work as a solid band around the back of the neck - not particularly important for Dimitri, who has hair that will cover that spot, but important for Felix, who my wife is cosplaying and who has a ponytail and will continue to have a ponytail as a genderbend.

Ugly seam is ugly, but it can be because it's hidden. The closure is magnetic and nestles behind the gem. The 5 mm foam is thick enough to hold its shape when pressed together, so I didn't need another stabilization point. Ideally, I would have liked to match the color on this for the felt, but it's hidden anyway and that was the closest color I had on hand that wouldn't give me an allergic reaction (I have wool felt in that color, but it would cause me trouble on my neck).

I got a chunk of beading done on the tabard sides, and added the last of the trim that it needed. Hopefully I can finish the beading on the tabard today. I also want to go in on the silver part of the skirt and add some silver preciosa bicones at some point.
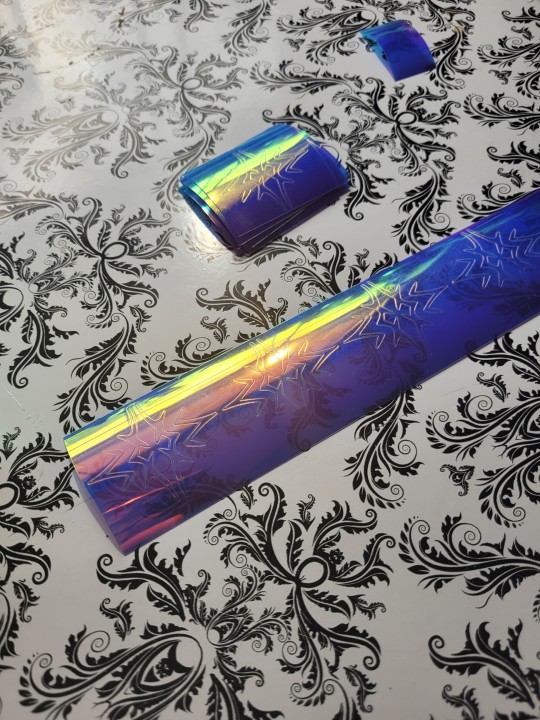
I think I finished everything that I wanted to do with my Cricut Maker as well. I cut 12+ crests for each of us in holographic vinyl (blue for me, transparent blue for her... they're both blue and transparent though). These will be on our dangles as an embellishment.
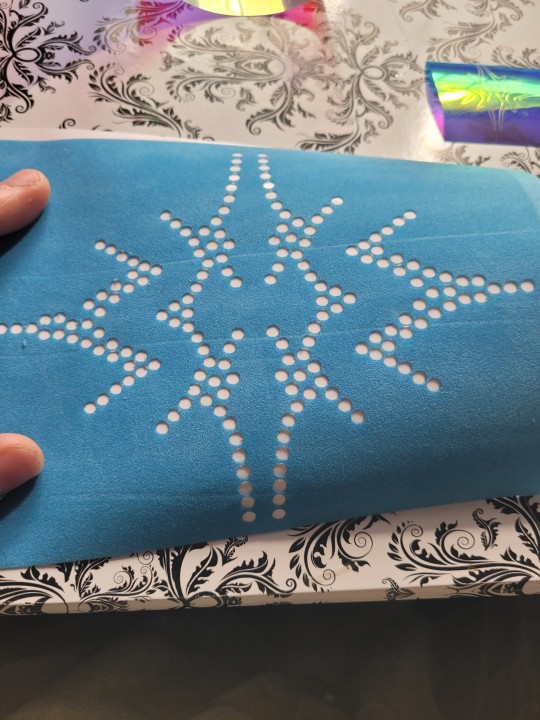
I also cut my rhinestone flock template. This will be used to add hotfix rhinestones to the bottom of the skirt. I'm planning to color match so it should be subtle.
In case you also have a Maker, I cut this flock without the paper backing, flock side up on a standard grip mat with the bonded wool felt setting, and ran it through twice. Once probably would have worked fine but I wanted to make sure it would work.
If you want to do anything with rhinestone templates, I can't recommend flock enough. It was pretty easy to design (I just went over the Blaiddyd Crest with dots the right size), mirrored and flipped pieces as needed, and cut it in my cricut. It worked on the first try with how I'd spaced everything. This is so much faster and precise than placing everything by hand would have been.
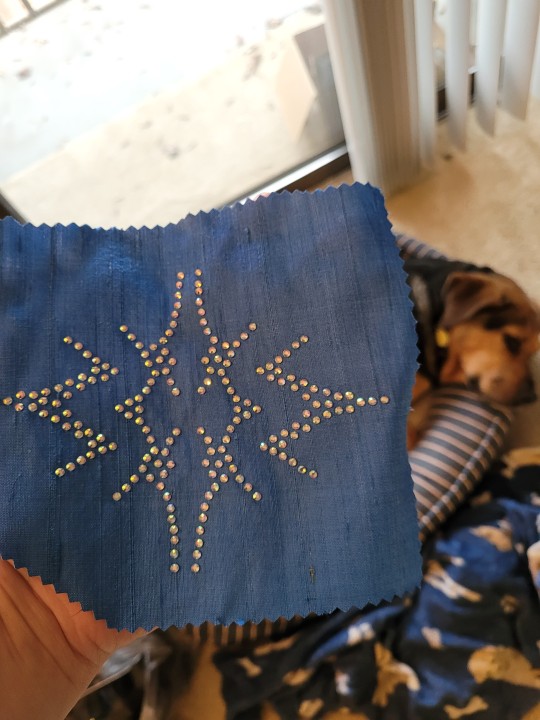
And here's the test on a scrap piece of dupioni with scrap rhinestones in the same size that came with my rhinestone brush. Unimpressed dog in background is unimpressed. 20 seconds at 320 F with my heat press at about 30 lbs of pressure did the job and caused no problem with the silk. Only one rhinestone of the entire design got displaced, which I adhered with gem tac (I didn't want to get my hotfix tool out).
👀 And not because I know from experience or anything, but don't use cricut transfer tape for rhinestone transfers. It isn't heat resistant and will try to melt on your heat press (I got it off in time).
Thankfully I figured out my rhinestone flock came with transfer tape so I'm all set tor doing this on my actual costume.
I won't be getting as much done this coming weekend because I'm going out of town Thursday night - Friday midday, then I have a friend coming in that afternoon from out of town, and on Saturday, I get my Byleth tattoo on my leg so I won't really feel like doing much after that.
2 notes
·
View notes
Note
Hi! Sorry if you've already done this, but could you maybe talk a little bit about how you do titles on covers/spines? They always look fantastic. Do you use something like a cricut machine for the letters?
thank you!! i'd be happy to talk about it especially bc it's been taking up a lot of room in my brain lately.
you're right, i use a cricut. i bought my Cricut Maker secondhand and it works quite well so far. up until now all my titles have been made with "premium vinyl", which requires no ironing and is supposedly permanent. however i've noticed that it comes off quite easily when applied to bookcloth, especially with thinner/smaller letters. i titled 90% of my books within a two-week time period so i didn't realize this would happen until after they were all done. for this reason i don't recommend the permanent vinyl for spines or cloth covers - i don't know how it would work on paper-covered boards. maybe it'd be better without those cloth fibers.
the one other titling method i've used was using a stencil (cut with the cricut) to paint with fabric markers. that worked really well and looks very dramatic (and there's nothing to be in danger of peeling off) but i don't think my hands are steady enough to do very detailed designs.
i have bought a couple sheets of heat-transfer vinyl to try out next - the idea of ironing my books is a little scary but i have heard that htv produces much longer-lasting results on bookcloth. i have some scrap boards covered in cloth that i will use as test pieces and i will post an update after i give it a shot!
maybe more information than you wanted to know, but thank you for asking!! <3
8 notes
·
View notes
Last Seen Blogs