#Steps to install docker
Explore tagged Tumblr posts
Visit Tumblr Blog
Explore Tumblr blogs with no restrictions, modern design and the best experience.
Last Seen Tumblr Blogs


Fun Fact
Mobile Tumblr US users spend an average of 4.04 minutes per session on the app.
Text
Step 0. Get fed up with Windows 10/11 and all the forced-fed stuff, like ads and LLM, in the Start menu.
Step 1. Install Ubuntu Linux
Step 2. Learn Docker & cool stuff and wonder why I used an abomination called WSL. This is the real deal.
Step 3. Get into VIM. Watch some cool videos, and ditch the last spyware called VSCode.
Step 4: Learn about NixOS and switch to use because all cool kids like it. This is the end of the distro hopping.
Step 5: Minding my business and YouTube recommends FreeBSD. Oh noo. Here we go again…😅
#nixos#freebsd#linux#shitpost#gnu#sysadmin#devops#programming#programmers humor#windows 10#windows 11
89 notes
·
View notes
Text
Attention Splatoon Artists!!
I'm happy to announce that my Splatoon brushes (v.2) bundle for Krita is available for download!!! (rbs are appreciated<3)

This bundle includes new and reworked brushes (from the previous version), focused on imitating the official art style of the Splatoon series' artworks.
Here's a brief rundown of the brushes:

Download Link:
How to install them:
Download the .bundle file from the Google Drive link, and place it wherever you want on your computer

2. Open Krita and go to Settings > Manage Resource Libraries

3. On the Manage Resource Libraries window, click the Import button and select the .bundle file on the file explorer

4. Once you finish the last step, you should see the bundle is now on your Manage Resource Libraries window

5. Now, restart Krita and open a new file. The brushes should be on your Brush Presets docker!! (If you can't find them for whatever reason, just search "Splatoon" on the docker and the brushes should appear.)

"But Matcha, how good are they??" Well, that obviously depends on your drawing/painting skills and familiarity with the brushes, but here are some comparisons:


On both of these I traced the official artworks and tried my best to replicate the paintings, using only my brushes. You can decide if these are to your liking or not :p
Anyway, thank you for the attention and good luck making beautiful art <3
Ps: If you do use them, don't be afraid to tag me! I'd love to see you art :D
#splatoon#splatoon art#splatoon brushes#krita brushes#matcha squid#matcha#splatoon resources#matcha brushes#matcha post#krita#krita brush packs#krita illustration#drawn with krita#made with krita#digital drawing
217 notes
·
View notes
Text
youtube
How to Use Container Manager (Docker) on a Synology NAS - Beginners Guide
This step-by-step guide will show you how to install Container Manager on a Synology NAS and implement your own Docker containers! Container Manager is the "new" Docker application in versions of DSM newer than 7.2. While Container Manager is very similar to the old version of Docker, it has some awesome new features like Docker Compose. Learn everything about Container Manager in this full setup guide!
#How to Use Container Manager#docker course#educate yourselves#educate yourself#technology#docker tutorial#tips and tricks#container manager#nas synology#synology#beginners guide#education#free education#youtube#Youtube
3 notes
·
View notes
Text
How to host local Club Penguin Private Server (CPPS) on Silicon Mac (M1/M2/M3) thru play.localserver & Solero's Wand install.
I spent so long looking for a solution to this that I want to contribute what worked for me. I got so frustrated looking for something that worked, and I hope this guide will help others avoid that frustration.
This is NOT a guide on hosting or serving a CPPS. This is a guide on making a CPPS playable by locally hosting your server on your Silicon M1/M2/M3 Macbook. This worked on my M3 Macbook, and, in my experience, it seems the newer the hardware/operating system gets, the harder it is accomplish this.
DISCLAIMER *I do not know very much about this topic. I can paste commands into terminal and execute them, I know how to install DMG files I downloaded from the internet (the bar is in hell, I am aware), and I know how to enter play.localhost to run this in a browser. I am no expert; this guide is for beginners like myself who want a CPPS. This is beginner-level stuff. If you want advice or need help hosting, refer to the Wand Github page, Solero's Dash (an actual web-hosting solution for Houdini/Wand), Solero's discord, or, when in doubt, Google it. (I recommend only asking for help in Solero's discord for help AFTER trying your best to search for a solution, and even after that, trying to search key terms in their chat logs. They often have to repeat the same advice over, and over, and over again.)*
TLDR; IDK shit about shit
USING WAND INSTALLER
wand description from github: Wand makes it easy to configure dash, houdini and a media server utilizing docker & docker-compose.
All the assets are located here.
Installation instructions from the above link:
Installation script 1. run the script: bash <(curl -s https://raw.githubusercontent.com/solero/wand/master/install.sh) 2. Answer Questions which are: Database password (Leave blank for random password) Hostname (example: clubpenguin.com) (Leave empty for localhost) External IP Address (Leave empty for localhost) 3. Run and enjoy. Run this command: $ cd wand && sudo docker-compose up
The steps I took:
1. Install Docker via Terminal & Homebrew.
Installing the Docker DMG file did not work properly when I tried. I realized later that Docker is seperate from Docker Desktop (the DMG file). I got Docker to work by using Terminal to install Homebrew, and then using Homebrew to install Docker.
Indented text = paste into Terminal.
Command to install Homebrew:
/bin/bash -c "$(curl -fsSL https://raw.githubusercontent.com/Homebrew/install/HEAD/install.sh)"
Ensure Homebrew is installed:
brew --version
Install Docker:
brew install docker
Recommended: Install Docker Desktop (useful in determining if your server is running, stopped, or stuck in a restart loop).
brew install --cask docker
Run Docker Desktop:
open -a Docker
2. Run installation script:
bash <(curl -s https://raw.githubusercontent.com/solero/wand/master/install.sh)
From Github instructions:
Answer Questions which are:
Database password (Leave blank for random password)
Hostname (example: clubpenguin.com) (Leave empty for localhost)
External IP Address (Leave empty for localhost)
3. $ cd wand && sudo docker-compose up
This is what is provided in the Github. This command didn't work on Mac; I believe it's formatted for Linux OS. Here's how I broke it up and enabled it to run from Mac's Terminal.
Navigate to Wand directory:
cd wand
Double-check if you're in the right directory:
ls
Start Docker container:
docker-compose up
If the above doesn't work, try
docker compose up
or
brew install docker-compose
Takes a second...

Ensure Docker is running:
docker info
If it isn't, open the Docker Desktop application.
*After using compose up, this error may appear:*
WARN[0000] /Users/[user]/wand/docker-compose.yml: the attribute version is obsolete, it will be ignored, please remove it to avoid potential confusion
This is harmless. If you get annoyed by errors, this can be solved by:
nano docker-compose.yml

See Version 3.7 at the top? Delete that line.
Ctrl-X (NOT COMMAND-X) to exit, Y to save, Enter.
PLAY.LOCALHOST
Type http://PLAY.LOCALHOST into a browser.

Create a penguin.

Try logging in that penguin:

This step was agony. I'm not savvy with running obsolete or deprecated software, and, of course, Club Penguin (and Houdini/Wand's assest) uses Flash, which was discontinued, and timebombed by Adobe, in 2021.
I tried Ruffle. Club Penguin Journey uses Ruffle, so why can't I?
Running Ruffle in Firefox:


No luck.
In the Solero discord, they'll direct to this blog post:

This method does not work on Mac M1/M2/M3. The program is "out of date" and you cannot run it. It works on Macbook's running Sonoma and backward. I'm on an M3 running Sequoia.
they'll often post this video in the discord:

In theory, this method should work, and it does for many, but for whatever reason, not on my M3. I tried different versions of Ungoogled, I tried so many different patches of Pepperflash, and it never cooperated. I tried Pepperflash, I tried Fast Patch!, I tried dedicated Flash browsers, running Flash plugins for Pale Moon, Ungoogled, Waterfox, but I could never get past him.

Every time I see this stupid penguin's face I'm filled with rage. But I am going to save you that rage!!!
If you get this method to work, yay! I could not. Maybe I don't know enough about patching, maybe I'm a little tech stupid.
WHAT WORKED: Using a dedicated CPPS desktop application that allows you to plug in a URL.
I give you...

He is your solution, your answer to
I discovered this solution through Solero's Discord, when someone answered a question re: playing online.

Waddle Forever was not what I was looking forever, but I noticed in their credits:
The electron client is originally forked from the Club Penguin Avalanche client. The server is based in solero's works in reverse engineering the Club Penguin server (Houdini server emulator). The media server is also mostly from solero's media servers.
And that's how I found out the solution: Using CPA Client
Download the CPAvalanche Client
It runs Adode Flash x64. Easy peasy.
(the instructions are in Portuguese, but for English users:
Navigate to releases.

And download this one:

Once downloaded, open.

Drag into applications.
Run http://play.localhost through the client:
Open CPAvalanche Client. It will direct you to CPAvalance once loaded, but you're here because you want to play play.localhost.
Navigate to CPAvalanche Client next to your Apple. Click Mudar a URL do Club Penguin.

Press Sim.

URL: http://play.localhost
Ok.

Press Login once the page loads, and...

That's it! No more penguin! Have fun :)
CREDITS:
Solero Discord / Waddle Forever / Wand / CPA Client / Solero.Me
#solero/wand#wand#solero#cpps#club penguin private server#cpps localhost#club penguin#macbook#macbook silicon#mac m1#mac m2#mac m3#apple silicon
2 notes
·
View notes
Text
How To Setup Elasticsearch 6.4 On RHEL/CentOS 6/7?
What is Elasticsearch? Elasticsearch is a search engine based on Lucene. It is useful in a distributed environment and helps in a multitenant-capable full-text search engine. While you query something from Elasticsearch it will provide you with an HTTP web interface and schema-free JSON documents. it provides the ability for full-text search. Elasticsearch is developed in Java and is released as open-source under the terms of the Apache 2 license. Scenario: 1. Server IP: 192.168.56.101 2. Elasticsearch: Version 6.4 3. OS: CentOS 7.5 4. RAM: 4 GB Note: If you are a SUDO user then prefix every command with sudo, like #sudo ifconfig With the help of this guide, you will be able to set up Elasticsearch single-node clusters on CentOS, Red Hat, and Fedora systems. Step 1: Install and Verify Java Java is the primary requirement for installing Elasticsearch. So, make sure you have Java installed on your system. # java -version openjdk version "1.8.0_181" OpenJDK Runtime Environment (build 1.8.0_181-b13) OpenJDK 64-Bit Server VM (build 25.181-b13, mixed mode) If you don’t have Java installed on your system, then run the below command # yum install java-1.8.0-openjdk Step 2: Setup Elasticsearch For this guide, I am downloading the latest Elasticsearch tar from its official website so follow the below step # wget https://artifacts.elastic.co/downloads/elasticsearch/elasticsearch-6.4.2.tar.gz # tar -xzf elasticsearch-6.4.2.tar.gz # tar -xzf elasticsearch-6.4.2.tar.gz # mv elasticsearch-6.4.2 /usr/local/elasticsearch Step 5: Permission and User We need a user for running elasticsearch (root is not recommended). # useradd elasticsearch # chown -R elasticsearch.elasticsearch /usr/local/elasticsearch/ Step 6: Setup Ulimits Now to get a Running system we need to make some changes of ulimits else we will get an error like “max number of threads for user is too low, increase to at least ” so to overcome this issue make below changes you should run. # ulimit -n 65536 # ulimit -u 2048 Or you may edit the file to make changes permanent # vim /etc/security/limits.conf elasticsearch - nofile 65536 elasticsearch soft nofile 64000 elasticsearch hard nofile 64000 elasticsearch hard nproc 4096 elasticsearch soft nproc 4096 Save files using :wq Step 7: Configure Elasticsearch Now make some configuration changes like cluster name or node name to make our single node cluster live. # cd /usr/local/elasticsearch/ Now, look for the below keywords in the file and change according to you need # vim conf/elasticsearch.yml cluster.name: kapendra-cluster-1 node.name: kapendra-node-1 http.port: 9200 to set this value to your IP or make it 0.0.0.0 ID needs to be accessible from anywhere from the network. Else put your IP of localhost network.host: 0.0.0.0 There is one more thing if you have any dedicated mount pint for data then change the value for #path.data: /path/to/data to your mount point.
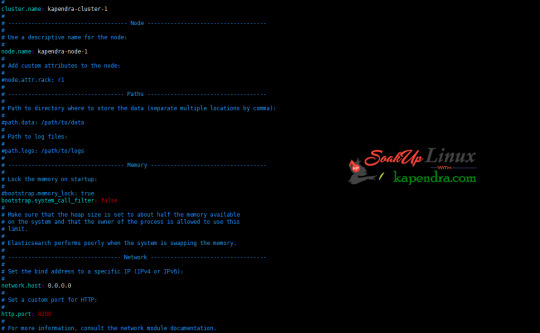
Your configuration should look like the above. Step 8: Starting Elasticsearch Cluster As the Elasticsearch setup is completed. Let the start Elasticsearch cluster with elastic search user so first switch to elastic search user and then run the cluster # su - elasticsearch $ /usr/local/elasticsearch/bin/elasticsearch 22278 Step 9: Verify Setup You have all done it, just need to verify the setup. Elasticsearch works on port default port 9200, open your browser to point your server on port 9200, You will find something like the below output http://localhost:9200 or http://192.168.56.101:9200 at the end of this article, you have successfully set up Elasticsearch single node cluster. In the next few articles, we will try to cover a few commands and their setup in the docker container for development environments on local machines. Read the full article
2 notes
·
View notes
Text
How to Install
Looking for easy, step-by-step guides on how to install everything from software to home devices? Our "How to Install" blog provides clear, beginner-friendly instructions to help you get things up and running without the hassle. Whether you're setting up a new app, assembling tech gadgets, or configuring tools, we simplify the process for you. Each post is written with accuracy and user convenience in mind.
How to Install How to Install Printers Without CD How to Install Webcam Drivers How to Install SSH How to Install Pixelmon How to Install OptiFine How to Install Fabric How to Install Zend Framework with XAMPP on Windows How to Install Roblox on Chromebook How to Install Roblox Studio How to Install Firefox on Mac How to Install Firefox on Linux How to Install Firefox on Windows How to Install Java Step-by-Step Guide for Beginners How to Install Java on Mac Follow Full Process Ultimate Guide How to Install Java for Minecraft Easy Step Guide for How to Install VPN for Privacy How to Install VPN Server Virtual Private Network How to Install VPN on Router A Step-by-Step Guide : Complete Guide for How to Install Anaconda How to Install Anaconda on Linux Complete Guide How to Install Anaconda on Mac: A Step-by-Step Guide How to Install Anaconda on Ubuntu: A Step-by-Step Guide How to Install Anaconda on Windows How to Install npm A Step-by-Step Guide for Beginners How to Install npm on Ubuntu Step-by-Step How to Install NVM on Ubuntu Tips, and Explanations How to Install npm on Windows Solve Common Issues How to Install NVM on Windows Troubleshooting Tips How to Install npm on Visual Studio Code How to Install Node.js on Your Machine How to Install Node.js on Linux Step-by-Step Guide How to Install Node.js on Mac Step-by-Step Guide How to Install Node Modules on Angular How to Install Node.js on Ubuntu The Latest Version How to Install Node.js on Windows Get started Full Method How to Install APK File on Your Android Device Complete Guide on How to Install APK on Android TV How to Install APK on Chromebook Step by Step Process How to Install APK on iOS A Comprehensive Guide How to Install IPA on iPhone A Complete Guide How to Install APK on Windows 10 Complete Guide How to Install Git A Step-by-Step Guide for Beginners How to Install Git Bash A Complete Step-by-Step Guide How to Install Git on Visual Studio Code How to Install GitHub Simple Step-by-Step Process How to Install Git on Mac Step-by-Step Guide How to Install Git on Linux A Step-by-Step Guide How to Install Git on Ubuntu Step-by-Step Guide How to Install Git on Windows A Simple Guide How to Install Docker How to Install Docker on Linux How to Install Docker on Mac How to Install Docker Daemon Mac How to Install Docker on Ubuntu How to Install Docker Compose on Ubuntu 20.04 How to Install Docker Compose on Windows How to Install Docker on Windows How to Install WordPress How to Install WordPress on Ubuntu How to Install WordPress Plugins How to Install WordPress on Windows 10 How to Install Kodi on Firestick How to Install Exodus on Kodi How to Install The Crew on Kodi How to Install XAMPP on Mac
0 notes
Text
Mastering Java Dockerfiles: Best Practices for Efficient Development
When it comes to creating a Java application, Dockerization is a crucial step. But, writing a Java Dockerfile can be daunting, especially for beginners. At IAMDevBox.com, we've put together a comprehensive guide to help you master the art of writing efficient Java Dockerfiles. First and foremost, it's essential to understand the purpose of a Dockerfile. A Dockerfile is a text file that contains instructions for building a Docker image. It's used to define the base image, install dependencies, and specify the command to run when the container starts. Read more: https://www.iamdevbox.com/posts/
0 notes
Text
Docker Tutorial for Beginners: Learn Docker Step by Step
What is Docker?
Docker is an open-source platform that enables developers to automate the deployment of applications inside lightweight, portable containers. These containers include everything the application needs to run—code, runtime, system tools, libraries, and settings—so that it can work reliably in any environment.
Before Docker, developers faced the age-old problem: “It works on my machine!” Docker solves this by providing a consistent runtime environment across development, testing, and production.
Why Learn Docker?
Docker is used by organizations of all sizes to simplify software delivery and improve scalability. As more companies shift to microservices, cloud computing, and DevOps practices, Docker has become a must-have skill. Learning Docker helps you:
Package applications quickly and consistently
Deploy apps across different environments with confidence
Reduce system conflicts and configuration issues
Improve collaboration between development and operations teams
Work more effectively with modern cloud platforms like AWS, Azure, and GCP
Who Is This Docker Tutorial For?
This Docker tutorial is designed for absolute beginners. Whether you're a developer, system administrator, QA engineer, or DevOps enthusiast, you’ll find step-by-step instructions to help you:
Understand the basics of Docker
Install Docker on your machine
Create and manage Docker containers
Build custom Docker images
Use Docker commands and best practices
No prior knowledge of containers is required, but basic familiarity with the command line and a programming language (like Python, Java, or Node.js) will be helpful.
What You Will Learn: Step-by-Step Breakdown
1. Introduction to Docker
We start with the fundamentals. You’ll learn:
What Docker is and why it’s useful
The difference between containers and virtual machines
Key Docker components: Docker Engine, Docker Hub, Dockerfile, Docker Compose
2. Installing Docker
Next, we guide you through installing Docker on:
Windows
macOS
Linux
You’ll set up Docker Desktop or Docker CLI and run your first container using the hello-world image.
3. Working with Docker Images and Containers
You’ll explore:
How to pull images from Docker Hub
How to run containers using docker run
Inspecting containers with docker ps, docker inspect, and docker logs
Stopping and removing containers
4. Building Custom Docker Images
You’ll learn how to:
Write a Dockerfile
Use docker build to create a custom image
Add dependencies and environment variables
Optimize Docker images for performance
5. Docker Volumes and Networking
Understand how to:
Use volumes to persist data outside containers
Create custom networks for container communication
Link multiple containers (e.g., a Node.js app with a MongoDB container)
6. Docker Compose (Bonus Section)
Docker Compose lets you define multi-container applications. You’ll learn how to:
Write a docker-compose.yml file
Start multiple services with a single command
Manage application stacks easily
Real-World Examples Included
Throughout the tutorial, we use real-world examples to reinforce each concept. You’ll deploy a simple web application using Docker, connect it to a database, and scale services with Docker Compose.
Example Projects:
Dockerizing a static HTML website
Creating a REST API with Node.js and Express inside a container
Running a MySQL or MongoDB database container
Building a full-stack web app with Docker Compose
Best Practices and Tips
As you progress, you’ll also learn:
Naming conventions for containers and images
How to clean up unused images and containers
Tagging and pushing images to Docker Hub
Security basics when using Docker in production
What’s Next After This Tutorial?
After completing this Docker tutorial, you’ll be well-equipped to:
Use Docker in personal or professional projects
Learn Kubernetes and container orchestration
Apply Docker in CI/CD pipelines
Deploy containers to cloud platforms
Conclusion
Docker is an essential tool in the modern developer's toolbox. By learning Docker step by step in this beginner-friendly tutorial, you’ll gain the skills and confidence to build, deploy, and manage applications efficiently and consistently across different environments.
Whether you’re building simple web apps or complex microservices, Docker provides the flexibility, speed, and scalability needed for success. So dive in, follow along with the hands-on examples, and start your journey to mastering containerization with Docker tpoint-tech!
0 notes
Text
Sweep AI: The Future of Automated Code Refactoring
Introduction to Sweep AI
In today’s digital age, writing and maintaining clean code can wear developers down. Deadlines pile up, bugs pop in, and projects often fall behind. That’s where Sweep AI steps in. It acts as a reliable coding assistant that saves time, boosts productivity, and supports developers by doing the heavy lifting in coding tasks.
This article breaks down everything about Sweep AI, how it helps with code automation, and why many developers choose it as their go-to AI tool.
Understanding Sweep AI
Sweep AI is an open-source AI-powered tool that behaves like a junior developer. It listens to your needs, reads your code, and writes or fixes it accordingly. It can turn bug reports into actual code fixes without needing constant manual guidance.
More importantly, Sweep AI does not cost a dime to start. It’s ideal for teams and solo developers who want to move fast without sacrificing code quality.
How Sweep AI Works
Sweep AI works in a simple yet powerful way. Once a developer writes a feature request or a bug report, the AI jumps into action. Here’s what it usually does:
Reads the existing code
Plans the changes intelligently
Writes pull requests automatically
Updates based on comments or suggestions
Sweep AI also uses popularity ranking to understand which parts of your repository matter the most. It responds to feedback and works closely with developers throughout the code improvement process.
Types of Refactoring Sweeps AI Can Handle
Sweeps AI does not just work on surface-level improvements. It digs deep into the code. Some of its main capabilities include:
Function extraction: breaking large functions into smaller, clearer ones
Renaming variables: making names more meaningful
Removing dead code: getting rid of unused blocks
Code formatting: applying consistent style and spacing
It can also detect complex issues like duplicate logic across files, risky design patterns, and nested loops that slow down performance.
Why Developers Are Turning to Sweeps AI
Many developers use Sweeps AI because it:
Saves time
Reduces human error
Maintains consistent coding standards
Improves software quality
Imagine a junior developer who must refactor 500 lines of spaghetti code. That person might take hours or even days to clean it up. With Sweeps AI, the job could be done in minutes.
Step-by-Step Guide to Start Using Sweep AI
You don’t need to be a tech wizard to get started with Sweep AI. Here are two easy methods:
Install the Sweep AI GitHub App Connects to your repository and starts working almost immediately.
Self-host using Docker Ideal for developers who want more control or need to run it privately.
Sweep AI also shares helpful guides, video tutorials, and documentation to walk users through each step.
The Present and the Future
Right now, Sweeps AI already supports languages like Python, JavaScript, TypeScript, and Java. But the roadmap includes support for C++, PHP, and even legacy languages like COBOL. That shows just how ambitious the project is.
In the coming years, we might see Sweeps AI integrated into platforms like GitHub, VS Code, and JetBrains IDES by default. That means you won’t need to go out of your way to use it will be part of your everyday coding workflow.
How Much Does Sweep AI Cost?
Sweep AI offers a flexible pricing model:
Free Tier – Unlimited GPT-3.5 tickets for all users.
Plus Plan – $120/month includes 30 GPT-4 tickets for more advanced tasks.
GPT-4 Access – Requires users to connect their own Openai API key (charges may apply).
Whether you’re working on a startup project or a large codebase, there’s a plan that fits.
Is Sweep AI Worth It?
Absolutely. Sweep AI is more than just another coding assistant it’s a valuable teammate. It understands what you need, helps you fix problems faster, and lets you focus on what really matters: building great products.
Thanks to its smart features and developer-friendly design, Sweep AI stands out as one of the top AI tools for modern software teams. So, if you haven’t tried it yet, now’s a good time to dive in and take advantage of what it offers.
Frequently Asked Questions
Q: Who is the founder of Sweep AI?
Sweep AI was co-founded by William Suryawan and Kevin Luo, two AI engineers focused on making AI useful for developers by automating common tasks in GitHub.
Q: Is there another AI like Chatgpt?
Yes, there are several AIS similar to Chatgpt, including Claude, Gemini (by Google), Cohere, and Anthropic’s Claude. However, Sweep AI is more focused on code generation and GitHub integrations.
Q: Which AI solves GitHub issues?
Sweep AI is one of the top tools for automatically solving GitHub issues by generating pull requests based on bug reports or feature requests. It acts like a junior developer who understands your project.
Q: What is an AI agent, and how does it work?
An AI agent is a software program that performs tasks autonomously using artificial intelligence. It receives input (like code requests), makes decisions, and performs actions (like fixing bugs or writing code) based on logic and data.
Q: Who is the CEO of Sweep.io?
As of the latest information, Kevin Luo serves as the CEO of Sweep.io, focusing on making AI development tools smarter and more accessible.
0 notes
Text
🚀 Master DevOps Automation: The Complete Jenkins CI/CD Pipeline Blueprint

In today’s fast-paced digital world, delivering software faster, safer, and smarter is not just a trend—it’s a business necessity. Whether you're a budding developer or an experienced DevOps engineer, mastering Jenkins CI/CD pipelines is your ticket to automating delivery workflows and boosting deployment efficiency.
Welcome to the era of DevOps, where integration meets automation—and The Complete Jenkins DevOps CI/CD Pipeline course is your ultimate guide to becoming a DevOps pro.
So, let’s break down what Jenkins, CI/CD, and DevOps really mean, why you should care, and how this course can change the game for your career or business. Let’s dive in!
🌐 What is Jenkins and Why Does It Matter in DevOps?
Let’s keep this simple.
Jenkins is an open-source automation tool written in Java. It helps you automate the process of building, testing, and deploying applications. Think of Jenkins as your digital assistant that works around the clock to streamline your code delivery process.
Here’s why Jenkins is such a big deal in DevOps:
💡 Automation: Eliminate manual errors and repetitive tasks.
🧱 Flexibility: Jenkins integrates with over 1,800 plugins.
🔁 Continuous Integration & Continuous Deployment (CI/CD): Push code, run tests, deploy updates—all without lifting a finger.
Whether you're working on a solo project or part of a large development team, Jenkins helps you ship quality software, faster and more reliably.
🧰 What Exactly Is CI/CD?
CI/CD may sound technical, but it’s pretty straightforward.
Continuous Integration (CI) means developers regularly push code to a shared repository. Jenkins automatically tests that code to catch bugs early.
Continuous Delivery (CD) means your application gets automatically built and deployed to a staging or production environment after passing those tests.
Together, CI/CD creates a seamless development flow that ensures your app is always in a deployable state. And Jenkins is the engine behind that flow.
In short, CI/CD = Less chaos. More control.
🚀 Why You Need Jenkins CI/CD in Your Skillset
Here’s the truth: DevOps is the future of software development. Companies want faster releases and fewer bugs. If you can offer that, you’re gold.
💼 Career Boost
Hiring managers actively seek professionals who understand CI/CD practices and Jenkins workflows. In fact, Jenkins has become a staple in almost every DevOps job listing.
⏱️ Time-Saver
Imagine testing and deploying code with a click—or even better, no clicks at all. Jenkins automates these steps, freeing up your time for more important work.
✅ Fewer Bugs
Because Jenkins automatically tests new code, you catch bugs earlier—when they’re cheaper and easier to fix.
🎯 What Will You Learn in The Complete Jenkins DevOps CI/CD Pipeline?
If you’ve ever been overwhelmed by complex DevOps tools or confusing workflows, this course simplifies it all.
Here’s a sneak peek of what The Complete Jenkins DevOps CI/CD Pipeline course offers:
🏗️ Setting Up Jenkins from Scratch
Learn how to install and configure Jenkins on your system, including tips for cloud deployment on AWS or Docker. Whether you're on Windows, Linux, or Mac, you’re covered.
🔌 Plugin Essentials
You’ll discover which Jenkins plugins make life easier—from GitHub integration to Slack notifications, and how to use them effectively.
🛠️ Building Pipelines
From freestyle jobs to declarative pipelines, you’ll master how to:
Trigger builds on code push
Run automated tests
Package and deploy code
🧪 Automated Testing Integration
You’ll integrate Jenkins with testing tools like JUnit or Selenium to automatically test every new piece of code. No more crossing fingers during deployments!
☁️ Deploy to AWS, Docker, Kubernetes
You’ll even explore advanced deployment setups using cloud infrastructure and containerization platforms. That’s real-world, production-grade training.
💡 Why This Course is a Game-Changer
Let’s be honest—there are plenty of Jenkins tutorials out there. So, what makes this one different?
✅ Beginner to Pro Structure
Whether you’re just starting or already have some DevOps experience, the course gradually builds your knowledge with hands-on, real-world projects.
🎓 Step-by-Step Guidance
Every lesson is explained in plain English. No unnecessary jargon. You’ll know why you’re doing each step, not just how.
🔥 Lifetime Access & Updates
Once you enroll, the content is yours forever. Plus, updates keep your skills fresh as Jenkins evolves.
🧩 Real-World Scenarios and Projects
This isn’t theory. You’ll walk away with projects that mirror real-world use cases, including:
CI/CD for a Java or Node.js application
Jenkins deployment using Docker and GitHub Actions
Notifications via Slack or email for failed builds
These are portfolio-grade projects that you can showcase to employers or clients.
🧠 Who Should Take This Course?
Short answer: Anyone serious about DevOps.
Here’s a breakdown: RoleBenefitSoftware DevelopersAutomate builds and testsSystem AdminsLearn infrastructure automationDevOps EngineersMaster full CI/CD pipelinesFreelancersDeliver faster and impress clientsStudents/Job SeekersGain competitive job-ready skills
💬 What People Are Saying
“This course made Jenkins so much easier to understand. Within weeks, I was running automated deployments on my projects!”
“The hands-on labs were invaluable. Now I actually understand how CI/CD works in a real-world pipeline.”
“Great value. The instructor explains everything clearly and updates the content regularly.”
🔍 SEO Deep Dive: Keywords You Naturally Rank For
Now, while the blog wasn’t keyword-stuffed (because no one likes that), it’s optimized for search intent with valuable keyword coverage:
Jenkins CI/CD Pipeline
Jenkins DevOps course
Jenkins automation tutorial
Jenkins pipeline for beginners
Continuous integration with Jenkins
Learn Jenkins online
DevOps with Jenkins
Jenkins for developers
Jenkins certification training
Each of these phrases has been naturally incorporated into the content—so you rank without losing readability.
🏁 Final Thoughts: Don’t Just Learn—Build, Automate, Deploy
If you’re ready to automate your builds, reduce bugs, and deploy like a pro, then don’t miss your chance to master the Jenkins CI/CD pipeline.
Start today and become the engineer who delivers faster, better, and smarter.
0 notes
Text
This article will guide you through all the steps necessary for installing Portainer on Debian 12.
https://greenwebpage.com/community/how-to-install-portainer-docker-ui-web-interface-on-debian-12/
0 notes
Text
2 notes
·
View notes
Text
AIOps for Faster Root Cause Analysis: Step-by-Step Guide
The tutorial on using AIOps for faster root cause analysis is a comprehensive guide that combines AI, machine learning, and observability tools to streamline the identification of issues. Below is a structured approach to implementing the tutorial, ensuring clarity and practical application. 1. Environment Setup Install Docker and Docker Compose: Ensure Docker is installed on your system. This…
0 notes
Link
#Automation#configure#containerization#Docker#Install#Linux#mediaserver#Monitoring#movies#NZB#open-source#Plex#PVR#Radarr#self-hosted#Setup#Sonarr#Streaming#systemadministration#torrent#Usenet
0 notes
Text
Mobile App Development Services: Transforming Ideas into Powerful Digital Experiences
In today’s mobile-first world, having a strong mobile presence isn’t just a competitive advantage—it’s a necessity. With over 6.8 billion smartphone users globally, businesses that invest in mobile app development can reach their customers where they spend most of their digital time. At Xoance, we specialize in crafting seamless, scalable, and smart mobile applications that help brands elevate user engagement and drive measurable growth.
Why Mobile App Development Matters
Mobile apps are more than just a convenience; they’re strategic tools that can boost brand loyalty, enhance customer experiences, and streamline operations. Whether you’re a startup, SME, or enterprise, a well-developed mobile app can:
Improve customer engagement and retention
Provide personalized services and real-time communication
Increase operational efficiency
Generate new revenue streams
Collect valuable user data and feedback
At Xoance, we understand the value of delivering meaningful mobile experiences. Our mobile app development services are designed to meet the dynamic needs of modern businesses across a wide range of industries.
Who We Are
Xoance is a full-service digital solutions company that combines creativity with technology to build exceptional digital products. With core expertise in web and mobile development, UI/UX design, branding, and SaaS, we offer end-to-end services tailored to your goals. Our mobile solutions cater to diverse sectors including healthcare, retail, education, real estate, FMCG, media, and manufacturing, making us a versatile partner in your digital journey.
Our Mobile App Development Services
We provide comprehensive mobile app development services that cover the entire lifecycle—from ideation to post-launch support.
1. iOS App Development
Our team builds elegant, high-performance iOS apps using Swift and Objective-C, designed for the Apple ecosystem. Whether it’s an enterprise-grade tool or a consumer-facing application, we ensure intuitive design and flawless functionality.
2. Android App Development
Using Kotlin and Java, we create custom Android applications that are optimized for performance, compatibility, and user satisfaction. Our apps are designed to work across a wide range of Android devices and versions.
3. Cross-Platform App Development
Need faster time-to-market without compromising quality? Our experts use Flutter and React Native to build cross-platform apps that offer native-like performance while reducing development time and cost.
4. Progressive Web Apps (PWA)
We also develop PWAs—web apps that deliver app-like experiences right from the browser. PWAs are lightweight, fast, and ideal for businesses looking to reach users across platforms without requiring a full app install.
5. App Maintenance & Optimization
Our support doesn’t end at launch. We offer ongoing maintenance, performance optimization, and feature upgrades to ensure your app remains updated, secure, and competitive.
Our Process: From Idea to Execution
At Xoance, we follow an agile, user-first approach to mobile app development. Our process is structured yet flexible to adapt to your vision:
Discovery & Planning: Understanding your goals, market, and audience
UI/UX Design: Creating intuitive, attractive, and human-centered interfaces
Development: Writing clean, scalable code using the latest tools and frameworks
Testing: Rigorous manual and automated QA for flawless performance
Launch & Support: Seamless deployment, app store publishing, and ongoing maintenance
We believe in close collaboration, transparency, and agility—ensuring you're involved every step of the way.
Technologies We Use
We leverage the latest technologies to build fast, secure, and scalable mobile apps:
Frontend: React Native, Flutter
Backend: Node.js, Firebase, PHP, Laravel
Databases: MySQL, MongoDB, Firestore
DevOps & Tools: Docker, GitHub Actions, CI/CD, Jira, Figma, Postman
Our deep technical expertise allows us to choose the right stack for each project, ensuring optimal performance and scalability.
Industries We Serve
Our mobile solutions are built with domain-specific features that cater to the unique needs of different industries:
Healthcare: Appointment booking, telemedicine, patient management
Retail & E-commerce: Product catalogs, loyalty programs, order tracking
Education: E-learning platforms, student portals, test prep apps
Real Estate: Property listings, virtual tours, agent tools
Media & Entertainment: Streaming apps, content discovery, interactive UX
Manufacturing: Field service apps, inventory tracking, process monitoring
Why Choose Xoance?
Client-Centric Approach: We focus on your goals, not just the tech.
UX-First Design: Our design process combines user psychology and data insights.
Scalability: We build with future growth in mind.
Dedicated Teams: Work with experienced developers, designers, and project managers.
End-to-End Service: From concept to post-launch support, we’re with you every step of the way.
Success Stories
We’ve helped startups scale, enterprises digitize, and brands connect with millions of users. From real-time tracking apps to e-commerce platforms and educational tools, our portfolio speaks for itself.
“Xoance turned our vision into a reality. The app they developed helped us increase user retention by 45% within six months.” – A satisfied client
Let’s Build Something Incredible
Ready to launch your next big idea? Whether you need a standalone app or want to integrate mobile into your digital ecosystem, Xoance is your trusted partner for mobile app development services. Let’s bring your concept to life with technology that works—and experiences that wow.
Contact Us Today 📧 [email protected] 🌐 www.xoance.com 📞 +1 559-465-8444
0 notes