#hp & d$mp is a given -_-;
Text

[ Hacking was successful. With a 'Great Success', the parameters of the Servant are already discerned, removing it as an option and given for free. ]
SABER - Main Body:
Strength: D (B)
Endurance: C+ (A+)
Agility: E (C)
Mana: C
Luck: A+
NP: A+
PHANTOM SABER (LUNE):
Strength: C+
Endurance: C
Agility: A
Mana: B
Luck: A++
NP: B
Action descriptions are under the cut.
Taking an action will alert the enemy Servant that they've been hacked.
'Discern Skills' reveals Servant skills. Noble Phantasms may be revealed depending on the success of the option.
'Inflict Negative Status' inflicts a random negative effect. Once specific items are acquired, then a specific effect can be chosen.
'Inflict Positive Status' inflicts a random positive effect. With your current items, if this option wins, you can choose between healing HP or MP at the expense of your items.
Each Servant has a special 'hacking' ability. 'Suncell Adaptation' is KUKULKAN's.
'Suncell Adaptation' is the merge of several skills. The concept of KUKULKAN being 'an invader who adapts', and the Interlopers innate magecraft, acting as a minor version of 'Spirit Core Liberation'. A random aspect from the hacked Servant will be copied and turned into a 'one time use' item- however, this action fully alerts the individual being hacked of your presence (if they weren't aware beforehand).
52 notes
·
View notes
Text
Finished my little modded run of Terraria :)

So PRIMARILY this run was testing out-
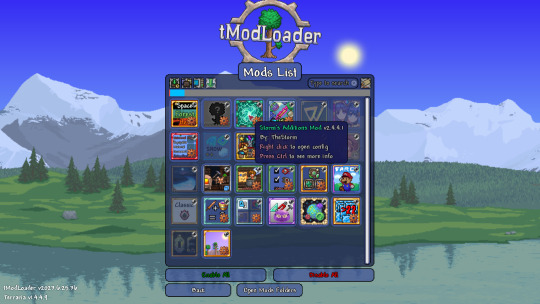
Storm's Additions and the Artificer's Accessories.
Most other mods were minor or QOL, though special shoutouts to Fargo's Paper Mario badges and the Block's Leveling mod which I'll mention briefly.
I'm not great at Terraria, I can beat it on normal no prob (like here) but expert is really challenging and I've never committed to just beating the base game on it yet, so I'm not above grabbing a mod here and there to inch things in my favor to allow me to not just hit the hardest wall in the world every single progression point lol
The latter two mods were mostly that for me.
The Paper Mario badges are all minor (to moderate) buffs and my (unskilled but experienced) judgement would be that they add up to like 3~4 accessories worth of buffs once you unlock nearly all of the BP to equip them, with a 'decent' drip feed of BP throughout progression so you can't just JUMP to having all that power ASAP.
So UNDOUBTEDLY a "Make it easier" mod but not a "Here's a broken 1 shot every boss item" mod. And considering that you have to acquire the badges, I'd say this is a pretty nice mod. Yes, you are stronger. No, you're not "Broken / Given it for free", felt more like unlocking additional accessory slots via getting BP and badges :)
If you don't mind making things easier while adding new loot to seek out for your build (that is mostly independent of your build in terms of emphasizing one playstyle or another) then I recommend! But if you're hoping it's non-impactful then uh, no, it DEFINITELY gives you a minor to moderate advantage.
Most are kinda small or not boss significant, like making enemies drop more hearts on death (without using statues this won't matter much most boss fights), but some are rather impactful (but cost most of your BP lol) like 50% defense which genuinely seems crazy but does kinda take away most of your BP.
Personally, I thought the badges felt fair. Yes, some are really strong, but they are found late game and aren't CRAZY. Some more HP, some more MP, a berserk (low HP) damage buff of 50%, 50% defense buff- there are BIG buffs in here but they often come attached with rarity and BP cost.
All in all, I enjoyed this mod but from the start to the end I always wanted "More" badges, which without checking the mod page, and considering some of the badges I DID get were ultra rare drops, I'd wager it was a grind issue and I just didn't find more to enjoy.
I'll probably continue using this one! It is lightweight in terms of impacting actual gameplay, gives me more loot to seek out, and demonstrably buffs me to better tackle many of the harder-than-vanilla content creatives like to make in their mods :D
Next on the smaller mod side was the Block's Leveling Mod, which, I won't sugar coat it, is both why I could beat the final challenge boss and is also a mod I made exactly 1 use of- during said boss lol.
The mod can explain itself more thoroughly for itself, but the short version is you can use equipment repeatedly to build XP in that weapon and make it stronger- by base options this can get to level 100 for 3x the damage (A TON!!!!). It also lets you toggle applying xp to yourself for a small (1.4x) buff.
I had the mod "on" but you have to attach a rune to a weapon to get xp, otherwise you're playing vanilla- and you have to turn on player xp for that to work- and I decided I'd only use either feature if I felt stuck.
So I actually didn't use this mod at all.... until the VERY last challenge boss of my experience. So I can't really comment on this much beyond it's "POTENTIALLY OP AS HELL", can be exploited via training dummies (lol), and can be a get out of jail card I guess?
Not a big fan of this one. Not for any fault of the creator; It's more that the concept isn't too exciting in Terraria for me, and when I sat down to actually "use" it I didn't really enjoy just messing around blindly until all of a sudden my weapons did 3x the damage and I could beat the boss easily.
Not for me, I won't be using this mod again I don't think.
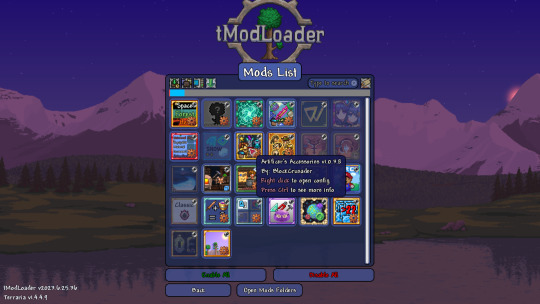
Artificer's Accessories is a mod that adds some new armor based around a new "pseudo class" and a handful of accessories based on the same.
The gist of the new class being accessories as cooldown based weaponry (or tools/buffs etc). Artificer armor often come in the form of "Middling as hell buffs compared to similar progression equipment, but grants you additional accessory slots and any artificer accessories will have reduced cooldowns while wearing this".
To avoid going into too much detail, I actually really enjoy this mod.
But... maybe not exactly for the intended purpose?
I USED some artificer pieces towards the end of my playthrough, and I love that a ton of them exist, but I mostly used the armor portion of this mod because I rather enjoyed the build diversity it encouraged.
Artificer armor generally scales itself as "Lower damage output, a unique "feature", and accessories" and I found that really fun to use without actually using artificer accessories lol
My final armor set was the towers variant which more or less just granted me middling stats, 3 more slots, and a buff to damage and defense if I use an artif-accessory
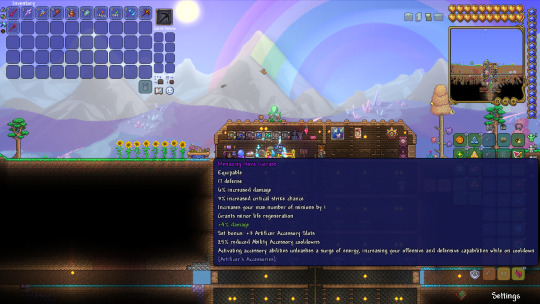
But on top of that it gives an extra minion and some more life regen, altogether this let me play around with my various accessory options a lot more and find a happy medium of survivability and build freedom on what weapons I went with (I primarily Maged this playthrough).
A standout for me was when I got the alien varient, the Xeno set's main gimmick was granting me a recovering halo shield of 100 hp
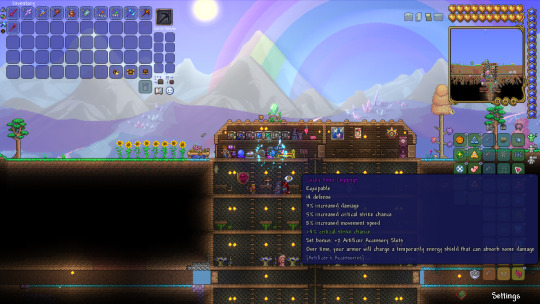
which I rather enjoyed :)
But yeah, Artificer's is a mod I think I'll be continuing to use in the future as well because the accessories are 'neat' but mostly unexplored by me, and the armor is actually really nice for making hybrid builds of sorts- though perhaps on higher difficulty that stops being the case due to their defense values which most closely resemble mage armor of a similar level, though I'd argue that equals out- less magic damage but more slots etc.
And finally the meat and potatoes of this modded playthrough which... maybe... shouldn't have been the meat and potatoes but ended up being a mod I like a ton regardless: Storm's Additions.
Storm's additions adds over 300 items and I figured while it's light on bosses (3) maybe it could make for a full mod playthrough experience, and the answer to that is, "Kinda" but with an asterisk of quality.
Storm's only adds 3 bosses, that in itself means it didn't really transform the playthrough like something as immense as Calamity does but who would reasonably compare every mod to that ridiculous behemoth. What Storm DOES add is a TON of equipment EVERYWHERE.
I was using almost exclusively equipment from Storm's from about the halfway point to the very end because there's just so much good and fun stuff in there!
My biggest complaint would honestly just be that my pre-hard mode experience felt close to vanilla. This is probably due to me exploring in ways that happened to prevent me from finding fun pre-hard mode stuff, but it's what I experienced all the same.
The SECOND I hit hard mode though? BAM! AWESOME WEAPONS! AWESOME ACCESSORIES! AWESOME NEW GEAR TO MAKE! LOVED IT!
I would go so far as to say I would currently recommend Storm's to any modded playthrough as just a set of "additions" rather than the core mod you're seeking to explore.
It expands a ton of vanilla stuff in great ways, even just giving the Towers more enemy variety was nice.
And it has a ton of equipment that feels both appropriate to the progression point and REALLY FUN~! With plenty of items like accessories that I could easily see being valuable even in mods that often power scale to the extreme like Calamity can.
The bosses were all pretty well done as well. The final boss definitely feels like a calamity style "challenge" boss with a ton of phases and bullet hell patterns to learn.
As mentioned earlier, this is the closest I came to anything that can be considered "cheating" in how I defeated him. I got him to less than 1/3 health twice, seeing his second to last phase in the process, before deciding that I would give in and actually utilize the leveling mod to push myself over that wall.
What kinda sucks is I definitely could have done it without if I abused the nurse or made a better arena but I knew that going in- I chose to take the boost because I was losing interest more than anything which is my decision to make lol
And like any good challenge boss he gives an ABSURD weapon on defeat- one that can be shimmered into a different equally absurd weapon as well. Nice :)
Storm's is obviously yet another mod from this list that I think I'll simply keep on in all future playthroughs. And it's the one I think I'd most highly recommend because it really does, quite simply, only ADD to the experience with it's additions. Great mod :) But, as implied, since it's mostly adding side content stuff- equipment etc, it's not exactly a mod to frame a playthrough around like I did here- it's named correctly and should be seen as something in addition to your mod of choice- I basically just played "Vanilla....+ Storms!" which was a lot of fun! But take this info and run with it however you please :)
That was a fun playthrough :)
12 notes
·
View notes
Text
personally, my general rule of thumb is that if removing the uncritical or romanticized bigoted parts of a media makes its plot/premise fall apart, or the creators have vehemently shown lack of care for their racism/transphobia/etc. and perpetuated it in their future works, it’s not something i’d want to interact with even under a critical lens.
#eg. het&Iia. tbb. and so on#hp & d$mp is a given -_-;#both for the creators' direct influence in future works and continued bigotry#jestersvaguely#idk like it's one of those things where...how much must you separate the original material before it's not that og material at all?#just make your own shit at that point. take what you DID find appealing (the traits of character?) and remove & replace that racist context#know the shitty aspects of it that it's praising so you don't carry that into your own work w unchecked bias#pick it apart for your own intriguing story with the small pieces that piqued your interest in the first place#just be careful not to follow the original material's same route -_- which you shouldn't! unless you#'re straight up pulling the major racist/pedophillic/etc. story beats that you initially claimed to criticize...#ugh. idk. does this make sense. i'm a bit delirious
6 notes
·
View notes
Note
Yo Imma dummy and fell in love with your DP Phantasy AU and am brimming with questions. How does Val’s suit work here? What’s Vlad’s situation here? How does partial resurrection work? Like I said, brimming with questions, expect a flood later.
*slams my hands on the table* HI HELLO THANK YOU FOR LIKING THIS DUM AU IM SORRY IT TOOK SO LONG TO REPLY IM AKSNDAKSADKJ Im so glad you like this tho i really do qwq <3 <3 <3
Anyway umm be ready for a long answer because BOI I do have a lot to talk
because I did type a lot on the original description and then tmblr goes upload error on me so i lost all that so YEAH i hope u dont mind the long post
Feel free to send more questions tho im always down to talk :DD
So Vlad thing, I havent given that one much thought yet. But this is fantasy AU so he can now finally be the brooding-alone--in-his-oversized-castle vampire that he is
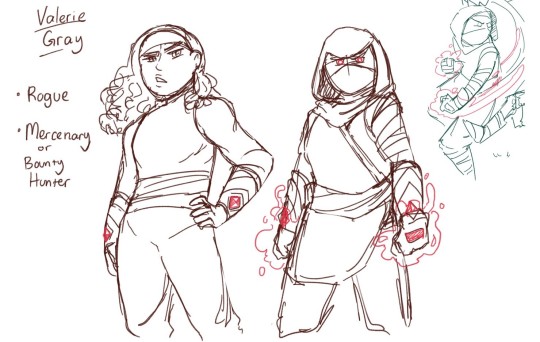
Valerie would be a rogue mercenary / bounty hunter (coz Red Huntress lol). I haven’t thought up how her S2 suit yet but she probably has a cursed gem on her glove or bracelet that slowly corrupts her. Maybe it could turn into armor like Trollhunter style that be neat :3c
NOW! The Ressurection thing!
disclaimer : im makni this with my very limited idea of dnd n game stuff so please do tell if its too far off??
But yeah, for this think of HP as your body hit point, and MP as your magic consist in your soul. When the portal open up on him, it needs something to anchor itself to both realm. The portal use Danny as said anchor and seperate his soul from the body, using the body to anchor to living world, and the soul to the ghost/dead realm. Should either of it got destroyed or killed, the portal would be closed.
Danny’s soul turned into a Lich, and his body is.. well it’s just there i guess. It’s alive techncially (thanks to sam’s ressurection attempt) but it doesn’t have a soul anymore. As a lich you can’t just.. get merge back into your old body. I mean you can possess it but that’s just not the same. Also because of the whole being turned into a lich, his body is basically his horcrux, which is an item lich use to store life force/soul. It what makes Lich almost immortal?? so long the item is not broken. maybe not immortal but you get the gist, it’s like voldie’s horcruxes basically, except he only got one
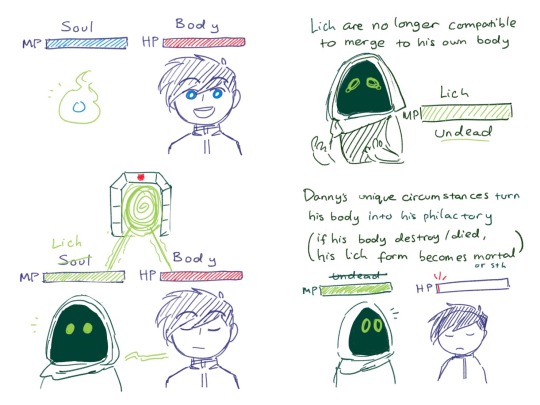
So now we have a) portal use both danny soul and body as anchor; b) danny’s body is his horcrux; c) if his body or soul is destroyed, the portal closes; and d) if danny’s body died, his lich form is no longer immortal
Sooo, in DnD there’s a system? In which if your health hits 0, you don’t immidiately die. You basically passed out, and then you have to do roll dices to wake up again. But if you got hit again in the 0 HP state, then you die for good.
I’m basically playing around this. If Danny’s HP hits 0, technically speaking he ded. Not full dead yet, but no more life energy in there to fuel/anchor the portal anymore, basically closing the thing completely.
AND it’s dead enough to weaken or alter Danny’s lich status to.. not.. complete undead anymore. So maybe MAYBE they can try to merge both the soul and the body back together. By using ressurection to jump start or force the soul to bound back with the body again
So that’s what Danny Sam and Tucker were planning for. More less sth like this :

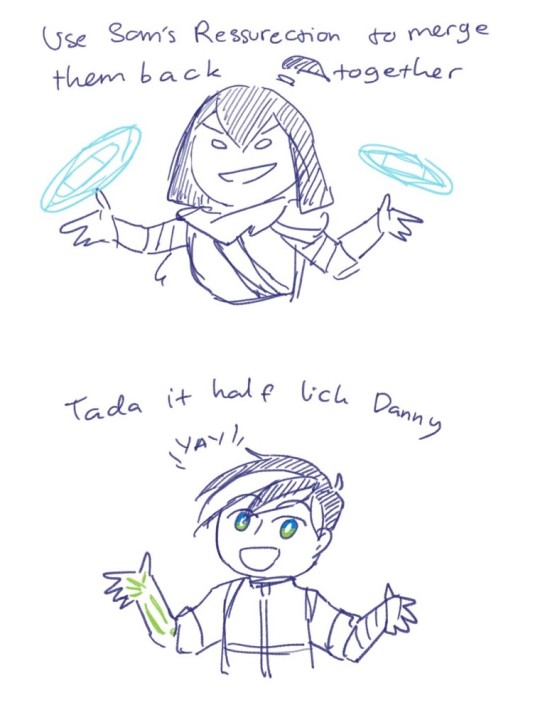
why half lich? Because while no longer undead, he’s still technically a Lich sorta so.. partial lich? Also because half lich sounds cool so ye
Hopefully that explains it??
#long post#DP Phantasy AU#im sorry but i'm having so much fun answering this sorry its so long#dp au#dp fantasy au#tgfangirl4eva
269 notes
·
View notes
Text
Fey's RPG RueViews: 5e PHB Sub-Stuffs
In Which the Author Laments and Scorns 5e in General
This is only PHB stuffs with sub-parts. Ye hath been warned.
Abjuration (Wizard School): Arcane ward should be a spell. C
Ancients (Paladin Oath): Listed second.¹ Fluff = beauty, mechanics = nature; these are not the same. I get that Paladin = Champion of X, but isn't "Champion of Nature" what the Ranger is supposed to be? Cish
Arcane Trickster (Rogue): Listed third;¹ I didn't expect this to be here and suspect it's quite a bit more powerful than the other two archetypes solely because it has spells. And it breaks spellcasting conventions, too!² B
Archfey (Warlock Pact): Alphabetized so that we don't automatically think of the Warlock for what it is. Can't decide how much Enchantment it's going to use because Great Old One is right there, so it's got just about everything. C
Assassin (Rogue): Listed second;¹ I feel like 5e crapped on feats just so that it could make mediocre subclasses like this. D
Battle Master (Fighter): Listed second;¹ I don't think I've yet seen a more convoluted version of "Warrior getting moves" than this, which is astounding given what edition it is. But hey, feats are now entirely optional! D-
Beast Master (Hunter): Listed second;¹ they had to revise this to make it work because they couldn't figure out how not to screw up their own action economy. F
Berserker (Barbarian): Simple and sweet, but totally ignores the "will attack friends and foes alike" part. Not sure how I feel about that. N/A
Champion (Fighter): Listed first.¹ Not at all a champion of anything; instead just the base fighter but more so. Has Improved Crit twice, which is okay. D
Conjuration (Wizard School): Minor conjuration would be how prestidigitation would work if upgraded like any other cantrip; benign transposition is a spell. C
Dark Elf: Absolutely superior to the High Elf (one bonus language < two spells), but Drow shouldn't get extra attention when Duergar and Svirfneblin don't. I mean, c'mon. A
Devotion (Paladin Oath): Listed first.¹ See my post on Paladin oaths.
Divination (Wizard School): This is how you make a school specialist! S
Draconic Bloodline (Sorcerous Origin): It's like it's copied and pasted straight from 4e! (That's bad.) Rather unimpressed here. D
Eldritch Knight (Fighter): Casts like the Arcane Trickster,² so is probably way more powerful than the other two. Also, hooray, being an armored mage is horrendously easy! B for Broken (Probably)
Enchantment (Wizard School): Everything here is already a spell or inferior to an existing spell except Split Enchantment, which is metamagic. D
Evocation (Wizard School): A mixture of Warmage's Edge, a psionic feat, and a metamagic feat/archmage ability. It works. C
Fiend (Warlock Pact): Fire spells! Overall, it's like a very themed 3.5 Warlock, but Hurl Through Hell (which is delightful) should be a spell or invocation. A-
Forest Gnome: This is pretty much the 3.x Rock Gnome (Forest Gnomes also had pass without trace), but that's fine because the original distinction between dwarves and gnomes in D&D was pretty much between Mountain Dwarves and these guys (but treated as living in hills). A
Four Elements (Monk...Tao...): Listed last;¹ I tried comparing this to other casters and figured out it was rather awful. I like the idea, though, especially since it's an MP/mana system. D
Great Old One (Warlock Pact): This is essentially the psionic subclass (hence why they didn't need an officially psionic one); the flavor spilled over into the Sorcerer's version. Too bad it reduces Lovecraftian horror to telepathy + tentacles; there's barely any horror here. C
High Elf: Again, when you see the Dark Elf traits, you have to wonder about these ones. I dislike that they made the Forgotten Realms the default setting because Moon and Sun Elves are twists on Grey and High Elves, leading to wonky expectations. Not terrible, though. C
Hill Dwarf: +1 Wis should help a smidge with saves, while +1 HP/level is cool. (The whole "hit point maximum" phrasing is probably meant to be helpful, but I find it confusing.) B
Hunter (Ranger): Listed first.¹ Given how Beast Master was, I'd hope that this archetype (listed first¹ because it's literally what the class is?) would be better. It at least works, I guess. Man, do I hate this. D-
Illusion (Wizard School): I feel like this exists to make Toons. C
Knowledge (Cleric Domain): I love Divination and knowledge, yet because the 5e skill system is atrocious, I find this domain dreadfully boring. D
Land (Druid Circle): This is one-half of the 3.x Druid with an emphasis on spells. I like that they tried to make a Final Fantasy-style Geomancer out of it, as that seemed missing previously. B
Life (Cleric Domain): Just like we can't drop the spell slot system (which people have rebelled against since OD&D), we can't stop having our healbots wear heavy armor for no good reason. This at least works. C
Light (Cleric Domain): They didn't even bother making this not fiery, which was an issue with the Sun domain. C
Lightfoot Halfling: I don't see how Naturally Stealthy would differ from the normal rules, but whatever. Hooray normal-ass halfling! C
Lore (Bardic College): Y'know how you have lots of "yeah, that's the class itself but more so" subclasses? That's this one. C
Moon (Druid Circle): AKA the Wild Shape subclass. I mean, I've always thought wild shape should be a spell, but whatever. C
Mountain Dwarf: +2 Strength is great; having armor proficiencies that either overlap with class-provided ones or contradict class features in all situations where you want the Strength bonus is rather bad. I note that Mountain Dwarves in 3.5 didn't differ from Hill Dwarves (outside of Realms content, where things had to be printed differently for everything). C
Nature (Cleric Domain): Ah, the opportunity to revert to 2nd ed. and before with respect to the Druid, COWARDS! C
Necromancy (Wizard School): Hey, at least it gets something like Rebuking. It would be great if necromancers could create skeletons at first level, y'know. C+
Open Hand (Monk...Tao...): Listed first¹ because it's another of the "this is the class itself" subclasses. At least it gets Quivering Palm? C
Rock Gnome: Remade into Tinker Gnomes without being Krynn cringe. C
Shadow (Monk...Tao...): This is the Shadow Dancer from 3.x but improved in not having a maximum teleporting distance per day. It's probably here for non-Rogue Ninjas, in all honesty. B
Stout (Halfling Subrace): Halflings haven't been called "stout" since AD&D; these are the equivalent of Tolkien's Stoors (appearance) swapped with the Harfoots' dwarven affiliations -- because D&D's subraces (outside of the Realms) were always more straight-forward (Hairfoots/Lightfoots = Humans, Tallfellows and maybe Ghostwise = Elves, Stouts/Deep = Dwarves). It's tempting to say "take this over a dwarf" because dwarf racials favor being Fighters anyway and this way you'd have access to Lucky. B
Tempest (Cleric Domain): I did not expect this domain to exist where others did not, but I suspect it's here to let you play Thor. C
Thief (Rogue): Listed first,¹ presumably because it's the original. Seems okay for the most part, but it makes me sad for the destruction of the skill system. C
Totem Warrior (Barbarian): Okay, first off, the appropriation. Tumblr likes to talk about how "spirit animal" is culturally appropriative, but it isn't: it's an English phrasing to describe a concept that has existed in cultures all over the world. Seriously, I want to smack people who talk about it because this is the culturally appropriation they mean: the word "totem" (an Ojibwe word) and, by extension, its aesthetic.
But worse than that, the options presented here aren't even balanced against each other -- no attempt whatsoever. D
Transmutation (Wizard School): I think someone wanted to make an alchemist, but couldn't bring themselves to let alchemists get away with what they're supposed to do. They couldn't even call it a Philosopher's Stone! D
Trickster (Cleric Domain): My main takeaway from this is that it sure is lovely how you can only have one domain! C
Valor (Bardic College): I thought this was about par for the mixing classes subclasses until I realized that it makes a Bard (now a full caster) nearly as good as a Fighter at what the Fighter does without any drawbacks. B for Broken
Vengeance (Paladin Oath): See my Paladin Oath entry.
War (Cleric Domain): Take my issue with the Valor Bard and increase it quite a bit, given the Cleric's spell list. Seriously, what gives? B for Broken
Wild Magic (Sorcerous Origin): 4e strikes again! At least this time the idea is coherent and kinda cool. For, y'know, power incontinence. C
Wood Elf: Almost the elfiest of elves; if you combined this with the Drow (Cha boost, Drow Magic) and/or Eladrin, you'd have the absolute elfiest elf. B
Finally, what's missing in terms of subs?
Barbarian: "Totem" Warrior should be the lycanthropy option.
Bard: I dunno, something that improves magic? I guess?
Cleric: I could list domains, I guess.
Druid: The core circles exist to represent what the class did in 3.x without alteration. Maybe an animal companion that didn't suck?
Fighter: To be fair, I think everything is missing from this class.
Monk: I'd have taken a weapon master over the elementalist any day.
Paladin: It's weird how this was presented -- standard, Nature, and Vengeance. If you're going to do oaths by what you're championing, Cavalier (Pathfinder) and Champion (Arcana Unearthed/Evolved) gave you a better template, while WoW gave a better trichotomy for oaths by party role (Holy = Redemption, Protection = Devotion, Retribution = Vengeance).
Races: All of the subterranean races are mentioned and treated as monsters except the drow.
Ranger: Couldn't they have done one focusing on improving your weapon style? I mean, the class can easily boil down to "archer;" let it.
Rogue: Swashbuckler's in a different book.
Sorcerer: As fun as Dragon Disciple may be, if you're going to make a Sorcerous Origin, it should function like free metamagic applying to certain spells -- like an elementalist or a cantripologist or something.
Warlock: Needs more cursing. And more necromancy.
Wizard: A generalist option
Footnotes
¹ Because alphabetization is for chumps! Surely this isn't dreadfully confusing and yet another sign of poor writing and game design!
² It casts like a Sorcerer, but it uses Int and the Wizard list like a Wizard!
2 notes
·
View notes
Text
fuck it. soma cruz fgo servant profile bc i make my own content
Servant: / Servant Class: Soma Cruz / Alter Ego
Origin: / Region: Castlevania Series / Japan, 2035
Alignment: Lawful Neutral(?) “Yeah, not sure how I classify as Lawful given my past life, but whatever.”
Aliases: The Dark Lord, Dracula, Soma Cruz
Parameters: STR (B) / END (A+) / AGL (B+) / MP (EX) / LUK (A) / NP (???)
Class Skills: Authority of Beasts (Fake), Core of Chaos (A), One Who Severs Fate (A)
Character Info: “In order for God to be perfectly Good, there must always exist an embodiment of Chaos, a Dark Lord to emerge from the evil of humanity’s hearts.”
For one thousand years, the Belmont bloodline had opposed the terrible night that Count Dracula would bring with his powers. After generations of suffering, the Belmont’s latest mantle bearer, Julius Belmont, along with their generational allies, the Belnades clan and a nameless soldier, had managed to permanently defeat Dracula with the help of the Hakuba Clan’s shrine magics. Severing his connection to his power and sealing Castlevania, the embodiment of his power, within a solar eclipse, Dracula had finally faced his demise in 1999, prophesied by Nostradamus one millennium ago. Thus, the strongest Dark Lord had fallen, his throne empty and awaiting a new master.
In 2035, Soma Cruz had visited the Hakuba Shrine to meet with his childhood friend Mina, unaware of the birthright he would claim.
Skills:
Chaos Ring A: An extremely powerful construct that channels the very essence of Chaos. It can only be found by the one who can traverse and control the Chaos Realm, the Dark Lords personal right. Wearing it grants the unlimited magical power of the Chaos Realm, but actual output depends on the user. If the Demon King’s Ring is the symbol of Dracula and his reign, then the Chaos Ring could be considered the symbol of Soma and his new beginning.
Thematic narratives aside, it’s a very convenient tool for Soma.
“It’s weird, but it feels like…it was made for me. Almost like a welcome gift.”
[5->3 Turns] [Charge NP (20%->30%), Increase NP Gain (10%->25%) (3 Turns), Gain a Delayed buff 1 turn after skill use (Unremovable): [Charge NP (20->30%)]
Armament Master D: Soma is extremely proficient at using any and all forms of weaponry. Due to Dracula’s vast reach, Soma has a vast number of different modern and mythical weapons and gear at his disposal, notable weapons including Excalibur (sealed in the stone), Hrunting, Caladbolg, Mjolnir, and even a Positron Rifle, to name a few. However, one weapon unique to Soma is the Claimh Solais, an Irish sword of light mentioned in many legends and defining the archetype of “Sword of Light.” It provides a great boost to parameters and is surprisingly light weight despite its size. Another unique weapon he wields is the Valmanway, the “Blessed Wind” that is always ‘cutting’ even when still.
(The rank is D because despite his proficiency, Soma has never had any formal training.)
“I mean, it’s just a sword, right? How complex is it? You can just swing it and things die. Though…considering I have ol’ Drac’s memories…sorta, maybe I’m just remembering it?”
[8->6 Turns] [Increase Atk (10%->20%) (3 Turns), Gain Critical Stars (5->15), Increase Critical Star Absorption (3000%) (3 Turns), Increase Critical Damage (10%->20%) (3 Turns), Apply Special Attack against Sky, Star and Beast attribute enemies (20%->40%) (3 Turns)]
Power of Dominance (EX): Soma’s inheritance from Dracula, or more fittingly, the Chaos Entity opposite to God. The Power of Dominance is a unique ability that grants a complete mastery over the abilities of any and all souls Soma can acquire from the enemies he defeats. All the monsters that Dracula unleashed in his crusade against humanity are the countless souls under his domain, even that of Death itself, and their powers rightly belong to him.
Soma can differentiate between the types of Soul Arts he uses, and this reflects accordingly in his Noble Phantasm.
“I never wanted this power, but I guess I’m stuck with it. I’ll always carry the target on my back, but at least I can look awesome as hell while doing it, I suppose.”
[5->3 Turns] [Decrease Enemy Charge by 1 (20%->50%), Select own NP Command Card’s type between Quick, Arts or Buster for 3 Turns. Effect of NP changes depending on which Command Card Type is selected. This skill is immune to debuff effects (such as Skill Seal)]
Noble Phantasm:
Advent of Sorrow – He Who Severed His Fate Against Chaos and God / Anti-Divine, Anti-Self / Rank (???)
A manifestation of Soma’s power truly made his own, separate from the title of Dark Lord and Dracula. Having defeated the Chaos Entity, he managed to sever its connection to his soul, and be saved from his Fate. Even so, he carries the Power of Dominance with him always, and the countless souls and followers of Chaos always wait and offer themselves unto Soma to lead and command them. In his own imperfect way, neither holy nor demonic.
After all, he’s only human.
(Note: If used by the true Count Dracula, this would be considered an Anti-Humanity NP)
[Type: Buster] – [Deals massive damage to a single enemy (1200%->2400%), Chance to Decrease Charge by 1 (80%->100%). Overcharge: Increases own Buster Card Effectiveness (20%) (1 Turn) and NP Damage (1 Turn) (20%) (Activates First)]
[Type: Arts] – [Deals heavy damage to all enemies (400%->800%), Chance to decrease Atk (15%->25%) and Critical Chance (20%->30%). Overcharge: Inflict Curse (5 Turns).]
[Type: Quick] – [Apply Debuff Immune (1 Time), and Restore HP each turn for self (3 Turns) (1000->1500), and Increase NP Gauge each turn for self (3 Turns) (5%). Overcharge: Apply Def Up for all allies (3 Turns) (25%->50%).]
Bond Lines:
Bond 1: “Heh, thanks for having me! I’m still not too sure about how all this stuff works here, but if you need a monster taken down, I’m your guy.”
Bond 2: “So the rest of those dudes call you ‘Master’? Kind of awkward, but I guess they’re magical familiars at the end of the day. What? So am I? Sorry but, vampiric powers aside, I’m just a normal guy. I was even in University before I got dragged here. I’ll just call you [name] for now.”
Bond 3: “Do you like curry? Arikado said I shouldn’t be using these monster souls for dumb stuff, but they don’t mind. They always talk to me and really want to help me out wherever I am. Except Death, that guy sucks. He’s always breaking into my home and trying to convince me to become the next Dark Lord and to ‘accept my throne’ and stuff.”
Bond 4: “…It scares me, sometimes. Knowing not only what I am, but what I’m very capable of.”
Bond 5: “Y’know…you could always come back with me to my world, if you want to escape. I’ll take you to meet Mina, and Hammer and Yoko and Julius and Arikado and…Hm. Sorry. I know you can’t abandon this world, it’s where you grew up. There’s…a lot of people here who love you. You should always remember that and hold it close. It saved my life when I thought I couldn’t go on, and I know it will also save yours.”
Voice Lines:
(1): “I’m glad this place is a lot simpler than the castle. That place had so many hidden rooms and puzzles that I felt like I was going insane…No, as a matter of fact, DON’T tell me about all the secret workshops here.”
(2): “Hm? What’s up? I’m just relaxing here. Sorry if I’m taking up space. It’s nice to just take a moment.”
(3): “No, no, don’t worry. Even if I could, I’m not the type of guy to just go around stealing souls. I only do that to monsters, and even then, they become complacent once they return to me. I could show you some of the fun ones, like the Skeleton Gardener, if you’d like.”
Likes: “What I like? Curry! Oh, and Mina. She’s been with me for my whole life. I don’t know what I’d do without her.”
Dislikes: “This is gonna sound cliché, but garlic. It just tastes bad.”
Event: “Whoa, a party! Let’s go, I’m super bored cooped up in here.”
About The Holy Grail: “Wish granting? No thanks, I’ve read a ton of comics and things always go wrong. What? Of course, it’s a valuable source!”
Summon Quote: “Yo! My name is Soma Cruz. I’m just a regular high school student. Um…Where am I, exactly?”
Happy Birthday: “Happy Birthday, [name]! I’m so gonna throw you the coolest party ever! I’ll even invite Mina…If, uh, if that’s cool with you?”
(King Hassan): “D-Death!? Why are you��Oh. Uh, sorry about that. You reminded me of...someone. I’m sure you’re a cool guy underneath all that armor.”
(Vlad/Vlad III (EXTRA)): “Huh. So, in this world, the legend of Dracula is just that? A legend? Well, that’s a huge relief. I’m not exactly the kingly type.”
(Gilgamesh/Gilgamesh (Caster)): “Hey [name], could you give me a hand? This gold idiot keeps saying I stole his weapons, but they’re mine! …Hey! Stay back with those portal things! Someone, help!!!”
(Scathach): “Jeez, I bet Arikado will get along with that slave driver. Seriously, Arikado’s method of teaching me my powers amounted to locking me in a room with monsters and a pocketknife. Huh? She’s stomping over here!? [name], help me!”
(Marie Antionette): “I don’t know why, but…Looking at you makes me sad. I’m sorry.”
(Sessyoin Kiara): “Master, this lady is coming onto me WAY too hard. She keeps telling me to ‘embrace what I am’ and junk. I already get enough of that crap from cultists back home.”
(Sakata Kintoki/Astolfo/Romulus/Romulus-Quirinus/Ashwatthama): “Hey, you’re a pretty cool dude, huh? Finally, someone with some style!”
(Amakusa Shirou): “Ugh, you remind me of Fortner. And stop using rosaries around me, I’m not Satan, you jerk!”
(Mephistopheles): “Please, leave me alone. I’m not evil, nor will I ever be the Dark Lord. Just because I have those powers doesn’t mean I’m defined by them. Also, the alarm clock you gave me exploded, so I don’t think you’re all that trustworthy anyways.”
(Beni Enma): “Aww, you’re so cute...Wait, from the Underworld? A yokai? Guess you’re one of mine, then. If you want, I can loan you some Skeleton Waiters for your chain.”
(Any Avenger-Class Servant): “Hey, you guys are kinda like me! Everyone says you’re evil, but you’re actually really nice!”
(Arcueid Brunestud): “Master, that girl is shooting me some pretty weird looks....Huh? Reincarnating vampire? Oh, I guess I’d look pretty weird in that case. That’s not her fault, though. Maybe I’ll go say hi.”
QQABB Deck:
Buster Card: 2 Hit / -Soma raises Excalibur (still in the stone) and smashes it into the enemy-
Quick Card: 5 Hit / -Soma holds Valmanway in front of him, turns around, and multiple slashes envelop the enemy-
Art Card: 3 Hit / -Soma does two horizontal strikes, then a third overhead strike with Claimh Solais-
Extra Card: 6 Hit / -Soma punches twice, does a spin-attack with Claimh Solais, then jumps back and fires his Positron Rifle-
Level Up: “Whew…I feel so powerful.”
Ascension 1: “Whoo! Good job, [name].”
Ascension 2: “This…This is just like then…[name], maybe don’t do this anymore.”
Ascension 3: “Please…stop. I don’t know if I can pull myself back this time…”
Ascension 4: “I see. Well…as long as you’re by my side, I’ll never succumb. So please…don’t die.”
Battle Start ½: “Just how many monsters out there!? In any case, let’s do this thing!” / “I’ll carry the mantle and defeat this terrible night!”
Skill ½: “Bullet, set…Enchanted, set…Guardian, set…” / “How about some of this!”
Attack Selection ½/3: “Hmm.” / “Seriously!?” / “Nice.”
Attack ½/3: “Hraagh!” / “Take this!” / “You’re going down!”
Extra Attack: “Let’s see you handle THIS!”
Noble Phantasm Selection ½: “Are…Are you sure?” / “I’ll trust you on this.”
Noble Phantasm: “I will never be the Dark Lord…You, God, and The World will just have to deal with it!”
Noble Phantasm Damage: “I won’t…Submit...!”
Regular Damage: “Gah!”
Defeated ½: “Mina….” / “Julius…our promise…”
Battle Finish ½: “That was a close one…” / “Anyone need some healing? I have some spare spoiled milk…Oh wait, none of you have a Ghoul soul, huh?”
#fgo#fgo fanservant#soma cruz#castlevania#read this and catch my disease#fucking LOVE this funky little pimp coat lad#'but zerav this is way too op'- shut up i deserve this my cock is huge and yours can be to if you let go of such foolish notions and go ham
24 notes
·
View notes
Text
Magia Record BG index and pre-release material
This is the second part to my post about Magia Record's internal minutinae, featuring background images and promo trailers. Like its sister post, this contains spoilers for the entirety of Arc 1 and Arc 2.
---------------------------------------
[Pre-release promo material]
The oldest screenshots and in-game footage I can find are from February 2017. (Some screenshots are taken from archive.org's capture of magireco.com.)
Link to February 2017 trailer (game footage from 1:10 onward)
Link to screenshot album on Imgur
-Both the screenshots and trailer footage feature more jagged, speech bubble-like dialogue boxes, with character name tags displayed separately in the corners of the screen. Previous dialogue is pushed up and fades away as new speech bubbles come in.
-The dialogue scene appears to be an alternate setup for the prologue, still told from Homura's PoV. Iroha (initially labeled "???") seems to have rescued Homura from something (a tough Kamihama witch?), which Madoka and Mami then show up to thank her for.
-The Homura rescue scene's background is still present in the final version, though I can't recall if it was ever used. I can't say for certain where the scene was supposed to take place, but the background’s file ID in the final version corresponds to Daitou Ward.
-The team composition screen may look unfamiliar to NA players, but that's because the NA server started off with a redesigned version that was introduced later. The overall layout here is identical to the initial Japanese release. Differences include: “Formation" in katakana rather than "Magic Formation" in kanji, a big chunky "EPISODE" button in place of the Leader crown icon, placeholder stats, a version of Brave Echelon with different position-based buffs (ATK up for front two, ATK down for back two, nothing for center), and a WIP version of Mami's card art with simpler shading
-WIP version of the character upgrade menu. Differences include: different graphics and text on the menu icons, a simpler Favorite button, an entire bar gauge for Magia Level, a much more elaborate bar gauge for Episode Level, a different graphic for the character tray, and a completely unshaded WIP of Kyouko's card art.
-Beta version of the battle system. Features a placeholder version of the Magic Formation floor graphics, purple HP bars, metallic circles for the Magia and Support icons, and no Skill tab. The Skill tab is added in the trailer footage, which also shows that the disc queue at the top of the screen goes from right to left. The background is that of Shinsei Ward's residential street from the final version, albeit with differences such as the presence of a crosswalk.
-Beta version of Iroha's Skills page. She has 3 Accele discs (maybe for testing purposes?), her Connect is simply titled "Heal Connect", Strada Futuro hits a horizontal line rather than the entire field, and text reading "[Small]" is used in place of the final version's Roman numerals.
---------
The next set of screenshots and footage is from March, respectively taken from Famitsu's online articles and a promotional event at Anime Japan 2017.
Link to March 2017 event video
-Magic Formation floor graphics are now finalized. Status bars are closer to the final version, though MP bars have a segmented design and green/blue palette rather than blue/purple. Support unit's icon is the same as the final version's green "haven't used this friend support today" icon. Disc queue still goes right to left.
-I can't seem to find the original source, but the same battle setup is featured in a beta Mirrors screenshot (see album). The background is simply a monochrome version of the Shinsei street, presumably as a placeholder.
-A small popup indicates whether a given character can receive a Connect or not. (...This would have saved me a lot of "oh, duh" moments trying to Connect to a character who's been stunned. :V)
-Differences in Disc pools (Mami w/ a vertical Blast by default!) and Connect effects (DEF pierce for the entire team?!) may be for debug and/or footage-recording purposes.
-Iroha's arrows have a blue aura rather than a yellow one, and their trajectories in her Magia animation are different. The blue aura draws a lot of attention to how simple the arrow graphics actually are.
-Mami's Doppel animation uses doll-like Inu Curry graphics for Mami herself, as opposed to her actual battle sprites in the full version. Judging by similar promo art and a leftover screenshot of Madoka's Doppel (see below), this was the case for all characters' Doppels at this point in development.
---------
The March 2017 Famitsu screenshots are a mix of new ones and ones from February.
-Chapter 1-1 is titled "Captured in an Unknown Town", and features only one battle. If I had to guess, I'd say that this is the Homura rescue scene from earlier. The "Another Story" tab is labeled "Side Story", and a unique "Weekday Quests" tab is present (removed in favor of the "Event Quests" tab next to it in the final version, since each actual event has its own unique tab graphic).
-The battle screenshots are largely the same as the Anime Japan footage, but feature a completely unused Labyrinth BG(!!!). It features dinner plates (pancakes?) on a table-like floor, slices of meat both on the floor and hanging from a hook in the distance, and both skyscrapers and large marble statues half-submerged (being melted down?) in a gold-colored substance.
If I had to make a guess... it personally feels reminiscent of the Happy Prince, so perhaps it was meant to be a Labyrinth background for the Oscars at one point?
---------
Finally, there's the July 2017 trailer and two app store preview images.
Link to July 2017 trailer
Gameplay footage in the trailer is fairly close to the final game, with a few exceptions:
-Alternate versions of Candy and Rebecca's Labyrinth BGs during Chapter 1 dialogue, respectively replaced with Zenobia and Candy in the full version. They appear to be 'partly-merged' Labyrinth environments that incorporate parts of the surrounding city area. (I suspect this is why they were replaced, as creating different variants for every location in the city would be more effort than it was worth.)
(Incidentally, another shot from Chapter 1 has Iroha mentioning the “Sandbox Witch’s Labyrinth” as she does in the full version, so the various trailer shots may have been recorded at different times.)
-A hodgepodge of minions other than Echoes in the Enhancement Labyrinth.
-Unfinished-looking version of Zenobia's vertical Blast animation?
-Himika included as a 3-star in the initial character lineup(!), and her family dinner Memoria included as a 2-star with a different name and effect ("The Mao Family's Dinner Table" / DEF up for 3 turns).
-Ria's fashion show Memoria, likewise included as a 2-star.
-An unused 1-star Ability Memoria featuring Oscar. Might have been a Magia Adept, judging by the pattern of Memoria effects before it?
-All character-specific Memoria seen are 2-star Ability types, rather than the 3-star Skill types that most are in the final version.
-A dummy graphic for Shizuku's coffee shop Memoria, presumably because its art wasn’t finished yet.
-Different graphics for scenes in Kirika and Oriko’s MGS: Teresa in Zenobia’s labyrinth for Kirika (replaced with Candy and her labyrinth on release), and a different time of day for the alleyway background for Oriko. (While their dialogue is blurry, it does appear to match MGS lines from the full version.)
-Much like the team comp screen, the Enhancement Gem tray and Memoria equipment screens are those from the initial Japanese release, which were eventually redesigned into the versions NA started with. (Memoria were equipped on a per-character basis rather than a per-team basis, which was super cute in theory but super cumbersome in practice.)
---------
The two preview images can still be found on certain app stores, such as the Japanese Google Play page. Different screenshots are used on other Japanese pages and (naturally) all of the English pages.
-The lighting in Zenobia's battle BG is slightly different. (Yes I did a side-by-side comparison. Yes I'm a huge nerd.)
-The 'doll-style' version of Madoka's Doppel animation can be seen in the bottom-right. (It's still there on the English page, too!)
-Perhaps most notably: a screenshot of dialogue that appears nowhere in the final version, with Iroha commenting on the terrible state of someone's Soul Gem in a Labyrinth with a nail polish motif. All other dialogue in these screenshots matches the final version, and the dialogue box graphics are up to date with the rest of July's promo material. The Labyrinth is almost definitely Elfriede's, but why it would appear in the storyline is unclear. (Did Doppels summon an entire Labyrinth around themselves at some point? Or... :U)
---------------------------------------
[Background index]
Similarly to the character sprites, background images are given a 5-digit ID, with the first 4 digits (listed here) corresponding to the location depicted. The last digit counts up for each additional variant of the background: 1, 2 and 3 typically correspond to day, sunset and night variants, respectively.
Something interesting about the BG index is that a fair number of locations (though not all) are grouped geographically rather than chronologically. This helps pin down some locations that aren't immediately clear in-game, including a couple that aren't labeled on the Anime Japan 2019 map.
Incidentally, the Anime Japan 2019 map shows that Takarazaki is located directly west of Kamihama, while Mitakihara is located to the north-west.
(Bolded locations have corresponding files in the battle BG folder. A couple of them are even found only in said folder.)
1101 - Shinsei panorama
1102 - Shinsei residential street
1103 - ---
1104 - Shinsei tiled path
1105 - Mitama's shop (back room)
1106 - Mitama's shop
1107 - Kamihama University (front gate)
1108 - Kamihama University (back field)
1109 - Construction site (incl. Sapphire Lips labyrinth)
1110 - Blossom flower shop
1111 - ---
1112 - Crescent House, main lounge
1113 - Crescent House, computer lab
1114 - Crescent House, living room
1115 - Crescent House, Iroha’s room
1201 - Mizuna castle town
1202 - Mizuna residential street
1203 - ---
1204 - Mizuna road
1205 - Mizuna Shrine (gate)
1206 - Mizuna Shrine (interior)
1207 - Mizuna Girls' Academy (front gate)
1208 - Mizuna Girls' Academy (back field)
1209 - Art museum
1210 - Ryuushinkan dojo
1211 - Mizuna Castle
1301 - Suitoku shopping center
1302 - Sankyou street 1 (near grocery store)
1303 - Sankyou street 2 (near candy store)
1304 - Sankyou side street
1305 - Sankyou Educational Academy (front gate)
1306 - Sankyou Educational Academy (back field)
1307 - Sewer tunnel
1308 - Sewer clearing (incl. Pearl Eye labyrinth)
1309 - Natsume Books
1310 - Suitoku public bath (*only in Home BG form)
1311 - Emily's Counseling Room
1312 - Sankyou shops
1313 - Suitoku Temple (exterior)
1314 - Suitoku Temple (interior)
1315 - Cherry tree park
1316 - Ashitaya candy shop
1401 - Chuuou panorama
1402 - Chuuou main intersection
1403 - Chuuou highway
1404 - Chuuou sidewalk
1405 - Radio tower outskirts
1406 - Radio tower cabin
1407 - Cyberspace
1408 - Helipad
1409 - Chuuou Academy (front gate)
1410 - Chuuou Academy (rooftop field)
1411 - Puella Care trailer (exterior)
1412 - Puella Care trailer (interior)
1413 - Chuuou main intersection - additional variants
1501 - Sakae panorama (upwards camera)
1502 - Sakae intersection
1503 - ---
1504 - Sakae shopping street
1505 - Kamihama Memorial Archive
1506 - Memory Museum (incl. Ruby Navel labyrinth)
1507 - Memory Museum hallway
1508 - Kanagi's cafe
1509 - Sakae Integrated Academy (front gate)
1510 - Sakae Integrated Academy (back field)
1511 - Sakae panorama (head-on camera)
1512 - Alina’s Atelier
1601 - Koushou cable car station
1602 - Koushou intersection
1603 - ---
1604 - Koushou side street
1605 - Old trainyard
1606 - Chiaki bento shop
1607 - Ikumi's cafe
1608 - Koushou School (front gate)
1609 - ---
1610 - Yayoi factory
1611 - Amane Bamboo
1612 - Promised Blood warehouse (exterior)
1613 - Promised Blood warehouse (interior)
1614 - Koushou electric town
1615 - Subway tunnels
1701 - Daitou river bridge (unused?)
1702 - Daitou apartment complex
1703 - ---
1704 - Daitou street
1705 - Lake facing Ferris wheel
1706 - Daitou apartment hallway
1707 - Daitou apartment stairwell
1708 - Daitou apartment mini-mall
1709 - Daitou apartment park
1710 - Daitou apartment roof
1711 - Daitou apartment interior
1712 - Abandoned theme park site (incl. Aquamarine Heels labyrinth)
1713 - Foot of Ferris wheel
1714 - Chelation Land
1715 - Daitou shrine
1716 - Daitou festival stalls
1717 - Daitou Academy (front gate)
1718 - ---
1719 - Neo Magius auditorium (exterior)
1720 - Neo Magius auditorium (interior)
1721 - Kamihama Penitentiary (incl. Garnet Pinky labyrinth)
1722 - Kamihama Penitentiary underground
1801 - Minaminagi waterside cafe
1802 - Minaminagi waterfront sidewalk
1803 - Minaminagi Free Academy (front gate)
1804 - Minaminagi waterside road
1805 - Waterfront fountain park
1806 - Minaminagi container port (incl. Diamond Hair labyrinth)
1807 - ---
1808 - Kamihama Aquarium (Folklore of 0 hideout)
1809 - ---
1810 - Second-hand clothes market
1811 - Minagi Sea hotel exterior
1812 - Nachtmärchen house exterior
1813 - Nachtmärchen house interior
1901 - Hokuyou panorama (w/ Saint Lilliana Academy)
1902 - Hokuyou residential street
1903 - ---
1904 - Hokuyou side street
1905 - Mirror mansion
1906 - Mountain trail
1907 - Mountain viewing platform
1908 - Hotel Fendt Hope room
1909 - Eternal Sakura tree
1910 - Touka's computer lab
1911 - Eve's chapel
1912 - Hotel Fendt Hope jail cell
1913 - Forest clearing / former Fendt Hope site
1914 - Radio telescope
1915 - Radio telescope field
1916 - Hotel Fendt Hope basement
1917 - Hotel Fendt Hope hallways
1918 - Hotel Fendt Hope exterior (incl. Turquoise Ears labyrinth)
1919 - Hotel Fendt Hope stairwell
1920 - Hotel Fendt Hope lobby (w/ Soldier Bear)
1921 - Hotel Fendt Hope secret passage
1922 - Walnuts
1923 - Walnuts kitchen
1924 - Roof (site of the Magius' wish)
1925 - Touka's room
1926 - Saint Liliana Academy (front gate)
1927 - Saint Liliana Academy (back garden)
1928 - ---
1929 - Moo-Moo Farm
1930 - Forest thicket
1931 - Satomi Medical Center exterior
1932 - Hokuyou lakeside street (incl. Opal Neck labyrinth)
1933 - Former Fendt Hope site - additional variants
2001 - Iroha and Ui's bedroom
2002 - Neighboring city intersection
2003 - Neighboring city side street
2004 - Neighboring city industrial site
2005 - Azalea House
2006 - Mitakihara school hallway
2007 - 15th-century Europe woodland
2008 - 15th-century Europe village
2009 - 15th-century Europe castle
2010 - 15th-century Europe camp
2011 - 15th-century Europe fortress bridge
2012 - 15th-century Europe chapel
2013 - 15th-century Europe dungeon
2014 - Mitakihara hospital roof
2015 - Chocolate shoppe
2016 - Madoka's bedroom
2017 - Mami's living room
2018 - Sky (OG series, end of timeline 4)
2019 - Mitakihara school roof
2020 - Mitakihara school classroom
2021 - Mitakihara school front gate
2022 - Neighboring city sidewalk (incl. Yuna/Iroha mindscapes)
2023 - 15th-century France map
2024 - FM Kamihama studio
2025 - Beaches
2026 - Beachside trees
2027 - Shrine forest
2028 - Seaside cliff
2029 - Beachside inn exterior
2030 - Beachside inn interior
2031 - Ocean
2032 - Fishing spot
2033 - Octopus House
2034 - Grotto
2035 - Summer festival stalls
2036 - Summer festival stage
2037 - Kyuubey in the window
2038 - Classroom (diary flashback)
2039 - City wreckage (site of Madoka's wish)
2040 - Madoka's magic circle
2041 - Outer space
2042 - Madoka dimension
2043 - Riko's dream (landscape)
2044 - Riko's dream (crowd)
2045 - Nagisa movie theater still
2046 - Neighboring city intersection
2047 - Wooded path near beach
2048 - Gravel beach
2049 - Deep forest path
2050 - Forest pond
2051 - Cavern
2052 - Futatsugi City construction site
2053 - Snowglobe
2054 - Rocky beach shore
2055 - Lighthouse
2056 - Water park (slides)
2057 - Water park (cafe)
2058 - Water park (kids’ pool)
2059 - Water park (indoor pool)
2060 - Water park (show stage)
2061 - Dragon Palace Aquarium (exterior)
2062 - Dragon Palace Aquarium (courtyard)
2063 - Halloween Castle labyrinth
2064 - Angels on the Road locations
2065 - Tamaki residence
2066 - “Mr. Purrs-a-lot” set
2067 - Tangled-Up Ruins labyrinth
2068 - Seabed
2069 - Cemetery Banquet labyrinth
2070 - Hotaru’s dreamscapes
2071 - Bygone Dream castle grounds
2072 - Medieval Japanese armory
2073 - Medieval Japanese audience chamber
2074 - Medieval Japanese town
2075 - Grass plain
2076 - Morgue
2077 - Dream fog (Grief corrosion)
2078 - River w/ drifting flowers
2079 - Sunflower field
2080 - Anime train interior
2081 - Anime train platform
2082 - Cafe BIG WAVES interior
2083 - Cafe BIG WAVES exterior
2084 - 5th Anniversary gemstones BG
2085 - Fire/ice illusion town
2086 - Fire/ice illusion caves
2087 - Snowfield
2101 - Hospital interiors (group 1)
2102 - School interiors
2103 - Arcade
2104 - Shopping mall (escalators)
2105 - ---
2106 - Train station (turnstiles)
2107 - Generic bedroom
2108 - Generic living room
2109 - Supermarket
2110 - Concert
2111 - Fast-food joint
2112 - Convenience store exterior
2113 - Riverbank
2114 - Playground / Festival stalls
2115 - Back alley 1 (OG series episode 5)
2116 - Under-construction building
2117 - City skyline
2118 - Mirrors interiors (incl. Nanoha arenas)
2119 - Mikazuki Villa (Iroha's bedroom)
2120 - Mikazuki Villa (living room)
2121 - Banbanzai (interior)
2122 - Restaurant
2123 - Hotel bedroom
2124 - Kamihama shopping street
2125 - Dream fog (incl. Kazumi event BG)
2126 - Mikazuki Villa (kitchen)
2127 - Banbanzai (exterior)
2128 - Halloween theatre
2129 - Run-down house
2130 - Alina's cube Labyrinth / Dark clouds (Atelier event)
2131 - Mifuyu's illusion desert
2132 - Dance studio
2133 - Outdoor cafe terrace
2132 - School gymnasium
2135 - Bird's-eye view of Kamihama
2136 - ---
2137 - Hospital interiors (group 2)
2138 - Dilapidated building hideout
2139 - Underpass
2140 - Shopping mall (upstairs boutiques)
2141 - Clothing store
2142 - Park clearing w/ benches
2143 - ---
2144 - Traditional house (interior)
2145 - Mifuyu’s room
2146 - Posh house (living room)
2147 - Posh house (bedroom)
2148 - Office
2149 - Sakae Integrated Academy art studio
2150 - Futatsugi City bridges
2151 - Library
2152 - ---
2153 - Western mansion (interior)
2154 - Western mansion (exterior garden)
2155 - School interiors (night + Uwasa variants)
2156 - City rooftops 1 (green rooftop)
2157 - City rooftops 2 (gray rooftop)
2158 - City rooftops 3 (rooftop rooms & pipes)
2159 - Back alley 2 (Rebellion-esque)
2160 - Back alley 3 (Takarazaki)
2161 - Live show stage
2162 - Nayuta’s residence (kitchen)
2163 - Train car interior
2164 - Graveyard
2165 - Kamihama Big Sight (exterior)
2166 - Kamihama Big Sight (interior)
2167 - School interiors (Mizuna school festival variants)
2168 - Karaoke room
2169 - Mikazuki Villa (exterior)
2170 - Train station (platform)
2171 - Mikazuki Villa (past interior)
2172 - Takarazaki train station
2173 - Youth community center (exterior)
2174 - Youth community center (interior)
2175 - Apartment living room
2176 - Apartment entryway
2177 - School classrooms (Christmas)
2178 - Ryou’s newspaper club room
2179 - Apartment exterior
2180 - Hospital staff area
2181 - Riverbed w/ bridge
2182 - Waterfall basin
2183 - Broadcast studio
2184 - Shed
2185 - Prep room
2186 - City skyline (Arc 2 Chapter 10)
2187 - Car interior (Arc 2 Chapter 12)
2188 - Auto-Purification System dome
2189 - Kamihama Student Association Halloween event (exterior)
2190 - Kamihama Student Association Halloween event (interior)
2191 - Futatsugi Halloween torii road
2192 - Hospital interiors (group 3)
2193 - Shii’s orphanage
2301 - Homura's living room
2302 - Train platform (OG series episode 8)
2303 - Dog Drug Reinforcement!!
2304 - Site of Homura vs. Walpurgisnacht
2305 - Mitakihara school road
2306 - ---
2307 - Mitakihara food court
2308 - Mami's kitchen
2309 - Mami's foyer
2310 - Sakura family church
2311 - Bus stop (OG series episode 8)
2312 - Overpass (OG series episode 6)
2313 - Construction site (OG series, time-stop training)
2314 - Homura's hospital room
2315 - Kyousuke's hospital room
2316 - Mabayu's room
2317 - Café Récompense exterior
2318 - Café Récompense interior
2319 - Red-tinted industrial area (OG series timeline 3)
2320 - Factory entry gate
2321 - OG series hospital roof
2322 - Rebellion watertop cafe
2323 - Rebellion highway arch top
2324 - Rebellion Gothic ruins
2325 - Rebellion alleyway (Sayaka reveal scene)
2326 - Rebellion cityscape (blimps)
2327 - Scene 0 green TV
2401 - Sky backdrops
2402 - Forest w/ full moon
2403 - United Kimochi labyrinth
2404 - Scene 0 dark void
3101 - Madogatari collab BG (*only in Home BG form)
3102 - Rarity Star chapel
3103 - Darkness-covered France
3104 - Coco Ichi
3105 - Kamiha☆Magica concert
3106 - Purgatory
3107 - Site of Darc vs. La Reine (battle BG only)
3108 - Kamihamageddon (*only in Home BG/menu BG form)
3109 - Pucelle Academy / Palace interior shots
3110 - Refrigerator
3111 - Ark of Memory
3112 - 15th-century castle town
3113 - Oriko’s house
3114 - Oriko’s nightmare
3115 - MagiRepo Hawai’i vacation
3116 - MagiRepo throne (*only in Home BG form)
3117 - MagiRepo Kamihama M.V.D.
3118 - Café LycoReco
3119 - MagiReco + LycoReco skylines
3120 - MagiRepo sports day (*only in Home BG form)
41043 - Coalsack
46000 - Teresa arena
46001 - Candy arena
46101 - --- (empty bc 6101 = Shitori Egumo)
46102 - --- (ditto)
46103 - Zenobia arena
46104 - Rebecca arena
46105 - Stacey arena
46106 - Shin arena
46107 - Durbar arena
46108 - Paola arena
46109 - Lucy arena
46110 - Etteilla arena
46111 - --- (empty bc 6111 = Made in 168?)
46112 - Oshiti arena (battle BG only)
46113 - Raspberry arena (battle BG only)
46114 - Boxwood arena
46115 - ---
46116 - ---
46117 - ---
46118 - --- (empty bc 6118 = Neo Dorothy?)
46119 - Маруся arena
46120 - Slave of Anima arena
46121 - --- (empty bc 6121 = Eckert)
46122 - --- (empty bc 6122 = Martina)
46123 - Blot arena
46124 - Ichizo arena
46201 - Echoes arena
46202 ~ 46206 - --- (empty bc they correspond to boss IDs that just use the Echoes arena?)
46207 - Pillar of Tomorrow arena 1
46208 - Pillar of Tomorrow arena 2
46209 - Pillar of Tomorrow arena 3
46211 - Mirrors gateway (regular)
46212 - Mirrors gateway (Halloween - battle BG only)
46213 - Mirrors gateway (New Year's)
46214 - Mirrors gateway (Charlotte)
46215 - Mirrors gateway (Christmas - battle BG only)
46400 - Patricia arena
46401 - Gertrud arena
46402 - --- (empty by 6/7405 = Gertrud’s 2nd minion slot)
46403 - Charlotte arena
46404 - Uhrmann arena
46405 - --- (empty bc 6405 = Walpurgisnacht)
46406 - Albertine arena
46407 - H.N. Elly arena
46408 - ---
46409 - Elsa Maria arena
46410 - Isabel arena
46411 - Patricia arena (sports day ver.)
46412 - Roberta arena
46413 - Gisela arena (battle BG only)
46414 - Oktavia arena (rock concert ver.)
46415 - ---
46416 - Homulilly arena / Rebellion sky (dark rainbow)
46417 - Kriemhild Gretchen (OG series timeline 4 vantage point)
46500 - Matasaburo arena
46602 - Witch of bulls’ arena
46800 - Little Goat's Dream arena
46801 - Little Bear's Dream arena (battle BG only)
47000 - Huygens area
47001 - Harold area
47101 - --- (see above)
47102 - --- (see above)
47103 - Zabaii area
47104 - Joseph area
47105 - Ekaterina area
47106 - Kotori area
47107 - Patan area
47108 - Bona area
47109 - Coco area
47110 - --- (empty bc 6110 = Etteilla)
47111 - ---
47112 - Suzugamori area
47401 - Anthony area
47403 - Pyotr area
47408 - Ulla area
47416 - Rebellion cocoon castle (Homulilly minions’ area?)
48000 ~ 49401 - Copies of corresponding 46000 Labyrinth BGs, with time-stop filter
49000 - Teresa arena (ceiling view)
5001 - Tokime Village
5002 - Tokime Village side path
5003 - Tokime Village river bridge
5004 - Tokime Village ritual stage
5005 - Tokime Village underground shrine
5006 - Tokime Village forest shrine
5007 - Tokime Village house interior
5008 - Tokime Village mountain top
5101 - Futatsugi City catacomb
5102 - Futatsugi City demolition site
5301 - Yukuni City main street
5302 - Yukuni City mountain road
5303 - Yukuni City parking lot
5304 - Yukuni City traditional street
6001 - Sacred tree
6002 - Burning forest
6003 - Sengoku period house interior
6101 - Pharaoh’s throne room
6102 - Alexandria street
6103 - Desert
6104 - Canyon
6105 - Cleopatra’s bedchamber
6201 - Fjord village
6202 - Battle of Stamford Bridge
6203 - Fjord village bedroom
6204 - Fjord ocean sunset
6301 - Tibetan monastery
6302 - Tibetan town
6303 - Tibetan bedchamber
6304 - Tibetan grassland
6401 - Yamataikoku village houses
6402 - Yamataikoku village paddy
6403 - Yamataikoku house interior (altar)
6404 - Yamataikoku house interior
6501 - Pompeii street
6502 - Pompeii house interior
6503 - Pompeii manor courtyard
6504 - Pompeii temple
6505 - Pompeii ocean cliff
6506 - Spacetime rift
9000 onward - Assorted battle BGs, converted into static versions for... some purpose? I dunno. Whatever it was, new ones stopped being added around April 2018, when the second chunk of Chapter 7 came out. Consists of all main-story battle BGs up to the first chunk of Chapter 7, labyrinth BGs up to Shin, and the unique battle BGs from Darc's event and Valentine's Day 2018. Also includes a time-stopped version of Patricia's arena.
9999 - Summer 2022 “notebook page” BG (*only in menu BG form)
---------------------------------------
[Unused Memoria images]
For the most part, the Memoria image index counts up linearly in order of JP release, but there's a few interesting gaps in the numbering. Some of these gaps can be filled in from pre-release footage. Others can be filled thanks to event CGs elsewhere in the game's files: specifically, those that use the Memoria-based CGs’ "memoria_xxxx.jpg" naming scheme despite lacking a Memoria counterpart of their own. (Many non-Memoria event CGs don't use this kind of filename, which marks these ones out in particular.)
1012 - 1-star Ability Type featuring Oscar, pictured in pre-release footage. Judging by the pattern of other 1-star Memoria effects, it may have been a Magia Adept.
1036 - 2-star Skill Type with a similar image to “All Eyes On Me,” pictured in pre-release footage. Ria’s hair ribbons differ from the final version. Matches Ria’s position in the initial character lineup, had she been included upon release.
1040 - “The Mao Family's Dinner Table,” a 2-star Skill Type with the same image as “The Mao Family is as Rowdy as Ever” (albeit cropped differently). Featured in pre-release footage, with its effect being DEF up for 3 turns. Matches Himika’s position in the initial character lineup, had she been included upon release.
1058 and 1060 - Unknown. Both go within the handful of Memoria featuring scenes of Momoko's team in Chapter 1 and 2.
1092 - Matches Ria’s position in the initial lineup, had she been included upon release. Presumably the original slot for her personal Memoria.
1096 - Matches Himika’s position in the initial lineup, had she been included upon release. Presumably the original slot for her personal Memoria.
1157 - CG of Tsukasa doing laundry at the workshop, forming a pair with Tsukuyo's koto practice CG.
1211 - CG of Kanagi on the phone in Chapter 7.
1242 - CG of Iroha's birthday (:D!) from Mikazuki Villa's Summer Vacation.
1256 - Duplicate CG of "Three Geniuses", prior to its actual implementation as a Memoria later on.
1296 - Unknown? Goes between Mitama's New Year Memoria and the Limit Breakers.
1410 - CG of Yuna's "awakening" in Crimson Resolve. May have been intended as either an extra event reward or a shop-bought event currency Memoria.
Also, Memoria specific to non-JP servers appear to count up linearly from 9001 (NA server), 10001 (CH server), and 100001 (TW server). (Not totally sure about the CH and TW servers, though, since I haven’t seen the actual filesystem for those. Could be a wiki placeholder?)
30 notes
·
View notes
Text
Final Fantasy II review
One of the most interesting parts of the Final Fantasy series, and a big reason why I’m so fond of it, is that every main series game takes its own approach to the gameplay. From the job systems of III and V, the Materia system of VII, the Junctioning system of VIII, or the straight up action combat of XV, every game has a different focus that makes them stand out, and while the results can certainly fall short at times, it’s still something worth commending. For example, take the subject of today’s review, Final Fantasy II. For the second game in the series, and a game that came out in 1988, it’s a huge step up from the original game in a lot of ways. A much more detailed plot, containing several defined playable and supporting characters, a much more experimental battle system, the introduction of many elements, gameplay and otherwise, that would establish a true identity for the series, away from just being a ripoff of Dungeons & Dragons 1st edition, it’s an impressive and critical step forward for the series. Unfortunately for the game, it hasn’t been 1988 in over 30 years, and it’s now easily the weakest game in the series in my opinion. As for why that is, well, that’s what we’re taking a look at today. As with the first game, I’m reviewing the PSP version. Note I’ll be pretty lax with spoilers, so take caution, if you actually care to avoid spoilers.
Story:
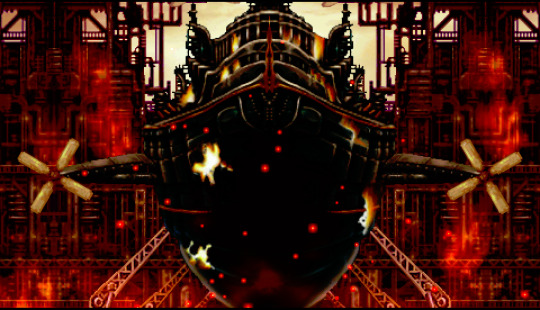
Final Fantasy II takes place in an entirely different world than Final Fantasy I, a tradition that every main series game would follow. The peace of this world is shattered after the rise of Emperor Mateus of Palamecia, who, bent on world domination, raises a fearsome army and unleashes the denizens of Hell upon the land, conquering a large portion of the world. The city of Fynn organizes a large resistance effort, only to be attacked by the Emperor’s army, forcing a small remnant to flee to the town of Altair, establishing the Wild Rose Rebellion, led by Princess Hilda. During the fall of Fynn, four youths, Firion, Maria, Guy, and Leon, attempted to escape as well, only to be attacked and left for dead by the Emperor’s soldiers, with Leon going missing as well. Rescued by the rebellion, and healed by the white wizard Minwu, Firion, Maria, and Guy, having nothing left to return to, and wishing to search for the missing Leon, join the rebellion to fight back against Palamecia. Meanwhile, the Emperor, his army having taken heavy losses taking Fynn, takes to devising much less conventional methods of establishing his rule, starting with a massive airship called the Dreadnought, meant to scare the populace into obedience, on threat of total destruction.
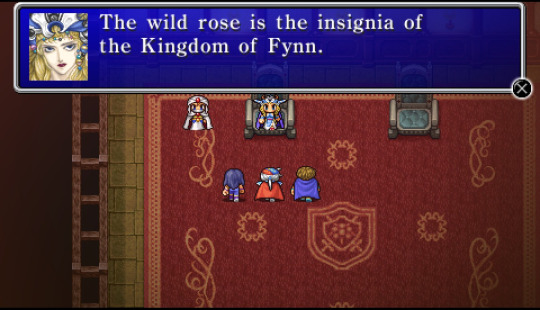
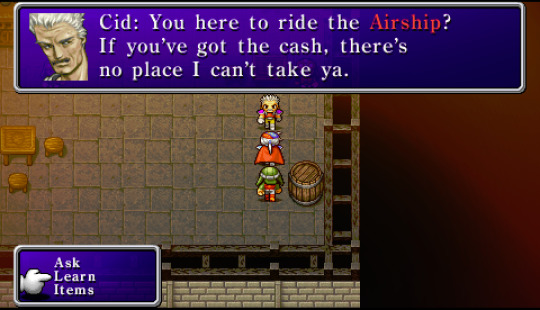
Compared to the very light plot of Final Fantasy I, the story here is much more involved. Instead of wandering between locations more or less aimlessly, there’s always an explicit plot reason to go to new locations, the party being given tasks like finding mythril to supply the rebellion with better equipment, or trying to recruit potential allies. Compared to the party in the first game just being completely blank slates, the party consists of the more distinctive Firion, Maria, and Guy, with the fourth slot being filled by various guest characters that come and go as the story goes on, such as Gordon, the prince of the fallen kingdom of Kashuan, and Ricard Highwind, the last of the dragoons, and there’s actually an established side cast, including characters like Hilda, the leader of the rebellion and princess of Fynn, Paul, a noble thief assisting the rebellion, and Cid, a former knight who maintains the world’s only airship, with this notably being Cid’s first appearance in the series.
Final Fantasy II is also very noticeably darker than the first game. While the plot circumstances of the first game weren’t exactly cheerful, with the world falling apart due to the influence of the Fiends, outside of a select few towns, this wasn’t very obvious, and the game overall carried a bright, adventurous feel. Not so with Final Fantasy II, where the Emperor is a much more prominent and ruthless villain who’s already conquered or ruined a majority of the world, always keeping another plan on standby, and staying one step ahead of the heroes. Many characters die over the story, from random NPCs to even temporary party members, and the game overall carries a prominent melancholic, empty feel to it, one that’s very impressive considering the time it was made.
To be honest, however, it actually goes a bit too far in this regard. Almost everything the protagonists accomplish comes at the cost of allies dying, or something preventing them from fully completing their mission. Many NPCs are pessimistic about the chances of humanity being able to win against the Emperor, and so much destruction is wrought upon the world by the end that it seems there’s not even much left to save. From the very beginning of the game, which starts with your party instantly being destroyed in an unwinnable battle, the game is nothing but a constant stream of death and hollow victories, with plenty of characters you can find mourning their losses, and there’s very, very few points in the story that offer any sort of relief from it. Combined with the Emperor barely seeming bothered by anything the party accomplishes, and running circles around them more than a few times, it’s very easy to simply lose any investment in the story.

The characters unfortunately only add to this lack of investment. It’s hard to hold it against the game, but the main party of Firion, Maria, and Guy is still easily the least developed cast in the series. They have little dialogue to themselves to begin with, and have very minimal personality traits, especially Firion, who pretty much only exists to be the hero by default. Additionally, whereas in most RPGs, the cast’s varying personalities and skills tend to gain importance, here, the only skill any of them have is Guy being able to talk to beavers, which only comes up once in a way that doesn’t even affect the story, and, again, they have nearly no personality otherwise, which totals out to each of them having, at best, 1 moment each throughout the story where they’re not completely interchangeable with each other, which barely elevates them above the completely blank slate party of FF1.
The guest party members and NPCs fair a bit better, but not by much. The guests tend to be at least mildly interesting, like the fatalistic Minwu, the cowardly Gordon, who learns to be courageous as the story goes on, to the pirate girl Leila, but they’re still nothing special, and there’s surprisingly few other NPCs, most of which aren’t too memorable either. Even the Emperor himself is about one of the most stereotypical evil emperor characters you could have, not helped by the very few scenes he gets. That’s not to say he’s a bad villain, though. His successfulness does create a presence that looms over the entire story, and he pulls off one of the coolest plot twists in the series; after being killed by the party in a very easy battle late in the game, he simply returns as a demon himself, having become far, far stronger than he had ever been in life, to the point of taking over Hell itself. It’s such a unique and unexpected twist on the seemingly weak political villain that it alone cements the Emperor as one of the more memorable villains in the series. Overall, while the writing of the game is quite impressive for the time, and laid a good deal of groundwork for the improved writing of future entries, it’s just passable at best nowadays.
Gameplay:
Here’s where things really start falling apart. On the surface, not much the combat doesn’t seem terribly different from Final Fantasy I, with it still being a standard turn based system with basic commands like attacking, using magic, and defending. The big differences in Final Fantasy II’s combat lie in the character progression. The first game had you simply selecting a party of 4 classes at the start of the game, gradually making them stronger across the game by leveling them up and acquiring specific equipment and spells for each, like pretty much every normal JRPG. FF2, on the other hand, uses a much more complex system. Every party member is capable of using every weapon and learning every spell, in the process abandoning the D&D system of set spell charges and instead introducing the traditional MP system, and characters are not set in specialized classes and roles. Instead, FF2 discards the usual EXP based leveling system, and instead uses a stat leveling system, where the individual stats of each character level up separately depending on the course of battle, and while each character starts with predetermined stats that favor a particular role for them, with enough grinding, you can still reshape them however you wish. This stat growth system would later be used and refined for the SaGa series, and it’s a very ambitious attempt at improving upon the party building system the first game established.
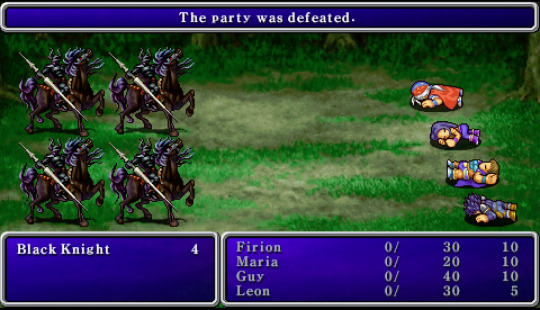
In total, there are 12 main stats that can be increased through battle: HP, your health points, which is raised in regular intervals, or losing HP in battle, MP, magic points that allow you to use spells, which is raised by having MP reduced in battle, Strength, which determines your physical attack, and is raised by using the attack command, Magic, which determines how much MP you get when it is gained, and is raised by having MP reduced in battle, Spirit, which determines the strength of white magic spells, and is raised by casting white magic in battle, Intelligence, which determines the strength of black magic spells, and is raised casting black magic in battle, Stamina, which determines how much HP you get when it is gained, and is increased by losing HP in battle, Evasion, which determines how likely a character can dodge physical attacks, and is raised by being targeted by attacks in battle, Agility, which factors into evasion calculation, and is raised by having high evasion, and Magic Defense, which determines how resilient a character is to offensive magic, and is raised by being targeted by offensive magic in battle.
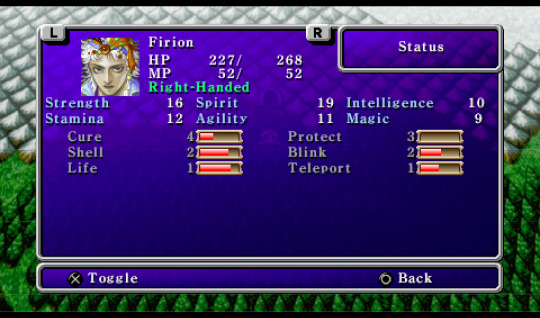
However, it doesn’t stop there, as individual weapon types and spells also have levels that can be raised, which is done so by gaining skill points in them by attacking or casting them during battle. Once enough skill points are gained, they advance to the next level, with the hard cap being 16. Gaining weapon levels allows that character to be more accurate and attack more times at once with that type of weapon, and raising spell levels increases their power and makes them more accurate. Each weapon type, consisting of swords, spears, axes, staves, knives, bows, shields, and unarmed, have different attributes, such as spears being a relatively balanced type, with lower individual power than swords and axes, but higher accuracy, while bows are allow characters to attack from the newly introduced back row, which makes them immune to physical attacks, but prevents them from attacking with any other weapon type. While focusing on one weapon type with each character would seem the most efficient, the game only tends to give you one or two weapons of each type at a time, many of which have good boosts in power or added effects, making focusing on a few different types a decent idea.
Shields are unique in that, while equipping them doesn’t raise your defense as might be expected, and actually lower your attack, they give large evasion bonuses that makes dodging attacks much easier, and have the chance of blocking a physical attack completely even if something does connect, all of which increases as you gain levels in it. As for other defensive equipment, you have heavy and light types of armor, with light armor giving less defense bonuses than their heavier counterparts, but not weighing nearly as much, and thus leaving you much more evade. As for spells, they start out very underpowered, and have awful accuracy in the case of buff and debuff spells, but become much more effective after a few levels, with the downside of them costing more MP to cast with each level gained. Characters can learn up to 16 spells, and are free to remove them at any time, at the cost of having to level them again from scratch if they ever relearn them. Instead of simply learn spells by buying them in towns, spells are instead learned from tomes, which can be bought from shops, found in treasure chests, or dropped from enemies. Using them on the field teaches a character that spell, while using the tomes in battle instead casts a high level version of the spell, at the cost of losing that tome.
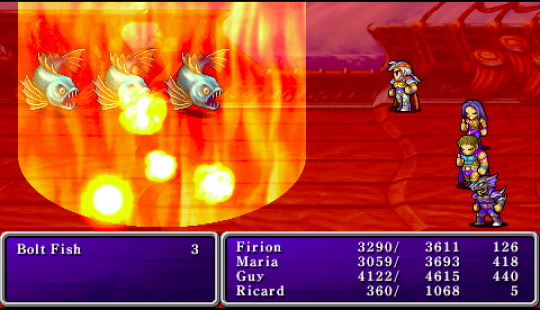
Unfortunately, as creative as this all is, this system has some serious issues. The main one, which you have already guessed, is that the game is incredibly, incredibly grindy because of these mechanics, and in a much worse way than most other RPGs. While not every stat is going to be important for each character, depending on how you build them, there’s still a lot of things it forces you to keep track of. Even if you want to make a dedicated mage, sticking in the back row with a bow for the whole game will leave them with so little vitality and HP that they’ll just be uncomfortably fragile, and with the magic attacks enemies have by the endgame, you really want to keep them in the front row for a good part of the game. Most spells, including important ones like Life and Esuna, for reviving party members and removing status effects respectively, while extremely useful, have such horrible accuracy to start that they’re completely useless before you level them up, and the weapon distribution is quite unbalanced, with swords having easily the best selection even in the midgame, essentially leaving most other types as stopgaps.
While you might level your important stats a good bit just naturally going through areas, trying to deliberately level any of them is a commitment. While HP, strength, spirit, intelligence, and magic defense tend to come easily enough, increasing stamina often only happens through the loss of a large chunk of their maximum HP, which, obviously, preferably doesn’t happen on a regular basis. This goes likewise for MP and magic, which is rather irritating, as not only do you need more and more MP as your spells level up, but ways to restore MP are extremely limited and costly. The bizarre loop of agility factoring in to evasion increasing, while itself only leveling up based on your current evasion, means that the only reliable way of increasing either is to equip the lightest equipment you have. While leveling up weapon levels is easy enough, especially since you can dual wield different types at once, leveling up spells is a much slower process, with casting low level spells during random encounters, even those that won’t actually help at the moment, often being one of the only feasible ways to get them leveled quick. You may even be tempted to ignore magic beyond simple spells like Cure because of the individual effort needed, but the game will quickly hammer the importance of magic into you; from the randomly encountered flans and bombs that either have absurd physical defense or tend to explode if not fully defeated in one turn, with magic being the only reasonable way to take them out, to mandatory bosses that hit quite hard, and also have enough physical defense to make physical attacks nearly worthless without absurd grinding, you’re not getting through the early game without dedicating some time to magic. On the flip side, another early dungeon has a boss that outright absorbs magic, making physical attacks the only way to beat it.
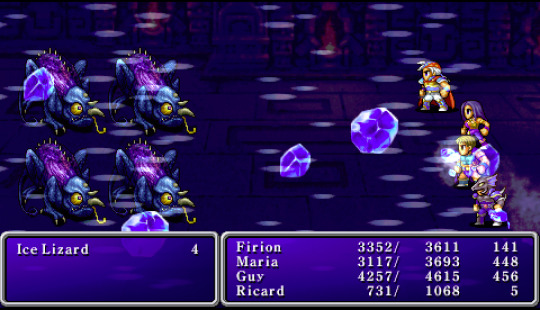
The game has quite a reputation for being brutal, and it’s not inaccurate, with most dungeons being more than glad to beat you down without remorse, and there’s tons of troublesome enemies to be found throughout the game, doubly so if you try to go for all the treasure chests in the area, as many of them are guarded by encounters called monster-in-a-box, which are often much more powerful than other encounters around. Most bosses are more than happy to make your life miserable too, especially the infamous Lamia Queen and Behemoth. However, this difficulty is in no way fair or well designed. While the growth system can easily leave you unsure as to whether or not you’re prepared for a dungeon, since you have no easy guideline to go off of compared to standard leveling, that’s not even the worst of it. The design of the dungeons, and even the world map, are horrible. There’s tons of doors scattered throughout pretty much every dungeon, and 90% of them lead to dead end rooms with raised encounter rates. There is absolutely no way to tell which doors are dead ends and which are necessary to progress, so you’re reduced to trial and error, which is extremely exhausting when there’s so many doors per dungeon, and you’re almost guaranteed to get into an encounter before you can leave each one, and if you’re tempted to ignore any doors when they don’t seem mandatory to progress, in many of those cases, there’s treasure rooms hidden among them, once again with no way to figure out other than guessing.
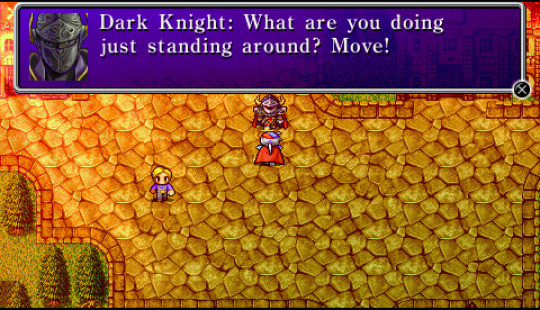
The world map, on the other hand, is one of the best arguments against open ended world design there is. Compared to the first game, there are almost no physical obstacles barring where you can go, other than a few rivers that are only crossable by canoe, something you get almost immediately, and a few areas only accessible by boat. Instead, you’re kept out of where you’re not supposed to be through the Dragon Quest 1 method of having the random encounters kill you horribly. The problems with this method are twofold: not only are the borders between where you’re supposed to be and where you’re not very thin, to the point of running into late game enemies just outside of the first town if you go just a biiit too far to the left, compared to Dragon Quest 1 often using bridges as visible borders between areas, but it just doesn’t really fit with how the game is designed. Dragon Quest 1′s pacing is rather relaxed, as while you do have plot objectives, the game doesn’t rush you to fulfill them. You’re meant to just hang around the areas you can survive in, grinding your way up and getting whatever equipment you need until you feel confident to move onto whichever area seems to be designed for next. In Final Fantasy II, you’re constantly being sent back and forth between areas to get new orders or do whatever the plot wants of you at that moment, but while the game loves telling where to go, it’s pretty bad at telling you how to get there, with its often vague directions being spread out between NPCs in multiple towns, to boot. While there is a map of the overworld you can access, it can still get pretty annoying having to meticulously check where you’re going, and you’re still liable to being decimated just because you wandered into a harmless seeming area. One nasty example comes after completing Kashuon Keep, not too far into the game. You’re expected to head back to Altair, which is on the other side of the world and is quite a bit of a walk, but heading south soon loops back to the Altair area, making for a much shorter walk. Trying to put this idea into practice, however, sends you across the large Palamecian desert, full of enemies more than eager to tell you that this area is still a few dungeons away from being accessed. It’s not completely unsurvivable, and can be safely traversed by finding the nearby hidden Chocobo, but it’s still a nasty situation after a very irritating dungeon.
The biggest, and most frustrating, source of difficulty, however, is that the game stubbornly refuses to tell you anything about what’s going on behind the scenes. There’s so many mechanics left unexplained that cause a lot of difficulty if you don’t understand them. For example, every enemy has a stat called rank, which determines how many skill points for your weapons and magic you’ll actually get by using them on said foes. Essentially, if your weapon or magic levels are higher than the enemy’s rank, you need to use that weapon or spell more times in that battle based on the difference between the numbers to actually get any skill points. Not an unreasonable system, and you can view every enemy’s rank in the bestiary, but the game never directly addresses this, and even the most powerful enemies only go up to rank 10, effectively softcapping your skills and spells at 10, which often leads into having your party attack each other to bypass the entire mechanic, a depressingly efficient solution most of the time. Other stats the game never cares to explain are evasion and magic defense, which both display both numbers and percentages. For evasion, the number represents the number of attacks that character is capable of dodging, as physical attacks strike multiple times per round, and the likeliness of evading each attack. With magic defense, the number represents the number of attempts at avoiding a status effect can be made, and the percentage represents the chance of successfully doing so. Despite the name, the stat does not reduce damage taken from magic attacks.
On the subject of magic, the spells available to you are also plagued with unneeded complexity and vagueness. First off, the descriptions for many spells tend to only give you the barest idea of what they actually do; Aura “Enhances effectiveness against various foes.” It never tells you what enemy types count, or that it only becomes effective against certain types as its level increases, you just have to hope that it’s working whenever you use it. Barrier “Raises a barrier to defend against special attacks.”, again giving you no indication as to what it’s actually protecting against. Shell and Wall both claim to raise magic defense, but give no obvious indication how they’re actually different from each other, and Dispel claims to remove protective magical barriers, which lowers the target’s magic defense, even though you may infer that it removes buffs, like in later games. Other spells tend to be redundant or very situational. Basuna removes temporary status effects, compared to Esuna removing permanent status effects, which is near worthless since not only do temporary effects wear off after a number of turns, but they go away after battle regardless, and are rarely effective enough to waste a turn removing. Fear increases the likelyhood of enemies fleeing battle, which is not only rare to actually work, but is worthless, since you don’t get any credit for defeating any enemies that do flee. Sap reduces the MP of the target, which is not only rarely likely to work, but counterintuitive if you have the infamous Osmose spell, which saps large amounts of MP while restoring the same amount for the user. Status effects also have different elements to them, namely body, mind, and matter, with most enemies having different resistances. Some spells, like Stop and Paralysis, have the same effect, but different elements, and keeping track is both difficult, both remembering which spell is which element, and what enemies are actually affected by each element, and nearly pointless, since the effects are rarely worth bothering with in favor of just attacking. Matter elemental spells, however, are rarely resisted by most enemies, even bosses, and mostly comprise of instant death spells like Mini, Break, Teleport, and most infamously, Toad. Not only does this game make instant death spells effective, it makes them downright overpowered, with almost every encounter being capable of being solved through judicious application of Toad.
But the peak of all this is a special property that some enemies, like ghosts and the final boss, have applied to their physical attacks: a draining effect that not only restores their HP by the amount of damage inflicted, but specifically inflicts 1/16th of the target’s maximum HP per hit, with them eventually attacking 8 times per turn by the final dungeon. To sum this up simply, this makes heavier equipment worse than worthless. Not only will the defensive power do nothing to protect from this damage, but it actively weighs you down and destroys your evasion, guaranteeing you’ll take all those possible hits unless your did some extreme evasion grinding. You’d be protected better by not wearing anything at all, because at least then you’ll make use of all your natural evasion. Unless you want to constantly heal your characters for half their health everytime you run into specific encounters, you have to dedicate a lot of your time, or most of your run through the game, to getting their evasion leveled enough that this isn’t a problem. Knowing this can be the difference between fruitlessly blowing all your resources and breezing through effortlessly, and there is a certain weapon, the Blood Sword, that has this same draining effect, which can singlehandedly annihilate the final boss once you’ve figured this out. While there’s a few other smaller issues, like several encounter formations that cannot be ran from for no apparent reason, other than possibly being formations used in certain monster-in-a-box encounters, those are the main issues, and being aware of them, and having the information to circumvent them, makes the game much, much easier. If anything, it makes the game extremely breakable. From physical attackers that dodge everything thrown at them, to spellcasters that can wipe out encounters with a single cast, it doesn’t take much to erase the difficulty once you know what you’re doing.
As for bonus content, there’s Soul of Rebirth, a bonus mode unlocked after completing the main game, first added in the GBA version, which focuses on several characters who die in the course of the story finding themselves in what they think is the Jade Passage, the path to Hell. While a cool concept that has a really neat final boss of its own, namely the light side of the Emperor, who split off from his dark half after death and instead took over Heaven, it still has issues of its own, namely that most of the party are guest characters in the main game, and carry over the stats, equipment, and spells they had when they left the party, meaning if you didn’t bother training them and stripped them of all equipment before they departed, you’re in an absurd time. The mode is also quite short, and only consists of two dungeons that are just mirrored versions of the final two dungeons of the main game and a town. A neat addition, but not much more than that. Other than that, the only optional content to find in the main game is the Arcane Labyrinth, a bonus dungeon added specifically for the PSP release. The game uses a keyword system where you can learn important terms from NPCs, and ask about those terms to get directions or a bit more plot. It’s sort of neat in concept, but in practice it doesn’t amount to much other than make it slightly more annoying to find out what to do, especially if you manage to miss a keyword. The Arcane Labyrinth, however, revolves around its use. In order to progress past the entrance, you must select a keyword at the portal to the next floor, which then takes you to a specific floor based around the keyword you chose. Almost every floor has a little sidequest to solve, like defeating specific enemies or giving items to NPCs, which give you new keywords exclusive to the labyrinth, or hints for some of the trickier floors. While they can be kinda annoying to do, you only ever have to complete them once for their reward, and can otherwise run straight to the exit on subsequent visits.
Every floor requires you to select keywords for the next, with 45 different floors being available in total, and the Arcane Labyrinth is actually split into 3 sections, with the northwest section requiring four floors to be visited, the northeast seven floors, and the south ten floors, though while you can’t visit the same floor twice in the same section, you can choose repeats in separate sections. There is much more strategy than simply randomly selecting floors, however. Each keyword belongs to a different category, which cause different reactions depending on your next choice. Picking keywords in the same category in a row cause better treasure to spawn and lower the encounter rate, while picking something in a category that opposes it, such as a matter and materials floor after going through a magic and spirits floor, has the opposite effect. Even more importantly, each playable character has a set of keywords that resonate with them, to varying degrees. This becomes important after finishing all three sections, which unlocks the Arcane Sanctuary. Within is Deumion, the master of the Labyrinth, who summons a superboss, Phrekyos, to test you, with its strength varying depending on how many keywords you’ve gotten through the story, making it beatable even in earlier parts of the game. Beating Phrekyos allows you to get a reward from Deumion; if you picked enough keywords that resonate with a certain party member, you will be able to get their ultimate weapon, which not only have tons of power, but confer massive stat boosts when equipped. If your keywords didn’t resonate enough, you only get an elixir, something that you can buy, albeit with absurd amounts of money. The optimal keywords for the main party are only unlocked in the endgame, but it can actually be worth visiting early for the party members that are used in Soul of Rebirth, as the weapons make it much more manageable, though visiting too early can end with you being much too powerful compared to how you should be. A special set of keywords also allow you to see Deumion’s past, leaving you able to either peacefully receive from him the Revive spell, or fight him as the ultimate superboss for the Destroy spell. Both are disgustingly impractical, but it’s a neat idea nonetheless. Overall, the Arcane Labyrinth, though still rife with its own set of frustrations, is actually one of the more enjoyable bonus dungeons I’ve come across, with a very creative concept that actually leaves you curious as to what the next floor could hold.
Overall, while the gameplay of Final Fantasy II has some interesting ideas, it’s held back by an irritating lack of explanation as to how it works, the overly grindy design, and just plain poor design and execution. It’s a miserable experience that makes even other early JRPGs seem appealing, just because their grinding is so much simpler to handle, and I need to note, this is the most polished version of the game. Between bugs, a horribly limited inventory, and even more absurd design decisions, like stats sometimes decreasing instead of increasing, or weapons massively decreasing magic accuracy, and increasing skills taking even longer, any version earlier than the GBA version is even more infuriating and even less playable.
Graphics:
Final Fantasy II is actually a quite nice looking game, as with the rest of the Final Fantasy releases on PSP. Locations have a lot of detail to them, like ambient effects like rolling fog, and noticeable lighting effects, with a few areas like Pandemonium having pretty fascinating designs, and there’s some pretty good looking cutscenes for bigger story events. Spell animations are pretty neat, and attack spells have a nice detail where their animations become more elaborate as you level them up more. Characters even finally look accurate to their original art by Yoshitaka Amano, unlike earlier versions, though that’s not necessarily a positive: between Firion’s random mishmash of materials and colors, Maria and Guy’s awkward, half complete outfits, and the terrifyingly gaudy Emperor, this is possibly the tackiest looking cast in the series. The monster designs, on the other hand, are top notch. After Final Fantasy I’s bestiary was lifted almost entirely out of D&D, this game introduced a lot of original and iconic enemies, like the coeurls, the bombs, the malboros, the adamantoises, and the behemoths. It even introduced chocobos, though it’s easy to miss their existence, as their confined to one spot on the world map that’s decently hidden. While there are still a lot of oddities like vampires and giant mantises, it’s still one of the biggest advancements in the series in this regard. The enemy designs also excel in that they look much more threatening than in the first game. These enemies literally come from Hell, and look the part. I’d even go so far as to say that this is the best looking Final Fantasy game on the PSP, and has some of the coolest enemy designs in the series.
Sound:
Final Fantasy II’s soundtrack was composed by Nobuo Uematsu, as usual, and remixed by Tsuyoshi Sekito for the remakes. All things considered, it’s my least favorite soundtrack in the main series. That’s not to say it’s bad at all, and there are some great tracks like the Rebel Army Theme, the somber main theme which plains on the overworld, Ancient Castle, the Tower of the Magi, Battle Theme A, typically used for major boss encounters, and Battle Theme 2, the final boss theme. However, as an overall, it’s just not quite as good as the soundtracks for the rest of the main series, to me. It also contains my least favorite version of the Prelude, being just a bit too high pitched for my liking, and my least favorite battle theme, sounding way too intense just for regular encounters, and quickly becoming grating not too far into the game. The soundtrack is good in its own right, and is worth a listen, it just doesn’t quite reach the heights that some of the others do.
Conclusion:
Overall, I give Final Fantasy II a firm not recommended. Though very ambitious and important for its day, its story, design, and mechanics have aged like milk compared to the other Final Fantasy games on the NES. While technically still perfectly playable, especially with deeper knowledge as to how the mechanics work, it doesn’t make for much fun at all. You’re better off keeping your distance from this entry.
Now, with this absurdly long review finally done, finishing this game, and the subject of my next review, hopefully to be soon, have convinced me I need a break from older RPGs for a while. Till next time.
-Scout
6 notes
·
View notes
Text
Final Fantasy 8: An Amazing Story Hidden Behind Weird Mechanics
So it should be said that there is one thing that I love and that is some good narrative in gaming. I love it, give me a game with a good narrative and at least decent gameplay and I am in there, and a good narrative doesn't mean oscar level writing because I love Deadly Premonition, a notoriously weird game, but a golden game in my heart. Its story is weird and unique and at times outright strange, but it's endearing and I love how wild the story gets as it goes on. Now why am I talking about this? Why it's because of my lovely new bad gameplay good narrative obsession, Final Fantasy 8. That's right, gamer boys and girls we are going back to another old game, and that's because I just played it, and the remastered just got announced at E3 this year.
Alright so if you know nothing about the Final Fantasy series, let alone the 8th installment, let me help you out. Final Fantasy is an old franchise, it started in 1987 and got its name because the original name Fighting Fantasy was taken by a board game in the states, the myth of it being called Final Fantasy because it was a last ditch effort to make a successful game is just that, a myth. The game is prolific, being one of the granddaddy's of the JRPG genre and helping bring that good ol fashion turn based combat system popular in tabletop games like Dungeons and Dragons (D&D) to videogames. Final Fantasy 1 is a classic of gaming and also is kind of like D&D, you have classes similar to the previously mentioned board game; Warrior, Monk, Thief, Paladin; with a few of its own unique classes; Red mage, Black mage and White mage. The games story was very simple, worlds ending, killing these fiends and go back in time and stop Chaos from doing this over again, also at some point the game explains that you are from another universe and that's why you just start outside the beginning kingdom, Final Fantasy stories like to be a little wild at times.
Like D&D you gained levels in this game by fighting monsters, getting stronger with each fight and eventually being strong enough to be able to face the final boss on even grounds, or maybe a little above them if you grind out yourself to max level. This system, if you are into the RPG genre, is incredibly rewarding as you get to see your team of lowly nothings evolve into masters of combat who can slay gods. The best part, to me at least, is going back to the starting area or an area that gave you trouble and stomping on those monsters who thought they were so cool 20 levels ago. Now in Final Fantasy series this system is in most of them, fight monsters, get exp, level up and your stats go up with it, the special cases are Final Fantasy 2,6,8 and 10, and of these the worst offenders of weird leveling are 2, 6 and 8. That's right, I said it, 6 has a weird leveling system with level not raising stats and needing summons equipped to level stats, I personally don't believe that it deserves its spot as one of the best Final Fantasys but that is an article for another time. I could explain why each is weird and 10 is fun and different in a good way, but forget all that and let's get into the focus of this piece, Final Fantasy 8.
Now even though it is my new obsession in good story bad gameplay, my fascination for this game goes way back to when I was a 3 year old with a pizza hut demo disc. Yeah you bet that was a thing, you would order a large pizza and it would come with a playstation demo disc that had a couple of games, but the only one that mattered to little old me was the demo for Final Fantasy 8, or that game with the guy with the cool sword and big water snake, as I was 3 and couldn't read that well. Seriously, if you have played a Final Fantasy game before you would know that you can use summons by clicking the tab they are in and then selecting the one you want, well ol kid me thought it was random as I was just picking things at random. So what I am saying is, I have always had a special place for this game in my heart, so there might be a bit of bias.
So I spent some time flip flopping over what I wanted to discuss and explain first, story or gameplay, on the one hand I wanted you to know what FF8 had to offer narratively, but on the other hand I feel I should let you guys know what you're getting into when you play this. So I decided to compliment sandwich this one, but like a subway compliment sandwich where the teenager who doesn't really want to work there barely tries to cut your bread so the top part is like really thin. So thin that what I am going to give you is this, FF8 is a great story of a young man learning to overcome his own weaknesses to understand that strength can be found in companions, listen I know that sounds cliche but I need more space to talk about the amazing character development and got to tell you about this bad gameplay.
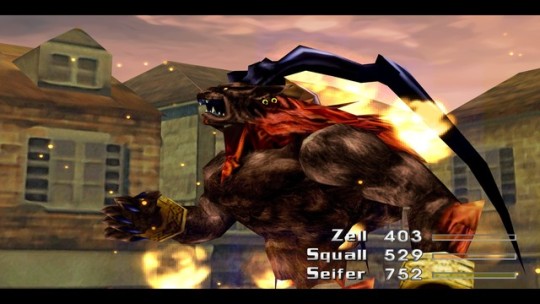
So remember when I said that old Final Fantasy's had a nice leveling system based on fighting enemies, getting exp and raising stats? Throw it all out the window, because like I told you earlier FF8 is one of the weird ones. So for some reason FF8 has a whole system based around equipping "Guardian Forces" (summons) and then through this unlocking the ability to junction (equip) magic to your stats; like strength, magic, hp and the other classics; while also being able to junction magic to element and status attack and defense, allowing you to be able to either protect or do damage based on said elements and statuses. Now you might be thinking how does this work, because magic is usually used based on magic points (mp) well there is no mp in FF8. This is due to the narrative stating that it is very rare for people to do raw magic instead they need to draw magic from nature and creatures/people and use it that way. This means that in FF8 magic is a finite resource and instead of regaining mp you have to spend time drawing magic that is randomized to be either 2 or 12 magic, so it can take awhile. If this sounds a bit weird and confusing, don't worry it kind of is, there are tutorials to explain it, but man is it a weird system. So why is this all necessary? Well unlike other Final Fantasy's, in FF8 leveling raises your stats by the littlest amount, so to be able to do decent damage and also defend against it you need to junction magic. Also to make things even worse, leveling can be a problem as monsters level with you, so if an enemy is tough for you at level 20, raising your level to 30 won't help you as they will be doing more damage and have more health. The game does try to offset this by making it so if an enemy had fire to be drawn at lvl 10, at lvl 30 they would have fira to be drawn, which would make it so that you can junction a more powerful magic and do more damage. FF8 also gives you the option to just cast magic instead of drawing it from enemies, and can be useful since most bosses have healing magic to draw from them meaning you can go in without a huge stock of cure's.
Alright so we have a confusing system with a bad mechanic of monsters getting stronger with you as you level, is that all that is weird? Nope. So remember the guardian forces I mentioned earlier? Well they are necessary to be able to junction spells to stats and make your party stronger, but there are a limited number of them and that usually means only three of the six party members will have guardian forces so you can make a decent party for fighting. The problem is that the game likes to switch around who is playable a lot, and while it is fun and interesting in the narrative, it sucks gameplay wise. The game does make it easy by letting you be able to switch who has what guardian forces in a menu, but it gets tedious after the 15th time you have to do it and especially when the game switches between two perspectives like 4 times in 30 minutes. Also sometimes you have dream sequences where you play as another team and when you come back to your main party everyone but Squall, the main character, has everything unequipped, so you have to go back and re-junction everything and it's just a waste of time. Listen I could keep going on the weird aspects of this game, but I don't want it to take up this whole article and we got cool card games to talk about.
FF8 does a lot of things in a weird and bad way, but that doesn't mean it doesn't do things really really right, and thats with Triple Triad baby! Triple Triad is the super fun card game that exist within FF8, a game so good that you can also play it in FF14. The game is easy to get into and can get pretty hard with each area of the game map have unique rules, yet you can game the system by going to areas and abolishing rules and bring rules from other regions to new regions. Well except for one region, it is the king of rules, no exceptions! The fun of this game is not just showing the npc's of FF8 why you are the Yugi Muto of Triple Triad, you see you can learn an ability to turn cards you win from Triple Triad into items, which in turn can be turned into spells, powerful spells, I'm talking spells you are not meant to gain until like lvl 45 or 50. This means that if you want to you can spend time in the starting area at lvl 7 and leave a powerhouse that level thanks to Triple Triad. But there is a problem, this method is not quick, it takes hours to do this and also to even be able to get the ability to do this you will need to get AP for your Guardian Forces, which means either fighting fights normally or carding enemies which kills them but doesn' give exp, it can only be done at low health so be careful not to accidentally kill them.
So I have given a decent way to have fun but let me give you guys, in my opinion, the best way to enjoy FF8's gameplay, cheats. That's right a game that's so weird that the PC port has cheats that you can add to your save. I'm not talking about the normal ones we saw when FF7 and FF9 were ported to modern consoles, like the ability to turn off encounters and have it so you don't lose health in combat and do max 9999 damage. I am talking about the ability to modify a save file so you start with most low and mid level magic at full stock on all characters, and let me tell you it is a blessing. On PC it also allows you to at anytime raise all magic stocks to 100 and max level Guardian Forces, and let me tell you guys if you don't have the patience for the grind or want to try and just enjoy the story I highly suggest using these cheats, it makes things so much easier and I hope that the FF8 port coming to console has these cheats too. Also I should let you guys know I didn't immediately use these cheats, I tried to play it legit about three different times and every time the grind burnt me out, honestly if it wasn't for these cheats I would never had enjoyed FF8's amazing story. Speaking of amazing stories, let's finish off this subway compliment sandwich and talk about the good stuff.
So let me give you guys the easy lore of this world, on this planet, there are two types of people, normal people and sorceress, sorceresses can use magic naturally and a lot of them use this power for world domination especially the last sorceress, Adel, who was in charge of the country of Esthar and almost succeeded, due to this the Gardens were created by a man named Cid with the sole purpose to be able to kill sorceress should one like Adel show up again. The thing is one will show up and I don't mean because of plots need for a main antagonist, I mean because a sorceress can not die until she passes her powers to another female. Our story follows the character of Squall Lionheart, a quiet and distant youth who wants nothing more than to be able to prove that he is strong enough to be on his own, so badly that he actively shuts out other people who try to get close to him. Our boy here is a SeeD candidate in Balamb Garden, which means he is close to graduating and being basically a mercenary for the Garden until the need to fight a Sorceress arrives. And from there that's how the story grows, you have a cast of characters that join over time each interesting in their own right, helping as you deal with a looming sorceresses threat. Sounds pretty standard right? Well let's be real even something standard can be handled masterfully and that is exactly what FF8 does. Before I get into that there are two more characters I need to talk about. Laguna Loire, a soldier of the Galbadian army, who Squall keeps having vivid dreams about, through these dreams you see piece by piece of what he went through and how these events shaped him and the world around him and also how he is connected to Squall. There is also Rinoa Heartilly, a young girl who wishes to free the city of Timber from Galabadian control and in the process acts as the catalyst to what motivates Squall to change, all do to a chance meeting. When you look at the plot of FF8 it is abit generic what with stopping a Sorceress from creating her perfect utopia and most characters, outside of the ones mentioned above, get little depth to them, but what makes this story so engaging and interesting is Squall.
You see Squall starts off as a character who I can say I was disappointed in and didn't really like, a character I had adored since I was a kid due to my memories with that demo. He is angsty, off putting and really annoying, hell it feels like half of Squalls Dialogue is "...", but the thing is, that's the point. Squall is like that because he is afraid of trusting people again, fearing that if he does he will get hurt again and abandoned like he was as a child, so he puts on this cold front to make it easier for him, he doesn't have to worry if people like and rely on him if he is cold and indifferent, they would all just hate him. It is through this premise and his chance meeting with Rinoa that we see how Squall grows and changes, a man who I started off hating and grew to love and it's because it feels natural. Squall isn't cold because he thinks its cool or because he knows he is better than everyone else, he is a kid, a sad kid who went through heartbreak way to young and is afraid to love someone again. He is thrust into a dangerous world and has to come to terms that his lifestyle will not work for him, that he needs and wants to rely on others and he can't just keep ignoring a part of himself. Through the course of FF8 you see a quiet kid with a broken heart, overcome himself and become a real hero and use his new strength to make sure he can protect those close to him as well as himself.
And now we reach a bit of a problem, I would love to explain more, I want to explain why certain scenes moved me so much and why Squall's journey brought me to tears, but then I would need to spoil parts of the story, and that is the last thing I want to do. This is a Final Fantasy story that has incredible character development and I want people to be able to experience it themselves, to see what makes it great. I should also at least mention that the story is not without faults and tropes with Rinoa starting off being your typical manic pixie dream girl and if Squall really wanted to be alone he would have left SeeD after completing his training, and of course the other characters are not given as much screen time as Squall and Rinoa. However, tropes are not always bad and can still have depth, and by the end of the story I would say that Rinoa sheds the trope but it is on the nose in the beginning.
I left a lot of stuff out and with the HD remaster coming out sometime this year I think that if this article intrigued you, pick up a copy and experience it yourself. Experience a masterpiece of character growth that I believe is held back by clunky gameplay choices. I sincerely hope if you do decide to pick up this title that you enjoy Squall's story as much as I did.
#final fantasy#final fantasy viii#final fantasy 8#final fantasy 8 hd#final fantasy 8 remaster#squall#squall leonhart#rinoa#rinoa heartilly#laguna#laguna loire#article#look at at#discussion
44 notes
·
View notes
Text
The Gamer Hero, Deku Chapter 1
A/N I hope you guys like my first fanfiction. This is a concept that I thought of that I'm surprised hasn't come up yet, at least for BNHA. Either that or it has and I haven't seen it yet.
xoxoxo
"Sorry, kid, it's not going to happen," the doctor said. "If you had a Quirk, it would've shown itself by now."
"What do you mean?" my mom asked.
The doctor pointed to an x-ray of my foot. "After the emergence of Quirks, there were studies done. It was found that most people with a Quirk lack this joint right here. It's possible for someone to have the joint and a Quirk regardless, but if Izuku here hasn't developed a Quirk at this age, it probably means he doesn't have one."
After that, I was crushed. The one thing that I wanted most was to be a hero, and now that dream seemed completely out of reach. How could I become a hero without a Quirk? I never completely gave up, but after a while, it just seemed so hard. It was around this time that I really started to get into video games. In them, I could be the hero. I was always the hero. I saved the day, stopped the bad guys, and had all kinds of cool powers. Maybe... maybe that was what kept me going. At any rate, I eventually redoubled my efforts to become a hero and began analyzing everything I possibly could about heroes. I watched hundreds of videos of fights between heroes and villains in all kinds of environments. I went to see every hero fight I could. I learned enough that I could theoretically be certified a Quirk counselor if I took the exam. Still, I always had some doubt as to whether or not I could do it. If there was ever a hero without a Quirk, they never made it big enough to even be mentioned. Everyone at school laughed at me for saying I wanted to be a hero.
But that all changed the day my Quirk awakened.
I woke up feeling odd, but couldn't quite place why. It only hit me when I was brushing my teeth. When I was just about done, I noticed something weird above my head in the mirror. I looked up and immediately spat out my toothpaste when I saw white text floating above my head. It might have been reversed, but I could read it clear as day.
The Gamer
LV 5
Midoriya Izuku
I had no idea what to make of it. "Why is there a text box floating over my head!?" I thought. "And what's with that part that says 'The Gamer?" I might have stayed there, staring like a deer in headlights at my own reflection, for hours if my mom hadn't called up to me.
"Izuku! Hurry up or you'll be late for school!" That snapped me out of my reverie. Whatever it was could probably wait until I was at school.
"Coming!" I yelled back down, and then hurriedly finished getting ready. When I went downstairs, she was waiting for me with my lunch. After she gave it to me (along with a hug and a kiss) I looked above her head.
Supermom
LV 11
Midoriya Inko
So it wasn't just me. It seemed to me like she couldn't see the words, considering the fact that she hadn't reacted at all. Still, better to be safe than sorry. "Hey, Mom?"
"Yes, Izuku?"
"Have you noticed anything strange today?"
"No, why do you ask?"
"I thought something was off. I guess I just stayed up a little too late last night." She narrowed her eyes at me. "D-don't worry, though! I'm fine now." That confirmed that she couldn't see the text floating above our heads. Satisfied, I headed out the door.
xoxoxo
On the way to school, I saw that everyone had a title above their heads. "It's just like a video game!" I thought. I stopped for a second as a thought struck me, then continued as I thought about it. "Could this be a Quirk? What if that's the reason? It'd explain why only I can see these titles. The doctor did say that it was possible I had a Quirk, just not likely. But why now? Why wouldn't my Quirk have shown up earlier?" I was so distracted that I didn't even notice the crowd until I walked into someone's back. After apologizing, I followed everyone's gaze to see a giant, monstrous man standing on the overpass.
Giant Monster Man
LV 32
Yamazaki Riku
"Guy gets cornered by heroes and just turns into a giant monster," a nearby man said as if it was a common occurrence. I made my way through the crowd toward the front. When I did, a bunch of fangirls squealed as a guy who looked like a cross between a ninja and a tree kicked the giant in the face. "It's Kamui Woods," I said. I squinted and just barely made out his title while he monologued at the villain.
?
LV ?
Nishiya Shinji
Huh. I figured that the titles had some limitations to it. My assumption was immediately given some credit when a giant woman kicked the giant villain in the jaw while he was distracted with Kamui Woods' special attack.
?
LV ?
Takeyama Yu
"Mt. Lady, huh?" the guy next to me said. "She's certainly making a name for herself. Seems like she might make it big."
"Yeah," I muttered. "She's certainly got a good Quirk for hero work. Plenty of power and flashy too. I can see a few downsides, though. She can't use it in tight spaces and being that big would definitely cause a lot of collateral damage." I was interrupted by a ping. I looked down to see... a blue text box?
A new skill has been created through special action! Continuously analyzing your surroundings has created the skill 'Observe' to gain information about objects.
Observe (Active) LV1 EXP: 0.00%
The ability to observe one's surroundings and gain information from it.
Gives the user information about the object it is used on.
Yet again, all I could do was gape at what I saw. A skill... so this wasn't just identifying people... I don't know how I immediately knew how to use it, but I did. "Observe," I thought while looking at the text box for the Observe skill, and a new text box popped up.
The text box for the Observe skill. Shows the effects and experience of the Observe skill.
I probably would've played around with this more, but the man next to me cleared his throat and said, "Hey, kid! Are you okay?"
"O-oh, I'm fine!" I blurted out.
"You looked pretty distracted, there. Something happen?" he asked.
"Don't worry about it," I replied. "My Quirk's just a little weird." I was just using it as an excuse, but... it had to have been my Quirk. There was no other explanation for it. I decided that I'd explore this new Quirk as best I could when I got to school. Wait. "I HAVE TO GET TO SCHOOL!" I realized and ran for it.
xoxoxo
Once I made it to my homeroom, I immediately collapsed into my chair, panting. I looked at the text boxes that had appeared on the run to my school.
The level of the skill Observe has increased by one! The level of the skill Observe has increased by one!
Those and a bunch of Observe text boxes made up most of them. I saw the LV1 on Observe's text box and inferred that I could probably raise the level of the skill by using it a bunch. Naturally, I spammed it at every item I could on the run over. However, there were two that I hadn't expected.
Due to repeated struggles, your VIT has increased by one.
Due to prolonged running, your DEX has increased by one.
Well. That was interesting. I suppose it made sense. I may have gained some weird video game power, but I was still in real life... supposedly... so I was still able to exercise. I wondered what my stats were, then had an idea. I concentrated, then thought the word "Menu" to myself, just like when I used Observe. It didn't surprise me, then, when a menu popped up.
Status Screen
Skill List
Inventory
Party Options
Map
Quest Log
Options
Well, that seemed interesting. I decided to start at the top and make my way down. "Status Screen"
Name: Midoriya Izuku
Title: The Gamer
Level: 5
HP: 250/250
MP: 275/275
STR: 10
VIT: 11
DEX: 11
INT: 30
WIS: 10
LUK: 10
POINTS: 0
MONEY: 0 Yen
What? I got most of my stats, but... why would a level five character have twenty more points in INT than in the other stats? I guess that explained why I didn't start at level one, but... maybe I got five stats per level after one and my Quirk automatically dumped those into INT because of my above-average IQ? I guess that made sense, but I really wished it hadn't. I could have probably used those points better myself, Quirk! Still... I decided that I'd have to train up my stats the hard way at first. "I can probably focus on INT, WIS, and LUC during school hours. Studying and doing math problems should probably increase my INT, maybe I could increase my WIS by meditating, and if I constantly flip a coin and call it that'd probably increase LUC. As for out of school, I said I was going to Yuuei, so nobody would think twice about me exercising like crazy. Actually, why haven't I done that already? 'Exercised like crazy' is half of what made Batman Batman, so why did it take me this long to figure out that I should do that!?" I then noticed another text box.
Due to planning things carefully, your WIS has increased by one!
That's probably what led to me questioning my previous actions. I would have thought about that further, but I was interrupted (again) by someone saying my name. "Midoriya-kun is also planning on going to Yuuei." Oh no.
"WHAT!? DEKU!?" Kacchan went over to my desk and started burning my desk with tiny explosions. I got a good look at his name.
Lord Explosion Murder
LV 14
Bakugou Katsuki
That title was really accurate. "YOU DON'T EVEN HAVE A FUCKING QUIRK, YA SHITTY DEKU! YOU'RE JUST A DISGRACE!"
"Kacchan..." I sighed. I was surprisingly calm considering the fact that an explosive blonde was shouting in my face. I guessed I was just really distracted by the whole "I have a Quirk now" thing. "You can't stop me from going to Yuuei, no matter what you do." "Actually," I thought, "while he's in my face like this... Observe."
Name: Bakugou Katsuki
Title: Lord Explosion Murder
Level: 14
HP: 800/800
MP: 725/725
STR: 27
VIT: 25
DEX: 35
INT: 29
WIS: 13
LUC: 13
Quirk: Explosion
Emotions: Angry, worried
That last one didn't seem right... "SHITTY DEKU! I'LL MURDER YOU!"
"Bakugou, calm down!" the teacher said. "Remember, you're not supposed to use your Quirk in school. I don't think that getting a detention will look very good to Yuuei."
"FINE! I'M JUST GONNA GLARE AT HIM!"
"PLease limit yourself to that. That isn't against the rules and doesn't cause a disturbance."
"MAYBE I WILL!"
Wow Kacchan is high-strung. I sighed as he plopped back into his seat and started glaring at me. With that threat out of the way, I decided to test my new training regimen.
xoxoxo
On the walk home from school, I decided to review what I'd done at school. After Bakugou's outburst, I'd decided to try out meditation, which yielded quite the fruit.
A skill has been created through special action! Through repeated meditation, the skill 'Meditation' has been created.
Meditation (Active) LV2 EXP: 61.23%
By clearing one's mind, the mind becomes much sharper. This skill allows the user to meditate on the mysteries of life, the universe, and everything for enlightenment.
Increase HP recovery per minute by WIS while meditating.
Increase MP recovery per minute by WIS while meditating.
Increase stamina recovery per minute by WIS while meditating.
WIS can be trained through meditation.
Through repeated meditation, your WIS has increased by one!
I also found a 500 yen coin during lunch and started flipping it as I'd planned. Just like I'd thought, calling it right enough times had increased my LUC.
Due to repeatedly winning games of chance, your LUC has increased by one!
"I should probably focus on VIT and DEX, and especially DEX. Even if I can shrug off getting punched by a truck and hit with the same amount of force, there's going to be some attacks that I can only dodge." I would have done some more planning, but I was interrupted by a weird feeling and a ping. I was excited to see what this new text box would bring me until...
A new skill has been created through special action! Through exposure to impending doom, the skill 'Sense Danger' has been created.
I had about a second to think "Well that is the second most ominous thing I've ever seen." before a manhole burst with some form of sludge. The sludge consolidated into a single blob that somehow had eyes and a mouth with teeth.
Sludge Monster
LV 26
Kurosawa Shou
xoxoxo
A/N: CLLLLIFFHANGER! I hope you guys like it! Just know that I'm always open to constructive criticism, especially with my math because fuck math. Also I'd like to apologize in advance if my updates are erratic. I'm still in school and I can get easily distracted.
2 notes
·
View notes
Text

ASSASSIN ran.
This is what ASSASSIN-class Servants were good at. Running. Hiding. Striking from the shadows.
Your adversary, however, seemed unfazed and unsurprised.
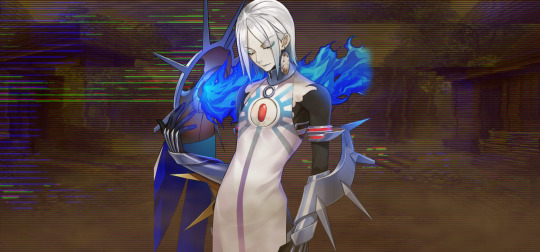
'BOWMAN': "So it's death then."
The BOWMAN fired one arrow.

The sounds of the heavens themselves ruptured, bright light filled the area like the sun itself had burst to life between the two Servants as ASSASSIN narrowly dove out of the way. Despite his fast movement, the arrow landed heavily against his shoulder as he dove into an alleyway and continued to sprint away, his breath heavy and panicked.
[ Damage reduced to 3 thanks to a Great Success with Agility A! 4 HP remaining! ]
This.
This is why this Servant's face is burned within your mind.
Why you remember his expression so clearly as he stated his True Name. Disappointed. Somber. Determined.

KARNA: "My True Name is Karna. My bow, Vijaya, is the absolute pinnacle of its kind. Crafted for and wielded by Shiva, it ensures absolute victory. You were given a chance to live. That chance is gone."
The bowman's words rung as clear as church bells, even as you drew further and further away.
An announcement of an incredibly powerful Servant, and perhaps an even more incredible Noble Phantasm.
ASSASSIN: "Dammit… dammit!"
Eventually he found a homestead, slipping and ducking inside. The home was filled with the dissipating data of a small family. Digital corpses. Ones and zeroes, and yet the macabre sight began to feel a bit nauseating.
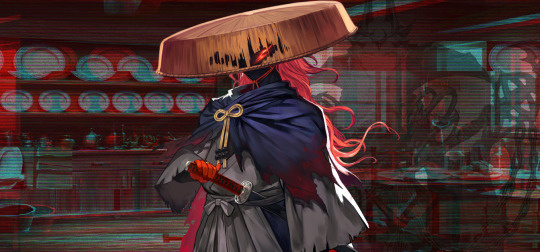
ASSASSIN found himself shaking, which frustrated him more. Even with the arrow skimming off his body, his shoulder was bleeding profusely. A direct hit from that was certain death. Of all the Lair Servants- of all the people to fight- it had to be this one? Caster was easy, his head rolled cleanly off his shoulders. But that was after extensive fighting and wearing him down. Near perfect strategy- this was their ambush- they weren't supposed to be the ones in this situation.
He felt the strength of the T-Summon waning, which didn't do anything to calm his nerves.
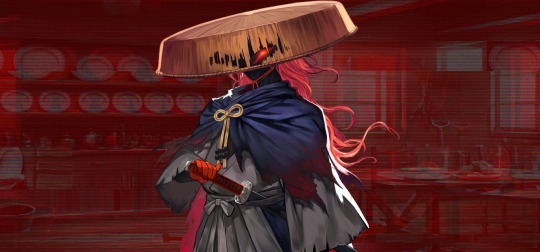
ASSASSIN: "I'll be damned if I die here. Caster-- can you hear me, Caster--!"
No response. Was the signal being jammed? The code cast you were using to communicate was top of the line. They'd need to have an ally incredibly versed in magecraft or curses in order to effectively jam them in a situation like this.
This was only the first Lair Servant. This was supposed to be easy. An assassination- an ambush- and now ASSASSIN found himself on the back foot.
You could hear the sound of his footsteps as he walked around. His lack of urgency made the hopeless reality of the situation even more palpable. He spoke, with the same even, dry tone.

KARNA: "I promise to make your death swift... or perhaps that isn't a convincing reason to come out. Hm. It would be easier if you revealed yourself on your own. Trying to communicate isn't my forte."
SERVANT: SLAYING ASSASSIN
T-SUMMONED: [PHANTOM COUNTESS]
Strength: C
Endurance: D
Agility: A (Raised from B)
Mana: C (Raised from E)
Luck: D (Raised from E)
NP: B (Raised from C)
HP: 4/5
MP: 3/7
Maximum Damage (Strength): 7 (Increased due to the amount of blood present!)
Maximum Damage (Mana): 7 (Increased due to the amount of blood present!)
32 notes
·
View notes
Text
HI EVERYONE AND HELP: an announcement i’d like y’all to read it concerns y’all (to some extent i guess)
ok so i don’t have much time cause i travel tomorrow and i have a bunch of things to do (which i won’t ramble on but) FIRST THINGS FIRST
During my 3-day mania episode (and now spread to be a 5-day episode rip me), I thought of a lot of creation ideas (art and design, fandom and non-fandom alike)
[More long words ahead about my creation ideas and i want y’all to help me choose what i should work on next; with the exception of #6 and #7 bc those are guaranteed works i’ll work on first]
(This is a really long post ik but I’ve used the @ mention features a lot below and idk if it works under the cut so im sorry for the longass spam this is a once in a long while thing i promise)
AND bc i do not have the brainpower/energy to choose/think about these stuffs IMMA ASK YOU GUYS TO HELP ME CHOOSE which ones you want me to work on bc I love all of these ideas and are !!!! about these but honestly indecision is taking control of my brain pls send help. D: ok so to help me out (and i guess this is great for you cause you can vote to see the content you wANT)! anywho, pls help me decide (specify the number and if you can, the reason why you’d like to see it; it can be a short one sentence answer honestly idc i just want help rn):
A levihan fic-inspired work; the fic is canon-divergent where Levi dies and he’s given a funeral service bc of his efforts as Humanity’s Strongest and Hange goes up to give a speech (fic by Frances @daisybrien ); will use lyrics from Poet - Bastille
A work for Cosmic Love - Florence at the Machine lyrics for the levihans bc why not (but also partial credit to Sophie @drinkyourfuckingmilk bc i remember her mentioning it that it was a levihan song and i love both cosmic love and the levihans sooooo)
Still transparent edits for the lyrics from Stay With Me - You Me At Six for the yumikuris (my first non-levihan work idea :OOO) but also like if you remember, transparent edits are stuff like the Haunt edit I made for levihan spookfest and the All of Me poster I made for Manna @julystorms
A gifset for Gio @themusicalbookworm 's amaze™ song called Stardust Veins about Yaoyoruzu Momo (im love her so much rn ajelddl;) - this one i have a lot of different ideas/possibilities for but I would go give Gio’s song a listen (especially if you’ve watched BNHA and or love Momo) bc honestly it was the first fanart-song I heard and honestly I don’t regret listening (i love it so much you have no idea dude)
A lyrics gifset feat. Laughter Lines - Bastille for the movie Coco (i wanted to make this for a long time and i kno i won’t be able to get to it for a while so pls if you’re reading this don’t steal my idea cause i know the film has been out for a while now)
[Urgent] Mikasa’s bday post with a hp quote - has duality themes/techniques/symbolisms if you’re interested but it’s a zekeret™ and i don’t want to give stuff away/ruin the surprise
[Urgent] Ymir’s bday post with Call of Silence lyrics and starry stuffs. I give partial credit to Gabby @sookashira who made a Ymir gifset/gfx where she said there was literally a Ymir constellation in the universe if i remember correctly so that’s partially inspired that idea (i can’t find it rn bc i’m tired but i do remember it my dude). And also partial credit to Daya @eren-s bc her latest Eren and Reiner edit of a recent manga chapter was cool and I found the way she did the dialogue pretty interesting and my idea for Ymir has dialogue sooooooo (i’m also lazy to find it bc limited brainpower sorry daya but i remember it and i talked to you about it)
A lyrics gifset/motion gfx for Shake it Out - Florence and the Machine Part 2; basically a continuation to Levi’s birthday post I made last year but with even more lyrics and cool stuffs™ (what i think is cool at least)
A lyrics gifset/motion gfx for Unstoppable - Sia feat. Hange’s moment where she shines and dodged them MPs and is doing a bunch of cool stuff (have i mentioned how much im love her too)
ahhhhh soo this is really long and if you’ve made it to the end of this i truly commend you for your efforts (come i clap for you™). tbh this is not even all of the ideas i thought of you have no idea how inspired i was these 5 days. buT, i say again, i would really appreciate it if you could tell me which idea you like the best and want me to make (and if you’re feelin extra generous i would appreciate 1-2 sentences of reasoning re: why this idea over the others)
[i might rebagel once or twice more to get more exposure again but yeah that’s it]
and also fyi i am behind on replies and tag games and communication in general; im sorry my brainpower rip but i will get to it tomorrow after i land so it will ALL BE DAIJOUBU (hey @hushpiper look im sayin what you said earlier to me)
THANK YOU THAT IS ALL
#shouting into oblivion#i spout nonsense#that is my new tag for like mania-fueled ideas#anyway#pls read and interact with me#im love you guys a lot so i think this is a way of returning the favor (of followign/subscribing to my content) basically#PLS HELP OUT YO LOCAL GIFMAKER#who's facing huge indecision rn#stuff i think you should read#(my important™ tag but like it's for subjectively important stuffs yaknow)
16 notes
·
View notes
Text
[[ OOC: Since the STUPID About Page is taking far too long I will post facts here until I can sort it -3- ]]
Basic:
Name: Dr. Wing Ding Gaster.
Alias / Nickname: Lilac.
Age: ??? ( He’s a skeleton you cannot tell - but from what you’ve heard? He’s older than Asgore. )
Sex / Gender: Male / Male (Masculine Pronouns)
Height: 6 ft 5 inch ( Slightly taller than Papyrus. )
Weight: ??? ( Is unbeknown to all even himself - he has never weighed himself nor seen the need too... Being a skeleton and all... )
STATS:
HP: ???
[ * You check Lilac’s HP . . . Nothing Happens. ]
AT: ???
[ * You check Lilac’s AT ... ]
[ * It seems like his AT can change, on the varying degree of how much Magic he exerts. ]
DF: ???
[ * You check Lilac’s DF. ]
[ * He seems more than capable of taking hits. But you still cannot see his DF Stats. ]
Strength: 1 ( Lilac has limited to No strength at all - he has no muscles nor strong bones. He enhances his strength with magic )
Agility: MAX ( Whatever MAX Agility may mean... But from what you can tell he’s mastered his swift movements, and that could be to your extreme disadvantage... Or it could be a fun challenge? )
Magic: MAX ( Again like MAX agility it could mean anything... But know this! Because of he technically doesn’t Exist he can use all of his magic without any nasty drawbacks - save maybe becoming tired. )
Abilities:
SYSTEM CHECK — this ability allows him to analyse the Timeline’s FILES, meaning Lilac can see if his presence will affect the connected Timelines - or even if his presence and certain actions will interfere with the Space-Time-Continuum!
DIAGNOSTIC SCANS — This allows the skeleton to check his chosen targets Stats, Conditions, Buffs and Debuffs - this gives him a full understanding of his targets Condition. ( he can activate this outside of battle too )
ASSISTANCE — this ability allows Lilac to summon magic based and controlled copies of his own hands, to well... Assist him in daily, mundane tasks or can even be used for attacks.
BONE MANIPULATION — the name does it justice, Lilac can manipulate bones at his will - even his own in dire cases. There are three different types of BONE ATTACKS he can complete: White - Does Normal Damage to HP the same amount as his AT damage. Blue - Does Movement Damage to HP, meaning if someone moves while the attack is in progress and they touch it the enemy will take Normal Damage. Black - Black BONE ATTACKS are special to Lilac alone, he will only use these attack on Monsters and beings who wield Magic. For their effect, as announced by the tall skeleton is “MAGIC DRAIN” literally meaning they will absorb the Enemy’s MP (Magic Points), But furthermore the amount drained is given to Lilac.
SOUL EFFECT — there are two types of SOUL EFFECT’s Lilac can trigger if the enemy has a SOUL with almost exactly the same effects as the BONE ATTACKS: Blue - Movement Restriction, says what the name suggests; Lilac can restrict the enemy’s movement via their SOUL, but alike sans he can move them at will. Black - this Mode is the exact same as the BONE ATTACK Version, save for that when the Enemy’s SOUL is turned Black it negates all Magic and gives it to Lilac to replenish his own.
SHORTCUTS — Just like Sans’ little trick, he can go wherever he wishes just by visualising the place and then warps himself there.
PROPHET — This is a PASSIVE ability that he has NO control over - it allows Lilac to see the Past, Present and Future of The timeline itself or of a being / person, it reveals facts to him that he may not wish to know, he usually keeps this ability a secret unless there is good reason to tell.
[[ OOC: WELP! I think that’s all for now?? May or may not add more later 030 have a load of stuff about Lilac :D ]]
#all the more knowledge || about blog#the forgotten knowledge of the forgotten man || about info#out of the void || ooc#wd gaster#long post
4 notes
·
View notes
Text
“What The Job?!” - Scholar
1 - Intro:
Alright, so I’ve had a bunch of my friends say it would be super helpful if I made a “how to Scholar” thing because I do it, and I do it quite well apparently. Instead of just making it for them, I thought I would share this information with all of you. So here it is, my first, “What The Job?!”
This guide is as of 4.05 and I’ll try and reblog with updates as significant changes are made to the class, or small ones. First off I want to say; this is how I play scholar, and my recommendations, not the be all end all Bible or anything of the sort. Now settle down and get ready to let me tell you a thing I like to think I know.
==============
2 - Index:
1 - Intro
2 - Index
3 - Terms
4 - Why/Should I Scholar?
5 - What kind of healing?
6 - Gear & Attributes
7 - Abilities
A - Special Note
B - Dps Skills
C - Non Healing Important Skills
D - Healing and Healing Related Skills
E - Aetherflow
F - Aetherflow stack skills:
G - Faerie Gauge
8 - Role Abilities
9 - Traits
10 - Pets/Faeries
A - How the Hell Does This Thing Work
B - Pet related skills and traits
C - Eos: The Perfect Child
D - Selene: The Multi-Tool
11 - Rotations
A - Gaging
B - Dps
C - Healing
12 - Stratagem
13 - Macro’s
14 - Hotbars
15 - Gaming Gear/Work Around
16 - The End
==============
3 - Terms:
Assuming you know the abbreviations for the classes, please see the below for further.
DOT = Damage over time
AOE = Area of effect
Crit = Critical
Dps = Damage per second
lvl = Level
ilvl = Item Level
HP = Hit points
EPH = Effective Potency Heal - Healing of spell + shields combined
MP = Mana Points
Mnd = Mind
Int = Intelligence
Pie = Piety
MSQ = Main story quest
==============
4 - Why/Should I Scholar?:
First off, Scholar is a job with a bit of an entry level issue. While Ast gets to start from 30 and gets a wide variety of heals locked behind 300+ MSQ quests and any one class to 50, and WHM is just CNJ 30 with a bunch of heals at the start; SCH is 30 levels of ACN, only to be given 2 heals total at lvl 30. It’s a rough start, but if you can make it to lvl 50 you really start to shine. SCH is a very strategic healer, you’ll find instead of the obvious answer you may have to read up a bit more on what you can do vs should do, or plan ahead of a fight a little to get the most out of the job at first. The more you play the class the less planning you’ll find you end up doing and the more reflexive you’ll become. This may seem tedious and a huge discouragement, but the job can be extremely rewarding to both you and the group when used effectively. I like to say I can pull rabbits out of my book, because sometimes that’s exactly what it feels like despite you controlling your own luck; it’s all in the execution.
==============
5 - What kind of healing?:
Galvanize, also known as Shields, all the shields, people joke SCH’s can mitigate enough damage your gear durability goes up (not actually). There’s also some micromanagement but honestly you have some of the most flexible, reactive, as well as proactive healing and dps available to a healer; SCH’s live up to the lore. Where WHM is big heals and big regen, and AST can buff, regen, and even shield like you, no one has a kit of abilities quite like you do. You can respond and react to almost every situation.
==============
6 - Gear & Attributes:
Everybody values these differently as a healer, for me it’s the following:
1. Mind: for healing potency you will spend all attribute points on this.
2. Critical Hit Rate: What makes SCH’s is the ability to Crit shield, I’ll explain this later but know it’s important, this also increases your damage when you do attack and Crit so it pulls double duty.
3. Piety: for MP to cast more spells for healing or Dps, since Aetherflow is a % of your MP, having more means a better return on the skill.
4. Determination: increases your damaging spells and your heals, always good.
5. Spell Speed: is nice but not necessary as your casts are decent times and a huge amount of your best heals and abilities are instant cast off global cooldown, and it doesn’t decrease your faerie’s recast timer which can throw her off sync in some combat.
Note: If you prefer surecast over swiftcast which is described later, bump spell speed up above determination as it will help greatly with resurrect and summon’s.
==============
7 - Abilities:
A - Special Note:
Anything that says “Shields” or “Galvanize” as part of the healing or spell effect DOES NOT stack with Nocturnal Sect AST’s shields. If you are in a party with an AST, please politely ask them to switch into Diurnal sect if they do not do so automatically as you do not have the choice of not using shielding heals like they do. If they ask why, explain that AST’s shields overwrite your shields, and vice versa, meaning you’re both wasting MP on casts that could be better spent. At this time AST actually shields MORE than a SCH, but they do not have the ability to spread shields like you, or the added flexibility that comes with your faerie. If they refuse… Well, pucker up and get ready for a rough run.
B - Dps Skills:
These first because you’re gonna have to get through 30 lvls of Arcanist somehow.
Ruin: lvl 1: 100 Potency Instant. Global cooldown.
Ruin is you attack when you have nothing better to do and all your dots are already applied and everything else is on cooldown and don’t have broil yet. Okay, but not winning any awards. Shares global cast cast time.
Ruin II: lvl 38: 100 Potency, Instant. Global cooldown.
An instant cast ability on the global cooldown. Is it high on your priority list? Not really, and for 2x the mana cost of Ruin I it’s pretty hard to justify casting, really only use this if you are running away from an AOE, or need to cast quickly on a target that needs to be killed to avoid a wipe mechanic before lvl 54.
Bio: lvl 2: 40 Potency x 6 = 240 Potency over 18 seconds, Instant. Global cooldown.
Part of your bread and butter Dps combo, it’s an instant cast and allows you to use other instant cast off global cooldown abilities while you wait to be able to cast again. Recommend to cast this while on the move or after Miasma; as you will quickly shoot off both abilities and give you a moment to cast Bane, both I’ll describe later.
Bio II: lvl 26: 35 Potency x 10 ticks = 350 Potency over 30 seconds, Instant. Global cooldown.
Another part of your bread and butter Dps combo, it’s an instant cast and allows you to use other instant cast off global cooldown abilities while you wait to be able to cast again. Your Bio upgrades into Bio II, same recommendations apply to casting.
Miasma: 35 Potency x 8 = 280 Potency over 24 seconds, 2.5 sec cast. Global cooldown.
Also a spell with cast time and the part of your bread and butter Dps combo, small cast time, recommend casting Miasma, then Bio II on each enemy, or Bane after casting the combo on the first enemy if you want to spread DoT’s more quickly.
Miasma II: 100 Potency + (25 Potency x 4) = 200 Potency over 12 seconds, AOE, 2.5 sec cast. Global cooldown.
So this is, different? You will want to use it with 3 or more enemies, but beware that MP cost, it’s steep and builds up fast, so don’t spam it. Again, this only pays off in any stage of the game if there are 3 or more mobs, preferably 4. Huge thing to note, this is an AOE around YOU; you will need to be in the thick of things to hit enemies with this, do not try to cast it from 15 yalms away from the mob.
Shadow Flare: lvl 50: 50 Potency x 5 = 250 Potency over 15 seconds + Slow 5% (slows cast and ability recast time for enemies in the area by 5%), 60 sec cooldown. Instant. No MP cost.
Shadow flare is a great opener, and a good skill to use if you’re not sure about being able to Dps and heal. The ability is cast instantly, this is great practice for nervous healers trying to get the hang of attacking and healing as you start to get a feel for what you can and can’t get away with. The fact this is a place-able AOE makes it better because at 4 enemies you reach 1000 Potency over 15 seconds which just under the average engagement time for a trash pull, this damage isn’t stellar on single targets, but still better than casting Ruin’s or Broil’s; regardless the extra damage will be welcome by your team, and the 5% slow will actually reduce incoming damage on the tank.
PLEASE NOTE: Only one AOE placeable can be active at a time, this means Sacred Soil OR Shadow Flare
Broil: lvl 54: 190 Potency, 2.5 sec cast. Global cooldown.
This is a straight up cast, at lvl 54, you can finally stop casting ruin and Ruin II! However beware; the MP cost will creep up on you as it is 4x Ruin in cost and quickly leave you without resources to heal if you get too caught up doing Dps. This does replace Ruin when you get it so you do still have the option of casting a cheaper instant spell Ruin II in comparison to Broil.
Broil II: lvl 64: 230 Potency, 2.5 sec cast. Global cooldown.
Broil becomes Broil II, and with it a sizeable potency increase of 40, Broil II is doing decent damage; but still less that Bio II, Miasma I & II, and Shadowflare. The damage is more than Ruin II which we have available still, and Broil II upgrade does not increase the MP cost like it has done in previous iterations, thankfully.
C - Non Healing Important Skills:
These abilities are just as important as healing, remember you have them.
Resurrect: lvl 18: High MP cost revive, 8 sec cast. Global cooldown.
No cooldown really, massive cast time, huge MP cost, SMN and SCH share this resurrect, but you gain it at lvl 18 so be careful in the low level roulette Sastasha with squishy tanks.
Chain Strategem: lvl 66: Increased rate at which target takes critical hits by 15% for 15 sec, Cooldown 90 sec. Off global cooldown.
A huge boon to team damage, especially with crit focused dps, but generally a boon everyone can share and enjoy, super powerful during a dps check or phase skipping, also makes some bosses that might have been hard to clear just a little easier by offering a faster kill. Always try to pop this when it’s off cooldown during a boss and on the tougher mobs of trash pulls.
D - Healing and Healing Related Skills:
Time for your main healing abilities
Physick: lvl 4: 400 Potency, 2.0 sec cast. Global cooldown.
Not something to shy away from using, it’s a potent heal for a low cost, and will help you manage your MP through long fights.
Adloquium: lvl 30: 300 Potency + 300 Shields (also known as Galvanize) that can be doubled with a crit, Shield lasts 30 sec, 2 sec cast. Global cooldown.
This skill is very special and very powerful, the healing however costs 3 times more than Physick for only 200 more effective healing. Why? First, because while the shield takes damage you can heal the health under it with your myriad of abilities. Second, because when you Crit, the shield becomes 2 times the potency based off the Crit bonus. Let me break this healing equivalent of an orgasm down. Example: you cast Adloquium for a 10k crit heal, this generates a 20K shield on that character to absorb damage as well. This means you can either sit and regenerate mana, or perform DPS depending on the scenario before healing again.
Succor: lvl35: AOE HP for self and nearby party members, 150 potency, 150 Shields that can be doubled with a crit, Shield lasts 30 sec, 2.5 sec cast. Global cooldown.
This is your AOE heal, it has a higher cost than Adloquium by 25% so don’t use it too heavily if you can help it. The heal + shield is good for topping up party members after a big heal, or a regen has be put on them by another healer, or if it’s a stack up mechanic. The extra 150 shields goes on top of a health bar and takes damage first, never forget this, I can’t stress it enough; a WHM or AST in dirunal can regen all they want but they can’t “overheal” like you unless they’re an AST in nocturnal sect. The same effects apply for critical heals here as with Adloquium; this is why the crit stat is so important.
Deployment Tactics: lvl 56: Extends Eye for an Eye and Galvanize (shield) effect on target to nearby allies. Cooldown 120 sec. Instant. Off global cooldown.
This is a somewhat situational but extremely useful skill and can be cast more often than you think. Cast Eye for an Eye, then Adloquium, and spread the effects from the tank to that dps that keeps getting hit by everything, your team will thank you. What this means is if you Crit heal or not, the shield and Eye for an Eye will be replicated on all nearby party members (range is about the size of Sacred Soil from target). This means any melee dps will likely share this double buff if they’re close to the tank you cast it on; helping spread the damage reduction debuff of Eye for an Eye if hit while protecting them from AOE damage thanks to the shield. Please note if the tank takes damage, this does not subtract from the original total that gets shared, as well if your Crit heal for 10k, the 20k shield will be spread to everyone within range. The only time you shouldn’t use emergency tactics is when the tank buster destroys the shield, it will not be shared if it’s worn off in such a case. So, go grab your hot pocket while you wait for people to start taking damage again (sarcasm; please don’t do this, Dps instead if you’re comfortable or just sit there gawking over how amazing that felt to pull off). Despite Eye for an Eye being a role ability and no longer a SCH/SMN specific ability, it has remained attached to this skill and hence why it’s nearly a must for SCH to take.
Emergency Tactics: lvl 58: Turn the next Galvanize (shield) into healing instead of a barrier, Cooldown 20 sec. Instant. Off global cooldown.
Say you crit a Adloquium again and get a 10k heal; rather than shielding 20k like a crit should, it instead is uses the 20k shield in addition to normal healing of 10k to reach 30k total healing; if Emergency Tactics was used beforehand. Short of Essential dignity at almost no HP as AST, or Benediction as WHM. Using Emergency Tactics with Adloquium or Succor can make them into some of the most potent healing spells in the game. On a 20 second cooldown, it’s like a stronger lustrate or indomitability with cast time when it crit’s.
Dissipation: lvl 60: Order your faerie away, gain 3 stacks of Aetherflow and NO MP & Gain +20% healing Potency - Duration 30 sec - Cooldown 180 sec. Can not re-summon faerie for duration. Instant. Off global cooldown.
This ability before stormblood may never see use on your bar, but given the recent increase in content difficulty, or any scenario where you have to carry your co-healer, this ability will save you. What you want to reserve it for is when you’ve pop lucid dreaming and you’re out of mp and aetherflow, and you need heals right now. This is an amazing last resort button. What happens is while you have say 2k MP and can barely cast a succor, you can now cast three lustrate’s for example and save the tank from a buster, or do indomitability and heal everyone from the room wide or stack up mechanic. Meanwhile, you have enough mp to cast physick it’s buffed 20%. This can help you limp by till the next aetherflow comes off cooldown, and post 68, it even causes aetherflow to come off cooldown sooner due to your trait that reduces the time for aetherflow to cooldown with each stack used. With mp refresh on, or aetherflow coming off cooldown, this can save your bacon when the going gets tough and your MP has left the building. Personal recommendation is as soon as you get the MP back, swiftcast resummon your faerie, or wait until a long wind up mechanic where nothing is happening and get your faerie back then.
Please note: Dissipation’s potency increase does not affect the healing potency of Lustrate, or Indomitability, or Excogitation; so don’t use this hoping to make those abilities more powerful. Also see Fey Union for Dissipation interaction with the skill.
E - Aetherflow:
This is your life saver, your god/goddess, your savior in the dark, the glimmering salvation of your allies, or scythe to help reap enemies. This is your core mechanic.
Effect: MP regen of 10% + 3 stacks of Aetherflow - Cooldown of 60 seconds. Lvl 68 Trait: 100% chance that when casting a spell using a stack that it reduces cooldown of Aetherflow by 5 seconds. The stacks do not have a duration and are infinite.
These three stacks are gold and the 10% MP regen instantly can prevent a raid wipe as it’s enough to revive one character if your Piety is high enough, even right after being revived yourself if the plan went south. WHM and AST can’t do this, you are a special snowflake with this one spell and can turn a wipe into a recovery, and then a win. While you will want to constantly use your stacks of Aetherflow to get the best use out of them and then pop this to keep your MP up, know this is also the biggest “oh shit” button in the game and you may want to save it for a tough moment if you know one is coming up. As of Stormblood (4.0) at lvl 70, using aetherflow stacks increases your Faerie Gauge by a portion each time you use one for a spell/ability which will be covered more in depth later; so spending is better than holding at that point especially.
F - Aetherflow stack skills:
The below skills use stacks of Aetherflow gained from the skill by the same name described above, utilize these carefully because you only get 3 stacks every 60 seconds roughly. All Aetherflow skills use 1 stack of Aetherflow, and there cannot be more than 3 held at one time. All of these casts are instant as well.
Energy Drain: lvl 6: Absorb damage dealt as MP and HP at a Potency of 150. Instant. Off global cooldown.
This is the “oh shit” button to your “oh shit” button when MP is running low. This may be because you’re dpsing really hard, or healing is going well and you don’t quite need Aetherflow stacks to heal and maybe got caught up, or maybe didn’t spend your MP as wisely as you could. You can easily squeeze out an additional 20% MP over 9 seconds and heal yourself at the same time for about 20% of your HP too. Using this with Dissipation when you’re strapped for MP and need to revive someone is one way to recover from a bad scenario and low resources.
Bane: lvl 30: Spread the target enemy’s Bio, and Miasma spells with their remaining duration to surrounding enemies + 15% chance to spread the spell with full duration instead of the remainder. Potency of DoT’s is reduced by 20% for second enemy, 40% for third enemy, and 60% for the fourth, and 80% for the fifth and beyond. Cooldown 10 sec, Instant. Off global cooldown.
To explain, say your DoTs (Bio II & Miasma) are at 21 seconds remaining on both DoT spells, you have only casted them on one target and a bunch of adds spawn, let us say there is 5 adds on top of the first. You spread the remaining 21 seconds to all 5 mobs if they are within range of the initial target with a 15% chance for each spread spell it resets to full duration. This means you can spread 490 potency worth of spells to the first enemy it hits, followed by the following for each successive enemy hit depreciating (392/294/196/98 onward) without actually having to cast on each one. The total potency for the six mobs for your simply two spells cast becomes 1960. Yes this got a huge nerf in Stormblood if you remember the heaven’s ward days, but it is still saving you a bunch of time and energy you would have spent casting (roughly 18 seconds of spell casting), and ideally you cast Bane well before the 21 second mark, instead at the 24 second mark right after you Bio II & Miasma combo which increases the potency even more so. This is amazingly useful if you find your heals are in good working order and you don’t find yourself using your stacks on healing spells; great for working up to the boss and making trash pulls go faster.
Sacred Soil: lvl 45: 10% damage reduction to all friendly targets in the place-able AOE circle - Duration 15 sec, Cooldown 30 sec + 20% chance your next Succor within 15 sec is free. Instant. Off global cooldown.
This ability is amazing for mechanic and boss attacks in raids or dungeons as it reduces all damage by 10%, while AST can do this and provide a regen, AST has to be in the center of the mess with this and is unable to perform other actions during the duration of the cast, where SCH can deploy this without being in the fire themselves and still healing allies. WHM can throw down a regen bubble, but it does not prevent 10% of damage which can prevent a wipe where a regen doesn’t. Again, you are flexible where others have to dedicate or lack your utility. While we already explained what Succor is, reflect on the fact that after casting a 10% damage reduction circle you have a chance to free cast an AOE heal + shield spell which proc’s surprisingly often, and can be combo with emergency tactics for a big heal as discussed earlier instead of a shield heal.
PLEASE NOTE: Only one AOE placeable can be active at a time, this means Sacred Soil OR Shadow Flare.
Lustrate: lvl 50: Heal for 600 Potency, Cooldown 1 sec. Instant. Off global cooldown.
You read that right, 600 potency, and without any MP cost, instantly; but you can only cast 3 every 60 seconds assuming you don’t use your Aetherflow stacks on anything else and don’t use Dissipation. The boon this has is the instant cast for emergencies, and the fact you can spread all 3 casts across multiple members of the party at different times of need. Great for topping off a tank after a buster and then healing two dps. The only thing with comparable single target is Tetragrammaton at 700 Potency once every 60 seconds from WHM; and Benefic II from AST at 650 Potency, which while can be cast with global cooldown regularily, can quickly use up all your MP where Lustrate does no such thing.
Indomitability: lvl 52: 500 Potency, Cooldown 30 sec. Instant. Off global cooldown.
Another instant cast, this time an AOE heal, while WHM wins this round having Cure III on global cooldown and 550 Potency, and AST with Helios for 300 Potency on global cooldown; the fact you can cast this between your own heals without MP costs is where it shines, or weaving it in between other off or on global cooldown casts. For example: Lustrate, Indomitability, Lustrate: One target gets 1700 effective potency heal, and the whole party gets 500 in under 2 seconds. Second example: Cast succor first for 150 heal + 150 shield, on top of the other casts mentioned previously for 2000 effective potency heal in under 5 seconds to single target and 800 effective potency heal to party. It is extremely hard for the other healers to pull off this much burst healing on command so frequently. With the trait on aetherflow at lvl 68, this could happen as often as once every 45 seconds, 30 seconds with Dissipation.
Excogitation: lvl 62: Target party member gains Excogitation status effect, when target falls below 50% HP, auto healed for 800 Potency, Cooldown 45 sec. Can not be cast on self. Effect duration 45 seconds. Instant. Off global cooldown.
Another Aetherflow ability making your stacks even more precious. This ability can be pre-casted before a tank buster for example, or protect your co-healer, even casted after losing 50% hp for an instant trigger. While more potent than Lustrate by 200 potency, this is more useful in preparing for a bad day than it is for using in the heat of the moment. Note this ability does have a duration of 45 seconds and a cooldown of 45 seconds. This isn’t a bad choice to use on a target when they’re being resurrected, because as soon as their HP show’s they’ll have the effect trigger and heal them up to past half HP; without wasting an Aetherflow stack on Lustrate for a 0 HP heal because they’re “not alive yet” according to the server. If only the tank is taking damage and there is not tank buster coming, avoid using this ability, as your faerie can heal them for a surprising amount and stop the effect from triggering which wastes the stack. With patch 4.05 this now lines up well with Aetherflows recast time so spending at least one stack on Excogitation isn’t a bad idea and helps you get the most of your stacks.
G - Faerie Gauge:
This gauge is how you cast your lvl 70 ability Aetherpact, to begin the effect of Fey Union, which is slowly depleted by Fey Union. The bar increases by 10 for every aetherflow stack you spend while your Faerie is summoned, and decreases by 10 for every 3 seconds Fey Union is active. Goes up to 100.
One thing worthy of note is if you Dissipate your Faerie, you maintain your Faerie Gauge numbers from before using Dissipate. Say you have 70 Gauge, and you Dissipate, you can resummon your faerie after the Dissipate wears off and still have 70 Gauge. Please note however that you will not gain Faerie Gauge for any Aetherflow actions used while the Faerie was not summoned, and death resets the Faerie gauge.
Rouse does not affect Fey Union potency, only Fey Illumination does.
Aetherpact/Fey Union: lvl 70: Order’s faerie to execute Fey Union with a target party member other than self, costs 10 Faerie Gauge per 3 seconds. Instant. Off global cooldown. Healing Potency 480. Turns into Dissolve Union upon casting and activating. 15 Yalm Range.
First off this allows you to dedicate a few seconds of healing to a character that needs it while you pay attention to the main target, or it can help work through a tank buster full of boss combos. This is an instant cast but the faerie has to move to stand within 15 yalms of the person it is cast on to maintain the tether, even though it can be cast at a distance of 30 yalms. Keep the range limitation in mind, you either have to be in the thick of the action, or wait for your faerie to fly over and begin casting; both scenario’s demand your faerie to finish casting their current spell/ability before executing which is bad in a clutch heal situations and better suited for preparation. With a potency of 480, it is like a buffed Physick going off constantly on the target, and is very potent as a result.
Dissolve Union: Turns into Aetherpact when cast or when Faerie Gauge reaches 0. Ends the Fey Union ability early without using unspent Faerie Gauge.
With a 5 second recast time shared with Aetherpact, you’ll likely spend 20 on the gauge before the effect can be canceled, however this does allow the gauge to be saved for later use instead of all at once.
Things that increase Faerie Gauge: & How Much
- Energy Drain: 10
- Bane: 10
- Sacred Soil: 10
- Lustrate: 10
- Indomitability: 10
- Excogitation: 10
==============
8 - Role Abilities:
Alright you made it this far, but what the hell should your spare abilities be? You only get 5 so choose wisely! In order of appearance, see below.
Cleric Stance: lvl 8: 5% increase to damage for 15 sec, Cooldown 90 sec. Instant. Off global cooldown.
Thanks to the Dev’s, the cleric stance discord is mostly dead, but not whether or not you should be healing or attacking unfortunately. As a SCH you probably will get the most pressure to attack because your Faerie can heal most trash pulls on old game content, and some trash pulls on new content. Please, if you are learning, state you are learning, and no one in their right mind will bug you about this. If anything just do your best and give it a shot, if someone dies/you know you can’t dps during this pull & heal, then don’t dps and state that you can’t dps and heal the current scenario; at least then they can’t say you you’re standing around for “no reason” or “being lazy”. You won’t get better without trying either, so don’t be too afraid about throwing a spell out now or then, even if it’s just a Ruin or Broil, or maybe a Shadowflare. Learning how to dps and heal is fun, and is very rewarding when it comes to end game content. While 5% isn’t much, consider taking this over Break for example if you have everything else you want in the other 4 slots.
Break: lvl 12: apply a 40% heavy for 20 seconds, 2.5 sec recast. Global cooldown.
I state the recast time because this is one of few Healer Role Abilities that don’t have a huge cooldown. The heavy is nice, good for running away from something trying to kill you, think of break as “the push back that doesn’t actually push anything away.” Of course there will be mobs resistant to this ability which will make it useless, but it can be useful during leveling when something you don’t like attacks you.
Protect: lvl 16: Reduces party member physical and magic defense by a %, duration of 30 min, 2.5 sec recast. Global cooldown.
This buff means a % of damage taken is reduced, but granted the damage numbers are reduced by a larger amount on people with more physical or magical defense than those with lower numbers, this means using protect on a level sync’d content while your ilvl is unsync’d will cause damage to be reduced by a large amount. I’d say this is mandatory unless your co-healer decides to take it and you both worked out who has what. The percent isn’t precisely 10% anymore or even consistent I found after some math. For example: when cast with 1013 physical defense, physical defense went up to 1164, which is roughly 16% increase. Magick defense however went from 1769 to 2034, which is roughly a 15% increase. Highly recommend taking this if solo healing or designated protect caster in raid/trials.
Esuna: lvl 20: Removes a single detrimental effect from target, 1 sec cast, 2.5 sec recast. Global cooldown.
This ability now has the cast time of the old SCH ability Leeches with the same name of the WHM ability pre-Stormblood. This is very handy, so make sure someone is on Esuna duty if you are co-healing with someone, both of you have it, or just always have it in your set. You will have to Esuna SOMETHING eventually, and getting caught off guard when the status Doom is cast that needs to be Esuna’d and is going to kill the tank in 15 seconds is not fun. Alternatively, you can summon Selene and keep her on a tight leash (use obey and steady) as she has a group wide Esuna available every 60 seconds.
Lucid Dreaming: lvl 24: Refreshes MP with a Potency of 80 every 3 sec for 21 sec (560 total potency), and reduces enmity by ½, Cooldown 120 sec. Off global cooldown.
Now you’re probably thinking “I have Aetherflow, I don’t need this-” wrong, this is the second most useful thing you own, next to Aetherflow. Using this ability allows you to cast the high mp cost Broil’s, Adloquium’s and Succors more, and is a good emergency button to pair with Dissipation. If you’re using Dissipation, things are desperate and you need Aetherflow + you probably need a little MP too to make the most of the increased healing you receive from Dissipation, the enmity reduction is a boon because some content you might pull aggro/enmity/hate when you put out the next massive amounts of healing and damage, making it incredibly useful. At the same time, I’d say this is optional, because a SCH can run solely off the MP made from Aetherflow and Energy drain, it’s just a lot more resource monitoring than most are comfortable with.
Swiftcast: lvl 32: Instantly cast 1 ability, Cooldown 60 sec. Off global cooldown.
Now SCH has a lot of Instant cast abilities if you haven’t noticed; in fact, only their Miasma, Broil, Resurrect, Summoning either Faerie, and 3 heals (Physick/Adloquium/Succor) have any cast time. Really, priority for swiftcast goes as such; Resurrect, summoning faeries, healing spells, and dps abilities dead last. Is it a mandatory ability like Esuna and Protect? Yes and no, you CAN survive without swiftcast, life just sucks when things get really clutch during content. You can skip swiftcast if you know your co-healer, or you know the fight really well and when you can get away with long cast times, or you took spell speed over determination.
Eye for an Eye: lvl 36: Cooldown 120 Seconds. Instant. Off global cooldown.
Erect a magic barrier around a single party member for 30 seconds, provides a 20% chance that triggers a 10 second debuff, the debuff reduces target damage dealing abilities by 10%. This is a great spell to use in large mob groups as each mob that attacks as the chance to gain the debuff. Additionally the debuff can be reapplied on the enemy if it procs again so the 10 second can work out to be 30-40 seconds of debuff on the enemy if they’re super unlucky. Works on some but not all bosses. I would say this is mandatory for every scholar, more so than protect or esuna for the sole fact your deployment tactics is only half as useful without it, and this is a huge potential damage mitigation ability that should not be overlooked; especially if there is a lot of mobs or boss AOE’s constantly.
Largesse: lvl 40: Increases healing magic potency by 20% for 20 sec, Cooldown 90 sec. Instant. Off global cooldown.
This is both a necessary and optional skill. If you’ll be using Selene for the dungeon, consider taking this ability, if you’ll be using Eos, consider skipping on this ability. This ability DOES stack with Eos’s increase Fey Illumination 10% heal buff, so it’s not bad to take it with Eos either. Eos can end up with a 50% healing potency increase thanks to rouse, while you can end up with total 30% increase, or 50% if you use Dissipation right after her Fey Illumination ability. I will reiterate however that these potency increases DO NOT affect the healing potency of abilities that use Aetherflow stacks, so only Physick, Adloquium, and Succor benefit; hence the situational nature of its selection.
Surecast: lvl 44: Makes next spell that requires cast time ability uninterruptible: the caster becomes immune to attack interrupts, sleep, stun, knockback, and draw in effects for the duration. Duration 10 sec, Cooldown 30 sec. Instant. Off global cooldown.
Due to the increased utility of this spell come Stormblood, I’d arguably take it over Swiftcast now if speed doesn’t matter to you. There is now the utility of setting your faerie to heal someone while you do other things like resurrect as well. It can be cast twice as often as Swiftcast, and the added utility of being immune to certain effects for the duration of 10 seconds could be very potent depending on the situation. Useful situations are; literally any knockback, stun, sleep, or draw in ability. Think Palace of the Dead, Bismark EX, Titan EX,Leviathan EX, Sophia HM and EX, casting a big heal while multiple AOE’s go off, the list does go on quite extensively despite how situational it is. Again, a toss up between swiftcast and surecast, so choose what best suits your playstyle, but I would say at least pick one or the other.
Rescue: lvl 48: Instantly draw target party member to your side. Range of 30 yalms, Cooldown 150 sec. Instant. Off global cooldown.
This ability has some very unique utility to each healer, especially SCH. With your lvl 70 ability being a 15 yalm healing leash, dragging said injured person into range of the leash could be very valuable while you remain focused healing the tank. I know a lot of people with bad pings that would be super happy to have me use this on them to save their butt from an AOE. I see the most use of this being another healer who’s hurt/ player just revived and is in an AOE, possibly a dps like DRG or MNK who can dash right back into the action easily after getting healed or saved from the AOE, and tanks after a swap on something like Odin’s fate where they need healing because they just got the snot kicked out of them. This would be super useful to a tank like a DRK who just used Living Dead and needs immediate intensive healing attention. Very situation, but not to be overlooked, consider it over Cleric Stance and Break, especially if you notice/know someone is struggling with AOE’s.
Please note: however, the player being targeted by rescue can dodge, and you can miss.
My personal preference:
1>2>3>4>5
Protect>Lucid Dreaming>Eye for an Eye>Largesse>Swiftcast/Surecast
OR
Protect>Esuna>Lucid Dreaming>Eye for an Eye>Swiftcast/Surecast
The reason for the first choice would be if you have Selene as your faerie for reasons explained in the faerie section. Same goes for the second choice, only Eos would be equipped. The other option is to use the first selected 5 if you know there are no debuffs or very few in the current content, or remove Protect if you are co-healing raid content and the other healer is on protect duty. Having two healers with Esuna can be very powerful in heavily debuff focused content like Dun Scaith. Swapping out Eye for an Eye with Esuna or Largesse respectively, on a trial or raid where the bosses are immune to the effects, is a good choice as well.
==============
9: Traits:
These are the modifications that take place while you’re leveling, I’ll note important places, but please acknowledge that when I was explaining everything above, I assumed you were lvl 70, and these traits do not stack on top of what I said, I’ll do my best to be clear and simple about what changes each time so you know while you’re leveling why X isn’t healing like it’s supposed to, or Y isn’t as high of damage.
Aetherdam: lvl 6/20/40: Gain +1 aetherflow stack
So at lvl 6, you get a total of 1 stack of aetherflow, at lvl 20 you have 2, and when you hit lvl 40 you have 3. This is the resource explained above which is used for your unique healing abilities.
Enhanced Intelligence & Mind: lvl 20/40/60: Increases Mind and Intelligence stat by a total of 8/16/24
Maim and Mend: lvl 20/40: Basic action damage and HP restoration effect of caster and faerie increased by a total of 10%/30%
Corruption Mastery: lvl 26: Bio I upgrades to Bio II, simple yeah?
Broil Mastery: lvl 54/64: Ruin becomes Broil, pretty simple. Later on Broil becomes Broil II
Quickened Aetherflow: lvl 68: 100% chance that Aetherflow’s cooldown time is reduced by 5 seconds upon executing an Aetherflow Resource ability.
Only trait that really needs explaining, this makes it a huge deal to try and spend your stacks instead of holding onto them, and with some of the added utility added in Stormblood you have more flexibility now. Don’t be afraid to use one or two stacks and save 1 for the last few seconds of Aetherflow’s cooldown to see if you get a shorter cooldown or not. At a 5 sec reduction to a 60 second cooldown skill, you can cut Aetherflow’s cooldown by as much as half! Using Dissipation and spending those Aetherflow stacks in conjunction with normal Aetherflow stacks can make the cooldown extremely short and reward you with 9 stacks in 30 seconds and the 20% MP that comes with two triggered Aetherflow’s.
==============
10 - Pets/Fairies:
This deserves its own section just due to the sheer amount of stuff going on.
A - How the Hell Does This Thing Work:
Know your faerie scales off your Mind stat for heals AT THE TIME OF SUMMONING. A popular thing SMN’s do is pop a high level Int potion before summoning their Egi to fight, you can do the same with a Mind potion right before summoning your faerie in addition to food buffs with Mind. When the buff runs out, if the faerie/Egi is still alive, the buff persists until the faerie/Egi is summoned again, or dies and needs to be re-summoned.
Your faerie also gains any AOE team buffs performed by the faerie only but not others. Yes the faerie gains the buff by their name, but NO the faerie does not actually gain the effect; I’ve done testing and proven abilities like Bole or Sacred Soil on a faerie will have it still take same damage as without.
Putting your faerie on Obey and Steady is highly recommended to ensure abilities are activated at the most opportune times; however this takes a lot of practice to achieve, leaving them on Sic isn’t terrible it’s just not optimal.
Please note: Faeries will cast whatever ability you tell them to after their current task is finished, if you line up two spells make sure one has cast time first or the faerie will cast Skill 1>Embrace>Skill2 instead of Skill 1>Skill 2 if someone needs healing. This issue is most prominent with Eos when doing Healing buff > AoE heal, so be quick on the draw or sadly you’ll have to wait.
B - Pet related skills and traits:
Pet Reduced Damage: (Not shown)
Pets/faeries take less damage from AOE’s and direct attacks than normal characters due to their lack of armor and I believe also the bad response time. This is a unwritten rule that you won’t find plainly stated anywhere, this is all from player based observations. AOE’s especially they receive a huge damage reduction, while the exact number is unconfirmed, most AOE’s will do minimal damage to your pet/faerie with a few exceptions, some AOE’s won’t even touch it since your faerie can “fly”.
Rouse: lvl42: Increases all damage/HP restoration done by faerie by 40%, faerie becomes immune to stun, sleep, bind, and heavy. Duration of 20 Seconds, Cooldown 60 sec. Instant.
This is like the humane way to give your Faerie steroi- I mean… More magic! A 40% increase on a 250 Potency heal you’re not paying MP for every 3 seconds, means 350 potency for free on top of your 400 potency Physick. Now every 3 seconds you’re actually healing for 750 instead of 650 for the price of the cheapest heal all three healer classes get. Very useful!
C - Eos: The Wonder Faerie
Eos is the healing Fairie version of the summon spell variety, she focuses on defense, AoE heal over time, and increasing healing done.
Embrace: 250 Potency heal, 2 second cast, 3 second recast.
Eos will heal a target automatically if they fall before 80% HP with this ability, please keep this in mind if your tank is doing a big pull. Either put your faerie away, or constantly spam “Obey” while the pet is on “Steady”, this tactic can be done on both faeries. Good potency heal that can be paired with your healing for some large number.
Whispering Dawn: Gradually restores HP of faerie and all nearby party members with a Potency of 100 x 7 ticks = 700 Potency over 21 seconds. Cooldown 60 sec. “Instant”.
This is the only regen heal available to you, if Eos is not on steady and obey she will just do this whenever she wants. Fine for leveling up to 60 or so, but you’re going to have to start micromanaging her at some point to get the most out of her, especially endgame raids, extreme trials, or new content dungeons. I put “Instant” because there is about a 1 second cast time, and any orders before it finished will prevent the full cast from being completed, the cooldown is thankfully refunded if the spell does not go off.
Fey Covenant: Increase magic defense by 20% for faerie and nearby party members, Lasts 20 seconds, Cooldown 120 sec. “Instant”.
Short of being a dark night or using virus, this is really the only way to reduce the magic damage a party takes, again, a huge reason you should control your faerie instead of leaving it on auto; timing this to a magic attack from a boss is a huge life saver on MP and can make the squishier members survive things they shouldn’t. I put “Instant” because there is about a 1 second cast time, and any orders before it is finished will prevent the full cast from being completed, the cooldown is thankfully refunded if the spell does not go off here as well.
Fey Illumination: Increase spell based HP restoration of self and nearby party members by 10%, Lasts 20 seconds, Cooldown 120 sec. Instant.
Short and sweet, a huge boon to you and the co-healer, but shared Dissipation/Largesse drawback; this DOES NOT affect Lustrate, Indomitability, or Excogitation. This does affect things like an AST’s Essential Dignity or Benefic II, and a WHM’s Cure III or Assize, very potent heals that 20% makes a big difference on. For you this affects Physick, Adloquium, and Succor, but it also boosts your faerie. Combine a Physick and Embrace can reach an 775 Potency heal every 3 seconds for a very cheap cost. Conversely, your 10k Adloquium Crit heals 11k instead, with a 22k shield instead of the 20k shield, combine Emergency Tactics, and you have a 33k heal.
D - Selene: The Multi-Tool
Selene is debuff and buff, essentially a poor man’s Ast with some extra utility missing from the other healers.
Embrace: 250 Potency heal
Same as Eos
Silent Dusk: Silence target - Cooldown 40 sec. Instant.
I don’t know what we feed Selene, but honestly she is the only pet I leave on “do what you want” mode at all. She will literally only use Silence when it is applicable to something nearby you are attacking having a silence capable ability. Honestly, she deserves some credit here, a Faerie cookie, a pay raise, something. You can literally skip the odd mechanic here and there thanks to her. With a 40 second cooldown, it’s the fastest faerie ability recast aside from Embrace for Eos and Selene.
Fey Caress: Remove a single detrimental effect from nearby party members, Cooldown 60 sec. Instant.
Okay, if you didn’t think she deserved a treat before, pretty sure she does now. While on auto she may waste this, but she’s still trying to save you from using leeches on the whole party, kudos for trying? If you have her on obey and steady however, you can control and perform the skill at the optimal time and save yourself a massive migraine, even ignore a mechanic; and not when the tank has a poison stack of 1 and everyone one else is ok (she will do this on sic, so beware).
Fey Wind: Increase nearby party members weapon skill, spell cast, and recast times by 3% for 30 seconds, Cooldown 60 sec. Instant.
Most underappreciated exceptional skill any faerie has, possibly any pet in the game. If you’re running dual scholar, please, please, please consider having one of you decide to use Selene and the other use Eos. 3% more damage for 30 seconds every 60 seconds is a lot in the grand scheme of things; alternately if you’re good for heals and need to pass a Dps check, have your co-scholar and you both use Selene and time it perfectly in tandem for constant buff. That’s a 1.5% (for one Selene)/3% (for 2 Selene’s) damage increase every minute, and if timed with a SMN’s Dreadwyrm Trance, or a BLM’s Enochain- really any DPS and their damage buffs or modes, it’s amazing. That 1.5%/3% a minute over 5 minutes becomes 7.5%/15% more damage done, that may very well be enough to push phases fast enough, kill the boss before the rage wipe mechanic, really just strengthen the party as a whole. While a AST has this capability, it’s 10% for 20 seconds to the whole party as either damage or recast times that may or may not affect your Job, and only if they draw the right cards to share the cast with everyone which is a stroke of dumb luck at times and draws are 30 seconds apart meaning you may not get a group buff like this for another 2 to 3 minutes. Selene is a reliable Dps increase and deserves some love for that, you can leave her on Auto for fights with no debuff mechanic.
==============
11 - Rotations:
What you’re ideally going to be doing, but is always subject to change based on the needs of the party and what you are able to do with your current MP and Aetherflow.
A - Gaging:
Adloquium the tank, stop and gauge the dps and tank. Did they take a lot of damage, or are the shields still up, did the mobs die? Wait till the shield’s break, counting from the first hit; how long did it take? Based on your answers to these questions you’ll either want to top off with heals, wait and see how much damage the tank can really take, or swap to attacking.
B - DPS:
S1: Shadow flare then Miasma II if 3 or more enemies, otherwise skip to S2 > S2: Miasma > S3: Bio II > S4: Is there a bunch of enemies (3-5 or more)? Have Aetherflow to spare? Then Bane or skip to S5 > S5: Is tank still okay? Broil until damage of time expires.
C- Healing:
Sorry. I can’t really tell you what the healing rotation is because that is a scholar’s best boon, there is no clear rotation, there’s only the situation at hand you will have to learn how to handle each one and ones you didn’t know existed. Other healers have the same problem, but Scholar more so. If anything, Adloquium then Physick is your friend.
==============
12 - Stratagem:
Here is where I note ability combo’s I’ve learned or theorized, and state the situations I’ve used them in.
Strong AOE DoT heal
Ability Order: Rouse, Fey Illumination, Whispering Dawn
Use: Good for upcoming AOE damage, or just topping everyone off while dpsing. At ilvl 230 healing went from 800hp per tick to 1.2k per tick .
No Aetherflow - Heals needed
Ability Order: Fey Illumination, Largesse, Rouse, Emergency Tactics, Adloquium/Succor
Use: Aetherflow is on cooldown, but MP is high, the tank/party needs a big heal but you’re either solo healing or the co-healer kicked the bucket. Can replace Adloquium with Succor. Congrats, at ilvl 230 assuming you crit, you just healed for 21k (7k if you didn’t crit which is a Lustrate heal practically), that’s literally my DRK’s HP pool at ilvl 210 shy of 1k and if you have your Faerie set to co-heal, you just made them survive Living Dead’s effect (DRK has 22k HP even at ilvl 210).
Recharge Faerie Gauge/MP - Warning: High Aetherflow Consumption
Ability Order: Aetherflow, spend stacks(Energy Drain if not other abilities), If Eos: Fey Illumination, Dissipation, Largesse, Energy Drain (if low MP or spend stacks accordingly) and/or Lucid Dreaming (spend any stacks, or use Energy Drain for them), if MP is ok, hold onto stacks and use Dissipate in addition to Largesse to heal through faerie absence, resummon faerie, spend stacks, Aetherflow, spend stacks (again, Energy Drain or other abilities).
Use: This will build up your Faerie Gauge extremely fast, in as little as 30 seconds if you’re lucky and you can gain 90 points on the gauge. You’re also recovering an absurd amount of MP with this rotation. 20% MP for both aetherflow’s + what you gain for the 560 potency MP refresh of lucid dreaming, and if you used Energy Drain to spend all 9 stacks of aetherflow roughly 1350 Potency restore of MP & HP for self in those 9 stacks alone.
Really big AOE/tank buster coming - Healing needed before and after
Ability Order: Rouse, Fey Illumination, if you have Aetherflow stacks spend them on Lustrate topping people off (alternate lustrate, eye for an eye, lustrate if this is the case), Eye for an Eye, Whispering Dawn, Dissipation, Adloquium, Deployment Tactics, Sacred Soil, wait for damage, Indomitability/Lustrate, Lustrate lowest HP/tank, Emergency tactics, Succor.
Use: Heal like you mean it and cry for remainder of Dissipations duration till you can Swiftcast/Surecast/long cast a faerie summon; hopefully you have a co-healer while you spend 5 seconds summoning your pet if you do it the long way.
Maximum Eos Overdrive
Ability Order: Rouse, Fey Illumination, Aetherpact
Use: Simple, this makes your faerie’s heals very strong on single target, almost scary. What you can do is throw in a Whispering Dawn right before Aetherpact and your faerie will be competently healing everyone around you for roughly 20 seconds. With the Faerie Gauge depleting by 10 every 3 seconds at a total 60 gauge, the faerie would be able to make full use of the buff time.
==============
13 - Macro’s:
Alright so below I’m going to highlight some things I’ve discovered, useful macro’s that make life easier. Most correspond to controlling your faerie more effectively with less effort.
“Attack”: This Macro makes all your attacks attack the target of your target. Why? Because that means you can stay locked on the tank/dps for quick healing, and always attack what the tank/dps is attacking so you never accidentally steal aggro; this also allows you to use the same button to attack things on your own outside of instanced content. Just replace the ability names with the attack you want and have fun. (Can do this for Shadowflare too, remove third line, and it will cast on tank/dps/or the enemy in solo combat, but I prefer not to in case mobs make an oblong shape that requires more finesse.)
/micon ruin
/ac ruin
/ac ruin
Please note: I know it’s not rocket science to do this, but if you haven’t tried it yet, I highly recommend it This is a huge quality of life improvement to healers of any job, especially console players. Just make sure to have a focus target macro too so you can watch the boss cast times/spell names.
“Faerie! Behave!”: A macro I made to control my faerie more when needed, this interrupts them healing say, Dps with 75% HP left, and opts to heal the tank you are targeting with 40% HP left, because the AI for faerie is not always the brightest.
/micon physick
/ac physick
/pac “Heel”
/pac “embrace”
Please note: Replace “Physick” with whatever healing ability you would like to pair Eos’ or Selene’s Embrace with yours, good for adding to Esuna for example; this way you not only remove poison, but heal the damage it did. Use to Embrace under a Succor or Adloquium on a priority target that needs a little more attention than the rest of the group. The faerie heals for free, do not forget this! Be sure if you do this to space out your casting and don’t just mash pyhsick, this is why I say cast speed is a low priority early in the guide as you will fall out of sync with Eos/Selene as your recast is roughly 2.5 seconds, and their embrace is a 3 second recast cooldown beginning from start of cast.
“Faerie! Help?”: A slight variation on the previous macro; this has your faerie help you if they’re not doing anything else, which is rare, but helpful.
/micon physick
/ac physick
/pac “embrace”
“Dance!”: Because it almost looks like you’re dancing with your faerie at times. What this does is pairs Aetherflow with Rouse; this makes it so when you give yourself MP and Aetherflow stacks, Eos also gains a boost to basic healing skills so you can space out the Aetherflow more evenly or give MP time to regenerate by healing less because Eos/Selene is healing more.
/micon Aetherflow
/ac aetherflow
/wait 1
/ac Rouse
Please note: The added bonus is both of these are on a 60 second cooldown, and instant casts, so you can move while casting it and not interrupt. You could add an “Obey” for your faerie at the beginning, middle, or end, to get them to follow you if you want to use this as an additional “Move faerie, you’re gonna get hit.” button as well while the skill is on cooldown for double purpose.
“Useful Faerie Macros!”: Biggest issue with Eos/Selene is they do whatever the hell they want really, even on “obey” and “steady”; they keep healing anyone below 80% hp instead of casting the skill you want when you want it. Make the following macros instead to not only control Eos and Selene simultaneously without switching hotbars OR making an extra 4 macros. On console you may have to turn off switching to pet bar automatically for this to work best.
Obey!:
/micon “Steady” pet
/pac obey
/wait 1
/pac steady
Embrace:
/micon embrace pet
/pac heel
/pac embrace
AOE DOT / Silence:
/micon “Whispering dawn” pet
/pac heel
/pac “Silent Dusk”
/pac “Whispering dawn”
M Res / Rmv Debuff:
/micon “Fey covenant” pet
/pac heel
/pac “Fey Covenant”
/pac “Fey Caress”
Heal Buff / ATK Spd:
/micon “Fey Illumination” pet
/pac heel
/pac “fey Illumination”
/pac “fey Wind”
Please note: As long as you remember/reteach yourself what Selene’s spells look like, this is extremely handy to use so you don’t access your pet bar and slow yourself down when you could be casting; or use 8 macros for what you can do in 4. Alternatively you can set up 2 Macro’s in the following style to replace your summon spells that remap your skills depending on which faerie is out.
Summon Eos:
/micon “Summon”
/ac “Summon”
/hotbar pac “Fey Illumination” 2 4
/hotbar pac “Fey Covenant” 2 3
/hotbar pac “Whispering dawn” 2 2
==============
14 - Hotbars:
As a show to demonstrate my layout, see the below picture and the reasoning behind the madness:
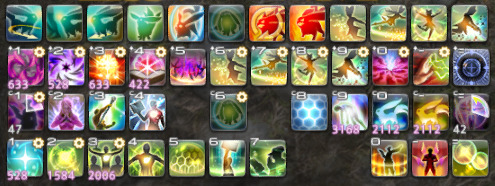
The top row is my pet bar, you will have to click these abilities manually.
Second from top (Hotbar 3) is Shift + Numbers/symbols “1 to =” across the top of my keyboard.
Second from bottom (Hotbar 2) is Ctrl + Numbers/symbols “1 to =” across the top of my keyboard.
And the bottom row (Hotbar 1) is numbers/symbols “1 to =” across the top of my keyboard.
The skills here constantly shift around, it would be impossible to always keep this up to date, but you can use the theory of: Healing bottom row, pet control and casting buff and resurrect middle row, attacks top row.
==============
15 - Gaming Gear/Work Around:
I do have a Logitech G600 mouse, highly recommend it if you have 50$-60$ to spare, definitely if you see it on sale. Also have used a Razer Naga for similar effect. Can also switch out numbers for numpad and play with both hands on keyboard, just remap Z, X, C, and V on your keyboard or similar to your thumb’s comfort so you can use your thumb for the first 3x3 set of squares, so on and so forth. I even setup a key to make the bottom hotbar switch between hotbar 1 and 4 with 1 being full control and 4 being partial control versions of my heal macros for my faerie. You can then setup / and * to cycle targets close to far and - and + to cycle party members up and down with Enter being “select”, you can always get to say by doing “alt+s” and do the same for other chats like linkshells, party, and FC chat. I did this for a while when my mouse was damaged…
Have I spent a lot of time optimizing this to be the best for me? Yes, yes I have. But this may not work for you; so please try, comment, share, and enjoy.
==============
16 - The End
Please Like or Reblog if you found this guide helpful, it helps me gauge the interest for making future guides of different classes.
Alright, that’s it, good freaking luck, see you all later…
It’s done…
Go home…
The shows over….
Alright, fine well, Yeku says we might do one for other classes if people request it, but I you didn’t hear that from me…
Shhh, now go…!
#tales of mod#what the job?!#scholar#ffxiv#guide#how to scholar#i wrote this instead of being an angry smol#amen to writing as an outlet to help others instead of destroy shit
63 notes
·
View notes
Text
Kami Skill Vol. 1 Ch. 6 - Thief's [Skill]
In exchange for someone sending me cash for some unknown reason, have a new chapter.
I'm awake.
Everything is fuzzy. My head is spinning. I try to breathe in, and I realize something is lodged in my mouth. A gag or something. I breathe in through my nose and exhale deeply, I can see a little more of the situation.
I'm in the dungeon. I'm being forced to lie down with my hands and feet bound. In front of me were the backs of the two self-proclaimed 'warriors' and the figure of Pierina carried on their shoulders--.
I screamed as hard as I could, but the gag made it impossible to speak.
The larger one, the man with Pierina at his side, noticed me. He didn't hesitate to come up to me and chuckle.
"You're going to get eaten by a monster there, brother."
The smaller one points at Pierina with his thumb and laughs.
"We'll make sure this one gets her money's worth."
--Money? No way you're going to sell her to a slaver!
I kept trying to shout as I crawl like a caterpillar, but my legs are tied to something that prevents me from getting any closer.
"Hahaha! This is what you get for setting us up earlier, you little shit!"
I gasp as he kicks me in the face, causing sparks to fly in front of my eyes.
"I had a hard time getting here, man! But, you know, it was quite a relief to receive such high quality merchandise..."
"It's a bit of a kick in the teeth, huh?"
--You're lucky I got hurt, assholes!
I struggle to lash out at them.
"Come on, let's get out of here. It's not safe for us to be on such a deep floor."
"Totally. Why is the meeting place even in the dungeon..."
The two men, large and small, continued to blather on like this as they went off with Pierina in their arms.
They melted into the darkness, and I couldn't even tell which way they went. Their sounds echoed and I couldn't get my bearings.
Oh, no, no, no, no, no, no!
I need to remember what Mr. Diego taught me!
I don't know who and where those guys are dealing with, but if they use the [Transfer Crystal], it's the last thing they do. Even if it's set to go to the 'dungeon entrance' when it's provided by the guild, with a little tweaking, that crystal can fly you to any place you've been.
I heard that it's possible to catch up with them by tracing the magic element, but I'm not a mage and I can't read or track the magic element.
If the slavers who have taken Pierina use the [Transfer Crystal] to escape somewhere far away, there'll be nothing left to find. Pierina will have to live as a slave in some country for the rest of her life!
I struggled and cursed under my breath.
I never thought I'd lose anyone I cared about again, not just Mary, but Pierina, when she was taken from me right in front of my eyes.
--No way!
With one last burst of effort, something connected to my foot snapped, and I rolled with the momentum.
--It snapped?!
Okay, relax, I'm a Thief. Even if my skills are the weakest thing you've ever heard of, even if I'm level 1, I'm still a Thief. I don't care if those sketchy bastards tied me up--
I carefully cut the ropes that bound my hands with the knife I had in my sleeve. As long as my hands are free, I'm good to go. I take the gag off, cut the ropes on both of my feet. and stand up.
--Pierina!
I stepped out of the space where I was restrained.
I paused for a moment then stiffened.
A white fog blankets the area. A temple-like structure is faintly visible. The layout of the dungeon, the level of difficulty, everything is different from the first level. It's an oppressive feeling.
It spreads in front of me like an overwhelming sense of anxiety. The instinctive fear of the unknown, the fear of being without a map or even a path.
I knew that if I took even one step out of this place, I would be immediately 'swallowed by the dungeon'. I couldn't shake the feeling.
Deep breath. Inhale and exhale.
The breath I exhale becomes cloudy white and assimilates with the fog. The breath I exhale from my body dissolves and assimilates with the fog of the dungeon. Yes, I think. Dissolve with it. Assimilate with the dungeon. This thing-- I'm not afraid of it. Don't be afraid.
I breathe in, breathe out.
I think. I've killed so many slimes. Maybe I'm a little higher level.
I'll be able to learn some skills when I reach a higher level.
Yes, skills. I'll have to go to the guild and get a sheet to find out what level I'm at now, but if it's a skill, I'll learn it right here, and I can use it right after I learn it.
--Please, learn a useful skill...!
I imagine my status in my head. It's not just skills that were given to me by the half-god, half-human queen. It's an adventurer's ... skill that 'you can learn new skills' as you level up.
An image of my status sprang up in my brain.
Name: Rana Prata Human: Lv? Thief: Lv? HP: 33 MP: 0 Attack: ? Defense: ? Agility: ? Abilities: Unlock Lv?, Detect Lv?, Tracking Lv?, [NEW] Mapping Lv2 Skill: 【Breathing】 You can breathe in and out.
--Mapping!
I open my eyes wide and hold my hands in front of my chest. A pen of light appears between my fingers and moves my hand to draw a map in the air.
The completed map has holes in some places. This is what it looks like at lower levels. Then the map of light disappears and [enters my head].
--Now it's [Tracking]!
I use the skill I originally learned, [Tracking]. As you advance in level, it will tell you the location of enemy monsters once you've encountered them, but at lower levels,
--Pierina! There you are!
It tells you the location of your lost party members. I compare it to the map in my brain and identify the location.
According to the map, this is the... 10th floor! Pierina is in a small space about 300 metri away from here. Because of the low level of my [detection] skills, I don't know who else is there, but those two men are probably there.
--Just hang on, Pierina!
I took a step, but in that moment.
The sound of flapping wings
"What the hell?!"
Something attacked me from the air. I hurriedly avoided it and then saw what it was, clinging to the ceiling.
"A giant bat... a killer bat!"
They are nasty guys that attack relentlessly from overhead that are hard to dodge - I remember Mr. Diego saying that. The guild's recommended level for defeating them was 5, I believe.
And,
The sound of echoing footsteps and roars.
The monsters were starting to gather.
A group of large hobgoblins, four of them (A to D), are slowly approaching. Beside them is a black wolf, and behind them is a rampaging monkey.
All of them are vicious monsters that can barely be dealt with by a party of four job level 10 people.
They are not a match for a novice adventurer who has just started challenging the dungeon today.
Even so, I look at them. I breathe softly and shallowly.
"...You guys..."
My chest armor has been ripped off, my dagger has been taken away, and I only have two small knives in my hand.
Still I stare at them. I take a deep, deep breath.
Pierina is waiting for me.
"Get out of the way!"
0 notes
Text
What is the difference between H.265 (HEVC) and H.264 (MPEG-4 AVC)?| Soukacatv.com
H.265 is the successor standard to H.264, aka MPEG-4 AVC and has generated huge optimism given Industry’s struggle with shortage of bandwidth, spectrum, storage and imminent need to take growing HD content for multi-platform delivery. HEVC was approved by ITU-T in Jan 2013 and has been among the most discussed broadcast trends, as well as the key technology offering at NAB and IBC with product vendors and service providers flooding HEVC solutions to bring alive the cherished 4K experience.
HEVC is Big Deal …Today H.264 is the most widely accepted and adopted format in online and broadcast domain for content compression and distribution. HEVC (High Efficiency Video Coding), the new video coding standard brings promise of huge bandwidth savings of approx. 40-45% over H.264 encoded content (ref. HEVC MP and H.264 HP with similar fps) with similar quality. In addition, HEVC has potential to significantly impact other areas including
HDMI Encoder Modulator,16in1 Digital Headend, HD RF Modulator at Soukacatv.com
SKD3013 3 Channel HD Encode Modulator
Dual HD Input Modulator With ISDB-T And DVB-T Modulation
DVB-T And ISDB-T Encoder Modulator
Accelerate demand and sale of 4K screens which has been largely limited due to large price difference and absence of UHD content. HEVC can offset the second challenge
Huge opportunities from reduced bitrate requirements enabling broadcasters and OTT vendors to bundle more channels / content on existing delivery mediums
Extend far greater video quality experience compared to H.264 encoded sequence at same bitrate
Ability to offer higher quality video for bandwidth constrained mobile networks
Realize differentiated and premium 4K content, multi-view encoding etc.
…But HEVC Adoption is still Far. While HEVC can bring respite to content producers, aggregators, distributors and consumers with more quality content at same bitrate, the adoption curve could still be years away.
Industry adoption weighs heavily on investments and with significant cost gone in H.264 gear for SD to HD migration, next expensive transition will take time. End to end deployment will require headend upgrade, workflow overhaul, re-deployment of media players (STBs, game consoles.) with embedded HEVC hardware decoders and migration of huge content libraries from H.264 to HEVC.
In addition to CE player, support from major technology players (Google, Adobe, Apple, Microsoft, Sony etc.) in their players, browsers, mobile and PC operating systems will determine majority adoption.
Time to realize power efficient and real time encoders/decoders given HEVC computational overheads. Availability of affordable HEVC technology in silicon with level of reliability will be the defining milestone
What differentiates HEVC from its Predecessor
Some of the key differences between H.265 (HEVC) and H.264 (MPEG 4 AVC) are listed below
H.264
MPEG 4 Part 10 AVC (Introduced in 2004)
Dominant and accepted video codec for Terrestrial, Cable, Satellite and IPTV broadcast. (ATSC/DVB/ISDB)
Widely used across Blu-Ray, security systems, videoconferencing, mobile video, media players, video chat etc.
- 40-50%-bit rate reduction compared to MPEG-2
- Led the growth of HD content delivery for Broadcast and Online
Successor to MPEG-2 Part
Hybrid spatial-temporal prediction model
- Flexible partition of Macro Block (MB), sub MB for motion estimation
- Intra Prediction (extrapolate already decoded neighboring pixels for prediction)
- Introduced multi-view extension
9 directional modes for intra prediction
- Macro Blocks structure with maximum size of 16x16
- Entropy coding is CABAC and CAVLC
Support Up to 4K (4,096×2,304)
Supports up to 59.94 fps
21 profiles; 17 levels
Unrealistic for UHD content delivery due to high bit rate requirements. Frame rate support restricted to 59.94
H.265
MPEG-H, HEVC, Part 2 (Approved in Jan 2013)
Implementation demonstration across NAB, IBC and other events starting 2012 from companies e.g. ATEME, Broadcom, Thomson, Harmonic (Cisco), Ericsson, Qualcomm etc. Increased R&D across Encoder/Decoder /CE vendors for software and hardware based solutions
- 40-50% the bit rate reduction at the same visual quality compared to H.264
- Potential to realize UHD, 2K, 4K for Broadcast and Online (OTT)
Successor to MPEG 4 AVC, H.264
Enhanced Hybrid spatial-temporal prediction model
- Flexible partitioning, introduces Coding Tree Units (Coding, Prediction and Transform Units -CU, PU, TU)
- 35 directional modes for intra prediction
- Superior parallel processing architecture, enhancements in multi-view coding extension
- CTU supporting larger block structure (64x64) with more variable sub partition structures
- Entropy coding is only CABAC
Up to 8K UHDTV (8192×4320)
Supports up to 300 fps
3 approved profiles, draft for additional 5; 13 levels
Computationally expensive (~ 300 % +) due to larger prediction units and expensive Motion Estimation (Intra prediction with more nodes, asymmetric partitions in Inter Prediction).
Cost of HEVC: With two HEVC patent pools, HEVC Advance and MPEG LA, the adoption cost of HEVC is expected to be roughly 16 times more expensive per unit than its predecessor H.264. Interestingly Sony, Panasonic, Qualcomm, Nokia and Broadcom with loads of patents are still not part of the current two pools.
There is general euphoria and high expectations from HEVC, but historically it takes somewhere between 6-10 years before a standard become mainstream. Some stimulating questions attributing to HEVC roadmap will include:
1.Larger screen resolution will require higher frame rates 60- 120 fps from current 24-30 fps, given the increase in fps, what overall efficiency savings could HEVC realistically achieve?
2.Given state of bandwidth networks, growth in video coupled with multi-screen delivery and absence of UHD content, will encoding existing SD/HD content with bitrate efficiency become more likely business case for HEVC rather than 4K?
3.How far is HEVC adoption from broadcast industry standard specifications (DVB/ATSC) given footprint of legacy equipment and transmission infrastructure?
4.What are the sector specific services which could lead the transition and embrace HEVC sooner that rest of the pack-mobile video services, OTT players? Similarly, role of international events like 2014 FIFA world cup and Rio 2016 Olympics towards selective adoption?
We are bound to witness more product and service roll-outs with HEVC-related technologies and announcements from early adopters who will define the expectations for mainstream Industry. HEVC has relevance and impact across wide ranging applications in Broadcast (Cable, Satellite, IPTV), Digital Cinema, Internet streaming, content production, storage, Mobile streaming, medical imaging, video conferencing among others, but how early will the industry endorse and adopt is yet to be seen.
Established in 2000, the Soukacatv.com main products are modulators both in analog and digital ones, amplifier and combiner. We are the very first one in manufacturing the headend system in China. Our 16 in 1 and 24 in 1 now are the most popular products all over the world.
For more, please access to https://www.soukacatv.com.
CONTACT US
Company: Dingshengwei Electronics Co., Ltd
Address: Bldg A, the first industry park of Guanlong, Xili Town, Nanshan, Shenzhen, Guangdong, China
Tel: +86 0755 26909863
Fax: +86 0755 26984949
Mobile: 13410066011
Email: [email protected]
Source: mediaentertainmentinfo
0 notes
Last Seen Blogs

urbanhomeservice
Urban Home Service

tromsojapan
トロムソNOW

productdesignfall2017
Product Design

superweb3
无标题

brookeoftheroses
of the roses