#html editor online
Explore tagged Tumblr posts
Visit Tumblr Blog
Explore Tumblr blogs with no restrictions, modern design and the best experience.
Last Seen Tumblr Blogs


Fun Fact
The average Tumblr user visits about 67 pages every month.
Text
Online Code Editor with live preview , online code editor , live code editor
Start Coding with EditBoxPro’s Online Code Editor Now!
In the digital age, coding has become an essential skill across various industries, from web development and software engineering to data science and artificial intelligence. EditBoxPro’s Online Code Editor with live preview offers a comprehensive solution for developers, students, and coding enthusiasts to write, test, and debug code in real-time. Let’s explore how EditBoxPro’s Online Code Editor can empower users to streamline their coding workflow, improve productivity, and bring their coding projects to life.
Unleashing the Power of EditBoxPro’s Online Code Editor
EditBoxPro’s Online Code Editor is a versatile tool designed to meet the needs of both novice learners and experienced developers. With its intuitive interface, robust features, and live preview functionality, our code editor provides users with a seamless coding experience that fosters creativity, collaboration, and innovation. Whether you’re working on a personal project, collaborating with a team, or learning to code for the first time, EditBoxPro’s Online Code Editor offers the flexibility and functionality you need to succeed.
Key Features of EditBoxPro’s Online Code Editor
Syntax Highlighting: Enjoy syntax highlighting for a wide range of programming languages, including HTML, CSS, JavaScript, Python, Java, and more. Our code editor highlights syntax elements with distinct colors, making it easier to read and understand your code.
Auto-Completion: Accelerate your coding workflow with auto-completion functionality, which suggests code snippets, variables, and function names as you type. Our code editor’s intelligent auto-completion feature helps you write code faster and reduces errors.
Live Preview: Visualize your code changes in real-time with EditBoxPro’s live preview functionality. Our code editor provides a live preview of your HTML, CSS, and JavaScript code, allowing you to see how your changes affect the appearance and functionality of your web pages instantly.
Multi-Language Support: Write code in multiple programming languages within the same editor interface. EditBoxPro’s Online Code Editor supports a wide range of programming languages, allowing you to work on diverse projects without switching between different tools.
Code Collaboration: Collaborate with team members or peers in real-time with EditBoxPro’s code collaboration feature. Our code editor allows multiple users to edit the same code file simultaneously, facilitating collaboration and teamwork on coding projects.
Version History: Keep track of your code revisions and changes with EditBoxPro’s version history feature. Our code editor automatically saves your code changes and allows you to revert to previous versions if needed, ensuring peace of mind and data integrity.
Advantages of Using EditBoxPro’s Online Code Editor
Accessibility: Access EditBoxPro’s Online Code Editor from any device with an internet connection, eliminating the need for complex software installations or downloads. Our code editor is accessible via web browsers, making it convenient for users to write code anytime, anywhere.
Ease of Use: Enjoy a user-friendly interface and intuitive controls that make coding accessible to users of all skill levels. EditBoxPro’s Online Code Editor is designed with simplicity and usability in mind, allowing users to focus on writing code without distractions.
Real-Time Feedback: Receive instant feedback on your code changes with EditBoxPro’s live preview functionality. Our code editor provides real-time updates, allowing you to test and debug your code efficiently and see the results of your changes instantly.
Learning Resources: Access a wealth of learning resources, tutorials, and documentation to support your coding journey. EditBoxPro’s Online Code Editor offers educational content and coding exercises to help users improve their coding skills and master new programming concepts.
Versatility: Use EditBoxPro’s Online Code Editor for a wide range of coding projects, including web development, software engineering, data analysis, and more. Our code editor supports multiple programming languages and offers features tailored to various coding tasks and projects.
Conclusion
Elevate your coding experience and unleash your creativity with EditBoxPro’s Online Code Editor with live preview. Whether you’re a seasoned developer, student, or coding enthusiast, our code editor provides the tools, features, and resources you need to write, test, and debug code effectively. Experience the power of real-time coding with EditBoxPro’s Online Code Editor and take your coding projects to new heights today!
Start Coding with EditBoxPro’s Online Code Editor Now!
online code editor, live editor, code editor, live code editor, make online code editor, best online code editor, live html editor, best online code editors, online html editor, best online editors, online html editor with css drag drop, live preview, live html preview visual studio code, editor, free online code editor, online free code editor, code editor online, online code editor python, online code editor c++, online code editor php, html editor
0 notes
Text
you should make a website!
"my favorite social media site is shutting down!"
"the CEO of the site i use just committed another atrocity!"
"i want a webspace that's all my own!"
if any of these sound like you (and if you're on tumblr, i know at least one applies) you should make your own website!
why make a website?
incredibly customizable
you can put whatever you want on it
it's, well, your own! like a house you build with your own hands
things you'll need
a computer. you can maybe get away with doing this on a mobile device, but i have zero experience there
a code editor. i like VScodium, which is a de-microsoft-ed version of VScode.
a will to learn ;)
site hosting
neocities. everyone knows neocities. at this point i do feel like it's become a bit too centralized, but it's a good option nonetheless. do note that there are filetype restrictions for free users, but that shouldn't be a huge issue for most. what may be an issue, though, is that there's a content security policy that prevents sites made after jan 1st, 2024 to use outside scripts. also, you have to pay to use your own domain
nekoweb. similar to neocities, but there's no filetype restrictions or a content security policy. some differences are outlined in the FAQ (thinking about moving here... i am a traitor...) i'm not sure if domain support is free or paid.
github pages or codeberg pages. you'll need an understanding of git for this
pages.gay: run by besties.house, uses git
teacake: free hosting is currently closed, but paid hosting starts at 2 bucks a month.
leprd.space: i know next to nothing about this.
a web server. don't recommend this if you don't know computer stuff but it is an option (you'll likely have to provide your own domain though)
gripes & solutions (?)
i'm not comfortable maintaining pages in pure HTML / templating with JS sucks!
with a static site generator, you can write pages in markdown and they'll be converted into HTML and (if you'd like) be put into a template of your choosing. my personal choice is 11ty but there are tons of options!
static site generators can be a bit of a learning curve (and you will have to write some html for templating) but if you're making a lot of pages or blogging regularly it's something to consider
there are starters for 11ty online but i might make a more beginner-proofed starter and/or guide in the future? don't count on it
i don't want to write/maintain CSS
simpleCSS is a tiny CSS file you can use to make semantic HTML ("naked" HTML) look nice. it's got decent customization options too. it's not particularly fancy or opinionated, but it's a good starting point if you need something
i don't know what to put on my website!
small list of ideas:
weblog
art/writing/music gallery
movie/show/book tracker
place to store bookmarks/links
scary! i'm scared!
my askbox/messages/e-mail inbox/etc. are open to anyone who'd like to ask for help!
418 notes
·
View notes
Text

Tutorials for Aesthetics
Hi! Reign here :) this guide is dedicated to teaching you how to make:
a) colour gradient text b) dividers c) pictures with gradients
Now, as a disclaimer, I'm not saying you should have all these things on your posts. Having pretty things won't guarantee a boatload of interactions and aesthetics shouldn't take away from the actual substance of your writing. Many fics do very well without all the glitz and glamour, and indeed simplicity goes a long way.
You should always prioritise clarity, improvement, and conviction in your writings. Don't get caught up in trying to look pretty and definitely don't be copying other creators' aesthetics unless they've given consent for you to do so.
This serves only as a starting off point for exploring styles that suit you.
Another disclaimer is that Canva, since I wrote and posted this, has and might make more changes which will render parts of this guide inapplicable, but the main parts should remain the same. Canva is best used with premium but I understand that not everyone can and is willing to spend money on this. So my advice is to find a different platform and search up tutorials online.
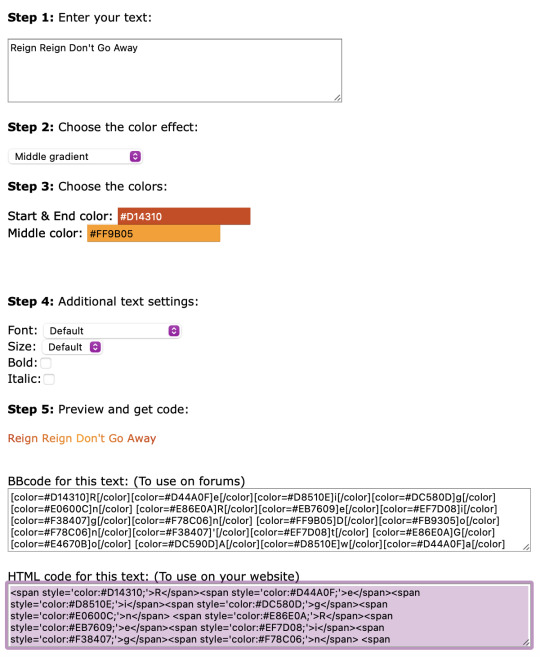
How to get the colour gradient text!
༯ I use stuffbydavid.com
༯ Decide if you want a horizontal gradient/middle gradient/three coloured gradient
༯ Pick your colours + write out the text you'd like to be coloured in the text box
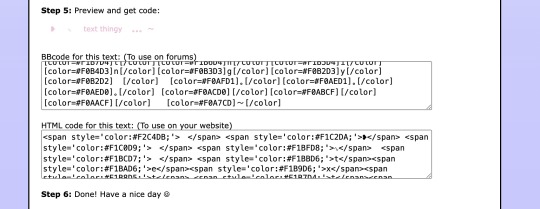
༯ You can see the preview and when you're happy copy all the text in the HTML code box
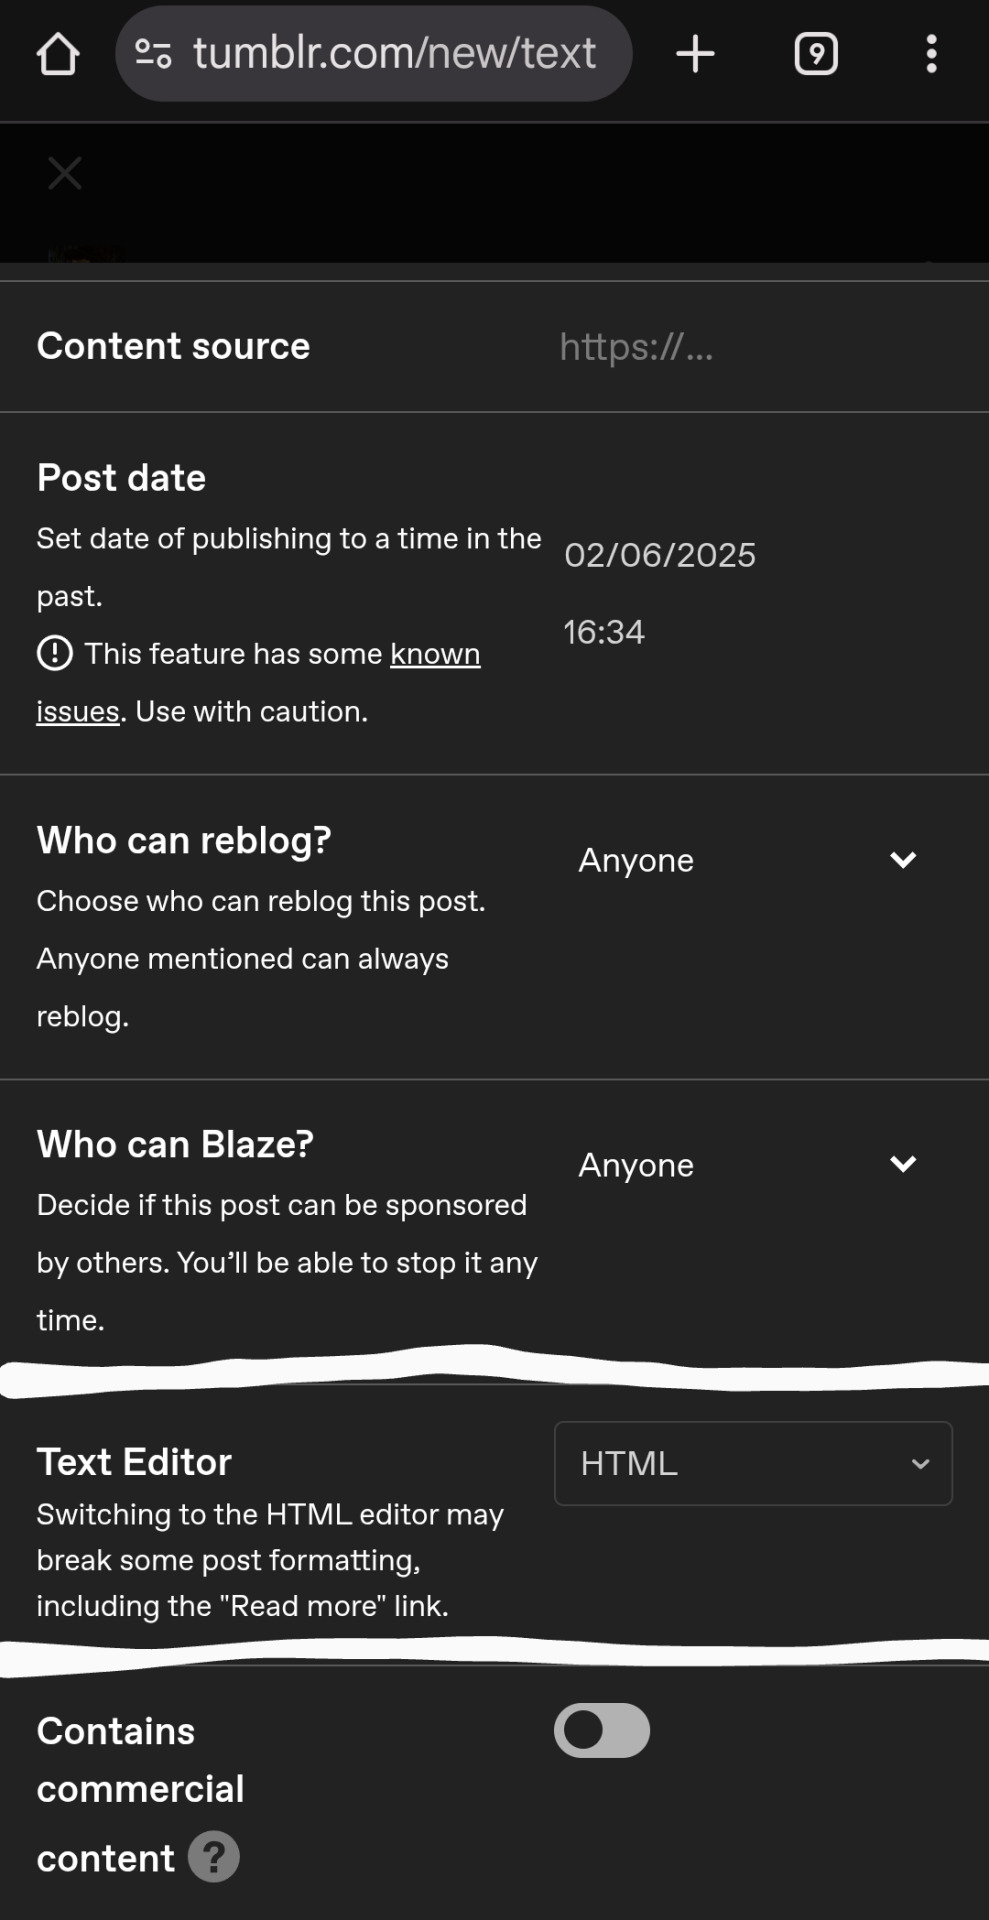
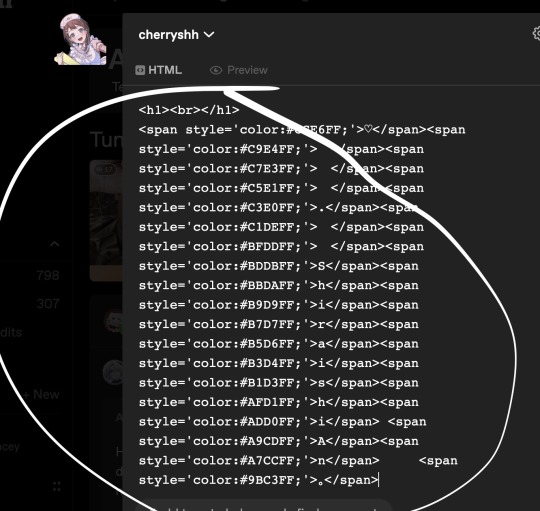
༯ Go on Tumblr, create a post, click the settings icon of the post, then in the Text Editor function change it from Rich Text to HTML
༯ All your coding will be pasted in the HTML side and they'll appear formatted in the Preview on your Tumblr post


How to make dividers!


༯ I use Canva
༯ Click Create a design
༯ Click Custom size -> for my colour gradient dividers, I use the 3000 x 40 px but you can use whatever sizing you'd like of course -> experiment to your liking
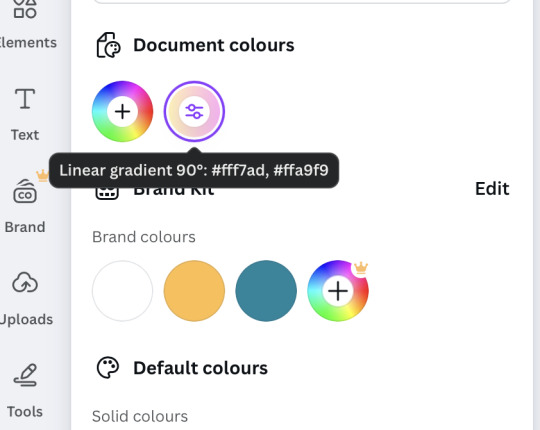
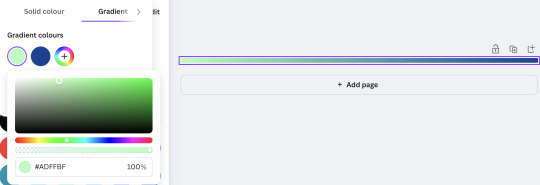
༯ Click the colour wheel to change your background colour
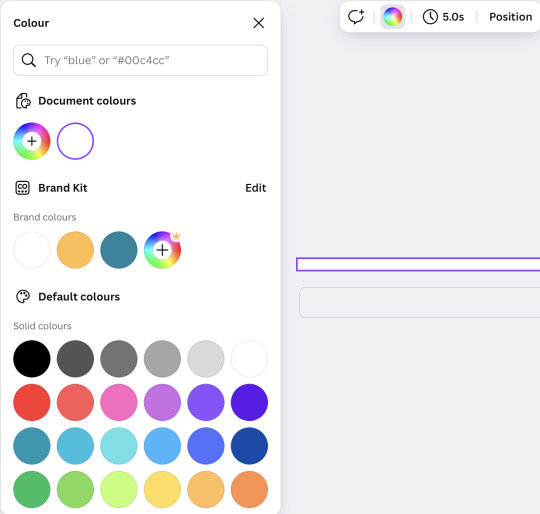
༯ You can do solid colours and use whatever hex code you'd like but to make gradients, scroll through the colour palettes to get to the different kinds of gradient options
༯ From there, you can change the colours of the gradient and adjust to your liking
༯ To download it, click Share, Download, keep it PNG, size 1 and Download for real

༯ On Tumblr, you're going to just drag and drop that downloaded image on the website or if you're on the app, just add it as a picture and adjust it where you'd like it to go on the post
༯ If you were to have drawings like the hearts or croissants for the divider, you'll want to adjust the Custom size, arrange the pictures or elements on the page, and download with a transparent background (it requires a premium subscription unfortunately but if you do the free trial and just make a bunch of banners and dividers before it runs out, you should be good)

༯ A lot of this will involve experimenting for what works for you. There's no cheat code to that, unfortunately. But have fun with it. Don't be afraid to trial and fail -- everyone did at some point
How to add gradient colour to pictures!
༯ Use Canva again
༯ Click Custom size -> 3000 x 800 px (or, again, whatever size you like)
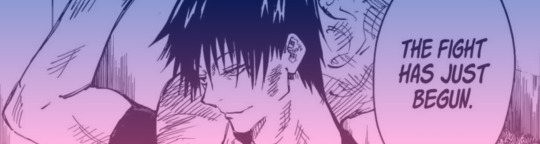
༯ Pick a picture you like -> for manga panels, I like to use Pinterest
༯ Drag that picture onto the blank page and adjust to fit
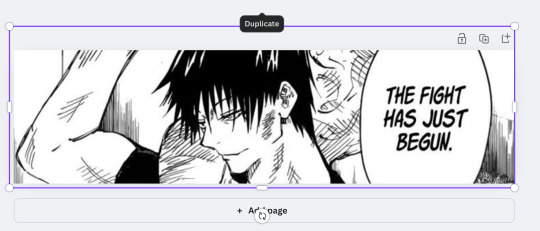
༯ Click Add Page -> on that page, change the background colour. You can use solid colours or gradient colours, it's the same process as for making gradient dividers

༯ Click the colour page, copy and paste it on your picture
༯ Adjust the transparency of your picture depending on how opaque you'd like the colour to be


༯ Delete the colour page and keep the picture
༯ Then, again, click Share and Download
༯ This is the final product -> you can obviously find better pictures and do whatever colours you'd like, this was just an example
༯ I'm not very tech savvy so if my explaining is terrible, I am so sorry 😭 but hopefully this makes senses and encourages you to experiment and be bolder with your layout!
150 notes
·
View notes
Text
PSA: Winterfox/Requires Hate/Benjanun Sriduangkaew/Maria Ying
I'm starting to see recs for Benjanun Sriduangkaew crop up in fandom again, so here's your reminder that Benjanun Sriduangkaew, aka Maria Ying, is actually Winterfox/Requires_Hate, a well-known serial harasser, blackmailer and abuser who decided that the best thing to do with her multimillionaire heiress time and money is to do real and lasting harm to many communities and many writers (especially writers of color) that she saw as rivals.
with how fast things move online right now, I imagine she's banking on people just forgetting everything she pulled: please don't! But even if you won't deny her your attention, at least keep yourself safe and remember that her modus operandi used to be either love bombing people until they let slip something she then blackmailed them with, or literally decades of unhinged harassment.
feel free to share.
original sources:
Mixon report: https://feralsapient.com/?p=889
The letter to Apex editors: https://web.archive.org/web/20170216003240/http://awitin.likhain.net/2017/02/a-letter-to-apex-editors-re-the-intersectional-sff-roundtable/
Zen Cho's report (start here of you never heard of any of this): https://web.archive.org/web/20200808225250/https://zencho.org/being-an-itemised-list-of-disagreements/
*she had once upon a time deleted her blog, hence the Wayback link; but now it's re-uploaded by her here, as she explicitly still stands by her words: https://zencho.org/articles/being-an-itemised-list-of-disagreements/
Rachel Manija Brown's report: https://rachelmanija.dreamwidth.org/1288081.html
#winterfox#benjanun sriduangkaew#maria ying#psa#her being a multimillionaire just puts such a cherry on this shit sundae#imagine being able to write#publish#commission#anything you want#how much she could do#and she chose to be that
1K notes
·
View notes
Note
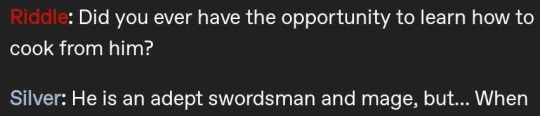
Not a request, but how were you able to gain special colored text on tumblr? Cause I saw the Silver Chef Story translation and I saw a darker red color for Riddle’s name and a warm gray for Silver.
Sure, here's a quick tutorial on the colors! When you create a new post on desktop, there's a gear icon in the top right corner. You'll want to go to the Text Editor option and change it to HTML

You'll see your document change into HTML formatting, with all the notations that come with whatever you've already typed up. You'll want to add
<span style="color: (color here)"> [TEXT HERE] </span>
Using Apprentice Chef Silver's vignette as an example:

(p indicates a paragraph and b indicates bold) This gave me:
You can find many sites online that'll list Hex colors to use here, and many drawing programs will also give you the colors you want. For example, the colors I've chosen for each of the students were color picked from one of their Birthday Boy ribbon colors!
83 notes
·
View notes
Text
Ok I am getting asked several times a day about this so I am going to break this down into steps and then pin this post.
How I Got a Job as a Travel Writer (aka the ten steps I took that eventually got me hired in the writing world)
I started writing unpaid for a magazine when I was in high school. I got a leg up because I knew someone whose parent knew the editor of an indie mag and gave me an email address. Unless you are lucky enough to find a connection like that, I suggest reaching out to indie mags and local publications to see if anyone will let you write for them for free.
Got a college degree (cultural anthropology)
Did an unpaid marketing internship one summer in college (it was at night so I could work during the day)
Did all the copywriting and marketing for a club on campus
Graduated in spring 2020, worked a bunch of dead-end jobs
Eventually ended up unemployed and directionless, lived off the government and savings and was generally lost and unhappy.
Decided I wanted a copywriting job but couldn't get hired. Spent months and months applying, never even got an interview.
Saw that several related jobs requested experience in stuff like SEO, html, Google Analytics, and WordPress. Took free online classes to learn those things. Also picked up some copywriting gigs from Upwork on the side to make some money and beef up my portfolio.
To practice WordPress and make myself seem more professional, I started a blog that functioned as a literary journal and published submissions from other young writers.
Found an opening at a copywriting agency and wrote some SEO articles on contract. This didn't pay enough to live on, but it was fun and made my resume way more impressive.
Eventually the agency work dried up and they didn't have any assignments for me, so I went back to Indeed with my new beefed up resume. I saw a job for travel writing and applied. I got hired.
66 notes
·
View notes
Note
Do you have the code of Wayfarer available to the public? I just have been working on making games in twine myself and am so impressed with your game, and can’t find out how to do some of the code you used for the life of me. (Mainly wondering how you implemented code like custom pronouns, custom name, etc)
Not from me.
I know people who have gotten their hands on the public game's HTML file, but it's not something that I've released myself for people to play around with. I prefer if people don't touch it, and I wouldn't recommend poking at it as a way to learn unless you know what you're doing. The compiled file is incomprehensible in the story viewer and will break the Twine editor. It also has a lot of bad or awkward code in the early section of the game since I didn't know what I was doing, and it's too late to fix it without breaking something else.
There are a lot of resources available online for basic IF needs. I have a page here that lists some old tutorials I made (they should still be compatible, but they haven't been updated for the most recent versions of Twine/SugarCube).
There's also a list of Twine guides, custom templates, custom macros, and the like.
If you want to play around with someone else's code to help you make your own game, I'd suggest starting with a custom template. Many of them come with name and pronoun macros built-in. Any macros or other bits of code will be much easier to play around with from a template then a fully-functioning game.
I'd also suggest looking through the documentation for the story format you want to use. SugarCube's has a bunch of stuff built-in, or you can figure out how to make your own from base principles.
21 notes
·
View notes
Note
Hiiii, I hope you're having a good day, I want to ask you how you make the color of your letters look like that?


Hallo !! I use this site !! ☆*:.。. o(≧▽≦)o .。.:*☆
#pinkcore#kawaii#sanriocore#cute#otakucore#sanrio#animecore#weebcore#hello kitty#jojifuku#✧ ೃ༄*ੈ✩𝐧𝐚𝐝𝐞𝐬𝐡𝐢𝐤𝐨𝐠𝐟 ‧₊˚ 🍮 ⋅ ☆🍓 ✧˚ ༘ ⋆。♡˚🎀 ✧˖°.#(๑>◡<๑) ୧ ‧₊˚ 🍮 ⋅ ☆🍓 ✧˚ ༘ ⋆。♡˚🎀 ✧˖°.
59 notes
·
View notes
Text

Advice; Where to Make Rules and About Pages
If you've read my advice post about the difference between about and rules pages and why they're both important, you may not be wondering the best way to make them. The good news is, there are plenty of options!
Tumblr
The simplest choice. In the past, people would make custom pages on their theme. However, since dash view has become popular (and you can't view custom pages via it, nor can you view them on mobile), most people simply post their about/rules page as a normal text post, and link to it in their pinned post. If you have a custom theme, make sure to link the pages in the navigation bar too!
Using a plain Tumblr post increases your page's readability, but reduces the amount of formatting you can do. If you make your pages elsewhere, you will be able to customise them a lot more.
Carrd
A free website maker. You can make a small site with a free account, and the prices are pretty reasonable if you need to make a bigger site. Carrd has a minimalist aesthetic, and it will also adjust what you make to fit a mobile browser (though this may break your formatting if you have designed something complicated).
Carrd is easy to use, but it is best used for simple designs. If you want to do something more complicated than a basic Carrd layout, you're going to spend a lot of time trying to make the formatting work. If you want multiple pages for your site, you're also going to spend a lot of time formatting as you can't clone pages, therefore have to recreate each one every time instead.
It uses markdown for formatting text. If you're familiar with it, this can speed up writing, but it may slow you down if you've never used it before.
One of the benefits of Carrd is that there are lots of free templates available within the rpc! Here are resources I found with a quick Google search, but there are plenty more out there if you look for them: [x] [x] [x]
Weebly
Another free website maker. You can make more for free here than you can on Carrd. Weebly sites should adapt to work on a mobile browser.
I've never seen anybody use Weebly for about/rules pages, but I do recommend it! It's very easy to use, and, unlike Carrd, you can copy and paste entire pages. This makes it ideal if you have lots of muses that you want to make individual about pages for.
It uses a more typical text editor than Carrd. Instead of markdown, it's more like Microsoft Word - where you highlight text and click buttons to add formatting. You also have HTML/CSS options.
Weebly does offer some free templates, but you're likely to want to edit them to suit your needs more. This is okay! It isn't difficult to do!
Google Docs
A popular, completely free option. As with Carrd, there are plenty of templates and resources within the rpc (here are three examples: [x] [x] [x]). These pages will be viewable on a mobile browser, but the theme may not translate well. Keep readability in mind if you use this option.
If you use this option, also make sure the link you share is viewer only and doesn't have editor permissions!
Other Options (WordPress, Self-Hosting, etc)
Don't feel you have to follow the crowd. If you like to use WordPress, use WordPress. You could also use Neocities, or any other website builder!
Personally, I already own a web domain because I have websites for other online activities, so I use about pages that I've coded from scratch and host them myself. For my rules page, I just use a Tumblr text post that's linked in my pinned post. In the past, I've used Carrd and Tumblr pages for about pages.
If you want to write your site using HTML, some free website hosters will allow you to do this (Neocities, for example). If you're interested in coding, I do recommend this! It allows you to have full customisability, and coding can be a really useful skill. However, one downside of this is it can make your pages hard to read on a mobile browser. It's up to you to decide how important this is.
If you're interested in learning HTML (as well as CSS, JavaScript, and other coding languages), this site is a great resource!
41 notes
·
View notes
Text
BatB Week podfic instructions and tips

Thanks to everyone who signed up for the podfic exchange! If you signed up as a reader, you should have gotten a message with info on who you matched with. Send a DM if you missed the message.
(If you didn’t sign up, there is still time! We still need one more podficcer! The form to sign up is here.)
I don’t personally do voice/audio work, but I’ve pulled together some quick tips and instructions for recording, editing, and posting podfics below the cut. If someone else has better/more suggestions, please add on!
Recording and editing
Need audio recording/editing software? You don't need anything fancy; you can record it on whatever voice recording software comes installed on your phone (I have Samsung Voice Recorder, for instance), or use one of these free, beginner-friendly audio editors: Lexis Audio Editor (Android, iOS, Windows), Audacity (Windows, Mac, Linux), GarageBand (Mac), Audiotool (online).
Nastasia Marquez has a great tutorial on how to record and edit voiceovers for beginners in Audacity. It's very easy to follow along and gets straight to the point.
When recording, watch out for plosives and sibilances (e.g. your "pps," "sss," and "shh") as they can easily hinder the quality of your recording by being aggressive to the ear. It’s hard to give tips since everyone will be working with different devices, but my suggestion would be to put some space between your mouth and the microphone, or have your device inside a sock. You can learn more on them and how to deal with them here.
A good way to get clean audio is to record under a blanket. It’s silly, but it’s as close to a padded studio as you can get for free. It reduces echo and makes the audio sound much better no matter the mic you use.
Don't be afraid to record in short batches! There’s no need to do it in long unbroken takes. Piece it together later.
Posting the audio file
Once you have your finished audio file, you have to upload it somewhere, because AO3 can host the link to it, but not the audio file itself. It seems like Internet Archive is popular for hosting podfic audio files. You can also host it on Google Drive, YouTube, Mediafire, or Spotify.
Posting the podfic to AO3
Go to ‘Post > New work’ just like you would for posting any fic to AO3.
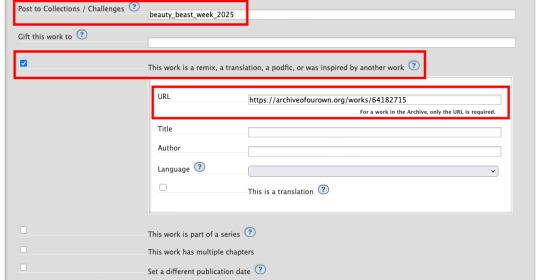
In the ‘Post to Collections / Challenges’ field, enter “beauty_beast_week_2025” (see first screenshot below).
Check the box that reads ‘This work is a remix, a translation, a podfic, or was inspired by another work’ and include the URL to the original fic (see first screenshot below). This not only gives credit to and notifies the author, but it adds a link to your podfic from their fic (when they approve it) so that your podfic gets more hits and kudos.
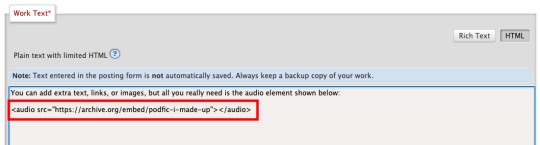
In the body of the post, insert the HTML to embed the audio file (see second screenshot below). It’s easy: AO3 has a simple guide to copy and paste from here.
If you’d like, you can add more content to the body of the post, like the event banner or some text, but it’s not necessary.
Here are some examples of BatB podfics so you can see how they’ve set things up: The Great Wide Somewhere, Mutual Care, and The Beast Within
Posting to the event
Important: tag the @beauty-beast-week account within the body of your Tumblr post itself by typing the @ symbol, typing beauty-beast-week, and then selecting that account name from the autocomplete menu that appears. This is the only way to be sure we see your post so we can reblog it from this account and include it in our master list posts.
Other than that, make sure you post to Tumblr on the day of the prompt you're using and include in your post:
Tag the @beauty-beast-week account within the body of the post (yes, I’m repeating myself)
Which fic your podfic is for, and link to it
Which day/prompt your podfic is for, in the body or tags
The event hashtag #batbweek and/or #batbweek 2025
Any other appropriate hashtags (characters, ship, NSFW and content warnings)
Optional: The event banner (save from the top of this post) or the day's banner (in the full event instructions that will come later)
Heads up authors! Check your AO3 email during the event!
If your work was adapted into a podfic for the exchange, check your email and follow the link to approve linking back the podfic to your original work so more people can discover the podfic version!

Send an ask or DM if you have any problems or questions!
7 notes
·
View notes
Note
Hi! I have a question, how do you do the different color text title? 😊
hii babe, so it's a bit complicated, but I'll try my best to explain.
You could use this post to help
And then there's my way:
I use the site patorjk
so patorjk the minimum amount of colour's you can have is two, but to make it one just use the same colour twice.
anyway you put your words in and choose your colours then press "generate colour faded text"
after that you'll get something like this
"<div><span style="color: #ff0000">p</span><span style="color: #ff0e00">a</span><span style="color: #ff1c00">i</span><span style="color: #ff2a00">r</span><span style="color: #ff3800">i</span><span style="color: #ff4700">n</span><span style="color: #ff5500">g</span><span style="color: #ff6300"> </span><span style="color: #ff7100">|</span><span style="color: #ff7f00"> </span></div>"
Now for this actually to work you need to be on Tumblr.com, online NOT the app
so once you're online, you press create and go to settings
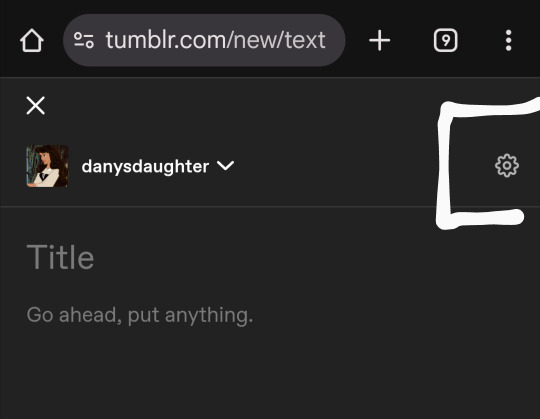
And after that you press text editor to make it on HTML
And after that you can put in the code
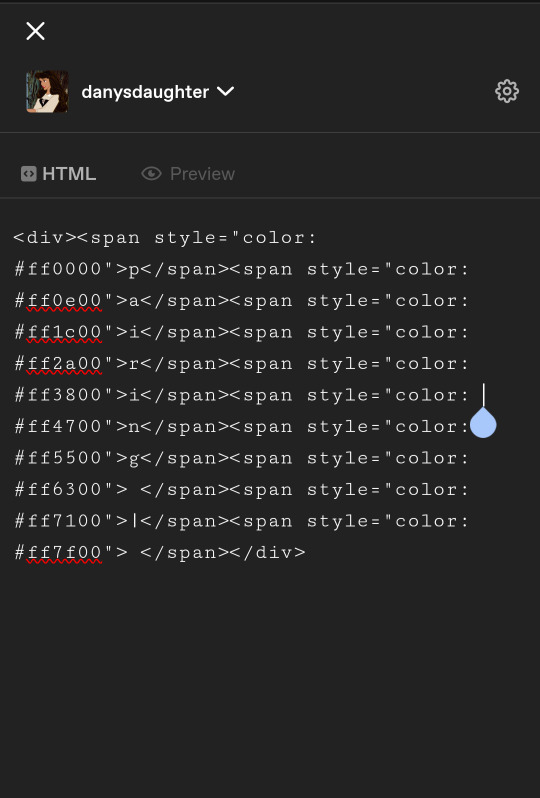
And then you press preview and it will come out like this:
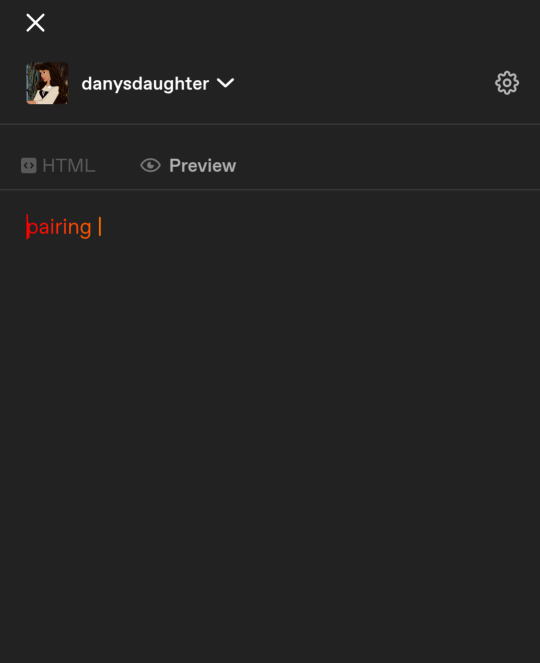
I'm sorry if I couldn't make it simpler, I really hope it helps❤️🩹
7 notes
·
View notes
Note
Hey Krad, do you have any advice for starting a website like yours? I love the idea of starting a website to host my fandom and personal portfolio, and maybe get back a piece of the old internet. How did you put yours together?
hey there! great question, and the good news is there's a lot of ways to go about it.
the bad news is, there's a lot of ways to go about it.
to simplify things, there's kind of ... three "tiers" to the back-end of how to create a website. let's break it down below.
high ease, low customization. (wix, weebly, squarespace, etc. you pay a company + they give you a bunch of themes and pre-made pages for you to drop images in.) can have one of these online in 2-3 hours, but it often "feels" templated and sterile.
medium ease, medium customization. (making a theme from scrach with tumblr's custom code editor, hybrid sites with some pages in pure code, some with wordpress grafted onto some subdomains). this is what i'd classify my site as, as I use wordpress for my logs for brainless updating. while i'm confident coding single/static pages, i just don't have the time or brainwidth right now to make a complex archiving system.
low ease, high customization. (neocities, pure html/css/coding). the downsides to this is oftentimes these sites are not phone-friendly, and there's a steep learning curve. but for the quintessential "old internet" experience, by far the best route to take. there's also something really empowering about learning why things work the way they do.)
some of this can be super intimidating if you're starting from 0 coding knowledge; there's no shame in switching to a templating software. hell i started with weebly and dicking around in tumblr's custom code template for a solid 5 years before making my current site, and that was with a previous 5 years of sketchy html experience) you're not gonna learn everything overnight.
but! as long as you keep a curious and inquisitive mind, you can't go wrong.
one last encouragement: there's kind of a mini renaissance with custom sites right now, especially in neocities circles, so you're kinda in luck in that there's more resources than ever. i love scumsuck's guides, and fancoders (the community) is also all over this too.
good luck!
60 notes
·
View notes
Note
hi !! i saw that you use gradient text and just wanted to ask for an example of the html on how to do it ? online tutorials haven't been helping me but i really wanna use it .. it's ok if you don't wanna share ^_^
Haiii sweet anon ! ! The Idol isn't the best at explaining , but che will try to do so to the best of her abilities. (( remember , this is only on desktop ))
step 1 ;; go to this page & insert the txt uu want 2 be gradient

step 2 & 3 ;; select the colors uu want for the gradient , then copy the second box of cnp text

step 4 ;; do a post like u normally would & click on the lil' settings icon
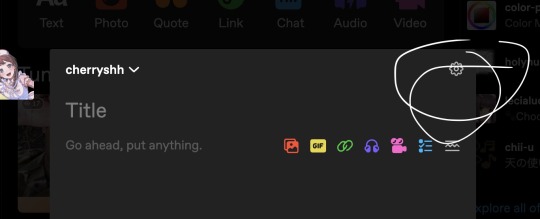
step 5 ;; uu should see a screen that allows you to switch from rich text to html.
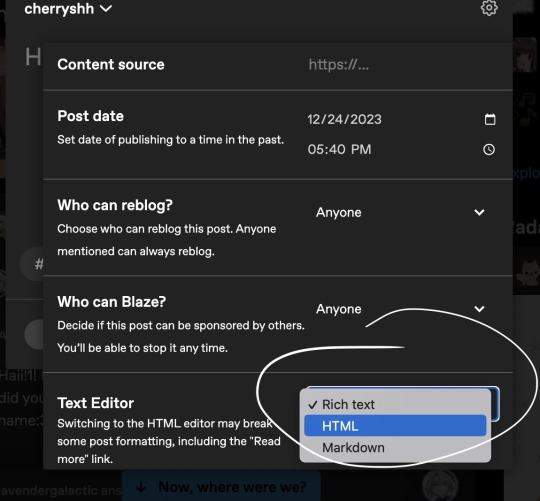
step 6 ;; just go back to where you insert the text for uur post and paste the html you got from the website earlier.
step 7 ;; click on the lil' settings icon again and switch the text editor back to rich text, and done ! < 3
69 notes
·
View notes
Text
There is something very weird about the relatively short nature of the culture surrounding website creation. As in, like, internet-user-created websites have been around for like 30-31 years at this point, and the culture surrounding them has changed so very much.
People used to create websites left and right for their own needs, their little shops and their little blogs about what they liked. Some websites of course housing horrible content since their dawn, and some being as mundane but as unique as the person behind its code. I have seen older sites, archived, that promoted creating your own site, and that was interesting to see. That culture of creating your own website and of sharing that knowledge on a still-growing facet of communication.
And then at some point social media appeared, and that was interesting, because now everyone was able to quickly present themselves without the need of a website, but that didn't mean people stopped making websites. I mean, hell, Geocities died in 2009, so a lot of people were creating their own websites for free before that time, no need to pay for domain names or hosting. And even without Geocities, there were other website hosting things that yes, while not as customizable, were still a resource for people to work with them. There's still a website floating around that I made when I was a kid using one of these services. Cool stuff.
All this to say that I do feel a weird sense of dread looking back and cross-referencing with the present and seeing things like "website creator powered by AI" and shit like that, because just ?? How did it go plummeting so quickly. There is a weird feeling of having lost a developing culture to corporations making quick access to posting things that, as corporations' nature dictates, are used to sell data or to train models or what have you. Similarly, we get pretty same-y looking pages because of the need to be slick or whatever with designs that just leaves everything looking the same. ALSO, the loss of spaces for kids, or just the gradual lowering of them in favor of cocomelons and whatever else the devil's machine has spawned is like watching an apple decay before having ripened. I do feel like there is this phenomenon in which how to make a site has been lost in the notion of "making a website falls into the realm of evil and scary coding and I could never be a programmer, plus who would look at it, plus we have tools to make them," etc etc etc. Here is a little secret: website creation is not exactly hard to pick up at all. You might say it's very similar to using a rich text editor like Word or a notes app or whatever you use. Similarly, have you used markdown for things like messages or D iscord messages, you know, with the asterisks for bold text and the likes? Markdown is based on html's structures. And truly, you do not have to even learn to code using Javascript if you don't want to, you can just go full html + css and structure your things as you go, adding your little images and your updates. Because guess what !! Html and css are not programming languages, they're a markup language and a stylesheet language respectively, which is a fancy way to say "you make the structure of your page with the first one and make it pretty with the second one". This includes cool stuff like tables, lists, grids, colors, transitions, etc. All of that without any programming. (That being said, if you are interested in programming, Javascript isn't too bad to pick up. The language itself *is* kind of evil, but using it in conjunction with html is not too difficult). I do have to say though, I am glad that there is a push to making your own websites and things, especially with Neocities sprawling a huge community of avid website creators, as well as the huge amount of tutorials and stuff making the push forward with making sites and online spaces and experiences more widely available. Hopefully this becomes a trend that keeps going up, considering the state of seemingly every single social media that has existed since the 2000s- 2010s.
#web#website#old web#dog discourse#ramblings#internet#computer#tech#but for real what the fuck#it's very bizarre to see this just pop in and out
7 notes
·
View notes
Text
How to Build Software Projects for Beginners

Building software projects is one of the best ways to learn programming and gain practical experience. Whether you want to enhance your resume or simply enjoy coding, starting your own project can be incredibly rewarding. Here’s a step-by-step guide to help you get started.
1. Choose Your Project Idea
Select a project that interests you and is appropriate for your skill level. Here are some ideas:
To-do list application
Personal blog or portfolio website
Weather app using a public API
Simple game (like Tic-Tac-Toe)
2. Define the Scope
Outline what features you want in your project. Start small and focus on the minimum viable product (MVP) — the simplest version of your idea that is still functional. You can always add more features later!
3. Choose the Right Tools and Technologies
Based on your project, choose the appropriate programming languages, frameworks, and tools:
Web Development: HTML, CSS, JavaScript, React, or Django
Mobile Development: Flutter, React Native, or native languages (Java/Kotlin for Android, Swift for iOS)
Game Development: Unity (C#), Godot (GDScript), or Pygame (Python)
4. Set Up Your Development Environment
Install the necessary software and tools:
Code editor (e.g., Visual Studio Code, Atom, or Sublime Text)
Version control (e.g., Git and GitHub for collaboration and backup)
Frameworks and libraries (install via package managers like npm, pip, or gems)
5. Break Down the Project into Tasks
Divide your project into smaller, manageable tasks. Create a to-do list or use project management tools like Trello or Asana to keep track of your progress.
6. Start Coding!
Begin with the core functionality of your project. Don’t worry about perfection at this stage. Focus on getting your code to work, and remember to:
Write clean, readable code
Test your code frequently
Commit your changes regularly using Git
7. Test and Debug
Once you have a working version, thoroughly test it. Look for bugs and fix any issues you encounter. Testing ensures your software functions correctly and provides a better user experience.
8. Seek Feedback
Share your project with friends, family, or online communities. Feedback can provide valuable insights and suggestions for improvement. Consider platforms like GitHub to showcase your work and get input from other developers.
9. Iterate and Improve
Based on feedback, make improvements and add new features. Software development is an iterative process, so don’t hesitate to refine your project continuously.
10. Document Your Work
Write documentation for your project. Include instructions on how to set it up, use it, and contribute. Good documentation helps others understand your project and can attract potential collaborators.
Conclusion
Building software projects is a fantastic way to learn and grow as a developer. Follow these steps, stay persistent, and enjoy the process. Remember, every project is a learning experience that will enhance your skills and confidence!
3 notes
·
View notes
Note
hiii i was wondering how you get ur post texts to be pastel pink :) instead of this hot pink
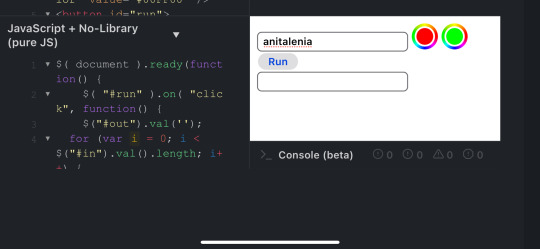
Hiii 💕💕 okay so it actually has to do with coding 😭 I’ll try my best to explain. So basically, I go to this website ( https://jsfiddle.net ), this is where you can make any color text you want.
— STEPS BELOW —
Step One: So, once you’re there you’ll see this screen, I’m on mobile so it might look a lil different.
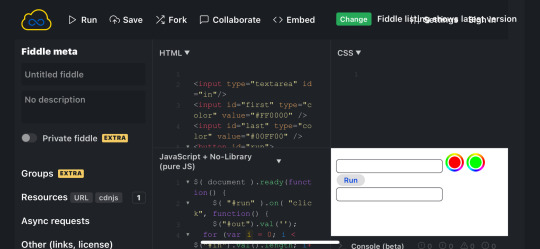
Step Two: Once there, you’ll go to the right side where the text boxes are.
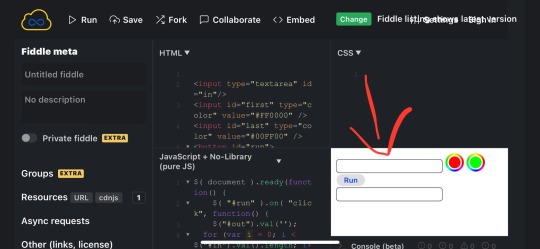
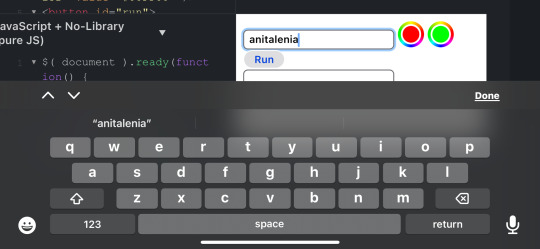
Step Three: In the top box, you’ll want to type in whatever text you want to make a different color.
Step Four: Next, where the red and green color dots are, click on the red dot. This is going to be where the color starts. You can make the text whatever color you want.
note: you can make your text gradient, as in two different colors. I make my text just one color ( that pale pink color ), which means both the red and green dot must be the same color. For gradient, the red and green need to be whatever two colors you want to make gradient. For example, if you wanted to do yellow and purple gradient text, change the red to the color yellow and the green to the color purple.
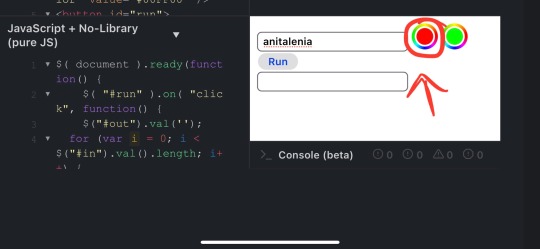


*FFE5FA is the color of my pink text.
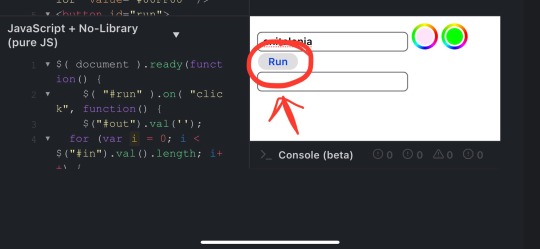
Step Five: After you’ve changed the color, hit the run button in between the text boxes.
Step Six: Once you’ve hit run, the text box below will generate the coding for your colored text.
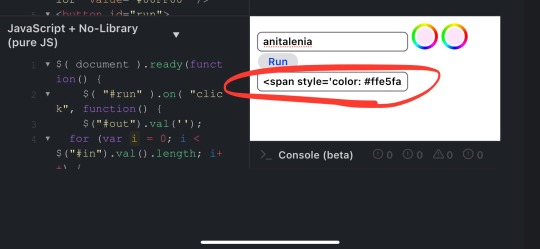
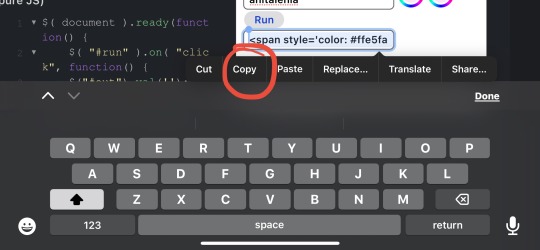
Step Seven: Once it’s there, you’ll want to click on it and hit the ‘select all’ button.
note: I am using this on an iPhone, so it may very on a Samsung or computer. Just make sure you copy the whole thing of code

Step Eight: Once you’ve hit select all, hit the copy button
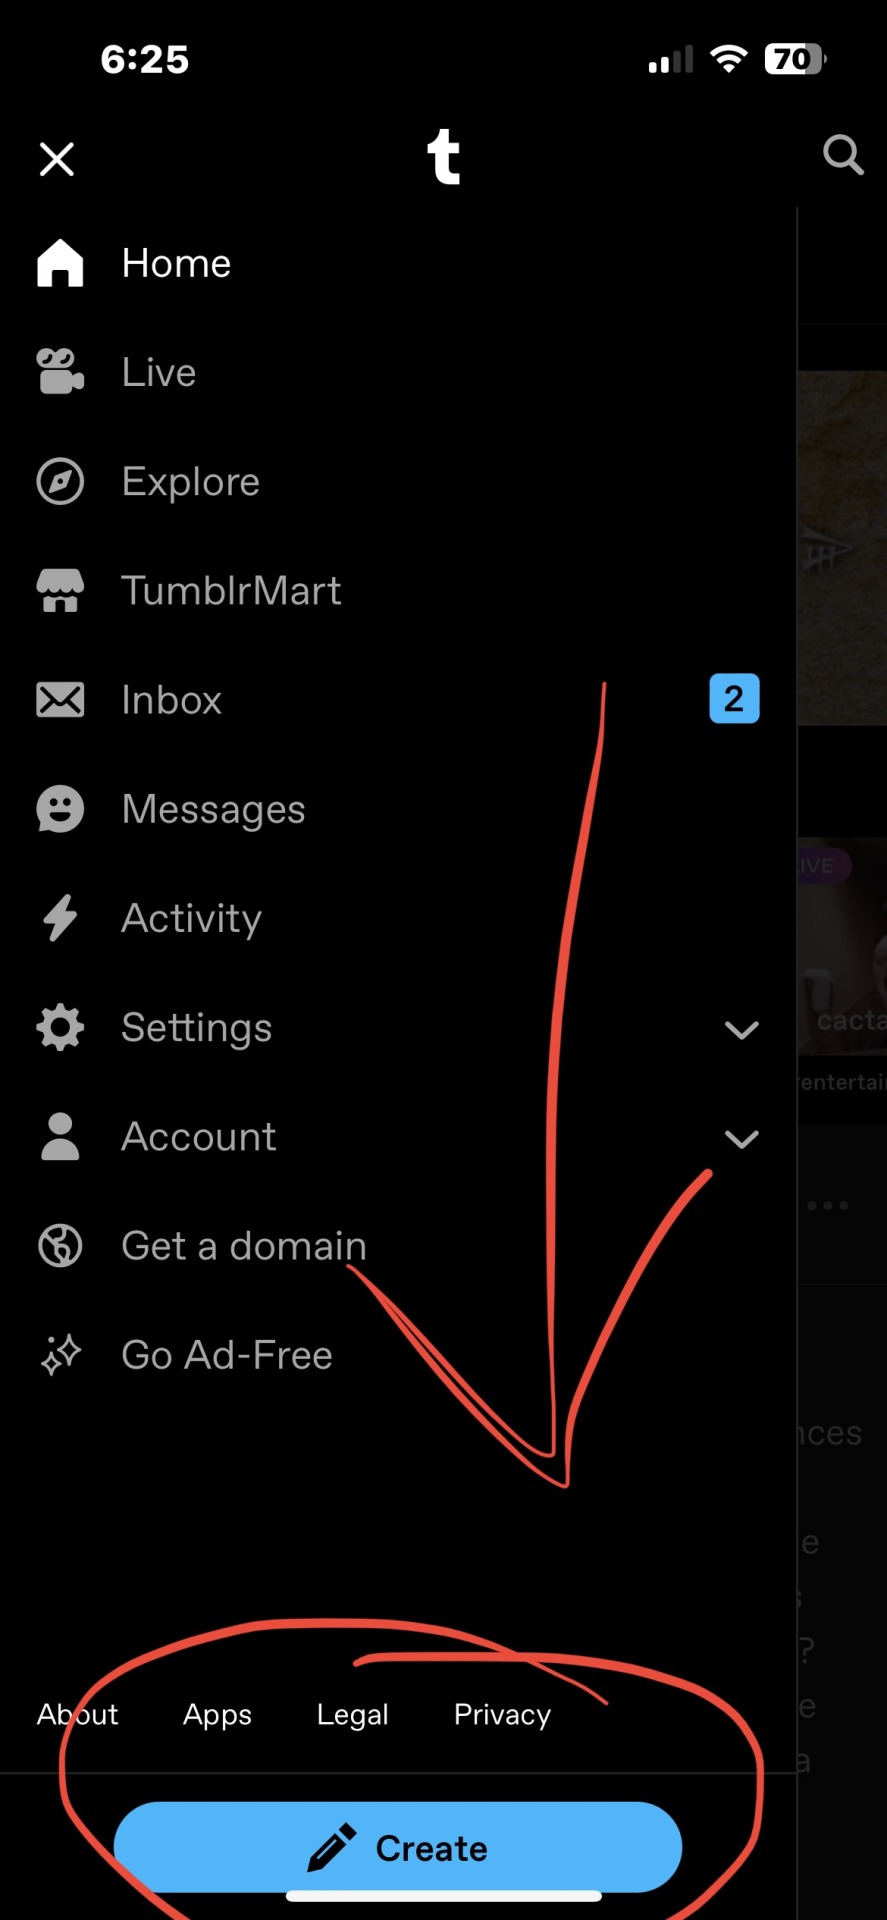
Step Nine: So now the text should be copied to clipboard and available to past where ever you want. After that, and this is an important detail or else it won’t work, you have to go to Tumblr Online, not the app.
Step Ten: Once you’re on tumblr, go to make a new post.
Step Eleven: Once you make the next post, you’ll want to go to the top right corner and click on the settings icon
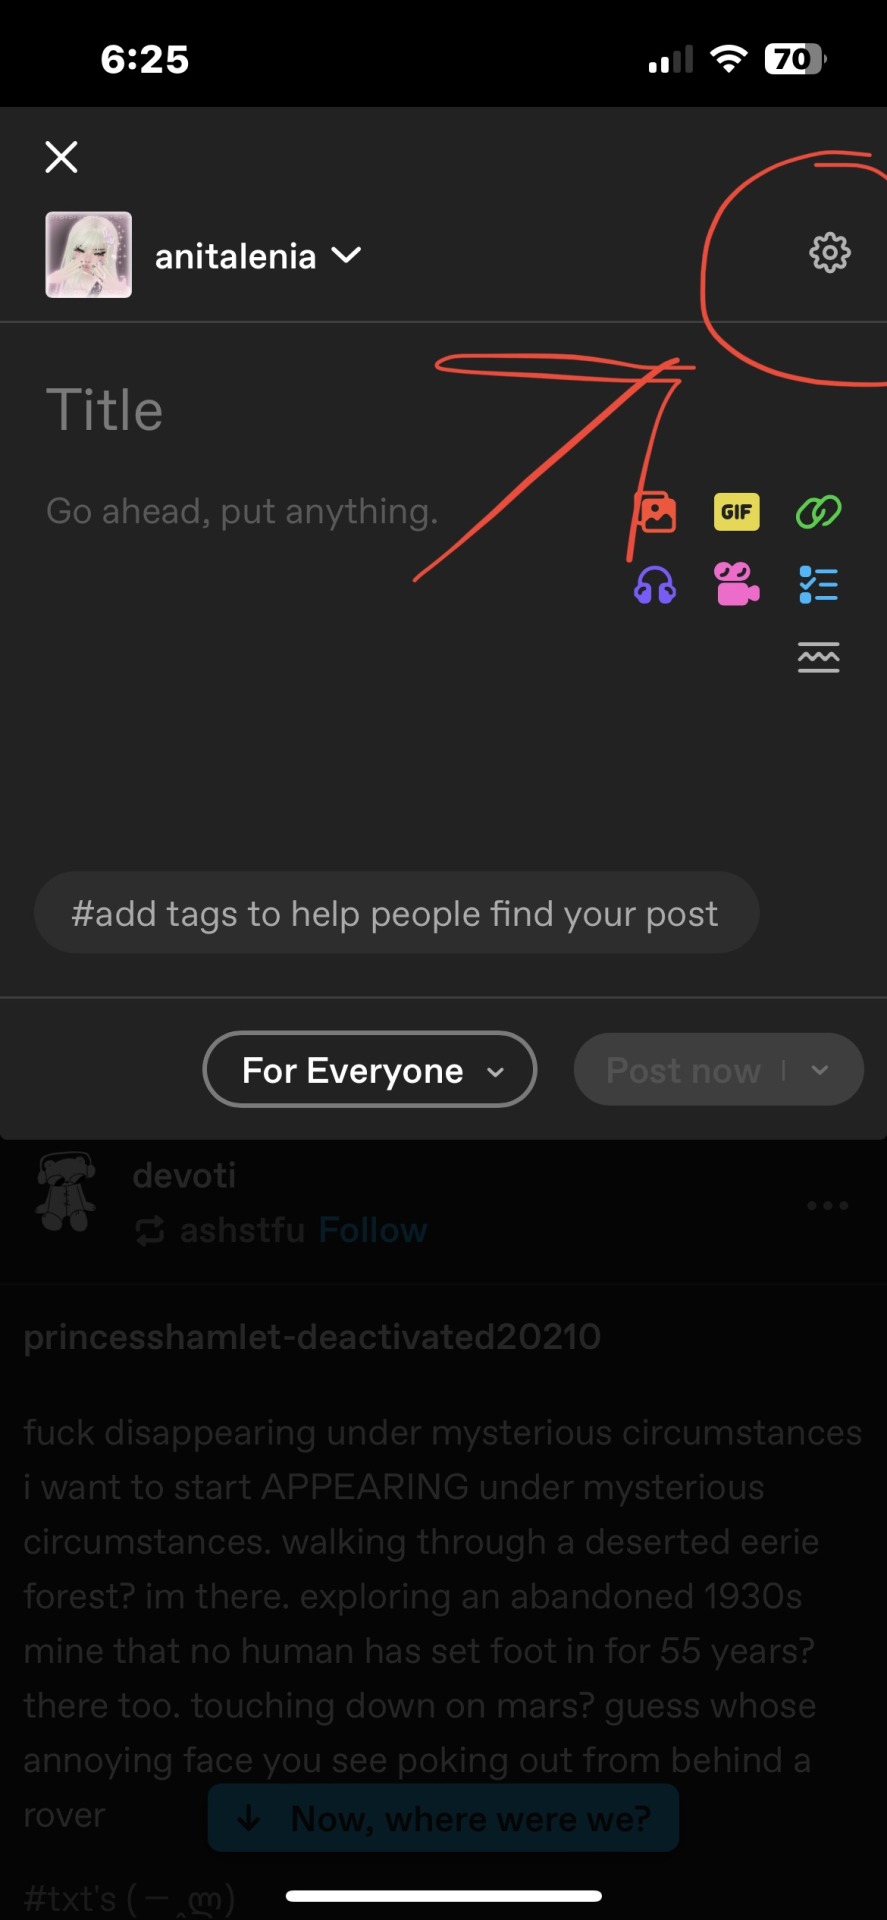
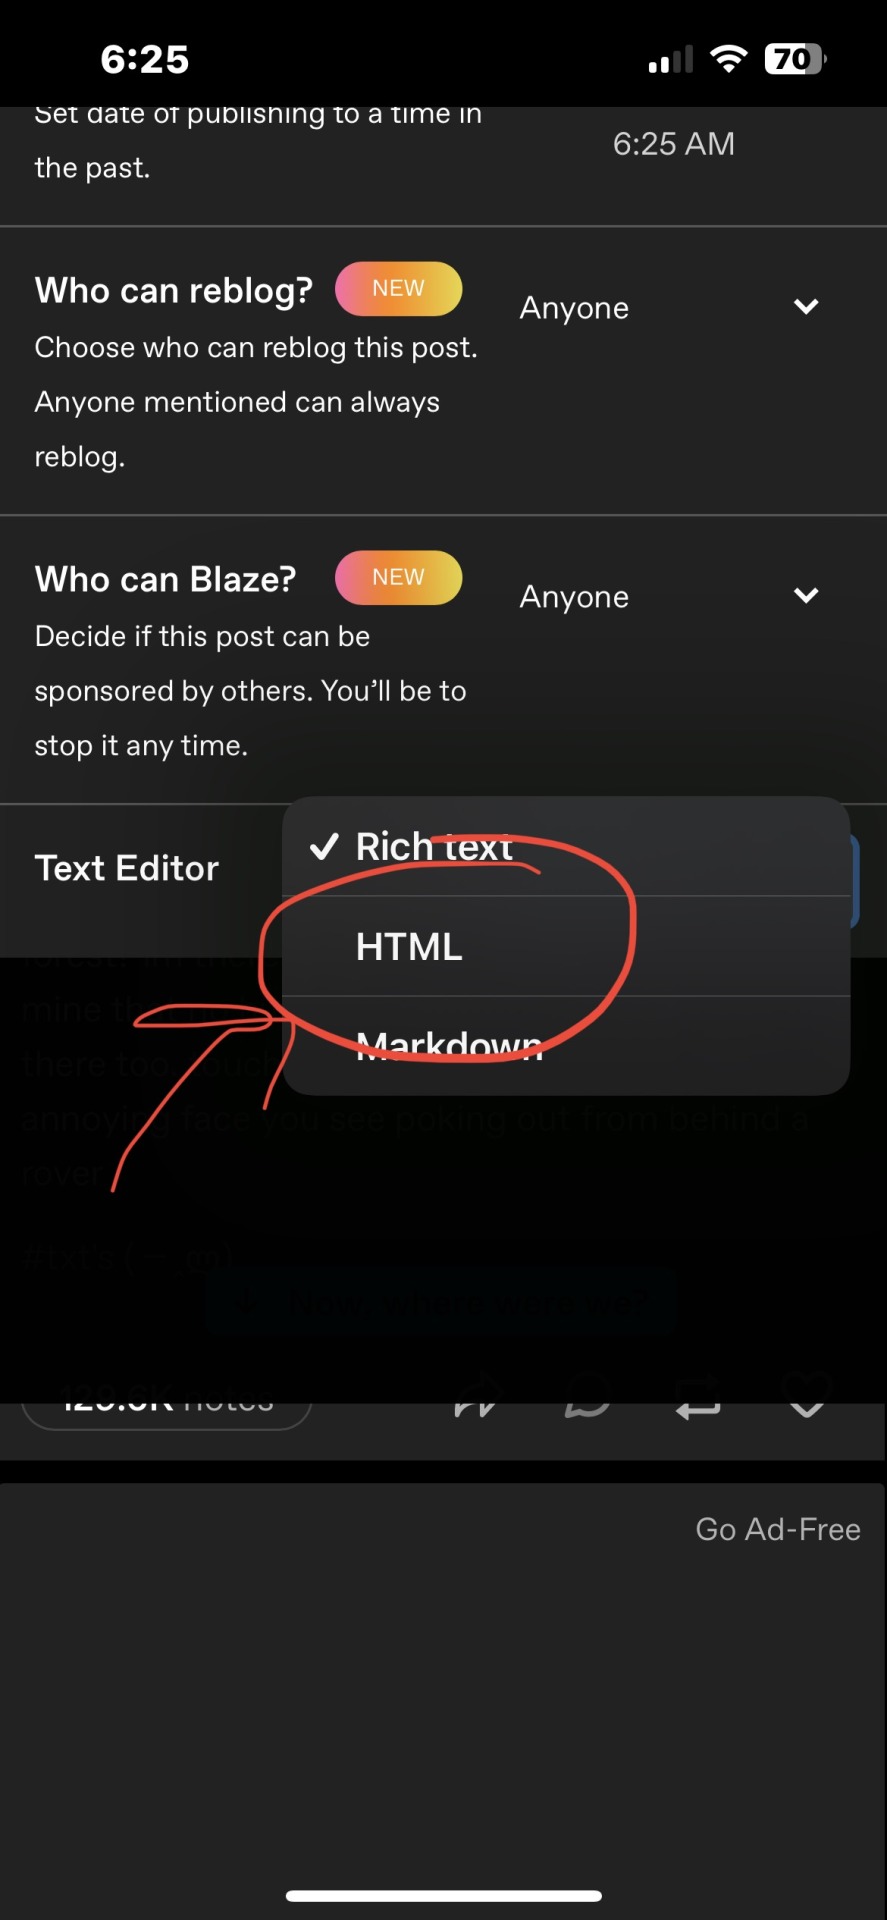
Step Twelve: You should see a screen like the one below. At the bottom of that pop up where it says TEXT EDITOR, the icon next to it should say Rich Text.

Step Thirteen: Click on the Rich Text box, and options should pop up saying, Rich Text, HTML, Markdown
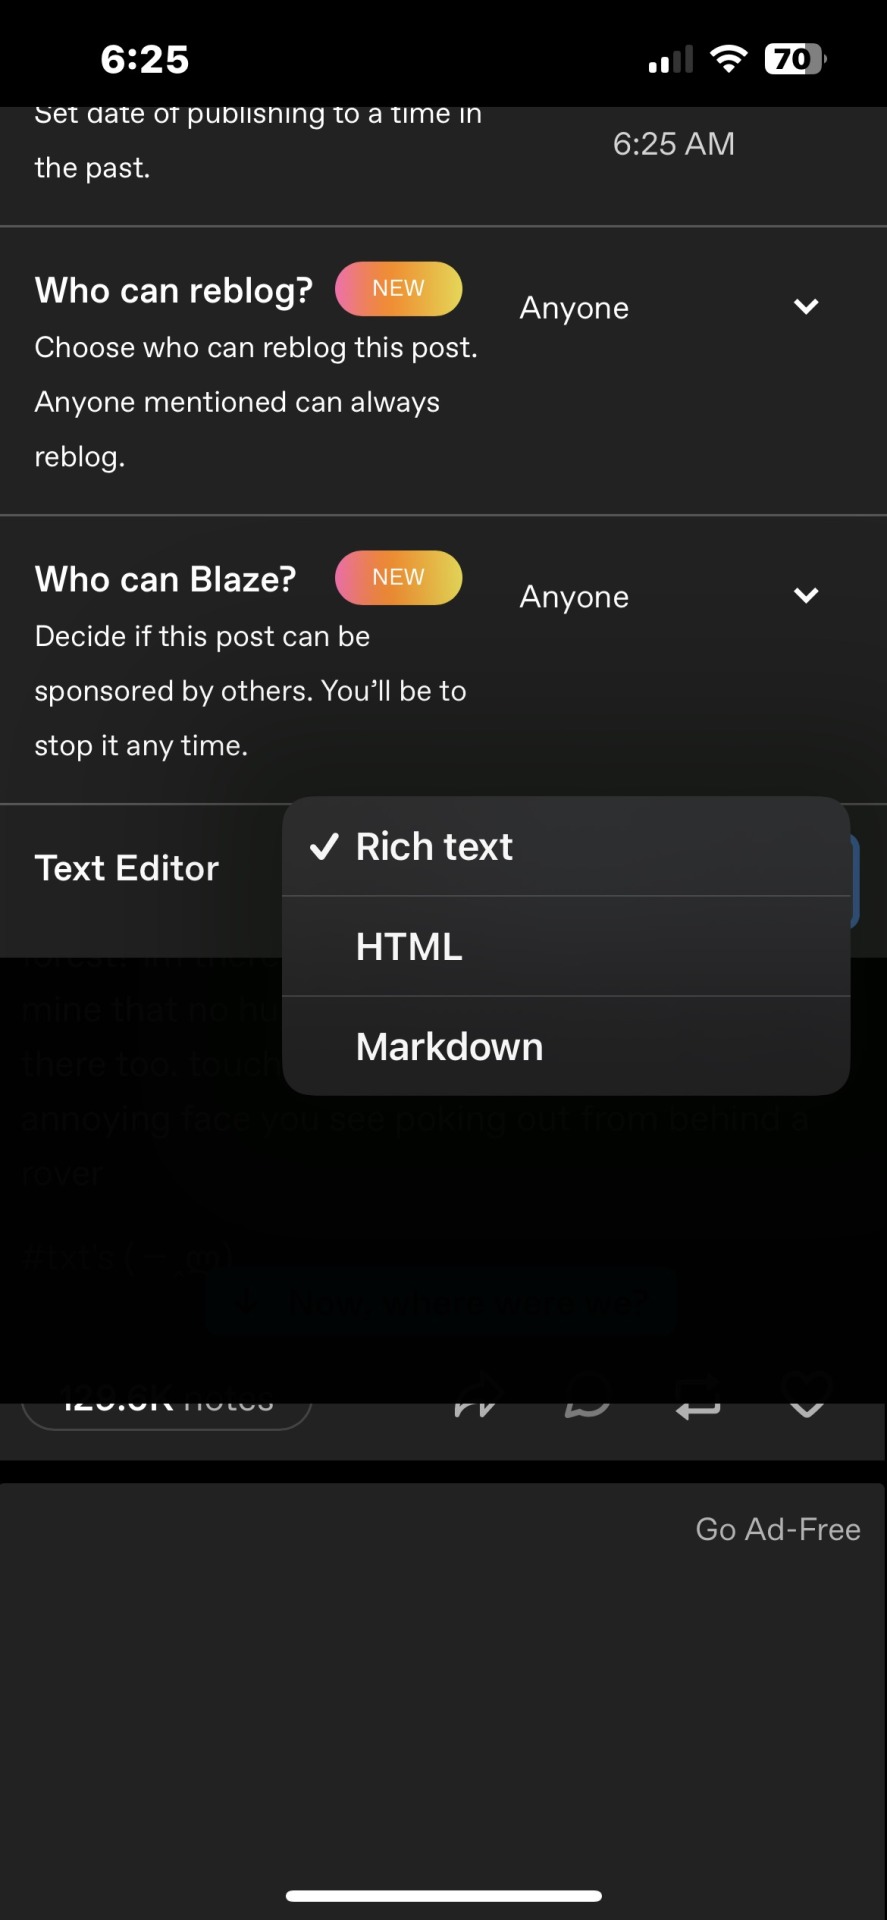
Step Fourteen: Click the HTML option
Step Fifteen: You should see this screen next

Step Sixteen: You’ll want to paste the HTML code you just copied next to or after the code already there like this

Step Seventeen: Okay then you’ll want to make sure it’s saved as a draft
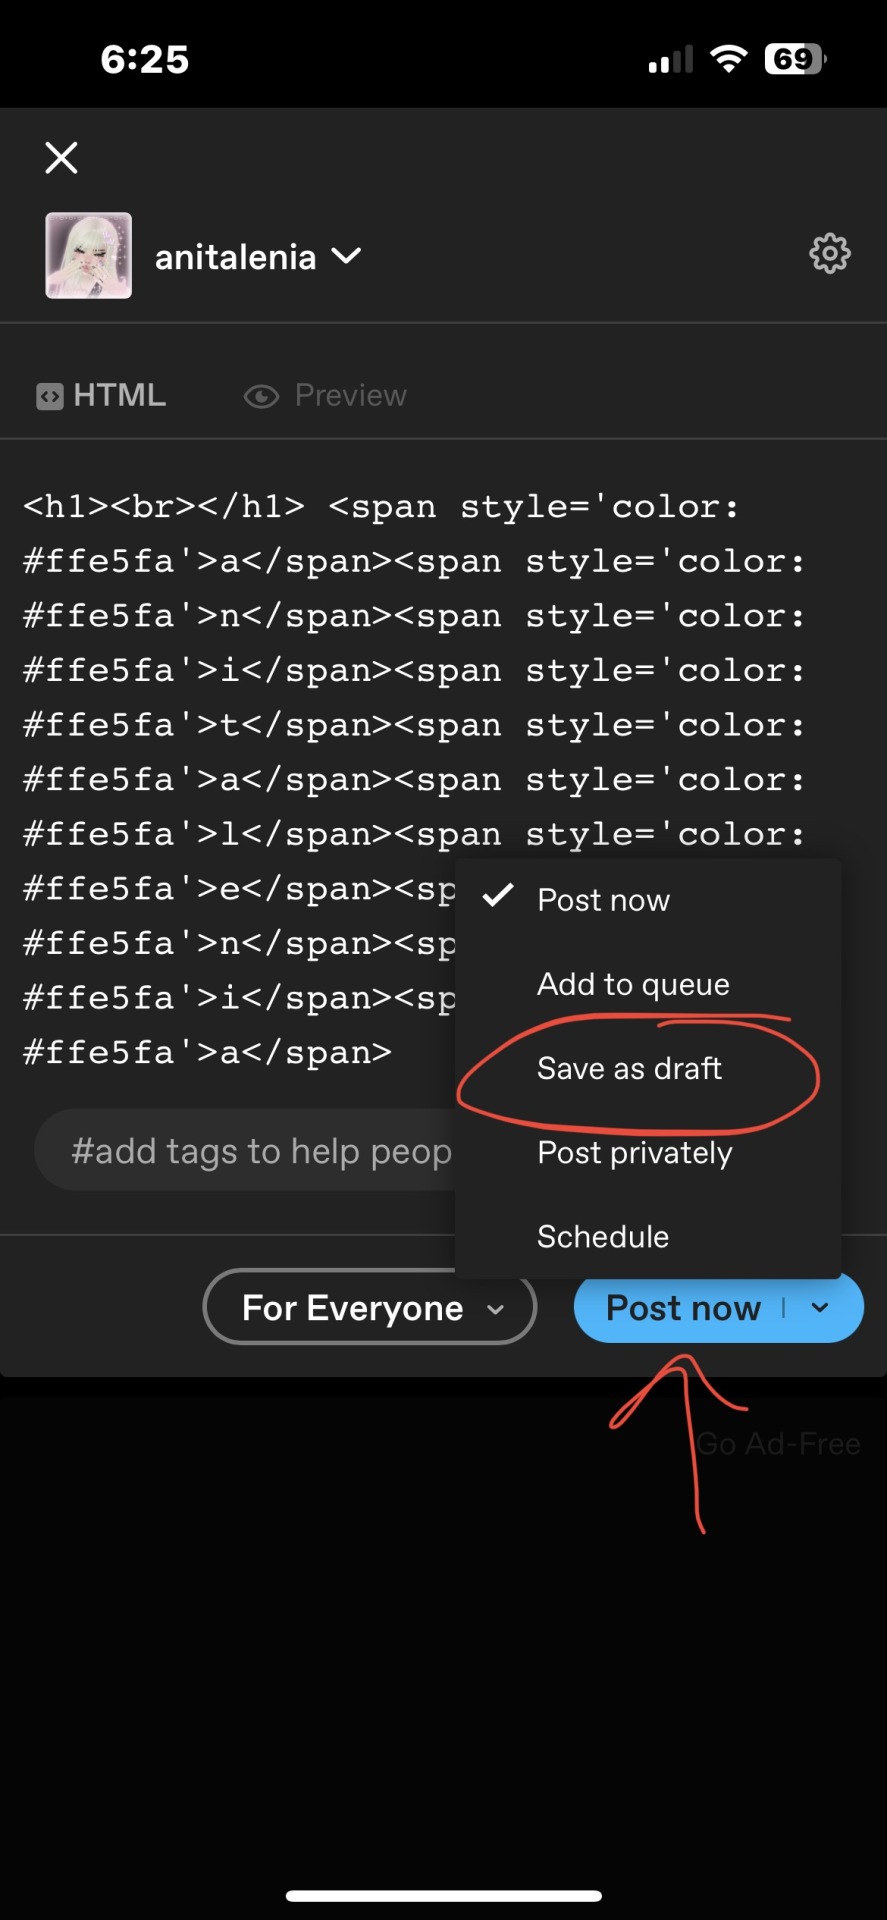
note: if you go to your drafts first and then create a new post, then it should automatically have the save as draft option at the bottom. It’s quicker than doing it like normal and having to select save as draft.
Step Eighteen: It should look like this now

Step Nineteen: Congratulations! You’ve done the hard part. Now go back to mobile or the app because it’s easier for these next steps in my opinion.
Step Twenty: In the app, go to that saved draft and make the text bold if you so choose, it makes it stand out more that way

Extras: you only need to make one colored text when you make a post, which means you don’t need to go through that whole process for each line/word you want to make colored.
— just type whatever words you want colored next to the already colored text, then move it down a space.
— however, once you delete that line of colored text it cannot be recovered, you’d have to go through this process again.
ANYWAY, I hope this helped. I tried to make it as step-by-step as possible. 😁😁💕💕
#─ ·˚꒰ 𝙍𝙀𝙋𝙇𝙄𝙀𝙎. ꒱ ₊˚ˑ#pink themes#aesthetic#pink#pinkcore#pink dividers#cute#sparkles#stars#writing prompt#writing help#colored text#text help#gradient#gradient text help#gradient text
107 notes
·
View notes