#i just saved the camera position in tab mode (ctrl + 5-9)
Text
I thought it might be fun to do a little behind the scenes for the last story post! You guys might be surprised how little actual editing was involved. I mainly just crop, add brightness and saturation, clean up any small bits of clipping or weirdness that bother me, and then add captions! Do you want to know what actually took me the longest?
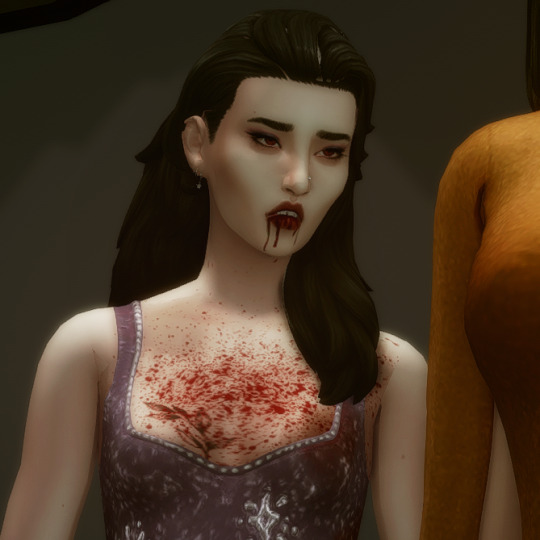
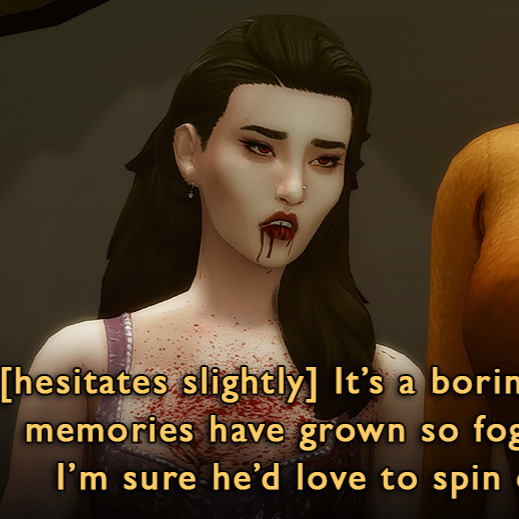
This hair had some problem areas that showed up in live mode but not CAS. It's such a tiny thing, but it annoyed me, so I had to touch it up in nearly every screenshot. Luckily, the darkness of her hair means I didn't have to do a perfect job.
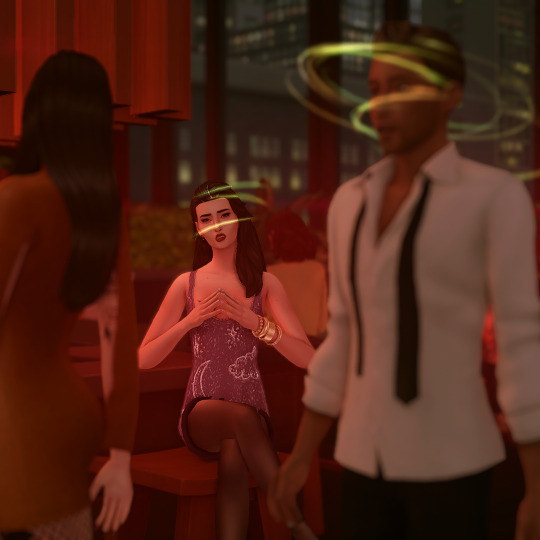
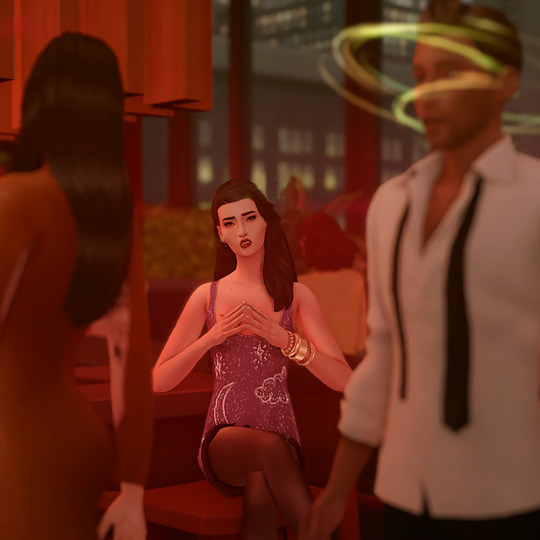
The effects were all done in-game. Lilith has the alluring visage vampire perk, which creates the red haze and mind control spiral. Unfortunately, Helena crossed her path too closely, and rather than set the shot up again I used the clone brush in Photoshop to edit out the effects around her head (vampires who can successfully do mind control on other vampires are exceedingly rare). By the way, I later figured out a quick and dirty method for dispelling unwanted visual effects on a Sim is to remove buffs in MCCC.
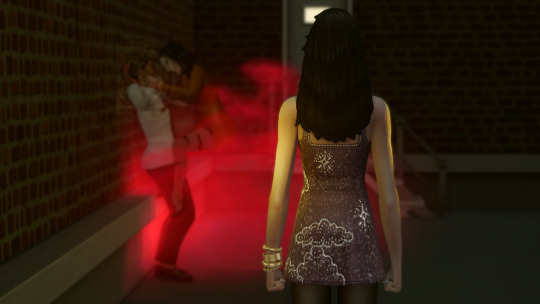
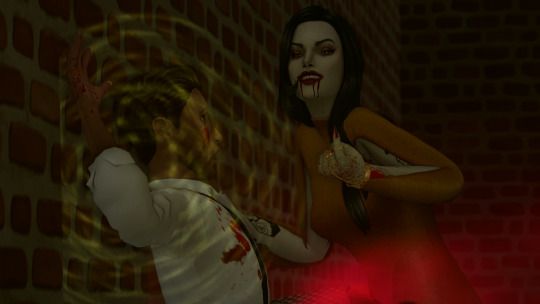
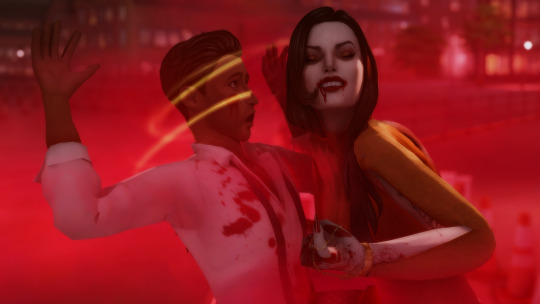
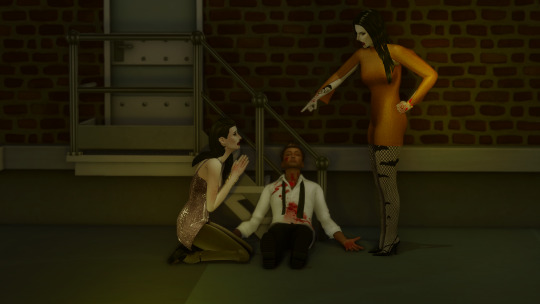
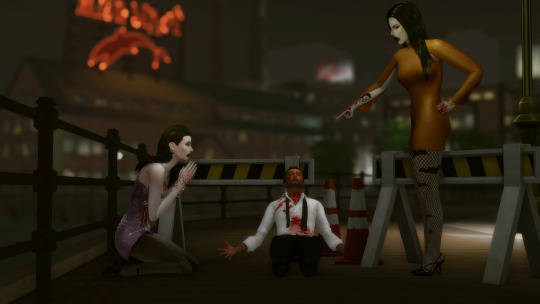
As I've mentioned, I had to shoot the attack scene twice. The first attempt was too dark, the location wasn't very visually interesting, I was in an area of San My where I had less camera control, and I used the Effects Player, which ended up being less eye-catching (hey, sometimes vanilla is the best option!). They would have worked to get the point across, but I think you can really see how I learned and improved upon my vision!
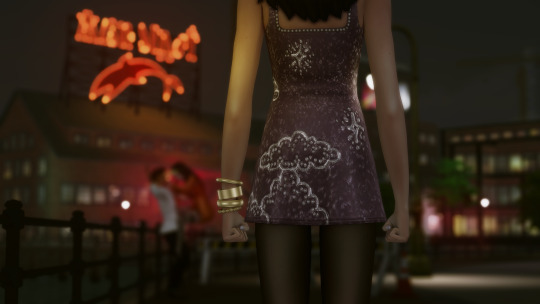
These comparison shots are all uncropped and unedited, by the way. Reshade/Relight truly does the heavy lifting. I've also gotten better at finding an angle I like and sticking with it, even if that's only because I don't want to adjust Relight all over again, lol! Speaking of angles, that last shot was done using the Dutch angle trick I learned in this tutorial by @surely-sims! First-person camera is actually super useful for storytelling. If you don't already know about this head-turning trick, it'll change your life. It comes in clutch for changing the eye line of a posed Sim since I'm not always great at getting that right in Blender.
Anyway, I don't know if anyone will find this super helpful or interesting, but I'm always open to questions about taking and editing screenshots, even though I feel like most of what I know has just been absorbed through osmosis and trial and error!
#ts4#sims 4#the zhaoverse#long post#i didn't even talk about the gifs but they were as simple as simple gets lol#i just saved the camera position in tab mode (ctrl + 5-9)#took two pictures from that angle#and then faded one shot into the other#all you need is the most basic gif making tutorial you can find#i use photoshop but i'm sure there are easier ways to do it#blood tw
62 notes
·
View notes
Note
Hello! this is a 2 part ask but, I'm sending it all in one to avoid cluttering up your inbox!!
Back in February or so you received an about your lighting setup for taking photo shoots and you linked all the stuff you use for them (thank you!), but… could we see how you have the lights arranged and such? It's something I've been trying to emulate because I find the lighting in your posts really nice, but can´r quite wrap my head around.
The 2nd part of the ask is a WCIF (sorry!) for the boxers and briefs in these 2 posts (/deathbypufferfish/718514235415691264 and /deathbypufferfish/718527232399884288/outtakes-since-yall-absolutely-lost-your-mind-for)
So sorry for sending such a long ask, and I hope you're having a great day or night! 💗
Yeah someone actually inquired about my set-up but I kept putting it off and then felt awkward doing it so late 😭 I'll answer the wcif in a separate post heheh. This is the post with my light and backdrop cc. The ceiling light is from Get Famous.
I have a build save that I use for photoshoots so I don't have to worry about clones walking around. It's just a basic room with my lighting set-up plus a space to teleport sims out of the way. I recommend turning off sim autonomy in this save too. I just evict sims when I'm done with their shoot.
Use different lights for different intensity, shapes of the light source, softness/harshness, and direction of light. If you experiment with different lights in build mode you'll see what I mean.

This is my general lighting set-up, but I am always adjusting the lights' color and brightness for what I need. Or turning some off. It depends on the mood I am going for and the sims complexion. (Since pale sims get blown up with my gshade on a white backdrop lol.) If I want a light from the left I will only have the front light and left one one for example. Mess around with the position of your angled lights!
Save your camera state so you can replicate the same shot for other sims or if you need to redo part of your set-up. Simply find your shot, hold down Ctrl and select a number key between 5-9. When you want to snap to your position, enter tab mode and press the number you set. You can set multiple camera states with different numbers. To clear the camera state, use Alt+ [5-9], or override it by repeating the original step.
Keep Teleport Sims statues on hand so you can drag them to the position of your sim if you need to switch out subjects and get the same position. Also to teleport sims away from your set-up.
For dynamic lighting like I do a dark backdrop with lights on the right and left of the sim at an angle. The colors I use the most are magenta for the focus area and blue for the shadows/contrast. It depends on the mood or sims complexion.
If you want a light source from below, use a table or outdoor light at their feet and turn off some/all lights.
Using the backdrop with different colors can affect the hue and brightness of your screenshot so be careful with that. If you need to key out the background, choose a color not present on your sim. You don't need to just use green. Mxao will also add a seam at the backdrops curve which can be edited out later.
18 notes
·
View notes
Text
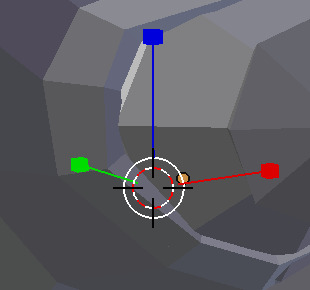
Save Free Camera Mode Position
Did you guys know you can save the position of your camera in Free Camera Mode (tab)???
When you've positioned the camera how you want it, you hit [ctrl] + [5, 6, 7, 8, or 9] to save the position. Then, you just hit [5, 6, 7, 8, or 9] to recall your position! I never knew this (did I miss a tutorial??) until I came across this article.
Also, it works with the Free Camera Mode that comes with Twisted Mexi's Better BuildBuy mod.
90 notes
·
View notes
Note
Hiii! I just saw your post of the like... little time hops from the archway (/post/678344962548563968/i-ran-around-those-ancient-highways-and-i-went) and HAKFKJHDJD I love it so much!! I was trying to do something similar with before/after photos while back but I was wondering, how in the HECK did you get the camera back to like almost exactly the same position every single dingle time? I had the hardest time with that. Thank you!! :^)
ok so when ur in tab mode pick the angle u wanna be at on the lot u wanna be on and go ctrl 5 (or 6 or 8 or 9) and that saves the camera angle under 5. so the next time ur in tab mode u can press 5 (or 6 or 7 or 8 or 9) and it'll be the camera angle u saved. u have 5 saved camera angles and when u press ctrl (number) again it overrides the previous angle
29 notes
·
View notes
Text
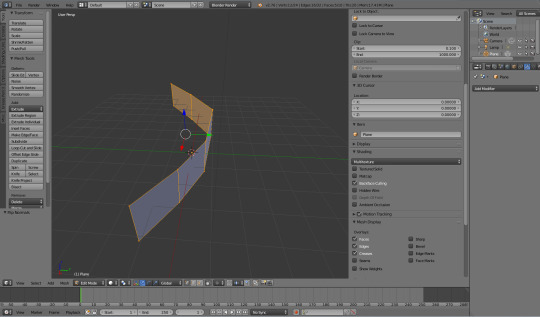
Blender shortcuts

CAMERA INSTRUCTIONS:
Holding the scroll of your mouse thingy: Will rotate the view
Scrolling the scroll of your mouse thingy: Will zoom in and out
Shift+Holding scroll thingy of your mouse: Change view position
CTRL+Holding scroll thingy of your mouse: Move your mouse and see what it does!
If you have this lil thingy:
Here are some awesome view switchers:
1: Will switch the view to the Front view
CTRL+1: Will switch the view to the back view
3: Will switch the view to the left view:
CTRL+3: Will switch the view to the right view
7: top view
9: Bottom view
5: Change perspective. Great when you’re meshing furniture or creating poses!
Blender Navigation Settings:

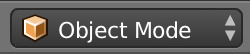
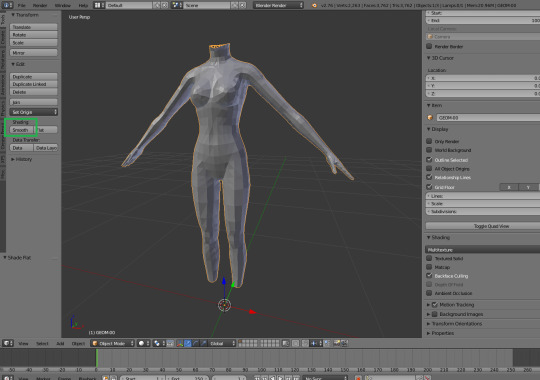
Object mode: Is basically the ‘outside coat’ of your mesh, or well... your mesh! if you Right+click on it, the mesh will be selected.
Note: Don’t scale, rotate, move your mesh in object mode though. It will screw up with your UV map and will throw errors!
Edit mode: Edit mode is basically... what it says, you get to drag around those amazing dots or edges or faces or... even the mesh! :)

Occult geometry: This little button will make your mesh transparent in a very helpful way! This way you’ll be able to select the back vertices that you’d otherwise not see.

Note: This option is only available in Edit Mode.
Add: It has various options, but for meshing the add>mesh>pickamesh it could be really helpful!

Transformation orientation:
Translate: Stands for moving around the scene/blender


Rotate: Makes you rotate your mesh in the scene/blender.


Scale: Gives you the ability to make your mesh bigger

Viewport shadings:
Note: Not all shadings are compatible with edit mode!
Solid: Is basically your gray-scaled mesh with no textures or anything added! Just let’s you focus on the mesh (edit mode compatible)


Wireframe: Let’s you see the edges of your mesh but the faces will be invisible. This could be nice to see whether something is symmetric on spots that you wouldn’t be able to see in solid mode. You can also select vertices that you can’t select in solid mode! (Edit mode compatible)


Texture: Makes you see the texture you applied on your UV map. To see how this will be helpful for TS3 meshing, click here: X
(Edit mode compatible)


Render: Sometimes useful to see how strong your specular map is. However for this, I’d recommend switching it to Cycle render. To read more about what the hell i’m talking about, here you go! x
And any tutorial on how to get it game-readyish: X


SHORTCUT INSTRUCTIONS:
Note: All these shortcuts will work in the UV map layout we’ll encounter later on. I’d also suggest copy pasting this list on a text editor so you don’t forget about them.
A: Will select everything Object mode (The view we’re in right now) And will select all the dots (vertices) In Edit mode.
B: Will let you select whatever you want with just dragging the mouse
C: Hey we made the alphabet here Is basically this brush selecting tool. Works great in Edit mode, but I rarely use it in object mode.
CTRL+Rightclick: (Does not work with the UV map layout) Will let you create this circle to select stuff!
TAB: Will let you switch back to edit mode or object mode!
L: (Will only work with Blender 2.70 or later) Stands for ‘Linked’. Will let you select parts of the mesh that are, well linked in a way. Works great with meshes with hard edges or hair meshes!
Shift+Right click: Is selecting one object (In object mode. In edit mode, you’ll be able to select one vertex at a time).
S: Stands for scaling.
S+X: Stands for scaling horizontally
S+Y: Stands for scaling vertically
R: Stands for rotating
G: Stands for grab n move!
G+Y: Stands for grab and moving it up and down
G+X: Stands for grabbing and moving it left and right
CTRL+J: Will join 2 separated ‘groups’ or ‘meshes’ together! Edit mode only!
Spacebar: If you can’t find a specific option, just search it! :)
Recommended settings for TS3:
Setting things up for the sims 3 could be a pain when you have no idea what the game works with and what-not. If you’re not really familiar with creating stuff for games in general, especially the sims 3, I’d definitely check this part out! :)
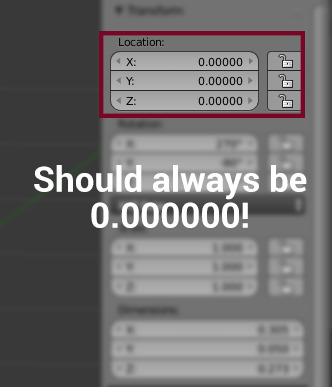
Right navigation side bar settings:
Note: Make sure that the following settings are being checked in Object mode NOT edit mode!
Location: This should always be on 0.00000. Reason why is because else your CC will be say, somewhere under your world when placing it in-game! Or super high in the sky! We don’t want that to happen, eh? ;)
Scale: This one should always be set to 1.000. This is very important! If you scale them up, it will screw up your UV map and Blender will throw tons of errors. If you do want to scale something up, please do this in edit mode NOT Object mode!
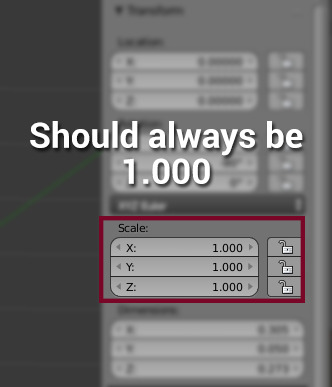
TIP: Scared of accidentally exporting it with these values being not correct or just wanna be lazy/safe? Try ticking these slot thingies before meshing! :) You’ll love them!

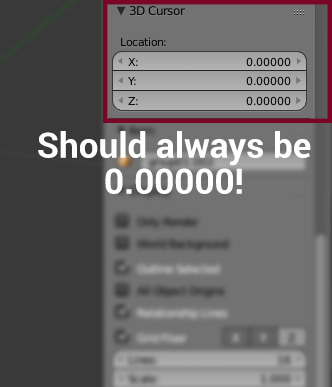
3D Cursor: In object mode you always want the cursor to be on 0.0000. This will be helpful when adding an existing Blender mesh! :) If it’s not on the 0.0000, then this could cause issues too with uv mapping.
Shadings: There’s not that much that we need to take care of here, but there’s one VERY important box we have to tick, which is the ‘backface culling’. Reason why is, is that the way it will look like turned on is the way it will look like in-game. Turning it off will NOT fix it!
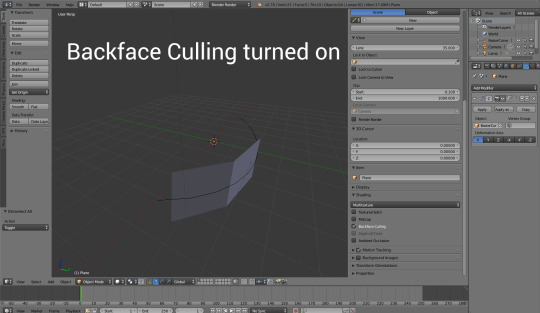
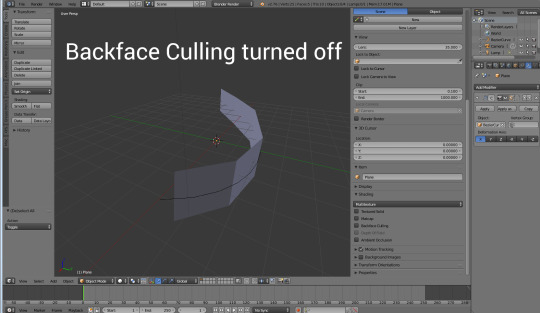
See how when turned on the back is invisible? This is how the plane will look in game if you don’t fix this. But... how *do* we fix it? Let’s go into edit mode!
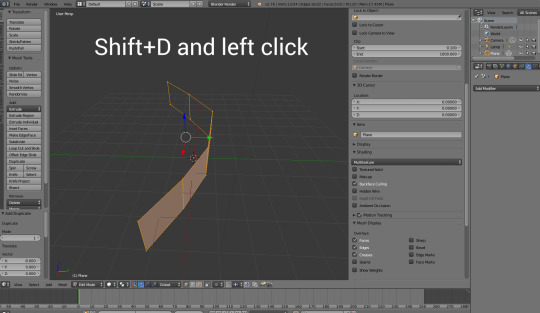
1. We want to duplicate the mesh with Shift+D and then left click to confirm the duplication.
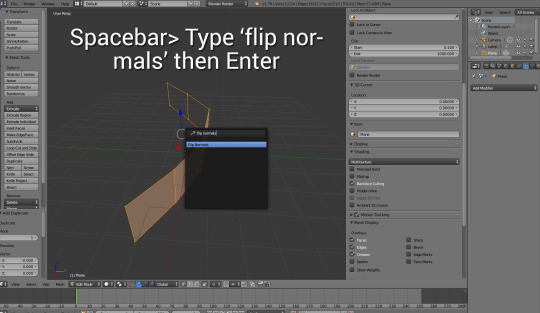
2. Then, we want to use the spacebar which stands for searching certain functionalities, type in ‘Flip normals’ and then press enter,
3. And there you go! Now the game won’t make them invisible from the back!
Left side bar navigation:
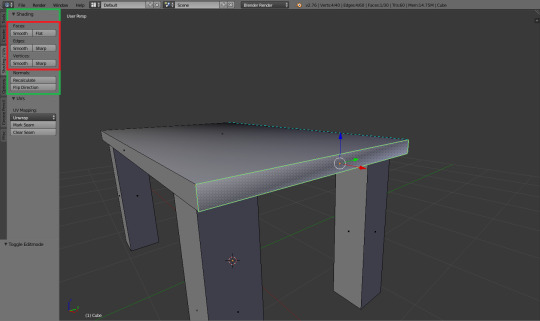
Shading: This option is only available in object mode. And is very helpful when you just imported a mesh but it doesn’t quite look right. Have a few examples!

Note: This option won’t just affect blender, it will also affect in-game.
Flat:
Smooth:

Now you think ‘why can’t it just smooth always?!’ well...
Smooth: Oh yuck! it’s 2005 all over again D:

Flat: Yay! it’s table-y! :D
Don’t fancy them all being fully flat or smooth? Let’s get to the next tab...
Shadings/UV>Shadings: This is really helpful for when you’re working on complex meshes! Shoes for example, would probably need this or a specific furniture, or even hair! The most recommended way of doing this is by selecting a few faces and use either the ‘faces: smooth’ or ‘flat’ function
Note: Only shows up in edit mode!
Exporting recommendations
When you’re sure you UV mapped it properly, and your mesh is ready to see the good ol’ milkshape to get it game-ready, the most recommended way of exporting it would be as a waterfront OBJ. OBJ is a really raw export function considered how it doesn’t support bones, which in this case is amazing! Since we don’t do anything with them in Blender when meshing stuff for ts3 :) BUT! There are some settings you want to have in order to export things successfully.
Let’s take a look at this thingy:

For exporting OBJ files:
Apply modifier
Include edges
Write normals
Include UVs
Objects as OBJ groups
Optional: Write materials (Basically your textures)
Scale: should be set to 1.00
Forward: -z Forward
Up: Y up
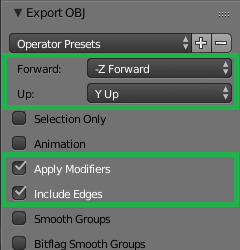
You can even save the setting by clicking on the + next to the ‘operator Presets’ and call it something like ‘ts3 export’ so you don’t have to keep selecting them :)
Helpful guides when you’re a noob!
Now this thing might be super duper long, but does not cover all the things you can do with it! I do recommend watching all or most of these links/videos in order to understand what the tutorials are about and what I’m doing.
NOTE: I occasionally will write down the shortcuts for specific functions but I WILL NOT explain it in my tutorials. They’re written for people with a basic knowledge for at least blender or their chosen 3D program.
Blender starters tutorials:
Interface explanation
Blender fundamentals
Beginner’s course
Awesome UV mapping tutorial
Model with curves
Customized bump maps
Simlicious:
Covering the basics in text
Info about normals
UV mapping to make things ts3 pattern-y good!
Me!:
Render only
Bake less pixelated textures
Fun stuff to look at and follow but optional:
Note: When following specific tutorials about cycle renders (Like making something translucent) These will NOT work in-game. Everything shown in render apart from the specular map, normal map and the diffuse map will NOT work in-game
Blender cloud: Is a really cool platform where you can basically watch whatever you want to gain knowledge on from the professionals! Which, is not your regular youtube videos ;) You won’t be disappointed!
https://cloud.blender.org/welcome
Blender free textures: Is a free online database where there are over 1500 free textures you can choose from, for non-commercial to commercial use, all for free! So no copyrighting involved!
https://cloud.blender.org/p/textures/
Blender today: Is kind of this awesome newspaper website. everyday you’ll get a new article, some artwork, others awesome tips to improve your work with Blender!
http://blender.today/p/
Jayanam: Has some great blender tutorials to maybe give you some ideas for your next meshing mission! :)
https://www.youtube.com/watch?v=icABMWGkOn4&list=PLboXykqtm8dydLQFk962346_TrAgzfMCF
Yan’s UV mapping tutorials: I learned a lot by just watcihng these videos! It sure is a recommended video to watch, but watch this one after you know how to UV map!
https://www.youtube.com/playlist?list=PLvPwLecDlWRD3F9lVD0ks_sdpxCgxgYm-
Hand-painted Sword by XRG81: Why this one? Well it did teach me the advanced ways of drawing on a texture map instead of just guessing in Photoshop if I did them write! :) And besides! It’s a really awesome way to avoid seams!
https://www.youtube.com/playlist?list=PLNHJ5gduZOiWXtbeiZZi3q082bclOHQY4
Tutor4u: Has tons of awesome tutorials on how to work with stuff in Blender!
742 notes
·
View notes
Note
Hi! I was wondering if you had a tutorial about taking better screenshots. I was trying to make some clothes but I can't actually take some good screens??? Like any program recommendation? Any good poses? Some cheats? I would be eternally grateful!
Okay so:
1. Use this backdrop, it gives nice lighting and a plain background
2. Use TAB mode to take your pictures, and you can turn the image with A and D, move up and don with E and Q. It allows you to focus on the area better.
3. Lighting mods like Reshade help!
4. If you want your preview pics to look the same it helps to “save” the camera position. In TAB mode you can press CTRL+ 4-9, then in TAB mode the next time you can just press the number and the camera moves back to where it was!
5. Good poses are usually more simple standing poses. For kids and tots look at the ones I converted on Sketchbookpixels, and for adults Noeyely (now Taultvec) has a lot of nice and simple poses.
6. Otherwise the rest is editing in PS! I usually like to use Topaz Adjust and Topaz Clean. In Topaz Adjust there is a filter called “Soft Focus”. I like to duplicate my layer, apply that and then set the opacity down.
Other than that I don’t have any more tips :/
51 notes
·
View notes
Note
Hi! Do you know of any posts/resources on how to make a gif edit w smooth camera zooms? I want to make edits w character stills that zoom in or out but I have no idea how to make it look good :')
Hello!! I apologize for the delayed response;; Technically there are two ways to do this (one extremely tedious) but I’m going to show you the easiest and fastest way!
TUTORIAL: CREATING CAMERA ZOOM GIFS
Difficulty: Easy - MediumNotes: some basic Photoshop knowledge is required (generally you should be comfortable with playing around with frames/layers and using the convert to timeline option)
As I mentioned, there are technically two ways to do this. You can either:
a) Zoom in frame by frame manually with little difference in each frame OR
b) Zoom in using the Timeline option to animate it
For this tutorial, I’m going to show the Timeline Animation only, just because it’s a whole lot easier and less time-consuming in that sense.
NOTE: So this was my first time doing camera zooms through animation (otherwise I have done them manually tweaking each frame and what not). I....seriously hope this is alright.....this is the smoothest way I think that isn’t super tedious but if there’s a very specific way you want it done, I only know the manual way otherwise;; I apologize greatly I’m still learning this stuff myself *cries*
1. Open your character stills. Do not open the whole psd (with layers and colourings and all that). Open your final result (which should be one single layer).

2. In your Timeline on the bottom, click “Create Frame Animation” so you can see the frames in your tray. Then, click the “Convert to Video Timeline” (the tiles right below your first frame)

Now, your screen should look like this:

3. I would suggest to drag the Timeline Tray up a bit more because we will be playing around with it for the rest of the tutorial. You can do so with this on the bottom near the scrollbar:

So, on the right is what we’ll call the “Layers Tray” which has your layer’s name and original image, and on the left you will also find your layer’s name, so we will call this the “Timeline Tray” for simplicity. Once you have selected your layer in the Layers Tray, go to your layer in the Timeline Tray and click the drop down menu beside the name. The drop down menu will show you three options but don’t worry about them. The main purpose of showing the menu is so you can see the layer animation space (underneath the purple shown below).

Furthermore, you should also be aware of the Indicator (the red line with the blue tab on your timeline.

Dragging it across the timeline will show you any changes you’ve made to the animation. This will be important later on.
4. You will see in your Timeline Tray the purple layer that has an arrow on the right side. Click the arrow. You will see the following menu pop up:

In the drop down list, select “Pan & Zoom” and then click anywhere outside the box. You have now created a zooming and panning keyframe animation, which is indicated by the new red space below the purple layer.

5. Just to explain things a little bit, a keyframe in this case is basically an animation. The red diamond you see at the start indicates when the animation will begin, and the second red diamond indicates when the animation should stop. Try playing your gif here and see how Photoshop has animated it automatically!
Now, let’s say you wanted the animation to end at the half-way point, you would drag the second red diamond to the middle and that would be considered the end. Test it out by doing so and pressing play, you will find that it will end at that point. Likewise, same is true for the first red diamond.
This is the very basis of how to create smooth panning. I do want to further show how you can manipulate zooming and panning manually so if you’re interested, keep reading!
6. Let’s say in my case, I wanted to zoom and pan towards Kindaichi bc he looks so damn pure that I have to. Although Photoshop can zoom and pan by itself more or less, I want to zoom in further and pan in further.
To do this, I will drag the Indicator (the red line with the blue tab) all the way to the second red diamond (so that it looks like it’s cut in half). Remember, the second red diamond shows the end of the animation. Here, we will dictate the zooming.

7. Make sure the second red diamond is selected and then hit ctrl + T to enter into Transformation mode. Now, you will have to basically size the image so that it is zoomed in and in the correct position you want the character to be in. So, I basically adjusted the size to something a lot bigger and then dragged the image over a bit to the right so I can show Kindaichi’s face. Once you’re done, click the checkmark to exit Transformation mode.
8. If you replay your gif now, you will see that it has changed so that the animation for the zooms end at the size you specified in the previous step.
9. Make sure to set your Frame Rates so that it doesn’t move either too slow or too fast. You can do this by clicking on the little bars on the right side of your time line:

Play around to a Frame Rate you like best!! Also, in the same menu, you will find the option to “Loop Playback” - this will make the gif continuous instead of it stopping after the first zoom.
10. As an additional note, you will notice that zooming in renders your image to be blurry because you’re essentially making the image bigger. I recommend that you create a large image size and use that to create the animation, and then after saving it, open it again and fit it onto the tumblr canvas size of your choice. That way you can lessen the blur a bit!
11. I personally had a lot of issues trying to save this through render video so what I ended up doing was File >> Save for Web >> and then saving it as a gif. However, if you’re like me, you’ll find out that the size of the animation was freaking huge! So, to counter that I saved it as a gif anyway and opened up the gif in a new tab. This time it opened with frames and layers as such:

Here, I basically re-sized the canvas and deleted LOTS of useless frames and layers, as well as adjusted the frame delays. This toned down my gif size quite a bit.
And here is the final result:

Again, I apologize if this isn’t what you were looking for.....I honestly found out how to do this accidentally (lmao when I was fucking around with photoshop for another tutorial I was like “ohhh what does this motion thing to do” and BAM this is what I found out). Hopefully this is alright! If you have any issues, please feel free to message me and I will do my best to help. As mentioned earlier I’m still learning about timeline animation myself so this was my first time doing it like this. Let me know if you have any questions/concerns!
147 notes
·
View notes
Note
hey! First of all , I love you to death adn I love your posts! Second, could you please link us to the tutorial you watched to do the blanket for that pose of yours? I would really apreciate it! thank you so much! ^3^
hi anon! omggggggg ;_; you’re too kind thank you so so muchhhh ;_; i did hunt for one when i first decided i needed to make blankets lmao but there’s not a tutorial out there to my knowledge dedicated to making pose blankets for sims ;_; i just did it by piecing together bits of my knowledge about blender physics lmao. i’m in the process of editing a video tutorial together but i’m just trying to summon up the courage to post it and let you all hear my annoying weird accent and my shitty laptop microphone LMAO. i’ll get the video tutorial up this week (hopefully tomorrow) which will explain everything in depth (it’s much much easier to talk through it and show rather than try and explain lmao), but in the meantime if you want to start making them right now, i’ll put together a little basic tutorial under the cut below. assumes some knowledge of object creation cos i’m not gonna go through it in complete detail here (e.g. how to make the mesh ready to use in game by adding a ground shadow, importing into tsrw, the usual checklist of things to do before importing it etc etc), just because it will take me too long and i’m incredibly tired rn lmao :’( the video will have complete detail and show you how to make the mesh ready to use in game and stuff but yeah, if you want to follow this one now i’ll link some other tutorials for those other parts
you need blender, milkshape, photoshop/gimp, dds plugin, and tsrw and all the usual add ons aka the align normals plugin for milkshape and any plugins that the tutorials i link to need
1. open your pose in blender. make sure you’ve already saved the pose as a clip file before you do this next step otherwise you’re gonna lose it forever :’(. go to file>export>export to .obj. then reopen blender, delete the cube, and go to file>import>import from .obj (or something like that) and select the .obj file you’ve just exported. you should now have weird solid body versions of your pose on your screen. you need to click on all of the individual group parts while holding the shift key (you’ll see them all light up in orange), then hit ctrl + j to join the parts together. your sim pose mesh should now be in one part.
2. follow this tutorial until about 6 minutes 30 seconds in. you need to set up the pose as a collision object, and depending on the pose, follow the tutorial and create a “ground” collision, or import a bed or sofa and set that up as a collision object, rather than the ground plane. ignore the part about the texture, although do unwrap the plane before you deform it for the sake of ease. also, be wary of how much you subdivide the blanket. you can see the verts/face count at the top of the screen, and the objective is to keep this as low as possible. too high and either your game or tsrw is gonna reject it. i personally always try and keep it under 10k verts, and even that is probably way too high. i’m just a sucker for a smooth looking blanket lmao
3. once you’ve followed the tutorial and your blanket has fallen into a nice position and you’re happy with it (you can move through the animation using the timeline to select the exact point you want), just export to an .obj file once more, and reopen blender’s startup screen.
4. again, delete the cube, and open the most recent .obj. now the cloth is frozen and the animation is lost. now you can delete the pose and the ground/bed/chair/whatever collision surface you had on the bottom to stop the cloth falling infinitely through blender lmao. also delete the lamps and cameras in the scene so you can see the textures properly.
5. now select your blanket and go into edit mode and pull up the UV/image tab. hopefully you unwrapped your mesh earlier, and you’ll see a nice grid in this part. this is your UV map, and now we’re gonna bake a texture.
6. go to your little world icon on the left hand side and tick the ambient occlusion box. then turn the samples up to around 20-25ish for a nice hq texture. if you have a slower computer, i’d advise maybe around 10-15 instead. tbh it doesn’t really matter so much, it’s only a blanket (but like i said, i’m a sucker for a smooth blanket hahaha) then click on the camera icon on the left and go down to bake. in bake mode, select ambient occlusion, and set the margin to 2. now in your UV/image tab, select new and just hit ok. you’ll now have a black square behind your UV map. now, once more under the camera tab, hit bake and wait as the most satisfying thing happens before your very eyes (watching this is my favourite FAVOURITE part)
7. once it’s baked and looking fab (you can check out the texture by selecting texture under viewport shading), go to save as image and save it somewhere convenient.
8. now i prefer a thick, duvet like blanket, because i’m always cold and like to be cosy all the time, but if you want a thin sheet this next part is optional. select your blanket mesh once more in edit mode, hit the space key, and type in duplicate. select duplicate, and then hit ‘E’. you can now make the blanket as thick or thin as you like by moving your mouse. left click again when the blanket is at your desired thickness.
9. finally, export it as an .obj. now you can make all the texture things. i like to open the bake in photoshop and apply a blur filter to smooth it out. then i make an alpha channel which is completely white and save it as a DXT5 interpolated alpha dds file. then make the mask and specular. if you’re unfamiliar with this process, here is a tutorial (you don’t really need the multiplier part because you already baked one, and you will probs just need a red fill layer for the mask unless you want a fancy one) (also ignore the bump map part, objects don’t often use them)
10. open your mesh in milkshape and align normals and assign joints. follow this tutorial, which should cover everything you need to know about this part! i’m v bad for saying this but i don’t tend to bother with remapping the ground shadow part when i’m making these blankets. they’re something you’re gonna use for a second and i personally don’t bother, but of course you can if you want to! save it as a .wso in order to import it into tsrw.
11. import your mesh into tsrw. if you don’t know how to do this or create sun shadows, please follow pages 44-46 of this tutorial. then you’ll need to add your textures and export the package! follow page 63-69 of this tutorial (also contains a handy overview of the different components if you still aren’t sure how to texture the blanket). you should be done! now you can pop your package or sims3pack in game and test it out with your pose! :)
if any of this doesn’t make sense or you have any questions or i’ve missed anything (i’m literally half asleep), please feel free to message me. like i said, hopefully the video tutorial will be up tomorrow, which covers things in a lot more detail. hopefully this is at least a little helpful though anon, good luck!
7 notes
·
View notes
Last Seen Blogs
notoriouslydevious
♥『League of Legends』♥

ctrlv
ctrlV

teenwolffanpage95
Teen Wolf

padmecat
Meow, friends

katerinasidonova
Kateřina Sidonová