#i might have to make my own variable and manually tell it in every reference to the old one to use mine instead but that seems wrong
Text
now that i have tampermonkey ive spent the past like hour trying to figure out how to use it to update the dark mode palette to include the navy again because i hate that it's just black. i looked at tumblr's CSS and literally the dark mode palette takes the "navy" variable and just sets it to 0, 0, 0 AKA black. i can edit it in the inspector (which is how i know exactly what they did) but i haven't figured out tampermonkey syntax/functionality to the extent i know how to script it to do this. this is a reasonable rabbit hole to be going down 30 minutes after i am supposed to be in bed
#like goddamn this UI update is so bad im learning more about web development to try and revert it#also any resources on tampermonkey helps BTW i dont know how to use it to update CSS variables if thats even possible#i might have to make my own variable and manually tell it in every reference to the old one to use mine instead but that seems wrong#anyway i am taking a metaphorical knife to this website#like the dark mode palette entries for navy and other color variables is what i want to update but i cant figure out how to do that#maybe i need to make my own stylesheet with its own set of variables and tell tumblr to load that sheet instead of the one it normally does#which is still a thing i don't know the proper syntax for so.
12 notes
·
View notes
Text
devlog # 6 // hex tilemaps and pathfinding, part 5 (refining pathfinding features)
so, if you can’t tell, i’m absolutely in love with development right now, been typing away for days and days. :’)

mainly, since the last devlog, i’ve spent my time doing two things:
- organising and backing up my development process
- refining the pathfinding system’s features
starting with that first point, once my project files and code started getting to be more than a few lines, i quickly realised that i would need to take some time to start keeping everything even more in order.
i came across trello, a tool where you can make and sort tasks to keep track of what’s going on in your project. currently, this is all entered manually, but i did notice they have a thousand features and other apps and things to take your task-keeping further. right now, i am satisfied and very much served by these simple lists. instead of countless, nondescript notes and word documents on my computer - “rpg notes”, “rpg devlog”, “devlog notes”, “game design”, “game design b”, “design notes”, etc - i keep all of my to-dos in one place.

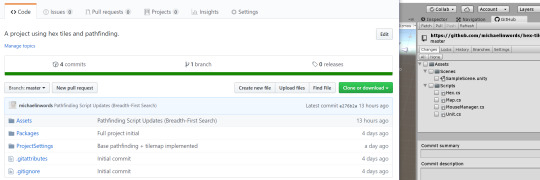
i also started using github (for unity) to keep changelogs and backups of all of my project files. this is something i had been especially thinking of as the files grew larger and larger, given that if i lost my progress, even though i could definitely put things back together (and perhaps more neatly the second time?), it would definitely throw off my motivation.
it only took a few minutes to set up a github repository(?) and install the associated plugin for unity, though i do not feel at all that i understand how this all really works - for now, the point is that i’ve got a consistent, easy way of tracking changes in my files and making sure i don’t lose them.
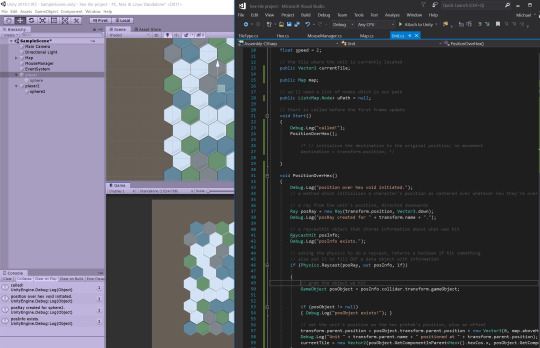
okay, now for what we’re really here for: the game, and its pathfinding system(s). what i’m not going to do in this devlog is explain every detail of how i’ve put things together; what i will do is explain (a) what i put together, (b) the patterns and resources i worked from, and (c) some of the challenges that came up throughout. there’s going to be lots of pictures today!
last time, we got to pathfinding in the sense that the game was able to identify the quickest route from our source position to a target tile position, then draw debug lines along that route. in the few days since then, i’ve complicated the system quite a lot.
firstly, i made changes so that the tiles actually have movement costs. i did this by creating a method that would take in the coordinates of a tile, then return its cost.
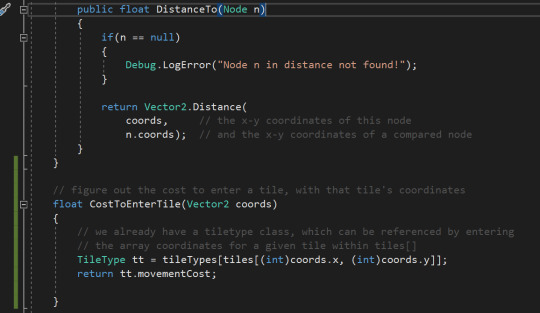
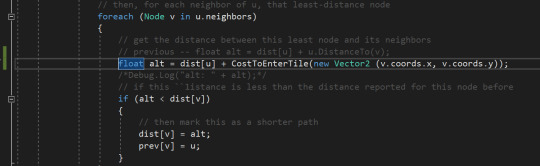
next, we needed to actually put this cost into the algorithm, so instead of the dist, i put in the CostToEnterTile - this piece of pathfinding might look familiar! (i actually ended up putting the distance back into the equation as well, not shown in this image.)
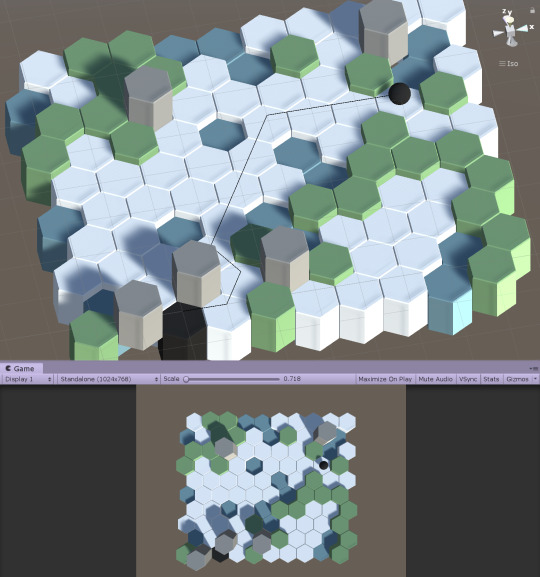
after manually defining the movement cost values for each tileType in the inspector, the game looked like this:
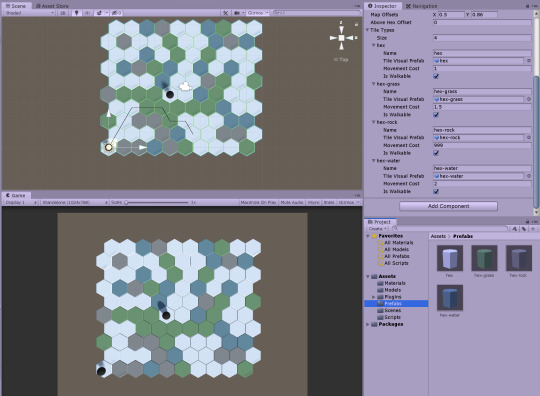
notice how the pathfinding is avoiding grey tiles, and somewhat the blue ones? this is not the “shortest” path, but it is the one that costs the player the least movement (which is what we want)!
next, i put in a method i imagined would be helpful - something called upon Start that would take a unit’s position, figure out if there was a hex below (via raycast), and then take on that hex’s position and array coordinates. for a reason i cannot explain, this works only on this exact player object - not even on copies - and it works about 85% of the time. :’) i don’t understand why at all, and i’ve pored over this code (and updated it) for hours. if you see why this code isn’t working how i intend, please let me know!
this is what it looks like when it does work (player was originally just vaguely, randomly over a tile and is now centered on that tile, internally storing a reference to its coordinates):

and whoa! the tiles are at different heights?
well, yes, because i created something for each tileType called the “height offset range”. this data is used when first instantiating all the hexes. brings a ton more depth into the level. lesgoooo unity 3d!

with this, the tiles start to look more like environmental terrain. it becomes more apparent that the pathfinding is very much avoiding certain tiles.
this is just one of many changes i want to implement that will allow the game to generate interesting levels, procedurally, with almost no effort.
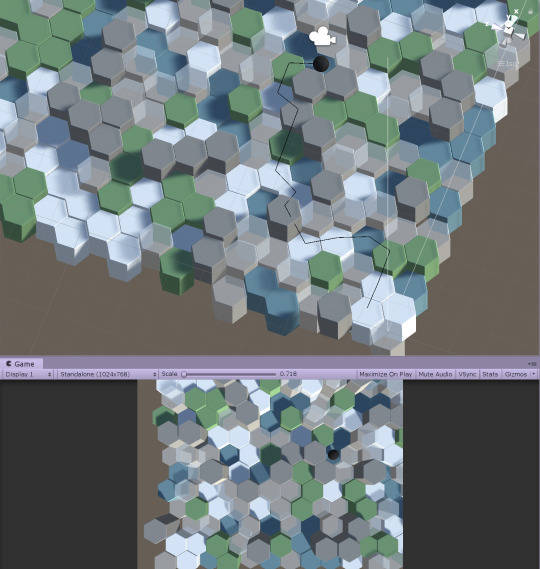
check out this “randomly” generated level, which has a more island-y feel, with the increased water tiles.

this was created by altering only 3 or so values, representing the proportions of a given tileType’s likelihood to be the one chosen when a hex is instantiated. (i want to soon move all of these variables into something editable from the inspector, so everything can be easily adjusted from inside unity, not from digging in the code.)
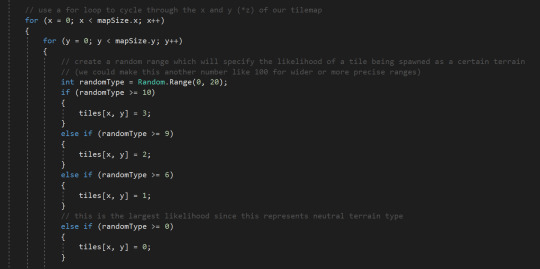
if i alter these few values again (notice below that i only change the 10, 9, and 6), we start generating levels that have quite a different feeling to them, something more rocky.


i even created another tileType (called “null”) which cannot be targeted or walked on. this creates an effect that looks like there are spaces cut out of the map.

it may seem like “well, of course, the pathfinding won’t go along these tiles if they don’t exist”, but they actually do exist; the pathfinding is recognising them and choosing against them. here is the same image as above, but with the null hexes changed to a visible/glassy material.
then, it felt like time to jump more into the code again and figure out how to not just calculate paths, but to actually use them to move the character. again, with insights from quill’s tutorial, i set up some code that would move the unit along the found path, guiding them to a specific “destination”, waiting for them to get close, then moving to the next piece as the next destination. cool shit that i definitely didn’t figure out alone.

after putting in some debugs (thanks to my virgo), we get a very satisfying list of steps the pathfinding went through to move the player, and our first visual..


! ! !
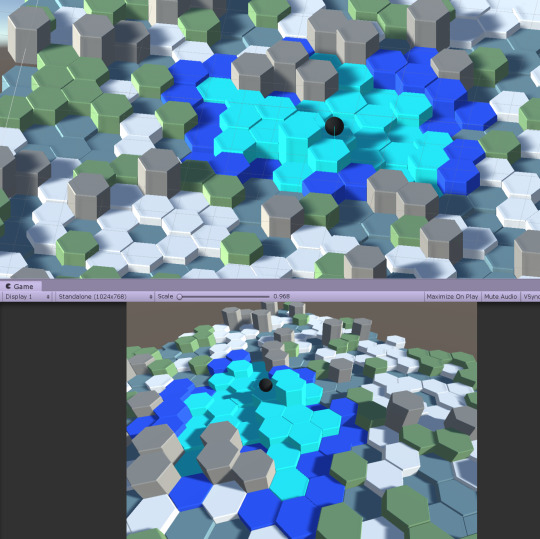
there remains only one thing to be done, from the two goals i defined for the pathfinding system. one was to be able to find a path and move a character there (which we just did), and the other was .. to highlight possible move spaces? how the fu--
welp, long story short, i panicked a bit because the few guides/tutorials i was finding were v e r y math and big, conceptual engineering (at least that’s how they felt). and when i found what felt like a more accessible tutorial that showed someone using pathfinding for this purpose (highlighting possible movement tiles), their implementation didn’t seem immediately like something i could integrate alongside what i had. i watched a bit, got frustrated and overwhelmed, then decided to relax, ease my mind .. which led me to this video lol? an mit talk about graph theory and breadth first search.
somehow, i found it comforting to just explore the concept without thinking of how to apply it immediately. i was just seeking to understand. and understand i did. right before i went to bed, i decided to write out - from this understanding - what kind of lists, variables, states, methods i would need to get this working. i set it aside, and went to sleep. and when i woke up the next day, this morning, this is what i did.
i translated what i had understood directly into new lists, variables, and the like - things i understood. and for the first time on this scale, i was doing this entirely freehand, without any tutorial. and i wrote for the code to do this when the the player was clicked on:

not so impressive? what about this?
that looks like what i asked for!
the only difference between the two is that, in the second implementation of this algorithm, rather than cycling through all of the hexes, i ask the search to stop at a certain point -- something i’m currently calling the movement buffer.
from the game’s movement rules, a player can not only attempt to move within a character’s movement range, but can also exert the player to try to push to a further tile; this has the consequence of the character hurting or overly fatiguing themself, if they do not make a high enough roll to move that amount. that’s what this image shows: the light blue represents the player’s movement, and the darker blue represents those exert/can-try-but-it’s-risky tiles.
i also took care of some other helpful, necessary features (can only select within the highlighted tiles, deselecting the unit will return tiles to their original colors, etc), also free-hand, just by applying the little pieces i know into a greater whole.

i have never felt more confident in my own programming ability; i define goals for my work, i research, i think through them, and then am able to create and refine the code that follows. with that massive update, i will temporarily be pausing on any pathfinding for a while (as both of the goals we defined have been completed!), and looking to other areas to explore.

thank you for joining me on this journey so far. <3 in the next days, i’ll mostly be looking into visuals - shader maths, animation, modeling - trying to get things looking pretty. most likely will be implementing a character stats UI, as well. see you in the next devlog (or find and chat with me on twitter.com/michaelinwords)!
with love and an ever-growing to-do list,
ahn
#dev#gamedev#indie games#indie developer#indie development#game development#art#shaders#math#animation#modeling#ui#character#rpg#turn-based rpg#final fantasy tactics#hex tiles#hex-based#grid#magic#fantasy#graph theory#pathfinding#engineering#mathematics#computer science#unity#unity3d
0 notes
Text
On automation and airmanship
“I believe any good pilot has a certain skepticism. If he or she isn’t a skeptic, they are headed for trouble. This seems especially true with the computer—and when I say computer I include FMS, autopilot and all. Being skeptical means a pilot refers to raw data to be certain the FMS etc., is doing its thing correctly. This is not always easy because as the computer develops it makes raw data more difficult to see, find and use.” – Captain Robert Buck, TWA
I have been known, on occasion, to talk to the autopilot. “Why on earth are you closing the throttles now?” or “What? Who told you to fly at 210 knots?” It’s possible that this could be a little unnerving to an unsuspecting first officer, but there are occasions when it is necessary to question the autopilot’s intentions or even its situational awareness. Sometimes I have to intervene: ”No, no, let’s not do it that way… here, let’s try this mode…” And every so often, “Oh for goodness’ sake, stop making this harder than it is…” a comment usually associated with disconnecting the thing.
Some of that comes from the early days of my career, the first five thousand hours of which involved Convairs and Metroliners with no autopilots and no flight directors. We hand flew all day, er, night, every day and night. This was a pattern only gradually altered by flying the 727, whose autopilot was equipped with an input control that we commonly referred to as the “lurch lever” because the spring tensions were not well calibrated to the G tolerances of the typical passenger’s posterior. On legs under an hour, many of us never engaged the autopilot at all, nor did we activate the flight directors unless we were flying an instrument approach. We simply flew pitch and power like we always had.
It might sound crazy, but airline pilots once flew trips without ever engaging the autopilot.
But most of it comes from a strategy to manage two parallel and integrated situational awarenesses: the old, original one (where are we, where are we going and at what angle of attack), along with a new one (where does the autoflight system think we are, where does it think we want to go, how is it going to get us there and, perhaps of separate but equal importance, where are we within one or more flight envelopes that it is designed to protect us from departing?). Both situational awarenesses are vital to safety. But with the advent of the second awareness, the automation awareness, it has become common for the authorities, manufacturers and various other august bodies of expertise to start describing pilots as “systems operators” or “system managers.”
This is not really a new idea. In 1953, Guy Murchie, writing in his book Song of the Sky, rather presciently predicted “a maplike screen on which will be projected pips of light representing not only his own position but those of other craft, enabling him to monitor the traffic situation continuously and check navigation by eyesight in the densest cloud.” This is a curiously accurate description of an FMS-driven Navigation Display with TCAS superimposed. By 1959, General Pete Quesada, the first FAA Administrator, observed that, with respect to military pilots, “The day of the throttle jockey is past. He is becoming a true professional, a manager of complex weapons systems.”
But back in 1939, writing in his masterpiece, Wind Sand and Stars, the French airmail pilot Antoine de Saint-Exupery anticipated how we might lose control of this evolution. He wrote that,
In the enthusiasm of our rapid mechanical conquests we have overlooked some things. We have perhaps driven men into the service of the machine, instead of building machinery for the service of man.
It is easy to intuit how the concept of a manager of systems veers toward a man in the service of the machine. With the acceleration of automation in the cockpit, and the mishaps and accidents that have resulted, it seems to me that we have never truly resolved Saint-Exupery’s point. On the one hand, the pilot in command remains the final authority as to the operation of the aircraft. On the other, the pilot is an operator of complex systems that he is no longer expected to understand.
A few years ago, David Blair and Nick Helms published a thoughtful paper entitled “The Swarm, the Cloud, and the Importance of Getting There First,” a treatise on remotely piloted aircraft operated by the US Air Force. They concisely and carefully captured Saint-Exupery’s dichotomy in more contemporary terms:
The first truth of special operations holds that humans are more important than hardware. In other words, technology exists to enable people to fulfill the mission. This is the capabilities view of technology: machines are amplifiers of human will, better enabling them to make something of their world. By exercising dominion through technology, people gain greater command over their environment. The alternative is that humans are important to operate the hardware—that people are subsystems within larger socio-mechanical constructs. This view, cybernetics, encloses people within closed control loops that regulate systemic variables within set parameters. Rather than human versus machine, the true discussion about the future of RPAs addresses capabilities versus cybernetics.
The original intent of contemporary cockpit automation arose from the capabilities view of technology, in particular the capability to optimize aerodynamic efficiency while also optimizing airspace utilization. This was, and still is, clearly a machine in the service of man. The intent of automation began to migrate toward the cybernetics view with the notion that we could automate human error out of the equation. In my experience, this migration happened about the same time we transitioned from experienced instructors hand-drawing schematics on whiteboards to well-meaning but very inexperienced people flipping Powerpoint slides salted with schematics from the maintenance manual.
Is this technology in service of man or vice versa?
Cockpit automation is today widely discussed and trained from the cybernetics view of technology. This has been powerfully reinforced by the extensive understanding of human factors as a deterministic, predictable discipline, indeed, by the fundamental understanding of behavior from the deterministic view of neuroscience.
In their 2014 report entitled “A Practical Guide for Improving Flight Path Monitoring”, the Flight Safety Foundation noted that,
Multiple studies have shown that many pilots poorly understand aspects of autoflight modes, in part because training emphasizes correct “button pushing” over developing accurate mental models. Simply stated, it is impossible to monitor a complex system if a pilot isn’t sure how to correctly operate that system or what type of aircraft performance can be expected from each autoflight mode. A pilot who has an accurate mental model of the autoflight system can then learn how to use each mode and will be able to accurately predict what the aircraft will do next in a given mode in each specific situation.
A short trip through Mr. Peabody’s Wayback Machine will place us in a new-hire flight engineer classroom. The instructor is a retired chief master sergeant, and he is diagramming by hand the disassembly, piece by piece, of an air conditioning pack. By the time he is done, the new pilots will thoroughly understand how a pack works, and therefore have a solid grasp of what they are looking at on the pack temp gauge… at least that was the plan in those days.
In order to get rid of the flight engineer, we had to get rid of the pack temperature gauge. The thinking was that by automating the systems and improving the system status annunciations, we could make the task of monitoring systems much simpler. As we automated, we also watered down the ground school; there was no longer any reason to truly understand the system at a component level, since the automation would tell you all you needed to know. This is precisely the trajectory that Murchie had in mind when, continuing his 1953 description of a future cockpit, he said that,
Elimination of everything unessential is a big load off the crew’s brains. When the flight engineer wants to check whether his battery generators are working he used to have to read a dial needle pointing to numbers of amperes of charge or discharge. In the future he will only see a green or red light indicating “yes” or “no.” With fifty such indicators shorn of their wool, the crew will be spared much of the dangerous excess of information from which they have long had to select, abstract, interpolate, extrapolate, derive, and ignore—sometimes literally to the point of death. The airplane will enter a new phase of progress.
But along the way, I believe a very subtle paradigm shift occurred. Back in the day, we had a vague idea of approximately where we were in space. Between the A-N ranges, ADF pointers and LORAN systems, we were generally sure of which hemisphere we were flying in, and with some skill we could place the airplane over a runway threshold safely and reliably, albeit with little surety of exactly where we had been in the process of getting there. Whilst sorting out the bearings, radials and tones, it was essential to keep all one hundred and twelve cylinders lubricated, firing properly and not consuming more gasoline than was absolutely necessary. Monitoring had a great deal to do with aircraft systems, and less to do with the flight path. The flight path was more a matter of technique as long as one avoided an unintended stall.
But at the same time we were automating away little dials pointing at numbers indicating amperes, we were increasing airspace occupancy exponentially. Frequency, frequency, frequency. More flights, more options, more consumer choice, more tailored load factors, more capacity and then more capacity management… all while still operating approximately the same number of outer markers as we have for over sixty years. Capacity is choked; this leads immediately to tightening the longitudinal and vertical spacing between aircraft, as well as such things as Performance Based Navigation (PBN), Reduced Vertical Separation Minimums (RVSM), RNAV departures and arrivals, and the like. All of this is basically intended to obtain the maximum arrival rate possible for each runway at each terminal.
About the only way to fly an RNAV arrival to a busy airport is with lots of automation.
So the importance of flight path management has become supreme, and highly automated. In this manner, the airspace infrastructure has evolved into the kind of larger socio-mechanical construct that Blair and Helms described, in which people are subsystems. Along the way, the shift in paradigm, as well as a culture mesmerized with automation and digitization, slowly and unwittingly displaced procedural knowledge with declarative knowledge.
Simon Hall, of Cranfield University, has described declarative knowledge as, “the knowledge that the system works in a certain way,” and contrasted this with procedural knowledge, which he describes as, “ knowing how to use the system in context.” He explains that
The basic skills associated with “manually flying” an aircraft are predominantly based on procedural knowledge, i.e. how to achieve the task. However, the use of automation to control the flight path of an aircraft is taught as declarative knowledge. Pilots are required to manage systems based on a knowledge that the autoflight system works in a particular fashion. So, the pilot is faced with the same operational task of controlling the flight path but employs two different strategies of cognitive behaviour depending upon whether the task is manually or automatically executed.
It is important to stop for a minute and put this concept under a microscope. In the days of the flight engineer, declarative knowledge and procedural knowledge were more or less balanced, and they were integrated. Declarative knowledge supported procedural knowledge, and we were taught both. If you wanted to get the generator on line, you were going to have to synch the generator frequency to the bus frequency; you had to understand how this worked, and you had to be able to make it work, because it wasn’t going to do it by itself.
But right there, at that inflection point, is where the problems of automation gain a foothold, precisely because automated systems will do it by themselves. It is no longer a matter of procedurally operating a system; it is a matter of watching the system procedurally operate itself. When the Flight Safety Foundation describes an “accurate mental model which will enable the pilot to predict what the airplane will do next in a given mode for each specific situation,” they are referring entirely to declarative knowledge, a knowledge of how the system works, with the expectation that the pilot’s speed of cognition will exceed the system’s own procedural operation.
In the old days, the pilot’s speed of cognition controlled the procedural operation. Nothing would happen until you were ready for it to happen, because you had to make it happen. You could get behind the airplane moving in space, and you could get behind the situation in time, but it was pretty hard to get behind the systems. Today, you’d better be on your toes, because the automated system is going, with or without you. Indeed, the very phrase “predict what the airplane will do next,” as if this were a matter of conjecture, implies that the airplane has a mind of its own.
Yet the premise behind watered-down training is that the modern, sophisticated, fly-by-wire airplane is too complicated for the pilot to fully understand, and thus he or she has no need for extensive knowledge of the aircraft design and architecture. This is entirely in line with Murchie’s 1953 prediction that the crew “be spared much of the dangerous excess of information from which they have long had to select, abstract, interpolate, extrapolate, derive, and ignore.” Sixty years later, in the 2013 report Operational Use of Flight Management Systems, the Performance Based Operations Aviation Rulemaking Committee said that:
Pilot knowledge of the basic airplane systems is not as detailed as in the past. The WG recognizes that in the past, information was trained that was not needed or beneficial. The concern is that depth of systems knowledge may now be insufficient, and this may be operator dependent.
And so we arrive at the rather matter-of-fact condescension expressed in a pivotal statement following the 737 Max debacle:
A high-ranking Boeing official told the Wall Street Journal that “the company had decided against disclosing more details to cockpit crews due to concerns about inundating average pilots with too much information—and significantly more technical data—than they needed or could digest.”
Saint-Ex would have disagreed with some of Boeing’s philosophy.
St.-Exupery would have disagreed with this view. He wrote, also in Wind, Sand and Stars, that
The machine which at first blush seems a means of isolating man from the great problems of nature, actually plunges him more deeply into them. As for the peasant so for the pilot, dawn and twilight become events of consequence. His essential problems are set him by the mountain, the sea, the wind. Alone before the vast tribunal of the tempestuous sky, the pilot defends his mails and debates on terms of equality with those three elemental divinities.
In today’s terms, the cybernetic view of technology may, at first blush, seem a means of isolating the pilot from the essential problems of flight; it is easy to interpret envelope protection features this way. But at the same time, the capability view of technology amplifies human will, better enabling us to make something of our world. By exercising dominion through technology, we gain greater command over our environment… and thus we are plunged more deeply into those essential problems.
The deeper plunge into the essential problems of flight brings us, inevitably, to the problem of airmanship in an automated cockpit. When Staint-Exupery refers to the terms of equality on which we debate those three elemental divinities, he is referring specifically to the airmanship of his day. He began his approach to this question with an understanding of the mountains, the seas and the winds… the things which influence the sky, the great problems of nature into which the airman will shortly be plunged. He was interested in “all that happened in the sky,” things which signaled “the oncoming snow, the threat of fog, or the peace of a blessed night.”
We are still very interested in the threat of fog or oncoming snow. We are also very interested in windshear, convective available potential energy, lifted indexes, microbursts, outflow boundaries, ice crystal icing, collision coalescence freezing drizzle formation, and certainly turbulence, including mountain waves—pretty much anything that can ruin the peace of a blessed night.
To this we must add an understanding of the machine, an intuitive sense of its balance, its harmony, and its energy, a feel for how the machine leverages its precipitous position in the sky to resolve the problems of nature. To Saint-Exupery, the machine was the engine and flight controls all connected by stringers and spars and cables; today, we must include the complement of automation as part of the machine. For example, we must be constantly aware of pitch, power and vertical speed, while we also scrutinize Actual Navigation Performance (ANP) exactly as Saint-Exupery scrutinized the howl of the wind in the wires of his Breguet 14.
But in Saint-Exupery’s day, the idea of the pilot as a systems manager was unheard of, as was the contemporary suite of management school lexicon used to describe the systems manager. Terms such as discipline, professionalism, team skills, self-improvement, and skill acquisition were barely yet in anyone’s vocabulary. Nor were the now-classical superlatives, such as uncompromising, optimal, systematic and exceptional. Recent definitions of airmanship tend to include some or all of these terms; yet, in my opinion, all of them really beg the question. So what is airmanship really, and how does it work in an automated cockpit?
Let’s leave the management school semantics and centuries-old conceptual structures about discipline, obedience, and compliance behind for a while. All of these are tools we use to achieve the goal; they are not the goal. Rather, let’s begin by revisiting the words of FAR 91.1065(d):
For the purpose of this subpart, competent performance of a procedure or maneuver by a person to be used as a pilot requires that the pilot be the obvious master of the aircraft, with the successful outcome of the maneuver never in doubt.
Airmanship starts with the person in the left seat, no matter what the airplane.
The pilot, as the obvious master of the aircraft, forms the anchor of a definition of airmanship. This clearly refers to Saint-Exupery’s idea of the machine in the service of man. It also focuses responsibility and authority for the operation of the aircraft solely with the pilot, while placing distinct emphasis on knowledge and expertise. And yet, we have to be careful of the subsequent language, because the phrase “never in doubt” suggests the elimination of uncertainty, and that is a dangerous premise.
Looking back through early revisions and amendments to this regulatory language, it seems likely that the elimination of uncertainty was never really the intent; the language is always qualified with the words, “The applicant’s performance will be evaluated on the basis of judgment, knowledge, smoothness, and accuracy.” Indeed, the presence of the word judgment belies certainty; however, the problem is that an implicit expectation of certainty can create barriers to effective airmanship. For example, the successful outcome of a landing is always in doubt; this is the point of a no-fault go-around policy, which leverages the judgment and knowledge parts cited above.
Sadly, the expectation of certainty has a long history of coloring the understanding of mishaps. From the 1930s through the 1950s, the Civil Aeronautics Authority was so certain it understood what caused accidents that it published this axiom: “The capable and competent pilot will never allow an airplane to crack up.” Simple as that.
The paradox is that while we must have some degree of certainty that the flight will be successful—if it we didn’t, we would never fly—flight itself is inherently uncertain. While we cannot accept unmitigated specific risk (an unsafe condition with a probability of one), we have to be prepared to accept, and manage, the uncertainty associated with probabilistic risk (an unsafe condition based upon the averaged estimated probabilities of all unknown events). The interface between our own actions and the operating environment is the critical focal point. We can get into trouble if we assume that our own actions will assure the certainty of a successful maneuver.
The French philosopher Edgar Morin describes this paradox in what he calls the “ecology of action:”
As soon as a person begins any action whatsoever, the action starts to escape from his intentions. It enters into a sphere of interactions and is finally grasped by the environment in a way that may be contrary to the initial intention. So we have to follow the action and try to correct it if it is not too late, or sometimes shoot it down, like NASA exploding a rocket that has veered off course.
Ecology of action means taking into account the complexity it posits, meaning random incidents, chance, initiative, decision, the unexpected, the unforeseen, and awareness of deviations and transformations.
From this perspective, airmanship may be less about managing systems and quite a bit more about managing uncertainty. To some extent, this permeates our early flight training; we are warned by our mentors to “always have an out,” and we spent a lot of time looking for good fields to use in the event of a forced landing. As young pilots, we are impressionable and can easily envision a myriad of things going wrong, and as we strive to blend into the level of competence that we believe surrounds us, we prepare as thoroughly as we can. But as we develop an experience base, certainty seems more accessible. Indeed, one of the significant problems of modern aviation is that serious failures occur extremely rarely, and the uncertainty of our early flying days is replaced with an almost inevitable, and comfortable, complacence.
Morin goes on to discuss the use of strategy to manage uncertainty. He says that,
Strategy should prevail over program. A program sets up a sequence of actions to be executed without variation in a stable environment, but as soon as the outside conditions are modified, the program gets stuck. Whereas strategy elaborates a scenario of action based on an appraisal of the certainties and uncertainties, the probabilities and improbabilities of the situation. The scenario may and must be modified according to information gathered along the way and hazards, mishaps or good fortune encountered. We can use short term program sequences within our strategies. But for things done in an unstable, uncertain environment, strategy imposes.
A stabilized approach is not a program, it’s a strategy.
Probably the best definition of strategy that I have seen describes it as a “high level plan to achieve one or more goals under conditions of uncertainty,” a definition coined by Miryam Barad. This definition fits well with Morin’s concept. So what is an example of a strategy in the cockpit? The most compact example might be the stabilized approach concept. This can be achieved with or without automation, with or without a glass cockpit, and can be arrived at from a wide variety of descent profiles and lateral entries to the approach procedure. It can be achieved with or without a normal landing configuration, for example, in the case of a flap or slat failure. Nor does it necessarily lead to a smooth landing! Rather, it represents a high level plan to achieve a landing within the touchdown zone, on centerline and aligned with the runway, under conditions of some uncertainty, such as wind, braking action, pilot technique, even nominal fatigue.
A program, on the other hand, is manifested in profiles, litanies, callouts, checklists, and automated sequences. These have critical value as short term program sequences. But they themselves will not resolve instability or manage uncertainty.
Note that Morin is quite clear about the need to modify the scenario of action “according to information gathered.” The pilot must know exactly what he or she wants to do with the airplane, how the environment is likely to influence the plan, how the plan is evolving with the changing situation, and then how to utilize the all of the tools, including the short term program sequences inherent in the automation, to execute the plan.
With the strategy established, the application of Morin’s idea of the ecology of action is best considered through a short exploration of two concepts: prudence and mindfulness. These are common terms, and most of us assume that we know what they mean. In fact, both have very specific definitions, and in the case of prudence, a very long history.
In the fifth century, St. Augustine described prudence as “the knowledge of what to seek and what to avoid.” More specifically, in the seventh century, Isidore of Seville said that, “A prudent man is one who sees as it were from afar, for his sight is keen, and he foresees the event of uncertainties.”
But oddly enough, and at the risk of freewheeling completely off the rails of technical discussion, the best description of prudence that I have found was offered by St. Thomas Aquinas in his historically pivotal tome, the Summa Theologica, which he compiled during the thirteenth century. The word prudence derives from the Latin “providentia,” which means foresight. Thomas strengthened Isidore’s idea when he said that foresight “implies the notion of something distant, to which that which occurs in the present has to be directed.” He said that prudence is “right reason (what today we might call observed truth) applied to action.”
It turns out that St. Thomas’s ideas on prudence more or less make up the original foundation of what we consider as crew resource management. He describes three core elements:
Taking counsel, an act of inquiry, often seeking the opinion of others… first officers, flight attendants, dispatchers, mechanics, flight instructors, FSS briefers… lest something be overlooked. Thomas was quite clear on the assertion that a single person is often unable to capture all that matters to a given situation. Today, this speaks to the limits of human cognition within a dynamic environment.
Judging of what you have learned, an act of consideration, speculation, and for us, forming the opinions required by FAR Part 121, followed by an act of decision. Thomas splits this into two capacities: docility, the willingness to learn from others and decide accordingly, and shrewdness, the ability to draw accurate, “just-in-time” conclusions when there simply is no opportunity for extensive counsel or contemplation.
Executing command, the act of authority, in other words fulfilling the obligation bestowed on the pilot-in-command by FAR 91.3.
Thomas Aquinas, the first man to define CRM?
These three elements form the structure within which “that which occurs in the present” is directed toward “something distant.” If we listen carefully, we will hear these elements in the FAA’s explanation of FAR 91.1065, when they state that “The applicant’s performance will be evaluated on the basis of judgment, knowledge, smoothness, and accuracy (taking counsel, judging of what was learned, and executing command).” Remarkably, in the summer of 1901, Wilbur Wright reached back to these early discussions and penned what was probably the first description of prudence applied to air safety:
All who are practically concerned with aerial navigation agree that the safety of the operator is more important to successful experimentation than any other point. The history of past investigation demonstrates that greater prudence is needed rather than greater skill.
This brings us to an exploration of the more contemporary idea of mindfulness, “a rich awareness of discriminatory detail,” in the words of Karl Weick and Kathryn Sutcliffe. They elaborate on this by saying that being mindful means paying attention in a different way; it is to see more clearly, not to think harder and longer. You stop concentrating on those things that “confirm your hunches, are pleasant, feel certain, seem factual, are explicit, and that others agree on.” You start concentrating on things that “disconfirm, are unpleasant, feel uncertain, seem possible, are implicit, and are contested.” Mindfulness acknowledges the very same uncertainties which Isidore claimed a prudent man would foresee. This is the debate with Saint-Exupery’s elemental divinities.
Airmanship, in this context, can then be salted with more of Weick and Sutcliffe’s organizational ideas. First and foremost, the airman is preoccupied with failure, meaning what has already failed, what is failing at the moment, and what is likely to fail. The periodic twitch of a torquemeter, an unusual imbalance in generator load, a steady divergence between actual fuel burned and planned fuel burned, an unexpected collapse of the visibility, an unexpectedly long—or short—touchdown, an omitted checklist step, or certainly any number of unexpected automation behaviors… all of these things preoccupy the airman. What went wrong? Why did it go wrong? What does a particular failure mean? Is it a precursor?
Secondly, he or she is reluctant to simplify, despite seductive pressure to “eliminate everything unnecessary,” because simplification “obscures unwanted, unanticipated, unexplainable details and in doing so, increases the likelihood of unreliable performance.” This is certainly applicable to autoflight system function, but really to almost everything we do. There is no way to simplify the effects of airframe ice accretion, microbursts, or runway braking action, nor is there any simplification applicable to human behavior and error. Simplification invokes certainty, which flies straight into the face of the uncertainty which Isidore claimed prudence would anticipate. We cannot afford to obscure unwanted, unanticipated or unexplainable details.
Thirdly, the airman is sensitive to operations, a “watchfulness for moment-to-moment changes in conditions.” In this way, the airman “slows down the speed with which we call something ‘the same.’” The airman recognizes that today is not the same as yesterday, that the situation is ever changing, evolving, and uncertain. The same flight, in the same airplane, from the same gate is not the same today as it was yesterday. There are small differences which can have disproportional effects.
Lastly, the airman builds and maintains resilience, the quality of “recalibrating expectations, making sense of evolving uncertainties, and learning in real time.” To borrow from Weick’s writing on this, with some adaptation, a resilient cockpit works to keep errors small, improvises workarounds that preserve adherence to the strategy, and absorbs change while updating the strategy.
With the ideas of prudence and mindfulness front and center, let me turn to what I believe is the most important strategy implicit in good airmanship: the protection of the margins. Whether it be a forty five minute fuel reserve, 1.3 Vso, a 0.8% margin over net climb gradient, or a twenty mile berth around the downwind side of a thunderstorm, a core strategy of airmanship is the protection of the margins. The margins anticipate and buffer uncertainty. They provide space and time for any subordinate strategy to be modified. We cannot allow things of which we are already certain to erode the margins, lest the buffer against further uncertainty be lost.
Checklists and SOPs maintain safety margins and catch errors.
To that end, we land on the centerline for a reason: to preserve a seventy five foot margin of pavement on either side, to accommodate at least some of the threats that are “infinite in number, [and] cannot be grasped by reason,” like some combinations of hydroplaning and wind gusts, main gear trunnion fractures, airport snowplows wandering aimlessly around runways… in other words, the average estimated probabilities of all unknown events.
Further, we use standard operating procedures to track the centerline of the safe operating space, and to ensure that the procedural margins, and the error traps integrated within those margins, are available to function in the background. Standard operating procedures are themselves a strategy, a subset of the idea of protecting the margins; they are not a litany. They are intended to manage the ecology of action, and to track an action as it begins to deviate from our intention. This, too, is another way of looking at envelope protection, seen through the lens of the capability view; we gain greater control of our environment by using automation to ensure that critical aerodynamic margins are protected when hours and hours of sheer boredom lead to distraction or inattention, or are occasionally interrupted by brief moments of stark terror followed by a startle response.
These ideas largely inform both the old situational awareness, the aeronautical one, and the new situational awareness, the one aimed at automation. The thread that ties all of these ideas together is the acceptance of uncertainty. When Saint-Exupery uses terms like a debate with elemental divinities, or a tempestuous sky, he is describing uncertainty.
At this point, we can perhaps suggest a general definition of airmanship:
Airmanship is the application of both prudence and mindfulness so as to always remain the obvious master of the aircraft, and to construct, modify and execute the necessary strategies to ensure that the safe outcome of the flight is never manifestly in doubt, while always protecting the margins in anticipation of uncertainty.
If we see the operating environment only as a socio-mechanical construct, such as the National Airspace System, and thus teach only the cybernetic view of technology, we create a systems operator who is unprepared to debate on terms of equality with the mountain, the sea, and the wind, or, for that matter, with the central processing unit of the flight control computer. His terms have been dictated by the set parameters within a closed control loop, designed to trigger Morin’s “sequence of actions to be executed without variation in a stable environment.” The foresight is pre-programmed, trapped within the closed control loops, and limited to a narrow set of anticipated threats, or specific risks. This is antithetical to airmanship, because those parameters will eventually fall out of equality with the vast tribunal of a tempestuous sky.
The fundamental flaw in attempts to adapt the cybernetic view of technology to the problems of flight lies in the belief that we have expanded our knowledge to a point at which we have absolute, predictable, and repeatable control within a tempestuous sky. We don’t, and likely never will. An analog world will simply swat away a digital mindset.
If, on the other hand, we interpret automation through the capability view of technology, automation will always be subordinate to strategy, a machine in the service of man. Further, if we approach automation as capability, we are prepared for the degradation of that capability. Such degradation merely leads to modification of the strategy. Eventually, if need be, we will fly the approach by hand, using basic or even standby instruments, still remaining within the strategy of a stable approach.
Airmanship thus begins with strategy. Prudence facilitates an expectation that the action we have taken will begin to escape our intentions. A continuous loop of taking counsel, judging of what we have learned, and executing command, modifying the scenario “according to information gathered along the way and hazards, mishaps or good fortune encountered,” tracks the action and corrects its evolution, as it is grasped by the environment, so that the strategy is preserved, or, if necessary, modified, such as when we abandon the approach and go around. In this way, we remain the obvious master of the aircraft.
But human will cannot be amplified in ignorance. We need to recalibrate our automation training paradigm. We must begin with a discussion not of how the automation works, but of how we want to fly the airplane, what the essential problems of flight are, and then augment this broad discussion of strategy with the greater capabilities afforded through automation. Likewise, in all cases, we must emphasize how degraded automation impacts that capability within the original, overarching strategy. Finally, we must remain aware of uncertainty, and reference the training curriculum to the management of uncertainty. Memorizing “the litany” in isolation just won’t cut it, because the litany is a short term program, a closed control loop.
In the end, we can only preserve mastery of the aircraft if we understand airmanship as the management of uncertainty, not simply the management of systems. We must know how the airplane is constructed to achieve the design capabilities, and match this with a strategy for how we want the airplane to be flown to utilize those capabilities, and then insist that the autoflight systems fly our plan. When those systems don’t fly our plan, we need to step in and do some of that pilot stuff. The automation can never be allowed to become the master of the airplane, obvious or otherwise; in no case can it be allowed to place the successful outcome of any maneuver in any doubt whatsoever.
That is the essential nature of the conversation that I have with the autopilot.
The post On automation and airmanship appeared first on Air Facts Journal.
from Engineering Blog https://airfactsjournal.com/2020/08/on-automation-and-airmanship/
0 notes
Text
How to Make a Scalable SMS Chatbot Using Twilio, Python, and Google Sheets (with Free Code)
New Post has been published on https://tiptopreview.com/how-to-make-a-scalable-sms-chatbot-using-twilio-python-and-google-sheets-with-free-code/
How to Make a Scalable SMS Chatbot Using Twilio, Python, and Google Sheets (with Free Code)
Many of us are helping businesses that are facing hard times, or we’re facing hard times ourselves. If you’re working for a company (or client) that’s in trouble, the use of SMS chatbots could be a way for you to look outside your normal list of solutions and help them succeed in a completely different way. If you’re a marketer looking for work, adding this to your list of skills could mean you keep things ticking along while many of the usual doors are closed — or that you open new doors.
What you’ll get
In this post, I give you instructions and code to produce not just one, but a series of text-based chatbots that can be managed by Google Sheets.
The example here is set up to work with restaurants, but could be adapted to work with any business that needs to receive orders, check them against inventory/menus, and note them down to be fulfilled.
Once the system is set up, there will be no coding necessary to create a new SMS-based chatbot for a new business. Plus, that business will be able to manage key details (like incoming orders and a menu) by simply updating a Google Sheet, making all of this far more accessible than most other options.
But first, some context.
Some context
In September 2017, as one of my first big passion projects at Distilled, I wrote a Moz blog post telling people how to make a chatbot and giving away some example code.
This April, I got an email from a man named Alexandre Silvestre. Alex had launched “a non-profit effort to help the local small business owners navigate these challenging times, save as many jobs as possible, and continue to serve our community while helping to flatten the curve.”
This effort began by focusing on restaurants. Alex had found my 2017 post (holy moly, content marketing works!) and asked if I could help his team build a chatbot. We agreed on some basic requirements for the bot:
It had to work entirely within text message (and if the order was super complicated it had to be able to set up a call directly with the restaurant).
Running it had to be as close to free as possible.
Restaurants had to be able to check on orders, update menus, etc., without setting up special accounts.
The solution we agreed on had three parts:
Twilio (paid): supplies the phone number and handles most of the conversational back-and-forth.
Google Cloud Functions (semi-free): when a URL is called it runs code (including updating our database for the restaurant) and returns a response.
Google Sheets (free): our database platform. We have a sheet which lists all of the businesses using our chatbot, and linking off to the individual Google Sheets for each business.
I’ll take you through each of these components in turn and tell you how to work with them.
If you’re coming back to this post, or just need help with one area, feel free to jump to the specific part you’re interested in:
—Pricing
—Twilio
—Google Sheets
—Google Cloud Functions
—Test the bot
—Break things and have fun
—Postscript — weird hacks
Pricing
This should all run pretty cheaply — I’m talking like four cents an order.
Even so, always make sure that any pricing alerts are coming through to an email address you actively monitor.
When you’re just starting on this, or when you’ve made a change (like adding new functionality or new businesses), make sure you check back in on your credits over the next few weeks so you know what’s going on.
Twilio
Local Twilio phone numbers cost about $1.00 per month. It’ll cost about $0.0075 to send and receive texts, and Twilio Studio — which we use to do a lot of the “conversation” — costs $0.01 every time it’s activated (the first 1,000 every month are free).
So, assuming you have 2,500 text orders a month and each order takes about five text messages, it’s coming to about $100 a month in total.
Google Sheets
Google Sheets is free, and great. Long live Google Sheets.
Google Cloud Functions
Google shares full pricing details here, but the important things to know about are:
1. Promotional credits
You get a free trial which lasts up to a year, and it includes $300 of promotional credits, so it’ll spend that before it spends your money. We’d spent $0.00 (including promotional credits) at the end of a month of testing. That’s because there’s also a monthly free allowance.
2. Free allowance and pricing structure
Even aside from the free credits, Google gives a free allowance every month. If we assume that each order requires about 5 activations of our code and our code takes up to five seconds to run each time (which is a while but sometimes Google Sheets is sluggish), we could be getting up to over 400,000 orders per month before we dip into the promotional credits.
Twilio
Twilio is a paid platform that lets you buy a phone number and have that number automatically send certain responses based on input.
If you don’t want to read more about Twilio and just want the free Twilio chatbot flow, here it is.
Step 1: Buy a Twilio phone number
Once you’ve bought a phone number, you can receive texts to that number and they’ll be processed in your Twilio account. You can also send texts from that number.
Step 2: Find your phone number
You can see your list of purchased phone numbers by clicking the Twilio menu in the top left hand corner and then clicking “Phone Numbers”. Or, you can just go to phone-numbers/incoming.
Once you see your phone number listed, make a note of it.
Step 3: Create your Studio Flow
Studio is Twilio’s drag-and-drop editor that lets you create the structure of your conversation. A studio “flow” is just the name of a specific conversation you’ve constructed.
You can get to Twilio Studio by clicking on the Twilio menu again and clicking on “Studio” under “Runtime”.
Create a new flow by clicking “Create a flow”.
When you create a new flow, you’ll be given the option to start from scratch or use one of the built-in options to build your flow for you (although they won’t be as in-depth as the template I’m sharing here).
If you want to use a version of the flow which Alex and I built, select “Import from JSON” and click “Next”. Then, download this file and copy the contents into the box that comes up.
Make sure that it starts with a single brace, and ends with a single brace. The box that comes up will automatically have in it and if you don’t delete them before you paste, you’ll double-up and it won’t accept your input.
If all goes well, you’ll be presented with a flow that looks like this:
You might be asking: What in the name of all that is holy is that tangle of colored spaghetti?
That’s the Twilio Studio flow we created and, don’t worry, it basically splits up into a series of multiple-choice questions where the answer to each determines where you go next in the flow.
Everything on the canvas that you can see is a widget from the Twilio Studio widget library connected together with “if this, then that” type conditions.
The Studio Flow process
Before we go into specific blocks in the process, here’s an overview of what happens:
A customer messages one of our Twilio numbers
Based on the specific number messaged, we look up the restaurant associated with it. We then use the name and saved menu of the restaurant to message the customer.
If the customer tries to order off-menu, we connect a call to the restaurant
If the customer chooses something from our menu, we ask their name, then record their order in the sheet for that restaurant and tell them when to arrive to pick up their order
As/when the user messages to tell us they are outside the restaurant, we ask whether they are on-foot/a description of their vehicle. We record the vehicle description in the same restaurant sheet.
Let’s look at some example building blocks shall we?
Initial Trigger
The initial trigger appears right at the start of every flow, and splits the incoming contact based on whether it’s a text message, a phone call, or if code is accessing it.
“Incoming Message” means the contact was via text message. We only need to worry about that one for now, so let’s focus on the left-hand line.
Record the fact that we’re starting a new interaction
Next, we use a “Set Variables” block, which you can grab from the widget library.
The “Set Variables” block lets us save record information that we want to refer to later. For example, we start by just setting the “stage” of our interaction. We say that the stage is “start” as in, we are at the start of the interaction. Later on we’ll check what the value of stage is, both in Studio and in our external code, so that we know what to do, when.
Get our menu
We assume that if someone messaged us, triggering the chatbot, they are looking to order so the next stage is to work out what the applicable menu is.
Now, we could just write the menu out directly into Studio and say that whenever someone sends us a message, we respond with the same list of options. But that has a couple problems.
First, it would mean that if we want to set this up for multiple restaurants, we’d have to create a new flow for each.
The bigger issue is that restaurants often change their menus. If we want this to be something we can offer to lots of different restaurants, we don’t want to spend all our time manually updating Twilio every time a restaurant runs out of an ingredient.
So what we really need is for the restaurants to be able to list their own menus. This is where Google Sheets comes in, but we’ll get to that later. In Twilio, we just need to be able to ask for external information and forward that external information to the user. To do that we use a Webhook widget:
This widget makes a request to a URL, gets the response, and then lets us use the content of the response in our messages and flow.
If the request to the URL is successful, Twilio will automatically continue to our success step, otherwise we can set it to send an “Oops, something went wrong” response with the Fail option.
In this case, our Webhook will make a request to the Google Cloud functions URL (more on that later). The request we send will include some information about the user and what we need the code to do. The information will be in JSON format (the same format that we used to import the Twilio flow I shared above).
Our JSON will include the specific Twilio phone number that’s been messaged, and we’ll use that number to differentiate between restaurants, as well as the phone number that contacted us. It’ll also include the content of the text message we received and the “stage” we set earlier, so the code knows what the user is looking for.
Then the code will do some stuff (we’ll get to that later) and return information of its own. We can then tell Twilio to use parts of the response in messages.
Send a message in response
Next we can use the information we received to construct and send a message to the user. Twilio will remember the number you’re in a conversation with and it’ll send your messages to that number.
This is the “Send & Wait For Reply” widget, meaning that once this message is sent, Twilio will assume the conversation is still going rather than ending it there.
In this case, we’re writing our welcome message. We could write out just plain content, but we want to use some of the variables we got from our Webhook widget. We called that specific Webhook widget “get_options”, so we access the content we got from it by writing:
{{widgets.get_options
The response comes back in JSON, and fortunately Twilio automatically breaks that up for us.
We can access individual parts of the response by writing “parsed” and then the label we gave that information in our response. As it is, the response from the code looked something like this:
“name”: restaurant_name,
“dishes_string”: “You can choose from Margherita Pizza, Hawaiian Pizza, Vegetarian Pizza”
“additions”: “large, medium, small”
We get the available menu by writing “widgets.get_options.parsed.dishes_string”, and then we write the message below which will be sent to people who contact the bot:
Make a decision based on a message
We can’t assume everyone is going to use the bot in exactly the same way so we need to be able to change what we do based on certain conditions. The “Split Based On…” widget is how we select certain conditions and set what to do if they are met.
In this case, we use the content of the response to our previous message which we access using options_follow_up.inbound.Body. “Options_follow_up” is the name of the Send & Wait widget we just spoke about, “inbound” means the response and, “Body” means the text within it.
Then we set a condition. If the user responds with anything along the lines of “other”, “no”, “help”, etc., they’ll get sent off on another track to have a phone call. If they respond with anything not on that list, they might be trying to order, so we take their order and check it with our code:
Set up a call
If the user says they want something off-menu, we’ll need to set up a call with the restaurant. We do that by first calling the user:
Then, when they pick up, connecting that call to the restaurant number which we’ve already looked up in our sheets:
Step 4: Select your studio flow for this phone number
Follow the instructions in step two to get back to the specific listing for the phone number you bought. Then scroll to the bottom and select the Studio Flow you created.
Google Sheets
This chatbot uses two Google Sheets.
Free lookup sheet
The lookup sheet holds a list of Twilio phone numbers, the restaurant they have been assigned to, and the URL of the Google Sheet which holds the details for that restaurant, so that we know where to look for each.
You’ll need to create a copy of the sheet to use it. I’ve included a row in the sheet I shared, explaining each of the columns. Feel free to delete that when you know what you’re doing.
Free example restaurant sheet
The restaurant-specific sheet is where we include all of our information about the restaurant in a series of tabs. You’ll need to create a copy of the sheet to use it.
Orders
The orders tab is mainly used by our code. It will automatically write in the order time, customer name, customer phone number, and details of the order. By default it’ll write FALSE in the “PAID/READY?” column, which the restaurant will then need to update.
In the final stage, the script will add TRUE to the “CUSTOMER HERE?” column and give the car description in the “PICK UP INFO” column.
Wait time
This is a fairly simple tab, as it contains one cell where the restaurant writes in how long it’ll be before orders are ready. Our code will extract that and give it to Twilio to let customers know how long they’ll likely be waiting.
Available dishes and additions tabs
The restaurant lists the dishes that are available now along with simple adaptations to those dishes, then these menus are sent to customers when they contact the restaurant. When the code receives an order, it’ll also check that order against the list of dishes it sent to see if the customer is selecting one of the choices.
Script using sheet tab
You don’t need to touch this one at all — it’s just a precaution to avoid our code accidentally overwriting itself.
Imagine a situation where our code gets an order, finds the first empty row in the orders sheet, and writes that order down there. However, at the same time, someone else makes an order for the same restaurant, another instance of our code also looks for the first empty row, selects the same one, and they both write in it at the same time. We’d lose at least one order even though the code thinks everything is fine.
To try to avoid that, when our code starts to use the sheet, the first thing it does is change the “Script using sheet” value to TRUE and writes down when it starts using it. Then, when it’s done, it changes the value back to FALSE.
If our script goes to use the sheet and sees that “Script using sheet” is set to TRUE, it’ll wait until that value becomes FALSE and then write down the order.
How do I use the sheets?
Example restaurant sheet:
Make a copy of the example restaurant sheet.
Fill out all the details for your test restaurant.
Copy the URL of the sheet.
Lookup sheet:
Make a copy of the lookup sheet (you’ll only need to create one).
Don’t delete anything in the “extracted id” column but replace everything else.
Put your Twilio number in the first column.
Paste the URL of your test restaurant in the Business Sheet URL column.
Add your business’ phone number in the final column.
Sharing:
Find the “Service Account” email address (which I’ll direct you to in the Cloud Functions section).
Make sure that both sheets are shared with that email address having edit access.
Creating a new restaurant:
Any time you need to create a new restaurant, just make a copy of the restaurant sheet.
Make sure you tick “share with the same people” when you’re copying it.
Clear out the current details.
Paste the new Google Sheet URL in a new line of your lookup sheet.
When the code runs, it’ll open up the lookup sheet, use the Twilio phone number to find the specific sheet ID for that restaurant, go to that sheet, and return the menu.
Google Cloud Functions
Google Cloud Functions is a simple way to automatically run code online without having to set up servers or install a whole bunch of special programs somewhere to make sure your code is transferable.
If you don’t want to learn more about Google Cloud and just want code to run — here’s the free chatbot Python code.
What is the code doing?
Our code doesn’t try to handle any of the actual conversations, it just gets requests from Twilio — including details about the user and what stage they are at — and performs some simple functions.
Stage 1: “Start”
The code receives a message from Twilio including the Twilio number that was activated and the stage the user is at (start). Based on it being the “start” stage, the code activates the start function.
It looks up the specific restaurant sheet based on the Twilio number, then returns the menu for that restaurant.
It also sends Twilio things like the specific restaurant’s number and a condensed version of the menu and additions for us to check orders against.
Stage 2: “Chosen”
The code receives the stage the user is at (chosen) as well as their order message, the sheet ID for the restaurant, and the condensed menu (which it sent to Twilio before), so we don’t have to look those things up again.
Based on it being the “chosen” stage, the code activates the chosen function. It checks if the order matches our condensed menu. If they didn’t, it tells Twilio that the message doesn’t look like an order.
If the order does match our menu, it writes the order down in the first blank line. It also creates an order ID, which is a combination of the time and a portion of the user’s phone number.
It sends Twilio a message back saying if the order matched our menu and, if it did match our menu, what the order number is.
Stage 3: “Arrived”
The code receives the stage the user is at (arrived) and activates the arrived function. It also receives the message describing the user’s vehicle, the restaurant-specific sheet ID, and the order number, all of which it previously told Twilio.
It looks up the restaurant sheet, and finds the order ID that matches the one it was sent, then updates that row to show the user has arrived and the description of their car.
Twilio handles all the context
It might seem weird to you that every time the code finds some information (for instance, the sheet ID to look up) it sends that information to Twilio and requests it afresh later on. That’s because our code doesn’t know what’s going on at all, except for what Twilio tells it. Every time we activate our code, it starts exactly the same way so it has no way of knowing which user is texting Twilio, what stage they’re at, or even what restaurant we’re talking about.
Twilio remembers these things for the course of the interaction, so we use it to handle all of that stuff. Our code is a very simple “do-er” — it doesn’t “know” anything for more than about five seconds at a time.
How do I set up the code?
I don’t have time to describe how to use Google Cloud Functions in-depth, or how to code in Python, but the code I’ve shared above includes a fair number of notes explaining what’s going on, and I’ll talk you through the steps specific to this process.
Step 1: Set up
Make sure you:
Step 2: Create a new function
Go here and click “create a new function”. If you haven’t created a project before, you might need to do that first, and you can give the project whatever name you like.
Step 3: Set out the details for your function
The screen shot below gives you a lot of the details you need. I’d recommend you choose 256MB for memory — it should be enough. If you find you run into problems (or if you want to be more cautious from the start), then increase it to 512MB.
Make sure you select HTTP as the trigger and note down the URL it gives you (if you forget, you can always find the URL by going to the “Trigger” tab of the function).
Also make sure you tick the option to allow Unauthenticated Access (that way Twilio will be able to start the function).
Select “Inline editor” and paste in the Gist code I gave you (it’s heavily commented, I recommend giving it a read to make sure you’re happy with what it’s doing).
Click “REQUIREMENTS.TXT” and paste in the following lines of libraries you’ll need to use:
Make sure “function to execute” is SMS, then click the “Environment Variables” dropdown.
Just like I’ve done above, click “+ ADD VARIABLE”, write “spreadsheet_id” in the “Name” column, and in the “Value” column, paste in the ID of your lookup sheet. You get the ID by looking at the URL of the lookup sheet, and copying everything between the last two slashes (outlined in red below).
Click on the “Service account” drop down. It should come up with just “App Engine default service account” and give you an email address (as below) — that’s the email address you need all of your Google Sheets to be shared with. Write it down somewhere and add it as an edit user for both your lookup and restaurant-specific sheets.
Once you’ve done all of that, click “Deploy”.
Once you deploy, you should land back on the main screen for your Cloud Function. The green tick in the top left hand corner tells you everything is working.
Step 4: Turn on Sheets API
The first time your code tries to access Google Sheets, it might not be able to because you need to switch on the Google Sheets API for your account. Go here, select the project you’re working on with the dropdown menu in the top left corner, then click the big blue “ENABLE” button.
Step 5: Go back to Twilio and paste in the HTTP trigger for your code
Remember the trigger URL we noted down from when we were creating our function? Go back to your Twilio Studio and find all of the blocks with the </> sign in the top left corner:
Click on each in turn and paste your Google Cloud URL into the REQUEST URL box that comes up on the right side of the screen:
Test the bot
By now you should have your Cloud Function set up. You should also have both of your Google Sheets set up and shared with your Cloud Function service account.
The next step is to test the bot. Start by texting your Twilio number the word “order” to get it going. It should respond with a menu that your code pulls from your restaurant-specific Google Sheet. Follow the steps it sends you through to the end and check your Google Sheet to make sure it’s updating properly.
If for some reason it’s not working, there are two places you can check. Twilio keeps a log of all the errors it sees which you can find by clicking the little “Debugger” symbol in the top right corner:
Google also keeps a record of everything that happens with your Cloud Function. This includes non-error notifications. You can see all of that by clicking “VIEW LOGS” at the top:
Conclusion: break things and have fun
All of this is by no means perfect, and I’m sure there’s stuff you could add and improve, but this is a way of building a network of scalable chatbots, each specific to a different business, and each partially managed by that business at minimal cost.
Give this a try, break it, improve it, tear it up and start again, and let me know what you think!
Postscript: weird hacks
This bit is only really for people who are interested, but because we’ve deliberately done this on a shoestring, we run into a couple weird issues — mainly around requests to our bot when it hasn’t been activated for a bit.
When Twilio gets messages for the first time in a while, it turns on pretty quickly and expects other things to do so, too. For example, when Twilio makes requests to our code, it assumes that the code failed if it takes more than about five seconds. That’s not that unusual — a lot of chat platforms demand a five-second max turnaround time.
Cloud Functions are able to run pretty fast, even with lower memory allowances, but Google Sheets always seems to be a bit slow when accessed through the API. In fact, Google Sheets is particularly slow if it hasn’t been accessed in some time.
That can mean that, if no one has used your bot recently, Google Sheets API takes too long to respond the first time and Twilio gives up before our code can return, causing an error.
There are a couple parts of our script designed to avoid that.
Trying again
The first time we activate our Cloud Function, we don’t want it to actually change anything, we just want information. So in Twilio, we start by creating a variable called “retries” and setting the value as 0.
If the request fails, we check if the retries value is 0. If it is, then we set the retries value to 1 and try again. If it fails a second time, we don’t want to keep doing this forever so we send an error and stop there.
Waking the sheet up
The second time we activate our Cloud Function we do want it to do something. We can’t just do it again if it doesn’t return in time because we’ll end up with duplicate orders, which is a headache for the restaurant.
Instead, during an earlier part of the exchange, we make a pointless change to one of our sheets, just so that it’s ready for when we make the important change.
In our conversational flow we:
Send the menu
Get the response
Ask for the user’s name
Write the order
We don’t need to do anything to the sheet until step four, but after we get the user’s response (before we ask their name), we activate our code once to write something useless into the order sheet. We say to Twilio — whether that succeeds or fails — keep going with the interaction, because it doesn’t matter at that point whether we’ve returned in time. Then, hopefully, by the time we go to write in our order, Google Sheets is ready for some actual use.
There are limitations
Google Sheets is not the ideal database — it’s slow and could mean we miss the timeouts for Twilio. But these couple of extra steps help us work around some of those limitations.
Source link
0 notes
Text
Maiden Magic- The Original Horse Betting System - Maiden Horse Betting System- Maiden Magic!
https://www.reviewape.com/?p=9119
Maiden Magic- The Original Horse Betting System - Maiden Horse Betting System- Maiden Magic! - Product Name: Maiden Magic- The Original Horse Betting System – Maiden Horse Betting System- Maiden Magic! Click here to get Maiden Magic- The Original Horse Betting System – Maiden Horse Betting System- Maiden Magic! at discounted price while it’s still available… All orders are protected by SSL encryption – the highest industry standard for online security from trusted vendors. Maiden Magic- The Original Horse Betting System – Maiden Horse Betting System- Maiden Magic! is backed with a 60 Day No Questions Asked Money Back Guarantee. If within the first 60 days of receipt you are not satisfied with Wake Up Lean™, you can request a refund by sending an email to the address given inside the product and we will immediately refund your entire purchase price, with no questions asked. (function ($) { var $self = $('.adace-loader-5c30728aa9163'); var $wrapper = $self.closest('.adace-slot-wrapper'); "use strict"; var adace_load_5c30728aa9163 = function(){ var viewport = $(window).width(); var tabletStart = 601; var landscapeStart = 801; var tabletEnd = 961; var content = ''; var unpack = true; if(viewport=tabletStart && viewport=landscapeStart && viewport=tabletStart && viewport=tabletEnd){ if ($wrapper.hasClass('.adace-hide-on-desktop')){ $wrapper.remove(); } } if(unpack) { $self.replaceWith(decodeURIComponent(content)); } } if($wrapper.css('visibility') === 'visible' ) { adace_load_5c30728aa9163(); } else { //fire when visible. var refreshIntervalId = setInterval(function(){ if($wrapper.css('visibility') === 'visible' ) { adace_load_5c30728aa9163(); clearInterval(refreshIntervalId); } }, 999); } })(jQuery); Description: How many times have you nailed 2 races of the pick 3 only to lose the third one because it was an unpredictable maiden race? Or how many times have you aced 4 races in the Pick 6, only to lose the two that were maiden races? Frustrating huh? Nothing could be more disheartening. Well that all is about to change now! From the dawn of maiden racing, several myths have plagued the best of players and are still firm beliefs today. It has become common to see bettors shrug at the sight of these races and refuse to play them or even worse- take a blind stab in the dark! No one likes to be in such a vulnerable position, especially with money on the line! ” Wow! I never knew how easy it could be to spot maiden selections! I can’t tell you how many times I’ve walked away frustrated from the track, but with your system, the maidens no longer baffle me! Thanks guys, I owe you.” Mark W- Beaumont, Texas Let’s take a look at these myths and discredit them, so you never have to fall prey to what keeps average players from becoming pro handicappers. Myth #1- Maiden races are too hard to handicap because the horses are just too unpredictable. Wrong! Maiden races are easy to pick because maidens have an addedincentive to win. They don’t want to remain maidens forever, so thetrainers pull out all the stops in preparing for a maiden race. This a major factor that most people don’t even consider, but knowing this puts you well above the curve! Myth #2- Maiden races are difficult because the horses are too “green” to handicap. Hogwash! Being green and unpredictable is what makes the maiden race so simple to handicap. When these horses are so new to the game, the amount of variables that would be considered in any other race are considerably lower in a maiden race. This makes your job as a handicapper much easier! You only need to know what to look for… Myth #3- It is just too hard to get a handle on which horse has the “class” in the race. Horse hockey! It is easy to spot the class of the race and it is not always the horse that has finished in the money last out, either. A simple process points out the class with ease… Myth #4- Some maiden races are filled with a host of first time starters. Impossible to choose with no past performances to look at. Bullwinkle! The works are the answer here, but we will show you which works to look for and exactly what to look for in a workout. We guarantee you you have not heard about this one before! Myth #5- Some races are filled with nags that couldn’t outrun my grandmother with a full bladder. Can’t get a winner out of these. Wrong again. These races sometimes produce boxcar payoffs, and we will tell you how to maximize your chances and go to the payoff windows! So how can you cut through these myths and put to work a winning horse betting system that includes maiden selections? With a bit of magic, of course! The Maiden Magic horse betting system was designed to increase your win percentages and unlock the myths and heartaches behind maiden races. By implementing these simple techniques, maidens no longer have to be the thorn in your handicapping side! No longer are you forced to make a blind selection on a crucial maiden race, only to realize you are practically spitting in the wind! Maiden Magic takes you by the hand, shows you exactly what you need to know and will increase your win percentage in any maiden race you bet. Look, handicapping a maiden race is not rocket science, contrary to popular belief. Like any other race, maiden races have many of the same variables any other race has. Each horse has their own unique, tell-tale signs that can give you the leverage to unraveling one of the greatest mysteries in the horse racing sport. The key is knowing what to look for, when to implement it and how to capitalize on it. Through the Maiden Magic method, these key factors will leap out at you, grab you by the collar and say… “Now’s the Time to Make Your Move From Small Time Bettor to Professional Handicapper!” Maiden Magic is truly the original maiden horse betting system in that it covers the wide range of factors in determining a maiden winner, not through one system, but through a total of 5! As mentioned earlier, there are 5 major myths surrounding these races and with Maiden Magic, we cover all of them in great detail. Furthermore, we take these 5 situations and give you an exact blueprint on how to know which angle to use and when to use it! No other maiden betting system lays it all out there for you like Maiden Magic! ” Honestly, I’ve never cared much for the maidens. I’ve always felt that understanding the complexities behind these races was beyond my grasp, at least until this system came along! The videos were a tremendous help and picking a winner is a cinch! “ Becky H- Bastrop, Texas Besides having these 5 systems to choose from, Maiden Magic lays out an over-simplified strategy to determining which system to use in the appropriate scenario. You’ll never look at maiden races the same again after Maiden Magic… 5 Maiden Horse Betting Systems All Rolled Into One. An in-depth explaination of every system, how they work, how to spot them and how to know which one to use. From novice player to professional handicapper, this instant, downloadable PDF file holds nothing back. With right at 40 pages of content, Maiden Magic makes it simple for anyone to learn at any level. In-depth Video Tutorials. At over 80 minutes of “take you by the hand and show you how” videos, these horse racing video tutorials are an excellent companion to the Maiden Magic guide. No stone is left unturned and you’ll have a front row seat to learn at your own pace . Access to our Maiden Magic Stopwatch software. With this simple to use software we take the headaches out of handicapping so you can focus more on finding the contenders! We’ve also included a “How-To” video that makes using this tool all too simple! Instant Updates, Upgrades and Special Membership Offers to Maiden Magic. Our system doesn’t stop at teaching alone. Be in the know by becoming a Maiden Magic Member, included for free just for buying Maiden Magic today! ” I’ve tried a lot of horse racing systems in my years playing the ponies, but this one over-delivers. Keep up the good work- my bankroll appreciates it! “ David N- Hot Springs, Arkansas Waiting could be a very costly mistake…Not only because you will lose the opportunity to own Maiden Magic, but because you might check back and find that the price has went up… Honestly, we cannot guarantee the price won’t change at ANY time…Maiden Magic is a system that works, hands down. However, because racing odds determine everyone’s payouts, we cannot run the risk of over-exposing this system and creating an odds’ backlash. Massive payouts missed because the system has become a trend wouldn’t be fair to us or the buyers of this manual. I know you understand. A complete A-Z Handicapper’s Horse Racing Dictionary. With over 50 pages of horse racing jargon, betting terms and slang this is a must have reference book for the novice to mid-range handicapper looking to improve their knowledge of all things horse racing! As this sport grows, so will our dictionary and you’ll have access to instant updates as a Maiden Magic member. Yours absolutely free for your purchase of Maiden Magic. Disclaimer: Every effort has been made to accurately represent Maiden Magic and it’s potential. The testimonials and examples used are exceptional results, and don’t apply to the average purchaser and are not intended to represent or guarantee that anyone will achieve the same or similar results. Each individual’s success depends on his or her background, dedication, desire, motivation and adaptability. As with any business endeavor, there is an inherent risk of loss of capital and there is no guarantee that you will earn any money, especially if you were looking for a get-rich-quick scheme with a magical push-button. ClickBank is a registered trademark of Keynetics Inc., a Delaware corporation. Maiden Magic is not affiliated with Keynetics Inc. in any way, nor does Keynetics Inc. sponsor or approve any Maiden Magic product. Keynetics Inc. expresses no opinion as to the correctness of any of the statements made by Maiden Magic in the materials on this Web page or within the product itself or its bonuses. Terms of Use | Disclaimer | Privacy Policy | Contact Us | Legal | Affiliates Copyright 2009 All Rights Reserved Maiden Magic, the Original Maiden Horse Betting System. Click here to get Maiden Magic- The Original Horse Betting System – Maiden Horse Betting System- Maiden Magic! at discounted price while it’s still available… All orders are protected by SSL encryption – the highest industry standard for online security from trusted vendors. Maiden Magic- The Original Horse Betting System – Maiden Horse Betting System- Maiden Magic! is backed with a 60 Day No Questions Asked Money Back Guarantee. If within the first 60 days of receipt you are not satisfied with Wake Up Lean™, you can request a refund by sending an email to the address given inside the product and we will immediately refund your entire purchase price, with no questions asked. - ReviewApe - https://www.reviewape.com/?p=9119
0 notes
Text
9 SMARTER Approaches to USE EXCEL FOR ENGINEERING

As an engineer, you’re possibly making use of Excel almost day by day. It does not matter what trade you are in; Excel is implemented Everywhere in engineering.
Excel is often a large system which has a whole lot of superb probable, but how do you know if you’re working with it to its fullest capabilities? These 9 recommendations will help you begin to obtain essentially the most from Excel for engineering.
one. Convert Units without any External Equipment
If you’re like me, you most likely job with numerous units day by day. It’s one particular within the amazing annoyances on the engineering daily life. But, it’s end up being substantially significantly less annoying due to a perform in Excel that may do the grunt perform for you: CONVERT. It is syntax is:
Would like to study a lot more about advanced Excel procedures? View my free of cost coaching only for engineers. During the three-part video series I will show you methods to resolve complicated engineering difficulties in Excel. Click here to have started off.
CONVERT(variety, from_unit, to_unit)
The place number may be the value that you wish to convert, from_unit stands out as the unit of quantity, and to_unit could be the resulting unit you would like to acquire.
Now, you’ll no longer really need to head to outdoors tools to locate conversion things, or tricky code the factors into your spreadsheets to trigger confusion later. Just let the CONVERT function do the job for you personally.
You will discover a finish list of base units that Excel recognizes as “from_unit” and “to_unit” here (warning: not all units are available in earlier versions of Excel), but you can also make use of the function a number of occasions to convert even more complicated units which might be prevalent in engineering.
2. Use Named Ranges to make Formulas Much easier to understand
Engineering is tough ample, without the need of attempting to figure out what an equation like (G15+$C$4)/F9-H2 indicates. To get rid of the pain related with Excel cell references, use Named Ranges to make variables that you can use in the formulas.
Not only do they make it easier to enter formulas into a spreadsheet, however they make it Easier to comprehend the formulas whenever you or somebody else opens the spreadsheet weeks, months, or years later.
You can get a few other ways to produce Named Ranges, but these two are my favorites:
For “one-off” variables, select the cell that you simply just want to assign a variable identify to, then style the identify of the variable from the title box inside the upper left corner with the window (under the ribbon) as proven over.
In case you want to assign variables to numerous names at after, and have previously integrated the variable title inside a column or row next on the cell containing the value, do this: Initial, choose the cells containing the names and also the cells you need to assign the names. Then navigate to Formulas>Defined Names>Create from Assortment. If you want to master more, you can read through all about making named ranges from choices here.
Do you want to learn much more about state-of-the-art Excel tactics? View my zero cost, three-part video series just for engineers. In it I’ll show you the right way to resolve a complex engineering challenge in Excel using some of these methods and much more. Click right here to obtain begun.
3. Update Charts Automatically with Dynamic Titles, Axes, and Labels
To create it simple and easy to update chart titles, axis titles, and labels you are able to website link them right to cells. In case you demand to create lots of charts, this could be a true time-saver and could also potentially make it easier to avoid an error when you forget to update a chart title.
To update a chart title, axis, or label, 1st create the text that you simply desire to include inside a single cell about the worksheet. You could make use of the CONCATENATE perform to assemble text strings and numeric cell values into complicated titles.
Upcoming, pick the element for the chart. Then head to the formula bar and form “=” and choose the cell containing the text you want to use.
Now, the chart element will immediately when the cell worth changes. You can get inventive here and pull all sorts of material in to the chart, with no owning to be concerned about painstaking chart updates later on. It is all accomplished automatically!
4. Hit the Target with Goal Look for
Normally, we create spreadsheets to calculate a result from a series of input values. But what if you have accomplished this in the spreadsheet and would like to know what input worth will gain a preferred end result?
You could rearrange the equations and make the previous result the brand new input plus the old input the brand new outcome. You can also just guess at the input until you obtain the target outcome.
Fortunately however, neither of people are needed, because Excel has a instrument named Intention Seek to accomplish the perform for you.
Initially, open the Target Seek tool: Data>Forecast>What-If Analysis>Goal Seek.
While in the Input for “Set Cell:”, pick the outcome cell for which you understand the target. In “To Worth:”, enter the target worth.
Ultimately, in “By changing cell:” pick the single input you'd probably like to modify to alter the end result. Pick Ok, and Excel iterates to uncover the right input to accomplish the target.
5. Reference Data Tables in Calculations
One particular of the matters which makes Excel a great engineering instrument is the fact that it can be capable of handling both equations and tables of data. So you can mix these two functionalities to make powerful engineering versions by on the lookout up data from tables and pulling it into calculations.
You’re quite possibly previously familiar using the lookup functions VLOOKUP and HLOOKUP. In lots of cases, they could do anything you will need.
But, should you require alot more versatility and higher manage over your lookups use INDEX and MATCH instead. These two functions let you lookup information in any column or row of the table (not only the 1st a single), and you can handle no matter whether the value returned is the next greatest or smallest.
You may also use INDEX and MATCH to carry out linear interpolation on a set of data. This really is accomplished by taking advantage of the versatility of this lookup solution to discover the x- and y-values immediately prior to and following the target x-value.
6. Accurately Fit Equations to Data
A second way for you to use current information in the calculation is always to match an equation to that information and utilize the equation to determine the y-value to get a provided worth of x.
Most people understand how to extract an equation from data by plotting it on a scatter chart and including a trendline. That’s Ok for acquiring a quick and dirty equation, or recognize what type of function best fits the data.
Yet, when you want to use that equation inside your spreadsheet, you will have to have to enter it manually. This can outcome in mistakes from typos or forgetting to update the equation once the information is modified.
A much better strategy to get the equation is always to make use of the LINEST function. It is an array function that returns the coefficients (m and b) that define the very best match line by a information set. Its syntax is:
LINEST(known_y’s, [known_x’s], [const], [stats])
Exactly where:
known_y’s is the array of y-values in your data,
known_x’s is definitely the array of x-values,
const is known as a logical worth that tells Excel if to force the y-intercept to become equal to zero, and
stats specifies regardless of whether to return regression statistics, this kind of as R-squared, etc.
LINEST might be expanded beyond linear information sets to carry out nonlinear regression on data that fits polynomial, exponential, logarithmic and energy functions. It could possibly even be made use of for various linear regression likewise.
7. Save Time with User-Defined Functions
Excel has a lot of built-in functions at your disposal by default. But, if you should are like me, you'll find several calculations you end up engaging in repeatedly that really don't have a unique function in Excel.
These are perfect circumstances to produce a User Defined Perform (UDF) in Excel by using Visual Fundamental for Applications, or VBA, the built-in programming language for Office products.
Really do not be intimidated if you read “programming”, though. I’m NOT a programmer by trade, but I use VBA all the time to expand Excel’s capabilities and conserve myself time.
When you choose to learn about to create Consumer Defined Functions and unlock the tremendous potential of Excel with VBA, click here to read through about how I developed a UDF from scratch to calculate bending tension.
8. Execute Calculus Operations
As you think of Excel, you might not think “calculus”. But if you've got tables of information you are able to use numerical evaluation approaches to calculate the derivative or integral of that information.
These same primary solutions are utilized by a great deal more complicated engineering software to perform these operations, and so they are uncomplicated to duplicate in Excel.
To determine derivatives, you possibly can make use of the either forward, backward, or central distinctions. Every of those systems utilizes information in the table to calculate dy/dx, the sole variations are which information points are utilised for the calculation.
For forward differences, make use of the data at level n and n+1
For backward distinctions, use the data at points n and n-1
For central distinctions, use n-1 and n+1, as proven below
In the event you will need to integrate data inside a spreadsheet, the trapezoidal rule will work well. This approach calculates the location beneath the curve among xn and xn+1. If yn and yn+1 are several values, the area types a trapezoid, consequently the name.
9. Troubleshoot Bad Spreadsheets with Excel’s Auditing Tools
Every engineer has inherited a “broken” spreadsheet. If it is from a co-worker, you may continually request them to fix it and send it back. But what if the spreadsheet comes from your boss, or worse still, someone that is no longer with the corporation?
Typically, this may be a true nightmare, but Excel offers some equipment which will help you to straighten a misbehaving spreadsheet. Every single of those resources are usually found in the Formulas tab of the ribbon, within the Formula Auditing part:
While you can see, you'll find some different tools right here. I’ll cover two of them.
Very first, you possibly can use Trace Dependents to locate the inputs for the chosen cell. This will assist you to track down the place all the input values are coming from, if it is not obvious.
Numerous instances, this can lead you towards the supply of the error all by itself. When you are done, click clear away arrows to clean the arrows from the spreadsheet.
You can even utilize the Assess Formula instrument to determine the end result of the cell - one particular phase at a time. This is useful for all formulas, but in particular for all those that have logic functions or a large number of nested functions:
ten. BONUS TIP: Use Data Validation to stop Spreadsheet Errors
Here’s a bonus tip that ties in together with the last one particular. (Anyone who gets ahold of one's spreadsheet while in the long term will value it!) If you’re building an engineering model in Excel so you observe that there's a chance for that spreadsheet to make an error due to an improper input, you could limit the inputs to a cell by utilizing Information Validation.
Allowable inputs are:
Full numbers higher or less than a number or involving two numbers
Decimals greater or less than a quantity or in between two numbers
Values in a list
Dates
Instances
Text of the Specified Length
An Input that Meets a Customized Formula
Information Validation could be discovered underneath Data>Data Tools within the ribbon.
http://blogz.soup.io/post/661810486/9-Smarter-Methods-to-use-Excel-for
0 notes
Text
9 SMARTER Solutions to USE EXCEL FOR ENGINEERING

As an engineer, you are almost certainly making use of Excel essentially day by day. It does not matter what field that you are in; Excel is put to use All over the place in engineering.
Excel is usually a enormous plan that has a good deal of amazing potential, but how do you know if you’re making use of it to its fullest abilities? These 9 strategies will help you start to get just about the most out of Excel for engineering.
one. Convert Units not having External Tools
If you are like me, you probably operate with distinct units day-to-day. It is a single from the fantastic annoyances of the engineering life. But, it’s turned out to be very much less irritating due to a perform in Excel that may do the grunt get the job done for you: CONVERT. It’s syntax is:
Wish to master all the more about sophisticated Excel tactics? Observe my no cost education only for engineers. During the three-part video series I will show you easy methods to remedy complex engineering problems in Excel. Click right here to get began.
CONVERT(variety, from_unit, to_unit)
Wherever number will be the worth that you simply just want to convert, from_unit is the unit of quantity, and to_unit stands out as the resulting unit you want to get.
Now, you’ll no longer have to go to outdoors equipment to discover conversion elements, or challenging code the components into your spreadsheets to trigger confusion later. Just let the CONVERT perform do the perform to suit your needs.
You’ll discover a finish list of base units that Excel recognizes as “from_unit” and “to_unit” right here (warning: not all units are available in earlier versions of Excel), but you may also make use of the function a number of occasions to convert much more complex units that happen to be frequent in engineering.
2. Use Named Ranges to produce Formulas Less difficult to know
Engineering is challenging adequate, with out attempting to determine what an equation like (G15+$C$4)/F9-H2 implies. To eradicate the ache linked with Excel cell references, use Named Ranges to make variables that you simply can use inside your formulas.
Not merely do they make it easier to enter formulas into a spreadsheet, however they make it Much easier to know the formulas once you or someone else opens the spreadsheet weeks, months, or many years later.
One can find some other ways to produce Named Ranges, but these two are my favorites:
For “one-off” variables, pick the cell you prefer to assign a variable title to, then sort the title of your variable within the identify box in the upper left corner of the window (beneath the ribbon) as shown above.
If you prefer to assign variables to a number of names at after, and also have by now included the variable name inside a column or row subsequent to the cell containing the worth, do this: To begin with, choose the cells containing the names along with the cells you need to assign the names. Then navigate to Formulas>Defined Names>Create from Variety. Should you choose to find out a great deal more, you could read all about establishing named ranges from selections here.
Would you like to understand even more about innovative Excel techniques? Watch my cost-free, three-part video series only for engineers. In it I’ll show you ways to solve a complicated engineering challenge in Excel employing a few of these procedures and much more. Click right here to obtain started out.
3. Update Charts Automatically with Dynamic Titles, Axes, and Labels
To produce it very easy to update chart titles, axis titles, and labels you possibly can link them immediately to cells. If you should will need to generate a whole lot of charts, this can be a genuine time-saver and could also possibly enable you to keep clear of an error after you forget to update a chart title.
To update a chart title, axis, or label, 1st create the text that you just choose to consist of inside a single cell for the worksheet. You can utilize the CONCATENATE function to assemble text strings and numeric cell values into complicated titles.
Up coming, choose the part within the chart. Then head to the formula bar and sort “=” and choose the cell containing the text you wish to implement.
Now, the chart part will automatically once the cell value changes. You may get inventive here and pull all sorts of details into the chart, not having owning to stress about painstaking chart updates later. It’s all accomplished instantly!
four. Hit the Target with Aim Seek out
In most cases, we set up spreadsheets to determine a result from a series of input values. But what if you’ve completed this within a spreadsheet and like to know what input value will realize a wanted result?
You might rearrange the equations and make the previous outcome the brand new input along with the outdated input the new end result. You may also just guess on the input until you achieve the target outcome.
Luckily even though, neither of people are essential, considering that Excel features a tool called Objective Seek to perform the job for you.
Primary, open the Goal Seek out instrument: Data>Forecast>What-If Analysis>Goal Look for.
From the Input for “Set Cell:”, pick the consequence cell for which you recognize the target. In “To Worth:”, enter the target value.
Eventually, in “By altering cell:” decide on the single input you'd want to modify to alter the consequence. Pick Ok, and Excel iterates to uncover the right input to attain the target.
five. Reference Data Tables in Calculations
A single in the issues that makes Excel an awesome engineering device is the fact that it can be capable of dealing with both equations and tables of information. And you can combine these two functionalities to create robust engineering versions by looking up data from tables and pulling it into calculations.
You’re very likely presently familiar using the lookup functions VLOOKUP and HLOOKUP. In lots of cases, they are able to do almost everything you may need.
Then again, in the event you need extra versatility and better manage in excess of your lookups use INDEX and MATCH instead. These two functions allow you to lookup information in any column or row of a table (not just the 1st 1), and you can manage no matter if the value returned would be the following greatest or smallest.
You can even use INDEX and MATCH to carry out linear interpolation on a set of information. This can be executed by taking advantage of your versatility of this lookup method to discover the x- and y-values without delay just before and after the target x-value.
6. Accurately Fit Equations to Information
Yet another approach to use existing information in the calculation will be to fit an equation to that information and utilize the equation to find out the y-value to get a offered value of x.
Some people know how to extract an equation from information by plotting it on a scatter chart and incorporating a trendline. That’s Okay for having a swift and dirty equation, or appreciate what kind of perform top fits the data.
Then again, if you happen to desire to use that equation inside your spreadsheet, you’ll have to enter it manually. This could consequence in errors from typos or forgetting to update the equation once the data is altered.
A much better strategy to get the equation is to make use of the LINEST function. It’s an array perform that returns the coefficients (m and b) that define one of the best match line via a information set. Its syntax is:
LINEST(known_y’s, [known_x’s], [const], [stats])
In which:
known_y’s is definitely the array of y-values with your information,
known_x’s will be the array of x-values,
const is actually a logical value that tells Excel regardless if to force the y-intercept to be equal to zero, and
stats specifies if to return regression statistics, such as R-squared, and so forth.
LINEST will be expanded past linear information sets to perform nonlinear regression on information that fits polynomial, exponential, logarithmic and electrical power functions. It could possibly even be utilised for many different linear regression also.
seven. Conserve Time with User-Defined Functions
Excel has a lot of built-in functions at your disposal by default. But, if you happen to are like me, you will find quite a few calculations you end up accomplishing repeatedly that really do not have a particular function in Excel.
These are great circumstances to create a Consumer Defined Perform (UDF) in Excel employing Visual Essential for Applications, or VBA, the built-in programming language for Office solutions.
Don’t be intimidated once you read “programming”, though. I’m NOT a programmer by trade, but I use VBA all the time to broaden Excel’s abilities and save myself time.
If you happen to would like to know to create Consumer Defined Functions and unlock the enormous probable of Excel with VBA, click here to go through about how I made a UDF from scratch to calculate bending worry.
8. Carry out Calculus Operations
If you imagine of Excel, you may not suppose “calculus”. But if you will have tables of information you can use numerical evaluation systems to calculate the derivative or integral of that information.
These very same essential solutions are used by even more complicated engineering program to carry out these operations, and they are simple and easy to duplicate in Excel.
To calculate derivatives, you possibly can utilize the either forward, backward, or central variations. Each and every of those techniques makes use of data from the table to determine dy/dx, the sole distinctions are which information points are used for your calculation.
For forward variations, make use of the information at level n and n+1
For backward differences, make use of the information at points n and n-1
For central distinctions, use n-1 and n+1, as proven under
Should you will need to integrate information within a spreadsheet, the trapezoidal rule functions nicely. This process calculates the place under the curve amongst xn and xn+1. If yn and yn+1 are numerous values, the spot varieties a trapezoid, therefore the name.
9. Troubleshoot Undesirable Spreadsheets with Excel’s Auditing Equipment
Each engineer has inherited a “broken” spreadsheet. If it’s from a co-worker, you are able to generally ask them to repair it and send it back. But what should the spreadsheet comes from your boss, or worse nevertheless, someone that is no longer with the corporation?
Often, this may be a real nightmare, but Excel features some equipment that could allow you to straighten a misbehaving spreadsheet. Each of these equipment may be present in the Formulas tab in the ribbon, from the Formula Auditing segment:
When you can see, you can get some various equipment right here. I’ll cover two of them.
Initially, you can actually use Trace Dependents to locate the inputs for the selected cell. This may help you to track down the place all the input values are coming from, if it is not obvious.
A number of occasions, this may lead you towards the source of the error all by itself. Once you are finished, click remove arrows to clean the arrows from the spreadsheet.
You can also use the Evaluate Formula instrument to calculate the result of the cell - one stage at a time. That is valuable for all formulas, but in particular for anyone that consist of logic functions or countless nested functions:
10. BONUS TIP: Use Information Validation to stop Spreadsheet Mistakes
Here’s a bonus tip that ties in together with the final a single. (Any one who will get ahold of the spreadsheet while in the long term will appreciate it!) If you are establishing an engineering model in Excel and also you recognize that there's an opportunity for that spreadsheet to generate an error due to an improper input, you can actually restrict the inputs to a cell by utilizing Data Validation.
Allowable inputs are:
Complete numbers greater or less than a variety or between two numbers
Decimals higher or lower than a quantity or among two numbers
Values inside a list
Dates
Times
Text of a Certain Length
An Input that Meets a Custom Formula
Data Validation is often observed beneath Data>Data Equipment while in the ribbon.
http://blogg66.soup.io/post/659699393/9-Smarter-Ways-to-use-Excel-for
0 notes
Text
9 SMARTER Techniques to USE EXCEL FOR ENGINEERING

As an engineer, you are very likely making use of Excel just about every single day. It does not matter what market you are in; Excel is employed Everywhere in engineering.
Excel can be a huge program using a great deal of great probable, but how do you know if you’re using it to its fullest abilities? These 9 points can help you begin to acquire one of the most from Excel for engineering.
one. Convert Units without External Resources
If you’re like me, you most likely job with distinct units everyday. It’s 1 of your excellent annoyances of the engineering lifestyle. But, it is develop into a lot less annoying due to a function in Excel which will do the grunt deliver the results to suit your needs: CONVERT. It is syntax is:
Desire to learn a lot more about state-of-the-art Excel approaches? Watch my totally free coaching only for engineers. While in the three-part video series I will show you the right way to solve complex engineering issues in Excel. Click right here to acquire started.
CONVERT(amount, from_unit, to_unit)
In which variety stands out as the worth you desire to convert, from_unit would be the unit of number, and to_unit will be the resulting unit you'd like to obtain.
Now, you’ll no longer must head to outside tools to search out conversion factors, or tough code the components into your spreadsheets to bring about confusion later on. Just let the CONVERT perform do the get the job done for you.
You will discover a complete checklist of base units that Excel recognizes as “from_unit” and “to_unit” right here (warning: not all units are available in earlier versions of Excel), but you may also utilize the perform many times to convert alot more complicated units which might be common in engineering.
two. Use Named Ranges to make Formulas Easier to comprehend
Engineering is difficult enough, not having attempting to figure out what an equation like (G15+$C$4)/F9-H2 suggests. To eradicate the pain related with Excel cell references, use Named Ranges to make variables that you just can use as part of your formulas.
Not only do they make it much easier to enter formulas right into a spreadsheet, however they make it Much easier to know the formulas as you or someone else opens the spreadsheet weeks, months, or years later.
You will discover one or two different ways to produce Named Ranges, but these two are my favorites:
For “one-off” variables, select the cell that you just would like to assign a variable title to, then form the name with the variable in the name box within the upper left corner from the window (beneath the ribbon) as shown above.
If you like to assign variables to a number of names at after, and also have presently integrated the variable name inside a column or row up coming to the cell containing the value, do that: Very first, choose the cells containing the names along with the cells you wish to assign the names. Then navigate to Formulas>Defined Names>Create from Choice. Should you just want to learn about more, you can read through all about establishing named ranges from choices right here.
Do you want to find out much more about superior Excel techniques? Observe my free, three-part video series just for engineers. In it I’ll explain to you the right way to fix a complicated engineering challenge in Excel applying some of these approaches and much more. Click here to obtain commenced.
3. Update Charts Instantly with Dynamic Titles, Axes, and Labels
To create it simple to update chart titles, axis titles, and labels you may hyperlink them straight to cells. Should you demand to generate quite a lot of charts, this may be a true time-saver and could also probably enable you to steer clear of an error as soon as you fail to remember to update a chart title.
To update a chart title, axis, or label, initially develop the text which you would like to include within a single cell to the worksheet. You're able to utilize the CONCATENATE function to assemble text strings and numeric cell values into complex titles.
Following, select the element about the chart. Then head to the formula bar and sort “=” and decide on the cell containing the text you need to implement.
Now, the chart part will immediately when the cell worth alterations. You will get innovative here and pull all sorts of knowledge to the chart, without any owning to get worried about painstaking chart updates later. It is all completed automatically!
4. Hit the Target with Target Seek out
Commonly, we set up spreadsheets to determine a end result from a series of input values. But what if you have accomplished this inside a spreadsheet and prefer to understand what input worth will reach a desired outcome?
You might rearrange the equations and make the previous result the brand new input as well as the previous input the brand new result. You might also just guess at the input right up until you gain the target result.
Luckily even though, neither of these are critical, due to the fact Excel has a instrument referred to as Aim Look for to complete the get the job done for you personally.
First, open the Goal Look for device: Data>Forecast>What-If Analysis>Goal Seek out.
During the Input for “Set Cell:”, pick the result cell for which you realize the target. In “To Worth:”, enter the target worth.
Lastly, in “By shifting cell:” select the single input you'd probably wish to modify to change the end result. Select Okay, and Excel iterates to locate the correct input to attain the target.
5. Reference Information Tables in Calculations
One particular in the things which makes Excel an excellent engineering device is it really is capable of managing both equations and tables of information. So you can mix these two functionalities to make impressive engineering versions by searching up data from tables and pulling it into calculations.
You are perhaps presently acquainted together with the lookup functions VLOOKUP and HLOOKUP. In lots of situations, they could do everything you require.
Yet, in case you have alot more flexibility and higher manage more than your lookups use INDEX and MATCH as a substitute. These two functions allow you to lookup information in any column or row of a table (not just the primary one), so you can control regardless if the value returned certainly is the following biggest or smallest.
You can also use INDEX and MATCH to complete linear interpolation on the set of information. This really is accomplished by taking benefit of your versatility of this lookup method to locate the x- and y-values at once just before and following the target x-value.
six. Accurately Fit Equations to Information
Yet another method to use current information in the calculation is usually to match an equation to that data and use the equation to find out the y-value to get a provided value of x.
Many people understand how to extract an equation from information by plotting it on a scatter chart and adding a trendline. That’s Okay for getting a swift and dirty equation, or fully grasp what kind of function most effective fits the information.
On the other hand, in case you like to use that equation with your spreadsheet, you will want to enter it manually. This may consequence in mistakes from typos or forgetting to update the equation once the data is transformed.
A better approach to get the equation will be to use the LINEST function. It is an array perform that returns the coefficients (m and b) that define the very best fit line through a data set. Its syntax is:
LINEST(known_y’s, [known_x’s], [const], [stats])
The place:
known_y’s is definitely the array of y-values in the data,
known_x’s is definitely the array of x-values,
const is often a logical worth that tells Excel regardless if to force the y-intercept to be equal to zero, and
stats specifies regardless of whether to return regression statistics, such as R-squared, and so on.
LINEST are usually expanded beyond linear data sets to complete nonlinear regression on data that fits polynomial, exponential, logarithmic and electrical power functions. It may possibly even be implemented for multiple linear regression also.
seven. Conserve Time with User-Defined Functions
Excel has many built-in functions at your disposal by default. But, if you should are like me, you will discover countless calculations you finish up accomplishing repeatedly that don’t have a precise perform in Excel.
They are ideal predicaments to produce a User Defined Perform (UDF) in Excel utilising Visual Primary for Applications, or VBA, the built-in programming language for Workplace products.
Really don't be intimidated after you study “programming”, even though. I’m NOT a programmer by trade, but I use VBA on a regular basis to expand Excel’s capabilities and conserve myself time.
Should you like to find out to make User Defined Functions and unlock the huge possible of Excel with VBA, click right here to read about how I made a UDF from scratch to determine bending worry.
8. Complete Calculus Operations
Once you think of Excel, you may not suppose “calculus”. But if you may have tables of information you could use numerical evaluation tactics to calculate the derivative or integral of that data.
These similar basic systems are utilized by far more complex engineering program to execute these operations, and they are painless to duplicate in Excel.
To calculate derivatives, you possibly can utilize the either forward, backward, or central variations. Just about every of those ways makes use of data from your table to calculate dy/dx, the only differences are which information points are applied for that calculation.
For forward variations, use the information at point n and n+1
For backward distinctions, utilize the information at factors n and n-1
For central differences, use n-1 and n+1, as shown below
If you ever have to have to integrate information in the spreadsheet, the trapezoidal rule operates very well. This approach calculates the place under the curve in between xn and xn+1. If yn and yn+1 are unique values, the region types a trapezoid, therefore the title.
9. Troubleshoot Poor Spreadsheets with Excel’s Auditing Resources
Every single engineer has inherited a “broken” spreadsheet. If it’s from a co-worker, you're able to always ask them to repair it and send it back. But what when the spreadsheet comes from your boss, or worse but, somebody who is no longer using the provider?
In some cases, this can be a serious nightmare, but Excel features some equipment which could allow you to straighten a misbehaving spreadsheet. Each of those tools could very well be found in the Formulas tab with the ribbon, during the Formula Auditing part:
When you can see, there are several completely different equipment here. I’ll cover two of them.
Initial, you can actually use Trace Dependents to locate the inputs towards the selected cell. This may enable you to track down where each of the input values are coming from, if it is not clear.
Several times, this may lead you for the source of the error all by itself. When you are done, click clear away arrows to clean the arrows from your spreadsheet.
You can even make use of the Assess Formula instrument to determine the end result of a cell - 1 step at a time. This really is useful for all formulas, but particularly for all those that consist of logic functions or many nested functions:
ten. BONUS TIP: Use Data Validation to prevent Spreadsheet Errors
Here’s a bonus tip that ties in with all the last one particular. (Any person who will get ahold of one's spreadsheet during the future will enjoy it!) If you’re setting up an engineering model in Excel and you recognize that there's a chance for that spreadsheet to create an error thanks to an improper input, you are able to restrict the inputs to a cell by utilizing Data Validation.
Allowable inputs are:
Whole numbers higher or under a number or between two numbers
Decimals greater or less than a amount or involving two numbers
Values within a checklist
Dates
Instances
Text of a Specified Length
An Input that Meets a Custom Formula
Data Validation can be noticed underneath Data>Data Equipment inside the ribbon.
http://rickithrill1990.soup.io/post/659075558/9-Smarter-Tips-on-how-to-use
0 notes
Text
Azon Funnels Review and huge bonus
Azon Funnels Is A new way to offer Amazon.com products best inside FB carrier by creating affiliate stores that're 100% unique to key phrases that visitors type in the conversation!
Official site: http://www.socialleadfreak.com/azon-funnels-review/
I mentioned this in the previous couple of ideas yet I wish to see to it you understand that each web link inside one of your posts is an additional chance for a site visitor to click through as well as make their means into Amazon.com.
It's common for me to connect to Amazon.com 5 to ten times in a solitary article (even more if I'm doing an item testimonial).

5. Item Testimonial Articles Convert The Very Best
Doing a high quality item review for a product directly pertaining to your specific niche is a very simple way to amass higher click thru prices and also boosted sales, however just if your review is better.
Ideally you call the producer's advertising team or PR agency and also get them to send you a demo device of the item to examine, however this takes a great deal of initiative as well as might not deserve it on a smaller sized web traffic website (initially).
You intend to encourage the visitor to examine their purchase alternatives by the time they complete reading a write-up, which is why I'll always consist of links to all the items pointed out in an evaluation at the end of the article. By doing this it's a simple shift from learning about the item during your review and after that at the end it's time making an acquisition.
Example: See this USB Missile Launcher on Amazon.com
6. Develop An Email List
You've possibly heard this a hundred times by individuals telling you to construct an email checklist from the blog writer as well as internet marketing crowd, yet building an e-mail listing is way simpler on a physical product drivened website.
Why? People do not have their guard up when they are researching a physical product to purchase (when compared to various other purchase decisions online i.e. digital products). So what I like to do is supply some sort of free offer like a customers overview or some kind of info that gives even more details about the products they're looking into.
On the other hand, I 'd like for you to join my email list for this blog yet I need to be a little a lot more convincing by showing you that I'm a credible source initially. (Already encouraged? Join here;D).
For my e-newsletter Azon Funnels Review supplier I use Aweber and highly suggest them. Overall I can connect at least 5 to 10 percent of my overall income due to my e-mail listings because I prefer to concentrate on promoting products heavily to my listings during the vacations which leads into my following idea.
7. Create Sales And Also Promos During The Holidays.
I normally made between $500 as well as $1,000 a day every day throughout Black Friday Week, Cyber Monday as well as Cyber Week. It is reduced throughout various other vacations like Mom's Day, Papa's Day, Presidents Day, Valentines Day and so on however you could still promote numerous sales during these holidays as well. I target every vacation since Amazon.com develops an actual specialized sales web page every single time among these vacations come around. The deals shared on these web pages are normally really good also.
So just what I'll do is put together a post of all the leading products that are on sale in my specific niche using the ideas I've shared earlier like linking as often times as feasible, making the item picture clickable and after that sending out an e-mail to my listing etc. to obtain even more conversions.
Stats From A "Cyber Monday (My Niche) Price Cuts" Post Last Year.
11. Develop Your Amazon.com Build-A-Link Book Marking as well as Web Link.
This will certainly make it easy to build the relate to your affiliate ID constructed in. Visit to Associates Central, search in the left navigation sidebar, go to Build-A-Link, and also under Fixed Hyperlinks, discover Individual Things. Click and drag this into your Links toolbar or Faves food selection.
12. Develop Your Initial Web Link.
Most likely to Amazon and log in with your Associates account. Discover the item you intend to evaluate and also use the Site Stripe (grey red stripe on top of the display that you'll see when logged in as an Associate) to obtain your tailored connect to the item. They also use a variety of various other alternatives for creating web links and banners.
13. Blog site Your Review.
Currently click on your article link (Press It! by default in WordPress). If you're making use of WordPress, you should now see two pieces of link code in your posting form, the first one ending with "Associates Build-A-Link >". Remove via that point. The second component is a connect to the item with your Amazon.com Partner ID constructed in. Currently simply create your product testimonial, pick the suitable groups for it, and also struck Publish.
14. Construct Out Your Amazon.com Associate Website.
Prior to you promote your site, you intend to have some substantial content there. Create numerous item testimonials. Have at the very least 2-3 in each group you have actually produced. You may additionally intend to make groups for posts, news, and also discourse about your topic. The even more content your Azon Funnels Review site has, the better. And the fantastic point is that while you're writing all this, the search engines are obtaining notified automatically, presuming you turned on the notifications discussed symphonious 6.
15. Advertise Your Amazon.com Associate Site.
The best complimentary way to do this is to communicate with other bloggers covering comparable subjects and to participate in on the internet areas where your topic is gone over. See the Online Organisation Networking category for suggestions, as well as the Web marketing group.
Perk Tips for Earning Money Online as an Amazon Associate:.
You need to learn some standard HTML as well as standard concepts concerning running a web site. It's just not that tough. If you need to depend on acquired software application, you will not be able to obtain precisely just what you want, you won't understand exactly what to do when points fail, and you'll wind up spending cash you don't need to. Spend the time to discover it. It will certainly be well worth the financial investment.
I a little advise music over publications as well as various other products, primarily due to the fact that you can pay attention to the clips of a whole cd in about 10 mins and also obtain a good enough feeling for it (without getting it) to do a short evaluation. If you have another topic that you're passionate about, fantastic, however see to it you have an unique angle on the topic. Individuals could get testimonials regarding a great deal of those consumer items anywhere. You should give them a reason to concern your site.
( A few of that website traffic pop is also credited to the day I mail out to my e-mail lists though).
For the structure of these short articles I like to target an often looked key words such as "Cyber Monday (My Particular Niche) Discount rates" etc. because I recognize individuals look for "Cyber Monday" and "Black Friday" countless times every year yet they additionally search a longer type version like "Cyber Monday (My Specific Niche) Price cuts" as confirmed by the above traffic chart from among my Amazon websites.
8. Determine which specific niche you want to go into based upon Amazon.com's affiliate payout portion.
Amazon utilized to have a variable charge structure where you would make more loan if you referred extra sales to Amazon. They would certainly start at 4% and also you can make approximately 8.5% of a sale if you referred enough products. Amazon.com got rid of their variable fee structure in early 2017 and also changed that system with a fixed portion payment based on the group of products. Some particular niches pay a lot much less than others as well as it is essential to be familiar with the payment before you choose a niche:.
Note: These overalls are exact since June 2018 but could alter in the future. To see approximately day information look in your Amazon Associates website.
9. Use Several Tracking ID's For Each Web site.
You would not mount the very same Google Analytics code on each and every single website you have right? Of course not, due to the fact that you would not be able to tell what does it cost? traffic each of your sites were receiving separately. So the same point could be said for tracking the money you make on your Azon Funnels web sites (and yet individuals still inform me they use only one Amazon monitoring ID for all their web sites/ facepalm). In the, past I have actually gone so far regarding produce 15 different monitoring ID's for usage on a single web site.
By default Amazon designates you one monitoring ID like blahblahblah-20 but you can produce added tracking ID's right here.
10. Usage EasyAzon To Conserve Time And Also Make More Loan With Amazon.com.
One of the means I've likewise been able to make great money with Amazon is to automatically occupy info from a WordPress plugin that I had actually developed based on the demands I had for constructing Amazon centric sites. The result was EasyAzon. The plugin enables you to insert information and also associate connect to Amazon in a much faster method than creating the links on your own manually from Amazon.
Short Summary: Generally what the plugin does is enable you to swiftly place a text based affiliate web link, the image of the product as an associate link, a product information grid, transform United States Amazon links to UK, GR and so on using web link localization and so on etc. and have all those things be associate links to Amazon so it does a terrific job of improving click through rates.
The plugin is presently just $47 and readily available at EasyAzon.com.
11. Put Acquire Currently Button Into Your Articles.
This is something that EasyAzon might do for you, however if you do not want to spend the cash you can merely put your own buy currently button as well as transform it right into an Amazon associate link.
12. Produce An Item Comparison Grid.
Creating an item contrast grid for all of the products within your particular niche and also allowing individuals to kind by different functions is a fantastic means to obtain some additional sales. I have actually utilized this method on several of my web sites and also the item contrast web page alone could add an additional 5% to 10% earnings boost for a site.
If you do it by hand you'll need to use this WordPress plugin called WP Table Reloaded as well as exactly what I do is include different columns for info about the product and in the last column I utilize a buy currently button that individuals could click to see more details concerning the item.
To grab some additional cents, register for Google AdSense. It most likely will not produce a lot of revenue, yet it's complimentary to sign up and completely uncomplicated to maintain.
Establish reasonable expectations for revenues. You've just invested $20. You're going to make 5% on many items. That means that you have to offer $400 worth of stuff to make back your financial investment. To earn $20 a hr, what you write must generate $400 worth of acquisitions. You obtain credit score for various other acquisitions customers you send make while at Amazon.com besides simply the item you linked to, so it's not as tough as it might seem. It won't make you abundant, however it's not difficult to be profitable, and also it constructs in time.
In the end, you have to release the item to earn it live on your on-line shop.
After publishing the item, you can check it on your web site.
Similarly, you could include even more products to your on the internet store and gain excellent compensations by advertising them.
To conclude ultimately, we would just wish to point some minute Azon Funnels details you should pay heed while including and publishing affiliate items from Amazon.com.
Points to take care while promoting Amazon.com associate products:.
Pick an eCommerce maximized style. This will help you to vary from an average e-store. We would recommend you to use eCommerce optimized themes like Wooshop as well as eCommerce.
Constantly select products which have excellent testimonials from present clients.
Always provide a correct item description. This assists the users to earn a quick judgment and also get the enlisted item.
Setup your site with the necessary plugins. Your web site must load fast and also provide a fantastic reaction to the user.
Do check your Amazon affiliate web link while advertising items. If you miss out on the associate tag, any type of items bought will not be counted in your associate control panel.
Categorizing the items helps your individual to discover them quickly. It also helps in better conversion prices. Do give proper tags and appoint a pertinent group.
Think us, establishing an eCommerce store is not that difficult. The WooCommerce plugin has actually made it feasible for any person to configuration their on-line store. In the end, that doesn't want to make money!
13. Publish A Continual Bargains Blog Post.
If you want to discover a means to be able to mention items that are on sale much more regularly on your web site one of the simplest methods I've done that in the past is to just do a regular deals blog post. So what I'll do is publish a post every week with the very best offers for my niche and after that integrate all the previous techniques I've talked about over to link to the items on Amazon.com. Depending on exactly how commonly you release short articles you could do it essentially regularly (I have actually seen some websites do these style of articles daily).
14. Release A Regular Monthly Bestseller Listing.
Amazon has a bestseller web page located just at Amazon/ bestsellers and so one point I've done on my website is release a bestsellers listing as well as simply discuss the presently trending bestsellers. Typically talking the cream rises to the top so if you compose a write-up talking about the bestselling items those are likely to be the very best products your visitors are planning to get anyway.
Simply go to Amazon/ bestsellers and try to find your corresponding specific niche classification. I strive top 5 or leading 10 items.
Tags: Azon Funnels, Azon Funnels Review, AzonFunnels, AzonFunnels Review, Azon Funnels Bonus, Azon Funnels OTO, Azon Funnels Reviews, Azon Funnels Bonuses, AzonFunnels Review and bonus, Azon Funnels Reviews And Bonuses
0 notes
Text
Three essentials for effective Inventory management
Your business is on a roll. Your sales figures are on an uptrend, the customer count is growing steadily, and the profit seems to be good. Everything seems to be perfect until that point when you try to analyze how individual items in your inventory performed.
This is where you’ll discover the flaws in your business. Maybe the stock count does not tally with the sales figures, or you can’t tell which variant of a particular product performed the best. Or one of your regular customers is displeased to know that you’re out of stock of her favorite item and it will take another seven days to reorder it.
Can these issues be avoided? Well, a more reliable and disciplined stock management approach always helps. This article focuses on some simple tips you can follow for more efficient inventory management.
1. Identify your items
Giving each stock item a unique identifier is very important for effective inventory management. In supply chain management, this unique identifier is known as an SKU (Stock Keeping Unit).
The two prime reasons for assigning a unique identity to your items are to track the movement of each product and to analyze each item separately. As your list of items grows, it becomes more and more difficult to differentiate amongst them just by name or description. Moreover, if you sell items in various colors or sizes or similar items obtained from different suppliers, it is essential to identify each unique variation. Here’s an example of how you can assign SKUs for the items in your stock:
Here you can see that the SKU includes each aspect of the product. It’s organized using a ‘trickle-down effect,’ moving from the broadest information to the most specific details:
It is pretty clear that SKUs make it very easy to understand which item someone is referring to just by looking at the code. This system is even more effective when it’s paired with inventory management software. Most inventory software, such as Zoho Inventory, allows the user to bundle two or more items and sell them together as a separate product on the market. You can create a new SKU for the bundled or composite item and track it, while still monitoring the constituent items separately based on their individual SKUs.
If you maintain stock in an inventory management system, there are two important rules to follow while deciding on SKU for your items:
i) KISS (Keep It Simple, Stupid)
Keep your SKUs as simple as possible. Each member of your team should be able to quickly look at an SKU and recognize the information in it. For instance, if you source items from multiple vendors, including the initials of the vendor in the SKU will make it easy to spot how many items were purchased from each vendor.
ii) Use alphanumeric codes
Special characters can make your codes confusing and difficult to remember. Use letters and numbers to represent your products’ attributes and avoid special characters like #, *, or |.
2. Keep enough stock on hand
An out-of-stock situation is a nightmare for any business, and it can arise due to poor inventory planning or a lack of inventory control measures. As your business grows, it becomes more and more important to implement controls to reduce the occurrence of out-of-stock situations. But where do you start? Here are a couple of simple formulas to help you get your stock management on track.
i) Reorder point
A reorder point acts as a trigger for your business — when the stock level for a particular item reaches the reorder point, it means that it’s time to order more items from your vendor. You can determine the reorder point based on your sales trends and lead times. If your inventory consists of many items, you should calculate and set a reorder point for each item.
So, how does a reorder point help?
a) It helps you avoid out-of-stock situations
Out-of-stock situations happen when a seller fails to pay attention to the stock levels and doesn’t place an order until it’s too late. Setting a reorder point means that the seller is always notified when it’s the right time to reorder.
b) It helps you avoid overstocking
Ordering items before you need to can lead to overstocking, which can also be hazardous for your business. Overstocking eats up a lot of your storage space and a lot of your funds. A reorder point helps you strike a balance by buying items at just the right time. This saves you storage space and money, both of which are limited resources for small businesses.
c) It helps you retain customers
If your customers notice that their favorite items are always available in your store, they’ll be more likely to continue ordering from you. Keeping your existing customers happy through good stock management is much less expensive than acquiring new customers
ii) Safety stock formula
Safety stock acts as an extra layer of padding for your inventory so you can absorb sudden shocks. If there’s a delay in your supply or an unexpected surge in demand, you can dip into your safety stock instead of losing sales.
Suppose that, for example, your bestselling item reached its reorder point three days ago. You promptly reordered it, but now you’ve been informed that there’s a delay on the supplier’s end and your items won’t arrive for another week. Under normal circumstances, you’d get new stock in plenty of time, but now you could lose up to a week’s worth of sales while you wait for the delayed shipment. This is where safety stock comes into play. By calculating your safety stock ahead of time and factoring it into your reorder point, you’ve ensured that you still have some stock to sell during the delay.
To calculate the right amount of safety stock, you need to consider your average demand, the variability of your demand, and your lead time. Here’s a tiny glimpse at how it works: Safety stock formula e-book
3. Review what you have
It’s been some time since you started your business. You have named your items and implemented your control measures, and now it’s time to move on to the next step: stocktaking.
Stocktaking is a significant part of stock management. After a certain amount of time, usually a year, you need to tally your physical stock and compare it to your inventory records. Although it sounds painful and time-consuming to sit down and count the stock manually, it is important and worthwhile. Stocktaking helps you to reconcile the stock record in your inventory management software with the actual shelf count. It helps you to identify any discrepancies and take corrective actions.
Here are answers to a few of the questions you may be asking about your next stocktaking process:
i) What to count?
Only count items that you currently own and that have been recorded in your inventory system. You might have items in your store or warehouse that have already been purchased and invoiced but haven’t shipped out yet. Or you might have a new consignment of items that have arrived in your warehouse but not yet been entered in your inventory system. In the first case, since the sale has already been made, the goods now belong to the buyer. Your inventory system isn’t counting them as part of your stock, so counting them in your stocktaking will lead to misleading numbers. In the second case, if the items have not been recorded in the system but are included in the physical counting, there will obviously be a mismatch. So it is very important to separate those items from the rest before you start counting your stock.
ii) Where to begin?
Creating a map of your store helps a lot. If you have stocked items in different areas of the store based on their type or quantity, you’ll be able to predict which section will be most time-consuming to count. That will help you allot the most experienced staff to cover those areas so that they can be completed quickly and accurately.
iii) How to value stock?
After you have reviewed your stock, you need to figure out how much it’s worth. A lot of managers make the mistake of valuing their stock based on the price they paid when purchasing it. But to get a more accurate and reliable figure, the valuation should be based on the current market price.
How is stocktaking good for your business?
a) It helps you review your stock management practices
Even if all of your records tally, stocktaking raises some important questions that you should probably be considering. Have I been stocking too much? Should I recalculate my reorder point? Or should I move my warehouse to a bigger property?
b) It helps you spot broken items and take measures to mitigate them
If you deal with fragile or perishable items, then stocktaking can be very useful for discovering how many items have been broken or spoilt while in storage. If the rate of breakage and spoilage is high, then it is vital to revisit the way you stock items in your warehouse or store.
c) It helps you plan your next course of action
Stocktaking may reveal trends that go unnoticed during regular business days. For instance, it can show that you were able to sell very few units of a particular item and now you are left with a huge overstock. To clear this stock, you can bundle the slow-selling item with a fast-selling product and offer the bundle to your customer at a discount. You’ll also know to be more cautious in the future while ordering additional units of that product.
Putting it into practice
So, we’ve covered some simple tips which can help you get started with stock management. Use SKUs to keep track of every item in your inventory, use control measures to avoid running out of stock or overstocking, and use some basic preparations to make your stocktaking more efficient. If you follow these steps, you can streamline a lot of your inventory and order management activities. Inventory management software such as Zoho Inventory can also be very helpful in making your stock management more effective. Inventory management software helps you avoid duplicate entries while selecting the SKUs for your items, gives you automatic reminders when your items reach their reorder levels, and uses barcoding to save you a lot of time during stocktaking. With good inventory software and these simple stock strategies, your business will be ready for success.
from Zoho Blog https://ift.tt/2rwycat
via IFTTT
0 notes
Text
An Introduction to Google Tag Manager
Posted by Angela_Petteys
Digital marketing thrives on data. No matter what type of site you have, whether it’s a large e-commerce site, a personal website, or a site for a small business, it’s essential to understand how people interact with your site. Google Analytics can provide a lot of the important insights you’re looking for, but when used alone, it does have its limitations. But by tagging your site and using Google Tag Manager in conjunction with Google Analytics, you’re able to collect much more data than you can otherwise.
Tags are snippets of code which are added to a site to collect information and send it to third parties. You can use tags for all sorts of purposes, including scroll tracking, monitoring form submissions, conducting surveys, generating heat maps, remarketing, or tracking how people arrive at your site. They’re also used to monitor specific events like file downloads, clicks on certain links, or items being removed from a shopping cart.
Sites commonly use several different tags and the amount of code needed to create them all can be pretty overwhelming, especially if you’re trying to add or edit tags by going directly into the site’s source code. Google Tag Manager is a tool with a user-friendly, web-based interface that simplifies the process of working with tags. With GTM, you’re able to add, edit, and disable tags without having to touch the source code.
While GTM is, obviously, a Google product, it’s hardly limited to just working with tags for other Google services like AdWords or Analytics. You can use it to manage many different third-party tags, including Twitter, Bing Ads, Crazy Egg, and Hotjar, just to name a few. If there’s another tag which doesn’t have a template in GTM, you can add your own custom code. There are only a few types of tags GTM doesn’t work well with.
The pros and cons of GTMLessens reliance on web devs
By far, the biggest benefit to Google Tag Manager is that it makes it easier for marketers to implement tags without having to rely on web developers to do it for them. Developers are usually busy with other high-priority projects, so tagging often ends up on the back burner. But since Google Tag Manager helps you avoid touching the source code, marketers can quickly add and make changes to tags on their own. This is a big advantage if, for example, you only need to use a tag to collect data for a very brief amount of time. Without GTM, there’s a good chance that it would take longer for the tag to be added than it would actually be live for.
Still requires some technical implementation
Although GTM helps reduce the reliance on developers, it doesn’t completely eliminate it. You’ll still need someone to add the container code to each page of your site. And while GTM has plenty of tag templates to choose from which are easy enough for a non-developer to work with, more complex customized tags will likely require the help of someone who really understands coding. If you have existing tags that were manually added to your site’s source code, those will need to be removed first so that you don’t end up with duplicate data.
Most businesses can benefit from using it
Businesses of any size can potentially benefit from GTM. Since GTM makes it so much easier to add and edit tags without a developer, it’s great for smaller businesses that might have limited access to technical support. And since sites for enterprise-level businesses can easily use dozens of tags, GTM makes it easier to manage them all and improves site speed by helping them load more efficiently.
Tags can slow down site speed if fired synchronously
One issue with traditional tracking tags is that if they fire synchronously, they can slow down site speeds. When tags fire synchronously, one tag being slow to load slows down all the other tags that are waiting on it. And the longer a site takes to load, the more likely it is that people will leave without converting. But tags created in GTM load asynchronously by default, meaning each tag can fire anytime it’s ready to. If you need to control the order in which your tags are fired, there is tag sequencing and firing priority functionality to let you do that.
Can be used for AMP sites and mobile apps, as well
You’re not even limited to just using GTM with standard websites. GTM can also be used to manage tags for AMP sites and mobile apps. In the case of mobile apps, GTM can be a huge help since it lets you add and edit your tags without having to issue an updated version of your app, which users might not be quick to actually download. In some respects, using GTM for AMP sites or mobile apps is pretty similar to using it for a regular website, but they do have their differences. In this guide, we’re going to focus on using GTM for web.
Components of tags & GTM
On the surface, tags and tag managers are pretty straightforward. But before you can start working with them, there are a few main concepts you’ll need to know about.
Containers
When you start working with GTM, the first thing you’ll need to do is create a container. A container essentially “holds” all the tags for your site.
After creating a new container, GTM gives you some code to add to your site. This is your container code and it will need to be added to the source code so it displays on each page of your site. Some CMSes, such as WordPress, have plugins to help add the container code for you, but you may need to contact your web developer to have it added. Once you’ve done that, you’ll be able to add, edit, disable, or remove your tags as needed through GTM.
Triggers
Each tag on a site needs to serve a specific purpose. Maybe you want to have a tag send information when someone downloads a file, when an outbound link is clicked, or when a form is submitted. These sorts of events are known as triggers and all tags need to have at least one trigger assigned to it; otherwise, it’s not going to do anything.
Triggers can be broken down into two main components: events and filters. When you go to configure a trigger in GTM, you’ll be given a long list of types of triggers to choose from. These are your events. Once you choose an event, you’ll be able to set up your filter.
Filters can be divided further down into three parts: variables, operators, and values. We’ll talk more about variables in just a minute, but in this case, it refers to the type of variable involved. The operator tells the tag whether an event needs to equal (or if it should be greater or less than a certain value, contain a certain value, etc.) And of course, the value is the condition which needs to be met. Even though the word “value” is typically used in reference to numbers and prices, remember that in this case, it doesn’t necessarily have to be a numerical value. In many cases, your value will be something like a URL or a keyword.
For example, let’s say I wanted to see how many people were reading the blog content on my site in depth. I could create a tag with a Scroll Depth event trigger that should fire when the vertical scroll depth reaches 75%. If I wanted this to fire on every page of my site, I could leave the “All Pages” option selected in the trigger configuration box and I wouldn’t have to create any further filters. But since I’m focusing on blog content, I’d choose “Some Pages” and create the filter “Page URL” “Contains” “fakewebsitename.com/blog.”
There might also be some circumstances when you don’t want a tag to fire. In this case, you can create a blocking trigger to prevent it from firing on those occasions. GTM prioritizes blocking triggers over other types of triggers, so if you have a blocking trigger that contradicts a condition set by another trigger, Google Tag Manager will follow what’s specified by the blocking trigger. For instance, if you have a tag that’s set to fire on all of your pages, but there are a few pages you’d like to have excluded from that, you can just use a blocking trigger to prevent it from firing on those few pages.
Variables & constants
While tags depend on triggers, triggers depend on variables. Variables contain the value a trigger needs to evaluate to know whether or not it should fire. The tag compares the value of the variable to the value defined in the trigger and if the variable meets the conditions of the trigger, the tag will fire.
Tags also use variables to collect information that can be passed onto the data layer as a user interacts with the site. A common example of this would be if a tag was set to fire when a person adds a certain amount of products to their shopping cart.
Variables can often be reused between tags. One of the most popular tips for using GTM is to create constant variables with the ID numbers or tracking codes you’ll need to use more than once. For example, if you’ll need to use your Google Analytics property ID number in multiple tags, you could just create a constant string variable with the value being your ID number. That way, instead of repeatedly having to look up and enter your ID number, you could just select the variable name.
When using GTM, you’ll be working with two different types of variables: built-in variables and user-defined variables. Built-in variables are some of the most commonly used types of variables, so Google went ahead and made them easy to access in GTM.
Once you select a built-in variable, you’ll be able to configure its settings however you’d like. Note that these are just a few of the built-in variables for regular web containers. You can find more built-in variables by clicking the “Configure” button. If you’re using GTM for AMP sites or mobile apps, you may see different options to choose from.
If you need another type of variable that’s not included as a built-in variable, you can create a user-defined variable. When you go to add a user-defined variable, you’ll be given a list of types of variables to choose from. For more information on each type of variables, Simo Ahava has a very helpful guide to different variable types.
Variables can be created from the GTM dashboard by clicking on the “Variable” option on the left side menu. You can also create them while you’re creating a tag by clicking on the button next to the field that looks like a Lego block with a plus sign on it.
Data layers
Tags need information to know whether or not they should fire, but how (or where) do they get that information? One way they could find it is by checking the page’s HTML structure, but that’s really not an ideal solution. When tags need to search through HTML to find what they’re looking for, it can take longer for them to fire. And if the site’s HTML structure changes over time, tags can break. Besides, there are certain types of information a tag might need which won’t be found in a page’s HTML, like a transaction total.
A data layer is a JavaScript object which keeps the information tags need separate from the rest of your site’s code. Since tags don’t have to spend time searching through the HTML to find the information they need, this is another way GTM can help improve site speed. Instead, everything they’re looking for can be found in one place and it’s readily available when the page loads.
Technically, data layers are optional. You don’t have to specifically define one yourself; GTM can initiate one for you. But if you want to use GTM to track specific events, you’ll need to have a data layer.
To start off with, a new data layer object will look like this:
When adding a data layer, the object needs to be placed before the GTM container code. If the data layer object is placed after the container code, GTM won’t be able to access the information in it and the data layer will basically reset after loading.
Once the data layer object has been added to a page’s code, the brackets in the second line can be populated with information, variables, and events. Some types of information can be written directly into the data layer, but other types of information can be pushed into the data layer dynamically as a user interacts with your site, such as if someone downloads a file or if they add a certain amount of products to their shopping cart.
Working with GTMCreating accounts and containers
To get started, go to tagmanager.google.com and create an account. Under “Setup Account,” enter the name of the company whose site is being managed and hit “Continue.”
Next, you’ll set up your container. Enter your domain name as the container name, choose which type of page or app it will be used on, and click “Create.” If you choose iOS or Android, you’ll also have to specify whether you’re using Firebase SDK or a legacy SDK.
Note that I specifically said to use the company name as the account name and the site’s domain for the container name. In theory, you can name these anything you want. This is just how Google recommends naming them as a best practice. Generally speaking, one of the best things you can do when working with GTM is make sure everything is named very clearly. Otherwise, it’s very easy for mistakes to be made.
Multiple GTM accounts can be managed within a single GTM account, but Google advises creating one container per domain. You don’t have to create separate containers for each individual tag or for every individual page on a site; all tags can all be placed within one container.
For most companies and organizations, one container is all they’ll need. But in the case of a company that has subsidiaries or owns separate businesses, the website for each subsidiary/business should get its own container and all the containers can be managed from one main GTM account. If a site has a subdomain that is treated separately from the main domain, the subdomain should also be given its own container.
When a marketing agency is managing tags on behalf of a company, Google recommends that the company create their own GTM account, then add the agency’s Google account as a user. This way, the agency can access GTM, but it’s easy for the company to revoke access should they decide to change agencies.
After creating your container, accept the GTM terms of service and you’ll be given your container code.
Once the container code has been added, you’re able to start creating tags. But before you get started, it’s a good idea to take some time to figure out exactly which tags you want to add. Even though there aren’t any limits to the amount of tags you can put in a container, for best performance, Google advises keeping the amount of tags you use to a minimum. If you’re migrating your tags to GTM from another tag manager or are making the switch from tags coded in your source code, this is a good time to review the tags currently on your site. In many cases, sites have tags that are associated with services they’re no longer using or were used to track things that aren’t being monitored anymore, so this is a good opportunity to "clean house," so to speak.
Creating a tag
When you create or select a container, the first thing you’ll see is the GTM dashboard. We’ll eventually get around to talking about almost everything you see here, but let’s begin by creating a tag. Click “Add a New Tag” to open up a window where you’ll be able to name and configure your tag.
Before we go any further into the process of creating tags, remember to name your tags very clearly. Since sites often use several different tags, you won’t want there to be any confusion about which tag does what. Google’s recommended tag naming convention is: Tag Type - Detail - Location. For example, a Google Analytics tag that tracks form submissions on a Contact Us page would be named “GA - Form Submission - Contact Us.” Including the location of a tag in its name is a good idea because it helps distinguish it from similar tags on other pages. So if I had other GA form submission tags on my site, specifying that this one is on the Contact Us page would help me avoid editing the wrong one by mistake.
Putting the tag type at the beginning of a tag name also helps keep your tags organized. GTM lists tags alphabetically, so if you’re creating multiple tags for the same service or tool, all of those tags will all be grouped together and easy to find.
Now, back to creating a tag. When you click “Add a new tag” on the dashboard, this is the window you’ll see. Choose “Tag Configuration” and you’ll be given a long list of tag templates, which includes many of the most commonly used types of tags. If any of these are what you’re looking for, click on it and enter the information requested. If you don’t see the type of tag you want to create listed, choose “Custom HTML” to add your own code.
Since the exact information you’ll need to provide will vary depending on which type of tag you’re working with, I can’t possibly go into how to make every single type of tag. But as an example, let’s say I wanted to notify Google Analytics anytime someone views my pricing page. After choosing Universal Analytics, this is what I’d see:
All I would need to do is choose “Page View” from the “Track Type” dropdown menu, then enter the variable with my Google Analytics account information. If I hadn’t created that variable ahead of time, I could make one now by clicking the dropdown menu under “Google Analytics Settings” and choosing “New Variable.”
If I wanted to make changes to the tag firing sequence or create a firing schedule, I could do that by clicking on the “Advanced Settings” option. Click outside the tag configuration window to go back to the previous screen.
Next, you’ll need to create at least one trigger. Click the “Triggering” box underneath “Tag Configuration” to get started. If you don’t have a previously created trigger to choose from in the list that opens up, click the + sign in the upper right corner of the window. This will bring up a new window where you’ll be asked to name your new trigger. Do that and click on the “Tag Configuration” box so see a list of trigger types. In my case, I’d choose “Page View.”
Since I only want my tag to fire on one page, I’d choose “Some Page Views,” then create a filter specifying that the page URL needs to equal the URL of my pricing page. If I had another filter to add, I could click the plus (+) button next to the filter to set one up. If I had created multiple filters for this tag and later decided to get rid of one of them, all I’d have to do is hit the subtract (–) button next to the filter in question. When you’re done, click outside the window to exit.
Once your tag and trigger have been configured, save it and you can either keep working by creating more tags or you can preview your tag and make sure it’s working correctly before publishing it.
Previewing, debugging, and publishing tags
GTM’s “Preview & Debug” mode lets you test tags before publication so that you can make sure everything is working correctly and that you won’t have any errors throwing off your data.
To enter “Preview & Debug,” click the “Preview” button in the upper right corner of the GTM dashboard and you’ll see an orange banner notifying you that you are now in “Preview” mode. Next, open the site you’re tagging. If you already have your site open in another tab, refresh the page and you should see a “Debug” panel at the bottom of your screen. (Don’t worry, visitors to your site won’t be able to see it.)
The “Debug” panel shows all sorts of detailed information about your tags, triggers, and data layer. On the left side of the panel is an event timeline summary, which outlines all the events that occur in the data layer. At a minimum, you should be seeing at least three events listed here: Page View, DOM Ready, and Window Loaded. It’s OK to see more than three events, but if any of those three are missing, there’s a problem that needs to be fixed.
When you click on any of the events in your timeline, you’ll see all the tags which are set to fire when that event occurs. Click on any of the tags to see more detailed information about its triggers, properties, and if there are any blocking triggers associated with it.
As you work in “Preview & Debug” mode, you’re the only one who can see the information about your tags. But let’s say you’re working as part of a team on a tagging project and you find an issue you want to bring to another person’s attention. There is a way to do that. Switch back over to your GTM dashboard and look at the orange banner. On the right, there’s a “Share Preview” button. Click on it and you’ll bring up a box where you can enter the URL of the page in question. This will generate a preview link you can use to send to another person.
If you’re having a hard time getting “Preview & Debug” to work correctly, Analytics Mania has a great guide to solving some of the most common reasons why this happens.
Even after a tag has been published, Google still makes it easy to go back and check to make sure there aren’t any problems. Google Tag Assistant is a free Chrome extension and once it’s installed, you can visit any page on your site and it will tell you if your tags are firing correctly or if there are any improvements that could be made. GTA uses a three color system to indicate its findings: green, blue, and red. Green means all of your tags are working, blue means GTA has suggestions for how a tag could be improved, and red means it’s not working.
Once it appears that all of your tags are firing correctly, you can go ahead and publish them. From the GTM dashboard, hit the “Submit” button in the upper right corner and you’ll be asked to review your changes. If everything looks OK, enter a name and description for your new container version and publish it.
When you publish changes in GTM, it creates a new version of your container. If there’s ever a problem and you have to revert to an earlier version of your container, all you have to do is click the “Versions” button at the top of the GTM dashboard, choose the version you’d like to revert to from the list, click “Action,” then “Publish.”
If you’re migrating your tags from another tag manager or from hard-coded tags on your site, Google advises setting up all of your tags in GTM, then removing your old tags all at once and publishing the GTM..
http://ift.tt/2ElmnJY
0 notes
Last Seen Blogs

ovlov-blog-blog
O V L O V

hakunamishastatas
Untitled
hakunamishastatas
Untitled

weepingcollectivemiracle
doodle
weepingcollectivemiracle
doodle