
Statistics
We looked inside some of the posts by ahnmakes and here's what we found interesting.
Average Info
Notes Per Post
14
Likes Per Post
12
Reblog Per Post
1
Reply Per Post
1
Time Between Posts
20 days
Number of Posts By Type
Text
9
Last Seen Tumblr Blogs


Fun Fact
Tumblr has been providing a Korean-language service since 2013.
Text
devlog # 9 // life updates + new systems (UI, character stats, turn-based system)
so, I’ve been away for what feels like a year - there are a million things I could share. first, let me update you on life things, then tell you a bit about what I’ve worked on in-game. as far as life things, I have been t i r e d. and with autumn (my favorite season) here, the desire to cuddle and sleep all day is strong.

part of what’s been keeping me so tired is also that I both started uni studies and have a new job. in the last blog, I mentioned I was thinking of going to university for further studies in computer science and all. well, thanks to a few people’s generosity (and many, many phone calls, emails, etc), I did get signed up in time! I have been absolutely in love with the things I’ve been learning in my first computer science class ever; even though it teaches Java, I have found that everything I’m learning is very easy to translate into C# and what I’m building in Unity. each day, I feel more confident in my coding, so much so that nearly everything I’ve done in the past month has been entirely from my mind, just free-coding, without any tutorial or other guidance. it is really amazing to feel like I can code up a system in my mind, even when I am away from a computer, and then sit down and type it out and it run exactly as I intended. while my studies and my new job (not especially difficult, but asks but for many hours each week; consider supporting me on Patreon so I don’t need to work as much?) keep me busy and often fatigued, I have been reclaiming time to code things I love and am really excited about - and I’d like to share with you a couple of things I’ve recently built. (edit: I just realised that a lot of the images are blurry :( will think on a fix for this)

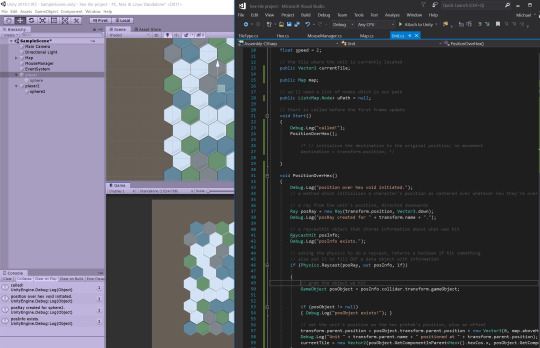
where we left off with the last devlog, I was working a lot on the systems to build up the physical world: tile generation, interactables, biomes, and the like. I did actually work on some other parts of the world and visuals (will share that in a near future devlog!), but more and more lately, I’ve been feeling like what will really keep me excited and focused, to feel like I’ve reached a solid checkpoint in my development, is being able to actually *play* the game. even if it’s repetitive, only one area, or without animations, being able to press play and move characters around and interact is something I know will excite me. so, that’s what I’ve been working towards. there are a handful of pieces I can identify between where the game was last devlog and what it needs to be minimally playable: - a basic UI that shows character stats - a system to calculate and update the stats to be displayed - a system to keep track of turns automatically - for the UI or world to display player choices accurately - at least a couple interactive actions the player can take, besides moving (damaging health, defending, etc) I started with making a basic character stat UI and a behind-the-scenes calculator. note: since we’re working mainly on systems in this devlog, I’m going to be sharing a lot of code talk. but maybe you’re into that sort of thing. also remember that my focus in each of these pieces is not to make something gorgeous or especially well-organised; my focus is to make something that works (though I am always thinking about optimisation and other possible patterns along the way).
so, this is what the first UI for character stats looks like! I modeled this as a basic idea of how you might make a UI for creating a character and being able to preview their stats - both the base ones (like might and agility) and also a few of the compound ones (health, stamina, mana).

in this version, a player can choose an inheritance (what other games call “race”), a birth sign, and a primary class (though you won’t be able to choose it from the start like this in the game). each of these choices contributes modifiers which change the stats, which is calculated altogether when you press the left or right buttons. (again, these are not all the inheritances, signs, or classes in the game)
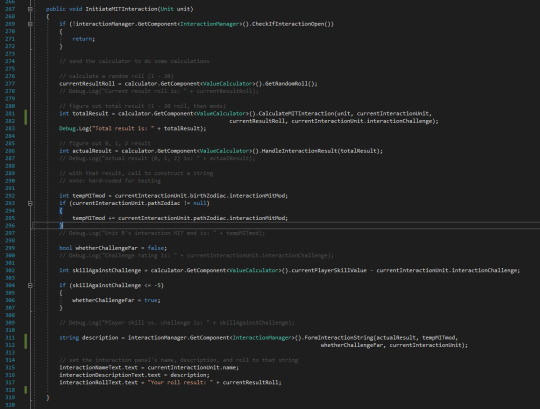
here’s a bit of the magick code that makes this happen:
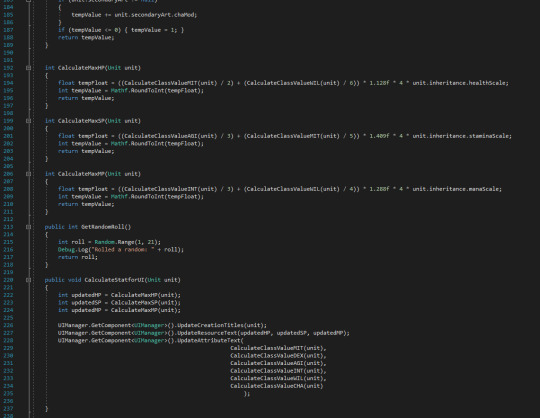
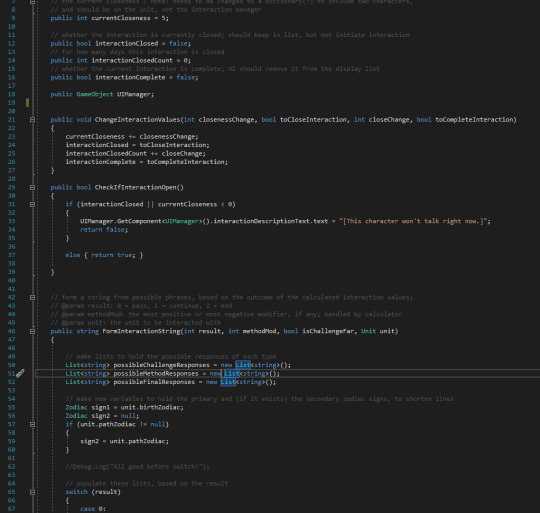
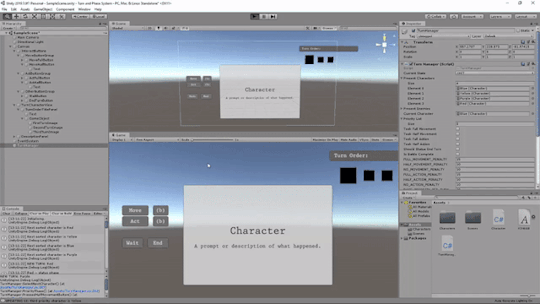
as you can (hopefully?) see, I’m calling methods (CalculateClassValueMIT, etc) to get the relevant stat values and multiplying those against a magic number (eep!) and the character’s inheritance scaling. what you might you also notice here is that these calculations are hard-coded to a given attribute (might, dexterity, intellect, etc); along with MIT, each of the other five attributes has its own calculation method. I really hate this because I know there has to be another way to do it, but this is the way I know how to do so far - feel free to message me other patterns! (for example, I’ve seen people make a Stat class, but I don’t really get that yet?) then, while I was feeling a bit playful with UI and stats, I thought I would spend a day making a prototype of a “charisma interaction” system. by this, I mean that - in the game - characters will be able to use their interpersonal skills to be able to navigate certain quests, get more information, and the like. charisma pairs with each of the other attributes to give a certain way of interacting; for example, charisma and might could be interpreted as aggression, intimidation, using one’s size or boldness to gain favor. pairing charisma with will could render an interaction more focused on relating, understanding, and empathising. you can see some of might interaction here.
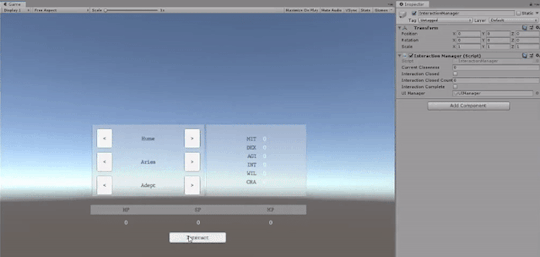
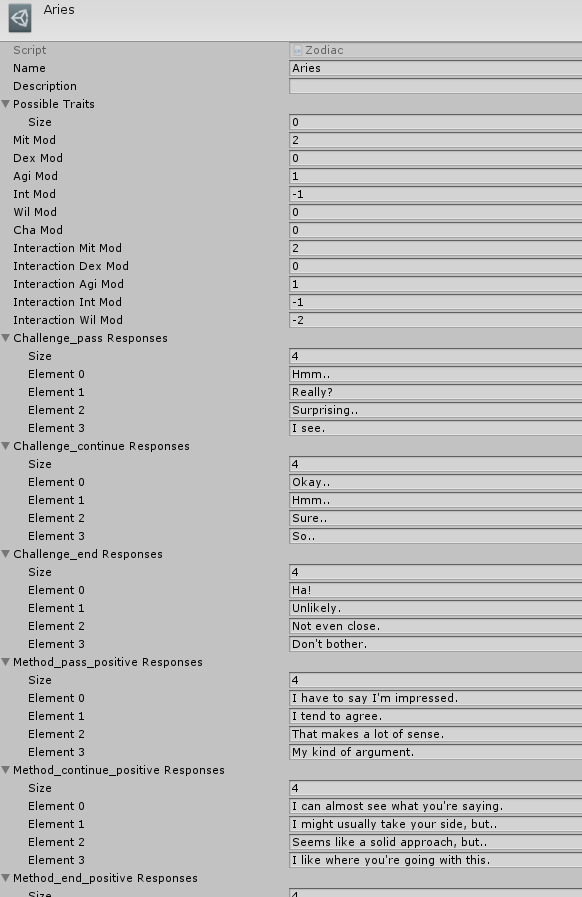
what’s shown in this is that Joseph, the unit kind enough to help with our testing, responds to your might interaction attempt with various phrases. behind the scenes, Joseph has their own inheritance, signs, and other traits, and when you click, these + a random roll are used to calculate *how* Joseph responds. in this case, Joseph has a primary sign of Aries, which inclines them to respond well to your might-based attempts (you’re in luck!). even when Joseph declines your attempts or chooses to stop talking about a subject (just wait some days for them to open up again), they will tell you that they mostly like how you’ve approached them, even if it didn’t work this time - a character with Virgo as a primary sign, however, might tell you off on your first attempt and refuse to interact further with you. rather than just a few pre-programmed dialogues, I am interested in the game having a more procedural, somewhat organic feel. also, in the actual game, Joseph will have slightly less patience; you won’t be able to keep clicking, only able to make an attempt twice in a day before the character closes that interaction. while the gif above shows many of the responses and reveal that there are just a handful of phrases this character will use, a player won’t see these in succession like this, so hopefully, the organic, personal feeling will be maintained. and again, in the future, I intend to make this more complex, not just button pressing. here’s some of the behind the scenes to how the aries sign is built. each sign is a scriptable object with these same parameters.
the basics of how a sentence is formed:
and what happens when you press the MIT button:
and the last thing to share today is about the turn-based system. I knew this was an important step in moving us closer to a playable version of the game.
take a look, and then I’ll explain.
feel free to rewatch a few times, since there’s a lot to notice.
first, I approached this system by defining exactly what makes up a turn. during a turn, the player will have four basic opportunities for choices: a first movement, an action, a secondary action (if the first was a half-action), and a second movement (if the character has any remaining movement). these are the phases that the character sees and directly interacts with. then, beyond/around that, each turn also needs to initialise a player and update any status effects (status phase), figure out who’s next and adjust each character’s place in the list (priority phase), and see if the battle conditions have been met or if a next turn is needed (check phase).

here’s a closer look at some of the phases in code:

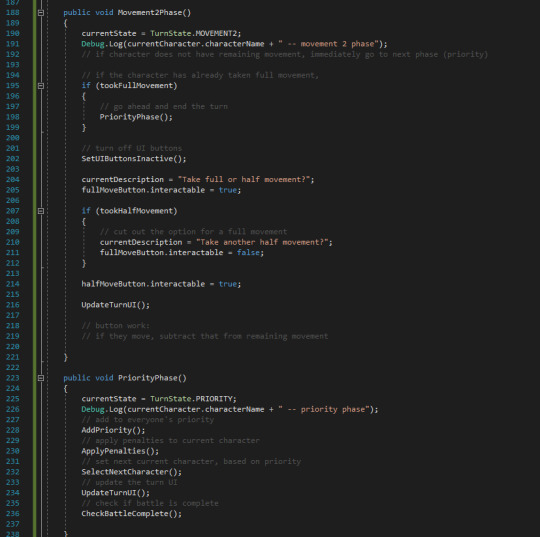
the basic setup is that the player interacts by pressing buttons when their input is needed, then the code moves through the phases depending on numerous factors: if the player used up all their movement, if they have action remaining, if they have a status (sleep? paralysed?) that will skip their turn, which phase it is currently ..
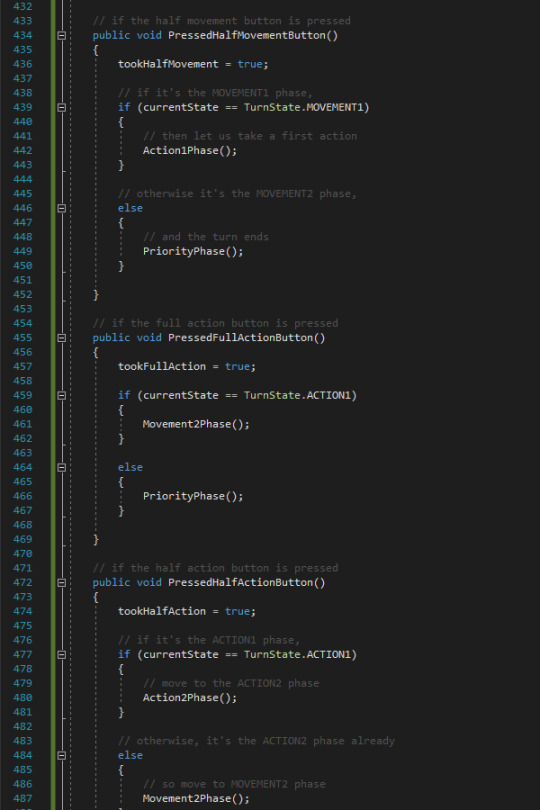
I have seen other approaches to coding a state machine (which I guess is what this is?) that I didn’t understand very much at all, and I am excited about this code because I know it came from me and all the things I’ve learned over my short time coding. importantly, i am excited because it works.
whew.

so, what’s next?
well, I’ve built these systems solo (separate from the rest of the game systems) so that I could really polish them (as much as one polishes prototypes :p) before moving them into the fray. so, a next step is to integrate both the stat UI and the turn-based system into the rest. to make it so that a player can pull up a fuller UI with a key press. to show a constant UI indicating which units are involved in an interaction, maybe with some predictive stats (chance of hit). and to have the player’s “movement button press” actually be them choosing which tile to move to, calculating automatically if that is their full movement range, and a much prettier (radial?) UI for selecting actions .. let’s not get ahead of ourselves. one thing at a time. I will keep working at it, with my plan being to get a workable version running this weekend, so maybe check back soon. and if you’d like to support me or get some behind the scene insights or help with building your game, do check out my Patreon - I would love for you to join my party: patreon.com/ahnmakes ✨✨ otherwise, I’ll see you in the next devlog! with love and need for a long, long sleep, ahn
#gamedev#game development#game dev#unity#c#c sharp#colorful#art#ui#ux#design#rpg#final fantasy tactics#fft
1 note
·
View note
Text
devlog # 8 // mapmaking, part 2 (plants, blender modeling + refining map visuals)
welcome back to the world of Gamedév!

okay, so, it’s been a couple weeks since the last devlog, but honestly, it feels like years have passed. to let you know a bit of what i’ve been up to, i’ve mainly been reflecting on pursuing further education in a formal setting. for close to a year now, i’ve already been studying computer science and game development pretty intentionally on my own - with the abundant resources available online, it is more than possible to receive a full and competent education without university studies. however, there are a few things that self-studying does not always make easy or accessible, namely: a) tangible, structured evidence of the skills you’re learning, in a format others (employers) feel they understand, b) opportunities to collaborate and build with other people around your skill levels, and c) in-person connections, leading to further interpersonal and career potentials
these are things that i think university education does tend to provide more consistently, and they are the reason that i am nearly certain i’ll be pursuing more formal education in the coming months. i am mainly waiting to hear back on a funding opportunity, so more details on my plan in the next devlog ..
as far as progress on zodaia, the main thing i worked on this week was getting some new models into the game. as you may remember, in the previous devlog, i had made a number of environmental models .. pretty much entirely out of cubes. the first model, a tree, allowed me to render a stunningly realistic and artistically compelling forest:

it may be difficult to tell, but this is a digitally-rendered forest scene, not a photo; hard to believe, but if you zoom in close, you might see subtle indications that these models were created from geometric shapes. while i did not imagine i could improve upon the flowing asymmetry of the grass or the bold sharpness of the rock faces, i thought i would give it a shot.

putting these placeholder assets temporarily aside, i decided to start with a sort of leafy plant because it seemed like something i couldn’t fuck up too much.
i opened blender, deleted the initial cube, and started with a flat plane, just the default one provided. i then extruded it a couple of times, making a longer, flat plane - it seemed easier to work with the leaf as a flat piece before bringing it more into 3d. i next curved the shape by selecting loop cuts and scaling them down as made sense to me; i didn’t follow any guide, just went along adjusting the shape into something pleasing to me. once i had a flat leaf that looked nice, i put a loop cut down the length of the leaf, and i rotated the whole leaf up, keeping its base close to the center, where the axes meet. i then pulled this center loop of vertices down, creating an indent in the leaf, then individually adjusted the side vertices up and down to create more depth, as if the leaf were rotated or growing differently along its edges.
and that brought me to this:

i know that is a lot of blender/3d-modeling talk, already, so let me know if you’d like a more in-depth blender introduction; if you support me on patreon, i will definitely make a tutorial so you can know more about the modeling process!
anyhow, once i had this one leaf, i just duplicated it and started manually positioning the leaves to make something that looked decent. i’m sure there is a more perfomant or efficient way to do things, but my goal right now is simply to make - i have spent years trying to conceptualise an ideal way to do everything, which often led to me not making anything at all, but the intention of this blog is for ahn to make. so, this is what i made:

obviously, as this was the first model i’ve made for the game (aside from the hex model, which will also soon get a rework), i couldn’t wait to see the model actually in the game. i made a basic green material, imported the model (as an fbx file) into unity, and simply replaced this with the model in one of the original InteractableObjects - i think i replaced the bush?
here’s how it looked:

already stunning! sincerely, this time. i am in love with the simplicity of this effect - and though i might feel differently later, right now, i love how this plant looks.
next, i continued swiftly on with a tree, since i imagined that is the thing that would be most engaging and also most visually rewarding. in the past, i have created low-poly trees before and absolutely loved the effect, so i also decided i would go for something similar this time.
skipping most of the modeling details, i basically just started with a cylinder and extruded, extruded, extruded and repositioned vertices until i got this shape - it took probably 5 minutes (including the part where i needed to bond the duplicated tree branch by manually creating faces between the central and duplicated branch vertices).

i then added in some icospheres, which i just pulled around and contorted into these shapes, which i (again) duplicated.

after creating materials for the tree bark and the tree top and putting a light in the scene, this was the quick render result.


and now, in the game..


the difference is absurd, especially considering how little energy it took to make these trees. i created a dark and a light variation once i had the models imported into unity, and will certainly make variations with many more shapes - however, right now, there is only that one tree model in this scene. could you tell? without studying the trees too hard, i think the automatic rotation (included in the procedural generation) gives a convincing effect, as if there are many tree models there.
and since i was coasting on the excitement of having these models complete nearly immediately, i decided to go ahead and do the grass and rock models, too.
again, start with one shape ..

then duplicate and make material ..

et voilà. also featuring the rocks i made.

actually, the first time i imported the model and pressed play, it crashed unity and looked like this:

why? i initially thought it was because i had made the noob mistake of making 3d grass (which i did) instead of using 2d images, but actually, it was because i had also imported a light and camera for each grass model; remember to delete them from the scene in blender before exporting!
with that, i was pretty in love with how everything was going. the environments are starting to look more organic and how i dream of them being.

updated glacier: (not much going on here yet; needs more water effects, snow falling .. but i did update the ice color and transparency to be more distinct from the snow)

desert scene with a very bright weather:

ash biome looking almost exactly the same:

gardens at night with an ambient light:

and two new biomes: the tundra, a mostly frozen, rocky landscape with some plant-growth:

and the cove, dark because it’s inside/a cave:

overall, i am super pleased with these developments and *so* thrilled for the next changes to come.

look out for the next devlog, where i’ll probably be working on a couple more models (or texturing/modeling the hexes?) and especially the more weather-y environmental effects: lighting, post processing, clouds, rain, lightning, water, the sky -- much to come. until then..
with love and hopefully a low poly count,
ahn
// support me on patreon? click here to join my party and help me keep making content like this <3
#low poly#low poly art#lowpoly#modeling#blender#modeljob#3d model#low poly modeling#art#environment#trees#grass#rocks#plants#digital#game art#game design#game dev#indie game#indie#indie game dev
7 notes
·
View notes
Text
devlog # 7 // mapmaking (the procedural foundation: biomes, terrains and weather)
whew, it feels like it’s been a month since i last posted here! in the last weeks before that devlog, i had been doing almost exclusively pathfinding work, stuff that requires a lot of intense math and coding, so i felt very excited to explore other directions this week.
oh, before we get too far into other updates, i do want to mention that i started a patreon, so that people (like you!) can support the game and, more generally, all of the educational content i’m aiming to create; please do go and support me there, even if it’s just a couple of dollars each month. it helps out immensely and i’m posting some exclusive, behind the scenes content there for all of you to learn with me <3

so, anyway, this week has been full of coding up new systems, and i’ve been doing that almost entirely undirected. i did start the player stat system, something which each unit could have or derive from in order to keep track of their stats - for that, i started by following a brackeys tutorial and pretty quickly got overwhelmed, i think mostly just because i feel like creating more freely and more visually. so, pause on that.
instead, i decided to follow my desire to create a couple of systems that would allow me to create a lot of graphics or feeling for the game, with very little effort. the first system that i dreamed of (i mean, i literally have been preparing code in my dreams) was for “biomes”. it is wild to look back at devlog #6 and realise that .. this system really didn’t exist then, because it definitely exists now.
let’s get started - what do i mean by “biomes”?

well, as in ecology, a biome (by my understanding) represents the kinds of life that interact in a space, between the earth/soil/plants and the animals or other presences there. speaking more specifically for zodaia (that’s the name of my game, by the way), a biome contains information about what kinds of terrains, weather patterns, and interactables (plants, trees, ores, animals/characters/npcs, things like chests) can exist in a given space.
the intention behind the “biome”, conceptually, is to allow the player to explore different types of lands/locations and have them *feel* like different places with very specific characteristics, so that the player comes to understand what challenges and opportunities and other patterns to expect there - to create regions of environmental features. and the intention, functionally, is to allow me to procedurally generate a number of environments by just defining a few parameters, making a lot more content for the game than what i could make designing each level by hand.
so, what might some of those parameters be? what kinds of things do we need to create a “biome”? well, to start with, we might decide to name some of the biomes, themselves: which different regions would we like to create? fortunately, this process was made especially easy because i had already had a number of biomes defined from my worldbuilding, notes i have written over the years of designing the game. so, the player might be able to visit - for example - icy glaciers, high mountain plateaus, valleys, deserts, dense forests .. in total, i have defined 27 different biomes (if you join on patreon, you can find out exactly which ones!) based on something i call affinities -- basically a system of elements, something to talk about in another devlog.
in short, i made a biome class to contain all of this info, giving each of the biomes a name and defining them by enums, an easy way of representing a predefined number of values and referencing them clearly later in code; instead of setting a range of numbers to represent the concepts, we can use words/letters which are easy to remember and much easier to understand.

next, i imagined that a biome might have “weather”, so a player might expect deserts to be dry, hot, and windy, while a glade might be especially humid or rainy or foggy. should these also be stored in an enum .. or maybe their own class? well, given that there are going to be different types of weather with their own different features, it might be helpful to make both an enum *and* a class, specifically as a scriptable object (also something i will talk more about in another devlog). basically, this will allow me to say “okay which biome is this?” and enter a value, then say “okay which weather types are possible there?” and simply plug in appropriate values there, as well. so, this is what a biome (as a scriptable object) looks like in the inspector - this one being for the desert type:

i standardised for each biome to have 4 possible weathers (the higher/earlier the weather, the more likely it is to occur) and if you look ahead, you’ll also see that each biome has 6 possible tile types - terrains - as well.
the terrains, which are also scriptable objects, define things like:
- which hex color/material/prefab to use
- the movement cost for that terrain type, and if it can be moved on at all (a bool, isWalkable, used by the pathfinding) - a range of possible offsets for its height (giving some texture to the landmass as a whole), and
- which kinds of interactables might spawn on that tile, if any

you can see here that the weather is set up similarly.

so, to go back to what makes up a biome, it’s actually a lot of information but each piece of that information can be configured easily and quickly to give reliable results. because of this system, rather than a plain hex grid or one which is slightly colored and textured, i can now create a completely new type of land in around 30 seconds, something which can produce hundreds, thousands of variations for players to experience through different playthroughs.
this is one of the first example biomes i made, the “pools” biome. though there are no textures on the hexes or models of grass and such showing what’s going on here, this biome represents an area where there is a lot of water, most of it being shallow, with some deeper spots and some grass and stone poking out of the water; in addition, by simulating time progressing (by clicking the time++ button), the weather would automatically change. i’m not sure if it’s hard for others to imagine with mostly plain hexes at this point, but this moment was the very promising beginning of a more complete biome system.

and now, i’ll just do some show and tell, with more emphasis on the show - take a look at how this system developed over the course of a day or two.
me getting the first trees to randomly spawn on the map; percentage was too high, but the map certainly felt less empty haha (must have improved the UI at some point in here, too)

added some chance for grass to spawn in the pools biome (made the grass model with basic cube shapes in unity, a quick prototype).

made a volcanic region, just by setting that there should be tiles like magma and stone, then defining a few weathers for this area.

then, the gardens, with some trees, grass, rocks, and bushes -- again, these models will be replaced by much improved models i’ll make in blender. the point was to get something working so that i could see how the system was growing; i’m finding it’s really important to focus on nearly just one thing at a time, rather than trying to balance a million systems and making measurable progress in none of them. i was very pleased with this step forward!


added some flowers for visual interest (also made with cubes in unity!)

a beautifully clean desert biome.

and a glacier.

and while you are looking at these images, it’s really important to understand that a biome isn’t just one map, it���s an infinite number of potential maps. the glacier i made above was made in just one click (after all the labor of creating the base system, of course), and i can now generate an endless number of distinct but similarly themed/feeling glaciers simply by clicking again, each possible map interacting beautifully with the pathfinding system we initially created.

this system is beginning to show some of the massive benefits i described in devlog #2, where i discussed whether i would approach the map-making in a more hand-crafted way, or a more procedural one. as i said then, i decided i would start with the more procedural side of things since that is what i was less comfortable with, and seeing what this can do already - what a machine can create from the properties i’ve set up - is immensely inspiring to me.
i think we’ll pause there for today, and next time, i’ll probably jump into more of the making-the-map-interactable parts of my implementations. as a teaser: did you know that those randomly generated trees, bushes, and rocks up above actually have items in them, things the player can pick up?
we’ll talk plenty about interactables and more environmental visuals in the next devlog. until then, with love and more maps than i could ever possibly explore, ahn
// support me on patreon?
#devlog#gamer#game development#game design#procedural generation#games#indie game dev#indie games#indie#indie developer#indie development#rpg#fantasy
2 notes
·
View notes
Text
devlog # 6 // hex tilemaps and pathfinding, part 5 (refining pathfinding features)
so, if you can’t tell, i’m absolutely in love with development right now, been typing away for days and days. :’)

mainly, since the last devlog, i’ve spent my time doing two things:
- organising and backing up my development process
- refining the pathfinding system’s features
starting with that first point, once my project files and code started getting to be more than a few lines, i quickly realised that i would need to take some time to start keeping everything even more in order.
i came across trello, a tool where you can make and sort tasks to keep track of what’s going on in your project. currently, this is all entered manually, but i did notice they have a thousand features and other apps and things to take your task-keeping further. right now, i am satisfied and very much served by these simple lists. instead of countless, nondescript notes and word documents on my computer - “rpg notes”, “rpg devlog”, “devlog notes”, “game design”, “game design b”, “design notes”, etc - i keep all of my to-dos in one place.

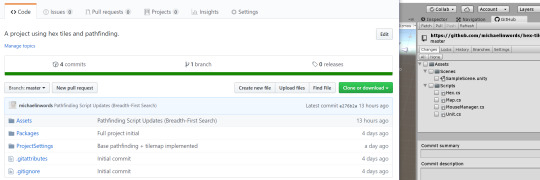
i also started using github (for unity) to keep changelogs and backups of all of my project files. this is something i had been especially thinking of as the files grew larger and larger, given that if i lost my progress, even though i could definitely put things back together (and perhaps more neatly the second time?), it would definitely throw off my motivation.
it only took a few minutes to set up a github repository(?) and install the associated plugin for unity, though i do not feel at all that i understand how this all really works - for now, the point is that i’ve got a consistent, easy way of tracking changes in my files and making sure i don’t lose them.
okay, now for what we’re really here for: the game, and its pathfinding system(s). what i’m not going to do in this devlog is explain every detail of how i’ve put things together; what i will do is explain (a) what i put together, (b) the patterns and resources i worked from, and (c) some of the challenges that came up throughout. there’s going to be lots of pictures today!
last time, we got to pathfinding in the sense that the game was able to identify the quickest route from our source position to a target tile position, then draw debug lines along that route. in the few days since then, i’ve complicated the system quite a lot.
firstly, i made changes so that the tiles actually have movement costs. i did this by creating a method that would take in the coordinates of a tile, then return its cost.
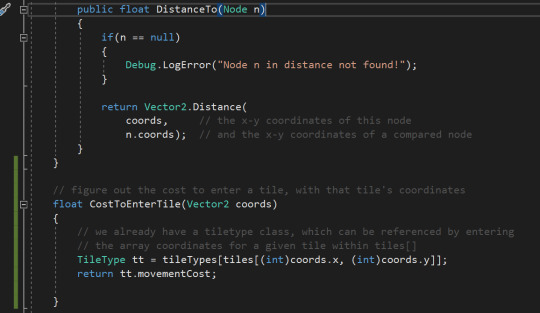
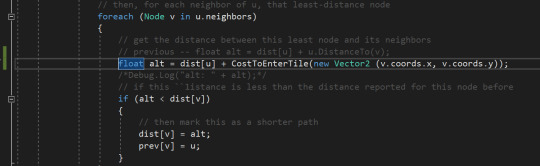
next, we needed to actually put this cost into the algorithm, so instead of the dist, i put in the CostToEnterTile - this piece of pathfinding might look familiar! (i actually ended up putting the distance back into the equation as well, not shown in this image.)
after manually defining the movement cost values for each tileType in the inspector, the game looked like this:
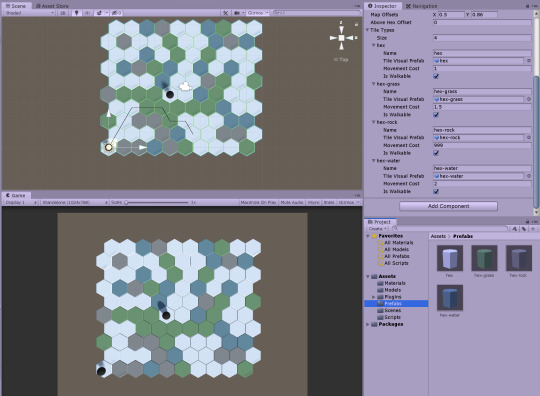
notice how the pathfinding is avoiding grey tiles, and somewhat the blue ones? this is not the “shortest” path, but it is the one that costs the player the least movement (which is what we want)!
next, i put in a method i imagined would be helpful - something called upon Start that would take a unit’s position, figure out if there was a hex below (via raycast), and then take on that hex’s position and array coordinates. for a reason i cannot explain, this works only on this exact player object - not even on copies - and it works about 85% of the time. :’) i don’t understand why at all, and i’ve pored over this code (and updated it) for hours. if you see why this code isn’t working how i intend, please let me know!
this is what it looks like when it does work (player was originally just vaguely, randomly over a tile and is now centered on that tile, internally storing a reference to its coordinates):

and whoa! the tiles are at different heights?
well, yes, because i created something for each tileType called the “height offset range”. this data is used when first instantiating all the hexes. brings a ton more depth into the level. lesgoooo unity 3d!

with this, the tiles start to look more like environmental terrain. it becomes more apparent that the pathfinding is very much avoiding certain tiles.
this is just one of many changes i want to implement that will allow the game to generate interesting levels, procedurally, with almost no effort.
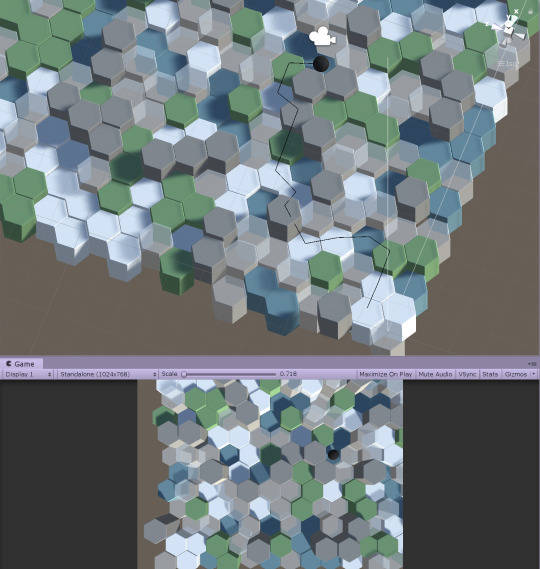
check out this “randomly” generated level, which has a more island-y feel, with the increased water tiles.

this was created by altering only 3 or so values, representing the proportions of a given tileType’s likelihood to be the one chosen when a hex is instantiated. (i want to soon move all of these variables into something editable from the inspector, so everything can be easily adjusted from inside unity, not from digging in the code.)
if i alter these few values again (notice below that i only change the 10, 9, and 6), we start generating levels that have quite a different feeling to them, something more rocky.


i even created another tileType (called “null”) which cannot be targeted or walked on. this creates an effect that looks like there are spaces cut out of the map.

it may seem like “well, of course, the pathfinding won’t go along these tiles if they don’t exist”, but they actually do exist; the pathfinding is recognising them and choosing against them. here is the same image as above, but with the null hexes changed to a visible/glassy material.
then, it felt like time to jump more into the code again and figure out how to not just calculate paths, but to actually use them to move the character. again, with insights from quill’s tutorial, i set up some code that would move the unit along the found path, guiding them to a specific “destination”, waiting for them to get close, then moving to the next piece as the next destination. cool shit that i definitely didn’t figure out alone.

after putting in some debugs (thanks to my virgo), we get a very satisfying list of steps the pathfinding went through to move the player, and our first visual..


! ! !
there remains only one thing to be done, from the two goals i defined for the pathfinding system. one was to be able to find a path and move a character there (which we just did), and the other was .. to highlight possible move spaces? how the fu--
welp, long story short, i panicked a bit because the few guides/tutorials i was finding were v e r y math and big, conceptual engineering (at least that’s how they felt). and when i found what felt like a more accessible tutorial that showed someone using pathfinding for this purpose (highlighting possible movement tiles), their implementation didn’t seem immediately like something i could integrate alongside what i had. i watched a bit, got frustrated and overwhelmed, then decided to relax, ease my mind .. which led me to this video lol? an mit talk about graph theory and breadth first search.
somehow, i found it comforting to just explore the concept without thinking of how to apply it immediately. i was just seeking to understand. and understand i did. right before i went to bed, i decided to write out - from this understanding - what kind of lists, variables, states, methods i would need to get this working. i set it aside, and went to sleep. and when i woke up the next day, this morning, this is what i did.
i translated what i had understood directly into new lists, variables, and the like - things i understood. and for the first time on this scale, i was doing this entirely freehand, without any tutorial. and i wrote for the code to do this when the the player was clicked on:
not so impressive? what about this?
that looks like what i asked for!
the only difference between the two is that, in the second implementation of this algorithm, rather than cycling through all of the hexes, i ask the search to stop at a certain point -- something i’m currently calling the movement buffer.
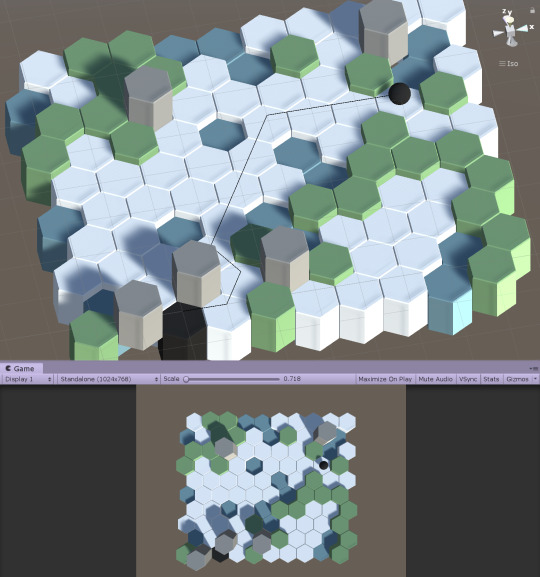
from the game’s movement rules, a player can not only attempt to move within a character’s movement range, but can also exert the player to try to push to a further tile; this has the consequence of the character hurting or overly fatiguing themself, if they do not make a high enough roll to move that amount. that’s what this image shows: the light blue represents the player’s movement, and the darker blue represents those exert/can-try-but-it’s-risky tiles.
i also took care of some other helpful, necessary features (can only select within the highlighted tiles, deselecting the unit will return tiles to their original colors, etc), also free-hand, just by applying the little pieces i know into a greater whole.

i have never felt more confident in my own programming ability; i define goals for my work, i research, i think through them, and then am able to create and refine the code that follows. with that massive update, i will temporarily be pausing on any pathfinding for a while (as both of the goals we defined have been completed!), and looking to other areas to explore.

thank you for joining me on this journey so far. <3 in the next days, i’ll mostly be looking into visuals - shader maths, animation, modeling - trying to get things looking pretty. most likely will be implementing a character stats UI, as well. see you in the next devlog (or find and chat with me on twitter.com/michaelinwords)!
with love and an ever-growing to-do list,
ahn
#dev#gamedev#indie games#indie developer#indie development#game development#art#shaders#math#animation#modeling#ui#character#rpg#turn-based rpg#final fantasy tactics#hex tiles#hex-based#grid#magic#fantasy#graph theory#pathfinding#engineering#mathematics#computer science#unity#unity3d
0 notes
Text
devlog # 5 // hex tilemaps and pathfinding, part 4 (concept + integration of paths)
it’s the big day - we’re going to be implementing a pathfinding system, one way or another. this is going to be a long one.
to start with, not all pathfinding is equal – some pathfinding systems excel in certain areas and struggle in others. it might be helpful to reflect before starting on what kinds of pathfinding will be suited to the different use cases i have in mind.
so, what am i using pathfinding for in the first place?
well, mainly, i’ll need it for (a) highlighting regions where the character could possibly move, showing those predictions, and (b) locating an optimal path to a chosen tile.

in both cases, i’ll need the system to take into account different terrain costs (moving more slowly through water, mud) and heights (for example, a steep cliff face) that will limit how much the player can move in these regions.
i may also need to implement both two-layer levels (things with roofs, or where you can go under/inside) and high one-layer levels (things without any roof, but just dramatic changes in height) – this is not a primary concern, however, and i expect solutions will become more apparent as i understand my own implementation of the pathfinding.
okay, so, now that we understand what kinds of needs there are for this game, what kinds of pathfinding systems are available?
in this introduction to a* algorithms (what i’ll be merging with another tutorial to try to craft a system that matches our needs), we find a very insightful exploration of how pathfinding works.
the basics of each of the systems to follow is that we (as i understand it so far – you should read the tutorial, yourself, since it has really great visuals/graphs):
(1) make a “frontier” list, an expanding ring of tiles to be considered
(2) make a “visited” list that will keep track of tiles we have considered
(3) remove our starting tile from the frontier list, add it to the visited list, then add its neighbors/every touching tile that hasn’t been visited to the frontier list
(4) repeat step 3 for the next tile in the frontier list: remove it from the frontier, add it to visited, and add its neighbors to the frontier, recursively expanding the ring until we have filled all of the map area
this loop so far seems to be called “breadth first search”, an algorithm pattern that just expands and visits every tile.
we can sharpen these algorithms further if we implement code to:
(5) keep track of where we “came from” for each tile and
(6) set a target (early exit) – do a check when visiting tiles to see if that tile is the destination tile; if so, we can exit the loop and report back “came from” to construct a path between our origin and destination
(7) introduce movement costs, numbers we define (maybe 1 for plains/neutral terrain, but 2 for water and 3 for mud), and sort our next-to-be-checked/frontier list by priority of lowest cost (meaning we’ll look for the easiest paths before the harder, more expensive ones); at this point, the pattern is often called “dijkstra’s algorithm” or “uniform cost search” (this will always return the shortest path, but might be relatively slow to find it), OR
(7b) sort the frontier list by a priority of distance, choosing to check what’s closest to the target first; called “greedy best first search” (fast, but unfortunately, this doesn’t always return the shortest path – read the introduction to understand why)
and lastly, we can:
(8) combine both priority queues, sorting our frontier by comparing both movement costs AND closeness to the goal/final tile
with step 8, we construct something that is known as a* pathfinding – the most common and seemingly most competent choice for most pathfinding needs.

[image source here]
thus, returning to our needs, for (a) highlighting regions where the character could possibly move, showing those predictions, and (b) locating an optimal path to a chosen tile, a* seems like it can fulfill both roles. we might find it ideal to implement a simpler dijkstra’s algorithm for (a) in order for the pathfinding to be more performant (not as computationally demanding) – why?
because if we are showing highlighted regions for where characters can possibly move, we might choose to do so in realtime/by just hovering over a character. with this being updated so rapidly, it might save some performance to use a system that is doing less calculating. however, there are also other ways to approach this (such as only running the algorithm when the character is first hovered over, not constantly), so it’s just something to consider. most likely, we will only need to run pathfinding once or twice during a player’s movement phase, meaning the computational load should be minimal. let’s get something working and then we’ll optimise at a later point, considering ways to write more efficient code along the way!

oof that was a lot of technical info. let’s get into writing some actual code now. i’ll be following along with this excellent tutorial series and connecting quill’s implementation with the patterns and needs we’ve explored above.
lesgoooooooooooooooooo!
so, one of the first things i did was create a TileType class which keeps track of .. well, tile types. the types of terrain available in the game. this holds a name for the terrain type, a visual prefab of the hex (different colors, materials, etc), and – soon – things like movement cost; in the future, we can easily plug in different materials or different models that more fully represent the terrain.

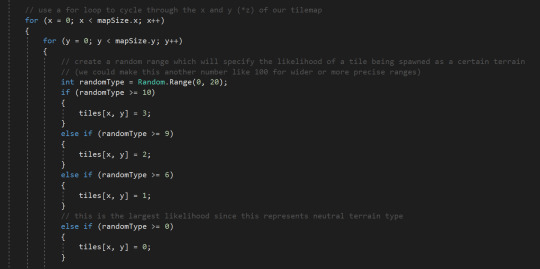
in addition, i implemented random ranges for terrain types, right before instantiating (putting the hexes in the world), so that there would be variation in the tiles each time they are generated (in the future, i’ll likely do this with a sort of noise to create more artistic distribution).

this automatically creates a more interesting field of tiles. (i’ve also changed our player colors to not be clashing with the new tile colors)

two things pop into my mind here. first, it would be really nice to convert our tile types into enums somehow so that we can reference the terrain types by name OR number. secondly, i also notice that now, if we click to toggle on a hex (when no unit is selected), we will color them black and then white, erasing their original color. maybe we should be storing this information somewhere? this is something to do soon, but for now, let’s keep with the task of pathfinding.
the next major task was to build a graph of nodes (tiles), something which we will not see, visually, but which the computer will need in order to understand how all the hexes relate to each other - this is also why we set up to define which tiles are neighbors, i.e. adjacent / touching each other.

ran into a pretty tough bug when we started adding neighbors to node lists; it took me about 20 minutes to realise we hadn’t initialised the nodes before adding to them (so they were showing up null). this also happened because i am not completely understanding lists and custom classes (our nodes) and such yet, but i am excited that i knew enough about debugging and how to go through each line to identify what the problem was!


once this was sorted, this meant that (theoretically) we had a graph of nodes that contained all of our tilespace, and also were listing data for each tile’s neighbors - you can see an example of conditional/constraint code i used to identify where a neighbor should be.
from here, we are now able to move to the next steps of the pathfinding pattern: i create a list to hold frontier nodes and a list to hold nodes we have not yet explored. then, the big boy math.
i am not going to go through explaining each line, but i assure you that i followed the steps i listed above (again, you can find very complete information on this pattern in this a* introductory tutorial):
(1) make a “frontier” list, (2) make a “visited” list, (3) remove starting tile from frontier list, add it to visited, add its unvisited neighbors to the frontier, (4) repeat step 3 for the next tile in the frontier list, recursively expanding the ring, (5) keep track of where we “came from” for each tile, and (6) set a target; upon finding, exit the loop and report a reversed “came from” list to construct a path between our origin and destination
here’s some of how i implemented that scary math and logic code, for if you like to torture yourself :’) with so much thanks to quill and their amazing channel for making these maths more accessible.


now, once i had followed quill’s tutorial through these 6 steps, customising things as needed to align with how i had already implemented the rest of my assets/scripts, i was so thrilled to check out how our pathfinding looked!
after coding for hours and being entirely ready to enjoy the fruits of my labor, i immediately got a set of errors, the kind that won’t even let the program start. :(
at first this really shook me because i thought i had followed the tutorial pretty intently, so i felt it was likely something i had chosen to change in the process. and how would i ever find what it was, among hundreds of lines of code i barely understood? i had put in the “returned without route” debug message just for thoroughness’s sake, not at all expecting to ever see it. i felt immediately that this revealed what a fraud of a developer i am - that this was confirmation of exactly what i had feared for years, what kept me away from this project: that i was actually incompetent, not capable of this. a lot of hurtful self talk started right away.
and i checked that right away.
i remembered that this was just one of many things i had made across the years, and because i had chosen to trust myself along the way, i would not stop trusting myself now - every change i had put into the code had been purposeful, intentional, and i could rely on that it was doing what i had asked it to do. instead of remaining hurt, i would devote all of that frustration and disappointment and surprise to sorting this out, the same way i had with a million other projects. i explored the code for hours, placing debugs along the process to clarify exactly what was happening at each step, which things completed and which didn’t.. eventually (among numerous other debugging efforts), i put in a few lines to color a given tile’s neighbors cyan, to make it clear if all the neighbors were being calculated properly. and immediately, it was clear they weren’t – so back to the code where we define how to find neighbors.

if the neighbors aren’t being calculated properly, that’s surely something that would mess up pathfinding, right?
i went through each line of code and adjusted the logic until each of the tiles i clicked show accurate neighbors in cyan.

yay! well, not yet. the way i had implemented this looked accurate, visually, but the underlying code later showed that there were extra neighbors being calculated (and some still missing?) along the edges. after another tiny meltdown and taking the night to breathe, rest, i implemented code that would tell me exactly how many neighbors each tile was reporting. and because i didn’t understand the math’s logic fully, i decided to do what i did know how to do: count. i went through and, checking tile to tile, explored exactly what was leading to mistaken or missing neighbors. it turned out to be that i hadn’t appropriately accounted for the (1) edge tiles, where x == 0 or the y is max, putting the tile at the top of the map, and (2) alternating offsets depending on whether rows were even or odd, how each column of the map snakes back and forth (in other words, adding 1 to y sometimes means putting a hex on the top left, and sometimes it’s on the top right).

solved! actually, not yet.

back to the code! i went line by line, continuing to add Debug.Log reports at any major step of the process: what’s our destination tile? “destination tile is...”
did we send this tile and a pathfinding call? “path call sent to map!”
did the map receive it? “path initiated in map.”
what’s our source? our target ..? and so on.
each step through this process helped me understand much more deeply, as i began to feel i was really grasping how and why the code worked (or didn’t work). eventually, i thought: if the code is no longer showing any problems in logic, maybe there are typos? so, i compared my code to quill’s open source files from their website. scanning, scanning .. found something!
an issue in scope. i had defined certain methods within loops, where they needed to be outside - and some were outside when they needed to be inside. a few curly braces later..

B A D A B I N G
B A D A B O O M
“Path complete - sent to unit.”
it works, and it makes sense why it works!
this little black line seems so small, but it represents that the game understands how to navigate basic pathfinding through the hexes -- something i have dreamed of being able to do for years.


and with that, i am going to rest in the beautiful feeling which is trusting myself, knowing there’s no reason i can’t do exactly what i dream of - that the difference between “i don’t know how to” and “i very much know how to” is just whether i’ve devoted the time or not.
in the next devlog, i’ll work on implementing movement costs/further heuristics to make the pathfinding even smarter, then tidy everything up aaaaaand.. whatever else i feel like. until then, with love and certainty that i am indeed a developer,
ahn
#unity#unity3d#gamedev#game development#game design#indie#indiedev#indie development#indie developer#pathfinding#final fantasy tactics#hexes#turn-based
0 notes
Text
devlog # 4 // hex tilemaps and pathfinding, part 3 (more foundation work)
so, we’re going to keep this one somewhat short (< a sign that this won’t be short at all), not only because this marks a logical place to pause before transitioning on to the next process/a slightly different topic, but because that next process - writing the actual code of our pathfinding - will be a very code intensive one. before we get into that, let’s do some tidying and prepping code ..
last time, we wrote code that would allow us to click on a tile and apply a color to it - the beginning of player-environment interactions! from there, however, we hadn’t implemented anything for the tiles to do beyond the coloring - and in fact, they could only be colored once, made purple forever more. (technically, the color would be changed to purple again and again in the program, but this change wouldn’t be visible to us after the first time.) instead of this behavior, one interaction we might want is for the tiles to be able to be toggled to a state and back - we can represent this with color.
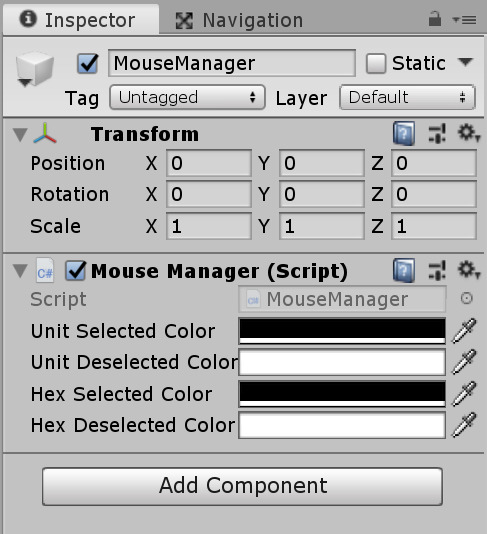
the most relevant code is (1) Click_Hex(GameObject hitObject), a method (i.e. group of closely related instructions) we’ve made that is called any time our mouse is over a hex tile and we click. and (2) the part where we get the mesh renderer (the thing that makes the hex show up on screen!) and look at its properties. rather than immediately just selecting to color the hex, we do a check to see “is the hex’s material already this color?” if not, we make it so, and if it is, we set it back to a default color.
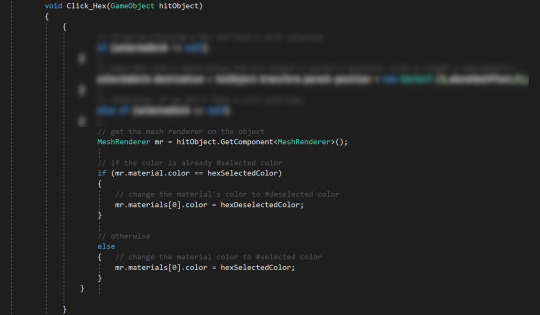
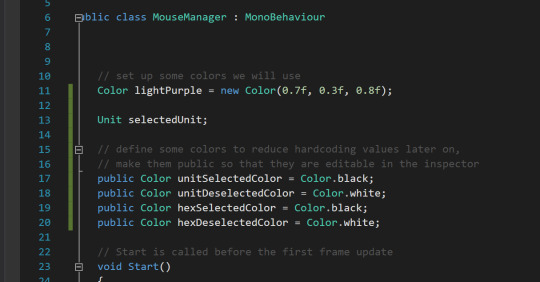
originally, we had also been hard-coding in the value of these colors, like: mr.materials[0].color = Color.black; this would mean that every time we wanted to change the color, we would need to find each reference to it in the code and make the change there. while this is definitely doable when there are only two references to the color, this quickly gets out of hand in larger projects and can lead to bugs later. so, we make it simpler: put references to these colors at the beginning of our class/script, one place where we can make global changes, and also make those colors public so that they can be visible/chosen in the inspector.
easy!
now, let’s return to the rest of the code in the Click_Hex method. what’s going on?
well, remember that this method gets called whenever we are over a hex tile and click it. but when we click on a hex tile, we probably need more than one response to be possible - we define possible responses here.
in this method, we’ve seen that one option is to get the mesh renderer and conditionally toggle a color back and forth. if we look above this part, we see that it’s defined by “else if (selectedUnit == null)”, meaning we only do this if .. well, what does it sound like? if we don’t have a selected unit.

the other possible response we’ve coded in is for if a selectedUnit is not null - in other words, if we have a selected unit.
(i’m not going to show the implementation here (because i am not entirely satisfied with it, nor do i fully understand it), but basically, we define elsewhere which unit is selected, if any; currently this is not a boolean, it is an object reference.)
according to this code, if there is a selected unit, then we set their destination to be the hitObject’s parent’s position plus a small bump up on the y-axis.
if this part looks confusing, it might be helpful to remember that: our hitObject is the gameobject which has a collider (which is the actual model itself), its parent is the neutral root (a prefab that helps us correct/neutralise rotations and other things that might upset our equations), and here, we are using the position (world space coordinates) on that parent’s transform (variables regarding size, scale, coordinates, etc).
translated into a more human way of talking, we’re telling the code: “whatever hex you hit, find the thing that holds it in place and copy that thing’s position -- the bring it up a little bit so that our unit isn’t inside the hex.”
is that clearer now? i hope??

we also quickly make a similar method to make our units have togglable colors + selectedUnit status as well.

alright, so we’ve managed to set up some distinct interactions in our code. (a) if we’re clicking a unit, toggle their color and whether they’re the selectedUnit. (b) if we’re clicking a hex and there’s no unit selected, toggle the hex’s color. (c) if we’re clicking and a unit is selected, set the unit to have a new destination point. here’s the code where we set that up, by the way:

currently, we are setting the destination as a simple Vector3 position, moving the unit in a direct, A > B kind of way. (also doing this in update, constantly, rather than at a fixed interval; in the future, we’ll put this movement into some sort of “movement phase”)
this is not our ideal implementation of pathfinding (yet!), which would be closer to A > b > b > b > B, but it does set us up nicely for the next part of the process, where we’ll be setting up those little b’s as intermediate steps towards our intended destination. g e t h y p e d.
here’s a screenshot of me doing 3 seconds of the actual pathfinding code before getting overwhelmed. :’) that’s what we’ll be doing next time.

anyhow, let’s wrap up here. you made it through a good bit of code! enjoy these lovely gifs showing how our implementation looks, thanks to the above programming.
(note that the “lag” in these gifs are not in the game; there is lag only because i made the video into gifs with only 7 or 10 frames per second!)
this first gif shows how we can click on tiles to toggle color, but only if no unit is selected. if the unit is selected, we instead move them!
i made the second gif almost immediately, only putting in a second unit with a different material. there was no messing around with the code in this part - how we wrote it, the code already supports having multiple units, but only one selected at a time. we’re awesome! that definitely was not unintentional!

currently, since this is not a very complete pathfinding, the units aren’t checking if there is already someone in a given tile, meaning they can overlap, move through each other, or be in the same tile. these are things we’ll worry about in the next devlog, since our pathfinding will help to address similar issues.
until then, enjoy these purple and teal spheres dancing with each other.
with love and a desire to comment every line of code,
ahn
#indie#indiedev#indie developer#gamedev#game developer#unity#unity3d#unity 3d#game#games#game development#final fantasy#final fantasy tactics#turn based
2 notes
·
View notes
Text
devlog #3 // hex tilemaps and pathfinding, part 2 (setting up a procedural map)
okay. procedural map generation, here we go!

last time, we talked through some of the options available for making tilemaps, namely hand-crafting maps or generating them more procedurally. after discussing a few benefits and challenges for both, i decided that it might make the most sense to start with the procedural side of things, so that’s what we’re doing today.
it all begins with one hex -- and a lovely tutorial.

i crafted this cutie in blender (a free modeling and animation tool). first, we make a cylinder and reduce its vertices to just 6, defining sharp edges. after that, we make a loop cut near the top, then scale down those vertices to add a bevel. just something simple to start with. export!
when bringing the model into unity, blender models seem to do lots of wild things, namely around rotations and scaling (for example, showing the hex as rotated 90 degrees on its side).

the model i’m using changed its orientation, position, and scale multiple times as i set it up, so rather than continue to mess with these discrepancies (namely differences in how blender and unity handle coordinate data), i decided just to orient and scale the model exactly as i desired, then child it to an empty gameobject. making this nested (an adjusted child object inside a neutral parent object) and a prefab (a template i could make endless copies from) assured that the tilemaps’ setup and calculations would be much simpler.
this image shows a few of the nested prefabs together, just to get an idea <3

here comes the scary part:
t h e C 0 D 3
i included (helpful?) comments in most of my coding today, so you can look more closely at those, but the basic procedure for setting up the initial map was as follows: (1) define that there will be a gameobject we’ll need a reference to - our hex prefab!
(2) define a map size as a vector2; in the tutorial linked above, quill does this in two different variables, but i don’t see why using a vector2 would cause any problems and it’s cleaner, so we’ll see
(3) in the start function (aka when i press play on the game), execute a for loop that goes through each of the x-y coordinate positions and instantiates (creates) a hex there note: our y coordinate is placed in the 3rd position of the Vector3, which actually represents the z-axis. i set up the coordinates this way in order to preserve our y-axis as vertical. things can certainly be set up differently, and the first few times i programmed the coordinates this way, it used to confuse me quite a lot :o

from there, we get something that looks like this:

so, not exactly ideal-appearing yet, but really quite close to what we need. it may be difficult to identify just by looking, but what’s happening is that the tiles are overlapping because our code is not adequately describing how much space to leave between them. for this, we set up offsets on each axis!
at first, i added multipliers in around the instantiate call so that the tiles would be spaced further apart when created, but i quickly realised this was not a very clean solution. instead of trying to figure out “okay how much do i need to modify the x position, due to the size of the tile?” and hard-coding in those values, i decided to adjust the hex model (inside the prefab) to something that would allow the tiles to be centered at whole numbers (1, 2, 3..) along the x-axis. although there were still hard-coded values for the offsets, these should ideally never change and the rest of our code remains clear, without any surprise, unexplained numbers.

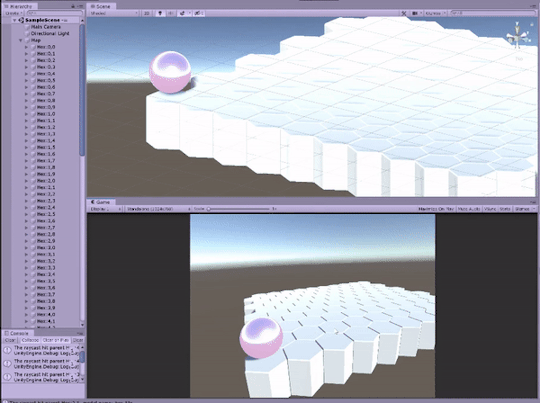
once adjusted, this code results in quite a pleasing set of tiles, or as pleasing as a plain white geometry can be:

and as mentioned before, this gave us cleaner positions along the x-axis, something i hope will be helpful later:

here, i decided to implement a few mostly cosmetic changes, to help things be more organised in the hierarchy - childing every created tile under the map object (which is where the map-generating script is placed) and giving each one a name based on its tilemap coordinates:


so, now that we have these tiles set up, how do we actually .. get them to .. do things? how do we interact with them?
well, following quill’s suggestion in the tutorial series, i create a mouse manager (a script i attach to an object in our scene) which will help us interact with the tiles.
ignore the "Color lightPurple” line for a second; really, the magick starts with our ray. this is an invisible line which begins at one point and is cast out in a direction, for a certain distance (or eternity!). fortunately, unity offers us the function of “Camera.main.ScreenPointToRay” which can take our “Input.mousePosition” and draw a ray between the main camera’s location and the screen coordinates where our mouse is placed. in other words, we are a little closer to being able to click on things! once we send out the ray, it says “i hit something” or “i didn’t hit anything” - if it does hit something, we give it the data structure of “hitInfo” and say “hey, fill this out so that we can know what the ray hit.” since this is currently in the update function, we will get this information back every single frame. every frame that our mouse is hovering over/touching something with a collider, our code will tell us the name of that object.
then, lastly, we set up to receive mouse input - aka clicks. this code says “when i let up from a left mouse click, grab the mesh renderer component on the ray-touched object, then change its color! that’s why we defined a color up top, in preparation of having many custom colors we might specify in the future.

and this is what that code looks like in action, as far as the clicking:

and lastly, a pretty view of our geometry <3

so, in summary, today we:
- created a hex prefab with a non-absurd rotation and scale
- set up a grid of those hexes which will automatically be spaced out appropriately
- made it so that we can hover or click on a tile and not only get back information on which tile it was, but also effect changes to that tile
whew.
we’re well on our way.
in the next devlog, let’s aim to set up more complex click interactions (like selecting tiles for movement, toggling colors, hovering one color but clicking to change) and some basic pathfinding to be able to move our player from one space to another. maybe we’ll even explore a bit of customising tile colors, heights, and textures to create biomes .. or perhaps save that for another time. with love and a hex-based personality,
ahn
#hex#hex-based#hex tiles#hex tile#final fantasy tactics#rpg#tactical#tactical rpg#gaming#yeast infection no more program#indie games#indie#indie developer#indie development#procedural#procedural generation
0 notes
Text
devlog #2 // hex tilemaps and pathfinding, part 1 (hand-crafted or procedural?)
so, here we go. the thing that has kept me – for months, if not years – from really getting started with making zodaia: making pathfinding for a hex tilemap.

in order to get started, it will be helpful to understand exactly what is involved in setting up pathfinding – or maybe what pathfinding is in the first place. pathfinding is the system that allows a player to choose a character, see their potential movement spaces, select one, and move there while considering the most optimal route (if all goes as planned); more specifically, pathfinding most involves the “see their potential movement spaces” part, something which usually involves some slightly complex logics, maths, and programming.
what processes, exactly, are necessary to set up a functional pathfinding system, as i need for zodaia?
(a) create a tilemap, hand-crafted or procedural
(b) scan each tile, indexing available tiles to a list (array?) of some sort
– while scanning, store data such as tile coordinates(?), height, type of terrain, whether walkable, if hidden item underneath, if portal
(c) select a tile (player or interactable object) with mouse input (raycast?)
(d) calculate which tiles are reachable, based on character movement range and terrain movement costs, then highlight these tiles
– calculate the most optimal route to the currently targeted/hovered tile, the path which presents the least movement costs
(e) select a tile from highlighted tiles to confirm and complete movement
– more advanced: allow players to drag/scroll their path of choice while hovering, not just the most mathematically optimal route
(f) complete movement (animations here) and any movement-related data (such as if the player will have any remaining movement available after)
let’s start with that first part. in creating a tilemap, we have a few of considerations, namely the differences between hand-crafted and procedural maps, their benefits and challenges:
hand-crafting.
with hand-crafted maps, i am personally placing each tile and feature (the trees, rocks, water, sky, npcs..) that goes into a given level. the benefit of hand-crafting is mainly that i am able to make each level something that feels really organic and aligned with my specific aesthetic ideals; i am able to directly shape the feeling of the level to be exactly what i want, making each level something remarkable. this is one way i plan to support the story, the lore, of the game, designing locations which the player will come to recognise across playthroughs.
the image from our first devlog is actually part of a hand-crafted level design; notice that there is a sort of tone to the image’s feeling?

the main challenge with hand-crafting, however, is that i am not sure how to index tiles to a list for pathfinding, given that tiles will be at varying heights and some may not exist at all (imagine gaps or tiles which are marked as non-traversable, not available for movement, such as trees)! one option i see is to keep a list of possible tile locations and then loop a raycast through that to form a list of currently available tiles, checking underneath where tiles are expected to see if they’re actually there. another option i see is to explore unity’s pathfinding system, though i am doubtful it meets my specific needs for this game and, even if it did, i would like to understand pathfinding enough to make use of a custom system.
procedural generation.
with procedural maps, i am still very much involved in the design of each level, but rather than placing individual features, i define various parameters that place features automatically. many people think that procedural generation means random generation, but any well-defined procedural system also involves conditions, limits to what is possible – these limits meaningfully define the feeling and atmosphere of a level.
i can tell the creation system to keep tiles within a certain height of one another, relatively flat with some waves, and to place a few rocks and minimal, short grasses, also choosing sandy colors for the tiles and letting the game know what kinds of weather (breezy, hot) and creatures (snakes, scorpions) i’d like to be here. with this, i may be defining a pattern for a desert landscape, something i can use to automatically create numerous somewhat “random”-seeming desert areas for the game. by tweaking these variables, i can also create patterns for glaciers, forests, plains, and much else.
the two images below were created entirely (and instantly) from one single hex model, the rest in code; nothing was hand-placed! these are basic, but one can also generate various landscaping models to really enrich an environment.


the main benefit of procedural generation is that i am able to create many, many varied levels quite easily, something which helps maintain some unfamiliarity for players; the game changes somewhat between each playthrough, crafting areas the player has not seen before. another major benefit of procedurally generating levels is that it resolves the main challenge in hand-crafting levels: as the tiles are defined automatically, i can also automatically index those tiles as they are created.
lastly, the main challenge in procedural generation is that even if the player has not technically seen a level before, they may *feel* as if they have already seen it before. think to no man’s sky, a game which features procedurally-generated worlds with semi-randomised creatures and color schemes and everything. while the game offers millions of worlds for the player to explore, many players remark after some hours that each new world just feels like a rearrangement of all the things they’ve seen before. creatures on planet A may have long, red wings and a short, speckled snout while creatures on planet D have short, speckled wings and a long, red snout.
[top image, fandom.com/articles/the-weirdest-creatures-so-far-in-no-mans-sky ; bottom, pinterest.com/pin/401453754264993498/ ]


from what i have observed, this does not always create a meaningful experience for players; often, this does not inspire story or feeling, other than frustration. in procedural systems, players become quickly aware of the underlying patterns making up the “random” levels, something which leads players to feel like content is really limited – which is exactly the opposite of what a procedural system hopes to communicate. in crafting procedural levels, i will need to focus sharply on the task creating *meaningful* variation, bringing the process close to creating something that feels as rich as if it were entirely hand-designed.
a balance of both?
i want to weave zodaia’s world together with both hand-crafted content and content which is crafted more procedurally, balancing things which the player can become familiar with as story-landscapes and things which are unique to a specific playthrough. fortunately, i am already quite familiar with hand-designing and have also set up some basic procedural content before.
for this current intention, i think it will make most sense to start with building a tilemap procedurally so that i can start on the more math- and programming-heavy side – again, because this is what scares me the most. once i understand these concepts more comfortably, i will have a much sharper idea of how to apply procedural processes over hand-crafted maps.
in the next devlog, we’ll start with one tile and build out from there, all in code.
with love and a tangible aversion to list-looping,
ahn
#gamedev#indie dev#indie developer#indie#game dev#game development#game design#rpg#fft#final fantasy tactics#procedural generation#level design#art#mood#feeling#tone#math#programming#algorithm#no man's sky
0 notes
Text
devlog #1 // the journey so far

welcome – i’m so glad our paths have intersected!
my name is ahn and this blog is to collect the thoughts, questions, art, and bits of code that make up my journey in game design and development. here, i’ll be sharing the various parts of my learning as i come to know the art of making games and other things which help us dream, fiction that inspires and helps us find meaning.
namely, i am making this blog to hold space for + commit to one project in particular – zodaia – which will be the focus of this first devlog.
what is zodaia?
zodaia (working title) is the dream of a game that i have been building for .. at least 5 years, as a concept. more technically, it is a tactical fantasy rpg set on hex-tile maps. more loosely, it is the game i have always wanted to play and hoped other games might be, something primarily inspired by final fantasy tactics, my favorite game of all time and the game which informed so much of my childhood.
what are some defining features of zodaia?
probably the three most defining features of zodaia are:
(1) a richly spiritual lore, with a strong focus on astrology and magicks
the gods of this realm are those of the western zodiac, manifest as tangible beings you can interact with and request favor from. the story revolves largely around how you ally yourself with, honor, or defy these gods and their various desires. there is a strong focus on themes of time and how this cosmic force shapes the events of the world (particularly through parallel realities); those who observe sharply and make themselves aware of patterns are rewarded manifold.
(2) a deeply customisable class system
there are currently more than 36 specialised classes the player can choose from, selecting one as a primary and another as a secondary – each of these classes has their own weapon preferences, stat bonuses, as well as myriad active and passive skills. with skills not limited to use by any specific class, the player may change their setup frequently in order to explore new strategies and identify the playstyles they most identify with.

(3) a responsive, interactive environment, in and out of combat
players will be able to visit various types of landscapes, each with its own weather patterns, landmarks, and inhabitants. each terrain will noticeably affect how players navigate combat – with tiles having height, being of certain elements, defining tactical advantage/disadvantage – and can be interacted with more generally, as well: players may tend to plants that grow over time, destroy certain landforms to reach new areas, discover hidden items in the map, and much beyond. players who visit the same location at different moments will also find those landscapes changed, as time renders each land differently.
how far along in programming + development are you?
in terms of my current experience making games, i have developed at least two projects, both relatively tiny in comparison to what zodaia will be. i have gone back and forth on the idea of whether to focus on many iterations of a larger project or practicing/learning skills by completing various smaller projects (i am not yet decided and expect i will never be fully decided).
through these experiences, and many more projects i’ve explored but not turned into complete works, i have gathered (what i see as) a fundamental understanding of general programming concepts, 3d modeling/blender, C#, and unity. i have done many, many, many tutorials to make a thing (models, 2d sprites, inventory UIs, landscapes, saving systems) but have not often put them together into one central “thing”. (p.s. the image at the top of this post is from one of the early scenes i built for zodaia, showing some models i made and put together a while back!)
for this reason, while zodaia is very much developed in terms of its concept and gameplay, it is almost entirely undeveloped in terms of actual code/programming built. aka there is no lack of documents detailing lore, gameplay, design and the like, but any code, models, and other developmental assets are either non-existent or scattered, remnants of past works.


that’s what i intend to change – i am making this blog as an intention, a determination, to gather all of my skills in roughly one place and focus them on roughly one work. it’s time to start thinking of this as a real thing, something which doesn’t yet exist as i desire but only because i haven’t put the hours into making it so; what is separating me from my dream is devoted time and labor.
so, how do i plan to get there?
i think one of the most important things in this journey is going to be accountability – a way to assure that i am showing up and remaining invested in doing the work i want to do. largely, this means being accountable to myself, but it also means making my work accountable to others, which is why i’ve chosen to make this blog, something public and visible! (perhaps i will write a separate post on what accountability will look like..)
beyond that, the next most important thing i see is simply skill-building. there are various things i don’t know how to do and – as mentioned above – i don’t know how to do them (at least at the level i need) because i haven’t yet put enough time into them. some of the skills i see i will need to develop are:
- programming stats, class, skill systems
- designing UIs that scale as desired
- improving my artwork (or finding a process within reach that i still find pleasing)
- sculpting models
- understanding shaders and materials
- post-processing
- rigging characters
- setting up animations
- building networking, potentially? (multiplayer, eh?)
- saving and protecting data
- optimising performance
aaaaaaand one, in particular, which has been terrifying to me for years: programming pathfinding on a tilemap. meeeep.
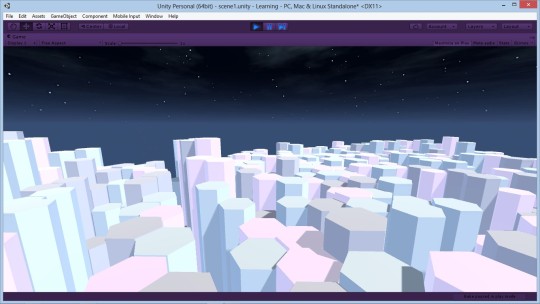
however, because that is the thing that terrifies me most, that’s exactly where i’ll be starting. keep an eye out for the next devlog, where i’ll be exploring all the things that inspire and frustrate me about pathfinding – we’re going to get there one way or another.
thanks for reading! if you have questions about the game or my experience or anything else, please submit it and i’ll be sure to respond.
with love and endless dreams of rpgs,
ahn
#gamedev#game dev#game development#game design#games#video games#rpgs#rpg#final fantasy#fft#final fantasy tactics#unity#blender#devlog
2 notes
·
View notes