#i would just love to make a tutorial on it ^_^
Explore tagged Tumblr posts
Visit Tumblr Blog
Explore Tumblr blogs with no restrictions, modern design and the best experience.
Last Seen Tumblr Blogs


Fun Fact
Tumblr.com rank in the US is 25.
Text
Hey! Thank you both for you input @kayleigh-83 and @black-plumbob. In the interest of keeping the original post (relatively) short, I didn't go into a huge amount of detail regarding my feelings on monetized youtube tutorials but now that some people have mentioned it, I wanted to provide clarity on my position.
So, a while back a popular Sims 2 youtuber decided to make a video of this tutorial. They did not ask me about it beforehand, and they did enable ad revenue on the video. Furthermore, they decided to credit me, alone, for this method of sims making. I made it clear in the post in question that I was iterating on @lilithpleasant's original idea, but this youtuber didn't really mention her at any point, and dubbed this method of townie-making "the Pooklet method" which ... it's not. It's just my iteration on Dee's townie-making method.
When I approached this youtuber, I told them that I didn't think it was acceptable for them to be receiving passive income from reciting the steps of a tutorial that I wrote out for free, using a method shared by a friend of mine whom they did not credit. Their response was "oh, well, I only made $140 of ad revenue off of that video!"
So, @lilithpleasant shared the original idea, for free, I iterated on it and shared my version with someone who asked about my townie-making method, also for free, and then this person came in, repeated those steps to their audience, completely ignored @lilithpleasant's foundational contribution without which my iteration wouldn't exist, and made $140 doing it.
I'm totally aware that there are ads placed on videos by youtube itself that creators have no control over. There's nothing anyone can do about that and I don't begrudge them that. But in this case, this youtuber did intentionally enable their own ad revenue, and they seemed genuinely bewildered that I was irritated with them when they "only" made $140 off of the work that @lilithpleasant and I provided for free. For me, the amount of money that they made isn't the issue, it's the act of monetizing what has been given to you for free. If they had "only" made $4 in ad revenue, I still would have thought it was annoying and scummy.
Had this person asked me ahead of time how I felt about them making this video, I would have 1) asked @lilithpleasant for their input, which is just as valuable as mine, if not more so, given that the original idea was hers, and 2) asked that this youtuber not enable ad revenue on the video. Because their contribution isn't worth more than mine. And that's the value judgment that people make—be it consciously or subconsciously—when they decide to monetize someone else's freely-provided resources. "I got this from you for free, but I deserve to be compensated for my time." And I think that's just kind of a shitty way to behave in a community that is very intentionally built on sharing.
I absolutely support making videos of tutorials for accessibility reasons, or just for fun. I love a good video tutorial. But @lilithpleasant and I shared this information for free. For fun. And if other people want to iterate, or share the tutorial in different formats or languages or what have you, I expect them to do it the same spirit. For free. For fun.
A quick-ish guide to the culture of The Sims 2 modding community.
Are you new to The Sims 2 community? Are you coming from more modern games, either in The Sims franchise itself or other contemporary games? Are you excited to start your #brand and become a #simfluencer and post your #earlyaccesscontent to support your #sidehustle?
Have a seat, then! Let's chat.
Hello, friend! My name's Pooklet. I've been playing since 2004 and creating since 2007. I'm by no means an expert in most forms of content creation itself, but I've been around since the heyday of The Sims 2, I've watched how community opinions have shifted (or not) since practically the beginning, and I'm hoping to give you a basic outline of the community culture that you can expect to encounter as a newcomer.
A very brief history of Sims 2 content monetization:
People have been trying to monetize content since there has been content to monetize, all the way back in the days of The Sims 1. We tend to call them "pay creators" and their websites "paysites." Some big names in this arena include The Sims Resource (their free-with-ads model is a relatively recent development, which is why you will find people to this day calling them T$R), PeggySims, Newsea, and many others that you can find on this handy website:
Paysites Must Be Destroyed
Now, if you have a glance at that website, you might be saying to yourself:
"But, that's illegal! I own the copyright to my custom content!"
Alas, no! Due to the wording of the End User License Agreement for The Sims 2, no custom content creator owns their creations for this game (or The Sims 1, or 3, or 4, for that matter, but we're talking about 2 right now). It all belongs to EA at the end of the day, and by installing and playing the game, you have agreed to these terms. Which means you have no individual, protected copyright, and it is perfectly legal for someone to download your paywalled content and then reupload it for free for others to enjoy. And they will!
Furthermore,
You are not making anything alone.
Everything from modding resources, to tutorials, to the mods required to fix disastrous glitches in the game code and make it playable at all, to the third party programs used to make any and all custom content, such as SimPE—all of these have been provided to you for free by other creators, many of whom have a usage policy that asks that people not use their freely-provided tools to make a profit. Although no one can be forced to follow a creator's policy, it is generally considered good manners to not try to make a profit off of someone else's free work. And if you are using these tools to make paywalled content, that's exactly what you're doing.
Pay creators have been ignoring these policies since the beginning of time, and so free creators likewise ignore their policies against sharing their paywalled content. Pay creators have also tried lots of different ways to keep their content exclusive, everything from trying to track leaks with slightly altered files to actively filling their content with malicious code. It has never worked.
Free creators have always found a way around these barriers. In fact, it's taken as something of a challenge to undermine monetization efforts. As you can see from Paysites Must Be Destroyed, there are entire teams of players devoted to reuploading paywalled content for free.
A culture of sharing.
The Sims 2 is something of a time capsule. At 20 years old, it predates a lot of the hyper-capitalist hustle culture that has infested every creative hobby. It is from a time when monetization was an outlier rather than the norm, and a much maligned outlier at that. This attitude has persisted for 20 years. Believe me when I say, you won't be the combo breaker. Especially now, given that The Sims 2 is not the most contemporary in the series and the community has shrunk considerably, down to the people who have either been here for a very long time, or newcomers that understand the community culture.
Also, it's just kind of not a great idea in general to try to make money off of a 20-year-old game with a pretty small community?
Like, I get that The Sims 4 is really saturated with pay creators and it's hard to get a foot in the door. I get that you might look at The Sims 2 and think that the small pond will give you room to be a big fish. It won't. You might get a handful of people willing to pay for your content, but at least one of those people will be resharing it for free.
Paywalls vs. optional donations.
Okay, so hopefully you now understand why people don't like it when you put content behind a paywall. But what about those Ko-fi and Paypal donation links you sometimes see at the bottom of people's downloads? Why is that okay, but a locked Patreon tier isn't? Well, because they're voluntary. No one is obligated to pay for that content to be able to download and use it. It's just a way for someone who does have a little extra cash to basically "tip" a creator whose content they like. You have no way of knowing whether the person who posts those links is actually receiving any donations. And that's kind of the point. Whether or not they receive any donations, they are still sharing their content, because they enjoy the hobby of making and sharing content.
"I can't make a living off of that!"
No, you can't. Because that's not what we do here. That is not part of our community culture for all the above reasons. If you want to make a reliable income off of your hobby, you're going to need to get a different hobby. Try Second Life! That is a community that actively encourages monetization. The Sims 4 allows for "early access" monetization. There's options out there for you, if what you want is to make a profit off of your creations for a game.
"Fine, what about monetized link forwarding services?"
Link forwarding services historically have malicious trackers or viruses embedded. People will also strip those and provide direct links to each other. Or they just won't download your content.
"What if I want to make YouTube videos of someone else's written tutorials and I enable ad revenue on them?"
Personally, I still think that's a dick move. I love video tutorials, I'm a very visual learner myself, and although you might feel entitled to compensation for reciting the steps of someone else's tutorial into a microphone and then editing and uploading the video, you're still monetizing someone else's freely-provided content. I would consider this an 'ask permission' scenario, one in which you tell the person, explicitly, that you will be making ad revenue off their work. If they're fine with that, then you're good! (For the record, I'm not fine with that.)
"What if—"
Look, no one can stop you from trying to monetize your content, or worse, someone else's content. But you will have the exact same arc as every pay creator who came before you: your efforts will be undermined at every turn, your reception in the greater community will be chilly at best, and it will become a battle between you and the folks resharing free reuploads of your content until any fun you initially had making content is gone.
"The steady erosion of every known social safety net beneath the crippling weight of end-stage, line-goes-up capitalism and the yawning abyss of poverty over which I am dangling has imbued me with such anxiety that I cannot engage with a hobby that precludes monetization. I am exhausted. I know no other way."
I get it, friend! I have lived in poverty all my life. I do not begrudge the impulse to find a way to make passive income off of your every waking moment. Increasingly, it seems like that is the only way to survive! Unfortunately, you will not be able to do that with this specific community. We know that we have something special here, having resisted monetization's encroach for so long, which makes us fight all the more viciously to maintain it. You are entitled to try to find ways to supplement your income, just not here. Personally, I consider that a feature, not a bug.
Bonus Round: Remember, That's Not Just Yours!
I said it earlier, but I want to reiterate: you are not making any TS2 CC alone. You are making it with tools, resources, knowledge and code that people have provided on the condition that they not be used for pay content.
To use myself as an example, "my" hair textures are a blend of resources provided by other creators. Namely, Nouk's original hair texture was edited by Vintage D, which I then further edited over the years, using parts by the creators Ephemera and Helga. It would be extremely shit of me to say "well, I think that the time that I put into my edit is worth money, so I'm charging for it" when the edits that I made would not exist without the work of those people. And it continues on down the line with edits that other people have made of my texture blends and color actions, and the content they make with them.
(If you see someone charging for these, btw, lemme know. I'd love to have a talk with them.)
In closing,
The knowledge base, the resources, the coding required to make any and all working content for The Sims 2 has been compiled for 20 years. Please understand, I'm not trying to denigrate anyone's creativity when I say: you cannot bring anything wholly "new" to TS2 CC-making, something that uses no one else's resources or programs, something you can point to and say "no one helped me with that. I did it all on my own. It is my property." Nor should you aspire to! The fun of The Sims 2 community is to share and share alike, to credit each other for our contributions, to hype each other up and iterate on shared works and resources. We've been doing it for 20 years, and hopefully we'll be doing it for many more! Wanting to be a #simfluencer is utterly antithetical to the community culture. No one is influencing anyone else. You need to leave that shit at the door if you want to be invited in.
TL;DR:
Don't show up to the commie circle-jerk trying to charge for handjobs. We're already giving them to each other for free, and nothing about your wrist technique is special enough to justify the cost.
#the sims 2#ts2#long post#i won't lie i almost quit making ts2 content entirely when i found that monetized tutorial.#it immediately killed some of the joy of it for me to know that even TUTORIALS that i made could be turned around and monetized.#p.s. if you know the youtuber i'm talking about please don't mention them by name.#i'm not trying to send heat their way three years after the fact i'm just referencing this incident to provide context for my point of view#i already talked to them privately and asked them to disable their ad revenue and donate what they had already accrued to charity.#they said they would and i took their word for it.
206 notes
·
View notes
Text
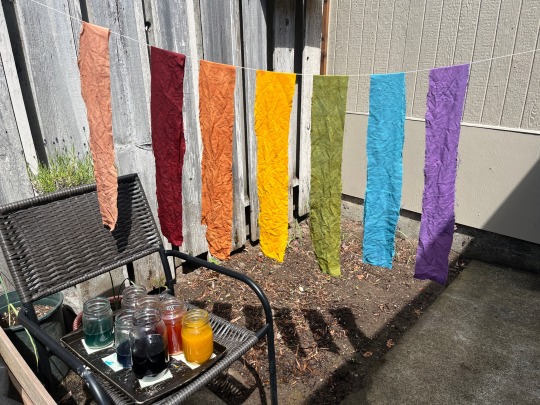
i loosely followed thedimelions’s tutorial for naturally dyeing a pride flag, with a lot of added research about natural dyes, stains, mordants, sewing, etc, and i wanted to share my results!!

process, notes, and more pics under the read more🌱
starting off i soaked my fabric (100% cotton acquired from joann's during their closing sale, rip joann's ;-;) in a 1:5 mixture of soy milk and water for 12 hours, then let dry on a clothesline in the sun, then dipped and dried two more times (the proteins in the soy milk help the natural dyes adhere to the fabric, creating darker colors and better colorfastness)

while that was happening i started making my dyes, which involved simmering my chosen dyestuffs in some water for 30-60 minutes. i didnt time it, just went until the color developed to a point i was happy with


as far as ratios i didn��t measure, but the more dyestuff = stronger color so err on the side of more
red: turmeric + baking soda, paprika, and yellow onion skin dye as the liquid base
orange: yellow onion skins
yellow: turmeric
green: red cabbage + baking powder (LOTS), turmeric
blue: red cabbage + baking powder
purple: red cabbage
for the red cabbage dyes, i added the baking powders and soda after simmering and just kept adding and stirring till i got the color i wanted. ((BIG NOTE red cabbage, and debatably most of the others that I used, are fugitive dyes, meaning its not a true dye and more of a stain that will fade with time and wash out more easily, especially without mordanting on additives like iron. keep this in mind if you end up doing this project or transfering these methods to cloth you will be using for clothes, ie washing and wearing more frequently))
i also tried to make a pink with avocado skins and pits, which did come out a lovely rosy color, but i didn’t end up using in the final flag, which i might use beet or red cabbage + lemon juice or another acidified for next time to get a more bright pink

now with my dyes ready and my cloth dried out from its previous soy milk dip i cut it into strips and stuck it in the jars, which were placed in the sun for the day (alternatively, you could simmer the cloth in the pot) and then left to sit overnight
the next day i squeezed out the excess dye and gave the ones with turmeric a light rinse to get the grit out, then hung them to dry
((small note i reused the dyes baths to see what would happen since they still looked just as pigmented, but the colors are much much much more faded on the second go around. all in all its doable, but I wouldn't recommend it.))

now time to sew! i procured a second hand sewing machine specifically for this project and had never sewed before, but thankfully this required the easiest stitch in the game (a straight stitch in a straight line). i looked up how to sew a flag specifically to get those clean lines rather than just overlapping, and this video was great (shoutout Suffolk Public Library)


as you can see my flag ended up quite long cause I left a lot of wiggle room, so I just look up flag ratios, trimmed it up (and used the extra strip of rainbow as decoration) then added a white strip folded over to make a way for me to hang it on a stick if I ever so desire.
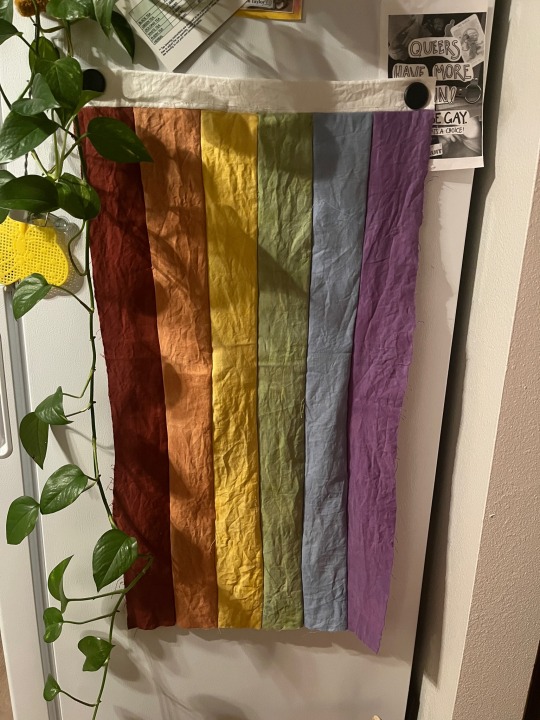
and ta daaa! i would still like to clean it up a bit, and do a zig zag stitch around the outside to stop the cloth from fraying further, but im happy with the unpolished look of it. once i figure out how to get a pink I like, and how to get browns and blacks, i want to make a progress flag and trans flag. also just started growing some indigo, so excited to see if I can get some blue dyes out of that.
65 notes
·
View notes
Note
I have been staring and admiring your piece of the holiday/dreemurr kids at the piano, and it’s so beautiful. The rendering is honestly the nicest/ most appealing rendering that i’ve seen in my opinion, i was wondering if you would share your process or a tutorial of sorts? No pressure, your art is so lovely and i strive to achieve a similar look someday :)
oh my goodness thank you!! 😭😭😭😭 thats such high praise.. and of course i can share!
so basically how i went about this is, this drawing came second to the first one, it literally ocurred to me in the middle of rendering the dark world kris and a lot of the composition choices came from the contrast between them. the timelapse starts with an already-laid-out piano sketch cuz i had to correct the perspective on the first one so many times that i took this shortcut for more accuracy, afterwards i did a quick sketch of the poses i imagined and very loosely arranged the background... i shouldve honestly used perspective lines but im too stubborn about them. anyways speaking of perspective, in the first one not only did i want to give it depth but also incline it somewhat, you will see its not exactly on a horizontal axis but tilted slightly, this is because i wanted to evoke a sense of instability/of being pulled in. so with the second canvas you can see me tilting it as i go to be a proper mirror to the first one.
enough talk on perspective (esp considering u asked for rendering particularly)... lets talk colors! so particularly for this canvas ill say.... the holiday kitchen was a bit nightmareish in terms of color palette bro its SO WHITE. you will see i went back and forth a few times about what tone to make the piano, the background, etc, so as to not be too bright next to the characters. speaking of which, i colored them first under the sketch and immediately started shifting hues, values, trying to find the vibe i wanted, because of the way i render, which is by merging the lineart with the color layer, this is because i like rendering to feel like im "sculpting" out my drawing, its easier to control shapes and textures this way (for me), i do understand it's not the most efficient one tho! sometimes i do make separate layers for complicated details that i dont want compromising the whole layer. i primarily use lasso fill after merging the layers because it gives off a cleaner look, and its much faster to manipulate the shapes and silhouettes with it (this is a core thing in my recent art cuz,, i used to spend waaaaay too much time doing everything by brush and at some point it started not only limiting me but putting me off from rendering altogether). then i used some textured brushes here and there to blend some colors and to deliberately place lineart where i want.
this piece in particular had a looot of back and forth of switching the character's palettes and outfits so that they could bounce off of each other better and make the viewer's eye navigate through more than one focal point. i wasnt planning on anything more than a subtle shadow here and there but i felt like the characters lacked a bit of depth, so i added shadows and highlights appropriately (always playing off from the base color of the thing im rendering, be it skin, clothes, i work the colors individually so that it feels less predictable). afterwards you just have to adjust the lighting on the background, figure out which details you want to make stand out (as u can see im not too overly detailed on background elements, just enough to properly suggest the room), and .. you're done!!
52 notes
·
View notes
Note
I am currently learning digital art and I love your style, is it ok to use your art as reference to study drawing? I don't want to copy you, just better understand this way of artwork
I usually ask not to use my art as a reference because in the past when I gave permission it still resulted in direct copying and people then had trouble coming to their own direction (and also copied all the mistakes I make). I would advise you to use traditional masters as references + you can find a lot of tutorials in the public domain now! Thanks for understanding!
30 notes
·
View notes
Text
i think once i move out of the apartment im currently in i would love to lock in and start doing youtube content... like sketchbook tours, draw with me, materials i use etc or even tutorials on materials!
i just lack the lighting, space and my phone will absolutely not cut it for camera work =(
but sooner rather than later i would love to start!
#i see yall loving the colored pencil drawing i did and its a lot easier than youd think to blend!#i would just love to make a tutorial on it ^_^
69 notes
·
View notes
Text
a reminder to young/new artists;
YOU WILL GET THERE EVENTUALLY.
i promise you, you will get there eventually. you will have the art style you've always envied, the quality you thought you'd never reach, the skill you think you don't have. you will get there.
you just have to keep going.
#and i know that's not easy. i have been there. every artist has.#but no one gets where they are through lack of effort and practice#you dont have to follow fancy tutorials. you dont have to do fancy lessons. you dont have to do anything other than-#-doing what you love. doing what makes YOU happy. i promise you YOU WILL GET THERE.#take it from an artist that thought he never would. you will get where you want to be.#a talking bunny#feeling sentimental :') realized im the artist young me always dreamed of being and thats just. hoohkjghfgh#i never thought i'd get here. so. something for artists that may be like me#U WILL GET THERE!! IF I CAN SO CAN U!!!
207 notes
·
View notes
Text
Mayblade D-3 & 13 | Eyes + Jewel
#the eyes are inspired by 'Who made me a Princess'#I love the jewel eyes in wmmap and found a tutorial so i just had to make this!!#in the live2d animation for this artwork the eyes were going to sparkle and bounce everytime they would open#but it ended up becoming so stiff instead#i didnt like it one bit#such a shame because i think the artwork itself is so pretty#oh and the hair was supposed to sway and bounce too#nevermind I'll work on it again and make a better one next time#beyblade#max mizuhara#beyblade art#mayblade 2025
67 notes
·
View notes
Text
Silly idea of Snow being Meta Knight's child or that he took her under his care
Actually, this could be canon 🤔
#kirby oc#kirby#snow white mahoiku#snow white#meta knight#kirby meta knight#they would have a really silly father and daughter dynamic#i love drawing wings BUT I FEEL I DEFORM THEM A LOT#like. does this make any sense??????#I don't watch tutorials or anything i just analyze others people art and use them as a guide#i... never liked tutorials or art class#i just do what i want in the way that's more... comfortable for me
33 notes
·
View notes
Note
19 and 20 for the Artist Ask Game! :D
What's your biggest insecurity when it comes to your artwork?

What motivates/inspires you artistically? (topics, emotions, etc)

#GUESS WHOSE ASKBOX IS WORKING AGAIN!!! at least on my art blog#I hope these make sense I'm half asleep right now BUT!!!!!! THANK YOU FOR THE ASK!!!#I feel like it's hard to pinpoint my insecurities with the art itself beyond just that it will be perceived by others because the specifics#change for me often ... but I used to be really insecure about how sketchy and loose my art often tends to be. I have a hand injury and a#slight hand tremor that makes it pretty hard to really fine tune stuff smoothly and at the time there was this really big push in the art#crowd I was in that drawings needed to be Super Clean and Smooth and tutorials and stuff would make rude comments about art that wasn't#and I felt like I could never be good enough because of it#I don't think I have much of that insecurity left anymore?? I LOVE sketchy art <3#bob asks#nattravn#ask memes#memes#Bob#my OCs#River#Psavine#Ersa#who hasn't shown up on this blog yet
18 notes
·
View notes
Text
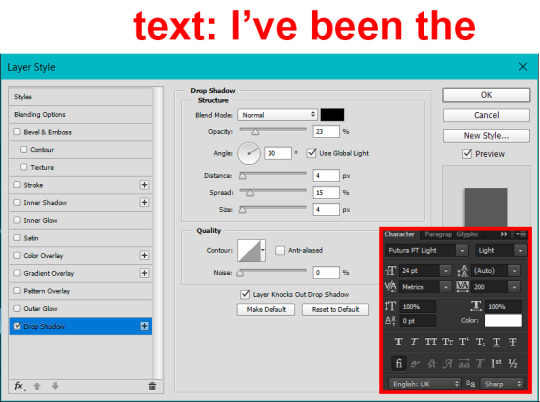
How To Gif: Glass Shatter Effect
By popular demand (ie, 7 people who voted in this poll), here is a tutorial on how to do the glass shatter effect I used to create the first gif in this set.
I use Photoshop CC 2015 (yes I know it's old) for my gifmaking, but you should be able to apply everything to newer versions of Photoshop. For this tutorial I'll be assuming you know the gifmaking basics, but if not, I would recommend this tutorial, which is the process I use to make gifs. Note that this particular process involves saving all of the frames, importing those frames into Photoshop, and then using an action to convert to a smart object.
Keep reading below the cut to learn how to do this effect!
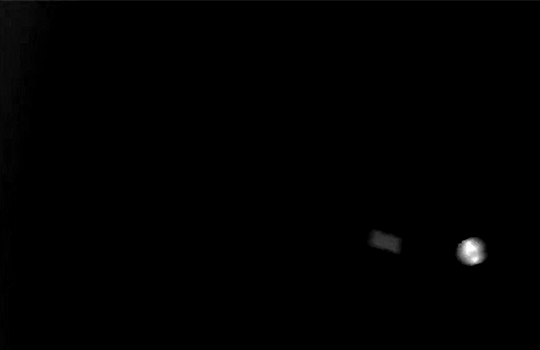
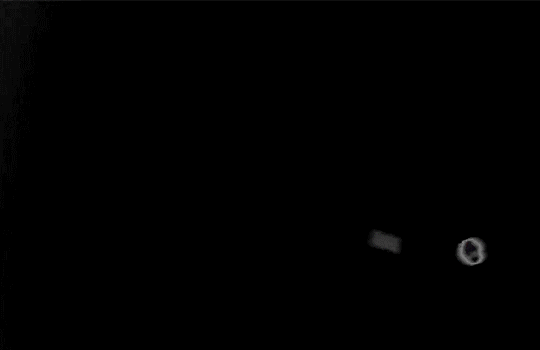
Before I could start making this gif, I needed three things; the two scenes that I wanted to use, and a video of the glass shattering effect. I already knew the scenes I wanted, so then I took to YouTube to find a video which I can't for the life of me find again (edit: thanks to add1ctedt0you in the replies for linking this video!), but it looked like this:
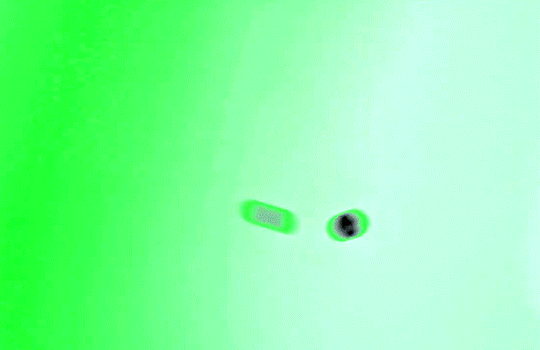
Something like this is what you want. Ideally the green part would be entirely white, but as long as there are two clearly different colours you can usually work with it.
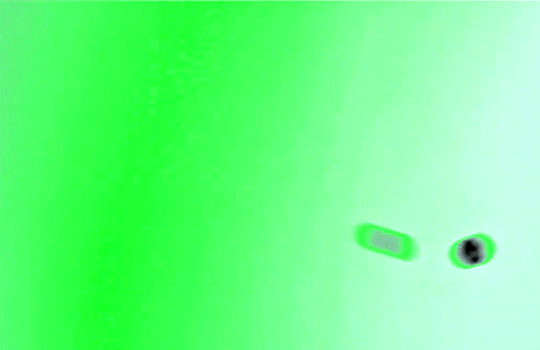
This looks a lot slower than the gif that I made, but that's not because of the frame rate - which is exactly the same above as in the final gif - it's just because there are extra frames in this slower one that I cut out. In the video I used, the glass shattering happened very slowly. I didn't want that, so I ended up skipping several frames when I loaded the frames into Photoshop before using my gifmaking action. I just did this by manually selecting one frame, skipping the next several before selecting another frame, and repeating this until I had selected 60 frames.
After using my gif action, I had a smart object of the glass shatter effect that looked like this:
That's a much better speed! It still wasn't quite where I needed it to be though. I needed this in black and white, so I slapped a hue/saturation adjustment on the smart object and set the saturation all the way down to -100.

Okay great, I could start putting the gif together now.
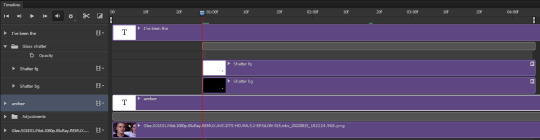
First, I made a copy of the glass shatter smart object, because I'll need that later. Then, I pulled in frames from the scene that I wanted to appear in the hole after the glass shatters, and I used those to create a new smart object with my gif action (we'll call it Scene-bg). I pulled Scene-bg into the same window as the glass shatter objects. Then I created a new smart object by combining one of the glass shatter objects with Scene-bg, which I did by selecting both layers right clicking, and selecting "Convert to Smart Object".
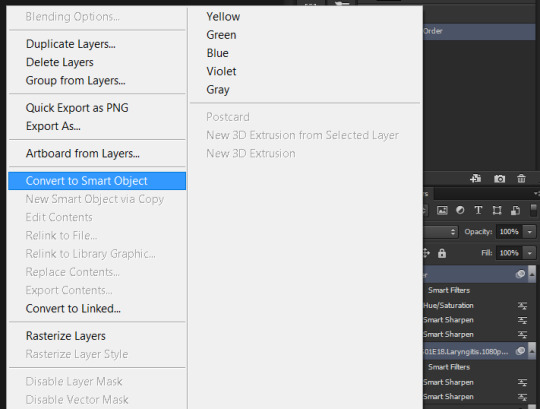
I renamed this smart object to Shatter-fg. I opened it by clicking on the little icon next to the layer name in the layers window here:
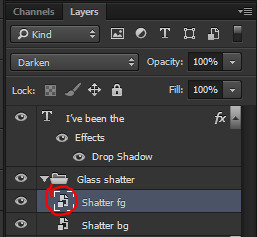
The most important thing here is that the shatter effect object should be the top layer, and I set the mode to "lighten". This will make sure that the lightest colour of either this layer and the layer behind it is displayed; that means that anywhere that's white in our shatter animation will still show up, but anywhere that's black we'll see what's in the layer(s) behind it.
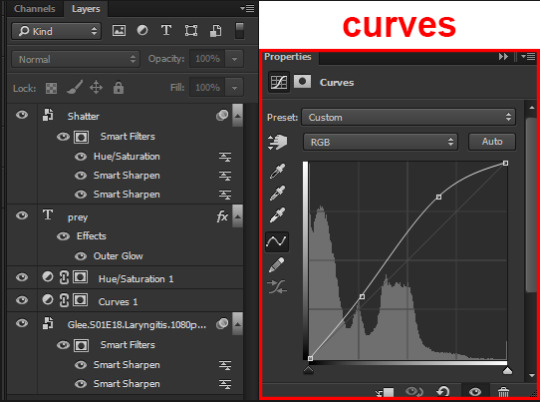
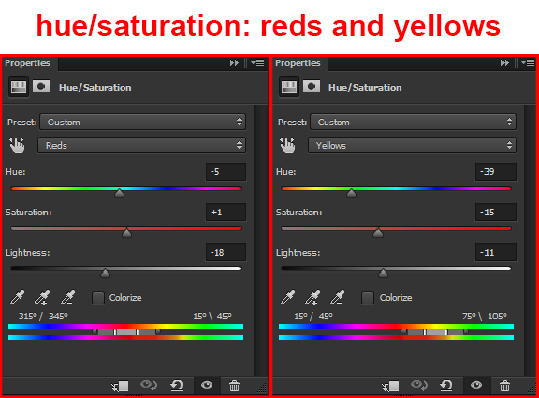
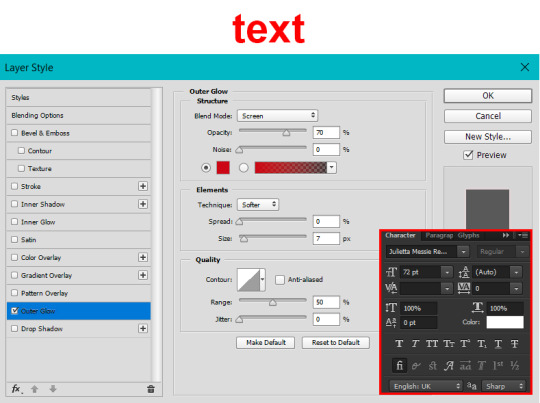
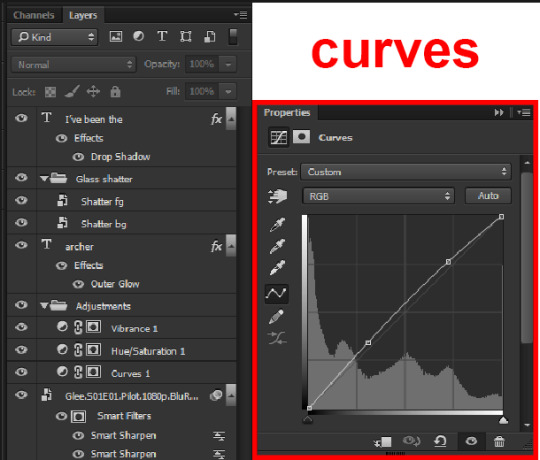
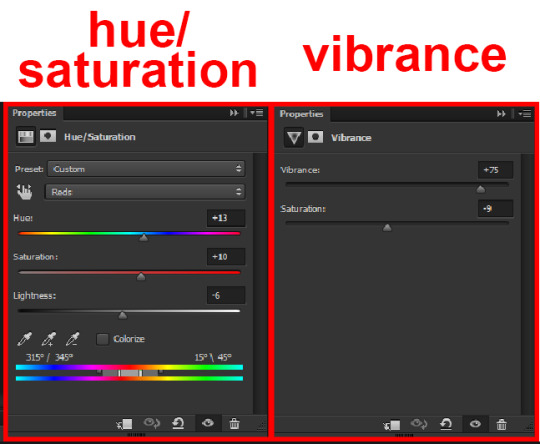
Then I threw some adjustment layers between them to get the colouring I wanted. I used a curves layer, a hue/saturation layer, and I also added text with an outer glow layer effect. Here's what the layer order looked like and the settings I used for each layer:
After this process, Shatter-fg looked like this:

Okay nice, this is starting to look like something! I saved this and went back to the main file with the other glass shatter object.
I needed to invert that other glass shatter object. There's a weird quirk with the version of Photoshop that I use where it doesn't like it when I apply specifically an invert adjustment to a smart object (it appears correctly when editing, but not on export) so I did this by creating a new smart object which included a separate invert layer, but if you have a newer version of Photoshop you can probably just apply the invert adjustment directly. Just note that you'll need to do one of these options; it won't work if you add a separate adjustment layer in the main file, it needs to be applied specifically to the smart object (which we'll now be calling Shatter-bg). It looked like this after I inverted it:
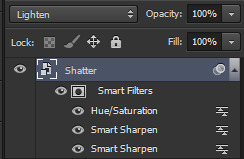
Once that's done, I made sure Shatter-fg was the layer directly above Shatter-bg, and set the mode of Shatter-fg to "darken" and Shatter-bg to "lighten". Since Shatter-fg is set to darken, it will be visible only when it is darker than the layer behind it. By setting Shatter-bg to lighten, I've guaranteed that the layer behind it will always be lighter (ie, white) in the places we want Shatter-fg to be visible, and will be black otherwise. Once I update those settings, this is what the gif looked like:
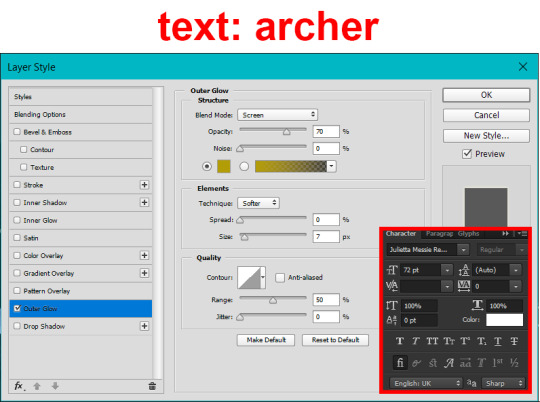
This is all there is to the glass shatter effect itself. Next I pulled in frames from the second scene to fill in the black areas. This layer needed to go below both glass shatter layers, so that it only shows through where the black. Then I added adjustment layers and some text. I used curves, hue/saturation, and vibrance adjustment layers, and I also added the "archer" text below the glass shatter layers so that it would be hidden to reveal the "prey" text. The other text I added above all of the layers, since I wanted this to be visible all the time. Here is the layer order and all of the settings I used for each of the layers:
I also grouped Shatter-bg and Shatter-fg and shifted them on the timeline so there would be some time to see the background gif before the shatter effect starts.
And that's all! Then it''s just a matter of exporting the finished product:
This is the first gifmaking tutorial I've ever made, so I hope I was able to be reasonably coherent and helpful! I'd love to hear if you make anything by following these steps, or even if you just feel like you've learned something reading through this. And if you have any outstanding questions, feel free to reply or send me an ask and I'd be happy to answer!
#gifmaking#tutorials#gifmaking tutorial#gif tutorial#photoshop#photoshop tutorial#usergif#gleesource#my tutorials#mine#how to gif#tw mark salling#mark salling tw#not tagging as glee because it's not actually about that but wanted the tw tags just in case#this was so much more effort to put together than I thought it would be lmao#I was like oh yeah I've already made the whole gif I just need to go back and explain how I did that...#it took A WHILE#anywayyyy it was fun though so I'm glad I did it#would love to know if anyone finds this helpful or interesting or tries out the effect or something similar!#you can also just grab the black/white gif I included above if you want to do the effect since I can't find the video... sorry lol#but yeah you have my permission to steal the black/white gifs for gifmaking purposes if you would like#just don't like. post your own tutorial claiming you made it or something?? but like you don't need to credit me or anything obviously.#ANYWAYYYY#I feel like... a LITTLE pretentious thinking I'm good enough at making gifs to be qualified to make a tutorial#but like it's fineeee everything is fine#gonna finally post this now enjoy byeeee
129 notes
·
View notes
Text
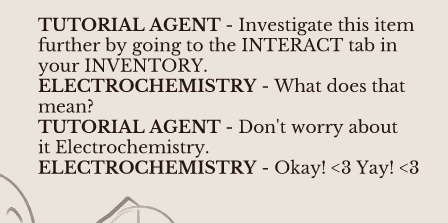
prepping for my Bonus Days. i love tutorial agent lmao
#chemi chats#yknow. last year's ''take sundays off'' made a lot of sense.#october 2023 was PERFECT for skilltober as it was a full four weeks (so six days for each skill type per week plus a day off)#and left two days at the end - the 30th and 31 - for Ancient Reptilian and Limbic. so it worked out really evenly!!#using the same method in 2024 does not yield the same clean results hjkjg it looks. so fucking messy gang hgkjg#but generally you can take any 5 days off? it would make sense to split it at the first any five days in a row.#like how we had five sundays last year. so like if we had five mondays this month we'd do free days on mondays right?#but this months was tuesdays and we all STARTED on tuesday SO LIKE HGKJG OKAY MAN. NOW WHAT HGKJ#i want to be posting the same skills as everyone else everyday but that's a bit much to ask yknow? syncing up is fun but its HARD man hgkjg#the reason why im talking about this is because im NOT taking the free days hgkjg or maybe i'll take one who knows lmao hgkj#but my ''free'' days are: Tutorial Agent with the INTs. Solace with the PSYs. Volta Do Mar with the FYSs. Kinetic Dressage with the MOTs.#and maybe Vices thrown in there? i might make Vices physique and put Volta with the psyches? and make Solace a little bonus end?#because i love her and shes special hgkj but i guess i'll see hkjf but EITHER WAY im gonna be posting on whenever free days are hgkj#so if everyone takes sundays+halloween off (except me because im Fucking Entrenched In This Shit) then thats when i'll post#(even though it'd be messy as hell like. splitting up the skill types hkjg??) maybe it'd make sense to do mondays+halloween so we can#finish a skill type section before taking a break/doing my bonus skills? and it'd even out but that requires coordination hgkjsk#sigh. or for me to accept that we'll all eventually fall out of sync and thats fine hgkj (<- I can be fine with this. It's just messy hkjg)#oh idk :P im gonna take my ''break''/bonus days on mondays+halloween and whatever happens happens <33#(<- assuming im gonna be able to finish a monthly challenge lmaooo) okay ive got a headache lmao goodnight i love you all as always <33
12 notes
·
View notes
Text
i swear every time i rewatch six (the musical) i like it even more holy shit it's so good
#even my least favorite song (heart of stone) doesn't make me like it less#and the rest of the songs are so good????#like#boom ex wives#BOOM no way#BOOM don't lose your head#BOOM BOOM haus of holbein AND get down????#holy shit all you wanna do????? samantha is so good????#and i don't need your love I????#and six (song) is so sweet#anyways#i would love to see it live#but alas#slime tutorials save me save me slime tutorials#a dragon chirps#honestly i just wanted to rewatch no way and ended up rewatching the whole thing because YEAH#six the musical
10 notes
·
View notes
Text
one thing i appreciate about the sadnesses is how they're so polite. like if i'm talking to my friends they'll just stand there and wait instead of continuing to chase me. i know this probably wasn't intentional and is just a side effect of cutscenes but it's still so funny bc today we were yapping and this sadness was behind us right. when we left the convo it just ran in the opposite direction instead of chasing so it looked like it wanted to join the conversation but got too scared and ran off instead...
anyways sadness ocs when!!!
EDIT: googled it and YEEAHH ODILE coming in clutch they're actually the remnants of people defeated by the king so yeah this idea actually makes sense (kind of)
#should i not impulsively make a stupid oc based on this? probably#will i? maybeee#in stars and time#i don't think this is a spoiler really just something funny i noticed while playing#guys half conscious sadnesses would be so cool hear me out#like aren't they frozen people??? i forgot where exactly sadnesses come from but it could prolly make sense#and even if it doesn't it's still funny#also another thing i like about the game is how the relationships are already established like this is happening by the END instead of the#beginning#so they're already friends and have been for who knows how long#they've been able to get through it all together#i really love how they make the tutorial scene still work#by having it be that mirabelle's just nervous so they go over formation to make her feel better#they're such good friends and it makes me :)#why am i hiding this part in the tags? because i'm evil
11 notes
·
View notes
Text
This is the exact reason why I hate when people ask to go through my phone. Its always Tsukasa’s fault just remember that.
#tenma facts come first because theyre js real like that#who would tsukasa tenma be without his siblings#uhh i may need to change or add onto some of these btw#if you have any cool little facts you can hand over… ahaha.. id love that 😊 (<- shaking)#IM COLLECTING EMUNENERUI FACTS TOO i swear. Unfortunately this blonde freak won’t let me go… Please.. Dude…#every time ive had a friend ask for my phone ive had to make up some sort of excuse or Hover. I mean hover over them#Like honestly i hate people going throuugh my phone js because of personal info that people choose to open up to me ab thats on there but#Some of them are probably suspicious. It really just is stuff related to my special interests#you open the notes and theres 30 word vomits in the wxs folder and god only knows how many other ones + ouran ideas in another#and 90% of them are unfinished#you check youtube and then theres over 40+ video essays in one playlist idek how many theatre related videos and “soap tutorials” and then#Over 100 videos in the wxs/leoni playlist#Mainly wxs videos too… I have a problem..#You open the photos. 1.2k tsukasa photos in one album says it all. And then the 600 wxs videos#I have at least 3k prsk related photos on my phone How did we get here after 2 years#wxs#wonderlands x showtime#tsukasa tenma#tenma tsukasa#he gives me a headache#wxs tsukasa#facts#ideas
11 notes
·
View notes
Text
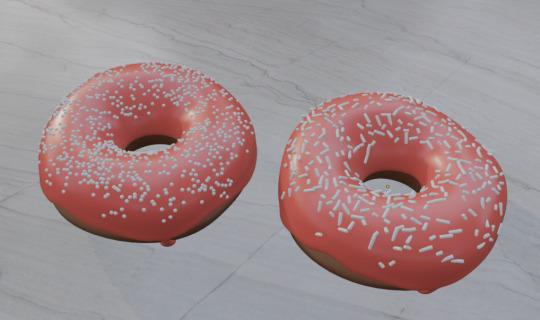
my ass is LEARNING!!!!!! Still working on the tutorial buuut it's getting late so I'll pick it back up tomorrow morning, then see if I can model something I tried to model a few years back (and utterly failed at because my ass could not figure out blender and refused to tutorial) so yippeee!!
#I am going for chocolate donut instead of the average normal donut because chocolate is superior#why is the icing red though? fire. death. demon donut#fit to be fed to the kings of hell#and also myself I too would like a demon donut#bwauuughh I'm just so excited to be learning this though#been wanting to for AGES now and I finally took the plunge today and omg I'm loving it so far#and I'm only on part 8 outta 14 of the tutorial!#hope I can make some fun n cool stuff to impress the two people who actively see the stupid shit I post lol#blender donut#blender wip#blender
4 notes
·
View notes
Note
how long does it take u to focus/find stuff in microscopes is there a trick to it bc i always feel like im losing it
like 30 seconds but that’s only bc i have to use a microscope all the time at work so i’m super used to it BUT I DO HAVE ADVICE always start with the smallest objective lens (usually 4x) and find ur little guy and focus him as best u can AND THEN when u switch to higher power objectives don’t move the stage up and down!! only use the fine tuning knob (heh knob) and ofc move the slide around if u need to find it because the field of view does change when u zoom in BUT u shouldn’t need to move the stage up and down after you initially focus it on low power, that’s usually how you’ll lose it and won’t find it again. keep moving up in power and only using the fine focus it will save u
#asks#also helpful if you center the little guy in the field of view when on low power so it’s less likely to get out of frame when you#increase magnification#also unfortunately sometimes some slides are just. really old and poorly stained </3#i wish there was an easy way to do like a tutorial video i would love to make one#I LOVE USING MICROSCOPES 🙏🙏🙏
13 notes
·
View notes