#iPhone Utility Software
Explore tagged Tumblr posts
Visit Tumblr Blog
Explore Tumblr blogs with no restrictions, modern design and the best experience.
Last Seen Tumblr Blogs


Fun Fact
Tumblr was acquired by Yahoo for $1.1B in 2013.
Text
What is 3uTools? A Comprehensive Guide for iOS Users
Managing an iPhone or iPad can be difficult, especially when you're restricted by iTunes. This is where 3uTools comes in. It is a free, all-in-one application that allows you more control over your iOS device. Whether you want to flash firmware, transfer data, or monitor your battery's condition, 3uTools makes the procedure simpler and more flexible.

Let's go over everything iOS users need to know about 3uTools.
What is 3uTools?
3uTools is a robust iOS management tool available for Windows and macOS. It allows users to manage apps, images, music, ringtones, movies, files, and other content on iPhones and iPads. It has a clean interface and user-friendly design, and it includes powerful features such as iOS flashing, jailbreaking, real-time device monitoring, and backup/restore all in one location.
Key Features of 3uTools
Here are some of the best things you can accomplish with 3uTools:
🔧 One-Click Flashing and Jailbreaking
Simple one-click tools allow you to upgrade or downgrade your iOS version, as well as jailbreak your smartphone if it is supported.
📁 File and Data Management
You can easily transfer music, images, videos, documents, and other data between your iPhone and computer.
🔄 Backup and restore.
Create full or selective backups that can be restored at any time. No iCloud required.
🔋 Battery and System Monitoring
Monitor your battery's health, storage utilization, and CPU performance in real time.
🔔 Custom ringtones and wallpapers.
Create and apply custom ringtones, or download wallpapers directly to your smartphone.
📍 Virtual location
Change your iPhone's GPS position without jailbreaking—ideal for testing or privacy.
Why iOS Users Love 3uTools
It is absolutely free to use.
Compatible with all major iOS versions.
Several functionalities do not require an Apple ID.
The interface is fast, trustworthy, and easy.
Advanced tools without jailbreaking (optional for some functionalities)
Is 3uTools safe?
Yes, 3uTools is safe to download from the official website. It is widely used by iOS users worldwide and has a solid reputation for dependability. To protect your device, always avoid using unapproved versions.
Final Thoughts
If you're an iPhone or iPad owner seeking for a more powerful, adaptable alternative to iTunes, 3uTools is the answer. With its extensive tool set and user-friendly interface, even beginners can manage their iOS devices like a master.
Try 3uTools today and gain complete control over your iOS experience.
#3uTools#3uTools Guide#iOS Management#iPhone Tools#Flash iOS#Jailbreak iPhone#iPhone File Transfer#iOS Backup Tool#iPhone Optimization#iPhone Utility Software#3uTools 2025
3 notes
·
View notes
Text
We Don't Gatekeep Art Resources | A Comprehensive List
Here's a list of some of the tools/sites I currently use or have used previously for works/studies. I'll separate it into Software/Utility, Reference, and 'Other' which will be just general things that could help you map out things for your experience with art. **[Free highlighted in pink, paid highlighted in green. Blue is variable/both. Prices Listed in USD]**
Software/Utility:
2D
Krita Painting app (PC) (my main digital art software on PC for 5+ yrs)
Clip Studio Paint [PC] [CSP 2.0+ allows for 3d modelling within the painting app and a lot of other cool features] [apparently allows up to 6 months free trial]
Procreate (12.99) [iPad/iPad Pro] (the GOAT)
Artstudio Pro [iPad/iPad Pro] (An alternative to Procreate if you enjoy the more traditional art app layout) -- I find this app handy when Procreate is lacking a feature I need, or vice versa. (you can easily transfer files between the two, but keep in mind Procreate's layer limit)
2D "Collaborative Painting/Drawing apps"
Magma Studio
Drawpile
Discord Whiteboard
Gartic Phone (Pretty decent for 2d animation practice, but has a hard limit on frames)
3D
Blender [3D Modelling, Sculpting + Layout] (PC)
Sculptris [PC] (it's an old unsupported version of Zbrush, but can help to get ideas out, and functions better than browser sculpting apps
Nomad Sculpt [iPad/iPad Pro] ($20) Works pretty well if you prefer a mobile setup, but it is a bit intense on the battery life and takes some getting used to
References + Study
Magic Poser [ PC and Mobile ] Has both free and paid versions, I've made do with just the lite version before
Artpose ($9.99) [Iphone + Steam]
Head Model Studio [IPhone] A 3D head, with both a basic blockout version for angles, and a paid version with more detail
Cubebrush [simply search "[keyword] pose reference pack"], they usually have good results + they frequently have sales!
Line of Action [Good for Gesture practice + daily sketching], also has other resources built in.
Quickposes Similar to Line of action, more geared toward anatomy
Drawabox | Perspective Fundamentals Improvement modules (Suggested by @taffingspy )
Sketchfab, this skull in particular is useful, but there is other models that can help you study anatomy as well.
Pinterest can be good, you just have to be careful, usually you're better off just finding reference pack if you have the money, sometimes certain creators have freebies as well
Artstation Marketplace can be decent [make sure to turn on the Aye-Eye filter so it doesn't feed you trash], a colleague of mine recommended this head model for practicing facial blocking, there is also this free version without lighting.
Local Art Museums [Unironically good for studying old "master work" if you're into that, or even just getting some inspiration]
Brushes + Other Useful software:
I personally have used both of these brush packs before making my own
(I actually don't know how to share my daily brush set because I frequently switch between Krita, Procreate, and ASP, but once I figure that out I'll be sure to do that lol)
Marc Brunet's Starter brush pack [Technically free but supporting him for this if you like it is ideal, there's some good brushes]
Dave Greco Brush Pack [$3]
Gumroad in general is a good place to find brushes and art resources. *Note; for Krita specifically, brush packs are a bit weird, so it may require you to find different packs, or import them in a particular way
PureRef [PC] - Reference Compiler/Moodboarding
VizRef ($3.99) [iPad] - Moodboarding/Reference Compiler
Artist Youtubers/Creators that helped me improve/guide me along as a self-taught artist from when I first started digital art to where I am today:
Proko
Marco Bucci
Sinix Design
Sycra
Hardy Fowler
Lighting Mentor
Winged Canvas
Moderndayjames
Swatches
Chommang_drawing
Marc Brunet (YTartschool)
+ Observing a lot of speedpaint art by people whose work I enjoy on social media/youtube, trying to dissect their processes
If you've gotten this far, first of all, congrats, you can read a lot, and second of all, thank you for reading and I hope this helps! I'll continue to come back and update this if I find any new resources in the future, or if my processes change :)
Much Love,
-Remidiy
#art#artwork#digital painting#painting#artists on tumblr#drawing#anime art#sketch#digital illustration#transfem#art tools#art resources#useful websites#small artist#illustration#digital art#artist on tumblr#procreate#my process#my art#krita#art tag#sharing is caring#learning#knowledge#useful stuff#links#reference
219 notes
·
View notes
Text
Yvette Heiser - How Phone Photography Has Transformed Over the Years
In the past two decades, phone photography has undergone a remarkable transformation, evolving from a novelty feature to a vital tool for both amateur and professional photographers. As smartphones have become ubiquitous, so too has the ability to capture high-quality images at any moment. Yvette Heiser talks about - How Photography Has Evolved Over the Years, highlighting the technological advancements that have revolutionized mobile photography, from improved sensors to AI-enhanced editing tools, making it easier than ever to take stunning photos with just a phone.

The Early Days of Mobile Photography
A Simple Beginning
The journey of phone photography began in the early 2000s with the introduction of basic camera phones. These devices featured low-resolution cameras, often producing images that lacked clarity and detail. The primary purpose of these cameras was to share quick snapshots rather than create high-quality photographs.
In 2002, the first commercially available camera phone, the Sharp J-SH04, was launched in Japan. It had a mere 0.11-megapixel sensor, which limited its capabilities. Early users primarily captured simple images for texting or sharing with friends. The quality was far from impressive, but it sparked a new way of documenting everyday life. Yvette Heiser Texas: A Complete Guide to Mastering Phone Photography explores this evolution, offering insights into how phone cameras have advanced over the years and how users can harness their full potential for stunning photography.
The Rise of Social Media
As social media platforms like Facebook and Instagram gained popularity in the late 2000s, so did the demand for better mobile photography. Users wanted to share their lives through images, prompting manufacturers to improve their camera technology. This shift marked a turning point in how people viewed phone photography.
Technological Advancements in Camera Phones
Improved Camera Quality
By the time the iPhone was introduced in 2007, mobile photography began to take a significant leap forward. The iPhone's 2-megapixel camera offered improved image quality compared to its predecessors. Over the years, subsequent iPhone models and other smartphones began to feature higher-resolution cameras with better sensors and optics.
Megapixels Matter: Modern smartphones now come equipped with cameras boasting 12-megapixels or more, allowing users to capture stunning images with remarkable detail.
Multiple Lenses: Many devices now include multiple lenses—wide-angle, telephoto, and macro—enabling users to experiment with different perspectives and styles.
Advanced Software and Features
In addition to hardware improvements, software enhancements have played a crucial role in transforming phone photography. Image processing algorithms have evolved significantly, enabling smartphones to produce high-quality images even in challenging lighting conditions.
Some notable advancements include:
Night Mode: This feature allows users to capture clear and vibrant images in low-light environments without using a flash.
Portrait Mode: By simulating depth of field, portrait mode helps create professional-looking photos by blurring the background while keeping the subject sharp.
AI Integration: Many smartphones now utilize artificial intelligence to enhance photos automatically, optimizing settings based on scene recognition.
The Influence of Social Media on Mobile Photography
The Pursuit of Perfection
Social media platforms have greatly influenced how people approach photography with their phones. The desire for likes and shares has led to a focus on aesthetics and creativity. Users are now more aware of composition, lighting, and editing techniques, resulting in a generation of visually-savvy photographers.
The Rise of Influencers
With the advent of social media influencers, mobile photography has become an essential skill for many aspiring content creators. Brands are increasingly collaborating with influencers who possess a strong visual storytelling ability through their smartphone photography. This trend has further pushed smartphone manufacturers to innovate and provide users with tools that cater to this growing market.
Mobile Photography as a Form of Art
Breaking Down Barriers
Today, phone photography is no longer just about capturing memories; it has become a legitimate form of art. Many photographers have transitioned from traditional cameras to smartphones, showcasing their work in galleries and exhibitions. This shift has democratized photography, allowing anyone with a smartphone to express their creativity.
Community and Collaboration
The rise of mobile photography communities has also contributed to its evolution. Platforms like Instagram have fostered connections among photographers, leading to collaborations and shared learning experiences. Users can now participate in challenges and workshops focused on improving their skills and showcasing their work.
Future Trends in Phone Photography
Continuous Innovation
As technology continues to advance, we can expect even more exciting developments in phone photography. Here are some trends that may shape the future:
Enhanced Image Stabilization: Future smartphone cameras will likely include advanced stabilization technologies that allow for smoother video recording and sharper still images.
Augmented Reality (AR): With AR applications becoming more popular, we might see features that enable users to overlay digital elements on their photos or create immersive experiences.
Higher Dynamic Range (HDR): Improved HDR capabilities will likely enhance the quality of photos taken in high-contrast environments, ensuring details are preserved in both highlights and shadows.
Sustainability and Ethical Considerations
As mobile photography grows, so does awareness of sustainability and ethical considerations in photography practices. Photographers are increasingly encouraged to consider their impact on the environment and seek ways to promote responsible practices.
Conclusion
The transformation of phone photography over the years has been nothing short of extraordinary. From its humble beginnings with basic camera phones to the sophisticated devices we use today, mobile photography has revolutionized how we capture and share moments. As technology continues to evolve, it will undoubtedly open new doors for creativity and expression. Whether you’re an aspiring photographer or simply enjoy documenting your daily life, embracing the art of phone photography offers endless possibilities for exploration and connection.
#wedding#camera#photographer#pictures#childphotography#moments#photography#yvette heiser#photographytips#events
6 notes
·
View notes
Text
Setting Up Calibre + FanFicFare
I've talked before about using Calibre to download fic off of fiction archives, so that's where I decided to start with this series. If you're interested in learning more about how to download fanfic for offline reading/local archiving, then watch the #ficArchiving tag. And if you're not interested in seeing these posts then that's also the tag to block.
Edit (3/22/25) - I've updated the post due to changes in how FanFicFare works with regards to site ratings metadata - the type of column this information needs to be stored in has changed as it no longer works with selectable, pre-set options as originally outlined. Also adding note that additional plugins are required to make FanFicFare's anthology options available.
(Since this is a long post, I'm sticking it under the cut.)
First some background on what Calibre is. It's an open source eBook manager and is really quite versatile for it's usage, thanks in part to the robust library of plugins that it utilizes. The default Calibre app comes bundled not only with management software but an e-reader, server options for locally hosting your library (or libraries), and a whole host of options for managing metadata. Default metadata being tracked include title, author, series, publishing data, synopsis, and tags, but you can manually add columns for any additional data you want - which comes in handy when managing a local fanfiction archive. You can add columns for the fandom the fic is written for, the included ships, characters, completion status, whether it's a single fic or a series turned into an anthology. If the information is useful for you, then you can add a method to track it.
Now, for what Calibre does not do. Because it only runs on Windows/Mac/Linux systems - aka it only runs on a PC - you cannot install it on your phone or tablet. There's no official Calibre apps for Android or iPhones either, though there are unofficial ones that can work with Calibre in server mode. I've never tried the unofficial apps, however, as they tend to cost money that I don't really think they're worth. That's largely because in server mode you can log in to the local instance of Calibre with a regular old browser. Just book mark the page and, so long as your on a network where the local instance is running, your phone or tablet will have access to every book on your Calibre's library (or libraries, depending on how you set things up). You can then either read the eBook directly on the browser or, my preferred method, download the file and read it on the e-reader app of your choice. (You can also make the server available outside your local network, but I've never bothered to learn to set that up.)
Given everything Calibre can do, I'm not particularly bothered by the lack of official apps for phones or tablets - as far as I'm concerned it doesn't need one.
This post is going to be focused on using Calibre for fanfictions specifically, but if you want more information on the other things it can be used for, the Calibre FAQ pages are quite extensive and goes into detail about it's format support, eBook conversion abilities, device integration, news download services, library management, and more.
Alrighty, so first thing you'll want to do is download the version of Calibre that works with your computer. You can also create a portable version that runs off a USB drive if you prefer. Once you've downloaded and installed Calibre, it's time to decide where you want your fanfics to live. Do you want all your eBooks to live in one spot or do you want separate libraries for fanfiction vs original fiction? Since I like to collect more metadata for my fanfic collection than for my regular eBooks - and then completely different extra data for tracking my Star Trek books, or Doctor Who books - I like to have multiple libraries for managing my eBook files. And Calibre makes managing multiple libraries at one time very, very simple.
In Calibre's header there are going to be a lot of icons - I’ve modified the header toolbar for my Calibre instance, but most of the default options are still visible in the picture below.

Specifically you want the one that looks like four books leaning against each other on a shelf. It should have the default library name displayed there - Calibre Library.

Clicking on that will open the menu used for maintaining multiple libraries. While the application only sets up one library by default, it can link to multiple libraries located anywhere on your computer's filesystem. Since I like to use Dropbox to back up my libraries, I usually locate mine in my local Dropbox folder. You can import existing libraries from one instance of Calibre to another, which makes moving from one computer to another, or maintaining the same library across multiple computers, very simple.
Let’s assume you want to have a separate library just for fanfiction. To that end, you'll want the first option on the menu - labeled "Switch/create library".
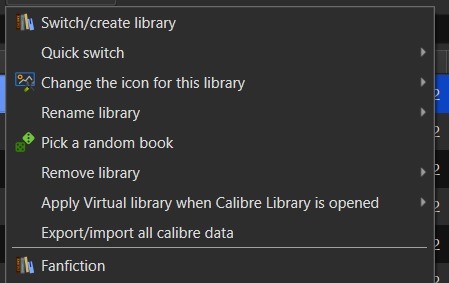
From there you'll want to select the folder - or create a new folder - with the name of the library you want to use in Calibre. I'd recommend something straightforward and call it "Fanfiction". Then you'll select the radio button labeled "Create an empty library at the new location".
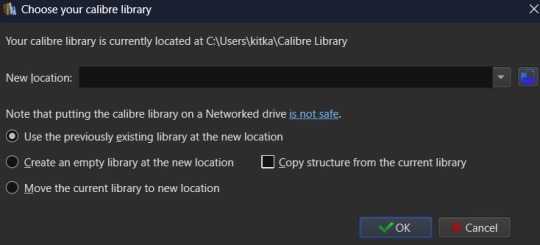
You don't need to copy the current library's structure since every library is created with Calibre's default structure and you won't have added any specialized data tracking at this point to copy over. Once you've set your library location and selected the option for creating a new library, hit the OK button. It'll create the new library and immediately change so that it's managing that library instance instead of the default Calibre Library instance.
If you aren't sure which library is currently open in the Calibre app, then the icon with the four books in the header is where you want to check. It will always be labeled with the name of the currently open library. The most recently opened libraries will be listed at the bottom of the menu opened by that icon for easy switching between libraries and the "Quick switch" option will list all the available libraries registered to your Calibre instance. The icon with the four books is the default icon for a library - if you change the icon for a library then keep in mind that the icon will change in the header when the library is the currently selected on.
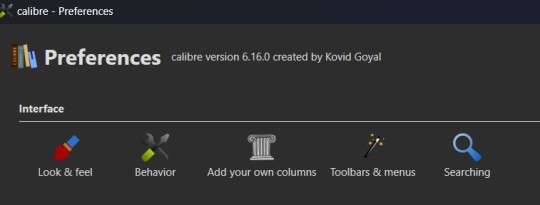
Alright, so step one is completed. You now have a dedicated Fanfiction library for maintaining any fics you choose to download. But the default metadata being tracked for the books isn't as robust as it could be. Time to bulk that information up. You'll want to look back at the header again, this time for an icon that looks like a crossed screwdriver and wrench. It's labeled Preferences. Click on that in the center of the icon to bring up the Preferences modal instead of just the menu (which you can access by clicking the associated down arrow beside the icon instead).

The Preferences modal is where you can access options to tweak the appearance, behavior, and various other functions of Calibre. And I certainly encourage experimenting with the application as it can be customized to your heart's desire to make it meet your accessibility needs. For now, however, we're only interested in the "Add your own columns" option on the top layer of the modal, under "Interface". The associated icon for the "Add your own columns" option is, appropriately, a small Greek column.
This will open the column maintenance modal which presents with a table listing all the existing columns - these all track some kind of metadata for the ebook - and will have checkboxes on the left most of the table indicating whether these columns are displayed on the main interface or are accessible only through the Edit Metadata modal. (We'll get to the Edit Metadata modal later.)
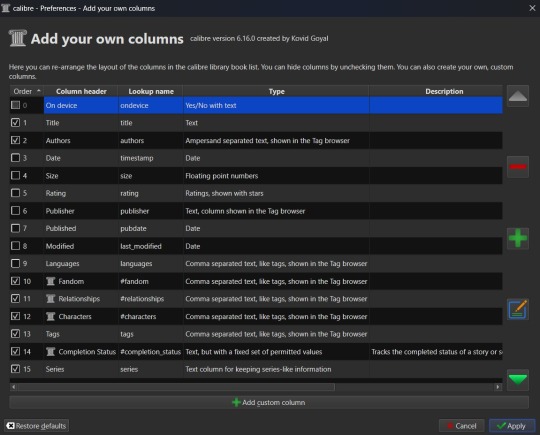
To the right of the table are options for moving a column up or down in the list order, a minus sign used for deleting unnecessary columns, a plus sign for adding new columns, and an edit option for editing existing columns. I'd recommend unchecking columns you don't want displayed in the main table, but not deleting columns. That way you can still store the metadata - and search on it - in that column, but it won't clutter up the main page.
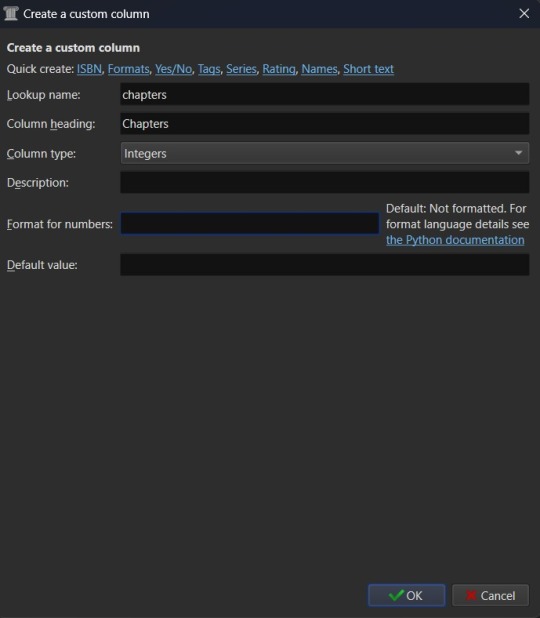
Alright, so now it's time to add some columns. Click the plus button to bring up a custom column form.
The "Lookup name" is what Calibre uses to do searches, so it needs to be something that can be safely saved in a database. "Column heading" is the pretty name that displays either as a column heading in the main Calibre table or as the metadata entry name in the "Edit metadata" modal. "Column type" has a dropdown of the different types of metadata that can be stored in a column and has an option to show checkmarks (a checkbox) for additional true/false parsing. There are a lot of options in the dropdown for metadata types, some of which will offer up additional column creation form options, and this is something that cannot be changed once a column has been saved. If you select the wrong one and realize it later, you'll have to delete the column and create a new one to take it's place. "Description" is there to help clarify things if the "Column header" isn't descriptive enough to make clear what the metadata being tracked by the column is for. And, finally, you can use the optional "Default value" if you want that column to be auto filled with a value you can update later.
Note that the form may add further fields to it, depending on the selected “Column type”.
Since this is going to be tracking fanfiction metadata, some good ideas for creating tag-type metadata columns would be "Fandom", "Ship", and "Characters". You might also consider "Rating", "Content Warnings", “Chapters”, or other data which might be better suited for other types of metadata. We'll start with the "Fandom" column.
You'll want to set the "Lookup name" to "fandom" (note the lowercase here), the "Column heading" to "Fandom" (uppercase this time), and the "Column type" to "Comma separated text, like tags, shown in the Tag browser". The "Description" is optional, so add what you like (or don't) there and the same goes for "Default value", which you might want to list as "Unsorted" or simply leave blank to indicate the fandom is currently unlisted. Once you're satisfied with your selections, click "OK" and you can either then "Apply" your settings changes or continue on to add more columns.
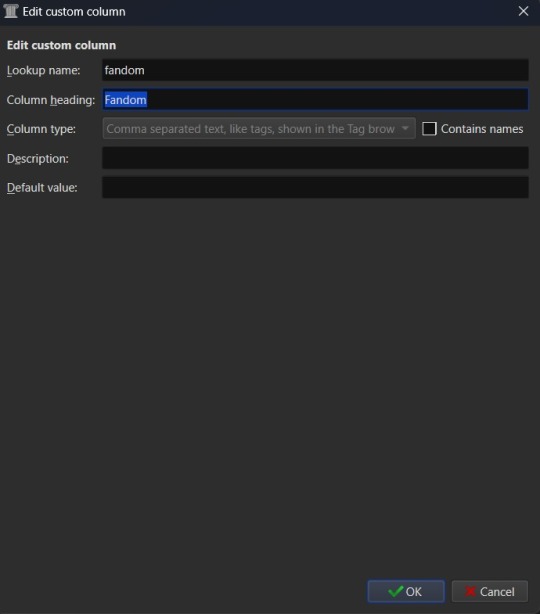
The "Ship" and "Character" data also work best as comma separated data, so I recommend making those columns in the same fashion as the "Fandom" column. “Chapters” you may want to add as an integer column, shown below.
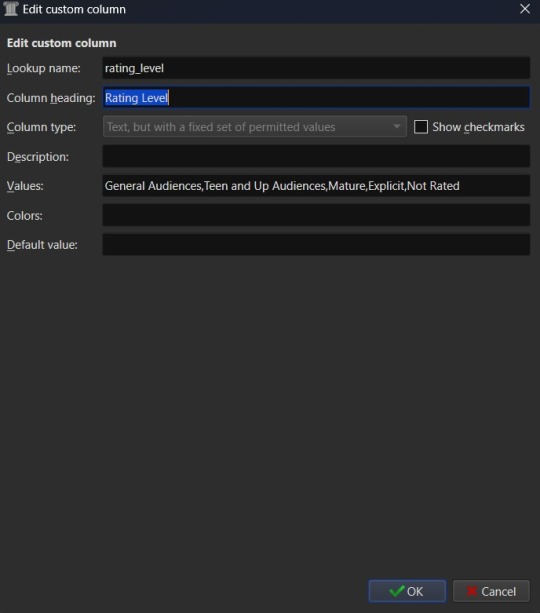
If you're wanting to add "Rating" as a column, then you might want to have specific options for rating a fic, such as limiting the options to the same ones used by Ao3. To this end, you'd fill out the form more like this. "Lookup name" as "rating_level" so as not to confuse it with the existing rating column for star ratings, "Column heading" as "Rating" or maybe "Rating Level", and "Column type" as "Text, but with a fixed set of permitted values". This "Column type" selection will bring up two more inputs on the column creation form - "Values" and "Colors". These two inputs work together and can be edited later. In the "Values" input, you can add a list of comma separated values. In this case the list for "Values" would look like "General Audiences, Teen and Up Audiences, Mature, Explicit, Not Rated". "Colors" is an optional list that will assign a different color to every option on the "Values" list that corresponds to an entry in the "Colors" list. So if you want General Audiences to be blue and no other option to have a color, you'd list "blue" for colors. Or "blue, blue, red, red, red" to have the first to options on the "Values" list as blue and the last three as red. You can play around with this more or leave it blank to have the options all be the same default colors.
Once you've finalized your selections, hit OK to create the column.
Edit (3/22/25) - FanFicFare currently no longer accurately scrapes ratings data into a column setup as "Text, but with a fixed set of permitted values". Instead you will need to use the "Comma separated text, like tags, shown in the Tag browser" option. Fixed values should still work for things like fic status, which have the Completed and In-Progress settings only, but changes either to FanFicFare or Ao3 (and thus any Ao3 clones) have made the fixed values option for ratings fail to correctly connect site tags to the preset values. The good news is that this will now set the ratings for an anthology fic made from a series page with the ratings of all fics within the series - so if some are General Audiences and others are Mature within a single anthology, that will be accurately reflected in your captured metadata after downloading a fic.
After creating all your new columns and selecting which ones you want present on the main table, hit the "Apply" button. You'll likely be prompted to restart Calibre. Do so and when the program reloads it should display the main table with all the columns exactly how you set them up. Which means step two is complete. At this point if you have any fanfiction eBooks already, you can drag and drop them into the table from folder files or use the "Add books" option at the left most side of the header toolbar to start adding those. You can manually update the metadata either by clicking on newly added book and then selecting a column or by clicking the book and then selecting the "Edit metadata" option in the header. So now it's time to take a quick look at the metadata editor modal.
By default, the metadata modal will only have one screen but, because you've added custom columns, there should be tabs at the top. One for "Basic metadata" and one for "Custom metadata". The "Basic metadata" includes options for title, title sort, author(s), author sort, series, series number, file versions (for tracking if you have epub, mobi, pdf, etc files of the same book), cover management options, the star-based rating system, tags, ids, upload date, published date, associated publisher, languages, and "Comments" which is where the story summery/synopsis should go. For regular, non-fanfiction eBooks, you might also take note of the "Download metadata" button which allows for scrapping official metadata off of sites like Barnes and Noble, Amazon, or other eBook sellers or archives.
The "Custom metadata" is where your custom column data will be found. It should be found at the top of the page and fill space downwards with however many custom columns you've added. Inputs that allow for comma separated values will still have a dropdown option associated to allow adding tags you've entered previously for other ebooks. Columns that only allow using preselected data are more likely to appear as select boxes or other form types. This is where you might notice you created a column type incorrectly, so make sure to check over all the data entry options for each metadata type you're collecting. If it doesn't look like it's set up the way you wanted it to be, you can go back to the column editing modal and try again.

The big draw of using Calibre to manage fanfiction eBooks, however, is being able to use Calibre to download the fanfictions from the web and convert them to eBook format for you. And that's where Calibre's plugin library comes in handy.
If you were making any edits to an existing eBook, save those and close the metadata editor. Head back over to the Preferences modal and check the Advanced settings options at the bottom of the modal. There should be a green puzzle piece icon labeled "Plugins" - click that to open the Plugins modal.

It will take you to a table used for monitoring and controlling existing plugins and, yes, it does already have 'plugins' installed. These are really more the application's default modules, but because of how Calibre works they can be edited and controlled in the same way that external plugins are. At the bottom of the page you'll see three buttons - "Get new plugins", "Check for updated plugins", and "Load plugin from file". These are concerned with the external plugins that you can add to Calibre. "Get new plugins" will allow you search through the official library of third party plugins available to Calibre - plugins that the Calibre team have vetted to confirm aren't actually malware. But they're by no means the only plugins you can install, as the "Load plugin from file" will allow you to load pretty much any plugin you want to. Such as a plugin for, say… stripping DRM off of purchased eBooks.

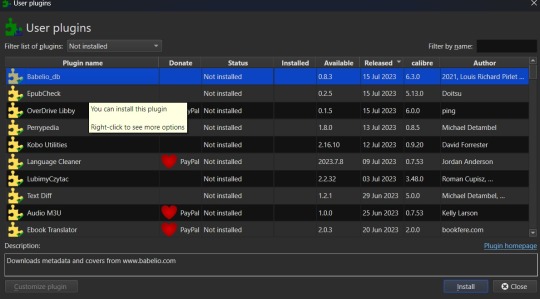
In this case, you want to select the "Get new plugins" option. This brings up a modal for User plugins and the displayed list will automatically be filtered by available plugins that have not yet been installed. You can filter this list further by typing "FanFicFare" into the "Filter by name" text input.
You can then select the FanFicFare plugin and install it. After installing the plugin, you should select the option to restart the application, to ensure that it installed properly. I'd also recommend adding the FanFicFare icon to the optional bottom toolbar instead of the header toolbar, since that'll make it much easier to find since, unless you add more plugins and assign them to that toolbar, it should be the only option on the bar right now.
Edit (3/22/25) - In addition to the FanFicFare plugin, you'll want to include two additional plugins so that FanFicFare can make it's anthology options available. These two plugins are EpubMerge and EpubSplit. These plugins can be used on their own to create anthologies by creating a new epub file from multiple epubs or splitting anthology books into separate epubs for each book contained within. Without these plugins FanFicFare's anthology options will be hidden, as it utilizes them for merging fics in a series together after downloading them separately.
So, full disclosure, you don't need Calibre to run FanFicFare. You could download it and run it from a command line interface instead. However, I prefer it's Calibre interface, especially since it really lets you take advantage of the best Calibre has to offer in metadata tracking, as it can be set up through Calibre to auto fill those columns I walked you through setting up earlier. But I'll get to more on that in a minute.Once Calibre has restarted, you should now have FanFicFare available on one of your toolbars. It's associated icon is a green text bubble with the letters "FF" in it pointing down at a picture of a book.

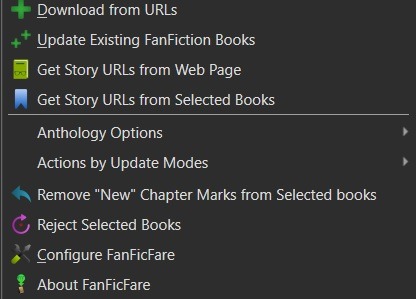
It'll have a small down arrow next to it, which you'll want to select in order to bring up FanFicFare's menu. At this point you can start downloading fics if you want - but let's do a little customizing first. Select the "Configure FanFicFare" option to bring up the configuration modal.
So this modal has a lot going on. And I do encourage doing some exploration on your own, because FanFicFare is a powerful tool made all the more powerful here in conjunction with Calibre's built in tools. Cover generation is very useful, "Reading lists" can be used to auto send new books to any devices you've linked to Calibre when they're connected to the computer, you can tie into email accounts to pull fanfics from email or pull URL links for downloading... there is just so much this plugin can do.
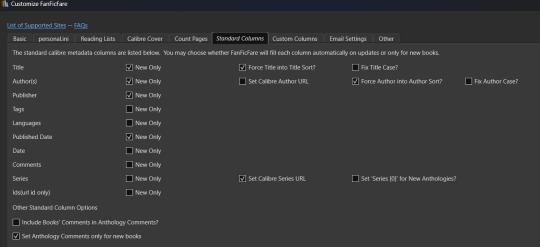
For now, however, we're interested in the column related options. First, check out the tab for "Standard Columns". Look over the options there carefully to make sure that the default settings are actually what you want. They're pretty straight foward - most are determining whether the metadata gets scraped and updated every time you update a fanfic eBook or if they're only scraped for new books. The rest have to do with title and author sorting, setting series related data, and setting the comment data for anthologies.
Once you've set that data how you want, head over to the "Custom Columns" tab where things get more interesting.
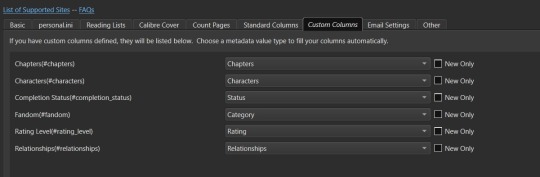
You should now be looking at a list of all those custom columns you created earlier, in alphabetical order. Each column will have a corresponding select box with nothing selected and an unchecked checkbox marked "New Only". This works in a pretty straightforward manner. Let's use "Fandom" as the example. Click the associated select box to open the dropdown and you'll see a bunch of potential metadata that FanFicFare scrapes listed there. It'll all go into the default tags column - found over in the "Standard Columns" section - but you can also parse it out to specific custom columns here. It might give you a few ideas for more columns you want to add for metadata sorting purposes. "Fandom" you'll want to link to "Category". I left "New Only" unchecked so that if I update an eBook later and it has a new fandom attached to the fic then that new metadata will be picked up and added to my Fandom tags for the fic.
Go through each custom column and set them up to be auto filled with the data you think fits it best. Select OK to save your changes and congratulations, this library has now been set up to import fanfiction.
Do keep in mind that FanFicFare's settings are on a per-library basis. So if you decide to do a separate library for different types of fanfics then you'll need to configure FanFicFare separate for every library. You may want separate libraries for different repositories, for example. Though FanFicFare is often smart enough to recognize when it already has an eBook version of a fanfiction from one repository - such as FFnet - when trying to download the same fic from another place - like Ao3.
You may need to make changes later to the personal.ini file associated with the library (which is also set up on a per-library basis) but I'll write up a separate post for that later. While sites protected by Cloud Flare more stringent protections will likely result in 403 responses and failed downloads, most fanfiction sites are going to work with the default FanFicFare settings. You could head over to, say, Archive of Our Own or Twisting the Hellmouth and grab a URL for a story from there. Or a URL for a series, which has links to multiple stories.
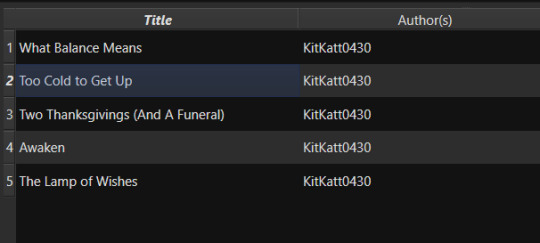
Now that the set up is done, it's time for the fun part. Downloading and maintaining fanfiction in your library. I'll be using a few of my fanfictions on Ao3 as example URLs. Awaken, which is already in my fanfiction library. What Balance Means, which is not already in my library. And the two series Hartmonfest 2023 and Eobard vs Eobard.
We'll start with the single URL uploads.
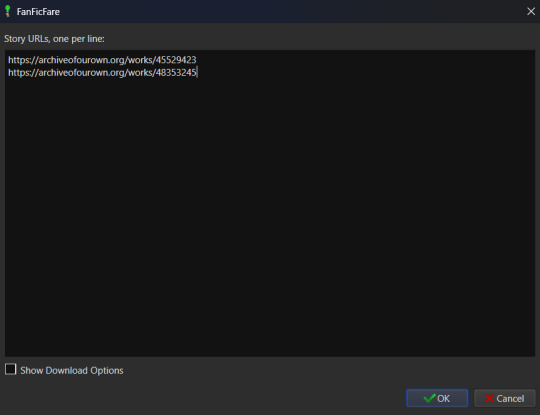
Click on the FanFicFare down arrow to bring up the menu and select the first option on the menu, labeled "Download from URLs". If you have a URL in your clipboard and have the option to grab URLs from the clipboard selected in the FanFicFare configuration (it's a default option, so you most likely do) then you should see that URL prepopulated in the text area when the Story URLs modal loads. You can add more URLs, one per line, to this text area and when you select OK each one will be individually downloaded as a separate epub file. For multi-chapter fics you only need to provide the url for the first chapter. FanFicFare will be able to detect the additional chapters and download them into the same epub file as the first chapter. All providing additional chapter URLs will do is lead to FanFicFare attempting to create multiple epubs of the same fanfic.
Once you've added your list of URLs to the text area, select OK. FanFicFare will do the rest, fetching metadata for the fic (or fics) and compiling the epub file(s). When it's finished compiling the data but hasn't officially saved the epubs, it will pop up a message letting you know how many "good" and "bad" entries it found.
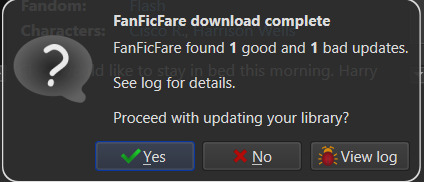
"Good" means it made an epub file and it's good to go. "Bad" could mean that you've already got the fanfic downloaded and no updates - such as new chapters - were available. Or it could mean that it failed to grab the web pages for whatever reason… like Cloud Flare blocking the download. You can go forward with the download at this point, adding the good epubs to your library. Or you could cancel the download, meaning none of the epubs are saved. Before choosing one of those options you can also choose to look at the job output, seen in the pop up as a button labeled "View log". This will display a list of every url you tried to download a fanfic for and information on either it's success or why it failed, the associated URL, and how many chapters were downloaded.
Since I already had Awaken downloaded and there have been no updates since the last time I downloaded it, that is the bad update from my list and the result I was expecting. What Balance Means hadn't been downloaded before, so it was the expected good update. Once Yes is selected in the dialog, the new fanfiction eBooks will be added to the library and will appear at the top of the main list in the application.
That's great for updating one fic at a time or copy-pasting in a list of fanfictions, but let's get ambitious. Maybe you want to import an entire page of bookmarked fanfictions at once or a series of fanfictions as individual books. Instead of copying every single URL by hand, you can take the URL for the series main page or the Bookmarks URL. With that URL copied, you can head over to the FanFicFare menu again, but this time select the option "Get Story URLs from Web Page"

The modal that pops up only allows for inputting one URL - the URL for the page you want it to scour for fanfic URLs. Once you've inputted that URL click the button labeled "For Individual Books." It might take a bit but it's going to pull up the same Story URLs modal from before, this time prepopulated with every URL from the page you gave it. Pretty cool, right? Click OK and watch it run the job just like before.
I gave it the URL for my Hartmonfest 2023 series, which is a complete series and it downloaded all three books. Once they're populated on the list, I could scroll over to the Series column to see that they all are listed as being part of the Hartmonfest 2023 series in the same series order they're listed in on Ao3.
However, what if I'm uploading an unfinished series, like Eobard vs Eobard, and want to be able to track when it updates later on? Single books can track when new chapters are updated; is there any way to do the same thing but on a larger scale? The answer is yes, but you have to upload the series as an anthology.
Head back to the "Get Story URLs from Web Page" option on the FanFicFare menu and give it another series URL. But, this time, click the button labeled For Anthology Epub. This will trigger the Story URLs modal again once it's gathered all the story URLs, but this time it looks a little different.

This time there will be text indicating the Series and Comments/description, the information for which will have been taken from the series metadata. The series story URLs will be present in the text area, allowing you to remove a story from the anthology if there's a fic in there you don't want included. Click OK to run the import job, which will run like normal.
When the job completes, there should be multiple good updates listed - one for every URL - but when you click yes to add the eBook to the library, you'll only see one added. It should be named following the convention "<Series Name> Anthology". So now I've got the "Eobard vs Eobard Anthology" in my library.
Last but not least, how to check for updates to incomplete fanfictions or series. It's generally pretty easy to do. Select the fanfiction(s) on the list that you want to check for updates on. If it's a single fanfiction (or several single fanfictions), you go to the FanFicFare menu and click the option "Update Existing FanFiction Books"
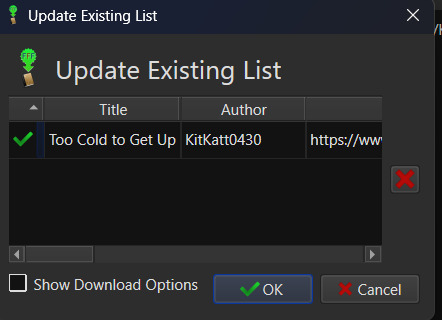
Click OK and let it run. Any fanfictions that don't have new chapters will return as bad entries. Any that have new chapters will be listed as good. Selecting Yes to add the good entries to the list will update the existing epub files with the new chapters.
However, if it's a series you want to update, I recommend doing those one at a time. Select the anthology from the eBook list and head back over to the FanFicFare menu. This time select "Anthology Options"; it'll open a fly-out menu. You want the bottom option, labeled "Update Anthology Epub". The associated URL for the series is saved as part of the eBook's metadata already, so it will pull the series metadata and associated URLs again, before returning you to that same modified Story URLs modal seen before. When you click OK, it'll pull all the fanfictions in the series - new and old - and any new chapters as well, bundling it up in a new eBook file that will replace the old one.
There's still a lot to talk about when it comes to managing fanfictions in Calibre, but I think I'll end here for now. You should be able to download, and manage, fanfiction from most websites at this point. So go back up your bookmarked fics and rest easy knowing that from this point forward a missing bookmark on your bookmarks list is no longer cause for sadness - it'll still be in your local archive to enjoy offline. Just don't go abusing this power, okay guys?
#kitkatt0430 explains#ficArchiving#calibre#fanficfare#the images all have alt text but if you find my image descriptions lacking feel free to add additional descriptions
52 notes
·
View notes
Text
Complete Guide to Disable Find My iPhone on iOS 10 Without Any Password

Disabling Find My iPhone on iOS 10 without any password can often seem like a daunting task, particularly if you’ve forgotten the Apple ID associated with your device. Apple's security measures are designed to protect user data, which can make the process feel intimidating. However, there are legitimate reasons for wanting to turn off this feature, such as when selling or giving away your device or dealing with a locked iPhone that you no longer use. This comprehensive guide aims to equip you with the necessary steps to navigate this challenge smoothly and effectively, focusing specifically on disabling Find My iPhone on iOS 10 without any password.
In this article, we will explore various methods to disable Find My iPhone on iOS 10 without any password required. From utilizing recovery options to employing specialized tools, we will outline the strategies you can employ to regain control over your device. Whether you’re a tech novice or a seasoned user, our step-by-step instructions will help ensure that you can disable this feature safely and effortlessly. By the end of this guide, you will have the confidence and knowledge to manage your iOS device and its security settings with ease, all while successfully disabling Find My iPhone on iOS 10 without any password.
What is Find My iPhone?
Find My iPhone is a robust feature developed by Apple that helps users locate, manage, and secure their Apple devices, including iPhones, iPads, Macs, Apple Watches, and AirPods. It is part of the larger Find My service, which combines location tracking for all Apple devices associated with an Apple ID. Below is a detailed overview of its functionalities, features, and requirements:
Key Features:
Location Tracking: Users can see the current location of their device on a map. If the device is nearby, they can play a sound to help locate it.
Lost Mode: If the device is lost or stolen, users can enable Lost Mode, which locks the device and displays a custom message with a contact number on the screen.
Remote Erase: In case of theft or loss, users can remotely erase all data on the device to protect their personal information.
Find Other Devices: Besides iPhones, Find My can also locate iPads, Macs, Apple Watches, and AirPods.
Activation Lock: When Find My iPhone is enabled, it also activates a security feature that prevents anyone from using the device without the owner’s Apple ID and password, making it harder for thieves to access or sell the device.
Why To Disable Find My iPhone on iOS 10?
Disabling Find My iPhone on iOS 10 can be useful in certain situations where you need to remove the security feature. Below are some common reasons why users might disable it, along with important considerations.
Preparing to Sell or Transfer the Device
If you're planning to sell, gift, or transfer your iPhone to someone else, it's crucial to disable Find My iPhone before doing so. This step is necessary to remove your Apple ID from the device and disable Activation Lock, which ties the iPhone to your Apple ID. Without disabling this feature, the new owner would be unable to access or use the iPhone fully, as they would need your Apple ID credentials to unlock it.
Restoring or Resetting the Device
When you need to perform a full restore or reset on your iPhone, whether for troubleshooting or preparing the device for resale, Find My iPhone must be turned off. iTunes or Finder on a Mac will not allow a full factory reset or software restore if Find My iPhone is enabled because of the Activation Lock feature, which is designed to prevent unauthorized use of the phone.
Without disabling Find My iPhone, any attempt to restore the phone would be halted, requiring you to first enter your Apple ID password to proceed with the process.
Troubleshooting and Repairs
Certain troubleshooting steps and repairs may also require disabling Find My iPhone. For example, if your iPhone encounters a serious issue and you need to restore it via recovery mode, the process won't fully work unless Find My iPhone is disabled first. Additionally, some third-party repair services may require it to be turned off before working on the device to ensure they can perform necessary functions like hardware testing or software restoration.
Reducing Battery Drain
Although less common, some users may disable Find My iPhone to reduce battery drain, particularly if location services are frequently active. Since Find My iPhone relies on tracking the device's location using GPS and other location services, it can cause a minor increase in battery usage. For users who don't find themselves frequently needing the feature, turning it off might help conserve battery power.
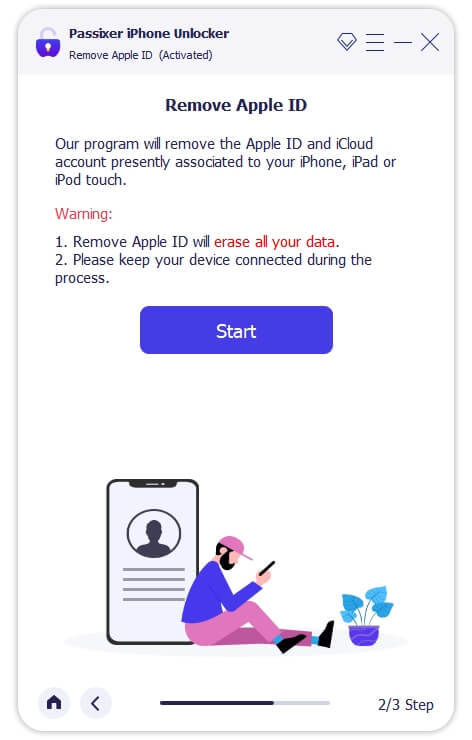
Disable Find My iPhone on iOS 10 With Passixer:
Here’s a simple and effective method to disable Find My iPhone on iOS 10 without any password with Passixer, using a trusted iOS unlocking tool like Passixer iPhone Unlocker and a reliable USB cable. This solution is perfect for users looking for a straightforward way to unlock their devices without hassle.
Passixer iPhone Unlocker is an intuitive application designed specifically for iPhone and iPad users who need to bypass security features effortlessly. Whether you’ve forgotten your passcode or need to dissociate an old Apple ID, this powerful software can effectively disable the Find My iPhone feature without the need for the original password. This capability is particularly advantageous for individuals purchasing second-hand devices still linked to a previous owner’s Apple ID.
Key Features
Unlock Any iOS Screen Lock: Easily removes screen locks like 4-digit/6-digit PINs, Face ID, and Touch ID, ensuring you can regain access to your device without complications.
Remove Apple ID Without Password: Unlink an Apple ID without needing the original password, enabling seamless access to all Apple services. This is especially helpful for users with second-hand devices still linked to a previous owner’s Apple ID.
Bypass iCloud Activation Lock: With Passixer, you can bypass the iCloud Activation Lock, simplifying the process of using previously owned devices.
Remove MDM Lock: This software offers two methods to remove Mobile Device Management (MDM) restrictions from devices that belong to companies or educational institutions, without needing passwords or jailbreaking.
Remove Screen Time Passcode: Quickly bypass the Screen Time passcode while ensuring no data is lost, making it ideal for managing family devices.
Remove iTunes Backup Encryption: Access encrypted iTunes backup passwords to retrieve your backup data without risk of information loss.
Device Compatibility: Supports a wide range of devices, including iPhone 4 to iPhone 15, all iPads, and iPod Touch models, and is compatible with iOS 17 and earlier versions.
Cross-Platform Support: Passixer works seamlessly on Windows (11/10/8.1/8/7) and Mac (OS X 10.7 and later, including macOS Big Sur and Monterey).
How To Use:
Step 1: Download and Install Passixer
Head to the official Passixer website to download the program. Complete the installation and launch the software, then select "Remove Apple ID" from the main menu.
Step 2: Connect Your iPhone
Use a USB cable to connect your iPhone (with Find My iPhone enabled) to your PC or Mac. Click "Start" in the software to initiate the unlocking process.
Step 3: Remove Your Apple ID
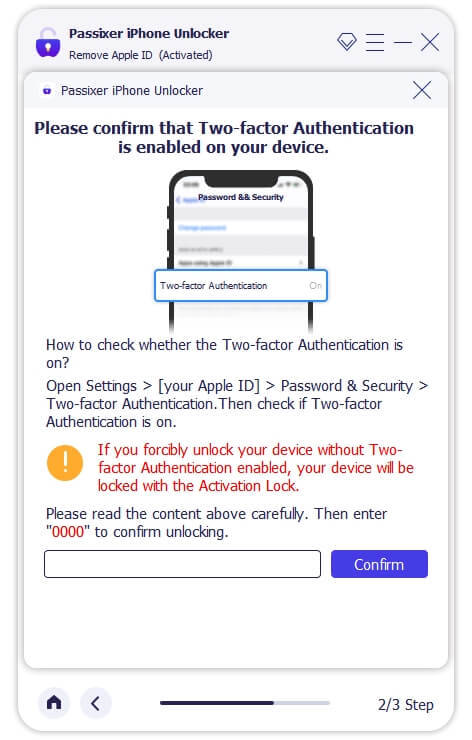
For iPhones running iOS 11.4 or later, ensure that Two-Factor Authentication is enabled. Verify device information, download the required firmware, and start the Apple ID removal process. This will also automatically deactivate the Find My iPhone feature.
Reset your iPhone settings by opening the Settings app, navigating to General, and selecting Reset > Reset All Settings. Once completed, Passixer will unlink the associated Apple ID.
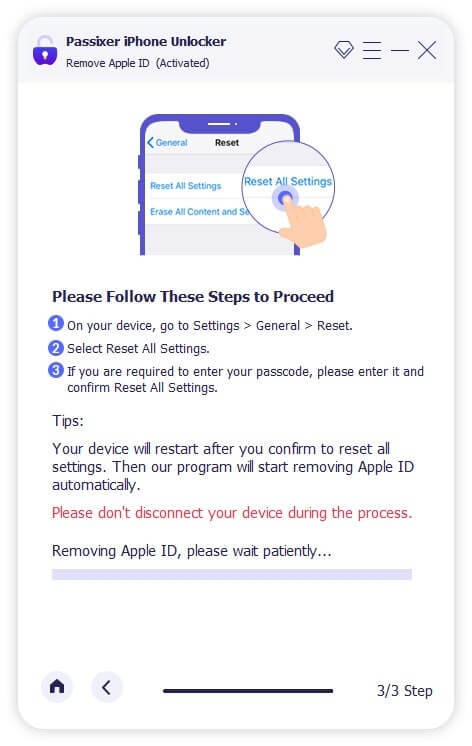
Disabling your Apple ID on an iPhone will also automatically turn off the Find My iPhone feature.
Pros:
No Password Needed: Removes the Apple ID without needing the original password, making it perfect for second-hand devices.
Bypasses Activation Lock: Unlocks iCloud Activation Lock to access devices linked to another user’s Apple ID.
Versatile: Also removes screen locks, bypasses MDM restrictions, and disables Screen Time passcodes without erasing data.
Broad Device Compatibility: Supports a wide range of devices, from iPhone 4 to iPhone 15, as well as iPads and iPod Touch devices.
Cross-Platform Availability: Works on both Windows and Mac.
Cons:
Costs Involved: While some versions offer free trials, full functionality typically requires a paid version.
Pricing Plan:
Enjoy secure and immediate email delivery, along with complimentary customer support. This software is designed specifically for Mac users.
Pricing Options: Select from the following plans: a 1-year license for $39.99, a 1-month license for $29.99, or a one-time lifetime license for $69.99. Each plan allows you to unlock up to 6 iOS devices on a single PC (taxes not included).
Discount Offers: Get up to $20 off on the 1-year and 1-month licenses, with original prices being $59.99 and $39.99, respectively.
Other Ways To Disbale Find My iPhone on iOS 10
Disabling Find My iPhone on iOS 10 without a password can be a complex process due to Apple's robust security measures. However, if you find yourself in a situation where you need to disable this feature, there are several methods you might consider. Below are detailed step-by-step instructions for each method, along with important considerations.
Method 1: Restore via iTunes
Requirements:
A computer with iTunes installed.
A USB cable to connect your iPhone to the computer.
How To Use:
Install iTunes: Make sure you have the latest version of iTunes installed on your computer. You can download it from the Apple website.
Connect Your iPhone: Use a USB cable to connect your iPhone to the computer. Launch iTunes once your device is connected.
Put iPhone into Recovery Mode:
For iPhone 6s and earlier: Press and hold the Home button and the Power button simultaneously until you see the recovery mode screen.
For iPhone 7 and 7 Plus: Press and hold the Volume Down and the Power buttons until you see the recovery mode screen.
For iPhone 8 and later: Quickly press and release the Volume Up button, then the Volume Down button, and finally press and hold the Side button until you see the recovery mode screen.
Restore iPhone: In iTunes, a message will appear indicating that a device in recovery mode has been detected. Choose the option to Restore. This will erase all content and settings from your iPhone, including the Find My iPhone setting.
Set Up iPhone: After the restore is complete, you can set up your iPhone as new or restore from a backup. Note that if Find My iPhone is still activated, it may ask for the Apple ID and password associated with the device.
Method 2: Jailbreak the Device
Warning: Jailbreaking voids your warranty and can expose your device to security risks. Use this method with caution.
Requirements:
A computer with a jailbreaking tool (e.g., Pangu, unc0ver).
How To Use:
Backup Your Data: Before attempting to jailbreak, make sure to back up your data using iTunes or iCloud, as this process may erase your device.
Download Jailbreaking Tool: Download a reputable jailbreaking tool that is compatible with iOS 10.
Connect Your iPhone: Use a USB cable to connect your iPhone to your computer.
Run the Jailbreaking Tool: Launch the jailbreaking software and follow the on-screen instructions to initiate the jailbreak. This usually involves clicking a button to start the process.
Complete the Jailbreak: Once the jailbreak is complete, your device will restart. You may need to install a Cydia app for further customization.
Disable Find My iPhone: After jailbreaking, you can use certain tweaks in Cydia to disable Find My iPhone. Search for relevant tools and follow their instructions.
Method 3: Contact Apple Support
How To Use:
Gather Documentation: Collect any documents that prove your ownership of the device, such as the original receipt or invoice.
Contact Apple Support: Visit the Apple Support website or call their support line. Explain your situation and provide the necessary documentation.
Follow Their Instructions: Apple Support may guide you through the process of disabling Find My iPhone. They may ask for your device's serial number and other identifying information.
Wait for Resolution: Depending on your situation, Apple may take some time to resolve the issue. Follow up as needed.
Conclusion:
In conclusion, disabling Find My iPhone on iOS 10 without a password may seem like a challenging endeavor, but with the right tools and guidance, it can be achieved effectively. Understanding the various legitimate reasons for wanting to disable this feature—such as preparing a device for sale, performing a factory reset, or troubleshooting issues—helps users navigate the process with purpose. By utilizing specialized tools like Passixer or following alternative methods, individuals can confidently regain access to their devices and manage their settings without the burden of forgotten passwords.
Ultimately, the key takeaway from this guide is that while Apple's security measures are designed to protect user data, there are practical solutions available for those in need. Whether you're a tech novice or an experienced user, our comprehensive instructions empower you to tackle this challenge head-on. By following the steps outlined in this guide, you can disable Find My iPhone on iOS 10, ensuring a smooth transition as you either pass on your device or regain control over it. With the right approach and resources, you can successfully navigate the complexities of Apple’s security features and regain full access to your device.
2 notes
·
View notes
Text
How Do Private Investigators Track Cell Phones?
Private investigators (PIs) are known for their resourcefulness and ability to uncover information that may seem out of reach for the average person. Among their many skills, tracking cell phones has become a critical tool in modern investigations. Whether working on cases involving missing persons, fraud, infidelity, or corporate espionage, PIs often rely on cell phone tracking to collect crucial evidence.

But how do private investigators track cell phones? This blog explores the techniques, tools, and ethical considerations involved in this sensitive process.
1. The Basics of Cell Phone Tracking
Cell phone tracking involves determining the location of a device by utilizing the technology it relies on to function—cell towers, GPS, and Wi-Fi networks. Smartphones emit signals that can be intercepted or analyzed to pinpoint their location. While law enforcement agencies have sophisticated tools and legal authority for tracking, private investigators often use alternative methods that stay within legal boundaries.
2. Common Techniques Used by Private Investigators
a. GPS Tracking
GPS (Global Positioning System) tracking is one of the most accurate ways to locate a cell phone. Many modern devices come equipped with built-in GPS chips that constantly communicate with satellites to determine their location. Private investigators might use the following approaches to access GPS data:
Authorized Access: If a private investigator has legal permission (e.g., from the device owner), they can use GPS tracking apps to monitor the phone's location. This is common in cases of missing persons or parental tracking of children.
Location-Sharing Apps: Some apps, like Find My iPhone or Google Find My Device, allow users to share their location. A PI might assist clients in accessing these features, provided they have the right credentials or consent.
b. Cell Tower Triangulation
Cell phones connect to nearby towers for communication, and the distance to these towers can be used to approximate the device's location. By analyzing signal strength from multiple towers, a process known as triangulation can determine the phone's general whereabouts.
Private investigators might collaborate with telecommunications providers to request such data, but this typically requires proper legal justification, such as a subpoena or court order.
c. Wi-Fi Positioning Systems (WPS)
Many modern devices use Wi-Fi signals for location tracking when GPS is unavailable. By identifying the networks a phone connects to, investigators can narrow down the location. This technique is particularly useful in urban areas, where Wi-Fi networks are abundant.
d. Mobile Applications
Private investigators may use third-party apps designed for tracking. These apps often require installation on the target device, making their use legally and ethically complex. Popular tracking apps include:
mSpy: Often marketed for parental control, this app can monitor a phone’s location, messages, and activity.
FlexiSPY: Offers advanced tracking features, but its use must comply with local laws.
Such software is generally legal only if used with the consent of the device owner.
e. Social Engineering
In some cases, private investigators might rely on social engineering techniques to gain access to location data. For example, they might trick the target into sharing their location via a deceptive message or link. While this is less common among reputable PIs, it highlights the importance of staying vigilant against such tactics.
3. Advanced Tracking Methods
a. IMEI and SIM Tracking
Every mobile device has a unique International Mobile Equipment Identity (IMEI) number. Similarly, SIM cards have unique identifiers that can be traced through the network. Private investigators may use IMEI or SIM tracking to locate a device if they have access to the necessary records or tools.
b. Stingray Devices
A Stingray is a portable device that mimics a cell tower, tricking nearby phones into connecting to it. Law enforcement agencies commonly use this technology, but private investigators typically avoid it due to its invasive nature and legal restrictions.
c. Geofencing
Geofencing creates a virtual perimeter around a specific area. If a device enters or exits this area, it triggers an alert. This technique can be used with GPS or mobile app tracking and is often employed in cases involving surveillance or asset protection.
4. Legal and Ethical Considerations
Tracking cell phones is a highly regulated activity due to privacy concerns. Private investigators must adhere to strict legal and ethical guidelines to avoid violating rights or committing crimes.
a. Consent
In most jurisdictions, private investigators can track a cell phone only with the consent of the device owner. For example, a parent might authorize tracking of their child’s phone, or an employer might monitor company-owned devices used by employees.
b. Privacy Laws
Privacy laws vary by country and region but generally prohibit unauthorized tracking. In the United States, the Electronic Communications Privacy Act (ECPA) regulates the interception of electronic communications, including location data. Similarly, the General Data Protection Regulation (GDPR) in the EU sets strict rules on personal data collection.
c. Ethical Practices
Reputable private investigators follow ethical practices to maintain professionalism and protect client interests. This includes:
Avoiding illegal tracking methods.
Respecting the privacy of non-consenting individuals.
Providing clear disclosures about the methods used.
Unethical practices, such as installing spyware without consent, can lead to legal repercussions and damage the investigator’s reputation.
5. The Role of Technology
Technology plays a central role in cell phone tracking. From software solutions to hardware tools, PIs have access to a wide range of resources that make their work more efficient. Some commonly used technologies include:
Tracking Apps: As mentioned earlier, these apps offer location-sharing features for authorized users.
Surveillance Tools: Tools like GPS trackers or geofencing systems allow investigators to monitor movement discreetly.
Data Analysis Software: PIs often use software to analyze call records, SMS logs, or app usage patterns, which can provide indirect clues about a person’s location.
6. Challenges in Cell Phone Tracking
Despite advancements, cell phone tracking comes with its challenges:
a. Legal Barriers
Obtaining location data without proper authorization can lead to legal consequences, limiting the methods available to private investigators.
b. Technological Limitations
Signal Interference: GPS tracking may not work in areas with poor satellite coverage, such as tunnels or densely packed buildings.
Device Security: Modern smartphones are equipped with advanced security features that prevent unauthorized access to location data.
c. Ethical Dilemmas
Balancing client demands with ethical considerations can be tricky. Investigators must ensure they don’t overstep boundaries while fulfilling their obligations.
7. Real-World Applications
Private investigators use cell phone tracking in various scenarios:
a. Missing Persons
Cell phone location data can provide vital clues in locating missing individuals, especially in time-sensitive cases.
b. Infidelity Investigations
PIs often track cell phones to gather evidence of infidelity. For example, GPS data might reveal that a spouse visited a suspicious location.
c. Corporate Investigations
In cases of corporate fraud or espionage, tracking company-owned devices can help identify rogue employees or uncover unauthorized activities.
d. Stalking and Harassment Cases
Cell phone tracking can help victims of stalking or harassment by identifying the perpetrator’s movements and providing evidence for legal action.
8. How to Protect Yourself from Unwanted Tracking
While private investigators are bound by legal and ethical guidelines, not everyone operates within the law. To protect yourself from unauthorized tracking:
Disable Location Services: Turn off GPS and location-sharing features when not needed.
Secure Your Device: Use strong passwords, enable two-factor authentication, and regularly update your phone’s software.
Avoid Suspicious Links: Be cautious about clicking on unknown links or downloading apps from unverified sources.
Use Anti-Spyware Apps: These can detect and remove tracking software from your device.
9. Conclusion
Private investigators play an essential role in uncovering the truth, and cell phone tracking is one of the many tools they use to achieve their goals. However, this practice requires a delicate balance of skill, technology, and adherence to legal and ethical standards.
For individuals and organizations seeking the services of a PI, it’s crucial to ensure they work with professionals who operate transparently and within the law. At the same time, understanding the methods and limitations of cell phone tracking can help protect your privacy and make informed decisions when hiring an investigator.
By staying informed about the capabilities and boundaries of cell phone tracking, you can better navigate the complexities of this modern investigative tool.
#private investigator#finding a hacker#spy phone#phone hacking tools#phone hacking service#phone hacking
1 note
·
View note
Text
Battery Optimization Techniques for iPhone
In a world dominated by smartphones, the iPhone stands out for its sleek design and advanced features. However, one common challenge users face is managing the device's battery life. The following guide will explore effective battery optimization techniques for iPhones, ensuring you get the most out of your device without constantly searching for a charging cable.
Understanding Battery Drain on iPhones
The first step in optimizing your iPhone's battery life is understanding what contributes to battery drain. Numerous factors, including resource-intensive apps and certain settings, can significantly impact how long your battery lasts. By identifying and addressing these factors, users can take control of their device's power consumption. iPhone repair melbourne is a possible solution for you!
Built-in Features for Battery Optimization
Fortunately, Apple provides built-in features within the iOS settings that can aid in battery optimization. Navigating through your iPhone's settings allows you to customize aspects like background app refresh and location services, both of which can have a substantial impact on battery life.
Display and Brightness Settings
The brightness of your iPhone's display is a major factor affecting battery life. By adjusting your screen brightness and utilizing other display settings, you can strike a balance between visibility and power consumption, ensuring your battery lasts longer throughout the day.
App-Specific Optimization Techniques
Popular apps, especially those with frequent updates and notifications, can contribute significantly to battery drain. This section will provide specific tips for optimizing apps like social media platforms, email, and messaging apps, helping users strike a balance between staying connected and preserving battery life.
Utilizing Low Power Mode
Low Power Mode is a built-in feature designed to extend battery life when it's needed most. We'll explore when and how to activate Low Power Mode for maximum benefit, ensuring your iPhone can last through those critical moments.
Regular Software Updates
Keeping your iPhone's operating system up to date is crucial for both security and battery optimization. We'll delve into the importance of regular software updates and guide users on how to keep their devices running the latest iOS version.
Optimizing Push Notifications
While notifications keep us informed, they can also contribute to battery drain. This section will provide insights into managing and customizing your notification settings, ensuring you stay connected without compromising battery life.
Battery Health Monitoring
Understanding and monitoring your iPhone's battery health is essential for long-term performance. We'll guide users on how to check their battery health and provide tips on maintaining a healthy battery, including when to consider a replacement.
Third-Party Apps for Battery Management
In the vast world of apps, some are specifically designed to optimize battery performance. However, caution is necessary when choosing third-party apps. We'll discuss the types of apps available and provide tips on selecting reliable options.
Charging Best Practices
There are many myths surrounding iPhone charging cycles. This section will debunk common misconceptions and provide users with optimal charging practices to prolong battery life.
Background App Refresh Management
Background app refresh allows apps to update content even when not in use, contributing to battery drain. We'll explore how to identify and control background app refresh, focusing on specific apps that commonly use this feature.
Location Services and GPS Usage
Location services, while handy, can be a significant drain on your battery. We'll discuss the impact of GPS usage and provide tips on managing location services to strike a balance between functionality and battery life.
Avoiding Extreme Temperatures
Temperature extremes can affect battery performance. This section will outline how temperature impacts your iPhone's battery and offer practical tips for keeping your device within the optimal temperature range.
Conclusion
Optimizing your iPhone's battery life doesn't have to be a complex task. By implementing the techniques discussed in this guide, users can enjoy longer battery life without sacrificing the functionality and convenience that iPhones provide. Take control of your device's power consumption and make the most out of every charge.
2 notes
·
View notes
Text
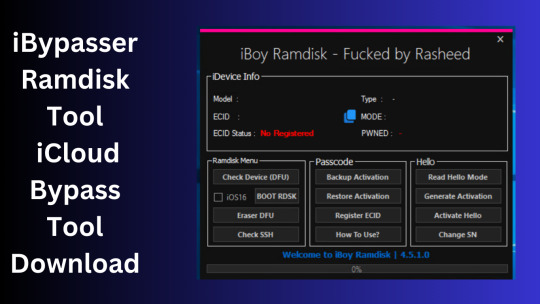
iBypasser Ramdisk Tool V2.7 iCloud Bypass Tool Download
iBypasser Ramdisk Tool V2.7 iCloud Bypass Windows Tool
iBypasser Ramdisk Tool is a powerful application designed to bypass iCloud activation on iOS devices running iOS 11-15 without the need for jailbreaking. It provides various functionalities to disable the passcode, back up files, disable the iCloud account by opening the menu, and retrieve the Apple ID and phone number associated with the device. Additionally, it offers the capability to disable the “Hello” screen using the MEID/GSM signal. Please note that bypassing iCloud activation is not endorsed by Apple and may violate their terms of service.
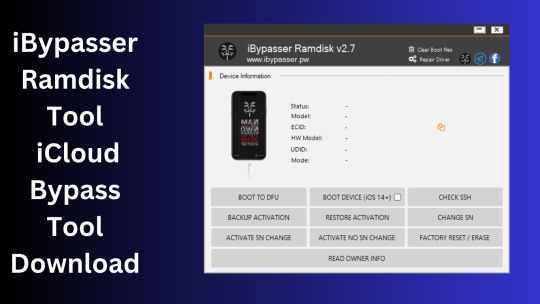
What is iBypasser Ramdisk Tool V2.7?
The iBypasser Ramdisk Tool V2.7 software program was created especially to get around the iCloud activation lock on the iOS device. Customers may use it to give a speedy fix if they find themselves locked out of their devices and unable to access all of the features on their iPhones, iPads, or iPods.
Features iBypasser Ramdisk tool:
Boot Device for iOS 15. x and earlier
Verify SSH
Restore/Backup Activation
Alter SN
Switch on the Hello Device
Go To Owner Info
iOS 15+ (DFU) Data Erasure
Remove Boot File
Changelog!!!
Update: iBypasser Ramdisk AIO v2.0
Resolving boot problems.
DFU Helper was added.
Driver problems were resolved.
Performance augmentation.
How To Use?
You will initially need to register the device’s ECID.
Your MAC notebook should have iBypasser RAMDISK installed. Next, unzip it.
Start your RAMDISK tool after that. then adhere to the directions below.
Enter DFU mode on the iPhone. When you successfully connect your device to DFU mode, the iBypasser RAMDISK Tool will provide you with further alternatives. Activate, Backup Files, Open SSH, Open Proxy, etc.
To open the proxy, type one and press the Enter key. Start SSH by pressing 2; then press 3 to access the backup files.
You may examine the data you successfully backed up on your device in the backup directory.
Second, flash your device with the 3u Tool or iTunes.
Connect your device to DFU mode once you’ve finished flashing it.
Open the proxy after switching the device to DFU mode Type 1. Press 4 again to turn on your gadget.
Readme:
Windows XP, Windows Vista, Windows 7, Windows 8, Windows 8.1, and Windows 10 (32-bit and 64-bit) are all fully compatible with the program.
Create a Backup: If you want to try the tool described above, create a backup of the personal information stored on the Android smartphone or tablet you intend to utilize. Considering that flashing any recovery or firmware has the potential to harm the device.
iBypasser Ramdisk Tool V2.7 iCloud Bypass Tool Download
Click Her
5 notes
·
View notes
Text
Ultimate Guide to Gadget Repairs in Dubai: Expert Services for Every Device
In our modern world, technology plays a vital role in our daily lives. From work to entertainment, devices such as smartphones and laptops are essential tools that require proper maintenance. In Dubai, where technology thrives, it is crucial to find reliable service providers for your gadget repair needs. This article will explore various repair services offered, including Macbook battery replacement, Macbook keyboard replacement, RAID data recovery, and iPhone repair.
Choosing the Right Repair Service in Dubai
When it comes to gadget repairs, finding a service provider you can trust is paramount. High-quality repairs not only extend the lifespan of your devices but also ensure optimal performance. In Dubai, many companies offer these essential services, but how do you discern which one to choose?
Consider factors such as expertise, customer service, and warranty on repairs. Popular filing systems, including RAID, protect business-critical data, and understanding how data recovery works becomes crucial. If you encounter issues, seeking expert assistance can save your business from significant data losses.
Understanding Macbook Battery Replacement in Dubai
One of the most common issues Macbook owners face is battery degradation. Over time, lithium-ion batteries lose their ability to hold a charge, which can lead to unexpected shutdowns or poor performance. If you find yourself frequently searching for "Macbook battery replacement Dubai," you’re not alone.
A professional battery replacement service can restore your device’s functionality, allowing for longer usage without interruption. When selecting a service provider, ensure they utilize genuine parts to guarantee the durability of the replacement battery. Furthermore, expert technicians can diagnose any other underlying issues that may affect your Macbook’s performance, ensuring a holistic approach to your device care.
The Essential Macbook Keyboard Replacement Service
Another prevalent issue Macbook users encounter is malfunctioning or damaged keyboards. Keys may become unresponsive due to wear and tear, spills, or other damage. This can lead to frustrating typing experiences, impacting your productivity. When you search for “Macbook keyboard replacement Dubai," you want to ensure that you are entrusting your device to skilled professionals.
Reliable repair services offer comprehensive examinations of your keyboard issues, providing seamless replacements that feel just as natural as your original keyboard. Moreover, they should offer warranties on their work, guaranteeing customer satisfaction. Opting for a trusted service provider can often save you from the hassle of dealing with multiple repairs down the line.
RAID Data Recovery: Protecting Your Critical Business Information
In today's data-driven world, the security of your information is more critical than ever. For businesses utilizing RAID (Redundant Array of Independent Disks) systems, the loss of essential data can be devastating. Many companies in Dubai specialize in RAID Data Recovery Dubai, ensuring that the integrity of your information remains intact even in emergencies.
When a RAID failure occurs, it can stem from various issues, including hardware malfunctions or user errors. Experts skilled in RAID systems are paramount in diagnosing the problem and recovering your data safely and efficiently. Entrusting your data recovery to experienced professionals can minimize downtime and protect your enterprise’s reputation.
Conduct thorough research on service providers in Dubai, looking for customer testimonials and reviews to find a company that guarantees successful data recovery.
Convenient iPhone Repair Services Near You
With the iPhone being one of the most popular smartphones globally, it's no surprise that repair services for this device are in high demand. Whether it's a cracked screen, battery problems, or software issues, it's essential to find an iPhone repair service that is nearby. Searching for “iPhone repair near me” can lead you to local experts who can address your device issues quickly and efficiently.
Local repair services often provide urgent solutions, allowing you to have your device fixed within hours or even minutes. Furthermore, many offer warranty and quality assurance on their repairs, ensuring that you walk away with a dependable fix that will last.
Final Touch: Finding Comprehensive Gadget Repair Solutions
In a bustling city like Dubai, where technology is woven into the fabric of daily life, knowing where to turn for reliable repairs is vital for both personal and professional devices. Whether you require a Macbook battery replacement, a Macbook keyboard replacement, or need specialized services like RAID data recovery, it's essential to seek out qualified technicians who can provide top-notch service and support.
When your iPhone requires attention, local service providers can offer quick fix solutions, alleviating the stress of being without your device. Ultimately, investing time in finding the right repair service can enhance the longevity and performance of your gadgets. Always remember to read reviews, ask for recommendations, and ensure the service provider uses quality parts to give you the assurance that your device remains in optimal working condition.
0 notes
Text
Exploring the Micro-Budget Film Revolution
The rise of micro-budget films is transforming independent filmmaking, ushering in a time when creativity flourishes despite financial restraints. With spending typically under $50,000, these films take advantage of digital technology, artificial intelligence, and alternative funding models to produce extraordinary works. Consequently, traditional financial barriers are broken, allowing indie filmmakers to create niche genre films that compete alongside big-budget productions. This blog explores the trends in micro-budget filmmaking, industry progress, and the influence on independent films and Hollywood.
The Impact of Digital Tools and AI on Filmmaking
The incorporation of digital tools and artificial intelligence is revolutionizing filmmaking, reducing obstacles while improving production quality. AI streamlines processes, enhancing editing, rendering, and predictive analytics, enabling filmmakers to concentrate more on storytelling and performances. Additionally, affordable digital cameras and software make cinematic quality accessible to many; acclaimed films like "Tangerine," filmed on an iPhone, highlight this transition. VR documentaries and immersive content, once unreachable, are now achievable on micro-budgets, expanding creative opportunities.
Innovative Funding and Distribution Models
New funding approaches such as blockchain and Initial Coin Offerings (ICOs) are transforming film financing by letting filmmakers sell digital tokens that provide backers with revenue or ownership shares. Smart contracts ensure transparent royalty distribution. Crowdfunding builds engagement with niche audiences eager to support films that match their interests, decreasing dependence on traditional studios. The international co-production model is also gaining ground, linking teams across regions to benefit from tax incentives and pooled funding resources.
Film distribution is changing, allowing micro-budget films to reach a worldwide audience. Streaming platforms and Video on Demand (VOD) services enable concurrent online and limited theatrical releases, maximizing reach for indie creators. Ad-supported VOD platforms offer dynamic revenue streams. Major chains like AMC are easing traditional restrictions with shorter theatrical windows, providing opportunities for indie projects. Micro-budget categories at major film festivals offer crucial visibility and recognition, helping productions overcome barriers and enhance revenue potential.
Advantages of Micro-Budget Films
A comparison between micro-budget and conventional budget films reveals unique indie advantages. With greater creative authority, micro-budget filmmakers experience less studio interference, allowing for the exploration of distinct narratives. While traditional films cautiously balance risk with significant marketing expenditures, micro-budget projects carry minimal financial risk with considerable return potential. Prominent examples include "The Blair Witch Project" and "Anora," achieving remarkable results on modest budgets. Niche genres are predominant in micro-budget offerings, contrasting with the mainstream focus of traditional films. Independent films also gain artistic esteem, winning awards and recognition against blockbuster competitors.
The importance of niche genre excellence cannot be overstated. Micro-budget films in horror, thrillers, and faith-based productions target devoted fan bases, where audience enthusiasm and viral marketing drive success. Creative allocation is vital: careful attention to scripts, casting, and location ensures high creative value despite financial limits. Utilizing technology for budgeting, workflow efficiencies, and distribution is crucial to maintaining a competitive edge. Moreover, international collaborations extend resources through partnerships that leverage tax credits and global assets.
For filmmakers aspiring to leverage the indie advantage through micro-budgeting, several strategies maximize impact. Step 1 involves using digital and AI tools to optimize production value from minimal budgets. Step 2 focuses on niche genres with dedicated audiences that often surpass cost expectations. Step 3 suggests blockchain crowdfunding and audience connection to secure financing, preserving creative freedom. Step 4 targets digital-first distribution and film festival circuits to build momentum and business opportunities. International partnerships tap into unique resources and tax incentives available worldwide.
To further engage with micro-budget filmmaking, filmmakers are encouraged to explore film festivals tailored to micro-budget and niche genres. Examining successful case studies like "Tangerine," "The Blair Witch Project," and "Anora" provides strategies for future projects. Staying updated on advances in AI and blockchain film financing helps filmmakers capitalize on pioneering platforms at the industry's forefront. Through focused storytelling, inspired casting, and authenticity, filmmakers can achieve audience and critical acclaim in the expanding micro-budget film landscape.
Independent filmmaking through micro-budgets is painting a transformative canvas for the future of cinema. As studios recognize this shift, projects become more diverse, supporting small but high-potential films. Within both domestic and international landscapes, the indie advantage grows, laying fertile ground for creativity, fiscal prudence, and profound storytelling—elements that keep the flame of innovation alive.
Ultimately, micro-budget films show that innovation, perseverance, and resourcefulness can bridge the gap between constraints and boundless creativity.
#Microbudget #IndieFilm #IndependentFilmmaking #AI #Blockchain
Unlock micro-budget filmmaking secrets at https://www.kvibe.com.
0 notes
Text
2025-04 Loadout - Where I Receive My Prusa3D Core One
Wow, the year is quickly chugging along! Here is an update to my current setup (some have respective links to Amazon that help defray the hosting costs and get me more funding to purchase cool, new gear). If you all have any questions about the items below, please feel free to reach out as I am always glad to share my thoughts.
The changes plus the detailed list are below:
Added:
3D Printer - Prusa Core One
Outdoor Backpack - Peak Design 25L Outdoor
AI - ChatGPT App
Password Manager - Apple Passwords + Bitwarden - Using Bitwarden in conjuction with Apple Passwords.
Removed:
Webcam with Smarts - Obsbot Tiny 2 - Moved over to utilizing my X-M5 as a webcam since the camera travels with me wherever I go.
Emulator - Retroid Pocket 4 Pro - Moved over to the Retroid Pocket Mini.
macOS Applications
Task Manager - Reminders
Text Editor - BBEdit
Terminal App - Ghostty
Automation App - Hazel
Online Backup Service - Backblaze
Backup Application - Carbon Copy Cloner
Calendar Support Application - ItsyCal
Time Support Application - Clocker
Recording/Streaming - Ecamm Live
iOS/iPadOS Applications
Podcast App - Castro
Camera App - Halide
Video Recording App - Kino
Object Scanning App - Scan Thing
Document Scanning App - Simple Scan + Notes.app
iOS/iPadOS/macOS Applications
Password Manager - Apple Passwords + Bitwarden
Package Tracking App - Parcel
Calendar App - Calendar.app
Recipe Manager - Mela
RSS Reader - Tapestry
Read Later Application - Goodlinks
Email Application - Mail.app
Note-Taking App - Tot, Apple Notes
Mastodon Application - Ivory
Social Media - Threads
Social Media - Bluesky
Mind-Mapping Software - Mind Node
Remote Control Application - Screens 5
AI - ChatGPT App
Hardware
Keyboard - HHKB Studio
Dock - OWC Thunderbolt Pro Dock
Laptop - 14" MacBook Pro
iPad - iPad Mini
3D Printer - Creality K1C
3D Printer - Prusa Core One - My new printer I recently added to the collection and I am very satisfied with it. Very well built and the support has been amazing.
Watch - Apple Watch Series 10 Black Aluminum 46mm with Cellular
Phone - iPhone 16 Pro Max
Inkjet Printer - Epson 4850
Charger - Anker MagGo 3-in-1 Charging Stand
Charger - Anker MagSafe Compatible MagGo UFO 3-in-1 Charger
Automation - Elgato Stream Deck Neo
Lighting - Elgato Key Light Neo
Game Capture - Elgato Game Capture Neo
Camera - Fujifilm X-M5
Trackball - Ploopy Adept
Audio Hardware
Microphone - Rode Podcaster White
Speaker - Beats Pill
Speaker - 3x HomePod mini
Microphone - Rode NT-USB Mini
Gaming
Emulator - Retroid Pocket Mini
Gaming with Friends - Helldivers 2
Universal Controller - 8BitDo Ultimate Bluetooth Controller
Storage/Bags/Cases
Daily Carry Backpack - Alpaka Elements Backpack Pro X-Pac VX42
Travel Backpack - Peak Design Travel Backpack
Tech Pouch - Peak Design Tech Pouch
Outdoor Backpack - Peak Design 25L Outdoor
Stationary
Pen - Tactile Turn Pens
Pen - Leuchtturm1917 Drehgriffel
Kitchen/Cooking
Indoor Grill - Ninja Foodi Indoor Grill
Pressure Cooker - Ninja Foodi Pressure Cooker
Convection Oven - Ninja Foodi Convection Oven
Coffee Maker - Fellow Aiden
Coffee Grinder - Baratza Fortè AP Coffee Grinder
MISC
Car Error Code Scan Tool - BlueDrive OBDII Scan Tool
Hosting Service - Hetzner
Universal Remote - Sofabaton Remote
Cell Service - US Mobile and T-Mobile
0 notes
Text
iPhone Repair Services in Bangalore: A Comprehensive Guide to Fixcare
In the bustling city of Bangalore, where technology is an integral part of daily life, iPhones have become indispensable tools for communication, work, and entertainment. However, like all electronic devices, iPhones are susceptible to issues such as screen damage, battery depletion, or software glitches. When faced with such problems, finding a reliable and efficient repair service is crucial. This is where Fixcare steps in, offering top-notch iPhone repair services across Bangalore.
About Fixcare
Fixcare is a renowned independent Apple service center in Bangalore, specializing in the repair of iPhones, iPads, MacBooks, and iWatches. With over two decades of experience, Fixcare has built a reputation for delivering exceptional repair services with a focus on customer satisfaction. Although not affiliated with Apple Inc., Fixcare employs certified technicians who utilize high-quality parts to ensure that your device functions as good as new.
Services Offered
Fixcare provides a wide range of iPhone repair services to address various issues:
Screen Replacement: Whether it's a cracked screen or unresponsive touch functionality, Fixcare offers prompt screen replacement services to restore your iPhone's display to its original condition.
Battery Replacement: If your iPhone's battery drains quickly or doesn't hold charge, Fixcare provides efficient battery replacement services to extend your device's battery life.
Back Glass Repair: For iPhone models with a glass back, Fixcare offers back glass repair services to fix any cracks or damages.
Water Damage Repair: Accidental spills or submersion can lead to water damage. Fixcare's technicians are equipped to handle water damage repairs, aiming to salvage your device.
Camera and Sensor Repair: Issues with the front or rear camera, Face ID, or other sensors are addressed by Fixcare's expert technicians to restore full functionality.
Logic Board Repair: For complex issues, Fixcare offers Level 4 (L4) chip-level repairs on logic boards, a service not commonly available in many repair centers.
Software and Hardware Diagnostics: Fixcare provides comprehensive diagnostics to identify and resolve software glitches, system errors, or hardware malfunctions.
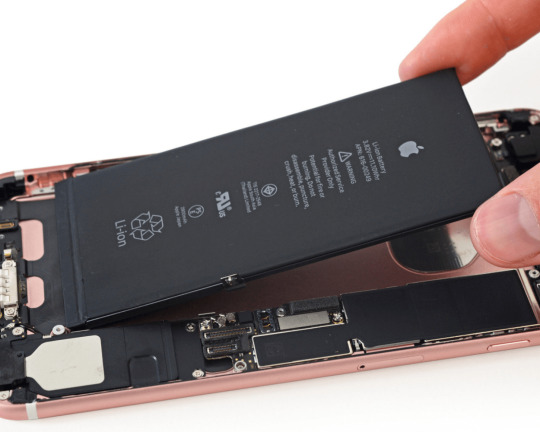
Why Choose Fixcare?
Several factors set Fixcare apart from other repair centers in Bangalore:
Expert Technicians: Fixcare employs certified technicians with extensive experience in repairing Apple devices, ensuring high-quality service.
Quality Parts: While not authorized by Apple, Fixcare uses premium quality spare parts that match the performance of original components.
Warranty: All repairs come with a warranty ranging from 90 days to one year, depending on the type of service, providing customers with peace of mind.
Convenience: Fixcare offers free pickup and delivery services across Bangalore. For simpler repairs, on-site service is available, allowing customers to have their devices fixed at their convenience.
Fast Turnaround Time: With most parts readily available, Fixcare ensures quick repairs, often completing tasks within 30 minutes for straightforward issues.
Pricing
Fixcare offers competitive pricing for its services. For instance, iPhone screen replacements start at ₹2,000, depending on the model and extent of damage. Battery replacements and other services are priced accordingly, ensuring affordability without compromising on quality.
Customer Testimonials
Customers have consistently praised Fixcare for its reliable services:
"Fixcare saved the day! Amazing service. Had my screen changed and some dust got into the speaker. The Fixcare executive had cleaned it for free and now I can hear clearly again." – Aryan Kapoor
Such testimonials reflect Fixcare's commitment to excellence and customer satisfaction.
Booking a Service
Booking a repair service with Fixcare is straightforward:
Visit the Website: Go to Fixcare's official website to explore the services offered.
Select Your Device: Choose the iPhone model and specify the issue you're facing.
Schedule an Appointment: Select a convenient time for pickup or on-site service.
Repair and Delivery: After the repair is completed, your device will be delivered back to you.
Alternatively, you can contact Fixcare directly at 8317 401 135 for assistance and bookings.
Conclusion
When your iPhone encounters issues, choosing a reliable and efficient repair service is essential. Fixcare stands out in Bangalore for its expert technicians, quality parts, and commitment to customer satisfaction. Whether it's a cracked screen, battery issues, or complex hardware problems, Fixcare offers comprehensive solutions to get your iPhone back to optimal performance. Reach out to Fixcare today and experience hassle-free iPhone repair services in Bangalore.
1 note
·
View note
Text
Thanks to iOS 18, iPhone 15 Pro users were able to assign more than 10 control utilities to Action Button
On iOS 18, Apple has added a series of new features and improvements for iPhone users, including the ability to customize the main screen, lock and hide applications, etc. Notable, this software version has also improved Action Button, helping iPhone 15 Pro and Pro Max users can quickly open control of third -party control utilities from the control center. Since the iPhone 15 Pro launched and…
0 notes
Text
Where to Find Affordable Mobile Phone Repairs Nearby?
Locating reasonably priced mobile phone repairs in your area might be problematic, but there are a few ways to be sure you're getting the finest value. Look for nearby repair businesses that provide reasonable prices as a starting point. Compared to large chains, many independent shops offer high-quality repairs at more affordable prices. In order to evaluate the dependability and affordability of these services, you can also look through internet reviews. Never be afraid to compare costs across multiple repair shops or to request a pricing quote in advance. To assist you in reducing the cost of repairs, certain stores might even provide discounts to new clients or on particular repair services. Locating the Best Local Cell Phone Repair ServiceThe search for mobile phone repair near me takes precedence when your phone breaks. Fast and dependable repairs are necessary to get your smartphone working again, even if the problem is a cracked screen, a dead battery, or software. Fortunately, lots of nearby repair shops and businesses provide knowledgeable fixes for a range of mobile phone issues. Fast service is their area of expertise, thus many of these repair shops guarantee that your phone will be returned in top shape.
Good Phone Repairs Close to Me When selecting a repair facility if you're looking for phone repairs near me, it's crucial to take a few things into account. Select stores that offer guarantees for their repair work and use trained experts. When replacing components, like screens or batteries, you want to make sure they are strong and long-lasting. It's a huge benefit for people in need of prompt fixes since many nearby repair shops provide same-day services. In order to locate the best repair business in your area, it's also a good idea to browse internet reviews or ask friends and family for advice. Reasonably priced mobile phone repair in Canberra Finding services for Mobile phone repair Canberra is easy for people who live in the area. Repair shops for all the major mobile phone brands are widely available in Canberra. Finding a technician that can handle your repair needs is not difficult, regardless of the brand you own—Samsung, iPhone, or another. Furthermore, free diagnostics are provided by a lot of Canberra-based repair companies, which let you better understand the issue before deciding to fix it. In order to make things more convenient for you, several repair shops also offer mobile service.
Easy iPad Screen Replacement Near MeFinding iPad screen repair near me should be your first move if your iPad screen breaks. Although a nearly useless screen can be caused by a cracked or damaged iPad, many local shops offer specialist services to swiftly repair or mend the screen. To prevent more issues, confirm that the repair facility you select utilizes premium screen replacements. A solid warranty will cover any potential problems that may develop after the repair is completed, thus it is imperative to inquire about the warranty for the screen repair. iPad Repair Near Me That's Reliable and Quick Numerous regional specialists not only fix screens but also deal with a range of other iPad problems, such as software bugs and battery replacements. You can find experts who can troubleshoot and fix these issues by searching for iPad repair near me. iPad repairs are convenient when you need a rapid fix because many repair places offer same-day service. be sure you check the technicians' experience level to be sure your device is in safe hands.
0 notes
Text
Luxury Tech in 2025: The Ultimate List of High-End Gadgets

The relentless march of technological innovation continues to redefine luxury in 2025. It's no longer solely about precious materials and meticulous craftsmanship; high-end gadgets now seamlessly blend cutting-edge features with exquisite design, catering to a discerning clientele that demands both performance and prestige. From opulent smartphones crafted with rare metals to immersive virtual reality experiences and intelligent home systems that anticipate every need, the luxury tech landscape in 2025 is a testament to the fusion of artistry and engineering. This ultimate list explores some of the most coveted high-end gadgets making waves this year, representing the pinnacle of technological sophistication and extravagant indulgence.
I. The Epitome of Mobile Opulence: Bespoke Smartphones
In a world saturated with smartphones, true luxury lies in exclusivity and personalization. 2025 sees a surge in bespoke smartphone offerings, where high-end materials and personalized features command astronomical price tags.
Vertu Metavertu 2 Max Screen: Continuing its legacy of crafting opulent mobile devices, Vertu's latest offering boasts a stunning, expansive display and unparalleled levels of customization. Utilizing precious metals like gold and platinum, along with ethically sourced leathers, each Metavertu 2 Max can be tailored to the owner's exact specifications, including embedded precious stones and personalized engravings. Beyond aesthetics, it features advanced security protocols and a dedicated concierge service, making it a statement of both wealth and discerning taste.
Caviar Stealth 2.0: Renowned for its extravagant modifications of popular smartphone models, Caviar introduces the Stealth 2.0. This iPhone 17 Pro Max (or equivalent Android flagship) undergoes a complete transformation, featuring корпуса crafted from hardened titanium, carbon fiber, and even meteorite fragments. Integrated solar charging capabilities and enhanced privacy features cater to the ultra-private and adventurous elite. Limited editions with unique artistic designs further elevate their exclusivity.
II. Immersive Entertainment Reimagined: High-End VR/AR Headsets
The lines between the physical and digital realms continue to blur, with luxury tech pushing the boundaries of immersive entertainment.
Apple Vision Pro (Luxury Edition): While the standard Apple Vision Pro already represents a premium offering, a potential luxury edition in 2025 could feature enhanced materials like polished aluminum alloys, premium leather headbands, and even custom-tuned audio systems developed in collaboration with high-end audio brands. Exclusive software experiences and personalized concierge support could further justify a higher price point for discerning early adopters.
High-Fidelity VR Headsets with Haptic Feedback Suits: For the ultimate home entertainment experience, ultra-high-resolution VR headsets paired with full-body haptic feedback suits offer unparalleled immersion. Brands like Varjo (known for their professional-grade VR) could partner with luxury designers to create aesthetically stunning headsets with customized optics and integrated high-end audio. Haptic suits from companies like Teslasuit, crafted with premium materials, would provide realistic tactile feedback, blurring the lines between virtual and physical sensations.
III. The Art of Audio: Exquisite Sound Systems and Headphones
For audiophiles who demand nothing but the purest sound and the most refined aesthetics, 2025 offers a plethora of high-end audio gadgets.
Statement Loudspeaker Systems: Brands like McIntosh, Sonus Faber, and Wilson Audio continue to push the boundaries of sonic perfection with flagship loudspeaker systems that are as much works of art as they are instruments of sound reproduction. Utilizing exotic materials, innovative acoustic designs, and meticulous craftsmanship, these systems can command prices well into the six or seven figures.
Luxury Noise-Cancelling Headphones with AI Personalization: Building upon existing premium headphones, 2025 sees the integration of advanced AI that learns the user's listening preferences and dynamically adjusts the sound signature and noise cancellation levels for an unparalleled personalized audio experience. Crafted with premium materials like lambskin leather and aerospace-grade aluminum, brands like Bang & Olufsen, Sennheiser (Orpheus successor), and Focal offer headphones that are both sonically exceptional and visually stunning.
High-Resolution Portable Audio Players with Bespoke Finishes: For the discerning listener on the go, brands like Astell&Kern continue to offer high-resolution portable audio players with uncompromising sound quality. In 2025, expect limited editions with корпуса crafted from precious metals, inlaid with gemstones, and featuring custom-tuned audio components for the ultimate portable listening experience.
IV. Intelligent Living, Elevated: Luxury Smart Home Ecosystems
Luxury in 2025 extends beyond individual gadgets to encompass seamlessly integrated smart home ecosystems that anticipate and cater to every need with effortless elegance.
AI-Powered Smart Mirrors with Personalized Wellness Insights: Beyond displaying the weather and news, luxury smart mirrors in 2025 utilize advanced AI and sensors to analyze the user's skin condition, track vital signs, and provide personalized wellness recommendations. Integrated with other smart home devices, they can adjust lighting, play calming music, or even schedule appointments based on the user's detected mood and health status.
Luxury Smart Refrigerators with Integrated AI Butlers: High-end smart refrigerators evolve into intelligent culinary hubs, featuring AI-powered inventory management, recipe suggestions based on available ingredients, and even automated ordering of groceries. Integrated high-resolution displays can stream entertainment, display family calendars, and connect with virtual assistants for a seamless kitchen experience. Bespoke designs with premium finishes and customizable interiors cater to the most discerning homeowners.
Comprehensive Smart Security Systems with Biometric Authentication and AI Surveillance: Luxury smart home security in 2025 goes beyond basic alarms. Expect systems with advanced biometric authentication (facial recognition, fingerprint scanning), AI-powered surveillance that can differentiate between individuals and intruders, and seamless integration with professional monitoring services. Discreetly integrated sensors and aesthetically pleasing control panels ensure both security and sophisticated design.
V. Exquisite Timekeeping, Reimagined: Smartwatches with Haute Horlogerie Aesthetics
The fusion of traditional watchmaking artistry and cutting-edge technology continues to evolve in luxury smartwatches.
TAG Heuer Solar-Powered Formula 1 Watch (Luxury Edition): Building upon their innovative solar-powered smartwatch, a luxury edition could feature корпуса crafted from precious metals like titanium or gold, adorned with ethically sourced gemstones, and paired with handcrafted leather straps. Exclusive watch faces and enhanced health tracking features would cater to the discerning clientele who appreciate both technological innovation and timeless design.
Bespoke Smartwatches with Mechanical Elements: A true pinnacle of luxury tech could involve smartwatches that integrate traditional mechanical watch movements with discreet digital displays and smart functionalities. Imagine a beautifully crafted tourbillon timepiece with hidden sensors tracking activity and sleep, controlled by a subtle digital interface. High-end watchmakers collaborating with technology companies could bring such horological marvels to fruition.
VI. The Thrill of the Road, Electrified and Intelligent: Luxury Electric Vehicles with Advanced Technology
Luxury automobiles in 2025 are no longer just about performance and opulent interiors; they are also showcases of cutting-edge technology and intelligent features.
Electric Supercars with Fully Autonomous Driving Capabilities: High-performance electric supercars from brands like Rimac, Ferrari, and Lamborghini will feature even more advanced autonomous driving systems, offering a seamless blend of exhilarating performance and effortless cruising. AI-powered personalization will adapt the driving experience to individual preferences, while augmented reality overlays on the windshield will provide real-time information and enhanced navigation.
Luxury Electric SUVs with Integrated Entertainment and Connectivity Ecosystems: High-end electric SUVs from brands like Rolls-Royce, Bentley, and Mercedes-Benz will transform the driving experience into a mobile sanctuary. Expect immersive entertainment systems with holographic displays, seamless integration with personal devices and smart home ecosystems, and advanced driver-assistance features that prioritize both safety and comfort.
Conclusion: The Convergence of Craftsmanship and Code
Luxury tech in 2025 is defined by a harmonious convergence of exquisite craftsmanship, cutting-edge technology, and personalized experiences. These high-end gadgets transcend mere functionality, becoming statements of individual style, technological prowess, and discerning taste. As technology continues to evolve at an unprecedented pace, the realm of luxury tech will undoubtedly continue to push boundaries, offering ever more innovative and extravagant ways to enhance our lives. For the elite who demand the very best, 2025 presents a dazzling array of gadgets that represent the ultimate fusion of artistry and engineering, promising a future where technology seamlessly integrates with a life of unparalleled luxury.
For More Updates visit Our Website: Analytics Insight
1 note
·
View note
Text
Jailbreak iOS 18.4
If you want more control over your iPhone and want to unlock additional customization options, Jailbreaking iOS 18.4 is the perfect solution. Jailbreaking allows you to bypass Apple’s restrictions, giving you access to features and apps that Apple normally blocks. This guide will show you how to easily jailbreak iOS 18.4 using the powerful and simple tool InstantJB. Read on to learn everything you need about Jailbreak iOS 18.4.
What Is Jailbreaking?
Jailbreaking is removing software restrictions imposed by Apple on iOS devices. When you jailbreak an iPhone, you gain access to the device's root file system. This allows you to install apps, tweaks, and unavailable themes in Apple’s App Store. It also provides a wide array of customization options, such as changing the look and feel of your device, adding new functionality, and much more.
By jailbreaking iOS 18.4, you’ll unlock new features and apps to make your device more personalized, efficient, and fun.
Why Jailbreak iOS 18.4?
There are several reasons why jailbreaking iOS 18.4 can be a great idea:
Customization: Jailbreaking iOS 18.4 opens up a world of customization. You can install custom themes, change icons, tweak the user interface, and even alter how apps behave.
Access to Third-Party Apps: Jailbreaking lets you install apps that are unavailable on the Apple App Store. These apps can enhance your device’s capabilities, including system utilities, game mods, and productivity tools.
Performance Enhancements: Many jailbreak tweaks are designed to improve the performance of your device. Whether it’s making your phone faster, improving battery life, or streamlining system processes, jailbreaking can make your device feel more responsive.
More Control Over Your Device: Jailbreaking gives you full control over your device. You can tweak system settings that Apple doesn’t normally allow, giving you deeper customization and functionality.
How to Jailbreak iOS 18.4 with InstantJB
The easiest and most reliable way to jailbreak iOS 18.4 is by using InstantJB. This tool is user-friendly, efficient, and doesn’t require a computer to complete the jailbreak. Here’s how to do it:
Download the Jailbreak App: The first step is downloading the Jailbreak iOS 18.4 app. Visit https://www.instantjb.com/cydia-ios-18-1-2-3-4-5-6-7-8-9-jailbreak.html to download InstantJB.
Install InstantJB: After downloading, open the app on your device. Follow the simple instructions that appear on-screen. InstantJB will guide you step by step through the entire process.
Wait for the Jailbreak to Complete: The jailbreaking process typically takes just a few minutes. Once InstantJB finishes installing the required files, your device will be ready for the next step.
Reboot Your Device: After the jailbreak is complete, reboot your iPhone or iPad. When your device restarts, you’ll have full access to your jailbroken device.
Start Customizing: Once your device reboots, you can explore the full range of features of Jailbreak iOS 18.4. You can install third-party apps, tweak systems, and personalize your iPhone to match your style.
Benefits of Jailbreaking iOS 18.4 with InstantJB
Ease of Use: InstantJB makes jailbreaking quick and simple. Even beginners will find the process easy to follow thanks to the intuitive interface.
No Need for a Computer: You don’t need a PC or Mac to use InstantJB. Everything can be done directly from your iPhone or iPad.
Quick and Efficient: InstantJB is designed to work fast, so you don’t have to wait long to enjoy a jailbroken device.
Safe and Secure: InstantJB is a trusted and secure app for jailbreaking. It ensures that your device stays safe throughout the process.
What Can You Do After Jailbreaking iOS 18.4?
Once you’ve jailbroken iOS 18.4, the possibilities are endless. Here’s what you can do:
Install Cydia: Cydia is a popular app store for jailbroken devices. With Cydia, you can install apps, tweaks, and themes that Apple doesn’t allow in the App Store. This gives you access to thousands of additional apps and features.
Customize Your Device: Jailbreaking opens up a wide range of customization options. You can change your device’s interface, install new icons and widgets, and modify how your apps look and function.
Improve Privacy and Security: Jailbroken devices can be customized with privacy and security features unavailable on standard iOS devices. You can block ads, restrict access to certain apps, and use additional security measures to protect your data.
Install Custom ROMs: If you want an entirely different experience, jailbreaking allows you to install custom ROMs. These ROMs can give your iPhone a different look and feel, which can be fun and refreshing.
Unlock Hidden Features: Jailbreaking lets you access hidden features of iOS that Apple normally keeps locked away. You can tweak the system to enable additional functionalities you wouldn’t otherwise be able to use.
Is Jailbreaking iOS 18.4 Safe?
While jailbreaking can offer many benefits, it’s important to be aware of some risks:
Voiding Warranty: Jailbreaking your device may void your warranty with Apple. However, you can always restore your device to factory settings if you need to take it in for repairs.
Security Risks: Jailbroken devices can be more vulnerable to malware or unauthorized access. Only install apps and tweaks from trusted sources, such as Cydia or InstantJB, to stay safe.
System Instability: Some tweaks and apps may not be compatible with iOS 18.4, which can cause instability. Be selective about the apps and tweaks you install to avoid issues.
Conclusion
Jailbreak iOS 18.4 is the best way to unlock your iPhone’s full potential. It allows you to customize your device, install third-party apps, and access features that Apple’s standard iOS doesn’t allow. By using InstantJB, the process becomes quick, easy, and safe.
Download the Jailbreak iOS 18.4 app directly from this link if you want to start jailbreaking your device. With InstantJB, you can unlock a world of customization options and enjoy a personalized iPhone experience.
Take control of your iPhone today and enjoy all the freedom that Jailbreak iOS 18.4 offers!
0 notes