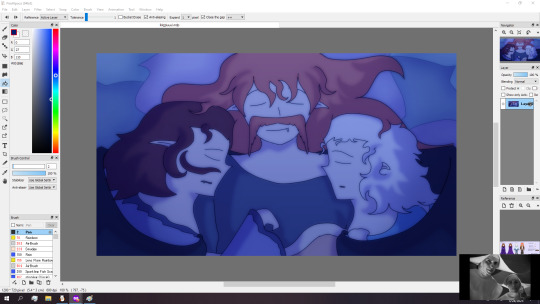
#image blur effect on android
Explore tagged Tumblr posts
Visit Tumblr Blog
Explore Tumblr blogs with no restrictions, modern design and the best experience.
Last Seen Tumblr Blogs


Fun Fact
Average visit duration of Tumblr.com is 10 mins and 25 secs.
Note
I've been meaning to ask this question but never have. The quality of your photos is just amazing; not simply in the subject (the beautiful and stunning you) but the image quality, the lighting, and the colours.
My question is what do you use to take these photos? Is it a digital SLR, a phone app in particular you'd recommend, etc. And do you ever use post production to improve contrast, crop the frame, blur backgrounds, etc?
I mainly would like to say that I'm always seriously impressed with what you post here, and thanks!
Aww thank you!
I just use my phone. I find that the cameras on phones are such amazing quality nowadays, it's sufficient for what I need it for. Currently, I have a Galaxy S23 Ultra (sorry iPhone peeps, I'm an android girl 🤣🤷🏻♀️) and I just use the camera, no app.
We do have a few digital professional cameras, but my husband just likes to use those for landscape photos 🤣🏔🌄🏞
I have a pretty specific style and I think post-production is GOLD--but I don't mean filters and beautifying effects. I'm a stickler about framing, lighting, background (it makes me crazy to have a cluttered background), sharpness, and saturation. If it's b&w, then I tend to prefer high contrast. Shadow and light are just amazing props.
And the context. The story. The authenticity of the photo. That's all super important to me too.
I think attitude is important. I don't shoot unless I feel inspiration. I actually used to shoot a lot more, but since life has been very busy, I don't force it. I do it when it makes me happy or if an idea really needs to be played out to satisfy my curiosity/creativity.
There's currently a beautifully edited shot that I'm mulling over posting for Halloween. It's full nudity, which I dont post much at all. But I usually will post full nudity when I just think the photo is stunning.....so we shall see 🤔
I sometimes wish I had a camera person because some shoots are just hard to frame and execute by yourself.
Here's an example of one of my favorite sets. The framing, lighting, background...just a favorite all around.


211 notes
·
View notes
Note
“His running theory is: new android phones have AI editing tool, that with a touch, sort of merges multiple shots into "best shot" and fix small touch ups automatically. And it also offers you the option without you even choosing as "here look at what i did".
I think it’s the new Google pixel. The advert is running on UKTV. It literally advertises how you can pick the best headshot out of a group from multiple images.
MANY people have mentioned this in the comment section on the Telegraph.
I rather think The Prince and Princess of Wales missed a trick today. Catherine should not have apologised, instead I think William should have joked about having done exactly this with his phone.
I have an i-phone and it has photo burst feature. One picture with many frames, and you pick the one you want, cause many of the frames end up with a blurring effect in different spots.
I am more than okay with Catherine apologizing. She used her voice. It was her prerogative.
The world needed a reminder that she is not a mute, and she certainly is not a coward who'd collapse to a floor in fit of tears over a controversy.
Catherine is made of the strongest stuff on earth.
53 notes
·
View notes
Note
Would you ever do a tutorial on how you get that old school anime effect on your stuff?
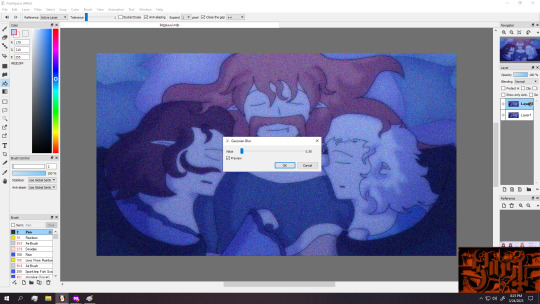
Sorry for taking so long to answer you anon, I am a derp at explaining but here is how I do my fake anime screenshots.
Tutorial below the keep reading as it is slightly long and I use FireAlpaca for this, but you can probably adapt this to other programs with the same layer effects.
First have your picture ready and merged into one layer.
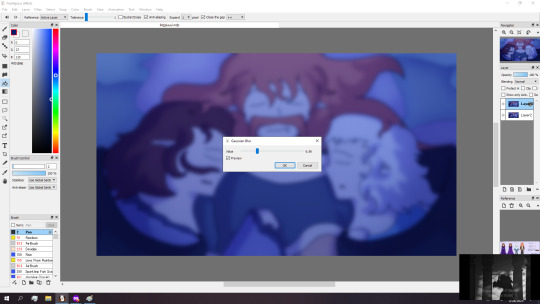

Then duplicate the image and apply a gaussian blur to it at around six percent strength or roughly the same blurriness of the screenshot.
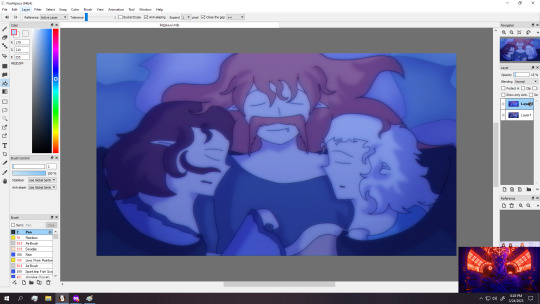
After you blurred the layer, set the blending mode to screen and adjust the layer opacity to around fifteen to thirty percent before merging everything back to one layer.

Then duplicate the layer again and motion blur it to around thirty intensity and then set the layer to color blend mode before merging.
Next make a new layer and fill it with a light color and setting it to the multiply layer and reducing the opacity to around five to twenty percent. (I am using a light blue but my default is usually a pink or orange peach color when not in a night scene like this)
Merge the layers down afterwards.


Then I do a slight chromatic aberration on a duplicated layer and then adjust the opacity to around thirty percent before merging everything down. (Note that if your program of choice doesn't come with a native chromatic aberration, you can just search up chromatic aberration tutorial in (program of your choice))

Once again duplicate the layer, and apply a noise filter at roughly hundred percent strength (or roughly to how the screenshot looks), before applying a very weak gaussian blur.
Merge everything down afterwards.

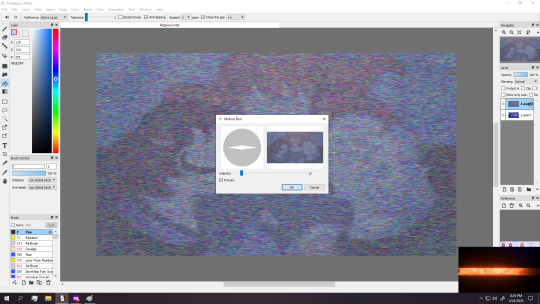

Optional step but you can duplicate the layer once again and apply several noise filters and a light motion blur before lowering the opacity to what you think looks right.
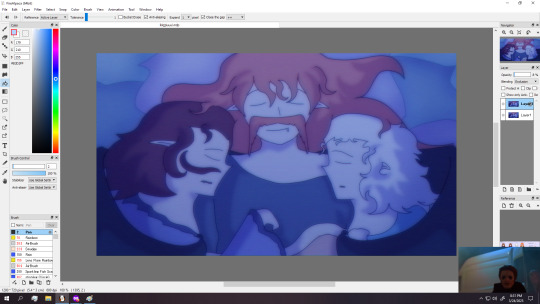
Next we duplicate the layer and apply the exclusion filter to it and lower the opacity of the layer by alot. (you can also just lower the saturation by a smidge if you don't have that layer option)
And you could call this done if you want, but for that extra crunch I use a program called NTSC RS. (I sadly do not know of an android version of this program)
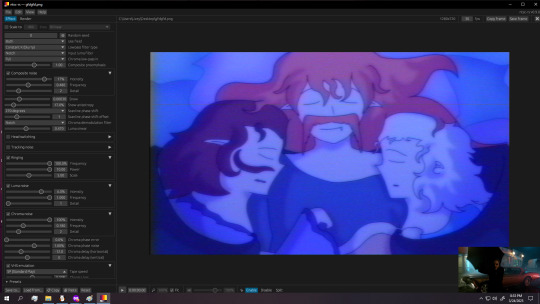
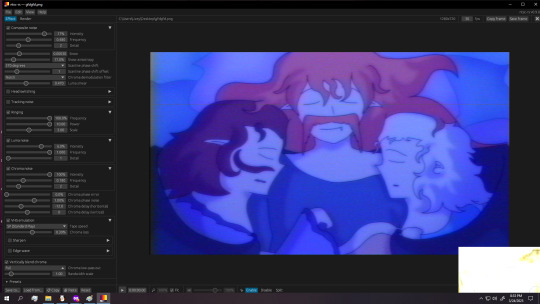
(And here are the settings I use)

Either save or copy the image (called frame in program) and then drag it to a new layer of your image and adjust the opacity if you don't want too much retro crunch.
Then you can adjust the color and saturation if you want and then you are done.

Also for anyone wondering how to do retro captions, the image below shows what I typically use, making sure to duplicate the text, move that to below the text and apply slight gaussian blur and multiply effect to it

(You can do the text on the original image and let it get crunchy, but I honestly like the caption to be readable so I do that after the crunch.)
#tutorial#fake anime screenshot#retro anime tutorial#fire alpaca#ntsc rs#art process#this is just how i do it#you could honestly throw the image through ntsc rs and adjust as needed but i prefer doing both#fire alpaca tutorial
4 notes
·
View notes
Text
Free & Powerful: Best Photo Editing Apps for Android Devices
In the era of phone photography, editing your images prior to posting them is just as crucial as capturing them. Whether you are an occasional user or an emerging content designer, the best free photo editor for Android can totally change your images into scroll-stopping images. Happily, the Play Store teems with good choices—most of them free and surprisingly capable.
In this tutorial, we'll walk you through the best free image editing application for Android, including the top choices that have professional-level capabilities without requiring you to spend a rupee.
Why You Need a Good Photo Editing App
Smartphones have advanced with in-camera capabilities, but editing apps allow you to tweak the minute details—brightness, contrast, saturation, filters, and even eliminate unwanted objects. With the top free photo editing app for Android, you get to do all this on-the-go, from your phone, without a computer.
Apps now provide features such as:
AI-driven background removal
Filters in one tap
Object cloning and healing
Multi-step color correction
Text overlays and stickers
So, let's get started with the best free photo editor apps for Android.
1. Snapseed – By Google
Snapseed is still a go-to for many and pros alike. It provides a smooth, ad-free experience along with an enormous collection of editing tools. From selective editing to accurate color adjustments, it's a clear winner as a best free photo editing app for Android.
Key Features:
29+ editing tools and filters
RAW file editing
Blemish healing tool
Lens blur and HDR scape
2. Lightroom Mobile – Adobe Quality for Free
Lightroom Mobile provides robust capabilities under a free plan that are well-suited for color grading and high-end editing. It is generally recommended as the best free photo editor app for Android for someone who is already familiar with Adobe's desktop software.
Key Features:
Professional presets
Auto-adjust AI tools
Selective edits and healing brush
Cloud sync for Adobe subscribers
If you're a beginner or want precise control over your photos, Lightroom is a solid choice for the best free photo editing software for Android.
3. PicsArt – Creative Freedom
PicsArt is the ideal app for artistic editing. It's filled with filters, stickers, collage features, and more. Though it does have in-app purchases, its gratis features make it a reliable choice when on the lookout for the best free photo editing app for Android.
Key Features:
AI effects
Background changer
Drawing tools and brushes
Meme and sticker generator
4. PhotoDirector – Real-Time Editing Fun
PhotoDirector integrates beauty filters, animations, and visual effects into a super-intuitive interface. Most users think of it as a best free photo editing app for Android due to how simple it makes advanced edits.
Top Features:
Sky replacement
Object removal
Animated decorations and overlays
Face retouch tools
PhotoDirector sits high among apps with advanced effects without cost, according to World Tech Zone.
5. Canva – Simple Yet Powerful
Though mostly recognized as a design application, Canva's mobile app features a useful photo editor. If you're a social media fan, this may be the best free photo editing software for Android to suit your tastes.
Major Features:
Drag-and-drop interface
Tools for overlaying text and graphics
Pre-made templates for Instagram, YouTube, etc.
One-tap improvements
6. Pixlr – No-Nonsense Editing
Pixlr has been relied upon by Android users for a long time because of its balance of simplicity and functionality. It's easily accessible and does not consume device memory, and so it's an underappreciated best free photo editing app for Android.
Major Features:
Double exposure
Auto-fix and stylize filters
Collage maker
Easy UI for quick editing
Choosing the Right App for You
With there being so many fantastic options, choosing the best free photo editing app for Android comes down to your needs:
Rapid social posts? Try Canva or PicsArt.
Pro retouching? Lightroom or Snapseed works best.
Artistic collages? Pixlr or PhotoDirector are perfect.
Whatever you do, each app listed here is a best free photo editing app for Android and all provide robust capabilities without requiring you to pay upfront.
Tricks for Getting the Most Out of Your App
Use all tools: Most users only work with basic filters. Get into curves, tuning, and layering controls.
Save presets: You can save your look with apps such as Lightroom and Snapseed.
Don't over-edit: Make images stand out, not appear phony.
High-resolution exports: Always export your photo in the highest resolution available.
According to World Tech Zone, AI-powered photo editing trends will only increase in 2025, so the time is ideal for playing around with your choices.
Final Thoughts
Having the top free photo editing application for Android is equivalent to having a pocket photo studio. Whether you are beauty-fying a selfie or producing content for your audience, these applications guarantee that you don't require costly software or a desktop computer in order to achieve professional-looking outcomes.
Keep in mind, the proper app has the potential to take your smartphone photography from great to incredible—and the top free photo editor app for Android is only a click away.
0 notes
Text
Vivo Y19s price in bangladesh

The Vivo Y19s is a budget-friendly smartphone that offers a compelling mix of features, making it an attractive option for users seeking value without compromising on essential functionalities.
🔍 Key Specifications Display: 6.68-inch IPS LCD, HD+ resolution (720 × 1608 pixels), 90Hz refresh rate, 1000 nits peak brightness
Processor: Unisoc Tiger T612 (12nm)
RAM & Storage: Options include 4GB/6GB/8GB RAM and 64GB/128GB/256GB storage, expandable via microSD card
Operating System: Android 14 with Funtouch OS 14
Rear Camera: Dual setup with a 50MP primary sensor and a 0.08MP depth sensor
Front Camera: 5MP sensor
Battery: 5500mAh capacity with 15W fast charging
Durability: IP64-rated for dust and water resistance; MIL-STD-810H compliant
Audio: Stereo speakers with up to 300% volume enhancement
Security: Side-mounted fingerprint sensor
📱 Design & Build The Vivo Y19s features a sleek design with a plastic back and frame, available in colors like Pearl Silver, Glossy Black, and Glacier Blue. It weighs approximately 198 grams and has dimensions of 165.8 x 76.1 x 8.1 mm. The device is IP64-rated, offering protection against dust
📷 Camera Performance The dual rear camera setup includes a 50MP primary sensor that captures detailed images in good lighting conditions. The 0.08MP depth sensor aids in portrait shots, providing a decent background blur effect. The 5MP front camera is suitable for selfies and video calls, though it may struggle in low-light environments.
⚙️ Performance & Software Powered by the Unisoc Tiger T612 processor, the Vivo Y19s handles daily tasks smoothly. The device runs on Android 14 with Funtouch OS 14, offering a user-friendly interface and various customization options. While it's capable of casual gaming, it's not designed for high-end gaming experiences.
The device supports 15W fast charging, allowing for quicker recharge times.
💰 Pricing & Availability India: Approximately ₹12,999 for the 6GB RAM + 128GB storage variant
Philippines: ₱6,499 for the base model
Nepal: NPR 18,499 for the 6GB RAM + 128GB storage variant
0 notes
Text
Screen Time in the Digital Age: Navigating the Attention Economy
The average person now spends nearly seven hours daily staring at screens—a 50% increase from a decade ago. Smartphones, social media, and streaming platforms dominate modern life, reshaping how we work, socialize, and relax. While technology offers undeniable benefits, excessive screen time has been linked to sleep disruption, anxiety, and diminished attention spans. As we navigate this digital landscape, finding balance is crucial for mental and physical well-being.
The Neuroscience of Screen Addiction
The allure of screens is deeply rooted in brain chemistry. Social media platforms exploit dopamine-driven feedback loops, where likes, notifications, and infinite scrolling create compulsive usage patterns. Neuroscientists compare this to slot machine mechanics—intermittent rewards keep users engaged.
The consequences are profound: studies show that heavy screen use fragments attention, reducing productivity by up to 40%. Evening exposure to blue light further disrupts circadian rhythms, suppressing melatonin and impairing sleep quality. These effects are particularly pronounced in children, whose developing brains are more susceptible to digital overstimulation.
Generational Impacts
Screen time affects all age groups differently. The American Academy of Pediatrics recommends no screens before 18 months and limited use for young children, yet many toddlers regularly interact with tablets. Among teens, 45% report feeling "addicted" to their devices, with social media fueling anxiety and body image issues. Adults, meanwhile, struggle with work-related screen fatigue—knowledge workers average just three hours of deep focus in an eight-hour workday. The ubiquity of screens has blurred boundaries between work and leisure, making digital detoxes increasingly necessary.
Practical Solutions for Digital Wellness
Reclaiming control over screen time requires intentional strategies. The "20-20-20 rule"—looking 20 feet away for 20 seconds every 20 minutes—reduces eye strain. Designating tech-free zones, such as bedrooms, fosters healthier sleep habits. Apps like Forest encourage focus by gamifying phone-free intervals, while scheduled digital detoxes help reset compulsive behaviors. Quality matters as much as quantity: replacing mindless scrolling with video calls or educational content ensures screen time remains meaningful.
The Future of Intentional Tech Use
As awareness grows, tech companies are responding with wellbeing features. iOS and Android now include screen time trackers and app limits. Minimalist devices like the Light Phone cater to those seeking digital simplicity. Meanwhile, attention-training apps such as Freedom and Offtime help users cultivate healthier habits. The challenge lies in redesigning technology to serve human needs rather than exploit psychological vulnerabilities.
Conclusion
Technology is woven into modern existence, but its use should be deliberate rather than habitual. By setting boundaries and prioritizing real-world connections, we can harness technology’s benefits without sacrificing well-being. As attention becomes our most precious resource, learning to protect it is essential.
0 notes
Text
"Discover the Best App for Fixing Blurry Photos: Top Picks and Expert Tips for Clearer Images"
**Best App for Fixing Blurry Photos: A Comprehensive Guide**
**I. Introduction**
In the age of digital photography, capturing the perfect moment is often just a click away. However, even the most seasoned photographers encounter the frustrating issue of blurry photos. Whether it's due to a shaky hand, poor lighting, or incorrect focus, blurry images can ruin an otherwise perfect shot. This is where technology steps in to save the day. With the best app for fixing blurry photos, you can transform those fuzzy memories into clear, vibrant images. This article aims to explore the top apps available for fixing blurry photos, providing you with the tools to enhance your photography skills and preserve your precious moments.
**II. Understanding Blurry Photos**
Blurry photos are a common issue faced by both amateur and professional photographers. They occur when the camera fails to capture a sharp image, resulting in a lack of clarity. Several factors contribute to this problem:
1. **Camera Shake**: This is one of the most common causes of blurry photos. It occurs when the camera moves during the exposure time, often due to unsteady hands.
2. **Incorrect Focus**: If the camera's focus is not set correctly, the subject of the photo may appear blurry while other parts of the image remain sharp.
3. **Low Light Conditions**: Inadequate lighting can force the camera to use slower shutter speeds, increasing the likelihood of blur due to movement.
Blurry photos can have a significant impact on both personal and professional photography. For personal use, they can diminish the quality of cherished memories. In professional settings, such as real estate or product photography, blurry images can affect the perceived quality and professionalism of the work.
**III. Criteria for Choosing the Best App**
When selecting the best app for fixing blurry photos, several key features should be considered:
- **User-Friendly Interface**: An intuitive design ensures that users of all skill levels can navigate the app with ease.
- **Advanced Algorithms for Image Sharpening**: The app should employ sophisticated technology to effectively enhance image clarity.
- **Compatibility with Various Platforms**: Ensure the app is available on your preferred device, whether it's iOS, Android, Windows, or Mac.
- **Customer Reviews and Ratings**: Feedback from other users can provide valuable insights into the app's performance and reliability.
- **Cost and In-App Purchases**: Consider the app's pricing structure and any additional costs for premium features.
**IV. Top Apps for Fixing Blurry Photos**
**A. Adobe Photoshop Express**
Adobe Photoshop Express is a powerful tool for unblurring images. It offers a range of features, including noise reduction and sharpening tools, to enhance photo clarity. While it excels in providing professional-grade editing capabilities, it may require a learning curve for beginners. However, its benefits, such as seamless integration with other Adobe products, make it a top choice for many users.
**B. Remini**
Remini is renowned for its ability to fix blurry images with just a few taps. Utilizing advanced AI technology, it enhances photo quality by restoring details and improving sharpness. Its user-friendly interface makes it accessible to all, though some users may find the free version's limitations a drawback.
**C. Fotor Photo Editor**
Fotor Photo Editor offers a comprehensive suite of editing tools, including options to fix blurry photos. Its batch processing feature allows users to edit multiple images simultaneously, saving time and effort. While it provides excellent functionality, some advanced features may require a subscription.
**D. Snapseed**
Developed by Google, Snapseed is a versatile photo editing app that includes tools for image sharpening. Its intuitive interface and wide range of features make it a favorite among photographers. However, its complexity may be overwhelming for those new to photo editing.
**V. How to Use These Apps: A Step-by-Step Guide**
**A. Adobe Photoshop Express Tutorial**
1. Open the app and import your blurry photo.
2. Navigate to the "Sharpen" tool.
3. Adjust the slider to enhance image clarity.
4. Use the "Noise Reduction" feature to smooth out any graininess.
5. Save your edited photo.
**B. Remini Tutorial**
1. Launch Remini and select the "Enhance" option.
2. Upload your blurry image.
3. Let the app process the photo using its AI technology.
4. Review the enhanced image and save it to your device.
**C. Fotor Photo Editor Tutorial**
1. Open Fotor and upload your photo.
2. Select the "1-Tap Enhance" feature for quick fixes.
3. For more control, use the "Sharpness" tool to adjust clarity.
4. Save the edited image.
**D. Snapseed Tutorial**
1. Import your photo into Snapseed.
2. Tap on "Details" and select "Sharpening."
3. Adjust the sharpening level to your preference.
4. Use the "Structure" tool to enhance details.
5. Save the final image.
**VI. Best Practices for Avoiding Blurry Photos**
To minimize the occurrence of blurry photos, consider the following tips:
- **Proper Camera Handling Techniques**: Hold the camera steady and use both hands for support.
- **Importance of Lighting**: Ensure adequate lighting to reduce the need for slow shutter speeds.
- **Using Tripods or Stabilizers**: These tools provide stability and prevent camera shake.
- **Post-Processing Tips**: Use editing software to enhance photo quality and correct minor blurriness.
**VII. Conclusion**
In conclusion, selecting the best app for fixing blurry photos can significantly enhance your photography experience. Whether you choose Adobe Photoshop Express, Remini, Fotor Photo Editor, or Snapseed, each app offers unique features to improve image clarity. Experimenting with different apps will help you find the perfect fit for your needs, ensuring that your photos are always picture-perfect.
0 notes
Text
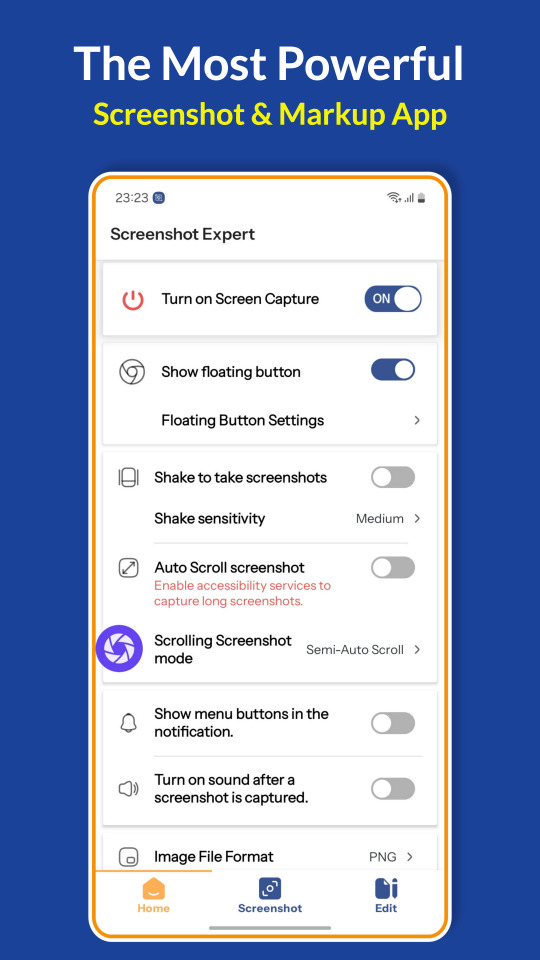
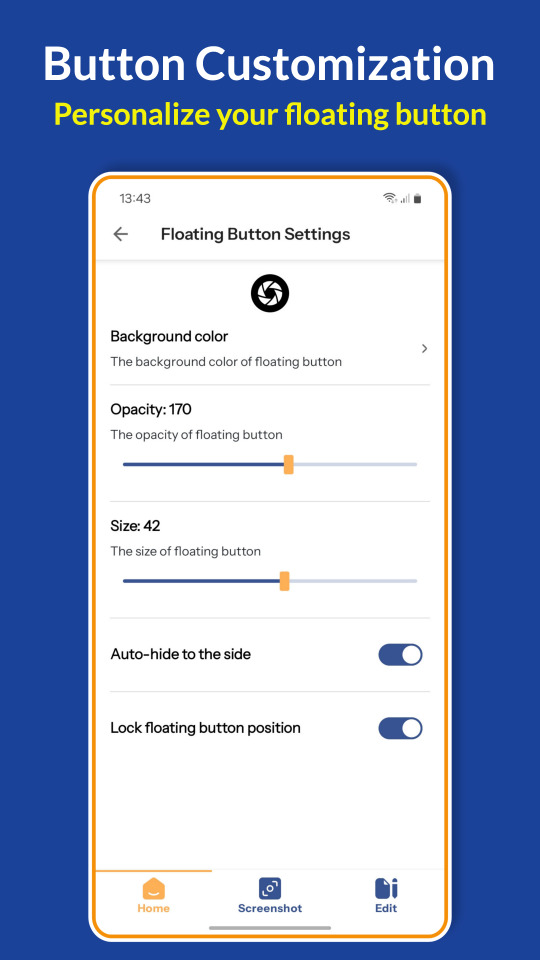
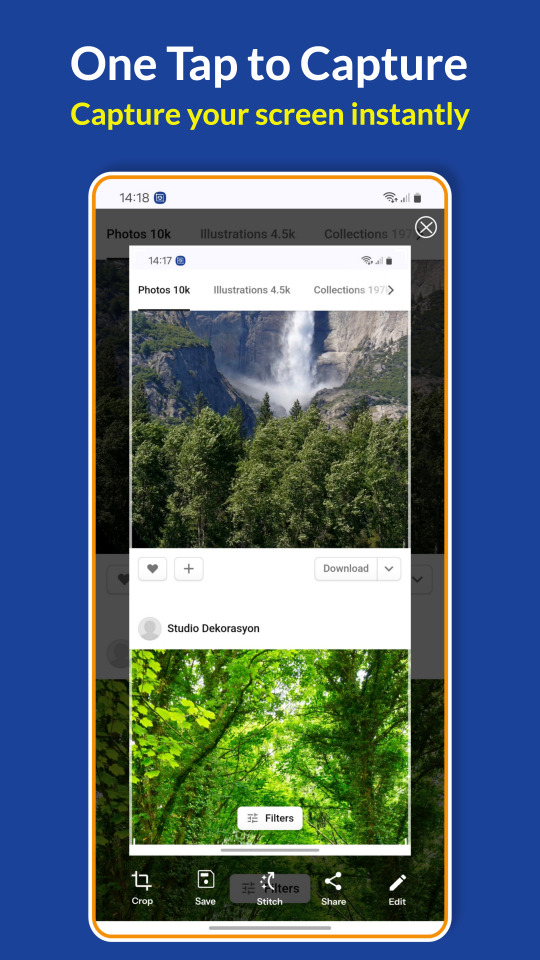


Screenshot Expert: The Ultimate Screenshot & Photo Markup Tool!
Download now
Screenshot Expert is a free, easy-to-use, and feature-packed screen capture, screenshot, and photo editing app for Android. Capture high-quality screen snaps instantly with a floating button, screen grab, one-touch screenshot, snap capture, or by shaking your device.
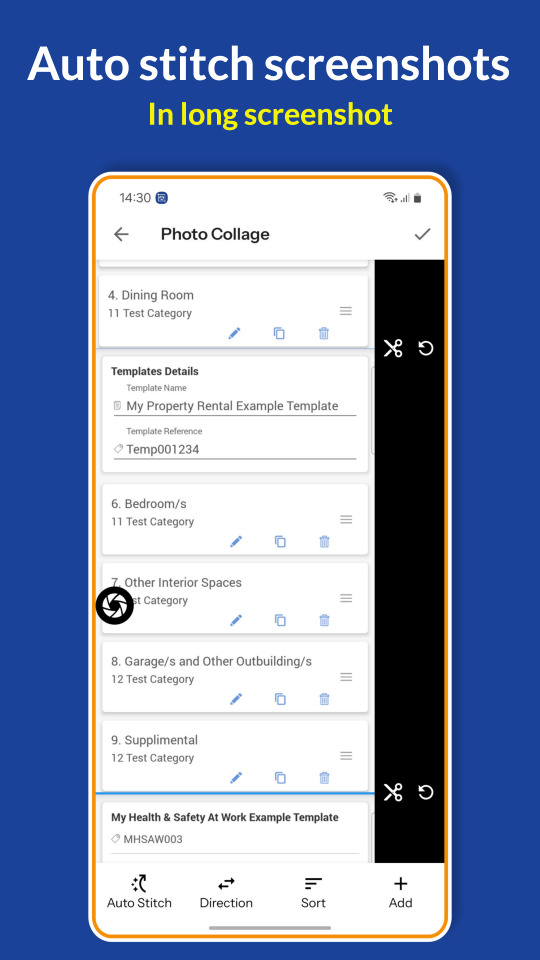
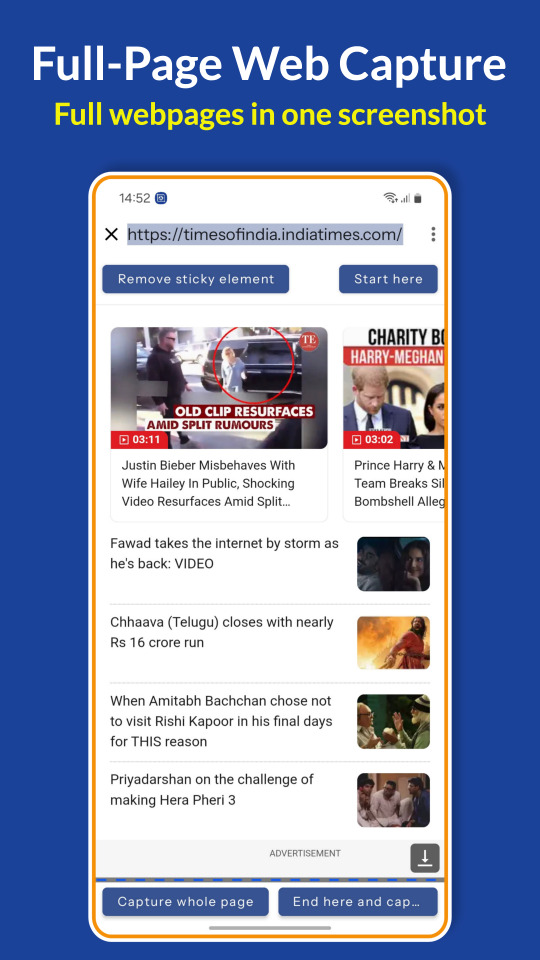
Enhance your screenshots with powerful markup and annotation tools, highlight key details, blur sensitive content, doodle on screenshots, add text, and draw arrows, rectangles, circles, and more. With auto-trimming, scrolling screenshot capture, merge screenshots, and full-page scroll capture, Screenshot Expert is the most advanced screenshot assistant you'll ever need!
Key Features – Capture, Edit & Share with Ease! ✅ Multiple Screenshot Methods: ◆ Floating Button – One-tap screenshot capture anytime, anywhere. ◆ Shake to Capture – Instantly take screenshots by shaking your phone. ◆ Scrolling Screenshot – Capture full webpages, long chats, and documents in a single image. ◆ Full-Page Web Capture – Save entire web pages instantly by sharing the URL. ◆ Merge Screenshots Automatically – Align and combine overlapping screenshots seamlessly. ◆ Sketch & Draw on Screenshot – Use freehand drawing, arrows, and highlights. ◆ Fast, Lightweight & Secure – The best privacy-focused screenshot app with zero data collection.
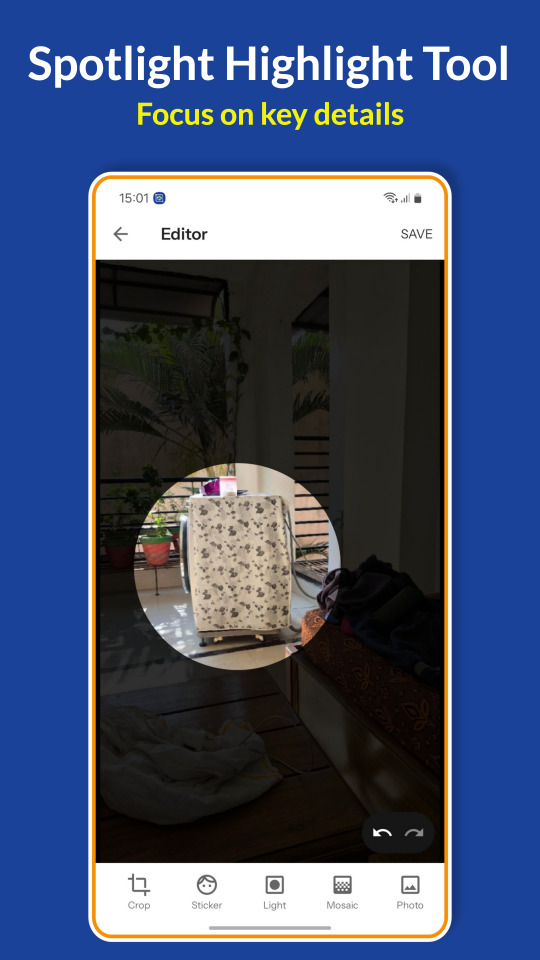
✅ Smart Screenshot Editing & Markup Tool: ◆ Crop & Rotate – Resize images in various shapes (rectangle, circle, triangle, star, etc.). ◆ Highlight & Spotlight – Draw attention to key details. ◆ Blur & Pixelate – Hide sensitive information before sharing. ◆ Magnify Tool – Zoom into specific areas for better clarity. ◆ Text & Stickers – Add captions, emojis, and stylish elements. ◆ Annotation Tools – Draw arrows, rectangles, circles, and freehand shapes. ◆ Edit Any Image – Import and markup any photo from your gallery.
✅ Photo Stitching – Create Long Screenshots Instantly! ◆ Auto-Detect & Stitch – Merge multiple screenshots into a single long image. ◆ Vertical & Horizontal Stitching – Seamlessly combine images in both directions.
✅ Map Capture & Annotation – Highlight Locations with Ease! ◆ Capture full maps and annotate with text, markers, and highlights effortlessly.
✅ Fast, Lightweight & User-Friendly: ◆ No Root Required – Works on all Android devices without root access. ◆ Small App Size – Minimal storage usage for maximum performance. ◆ Multi-Language Support – Available in 50+ languages for global users.
✅ Accessibility Service – Long Screenshots Made Easy! ◆ Uses Android's Accessibility Service to enable long screenshot capture. ◆ 100% Private & Secure – We do not collect, share, or store any user data.
✅ Screenshot Expert – Smarter, Faster, Better! Take screenshots like a pro with one-touch capture, floating button, and scrolling screenshot features. Enhance your images with powerful editing and markup tools—crop, doodle, add text, shapes, blur effects, and more. Whether you need a quick screenshot tool or advanced photo editing with annotations, Screenshot Expert has it all for effortless, high-quality screenshots!
⚠️ Important Notice: ◆ Screenshot Expert cannot capture secure content from banking apps, DRM-protected media, or password input screens due to security policies.
💬 Feedback & Support: ◆ We value your feedback! Contact us at [email protected] for any suggestions or issues.
📥 Download Screenshot Expert now to capture, edit, and enhance screenshots effortlessly! Get the ultimate screenshot tool with snap capture, scrolling screenshot, and pro-level markup! 🚀
#ScreenshotExpert#AndroidScreenshotApp#PhotoMarkupTool#ScreenCaptureApp#MarkupScreenshots#ScrollScreenshot#LongScreenshot
1 note
·
View note
Text
Realme Note 50 Price in Bangladesh. Full Phone specifications and review
Introduction
Realme Note 50 offers a unique combination of performance and features tailored for Bangladeshi users. The Realme Note 50 is a budget-friendly smartphone with an impressive display and stunning cameras. It also has a powerful processor. It is a smartphone that combines slick design with the latest technologies to appeal to gamers, tech lovers, and regular users.
The Realme Note 50 price in Bangladesh plays a crucial role in the decision-making process for local customers. This phone is a great buy, with its solid performance, capable camera, and long-lasting batteries. Does it meet the demands of Bangladeshi users? This review will examine its display, performance and usability.

Design Quality
Realme Note 50 features a sleek design, a sturdy construction and a stylish modern look. It has a sleek, glossy finish on the back that is both practical and attractive. The design minimizes fingerprints. The device is comfortable to use and feels premium despite its affordability. The lightweight design makes the device easy to use and carry for extended periods.
Realme Note 50 has a sturdy frame to withstand daily wear. Its slim design and round edges ensure a balanced weight while maintaining a comfortable grip. It is not water resistant, but it works well under the typical Bangladeshi climate conditions.
Display
Realme Note 50 has a Full HD+ display that features vibrant colors with sharp contrast. The display provides a clear and crisp viewing experience, whether you are watching videos, browsing social media or playing games. This screen has a smooth 90Hz refresh rate that is perfect for gaming and everyday tasks.
HDR enhances visual quality, providing a vibrant, bright display under varying lighting conditions. Corning Gorilla Glass provides additional protection for the display, which makes it more resistant to minor scratches and drops. Realme Note 50 offers a high-quality display at a reasonable price for Bangladeshi users who are looking to get the most out of their device.
Performance, UI & Operating System
Realme Note 50 runs on Realme UI 4.0 based Android 13. It offers a user-friendly and clean interface. It is easy to use and offers customization features and options to boost productivity. Regular software updates for Bangladeshi users ensures that their device is up to date with security patches and performance enhancements.
The Realme Note 50 runs on a MediaTek Dimensity 710 chipset, which is paired up with either 4GB or 6GB RAM depending on variant. The combination of the MediaTek Dimensity 700 chipset and 4GB or 6GB RAM ensures smooth daily performance, such as browsing social media sites, video streaming, etc. The phone can handle games like PUBG Mobile or Call of Duty on medium settings with no frame drop. If you need exclusive information please read Realme Nore 50 full review.
Realme Note 50 is a great device for Bangladeshi users looking for an affordable budget phone with multitasking abilities. It may not be as powerful as flagship smartphones, but it is still a good mid-range device.
Camera
Realme Note 50 has a quad-camera system with a 50MP sensor, which produces sharp photos. In daylight, the camera captures vibrant colors with fine detail. The camera is a little less effective in low light conditions but still manages to produce acceptable results.
You can capture wide-angle landscapes and group shots using the 8MP lens, while close-up photos with good detail are possible when you use the 2MP lens. Portrait shots are enhanced by the 2MP depth camera, which blurs backgrounds for a professional look.

The 16MP front camera is great for selfies. It produces clear, sharp, and natural-colored images. It offers features such as AI beautification, night mode and other useful tools for content creators and social media users in Bangladesh.
Charging & Battery
Realme Note 50 comes with a battery of 5000mAh that will last a whole day on moderate use. The battery is excellent, whether you are gaming, surfing, or watching videos. This phone will be perfect for Bangladeshi mobile users on the move.
Realme Note 50 supports 33W rapid charging, which allows you to charge your device from zero to fifty percent in less than 30 minutes. This means that the phone can be charged in a shorter time and so more time is spent using it. The Realme Note 50 has a charging speed that is more than adequate for many users, even though competitors offer higher charging speeds.
Network & Connectivity
Realme Note 50 is 5G-compatible, which makes it future proof for Bangladesh's expanding 5G network. The Realme Note 50 supports dual SIM, making it convenient for those who wish to make both professional and personal calls from a single phone.
Wi-Fi 5 and Bluetooth 5.1 are also available for connectivity, as is GPS navigation. It also has USB Type-C, which allows for data transfers and charging to be faster. This is convenient for Bangladeshi users used to multiple devices.
Storage and Sound Quality Options
Realme Note 50 has stereo speakers with balanced, clear sound. This makes it fun to watch videos and play games. The sound isn't as good as on premium phones, but it's still more than enough for an affordable phone.
There are 64GB and 128GB models, both of which will be enough for the majority of users in Bangladesh. There is no option to expand the storage. Users who want more room for photos, videos, apps and other media may opt for the larger 128GB version.
Unique Features
Future-proofing 5G technology
33W fast charging for quick top-ups
AI enhanced camera features to improve photography
Realme UI 4.0: A clean, customizable interface
Value and Price
Realme Note 50 is a great value, starting around BDT 17,000 (approximately). It is an excellent choice for Bangladeshi consumers who are looking for a phone that will handle their daily tasks.
Comparison of Competition
Realme Note 50 vs. Xiaomi Redmi Note 12
Note 50 improved camera performance, 50MP sensor at a more affordable price
Xiaomi Note 12 : higher refresh rate (120Hz) and MIUI features
Realme Note 50 vs. Samsung Galaxy A14
Note 50 - More powerful chipet and better camera
Samsung Galaxy A14 : Better display quality and slightly better built quality
FAQ
Q. Does the Realme Note 50 have a fast-charging feature? A. Yes, it supports 33W fast charging, which can charge the phone to 50% in around 30 minutes.
Q. Is the Realme Note 50 suitable for gaming? A. Yes, the phone handles gaming well on medium settings, providing a smooth experience for popular games like PUBG and Call of Duty.
Q. Does it support 5G? A. Yes, the Realme Note 50 is 5G-ready, making it a good choice for users in Bangladesh as 5G services continue to roll out.
Conclusion
Realme Note 50 offers a great budget option for Bangladeshi consumers who are looking for an affordable device that has a powerful camera and a long battery life. The Realme Note 50 is an impressive mid-range phone that delivers excellent value for money, featuring 5G connectivity, fast charging, and outstanding performance. Whether you're a student, professional, or simply looking to complement your device collection alongside your iPhone X, the Realme Note 50 is a fantastic choice.
#realme note 50 review#phone info#phone comparison#phone reviews#phone news#latest phone news#tech info#tech news#technology
0 notes
Text
Okay I know this is a silly thing but why has all software just decided that blurring/ anti-aliasing is better than low res? I mean, objectively I know why, but if you want a small low-res Image, it's going to be blurry to anyone you send it to unless they're viewing your image with infraview, which most people don't even know about. I'm not sure about Mac or IOS cause I don't use those, but I know for windows (I'll make the switch to Linux one day... Probably) and for Android, even their built-in image viewers do this anti-aliasing effect on everything, with no built in way to turn it off. I get that anti-aliasing is good for a lot of images but like can we just get a button to turn that shit off please? not every image needs smooth edges lol.
#this is mostly about pixel art but also about other stuff too#i think its weird that AA is seen as an objective upgrade to image quality especially by gamers#like yeah it can look good. but most of the time to me it either looks so similar/ the same that its not worth it or looks worse#is this a hot take?#also pretty much all this applies to image sharpening as well
1 note
·
View note
Text
What are the top 10 best photo filter apps for iPhone?
Years of effort are often required to master the art of editing Instagram photographs to achieve a consistent style. Today, however, you want your photographs to stand out, therefore we're going to let you in on social media's dirty little secret and list the top photo filter applications available. The finest apps let you quickly edit photos and add styles, automatically altering the colour, lighting, and tint to match your vision. In mobile app development companies in bangalore, finding the greatest photo filter app for your needs is essential for the best outcome.

Best Photo Filter Apps
1. PhotoDirector
You'll quickly see why PhotoDirector is our #1 pick after you download it for iPhone or Android. PhotoDirector is one of the largest selections of filters on our list, with over 400 high-quality photo filters included. Even better, PhotoDirector regularly receives content updates with the addition of new filters.Finding the correct appearance for your photo is one of the most difficult aspects of utilising photo filters, but PhotoDirector is excellent in this area.Sometimes the blend just isn't right, whether you're attempting to recreate an antiquated, analogue appearance with Lomo or you want to convey a sleek, urban vibe with Urban Ambience.
2. Canva
Canva offers a variety of design elements and layouts. Users have access to artistic components including fonts, collages, and stickers. The software also comes with extra features that make it simple to define a style and produce shareable content. But unlike PhotoDirector's library, Canva's premium platform doesn't provide as many picture editing tools and filters.
3. VSCO
For a multitude of reasons, Instagram users all around the world adore VSCO's straightforward, user-friendly mobile editing software. The software has a few sophisticated capabilities in addition to all the basic editing tools needed to enhance photos. To fit your preferences, you may also create and save custom filters.VSCO offers fewer free filters than services like PhotoDirector, similar to Canva. The software has a learning curve as well, which could frustrate or perplex new users.
4. Adobe Lightroom
On Windows and Mac, Adobe Lightroom has long been renowned for colour correcting. That pattern is maintained by the editing platform for mobile versions. It features dozens of filters and editing tools that quickly and easily change the colours of your photographs. Lightroom could make you feel rather constrained if you wish to perform sophisticated modifications. In contrast to PhotoDirector, the software concentrates on simple tweaks rather than offering users a comprehensive selection of editing options.
5. Snapseed
The portable photo editing and filter tool Snapseed makes it simple to edit pictures while on the go. It contains a variety of editing tools that make editing easier, including filters, presets, and auto-adjustment tools. Despite having all the available capabilities, Snapseed's Tune Image feature might be the most remarkable.
6. BeautyPlus
In mobile app development companies in India one of the most downloaded apps from both app stores is BeautyPlus. When it comes to beauty apps, it is one of the "OG"s. Since then, the creators have added additional features that are not related to beauty, such as templates, stickers, background patterns, and Cartoon filters to round out the most recent update.
7. AirBrush
With AirBrush, you can retouch your pictures or selfies to give them a polished appearance. This programme has a variety of filter effects in addition to manual retouching tools and numerous cosmetic looks. But the majority of those are better suited for selfies. There don't seem to be any filters for scenic or landscape photos.
8. Lensa
Your selfies should always be perfect, according to the Lensa app in app development company in bangalore. Lensa offers background removal, blur, and specialised lens functions in addition to smoothing out your skin and eliminating wrinkles so that you are the focus of every photograph. If you want to give each element of the image a more distinct adjustment, you can choose to alter the backdrop and foreground independently.
9. Video Filters Photo Editor・TON
The goal of TON is to make your material stand out by offering expert filters for your images and videos. The software simply provides filter effects, but they do it well. The software is free to download, but the more distinctive and intriguing filters are only accessible after you click the subscribe button.
10. Photo Editor & Filters
Splash and Filter are the two categories into which this app's primary functions are divided. With their splash feature, you can paint over the specific colours you wish to keep and leave the remainder in a greyscale, black-and-white, or other filter mode.
Read Also : chat app for android/iOS
0 notes
Text
The Elusive Definition of ‘Deepfake’
New Post has been published on https://thedigitalinsider.com/the-elusive-definition-of-deepfake/
The Elusive Definition of ‘Deepfake’
A compelling new study from Germany critiques the EU AI Act’s definition of the term ‘deepfake’ as overly vague, particularly in the context of digital image manipulation. The authors argue that the Act’s emphasis on content resembling real people or events – yet potentially appearing fake – lacks clarity.
They also highlight that the Act’s exceptions for ‘standard editing’ (i.e., supposedly minor AI-aided modifications to images) fail to consider both the pervasive influence of AI in consumer applications and the subjective nature of artistic conventions that predate the advent of AI.
Imprecise legislation on these issues gives rise to two key risks: a ‘chilling effect,’ where the law’s broad interpretive scope stifles innovation and the adoption of new systems; and a ‘scofflaw effect,’ where the law is disregarded as overreaching or irrelevant.
In either case, vague laws effectively shift the responsibility of establishing practical legal definitions onto future court rulings – a cautious and risk-averse approach to legislation.
AI-based image-manipulation technologies remain notably ahead of legislation’s capacity to address them, it seems. For instance, one noteworthy example of the growing elasticity of the concept of AI-driven ‘automatic’ post-processing, the paper observes, is the ‘Scene Optimizer’ function in recent Samsung cameras, which can replace user-taken images of the moon (a challenging subject), with an AI-driven, ‘refined’ image:
Top left, an example from the new paper of a real user-taken image of the moon, to the left of a Samsung-enhanced version automatically created with Scene Optimizer; Right, Samsung’s official illustration of the process behind this; lower left, examples from the Reddit user u/ibreakphotos, showing (left) a deliberately blurred image of the moon and (right), Samsung’s re-imagining of this image – even though the source photo was a picture of a monitor, and not the real moon. Sources (clockwise from top-left): https://arxiv.org/pdf/2412.09961; https://www.samsung.com/uk/support/mobile-devices/how-galaxy-cameras-combine-super-resolution-technologies-with-ai-to-produce-high-quality-images-of-the-moon/; https:/reddit.com/r/Android/comments/11nzrb0/samsung_space_zoom_moon_shots_are_fake_and_here/
In the lower-left of the image above, we see two images of the moon. The one on the left is a photo taken by a Reddit user. Here, the image has been deliberately blurred and downscaled by the user.
To its right we see a photo of the same degraded image taken with a Samsung camera with AI-driven post-processing enabled. The camera has automatically ‘augmented’ the recognized ‘moon’ object, even though it was not the real moon.
The paper levels deeper criticism at the Best Take feature incorporated into Google’s recent smartphones – a controversial AI feature that edits together the ‘best’ parts of a group photo, scanning multiple seconds of a photography sequence so that smiles are shuffled forward or backward in time as necessary – and no-one is shown in the middle of blinking.
The paper contends this kind of composite process has the potential to misrepresent events:
‘[In] a typical group photo setting, an average viewer would probably still consider the resulting photo as authentic. The smile which is inserted existed within a couple of seconds from the remaining photo being taken.
‘On the other hand, the ten second time frame of the best take feature is sufficient for a mood change. A person might have stopped smiling while the rest of the group laughs about a joke at their expense.
‘As a consequence, we assume that such a group photo may well constitute a deep fake.’
The new paper is titled What constitutes a Deep Fake? The blurry line between legitimate processing and manipulation under the EU AI Act, and comes from two researchers at the Computational Law Lab at the University of Tübingen, and Saarland University.
Old Tricks
Manipulating time in photography is far older than consumer-level AI. The new paper’s authors note the existence of much older techniques that can be argued as ‘inauthentic’, such as the concatenation of multiple sequential images into a High Dynamic Range (HDR) photo, or a ‘stitched’ panoramic photo.
Indeed, some of the oldest and most amusing photographic fakes were traditionally created by school-children running from one end of a school group to another, ahead of the trajectory of the special panoramic cameras that were once used for sports and school group photography – enabling the pupil to appear twice in the same image:
The temptation to trick panoramic cameras during group photos was too much to resist for many students, who were willing to risk a bad session at the head’s office in order to ‘clone’ themselves in school photos. Source: https://petapixel.com/2012/12/13/double-exposure-a-clever-photo-prank-from-half-a-century-ago/
Unless you take a photo in RAW mode, which basically dumps the camera lens sensor to a very large file without any kind of interpretation, it’s likely that your digital photos are not completely authentic. Camera systems routinely apply ‘improvement’ algorithms such as image sharpening and white balance, by default – and have done so since the origins of consumer-level digital photography.
The authors of the new paper argue that even these older types of digital photo augmentation do not represent ‘reality’, since such methods are designed to make photos more pleasing, not more ‘real’.
The study suggests that the EU AI Act, even with later amendments such as recitals 123–27, places all photographic output within an evidentiary framework unsuited to the context in which photos are produced these days, as opposed to the (nominally objective) nature of security camera footage or forensic photography. Most images addressed by the AI Act are more likely to originate in contexts where manufacturers and online platforms actively promote creative photo interpretation, including the use of AI.
The researchers suggest that photos ‘have never been an objective depiction of reality’. Considerations such as the camera’s location, the depth of field chosen, and lighting choices, all contribute to make a photograph deeply subjective.
The paper observes that routine ‘clean-up’ tasks – such as removing sensor dust or unwanted power lines from an otherwise well-composed scene – were only semi-automated before the rise of AI: users had to manually select a region or initiate a process to achieve their desired outcome.
Today, these operations are often triggered by a user’s text prompts, most notably in tools like Photoshop. At the consumer level, such features are increasingly automated without user input – an outcome that is apparently regarded by manufacturers and platforms as ‘obviously desirable’.
The Diluted Meaning of ‘Deepfake’
A central challenge for legislation around AI-altered and AI-generated imagery is the ambiguity of the term ‘deepfake’, which has had its meaning notably extended over the last two years.
Originally the terms applied only to video output from autoencoder-based systems such as DeepFaceLab and FaceSwap, both derived from anonymous code posted to Reddit in late 2017.
From 2022, the coming of Latent Diffusion Models (LDMs) such as Stable Diffusion and Flux, as well as text-to-video systems such as Sora, would also allow identity-swapping and customization, at improved resolution, versatility and fidelity. Now it was possible to create diffusion-based models that could depict celebrities and politicians. Since the term’ deepfake’ was already a headline-garnering treasure for media producers, it was extended to cover these systems.
Later, in both the media and the research literature, the term came also to include text-based impersonation. By this point, the original meaning of ‘deepfake’ was all but lost, while its extended meaning was constantly evolving, and increasingly diluted.
But since the word was so incendiary and galvanizing, and was by now a powerful political and media touchstone, it proved impossible to give up. It attracted readers to websites, funding to researchers, and attention to politicians. This lexical ambiguity is the main focus of the new research.
As the authors observe, article 3(60) of the EU AI Act outlines four conditions that define a ‘deepfake’.
1: True Moon
Firstly, the content must be generated or manipulated, i.e., either created from scratch using AI (generation) or altered from existing data (manipulation). The paper highlights the difficulty in distinguishing between ‘acceptable’ image-editing outcomes and manipulative deepfakes, given that digital photos are, in any case, never true representations of reality.
The paper contends that a Samsung-generated moon is arguably authentic, since the moon is unlikely to change appearance, and since the AI-generated content, trained on real lunar images, is therefore likely to be accurate.
However, the authors also state that since the Samsung system has been shown to generate an ‘enhanced’ image of the moon in a case where the source image was not the moon itself, this would be considered a ‘deepfake’.
It would be impractical to draw up a comprehensive list of differing use-cases around this kind of ad hoc functionality. Therefore the burden of definition seems to pass, once again, to the courts.
2: TextFakes
Secondly, the content must be in the form of image, audio, or video. Text content, while subject to other transparency obligations, is not considered a deepfake under the AI Act. This is not covered in any detail in the new study, though it can have a notable bearing on the effectiveness of visual deepfakes (see below).
3: Real World Problems
Thirdly, the content must resemble existing persons, objects, places, entities, or events. This condition establishes a connection to the real world, meaning that purely fabricated imagery, even if photorealistic, would not qualify as a deepfake. Recital 134 of the EU AI Act emphasizes the ‘resemblance’ aspect by adding the word ‘appreciably’ (an apparent deferral to subsequent legal judgements).
The authors, citing earlier work, consider whether an AI-generated face need belong to a real person, or whether it need only be adequately similar to a real person, in order to satisfy this definition.
For instance, how can one determine whether a sequence of photorealistic images depicting the politician Donald Trump has the intent of impersonation, if the images (or appended texts) do not specifically mention him? Facial recognition? User surveys? A judge’s definition of ‘common sense’?
Returning to the ‘TextFakes’ issue (see above), words often constitute a significant portion of the act of a visual deepfake. For instance, it is possible to take an (unaltered) image or video of ‘person a’, and say, in a caption or a social media post, that the image is of ‘person b’ (assuming the two people bear a resemblance).
In such as case, no AI is needed, and the result may be strikingly effective – but does such a low-tech approach also constitute a ‘deepfake’?
4: Retouch, Remodel
Finally, the content must appear authentic or truthful to a person. This condition emphasizes the perception of human viewers. Content that is only recognized as representing a real person or object by an algorithm would not be considered a deepfake.
Of all the conditions in 3(60), this one most obviously defers to the later judgment of a court, since it does not allow for any interpretation via technical or mechanized means.
There are clearly some inherent difficulties in reaching consensus on such a subjective stipulation. The authors observe, for instance, that different people, and different types of people (such as children and adults), may be variously disposed to believe in a particular deepfake.
The authors further note that the advanced AI capabilities of tools like Photoshop challenge traditional definitions of ‘deepfake.’ While these systems may include basic safeguards against controversial or prohibited content, they dramatically expand the concept of ‘retouching.’ Users can now add or remove objects in a highly convincing, photorealistic manner, achieving a professional level of authenticity that redefines the boundaries of image manipulation.
The authors state:
‘We argue that the current definition of deep fakes in the AI act and the corresponding obligations are not sufficiently specified to tackle the challenges posed by deep fakes. By analyzing the life cycle of a digital photo from the camera sensor to the digital editing features, we find that:
‘(1.) Deep fakes are ill-defined in the EU AI Act. The definition leaves too much scope for what a deep fake is.
‘(2.) It is unclear how editing functions like Google’s “best take” feature can be considered as an exception to transparency obligations.
‘(3.) The exception for substantially edited images raises questions about what constitutes substantial editing of content and whether or not this editing must be perceptible by a natural person.’
Taking Exception
The EU AI Act contains exceptions that, the authors argue, can be very permissive. Article 50(2), they state, offers an exception in cases where the majority of an original source image is not altered. The authors note:
‘What can be considered content in the sense of Article 50(2) in cases of digital audio, images, and videos? For example, in the case of images, do we need to consider the pixel-space or the visible space perceptible by humans? Substantive manipulations in the pixel space might not change human perception, and on the other hand, small perturbations in the pixel space can change the perception dramatically.’
The researchers provide the example of adding a hand-gun to the photo a person who is pointing at someone. By adding the gun, one is changing as little as 5% of the image; however, the semantic significance of the changed portion is notable. Therefore it seems that this exception does not take account of any ‘common-sense’ understanding of the effect a small detail can have on the overall significance of an image.
Section 50(2) also allows exceptions for an ‘assistive function for standard editing’. Since the Act does not define what ‘standard editing’ means, even post-processing features as extreme as Google’s Best Take would seem to be protected by this exception, the authors observe.
Conclusion
The stated intention of the new work is to encourage interdisciplinary study around the regulation of deepfakes, and to act as a starting point for new dialogues between computer scientists and legal scholars.
However, the paper itself succumbs to tautology at several points: it frequently uses the term ‘deepfake’ as if its meaning were self-evident, whilst taking aim at the EU AI Act for failing to define what actually constitutes a deepfake.
First published Monday, December 16, 2024
#2022#2024#ADD#adoption#ai#ai act#ai-generated content#algorithm#Algorithms#android#applications#approach#Article#Artificial Intelligence#attention#audio#bearing#Cameras#challenge#change#Children#clockwise#clone#code#comprehensive#computer#content#court#data#december
0 notes
Text
OnePlus Pad Receives OxygenOS 15 Update in India: Key Features and Enhancements

OnePlus has started rolling out the stable OxygenOS 15 update for its OnePlus Pad in India, the company announced through its community forum on Monday. Based on Android 15, the update introduces a host of visual and functional upgrades, including flux themes, AI-powered features, and new productivity tools.
Key Features of OxygenOS 15
1. Visual Enhancements
OxygenOS 15 brings significant visual upgrades across the user interface (UI):
Flux Themes: Includes extensive home and lock screen customization options. Users can now apply blurred wallpapers, clock color blending, and glass textures.
Luminous Rendering Effects: Improved animations and design refinements across the UI.
Live Alerts System: Redesigned alert capsules open detailed cards with updated animations for a cleaner experience.
2. AI Features
The update leverages artificial intelligence to enhance user functionality:
AI Reflections Eraser: Removes unwanted reflections from glass surfaces in images.
AI Writing Suite: Helps polish and optimize written content while formatting it into an organized structure.
Clean Up Feature: Removes filler words from voice notes without altering the original audio.
3. Camera and Editing Enhancements
Integrated Filters and Reversible Edits: The Camera app now offers better filter integration, and photo edits are reversible, saving previous settings for future adjustments.
4. Multitasking and Gestures
Floating Window Gestures: Swipe down to access the status window or swipe sideways to hide it.
Notification Panel: Improved actions with separate gestures for accessing quick settings and notifications.
5. Battery and Charging Management
Charging Limit Feature: Limits maximum charging to 80%, which is designed to reduce battery wear and extend its lifespan.
Availability
The OxygenOS 15 update is rolling out to OnePlus Pad users in India in batches and will expand to North America and Europe next week.
With its latest OS update, OnePlus aims to enhance both productivity and personalization for OnePlus Pad users, further cementing its position in the competitive tablet market
0 notes
Text
Xiaomi LED Smart TV X Series 2024 4K Ultra HD
The Xiaomi LED Smart TV X Series 2024 4K Ultra HD brings a blend of cutting-edge technology, vibrant 4K clarity, and smart features to elevate your viewing experience. Designed to cater to the modern home entertainment needs, this TV offers rich visuals, immersive audio, and seamless connectivity, making it a complete solution for families, movie buffs, and gamers alike. With a sleek design, powerful performance, and a smart interface, the X Series 2024 is a step forward in Xiaomi's lineup, providing an affordable and quality-driven alternative to high-end models.

Stunning 4K Ultra HD Visuals with Vivid Color Accuracy
At the heart of the Xiaomi X Series 2024 is its 4K Ultra HD (3840 x 2160 pixels) resolution, which delivers crystal-clear detail and vivid colors. The LED panel technology paired with Xiaomi's proprietary picture engine ensures that each frame is sharp, with accurate color reproduction and deep contrasts. With support for HDR10+ and Dolby Vision, the X Series offers an expanded color gamut, ensuring brighter whites, deeper blacks, and vibrant colors for an immersive viewing experience.
The wide color gamut and dynamic contrast work together to produce natural and realistic images, making it ideal for watching 4K movies, sports, and playing high-definition games. Xiaomi's advanced MEMC (Motion Estimation Motion Compensation) technology reduces motion blur, enhancing fast-paced content like sports and action films for smooth, seamless visuals.
Enhanced Audio with Dolby and DTS Support
Complementing the stunning visuals, the Xiaomi X Series 2024 features Dolby Audio and DTS-HD sound technology, providing an immersive audio experience. With powerful 20W dual stereo speakers, the TV delivers clear dialogue, rich bass, and impressive audio depth. Dolby Audio provides surround sound-like quality, making it feel like you’re at the center of the action, whether you’re watching a movie or playing a game.
The DTS-HD technology further enhances audio clarity by producing crisp sound effects, ensuring you catch every detail from the softest whispers to explosive action scenes. This superior sound setup eliminates the need for external sound systems, making it perfect for small to medium-sized rooms.
Smart TV Features Powered by Android TV
The Xiaomi X Series 2024 4K Ultra HD TV runs on Android TV, offering a familiar and easy-to-navigate interface. With access to the Google Play Store, users can download a vast library of apps, games, and streaming services like Netflix, Amazon Prime Video, Disney+, YouTube, and more. Built-in Google Assistant allows you to control the TV and compatible smart home devices using voice commands, creating a hands-free experience that makes watching TV more convenient.
In addition to Android TV’s features, Xiaomi has integrated PatchWall, a proprietary interface that aggregates content from multiple streaming platforms into one easy-to-browse interface. PatchWall includes Universal Search, personalized recommendations, and a Kids Mode with parental controls, ensuring a user-friendly experience that caters to all family members. This feature enables quick access to movies, shows, and popular content, making it easier than ever to find something to watch.
Seamless Connectivity and Control
The Xiaomi X Series 2024 comes with a wide array of connectivity options to suit all your multimedia needs. The TV includes:
3 HDMI ports for connecting gaming consoles, set-top boxes, and other devices
2 USB ports for external storage or additional peripherals
Bluetooth 5.0 and dual-band Wi-Fi for wireless connectivity
Optical audio out for sound system setups
The HDMI eARC feature enables high-quality audio pass-through to compatible soundbars and audio systems, ensuring lossless sound quality. Additionally, the Chromecast built-in feature allows users to mirror content directly from smartphones, tablets, and laptops, giving you a seamless way to share content on a larger screen.
The included smart remote control is ergonomically designed and equipped with hotkeys for popular streaming apps and Google Assistant, making navigation smooth and straightforward.
Sleek Design and Energy Efficiency
The Xiaomi X Series 2024 has a sleek, bezel-less design that provides an edge-to-edge display, maximizing screen space and enhancing immersion. The slim profile and stylish aesthetics fit into any home decor, and the sturdy stand keeps the TV stable on any surface. Its elegant design makes it a statement piece in any living room, delivering both style and substance.
Additionally, the TV is energy-efficient, designed to consume less power without compromising performance. This efficiency helps reduce electricity costs, especially for households that watch TV for extended periods.
Gaming Mode for Enhanced Performance
For gamers, the Xiaomi X Series 2024 includes a dedicated Gaming Mode that optimizes response time, reduces input lag, and delivers smooth gameplay visuals. The Auto Low Latency Mode (ALLM) ensures a seamless gaming experience, especially beneficial for competitive or high-paced gaming. Paired with the TV’s 4K HDR display, gaming visuals are enhanced, providing an engaging and immersive experience.
Conclusion: A Smart Choice for Modern Entertainment
The Xiaomi LED Smart TV X Series 2024 4K Ultra HD is a well-rounded smart TV that combines high-quality visuals, immersive audio, and a suite of smart features in an affordable package. Its Android TV OS and PatchWall provide a robust content ecosystem, while Dolby Audio and HDR support ensure a theater-like experience at home. With its gaming-friendly features and extensive connectivity options, this TV offers something for everyone, making it perfect for families, gamers, and streaming enthusiasts.
0 notes
Text
Magic Editor And Magic Eraser For Easy Google AI Photo Edits

With Google’s AI-powered Pixel editing tool, you can get the ideal photo with only a few touches.
Use Pixel’s sophisticated camera to improve the images; it allows you to alter the background and move, delete, and resize objects or people in a picture. The latest features of Magic Editor, which are coming with Pixel 9 phones, even allow you to zoom out to expand the boundaries of a photo or straighten a crooked image.
Magic Editor can help you realize your vision, whether you need to exclude an unknown person from the background of a family shot, edit your image to showcase a basketball player’s vertical during a stunning slam, or add a properly lit backdrop to your selfie in your summer attire.
Magic Editor
Greetings from the future of photo editing. With the aid of generative AI, reimagine all of your greatest experiences. Take a look yourself.
Place everything in its proper location. To move an item, simply tap, brush, or circle it. Additionally, you can use a pinch to resize items.
Magic Eraser
With a few taps, you can get rid of undesired items and more.
You can either manually brush or circle an object to erase it, or you can use suggestions to eliminate objects in a tap.
Unblurred Picture
Don’t allow a small movement to spoil an amazing moment. Both recent and vintage out-of-focus fuzzy photographs can be improved with Photo Unblur.
Additional methods for photograph editing
Light in Portrait Form
Even after the picture is taken, adjust the lighting and brightness to make everyone look stunning.
Pictures from a movie
Make movies out of your life. Transform your photos into moving 3D films to give them life.
Blur in portrait
Use Portrait Blur to blur the backdrop of a picture after it has been taken to make it into a portrait.
Reimagine your images using Magic Editor
With your Pixel device, you can rethink your photos using Magic Editor. Use contextual or special effect settings like “Sky” or “Golden hour,” to move, recompose, or eliminate photos.
Key:
Your device needs 4 GB RAM, a 64-bit processor, and Android 8.0 or later.
Experimental features may not work as expected.
Use the Magic Editor
On your Pixel, launch the Google Photos app.
To modify a picture, tap on it.
Click Edit.
Select Magic Editor in the lower left corner.
To make changes to a portion of your photo, utilize Magic Editor:
Key:
The creation of photo options in Magic Editor may take a while.
You can press and hold the screen to see or compare the original version of your altered photo.
You have the option to move, resize, remove, or rethink the portion of your photo that you have selected.
AI-Powered Easy Photo Edits: An Overview of Magic Editor and Magic Eraser
To make Google images stand out, it frequently modify them. Sometimes that entails making a small adjustment to a picture, such as cropping it. In other cases, it could include more intricate adjustments like eliminating extraneous objects or distractions, enhancing the lighting, or even coming up with a fresh composition. AI, which powers editing tools like Google Photos‘ Magic Editor and Magic Eraser, has transformed these once laborious, complicated operations.
Google understands how important it is to use Google AI Principles as a guide as it expands access to these capabilities. It is making it simpler to identify instances of AI adjustments in Google Photos to increase transparency even more. Google Photos will start identifying when a photo has been altered using Google AI within the Photos app the following week.
In order to identify that they were altered using generative AI, photos changed with programs like Magic Editor, Magic Eraser, and Zoom Enhance already contain metadata based on technical standards from The International Press Telecommunications Council (IPTC). It is going one step further now and displaying this data in the Photos app along with details like the file name, location, and backup status.
It will employ IPTC metadata to specify when an image is made up of components from several photos using non-generative characteristics, in addition to noting when the image has been altered using generative AI. To help you take amazing group shots, apps like Add Me on Google Pixel 9 and Best Take on Pixel 8 and Pixel 9 combine photos taken at the same moment to produce a blended image.
Although it is hopeful about AI’s potential, it also understands that cutting-edge technology can present significant obstacles that need to be addressed in a straightforward, considerate, and positive manner. These AI Principles outline Google’s dedication to ethical technology development and attempt to identify particular application domains that it will not pursue.
Read more on Govindhtech.com
#MagicEditor#MagicEraser#GoogleAI#GoogleAIPhoto#AI#PhotoEdit#generativeAI#Pixel#News#Technews#Technology#Technologynews#Technologytrends#govindhtech
0 notes
Text
Adobe Photoshop is the gold standard of image editing software
Photoshop Express is a streamlined, user-friendly version of Adobe Photoshop designed for those who want to enhance their photos quickly and efficiently. Whether you're a novice looking to dip your toes into photo editing or a seasoned pro seeking a lightweight tool for on-the-go adjustments, Photoshop Express offers an array of features that make photo editing a breeze. This guide will help you master Adobe Photoshop Express in just 2 hours, covering everything from the basics to advanced tips and tricks.
What is Adobe Photoshop Express?
Adobe Photoshop Express is a free photo editing app available for mobile devices and desktops. It combines a range of editing tools and filters to provide a simplified version of its more robust sibling, Adobe Photoshop. The app is designed for quick edits and adjustments, making it perfect for users who want to enhance their photos without diving into complex editing processes.
Getting Started with Photoshop Express
Step 1: Download and Install the App
The first step to mastering Photoshop Express is to download and install the app on your device. It is available on iOS, Android, and Windows devices. Simply search for "Adobe Photoshop Express" in your device's app store and follow the installation instructions.
Step 2: Set Up Your Account
Once installed, you'll need to set up an Adobe account or sign in with an existing one. An Adobe ID allows you to access additional features and sync your work across devices.
Step 3: Import Your Photos
After logging in, you can start importing your photos. Photoshop Express supports multiple file formats, including JPEG, PNG, and RAW. You can import photos directly from your device's gallery, cloud storage, or take a new photo using the app's built-in camera feature.
Core Features of Photoshop Express
1. Basic Adjustments
Photoshop Express offers several basic editing tools that can dramatically improve the quality of your photos:
Crop and Straighten: Adjust the composition of your photos by cropping them to different aspect ratios or by straightening them.
Exposure, Brightness, and Contrast: Modify the lighting and contrast to enhance the overall appearance of your images.
Saturation and Vibrance: Boost or reduce the intensity of colors to make your photos more vivid or muted.
2. Filters and Effects
One of the standout features of Photoshop Express is its extensive collection of filters and effects:
Looks: Apply pre-set filters with a single tap to quickly change the mood of your photo. These include options like "Black & White," "Vintage," "Portrait," and "Nature."
Blur: Create depth of field by blurring parts of your photo, giving it a professional look.
3. Advanced Editing Tools
For those looking to take their editing a step further, Photoshop Express offers several advanced tools:
Selective Editing: Make precise edits to specific areas of your photo without affecting the entire image. This is particularly useful for enhancing certain colors or correcting exposure in select areas.
Red Eye Removal: A quick fix for photos where subjects have red eyes due to flash photography.
Healing Brush: Remove blemishes, spots, or unwanted objects from your photos with this powerful tool.
4. Text and Borders
Add a personal touch to your photos by overlaying text or applying stylish borders. Photoshop Express provides a variety of fonts and styles, allowing you to customize your photos for social media, digital portfolios, or personal keepsakes.
Step-by-Step Guide: Mastering Photoshop Express in 2 Hours
Hour 1: Learning the Basics
Familiarize Yourself with the Interface: Spend the first 10 minutes exploring the app's layout and features. Understanding where tools are located will make the editing process smoother.
Import and Edit Your First Photo: Choose a photo to edit and start with basic adjustments like cropping, straightening, and tweaking the exposure, brightness, and contrast. This process should take about 15 minutes.
Experiment with Filters and Effects: Spend the next 15 minutes applying different filters and effects to your photo. Learn how each one alters the image and experiment with combining multiple effects.
Try Out Advanced Tools: Use the remaining 20 minutes of this hour to explore the advanced editing tools like selective editing, red-eye removal, and the healing brush. Start with easy edits and gradually try more complex adjustments.
Hour 2: Advanced Techniques and Creative Edits
Dive Deeper into Selective Editing: Spend 20 minutes learning how to use the selective editing tools to enhance specific areas of your photos. Focus on adjusting color, brightness, and detail selectively.
Add Text and Borders: Use the next 10 minutes to add text and borders to your images. Try different fonts, sizes, and colors to see what works best for your photo.
Save and Export: Spend 10 minutes learning how to save and export your photos. Photoshop Express allows you to save images in different formats and sizes, making it easy to share on social media or print.
Practice and Review: Use the final 20 minutes to practice what you’ve learned. Import new photos and apply all the techniques you’ve practiced. Experiment with different styles and looks to develop your unique editing style.
Tips for Mastering Photoshop Express
Use Shortcuts: Familiarize yourself with shortcuts and gestures that can speed up your editing process.
Experiment Regularly: The best way to learn is by doing. Regularly edit different types of photos to understand how various tools affect them.
Stay Updated: Adobe regularly updates Photoshop Express with new features and improvements. Make sure your app is always up-to-date to take advantage of the latest tools.
Conclusion
With its intuitive interface and powerful tools, Adobe Photoshop Express is an excellent choice for anyone looking to enhance their photos quickly and efficiently. By following this guide and dedicating just 2 hours, you can master Photoshop Express and start creating stunning photos that stand out. Happy editing!
0 notes