#fire alpaca tutorial
Explore tagged Tumblr posts
Visit Tumblr Blog
Explore Tumblr blogs with no restrictions, modern design and the best experience.
Last Seen Tumblr Blogs


Fun Fact
Tumblr has 411 employees.
Note
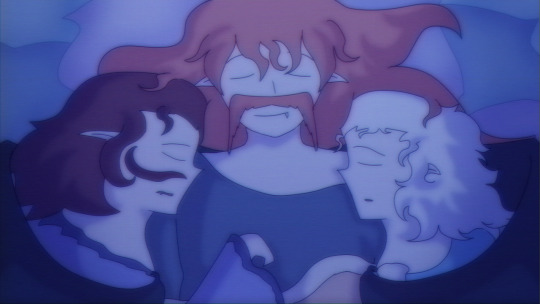
Would you ever do a tutorial on how you get that old school anime effect on your stuff?
Sorry for taking so long to answer you anon, I am a derp at explaining but here is how I do my fake anime screenshots.
Tutorial below the keep reading as it is slightly long and I use FireAlpaca for this, but you can probably adapt this to other programs with the same layer effects.
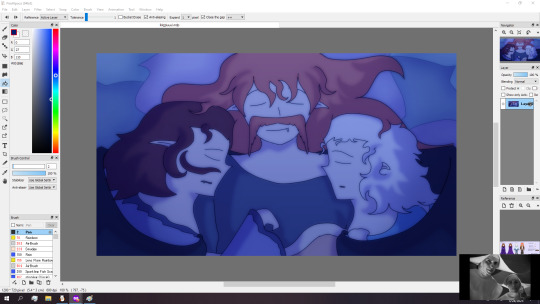
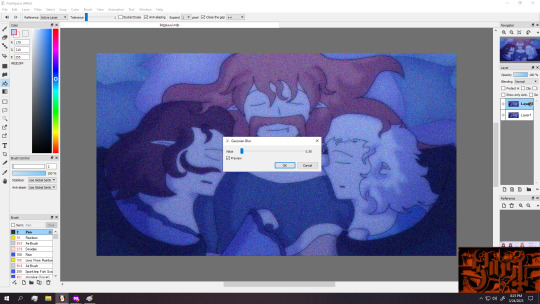
First have your picture ready and merged into one layer.
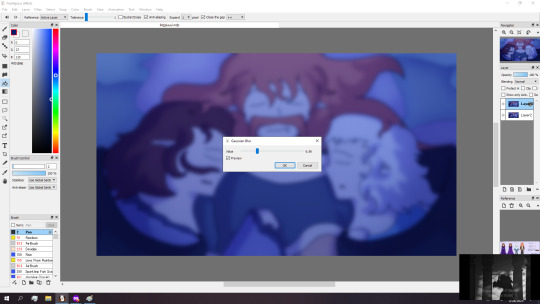

Then duplicate the image and apply a gaussian blur to it at around six percent strength or roughly the same blurriness of the screenshot.
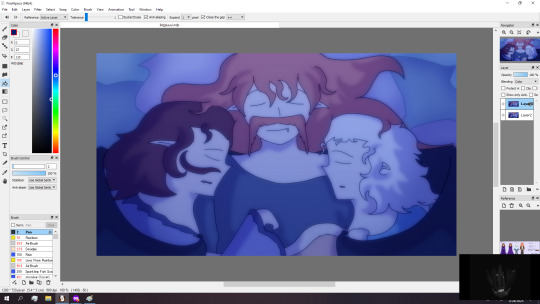
After you blurred the layer, set the blending mode to screen and adjust the layer opacity to around fifteen to thirty percent before merging everything back to one layer.

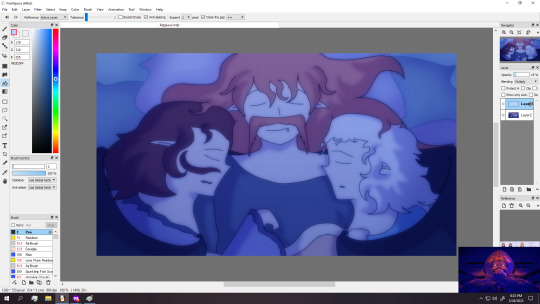
Then duplicate the layer again and motion blur it to around thirty intensity and then set the layer to color blend mode before merging.
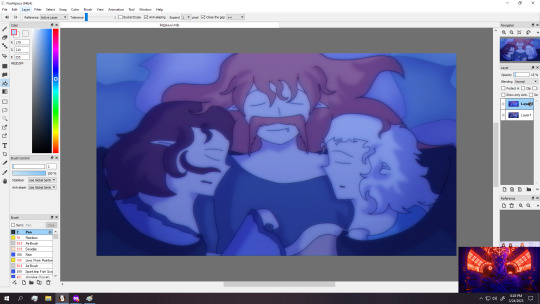
Next make a new layer and fill it with a light color and setting it to the multiply layer and reducing the opacity to around five to twenty percent. (I am using a light blue but my default is usually a pink or orange peach color when not in a night scene like this)
Merge the layers down afterwards.


Then I do a slight chromatic aberration on a duplicated layer and then adjust the opacity to around thirty percent before merging everything down. (Note that if your program of choice doesn't come with a native chromatic aberration, you can just search up chromatic aberration tutorial in (program of your choice))

Once again duplicate the layer, and apply a noise filter at roughly hundred percent strength (or roughly to how the screenshot looks), before applying a very weak gaussian blur.
Merge everything down afterwards.

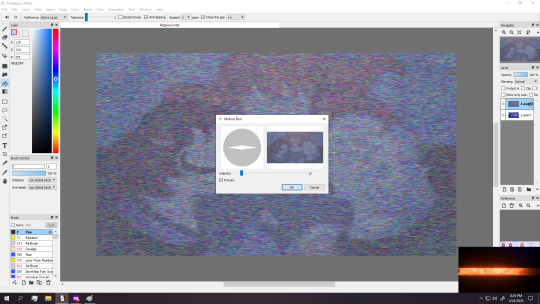

Optional step but you can duplicate the layer once again and apply several noise filters and a light motion blur before lowering the opacity to what you think looks right.
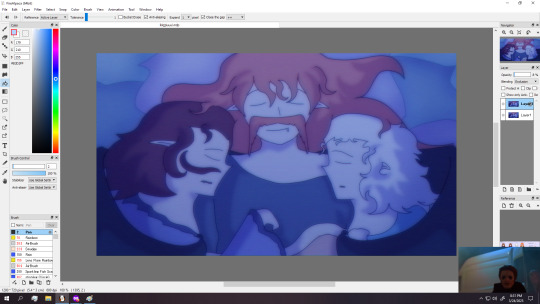
Next we duplicate the layer and apply the exclusion filter to it and lower the opacity of the layer by alot. (you can also just lower the saturation by a smidge if you don't have that layer option)
And you could call this done if you want, but for that extra crunch I use a program called NTSC RS. (I sadly do not know of an android version of this program)
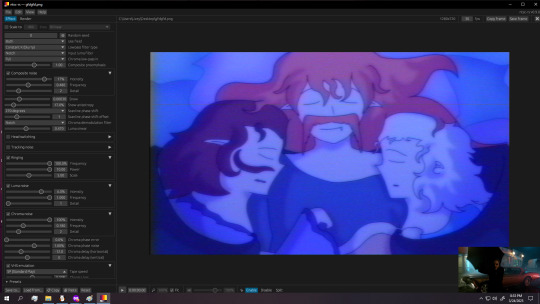
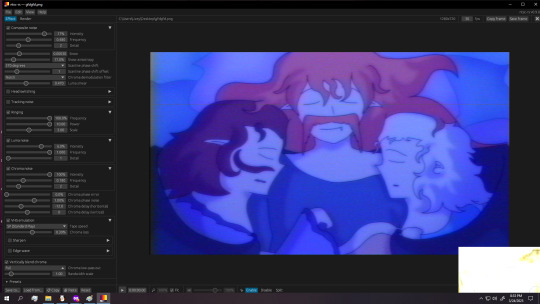
(And here are the settings I use)

Either save or copy the image (called frame in program) and then drag it to a new layer of your image and adjust the opacity if you don't want too much retro crunch.
Then you can adjust the color and saturation if you want and then you are done.
Also for anyone wondering how to do retro captions, the image below shows what I typically use, making sure to duplicate the text, move that to below the text and apply slight gaussian blur and multiply effect to it

(You can do the text on the original image and let it get crunchy, but I honestly like the caption to be readable so I do that after the crunch.)
#tutorial#fake anime screenshot#retro anime tutorial#fire alpaca#ntsc rs#art process#this is just how i do it#you could honestly throw the image through ntsc rs and adjust as needed but i prefer doing both#fire alpaca tutorial
4 notes
·
View notes
Note
the joys of finding another cat(boy?)!!! any tips for drawing furry/feline faces? been trying to draw a sona <:3
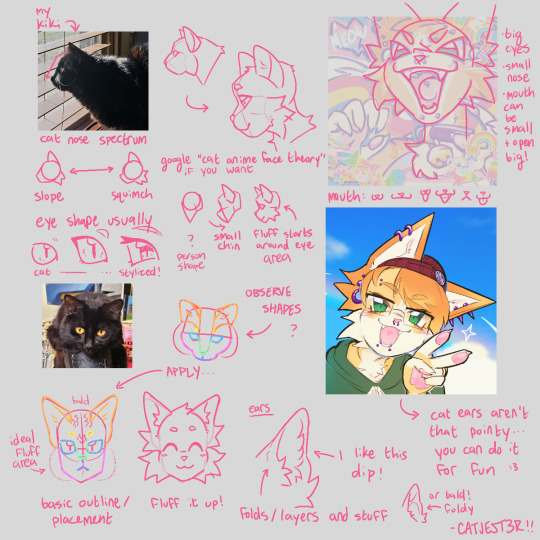
catboy yes!! heres a vague outline of how i draw cat face/heads!
overall i think cats are easiest to draw bc they have simple, short faces, so its a good place to start!! this might be unorganized or unhelpful, ive been around cats and drawing them my whole life, so a lot of stuff is second nature to me ^^' i think when anthropomorphizing(?) it definitely helps to add hair, ive always struggled with drawing bald furries xD
heres my previous tips post which might be good to check out before this one!! thanks for asking btw! 🐱💖
As before I wrote out my notes in alt text in case it's hard to read... :,3 I also recommend zooming in on the sections to view it!!
#art tutorial#furry#furry art#cat furry#digital art#art#my art#artists on tumblr#illustration#fursona#fur#anthro furry#fire alpaca#sfw furry#sfw fursona#sfw furry art#furry commissions#furry artist#furry anthro#anthro art#art commissions#commission#trans artist#transmasc artist#cat fursona#art help#art resources#art advice
184 notes
·
View notes
Text
Free Shit 101
Or: How I make cool graphics for Writeblr posts and Twine games
made from this and this!
We all know it: graphics are snappy. They catch the eye. Getting interest in pure text is hard. So, if you can't or don't want to draw, what do you do? You browse the internet for free shit and make a collage!
Many resources on the web are free for personal use, but some on this list are even free for commercial use, meaning you can make that book cover for self pub with them. Creative commons licenses are your friend, though not all CCs are created equal. If you're planning to post something in a place where you could potentially garner some attention, read through the specific license terms to avoid getting into trouble. You can look up the different creative commons licenses here.
And of course, this is a short list full of my personal favorite sites and programs that I actually use. If anyone has other resources that they love, please feel free to share them!
Graphics
Pexels.com
Pexels is full of high definition, professional-quality free stock photos by photographers. Everything on Pexels is free for commercial use so long as you don't use it unaltered, as per their site-wide license.
Wikimedia commons
Wikimedia commons has everything you would expect from Wikipedia pictures, including art and history. It's great for pictures of antiques, for example. The site can be filtered by license type.
Flickr
There are plenty of professional level photos to be found on Flickr, released for free by their creators. My favorites here are the nature and animal pictures. Again, Flickr doesn't set a uniform license for all photos, but instead lets you filter.
Sounds and music
Pixabay
Many people know Pixabay as a free image site, and I know I said graphics, but did you know that Pixabay also hosts free music and sound effects? Where Wikimedia commons and Flickr leave the choice of license to individual users, Pixabay takes Pexel's approach and sets a site-wide license.
Fonts
1001freefonts
A cool font can make or break a graphic. 1001freefonts is an aggregator for them, easily filtered by style and installed on your computer in no time. Filter by "free" and "free for personal use".
Programs
Fire Alpaca
I think everyone knows Fire Alpaca by now. In the context of graphics, it can be used to remove backgrounds, adjust colors, make collages, add a filter, slap on clouds with a free brush... You don't have to be able to draw, and there are plenty of tutorials out there to do just about anything you can imagine.
20 notes
·
View notes
Note
Sorry for asking, but how u do the lego figure :0 it's so cool!!
No need to apologize :3
i used blender to model the whole thing, fire alpaca for the shirt and facial cut outs and (because I was lazy and had no time to finish it) I downloaded an already made lego braid from mecabricks.com
Awesome tutorials I followed;
step by step model making by BornGC.
How to make a face rig by DogsRSpice
The braid part is from mecabricks. I'll remake the whole thing once I get a better computer.
7 notes
·
View notes
Note
What mobile apps can help you make graphic art in a short amount of time? ( I'm still trying to get better at my fox art.) 🦊
Hi!!
To be honest, what app you use doesn’t really impact art improvement or skill, it all comes with practice and also in general studying what you are trying to draw, with either references or tutorials.
But that isn’t really fulfilling the question, so I will just do down the list of recommendations I have for making digital art!!
Sketchbook is a great app to start off on, it’s free and gives you a good set of tools and brushes to use for your art.
From there, if you feel digital art is working for your art process I recommend going to procreate, it unfortunately isn’t free, and costed me about 3€ (of course this price isn’t accurate to all currencies), the price may have also gone up over time, I bought it a while ago when procreate wasn’t as huge yet, so apologies if I’m misinforming about the price. It gives you a huge variable of brushes and new possibilities for your art, it also includes resources for animating, which work well in my experience.
If procreate is working out just fine and you feel like you want to also try some new programs or apps, you can branch out to some apps like Clip Studio Paint, Ibis Paint or even Fire alpaca (and ofc many more). And then in the future if you want to take digital art really seriously, you could get new devices to draw on, like a fancy art tablet.
Ultimately I feel that good art can be made on ANY platform or devise, finding what works out for you is your journey and your choice to make, however what I recommend the most is that you go for the cheaper options before the expensive ones.
Anyways, hope this helps!! Have a good day/evening!!
#art#artist#digital artist#app#apps#drawing apps#drawing app#digital art#procreate#sketchbook#recommendations#app recommendations#clip studio paint#firealpaca#artists on tumblr#artists of tumblr#drawing#asks#ask#answered asks#funky question answers#answering asks#small artist#hope this helps#hope this makes sense
12 notes
·
View notes
Note
i’m OBSESSED with how you colour how did you do it
HIHIHI sdkfhuisd thank you????? so emmm... small tutorial??

ok so pretty much i use three colours with this logic.
here's a crappy doodle of how it works basically. I use a brush in 69% opacity and the colour picking tool to render them out. first the shade then the light


in cases like the trenchcoat where's there's a lot of shadows going on, it looks too pink, so i use an extra brownish usually to define it better and make the shadows deeper.
here we arrive at the part i just wing it and act however the holly spirit blesses me (or curse me) for the day. I add a coloured layer, almost always on luminosity (sometimes i add a second coloured layer on a diff blend too) and mess with the opacity and hues until i like it. Usually i use reds, bc i love warm colours in my drawings.
I dont know about other drawing programs (i use fire alpaca) but then i go to the tone curve tool and go absolutely wild. no method. no skill. i just drag and drag and reset and drag.


for the last part... gradient, fire alpaca has already some pre made ones so i usually use those. Not one in particular, i just play with a lot of them and basically get them through all the blending options until i like it. Gradients add some lighting ig.


andddd heres the finished piece! basically my way of thinking is... this is digital art, i will absolutely abuse all the perks it gives me.
3 notes
·
View notes
Note
I didnt see if you have a main or non-rainworld blog so I hope its okay to ask here! watching your process video and the arti vs scav chief video was inspiring to me and I want to get into making animations in fire alpaca too. How did you start out? and what can you suggest to practice? honestly, just interested in anything you have to say on the topic learning to animate. insights, tips, resources,etc.
I am not the best person to ask because my learning process was that i just literally started to animate one day -
The best tip I can give is to learn to REALLY observe movement. We don't usually intuitively notice all the intricacies of how things move, how the physics play into that, etc... I don't imagine knowing these things would normally be useful, either. But once you look at movement and pay attention in your everyday life, you start to see how running looks different based on terrain, how eyes lock to their target very rapidly, how we cannot perceive the individual "frames" when the movement is very fast, and so on. And once you have seen these things and they're in your head, you need to experiment to figure out how you could translate them into frames. Looking at references while you're animating is really good for this, too.
I know that sounds a little abstract, so here's some more concrete tips:
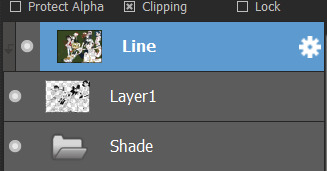
learn how the program works, and what tools you have at your disposal! It took me an embarrassing amount of time to figure out about the "protect alpha" and "clipping" options in firealpaca, and those two are literally life-changing
if you're not quite sure how to draw a particular motion, it's probably good to sketch the entire thing in advance. it's faster to adjust a sketch than it is to adjust an already finished animation. if you have a clear idea of how the motion should look in your head, then you could consider figuring it out as you go instead of sketching every frame.
i also made this video 2 years ago, which does include some concrete tips but it's also more than a little unhinged so I don't know how much help it'll be :D there are other tutorials out there about how the program works.
39 notes
·
View notes
Note
0w0
Hallo! I was wondering, how did you learn to animate? What interested you in it? What do you use? Even if you don't have the attention span to do it often, I think it's really cool that you can.
I learned from YT animation tutorials. There's tons you can learn from.
I use Clip Studio Paint currently (The version that's better suited for animation I forget which one) and the one I made the Shadow and Dark animation with, but also use Adobe animate (Great for symbols/puppet stuff which I love)
Fire Alpaca used to be the one I used for the videos shown below and that was before they added more features from what I can tell?
Honestly you can animate with anything I just love having a real time audio timeline in Adobe and Clip.
I'm that weirdo who made these, so I've been at it for awhile now. I used to have the patience for longer stuff but my brain is fried now adays.
Learning how to Key Frame efficiently + Drawing good thumbnails/story boards to work off of would be my honest advice for beginners that NO ONE seems to think to mention.
Keyframe advice: ONLY. DRAW. WHAT. IS. IMPORTANT.
You can add in-betweens later don't just GO FOR IT. Keyframe the movement out FIRST THEN add in-betweens. Only major poses to get the movement across you can fill in the gaps later. This seems fucking obvious but uhhhhh. UHHHH. COMMON KNOWLEDGE IS ONLY COMMON IF IT'S MENTIONED TO HELL AND BACK???
Clean readable thumbnails help so much. I have a tendency to just draw scribbles...Don't do that. Lmfao. Moral is low as shit when you can't tell wtf you drew through or are trying to convey with the chicken scratch.
When you're an animator by yourself you are the Storyboarder, the Clean up artist, line artist and effects artist.
DO EM ALL WELL OR THE ANIMATION WILL SUFFER. 😭
Don't let the storyboards be shit it'll fuck the rest up TRUST ME.
Having audio you're willing to listen to on repeat for HOURS helps too.
I was interested in animation because I was a bored 12 year old with too much time on his hands and the need to DRAW. FOR HOURS.
Honestly tho i just love the fact it's smth that impresses people XD
Makes me feel powerful... I can literally draw whatever I want. Such an ability.
15 notes
·
View notes
Note
ALL the artist ask game questions. ALL OF THEM-
omg yes hold up
1. uuh krita, fire alpaca (i used to use fire alpaca but not after getting csp)
2. left? i think? i can draw all directions (-ish) (it wont be good but i can)
3. none?? idk bro i have bad memory (or maybe i suppress them idk)
4. anything from canon media. like i love you boo but why. also clothes and poses
5. i post very little of my art actually lmao whoops. very busy lately but might start posting art again if i remember
6. my hyperfixation at the time. or well, me. also art tutorials i see on pinterest, though that's a bit more conscious i think
7. SCULPTING TRADITIONAL PAINTING GRAFFITI all so cool amazing wow
8. there's so many that i cant even remember jesus christ-
9. everything is keysmashes. i do not name my layers. i am satan
10. mm i actually like drawing shirts i think?
11. music. fun fact i listened to paranoia on loop for over a week. thats what brain rot does to a man
12. uuuh hhand
13. i really dont know. every thing is my thing. every creator is admirable in their own way. love everyone. commit crime
14. death? eldritch horrors? blood? rot and corruption? yeag the good shit
15. my room. at school also because im studying animation and game design
16. making. sprite sheets. for 2d game.
17. i usually have a tea nearby but i always forget it. i kinda drink it halfway when it's still warm, then forget about it and then when i go back for it it's cold so i just chug it all and go get a new one
18. uuh i'd say like? 10? im very gentle and loving with my stuff uwu
19. no. i do not. ok but maybe like. cloth idk.
20. hands. idk bro i drew them so much at one point out of spite i just kinda got good at it and now i just wing it and it looks good and doesnt require much thought. and if it requires thought it's in a funky position but then i just wrangle my own hands a little, inspect it, and then continue to draw
21. lineless, painting-esque, thick lines, realistic, sketchy... yeah good shit
22. nah man i just go straight for the laptop
23. uuh sometimes
24. im satan i dont use references often. but when i do? yeah i think
25. i havent been told so idk
26. i. dont really intend anything on purpose? so when someone interprets something wild i just kinda go "yeaah sure! idk either!"
27. Dno. straight for the art. might doodle thine truly if im not in a hurry
28. nah, but i'd like to! i've made art for two 2D games in the past year and now there's a 3D one in the making. im charged with making the 3D model for our main villain thing and boy is it pain
29. bold of you to assume anything doesnt inspire me artistically (he doesnt know)
30. thats a great question i have no idea 👍
#i should be arting but i answering this instead whoops haha#i needed a break anyways so its fine#ask chilei#my beloved mutual#somebody (once told me) my beloved#chilei's on skooma again
2 notes
·
View notes
Note
Have you ever animated? If so do you know any good animating apps? (NOT krita, already tried that, won't work with my drawing tablet, also completely free apps preferred, i'm on a budget)
I gotchu
I have animated before, and although I haven't tried 3d yet, I know what to recommend for that. Both programs are free.
In a 2d style, I prefer to use Fire Alpaca (which I also use for just normal drawing too). There's an animation tab up top, and you can use layers as key frames. It's got a lot of bells and whistles, but I think it's easy to get used to (granted, I got it like, several updates ago, so I might be full of dung lmao.)
For 3d style, I recommend Blender. I haven't gotten around to 3d animating yet, and it's difficult to figure out, but there are some good tutorials to help learn (word to the wise: if you see a series of tutorials teaching you how to sculpt a donut, that's a good series to study from.) It gets much less confusing to look at after tutorials, trust me XD
2 notes
·
View notes
Text
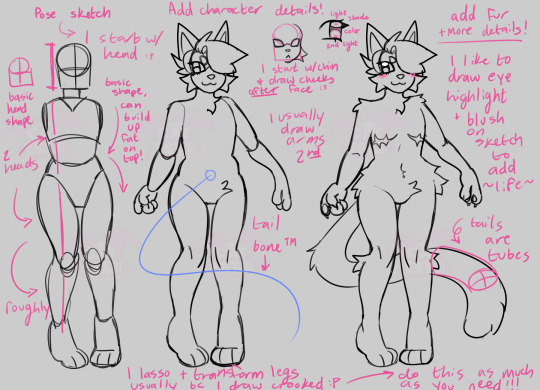
i dont think ive ever done this before, accept my sloppy 20 min explanation + bonus notes below!! (feel free to ask follow ups! this is just my pose/skeleton style, I wasn't sure which part you wanted help with :x)
⚠️THIS IS NOT A DO/DONT GUIDE AND IS BASED ONLY ON HOW I PERSONALLY DRAW!!!⚠️
these days i usually look for references or at least inspiration for poses on pinterest, which can be broken down to whatever kind of "skeleton" youre comfortable with!! this is how i draw mine :3
i go for a blocky head that i shape out AFTER the face is added, so i can reference where the eyes and mouth are for the cheek placement
i block out the ribcage, torso, and pelvis, the legs usually have to be adjusted a lot with lasso/transform tools bc they start to skew right most of the time xD i use those a lot in the sketch phase, if youre drawing digitally, take advantage of this!!!
important things to note!!
-thighs/calves are usually rounder on the top! ankles and knees are typically the thinnest point (i can do a separate tut for fat if anyone wants!)
-arms are curvy too, i'll admit this example is drawn a bit hastily so its not a great example, but typically the forearm and back of arm(?) are flat and the opposite side will "pop out"
-tails are harder than expected tbh, posing a tail can be difficult! drawing a tail bone is a must for me, thin tails are like tubes, fluffier tails like wolves are a bit easier! padding with fluff makes everything look better bc you can cover up any parts that look kinda "off" xD
-i dont differentiate "male" or "female" figures, just build and vibes. id rather be told directly where a character holds their weight, if they have breasts or not, etc. blocky vs curvy tutorials you will always be infamous (bad)
i have no idea if this makes any sense so feel free to ask more!! im really happy a beginner would come to me for advice... ;; good luck!!
#art tutorial#furry#furry art#digital art#art#my art#artists on tumblr#illustration#fursona#fur#anthro furry#fire alpaca#sfw furry#sfw fursona#sfw furry art#furry commissions#furry artist#furry anthro#anthro art#art commissions#commission#trans artist#transmasc artist
132 notes
·
View notes
Note
Big fair on perfering coloring and honestly you do such a nice job of it coloring really is an underrated skill in it's own right
THank you!!!
plus in my mind manga is basically a coloring book. Now there are some manga's I want color mainly its because of how the mangaka uses their ink an example of this is to go the opposite way Rumika Takahashi is a example of manga color becuse when she uses black she always uses white lines in place of black lines even if the entire outfit is black (example is a manga cap from mermaid saga I will color someday)
if you are intrested in coloring manga really look for mangakas that use this techique because it serves as a guide line on how they clothes and hair folds. ALSO do not be afraid to slightly alter the image for example in a sailor moon image I colored one of the earings didn't make sense so I slightly redrew it to match the other one and if you are coloring in the black lines THE CLIPPING tool is best friend this is what it looks like in fire alpaca which is what i use

and the way to use it is to set it above your line art
that way it will only coloring water is present on the layer below that is not clipped
also the way prep my images to get a nice sharp line art is a I do this in photoshop

and make sure all layers are is clicked on when you fill in the black and just adjust the opacity and torlence until you get the line art that you like and then just clean up it up
sorry this kind of turned into a tutorial I'm kind drunk and felt like rambling
4 notes
·
View notes
Text
I LEARNED HOW TO USE THE FUCKING GRADIENT TOOL IN FIRE ALPACA. No new artwork to show today but that tool will make blending a hell of a lot easier. The Jack-o'-lantern silhouette I drew with that nice ass sky was blended with a brush tool. I've been trying to reproduce that and for some reason... I cannot. I think I'm gonna try a graveyard when I get home from work. I found a nice, spooky paint along tutorial I may try.
1 note
·
View note
Text

"Winged Hero"
This is one of my earliest digital pieces. The piece was based on the character Hawks from My Hero Academia. I wanted to create a serious work that showcased his bright vermillion wings. The most important detail I painstakingly worked on was to give his wings a bright glow. I'd like to thank YouTube tutorials for teaching me the layering and techniques needed to create the 2D glow. I used my newly bought drawing tablet and the software fire alpaca to create "Winged Hero"
April 2020
0 notes
Text

little work in progress of a thing while I scream. I miss fire alpaca but I can't use it anymore so.. learning clip studio.
I should look up tutorials but yolo going in blind.
2 notes
·
View notes
Photo

Nothing fancy but if you’re as frustrated by the tediousness that is Drawing Chains as I am, here’s a faster way to do it than starting out with just lineart.
Also just to keep things fast, for shading just color pick the new outline color and use that at a lower opacity, then use white for highlights. Tahdaahhh~
#tutorial#chain tutorial#chain link tutorial#fire alpaca tutorial#obv you can go in and erase the extra line on the first and last links
72 notes
·
View notes