#install mysql on mac
Explore tagged Tumblr posts
Visit Tumblr Blog
Explore Tumblr blogs with no restrictions, modern design and the best experience.
Last Seen Tumblr Blogs


Fun Fact
70% of Tumblr users say the Dashboard is their favorite place to spend time online.
Text
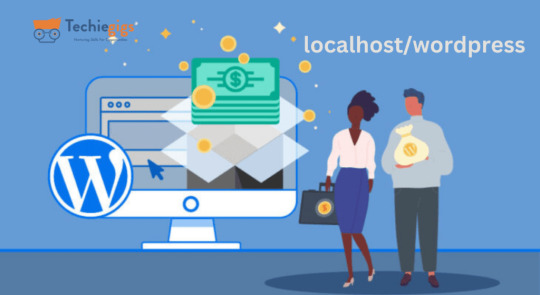
🚀 Power BI MySQL Integration: The Ultimate No-Code Guide to Real-Time Analytics
📈 Why Power BI MySQL Integration is a Game-Changer
In today’s data-first world, real-time insights are more than a luxury—they’re a necessity. According to recent studies, 80% of companies are investing in data analytics to gain a competitive edge. Without accurate, up-to-date data, business decisions can miss the mark.
That's why integrating your MySQL database with Power BI can be a total game-changer.
Imagine pulling live sales data from MySQL straight into Power BI dashboards—no manual exports, no code, no delays. It’s not just about saving time (though it can cut reporting time in half)—it’s about making better, faster, smarter decisions.

🔍 What is Power BI and MySQL? Why Should You Care?
Before jumping into the “how,” let’s understand the “why.”
💡 Power BI: The Visual Storyteller
Power BI is a powerful data visualization tool by Microsoft. It helps you create interactive dashboards, reports, and analytics that help decision-makers see the bigger picture.
🗃️ MySQL: The Backbone of Your Data
MySQL is one of the world’s most popular open-source relational database systems. It can handle massive amounts of structured data—and it’s the go-to for many organizations' back-end systems.
🤝 The Magic of Integration
By connecting Power BI to MySQL, you combine MySQL’s data storage strength with Power BI’s visualization brilliance. That means:
Real-time reporting
Automated dashboards
Zero manual effort
And the best part? With Konnectify, you don’t need to write a single line of code to get started.
⚙️ What You Need for Power BI MySQL Integration
To get your integration up and running, you’ll need:

🧩 How to Connect Power BI to MySQL (Step-by-Step)
Let’s walk through how to get everything set up—whether you’re a data novice or a pro.
Step 1: Download MySQL Workbench
Start by managing your MySQL databases with MySQL Workbench. You can download it from the official MySQL site.
Step 2: Install the MySQL ODBC Connector
You’ll need the MySQL ODBC driver so Power BI can connect to your MySQL database.
Go to MySQL's official site and download the ODBC Connector for Windows or Mac.
Install it and take note of the DSN name you create.
Step 3: Connect MySQL to Power BI Desktop
Open Power BI Desktop
Click Get Data > MySQL Database
Enter your server address and database name
Authenticate using your credentials
Click Connect, and boom—your MySQL tables are now visible in Power BI
🔄 Automate Data Sync Between Power BI and MySQL with Konnectify
Manual syncing is a thing of the past. Here’s how to automate the entire workflow using Konnectify:
Step-by-Step Konnectify Setup
Log into Konnectify Go to your Konnectify dashboard and sign in.
Choose MySQL from the App Marketplace
Set Your Trigger Example: "New data entry in MySQL."
Create Your Action Example: "Create row in Power BI dashboard."
Customize Workflow Use Konnectify’s visual editor to map fields, add filters, and set conditions.
Activate It Click "Activate" and your workflow starts running 24/7.
Now, every time your MySQL database updates, Power BI reflects it instantly—zero manual work.
🔎 Real-World Use Cases for Power BI and MySQL Integration
Let’s explore how different departments can use this integration to transform workflows and drive results.
1. 📊 Automate Financial Reports in Power BI
With Konnectify pulling MySQL data into Power BI:
Financial dashboards update automatically
No need to manually extract CSV files
Get real-time metrics like revenue, expenses, and profit margins
Organizations using real-time analytics saw a 20% increase in operational efficiency.
2. 💸 Analyze Sales Performance with Live MySQL Data
Sales teams can monitor:
Conversion rates
Customer acquisition cost
Regional performance
Power BI helps visualize this sales data and spot trends or bottlenecks—all in real-time, thanks to MySQL integration.
3. 🏷️ Manage Inventory with Real-Time Dashboards
Inventory dips below minimum stock? Trigger alerts.
With Power BI + MySQL:
Track current stock levels
Monitor restocking needs
Visualize inventory turnover
Set up Power BI dashboards that refresh automatically as MySQL updates your stock records.
4. 🛠️ Track Customer Support KPIs
Integrate your helpdesk MySQL tables and watch:
Response times
Ticket resolution rates
SLA compliance metrics
All of this is visualized in Power BI without pulling a single report manually.
5. 📅 Project Management & Timelines
By integrating MySQL with Power BI:
Track project deadlines
Monitor team performance
Visualize tasks at risk of delay
Project managers can act faster using data-driven alerts and Gantt-style dashboards in Power BI.
📅 How to Set Up Real-Time Dashboards in Power BI
Once your integration is live:
Go to Power BI Service
Create a dashboard using your connected MySQL data
Pin visuals and set refresh schedules
Optional: Set up alerts for KPIs
With Konnectify automating your backend sync, your Power BI dashboards are always accurate.
🔒 Is It Secure to Integrate Power BI with MySQL?
Yes if you follow best practices:
Use secure credentials (OAuth or 2FA if possible)
Install the latest ODBC Connector versions
Limit data access to essential users
Monitor logs via Konnectify’s dashboard
Both Power BI and MySQL are enterprise-grade platforms with robust compliance and encryption standards.
✨ Why Konnectify is the Best Tool for Power BI MySQL Integration
Konnectify is more than just a connector. It’s a complete automation platform that lets you:
Connect 150+ apps, including CRMs, email tools, cloud storage, and ERPs
Build visual workflows with drag-and-drop logic
Monitor errors, delays, and sync status
Save hundreds of hours on manual tasks
And yes no coding required.
🧠 FAQs: Power BI MySQL Integration
Q1: Is Power BI compatible with MySQL? ✅ Yes. Power BI supports MySQL through ODBC and native connectors.
Q2: Do I need a premium Power BI account? ❌ No. Power BI Desktop works with MySQL even on the free tier.
Q3: Can I connect multiple MySQL databases? ✅ Yes. Konnectify allows multiple workflows across various databases.
Q4: What if MySQL has sensitive data? 🔐 Use encryption, access control, and filtered queries to secure data.
Q5: Will the integration slow down MySQL? ❌ No. With proper indexing and sync schedules, performance remains stable.
Q6: Is Konnectify safe to use? ✅ Absolutely. It uses encrypted tokens, secure OAuth, and follows GDPR compliance.
🏁 Final Thoughts: It’s Time to Sync Smarter
Gone are the days of juggling spreadsheets, exporting CSVs, or waiting on IT teams to build custom connectors. With Power BI MySQL integration via Konnectify, you unlock:
Real-time analytics
Fully automated dashboards
Insights that move your business forward
Stop manually syncing data—start automating it today.
#it services#saas#saas development company#saas platform#information technology#saas technology#b2b saas#software#software development#ipaas
0 notes
Text
Assignment 1: SQL Startup 20 Points
Do the following and then upload a .pdf file. Install the correct version (Windows vs. Mac vs. Linux) of MySQL: http://dev.mysql.com/downloads/mysql/ Make sure it works. Here is an example of commands to try. Mac users: Use Terminal under Applications/Utilities. Windows users: Use the command prompt. Unix commands to find and start using MySQL: cd /usr/local/mysql/bin ./mysql -u root -p When…
0 notes
Text
Top 5 Tools for Running WordPress Locally Like a Pro
Running WordPress locally is a game-changer for developers, designers, and bloggers who want to experiment, build, and optimize their websites without affecting the live version. Local WordPress environments allow you to test plugins, themes, and custom code with zero risk. But which tools can help you achieve this seamlessly? Here’s a roundup of the top 5 tools for running WordPress locally like a pro.
1. Local by Flywheel
Why It Stands Out: Local by Flywheel is one of the most popular tools for creating local WordPress environments. It offers a user-friendly interface, quick setup, and seamless WordPress site management.
Key Features:
Easy site creation with one click.
SSL support for secure testing.
Direct deployment to Flywheel and WP Engine hosting.
Best For: Beginners and professionals looking for a straightforward, powerful local setup.
2. XAMPP
Why It Stands Out: XAMPP is a versatile open-source tool that includes Apache, MariaDB, PHP, and Perl. It’s widely used to create a local server environment for WordPress.
Key Features:
Supports multiple operating systems, including Windows, Mac, and Linux.
Pre-configured setup for WordPress installations.
Highly customizable for advanced users.
Best For: Tech-savvy users who need complete control over their environment.
3. WAMP
Why It Stands Out: WAMP (Windows, Apache, MySQL, PHP) is a robust tool for Windows users to create a local WordPress development setup.
Key Features:
Easy installation and configuration.
Built-in database management with phpMyAdmin.
Lightweight and beginner-friendly.
Best For: Windows users seeking a simple yet effective WordPress local hosting solution.
4. MAMP
Why It Stands Out: MAMP (Mac, Apache, MySQL, PHP) is a reliable choice for Mac users but also works on Windows. Its simplicity and performance make it ideal for local WordPress development.
Key Features:
Quick installation and setup.
Free and Pro versions available with advanced features.
Multi-PHP versions support for testing.
Best For: Mac users and developers who need flexibility and advanced features.
5. Docker
Why It Stands Out: Docker isn’t just a WordPress-specific tool; it’s a container-based platform that allows developers to build isolated environments for various applications, including WordPress.
Key Features:
Portability across different environments.
Pre-built WordPress Docker images for quick setup.
Highly scalable and robust for professional use.
Best For: Advanced developers looking for cutting-edge solutions for local WordPress environments.
Conclusion
Running WordPress locally doesn’t have to be a daunting task. With tools like Local by Flywheel, XAMPP, WAMP, MAMP, and Docker, you can create a secure, efficient, and customizable environment to test and refine your WordPress sites. Choose the tool that best aligns with your technical expertise and requirements, and start building like a pro.
0 notes
Text
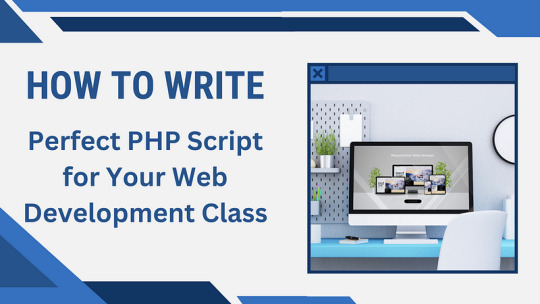
How to Write the Perfect PHP Script for Your Web Development Class
PHP (Hypertext Preprocessor) is a widely-used server-side scripting language that powers millions of websites and applications.
Its versatility, ease of use, and integration capabilities with databases make it a popular choice for web developers.
If you’re enrolled in a web development class, mastering PHP is essential for creating dynamic and interactive web pages.
In the initial stages of learning PHP, many students encounter challenges that can hinder their progress.
This is where AssignmentDude comes in. Offering expert assistance in PHP homework, AssignmentDude provides personalized support tailored to your learning needs with PHP assignment help.
Whether you’re struggling with basic syntax or complex database interactions, our team of experienced tutors is here to help you navigate through your assignments and enhance your understanding of PHP programming.
At AssignmentDude, we understand that mastering PHP requires practice and guidance.
Our services are designed to empower you with the skills needed to tackle real-world projects confidently.
From understanding fundamental concepts to implementing advanced features, our dedicated tutors are committed to helping you succeed in your web development journey.
As you embark on this learning path, remember that seeking help is not a sign of weakness but rather a proactive step toward mastering the art of programming.
With AssignmentDude’s support, you can overcome obstacles and develop a strong foundation in PHP that will serve you well throughout your career.
Understanding the Basics of PHP
Before diving into writing scripts, it’s crucial to understand the fundamentals of PHP. This section will cover the essential concepts that every beginner should know.
What is PHP?
PHP is a server-side scripting language designed primarily for web development but also used as a general-purpose programming language.
It allows developers to create dynamic content that interacts with databases and can handle user input effectively.
Why Use PHP?
Cross-Platform Compatibility: PHP runs on various platforms (Windows, Linux, macOS), making it versatile for different server environments.
Database Integration: PHP seamlessly integrates with databases like MySQL, PostgreSQL, and SQLite, allowing for efficient data management.
Open Source: Being open-source means that PHP is free to use and has a large community contributing to its continuous improvement and support.
Ease of Learning: The syntax of PHP is similar to C and Java, making it relatively easy for beginners to pick up.
Setting Up Your Development Environment
To start writing PHP scripts, you’ll need a suitable development environment. Here’s how to set it up:
Install XAMPP/WAMP/MAMP: These are popular packages that include Apache server, MySQL database, and PHP interpreter.
XAMPP: Cross-platform solution available for Windows, Linux, and macOS.
WAMP: Windows-specific solution.
MAMP: Mac-specific solution.
Create Your Project Directory:
Navigate to the htdocs folder within your XAMPP installation directory (usually found at C:\xampp\htdocs on Windows).
Create a new folder for your project (e.g., my_first_php_project).
Choose an IDE or Text Editor:
Popular choices include Visual Studio Code, Sublime Text, or PhpStorm. These editors provide syntax highlighting and debugging tools that enhance your coding experience.
Writing Your First PHP Script
Now that your environment is set up, let’s write your first simple PHP script.
Step 1: Create a New File
Open your text editor or IDE.
Create a new file named index.php in your project directory.
Step 2: Write Basic PHP Code
Add the following code to index.php:
php
<!DOCTYPE html>
<html lang=”en”>
<head>
<meta charset=”UTF-8">
<meta name=”viewport” content=”width=device-width, initial-scale=1.0">
<title>My First PHP Page</title>
</head>
<body>
<h1>Welcome to My First PHP Page!</h1>
<?php
echo “Hello, World! This is my first PHP script.”;
?>
</body>
</html>
Step 3: Run Your Script
Start the Apache server using XAMPP Control Panel.
Open your web browser and navigate to http://localhost/my_first_php_project/index.php.
You should see “Welcome to My First PHP Page!” followed by “Hello, World! This is my first PHP script.” displayed on the page.
Understanding Basic Syntax
PHP scripts can be embedded within HTML code. The opening tag <?php indicates the start of a PHP block, while ?> marks its end. Here are some key points about PHP syntax:
Variables: Variables in PHP start with a dollar sign ($). For example:
php
$name = “John Doe”;
echo $name; // Outputs: John Doe
Data Types: Common data types include strings, integers, floats, booleans, arrays, and objects.
Comments: Use comments to document your code:
php
// This is a single-line comment
/* This is a
multi-line comment */
Control Structures
Control structures allow you to control the flow of execution in your scripts.
Conditional Statements
Conditional statements execute different blocks of code based on certain conditions:
php
$age = 18;
if ($age >= 18) {
echo “You are an adult.”;
} else {
echo “You are not an adult.”;
}
Looping Statements
Loops enable repetitive execution of code blocks:
For Loop:
php
for ($i = 0; $i < 5; $i++) {
echo “Number: $i<br>”;
}
While Loop:
php
$count = 0;
while ($count < 5) {
echo “Count: $count<br>”;
$count++;
}
Working with Functions
Functions are reusable blocks of code that perform specific tasks.
Defining Functions
You can define functions using the function keyword:
php
function greet($name) {
return “Hello, $name!”;
}
echo greet(“Alice”); // Outputs: Hello, Alice!
Built-in Functions
PHP comes with numerous built-in functions for various purposes:
String manipulation functions like strlen(), str_replace(), etc.
Array functions like array_push(), array_merge(), etc.
Handling Forms and User Input
One of the key aspects of web development is handling user input through forms.
Creating HTML Forms
You can create forms using standard HTML elements:
xml
<form action=”process.php” method=”post”>
Name: <input type=”text” name=”name”><br>
Age: <input type=”number” name=”age”><br>
<input type=”submit” value=”Submit”>
</form>
Processing Form Data in PHP
To process submitted form data:
php
// process.php
if ($_SERVER[“REQUEST_METHOD”] == “POST”) {
$name = $_POST[‘name’];
$age = $_POST[‘age’];
echo “Name: $name<br>”;
echo “Age: $age<br>”;
}
Form Validation and Security
Always validate user input before processing it:
php
if (!empty($name) && filter_var($age, FILTER_VALIDATE_INT)) {
// Process valid input
} else {
echo “Invalid input.”;
}
Working with Databases (MySQL)
Integrating databases into your applications allows for dynamic data management.
Connecting to MySQL Database
To connect to a MySQL database using PDO (PHP Data Objects):
php
try {
$pdo = new PDO(‘mysql:host=localhost;dbname=my_database’, ‘username’, ‘password’);
} catch (PDOException $e) {
echo “Connection failed: “ . $e->getMessage();
}
Performing CRUD Operations
CRUD stands for Create, Read, Update, Delete operations on database records.
Create Operation
php
$sql = “INSERT INTO users (name, age) VALUES (:name, :age)”;
$stmt = $pdo->prepare($sql);
$stmt->execute([‘name’ => ‘John’, ‘age’ => 30]);
Read Operation
php
$sql = “SELECT * FROM users”;
$stmt = $pdo->query($sql);
while ($row = $stmt->fetch()) {
echo $row[‘name’] . “<br>”;
}
Update Operation
php
$sql = “UPDATE users SET age = :age WHERE name = :name”;
$stmt = $pdo->prepare($sql);
$stmt->execute([‘age’ => 31, ‘name’ => ‘John’]);
Delete Operation
php
$sql = “DELETE FROM users WHERE name = :name”;
$stmt = $pdo->prepare($sql);
$stmt->execute([‘name’ => ‘John’]);
Object-Oriented Programming (OOP) in PHP
OOP allows for more organized code through encapsulation and inheritance.
Defining Classes and Objects
You can define classes using the class keyword:
php
class User {
public $name;
public function __construct($name) {
$this->name = $name;
}
public function greet() {
return “Hello, {$this->name}!”;
}
}
$user = new User(“Alice”);
echo $user->greet(); // Outputs: Hello, Alice!
Inheritance in OOP
Inheritance allows one class to inherit properties and methods from another class:
php
class Admin extends User {
public function greet() {
return “Welcome back, Admin {$this->name}!”;
}
}
$admin = new Admin(“Bob”);
echo $admin->greet(); // Outputs: Welcome back, Admin Bob!
Error Handling in PHP
Handling errors gracefully is crucial for maintaining application stability.
Using Try-Catch Blocks
You can catch exceptions using try-catch blocks:
php
try {
// Code that may throw an exception
} catch (Exception $e) {
echo ‘Caught exception: ‘, $e->getMessage(), “\n”;
}
Best Practices for Writing Clean Code
Writing clean code improves maintainability and readability:
Use Meaningful Variable Names: Choose descriptive names for variables and functions.
Keep Functions Short: Each function should perform one task only.
Comment Your Code: Use comments judiciously to explain complex logic but avoid over-commenting obvious code.
Follow Coding Standards: Adhere to consistent coding standards such as PSR (PHP Standards Recommendations).
Advanced Topics in PHP
As you become more comfortable with basic concepts in PHP scripting, it’s time to explore some advanced topics that will enhance your skills further.
Working with Sessions
Sessions allow you to store user information across multiple pages during their visit to your website.
Starting a Session
To use sessions in PHP:
php
session_start(); // Must be called before any output is sent
$_SESSION[‘username’] = ‘JohnDoe’;
Accessing Session Variables
To access session variables on another page:
php
session_start();
echo $_SESSION[‘username’]; // Outputs: JohnDoe
Destroying Sessions
To end a session when it’s no longer needed:
php
session_start();
session_destroy(); // Destroys all data registered to a session
File Handling
PHP provides functions for reading from and writing to files on the server.
Writing Data to Files
You can write data to files using fopen() and fwrite() functions:
php
$file = fopen(“example.txt”, “w”);
fwrite($file, “Hello World!”);
fclose($file);
Reading Data from Files
To read data from files:
php
$file = fopen(“example.txt”, “r”);
$content = fread($file, filesize(“example.txt”));
fclose($file);
echo $content; // Outputs: Hello World!
Using Composer
Composer is a dependency manager for PHP that simplifies package management.
Installing Composer
To install Composer globally on your system:
Download Composer installer from getcomposer.org.
Follow installation instructions based on your operating system.
Using Composer
To create a new project with Composer:
Navigate to your project directory in the terminal.
Run:
bash
composer init
Follow prompts to set up your project configuration.
You can then require packages by running:
bash
composer require vendor/package-name
Security Best Practices
Security should always be a priority when developing web applications with PHP. Here are some key practices:
Input Validation
Always validate user inputs before processing them:
php
$name = filter_input(INPUT_POST, ‘name’, FILTER_SANITIZE_STRING);
$age = filter_input(INPUT_POST,’age’, FILTER_VALIDATE_INT);
if (!$age) {
die(“Invalid age provided.”);
}
Prepared Statements
Use prepared statements when interacting with databases to prevent SQL injection attacks:
php
$stmt = $pdo->prepare(“SELECT * FROM users WHERE email=:email”);
$stmt->execute([‘email’ => $_POST[‘email’]]);
$user = $stmt->fetch();
Password Hashing
Never store passwords as plain text; always hash them before saving them in the database:
php
$passwordHash = password_hash($passwordInput , PASSWORD_DEFAULT);
// Store `$passwordHash` in the database instead of plain password.
To verify passwords during login:
php
if (password_verify($passwordInput ,$passwordHash)) {
echo ‘Password is valid!’;
} else {
echo ‘Invalid password.’;
}
Debugging Techniques
Debugging is an essential skill for developers when things don’t work as expected.
Enabling Error Reporting
During development phases enable error reporting by adding this line at the top of your script:
php
error_reporting(E_ALL);
ini_set(‘display_errors’, 1);
This will display all errors directly on the page during development which helps identify issues quickly but should be disabled on production sites.
Using Debugging Tools
Tools such as Xdebug provide advanced debugging capabilities including stack traces which help trace issues back through function calls leading up until an error occurs.
Real-World Applications of PHP
Understanding how PHP fits into real-world applications will solidify your knowledge further.
Content Management Systems (CMS)
Many popular CMS platforms such as WordPress are built using PHP. Learning how these systems work can provide insights into best practices for building scalable applications.
WordPress Development: You might want to explore creating themes or plugins which involves understanding hooks and filters within WordPress’s architecture.
E-commerce Platforms
Building e-commerce websites often involves complex functionalities like user authentication systems along with payment gateway integrations which rely heavily on secure coding practices learned through mastering core concepts in PHP development.
Example Project Idea: Create an online store where users can register accounts; add products into their cart; checkout securely using payment gateways like PayPal or Stripe integrated via API calls handled through backend scripts written in php!
RESTful APIs
PHP can also be used to build RESTful APIs which allow different applications or services communicate over HTTP protocols seamlessly exchanging data formats like JSON or XML making it easier integrate third-party services into existing applications without much hassle!
Here’s an example snippet demonstrating how you might set up routes within an API built using php:
php
header(‘Content-Type: application/json’);
$requestMethod=$_SERVER[“REQUEST_METHOD”];
switch ($requestMethod) {
case ‘GET’:
// Handle GET request
break;
case ‘POST’:
// Handle POST request
break;
case ‘PUT’:
// Handle PUT request
break;
case ‘DELETE’:
// Handle DELETE request
break;
default:
http_response_code(405); // Method Not Allowed
break;
}
Common Pitfalls When Learning PHP
As you learn more about writing scripts in php here are some common pitfalls students often face along their journey!
Not Understanding Scope: Variables defined inside functions have local scope meaning they cannot be accessed outside those functions unless explicitly returned or declared global which leads many beginners confused when trying access them elsewhere leading errors being thrown unexpectedly!
Overusing Global Variables: While globals may seem convenient they make tracking down bugs much harder since any part could change its value at any time leading unpredictable behavior instead try pass values around via function parameters whenever possible!
Ignoring Security Measures: Failing implement proper security measures opens doors malicious attacks such as SQL injections so always sanitize inputs validate data before processing anything coming from users!
Neglecting Documentation & Comments: As projects grow larger keeping track becomes increasingly difficult without proper documentation so take time write clear comments explaining logic behind decisions made throughout codebase helps others understand intentions behind design choices later down line!
Not Testing Thoroughly Enough Before Deployment: Always test thoroughly before deploying anything live since bugs missed during development phases could cause significant issues once exposed real-world scenarios especially if sensitive information involved!
Conclusion
Writing perfect PHP scripts requires understanding fundamental concepts as well as best practices in coding standards while avoiding common pitfalls along way!
By mastering these skills through practice seeking help when needed — like utilizing resources from AssignmentDude — you can excel not only within classroom settings but also beyond them into real-world projects! Submit Your Assignment Now!
Remember that learning programming is an ongoing journey filled with challenges opportunities growth embrace each challenge as chance improve skills further!
If you ever find yourself stuck overwhelmed by assignments related specifically C++ don’t hesitate reach out AssignmentDude expert assistance tailored specifically students just like YOU! Together we’ll ensure success throughout entire learning process!
#do my programming homework#programming assignment help#urgent assignment help#assignment help service#final year project help#php assignment help#python programming
0 notes
Text
Hire Magento Expert in India
Magento is open source shopping cart software has all the required components for building a successful online store. It has an ascendable and rich CMS based on PHP and MySQL databases.
Simple and flexible to employ, Magento imparts sufficient room to online business owners to handle content of their online stores. From controlling the outlook of the store to optimizing functionalities like SEO along with the types of Magento integration, Magento has driven online portals that can be handled with complete simplicity and ease. Endowing the online merchants to make elusive changes on their website as per the requirement of their business, Magento has evolved as one of the most coveted shopping cart software that has taken ecommerce industry to a whole new level. Hence, Magento is highly popular ecommerce solution that has created a demand for to Hire Magento expert in India with optimum experience and talent.
The most favoured benefit of the Magento platform is that it caters to a global audience, with in-built global features, namely multiple currency and multilingual support. Compatible with other browsers like Windows, Mac OC and Linux, it has built-in plug-in with unlimited designs and themes with the intention to deliver unique experience to online customers and users.
The requirement to create a highly dynamic website with an intuitive admin is one of the primary requirements of creating a sturdy ecommerce solution these days. One of the most important features that make Magento highly enticing in the ecommerce circle is its intuitive admin. Realizing the user behaviour is a vital facet for the website owners to improvise or change their marketing plan. Magento enables simple incorporation of Google Analytics that assists in getting an insight into demand supply value chain and user behaviour. This brings website owners near to the customer by enabling them to pay close attention to evolving practices and user requirement.
In an era of smart phones, there is an imminent requirement to create websites that can be accessed on the cell phones. For the same reason, Magento developers have emerged with a control panel known as “Magento Mobile Admin Panel”. This has been added to deliver real time personalization in respect to sending updates when it comes to merchandizing and promotions. The panel gets installed directly into an existing system and thereby supports multiple devices at the same time. Apart from handling orders and content across various capabilities, the panel provides smooth incorporation with content management systems, catalogues and store configurations.
To successfully carry out the above mentioned chores, it is important to Hire Magento expert in India with ample experience and proficiency. Begore hiring Magento developers, it is important to recognize the necessary skill sets. Hire a Magento developer that is a domain expert and has experience. The developers are able to deliver amazing, creative, user-friendly and flexible Magento site and solution in the stipulated time period that has been set by the clients that have initiated the work.
#Hire Magento Expert#Magento Website Design Services#website design#e-commerce developers in india#magento certified developer in india#Custom CMS Development
0 notes
Text
Looking for best PHP IDE? We have shortlisted some of the best PHP editors including paid, free and open source options. These PHP IDE may help you be even more productive on web development. The use of an IDE eliminates a lot of efforts that go in web development. A PHP language aware editor can certainly help you focus your attention on a real job. Some of these IDE is very popular and used by thousands of PHP developers and programmers on a regular basis. In order to get success in developing PHP sites, it is necessary to have a good development environment. While producing web sites it is often necessary to edit HTML, CSS and JavaScript files. That is why usable IDE should supply all those file types and provide a full set of tools for effective development. PHP is one of the most popular web programming languages on the planet. The open source community of PHP has contributed many good tools for developers productivity, however, there is no one size fits all. Every project is unique and the requirements and preferences of developers are different. This article includes a list of some most popular PHP IDEs: Codelobster PHP Edition, Eclipse PDT, Komodo IDE, NetBeans IDE, PHPStorm, NuSphere PhpED. Below are the best PHP IDEs in our opinion, (not necessarily in any order) Codelobster PHP Edition Codelobster PHP Edition is accessible from CodeLobster Software. CodeLobster PHP maintains a Windows platform. Plug-ins are not free but the registration is absolutely free. CodeLobster makes possible to install the debugger automatically. To get help on how to configure the debugger, please, visit the official site. You have an ability to deploy projects on your local web server or remote server by FTP. By downloading free version of the mentioned software you get PHP, HTML, JavaScript, and CSS code highlighting; JavaScript, HTML, PHP, and CSS code collapsing; HTML and CSS autocomplete; PHP and JavaScript Advanced autocomplete; HTML toolbar; Bookmarks; PHP Debugger; Context and Dynamic Help with search functionality for work with PHP, MySQL, HTML; Portable option; Pair highlighting; Pair selection, tags and attributes selection commands; Tooltip; Navigation by holding CTRL key; HTML/CSS code inspector; Class View; Project manager; Preview in a browser; File Explorer with FTP/SFTP support; Incremental find and other possible functionalities of similar programs. These plug-ins allow operating with famous CMS and Frameworks: Facebook, CakePHP, Joomla, WordPress, Drupal, Smarty, JQuery, Symfony, CodeIgniter, Yii. Eclipse PDT Eclipse is designed to allow developers to choose the language, platform, and vendor environment. Eclipse Platform includes a wide range of plug-ins, tools, and examples. Eclipse is a program that makes available to construct, integrate, and use software tools. Supported operating systems: Linux, Windows, and Mac OS X. Installation includes all necessary tools to elaborate on PHP. It also involves Data Tools Platform to control the databank, plug-ins for interaction with JavaScript, C / C + +, XML editor, and other different tools. You can use Zend debugger or Xdebug for Debugging PHP applications on Eclipse PDT. Komodo ActiveState Komodo ActiveState is a PHP IDE that can be used as an international language development environment and supply Ruby, Perl, and Tcl Python. It can be installed using Smarty and Zend PHP frameworks. You can also use integration involving version control systems (CVS, Subversion and Perforce). Supported operating systems: Linux, Windows and Mac OS X. Komodo allows you to begin CGI Environment Simulation and construct web server holodeck. It simulates activities on a real web server. One of the advantages of CGI Environment Simulation is a very fast installation. It is possible to download free 21-day version of Komodo from ActiveState site. PhpStorm PhpStorm provides qualitative and rich facilities for PHP code editing including highlighting, the conformation of code formatting, fast error checking, intensive code autocomplete.
PhpStorm editor is compatible with PHPDoc in your code and provides appropriate code ending based on proprietary, device and var annotations. PHP code refactoring also reviews PHPDocs to keep them up-to-date. Supported operating systems: Linux, Windows, and Mac OS X. PhpStorm is focused on developer’s productive capacity that profoundly co-operates your code, assures smart code ending, quick navigation and very fast error checking. It will help you to form your code, run unit-tests or perform full debugging. PhpStorm is an IDE for HTML, JavaScript, and PHP. PhpStorm code ending functionality (Ctrl + Space) completes classes, functions, variable names, PHP keywords, and besides often used names for fields and variables depending on their types. NuSphere PhpED NuSphere PhpED works on Windows environment. If NuSphere is certificated you can use IDE with OS MAC or Linux via Wine emulator. Supported operating systems: Windows 2000, XP, 2003, 2008, Vista, Windows7. PhpED is provided with Advanced PHP Editor, PHP Debugger and PHP Profiler, Code Insight, Database Client, Integrated Help System, Code Insight. It completely supports JavaScript, HTML, CSS, XML, SMARTY, XHTML and others. IDE maintains PHP from 4.2 to 5.3 version and the Editor - from features and variables to spaces and aliases, Dynamic Syntax Highlighting, Multiple Language Syntax Highlighting, Auto Highlight variables, etc. IDE PhpED provides customers with a lot of tools and features useful for elaboration on PHP. There is a database management client, separate window to manage Telnet or SSH connections, NuSOAP window to work with web services. PhpED supports its own embedded web server adjusted in IDE, but the server is available for small applications only. Full web applications should be adjusted on the outer web server. Debuggers PhpED, DBG can interact with Apache, IIS, web server which maintains standard PHP utilization. Zend Studio Zend Studio is one of the very comprehensive PHP IDE available. It has very powerful PHP and Javascript debugging, team collaboration and remote server tools. The Zend studio is one of the highest priced PHP IDEs, though it has a free version however that does not come with very good features. +2 Open Source Free PHP IDEs NetBeans IDE(Free) Elaboration of NetBeans IDE is performed by independent NetBeans community and NetBeans Org Company. Oracle maintains and invests in NetBeans IDE. The program allows editing several files at once by dividing the screen into several parts. In order to do it, you need to open two files and drag a marker of any file to the bottom of the screen. Then you can see a red framework in the text box in the lower part of the screen. Supported operating systems: Linux, Windows and Mac OS X. All the tools necessary for the construction of professional desktop, web, and mobile applications with the Java platform, C/C++, PHP, JavaScript, and Groovy are accessible. A library of free source codes is integrated for software developers. NetBeans IDE 7.0, produced with language supporting to elaborate on Java SE 7, supports GlassFish 3.1, Oracle Database, Maven 3, Oracle WebLogic, HTML 5. Aptana Studio PHP Editor(Free) Aptana Studio, Developed by Aptana Inc. is a leading open-source HTML editor and many people are not aware that it also comes with a PHP support. Aptana Studio is developed on the Eclipse platform. Supported operating systems: Linux, Windows and Mac OS X. It has inbuilt support for Smarty and the recent versions for Aptana also include a Debugger for PHP developers. Aptana Studio is built on top of the Eclipse platform and is very stable and powerful. Summary Most of the IDEs have the opportunity to add and parse any library or framework. After this well-read work autocomplete feature works for the corresponding classes. However Codelobster PHP Edition, thanks to a special plug-in, has a possibility to create PHP projects using many open source PHP frameworks automatically, add new modules and components,
look-ahead Templates in special Theme Editor and serve Context with help original sites. The choice is yours! There are a number of other productivity PHP IDEs too, besides the ones mentioned. Do let us know if you have used some other tools or plug-ins which you were impressed with. Article Updates Updated on May 2019: Minor changes and updates to the introduction section. Images are updated to HTTPS.
0 notes
Text
How to install and connect DBeaver with PostgreSQL on macOS
DBeaver is a free and open source database management tool for Windows, Linux and Mac OS X designed utilized by developers, system administrators, database admins etc. It supports a wide range of databases, including popular ones like MySQL, PostgreSQL, SQLite, and Oracle. In this short article, we shall discuss how to install and connect DBeaver with PostgreSQL on macOS. Please see learn how to…
0 notes
Text
Getting Started with PHP: A Beginner's Guide to Your First "Hello World" Program

Introduction
PHP tutorial for beginners and professionals provides in-depth knowledge of PHP scripting language. Our PHP tutorial will help you to learn PHP scripting language easily.
This PHP tutorial covers all the topics of PHP such as introduction, control statements, functions, array, string, file handling, form handling, regular expression, date and time, object-oriented programming in PHP, math, PHP MySQL, PHP with Ajax, PHP with jQuery and PHP with XML.
What is PHP
PHP is an open-source, interpreted, and object-oriented scripting language that can be executed at the server side. PHP is well suited for web development. Therefore, it is used to develop web applications (an application that executes on the server and generates the dynamic page.).
PHP was created by Rasmus Lerdorf in 1994 but appeared in the market in 1995. PHP 7.0 is the latest version of PHP, which was released on 28 November. Some important points need to be noticed about PHP are as follows:
PHP stands for Hypertext Preprocessor.
PHP is an interpreted language, i.e., there is no need for compilation.
PHP can be embedded into HTML.
PHP is an object-oriented language.
PHP is an open-source scripting language.
PHP is simple and easy to learn language.

Why use PHP
PHP is a server-side scripting language, which is used to design dynamic web applications with MySQL database.
It handles dynamic content, database as well as session tracking for the website.
You can create sessions in PHP.
It can access cookies variables and also set cookies.
Using PHP language, you can control the user's to access some pages of your website.
It helps to encrypt the data and apply validation.
PHP supports several protocols such as HTTP, POP3, SNMP, LDAP, IMAP, and many more.
PHP Features

Install PHP
To install PHP, we will suggest you to install AMP (Apache, MySQL, PHP) software stack. It is available for all operating systems. There are many AMP options available in the market that are given below:
WAMP for Windows
LAMP for Linux
MAMP for Mac
SAMP for Solaris
FAMP for FreeBSD
XAMPP (Cross, Apache, MySQL, PHP, Perl) for Cross Platform: It includes some other components too such as FileZilla, OpenSSL, Webalizer, Mercury Mail, etc.
How to install XAMPP server on windows
We will learn how to install the XAMPP server on windows platform step by step. Follow the below steps and install the XAMPP server on your system.
Step 1: Click on the above link provided to download the XAMPP server according to your window requirement.
Step 2: After downloading XAMPP, double click on the downloaded file and allow XAMPP to make changes in your system. A window will pop-up, where you have to click on the Next button.
Step 3: Here, select the components, which you want to install and click Next.

Step 4: Choose a folder where you want to install the XAMPP in your system and click Next
Step 5: Click Next and move ahead
Step 6: XAMPP is ready to install, so click on the Next button and install the XAMPP.
Step 7: A finish window will display after successful installation. Click on the Finish button
Step 8: Choose your preferred language
Step 9: XAMPP is ready to use. Start the Apache server and MySQL and run the php program on the localhost.
Step 10: If no error is shown, then XAMPP is running successfully

How to run PHP code in XAMPP
Generally, a PHP file contains HTML tags and some PHP scripting code. It is very easy to create a simple PHP example. To do so, create a file and write HTML tags + PHP code and save this file with .php extension.
All PHP code goes between the php tag. It starts with <?php and ends with ?>. The syntax of PHP tag is given below:
<?php
//your code here
?>
How to run PHP programs in XAMPP PHP is a popular backend programming language. PHP programs can be written on any editor, such as - Notepad, Notepad++, Dreamweaver, etc. These programs save with .php extension, i.e., filename.php inside the htdocs folder.
For example - p1.php.
As I'm using window, and my XAMPP server is installed in D drive. So, the path for the htdocs directory will be "D:\xampp\htdocs".
Step 1: Create a simple PHP program like hello world.
<?php
echo "Hello World!";
?>
Step 2: Save the file with hello.php name in the htdocs folder, which resides inside the xampp folder.
Step 3: Run the XAMPP server and start the Apache and MySQL.
Step4: Now, open the web browser and type localhost http://localhost/hello.php on your browser window.
Step 5: The output for the above hello.php program will be shown as the screenshot below

Most of the time, PHP programs run as a web server module. However, PHP can also be run on CLI (Command Line Interface).
Credits – Shweta Patil (Backend)
MetricsViews Pvt. Ltd.
MetricsViews specializes in building a solid DevOps strategy with cloud-native including AWS, GCP, Azure, Salesforce, and many more. We excel in microservice adoption, CI/CD, Orchestration, and Provisioning of Infrastructure - with Smart DevOps tools like Terraform, and CloudFormation on the cloud.
www.metricsviews.com
0 notes
Text
10 Best Local WordPress Development Environments
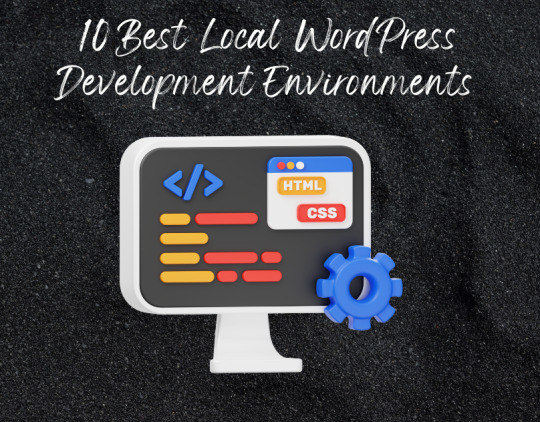
Do you want to drastically lower the possibility of your WordPress website crashing while still being able to make changes to it quickly and simply? Then, a local WordPress development environment will come in helpful.
It is safe to make changes in a local WordPress development environment without interfering with your website. You may safely update websites, test themes and plugins, and provide good performance at a reasonable cost in your environment. Because you can use these products without an internet connection, they are also very convenient.
1) Local By Flywheel
Flywheel's Local is user-friendly even for those without any prior development experience. It was formerly limited to macOS users, but it is now available for Windows as well.
With this tool, choosing between Nginx and Apache servers simplifies the process of creating a new website. Because Local offers the ability to generate live links for your local websites, you can work together with colleagues or clients as well.
2) WampServer
Next up is WAMPServer, a well-liked and remarkably versatile Windows web development environment. Windows, Apache, MySQL, and PHP are the acronyms for WAMP. With PHP, Apache, and a MySQL database, you may use it to develop any kind of web application.
You don't need to use a remote web server to administer, create, test, and construct websites with this tool.
3) XAMPP
Cross-platform, Apache, MariaDB, PHP, and Perl are the acronyms for XAMP. This Apache distribution comes with PHP, Perl, and MariaDB and works with Windows, Linux, and OS X.
With almost everything needed for a local WordPress development environment, XAMP is an incredibly potent tool. Like the best local environments, XAMPP lets you continue working on your website even when you are not connected to the internet.
Because your site is offline and you can work away from prying eyes of clients or hackers, it also offers superior protection.
4) MAMP
MAMP is limited to Windows and macOS, unlike XAMP. On the other hand, it gives you access to extra programs like phpMyAdmin, Perl, Python, etc. This implies that while building local websites and apps, you have a lot of possibilities.
Compared to other tools on this list, it provides less control over each environment's components, but because it has fewer options, it is one of the easiest to use.
You can also choose to use MAMP Pro, the tool's commercial version, if you truly want all the capabilities and options, like a built-in editor, the ability to set up Nginx servers, and a mobile testing tool.
5) Vagrant
If you like to run virtual computers on your computer and use them as environments for your projects, Vagrant is a fantastic tool. You may quickly create up different Multi-VM machines and launch them all with a single command using a single configuration file.
Additionally, Vagrant stores configuration settings in a text file, placing them under source control. Therefore, you may use Vagrant to reload the virtual machine and undo any modifications made to your website in case something goes wrong.
6) Laragon
Despite being more recent than some of the environments on our list, Laragon boasts blazingly quick performance and effortless installation. On Windows devices, Laragon offers what may be the simplest installation for MySQL, PHP, Perl, and Apache web servers.
Furthermore, PHP extensions can be activated with a single click, in contrast to earlier tools. Laragon lets you share your work with clients or colleagues and is free to download and use.
7) Laravel Valet
For Mac minimalists, Valet by Laravel offers a distinctive local WordPress development environment. When you turn on your Mac, it sets up Nginx to run in the background. Valet then proxies all requests to websites that are installed on your machine via DnsMasq.
As a result, while consuming a remarkably small amount of RAM, the programming environment becomes even faster than Laragon. Valet is quicker, simpler to use, and ideal for systems with less RAM than XAMPP or Vagrant, even
if it lacks some of their features and power.
8) Instant WP
An excellent local WordPress website powering option is Instant WP. Despite lacking the robustness of some of the more capable environments, this tool's ability to run from a USB drive and on both Windows and macOS is one of its strongest features.
Therefore, if you need to work on a WordPress project locally on several PCs or wish to share a copy of your project without hosting it on a web server, Instant WP is a practical option.
9) DevKinsta
For Windows, Ubuntu, and macOS, DevKinsta is a free local WordPress development environment.
DevKinsta allows you to launch as many websites as necessary by mimicking the one-click WordPress site creation process locally. It also allows users to switch between PHP versions for testing and supports the most recent versions of PHP.
DevKinsta uses Docker to quickly and securely create a local WordPress environment that enhances security, performs well, and makes upgrades and bug fixes simpler.
10) Duplicator
You can replicate a WordPress website to your local computer or another hosting account with Duplicator, a free, wildly popular, and highly rated WordPress plugin.
1 note
·
View note
Text
Master WordPress: Setting up your local Development Environment
WordPress is a popular and powerful platform for creating websites, blogs, and online stores. But before you can start building your WordPress site, you need to set up a development environment where you can work on your site without affecting the live version.
A development environment is a safe and private space where you can install WordPress, test new features, experiment with plugins and themes, and debug any issues. It also allows you to work offline, without relying on an internet connection or a web server.
In this article, I will show you how to set up a local development environment for WordPress using a free tool called Local by Flywheel.

Local by Flywheel is an easy-to-use application that lets you create and manage multiple WordPress sites on your own computer.
What You Need to Set up a Local Development Environment for WordPress
To set up a local development environment for WordPress, you need the following:
A computer running Windows, Mac, or Linux.
A web browser such as Google Chrome, Firefox, or Microsoft Edge.
A text editor or an integrated development environment (IDE) such as Visual Studio Code, Atom, or Sublime Text. (I personally prefer VS Code because easy to customize and use 😁)
A local server stack that includes PHP, MySQL, and Apache or Nginx. This is what powers your WordPress site locally.
A WordPress installation package that includes the core files and the database.
You can download and install all these components separately, but that can be time-consuming and complicated. That’s why I recommend using Local by Flywheel, which bundles everything you need in one convenient package.

How to Install Local by Flywheel
Local by Flywheel is a free application that you can download from the official website: https://localwp.com/
To install Local by Flywheel, follow these steps:
Download the installer for your operating system from the website.
Run the installer and follow the instructions on the screen.
Once the installation is complete, launch the application and create an account or log in with your existing account.
You will see the main dashboard of Local by Flywheel, where you can create and manage your local WordPress sites.
How to Create a Local WordPress Site with Local by Flywheel
To create a local WordPress site with Local by Flywheel, follow these steps:
Click on the + button at the top left corner of the dashboard.
Choose a name for your site and click on Advanced Options to customize the domain name, path, and environment type. You can leave the default settings if you want.
Click on Continue to proceed to the next step.
Choose a username, password, and email address for your WordPress admin account. You can also choose whether to install WordPress multisite or not.
Click on Add Site to start creating your site. This may take a few minutes depending on your internet speed and computer performance.
Once your site is ready, you will see it listed on the dashboard. You can click on Admin to access the WordPress dashboard, or click on Open Site to view the front-end of your site in your browser.
How to Work on Your Local WordPress Site
Now that you have created your local WordPress site, you can start working on it as you would on any other WordPress site. You can install plugins and themes, create posts and pages, customize settings, and more.
Some of the benefits of working on a local WordPress site are:
You can work faster and see changes instantly in your browser.
You can work offline without needing an internet connection or a web server.
You can test new features and updates without affecting the live version of your site.
You can experiment with different plugins and themes without worrying about breaking your site or losing data.
You can debug any issues more easily using tools such as WP_DEBUG or Query Monitor.
How to Make Your Site Live
Once you are happy with your local WordPress site, you may want to make it live so that other people can access it on the internet. To do this, you need to migrate your site from your local environment to a web hosting service.
There are different ways to migrate your site from Local by Flywheel to a web host, but one of the easiest ways is to use the Connect feature of Local by Flywheel.
The Connect feature allows you to connect your local site to a web host such as WP Engine or Flywheel (both owned by the same company as Local by Flywheel) and push or pull changes between them.
To use the Connect feature of Local by Flywheel, follow these steps:
Click on the name of your local site on the dashboard and go to the Connect tab.
Choose a web host that you want to connect to. You will need to have an account with them and create a site on their platform first.
Follow the instructions on the screen to link your local site and your web host site.
Once the connection is established, you can push or pull changes between your local site and your web host site. Pushing changes means sending your local site to your web host site, while pulling changes means receiving your web host site to your local site.
You can also choose whether to push or pull the entire site or only specific parts such as the database, files, or plugins and themes.
Conclusion
Setting up a local development environment for WordPress is a smart and efficient way to work on your WordPress site. It gives you more control, flexibility, and security over your site.
Using Local by Flywheel, you can easily create and manage multiple WordPress sites on your own computer, without needing any technical skills or extra software.
You can also migrate your site from Local by Flywheel to a web host using the Connect feature, and sync changes between them.
I hope this article helped you learn how to set up a local development environment for WordPress using Local by Flywheel. If you have any questions or feedback, feel free to leave a comment below. Happy WordPressing!

#wordpress#wordpress development#webdevelopment#localenvironment#flywheel#blogging#tutorial#techniki tantram#technikitantram#wordpressdeveloper
1 note
·
View note
Text
Easy TYPO3 installation: Manual & Composer methods!
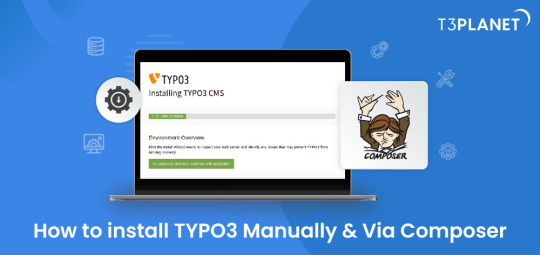
TYPO3 is the most secure, fast and robust CMS that is powered by easy installation which makes it easy for anyone to create a website. Leading TYPO3 web hosting providers facilitate quick and straightforward TYPO3 installations, typically requiring less than five minutes to set up.
In this Step by step Tutorial We are looking into how to install TYPO3 Manually and Via Composer .
Let's Look How?
System Requirement for installing TYPO3
It's essential to ensure the proper prerequisites for CMS installation are in place.
This process primarily necessitates two key components: a web server and a database server.
Operating System : Linux, Windows or Mac, or cloud infrastructure
Web Server : Apache httpd, Nginx, Microsoft IIS, Caddy Server ,
Supported Browser : Chrome (latest) , Edge (latest) , Firefox (latest) , Safari (latest)
Composer Requirement : Composer >= 2.1
Database : MariaDB >= 10.2.7 <= 10.5.99 Microsoft SQL Server MySQL >= 5.7.9 <= 8.0.99 PostgreSQL SQLite
Hardware Requirement RAM >= 256 MB
PHP Version Support PHP >= 7.4.1 <= 8.1.99
How to Install Via Composer
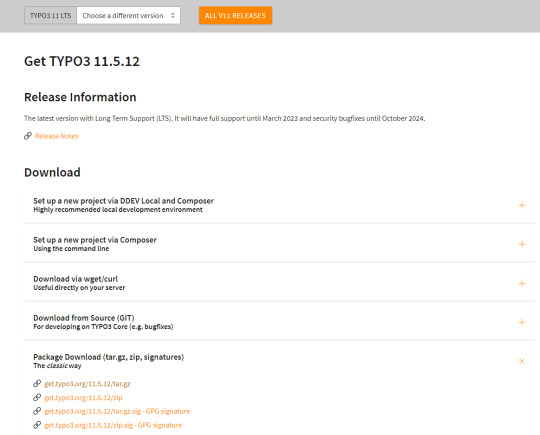
Step 1 Download TYPO3 From Website
The first step involves obtaining TYPO3 from its official website. You can acquire your preferred TYPO3 version from there.
2. Configure the Installation Files
Following Steps can be followed to setup the installation file of TYPO3.Begin by extracting the TYPO3 Zip file that you downloaded from TYPO3's official website. This will create a folder on your system containing all the necessary files for TYPO3.
Next, transfer these items to the server's designated folder Further , it is critical to decide the installation location for TYPO3. If you intend to Access it through main domains , this means you will need to Upload TYPO3 Files directly to public_html/ directory of your account..
However, if you have a different setup in mind, the location may vary accordingly.
there two different ways to transfer your records first is Utilising an FTP or second way of directly through cpanel account.
3.Initiate the Installation Process
To begin the installation process, generate a file named 'FIRST_INSTALL' within the same directory where you've uploaded your TYPO3 files.
This serves as a security checkpoint that grants permission to proceed with the installation. You can create this file using FTP or utilise the File Manager in your cPanel account.
4.Verification of System Requirements
To access the TYPO3 installation wizard, visit
“ https://www.MY_INSTALL.com/typo3/install.php." This tool is designed to facilitate the TYPO3 installation process, which consists of five phases.
In the initial phase, the tool conducts a thorough examination of your system environment. If any issues arise as a result of system settings, you can utilize the troubleshooting function to address them. If no problems are detected, you can continue with the installation process.
5.Configuring TYPO3 Setup
For Configuring TYPO3 Setup You can follow this steps :
You'll integrate the MySQL database. Log in using the username 'root,' and note that no password is necessary when using the XAMPP installer.
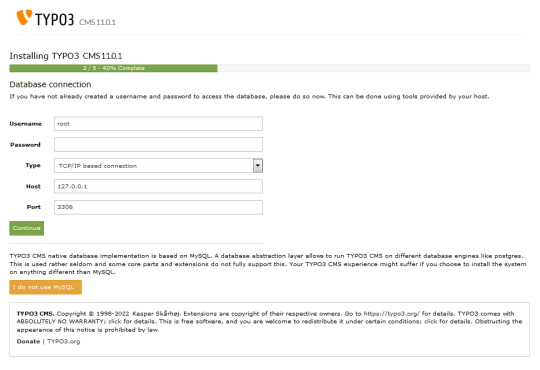
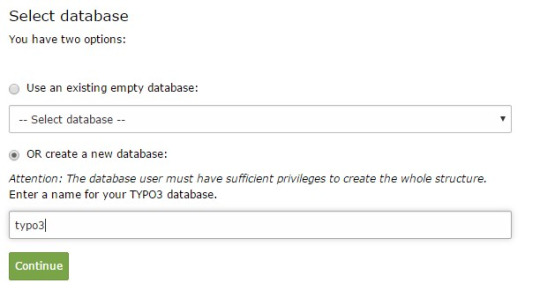
Next, you can either select an existing database or create a new one It's worth noting that you now have the option to use a different database implementation other than MySQL.
Next, you'll create an admin user for the TYPO3 backend. The password you set for this user will also be utilised for the install tool.
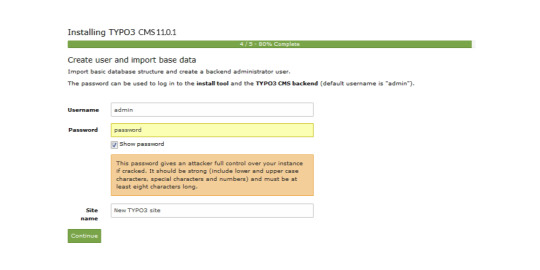
Now the installation itself is completed.
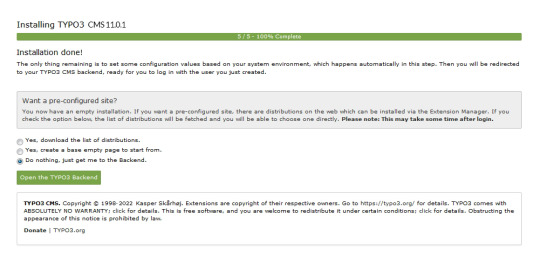
Lastly , the installation wizard finalises by automatically adjusting certain configurations to match your system environment.
However , You still have the option to choose whether TYPO3 will create an empty website or remain inactive temporarily.
By selecting 'Open the TYPO3 Backend,' you'll access the admin area, where you can log in using the account you just created.
Congratulations ! You have Completed and installed TYPO3 manually .
Install TYPO3 Via Composer Mode
For detailed instructions on installing TYPO3 using Composer, you can find a comprehensive step-by-step guide here: How to install TYPO3 - Manually & Via Composer
0 notes
Text
Assignment 1: SQL Startup
Do the following and then upload a .pdf file. Install the correct version (Windows vs. Mac vs. Linux) of MySQL: http://dev.mysql.com/downloads/mysql/ Make sure it works. Here is an example of commands to try. Mac users: Use Terminal under Applications/Utilities. Windows users: Use the command prompt. Unix commands to find and start using MySQL: cd /usr/local/mysql/bin ./mysql -u root -p When…
0 notes
Photo

Installing Laravel Valet – How to setup a local dev environment tutorial 4 Follow me on social media: Twitter: @QuentinWatt Facebook: @quentinwatt Instagram: @quentinwatt Subscribe: I also ... source
#how to#how to install laravel on mac#How to install laravel valet#how to set up a localhost#how to set up valet#install#install mysql on mac#laracasts#Laravel#local development environment#localhost#mac#Quentin Watt#tutorial#valet#web development
0 notes
Text
Install mysql on mac brew

#Install mysql on mac brew install
#Install mysql on mac brew code
#Install mysql on mac brew password
#Install mysql on mac brew free
#Install mysql on mac brew install
To install specific versions of Xdebug we need to switch to the PHP version we want to install it on, then run these commands: For PHP 7.0 sphp 7.0 There are some compatibility issues we need to take into account, as certain versions of PHP can only run certain versions of Xdebug: PHP Version Full documentation on Xdebug contains extensive information about all the functionality available.
#Install mysql on mac brew code
This means you can set breakpoints, and step through your PHP code inspecting as you go. One of the best features however, is the ability to remote debug your code. It also provides other useful dumping methods as well as displaying stack traces. Xdebug provides is a debugging and profiling extension for PHP that provides an HTML-friendly output for the var_dump() method that improves the readability of the default version. PHP comes with limited support to dump variables or log to a file, but for more complex situations you need something more powerful. One of the most important aspects of any kind of development is the ability to debug and fix your code. Voila! we have successfully setup wildcard forwarding of all *.test DNS names to localhost. Now you can test it out by pinging some bogus. Sudo bash -c 'echo "nameserver 127.0.0.1" > /etc/resolver/test' Start it and ensure it auto-starts on reboot in the future: sudo brew services start dnsmasqĪnd lastly, add it to the resolvers: sudo mkdir -v /etc/resolver Then we setup *.test hosts: echo 'address=/.test/127.0.0.1' > /opt/homebrew/etc/nf You can do this by manually adding entries to /etc/hosts ever time, or you can install and configure Dnsmasq to automatically handle wildcard *.test names and forward all of them to localhost ( 127.0.0.1).įirst we install it with brew: brew install dnsmasq This by default will not resolve to your local machine, but it's often very useful to be able to setup various virtual hosts for development purposes. In the example virtualhost we setup above, we defined a ServerName of grav-admin.test. dev domains to use SSL, this guide has been updated to use. dev domain name, but since Chrome 63 forces all. ĭocumentRoot "/Users/your_user/Sites/grav-admin" When you set up virtual hosts, you will lose your older document root, so you will need to add back support for that first as a virtual host. This file has some instructions already but the important thing to remember is that these rules are matched in order. Then you can edit this referenced file and configure it to your needs: code /opt/homebrew/etc/httpd/extra/nf First you will need to uncomment the following lines in your /opt/homebrew/etc/httpd/nf file: LoadModule vhost_alias_module lib/httpd/modules/mod_vhost_alias.so Detailed information can be found on the site.Īpache already comes preconfigured to support this behavior but it is not enabled. This means that you can set up names such as which point to your Grav setup, or for a project-specific URL.Īpache generally performs name-based matching, so you don't need to configure multiple IP addresses. If you need to stop the server, you can use the simple command: brew services stop mariadb Apache Virtual HostsĪ very handy development option is to have multiple virtual hosts set up for you various projects. You should be create a new MySQL connection, give it a Name, a color, and check Use socket option after you enter a User of root and your newly created password.
#Install mysql on mac brew free
(it's awesome and there's a free version!). You can just press return when prompted for the current root password.ĭownload TablePlus and install it. Just answer the questions and fill them in as is appropriate for your environment. The simplest way to do this is to use the provided script: sudo /opt/homebrew/bin/mysql_secure_installation
#Install mysql on mac brew password
You must change MySQL server password and secure your installation. You should get some positive feedback on that action: => Successfully started `mariadb` (label: ) Detailed information on the HomeBrew installation process can be found on the site but the essentials are as follows:Īfter a successful installation, you can start the server ane ensure it autostarts in the future with: brew services start mariadb However, we now have switched to MariaDB which is a drop-in replacement for MySQL and is easily installed and updated with Brew. In the original guide, we used the Oracle MySQL installation package. MySQLĪlthough not required for development of Grav, there are times you definitely need an installation of MySQL. If you are a beginner developer, you will be better served using MAMP or MAMP Pro. This guide is intended for experienced web developers.
0 notes
Text
Install mysql on mac prerequisites

#INSTALL MYSQL ON MAC PREREQUISITES MAC OS X#
#INSTALL MYSQL ON MAC PREREQUISITES INSTALL#
In case you are using the bash shell (as I do) then you should have a. How you go about doing this, depends on the shell you are using, and I’m assuming you are able to export a shell variable on your own. Users/Antonio/Code/django_trunk/django/bin We need therefore to add the following to the PATH (again, change it to your own location): The bin directory within the django folder (which is inside django_trunk itself) contains several management utilities. Of course, change it to the full path location of the directory on your filesystem. Within this file, place only one line containing the path to your django_trunk folder. Library/Python/2.5/site-packages/django.pth What you need to do is inform Python about the location of your django_trunk directory. You can verify this by running python in the Terminal (use exit() to get out of the python shell).
#INSTALL MYSQL ON MAC PREREQUISITES INSTALL#
Mac OS X 10.5 already ships with Python 2.5.1, thus you won’t have to install it. The development code is also rather stable and used by most people in production mode, even for sites like the Washington Post. The reason for this is that the trunk version implements a few new features. MacPorts is not required for this how-to.įirst and foremost, we are going to install Django from its svn repository, as opposed to obtaining the 0.96 release archive. I’m writing about this for the benefit of those of you who may attempt and struggle with this feat.
#INSTALL MYSQL ON MAC PREREQUISITES MAC OS X#
Installing Django on Mac OS X Leopard is supposed to be very straightforward, but if you are new to it, you may encounter a few puzzling questions and, in the case of MySQL, even a couple of headaches.
0 notes
Text
In this article, I’ll be sharing the technical expertise and help you understand all that freaky on the first sight staff. There will be information about stacks, frameworks, programming languages etc., - everything that can help one understand aspects of developing tools that are commonly used in web development agencies.What is MEAN stack development?So, today we are going to talk about MEAN, not the adjective, but the abbreviation for the Javascript web development stack that consists of:MongoDB - database.Express.js - application server, used for the backend.Angular.js - web application framework, used for the frontend.Node.js - web server. The MEAN stack today is a modern and more flexible analog of LAMP (Linux, Apache, MySQL, PHP) web development stack. While LAMP requires special OS, MEAN can be developed on every OS - Windows, Mac, Linux.Technical features of MEAN technology stackMongoDB MongoDB is a document-oriented database specially created to store hierarchical data structures (documents) and is implemented using a NoSQL approach. This NoSQL approach represents a fundamental shift in the persistence strategy.The programmer spends less time writing SQL statements and more writing the map/reduce functions in JavaScript. This eliminates the huge layers of transformation logic since MongoDB initially produces the JavaScript Object Notation (JSON) format. As a result, writing of REST web services is extremely easy.Express.js Express.js is free and open-source web application framework that runs on top of Node.js. It is used for backend development. The huge step from LAMP is a transition from a traditional generation of pages on the server side to targeting single-page applications (SPA) on the client side. Express allows you to manage and route/generate pages on the server side, but other components of MEAN stack such as Angular.js turn it more into client side.Angular.jsAngular.js is frontend MVC (Model-View-Controller) framework in Javascript with an open-source software.The transition to SPA does not simply translate the MVC artifacts from the server to the client device. This is also a jump from the mentality of synchronism to the mentality of asynchronism, which is essentially event-driven. And perhaps, most importantly is the movement from page-oriented applications to component-oriented applications.Node.js JavaScript development platform for server-side. It transforms JavaScript from a highly specialized language to general-purpose language. Node.js replaces Apache from the LAMP stack. But Node.js is much more than just a web server. In fact, the finished application is not deployed on a separate web server; instead, the web server itself is included in the application and automatically installed as part of the MEAN stack. As a result, the deployment process is greatly simplified, since the required version of the web server is explicitly defined along with the remaining dependencies of the execution time.Why we prefer using the MEAN stack over LAMP?During the last 10 years of our existence, we have always been trying to improve our development process. We rejected ineffective, slow or narrow-oriented tools and worked hard to deliver only high-quality results. We tried using LAMP and actually we still use it in some projects, but the transition to MEAN stack development is where we are heading to. Why? Here is the answer: One programming language (JavaScript) - less confusion with syntax.On AngularJS it is convenient to make rich client applications that do not require reloading of pages (MVC, event model, routing, the possibility of creating components + this killer-feature: two-way data binding).On Node.js in conjunction with Express framework, it is good to do RESTful API backend. When the server sends only the data to JSON, and the client itself is engaged in the submission. This reduces the connectivity of the client and server + simplifies the creation of a mobile application in the future (it will come in handy with the same API).
Of course, the RESTful API can be done in PHP, but the PHP process will be created and terminated with each request, spending resources on initialization, while the process on Node.js hangs in memory all the time.Asynchrony. Even the fact that any mean stack example can be implemented two times faster because of asynchrony, make us believe, that is one of the best options. Node.js does not block the current process when accessing external resources (for example, the database). This allows, among other things, to execute several requests in parallel. Node.js has a cool NPM package manager and a cool package community. Under any task, be it PDF generation or Email sending, it's easy to find a package with a concise interface and add it to your application.So with these technologies, the MEAN stack developers can build applications with higher quality in less time so that they can deliver a quick result to the customer while fewer resources are used. The author of this article - Liza Kerimova, internet marketer at Artjoker, software development company, that specializes in web development. Our goal is to turn clients’ ideas only to excellent results!
0 notes