#install node and npm
Explore tagged Tumblr posts
Visit Tumblr Blog
Explore Tumblr blogs with no restrictions, modern design and the best experience.
Last Seen Tumblr Blogs


Fun Fact
Total funding amounts to $125.3M.
Text
Since its been like, almost a year since I did any programming work I was passionate about, I decided I was gonna make a simple word count tracker for my november writing project.
But because its been so long since I had to set up a new project, I forgot the mandatory, hour long fight with NPM before you actually got to see anything on your screen.
#valk yelling at clouds#install FNM to install Node to install NPM to install Angular to put things on your screen#what is this even????
3 notes
·
View notes
Text
Mini React.js Tips #2 | Resources ✨

Continuing the #mini react tips series, it's time to understand what is going on with the folders and files in the default React project - they can be a bit confusing as to what folder/file does what~!
What you'll need:
know how to create a React project >> click
already taken a look around the files and folders themselves

What does the file structure look like?
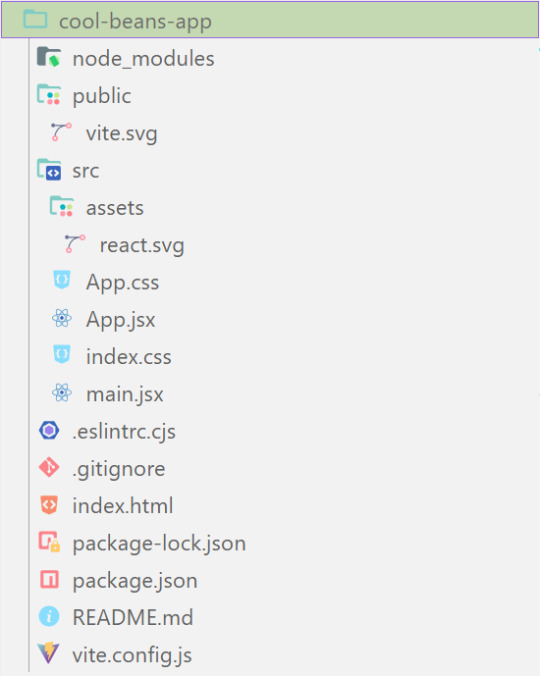
✤ node_modules folder: contains all the dependencies and packages (tools, resources, code, or software libraries created by others) needed for your project to run properly! These dependencies are usually managed by a package manager, such as npm (Node Package Manager)!
✤ public folder: Holds static assets (files that don't change dynamically and remain fixed) that don't require any special processing before using them! These assets are things like images, icons, or files that can be used directly without going through any additional steps.
✤ src folder: This is where your main source code resides. 'src' is short for source.
✤ assets folder: This folder stores static assets such as images, logos, and similar files. This folder is handy for organizing and accessing these non-changing elements in your project.
✤ App.css: This file contains styles specific to the App component (we will learn what 'components' are in React in the next tips post~!).
✤ App.jsx: This is the main component of your React application. It's where you define the structure and behavior of your app. The .jsx extension means the file uses a mixture of both HTML and JavaScript - open the file and see for yourself~!
✤ index.css: This file contains global styles that apply to the entire project. Any styles defined in this file will be applied universally across different parts of your project, providing a consistent look and feel.
✤ main.jsx: This is the entry point of your application! In this file, the React app is rendered, meaning it's the starting point where the React components are translated into the actual HTML elements displayed in the browser. Would recommend not to delete as a beginner!!
✤ .eslintrc.cjs: This file is the ESLint configuration. ESLint (one of the dependencies installed) is a tool that helps maintain coding standards and identifies common errors in your code. This configuration file contains rules and settings that define how ESLint should analyze and check your code.
✤ .gitignore: This file specifies which files and folders should be ignored by Git when version-controlling your project. It helps to avoid committing unnecessary files. The node_modules folder is typically ignored.
✤ index.html: This is the main HTML file that serves as the entry point for your React application. It includes the necessary scripts and links to load your app.
✤ package.json: A metadata file for your project. It includes essential information about the project, such as its name, version, description, and configuration details. Also, it holds a list of dependencies needed for the project to run - when someone else has the project on their local machine and wants to set it up, they can use the information in the file to install all the listed dependencies via npm install.
✤ package-lock.json: This file's purpose is to lock down and record the exact versions of each installed dependency/package in your project. This ensures consistency across different environments when other developers or systems install the dependencies.
✤ README.md: This file typically contains information about your project, including how to set it up, use it, and any other relevant details.
✤ vite.config.js: This file contains the configuration settings for Vite, the build tool used for this React project. It may include options for development and production builds, plugins, and other build-related configurations.
Congratulations! You know what the default folders and files do! Have a play around and familiarise yourself with them~!
BroCode’s 'React Full Course for Free’ 2024 >> click
React Official Website >> click
React's JSX >> click
The basics of Package.json >> click
Previous Tip: Tip #1 Creating The Default React Project >> click
Stay tuned for the other posts I will make on this series #mini react tips~!
#mini react tips#my resources#resources#codeblr#coding#progblr#programming#studyblr#studying#javascript#react.js#reactjs#coding tips#coding resources
25 notes
·
View notes
Text
i want to keep tumblr because i like aesthetics
aesthetic aggregation is important because it allows for intimate relationships to develop outside of life-long domesticated-servile contracts
you transfer
love energy,
actually, when you share your aesthetic, and merge, like that
however
i don't think its possible to make organic relationships the same way it was a decade ago, no, entirely too sanitized
i highly doubt, since the algorithm that i'll ever oganically run into; actually its absurd to even finish that sentence
luckily, i became a sysadmin / programmer, in the interem period, and can actually build the tools this time around
i have an idea for an aesthetic aggregator portal place that combines dump.fm & tumblr with cellular automata, like a living pool you gaze into and everything's a ripple on a wave, man, that's like connected, woah
and i'm schemeing on it, i love lisp, when i go looking everything i want to do is available to me like channeling a spell... somebody already wrote scheme to wasm, that really shouldn't be too hard... still looking for alternate ways to chat :D hmu on xmpp it's exactly like AIM
i've tried node/npm, python, package managers... the best most satisfying one if you're going to go and install a big library, blob thing like that, is probably some flavor of emacs... for me, this is a personal preference, the fact that you 'can' do anything that rust/python/go/js can do in LISP... is enough for me, because, it is elegant, it is more pleasant to look at and easier to read, idk. loving my time with it recently and have been knocking it out of the park most days recently... the past 7 years i've been working on a top secret project, which will have a working alpha demo of the basic features by the end of next week :D
the best os rn is a freeBSD jail with guixSD GNU/linux-libre there's also hyperbola/BSD in the works you want to try to phase out the linux kernel because of all the google/microsoft shenanigans creeping in, you don't need unix/linux any more you can do all your daily driver stuff on an embedded, low power risc soc that costs under a hundo you need less overhead for embedded systems, there's microkernels like genome, and platforms like zephyr, its ok to move away idk one thing i learned its good to take a step back and look at the scope of what you're trying to achieve, try to strip away all the unneccessary parts... a mhz is 1,000,000 calculations a microsecond or whatever, when you sit down and write a piece of code how many calculations exactly do you need to do to do your business, honestly.
^these are the 3 am ramblings of a minimalist
i'm trying to find peers here on my site that's connected to the internet that's why i'm sending messages to it about my interests, pardon me, sir please send $1 to this address
3 notes
·
View notes
Text
React JS
Component-Based Architecture:
React applications are built using components, which are reusable, self-contained pieces of the UI. Components can be nested, managed, and handled independently, leading to better maintainability and scalability.
JSX (JavaScript XML):
React uses JSX, a syntax extension that allows HTML to be written within JavaScript. This makes the code more readable and easier to write.
Virtual DOM:
React maintains a virtual DOM, an in-memory representation of the actual DOM. When the state of an object changes, React updates the virtual DOM and efficiently determines the minimal set of changes needed to update the real DOM, leading to performance improvements.
One-Way Data Binding:
Data flows in one direction, from parent to child components, which makes the data flow and logic easier to understand and debug.
State Management:
React components can maintain internal state, making it easy to build dynamic and interactive UIs. For more complex state management, libraries like Redux or Context API can be used.
Advantages of Using React
Performance:
Due to the virtual DOM, React minimizes direct manipulation of the DOM, resulting in better performance for dynamic applications.
Reusable Components:
Components can be reused across different parts of an application, reducing the amount of code and enhancing consistency.
Strong Community and Ecosystem:
A large community and a rich ecosystem of tools and libraries support React, making it easier to find solutions, get support, and integrate with other technologies.
SEO Friendly:
React can be rendered on the server using Node.js, making web pages more SEO-friendly compared to traditional client-side rendering.
Getting Started with React
To start building applications with React, you need to have Node.js and npm (Node Package Manager) installed. Here’s a basic setup to create a new React application:
Install Node.js and npm:
Download and install from Node.js website.
Create a New React Application:
You can use Create React App, an officially supported way to create single-page React applications with no configuration required:
npx create-react-app my-app cd my-app npm start
import React from 'react';
function Welcome(props) { return
Hello, {props.name}
; }
export default Welcome;
#React JS#Front end Developer#Advanced JavaScript#coding#html css#htmlcoding#html#css#php#website#html5 css3#software#React Training
5 notes
·
View notes
Text
The Debate of the Decade: What to choose as the backend framework Node.Js or Ruby on Rails?
New, cutting-edge web development frameworks and tools have been made available in recent years. While this variety is great for developers and company owners alike, it does come with certain drawbacks. This not only creates a lot of confusion but also slows down development at a time when quick and effective answers are essential. This is why discussions about whether Ruby on Rails or Noe.js is superior continue to rage. What framework is best for what kind of project is a hotly contested question. Nivida Web Solutions is a top-tier web development company in Vadodara. Nivida Web Solutions is the place to go if you want to make a beautiful website that gets people talking.

Identifying the optimal option for your work is challenging. This piece breaks things down for you. Two widely used web development frameworks, RoR and Node.js, are compared and contrasted in this article. We'll also get deep into contrasting RoR and Node.js. Let's get started with a quick overview of Ruby on Rails and Node.js.
NodeJS:
This method makes it possible to convert client-side software to server-side ones. At the node, JavaScript is usually converted into machine code that the hardware can process with a single click. Node.js is a very efficient server-side web framework built on the Chrome V8 Engine. It makes a sizable contribution to the maximum conversion rate achievable under normal operating conditions.
There are several open-source libraries available through the Node Package Manager that make the Node.js ecosystem special. Node.js's built-in modules make it suitable for managing everything from computer resources to security information. Are you prepared to make your mark in the online world? If you want to improve your online reputation, team up with Nivida Web Solutions, the best web development company in Gujarat.
Key Features:
· Cross-Platforms Interoperability
· V8 Engine
· Microservice Development and Swift Deployment
· Easy to Scale
· Dependable Technology
Ruby on Rails:
The back-end framework Ruby on Rails (RoR) is commonly used for both web and desktop applications. Developers appreciate the Ruby framework because it provides a solid foundation upon which other website elements may be built. A custom-made website can greatly enhance your visibility on the web. If you're looking for a trustworthy web development company in India, go no further than Nivida Web Solutions.
Ruby on Rails' cutting-edge features, such as automatic table generation, database migrations, and view scaffolding, are a big reason for the framework's widespread adoption.
Key Features:
· MVC Structure
· Current Record
· Convention Over Configuration (CoC)
· Automatic Deployment
· The Boom of Mobile Apps
· Sharing Data in Databases
Node.js v/s RoR:
· Libraries:
The Rails package library is called the Ruby Gems. However, the Node.Js Node Package Manager (NPM) provides libraries and packages to help programmers avoid duplicating their work. Ruby Gems and NPM work together to make it easy to generate NPM packages with strict version control and straightforward installation.
· Performance:
Node.js' performance has been lauded for its speed. Node.js is the go-to framework for resource-intensive projects because of its ability to run asynchronous code and the fact that it is powered by Google's V8 engine. Ruby on Rails is 20 times less efficient than Node.js.
· Scalability:
Ruby's scalability is constrained by comparison to Node.js due to the latter's cluster module. In an abstraction-based cluster, the number of CPUs a process uses is based on the demands of the application.
· Architecture:
The Node.js ecosystem has a wealth of useful components, but JavaScript was never designed to handle backend activities and has significant constraints when it comes to cutting-edge construction strategies. Ruby on Rails, in contrast to Node.js, is a framework that aims to streamline the process of building out a website's infrastructure by eliminating frequent installation problems.
· The learning curve:
Ruby has a low barrier to entry since it is an easy language to learn. The learning curve with Node.js is considerably lower. JavaScript veterans will have the easiest time learning the language, but developers acquainted with various languages should have no trouble.
Final Thoughts:
Both Node.JS and RoR have been tried and tested in real-world scenarios. Ruby on Rails is great for fast-paced development teams, whereas Node.js excels at building real-time web apps and single-page applications.
If you are in need of a back-end developer, Nivida Web Solutions, a unique web development agency in Gujarat, can assist you in creating a product that will both meet and exceed the needs of your target audience.
#web development company in vadodara#web development company in India#web development company in Gujarat#Web development Companies in Vadodara#Web development Companies in India#Web development Companies in Gujarat#Web development agency in Gujarat#Web development agency in India#Web development agency in Vadodara
8 notes
·
View notes
Text
Importance of MERN Stack
What is MERN Stack?
Four essential technologies make up the full-stack JavaScript framework MERN Stack:
MongoDB: A NoSQL database system known for its flexibility and scalability, MongoDB stores data in a JSON-like format, making it ideal for handling large volumes of data.
Express.js: A minimalist web application framework for Node.js, Express.js simplifies the process of building robust and scalable web applications by providing a set of features for web and mobile applications.
React.js: Developed by Facebook, React.js is a powerful JavaScript library for building interactive user interfaces. Its component-based architecture allows developers to create reusable UI components, resulting in a more modular and maintainable codebase.
Node.js: A server-side JavaScript runtime environment, Node.js enables developers to build fast and scalable network applications. With its event-driven, non-blocking I/O model, Node.js is well-suited for building real-time web applications.
Why Choose MERN Stack?
Streamlined Development: With MERN Stack, developers can leverage the power of JavaScript across the entire development stack, from frontend to backend. This unified approach reduces development time and eliminates the need to switch between different programming languages and frameworks.
SEO-Friendly Architecture: MERN Stack's server-side rendering capabilities, coupled with its support for modern JavaScript frameworks like React.js, make it highly SEO-friendly. This ensures that web applications built with MERN Stack are easily discoverable by search engines, leading to improved search engine rankings and increased organic traffic.
Optimized Performance: MERN Stack's asynchronous, non-blocking architecture allows for seamless communication between frontend, backend, and database components, resulting in faster response times and improved performance. This translates to a smoother user experience and higher customer satisfaction.
Improved Security: In today's digital environment, security is of the highest priority. MERN Stack provides built-in security features, such as authentication and authorization mechanisms, as well as support for encryption and data validation, to ensure that web applications are protected against common security threats.
Scalability and Flexibility: Whether you're building a small-scale application or a large-scale enterprise solution, MERN Stack offers the scalability and flexibility you need to grow and adapt to changing business requirements. With its modular architecture and support for microservices, MERN Stack allows for easy scaling and maintenance of complex applications.
Getting Started with MERN Stack
Are you prepared to explore the MERN Stack world? Here is a detailed how-to for getting started:
Install Node.js: Begin by installing Node.js, which includes npm (Node Package Manager), on your local machine. Node.js will serve as the runtime environment for your server-side code.
Set Up MongoDB: Install MongoDB, a NoSQL database system, and set up a local or remote MongoDB instance to store your application data.
Create an Express.js Server: Use Express.js to create a server-side application that will handle HTTP requests and serve as the backend for your web application.
Build Your React.js Frontend: Use React.js to create a client-side application that will handle user interface interactions and communicate with the backend server.
Integrate MongoDB with Express.js: Connect your Express.js server to your MongoDB database using Mongoose, a MongoDB object modeling tool for Node.js.
Deploy Your Application: Once your application is complete, deploy it to a hosting provider of your choice to make it accessible to users worldwide.
Conclusion
MERN Stack offers a powerful and versatile framework for building modern web applications that are fast, scalable, and secure. Whether you're a seasoned developer or just getting started, MERN Stack provides the tools and resources you need to bring your ideas to life. So why wait? Start exploring the endless possibilities of MERN Stack today and unlock the potential of your web development projects with Meander Training, Meander training is a platform where you can start your web development journey, it provides industrial training with certification.
1 note
·
View note
Text
You can learn NodeJS easily, Here's all you need:
1.Introduction to Node.js
• JavaScript Runtime for Server-Side Development
• Non-Blocking I/0
2.Setting Up Node.js
• Installing Node.js and NPM
• Package.json Configuration
• Node Version Manager (NVM)
3.Node.js Modules
• CommonJS Modules (require, module.exports)
• ES6 Modules (import, export)
• Built-in Modules (e.g., fs, http, events)
4.Core Concepts
• Event Loop
• Callbacks and Asynchronous Programming
• Streams and Buffers
5.Core Modules
• fs (File Svstem)
• http and https (HTTP Modules)
• events (Event Emitter)
• util (Utilities)
• os (Operating System)
• path (Path Module)
6.NPM (Node Package Manager)
• Installing Packages
• Creating and Managing package.json
• Semantic Versioning
• NPM Scripts
7.Asynchronous Programming in Node.js
• Callbacks
• Promises
• Async/Await
• Error-First Callbacks
8.Express.js Framework
• Routing
• Middleware
• Templating Engines (Pug, EJS)
• RESTful APIs
• Error Handling Middleware
9.Working with Databases
• Connecting to Databases (MongoDB, MySQL)
• Mongoose (for MongoDB)
• Sequelize (for MySQL)
• Database Migrations and Seeders
10.Authentication and Authorization
• JSON Web Tokens (JWT)
• Passport.js Middleware
• OAuth and OAuth2
11.Security
• Helmet.js (Security Middleware)
• Input Validation and Sanitization
• Secure Headers
• Cross-Origin Resource Sharing (CORS)
12.Testing and Debugging
• Unit Testing (Mocha, Chai)
• Debugging Tools (Node Inspector)
• Load Testing (Artillery, Apache Bench)
13.API Documentation
• Swagger
• API Blueprint
• Postman Documentation
14.Real-Time Applications
• WebSockets (Socket.io)
• Server-Sent Events (SSE)
• WebRTC for Video Calls
15.Performance Optimization
• Caching Strategies (in-memory, Redis)
• Load Balancing (Nginx, HAProxy)
• Profiling and Optimization Tools (Node Clinic, New Relic)
16.Deployment and Hosting
• Deploying Node.js Apps (PM2, Forever)
• Hosting Platforms (AWS, Heroku, DigitalOcean)
• Continuous Integration and Deployment-(Jenkins, Travis CI)
17.RESTful API Design
• Best Practices
• API Versioning
• HATEOAS (Hypermedia as the Engine-of Application State)
18.Middleware and Custom Modules
• Creating Custom Middleware
• Organizing Code into Modules
• Publish and Use Private NPM Packages
19.Logging
• Winston Logger
• Morgan Middleware
• Log Rotation Strategies
20.Streaming and Buffers
• Readable and Writable Streams
• Buffers
• Transform Streams
21.Error Handling and Monitoring
• Sentry and Error Tracking
• Health Checks and Monitoring Endpoints
22.Microservices Architecture
• Principles of Microservices
• Communication Patterns (REST, gRPC)
• Service Discovery and Load Balancing in Microservices
1 note
·
View note
Text
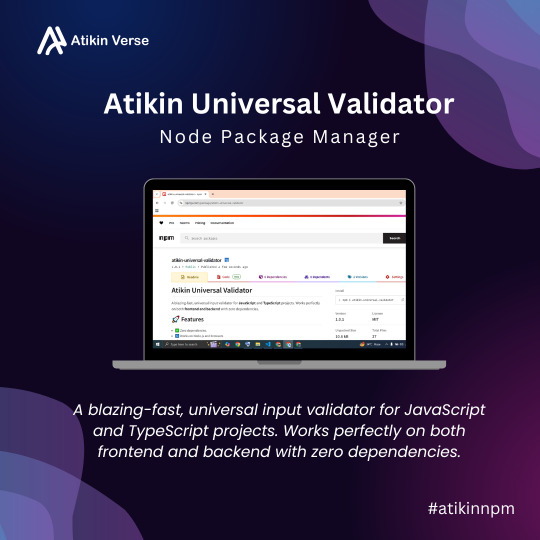
🚨 Day 14 of 100 Days, 100 Innovations!
💥 Stop Writing the Same Validation Code Again & Again!
⚡ Introducing: Atikin Universal Validator
A blazing-fast, zero-dependency JS/TS validator that works EVERYWHERE:
✅ Frontend (React, Vue, Svelte…) ✅ Backend (Node, Express, NestJS…) ✅ Fully typed – built with TypeScript
✨ Example: validate({ email: ["[email protected]", "isEmail"], password: ["Strong@123", "isStrongPassword"] });
🎯 Validate in ONE LINE.
📦 Install now: npm i atikin-universal-validator
🔗 Live on NPM → https://www.npmjs.com/package/atikin-universal-validator
Made with ❤️ by : Atikin Verse
#atikinverse#100Days100Innovations#javascript#typescript#npm#npmtools#DevCommunity#opensource#webdev#nodejs#frontend#backend#atikin
0 notes
Text
How to Install
Looking for easy, step-by-step guides on how to install everything from software to home devices? Our "How to Install" blog provides clear, beginner-friendly instructions to help you get things up and running without the hassle. Whether you're setting up a new app, assembling tech gadgets, or configuring tools, we simplify the process for you. Each post is written with accuracy and user convenience in mind.
How to Install How to Install Printers Without CD How to Install Webcam Drivers How to Install SSH How to Install Pixelmon How to Install OptiFine How to Install Fabric How to Install Zend Framework with XAMPP on Windows How to Install Roblox on Chromebook How to Install Roblox Studio How to Install Firefox on Mac How to Install Firefox on Linux How to Install Firefox on Windows How to Install Java Step-by-Step Guide for Beginners How to Install Java on Mac Follow Full Process Ultimate Guide How to Install Java for Minecraft Easy Step Guide for How to Install VPN for Privacy How to Install VPN Server Virtual Private Network How to Install VPN on Router A Step-by-Step Guide : Complete Guide for How to Install Anaconda How to Install Anaconda on Linux Complete Guide How to Install Anaconda on Mac: A Step-by-Step Guide How to Install Anaconda on Ubuntu: A Step-by-Step Guide How to Install Anaconda on Windows How to Install npm A Step-by-Step Guide for Beginners How to Install npm on Ubuntu Step-by-Step How to Install NVM on Ubuntu Tips, and Explanations How to Install npm on Windows Solve Common Issues How to Install NVM on Windows Troubleshooting Tips How to Install npm on Visual Studio Code How to Install Node.js on Your Machine How to Install Node.js on Linux Step-by-Step Guide How to Install Node.js on Mac Step-by-Step Guide How to Install Node Modules on Angular How to Install Node.js on Ubuntu The Latest Version How to Install Node.js on Windows Get started Full Method How to Install APK File on Your Android Device Complete Guide on How to Install APK on Android TV How to Install APK on Chromebook Step by Step Process How to Install APK on iOS A Comprehensive Guide How to Install IPA on iPhone A Complete Guide How to Install APK on Windows 10 Complete Guide How to Install Git A Step-by-Step Guide for Beginners How to Install Git Bash A Complete Step-by-Step Guide How to Install Git on Visual Studio Code How to Install GitHub Simple Step-by-Step Process How to Install Git on Mac Step-by-Step Guide How to Install Git on Linux A Step-by-Step Guide How to Install Git on Ubuntu Step-by-Step Guide How to Install Git on Windows A Simple Guide How to Install Docker How to Install Docker on Linux How to Install Docker on Mac How to Install Docker Daemon Mac How to Install Docker on Ubuntu How to Install Docker Compose on Ubuntu 20.04 How to Install Docker Compose on Windows How to Install Docker on Windows How to Install WordPress How to Install WordPress on Ubuntu How to Install WordPress Plugins How to Install WordPress on Windows 10 How to Install Kodi on Firestick How to Install Exodus on Kodi How to Install The Crew on Kodi How to Install XAMPP on Mac
0 notes
Text
Start Coding Today: Learn React JS for Beginners

Start Coding Today: Learn React JS for Beginners”—will give you a solid foundation and guide you step by step toward becoming a confident React developer.
React JS, developed by Facebook, is an open-source JavaScript library used to build user interfaces, especially for single-page applications (SPAs). Unlike traditional JavaScript or jQuery, React follows a component-based architecture, making the code easier to manage, scale, and debug. With React, you can break complex UIs into small, reusable pieces called components.
Why Learn React JS?
Before diving into the how-to, let’s understand why learning React JS is a smart choice for beginners:
High Demand: React developers are in high demand in tech companies worldwide.
Easy to Learn: If you know basic HTML, CSS, and JavaScript, you can quickly get started with React.
Reusable Components: Build and reuse UI blocks easily across your project.
Strong Community Support: Tons of tutorials, open-source tools, and documentation are available.
Backed by Facebook: React is regularly updated and widely used in real-world applications (Facebook, Instagram, Netflix, Airbnb).
Prerequisites Before You Start
React is based on JavaScript, so a beginner should have:
Basic knowledge of HTML and CSS
Familiarity with JavaScript fundamentals such as variables, functions, arrays, and objects
Understanding of ES6+ features like let, const, arrow functions, destructuring, and modules
Don’t worry if you’re not perfect at JavaScript yet. You can still start learning React and improve your skills as you go.
Setting Up the React Development Environment
There are a few ways to set up your React project, but the easiest way for beginners is using Create React App, a boilerplate provided by the React team.
Step 1: Install Node.js and npm
Download and install Node.js from https://nodejs.org. npm (Node Package Manager) comes bundled with it.
Step 2: Install Create React App
Open your terminal or command prompt and run:
create-react-app my-first-react-app
This command creates a new folder with all the necessary files and dependencies.
Step 3: Start the Development Server
Navigate to your app folder:
my-first-react-app
Then start the app:
Your first React application will launch in your browser at http://localhost:3000.
Understanding the Basics of React
Now that you have your environment set up, let’s understand key React concepts:
1. Components
React apps are made up of components. Each component is a JavaScript function or class that returns HTML (JSX).
function Welcome() { return <h1>Hello, React Beginner!</h1>; }
2. JSX (JavaScript XML)
JSX lets you write HTML inside JavaScript. It’s not mandatory, but it makes code easier to write and understand.
const element = <h1>Hello, World!</h1>;
3. Props
Props (short for properties) allow you to pass data from one component to another.
function Welcome(props) { return <h1>Hello, {props.name}</h1>; }
4. State
State lets you track and manage data within a component.
import React, { useState } from 'react'; function Counter() { const [count, setCount] = useState(0); return ( <div> <p>You clicked {count} times.</p> <button onClick={() => setCount(count + 1)}>Click me</button> </div> ); }
Building Your First React App
Let’s create a simple React app — a counter.
Open the App.js file.
Replace the existing code with the following:
import React, { useState } from 'react'; function App() { const [count, setCount] = useState(0); return ( <div style={{ textAlign: 'center', marginTop: '50px' }}> <h1>Simple Counter App</h1> <p>You clicked {count} times</p> <button onClick={() => setCount(count + 1)}>Click Me</button> </div> ); } export default App;
Save the file, and see your app live on the browser.
Congratulations—you’ve just built your first interactive React app!
Where to Go Next?
After mastering the basics, explore the following:
React Router: For navigation between pages
useEffect Hook: For side effects like API calls
Forms and Input Handling
API Integration using fetch or axios
Styling (CSS Modules, Styled Components, Tailwind CSS)
Context API or Redux for state management
Deploying your app on platforms like Netlify or Vercel
Practice Projects for Beginners
Here are some simple projects to strengthen your skills:
Todo App
Weather App using an API
Digital Clock
Calculator
Random Quote Generator
These will help you apply the concepts you've learned and build your portfolio.
Final Thoughts
This “Start Coding Today: Learn React JS for Beginners” guide is your entry point into the world of modern web development. React is beginner-friendly yet powerful enough to build complex applications. With practice, patience, and curiosity, you'll move from writing your first “Hello, World!” to deploying full-featured web apps.
Remember, the best way to learn is by doing. Start small, build projects, read documentation, and keep experimenting. The world of React is vast and exciting—start coding today, and you’ll be amazed by what you can create!
0 notes
Text
100daysofcode #day002
Node package Manager
Native to nodejs installation is npm itself. Its is very robust and get's the job done. But there is a better option. I would not say limitations of native npm is overcome by pnpm and its predecessor yarn. There are added features to npm and not necessarily limitations. I was using yarn until last month when I run into a codebase the was configured with pnpm. I have since used it for any project I have developed. To install pnpm you can visit their documentation, my prefered way is to use powershell or chocolately. Now chocolately or choco is an option when installing nodejs, if you did not install it then use the powershell command.
Visit pnpm and install using your preferred method.
Powershell command - Invoke-WebRequest https://get.pnpm.io/install.ps1 -UseBasicParsing | Invoke-Expression
Chocolately command - choco install pnpm
If you have to install a package manager then get chocolately or sccop. These will allow you to run an upgrade command when there is an update
#studyblr#codeblr#electronjs#typescript#100daysofcode#youtube#codetrain Gen20#codetrian-alumni#programming#coding#javascript#web development#linux#open source#cross platform apps#stackoverflow#Youtube#react#LSP
0 notes
Text
Socket.IO setup

Building Real-Time Applications with Socket.IO setup: Step-by-Step Tutorial
Socket.IO setup. In today's interconnected world, real-time applications are becoming increasingly essential. Whether it's for live chat applications, collaborative tools, or gaming, real-time communication enhances user engagement and makes interactions more dynamic. One powerful tool for building real-time applications is Socket.IO. In this tutorial, we will guide you through the process of building a real-time application using Socket.IO, focusing on key concepts and practical implementation. What is Socket.IO? Socket.IO is a JavaScript library that enables real-time, bidirectional communication between web clients (like browsers) and servers. Unlike traditional HTTP requests, which follow a request-response model, Socket.IO provides a persistent connection, enabling instant data exchange between the client and server. Socket.IO works on top of WebSockets, but it provides fallback mechanisms for environments where WebSockets may not be available. This ensures that real-time communication is possible in a wide range of conditions, making it a versatile choice for building interactive web applications. Prerequisites Before we dive into the tutorial, make sure you have the following: Basic knowledge of JavaScript and Node.js Node.js installed on your machine. You can download it from nodejs.org. A code editor (like Visual Studio Code or Sublime Text). Step 1: Setting Up the Project Start by setting up a basic Node.js project. Create a new directory for your project: bash mkdir real-time-app cd real-time-app Initialize a new Node.js project: bash npm init -y Install Express and Socket.IO: bash npm install express socket.io Express is a lightweight web framework for Node.js that simplifies the creation of web servers. Socket.IO will handle real-time communication between the server and the client. Step 2: Create the Server Now that we've set up the dependencies, let's create a simple server. Create a file called server.js in the project root: js const express = require('express'); const http = require('http'); const socketIo = require('socket.io');// Create an instance of Express app const app = express();// Create an HTTP server const server = http.createServer(app); // Initialize Socket.IO with the HTTP server const io = socketIo(server); // Serve static files (like HTML, CSS, JS) app.use(express.static('public')); // Handle socket connection io.on('connection', (socket) => { console.log('a user connected'); // Handle message from client socket.on('chat message', (msg) => { io.emit('chat message', msg); // Emit the message to all clients }); // Handle disconnect socket.on('disconnect', () => { console.log('user disconnected'); }); }); // Start the server server.listen(3000, () => { console.log('Server is running on http://localhost:3000'); }); Step 3: Create the Client-Side Next, we need to create the client-side code that will connect to the server and send/receive messages in real time. Create a public folder inside the project directory. In the public folder, create an index.html file: html Real-Time Chat Real-Time Chat Application Send const socket = io(); // Connect to the server// Listen for messages from the server socket.on('chat message', function(msg){ const li = document.createElement('li'); li.textContent = msg; document.getElementById('messages').appendChild(li); }); // Handle form submission const form = document.getElementById('form'); form.addEventListener('submit', function(event){ event.preventDefault(); const input = document.getElementById('input'); socket.emit('chat message', input.value); // Send the message to the server input.value = ''; // Clear the input field }); Step 4: Run the Application With the server and client code in place, it’s time to run the application! In your terminal, run the following command: bash node server.js Open your browser and go to http://localhost:3000. You should see the chat interface. Open multiple browser windows or tabs to simulate multiple users. Type a message in the input field and click "Send." You should see the message appear in real-time in all open windows/tabs. Step 5: Enhancements and Improvements Congratulations! You've built a basic real-time chat application using Socket.IO. To enhance the application, consider adding the following features: User authentication: Allow users to log in before they can send messages. Private messaging: Enable users to send messages to specific individuals. Message persistence: Use a database (e.g., MongoDB) to store chat history. Typing indicators: Show when a user is typing a message in real time. Emoji support: Allow users to send emojis and other media. Conclusion Socket.IO setup. In this tutorial, we covered the basics of building a real-time application using Socket.IO. We walked through setting up a Node.js server with Express, integrating Socket.IO for real-time communication, and creating a simple chat interface on the client side. Socket.IO makes it easy to add real-time features to your web applications, enabling more dynamic and interactive experiences for users. With this foundation, you can now start exploring more advanced real-time features and take your applications to the next level! Read the full article
#communication#CreatetheClient-Side#CreatetheServer#Enhancements#function#History#Improvements#RuntheApplication#Setting
0 notes
Photo

New Post has been published on https://codebriefly.com/building-and-deploying-angular-19-apps/
Building and Deploying Angular 19 Apps
Efficiently building and deploying Angular 19 applications is crucial for delivering high-performance, production-ready web applications. In this blog, we will cover the complete process of building and deploying Angular 19 apps, including best practices and optimization tips.
Table of Contents
Toggle
Why Building and Deploying Matters
Preparing Your Angular 19 App for Production
Building Angular 19 App
Key Optimizations in Production Build:
Configuration Example:
Deploying Angular 19 App
Deploying on Firebase Hosting
Deploying on AWS S3 and CloudFront
Automating Deployment with CI/CD
Example with GitHub Actions
Best Practices for Building and Deploying Angular 19 Apps
Final Thoughts
Why Building and Deploying Matters
Building and deploying are the final steps of the development lifecycle. Building compiles your Angular project into static files, while deploying makes it accessible to users on a server. Proper optimization and configuration ensure faster load times and better performance.
Preparing Your Angular 19 App for Production
Before building the application, make sure to:
Update Angular CLI: Keep your Angular CLI up to date.
npm install -g @angular/cli
Optimize Production Build: Enable AOT compilation and minification.
Environment Configuration: Use the correct environment variables for production.
Building Angular 19 App
To create a production build, run the following command:
ng build --configuration=production
This command generates optimized files in the dist/ folder.
Key Optimizations in Production Build:
AOT Compilation: Reduces bundle size by compiling templates during the build.
Tree Shaking: Removes unused modules and functions.
Minification: Compresses HTML, CSS, and JavaScript files.
Source Map Exclusion: Disables source maps for production builds to improve security and reduce file size.
Configuration Example:
Modify the angular.json file to customize production settings:
"configurations": "production": "optimization": true, "outputHashing": "all", "sourceMap": false, "namedChunks": false, "extractCss": true, "aot": true, "fileReplacements": [ "replace": "src/environments/environment.ts", "with": "src/environments/environment.prod.ts" ]
Deploying Angular 19 App
Deployment options for Angular apps include:
Static Web Servers (e.g., NGINX, Apache)
Cloud Platforms (e.g., AWS S3, Firebase Hosting)
Docker Containers
Serverless Platforms (e.g., AWS Lambda)
Deploying on Firebase Hosting
Install Firebase CLI:
npm install -g firebase-tools
Login to Firebase:
firebase login
Initialize Firebase Project:
firebase init hosting
Deploy the App:
firebase deploy
Deploying on AWS S3 and CloudFront
Build the Project:
ng build --configuration=production
Upload to S3:
aws s3 sync ./dist/my-app s3://my-angular-app
Configure CloudFront Distribution: Set the S3 bucket as the origin.
Automating Deployment with CI/CD
Setting up a CI/CD pipeline ensures seamless updates and faster deployments.
Example with GitHub Actions
Create a .github/workflows/deploy.yml file:
name: Deploy Angular App on: [push] jobs: build-and-deploy: runs-on: ubuntu-latest steps: - uses: actions/checkout@v2 - name: Set up Node.js uses: actions/setup-node@v2 with: node-version: '18' - run: npm install - run: npm run build -- --configuration=production - name: Deploy to S3 run: aws s3 sync ./dist/my-app s3://my-angular-app --delete
Best Practices for Building and Deploying Angular 19 Apps
Optimize for Production: Always use AOT and minification.
Use CI/CD Pipelines: Automate the build and deployment process.
Monitor Performance: Utilize tools like Lighthouse to analyze performance.
Secure the Application: Enable HTTPS and configure secure headers.
Cache Busting: Use hashed filenames to avoid caching issues.
Containerize with Docker: Simplifies deployments and scales easily.
Final Thoughts
Building and deploying Angular 19 applications efficiently can significantly enhance performance and maintainability. Following best practices and leveraging cloud hosting services ensure that your app is robust, scalable, and fast. Start building your next Angular project with confidence!
Keep learning & stay safe 😉
You may like:
Testing and Debugging Angular 19 Apps
Performance Optimization and Best Practices in Angular 19
UI/UX with Angular Material in Angular 19
0 notes
Text
Crypto malware silently steals ETH, XRP, SOL from wallets
Cybersecurity researchers have shared details of a malware campaign targeting Ethereum, XRP, and Solana. The attack mainly targets Atomic and Exodus wallet users through compromised node package manager (NPM) packages. It then redirects transactions to attacker-controlled addresses without the wallet owner’s knowledge. The attack begins when developers unknowingly install trojanized npm packages…
0 notes
Text
Introduction to Server and Network Programming

Server and network programming is essential for building applications that communicate over the internet or local networks. From creating web servers to building chat apps or IoT solutions, understanding networking fundamentals is key for any modern developer.
What is Server and Network Programming?
Server and network programming involves writing code that enables applications to communicate with each other over a network. This includes:
Creating and managing servers
Establishing network connections
Sending and receiving data (HTTP, TCP/IP, UDP)
Managing client-server interactions
Common Use Cases
Web servers and APIs
Chat applications
Multiplayer games
IoT device communication
File transfer services
Key Concepts in Network Programming
IP Address: Identifies a device on a network
Port: Endpoint for communication on a device
Client-Server Model: One device requests (client), another responds (server)
Protocols: Rules for data exchange (TCP, UDP, HTTP, FTP, etc.)
Sockets: Programming interface for network communication
Popular Languages for Network Programming
Python: Great for rapid prototyping and learning (socket, asyncio, Flask)
JavaScript/Node.js: Ideal for real-time apps (Express, WebSockets)
Java: Enterprise-grade networking (ServerSocket, RMI)
C/C++: Low-level networking with high performance (raw sockets)
Go: Fast and efficient concurrency (net/http, goroutines)
1. Creating a Simple Server in Python
import socket server = socket.socket(socket.AF_INET, socket.SOCK_STREAM) server.bind(('localhost', 8080)) server.listen(1) print("Waiting for a connection...") conn, addr = server.accept() print(f"Connected to {addr}") conn.send(b"Hello from the server!") conn.close()
2. Making a Request (Client Side)
import socket client = socket.socket(socket.AF_INET, socket.SOCK_STREAM) client.connect(('localhost', 8080)) message = client.recv(1024) print("Received:", message.decode()) client.close()
3. RESTful API with Node.js
// Install Express first: npm install express const express = require('express'); const app = express(); app.get('/', (req, res) => res.send('Hello from Node server!')); app.listen(3000, () => console.log('Server running on port 3000'));
4. Real-Time Communication with WebSockets
Use WebSockets for two-way communication:
Socket.io (Node.js)
ws library (JavaScript)
WebSocket library (Python)
5. Network Security Basics
Use HTTPS to encrypt web traffic
Sanitize inputs to avoid injection attacks
Use authentication tokens or API keys
Implement firewalls and access control
6. Tools and Protocol Analyzers
Wireshark: Analyze network packets
Postman: Test HTTP APIs
Netcat: Debug and scan ports
Ping/traceroute: Diagnose connectivity
Conclusion
Server and network programming are crucial for building scalable, efficient, and connected applications. Whether you're interested in building a simple REST API or a real-time multiplayer game, a strong grasp of networking concepts will take your skills to the next level.
0 notes
Text
Understanding ReactJS – A Beginner-Friendly Guide

Introduction
ReactJS is widely used in various industries, including web development company in Bangalore, which leverage its capabilities to build dynamic and scalable applications.
Imagine a world where building a website is like assembling LEGO blocks—each block representing a specific function. This is exactly what ReactJS does! ReactJS is a powerful JavaScript library developed by Facebook that helps developers create interactive user interfaces in a structured, reusable, and efficient way. Since its release in 2013, it has become a game-changer in web development, powering applications like Facebook, Instagram, and Airbnb.
ReactJS has revolutionized front-end development by making it easier to build large-scale applications with reusable components and a seamless user experience. In this guide, we will break down ReactJS into simple, digestible concepts, making it easy for beginners to grasp and use effectively.
What is ReactJS?
ReactJS is an open-source JavaScript library designed to create fast and dynamic web applications. Unlike traditional HTML and JavaScript, where each change refreshes the entire webpage, React uses a smart feature called the Virtual DOM to update only the necessary parts. This significantly boosts performance and enhances user experience.
Why Choose ReactJS?
Component-Based Structure: Applications are built using reusable components, making development organized and efficient.
Lightning-Fast Performance: The virtual DOM optimizes updates, improving speed.
Strong Community & Support: With a vast developer community, solutions and tutorials are readily available.
SEO-Friendly: Unlike other JavaScript-heavy frameworks, React supports server-side rendering, improving search engine rankings.
Scalability: From small projects to large enterprise applications, React scales seamlessly.
Cross-Platform Development: React Native, a React-based framework, allows developers to build mobile applications using the same concepts.
Core Concepts of ReactJS
1. Components – The Building Blocks
Think of React components as small, reusable pieces of a website, just like individual LEGO pieces. A component can be a button, a form, or an entire page!
There are two types of components:
Functional Components – Simple, stateless components that return UI elements.
Class Components – More powerful components that can manage their own state and lifecycle events.
Components help in modular development, making it easier to maintain and scale applications.
2. JSX (JavaScript XML) – Writing HTML in JavaScript
React uses JSX, a special syntax that looks like HTML but works inside JavaScript. JSX makes UI code easier to read and write, reducing complexity and improving development speed.
3. Props – Passing Data Between Components
Props (short for properties) allow components to communicate with each other by passing data. They help in making components dynamic and reusable.
4. State – Managing Dynamic Data
State is used to store and manage data that can change over time. Unlike props, which are read-only, state can be updated dynamically. This makes applications more interactive and responsive.
5. Virtual DOM – The Secret Behind React’s Speed
Traditional web applications update the entire webpage when a change occurs. React, however, creates a Virtual DOM, a lightweight copy of the actual DOM. Instead of reloading everything, it updates only the changed elements, making applications incredibly fast.
Getting Started with ReactJS
Setting up a React project is simple. Follow these steps:
Install Node.js and npm: React requires Node.js, which comes with npm (Node Package Manager).
Create a React App: Open the terminal and run npx create-react-app my-app.
Navigate to the project folder: Use cd my-app.
Start the development server: Run npm start. Your app will open in the browser at http://localhost:3000/.
This setup creates a structured environment to build React applications efficiently.
Advanced React Features
1. React Hooks – Making Functional Components More Powerful
Hooks allow functional components to manage state and side effects. The useState hook is one of the most commonly used, replacing class components in many cases.
2. React Router – Handling Multiple Pages
React applications often need navigation between different pages. React Router enables this functionality without requiring full-page reloads, ensuring smooth transitions between components.
3. Redux – Managing Complex Application State
As applications grow, managing state becomes challenging. Redux is a popular library that helps manage state in a predictable and structured way, making applications easier to debug and maintain.
4. Context API – An Alternative to Redux
For applications that do not require a complex state management system, React provides the Context API. It allows data to be passed globally without the need for prop drilling, improving code efficiency.
5. Server-Side Rendering (SSR) – Improving Performance and SEO
React supports SSR, which allows content to be rendered on the server before being sent to the client. This enhances page speed, improves SEO, and ensures better user engagement.
Best Practices for React Development
Keep Components Small and Focused: Each component should have a single responsibility.
Use Functional Components and Hooks: They make code simpler and more readable.
Optimize Performance: Use techniques like lazy loading, memoization, and avoiding unnecessary re-renders.
Follow a Consistent Folder Structure: Organizing components, assets, and utilities properly improves maintainability.
Use Error Boundaries: They help in handling errors gracefully without breaking the entire application.
Write Clean and Reusable Code: Reusing components and avoiding redundant code improves efficiency.
Future of ReactJS
React continues to evolve with new features and improvements. Some trends shaping its future include:
Concurrent Mode: Improving performance by allowing multiple tasks to run simultaneously.
React Server Components: Enhancing server-side capabilities.
Better Developer Experience: With updates in developer tools and debugging features.
With strong community support and continuous updates, ReactJS remains a top choice for front-end development.
Conclusion
ReactJS is a powerful tool that makes web development easier, faster, and more efficient. With its component-based architecture, virtual DOM, and advanced features like hooks and routing, it’s no wonder that companies worldwide rely on it.
By learning React, you unlock the potential to create stunning, high-performance web applications. Whether you’re a beginner or an experienced developer, mastering ReactJS will open doors to countless opportunities in the tech world.
With its vast ecosystem, seamless integrations, and continuous improvements, ReactJS remains at the forefront of web development. If you're planning to dive into front-end development, ReactJS is the perfect technology to master.
Keywords: ReactJS, JavaScript, Web Development, UI Components, Virtual DOM, Front-End Development, React Hooks, Redux, Server-Side Rendering, React Router, Context API, Web Development Company in Bangalore
#ReactJS#WebDevelopment#JavaScript#FrontendDevelopment#ReactComponents#VirtualDOM#ReactHooks#WebDevelopmentCompany#BangaloreTech#SEO#UIUX#SoftwareDevelopment#Programming#Coding#ReactNative#TechTrends
0 notes