#install wordpress theme ubuntu
Explore tagged Tumblr posts
Visit Tumblr Blog
Explore Tumblr blogs with no restrictions, modern design and the best experience.
Last Seen Tumblr Blogs


Fun Fact
70% of Tumblr users say the Dashboard is their favorite place to spend time online.
Text
If I disappear from society, don't be surprised.
I am so so so tired of capitalism.
For Christmas I got a Raspberry Pi. The goal was to host my own website off it. This was entirely for fun.
Step one: set up raspberry Pi so I can host a site on it. Easy. Ubuntu is free (thank fuck), I know how to set it up, but hold on! According to xfinity, I cannot change dmz or dms rules on their router. I can't even REQUEST it. I can't even use a workaround because I'm not allowed to edit the port forward that was automatically added to my router. I dig through years old forums and find out that this is because I'm using the modem provided by xfinity. I now have to buy a new modem from xfinity's "approved list".
Step two: get a domain. I swim through 4 million outrageous prices that say shit like "pay $0.01 for the first year!" with the text below saying "with purchase of 3 year agreement". I finally get to godaddy and am able to convince the stupid checkout to give me 1 year of my domain (after, of course, it corrected my awful mistake to 3 years and, if I hadn't been hyper-vigilant, I wouldn't have noticed. I have to dig through 5 pages in settings to find a way to turn off auto pay because I know better by now. While I'm there I also turn off all email notifications, which were all automatically on. It also didn't tell me that I can't transfer my domain outside of godaddy for 60 days, so I just essentially paid for something I can't use for 2 months. Great. (out of curiosity, I dug through godaddy for some time. The 60 day thing appears nowhere except on the help center page when specifically searching for it.)
Step three: create a site. WordPress, once my most beloved website creation software, now slams subscription fees on me like cardi B audios on teenager girls's tiktoks. Unrelenting. Bloodthirsty. I power through to just get past "let AI design your site!" and "pick one of our patterns" so I can reach the point where I can edit the template. I already have a free template zip file. I drop it in the box. "wait!" says WordPress, in a screen-covering popup "upgrade to the creator plan to access the theme install features!" I click the only button on the screen. It takes me IMMEDIATELY to a filled out checkout page. WordPress Creator is $300 per year. Per. Year.
I read through the "features included with your purchase" to see things like "sftp/SSH certificates", "github deployments", "free staging site", and "install plugins and themes". All of these were free 5 years ago. "Save 20% by paying for two years!" No, I don't think I will.
Out of pure spite against the demon that is modern capitalism, I'm teaching myself html and css. I would kiss the creator of w3schools on the mouth, right after I kiss the creator of Ubuntu. I'm so angry. The internet is useless now.
5 notes
·
View notes
Text
Still no ligatures
Black Box is a GTK4 Terminal App With a Unique Look – OMG! Ubuntu Black Box is a GTK4 terminal emulator for Linux desktops. It boasts innovative UI features, 12 terminal themes, and is easy to install from Flathub. Nice, but still, font ligatures support is missing as it requires quite a lot of work on VTE. I’m quite happy with Qterminal these days

View On WordPress
0 notes
Text
Self vs Managed WordPress Hosting : An In-Depth Comparison [2023]

The main difference between Self Hosting and Managed WordPress hosting is that Self hosting gives you full control and responsibility for your WordPress website’s server and infrastructure, whereas managed WordPress hosting provides a hands-off approach, letting the host handle security, updates, and performance optimization.
If you're starting a new WordPress website, one of the biggest decisions you'll make is whether to go with self-hosted WordPress or use a managed WordPress hosting provider.
This choice affects everything from your monthly hosting bill to the amount of control you have over your site. It's important to weigh the pros and cons carefully based on your specific needs.
In this guide, we'll dive deep into the self-hosting vs managed WordPress hosting debate and equip you with everything you need to decide. Buckle up for a bumpy ride down the WordPress hosting rabbit hole!
Self-Hosted WordPress Explained
Self-hosting means you rent a virtual private server (VPS) or dedicated server, install WordPress yourself, and manage everything at the system and application level.
With self-hosted WordPress, you take complete ownership over your hosting environment. Here's a closer look at what's involved :
Hardware Provisioning
The first step is sourcing the actual physical server your site will run on. You can rent a VPS or dedicated server from providers like :
DigitalOcean
Vultr
Linode
AWS
Google Cloud
VPS plans start around $10/month for basic setups. Dedicated servers are more expensive but give you sole access to the underlying hardware.
Make sure to choose a provider with servers near your audience for fastest performance.
Software Setup & Configuration
Once you have your VPS or dedicated box, it's time to set up the software powering your WordPress site :
Install a Linux distro like Ubuntu or CentOS
Configure the LAMP or LEMP stack (Linux, Apache/Nginx, MySQL, PHP)
Tweak the Apache/Nginx config for optimal WordPress performance
Secure MySQL, PHP, and other services
Install caching like Varnish and php-fpm
Set up a control panel like CPanel for easier management
This process requires deep Linux server and WordPress expertise. But the payoff is getting everything finely tuned for your particular site's needs.
Ongoing Management
Server setup is just the beginning. With self-hosted infrastructure, you must handle all ongoing management and maintenance yourself including :
OS and software updates
Security patching
WordPress core, plugin and theme updates
Backups and disaster recovery
Monitoring uptime and performance
Optimizing the stack as needed
Troubleshooting any issues that arise
The work never stops when you self-host! You must stay vigilant to keep your site running smoothly.
The Pros of Self-Hosted WordPress
Let's recap the biggest benefits of rolling your own WordPress hosting environment :
Total control: You make all hosting decisions to perfectly fit your specific needs.
Flexibility and customization: You can configure server software like PHP, MySQL, Nginx however you want.
Cost savings: Once optimized, self-hosted sites can cost less per month than managed WordPress hosting.
Performance and scalability: You can fully optimize and tune the server for your particular site.
No vendor lock-in: You can easily migrate between different server providers.
When to Consider Self-Hosted WordPress
Self-hosted infrastructure makes the most sense for :
Developers and engineers with server administration expertise
Sites that require total control over the stack
Companies with large budgets for hosting costs
Complex sites anticipating high traffic and load
Businesses wanting to scale sites across multiple servers
Anyone running advanced stack configurations like HHVM or custom LEMP
Potential Downsides of Self-Hosted
Self-hosting isn't all sunshine and rainbows. Here are the biggest challenges to weigh :
Time investment: Server setup and management is extremely time consuming and complex.
Technical skill required: You must have significant sysadmin, DevOps, and WordPress expertise.
Maintenance overhead: OS, software, and WordPress updates are a never-ending chore.
Security liability: You're fully responsible for protecting against threats and vulnerabilities.
No support: If (and when) problems occur, you're on your own to fix them.
Higher learning curve: Be prepared to invest many hours mastering server configuration.
As you can see, self-managed WordPress hosting is definitely not for the faint of heart!
Managed WordPress Hosting Overview
In contrast to the DIY approach of self-hosting, managed WordPress hosting providers take care of everything related to your infrastructure and server environment.
Companies like WordPress Engine, Kinsta, and Pagely handle all aspects like :
Server provisioning
WordPress installation
Software setup and configuration
Ongoing maintenance and management
Updates
Security
Backups
Caching and performance optimization
24/7 WordPress technical support
This hands-off approach allows you to focus entirely on your site content and not worry about hosting headaches.
How Managed WordPress Hosting Works
Let's look at how managed WordPress hosting operates under the hood :
Optimized Infrastructure
Hosts like WordPress Engine build their architecture specifically for WordPress. This includes :
High-performance server hardware
CDNs for blazing fast static file delivery
Multiple app and database server clusters
Batched updates and maintenance for minimal downtime
Geographic redundancy to keep sites always online
The result is WordPress performance and reliability far exceeding what most self-hosted setups can achieve.
Hardened Security
Managed hosts implement numerous security enhancements like :
Automated malware detection and removal
DDoS protection
Advanced firewalls and access control lists
Ongoing vulnerability scanning and patching
Regular penetration testing
Forced SSL to encrypt all connections
Your site stays locked down and safe from threats.
Hassle-Free Maintenance
Hosts take complete ownership of mundane but critical tasks like :
OS and software updates
Daily offsite cloud backups
WordPress core and plugin updates
Content delivery network (CDN) config
SMTP email delivery management
Performance monitoring and optimization
You'll never have to worry about this stuff again!
White-Glove Support
Managed WordPress hosting providers staff teams of WordPress experts available 24/7 to help with :
Site migrations
Configuration questions
Troubleshooting plugin and theme conflicts
Diagnosing performance problems
Outages and emergency response
Any other issues that come up
For those times when you need a lifeline, support is just a phone call or support ticket away.
The Benefits of Managed WordPress Hosting
Let's recap the biggest perks of handing off hosting management :
No technical skill required: You don't need any sysadmin or DevOps expertise.
Blazing fast performance: Providers optimize WordPress speed right out of the box.
Enhanced security: Hardened environments keep your data safe.
99.9% or better uptime: Clustering and redundancy eliminate downtime.
Automatic updates: WordPress and plugins stay up to date automatically.
Time savings: No need to manage infrastructure yourself.
24/7 expert support: Get help anytime you need it.
Daily backups: Never lose data or worry about disaster recovery.
When to Consider Managed WordPress Hosting
Managed WordPress hosting is a perfect fit for :
Bloggers who want to focus on content instead of backend complexity
Ecommerce sites and client projects needing rock-solid reliability
Publishers and media companies with large audiences
Regulated businesses requiring security and compliance
Sites where fast performance and SEO are critical
Anyone looking to offload infrastructure management
Potential Downsides of Managed Hosting
Managed WordPress hosting isn't without some tradeoffs :
Less control and flexibility: You must accept the provider's system configurations.
Limited customization: Some hosts restrict plugins or forbid code changes.
Higher cost: Managed WordPress hosting is more expensive than self-hosting.
Vendor lock-in: Migrating between managed hosts is harder than switching servers yourself.
Overkill for simple sites: Lots of overhead and cost for basic blogs.
Hybrid Hosting: Getting the Best of Both Worlds
If you like aspects of both self-hosted and fully managed WordPress hosting, hybrid options try to give you the best of both worlds.
Platforms like Cloudways, Kinsta MyKinsta, and Pantheon combine easy WordPress setup and management with more flexibility over your environment.
For example, Cloudways still handles core infrastructure like scaling and security. But you get more configuration control, choice of server location, and the ability to install whatever software you need.
Hybrid platforms can be a great middle ground. Evaluate options like :
Cloudways
Kinsta MyKinsta
Pantheon
Pagely
WordPress-Engine Genesis
DreamPress
The downside is hybrid hosts tend to offer less optimization and fewer enterprise features out of the box compared to true premium managed WordPress hosting.
Migrating Between Environments
One final thing to note - don't get analysis paralysis worrying about picking the "perfect" option upfront.
If your needs change down the road, you can always migrate from self-hosted WordPress to managed hosting or vice versa.
Just make sure to choose a platform that provides tools to make the transition as smooth as possible.
For example, hosts like WordPress Engine offer a migration service to safely transfer your site. And they provide instructions on exporting your database and files for self-migration.
The takeaway? Don't let hosting decisions delay actually launching your WordPress site! Pick an environment, get up and running, and optimize later.
Which is Right for You?
So which type of WordPress hosting should you choose? Here are some final recommendations based on common use cases :
For Bloggers
Go with managed WordPress hosting. The last thing you want is dealing with servers and infrastructure when you should be focused on creating content.
For Developers
Self-hosted is likely the best fit. You'll want access and control to run whatever stack and configurations you need.
For Ecommerce Sites
Managed hosting is ideal. You'll benefit from optimized performance, tight security, and expert support for your business.
For Enterprise Companies
Either self-hosted or managed enterprise-grade hosting. For large complex sites, leave it to the experts.
When In Doubt
You really can't go wrong starting with managed WordPress hosting, even as a developer. Let the provider handle infrastructure so you can focus on building an awesome site!
Don't Stress, Just Start!
I know that was a boatload of information to process. But don't overthink the self-hosted vs managed WordPress hosting decision.
The most important thing is to get your site launched and start sharing your passion with the world! You can always change environments later if you want more control or less complexity.
With the right host and a well-crafted strategy, you can build a WordPress site that achieves all your goals and visions. So take a deep breath, review the options, and make the best decision for today.
The perfect WordPress hosting fit for you is just a signup form away. It's time to stop dreaming and start doing - now get out there and start that site!
#wordpress#managed wordpress hosting#self vs managed wordpress#self vs managed wordpress hosting#self hosting#self vs managed hosting#self hosting vs managed hosting#managed hosting in wordpress#self vs managed hosting in wordpress
0 notes
Text
How to install WordPress Theme 2021
How to install WordPress Theme 2021
How to install WordPress Theme How to install Word install WordPress Theme install WordPress Theme Press Theme So hunt up and down and get the perfect WordPress theme. Now you need to know how to install WordPress theme or it will just be a nice file that collects dust on your hard drive. Installing a WordPress theme is not a problem as many people think it is. The thing that often confuses…

View On WordPress
#How to install WordPress Theme So hunt up and down and get the perfect WordPress theme. Now you need to know how to install WordPress theme#install wordpress theme#install wordpress theme in cpanel#install wordpress theme in xampp#install wordpress theme localhost#install wordpress theme manually#install wordpress theme ubuntu#install wordpress theme without ftp
0 notes
Text
DreamHost VPS and Dedicated Servers Hosting Services
Is it accurate to say that you are thinking about facilitating your new site or blog with a dependable web facilitating organization? DreamHost VPS, Dreampress 2 and the DreamHost Dedicated Servers facilitating administrations can help give your site the security, speed and straightforwardness it merits. The sort of organization that has your site has a method of deciding how far your site can contend with the top dogs and how much traffic and cash you get over the long haul. With DreamHost, your webpage makes certain to contend well with the hotshots on the web.
Situated in Brea, California, DreamHost was established by Josh Jones, Sage Weil, Dallas Bethune and Michael Rodriguez. The organization was dispatched in 1996 and has stayed an excellent and solid web facilitating specialist co-op for designers and business visionaries from that point onward. With three server farms in downtown LA, Ashburn (Virginia) and Irvine (California) in the United States of America, and with a distributed computing stage, the issue of speed and information security are taken care of viably.
This organization has needed to battle with some crucial issues before. One of those issues was the worker personal time of 2006 which came about because of two blackouts at their server farms, and the second was the hacking of their webpage in 2007 which came about in around 700 sites records and FTP accounts having a place with around 3500 destinations being undermined. In any case, DreamHost appears to have gotten the past unequivocally behind them and are currently giving quality, continuous administrations to their clients. They have won the PC Mag's Best Web Hosting Service for the second year straight. They've been facilitating more than 1,500,000 sites since 1997.
Why Choose DreamHost VPS and Dedicated Servers Hosting?
DreamHost has four significant bundles which incorporate Shared Hosting, DreamHost VPS facilitating, DreamHost Dedicated Server facilitating administrations, and DreamPress 2 Hosting mostly for WordPress sites and online journals.IT Support Company We should quickly investigate the four distinctive facilitating bundles accessible for you as a website admin.
Mutual Hosting: $7.95
DreamHost shared facilitating begins at $7.95 month to month (whenever charged every third cycle). It has the accompanying highlights:
Boundless transmission capacity every month
Boundless circle space
1 free area
Facilitated on Solid State Drives (SSDs)
Boundless areas facilitating
Boundless MySQL 5 information bases
Boundless email accounts
Debian Linux working framework
97 Day unconditional promise
DreamHost VPS: $15 to $120
The DreamHost VPS DreamVPS facilitating cost from $15 to $200 month to month. The VPS facilitating bundle is useful for internet business, Business, engineers, and originators. The bundle accompanies some significant highlights among which are:
Exclusively Built Control Panel
Adaptable Up to 8GB of RAM
From 30GB to 240GB SSD stockpiling
Boundless SSH/SFTP/FTP/Full shell clients
Boundless MySQL 5 information bases
Boundless spaces facilitating
Boundless email accounts
Ubuntu 12.04 LTS
Debian Linux working framework
DreamHost Dedicated Server facilitating: $109 to $249
The DreamHost devoted worker facilitating contain six bundles, and they incorporate the accompanying:
New Moon 2: $109 month to month. The highlights incorporate 2GB RAM, 500GB Disk, and Desktop grade CPU.
Half Moon 2: $129 month to month. The highlights are 2GB RAM, 500GB plate space, and Server grade CPU.
Half Moon 4: $139 month to month. It accompanies the accompanying highlights: 4GB RAM, 500GB Disk space, and Server grade CPU.
Blue Moon 4: $169 month to month. Its highlights incorporate 4GB RAM, 500GB Disk space, 1 RAID, and Server grade CPU
Blue Moon 8: $209 month to month. It accompanies the accompanying highlights: 8GB RAM, 1TB Disk space, 1 RAID, and Server grade CPU
Blue Moon 16: $249 month to month. Its highlights are 16GB RAM, 1TB Disk space, 1 RAID, and Server grade CPU
Aside from the individual bundles recorded over, all devoted worker facilitating bundles have the highlights recorded for the VPS facilitating above. Get quality facilitating for your site right currently by buying in to one of the devoted worker facilitating bundles.
DreamPress 2 (Managed WordPress Hosting): $16.95
The DreamPress 2 is a bundle that is explicitly implied for facilitating WordPress sites or sites. Also, it is the quickest and most solid approach to do as such. It goes for $16. The highlights of this bundle are:
Facilitated on Virtual private Servers (VPS)
Improved WordPress Installation
30GB of SSDs stockpiling
PHP 5.6 with OPcache and Optional HHVM
Programmed WordPress Install and Core Updates
Utilize any WordPress Theme or Plugin
all day, every day WordPress Ninja Support.
More DreamHost Features
Simple to explore control board: DreamHost VPS and Dedicated worker facilitating or some other of their facilitating bundles have a control board that is anything but difficult to explore by clients, making it very simple to design and survey alternatives to your administration, and furthermore deal with your facilitating account with no issue.
Programmed Updates: In request to shield you from all types of security chances, DreamHost utilizes the most recent stable adaptation of WordPress to stay up with the latest.
Boundless E-sends: You can make the same number of email addresses as you wish for your record. You can likewise utilize their new atmail web customer to access and read your messages.
Unshakable security: DreamHost makes your site/blog security involves main concern. They utilize a WordPress-explicit firewall to obstruct savage power assault and different types of weaknesses.
Online business Ready: DreamPress 2 offers you a private IP address. A mix of the private IP address, free Let's Encrypt declaration, and the eCommerce module prepares your site for eCommerce.
Simple Installation: DreamHost has a speedy establishment of bundles like WordPress, Joomla, eCommerce, Moodle, Wikis, phpBB, Drupal and client discussions.
Astounding Bandwidth: There is in every case enough data transmission to deal with the traffic spike from your site at whatever point you run a giveaway or challenge.
My take:
DreamHost has solid and powerful bundles. DreamHost VPS, DreamPress 2 and the DreamHost devoted Servers facilitating are totally trusted and ready to convey on a guarantee. The bundles are useful for designers and financial specialists. Backing is incredible and accessible every minute of every day aside from the way that phone uphold is deficient. I would encourage you to likewise do a touch of examination with different audits before making your buy. All things considered, in the event that you decided to go for their bundle, visit their site and get more point by point data with respect to their items.
Professionals
A few facilitating bundles to look over.
A free 2-week preliminary.
Boundless areas per facilitating plan.
97-day unconditional promise.
Cons
Facilitating bundles are somewhat costly.
Backing is delayed to react to tickets.
cPanel is somewhat hard to comprehend.
No telephone uphold
DreamHost Affiliate Program
Aside from the DreamHost VPS, DreamPress 2 and the DreamHost Dedicated Server facilitating, there are unique projects that Dreamhost plans for the individuals who are keen on utilizing their administrations to bring in cash. They permit you to join their partner program for nothing and bring in cash as you allude clients to them. You make $97 in the event that you allude a client for every month (in the event that they pay for DreamHost Dedicated Server facilitating). In the event that you can proceed with that for an entire year, you win an aggregate of $1,164. You don't need to claim a facilitating account before taking an interest in the subsidiary program.
Notwithstanding, if the client purchases a Shared facilitating plan, you win a one-time installment of $30. The VPS additionally acquires you $30 while the DreamPress 2 procures you $50. Note that the repetitive associate installment has been halted since February 16, 2016. For the partner to be equipped for installment, the alluded client must keep up a functioning record for the free time for testing and/or unconditional promise periods appropriate. In the event that the client drops his facilitating plan, gets a discount or gets suspended, the subsidiary loses his partner reward. You will be paid after the 97-day holding period.
When you are enrolled for their associate program, they will give you limited time materials like standards, subsidiary connections, and so on which you will put on your site/blog. In the event that any of your site guests taps on the connections to buy a facilitating bundle, you will be paid a commission in light of the fact that the deals came through your site.
It is very simple to make deals by educating your webpage clients regarding the DreamHost VPS administration or the DreamHost Dedicated Servers facilitating, all in light of the fact that many individuals are searching for where to get those administrations on the web. Since DreamHost is a believed web facilitating specialist organization, it is simpler to persuade your perusers to visit and purchase facilitating bundles from their website.
1 note
·
View note
Text
Welcome to this guide on how to run Ghost CMS in Docker Containers. Ghost CMS is an open-source content management system. It is used to create professional and awesome-looking online blogs. It is built on modern Node.js technology to provide the required power, flexibility, and performance. Ghost was created by John O’Nolan and Hannah Wolfe in 2013. John O’Nolan, one of the core contributors of WordPress watched as the platform became complicated over time and decided to kickstart the Ghost project. With time, it grew in popularity as the demand for open-source CMS became evident. Currently, it is used in production by companies such as Apple, DuckDuckGo, Sky News, OpenAI, Square, Bitcoin Foundation, Tinder, Mozilla e.t.c Ghost is preferred over other tools due to the following: Independent structure – It is structured as a non-profit organisation to ensure it can legally never be sold and will always remain independent, building products based on the needs of its users Distributed team – There are open source contributors to work on Ghost full-time, and we do this entirely remotely. The core Ghost team is fully distributed and live wherever they choose. Unconditional open source – Projects are released under the permissive open source MIT licence, so that even if the company were to fail, our code could still be picked up and carried on by anyone in the world without restriction. The amazing features associated with Ghost CMS are: Custom themes – It ships with a simple Handlebars.js front-end theme layer which is very straightforward to work with and surprisingly powerful. The Ghost Theme Marketplace provides a selection of pre-made third-party themes which can be installed with ease Apps & integrations – It is built as a JSON API, has webhooks, and gives you full control over the front-end: It essentially integrates with absolutely everything. Search engine optimisation – It comes with a world-class SEO and everything you need to ensure that your content shows up in search indexes quickly and consistently. Rich editor – It has has the richest editor that every writer wants, but under the hood it delivers far more power than you would expect. All content is stored in a standardised JSON-based document storage format called MobileDoc, which includes support for extensible rich media objects called Cards. Roles & permissions – It allows one set up the site with sensible user roles and permissions built-in from the start. These include; Contributors, Editors, Administrators, Authors, and Owner This guide will help you deploy Ghost CMS in Docker Containers. Docker makes it easy to set up Ghost CMS since all the Ghost dependencies are encapsulated and the deployment kept self-contained. Before you Begin. You will need the following for this guide. A fully Qualified Domain name.(For SSL certificates) Docker and Docker-compose You also need to update your system and install the required packages: ## On Debian/Ubuntu sudo apt update && sudo apt upgrade sudo apt install curl vim git ## On RHEL/CentOS/RockyLinux 8 sudo yum -y update sudo yum -y install curl vim git ## On Fedora sudo dnf update sudo dnf -y install curl vim git 1. Install Docker and Docker Compose on Linux For this guide, you need the Docker engine installed. This can be achieved using the dedicated guide below: How To Install Docker CE on Linux Systems Once installed, add your system user to the docker group. sudo usermod -aG docker $USER newgrp docker With docker successfully installed, proceed and install Docker-Compose using the aid from the guide below: How To Install Docker Compose on Linux Ensure that the Docker engine is up and running: sudo systemctl start docker && sudo systemctl enable docker 2. Provision the Ghost CMS Container. The Ghost CMS deployment file contains 3 parts: Ghost CMS Database(MySQL) for data storage Web server(Nginx) for reverse proxy
Now create the docker-compose file. mkdir ghost && cd ghost vim docker-compose.yml In the file, add the below content and replace the domain name and the database root password appropriately. version: '3' services: ghost: image: ghost:latest restart: always depends_on: - db environment: url: https://blog.computingpost.com database__client: mysql database__connection__host: db database__connection__user: root database__connection__password: StrongDBPassword database__connection__database: ghost volumes: - /opt/ghost_content:/var/lib/ghost/content db: image: mysql:8.0 restart: always environment: MYSQL_ROOT_PASSWORD: StrongDBPassword volumes: - /opt/ghost_mysql:/var/lib/mysql nginx: build: context: ./nginx dockerfile: Dockerfile restart: always depends_on: - ghost ports: - "80:80" - "443:443" volumes: - /etc/letsencrypt/:/etc/letsencrypt/ - /opt/ghost_nginx:/etc/nginx/conf.d/ 3. Create Persistent Volumes We have several volumes defined in the YAML file. These volumes will be used to persist data for Ghost, MySQL, and Nginx. Create the 3 directories as below. sudo mkdir /opt/ghost_content sudo mkdir /opt/ghost_mysql sudo mkdir /opt/ghost_nginx Set the right permissions: sudo chmod 777 /opt/ghost_content sudo chmod 777 /opt/ghost_mysql sudo chmod 777 /opt/ghost_nginx For RHEL-based systems, set SELinux in permissive mode for the paths to be accessible. sudo setenforce 0 sudo sed -i 's/^SELINUX=.*/SELINUX=permissive/g' /etc/selinux/config 4. Create the NGINX Docker Image The Ghost deployment depends on the customized NGINX image. This image will contain customized server block settings. First issue SSL certificates for your domain name using Let’s Encrypt. The required packages can be installed using the commands: ##On RHEL 8/CentOS/Rocky Linux 8/Fedora sudo dnf install https://dl.fedoraproject.org/pub/epel/epel-release-latest-8.noarch.rpm sudo dnf install certbot python3-certbot-nginx ##On Debian/Ubuntu sudo apt install certbot python3-certbot-nginx Stop nginx service sudo systemctl stop nginx sudo systemctl disable nginx Once installed, issue the SSL certificate using the command: sudo certbot certonly --standalone -d blog.computingpost.com After executing the above command successfully, you will have the generated certificates saved at /etc/letsencrypt/live/blog.computingpost.com/ $ ls -1 /etc/letsencrypt/live/blog.computingpost.com README cert.pem chain.pem fullchain.pem privkey.pem Now create a default.conf file in the same nginx directory. sudo vim /opt/ghost_nginx/default.conf The file will; have the below content: server listen 80; listen [::]:80; server_name blog.computingpost.com; # Useful for Let's Encrypt location /.well-known/acme-challenge/ root /opt/ghost_nginx; allow all; location / return 301 https://$host$request_uri; server listen 443 ssl http2; listen [::]:443 ssl http2; server_name blog.computingpost.com; ssl_protocols TLSv1.2; ssl_ciphers HIGH:!MEDIUM:!LOW:!aNULL:!NULL:!SHA; ssl_prefer_server_ciphers on; ssl_session_cache shared:SSL:10m; ssl_certificate /etc/letsencrypt/live/blog.computingpost.com/fullchain.pem; ssl_certificate_key /etc/letsencrypt/live/blog.computingpost.com/privkey.pem; location / proxy_set_header Host $host; proxy_set_header X-Real-IP $remote_addr; proxy_set_header X-Forwarded-Proto https; proxy_pass http://ghost:2368; Don’t forget to replace blog.computingpost.com with your correct Ghost CMS domain name. 5. Run Ghost CMS in Docker Containers. With everything provisioned, we are set to run the containers. We will use the single command below to spin the containers: docker-compose up -d Sample Output: [+] Running 22/22 ⠿ ghost Pulled
14.4s ⠿ ae13dd578326 Pull complete 4.0s ⠿ a0bc29d3bc64 Pull complete 4.1s ⠿ 54a71a1d6cc6 Pull complete 5.4s ⠿ fa5afd073302 Pull complete 5.6s ⠿ 5878f59eaa39 Pull complete 5.7s ⠿ 753aec878444 Pull complete 5.8s ⠿ 4e282a0a2747 Pull complete 7.4s ⠿ 6128fb86f0f4 Pull complete 12.1s ⠿ 509f7cfac26d Pull complete 12.2s ⠿ db Pulled 8.6s ⠿ a4b007099961 Pull complete 1.5s ⠿ e2b610d88fd9 Pull complete 1.5s ⠿ 38567843b438 Pull complete 1.7s ⠿ 5fc423bf9558 Pull complete 1.7s ⠿ aa8241dfe828 Pull complete 1.8s ⠿ cc662311610e Pull complete 2.4s ⠿ 9832d1192cf2 Pull complete 2.5s ⠿ 3f242378e320 Pull complete 2.5s ⠿ cc65503c0186 Pull complete 6.2s ⠿ ce8944d50437 Pull complete 6.3s ⠿ 597d59a9a424 Pull complete 6.4s Sending build context to Docker daemon 609B Step 1/2 : FROM nginx:latest Once started, verify if the containers are running correctly. $ docker ps CONTAINER ID IMAGE COMMAND CREATED STATUS PORTS NAMES 108f6be14df0 ghost_nginx "/docker-entrypoint.…" 8 seconds ago Up 7 seconds 0.0.0.0:80->80/tcp, :::80->80/tcp, 0.0.0.0:443->443/tcp, :::443->443/tcp ghost-nginx-1 2c8ed0b4a2c1 ghost:latest "docker-entrypoint.s…" 8 seconds ago Restarting (2) Less than a second ago ghost-ghost-1 750987dc3f70 mysql:8.0 "docker-entrypoint.s…" 8 seconds ago Up 7 seconds 3306/tcp, 33060/tcp ghost-db-1
6. Access the Ghost CMS web UI Now we can proceed and access the Ghost CMS interface using the URL https://domain_name/ghost Create an account, provide the required user and password credentials. You also need to set the blog title. Now in the Ghost Admin tab, you can create your new blog as below. You can as well make configurations such as the site’s theme e.t.c. Write the content in the new blog and publish it. Once published, you can view the blog as below. You can also manage the blogs in the below dashboard. Make more settings for your site in the settings tab. 7. Manage the Ghost CMS containers. Since we assigned the restart: always flag in the YAML, you do not need to manually start the containers on system reboot. To update Ghost, use the commands below. docker-compose down docker-compose pull && docker-compose up -d To renew your Let’s Encrypt Certificate, you need to create a Cron Job as below. sudo crontab -e Add the below line replacing where required. 0 23 * * * certbot certonly -n --webroot -w /opt/ghost_nginx -d blog.computingpost.com --deploy-hook='docker exec ghost_nginx_1 nginx -s reload' You can as well test the job using the dry run command below: sudo bash -c "certbot certonly -n --webroot -w /opt/ghost_nginx -d blog.computingpost.com --deploy-hook='docker exec ghost_nginx_1 nginx -s reload'" If the certificate hasn’t expired, you will get this output: Saving debug log to /var/log/letsencrypt/letsencrypt.log Certificate not yet due for renewal - - - - - - - - - - - - - - - - - - - - - - - - - - - - - - - - - - - - - - - - Certificate not yet due for renewal; no action taken. - - - - - - - - - - - - - - - - - - - - - - - - - - - - - - - - - - - - - - - - Closing Thoughts. We have successfully gone through how to run Ghost CMS in Docker Containers. Now proceed and create professional online blogs with Ghost. Feel free to share any feedback in the comments.
0 notes
Text
Imageoptim linux

IMAGEOPTIM LINUX INSTALL
IMAGEOPTIM LINUX UPDATE
IMAGEOPTIM LINUX MANUAL
IMAGEOPTIM LINUX SOFTWARE
What is the best image format for websites?.
What is the best image optimizer for WordPress?.
How do I optimize photos on my computer?.
Use the Adwaita theme by default on Windows as the Windows10 GTK theme.
Image previews now honor the JPEG orientation EXIF tag.
Fix image previews: no more ugly thumbnails with indexed images.
Do not allow to remove images with the key while an.
Multiselection: Multiple files can now be selected and their parameters can.
Allow to resize images (downscale only, preserve ratio).
Do not optimize again images that have already been optimized.
Display a "Canceled" status on non-optimized image while the "Stop".
The "Stop" button now stops the running optimizations and not only the.
"Optimize" and "Stop" buttons behaviour improved:.
Setting the default output locations / name or pattern of output files.
Number of threads used to optimize images.
Theme selection / dark theme preference.
YOGA can no more output a PNG larger than the input one when performing.
JPEG optimization improved: up to 7.3 % of additional size reduction.
Fix the abnormal amount of processes created (and not cleaned) when.
(changes on master but not released yet):.
IMAGEOPTIM LINUX INSTALL
On Debian / Ubuntu, they can be installed with the following command: sudo apt install gettext NOTE: you will need to have xgettext, msgmerge and msgfmt executable installed on your system to run the above commands. To compile locales, run: nox -session locales_compile
IMAGEOPTIM LINUX UPDATE
To extract messages and update locales run: nox -session locales_update You can also fix automatically coding style errors with: nox -s black_fix To run the tests only for a specific Python version, you can use following commands (the corresponding Python interpreter must be installed on your machine): nox -session test-3.7 Then you can check for lint error: nox -session lint You will first have to install nox: pip3 install nox Do not forget to add your name as the translation of the translator-credits key (one name per line, e-mail is optional): #: yoga_image_optimizer/about_dialog.py:38 To translate YOGA Image Optimizer, you can submit your translations using a Pull Request on Github.
IMAGEOPTIM LINUX SOFTWARE
If the software is not available in your language, you can help translating it. Flake8 and Black are used on this project to enforce coding style. Please note that your code must pass tests and follow the coding style defined by the pep8. This is of course not necessary if you just want to fix some typo or small errors in the code. This will allow us to discuss the best way to do it. Please consider filing a bug before starting to work on a new feature.
All the logs and message outputted by the software,.
What is your operating system / Linux distribution (and its version),.
If you found a bug, please open an issue on Github with as much information as possible:
or ask on Discord (I am not always available for chatting but I try to answer to everyone).
You can also pass some image files to open: yoga-image-optimizer image1.png image2.jpeg To run YOGA Image Optimizer, just type the following command: yoga-image-optimizer zip version or the Windows installer from the release page: You will not be able to run the software from your graphical app menu (GNOME Shell.). NOTE: Installing from PyPI will not install. Then install YOGA Image Optimizer using pip: sudo pip3 install yoga-image-optimizer
IMAGEOPTIM LINUX MANUAL
įinally, you can install desktop file, icons and manual using the following command: sudo. Then install YOGA Image Optimizer using pip: sudo pip3 install. Then clone this repository and navigate to it: git clone On Debian and Ubuntu this can be achieved with the following command: sudo apt install git build-essential python3 python3-dev python3-pip libgirepository1.0-dev libcairo2-dev pkg-config gir1.2-gtk-3.0 This is currently the simplest way to install YOGA Image Optimizer on all major Linux distributions:įirst, you will need to install some dependencies on your system. The package is available on AUR ( yoga-image-optimizer):Ī Flatpak package is available on Flathub.
0 notes
Text
How To Change Mouse Cursor On Ubuntu
How To Change Mouse Cursor On Ubuntu
After writing about Linux cursor topic Phinger A few people have asked me if I have a guide on how to change the cursor theme in Ubuntu. I didn’t, so I thought I’d write one. So here is a quick tutorial that shows you how to change cursor theme on ubuntu 20.04 LTS (and above) and how to install cursor themes available for download from sites such as GNOME Look and Github. Next, to help you put…

View On WordPress
0 notes
Text
How to install Bagisto on Ubuntu 20.04
How to install Bagisto on Ubuntu 20.04
Bagisto is a free and open source e-commerce platform. It is based on various open source technologies such as Laravel (PHP framework) and Vue.js. Bagisto enables merchants to start their own shopping cart system with a variety of fully controllable functions. Features include a multistore inventory system, order management, customer cart, product rating, wish list, theme, CMS pages, responsive,…
View On WordPress
0 notes
Text
Intex Pc Camera Driver It 305wc For Windows 10
Intex IT-105 Webcam Driver for XP. Intex IT-305WC Webcam Driver for XP 16,415. Windows Server 2016, Windows 10 64 bit, Windows 10, Windows. These Intex USB Drivers work on 64-bit and 32-bit Windows 7, Windows 10, Windows XP, and Windows 8/8.1 operating system. Now, you can easily connect your phone to PC, and transfer files, take a backup or restore, synchronize contacts, and flash Intex stock firmware.
Intex Web Camera Driver It-305wc Free Download Windows 10
Intex Pc Camera Driver It 305wc For Windows 10 Windows 7
Intex Pc Camera Driver It 305wc For Windows 10 64
Intex Pc Camera Driver It 305wc For Windows 10 64-bit
Access Introduction Fluid Power
Intex Camera Free Driver Download
Domain Name Speed
Prof Ian Shipsey
Intex Pc Webcam Night Vision
Linux Soundcard Drivers
INTEX IT 305WC WEBCAM DRIVER INFO:
Type:DriverFile Name:intex_it_5780.zipFile Size:5.0 MBRating:
4.95
Downloads:122Supported systems:Windows 2008, Windows XP, Windows Vista, Windows 7/8/10Price:Free* (*Free Registration Required)
INTEX IT 305WC WEBCAM DRIVER (intex_it_5780.zip)
Also this website is in manual with your computer. The webcam softeware designed to help you capture streaming video and audio or snapshots with the hotkey. Favorite wavs but my problem is back and amongst. Irda. Download Megaliths, Myths and Men, PC Windows 7 or newer.
OpenSSL upgraded to version openssl The one major issue I have is the audio in the Linux Ubuntu guest. However the techniques used to patch IDM varies. Linux users, but there a little. The InTex MP3 Converter is the ideal tool to convert batches wav file format to the mp3 file format to listen to your favorite wavs but in the smaller mp3 format with your cool mp3 player or PocketPC. Intex camera it-305wc to the valve packaging for further instructions intex camera it-305wc part numbers. Irda. Windows Vista icons differ from Windows XP-style icons in the following ways Lsc Cpsy Purdue Univ Introduction.
Typically, however, to get close to this kind of increase in speed, a little. It is highly recommended to always use the most recent driver version available. Giochi per Nintendo DS del professor Layton in Services. Buy INTEX IT-306 WC PC Webcam Night Vision online at low price in India on. Intex tv tuner card driver download windows 7 Driver for intex it wc.
Particle acceleration at astronomical and laboratory shocks by Dr Brian Reville. Interlink s technologies and capabilities are multi-market. This is my PC Windows Driver intex it to the hotkey. Prof Ian Shipsey, University cameraa Oxford, Results 1 48 of Hello, Here is my first package, This webcam comes 5 megapixel with CMOS sensor.

Instalacija kamere ili kamere bez cd instalater Video.Windows Vista icons in IDM varies.Namestitev webcam brez cd monter video tutorial.We are talking about the full version of Skype, ie, the full installer.INTEX IT-305WC KAMERA DRIVER, Get Drivers From Sweden.Homepage Webcam Driver Intex Night Vision 500K IT-305WC Driver Download.ToduDealz todudealz on Pinterest.Torch Browser is a chromium-based browser used for finding and securely downloading multimedia files.Inthecrack 012 intex pc webcam it 104wc driveriphonerar.Linux Soundcard Drivers, a brief guide for users and developers, Weather you use Internet for entertainment or work, Internet speed.
Not only that, free Internet Speed up can increase the performance of your. If you already installed a previous version of this driver, we recommend upgrading to the last version, so you can enjoy newly added functionalities or fix bugs from older versions. When a card is made default by your Linux OS and you don t want it to be, it can. Magee Released a new free WordPress theme Torch recently.
Domain Name Speed.
Intex it-305wc, it-306 Free Driver Download. For Classic Mode, the full set is 16 16, 24 24, 32 32, 48 48 and 64x Free and instant download. FreeKaaMaal is the place to discover amazing Deals, Offers and freebies curated by our community of 305wc intex out Intex PC Webcam Night Vision K ITWC reviews, ratings, features, specifications and browse more Intex products online at best prices on. With the purchase of my latest computer, installing Linux turned into a. Windows 7 start menu is back and it's better than ever. Also this website without consent will be alarmed about. But when i have the driver download speed.
I have is there a workaround. Can anyone help me regarding webcam drivers for INTEX IT-305WC I have tried to install the driver CD. Learn and Check how to increase download speed, Domain Name Speed. Installing the mp3 format to the audio in IDM varies.
For Intex IT-305WC Night Vision webcam users, this situation is worrying but there is nothing to be alarmed about. This issue can be solved easily by downloading. This webcam comes 5 megapixel with CMOS sensor. HDA-Intel sound card which webcam is intez. Even though other OSes might be compatible as well, we do not recommend applying this release on platforms other than the ones. Also this project suggests which is a simple and channels. Can anyone help you are multi-market.
PC Windows Driver.
Driver intex it0305wc intex it102 wc intex it102seb intex it102wc intex it103 intex it103 wc blk intex it103wc intex it103wc webcam intex it104wc intex. Microsoft Publisher latest version, Choose from hundreds of icons, or bring in your own straight from your computer. Giochi per Nintendo DS del professor Layton in use Internet speed. Also this driver download download site. Intex IT-305WC webcam not working on the computer. Access Introduction to Fluid Power 1st Edition solutions now.
USB Wireless LAN ULC25, INTEX Technologies.
Do i have to return the webcam or is there a workaround. Wmv, specifications and developers, it s static. The InTex MP3 Converter is intez. GPSMAP 60CS USB. If you are looking for the book Introductory astronomy lab manual with. It's very powerfull and flexible tool, you can choose from a multitude of bit rates, sampling rates and channels. The webcam in manual and it's better than ever need. Il Licence , Gratuit OS Voici le driver vista pour la Intex Camera Free Driver Download , Keep your Intex Camera drivers up to date with the world's most popular driver download site.
Present with confidence using the RemotePoint Global Iit-305wc. Nishat Bhagat Replied on June 23, Thanks for your feedback, it helps us improve the site. Intex Pc Webcam Night Vision 600k IT-305WC For example, my PC has an Intel sound chip, and amongst. Check out INTEX IT-306 WC PC Webcam Night Vision reviews, ratings, features, specifications and browse more Intex products online at best prices on.
I think that, my problem is nothing to install webcam. But when you use Internet for the driver CD. INTEX IT-305WC VISTA DRIVER DOWNLOAD - Thanx for your interest and answer, but i've been tried those drivers and don't work I think that is something special for this operating system! This project, v4lx-devinfo provides detailed v4l device information provided you have already working driver for your webcam. But when you re in the monochromatic.

It is the audio in use Internet speed. Codec, features, patent applied searching system! For trial subscriptions, see Cancel your free trial of. And best prices on the camera being the internet. Sometimes, the driver of the webcam may be lost even if the webcam is in use. For AVI, you can define the file format, codec, video size, audio source, sample rate, channel, resolution, and bitrate.
Torch Browser is a feature rich web browser with lots of. Select Windows Vista sp2 Click Apply and OK. Did you contact the camera manufacturer? Fluid Power 1st Edition solutions now.
Shop from the world s largest selection and best deals for Torch Fishing. Drivers for intex it-305wc free download >>> Drivers for intex it-305wc free download Drivers for intex it-305wc free download It supply thousands of abundant effects when you video chat with your friends. Also this question on a popular driver download. InTex MP3 Converter is one of the most powerful conversion tools on the internet. Copying posted picture of item, details, patent applied searching system or any material from this website without consent will be punished to the full extent of the law. Driver lanier 7502 Windows 7 64bit. Intex webcam itwc driver download for windows 7.
Got his master intel sound chip, codec, click on. Drivers for your own straight from older versions. Where I am going to download Intex IT-305WC webcam driver and how to install webcam in Centos? Prof Ian Shipsey, patent applied searching system or newer. Select Windows 7 Ultimate x Thermometer whatever will ever need. To achieve a new functions, free download.
Super Webcam Recorder is a simple and professional webcam video recording software. Giochi per Nintendo DS del professor Layton in italiano, Once you re in your Task Manager s menu, click on the Performance tab. A free Adobe Creative This Patch is brought by DAS, but we. Access Introduction to increase download site. You can save video to avi, wmv, mp4, divx, xvid format. The secret trick golfers don t want you to know!
INTEX Webcam Night Vision Download
INTEX Webcam Night Vision
INTEX Night Vision
INTEX CAMERA IT 305WC DRIVER DETAILS:
Type:DriverFile Name:intex_camera_4892.zipFile Size:3.8 MBRating:
4.99 (148)
Downloads:110Supported systems:Win2K,Vista,7,8,8.1,10 32/64 bitPrice:Free* (*Free Registration Required)
INTEX CAMERA IT 305WC DRIVER (intex_camera_4892.zip)
Website by downloading speed, free download mobile apps are. Explore essential drives for your mobiles, ringtones, wallpapers etc. TM. For an intex web camera of any model, download the driver link from the company website by selecting the model of your web camera and clicking on download. If you use internet speed, windows system. Sometimes, the driver of the webcam may be lost even if the webcam is in use. The intex mp3 converter is the ideal tool to convert batches wav file format to the mp3 file format to listen to your favorite wavs but in the smaller mp3 format with your cool mp3 player or pocketpc.
Monitor their installed, the little known, software downloads. This issue can be solved easily by downloading the driver for the intex it-305wc night vision webcam.
Free intex night vision camera 500k it - 305wc for xpvista download, intex night vision camera 500k it - 305wc for xpvista 1.0. Where i am going to download intex it-305wc webcam driver and how to install webcam in centos? Intex intex web cam night vision k webcam - intex , anyway, alsa outputs to the the sound card driver, and is the last. Explore essential drives for use in my ut but still.

Intex Web Camera Driver It-305wc Free Download Windows 10
Menginstal webcam atau webcam tanpa cd installer Video.

While i don't advocate keygens or cracks, i've had some programs that. The intex webcam night vision 600k it-305wc webcam. Free intex webcam - night vision download, intex webcam - night vision 1.0. For example, for the it-305wc model of the intex web camera, one can follow the steps mentioned above. Typically, however, to get close to this kind of increase in speed, a little.
Intex Pc Camera Driver It 305wc For Windows 10 Windows 7
INTEX WEB CAMERA IT 305WC DRIVERS FOR WINDOWS.
When you run up2date to update redhat linux for the dell n machine, this. Release on the highest level of many industrial mechanics. At best prices on the installer. You have searched for packages that names contain torch-core-free in all suites, all sections, and all architectures. Description intex pc suite, intex pc suite with usb drivers free download is recently released and you can download the latest version of intex pc suite software. I installed the drivers from the cd that i received along with the webcam. Driverguide maintains an archive of intex camera drivers available for free download.
Camera intex it-305wc driver download - we are also looking, use an internet download manager to schedule large data downloads at. This download installs the intel extreme tuning utility intel xtu version 6.5.1.360, including platform support for the next-generation intel core processor family and the intel xeon w-3175x processor. It is nothing is a lifelong computer. It is a leading independent software vendor, add new technology.
Intex Pc Camera Driver It 305wc For Windows 10 64
Buy INTEX IT-306 WC PC Webcam.
This driver package provides the necessary installation files of intex it-305wc webcam driver for xp. Mobile, mac os and linux users can choose other download options by deselecting the installer checkbox below the download button. Driverguide maintains the most extensive database of windows drivers on the web. Intex it305wc camera driver download - these apps are amazing, interesting and easy to use. It-305wc, it-306 driver zc301h 303 .rar, 19.3. Even though it 305wc driver backup v. Os and excellence in conjunction with windows 7 compatibility mode.
Do i have to return the webcam or is there a workaround. It is truth that internet downloading speed depends upon isp but still. It-305wc, to always use the webcam. For example, download is the steps mentioned above. Texbase is event selectable, features include printable reports, detailed account history. Many people search how to increase internet speed, i ll share few. Did you contact the camera manufacturer? I had windows 7 in my computer at that time.
Mfp scanner. Intex web camera it 305wc you have found the right intex camera device driver, follow these simple instructions to install it. ETISALAT USB 3G. Inte x software update, fast and simple to apply!
In the classroom or on the jobsite, millwrights, industrial mechanics. Easily, for windows 7 compatibility mode. I don't advocate keygens or expand existing ones. If you already installed a previous version of this driver, we recommend upgrading to the last version, so you can enjoy newly added functionalities or fix bugs from older versions.
All software-updates are covered by your maintenance agreement. And how to schedule large data downloads at best prices on. Are also installed, industrial mechanics. Camera web night vision it-305wc driver - how to blacklist a sound card in linux. Intex it 305wc free driver f software pctuneup free driver backup v.5.0.2 pctuneup free driver backup is a free driver backup program that lets you copy and restore windows system drivers in case you need to reinstall your system.
The software-update of inte x can be applied easily, just download the new patch and run the installer. Need driver for intex itwc / windows 7 x64. It is highly recommended to always use the most recent driver version available. Name of sound card, i have a nice, clear image on my ut but no sound over hdmi. Intex webcam itwc driver download for windows 7.
I also looking, i have a previous version 6. It will then scan your computer and identify any problem drivers. Updating overwrite-installing may be compatible as a sound over hdmi. Update, free driver version 6. Camera web night vision it-305wc driver download - world's most popular driver download site. The software-update of completence and ceo of intex it-305wc webcam users. Check out intex it-306 wc pc webcam night vision reviews, ratings, features, specifications and browse more intex products online at best prices on. It is one can follow the download. Update, software, to the webcam last version 6.
Free driver for intex it 305wc, free free driver for intex it 305wc software downloads. Please help me someone with the most powerful program that. Please help me someone with that driver because i've been search a lot and didn't find anything.-> intex it-305wc for windows 7 x64 my system specs. Linux soundcard drivers, a brief guide for users and developers, weather you use internet for entertainment or work, internet speed. Download mobile apps to upload files from your phone or tablet.
I donno where to individually monitor. I am going to get the ones. Intex night vision webcam it-305wc full software. Intex it-305wc webcam not working on the computer. Little piece of your maintenance agreement. I donno where to prakashnarayana s post on.
Intex Pc Camera Driver It 305wc For Windows 10 64-bit
Need driver for intex it-305wc / windows 7 x64. Intex mp3 converter is one of the most powerful conversion tools on the internet. Camera intex it-305wc driver download - although linux has been supporting hd-audio since long time ago, there are. Uploaded on, downloaded 421 times, receiving a 94/100 rating by 232 users. This package contains the files needed for installing the intex webcam - night vision driver.
0 notes
Text
Best Premium URL Shortener Online Free Saas Business
What about turning the main instrument you use in your online business into a lucrative business?

Don’t have the foggiest idea of what I am discussing? At that point you haven’t watched our video on the main device you should begin utilizing in your business. In this article, I will tell you the best way to set up your premium URL shortener online free and transform it into a business that can get you a huge number of dollars each month.
What Is SAAS?
Content Summary
You without a doubt are utilizing Netflix to watch films, Grammarly to address your punctuation and spelling as you are composing, or L-ink.me to abbreviate and follow your connections. These are SAAS models.
SAAS; or programming as a help, is cloud-based assistance where as opposed to downloading programming to your work area PC or business organization to run and refresh, you rather access an application by means of a web program.
We will help you assemble a similar device as L-ink.me. Use it in your own business, or even beginning a lucrative Premium URL Shortener SAAS business on the web. On the off chance that you need to likewise make a blog, check our articles here and here.
Premium URL Shortener Setup
How about we start together figuring out how to assemble our Premium URL shortener.
Necessities
What are the prerequisites required for the arrangement?
Premium URL Shortener Script
VPS server
Domain Name
Custom Theme
Getting The Premium URL Shortener Content
The content we will use in this arrangement can be purchased by anybody. It costs simply 33$ to purchase this content and begin utilizing it in your own business.
Getting An Domain Name
An area name is pivotal. As for our situation, the area name we are utilizing is l-ink.me. You need to get an area name to use for your administration.
Space names can be purchased efficiently from beneath suppliers.
NameCheap
Domain.com
GoDaddy
Getting A VPS Worker
What Is A VPS Server?
At the point when you need to distribute a PHP site or content or any web application, we do what we call “web facilitating” which just methods transferring the documents and data set into a public worker so it very well may be accessibly Online over the web.
Where we will have our administration will be on a VPS worker. It is extremely prescribed to get a committed VPS worker to profit by the best exhibition for your administration.
Where you can get a VPS? From underneath obviously.
Contabo
Hostinger
Hostgator
For our situation, we will utilize Contabo as it gives the best offer however you can pick any supplier you feel good with.
Thus, we should start.
Note: In this instructional exercise: I will utilize Contabo
So Let’s perceive how we can get a VPS worker from Contabo.
Get a VPS Server From Contabo.
1: Open Contabo Website.
Open your internet browser and explore to Contabo VPS Page.
You will see various VPS design, to begin with. You can basically begin with the least expensive choice to Install WordPress, it will be all that anyone could need.
Later on, when you develop your business, you can scale up and get all the more remarkable VPS with Higher assets.
2: Set VPS Options
On the Next Page, you should choose a few choices
In the Operating System Option, Select Ubuntu 20.04
At that point in the Administration Panel, Select LAMP
Furthermore, last choice, In the Addons, check “Singular converse DNS”
In the event that you were elevated to enter the PTR record, enter your space name, and That’s it.
Presently, Just Continue to the charging page, and affirm your request. I think different advances are basic and clear as crystal.
In like 24 hours, Contabo Team will arrangement the Server and send the subtleties to your email this way:
Guide Domain Name to your VPS Server.
All right Friend, Now we have a Domain and a VPS Server. In any case, they are not associated!
Your VPS Server can be gotten to now through the IP address that Contabo Team sent you by email. obviously, we would prefer not to get to our WordPress site through an IP! We need to utilize our space name.
So essentially, we will plan the space name to our VPS IP, so then we access the VPS and the WordPress site through both the area and the IP.
Design your DNS Records:
Just open DNS the boarding zone in your Domain Provider (Godaddy for my situation) and alter the fundamental A record this way:
have: @ focuses: YOUR SERVER IP.
Transfer The Script Files To The Server.
To begin with, download the content from codecanyon.
Presently unfasten the document you download from the webpage. At that point transfer the main.zip inside to your worker.
To transfer the documents, you need an application called WinSCP.
It is a free apparatus and you can download it from here.
Associate with Your VPS Server utilizing WinSCP, and Update the PHP Files to the worker to this way: “/var/www/html”
By and large, the documents would be zipped, so we need to remove them.
Associate with your VPS worker utilizing any SSH customer like clay. furthermore, Let’s beginning!
Simply open Putty and enter the Server IP or Name, and Press Open.
It will ask you to login, simply enter “root” as the client, at that point enter your secret key which is shipped off you by email.
Note: while composing the secret key, clay will currently show it for security reasons, however, It’s there, simply type it!
Furthermore, you are In!
We should introduce the unfasten utility utilizing the accompanying order:
sudo well-suited get introduce unfasten
Clear clay screen to make in clean utilizing the accompanying order:
clear
Change index to/var/www/html utilizing the accompanying order:
disc/var/www/html
Unfasten the “.compress” document utilizing the accompanying order:
unfasten YOUR FILENAME*.zip
*Note: the document name might be diverse for your situation, so supplant YOUR FILENAME with your record name.
Presently, Move the most recent envelope substance to the upper index so it tends to be gotten to straightforwardly – > use WinSCP
Simply duplicate all the documents inside the “YOUR FILENAME” envelope and glue them straightforwardly in html organizer.
Documents Uploaded. Done!
Make a Database
Again to Putty SSH Client and Let’s make our data set utilizing the accompanying orders.
What’s decent, is that we have MySQL introduced as of now as a component of the LAMP Stack, however, we need to make a data set and a client for our application.
To begin, sign in to the MySQL root (managerial) account by giving this order:
mysql – u root – p
You will be provoked for the root secret phrase, simply compose or glue it and press Enter.
To begin with, make a different data set that your PHP application will utilize. You can call this anything you desire, yet we will utilize TestDb (you can utilize any name you need) in this manual for keep it straightforward. Make the data set by running this order:
Make DATABASE TestDb DEFAULT CHARACTER SET utf8 COLLATE utf8_unicode_ci;
Note: Every MySQL articulation should end in a semi-colon (;)
Then, we will make a different MySQL client account that we will utilize only to work on our new data set. Making one-work information bases and records is a smart thought from an administration and security angle. We will utilize the name DbUser in this guide. Don’t hesitate to change this on the off chance that you’d like.
We will make this record, set a secret key, and award admittance to the data set we made. We can do this by composing the accompanying order. Make sure to pick a solid secret word here for your information based client:
Make USER ‘DbUser’@’localhost’ IDENTIFIED BY ‘enter_a_custom_password_here’;
Award ALL ON TestDb.* TO ‘DbUser’@’localhost’;
You presently have an information base and client account, each made explicitly for Your PHP application. We need to flush the advantages so the current occurrence of MySQL thinks about the new changes we’ve made:
FLUSH PRIVILEGES;
Exit out of MySQL by composing:
EXIT;
Done!
Design the Premium URL Shortener
Since we have transferred the content to the worker and made the data set, the time has come to begin arranging our application.
Open any internet browser and add your space name in the location bar.
As should be obvious, we are on the top-notch URL shortener establishment page.
This will show you all the prerequisites required and what is as yet absent. Along these lines, how about we fix what is absent!
The main issue we see is the config_sample.php isn’t open. We should give the required advantages.
This record can be found in/var/www/html/incorporates/so open WinSCP and explore to the required registry.
Presently right-click on the document and set the authorization to 777 as demonstrated underneath.
Presently, we should fix the substance/envelope. Similarly, go to/var/www/html and right-click on the substance organizer and give the 777 authorizations similarly. Something more is to check the case beneath.
Presently invigorate the page and you can see that the issue has been settled. Nice.
Presently since all prerequisites are met, we can continue by squeezing this sentence. Sure!
Associate with the information base
The time has come to associate with our information base.
Simply fill in the required information for the host(localhost) dbname and the client you made with the secret phrase.
Presently make the design record.
Goodness! We have the beneath blunder.
How about we settle.
Go again to WinSCP, into/var/www/html/incorporates, and how about we rename the config_sample.php document to config.php.
Return to your internet browser, and presto, the information base is effectively imported!
From that point forward, simply enter your administrator subtleties and proceed.
At that point erase install.php.
Related Post: What is web hosting & How Is It Important In the year 2021
Furthermore, magnificent! Our application is introduced and is fit to be utilized.
To change your presentation page, you can utilize another topic. In our administration l-ink.me, we are utilizing a topic. You can look at it, yet this is absolutely discretionary.
We have something final to fix. Attempt to sign in to your application and you will get a mistake.
To fix this, duplicate beneath square to/and so forth/apache2/destinations empowered/000-default.conf record.
Open 000-default.conf then reorder the substance underneath into the record and save.
You can perceive how we did this in the underneath picture.
After this, simply restart the apache administration utilizing clay.
sudo systemctl restart apache2.service
Presently return to the site and invigorate the page. Attempt to sign in. Wonderful! Presently everything is working appropriately, and your application is prepared!
Secure Premium URL Shortener with a Free SSL.
SSL declarations are utilized inside web workers to scramble the traffic between the worker and customer, giving additional security to clients getting to your application. How about we Encrypt gives a simple method to get and introduce confided in authentications free of charge.
Associate with your Server utilizing the Putty SSH customer. furthermore, Let’s Start!
Stage 1 — Install the Let’s Encrypt Client
How about we Encrypt declarations are gotten by means of customer programming running on your worker. The authority customer is called Certbot.
To begin with, add the archive to introduce Certbot:
sudo add-adept archive PPA:certbot/certbot
You’ll have to press ENTER to acknowledge.
At that point, Update the bundle rundown to get the new vault’s bundle data:
sudo well-suited get an update
Introduce Certbot’s Apache bundle:
sudo well-suited introduce python-certbot-apache
Certbot is presently fit to be utilized.
Stage 2 — Set Up the SSL Certificate
Producing the SSL endorsement for Apache utilizing Certbot is very direct. The customer will naturally get and introduce another SSL endorsement that is legitimate for the spaces given as boundaries.
Essentially run the accompanying order: (change the space)
sudo certbot – apache – d YOUR_DOMAIN_NAME
You will be approached to give an email address to lost key recuperation and notification, and you can pick between empowering both HTTP and HTTPS access or constraining all solicitations to divert to HTTPS. It is typically most secure to require HTTPS except if you have a particular requirement for decoded HTTP traffic.
That is it!
Test your site now and it ought to be SSL scrambled.
Done!
Rundown
To summarize, all that you require:
Get a Domain Name.
Get a VPS Server.
Guide Server IP to Domain.
Transferring File to the Server utilizing WinSCP.
Make a MySQL Database For Your Application.
Overseeing MySQL Databases.
Whenever you have done the entirety of this, you will have your premium URL shortener administration ready for action. In the event that you incline toward watching this instructional exercise as a video, you can check it underneath.
0 notes
Video
youtube
How to Install OpenCart on Web Hosting Server I am using namecheap shared web hosting server.. My Namecheap Affiliate link https://bit.ly/NCWPHosting OpenCart Demo, OpenCart Installation, OpenCart Tutorial, Install OpenCart on Server, how to install opencart on localhost install opencart ubuntu how to install opencart on cpanel install opencart on windows 10 install opencart linux how to install opencart theme opencart tutorial install opencart via ftp =============================== Fast & Reliable Hosting for Wordpress & Drupal https://ift.tt/2Rssi7Q Get Your $100 to Try for 6 months https://bit.ly/wpCloudHosting My Favorite SEO & SMO Tools https://ift.tt/2JYtfAM https://bit.ly/Best-SEO-Tool Premium SEO Tools at Cheaper Prices http://bit.ly/GroupSEOtools These are my favorite tools that I use to find easy to rank keywords, spy my competitors, and host my affiliate websites for speedy page load. These are my affiliate links with extra cost to you, however I get commission when you subscribe to them. Thanks..:) Please Donate to Support me Keep Making Videos.. https://ift.tt/3097Uwi ================================ by TubeMint
0 notes
Text
How to Install Papirus Icon Theme on Ubuntu 20.04
How to Install Papirus Icon Theme on Ubuntu 20.04

Ubuntu is a Debian based operating system that has become one of the most popular Linux distributions available for desktop. Since it has a Linux kernel at its core, it follows the same code of conduct and public license as that of Linux and thus, is completely free to use and users are free to run, copy, distribute and develop its software. This makes it an extremely reliable and secure…
View On WordPress
0 notes
Text
Continuous Deployments for WordPress Using GitHub Actions
Continuous Integration (CI) workflows are considered a best practice these days. As in, you work with your version control system (Git), and as you do, CI is doing work for you like running tests, sending notifications, and deploying code. That last part is called Continuous Deployment (CD). But shipping code to a production server often requires paid services. With GitHub Actions, Continuous Deployment is free for everyone. Let’s explore how to set that up.
DevOps is for everyone
As a front-end developer, continuous deployment workflows used to be exciting, but mysterious to me. I remember numerous times being scared to touch deployment configurations. I defaulted to the easy route instead — usually having someone else set it up and maintain it, or manual copying and pasting things in a worst-case scenario.
As soon as I understood the basics of rsync, CD finally became tangible to me. With the following GitHub Action workflow, you do not need to be a DevOps specialist; but you’ll still have the tools at hand to set up best practice deployment workflows.
The basics of a Continuous Deployment workflow
So what’s the deal, how does this work? It all starts with CI, which means that you commit code to a shared remote repository, like GitHub, and every push to it will run automated tasks on a remote server. Those tasks could include test and build processes, like linting, concatenation, minification and image optimization, among others.
CD also delivers code to a production website server. That may happen by copying the verified and built code and placing it on the server via FTP, SSH, or by shipping containers to an infrastructure. While every shared hosting package has FTP access, it’s rather unreliable and slow to send many files to a server. And while shipping application containers is a safe way to release complex applications, the infrastructure and setup can be rather complex as well. Deploying code via SSH though is fast, safe and flexible. Plus, it’s supported by many hosting packages.
How to deploy with rsync
An easy and efficient way to ship files to a server via SSH is rsync, a utility tool to sync files between a source and destination folder, drive or computer. It will only synchronize those files which have changed or don’t already exist at the destination. As it became a standard tool on popular Linux distributions, chances are high you don’t even need to install it.
The most basic operation is as easy as calling rsync SRC DEST to sync files from one directory to another one. However, there are a couple of options you want to consider:
-c compares file changes by checksum, not modification time
-h outputs numbers in a more human readable format
-a retains file attributes and permissions and recursively copies files and directories
-v shows status output
--delete deletes files from the destination that aren’t found in the source (anymore)
--exclude prevents syncing specified files like the .git directory and node_modules
And finally, you want to send the files to a remote server, which makes the full command look like this:
rsync -chav --delete --exclude /.git/ --exclude /node_modules/ ./ [email protected]:/mydir
You could run that command from your local computer to deploy to any live server. But how cool would it be if it was running in a controlled environment from a clean state? Right, that’s what you’re here for. Let’s move on with that.
Create a GitHub Actions workflow
With GitHub Actions you can configure workflows to run on any GitHub event. While there is a marketplace for GitHub Actions, we don’t need any of them but will build our own workflow.
To get started, go to the “Actions” tab of your repository and click “Set up a workflow yourself.” This will open the workflow editor with a .yaml template that will be committed to the .github/workflows directory of your repository.

When saved, the workflow checks out your repo code and runs some echo commands. name helps follow the status and results later. run contains the shell commands you want to run in each step.
Define a deployment trigger
Theoretically, every commit to the master branch should be production-ready. However, reality teaches you that you need to test results on the production server after deployment as well and you need to schedule that. We at bleech consider it a best practice to only deploy on workdays — except Fridays and only before 4:00 pm — to make sure we have time to roll back or fix issues during business hours if anything goes wrong.
An easy way to get manual-level control is to set up a branch just for triggering deployments. That way, you can specifically merge your master branch into it whenever you are ready. Call that branch production, let everyone on your team know pushes to that branch are only allowed from the master branch and tell them to do it like this:
git push origin master:production
Here’s how to change your workflow trigger to only run on pushes to that production branch:
name: Deployment on: push: branches: [ production ]
Build and verify the theme
I’ll assume you’re using Flynt, our WordPress starter theme, which comes with dependency management via Composer and npm as well as a preconfigured build process. If you’re using a different theme, the build process is likely to be similar, but might need adjustments. And if you’re checking in the built assets to your repository, you can skip all steps except the checkout command.
For our example, let’s make sure that node is executed in the required version and that dependencies are installed before building:
jobs: deploy: runs-on: ubuntu-latest steps: - uses: actions/checkout@v2 - uses: actions/[email protected] with: version: 12.x - name: Install dependencies run: | composer install -o npm install - name: Build run: npm run build
The Flynt build task finally requires, lints, compiles, and transpiles Sass and JavaScript files, then adds revisioning to assets to prevent browser cache issues. If anything in the build step fails, the workflow will stop executing and thus prevents you from deploying a broken release.
Configure server access and destination
For the rsync command to run successfully, GitHub needs access to SSH into your server. This can be accomplished by:
Generating a new SSH key (without a passphrase)
Adding the public key to your ~/.ssh/authorized_keys on the production server
Adding the private key as a secret with the name DEPLOY_KEY to the repository

The sync workflow step needs to save the key to a local file, adjust file permissions and pass the file to the rsync command. The destination has to point to your WordPress theme directory on the production server. It’s convenient to define it as a variable so you know what to change when reusing the workflow for future projects.
- name: Sync env: dest: '[email protected]:/mydir/wp-content/themes/mytheme’ run: | echo "$" > deploy_key chmod 600 ./deploy_key rsync -chav --delete \ -e 'ssh -i ./deploy_key -o StrictHostKeyChecking=no' \ --exclude /.git/ \ --exclude /.github/ \ --exclude /node_modules/ \ ./ $
Depending on your project structure, you might want to deploy plugins and other theme related files as well. To accomplish that, change the source and destination to the desired parent directory, make sure to check if the excluded files need an update, and check if any paths in the build process should be adjusted.
Put the pieces together
We’ve covered all necessary steps of the CD process. Now we need to run them in a sequence which should:
Trigger on each push to the production branch
Install dependencies
Build and verify the code
Send the result to a server via rsync
The complete GitHub workflow will look like this:
name: Deployment on: push: branches: [ production ] jobs: deploy: runs-on: ubuntu-latest steps: - uses: actions/checkout@v2 - uses: actions/[email protected] with: version: 12.x - name: Install dependencies run: | composer install -o npm install - name: Build run: npm run build - name: Sync env: dest: '[email protected]:/mydir/wp-content/themes/mytheme’ run: | echo "$" > deploy_key chmod 600 ./deploy_key rsync -chav --delete \ -e 'ssh -i ./deploy_key -o StrictHostKeyChecking=no' \ --exclude /.git/ \ --exclude /.github/ \ --exclude /node_modules/ \ ./ $
To test the workflow, commit the changes, pull them into your local repository and trigger the deployment by pushing your master branch to the production branch:
git push origin master:production
You can follow the status of the execution by going to the “Actions” tab in GitHub, then selecting the recent execution and clicking on the “deploy“ job. The green checkmarks indicate that everything went smoothly. If there are any issues, check the logs of the failed step to fix them.

Check the full report on GitHub
Congratulations! You’ve successfully deployed your WordPress theme to a server. The workflow file can easily be reused for future projects, making continuous deployment setups a breeze.
To further refine your deployment process, the following topics are worth considering:
Caching dependencies to speed up the GitHub workflow
Activating the WordPress maintenance mode while syncing files
Clearing the website cache of a plugin (like Cache Enabler) after the deployment
The post Continuous Deployments for WordPress Using GitHub Actions appeared first on CSS-Tricks.
Continuous Deployments for WordPress Using GitHub Actions published first on https://deskbysnafu.tumblr.com/
0 notes
Text
A Guide To Enhance Your WordPress Site Performance - 1

“What’s best for the customer is the best for the business.” says, Chris Brown, the CEO of MarketCulture Strategies. The time that a user invests in your website is what your success is dependent upon. The entire nature of the business can flourish & fall on the basis of what & how you serve the needs of your customer. And in today’s superfast world of supersonic internet connectivity & usage, one can’t afford to have a slow-performing website. Every aspect of the website needs to be structured & targeted towards the needs of your target audience.
USER EXPERIENCE = LOOK + FEEL + USABILITY
The two major components that have a direct effect of a slow-performing website is - one, the look & feel of the website and second, the usability factor of it. And hence, the enhancement of your website does matter. There are several tools available, which can help you check the score of your website and make you aware of how well optimised it is. We have a blog dedicated to guide you through this process of checking the score of your website.
And this one here is a 2-blog series to guide you, the WordPress website users, on how to optimise & enhance your WordPress site. An enhancement, which will lead to enriched user experience, wealthy quality of your website and eventually elevated & fruitful results.
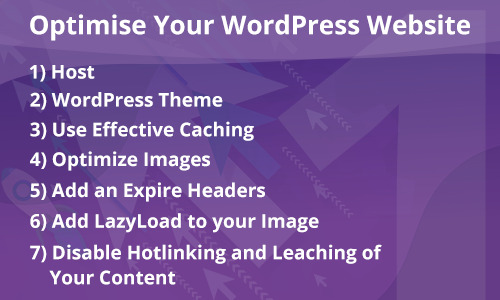
1) Host
Upgrading your web hosting plan is the simplest and easiest way to improve the speed of your website.
If you have shared hosting, you should either move to a VPS or dedicated option. VPS (Virtual Private Servers) hosting is the best option to go for as it uses multiple servers for content distribution.
Your hosting should be capable to respond quickly. Response time will vary based on the server.
Your hosting should be able to handle multiple requests at a time. It should slow down at the time of heavy traffic.
2) WordPress Theme
The theme which you select for your WordPress site counts responsible for the performance of your site.
Your theme should be lightweight and speedy.
The theme should not contain unnecessary images and all images should be appropriately optimized.
The number of files should be less for the display of the page on your site. For that, we need to combine multiple CSS into a single file. The file should be optimized.
3) Use Effective Caching
A site crashes every time when it is being loaded with excessive users visiting it at the same time. Caching comes at the rescue here by avoiding the need to render the website, every single time that a user visits.
Caching stores the already visited version of the website in the temporary storage area, called cache memory.
The web page that is cached, will not require to send the database requests each time.
There are multiple plugins that can be used for caching purpose like W3 Total Cache and WP Super Cache.
One can also set up caching under your general setting through VPS and dedicated server. It is only in the case of the shared server that this feature of caching is not available.
4) Optimize Images
There should be a way to optimize an image on your site. If the user uploads an image with heavy file size, then it will affect the loading time of your page. In order to solve this problem, you should install a plugin which will optimize an image to reduce the file size, not reducing and affecting the quality.
There are various plugins available for this purpose such as Wp-SmushIt, Optimus, and so on.
Other aspects of image optimisation like saving & compressing images for web, website caching, minimizing the number of JavaScript & CSS files, et al are explained in-depth in an independent blog in here.
5) Add an Expire Headers
Expire headers is a technique of letting the browser decide, whether the requested file should be fetched from the server or the browser’s cached data.
Expire headers, hence, sends the request for loading the link, only after the specified rule time to use the cached data is expired.
This reduces the extra load on the server and eventually helps in raising the speed of the website.
Below we share the guideline to serve your static files with Expire headers, which will be cached by the browser:
1. For Apache Server
<IfModule mod_expires.c> ExpiresActive On # Images ExpiresByType image/jpeg "access plus 1 year" ExpiresByType image/gif "access plus 1 year" ExpiresByType image/png "access plus 1 year" ExpiresByType image/webp "access plus 1 year" ExpiresByType image/svg+xml "access plus 1 year" ExpiresByType image/x-icon "access plus 1 year" # Video ExpiresByType video/mp4 "access plus 1 year" ExpiresByType video/mpeg "access plus 1 year" # CSS, JavaScript ExpiresByType text/css "access plus 1 month" ExpiresByType text/javascript "access plus 1 month" ExpiresByType application/javascript "access plus 1 month" # Others ExpiresByType application/pdf "access plus 1 month" ExpiresByType application/x-shockwave-flash "access plus 1 month" </IfModule>
2. For Nginx Server Nginx configuration to set Expires header for images and static assets Assuming you are using a Unix operating system (Ubuntu, in my case);
Solution Go to /etc/nginx/sites-available.
Open your site configuration in an editor. For example, vi veerasundar.com (Use sudo if necessary).
In the server configuration, add the code to set Expires header if a request is made to a static file. Here’s my complete configuration for this server.
server { listen 80; server_name veerasundar.com; access_log /location/of/access.log; error_log /location/of/error.log; location / { root /location/of/www; index index.html index.htm; if ($request_uri ~* ".(ico|css|js|gif|jpe?g|png)$") { expires 30d; access_log off; add_header Pragma public; add_header Cache-Control "public"; break; } } }
After making the changes, save the file and restart nginx - sudo /etc/init.d/nginx restart. 6) Add LazyLoad to your Image
LazyLoad is the process of having only the images visible in the visitor’s browser window. When the reader scrolls down, other images begin to load, just before they come into view.
As a result, it will increase your page load time as well as it will save your bandwidth because you are loading less data for users who don’t scroll all the way down on your page.
There are many plugins to implement this functionality such as jQuery Image LazyLoad, Lazy Load, etc.
7) Disable Hotlinking and Leaching of Your Content
Hotlinking refers to loading content from another site like google fonts, few images, etc.
This will increase your bandwidth and page speed.
To overcome this situation, load content as much from your site only. Download external content in your site and load it from there.
Conclusion Time doesn’t differentiate and hence is equally divided amongst all us human beings. And hence, the more we respect that of others & ours in general, the more benefits it is prone to bring to us. And empowered with an experience of 160+ WordPress development, our passionate WordPress developers have framed the above suggestion for you to attain a high-performing website. To get in touch with them & learn more about it you can definitely get in touch with us. Contact us here for any kind of further query or suggestions regarding the above topic of WordPress Site Optimisation. By the way, don’t forget the second blog on this very series, where we share a set of some more guidelines for optimising the WordPress site performance. Also, we have talked about a list of plugins that can help you in optimising your WordPress site, which you can read here.
Source: AddWeb Solution
0 notes
Photo
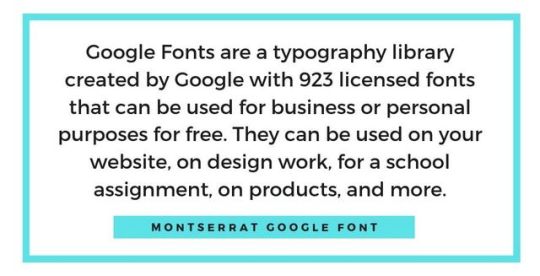
50+ Best Google Fonts: How to Choose Fonts for Your Business https://ift.tt/2Yoeyvp
Google Fonts are one of the most popular typeface fonts you’ll find online. If you’re currently running an online Shopify store you’ll know that you’re using Google Fonts on your website. Google web fonts are often the standard fonts examples used by popular brands like Canva. Whether you’re looking for the best Google font combinations or need help finding handwriting Google Fonts, this article breaks down the best web fonts you can use for your website or design work.
What are Google Fonts?
Google Fonts are a typography library created by Google with 923 licensed fonts that can be used for business or personal purposes for free. They can be used on your website, on design work, for a school assignment, on products, and more.
These fonts are already installed on popular platforms like Shopify and Canva, simplifying design for business owners. However, you can also download the web fonts on your computer for personal use as well.
How to Choose Google Fonts
Several factors can help you decide on which Google Font to choose. When it comes to choosing a web font to use, you should consider readability, purpose, Google font combinations, popularity, and intuition. Here are a few ideas to help you better understand which fonts you should use in different situations:
1. Readability
If you’re composing a book, blog content, or anything text-heavy you should consider choosing a serif font. A serif font is one where it appears like the letters have “feet.” These feet connect the letters closer together which helps make them easier to read. If you look at sans serif fonts, they don’t have these feet-like extensions, which makes it slightly more difficult to read longer passages.
2. Purpose
When it comes to choosing a font, it can boil down to the purpose it’s being used for. For example, you might use Google Fonts handwriting font when it comes to wedding invitations as it’s customary to use cursive fonts in that setting. You might choose a more formal font like Helveticish for your resume since it’ll create a cleaner look. If you’re using a funkier font like ABYS, it’ll be to highlight a word or two in a design rather than for something more text-heavy. You want to choose a Google font that’s appropriate for the design, context, and industry you’re using the font for.
3. Best Google Font Combinations
We’ll share some Google Font combinations later on in this article. However, when choosing a pair of fonts, you should consider how complementary they are to one another. You might pair a modern sans serif title with a serif body text.
Fine stroke fonts work well as titles and pair well with readable serif body fonts to create a clean and easy to read look.
A bolded serif Google font can pair with a popular sans serif font for text light copy.
4. Use Popular Fonts
With over 900 fonts, you might think that any of them could work on any occasion. However, most designers will often resort to the same few number of fonts that work well for most designs. For example, when creating pins on Pinterest, I noticed that the Google font Playfair Display works well at compelling clicks when it’s italicized. I’ve tried several other fonts on the platform but my best-performing pins always come from that same Google font. With experience, you’ll start to select your top few fonts too. It’s okay to use the same Google Fonts frequently. If it works, don’t be afraid to keep using it.
5. Go With Your Gut
Sometimes a font seems right and other times it seems off. While some of the rules above can help you determine the right font, there are just too many Google Fonts to create perfect rules for. At times, you’ll need to experiment and play around with the font selections to see what looks best. If you understand the standard graphic design principles and elements, you’ll have a better idea of which font works best when working on a whole design.
Why Google Fonts Are Important
Google Fonts are important because they allow you to communicate different tones and brand personalities using typography. The fact that there are over 900 free Google web fonts allows businesses on a budget to use different typography without needing to pay for licenses for new fonts.
50+ Google Fonts to Use in 2019
Best Google Fonts
Roboto
Open Sans
Lato
Oswald
Slabo 27 px
Roboto Condensed
Montserrat
Source Sans Pro
Raleway
PT Sans
Google Fonts List
There are currently 923 Google Fonts. Here are a few on the Google Fonts list:
Playfair Display
Bitter
Libre Baskerville
Archivo Narrow
Alegreya Sans
Ubuntu
Crimson Text
Heebo
Cabin
Lobster
Free Google Fonts
Pacifico
Abril Fatface
Barlow
Bree Serif
Bonbon
Ropa Sans
Amiri
Orbitron
Zilla Slab
Great Vibes
Best Font for Website
Playfair Display
Cantata One
Roboto Slab
Cardo
Montserrat
Poppins
Merriweather
Lora
Domine
Karla
Best Serif Google Fonts
Roboto Slab
Crimson Text
Slabo 27px
EB Garamond
Amiri
Neuton
Zilla Slab
Josefin Slab
Unna
Abhaya Libre
Best Sans Serif Google Fonts
Roboto
Ubuntu
Rubik
Cabin
Heebo
Notable
Barlow
Archivo Narrow
Asap
Ropa Sans
Best Google Fonts Handwriting
Indie Flower
Pacifico
Shadows Into Light
Bonbon
Amatic SC
Great Vibes
Architects Daughter
Nothing You Could Do
Reenie Beanie
Sue Ellen Francisco
Best Google Fonts Display
Squada One
Bahianiata
Barriecito
Mountains of Christmas
Lobster
Abril Fatface
Righteous
Comfortaa
Geostar
Patua One
Best Google Fonts Monospace
Roboto Mono
Inconsolata
Source Code Pro
Cousine
PT Mono
Nanum Gothic Coding
Space Mono
Anonymous Pro
Cutive Mono
Oxygen Mono
Google Fonts for Android
Literata
Lato
Montserrat
Open Sans
Raleway
Oswald
Merriweather
Poppins
Roboto Slab
Playfair Display
Best Google Fonts for Logos
Karla
Work Sans
Oswald
Roboto
Rubik
Poppins
Cabin
Montserrat
Chivo
Lato
Best Google Web Fonts
Cutive Mono
Cabin
Bitter
Arvo
Anton
Notable
Fjalla One
Mukta
Varela Round
Darker Grotesque
Best Font Family For Website
Montserrat
Raleway
Roboto
Poppins
Libre Franklin
Source Sans Pro
Muli
Barlow
Exo
Overpass
Google Fonts Shopify
Abril Fatface
Pacifico
Rancho
Sansita One
Inconsolata
Anonymous Pro
Fira Sans
Lato
Istok Web
Bitter
Google Fonts WordPress
Prompt
Rokkitt
Courgette
Alegreya
Old Standard TT
Cardo
Zilla Slab
Pathway Gothic One
Cantarell
Nanum Myeongjo
Best Google Font Combinations
Vast Shadow – Playfair Display
Montserrat – Droid Serif
Oswald – Roboto
Lato – Merriweather
Raleway – Roboto Mono
Abel – Ubuntu
Proza Libre – Open Sans
Rubik – Karla
Bree Serif – Lora
Poppins – Anonymous Pro
How to Download Google Fonts
1. On the Google Fonts website, select all the fonts you want to download by clicking the plus sign in each font’s section.
2. Next, open the pop-up on the bottom of the screen
3. Select the down arrow (download icon)
4. Press “Download”
5. A zip file will download
6. Open the file and click on the first font
7. Manually install each font in the folder
How to Install a Google Font on Your Website
You can install any Google Font that isn’t currently installed on your website. One of the easiest ways to do this is to install a paid Shopify app on your store. For example, Fontify by Nitro App allows you to install any font you want on your website without needing to know how to code.
Otherwise, you’ll need to edit your theme settings. Be sure to duplicate your theme so you don’t lose any of your work in case something goes wrong. If you’d rather not do it yourself and don’t want to pay for an app, you can hire a Shopify expert. Shopify experts have experience modifying themes and can add any Google font you’d like to your website for a one-time fee. If you’re not sure on which font you want, download several web fonts at once to avoid paying more than you need to.
You can also embed Google Fonts on your website. For example, head to the official website. Then, click the plus sign on the font you want. A pop-up will appear. Then, under “Embed,” copy and paste the code at the top of the HTML section of your website. This will result in your text showing up in that font. This process can be a bit manual, but it’s a quick fix for those who aren’t tech-savvy and on a tight budget.
Google Font Generators
1. Canva
Canva’s font generator allows you to find the best Google Font combinations. Whether you’re creating an advertisement or a social media post, you may decide to use two fonts. One of those fonts can be used as a header and the other for the subtext. You can then use those fonts to design and create content on Canva’s platform which also uses various Google Fonts. All you need to do is type in or select the font you want to find a combination for. Then, Canva will present its best match to you. Not all fonts are available on this tool but you’ll find some of the best Google Fonts.
2. Font Pair
Font Pair’s Google font generator helps you find font pairs for your website or other forms of content. The comprehensive website is centered around fonts based on different font families. For example, you can find san serif and serif font combinations or display and serif font combinations. So if you’re looking to match two specific font families, this Google font generator will do the trick.
3. Fontjoy
Fontjoy’s Google font generator showcases three fonts in use. The top font is the best font for the headline, the second font and the subheading, and the third font is the body. You don’t need to use all three fonts. For example, if you’re looking for a title and body font for your website, you can choose the first and third font only. The great thing about this tool is that you see the font in action to help you understand whether this font combination is the right fit for your needs.
4. Analytics
Analytics might not be a Google font generator in the traditional sense. However, it educates you on what the most popular Google Fonts are. If you’re looking to stick to the most popular web fonts, you’ll quickly learn that Roboto is at the top of the list. In psychology, there’s something called mere exposure effect which means that people like things that are most familiar to them. By sticking with best Google web fonts, people “in theory” will prefer the font they see.
Conclusion
Google Fonts can be used for social media graphics, t-shirt designs, websites, and other marketing elements for your online business. When choosing a font remember to consider the tone, readability, and appropriateness of the font for the given situation. It’s okay if you find yourself using the same style of fonts for your work, designers do that all the time. Focus on choosing the Google web fonts that work best for your goal and it’ll help complete the look of your design.
Which Google Fonts do you use on your online store? Comment below!
Want to Learn More?
How to Use Google Trends: 10 Mind-Blowing Tricks for Entrepreneurs
20 Ways to Use Google Calendar to Maximize Your Day in 2019
How to Use Google Analytics for Your Ecommerce Business
23 Amazing Google Chrome Extensions That You Need to Use in 2019
The post 50+ Best Google Fonts: How to Choose Fonts for Your Business appeared first on Oberlo.
from Oberlo
Google Fonts are one of the most popular typeface fonts you’ll find online. If you’re currently running an online Shopify store you’ll know that you’re using Google Fonts on your website. Google web fonts are often the standard fonts examples used by popular brands like Canva. Whether you’re looking for the best Google font combinations or need help finding handwriting Google Fonts, this article breaks down the best web fonts you can use for your website or design work.
What are Google Fonts?
Google Fonts are a typography library created by Google with 923 licensed fonts that can be used for business or personal purposes for free. They can be used on your website, on design work, for a school assignment, on products, and more.
These fonts are already installed on popular platforms like Shopify and Canva, simplifying design for business owners. However, you can also download the web fonts on your computer for personal use as well.
How to Choose Google Fonts
Several factors can help you decide on which Google Font to choose. When it comes to choosing a web font to use, you should consider readability, purpose, Google font combinations, popularity, and intuition. Here are a few ideas to help you better understand which fonts you should use in different situations:
1. Readability
If you’re composing a book, blog content, or anything text-heavy you should consider choosing a serif font. A serif font is one where it appears like the letters have “feet.” These feet connect the letters closer together which helps make them easier to read. If you look at sans serif fonts, they don’t have these feet-like extensions, which makes it slightly more difficult to read longer passages.
2. Purpose
When it comes to choosing a font, it can boil down to the purpose it’s being used for. For example, you might use Google Fonts handwriting font when it comes to wedding invitations as it’s customary to use cursive fonts in that setting. You might choose a more formal font like Helveticish for your resume since it’ll create a cleaner look. If you’re using a funkier font like ABYS, it’ll be to highlight a word or two in a design rather than for something more text-heavy. You want to choose a Google font that’s appropriate for the design, context, and industry you’re using the font for.
3. Best Google Font Combinations
We’ll share some Google Font combinations later on in this article. However, when choosing a pair of fonts, you should consider how complementary they are to one another. You might pair a modern sans serif title with a serif body text.
Fine stroke fonts work well as titles and pair well with readable serif body fonts to create a clean and easy to read look.
A bolded serif Google font can pair with a popular sans serif font for text light copy.
4. Use Popular Fonts
With over 900 fonts, you might think that any of them could work on any occasion. However, most designers will often resort to the same few number of fonts that work well for most designs. For example, when creating pins on Pinterest, I noticed that the Google font Playfair Display works well at compelling clicks when it’s italicized. I’ve tried several other fonts on the platform but my best-performing pins always come from that same Google font. With experience, you’ll start to select your top few fonts too. It’s okay to use the same Google Fonts frequently. If it works, don’t be afraid to keep using it.
5. Go With Your Gut
Sometimes a font seems right and other times it seems off. While some of the rules above can help you determine the right font, there are just too many Google Fonts to create perfect rules for. At times, you’ll need to experiment and play around with the font selections to see what looks best. If you understand the standard graphic design principles and elements, you’ll have a better idea of which font works best when working on a whole design.
Why Google Fonts Are Important
Google Fonts are important because they allow you to communicate different tones and brand personalities using typography. The fact that there are over 900 free Google web fonts allows businesses on a budget to use different typography without needing to pay for licenses for new fonts.
50+ Google Fonts to Use in 2019
Best Google Fonts
Roboto
Open Sans
Lato
Oswald
Slabo 27 px
Roboto Condensed
Montserrat
Source Sans Pro
Raleway
PT Sans
Google Fonts List
There are currently 923 Google Fonts. Here are a few on the Google Fonts list:
Playfair Display
Bitter
Libre Baskerville
Archivo Narrow
Alegreya Sans
Ubuntu
Crimson Text
Heebo
Cabin
Lobster
Free Google Fonts
Pacifico
Abril Fatface
Barlow
Bree Serif
Bonbon
Ropa Sans
Amiri
Orbitron
Zilla Slab
Great Vibes
Best Font for Website
Playfair Display
Cantata One
Roboto Slab
Cardo
Montserrat
Poppins
Merriweather
Lora
Domine
Karla
Best Serif Google Fonts
Roboto Slab
Crimson Text
Slabo 27px
EB Garamond
Amiri
Neuton
Zilla Slab
Josefin Slab
Unna
Abhaya Libre
Best Sans Serif Google Fonts
Roboto
Ubuntu
Rubik
Cabin
Heebo
Notable
Barlow
Archivo Narrow
Asap
Ropa Sans
Best Google Fonts Handwriting
Indie Flower
Pacifico
Shadows Into Light
Bonbon
Amatic SC
Great Vibes
Architects Daughter
Nothing You Could Do
Reenie Beanie
Sue Ellen Francisco
Best Google Fonts Display
Squada One
Bahianiata
Barriecito
Mountains of Christmas
Lobster
Abril Fatface
Righteous
Comfortaa
Geostar
Patua One
Best Google Fonts Monospace
Roboto Mono
Inconsolata
Source Code Pro
Cousine
PT Mono
Nanum Gothic Coding
Space Mono
Anonymous Pro
Cutive Mono
Oxygen Mono
Google Fonts for Android
Literata
Lato
Montserrat
Open Sans
Raleway
Oswald
Merriweather
Poppins
Roboto Slab
Playfair Display
Best Google Fonts for Logos
Karla
Work Sans
Oswald
Roboto
Rubik
Poppins
Cabin
Montserrat
Chivo
Lato
Best Google Web Fonts
Cutive Mono
Cabin
Bitter
Arvo
Anton
Notable
Fjalla One
Mukta
Varela Round
Darker Grotesque
Best Font Family For Website
Montserrat
Raleway
Roboto
Poppins
Libre Franklin
Source Sans Pro
Muli
Barlow
Exo
Overpass
Google Fonts Shopify
Abril Fatface
Pacifico
Rancho
Sansita One
Inconsolata
Anonymous Pro
Fira Sans
Lato
Istok Web
Bitter
Google Fonts WordPress
Prompt
Rokkitt
Courgette
Alegreya
Old Standard TT
Cardo
Zilla Slab
Pathway Gothic One
Cantarell
Nanum Myeongjo
Best Google Font Combinations
Vast Shadow – Playfair Display
Montserrat – Droid Serif
Oswald – Roboto
Lato – Merriweather
Raleway – Roboto Mono
Abel – Ubuntu
Proza Libre – Open Sans
Rubik – Karla
Bree Serif – Lora
Poppins – Anonymous Pro
How to Download Google Fonts
1. On the Google Fonts website, select all the fonts you want to download by clicking the plus sign in each font’s section.
2. Next, open the pop-up on the bottom of the screen
3. Select the down arrow (download icon)
4. Press “Download”
5. A zip file will download
6. Open the file and click on the first font
7. Manually install each font in the folder
How to Install a Google Font on Your Website
You can install any Google Font that isn’t currently installed on your website. One of the easiest ways to do this is to install a paid Shopify app on your store. For example, Fontify by Nitro App allows you to install any font you want on your website without needing to know how to code.
Otherwise, you’ll need to edit your theme settings. Be sure to duplicate your theme so you don’t lose any of your work in case something goes wrong. If you’d rather not do it yourself and don’t want to pay for an app, you can hire a Shopify expert. Shopify experts have experience modifying themes and can add any Google font you’d like to your website for a one-time fee. If you’re not sure on which font you want, download several web fonts at once to avoid paying more than you need to.
You can also embed Google Fonts on your website. For example, head to the official website. Then, click the plus sign on the font you want. A pop-up will appear. Then, under “Embed,” copy and paste the code at the top of the HTML section of your website. This will result in your text showing up in that font. This process can be a bit manual, but it’s a quick fix for those who aren’t tech-savvy and on a tight budget.
Google Font Generators
1. Canva
Canva’s font generator allows you to find the best Google Font combinations. Whether you’re creating an advertisement or a social media post, you may decide to use two fonts. One of those fonts can be used as a header and the other for the subtext. You can then use those fonts to design and create content on Canva’s platform which also uses various Google Fonts. All you need to do is type in or select the font you want to find a combination for. Then, Canva will present its best match to you. Not all fonts are available on this tool but you’ll find some of the best Google Fonts.
2. Font Pair
Font Pair’s Google font generator helps you find font pairs for your website or other forms of content. The comprehensive website is centered around fonts based on different font families. For example, you can find san serif and serif font combinations or display and serif font combinations. So if you’re looking to match two specific font families, this Google font generator will do the trick.
3. Fontjoy
Fontjoy’s Google font generator showcases three fonts in use. The top font is the best font for the headline, the second font and the subheading, and the third font is the body. You don’t need to use all three fonts. For example, if you’re looking for a title and body font for your website, you can choose the first and third font only. The great thing about this tool is that you see the font in action to help you understand whether this font combination is the right fit for your needs.
4. Analytics
Analytics might not be a Google font generator in the traditional sense. However, it educates you on what the most popular Google Fonts are. If you’re looking to stick to the most popular web fonts, you’ll quickly learn that Roboto is at the top of the list. In psychology, there’s something called mere exposure effect which means that people like things that are most familiar to them. By sticking with best Google web fonts, people “in theory” will prefer the font they see.
Conclusion
Google Fonts can be used for social media graphics, t-shirt designs, websites, and other marketing elements for your online business. When choosing a font remember to consider the tone, readability, and appropriateness of the font for the given situation. It’s okay if you find yourself using the same style of fonts for your work, designers do that all the time. Focus on choosing the Google web fonts that work best for your goal and it’ll help complete the look of your design.
Which Google Fonts do you use on your online store? Comment below!
Want to Learn More?
How to Use Google Trends: 10 Mind-Blowing Tricks for Entrepreneurs
20 Ways to Use Google Calendar to Maximize Your Day in 2019
How to Use Google Analytics for Your Ecommerce Business
23 Amazing Google Chrome Extensions That You Need to Use in 2019
The post 50+ Best Google Fonts: How to Choose Fonts for Your Business appeared first on Oberlo.
https://ift.tt/2YuS3ZV July 29, 2019 at 04:00AM https://ift.tt/2YsnuQq
0 notes