#install wordpress theme localhost
Explore tagged Tumblr posts
Visit Tumblr Blog
Explore Tumblr blogs with no restrictions, modern design and the best experience.
Last Seen Tumblr Blogs


Fun Fact
Tumblr was acquired by Yahoo for $1.1B in 2013.
Text
How to Install WordPress Locally on Your MacBook (Easy Guide)
🚀 Exciting news for all you WordPress developers and enthusiasts! 🎉 Just published a new blog post on how to easily install WordPress locally on your MacBook! 💻 Perfect for testing themes, plugins, and building websites offline. No more messing with live servers! 🙌 This step-by-step guide walks you through the entire process, making it super simple even for beginners. Whether you're using MAMP, XAMPP, or another local development environment, this tutorial has you covered. 🤓 Check it out now and start building your WordPress projects locally! 👇 #WordPress #LocalDevelopment #MacBook #Installation #Tutorial #WebDev #MAMP #XAMPP #Localhost #PHP #MySQL #WordPressTutorial #WebDevelopment #Coding #Tech #BlogPost #NewBlog #LearnToCode #RTFM #100DaysOfRTFM #Innovation #Technology #Creativity #LocalWP #SoftwareDevelopment #DigitalStrategy #DigitalMarketing
So, you’re ready to dive into the world of WordPress development, but you don’t want to mess with a live server just yet? Great idea! Setting up WordPress locally on your MacBook is the perfect way to experiment, test themes and plugins, and build your website in a safe environment. This guide will walk you through the process step-by-step. Why Install WordPress Locally? Before we jump in, let’s…
#Installation#Local Development#Localhost#MacBook#MAMP#MySQL#PHP#Tutorial#Web Development#WordPress#XAMPP
0 notes
Text
How to Move Your WordPress Site from Localhost to a Live Server
Developing a WordPress site on localhost is a great way to build and test your website in a controlled environment. However, the real challenge arises when it's time to move the site from your local server to a live hosting environment. If not done correctly, you could encounter broken links, missing images, or even database errors.
In this blog, we'll guide you through a step-by-step process to successfully move your WordPress site from localhost to a live server.

Step 1: Choose the Right Hosting Provider
Your first step is to select a reliable web hosting provider that meets your website’s needs. Look for:
Server Speed: Fast servers for better performance.
Uptime Guarantee: At least 99.9% uptime to ensure availability.
Ease of Use: User-friendly dashboards and tools.
WordPress Support: Hosting optimized for WordPress websites.
Popular options include Bluehost, SiteGround, and WP Engine.
Step 2: Export Your Local WordPress Database
The database is the backbone of your WordPress site. To export it:
Open phpMyAdmin on your local server (e.g., XAMPP or WAMP).
Select your WordPress database.
Click on the Export tab and choose the Quick Export method.
Save the .sql file to your computer.
Step 3: Upload Your WordPress Files to the Live Server
To move your files:
Compress Your WordPress Folder: Zip your local WordPress installation folder.
Access Your Hosting Account: Use a file manager or an FTP client like FileZilla.
Upload the Files: Transfer the zipped folder to your hosting server's root directory (usually public_html).
Unzip the Folder: Extract the files once uploaded.
Step 4: Create a Database on the Live Server
Now, set up a new database on your live hosting server:
Log in to your hosting control panel (e.g., cPanel).
Navigate to the MySQL Databases section.
Create a new database, database user, and password.
Assign the user to the database with full privileges.
Step 5: Import the Database to the Live Server
Open phpMyAdmin in your hosting control panel.
Select the new database you created.
Click the Import tab.
Choose the .sql file you exported from your localhost.
Click Go to import the database.
Step 6: Update the wp-config.php File
To connect your site to the live database:
Locate the wp-config.php file in your WordPress installation.
Open the file in a text editor.
Update the following lines: define('DB_NAME', 'your_live_database_name'); define('DB_USER', 'your_live_database_user'); define('DB_PASSWORD', 'your_live_database_password'); define('DB_HOST', 'localhost'); // Keep this unless your host specifies otherwise.
Save the file and upload it to your server via FTP.
Step 7: Update URLs in the Database
Your localhost URLs need to be replaced with your live site URLs.
Use a tool like Search Replace DB or run SQL queries in phpMyAdmin.
In phpMyAdmin, run the following query: UPDATE wp_options SET option_value = 'http://your-live-site.com' WHERE option_name = 'siteurl'; UPDATE wp_options SET option_value = 'http://your-live-site.com' WHERE option_name = 'home';
Step 8: Test Your Live Website
Once everything is uploaded and configured, check your website by entering its URL in a browser. Test for:
Broken Links: Fix them using plugins like Broken Link Checker.
Missing Images: Ensure media files were uploaded correctly.
Functionality: Verify forms, buttons, and features work as expected.
Step 9: Set Up Permalinks
To ensure proper URL structure:
Log in to your WordPress admin dashboard on the live site.
Go to Settings > Permalinks.
Choose your preferred permalink structure and click Save Changes.
Step 10: Secure Your Live Website
After migrating, secure your site to prevent vulnerabilities:
Install an SSL Certificate: Most hosting providers offer free SSL certificates.
Update Plugins and Themes: Ensure everything is up to date.
Set Up Backups: Use plugins like UpdraftPlus for regular backups.
Conclusion
Moving your WordPress site from localhost to a live server may seem daunting, but by following these steps, you can ensure a smooth and error-free migration. A successful move allows you to showcase your site to the world, engage your audience, and achieve your goals.
Start today and take your WordPress project live with confidence!
0 notes
Text
How do you edit WordPress on a localhost?
Editing a WordPress site on localhost involves setting up a local development environment on your computer. Here's a general guide on how to do this:
1. Install a Local Server Environment:
You can use software like XAMPP, MAMP, or Local by Flywheel. These tools provide a local server environment with Apache, MySQL, and PHP.
Download and install the software of your choice.
2. Download WordPress:
Visit the official WordPress website (https://wordpress.org/) and download the latest version of WordPress.
3. Set Up Database:
Open your local server software and start the server.
Create a new database for your WordPress installation. Note down the database name, username, and password.
4. Install WordPress:
Extract the WordPress zip file you downloaded.
Move the WordPress files to the root directory of your local server (e.g., htdocs in XAMPP).
Rename the wp-config-sample.php file to wp-config.php.
Open wp-config.php and enter your database details (database name, username, password).
5. Access Local WordPress Site:
Open your web browser and go to http://localhost/yourwordpressfolder (replace "yourwordpressfolder" with the actual folder name where you installed WordPress).
6. Edit Your WordPress Site:
Log in to your local WordPress site using the credentials you set during the installation.
You can now edit your WordPress site just like you would on a live server. Install themes, plugins, and make changes to content and settings.
7. Theme and Plugin Development:
If you are a developer and want to make theme or plugin changes, you can create a themes or plugins folder inside the wp-content directory and develop your code there.
8. Save Changes:
Any changes you make on your localhost won't affect your live site until you migrate the changes. For this, you might use a migration plugin or manually transfer files and the database.
Important Note: Always remember that changes made on your localhost won't reflect on the live site until you manually migrate the changes. Be cautious when making significant changes, and consider using a backup solution.
If you plan to move your site from localhost to a live server, you'll need to export your database and migrate your files. There are plugins and manual methods available for this purpose.
1 note
·
View note
Video
youtube
How to install wordpress theme on localhost xampp | install wordpress locally
0 notes
Text
How to install WordPress Theme 2021
How to install WordPress Theme 2021
How to install WordPress Theme How to install Word install WordPress Theme install WordPress Theme Press Theme So hunt up and down and get the perfect WordPress theme. Now you need to know how to install WordPress theme or it will just be a nice file that collects dust on your hard drive. Installing a WordPress theme is not a problem as many people think it is. The thing that often confuses…

View On WordPress
#How to install WordPress Theme So hunt up and down and get the perfect WordPress theme. Now you need to know how to install WordPress theme#install wordpress theme#install wordpress theme in cpanel#install wordpress theme in xampp#install wordpress theme localhost#install wordpress theme manually#install wordpress theme ubuntu#install wordpress theme without ftp
0 notes
Video
youtube
How to Install Wordpress and Theme on localhost using XAMPP and MySQL.wordpress localhost7) How to install WordPress on localhos,8) How to setup WordPress and installation theme in localhost.,9) how to install wordpress on localhost xampp,10) how to install wordpress on localhost xwamp,11) how to install wordpress theme on xampp localhost,12) install wordpress locally windows 10,13) How to Install Wordpress and Theme on localhost using XAMPP,14) wordpress tutorial,15) wordpress theme installation
1 note
·
View note
Text
Download Bitnami WordPress Local _ Need One click and Install now
Download Bitnami WordPress Local _ Need One click and Install now
Download Bitnami WordPress Local The very first thing that I discovered in WordPress was its set up course of on localhost with the help of Bitnami WordPress. (Download Bitnami WordPress Local) unknown with the opposite unique options that it has. So after the various analysis, at present I’m right here to current some helpful & easy steps of How you can Set up WordPress on Localhost so it may…

View On WordPress
#how to install plugins in wordpress#how to install theme in wordpress#how to install wordpress#how to install wordpress in cpanel#how to install wordpress in wamp server#how to install wordpress in windows 7#how to install wordpress locally#how to install wordpress on local computer#how to install wordpress on local machine#how to install wordpress on local server#how to install wordpress on localhost#how to install wordpress on windows 10#how to install wordpress on windows 8#how to install wordpress theme#how to install wordpress theme on localhost#install wordpress#install wordpress locally#install wordpress on cpanel#install wordpress on windows 10#wordpress download and install#wordpress install
0 notes
Text
Confessions Of A Novice Video Gamer
The third level is set in space, where you must escape the planet surface in the Millennium Falcon and destroy the Tie Fighters chasing you, each kill accompanied by a cheer from Chewbacca. The third arcade release set in the Star Wars universe sees Atari go back in time, to a previous episode in the series as well as to the vector graphics format of the original game. Keen Star Wars fans will notice that the Death Star is actually the second Death Star featured in Return of the Jedi, not the one from the original Star Wars film. If the standard stand-up version of the Star Wars arcade game were not exciting enough, there was also an inspired special edition cabinet that allowed gamers to actually sit inside the game, like climbing into your very own X-Wing ship. There some great games on the PS3, best game on the PS3? I messed up the skeletons before, so I have to reinstall the game. I have never before been so moved and captivated while playing a video game. Journey employs an orchestral soundtrack that is truly unique, and syncs with the game seamlessly.
The highlight of this game or games is its wonderful complexity. Playing the games in 3D is different. Obviously this is not the end of good games to play. You can play any of the missions over and over again to help you advance your rank. It debuted on March 2012, over the PlayStation Network. Despite never being as popular as the X-Box or PlayStation 2 and also having a reputation is a 'console for kiddies' there were plenty of worthy titles developed for the unit. To illustrate, if you refer to the section pertaining to Cartoony Toons, there is an example of three images that are stripped-down cartoon faces without bodies and we are informed that is all a character needs. Adobe Dreamweaver, Microsoft FrontPage, are examples of web development software. If you feel that, your skills go beyond Adobe flash then take a close look at Maya or Autodesk is its common name. Each time you level up you can then improve your action skill. Some key frames are specified at extreme positions, where others are spaced such that the time interval between them is not too large. Star Wars was such a popular movie series, I have no doubt all of these games are riveting!
Nowadays, filmmakers rely so much on animation to bring their scripts to life on the movie screen. Multimedia: Movie Edit Pro, Sony ACID Music Studio and Maya. I'm not sure how to describe how superb this game really is, words escape me. That is, he or she first draws the first frame of the animation, then the second, and so on until the sequence is complete. An artist or cartoonist is this case will dream up a character then draw it. Exaggeration, for instance, can be used in poses to draw attention to what the character is doing. Its main aim is to draw the attention of the audience to the most relevant action, personality, expression or a mood in a scene so that it is easily recognizable. The 2nd and 3rd waves feature the Hoth battle scene from the Empire Strikes Back, and a final showdown with Darth Vader from the Return of the Jedi, as well as the destruction of the second Death Star.
The gameplay of Empire Strikes Back followed a similar theme to Star Wars, replaced with classic scenes from Episode 5, starting on the surface of the Ice Planet Hoth. Functionality: The idea behind using a three-dimensional scanner is creating a Point Cloud of the Geometric Samples on the subjects surface. Relational database management systems like SQL, Cloud SQL and Oracle are used in complex installations to manage vast data and ensure data integrity. Security and client identification systems. Custom applications are tweaked to suit the changing demands of the client organization. General purpose applications are designed as feature-full packages while custom software are tailor-made for a client. Wordpress, Joomla and Drupal are dynamic web creation tools which are installed offline on localhosts or online on web server platforms. They work on top of browsers and use crawling or spider-like scripts to search for user requests from every corner of the world wide web.
Web apps are installed and/or run on web browsers. It also permits a user to access websites that are usually blocked in ordinary browsers. In this case lesser people are involved and the production cycle is shorter and tighter. Watch people and things around you to find out how character transports through movement. For example, a bouncing ball tends to have a lot of ease in and out when at the top of its bounce. Top Notch software have features to covey this function alone. Thus, while creating an animation sequence, the animator should try to have motion following curved paths rather than straight line paths. The shots may come easy but the motion and lighting sets the difference between an average animator and a pro. While online looking for video reviews, I noticed some other future games that I may try, such as Crysis 2, Rage, and Mass Effect.
jasa animasi jasa pembuatan animasi jasa video animasi
#animation#3d animation#video#video animation#animation tools#animation software#game animation#animation tutorial
10 notes
·
View notes
Text
How to Set Up a Local Server on Mac for Beginners #NotADeveloper #WordPress
Let’s start by inserting a disclaimer, I am not a developer or coder in any way. I am not “tech savvy” or futuristic. I can work a computer enough to get online and manage my daily tasks or watch youtube videos. Oh ,and of course email. But l wanted to learn more about what Landon and Cliff do, to enter their world and understand their nerd talk. So they walked me through setting up a local server running WordPress on my mac laptop, and I took notes. Stay tuned for more blogs to come, including setting up divi builder (the fun stuff)! It was difficult to understand at some points, and others straight up made no sense, but alas! We made it through and I am here to share that experience. Sharing it with the hope that someone out there like me, can find this useful and motivating. Or the rest of you smarties find it amusing!
First things first, download WordPress. This is a commonly used CMS or content management system where you can login in to your site and make changes etc.

Once you download WordPress, you will want to move the file into your Sites Folder in Finder. (You can check for the download on your desktop or in Finder under downloads.) This is located in the Home folder. ( the one with the little house next to it.) If this folder does not yet exist, just right click and create a new one.

Once you add the WordPress download (drag and drop the folder here), you can rename if you’d like. Here in my test run, I named it “HairByKelseyAnn”. This can keep you more organized if you want to create multiple sites. (This will be talked about in another blog post to come. For now, let’s just stick with one!)

Next, download MAMP (”Stands for "Mac OS X, Apache, MySQL, and PHP." MAMP is a variation of the LAMP software package that can be installed on Mac OS X. It can be used to run a live web server from a Mac, but is most commonly used for web development and local testing purposes” Description from techterms.com) In this case, we are using it for testing purposes. You can download MAMP (I downloaded MAMP instead of MAMP pro because it’s free) Once you have that downloaded, open it up . If you are having trouble finding it, or any applications, hit command key (⌘) and the space bar at the same time. This will pull up a search bar so you can just type in MAMP and hit enter.

Once you have MAMP open, there are two ways to get to your preferences. You can either select MAMP in the top bar of your computer (next to the apple in the top left corner) or you can hit command key (⌘) and comma(,) at the same time. You will get a drop down like in the image below.
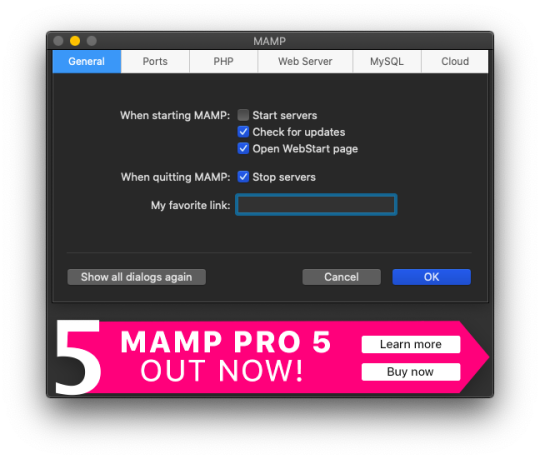
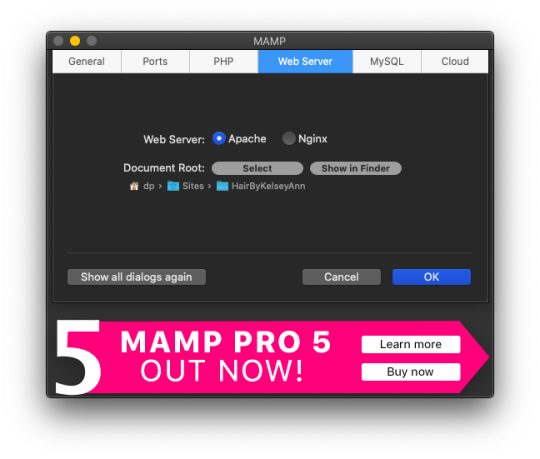
Select the Web Server tab, and this is where you make your document root to the folder you created. (Hit select and add the folder you created from your WordPress download.) This is basically creating a starting point for your localhost server so it knows what files to work from.
After you have your document root folder linked, click ok and it will bring you back to the “home screen”. At this point, you can click Start Servers.

Open a new tab or window, and go to- http://localhost:8888/phpMyAdmin From here you will click the database tab and create new. I chose to name my new DB the same name as the other folders I created. (This is where you create a custom database that WordPress will use. This is highly advanced and you should not find yourself here, beyond initial creation. )

After you have created your DB (DataBase), go to http://localhost:8888/ and follow through the WordPress setup. This is where you are setting up the foundation for your site.
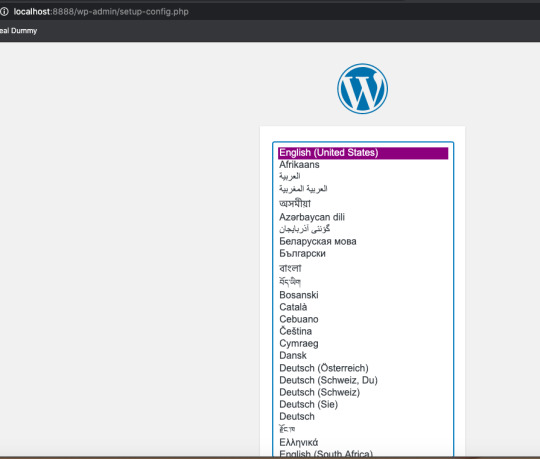
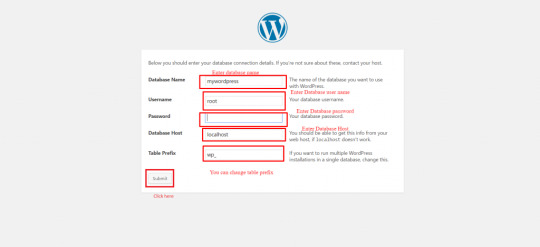
Once you get to this screen (see below) your DataBase Name should be the same as the DB name you previously created a local host file for. Username and Password set to “root” This is a general password for WordPress to login. This is not your personal account or information. Submit this, and on the next screen, click Run the Installation.

The next page will ask you for your Site name and username/ password. This is your personal information. Do Not Share! There is a checkbox asking if you want to discourage search engines ( Google, Yahoo, Bing, etc) from finding your site. You want to check this box because you are only trying to build your website on your computer (For now!). Launching your website to “go live” is separate documentation. This is for building your “rough draft” so you make sure your site is perfect before you let the world see it. After you submit this, you should have this screen.

At this point, you have set up a local server (YAY!) and created the skeleton of a WordPress website, on your computer. From here you can see my next blog post on how to customize and what your different sidebar tabs can do.
Setting up a local host on your computer gives you the ability to work on your website without being connected to the internet. The link below is how you can visualize your saved changes. (Refresh the page to see new changes made)
http://localhost:8888/
Below is the link to your WordPress dashboard. This is where you can start to mess around with themes and layouts. You can end here, or you can download the divi theme builder to really customize your site. Divi builder makes it easier to see the layout and customize as you’re looking at your site.
http://localhost:8888/wp-admin/index.php
Be sure to have your server turned on in MAMP to access your site!
I hope that you enjoyed this article and found it useful! Ideal Dummy is all about sharing knowledge and educating people on how to manage their websites. Or just computer knowledge in general! This is a tech savvy era, and we are here to help! So from one beginner to another, you can do it!
For more information, check out our website.
Written and Documented By: Kelsey Ann
#idealdummy#wordpress#computer#localhost#serversetup#localserver#software development#phpmyadmin#MAMP#macintosh#mac#database#website build#education#computer education#developers & startups#beginner#technology#kansascity
1 note
·
View note
Text
Backing Up Your Localhost WordPress Site: Methods and Tools
Creating backups of your localhost WordPress site is an essential practice for safeguarding your work and ensuring you can recover from unexpected errors or data loss. Whether you are testing themes, developing plugins, or building a new website, a reliable backup process can save you time and stress. This blog outlines effective methods and tools to back up your localhost WordPress site.

Why Backup Your Localhost WordPress Site?
Prevent Data Loss
Unintentional file deletions, database errors, or hardware failures can result in losing hours of work.
Streamline Testing
Backups enable you to revert to a previous state if something breaks during theme or plugin testing.
Ease Migration
Backing up your localhost site simplifies the process of moving it to a live server or another environment.
Experiment Freely
Knowing you have a backup allows you to experiment with code or settings without fear of permanent damage.
Components to Back Up
A WordPress site consists of two primary components:
WordPress Files
These include core files, theme files, plugin files, and uploaded media stored in the wp-content folder.
Database
The database stores your website’s content, settings, and user data. It is usually managed through tools like phpMyAdmin or MySQL Workbench.
Methods for Backing Up Localhost WordPress Sites
1. Manual Backup
Steps:
Copy WordPress Files
Navigate to the directory where your WordPress installation resides (e.g., htdocs in XAMPP).
Copy all files and folders to a secure location, such as an external hard drive or cloud storage.
Export the Database
Access phpMyAdmin or your database management tool.
Select your WordPress database and click on the "Export" option.
Choose the "Quick" export method and save the .sql file.
Advantages:
Complete control over the backup process.
No additional tools required.
Disadvantages:
Time-consuming and prone to human error.
2. Using Plugins
Many WordPress backup plugins work seamlessly on localhost installations. Here are some popular choices:
UpdraftPlus
Schedule and automate backups for both files and databases.
Store backups locally or on cloud platforms like Google Drive, Dropbox, or OneDrive.
Duplicator
Create complete site backups, including files and databases.
Ideal for migrating your localhost site to a live server.
All-in-One WP Migration
Export your site’s files and database into a single file.
Easily import backups to restore your site.
Steps to Use a Plugin:
Install the chosen plugin on your localhost WordPress site.
Follow the plugin’s setup instructions to create and save backups.
Store the backups in a secure location.
Advantages:
Automated and user-friendly.
Additional features like scheduling and cloud integration.
Disadvantages:
Some advanced features may require a premium version.
3. Using Command Line Tools
If you are comfortable with the command line, tools like WP-CLI can streamline the backup process.
Steps:
Backup Files
Use commands to compress your WordPress directory into a zip file:zip -r backup.zip /path/to/wordpress
Backup Database
Export your database using WP-CLI:wp db export backup.sql
Advantages:
Fast and efficient for advanced users.
Scriptable for regular backups.
Disadvantages:
Requires familiarity with the command line.
4. Using Localhost Management Tools
Tools like Local by Flywheel and DevKinsta come with built-in backup options, making the process simpler.
Steps:
Locate the backup feature in your chosen tool.
Follow the instructions to create and store a backup.
Restore the backup if needed.
Advantages:
Integrated with the localhost environment.
Minimal setup required.
Disadvantages:
Limited to specific tools.
Best Practices for Backing Up Localhost WordPress Sites
Schedule Regular Backups
Set a schedule to ensure backups are created consistently.
Use Multiple Storage Locations
Keep backups in at least two locations, such as an external drive and cloud storage.
Test Your Backups
Regularly restore backups to verify their integrity and functionality.
Document Your Process
Maintain a clear record of your backup and restoration steps for future reference.
Secure Your Backups
Encrypt sensitive backups and limit access to authorized users.
Conclusion
Backing up your localhost WordPress site is a vital step in ensuring the safety and continuity of your work. Whether you choose manual methods, plugins, or advanced tools, the key is consistency and reliability. By implementing these best practices, you can safeguard your projects and work with confidence, knowing that you’re prepared for any challenges that come your way.
0 notes
Text
Become a WordPress Developer: Unlocking Power With Code

Learn PHP, JavaScript, WordPress theming & the WP REST API to Create Custom & Interactive WordPress Websites. Become a WordPress Developer: Unlocking Power With Code What you’ll learn: Why code is the key to building whatever you can imagine with WordPressThe ability to write PHP to manipulate the data of a WordPress siteThe ability to write JavaScript to add on-the-fly interactivity to a WordPress siteHow to code your own new custom block types for the "Gutenberg" Block EditorThe skills, knowledge and vocabulary to work professionally as a WordPress developer Requirements: Basic WordPress knowledge (how to create a blog post, etc...)A basic understanding of HTML (e.g. "p" is for paragraph, "h1" is for headline, etc...)No CSS knowledge required (although it helps to understand that CSS is used to add style & design to a page)No JavaScript knowledge required (although it helps to understand that JS is used to add interactivity to a page) Become a WordPress Developer: Unlocking Power With Code Description: Unlock the full power of WordPress and go beyond "just a blog platform" by learning how to code completely custom WordPress powered sites. Updated for 2019: A new 3 part lesson on coding our own custom block type for the new "Gutenberg" Block Editor in WordPress. I've spent the last 12 years studying WordPress, PHP, and JavaScript and now I'm here to teach you everything I know. Come along on this journey with me and become a WordPress developer. Together we will build a website for a fictional university and along the way we will: Install WordPress on your personal computer so you have a private playground copy of WordPress to practice and experiment with Get introduced to the PHP language (this is what powers WordPress) Set Up a New Theme (You'll learn how to convert any HTML template into a living breathing WordPress theme) Create Custom Post Types and Custom Fields Relate pieces of content with each other (e.g. a professor and a program) Learn the basics of (object-oriented) JavaScript Leverage the WP REST API Learn to use JavaScript to communicate with the WordPress back-end on-the-fly Let visitors sign up for a basic account on our site Build a "My Notes" feature (user specific single page application with real-time CRUD actions) Let users "like" or "heart" a professor (update the professor's like count on-the-fly) Deploy our website live up onto the web for the entire world to view And much more! This course may be brand new, but this isn’t my first time teaching. I’ve led training sessions for Fortune 500 companies and I’ve already helped over 17,000 people on Udemy and received the following feedback: "Brad definitely has some of the best techniques to embed the lesson into your mind… hands down these are the best tutorials I have had the opportunity to view." "Presentation is concise without being tedious… you honestly feel that you have a thorough understanding of the subject." "… explained the process. Not memorize this or that, he explained the process. If you're looking to take a course to understand the foundations of creating websites, look no further." Become highly valuable and relevant to the companies that are hiring WordPress developers; in one convenient place alongside one instructor. If you're ready to begin coding custom websites - I'll see you on the inside! Who this course is for: Developers who want to use WordPress as a true Content Management System and not "just a blog platform." Those looking to learn the PHP and JavaScript languages. People who want to learn about the "REST API" which allows us to interact with WordPress data on-the-fly in realtime. Anyone interested in custom post types, custom fields, and creating relationships between various content types. Who is the target audience? Developers who want to use WordPress as a true Content Management System and not "just a blog platform."Those looking to learn the PHP and JavaScript languages.People who want to learn about the "REST API" which allows us to interact with WordPress data on-the-fly in realtime.Anyone interested in custom post types, custom fields, and creating relationships between various content types. Course content of Become a WordPress Developer: Unlocking Power With Code: Total Lecture:47 Welcome to the Course! What is a Dev Environment? (Your First Installation) If You're Unable to Install Local by Flywheel First Taste of PHP Note for Local by Flywheel Users Creating a New Theme PHP Functions PHP Arrays Quick Note: Classic Editor vs Default Editor The Famous "Loop" in WordPress Header & Footer Convert Static HTML Template into WordPress Quick Note: Avoiding Caching (CSS & JS) During Dev Interior Page Template Parent & Children Pages To Echo or Not To Echo Menu of Child Page Links A Few Quick Edits / Improvements Navigation Menus Blog Listing Page (index.php vs front-page.php) Blog Continued Blog Archives (archive.php) Custom Queries Blog: Few Quick Edits & Improvements Note on Gulp Preparing For Automation: What is a Command Line? Workflow and Automation (Part 1) Tip: If Your "localhost:3000" Loads Very Slowly... Workflow and Automation (Part 2) Custom Post Types Displaying Custom Post Types Quick Timeout: Misc Updates Custom Fields Ordering (Sorting) Custom Queries Manipulating Default URL Based Queries Past Events Page (Custom Query Pagination) Creating Relationships Between Content Displaying Relationships (Front-End) Quick Program Edits Professors Post Type Featured Image (Post Thumbnail) Featured Image Sizes & Cropping Page Banner Dynamic Background Image 16 more sections Become a WordPress Developer: Unlocking Power With Code course Created by Brad Schiff Last updated 8/2019 English Read the full article
#Developer#HTML#JavaScript#PHP#WordPresstheming#WordPressWebsites#WPRESTAPI#Udemy Free#udemy free courses#udemy courses online#Free courses#udemy#webcourses
0 notes
Text
How to install Wordpress on localhost (XAMPP)
Wordpress is an open source web management system based on PHP. We can make blogging, eCommerce site by Wordpress. We can install themes easily in WordPress to change the layout. We can install the plugin to extend the functionality of Wordpress. Before installation of Wordpress, We should have apache and MySql server.
Steps to install Wordpress on localhost:
Download the latest version of Wordpress from Wordpress.org and extract it. Make sure your Apache and Mysql servers are running.

Create a database from localhost(localhost/PHPMyAdmin). Enter database name which you want. I have created ‘mywordpress’ database.

Rename extracted file if you want then copy it into htdocs. Type localhost/WordPress on your web browser. Enter Database Name, Database Username, Database Password, Database Host, you can change Table Prefix. Then click on Submit.
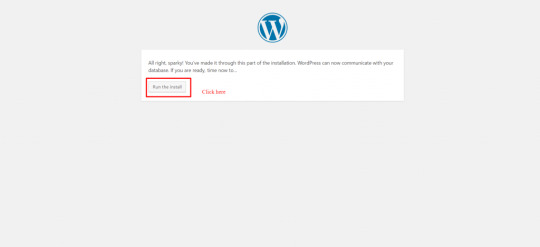
Click on Run the install.
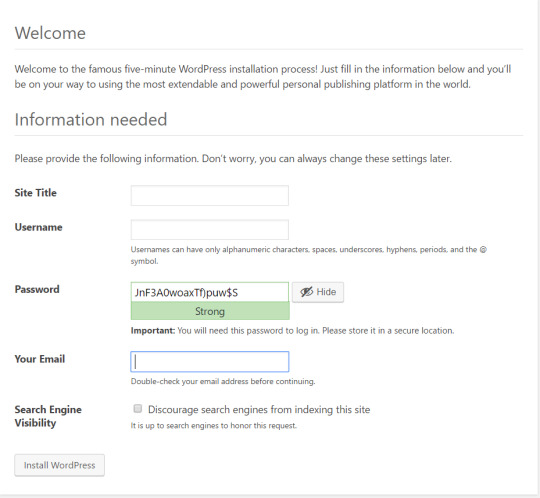
Enter Site Title, Choose Username and Unique Password, Enter Email Address then click on Install Wordpress.
After installation, Login with Your Username and Password. Read the full article
1 note
·
View note
Text

Ananova technical experts recommend disabling access to wp-config. PHP to secure WordPress thus preventing unauthorized access. The file contains sensitive information like database credentials, configuration settings and security keys. The administrators can change table prefixes, relocate core WordPress file folders like wp-plugins, wp-uploads, and wp-content, and perform other advanced configurations.
<?php /** * The base configuration for WordPress * The wp-config.php creation script uses this file during the installation. * You don't have to use the web site, you can copy this file to "wp-config.php" * and fill in the values. * This file contains the following configurations: * * Database settings * * Secret keys * * Database table prefix * * ABSPATH * * @link https://wordpress.org/support/article/editing-wp-config-php/ * * @package WordPress */ // ** Database settings - You can get this info from your web host ** // /** The name of the database for WordPress */ define( 'DB_NAME', 'database_name_here' );
/** Database username */ define( 'DB_USER', 'username_here' );
/** Database password */ define( 'DB_PASSWORD', 'password_here' );
/** Database hostname */ define( 'DB_HOST', 'localhost' );
/** Database charset to use in creating database tables. */ define( 'DB_CHARSET', 'utf8' );
/** The database collate type. Don't change this if in doubt. */ define( 'DB_COLLATE', '' ); /**#@+ * Authentication unique keys and salts. * Change these to different unique phrases! You can generate these using the {@link https://api.wordpress.org/secret-key/1.1/salt/ WordPress.org secret-key service}. * You can change these at any point in time to invalidate all existing cookies. * This will force all users to have to log in again. * * @since 2.6.0 */ define( 'AUTH_KEY', 'put your unique phrase here' ); define( 'SECURE_AUTH_KEY', 'put your unique phrase here' ); define( 'LOGGED_IN_KEY', 'put your unique phrase here' ); define( 'NONCE_KEY', 'put your unique phrase here' ); define( 'AUTH_SALT', 'put your unique phrase here' ); define( 'SECURE_AUTH_SALT', 'put your unique phrase here' ); define( 'LOGGED_IN_SALT', 'put your unique phrase here' ); define( 'NONCE_SALT', 'put your unique phrase here' );
/**#@-*/ /** * WordPress database table prefix. * You can have multiple installations in one database if you give each a unique prefix. Only numbers, letters, and underscores please! */ $table_prefix = 'wp_'; /** * For developers: WordPress debugging mode. * Change this to true to enable the display of notices during development. * It is strongly recommended that plugin and theme developers use WP_DEBUG * in their development environments. * For information on other constants that can be used for debugging, * visit the documentation. * * @link https://wordpress.org/support/article/debugging-in-wordpress/ */ define( 'WP_DEBUG', false ); /* Add any custom values between this line and the "stop editing" line. */ /* That's all, stop editing! Happy publishing. */ /** Absolute path to the WordPress directory. */ if ( ! defined( 'ABSPATH' ) ) { define( 'ABSPATH', __DIR__ . '/' ); } /** Sets up WordPress vars and included files. */ require_once ABSPATH . 'wp-settings.php';
Courtesy: https://jetpack.com/blog/wp-config-php/
How To Disable Access to wp-config.php Using .htaccess
# to protect wp-config.php<Files wp-config.php>order allow,denydeny from all</Files>
Here “deny all” will deny everyone access to wp-config.php.
0 notes
Text
Setting up wordpress for mac

SETTING UP WORDPRESS FOR MAC HOW TO
SETTING UP WORDPRESS FOR MAC INSTALL
Now that DesktopServer is up and running, it will ask you whether you want to create a new developer website. No credit card required You will need to run Apache and MySQL for WordPress to work. You’ll then be prompted to start running Apache and MySQL services in order to run WordPress. Ensure “Yes” is selected and click “Next.” Restart DesktopServer to continue setup. The software will then prompt you to restart so it can run as an admin and create, modify, start and stop web service. Select “New DesktopServer Limited Installation.” In this tutorial we’ll set up the limited version of DesktopServer.ĭesktopServer will then carry on installing and ask you to close the installer. You’ll then be asked to choose a product. In the next window, accept the terms and conditions.
SETTING UP WORDPRESS FOR MAC INSTALL
Follow the prompts to install DesktopServer. Once installed, launch DesktopServer and you will be prompted to complete set up. Once downloaded, install DesktopServer like you would any other software on OS X. There is also a pro version of the software, DesktopServer Premium, but today we’re going to stick with the free, limited version. Head to the website and download DesktopServer. htaccess.įor this tutorial, we’re going to set up the limited version of DesktopServer, which provides a maximum of three virtual servers. The cool thing about DesktopServer is that it’s even easier to set up than WAMP and you don’t have to manually edit any files, like wp-config.php or. Earlier this week I looked at MAMP, a similar server software tool that also provides the necessary server setup needed to run WordPress on a computer rather than online. Each of these servers is created on your computer and can be accessed from your browser using a made-up name, i.e.
SETTING UP WORDPRESS FOR MAC HOW TO
In this tutorial, I’ll walk you through how to set up the limited version of DesktopServer on OS X.Ĭontinue reading, or jump ahead using these links:ĭesktopServer, by, allows you to create dozens of “virtual servers” for developing and testing themes and plugins. And thanks to DesktopServer, it can take as little as 5 minutes to get WordPress up and running on your local machine.ĭesktopServer is so easy, you may even consider ditching WAMP. Setting up a localhost environment for WordPress can save you loads of time if you regularly test themes and plugins.
0 notes
Text
Wordpress localhost ampps alternative

#Wordpress localhost ampps alternative how to#
#Wordpress localhost ampps alternative install#
#Wordpress localhost ampps alternative update#
I had mega problems getting the XAMPP Server working locally, so I decided to try the WAMP. In “Step 5”, you say “With your browser go to Should this be: Thanks so much for your assistance! In “Step 4”, you say “…… the username is root, enter nothing between the ‘.’, and host……” What is the “enter nothing between the ‘…’ referring to? The password?ģ. In “Step 3″, you say ” Go to wamp / www”… This directory does not exist. (get “IE cannot display this webpage” error on this one. No luck on either front, as constant “The requested URL was not found on this server” errors.
#Wordpress localhost ampps alternative install#
Having endless problems with the install and have tried both Nicks and your directions. If you’re having a problem getting your WAMP or XAMPP server online, that’s a whole ‘nother issue, but check to make sure you’re not using IIS infact disable IIS if possible. Step5.)With your browser go to Hope that helps! New file structure will be wamp / Step4.)Unless you’ve changed the db username, password or host name then the db_name is whatever you created in Step 2, the username is root, enter nothing between the ‘.’, and host is localhost. Step 3.) Go to wamp / to a folder ( mysite) with only the content of the wordpress folder dumped directly into ( mysite). With WAMP installed (or XAMPP) your Step 3, 4 and 5 will look different then, our gracious host has suggested, with a MAMP install.
#Wordpress localhost ampps alternative how to#
In the next chapter, I’m going to show you how to create a custom WordPress theme in designer way (no PHP skill is required).įor anyone using WAMP (and possibly XAMPP, have not tested) who has any issues related to Step 3-5, here is your solution: With your browser, go to and follow the instructions to install WordPress.
#Wordpress localhost ampps alternative update#
Open wp-config.php and update the database details (db_name, user, password, host) according to your local server. In the folder, rename the wp-config-sample.php to wp-config.php. Go to the htdocs folder (where you installed the MAMP), extract the wordpress.zip to a new folder (eg. Go to and download the latest build of WordPress. In the phpMyAdmin page, create a new database (eg. Create a New DatabaseĪfter you’ve installed MAMP, run it and it should take you to the start page. I’m using Mac here, so I’m going to install MAMP. In order to run any PHP/database application on a local computer, you need a local host (ie. Run wp-admin/install.php and follow the instructions to install WordPress.īefore you start, let’s look at the requirements to run WordPress: Rename the wp-config-sample.php file to wp-config.php and update the database details according to your local server. Install a local server ( Mac: MAMP, PC: XAMPP or WAMP).ĭownload WordPress from and extract the files to a new folder under the htdocs folder. Here are the simplified steps on how to install WordPress on a local computer: If you have some technical background, you can skip the detailed steps in this tutorial. This tutorial is intended for beginners who want to learn how to run WordPress locally. You can also use the local version to test new plugins, themes, and upgrades. By doing so, it will save you time from updating and previewing files (so, you don’t have to frequently upload files on every change). In this chapter, you will learn how to install WordPress on a local computer. This is the first chapter of the Complete WordPress Theme Guide series.
0 notes
Text
Mamp wordpress mac theme

MAMP WORDPRESS MAC THEME HOW TO
MAMP WORDPRESS MAC THEME FOR MAC OS
MAMP WORDPRESS MAC THEME INSTALL
MAMP WORDPRESS MAC THEME PRO
MAMP WORDPRESS MAC THEME SOFTWARE
Click “Let’s Go!”.Īs you can see above you only need to change the top 3 fields to connect to your database: You’ll then see a screen checking that you have the 5 bits of info you’ll need to configure WordPress. The safest way is to manually create the file.” Ignore it and click “Create a Configuration File”. You can create a wp-config.php file through a web interface, but this doesn’t work for all server setups. With any luck, you’ll be greeted with a screen saying, “There doesn’t seem to be a wp-config.php file.
MAMP WORDPRESS MAC THEME INSTALL
Having created the database you are nearly ready to install WordPress! Go to in your browser.
Type a name for your database (no spaces or special characters) and remember it.
Click Databases in the second line of tabs in blue.
Now that you have all this MAMP goodness installed on your machine, everything that you put in the folder Applications/MAMP/htdocs/ ends up on your localhost “website” which you can access through a browser at Next you should download the most recent version of WordPress (how many times have we all done that?) After unzipping, place the /wordpress/ folder inside your /htdocs/ folder.
P is for PHP (or Perl or Python) the programming languages used for web development.
M is for MySQL the database management system (or database server).
MAMP WORDPRESS MAC THEME FOR MAC OS
M is for Mac OS X, your operating system.
MAMP WORDPRESS MAC THEME SOFTWARE
MAMP is a acronym that stands for the stack of software it uses: This can be done in 5 minutes.įirst of all you should download and set up MAMP.
MAMP WORDPRESS MAC THEME HOW TO
The following video shows you how to install WordPress on your Mac using MAMP. If you are on a Windows PC you can use XAMPP. Getting WordPress installed on your own computer, as if your computer was a webhost’s server, is easy on a Mac with MAMP. Why would you want to do this? You’ll find the process much quicker and it’ll stop you going crazy waiting for files to upload to the server. It does not store any personal data.Any sort of WordPress development – testing themes and plugins, creating themes and plugins, etc. The cookie is set by the GDPR Cookie Consent plugin and is used to store whether or not user has consented to the use of cookies. The cookie is used to store the user consent for the cookies in the category "Performance". This cookie is set by GDPR Cookie Consent plugin. The cookie is used to store the user consent for the cookies in the category "Other. The cookies is used to store the user consent for the cookies in the category "Necessary". The cookie is set by GDPR cookie consent to record the user consent for the cookies in the category "Functional". The cookie is used to store the user consent for the cookies in the category "Analytics". These cookies ensure basic functionalities and security features of the website, anonymously. Necessary cookies are absolutely essential for the website to function properly. Well, it's either a blackberry iced-tea mojito, or a nice flat white coffee with a double shot of espresso, or, a caramel macchiato coffee. You know what I love sipping on whilst I'm working on website projects? Step One: Go get yourself a beverage of your choice
MAMP WORDPRESS MAC THEME PRO
I'm running a 2016 MacBook Pro with Touch bar with the latest version of Mac OS, however, it really doesn't really matter which version of the OS you're using or how old your Mac is, this tutorial is universal.Īre you ready? Let's get to it. OK, so now let's get on with the detailed tutorial on how to install WordPress locally on your Mac.
You save yourself money on additional web hosting resources, and you don't need to purchase a new domain for your local site either.
If you're a web developer like myself, a great way to start a new project is locally, before moving it over to a staging or live site.
You can access your site offline since it's installed locally on your Mac.
You can do all the messing around you want without running the risk of breaking your live site.
There are some advantages of hosting a WordPress website locally on your computer, here are some of them. I much prefer to mess around with a WordPress site that is actually installed locally on my Mac. Reason being is that if I make a mistake, I could bring down my entire site.Īnd the headache of trying to fix things I could do without. These days, however, I try not to do too much messing around with my actual live site. I think it's a great way to learn how to do new things with WordPress. Hey, I'm exactly the same, I love messing around with my site. If you have a WordPress website then I'm sure you love to spend time messing around with it, tweaking it endlessly. In this post, I'll show you how to install WordPress locally on a Mac computer using MAMP.
0 notes