#json property from variable
Explore tagged Tumblr posts
Visit Tumblr Blog
Explore Tumblr blogs with no restrictions, modern design and the best experience.
Last Seen Tumblr Blogs


Fun Fact
69% of Tumblr users are millennials.
Text
Difference between ES5 and ES6
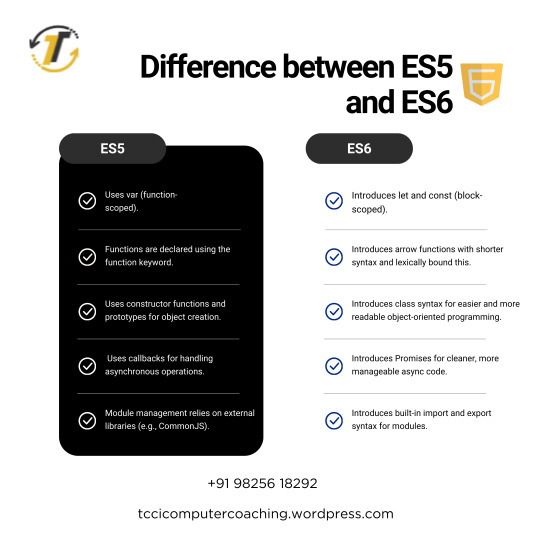
JavaScript is the must need programming language for both web and software engineering, and it keeps on changing with time. All developers should know the difference between ES5 and ES6 because major variations and advancements were made in those versions. ES5 started the foundation and had shown more advanced features in the version of ECMAScript 2015, also known as ES6. At TCCI Computer Coaching Institute, we ensure that each student understands these updates deeply so that they can be ahead in their programming journey.
What is ES5?
ES5, which stands for ECMAScript 5, was launched in 2009. This is the version of JavaScript which was seen to be stable, and it filled some of the most important holes that were there in the earlier versions. Key features of ES5 include:
Strict Mode: Strict mode allows developers to write secure and optimized code because it throws an error for all actions that are allowed in other versions.
JSON Support: ES5 provided support to work with JSON (JavaScript Object Notation), which is an essential feature for data interchange.
Array Methods: It introduced several new array methods, such as forEach(), map(), filter(), and reduce(), that simplify operations on arrays.
Getter/Setter Methods: ES5 allows the use of getter and setter methods, making it possible to control object properties.
What is ES6?
ES6, also commonly referred to as ECMAScript 2015, was a substantial update to the JavaScript language to include many new features as well as additions that make this language more powerful, concise, and much more modern in its expression. Some of its key features include:
Let and Const: There are let and const, added to declare a variable, with let offering better scoping than var, and const having no redefinition.
Arrow Functions: More concise syntax - also preserves this context.
Template Literals: Template literals ease string interpolation and multiline strings, and are much readable and less error-prone.
Classes: Classes, which are new in ES6, make the syntax for creating objects and handling inheritance much simpler than it used to be. It makes JavaScript resemble other more conventional object-oriented programming languages.
Promises: The promise is how asynchronous code works; promises handle success and failure states much easier.
Destructuring: This helps extract values from arrays and objects into separate variables in a simple syntax.
Modules: ES6 provided modules, where JavaScript code could be broken into reusable, maintainable pieces.
Key differences between ES5 and ES6
Variable declarations:
ES5 : Variables are declared using var.
ES6 : let and const keywords were introduced which provide block scoping and better predictability
Functions:
ES5: The function keyword is used to declare functions, and the this context can be a little tricky in some cases.
ES6: Arrow functions offer a more compact syntax and lexically bind the this keyword, avoiding common problems with this.
Object-Oriented Programming:
ES5: JavaScript uses prototype-based inheritance.
ES6: Introduces the class syntax, making object-oriented programming much more intuitive and easier to use.
Asynchronous Programming:
ES5: Callbacks are typically used for handling asynchronous code.
ES6: It introduced promises that made asynchronous operation cleaner.
Modules:
ES5 JavaScript does not natively support modules. Developers will use libraries such as CommonJS or RequireJS.
ES6 Native module support using the keywords import and export, which facilitates code organization and reusability
Template Literals:
ES5 String concatenation is done by using + operators, which can sometimes be error-prone and messy to read.
ES6 Template literals enable multi-line strings and interpolation of strings, enhancing readability.
Why Is It Important to Learn ES6?
At TCCI Computer Coaching Institute, we understand that staying updated with the latest advancements in JavaScript is crucial for your programming career. Learning ES6 is not just about getting familiar with new syntax, but also about adopting best practices that improve the quality and maintainability of your code.
As the JavaScript community shifts towards ES6 as the norm, most of the modern libraries and frameworks are built using the features of ES6. So, mastering ES6 will help you work with the latest technologies like React, Angular, and Node.js. The difference between ES5 and ES6 will also make you a more efficient developer in writing clean, efficient, and scalable code regardless of whether you are a beginner or a seasoned developer.
Learn ES6 with TCCI Computer Coaching Institute
We provide in-depth JavaScript training classes at TCCI Computer Coaching Institute that covers everything, starting from the basic knowledge of ES5 to the latest features added to ES6 and beyond. We ensure you have hands-on practice by giving practical exercise and real-world projects, along with individual guidance.
Learn at your pace with our online and offline classes.
Expert Trainers: Our trainers are industry experts with years of experience in teaching JavaScript and web development.
Real-World Applications: We focus on real-world programming challenges, ensuring that you are well-prepared for the job market.
It is one of the important steps in becoming a good JavaScript developer, as one should master the differences between ES5 and ES6. We provide the right environment and resources to learn and grow as a developer at TCCI Computer Coaching Institute. Join us today and start your journey toward mastering JavaScript!
Location: Ahmedabad, Gujarat
Call now on +91 9825618292
Get information from https://tccicomputercoaching.wordpress.com/
#Best Computer Training Institutes Bopal Ahmedabad#Best Javascript Course Training in Ahmedabad#Difference between ES5 and ES6#ES5 vs ES6#TCCI Computer Coaching Institute
0 notes
Text
Scope Computers
Web development Training
(Admission Open)
New Batch Start 15.05.2024
A comprehensive web development course typically covers a wide range of topics, skills, and technologies necessary to build modern websites and web applications. Here's a detailed description of what might be included in such a course:
### Introduction to Web Development
- Overview of web development concepts, history, and industry trends
- Understanding the client-server model and how the web works
- Introduction to basic web technologies: HTML, CSS, JavaScript
### Frontend Development
1. **HTML (Hypertext Markup Language)**
- Basics of HTML: structure, elements, attributes
- Semantic HTML for better accessibility and SEO
- Forms and input elements
- HTML5 features and APIs
2. **CSS (Cascading Style Sheets)**
- Styling HTML elements: selectors, properties, values
- CSS layout techniques: flexbox, grid, positioning
- Responsive web design and media queries
- CSS preprocessors like Sass or LESS
- Introduction to CSS frameworks like Bootstrap or Foundation
3. **JavaScript**
- Fundamentals of JavaScript: variables, data types, operators, control structures
- Functions and scope
- DOM manipulation and event handling
- Asynchronous JavaScript and promises
- Introduction to ES6+ features
- Working with JSON and AJAX
### Backend Development
1. **Server-side Languages**
- Introduction to server-side programming languages like Node.js, Python (Django/Flask), Ruby (Rails), PHP, etc.
- Setting up a development environment
- Basic syntax, data types, and control structures
2. **Database Management**
- Relational databases (SQL) vs. NoSQL databases
- Working with databases using SQL (e.g., MySQL, PostgreSQL) or NoSQL (e.g., MongoDB)
- CRUD operations (Create, Read, Update, Delete)
- Database normalization and optimization techniques
3. **Web Frameworks and APIs**
- Introduction to web frameworks for backend development (e.g., Express.js for Node.js, Django for Python)
- RESTful API design principles
- Authentication and authorization
- Handling HTTP requests and responses
### Full Stack Development
- Integrating frontend and backend components to build full-fledged web applications
- Project-based learning: building real-world web applications from scratch
- Version control with Git and GitHub
### Additional Topics
- Web security best practices: XSS, CSRF, SQL injection, etc.
- Performance optimization techniques
- Deployment and hosting options for web applications (e.g., Heroku, AWS, Netlify)
- Continuous integration and deployment (CI/CD) pipelines
- Web accessibility standards and guidelines
- Basics of SEO (Search Engine Optimization)
### Elective/Specialization Tracks (Optional)
- Mobile web development
- Single-page application (SPA) development with frameworks like React, Angular, or Vue.js
- E-commerce website development
- Progressive web apps (PWAs)
- Web design principles and UI/UX fundamentals
### Conclusion
- Final project/portfolio development
- Career guidance, job search strategies, and interview preparation
This course structure aims to provide students with a well-rounded understanding of both frontend and backend web development, along with essential skills in design, deployment, and project management necessary to succeed in the field.

#WebDevelopment#FullStack#HTML#CSS#JavaScript#FrontendDevelopment#BackendDevelopment#WebDesign#CodeNewbie#LearnToCode#Programming#WebDevLife#DeveloperCommunity#TechEducation#OnlineLearning#WebDevelopmentBootcamp#CodingBootcamp#WebDevelopmentCourse#WebDevTutorial#BuildWebsites
1 note
·
View note
Text
Mastering Data Wrangling Techniques: Essential Preparation for Data Analyst Course in Mumbai
Navigating from raw data to meaningful decisions typically involves facing numerous challenges in the data analysis process. Data wrangling, or data munging, is the crucial preliminary step in this journey. It entails transforming raw data through cleaning, structuring, and augmentation to prepare it for analytical use. For aspiring data analysts in Mumbai, mastering data wrangling techniques is imperative to excel in their profession and maximise the potential of the data they work with. Here, we delve into the essential techniques that form the backbone of data wrangling and its significance in the context of a Data Analytics Course in Mumbai.
1. Understanding Data Sources:
Before embarking on the data-wrangling journey, it's crucial to comprehend the various data sources available. These may include structured data from databases, semi-structured data like JSON or XML files, or unstructured data like text documents or social media feeds. Familiarising oneself with these diverse data sources lays the foundation for effective data wrangling.
2. Data Cleaning:
To enable practical analysis, data originating from real-world contexts must often be amended and supplemented to address missing values. Data cleaning involves identifying and rectifying these anomalies to ensure data accuracy and reliability. Techniques such as imputation for missing values, outlier detection, and removing duplicates are commonly employed during this phase.
3. Data Transformation:
Transforming data into a standardised format is essential for seamless analysis. This involves normalisation, where data is scaled to a consistent range and categorical variables are encoded into numerical representations. Furthermore, by utilising feature engineering practices, one can generate additional variables that better represent the patterns hidden within the data.
4. Handling Data Quality Issues:
Data quality issues, such as formatting inconsistencies or conflicting values, pose significant challenges during data wrangling. Techniques like data validation and data profiling aid in identifying and addressing these issues effectively. Analysts can derive more accurate insights from their datasets by ensuring data integrity and consistency.
5. Exploratory Data Analysis (EDA):
Within the data-wrangling sequence, EDA plays an essential role by revealing the intrinsic properties and configurations of the data. Visualisations, summary statistics, and correlation analysis are commonly used in EDA. Analysts can gain valuable insights that inform subsequent wrangling decisions by exploring the data thoroughly.
6. Automation and Scripting:
As datasets grow in size and complexity, manual data wrangling becomes increasingly impractical. Automation techniques, facilitated by scripting languages like Python or R, enable analysts to streamline repetitive tasks and efficiently handle large volumes of data. Analysts can expedite the data-wrangling process by writing reusable scripts and workflows and focusing on higher-level analysis tasks.
7. Documentation and Version Control:
Documenting the data wrangling process is essential for reproducibility and transparency. Comprehensive documentation should capture data sources, cleaning procedures, and transformation steps. Moreover, version control systems like Git enable analysts to track data changes over time, facilitating collaboration and error management.
In the context of pursuing a Data Analyst Course in Mumbai, mastering data wrangling techniques holds immense significance. Mumbai, being a hub of diverse industries ranging from finance to entertainment, presents abundant opportunities for data analysts. However, aspiring analysts must possess solid data-wrangling skills to leverage the potential of data effectively. A comprehensive Data Analyst Course should encompass practical training modules focused on data wrangling techniques, equipping students with the necessary tools and expertise to tackle real-world data challenges.
By emphasizing hands-on experience with industry-standard tools and datasets, such courses empower students to confidently navigate the complexities of data wrangling. Additionally, guest lectures and workshops conducted by seasoned professionals provide valuable insights into best practices and emerging trends in data wrangling.
In conclusion, data wrangling is the cornerstone of practical data analysis, facilitating the transformation of raw data into actionable insights. Individuals interested in a data analyst career in Mumbai must focus on honing their data-wrangling abilities. Enrolling in a Data Analyst Course that provides extensive instruction and practical application can help them gain the expertise required to succeed in this vibrant field.
ExcelR's Data Analyst Course in Mumbai provides a robust curriculum designed to equip you with the essential skills for a successful career in data analysis.
Business name: ExcelR- Data Science, Data Analytics, Business Analytics Course Training Mumbai
Address: 304, 3rd Floor, Pratibha Building. Three Petrol pump, Lal Bahadur Shastri Rd, opposite Manas Tower, Pakhdi, Thane West, Thane, Maharashtra 400602
Phone: 9108238354,
Email: [email protected]
0 notes
Text
How Chrome Extensions Can Scrape Hidden Information From Network Requests By Overriding XMLHttpRequest

Chrome extensions offer a versatile way to enhance browsing experiences by adding extra functionality to the Chrome browser. They serve various purposes, like augmenting product pages with additional information on e-commerce sites, scraping data from social media platforms such as LinkedIn or Twitter for analysis or future use, and even facilitating content scraping services for retrieving specific data from websites.
Scraping data from web pages typically involves injecting a content script to parse HTML or traverse the DOM tree using CSS selectors and XPaths. However, modern web applications built with frameworks like React or Vue pose challenges to this traditional scraping method due to their reactive nature.
When visiting a tweet on Twitter, essential details like author information, likes, retweets, and replies aren't readily available in the DOM. However, by inspecting the network tab, one can find API calls containing this hidden data, inaccessible through traditional DOM scraping. It's indeed possible to scrape this information from API calls, bypassing the limitations posed by the DOM.
A secondary method for scraping data involves intercepting API calls by overriding XMLHttpRequest. This entails replacing the native definition of XMLHttpRequest with a modified version via a content script injection. By doing so, developers gain the ability to monitor events within their modified XMLHttpRequest object while still maintaining the functionality of the original XMLHttpRequest object, allowing for seamless traffic monitoring without disrupting the user experience on third-party websites.
Step-by-Step Guide to Overriding XMLHttpRequest
Create a Script.js
This is an immediately invoked function expression (IIFE). It creates a private scope for the code inside, preventing variables from polluting the global scope.
XHR Prototype Modification: These lines save references to the original send and open methods of the XMLHttpRequest prototype.
Override Open Method: This code overrides the open method of XMLHttpRequest. When we create an XMLHttpRequest, this modification stores the request URL in the URL property of the XHR object.
Override Send Method: This code overrides the send method of XMLHttpRequest. It adds an event listener for the 'load' event. If the URL contains the specified string ("UserByScreenName"), it executes code to handle the response. After that, it calls the original send method.
Handling the Response: If the URL includes "UserByScreenName," it creates a new div element, sets its innerText to the intercepted response, and appends it to the document body.
Let's explore how we can override XMLHttpRequest!
Creating a Script Element: This code creates a new script element, sets its type to "text/javascript," specifies the source URL using Chrome.runtime.getURL("script.js"), and then appends it to the head of the document since it is a common way to inject a script into a web page.
Checking for DOM Elements: The checkForDOM function checks if the document's body and head elements are present. If they are, it calls the interceptData function. If not, it schedules another call to checkForDOM using requestIdleCallback to ensure the script waits until the necessary DOM elements are available.
Scraping Data from Profile: The scrapeDataProfile function looks for an element with the ID "__interceptedData." If found, it parses the JSON content of that element and logs it to the console as the API response. If not found, it schedules another call to scrapeDataProfile using requestIdleCallback.
Initiating the Process: These lines initiate the process by calling requestIdleCallback on checkForDOM and scrapeDataProfile. This ensures that the script begins by checking for the existence of the necessary DOM elements and then proceeds to scrape data when the "__interceptedData" element is available.
Pros
You can obtain substantial information from the server response and store details not in the user interface.
Cons
The server response may change after a certain period.
Here's a valuable tip
By simulating Twitter's internal API calls, you can retrieve additional information that wouldn't typically be displayed. For instance, you can access user details who liked tweets by invoking the API responsible for fetching this data, which is triggered when viewing the list of users who liked a tweet. However, it's important to keep these API calls straightforward, as overly frequent or unusual calls may trigger bot protection measures. This caution is crucial, as platforms like LinkedIn often use such strategies to detect scrapers, potentially leading to account restrictions or bans.
Conclusion
To conclude the entire situation, one must grasp the specific use case. Sometimes, extracting data from the user interface can be challenging due to its scattered placement. Therefore, opting to listen to API calls and retrieve data in a unified manner is more straightforward, especially for a browser extension development company aiming to streamline data extraction processes. Many websites utilize APIs to fetch collections of entities from the backend, subsequently binding them to the UI; this is precisely why intercepting API calls becomes essential.
#Content Scraping Services#Innovative Scrapping Techniques#Advanced Information Scraping Methods#browser extension development services
0 notes
Note
What is Haskell used for? I can point to many languages and say, "oh, this is often used for thus and such" but I don't know what Haskell's common use cases are.
The main use of Haskell is in improving Haskell :P
Seriously, parser combinators are a great idea and easily expressed in Haskell, and so it's easy enough to write some basic parsers for a non-syntax heavy language, and a lot of the features are developed with this in mind (and has trickle down effects on serialization/deserialization libraries--Aeson is pretty good for dealing with JSON (de)serialization)
I really like it for writing backends with Servant (kind of like Flask in that it's not a batteries-included type of server library), although the errors are kind of confusing, especially if you're not used to Haskell already
There's a relatively Haskell-specific development of a thing called "monad transformers", which is an ugly term for a way to write capability-specific abstractions
For instance, if you have MonadDatabase or a DatabaseT in your type signature, then that function can call whatever functions are defined for MonadDatabase, be it get/set for some restricted types, or computing raw SQL...either way, it's obvious that if you're trying to use this to get the system time, you're using the wrong abstraction (and you can have multiple of these in your type signature, so you might have (Monad m) => AWSBucketT (TimeT (m Int)), which assuming some definitions, might say "In some monad m, I'll return an Int, and have capabilities to access our company's AWSBuckets and read the system time"
(Monad transformers as they're used often aren't great imo, but i've already gone too deep, perhaps too deep by even saying "monad")
Beyond that, a couple other useful things: you might know map from Python or Rust, but what if it was easier to automatically get a sensible definition of map? After all, there's usually only one "right answer"--apply the function to all relevant targets!
So say you have some type like data Tree e a = Leaf e | Node a [Tree e a]
(so, a Tree over e and a is either a `Leaf` that only has an `e`, or a Node, which is annotated with an `a`, and has a list of child trees over the same types)
then if you just add `derive Functor` to the end of the datatype, it'll create a map function that looks like:
map f (Leaf e) = Leaf e
map f (Node a trees) = Node (f a) [map f tree | tree <- trees]
(or in pythonish: def map(f, t): if t.isLeaf(): pass; else: t.value = f(t.value); t.children = [map(f, tree) for tree in t.children])
Say you want your map to effect the Leafs rather than the annotations of the Nodes, then all you need to do is flip the type variables, then you can just write it as data Tree a e = Leaf e | Node a [Tree a e] deriving Functor
There's similar derivings for Show (the default printing type) or JSON de/serialization among others. If you're familiar with Rust's derive macro, it's a similar thing
This isn't something one should choose a language *for* but i think it's pretty neat
Property testing is easy in Haskell, you assert some property that you think your funciton should have (say, f(f(x)) = f(x)), write a way to compare the output for equality (or derive it), write a way to generate your inputs (or derive it, you can also easily customise it thanks to the combinators), and then your computer will generate however many "unit tests" that you want, and then check them all at once against the property. (There's an extension to this where if you put an ordering of "complexity", the property testing library will often try to find the "simplest" (according to your definition) input that violates the property.)
The pattern matching/equational definition of functions is something that I like a lot, there's a case analyzer built into the compiler that tells you when you've neglected a case (or added a case to a datatype), and there's extensions for IDEs that will show this as a linting message
Some other things that Haskell's used for is HPC (supposedly the FFI isn't awful, and implementing a really basic version of Map/Reduce in Haskell is pretty trivial, thanks to the thought put into async + threaded programming (it has problems and footguns, just mostly different ones than you're used to except for "the fuck is the runtime doing"; that just happens, and the GHC RTS i hear is like an abyss of phd theses)
There's also a healthy niche of circuit design(?), thanks to the deep support for embedded dsls; I'd recommend going through https://hackage.haskell.org/package/clash-ghc or Conal Elliot's work
Finally, Haskell is a language that tries to be on the forefront of language design. This means that a lot of useless and confusing features have snuck into the language, although usually they're gatekept behind compiler extensions. However, a lot of neat things show up early on in the Haskell world, before a lot of other programming languages pick up the features! I've already mentioned the deriving feature similar to Rust, it also has a linear types extension (tho support is limited as its a recent addition), and was a breeding ground for reactive programming iirc (React makes a lot more sense than Haskell's similar libraries tho)
#long post#trying not to be too technical while also being correct#i'm bad at selling haskell because it just feels so much comfier to me than any other language for a bunch of reasons that seem minor#but stack up#capability based programming good#equational function defintions good#the freedom of expression while also being constrained to reasonableness is good#definitely rambling
12 notes
·
View notes
Text
@staff Look, it’s been more than a week. I’m gonna hit you with this again because I hate endless scrolling, and I hate it because I’m often using under-powered devices to do odd things including using tumblr web, but the way you’ve implemented non-endless scrolling is broken. It’s broken, and its not accessible.
I’m currently writing a media server web interface that does a very similar thing. It loads items in via AJAX so that you don’t have a full page load during searches and so you can navigate without interrupting what you’re currently playing/doing.
I imagine you made your change so that everything could be served off the same JSON API instead of having to synchronize updates, which is great project management. Good job.
But what if I told you that you could have your cake and eat it too. You can! Let me introduce you to the Window History API. We’re going to use two main items:
The Function: history.pushState({state}, ‘Title’, ‘url’)
The Property: window.onpopstate
In my case I created a controller object that controls fetching and rendering the AJAX items, it is unimportant for this example. The function you will see is controller.page(int, bool), which just goes and gets the given page with an optional bool to tell it to push a state to the history or not.
On page load we need to look and see if there is a search string (like we might find if someone accidentally, or purposefully, presses the refresh button).
If you’re unfamiliar with the phrase search string here’s an example URL:
https://www.tumblr.com/dashboard?s=superwholock&p=5
Everything after and including the “?” is the search string. It’s a number of key name pairs separated by “&”s. The Key, or name, is on the left of the “=“ and the value is on the right. This are important as it gives users and tools a way to interact with, keep track of, and manage states of your webapp.
In JavaScript, getting the search string is pretty simple. We’re going to use the URL object:
var url = new URL(window.location); //Just use our provided URL var s = url.search;
The url object has a property which has the value of the search string. If that value is empty, then we don’t have a [s]earch or [p]age value
if(s.length == 0){ controller.page(1, false); // Don’t push our state }
If there is, we need to split it into pieces we can use:
else{ s = split(’&’); //Split our string into an array s[0] = s[0].replace(’?’, ‘’); //Remove the leading ? from the first entry var params = {}; //Create an empty object so we can use string keys for(var i = 0; i < s.length; i++){ var temp = s[i].split(’=‘); params[temp[0]] = decodeURI(temp[1]); //Decode our URI value to ensure it’s something we can use } if(params[’s’] != undefined){ document.getElementById(’#search’).value = params[’s’]; } if(params[’p’] != undefined){ var page = params[’p’]; }else{ var page = 1; } controller.page(page, false); }
Boom, now on page load if there is a [s]earch or [p]age value provided in the URL, our app will go ahead and load into that state. This protects us from bad button presses, spotty internet connections, and a whole bunch of headaches.
Next we need to actually push our states, luckily the History API makes that really easy. We pass the pushState function three values:
An object with whatever variables we want to assign it. In our example, I want to push the page and search variables so we don’t have to spend time parsing the URL if we don’t have to.
A title for our history item. Most browsers don’t use this, so just in case they start we’re going to pass an empty string ‘‘.
A URL for our history item. No worries, this can be relative, so we’re just going to pass the Search string we had to parse earlier (everything from the “?” and on)
I did this work inside my controller.page() function so remember the page variable is already provided to the function, but you can put this wherever needed:
var data = {’page’: page}; var search = document.getElementById(’search’).value; var url = ‘?p=‘ + page; if(search != ‘‘){ data[’search’] = search; url += encodeURI(search); } if(push == true){ //If we were told to push this state history.pushState(data, ‘‘, url); }
Alright, now we’re setting our initial state and we’re pushing our states, now we just need to build the logic that controls what happens when we go back or forward through those states: window.onpopstate = function(e){ if(e.state != null){ //If we have a state var state = e.state; if(state.search != undefined && state.search != ‘‘){ document.getElementById(’search’).value = state.search; }else{ document.getElementById(’search’).value = ‘‘; } controller.page(state.page, false); // You don’t want to push a state when you’re going back a state }else{ //If you’re at the first state then you don’t have an object and you need to parse the URL just like the first time. //Alternatively, if you want to write less, just parse the URL all the time and then you don’t need the Null check in this function } }
Conclusion, this is how you switch to an entirely AJAX driven content pool without breaking expected functionality of the browser. As an added benefit, it also allows your app to recover from poor internet connection, your tab being suspended or recovered from a crash, or any number of other cases.
I would really appreciate it if you would fix it, but if you don’t have time and have some money to throw at the problem, I’d be happy to fix it for you.
6 notes
·
View notes
Text
Update Announcement Bar in Shopify :)
Hi welcome to update announcement bar tutorial where we will have a look at the advanced implementation so that the value for someone to qualify for free shipping it's updated whenever someone adds an item to the card without the page having to refresh and the same thing should work on the cart page.
If someone adjusts the quantity you can see the message gets updated and it should be fun to implement this so let's go alright so starting this post I assume that you have already seen part 1 of this tutorial and just to quickly recap that by now you should have this modified announcement bar and you can display the amount that someone needs to add in order to unlock free shipping.
When you add an item to the cart this value won't get updated automatically and you need to refresh the page so that it gets updated and if you haven't seen part one yet I highly recommend you go back and watch that first so you can get a really good understanding of what is going on but otherwise if you're using the theme you could also go ahead and copy and paste the content of our modified header that liquid fire.
Okay so that being said I can already tell you that in this post we are going to write some JavaScript code to implement our update functionality and therefore I want to give you a quick overview on how the JavaScript is structured within the W theme and you will find the same pattern and many other themes as well and I can simply right click with my Chrome browser and then go to inspect and switch to the console and in here we can test and debug JavaScript code but what I want to show you right now is that our theme fires attached an object that is called theme to the window and in that theme object we will find all the theme elements that have to be managed in some way by JavaScript and just to name a few examples here we have the mobile navigation or maybe the search drawer or some post if we have posts on our page and all these elements contain methods that help to control them.
So for example we could use the MDOT search drawer and in here we will find a method that is called open and this would simply bring up the search bar and in the same way we have a method that is called closed and this would dismiss the search bar and in the same way we are going to create a helper function to update our shipping bar and then we will simply call that every time an input changes.

Okay so now we can have a look into the actual theme code and in your theme files you will find a folder called assets and this should contain the theme j/s which should contain most of the JavaScript for your theme and you can already see the window dot theme object which I just showed you on the front-end and here it is set to a blank object and then over time you will see that all the other elements are added to this object.
So we have the theme of currency the draw the header the mobile navigation the video and so on and so forth and within these elements we have all the helper functions that we can use to control the elements but for example here we have a method called pause video and here we have one that is called load videos and now we are going to scroll to the bottom and down there we will implement our own shipping bar element with all the necessary update functions.
So let me zoom in that it's easier for you to read and down here we drop to a new line and first of all we create our new shipping bar element so let's type theme dot shipping bar and then we set it to an empty JavaScript object and now we will drop in between these curly brackets and down here I can define the so-called object properties and all the properties will be public on the front end so maybe we could simply type test and then some text hello world and maybe another property or test - which will be some random number maybe one two three four five but we can also add functions to these properties.
So we will have an update function and then we would simply type function a pair of parenthesis and a pair of curly brackets and in here we can define what happens when someone executes the function let's do user lock and for now we would simply type updated shipping bar and for now safe this and after a quick refresh on the front end.
We should now have access to our new themed shipping bar object and you can already see that we have our defined values so ended shipping bar the test equals had a word and test two as one two three four five and we can even call our update method therefore we just use parentheses and you can see now it says updated shipping bar and this is exactly where we will implement our real update functionality later but for now I just want to tell you that I have a small problem with these two values being public because later we will have some variables and I don't want them to be public but with the syntax that I used we don't have a way to create private or hidden properties.

So we will fix that and then we will go ahead and implement the update method so back in the theme file we will now define this object in a slightly different way so let's type a theme but shipping bar and now we won't set it to an object immediately or instead to a function this function should be executed immediately so we type parentheses at the end and in between the curly brackets we can define that function and in here we can now define all the variables that we need and our update method and then all the variables will be private and we will only return or make the update method public and now I feel like this may sound a little bit confusing especially if you're new to JavaScript.
So let's define some variables and then I will show you this in action so we will have one variable for the shipping bar HTML and then we will have one let's say for the promote message we can do promote ext and then we will have another one for the message that shows up when you unlock free shipping so unlocked txt and down below we can then define our update function.
Let's do function that is called update we can also define that function right here but for now we will simply type console dot lock updated shipping bomb and now we can go ahead and delete all the above declaration and in this function we will simply return our new update function to the public let's type update we'll link to the update function and then save this so as we check the front-end one more time.
We should now see that within the theme that shipping bar element we only have access to the update method and all the other variables are no longer public and so this syntax helps to keep things structured and it's also used throughout the theme so I thought it would be a good idea to share this alright.
So in order to build out our update function we now need to assign some values to our variables and the shipping bar itself is relatively easy to get so we can simply use document query selector and then selected by its CSS class so I think it was announcement far nons min - bah but in order to get the other two values so the promote message and the unlock message and the threshold as well we will need that too.
Now we will use a small trick to get these because we can't simply access the customizer settings from the JavaScript file so therefore we will go back to the header dot liquid where we implemented our free shipping bar and then we will simply add these values to the data set of the announcement bar so we will define three data attributes the first one will be data #NAME? then we will have data there's unlocked and we will have data - threshold and now we can simply copy these variables that we defined above and place them into the data attributes are we wanted me to add curly brackets so the liquid gets rendered and unlocked txt threshold and in the JavaScript we can now get these data attributes and assign them to our variable so back in the JavaScript fire.

We can now take the announcement bar and get all the values we need from its data set so bar dot data set but promote and bar dot dataset dot unlocked and bar but dataset best hug we can save this and now the time has come that we can implement our update function and therefore we will use an ajax request so a request in the background if you want to say and therefore we type dollar sign get json and then the request domain which will be slash cart js.
So we want to request the cart and once we get that data so then we want to perform a certain action with their data so we can simply type the function and then cart and then curly brackets and in here we will define what happens with the card data but now let me show you really quick what we get when we call this request domain and therefore I will copy this to my clipboard and then I can use my Shopify domain and append slash card j/s and you can see that I get the card data in the JSON format and the JSON format is a way to display structured data we can see it here in a more structured way and you can see that I get information on the card like the item count the items in the card the subtotal total price and this is the key attribute.
I'm interested in to compare if the threshold has been reached or not yet and now back in the update function I can simply calculate the value that is left by subtracting the card dot total price from the threshold - card dot total price and in the same way as we did it in the header fire we now need to apply a money filter to this value left because right now it's incense and doesn't match the theme mana formatting.
So let's do VAR value left money and then we can use a function that lies within theme dot currency dot format money and this function will take the value and sense and the theme dot money format and then we can save it and now the last thing we have to do in order to finish our update method is simply check if the value that is left is less or equal to zero then we want to display the unlock message and otherwise so if it is still above the zero then we want to display the promote message and therefore we will simply access the announcement bar.
So we will type bar in our HTML in both cases and now we can simply copy the message from the head of fire so let's do this right away and right here we have the announcement bar message so we can simply copy it stood right here now we have to use single quotes we will get a conflict with these double quotes and we also remove the curly brackets from the liquid rendering because now we can use the JavaScript variable that we defined above and then we will use plus here we use single quotes again success message and down below we can copy the same statement or the same markup and now we will replace the unlock message with the promote message but if you remember.
We still have this dynamic placeholder from the customizer settings where we output the value that is left and we will replace that as well so let's type dot replace and then value oh it's in brackets where you and we will replace it with the value left money and then we can save it and I hope you can already see that this is very similar to what we have done in the first tutorial so in the head of fire we did basically the same we took some of the messages from the customizer and when we update or put out the announcement by message we simply check if the value that is left is less or equal to zero and then we set the announcement message to either the success message or to the promote message all right.
So now we should give our new implemented method a test on the front end and therefore I went to the cart page and now I will adjust the quantity and when I call our new method so theme the shipping part our update we should see this value jump to 10 euro and it does so this is great and now I would qualify for free shipping and I will call the same method again and then we should see the unlock message and we do so this works great and we didn't make any mistakes otherwise we would see them right here and we could fix them in the theme file but now that this is working.

We simply have to call this method whenever the card input or the card quality changes and I think right now you already have enough input so the last thing is very simple to do and then we can finish the project all right so back at the theme files we now have to find all the places where let's say in items edit with the card or the input quantity is changed or an item is removed entirely and in the W theme you can search for exactly these keywords.
So let's search for update item and right here you will find a function that is called whenever the input quantity changes and you can see that they also do an AJAX request to perform this on the background and once this is done they also do some other stuff and right before they end here we can call our new theme shipping bar update method let's copy it right here and this is the first place we will add this and then we will go ahead and search for at item 2 card or add item and you will see the second function that gets called whenever an item is added to the card and even here they do an ajax request to perform this on the background and again once this is done the executors function and right before they end this function.
We can again insert our new m dot shipping bar update method and save it again and the last place we recall our new function is when an item is removed so on remove and let's see here we have the function for it and there's the Ajax request to perform it on the background and once this is done they execute all this and at the end we will call our new shipping bar update method let's copy it here as well: and save and I think now we have all the important places.
So let's check this on the on the front-end so back at the front-end I can now try to add an item to the cart and you would see that this gets updated immediately and even on the cart page if I adjust the quantity let's say to six and is updates to the unlock message perfect and even if I remove the item entirely this jumps back to 50 so everything's working perfect.
Okay so before we finish the post I want to add one more little thing so that this gets a little bit safer to use because right now we don't have any validation if the shipping bar is enabled and if it isn't enabled this might throw an arrow and break a lot of theme code so what I simply want to do is after we get the shipping bar or after we try to get the shipping bar I want to test if the shipping bar has any useful value.

So we can simply type if bar and then wrap this into curly brackets and the same thing will be done in the update method so if we have a shipping bar then we want to do everything that we just implemented and otherwise we will simply do nothing so we'll save this and this is the minimum validation that we can make and then we can finally finish the post and this was a lot to explain and probably a lot of input for you as well so if you have questions you can always leave them down in the comment section and as always I hope you found some value in this post and then I hope to see you on the next post bye.
1 note
·
View note
Text
UIPath Advanced RPA Developer Certification Questions with Answers

Check Exam Format at https://www.scrumprinciples.com/uipath-advanced-rpa-developer-certification/ 1). How many types of actions can be performed in the Variables panel in UiPath? Ans : – a). Changing Variable types b). Adding new Variables c). Setting default values for variables 2). What is the possible technique to get the content of a PDF document is available in UiPath? Ans. First to opening the PDF and using Screen scraping to get its data. Second to the Read PDF Text activity and providing the PDF file’s path. 3). Which activity is used to represent a decision inside a Sequence? Ans:- The If activity 4). How can you exit from a For Each activity in UiPath? Ans: – Break activity 5). During the running of workflow, how can you see the steps the workflow is executing? Ans : – a).Using Debug and inspecting the Output panel b). Using Debug with Highlight Activities option 6). How can execution be paused before a particular activity in UiPath? Ans: – a).First to use a MessageBox activity b).Second to use a breakpoint in Debug mode 7). In Order to Save Attachments activity, it can save all the attachments of an email to: Ans : – a). A relative path b). An absolute Path 8). What is the Visual Basic property within the MailMessage class will you use to get the Date of an email? Ans : – a).Headers(“Date”) 9). Which is the best optimize navigation method to be used in a form within Citrix? Ans:- By sending keyboard commands/hotkeys 10). What happens if Find Image doesn’t actually find the desired image in UiPath? Ans: – An Exception is Throw. 11). Which recording profile is used to generate full selectors in UiPath? Ans: – Basic recording 12). Which activities can be used to mostly interact with the user? Ans : – a). Input Dialog b) Message Box 13). In Which situation we have to use the Flowchart workflow in UiPath? Ans : – a).When modelling a process that has loops to previous states b). When having a process with many decision blocks 14). In case if the PDF activities are not listed in your activities panel, how can you get them? Ans:- You have to install pdf activities using Manage Packages features. 15). What should you use to click on a hidden IE browser? Ans:- a). SimulateClick 16). Why Timeout MS property is used in UiPath? Ans : – a). To define the amount of time during which the target of an activity must be found. 17). Why Queues are used in UiPath? Ans: – Distribute transnational load among multiple robots 18). Is it possible to click a button with Click Image Activity if the target is not visible on the screen in UiPath? Ans:- No, you could click a button which is not visible only using selectors 19). What is the way to send an image inside a MailMessage? Ans:- a).You can add the path to the attachment directly in the send activity. b). You can specify the relative path of the image in the Attachments property. 20). If you need to sort a table from a .xlsx file, which feature is used? Ans: – An excel Sort Table Activity. 1). Which recording wizard is used to automate UI interactions in an application that does not offer support for selectors in UiPath. Ans: – Citrix Recording 2). Which of the following phrases are true regarding Project Organization? Ans: – Saves time for all team members, Is a constant concern of the robot developer 3). how do you define to create a layout of business logic in complex process automation? Ans: – Flowchart 4). Which activity is used to chain together multiple workflows in single automation in UiPath? Ans: – Invoke workflow File Activity 5). How can you manage passwords for an automation project in UiPath? Ans: – With Windows Credential Manager 6). Which activity is used to Get Outlook Mail Messages activity? Ans: – MailFolder 7). Which activities allow you to iterate through an array of strings in UiPath? Ans: – a). while b). For Each c). Do While 8). Can you insert a Flowchart activity in a Sequence in UiPath? Ans: – Yes 9). What is the use of The Orchestrator? Ans: – a)Remotely control robots b). Send Start commands to multiple robots c). Schedule robots to perform specific processes 10). How to check the UI Element is exist on the screen or not, which activity is used for this? Ans : – Element Exists 11). Where can you see the variables’ values when we execute the workflow in UiPath? Ans: – In the Locals Pane 12). What can you use to make sure that the execution continues even if an activity fails in UiPath? Ans : – Try/Catch Activity 13). Which activity is used If you want to wait until a UI Element becomes available on the screen in UiPath? Ans:- Find Element 14). What happens if you use the Excel Read Range activity to read a .xlsx file that is already opened in UiPath? Ans: – This will read the document successfully. 15). What is the way to optimize accuracy when scraping with OCR a region that contains only digits? Ans: – Use Google OCR with “Numbers Only” 16). Which property is used to make sure that the workflow continues even if an activity fails in UiPath? Ans :- ContinueOnError Property 17). Which property defines the amount of time in which the UI target of an activity must be found? Ans: – The TimeoutMS property 18). Why Attach Window used in UiPath? Ans: – Identifying the window you are working with. 19). What is the way to enable the (Clipping) Region selection mode when Screen Scraping in UiPath? Ans: – By Pressing F3 20). Which activity can be used to modify the value of an existing cell in a DataTable in UiPath? Ans:- Assign Activity How does the Anchor Base activity work? It searches for an UiElement at a fixed anchor position.It searches for an UiElement using a relative coordinate position.It searches for an UiElement by using another UiElement as anchor. What direction can the arguments of a workflow have? In arguments.Out argumentsIn/Out arguments. At the end of the execution of Workflow1, which retrieves some items from a database, is the database connection closed automatically? Yes, the connection is closed after 30 seconds.The connection has to be closed using a Disconnect activity.Only the database admin can decide this aspect. Where can we see the logs generated by running robots? In the Output panel.In the local Logs folder.In the Orchestrator logs. Why is renaming activities considered to be one of the best practices? In case of an exception, to be able to find its source activityTo be able to understand the process logic without expanding each sequence or invoked workflow.To easily understand the high-level business logic from a workflow. What type of Output variable do all Get Mail activities return? (POP3, IMAP, Outlook, Exchange) MailMessageListList Is it possible to retrieve the color of a specific Excel cell? Yes, by using Get Cell ColorNo. The color cannot be retrieved from a workbook.Only with an OCR Engine. Can you store a Selector in a variable? NoYes, in a UiElement variable.Yes, in a String variable. What can be used to debug a workflow? BreakpointsHighlighting activities.The Slow Step option. How can a robot start an application in Citrix? By using a command line.By double clicking on a Desktop icon.By using an Open Application activity.By defining a shortcut key for the application and then triggering the app with a Send Hotkey activity. What is Orchestrator used for? Running Windows processes on the local machine.Remotely controlling any number of robots and performing workflow management.Designing workflows to be run by robots in a supervised mode.Designing workflows to be run by robots in an unsupervised mode. What happens when a new version of a package is published? The processes using the package are automatically updated to the latest versionThe processes have to be updated in order for the robots to run the latest version of the packageThe old version of the package is overwritten What types of assets can be stored in Orchestrator? Array, Datatable, Bool, StringBool, String, Integer, CredentialInteger, Password, GenericValue, String Where can you trigger an unattended robot from? Select all the options that apply. The UiPath Robot icon in the system trayUiPath StudioRemotely, from Orchestrator How can a process be executed on three different robots? By deploying the process in the environment of the robots, which run it automaticallyBy creating a job and selecting all three robotsIt is not possible to allocate a process to three different robotsBy scheduling the process and adjusting the settings in the Execution Target tab accordingly The best way of managing variable values within a workflow, so that they can be shared on different robots and environments is: Using Json config files.Using excel config filesUsing assets defined in Orchestrator. What robots can be selected when you start a job from Orchestrator? Any robot provisioned in Orchestrator.Any robot you have access to according to your role permissions.Any robot in the same environment as the process to be executed. What is the best way of restricting the access of a person to a limited number of pages in Orchestrator? That option does not exist. Everyone is able to see everythingBy changing the rights of the Administrator to the desired state.By creating a different account and role for that person. When creating a new role, restrictions can be applied. “Add Assets” in Orchestrator has the following option: Value Per RobotValue Per EnvironmentValue Per ProcessSingle Value
What robot state is displayed on the Robots page while a job is being executed?
BusyRunnningPending Where should credentials be stored? Select all the options that apply. In Windows Credential Store.In Orchestrator, as assets.Directly inside the workflows, as variables. Which one of the statements below regarding the GetAppCredentials workflow included in UiPath Robotic Enterprise Framework is true? It first requests the credential from user.It first tries to fetch a credential from the Windows Credential Manager.It first tries to fetch a credential from Orchestrator. If a large item collection is processed using For Each, which activity enables you to efficiently exit the loop after a specific moment? No activity can be used. Instead, you have to create a Boolean variable based on which the For Each loop is brokenThe “Break” activity is the most suitable in For EachA While loop should be used instead of For Each Which of the following statements are true? Select all the options that apply. You cannot use a recorder in a Citrix environmentThe recorder is used to create a skeleton for the UI automationThe Desktop recorder generates partial selectors In UiPath Robotic Enterprise Framework, what are the transitions of the Init state? In the case of Success, the transition is to the Get Transaction Data state.In the case of System Error, the transition is to the Init state.In the case of Success, the transition is to the Process Transaction state.In the case of System Error, the transition is to the End Process state. Which statement about the UiPath Robotic Enterprise Framework template is false? The framework is meant to be a template that helps the user design processes.The framework can be used only if you get the input data from the UiPath server queues.The framework has a robust exception handling scheme and event logging. Which of the following are considered best practices? Select all the options that apply. Keeping environment settings hard coded inside workflows.Breaking the process into smaller workflows.Reusing workflows across different projects. In the UiPath Robotic Enterprise Framework template, if a System Error is encountered in the Init state of the Main workflow, which state is executed next? Get Transaction DataInitEnd Process In the UiPath Robotic Enterprise Framework template, in the Get Transaction Data state of the Main workflow, what happens before the next transaction item is retrieved? We check if the previous transaction has been completedWe check if a kill signal was sent from OrchestratorWe check if a stop signal was sent from Orchestrator When should an Attended Robot be used? Select the option that applies. When the processing of some input data relies on human decision.When a workflow needs to be modified and corrected.When the process might be interrupted by exceptions and errors. What happens in the Init state of the Main workflow, in the UiPath Robotic Enterprise Framework template? The robot reads the configuration file and initializes all the required applications.The transaction items are extracted from the Queue.The robot checks if the previous transaction is complete and then starts the next one. How should exceptions be handled? Select all the options that apply. By using Try Catch activities inside the workflow for unexpected application exceptions.By validating data using conditional blocks for business exceptions.UiPath handles exceptions by default. In which workflow in the UiPath Robotic Enterprise Framework template is the retry mechanism implemented? The SetTransactionStatus workflowThe Main workflowThe GetTransactionData workflow In the UiPath Robotic Enterprise Framework template, in the Main workflow, the State Machine includes the following states: Init stateGet transaction data stateProcess Transaction StateSet Transaction StateEnd Process State Which of the following are considered best practices? Removing unreferenced variables.Deleting disabled code.Leaving target applications opened. In a Try Catch activity, how many times is the Finally section executed if no error occurs in the Try section? OnceThe Finally section is executed only when the Catch section is executed.Zero In UiPath Robotic Enterprise Framework, the value of MaxRetryNumber in the Config.xlsx file should be set to a number greater than 0 to enable the retry mechanism in the following cases: Get data from spreadsheets, databases, email, web API.Do not work with UiPath Orchestrator queues.Get data from UiPath Orchestrator queues with Auto Retry disabled. The return value of the Get Transaction Item activity is of the following type: ObjectStringQueueItemList Which is the best way to navigate to a specific page in a web browser? Use the Navigate To activity inside an Attach Browser containerUse the Type Into activity inside an Attach Browser containerUse a Type Into activity with a full selector How should a UiPath developer handle frequent changes in the project files? By creating daily backups of the filesBy using a source control solution, such as SVN, TFS, etc.Old versions of the project files are not relevant What layout should be used for UI navigation and data processing? FlowchartSequenceState Machine In the UiPath Robotic Enterprise Framework template, if a System Error is encountered in the Process Transaction state of the Main workflow, which state is executed next? Get Transaction DataInitEnd Process How can you pass data between workflows? By using arguments.By using variables.By using a pipe. In the UiPath Robotic Enterprise Framework template, what happens if the processing of a transaction item fails with an Application Exception or a System Error? The process executes the End Process state.All used applications are closed and then re-initialized.The execution of the transaction item is retried if the MaxRetryNumber config value is greater than 0. Which of the following are required to have efficient execution of automation projects? Proper exception handlingRecovery abilitiesEffective logging mechanisms Read the full article
1 note
·
View note
Text
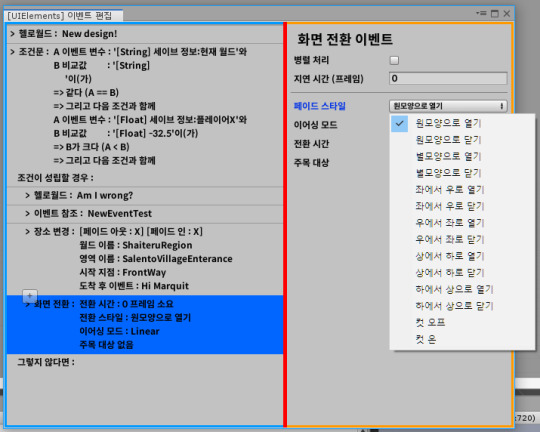
[Third week of 2019.10] White Spirit devlog - Creating Extended Events in Event Editor v2

Hi, there!
From today, I decided to get into the habit of filling in the write in post of what I worked every day.
I thought that this would allow me to be able to fill in the text in detail with what I learned and what I did at the time.
Leisurely is an important point because I can only use less time on weekdays.
Anyway, from the results of this habit, yes, it works!
On the day I worked, I realized that the method of pre-filling would improve the content and quality of the devlog.
Now let's get to the devlog!
Event Editor v2 Development


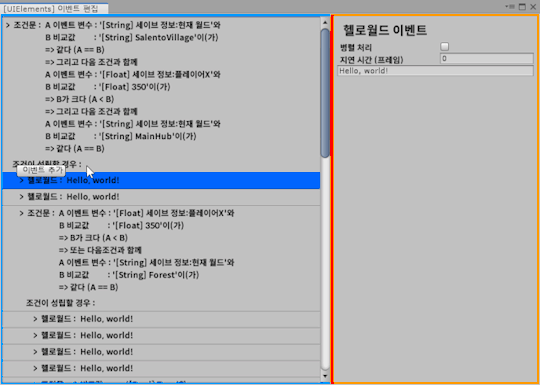
I've finished porting conditional events to the event editor v2.
And the reason why it took time to create this event is because of the nature of the event variables managed within the event.
Event variables took time to implement the editor for conditional events because of their ability to freely cast and compare between bool, int, float, and string types.
All of this editor's work is focused on migrating past editors, so you can check the specifics of event variables in last year August's devlog.
https://creta5164.tumblr.com/post/177408351156
https://creta5164.tumblr.com/post/177653185311
And one more thing, the Event Editor uses Json for data polymorphism and transformation tracking, and uses Json.NET's JsonConvert.PopulateObject method as its main element.

But this time, when I created the editor for conditional events, I learned about the new features of JsonConvert.PopulateObject. The default parsing option for the PopulateObject method was to add a set of data (arrays, lists, etc.) after the data, rather than overwriting it. This problem was noticed while testing the Conditional Event Editor, when I found Undo (Ctrl + Z) to increase the conditional element.
The following example will show you what it is.
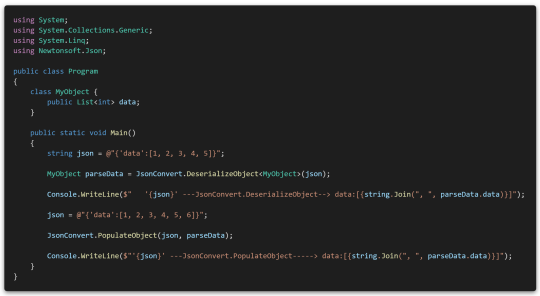

This code parses a JSON string into a MyObject object, then redefines it to JSON with one more number appended to the JSON string, and then updates the data through PopuateObject using JSON characters in the instanced object.
Of course, as mentioned above, elements like arrays are appended after the data. The desired behavior should be to update the data, so I'll should solve the problem.


This problem can fix this by creating a parsing rule via JsonSerializerSettings to force the parser to overwrite new data.
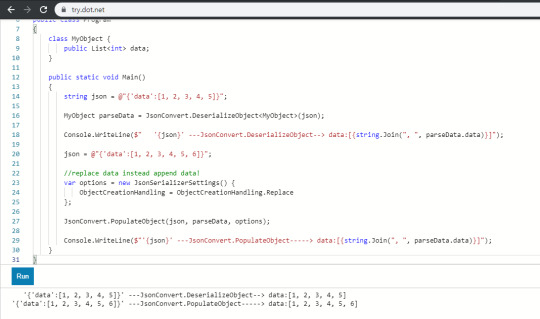
Again, try.dot.net helped to me test our C# code right on the web, so I can able to solve the problem quickly.
Thank you Microsoft!
You can try C# code at here : https://try.dot.net
In addition, this time I noticed an issue where the 'Add Event' button is misplaced in sub-events when the event description gets longer.
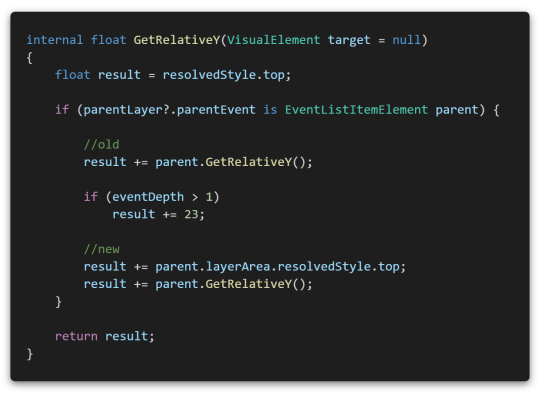
This was a logic error caused by adding only a fixed height in consideration of a situation where there was only one line of event description in a method that could infer where the add event button would be placed. (old) Fixed the event description field to be longer, adding the height of the layer group element. (new)

Ok, works well now!
I have just completed the conditional event, but there are still a lot of events left in the Event Editor v1.

From here, there are events that are specific to this game, so I decided to create a folder to organize those events separately.
I worked to make Unity form elements more readable before starting again.
UIElements has something called uss, which is similar to css, the design markup language for HTML.
I used this to change the text and size of all the basic elements.

First of all, Unity has a menu at the top right of every tab. ([▼三] icon)
If you expand it, there is a UIElements Debugger item, which will bring up a tool similar to the web browser's developer console.
(Or you can do it by pressing Ctrl + F5, but somehow I had a habit of constantly pressing F12 and then realizing that it wasn't the web...lol)

The window on the left is the debugger tool for UIElements.
Within the debugger tool there is a layout tree view on the left and element information on the right.
If you're a front-end web developer, you're pretty familiar with it.
1. Layout tree view
Hierarchy's version of UIElements. This shows the UIElements layout structure that the debugger is viewing (dropdown at the top right). From there, you can unfold the layout yourself and visually see how the layout is for each element. I already hovered over the TextInput element on the left, so the text in my layout is highlighted.
2. Element's Information (Properties)
Similarly, this is the UIElements version of the Inspector. This shows the information for the element selected in the layout tree view. You can see what the uss style class is applied to that element, or inline styles to see what values it contains. If you directly modify the value of an inline style here, it will temporarily affect the appearance of that element. In other words, You can try with your wonder "How can I give style values to look pretty?" or "What happens if this stretches a lot?" and can see the same thing in advance and experiment. In particular, the values at the top of the rectangle represent the margin, border, padding, and actual element size information of the applied style, which can be very useful when working with layout design.
As you can see from the layout tree view, that the Unity UIElements main form control does not consist of one or more elements. (for example, if it's Toggle, then the Label element is also included.) Looking at these elements, you can see that there is a uss class that starts with 'unity'.

Unity's default stylesheets are applied first in order, so if you write style information with the same class name, it will be applied later, giving you the freedom to customize Unity's controls.
So, I used this to improve readability.
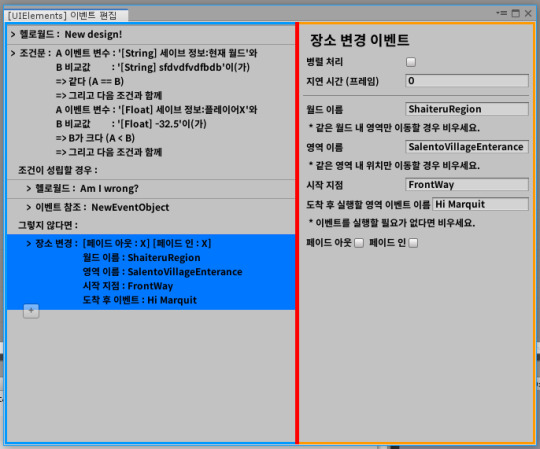
Anyway, I ported the change place event that was in v1.

Then I compared the event editor v1 to the v2 I working currently. It's changed a lot... and also readability changed a lot.

In fact, the readability is definitely different when viewed on high resolution and small screens.
(Dear Unity dev, please change Unity editor's font for CJK... please...)
And I keep worked on porting the events.
(This is screen fade event)

Then, as I worked on the screen fade event, I started to get confused as I worked on the unusual structure design I envisioned.
For events that refer to Unity objects, I've summarized where and how to reference them in comments.
Comment’s content
TODO : This event is a good example of an event that refers to a UnityObject. For events that do not use a UnityObject reference, take a look at HelloworldEvent. Reference data is based on SerializedProperty. ------------------------------------------------------------------------- References in the editor can be accessed through Editor_references, and both the editor and runtime can inherit the Editor_PreserveData and PreserveData methods to handle the data they reference. Reference data is an array.
26L-27L: The required number of reference data and the location of the data to be referenced have been explicitly declared. This can reduce the risk of hardcoding by modifying numbers even if the array's specifications change or the data structure changes.
143L: Fields that inherit from UnityObject are safe to get from PreserveData, so add a JsonIgnore attribute to avoid storing data explicitly.
146L-155L: At runtime you can get the reference target here.
You can check it how unusual my structure is in last month's devlog.
https://creta5164.tumblr.com/post/187730990776
Then, while testing the screen fade event, I found a bug.
I decided to set the center point of the screen fade through the transform used in the screen fade event.
But as soon as I added the event to event list in event editor, the object value of the previous reference event entered first.
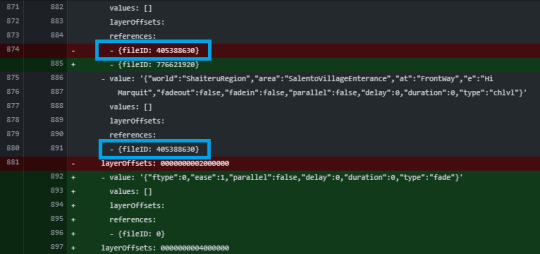
As a result, Unity Serializer brought the data of the newly added element as it was before the data was added, so that the data entering the center target was getting the value of the reference event above it.
(I've only modified and checked it now, but as you can see, the data in the place change event was intact as well.)
Because this is not the desired behavior, we used the ClearArray() method of SerializedProperty for the newly added data.

The text of my devlog is really the longest devlog in a while!
I want to thank you for reading so far...
I'll continue to do this next week.
As mentioned at the outset, future devlog will be written ahead of time after work, which is likely to increase the amount of development journals in each state.
When I'm done with the event system and the editor, I want to start by laying out the decorations in the room and making progress.
Until then, see you in next week!
1 note
·
View note
Text
Saved game serialization
Well, seems like another two months has gone by in a flash! I was away visiting family for some of this time, and the work I've been doing on the game has resulted in a frustrating lack of progress to show for it, but here's an update on what I've been up to anyway.
Saved game serialization
Up until now, saved games and constructions have been serialized via a binary stream, with no formatting, just using BinaryReader and BinaryWriter directly. This is fast and results in a compact file size, but has one huge disadvantage, a lack of version tolerance. In other words, if I add or remove any variables to be saved, or reorder them, then old saved game files will no longer load correctly. To work around this I wrote code to check a version number in the saved file, and then convert things over for each added or removed variable. This is a hack really, and has resulted in rather messy and hard to maintain code.
This situation is bad enough with just the demo version of the game out there, with a cut down feature set. Maintaining saved game backwards compatibility will only get harder once the full version is released.
Ideally, I need a properly structured save file format, with some kind of key value pairing that would allow for version tolerance, but wouldn't bloat the file size too much.
BinaryFormatter
First I investigated using BinaryFormatter, because it allows for version tolerance via optional fields, but I couldn't get it to work when deserializing MonoBehaviour classes. I need to be able to instantiate the MonoBehaviour and then populate serialized values into it, not have the deserialization process itself try and allocate a new MonoBehaviour (which is not allowed by Unity). I thought maybe using a serialization surrogate might allow for this, but couldn't figure out a way to make it work. The other downside of BinaryFormatter is all the assembly and type data it saves out adds quite a bit to the file size.
Json serialization
So after looking around for other possible solutions, I decided to try Json. This provides the key value pairs I need in a fairly compact structured format. I used Json.NET from Newtonsoft (provided via a Unity asset store package for ease of integration) which seemed really promising, it's very easy to use and highly configurable. In most cases there's very little additional code to write, you can just use the JsonProperty attribute to specify which class properties to serialize, and configure how they're serialized. Also, it allows for populating properties of a MonoBehaviour that has already been allocated, by using JsonSerializer.Populate() inside a JsonConverter.
Still, it took me several weeks to get Json serialization working for both saved constructions and full saved games, there were a few stumbling blocks along the way which took time to work around, as did just learning how to best use the Json.NET API. The end result seemed great though, it solved the version tolerance problem, and the code was so much simpler and cleaner.
One issue was that the resulting file sizes of the text based Json format were huge. Given that the game uses the same serialization code path to send construction data between networked players, this was a problem. So, I switched over to using Bson (the binary equivalent to Json), and also compressed the data via a DeflateStream. This worked well, the resulting file sizes actually ending up smaller than my original binary stream format.
Performance and memory problems
At this point I thought I was good to go, but then I started profiling the Json serialization with large saved game files (more than a thousand parts), and realized I was in trouble. Firstly, deserializing the saved game was more than twice as slow using Json vs. the old binary stream method. This wasn't a complete disaster as the load times weren't terribly long in the first place. The other more serious issue was that the Json deserialization did an enormous number of tiny GC allocations (as in millions of allocs, totalling hundreds of MB!).
I found that reducing the JsonProperty name lengths helped slightly with this but not to any significant degree. I spent quite a lot of time restructuring the code that loads the various modules in the game (player, constructions, time of day, etc.) to try and deserialize from the file stream more efficiently, but this made very little difference to performance or memory usage unfortunately (the resulting code was cleaner than before though so I guess the refactoring was worth doing anyway).
I'm annoyed with myself that I didn't do enough tests to pick up on these problems before putting all the effort in to convert the game over to use Json. If I'd known ahead of time, I probably wouldn't have bothered.
So now I'm not sure what to do. If I stick with the old binary stream solution, then all the Json serialization effort will have been wasted and I'm still stuck with difficult to maintain code for backwards compatibility. But the Json serialization option as it stands isn't acceptable, I'd need to do something to resolve the memory and performance issues. One possibility would be to manually serialize everything (i.e. use JsonReader / JsonWriter directly rather than JsonSerializer), supposedly this is the fastest way as it avoids overhead from reflection and so on.
I've decided for now to put all this to one side, think about it some more, and come back to it later. In the meantime I really need to get back to trying to make some positive progress with the rest of the game!
1 note
·
View note
Text
ANGULAR JAVA SCRIPTING (JS)
AngularJS is an open-source JavaScript framework which is used to create web apps with a focus on CRUD operations (operations like Create, Read, Update, and Delete) and AJAX-style development. Its objective is to overlay the browser with directives necessary for creating dynamic online applications, thus enhancing the HTML vocabulary.
The guiding philosophy of AngularJS is that UI is best specified declaratively (in HTML), action is best described imperatively (in JavaScript), and the two should never be combined.
The HyperText Markup Language (HTML) page, which contains additional customised HTML properties, was first read by the AngularJS framework in order to function. These properties are processed by Angular as directives to connect the page's input or output components to a model that is represented by common JavaScript variables. These JavaScript variables could have their values manually entered into the code or obtained from either static or dynamic JSON resources.
The AngularJS framework reads the HyperText Markup Language (HTML) page, which has extra custom HTML attributes in it. Angular can interpret those attributes and directives to could bind different parts of a page.
AngularJS uses the term "scope" as a "Model" in “MVC" architecture and all variables used in the scope are accessed by the "View" as well as the "Controller".
The most remarkable aspect of AngularJS was its two-way data binding, which largely frees the server backend from the burden of handling templates. Instead, templates are created using plain HTML and rendered in accordance with the information found in a model-defined scope. Through a controller, Angular's $scope service recognises and changes the model section and adjusts HTML expressions in the view. Any changes to the view are also mirrored in the model.
A developer could create unique, reusable HTML-like elements and attributes that define data bindings and the behaviour of presentation components using AngularJS directives.
0 notes
Text
How to install Packer on Ubuntu 22.04/20.04/18.04/16.04?. Packer is an open source tool for creating identical machine images for multiple platforms from a single source configuration. It is a cross-platform command-line and lightweight application capable of generating and highly machine images for multiple platforms in parallel. Check Packer use cases if you’re new to it and trying to figure out how you benefit from this tool. What is Packer Machine Image? A machine image is a single static unit that contains a pre-configured operating system and installed software which is used to quickly create new running machines. Machine image formats change for each platform. Some examples include AMIs for EC2, VMDK/VMX files for VMware, OVF exports for VirtualBox, etc. Install Packer on Ubuntu 22.04/20.04/18.04/16.04 Packer may be installed from a precompiled binary or from source. The easy and recommended method for all users is binary installation method. This is the one used in this article. First, check the latest release of Packer on the Downloads page. Then download the recent version for your platform. But for us we’ll perform installation from APT repository: Install basic dependencies: sudo apt update sudo apt -y install apt-transport-https ca-certificates curl software-properties-common Import GPG key used in package signing: curl -fsSL https://apt.releases.hashicorp.com/gpg | sudo gpg --dearmor -o /etc/apt/trusted.gpg.d/hashicorp.gpg Add Hashicorp APT repository to your Ubuntu system: sudo apt-add-repository "deb [arch=amd64] https://apt.releases.hashicorp.com $(lsb_release -cs) main" Finally update package index and install packer: sudo apt update sudo apt install packer After installing Packer, verify the installation is working by checking that the packer is available: $ packer Usage: packer [--version] [--help] [] Available commands are: build build image(s) from template console creates a console for testing variable interpolation fix fixes templates from old versions of packer fmt Rewrites HCL2 config files to canonical format hcl2_upgrade transform a JSON template into an HCL2 configuration init Install missing plugins or upgrade plugins inspect see components of a template plugins Interact with Packer plugins and catalog validate check that a template is valid version Prints the Packer version To check software version run: $ packer --version 1.8.3 If you placed the packer bi in a different directory, the PATH variable should contain this directory. Using Packer on Ubuntu 22.04/20.04/18.04/16.04 Builders are used to generate images and create machines for various platforms from templates. You can see a full list of suppported builders. A template is a configuration file used to define what image is built and its format is JSON. In our example below, we will use VirtualBox Builder to create an Ubuntu Virtual Machine and export it in the OVA or OVF format. Let’s create our working directory. mkdir projects/packer/ cd projects/packer/ Create a file called build.json with below contents "variables": "hostname": "ubuntu", "domain": "local", "ssh_user": "packer", "ssh_pass": "p@ck3r" , "builders": [ "type": "virtualbox-iso", "guest_os_type": "Ubuntu_64", "vm_name": "ubuntu-18.04-vbox-template", "iso_url": "http://cdimage.ubuntu.com/releases/18.04/release/ubuntu-18.04.6-server-amd64.iso", "iso_target_path": "/tmp/ubuntu-18.04.6-server-amd64.iso", "iso_checksum": "f5cbb8104348f0097a8e513b10173a07dbc6684595e331cb06f93f385d0aecf6", "memory": "1024", "cpus": "1", "disk_size": "20000", "format": "ova", "guest_additions_mode": "upload", "headless": "false", "http_directory": "http",
"ssh_username": "user `ssh_user`", "ssh_password": "user `ssh_pass`", "ssh_wait_timeout": "20m", "shutdown_command": "sudo /sbin/halt -p", "boot_command": [ "", "", "", "", "/install/vmlinuz", " auto", " console-setup/ask_detect=false", " console-setup/layoutcode=us", " console-setup/modelcode=pc105", " debconf/frontend=noninteractive", " debian-installer=en_US", " fb=false", " initrd=/install/initrd.gz", " kbd-chooser/method=us", " keyboard-configuration/layout=USA", " keyboard-configuration/variant=USA", " locale=en_US", " netcfg/get_domain=user `domain`", " netcfg/get_hostname=user `hostname`", " grub-installer/bootdev=/dev/sda", " noapic", " preseed/url=http:// .HTTPIP : .HTTPPort /preseed.cfg", " -- ", "" ] ], "provisioners": [ "type": "shell", "inline": [ "sleep 30", "sudo apt update", "sudo apt -y install bash-completion wget vim php php-fpm php-mysql" ] ] Change the settings to fit ypur deployment design. We also need a preseed file to automate installation of Ubuntu 18.04 on VirtualBox with Packer. Create a http directory as specified in JSON build file. mkdir http Then paste below to http/preseed.cfg file. # Language and Locale d-i debian-installer/language string en d-i debian-installer/locale string en_US.UTF-8 d-i localechooser/preferred-locale string en_US.UTF-8 d-i localechooser/supported-locales en_US.UTF-8 # Hostname / domain d-i netcfg/get_hostname string ubuntu d-i netcfg/get_domain string local # Keyboard d-i console-setup/ask_detect boolean false d-i keyboard-configuration/layout select USA d-i keyboard-configuration/variant select USA d-i keyboard-configuration/modelcode string pc105 # Timezone / Time d-i time/zone string UTC d-i clock-setup/utc-auto boolean true d-i clock-setup/utc boolean true # Server tasksel tasksel/first multiselect standard, ubuntu-server # No proxy d-i mirror/http/proxy string # Packages Policy d-i pkgsel/install-language-support boolean false d-i pkgsel/update-policy select none d-i pkgsel/upgrade select full-upgrade d-i pkgsel/include string openssh-server cryptsetup build-essential libssl-dev libreadline-dev zlib1g-dev # Partitioning d-i partman-auto/method string lvm d-i partman-auto-lvm/guided_size string max d-i partman-auto/choose_recipe select atomic d-i partman-auto/disk string /dev/sda d-i partman-lvm/confirm boolean true d-i partman-lvm/confirm_nooverwrite boolean true d-i partman-lvm/device_remove_lvm boolean true d-i partman/confirm_nooverwrite boolean true d-i partman/confirm boolean true d-i partman/confirm_write_new_label boolean true d-i partman/choose_partition select finish # Create packer user account. d-i passwd/user-fullname string packer d-i passwd/username string packer d-i passwd/user-password password p@ck3r d-i passwd/user-password-again password p@ck3r d-i user-setup/allow-password-weak boolean true d-i user-setup/encrypt-home boolean false d-i passwd/user-default-groups packer sudo If using this example, you’ll need to change username and password for user to be created in the preseed file. To build your image by running the following command. $ packer build build.json Since we had turned off installation in headless mode, you should be able to watch the installation on VirtualBox UI. I’ll cover the usage of other providers such as Docker, AWS, CloudStack, QEMU e.t.c in the following guides. Subscribe to our newsletter to get instant updates.
0 notes
Text
Package control sublime text 3

#PACKAGE CONTROL SUBLIME TEXT 3 MOD#
#PACKAGE CONTROL SUBLIME TEXT 3 FULL#
#PACKAGE CONTROL SUBLIME TEXT 3 MAC#
Fixed a crash that could occur when nesting embed patterns in.
Many syntax highlighting improvements, including significant improvements to:.
#PACKAGE CONTROL SUBLIME TEXT 3 MOD#
Accepts CSS color mod adjusters to manipulate the saturation, lightness or opacity of the foreground color. Added the foreground_adjust property to rules with a background.caret values now respect alpha as expected, rather than pre-blending against the background color.Added block_caret key to use in conjunction with block carets.Windows: Fixed some fonts having an incorrect baseline.Windows: Fixed a rendering issue with certain combining characters.Linux: Color glyphs are now drawn properly on light backgrounds.
#PACKAGE CONTROL SUBLIME TEXT 3 MAC#
Fixed some cases of incorrect glyph positions on Windows and Mac.Fixed a caret positioning bug when non-trivial graphemes are present.Improved rendering of combining characters.Windows: Fixed a bug where auto complete entries would contain an ellipsis when not required.Windows: Fixed minimized and maximized state not restoring.Mac: Error message dialogs can now be closed with the escape key.Mac: Ensure context menus are shown without scrolling.
#PACKAGE CONTROL SUBLIME TEXT 3 FULL#
Mac: Add full support for macOS native tabs.
Improved performance with large numbers of rules in a.
Added extends keyword to have one theme derive from another.
Added variables support and associated revised JSON format with variables key.
Linux: Tweaked behavior of up/down when on the first and last lines of a file to better match platform conventions.
Linux: Fixed a crash when using GTK_IM_MODULE=xim.
Linux: Improved input method (IM) support - fcitx, ibus, etc.
Fixed draw_minimap_border setting not working.
Improve positioning and sizing of gutter icons in some situations.
Inline diff presentation can be changed by customizing a color scheme.
Full inline diffs of each change can be displayed via the right-click context menu, or keyboard shortcuts.
The following diff-related commands were added:
API methods t_reference_document() and View.reset_reference_document() allow controlling the diff.
The git_diff_target setting controls base document source.
In coordination with the new Git functionality, diffs can be calculated against HEAD or the index.
The setting mini_diff controls incremental diff behavior.
Diff markers show added, modified and deleted lines.
All changes to a document are now represented by dedicated markers in the gutter.
All file reads are done through a custom, high-performance Git library written for Sublime Merge.
The setting show_git_status allows disabling Git integration.
Themes may customize the display of sidebar badges and status bar information.
Commands have been added to open a repository, see file or folder history, or blame a file in Sublime Merge.
The current Git branch and number of modifications is displayed in the status bar.
Ignored files and folders are visually de-emphasized.
Files and folders in the sidebar will now display badges to indicate Git status.
See also the Announcement Post NEW: Git Integration
API: Fixed regression with phantoms interfering with home/end behavior.
API: Fixed an incompatibility with SublimeREPL.
Linux: Fixed incorrect file ownership in the deb packages.
Linux: Tweaked the way text scaling is handled.
Linux: Improved high dpi handling under KDE.
Linux: Fixed compatibility with old Linux distributions.
Mac: Added a workaround for a MacOS issue with DisplayLink adapters.
Fixed swap_line_up and swap_line_down transforming tabs into spaces.
Fixed block carets changing the way text selection works.
Improved scrolling logic in some scenarios.
Improved file indexing behavior in some scenarios.
Fixed a crash in the Git repository handling.
Git: Fixed UTF8 BOMs not being handled correctly in.
Git: Improved performance with a large number of git repositories in the side bar.
This can be changed via the allow_git_home_dir setting.
Git: Git repositories at the top level of a users home directory are ignored for performance reasons.
Various syntax highlighting improvements.
0 notes
Text
Xl deployit

#Xl deployit update#
#Xl deployit free#
#Xl deployit windows#
#Xl deployit update#
NetSparkle is a C# software update framework for. NET Core library for all your SIP, VoIP and WebRTC needs! Open Source Continuous File SynchronizationĪ real-time communications, cross platform, C#. NET Core version from the System Linq Dynamic functionality.Ī Json based Rules Engine with extensive Dynamic expression supportĪ tiny win10 (dynamic) wallpaper changer | 巨应壁纸 | 动态壁纸Īn ASP.NET Core web application exposing OPC UA Servers to non OPCUA-compliant clients with a REST interfaceĪ Node.js implementation of RTMP/HTTP-FLV/WS-FLV/HLS/DASH/MP4 Media ServerĪ fully customizable and extensible all-purpose diagrams library for Blazor Go语言开发的端口转发工具 for port data forward (TavenLi 李锡远)Ī lightweight IoT edge analytics softwareĪ lightweight RTSP/RTMP/HTTP/HLS/HTTP-FLV/WebSocket-FLV/GB28181 server and client framework based on C++11 Net, LiveCharts2 can now practically run everywhere WPF, Xamarin, Avalonia, Uno (WIP), WinForms and UWP (WIP). Simple, flexible, interactive & powerful charts, maps and gauges for. NET core (it currently supports Kafka, RabbitMQ and MQTT).Ĭreate cross-platform (Xamarin, Windows. Silverback is a simple but feature-rich message bus for. SqlTableDependency extensions, Joker.OData, Joker.Redis, Joker.MVVM and ksqlDB LINQ provider Reactive data changes from SQL server to. High performance, cross platform ionic app for Home/Commerical Security Surveillance using ZoneMinderĮxpose a local server to the internet. Modern and flexible load testing framework for Pull and Push scenarios, designed to test any system regardless a protocol (HTTP/WebSockets/AMQP etc) or a semantic model (Pull/Push). NET Core lightweight configuration server YOLOv5 object detection with C#, ML.NET, ONNXįace analytics library based on deep neural networks and ONNX runtime.
#Xl deployit windows#
WeText is a sample application that demonstrates the implementation of DDD/CQRS and microservice architectural patterns in C#.Ī wrapper executable that can run any executable as a Windows service, in a permissive license.Ī remote control and remote scripting solution, built with. Payment,目前支持:支付宝(Alipay)、微信支付(WeChatPay)、QQ钱包(QPay)、京东支付(JDPay)、银联支付(UnionPay)ĭefinitely Fastest and Zero Allocation JSON Serializer for C#(NET. NET developers to easily add auto update functionality to their classic desktop application projects. Good luck demystifying the secrets of is a class library that allows.
You should be able to see the output of variable list on double clicking the script.
Now start a new deployment and open the Plan Analyzer after mapping the type to container.
You may change the type to deploy on any container type. This type will deploy on overthere.LocalHost by default.
Create new Application or include "test.scriptdeployable" type under existing package.
#Xl deployit free#
Copy the above free marker snippet into that file.
Create a folder script under XLDEPLOY_HOME/ext folder and create a new file called osscript.sh.ftl under that folder.
Or if you're just more interested in getting details of deployed, you can do thisĪ simple example to try this out would be TIP: Prefer keeping depth=0 or depth=1 if you prefer to use it with plugins other than XL-rules. Exception are generated while trying to find out values of certain properties who are unresolved at that point and throws exceptions. statics : is not explored since its not of type hash or a simple type step : when this is being explored, you'll see a lot of exceptions being generated in the log and it takes a lot of time but it would still show up in a while. NOTE: This won't work for jython step in XL-rules since that doesn't exposes the freemarker context IMPORTANT : If you use this with generic or another plugin except XL-rules, it will mostly include 3 top level variables that will be explored further. It gives you convenient output if you include it in a script that shows up in plan analyzer while planning for deployment. "Maybe $ Now this Freemarker snippet can be used wherever a free marker context is available. "What variable are exposed by Freemarker ?" A lot of new people starting on XL Deploy always get these questions in mind,"How do it get to know what variables i could use in my script ?"
0 notes
Text
Json reader disk map

Json reader disk map how to#
Json reader disk map drivers#
Json reader disk map driver#
Json reader disk map windows 10#
Json reader disk map software#
Json reader disk map how to#
How to Install Adobe Acrobat Reader on Ubuntu 20.04 Focal Fossa Linux.
Set Kali root password and enable root login.
How to change from default to alternative Python version on Debian Linux.
Netplan static IP on Ubuntu configuration.
How to enable/disable firewall on Ubuntu 18.04 Bionic Beaver Linux.
How to install Tweak Tool on Ubuntu 20.04 LTS Focal Fossa Linux.
Linux IP forwarding – How to Disable/Enable.
How to use bash array in a shell script.
Json reader disk map driver#
AMD Radeon Ubuntu 20.04 Driver Installation.
How to install missing ifconfig command on Debian Linux.
Json reader disk map windows 10#
Ubuntu 20.04 Remote Desktop Access from Windows 10.
How to find my IP address on Ubuntu 20.04 Focal Fossa Linux.
Json reader disk map drivers#
How to install the NVIDIA drivers on Ubuntu 20.04 Focal Fossa Linux.Import your JSON file into Python and iterate over the resulting data.Create a JSON file with some JSON in it.Instantiate an object from your class and print some data from it.Write a class to load the data from your string.Use the JSON module to convert your string into a dictionary.Crate a dictionary in the form of a string to use as JSON.Create a new Python file an import JSON.That dictionary can be used as a dictionary, or it can be imported into an object as it’s instantiated to transfer data into a new object. By using the json.load methods, you can convert the JSON into a dictionary. It’s really not hard to parse JSON in Python. Otherwise, the process is mostly the same. The other thing to note is the load method replaces loads because this is a file. You will need to read and parse it from files, though, and that’s why you set up that distros.json file.Ī with can simplify the process of reading and closing the file, so that’s the structure to use here. That doesn’t make much sense in practicality. You’re really not going to need to parse JSON from within a Python program. There is a fairly direct way to do it by loading the JSON into an object’s _dict_ property. There are a few ways to do this, but most involve creating a class that you instantiate by populating it with data from the JSON. JSON is actually an object in JavaScript, so it would make sense to want to import it as an object in Python. Next, let’s look at parsing JSON in Python to an object. loaded_json = json.loads(json_data)Īs you can see, loaded_json contains a dictionary, not a string that looks like one. You can save it to a variable and iterate over it to see. It won’t look much different, but Python sees it in a usable form now. Print(json.dumps(parsed_json, indent=4, sort_keys=True)) Try to load and print the JSON data: parsed_json = (json.loads(json_data)) Just know that this form handles data while load handles files. You don’t really need to worry about it too much. Did you notice the quotes around that dictionary that you created for the JSON? That’s because Python treats JSON as a string unless it’s coming from a file. Python uses the loads method from the json to load JSON from a string. That’s what you’ll be working with first. Take a step back to that simple line of JSON that you created earlier. Put the JSON below in the file [Įverything’s ready. Use your text editor of choice to make one and name it distros.json. If you’re not familiar, they are text files with the. The next thing that you’ll need is a JSON file. It shares almost identical syntax with a dictionary, so make a dictionary, and Python can use it as JSON. First, create a Python file that will hold your code for these exercises. There are a few things that you’ll need to set up first. $ – requires given linux commands to be executed as a regular non-privileged userīefore you can start to parse JSON in Python, you’ll need some JSON to work with. # – requires given linux commands to be executed with root privileges either directly as a root user or by use of sudo command Privileged access to your Linux system as root or via the sudo command.
Json reader disk map software#
Requirements, Conventions or Software Version Used How to parse JSON data in Python Software Requirements and Linux Command Line Conventions Category It is possible to parse JSON directly from a Linux command, however, Python has also no problem reading JSON. It’s used in most public APIs on the web, and it’s a great way to pass data between programs. JSON is a favorite among developers for serializing data. The objective of this article is to describe how to parse JSON data in Python.
0 notes
Text
Theme sublime merge

Theme sublime merge mod#
Theme sublime merge full#
Theme sublime merge mac#
Assorted minor fixes and stability improvements Fixed a Goto Symbol in Project performance regression Mac: Fixed a plugin_host crash when running a process that itself crashes
Theme sublime merge mod#
Added a custom min-contrast() adjuster for the CSS color mod function in minihtml Added support for hwb() colors to minihtml Various minor improvements related to plugin module loading and unloading Phantoms are now drawn correctly in conjunction with draw_centered Added t_reference_document() and View.reset_reference_document() to control diff generation Windows: Properly unlock directories after contained files are closed Windows: Fixed Open File treating paths as case-sensitive
Theme sublime merge mac#
Improve performance of file watching for ignored paths on Windows and Mac Many syntax highlighting improvements, including significant improvements to: Syntax Tests: Allow syntax test files to have a UTF-8 BOM Fixed a crash that could occur when nesting embed patterns in. Accepts CSS color mod adjusters to manipulate the saturation, lightness or opacity of the foreground color. caret values now respect alpha as expected, rather than pre-blending against the background colorĪdded the foreground_adjust property to rules with a background. Added block_caret key to use in conjunction with block carets Windows: Fixed some fonts having an incorrect baseline Windows: Fixed a rendering issue with certain combining characters Linux: Color glyphs are now drawn properly on light backgrounds Fixed some cases of incorrect glyph positions on Windows and Mac Fixed a caret positioning bug when non-trivial graphemes are present Improved rendering of combining characters Added extends keyword to have one theme derive from another Added variables support and associated revised JSON format with variables key Windows: Fixed a bug where auto complete entries would contain an ellipsis when not required Windows: Fixed minimized and maximized state not restoring Mac: Error message dialogs can now be closed with the escape key Mac: Ensure context menus are shown without scrolling
Theme sublime merge full#
Mac: Add full support for macOS native tabs Improved performance with large numbers of rules in a. Linux: Tweaked behavior of up/down when on the first and last lines of a file to better match platform conventions Linux: Fixed a crash when using GTK_IM_MODULE=xim Linux: Improved input method (IM) support - fcitx, ibus, etc Fixed draw_minimap_border setting not working Improve positioning and sizing of gutter icons in some situations The following diff-related commands were added: Inline diff presentation can be changed by customizing a color scheme Full inline diffs of each change can be displayed via the right-click context menu, or keyboard shortcuts API methods t_reference_document() and View.reset_reference_document() allow controlling the diff The git_diff_target setting controls base document source In coordination with the new Git functionality, diffs can be calculated against HEAD or the index The setting mini_diff controls incremental diff behavior Diff markers show added, modified and deleted lines All changes to a document are now represented by dedicated markers in the gutter All file reads are done through a custom, high-performance Git library written for Sublime Merge The setting show_git_status allows disabling Git integration Themes may customize the display of sidebar badges and status bar information Commands have been added to open a repository, see file or folder history, or blame a file in Sublime Merge The current Git branch and number of modifications is displayed in the status bar Ignored files and folders are visually de-emphasized Files and folders in the sidebar will now display badges to indicate Git status
0 notes