#just for making the mesh and testing it in-game
Explore tagged Tumblr posts
Visit Tumblr Blog
Explore Tumblr blogs with no restrictions, modern design and the best experience.
Last Seen Tumblr Blogs


Fun Fact
Average visit duration of Tumblr.com is 10 mins and 25 secs.
Text
LOM has one of the strangest methods I've ever seen in a game for toggling harder difficulties.
Instead of "Pick your difficulty: Easy, Normal, or Hard" -
You're locked to standard difficulty in your first playthrough and there is absolutely nothing that will tell you outright about the ominous skull-faced tome in your library in New Game plus.
Saying "yes" to the nightmare question triggers "Nightmare" mode while saying no to the last question triggers "No Future" mode.
From what I remember playing the PS1 version, Nightmare mode makes all enemies around lv 50 at minimum, while No Future mode makes all enemies become lv 99, including bosses, I think?
I did play through one save file fairly okay at Nightmare mode...until that darn Tropicallo boss...its mechanics do NOT mesh well with higher stats, lemme tell you that.
I suppose these modes are really for those who want to test out their tempered weapons and armor, but I never understood it myself, so I just traipse through LOM on usual difficulty haha.
Still...I forgot how incredibly ominous the whole aura of the Forbidden tome is. The music cutting out, the screen darkening, and then asking weird questions...it's probably inspired some creepypastas.
15 notes
·
View notes
Text

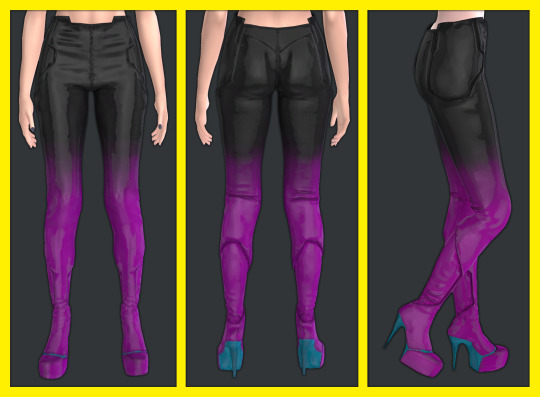
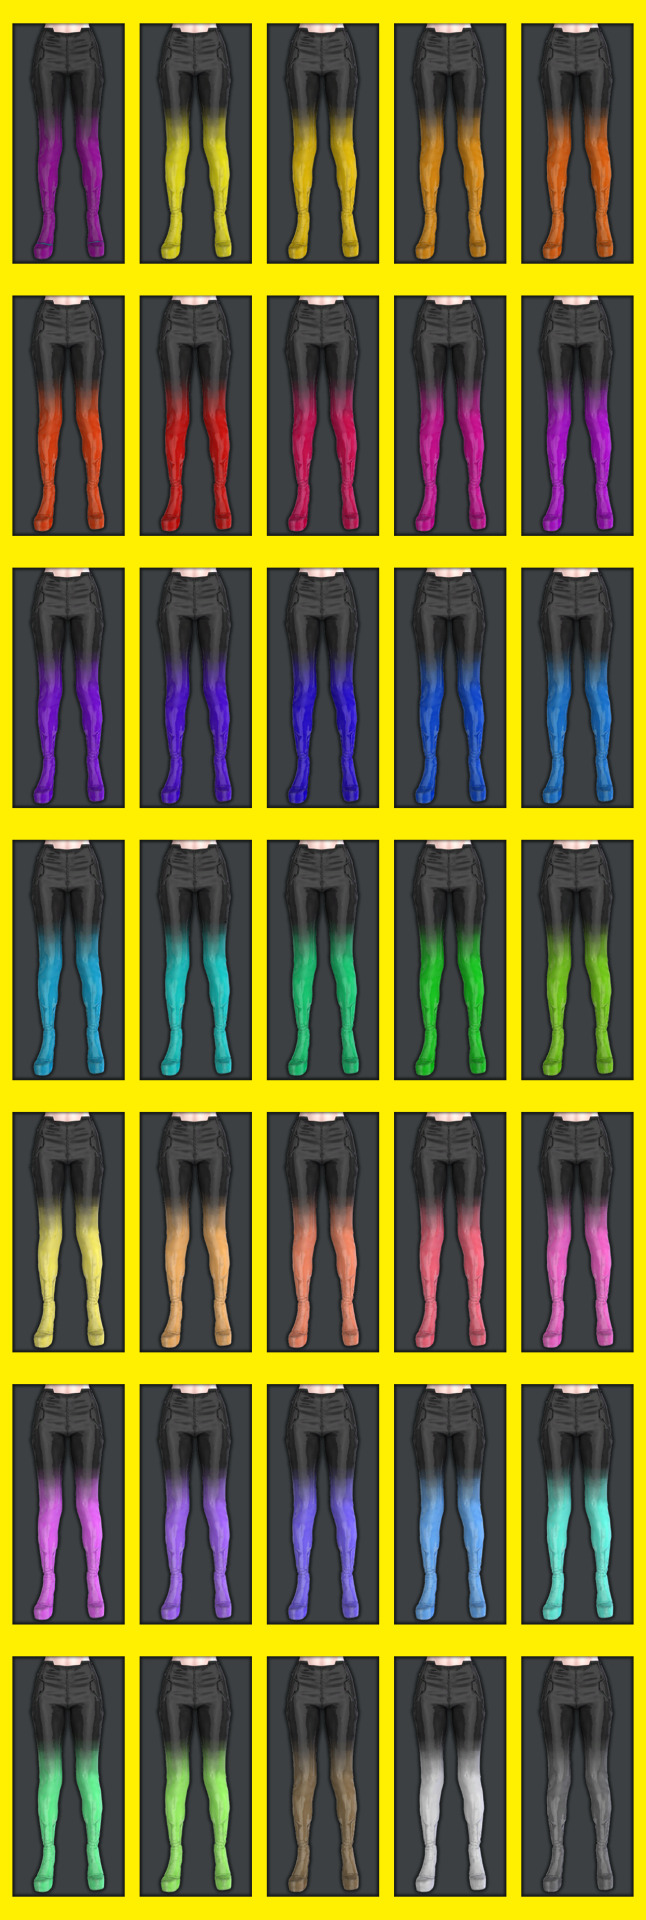
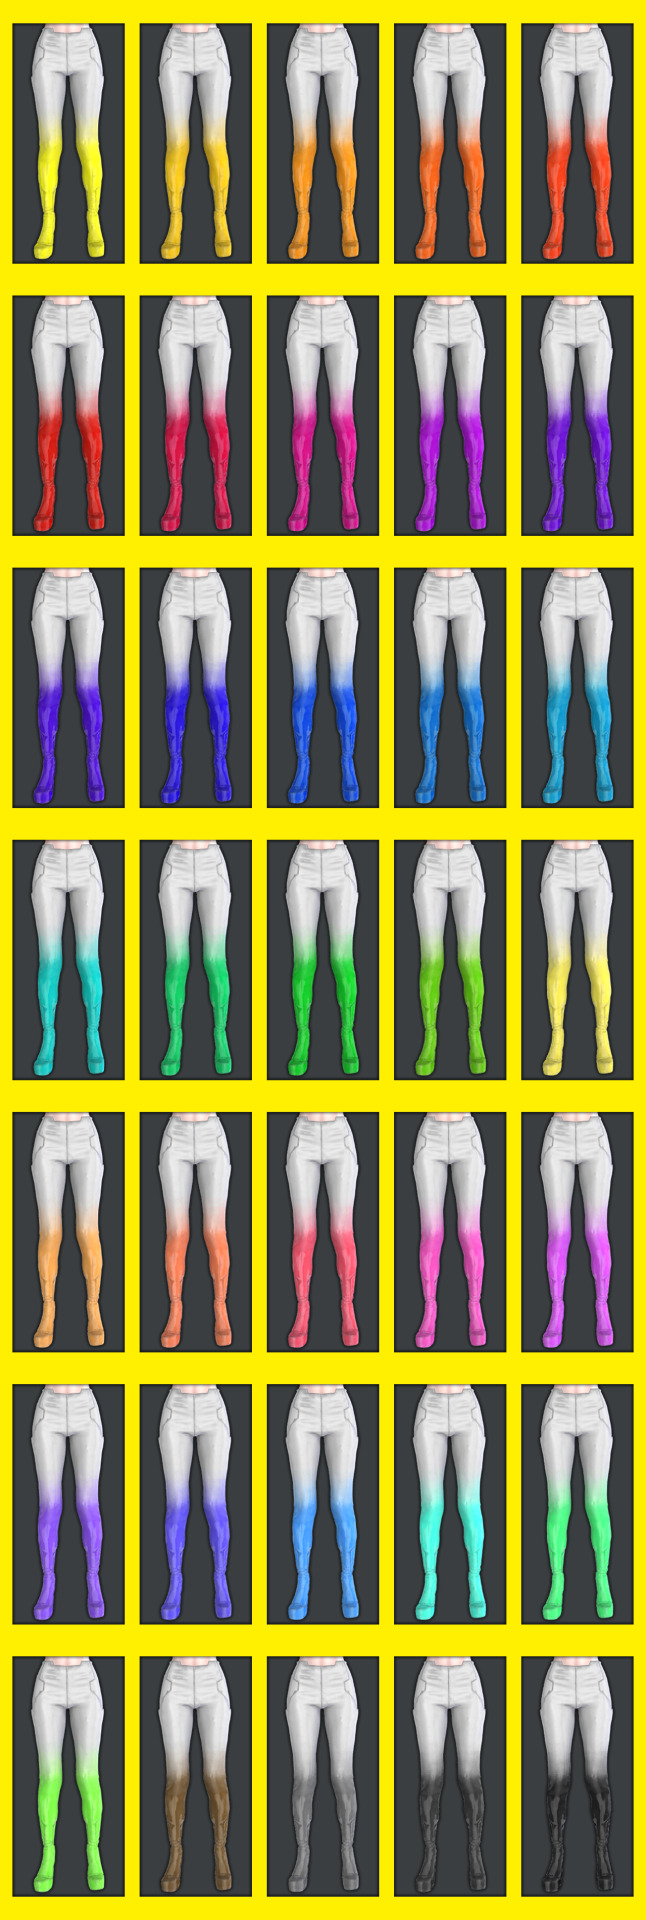
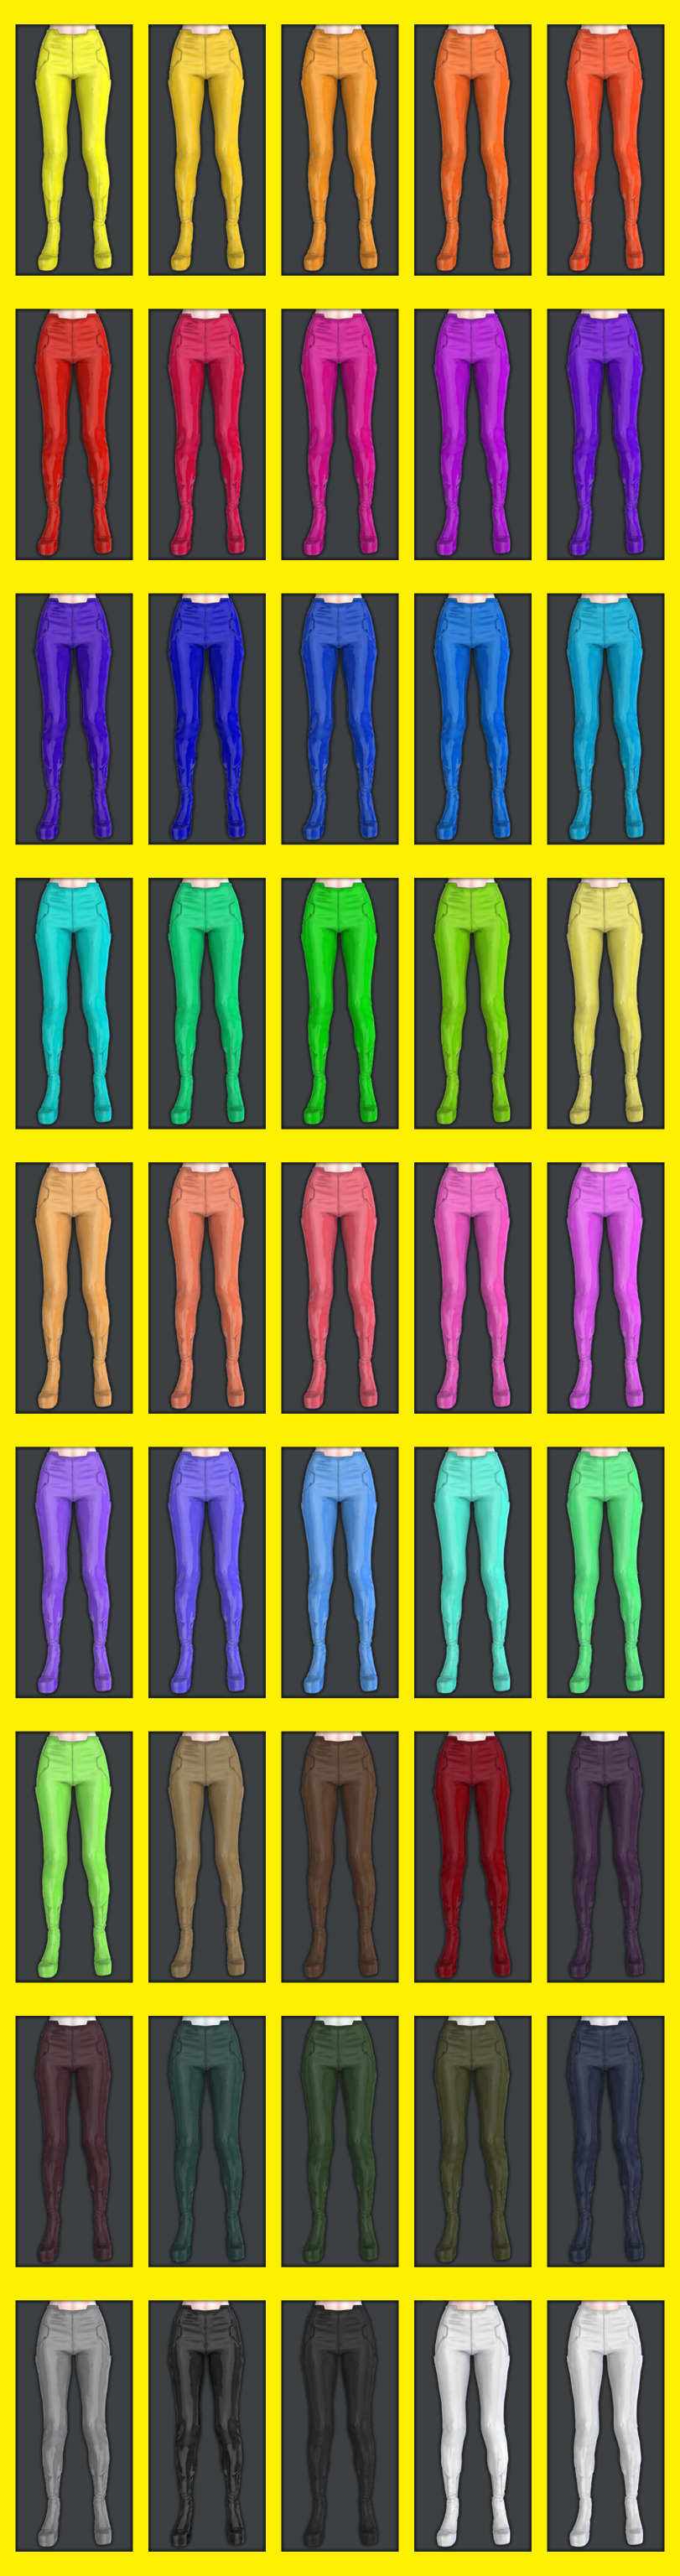
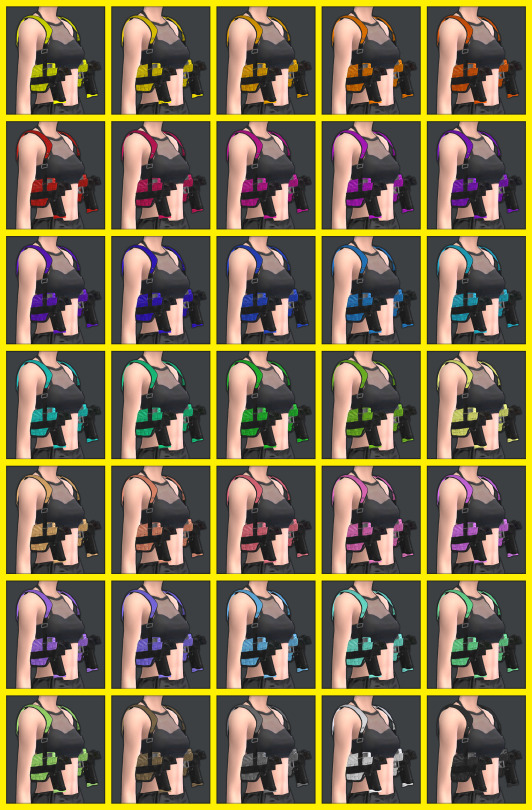
Abeni Twists by simstrouble
Been wanting and trying to make twists from scratch for ages, and I think I got it right this time 🤍
Base Game Compatible
24 Swatches
All LODs, Hat Compatible, All Maps, 26k poly (since every lock is individual and for the length, I couldn't go lower without getting pointy and unnatural-looking angles).
Ombre Accessory in Face Paint, 24 Swatches, and Color Wheel Enabled
3 Versions, shown below 👇🏼

Download (Patreon, Free) | Instagram | Pinterest
#simstrouble#ts4#sims 4#s4cc#ts4cc#s4mm#tsmm#these took a whole week and more#just for making the mesh and testing it in-game#totally worth it and i'm so proud of it 🥺
9K notes
·
View notes
Text
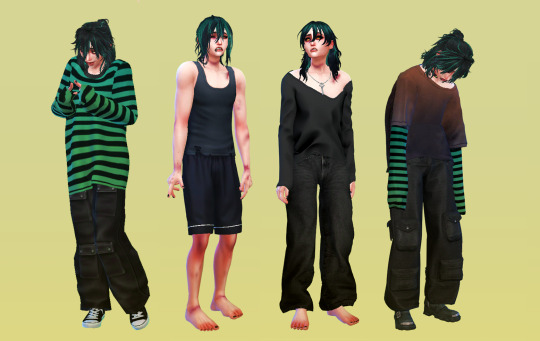
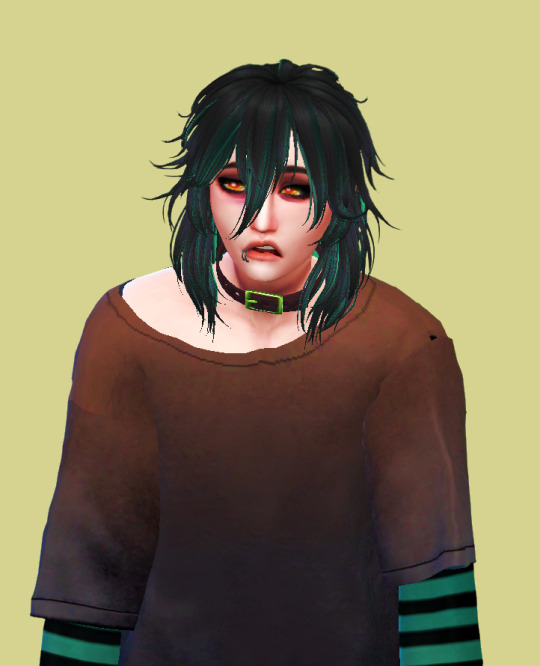
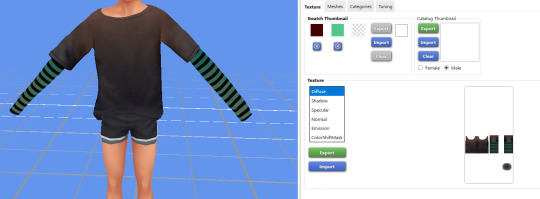
AHHHHHHHHHHH


#AHHHHHHHHHHHHH#it looks better than the frankenmesh tbh#high key scared to put it in my game#I’m OBSESSED#testing the mesh in game and then it’s just a recolor issue#might try to see if I can make the stripe a cool little addon but if I can’t get it first try I’m just not#twink tries blender#twink speaks
0 notes
Text


hi simblr, it's my birthday today! virgo supremacy! I decided to share one of my favorite recolors i've ever made (finally!!!). I sticker-ed up the City Living keyboard and added some other fun swatches. There is a functional version for use with the City Living EP, and a non functional deco version for both the floor and the wall! More info + download below the cut!
DETAILS:
This is a recolor of the keyboard that came with City Living, and the deco mesh separated by @pixlmonster. Unfortunately this means CL is required, I'm sorry! I was hoping the deco versions would work without CL but they do not. Mesh by pixlmonster is included.
There are 19 swatches. The first 6 are the more unique sticker-ed swatches, and some of my personal favorites. Swatches 7-11 are more patterned recolors, and the last 8 swatches are from @pictureamoebae's fluoro-pop collection. Sometimes you just need a neon pink keyboard, y'know?
You can see an unedited in game photo of all swatches right here (part one, part two, part three)
Custom thumbnails for the first swatch.
You can download a merged .package with the functional + deco versions, and they also come separated if you'd prefer to pick and choose.
CREDIT:
Thank you to pixlmonster for the liberated keyboard mesh and pictureamoebae for the fluoro-pop collection palette!
I'll be super honest: It's been a year since I first initially started this project and I didn't do a great job recording where I got all of the stickers used. I apologize. Some of them were in game assets already, found via petaluhsims' sticker sheets. Some were found via google/freepik and some came from other places that I'm sure I'm forgetting. I made the parental advisory + seattle grunge stickers on the first swatch myself. Simlish fonts were found via franzillasims' font masterpost. Thanks so much to all of the original sticker/pattern creators, all credit goes to them. I just compiled a bunch of stuff together.
thanks to sam @m0ckest for testing <3
here's an ugly GIF of all the swatches! I tried so hard to make it look better but alas. I have completely forgotten the art of GIF making. I still wanted to include it so y'all could see all of the swatches somewhat easily!

DL:
MERGED: SFS / MF
INDIVIDUAL: SFS / MF
#ts4#the sims 4#ts4cc#s4cc#sims 4 custom content#maxis match#sims 4 cc#ts4 custom content#mycc#drops this and runs away jdrlfk#MY MAGNUM OPUS 2.0 HAS ARRIVED#pls reblog if u like it means a lot ❤️#i literally love this recolor so much im sooo happy to finally share it#pls tag me or show me if u use it in your builds/gp! 🥺
7K notes
·
View notes
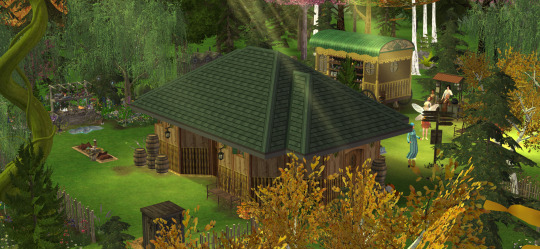
Text
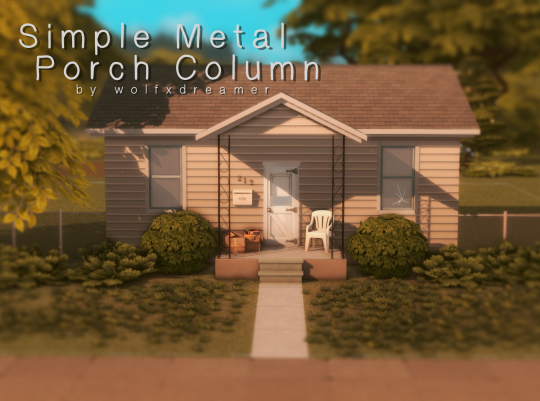
It's done guys! I finished the porch column, a lot quicker than I thought I would! Like it says in the name, this is just a very simple metal porch column, nothing fancy. I've been wanting these in my game for ages, and I searched the internet for them for a long time to no avail. So I decided to take on the challenge of creating them myself! Keep in mind this is my first ever piece of CC that I created mesh for from scratch. I ran into a few snags, but ultimately it seems to have worked out. I tested them in my game, and they work fine and look good! Please let me know if you run into any issues, and be patient with me while I try to fix them if anything is wrong lol
Information:
These are not actual columns, but objects/sculptures. So you can't use them on taller wall heights. they only work with short walls for now. (someday I'll make more variations or make them into stretchable columns)
Comes in 2 swatches: black, and white.
Feel free to use these however you want, include them with your build downloads, whatever! Just don't claim as your own or paywall them pretty pleaseee <3
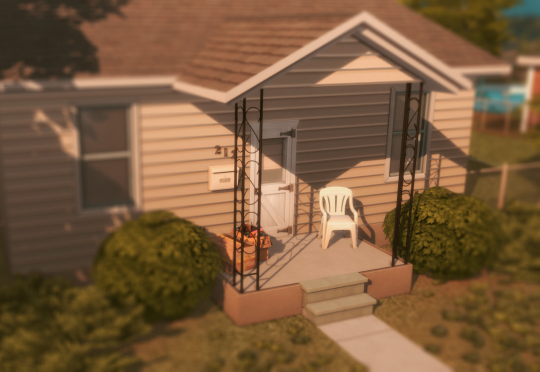
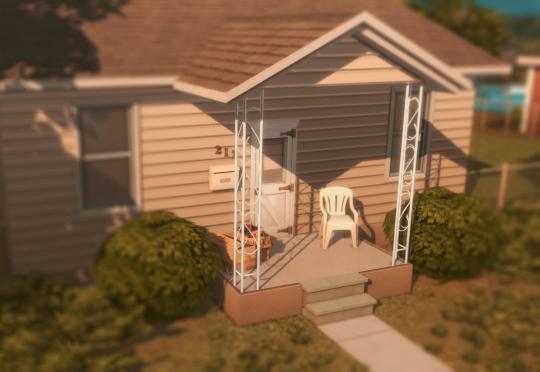
Download on Patreon (Freeee)
2K notes
·
View notes
Text

[4t2] Alertz Burglar Alarm
Hi there y'all! Since the last update for The Sims 4, burglars are back (10 years later-), and with them, a nice burglar alarm. This item got my attention and I wanted to port it to The Sims 2, but I don't had the game installed because ~Hard Drive Space issues~. However, I found the model out there, so I decided to port it finally!
I've found a few problems with it at the time to port to The Sims 2. For example, originally the led screen was attached to the green/red led, with no editions at all, which made the entire alarm to look green! Then, my second option was to simply edit the mesh and add it over the base alarm, so yeah, behind the led screen theres the actual turned off alarm, very clever! So I believe that if you didnt paid your bills and they cut the lights, I think the turned off screen wil be shown instead (didn't tested).


(The video is an old version with no glow)
It will switch between blue and orange (depending if a burglar activated it or not), however, sound effect couldn't be replaced with the TS4 version. If the cops arrives in time, the alarm will be deactivated and switch back to blue.
In order to make it functional, you'll need to download the Custom Burglar Alarms by MidgetheTree, otherwise, it's just a nice paperweight with no use :)
Alertz Burglar Alarm Information:
Description:
A state-of-the-art Burglar detector that can be upgraded with all the fanciest features. Helps you sleep safe and sound, unless a Burglar is spotted. Also effectively wakes the whole family up, as it should. Very, very loudly. Buy one for any door the Burglar could enter from!
Mesh and textures were converted by me.
Category - ‘Electronics/Small Electronics’
Price: - §85
Download: SFS | MTS
#sims 2#the sims 2#ts2#sims2#my cc#sims 2 custom content#dl:buy#4t2 conversion#4t2cc#sims 4t2#4t2 download
594 notes
·
View notes
Text

I've been so damn busy with work and uhh, I actually got egged on re-downloading Sims 4 and finally get a try on custom content recoloring for the first time so hehe- He's still a work in progress and I'm still play testing him in game but I had fun trying out new stuff at least. Credit of the Sol base to @redthebloodofangeryfangirls, thank you for letting me download him and test my recolor on ;w; Sol belongs to @fantasia-kitt Some extra emotions screenshot for fun and the wips when I test the recolor stuff under
Some goofy emotions screencaps btw he look silly

Disclaimer: I do not own or make the original meshes, I'm just trying out recoloring textures.


Anw lets hope work gets less hectic so I have more time to draw again
#the kid at the back fanart#the kid at the back sol#the kid at the back vn#tkatb vn#tkatb_vn#solivan brugmansia#sol brugmansia#yandere visual novel#male yandere#tkatb oc#tkatb sol#katb vn#the kid at the back#tkatb#ts4#the sims 4
469 notes
·
View notes
Text
Simstrouble's HecateV2 hairstyle converted for TS3

Again, huge thanks to @simstrouble for that awesome hairstyle, I'm a fan of her work <3
ALL CREDITS GO TO SIMSTROUBLE, I ONLY CONVERTED IT
ORIGINAL TS4 HAIRSTYLE
✦LOD0: 6.6K poly
✦LOD1: 5K poly
✦LOD2: 4k poly
✦LOD2: 800 poly
✦Both genders, child to elder
✦Breast slider compatible for T-E
✦Fixed pigtail glitch when sims are aging up and change hairstyle. In merged version I also connected children and adult hairs (tested in game, all must work)
✦Control map (roots, ends and all are recolourable)
✦Custom thumbnails (also in archives)
✦I lowered texture's contrast and made it lighter, just to make it look more "ts3-ish"
✦Not valid for random
✦Valid for maternity for both female and male
✦Sorry, but no meshes, I hated how stretching distorted hair and decided to leave it floaty on thin sims
DOWNLOADS (SFS)
Please, consider supporting the author of the original.
If you find any issues - please contact me.
#sims 3#ts3#4t3 conversion#sims 3 cc#ts3 cc#4t3#female cc#male cc#children cc#hair cc#ts3 hair#ts3 clayfied#ts3 low poly#hair: af#hair: am#hair: cu#hair: under 10k#hair: long#hair: wavy#simstrouble
265 notes
·
View notes
Text

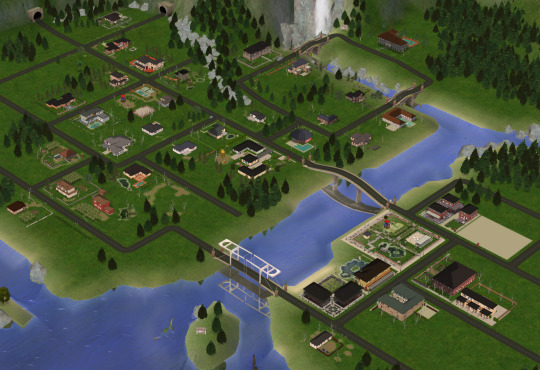
SimCare Medical Clinic

Sim File Share (currently slow due to traffic/site errors. I will keep trying to upload so check my Downloads page for updates.) Dropbox

Our SimCare team is dedicated to nurturing your health through proactive care and patient-centered treatment - whether you're seeking routine check-ups or specialized care. We’re here to support your journey toward a healthier life and ensure that you receive the best support for your health, every step of the way.

Price: 184, 065 Lot Size: 30x20 Lot Type: No Visitors Allowed Store Content: Click here CC Used: Click here File Type: Package Min. Required Game Version: 1.42 Packs Needed: The Sims 3, Pets (buydebug object), LN (elevator, floor, wallpaper), Ambitions, Generations, Seasons Simlish Clinic Signs (Add-on CC): Price: 1500 Environment: 7 HLOD: 122 Features: Shiftable, Frame is CASTable Category: Buy > Decor > Wall Decor Room: Living, Dining, Bedroom, Study EA Mesh Used: Painting Ranch 2x1 from The Sims 3 File Type: Package Min. Required Game Version: 1.42 Packs Needed: The Sims 3, Late Night
Hello and welcome back to my blog!
It’s been a minute, hasn’t it? Life got in the way and honestly, I’ve been taking my sweet time with this new build. It also didn’t help that the Sim File Share site kept giving me errors whenever I tried to upload it and I was supposed to post this last month.
Even now, I’m still dealing with errors on the site and after some frustration, I’ve decided to look into alternative sites for uploading content in the future. But after all the setbacks, it’s finally ready!
Thanks for sticking around and I really appreciate all the likes/reblogs, you all are the best! 💜
Click on the ’Keep Reading’ below for more information and pictures on this lot.


📣 Right-click on a picture and select ’Open image in new tab’ for a clearer view.

This clinic is designed to give a real-life feeling of visiting a healthcare facility. Inside, you’ll find a: reception area, consultation/exam rooms, pharmacy, laboratory, x-ray/radiology, restroom, locker room, staff break room, doctors office and a large empty room for the rabbit hole rug/door. Now, a couple of things to keep in mind - the layout is designed with a small staff in mind but you can use the extra space in the second floor, where the rabbit hole rug/door is placed, if you want to add more offices or any other services. Just make sure that there is enough space for the rabbit hole rug/door to avoid routing issues. I had to get creative with the signs for this build as I couldn’t find anything that felt right or any CCs that matches the layout of the clinic so I made my own directory signs. It is included in the download file and I’ve posted the details along with this post as it is an add-on for the clinic. I’m using a font called Simlish Deja Vu by gazifu@MTS for the signs and I’ve also included translations in the picture above. It’s not perfect but you know what? It does the job! I have also placed a big sign shown on the clinic that translates to 'Pharmacy' and I know it might seem a bit out of place but honestly, it’s the only large sign I liked that fit the building aesthetic I was going for. 📣 Please note that the CC included in the lot are not included on the download file. I’ve compiled a list for those interested in downloading them separately (please click the links above or go to WCIF Navigation page) but those are not required and will be automatically replaced in the game. Any expansion packs with build items listed in the Details section above may be required for this lot to show up in your game. This clinic has been such a fun build to put together and I hope you all enjoy the build. This lot has been play-tested and let me know if you experience any problems on your end!

TSR Tutorial - Create Custom Paintings Sims Wiki - Poly Counts for Creators TSR Workshop Simlish Deja Vu font by gazifu Pixabay
#petalruesimblr#community lot#the sims 3#the sims 3 hospital#the sims 3 clinic#decorative obj#lots#ts3#sims 3#sims 3 lots#ts3 simblr#ts3 simmer#ts3 download#ts3 screenshots#ts3 community#sims 3 download#sims 3 screenshots#ts3 hospital#ts3 clinic#ts3cc#the sims 3 custom paintings#ts3 custom paintings#s3ccfinds#s3cc download#the sims 3 wall decor#ts3 wall decor
171 notes
·
View notes
Text
Tutorial: Renumbering Shoes/Necklaces Meshes to avoid conflicts and explosions
First of all, a huge thanks to people at MTS and to @virtual-hugs who taught me how to do it at the Creators Cave!
Also sorry for taking so long to write this! It's because I kinda struggle to write in english 😬

What will you need:
S3PE
Mesh Toolkit
Your shoe/necklace/accessory package ready, so you won't need to go back to TSRW to tweak something. This should be the last step on your CC creation workflow!
First, why does this happen?
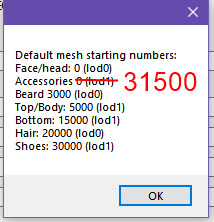
Each CAS part has a vertices ID range, and when two parts with morphs have vertices containing the same ID, conflict happens and this is what make some meshes to explode. And this tends to happen when we put high poly shoes with morphed high poly necklaces because the shoes verts ID range is too low. Shoes verts ID starts at 30000, and accessories starts at 31500. In the pícture below there's the information provided by the Hint button at Mesh Toolkit with all the verts IDs, but it erroneusly says that accessories start a 0.
With all that said, we can try to renumber these parts verts to a different IDs to try to bypass that.
But let's go to the tutorial!
Again, your shoe/necklace package should be ready to do this, so you won't need to go back to your project in TSRW!
For this tutorial, I'll be using Arltos 109, converted by @rollo-rolls. You can do this tutorial with any CC high poly shoes/necklace, just please respect the creators TOU and do not upload it.
Note how there are tiny gaps showing when the shoes are worn with necklace! In this picture they quite imperceptible, but with some shoes/necklaces more distracting distortions might occur.

👠Step 1:
Open Mesh Toolkit, click on Package Tools tab, and in the Name Those Files tab open your package. Click on Add names, and then type a unique name for the CC part you're working on and save it. Here's what I named mine:

👠Step 2:
Open your package on S3PE, and select the LOD1 (or the LOD0, if you're working with some accessory that might have it) GEOM plus the four BGEOs (they're the morphs) and export them to a folder (just click on it with the right button, and select Export > To file...)
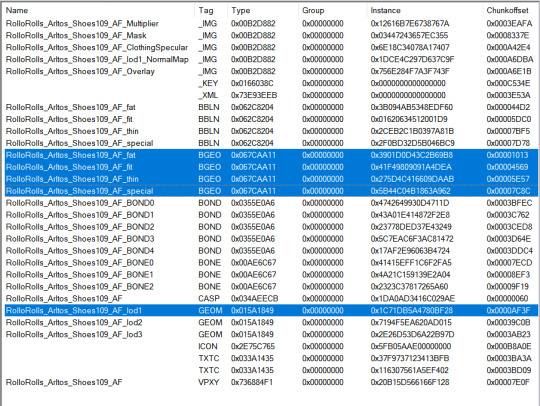
(see? this is why we added the names ^^)
👠Step 3:
Back in Mesh Toolkit, go to the GEOM Tools tab, then to [Re]Number Meshes tab. There, open your base GEOM mesh and BGEOs morphs accordingly.
In the "Number to start with" box, type the number which you want to start the verts ID. I'm usually going with 57000 for shoes, and with around 40000 for necklaces (so they won't conflict with old shoes that aren't renumbered).
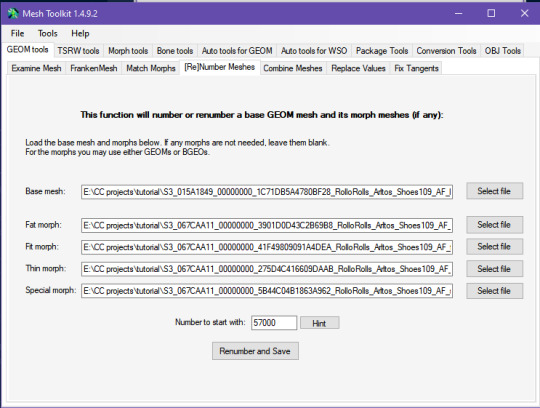
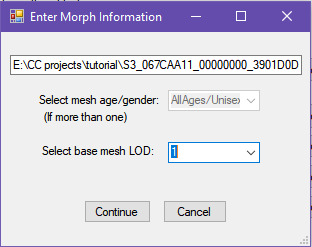
Click on Renumber and Save. When asked, select the according number for the LOD you're working with (in this case is 1, but again, if you're working with LOD0, then select 0), and click in Continue.
Then the program will prompt you to save the renumbered mesh and morphs. It's good to create a new sub-folder for them to avoid any confusion.

These are the files we get. LOD1 is my base mesh, and the others are the morphs.

👠Step 4:
Go back to your package on S3PE. Right click on the GEOM mesh you exported before, then click on Replace, and select your new base mesh. Save and close your package.
👠Step 5:
Go back to Mesh Toolkit. Go to the Package Tools tab, and then to the Add Morphs to Clothing/Hair tab, and open your package.
Tick "Use GEOM morph meshes", untick "Change morph blend TGI".
Then tick the morph you will add to the package, and then in the according box (in my case,LOD1 box, but again, if you're working with a LOD0, put it in the LOD0 box) open your new morph.
Then click on "Add morph to package". A box confirming the action will pop-up.
Repeat this step with the other morphs, reminding always to tick the according morph or otherwise you might make some mistake (as adding a fit morph in the place of the fat one).


After you finished, save your package (either the current one, or save as new package).
👠Step 6:
Now test it in game! If everything was done right, you should see no distortion in the shoes and necklaces. Also check if the morphs are working as intended, because sometimes we can make mistakes!
Remember that you'll won't be able to have both the old and the new altered package since they're still the same, we just replaced the meshes and morphs.
154 notes
·
View notes
Text
📥 How to install everything ?! 🗂️
It's a very big project ! Between the lots and the sims, you have to be very sure of what you are doing. However, this post is there to guide you through the steps of installing everything.


🟪 Phase one - The "Lot Master Meshes Post" 🏗️ (for the unpopulated neighborhood) : This post contains links for custom content (Building and Buying Mode) needed that does not install itself with the packaged files and needs to be installed for lots to display properly. Not downloading those things can cause bug, especially food/shop displays. 🟥 Phase two - The "Chapters" posts : install the lots 🏡 These posts contain links to big downloads or entire download sub-folders containing the lots.packages (Neighborhood, Downtown, MagicTown etc.). Each lot.package file must be installed for every lot to display properly in the neighborhood with The Sims 2 Clean Pack Installer by Mootilda. For the lots, every CC is needed. The CC presentation in the lots posts (between pictures) serves to illustrate (or to show you an alternative or to thank a creator) and is included in the packaged file or the lot master-meshes post. The lots post where only to show what you are downloading, and for the ones who just want to pick and choose a particular lot for their own game. 🟧 Phase three - The Neighborhood 🏘️ The "Chapter 5" post includes every neighborhood decoration CC you need for the neighborhoods, after you installed every lot packaged file. When, you passed the check-list, you can choose what to download between all the options presented to you. 🟨 Phase four - The CAS Master Meshes Posts 1 and 2 A lot of CC presented in those posts are not strictly necessary. If you don't install a default replacement, you will end up with the maxis content. If you don't load a custom hairstyle or clothing, you can have a display bug, but that is quickly corrected with the "change appearance" option. Big bugs can occur when an eye or skin color is missing, so I deliberately build my sims with the Maxis eye/skin options. These posts are for the ones who want to install my populated neighborhood. For those who only want to choose a few sims from the families, each sim in each family post has their own content listed. 🟩 Phase five - Download & install the TS1 families Subhood 🧑🤝🧑 I'm working on making one big neighborhood, but the issue with main hoods is unwanted sims spawning, especially custom PT and NPCs. And then potential corruption when you try to clean that freaking mess. The Main (completely unpopulated) hood with the populated subhood is the best option to have a "Fresh Start" clean neighborhood. After deleting the subhood, you have to move the family in houses. The Sims 1 has a big family bin. Choosing who is going where is part of the game, it doesn't seem right to choose for you. 🟦 Phase six - Passed the check list 🎮 You chose, you installed, you PLAY ! (veni, vedi, vici...)


⚠️ I'm not going to lie to you. It's a big project. I tried by the past to handle that kind of installation and here is my advice, good or bad, I don't know :
1 - Install every master-meshes, well organized in your files. 2 - Install every CC included in lot packages in the same folder, to make the duplicate replacing themselves (there are a lot since I use a lot of time the same items... logic). 3 - Install the neighborhood deco nicely organized in your folders. 4 - Test the lots/neighborhoods, see if everything works. 5 - Exit your game and Run a program to search for duplicates (like this one for exemple), and suppress all duplicates files from the "lots packaged file CC folder" (suppress where it's still messy) 6 - If you want to organize the "messy" folder, you can run a program like the great Delphy Download Organizer to efficiently re-dispatch files according to your own classification. However, I strongly advise against using this software to locate duplicates. It has the option, but it doesn't work well.
💡To go faster ? - The "Navigation" page on my Simblr !


#sims 2#sims 2 download#ts2 simblr#ts2#1t2#the sims 1#sims nostalgia#sims 1#the sims 2#ts1#ts1t2 families#ts1t2 neighborhood download#ts1t2 neighborhood project#ts1 to ts2#FAQ
54 notes
·
View notes
Text
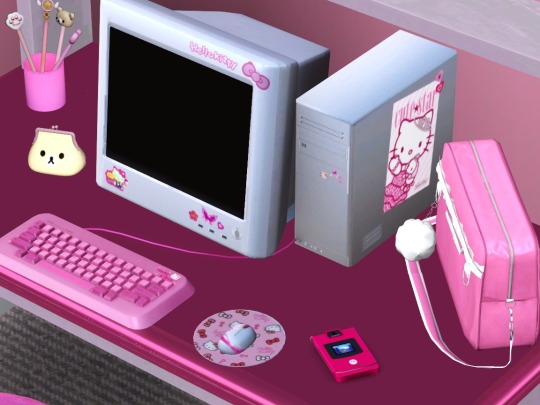
[tutorial] how to make computers functional in the sims 3 by sideshow_snob
Programs needed: TSRW [i use the old version] Blender 2.7 [you can use any version] Milkshape 1.8.4
You can download this tutorial as a .doc HERE
Original [right] TS3 version [left]

So, how do we start?
Seperate your computer of choice into pieces. [mouse, keyboard, monitor, monitor screen, mousepad if applicable, drop shadow if applicable]. This can be done by selecting faces and holding 'shift +' to select that entire piece. if shift + doesn't work you'll have to do it by hand. Once your desired piece is selected, press 'P' to separate.
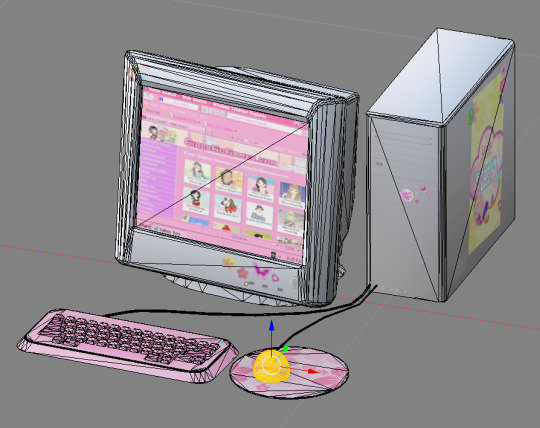
Once you've seperated all your parts, go ahead an open TSRW and clone a similar PC. I chose this one
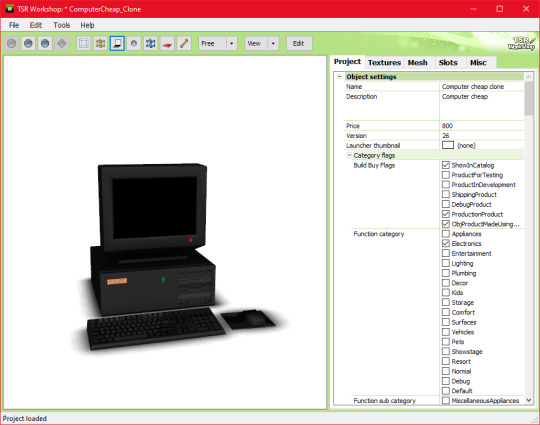
Go ahead and export the .wso AND .obj file for this computer in the mesh tab. I named my exports 'eapcref' we're going to be using this PC as a reference to modify our mesh, and assign bones in milkshape.
go ahead and import the .obj into blender, where your separated PC is.
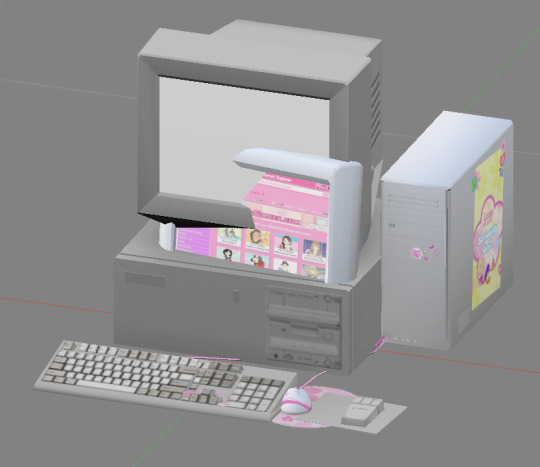
As you can see, these computers are pretty different. We're going to move each piece around until its in a similar size and position as the EA one, so the PC animates properly. Helpful shortcuts ---> G [grab] S [scale] R [Rotate]
This is what mine looked like when I finished moving it around:

Keep in mind, i actually tested mine quite a few times in game because the animation was not lining up with the PC location, so this is what mine looks like after a few modifications. Make sure you save this .blend file so you can modify it if necessary after you assign the bones.
Now onto actually assigning the bones…
Open milkshape and import all your seperated PC files.
Your PC parts should be grouped like this:
group_0: the monitor, mousepad [basically everything except the drop shadow, screen, and mouse] group_1: drop shadow group_2: screen
Now import your EA pc .wso file
Select the EA pc parts in the groups tab, then go to the joints tab and click 'show' Then go back to the groups tab, with the ea pc still selected, and select all your PC parts. Go back to the joints tab, and click 'assign'.
Now delete the EA PC.

the first bone is the mouse assignment, and the second bone is the rest of the computer.
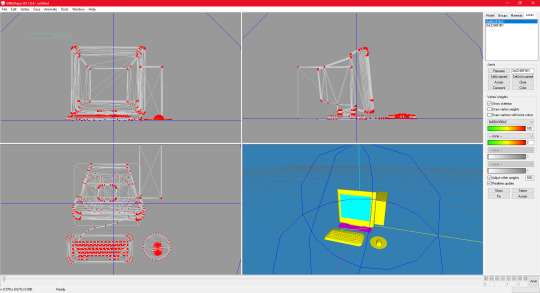
go ahead and click 'selassigned' and clear the bone assignment since its incorrect.
To assign the bones, go to the model tab and click 'select' alt shift left click all the bones in your mouse
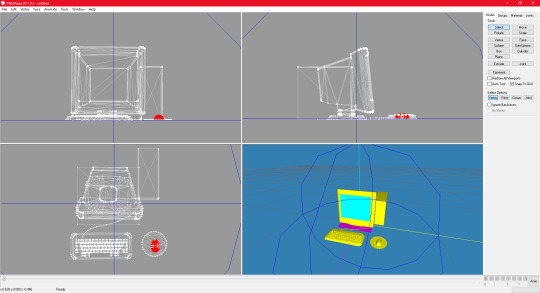
go back to the joints tab and click assign
now to assign the PC bones
Select everything except the mouse and drop shadow, then go back to the joints tab and click assign
you can check to see if your bones are properly assigned by clicking 'selassigned' on both bones
export as .wso and your finished!
something to note:
if your mousepad gets in the way while assigning bones, you can keep it seperate and just regroup it back into the mesh after assigning bones.
274 notes
·
View notes
Text
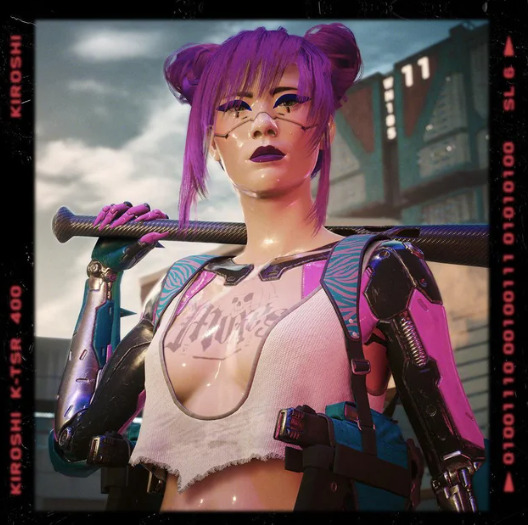
Cyberpunk 2077 - RITA SET - TS4 Conversions

Hello Chooms. Before downloading or reading anything, proceed to look at my total Night City baddies wearing it:

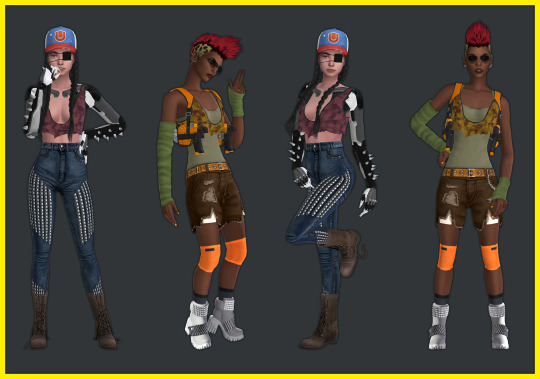
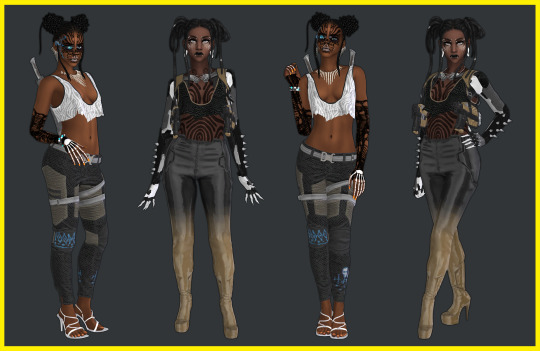
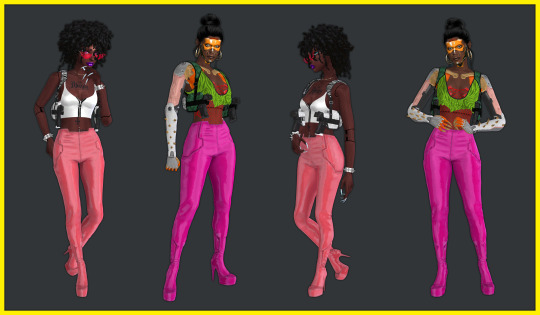


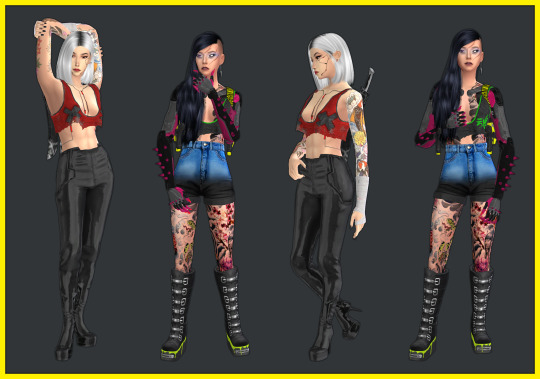

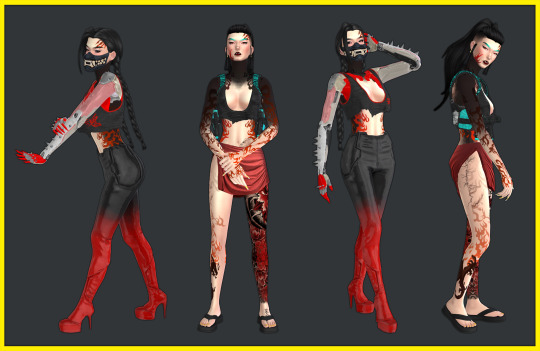
Now you have seen the Night City baddies, you may adequately and safely proceed to the download info 🤩💙💜💅
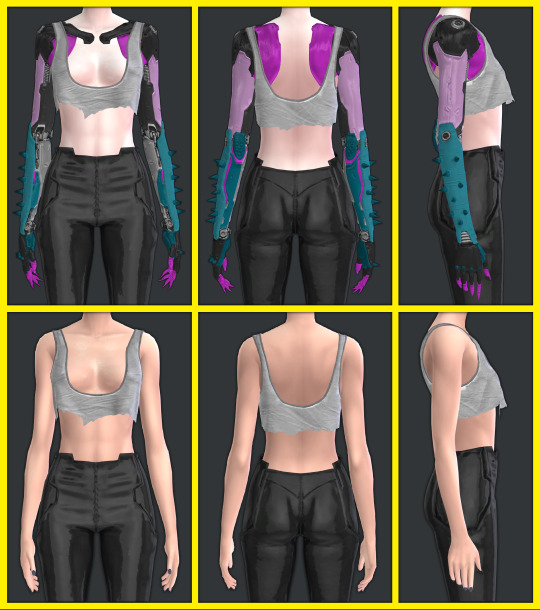
ヽ(✿゚▽゚)ノThe set includes:
💜Cyberpunk Tank Top with Kitsch Cybernetic Arms with many colour swatches for the arms (must use overlays to colour the tank top) + Cyberpunk Tank Top with no arms (must use same overlays to colour the tank top). EDIT: Just added a nude version of only the arms, use at your own risk, accessory top/bra links can be found in Recommended CC section below. (THIS REQUIRES THE TANK VERSION TO SHOW UP)


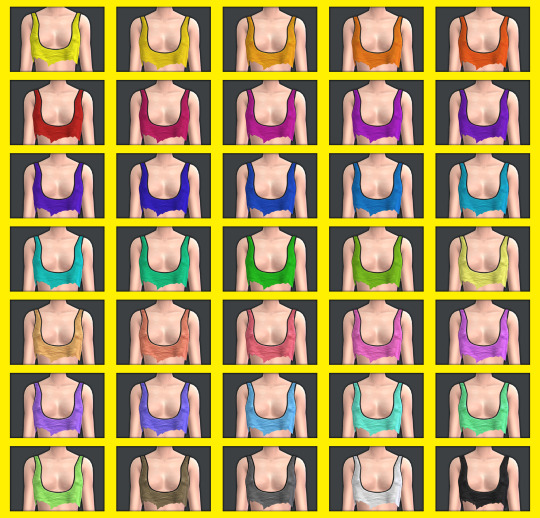
💜7 Tank Top Overlays (found in Middle finger left/right + Ring finger left/right of the rings category). I made it so you can pick and choose overlays or just take the merged file with them all. Don't unmerge any of the files. 1- Plain (35 swatches)
2- Zebra (35 swatches)

3- Kanji (35 swatches)
4- Faux Leather with colour edges (35 swatches) (sorry it is hard to see)

5- Dirty with tape crosses (35 swatches)
6- Plaid (15 swatches)
7- Camo (16 swatches)
💜Bottoms 3 versions: Black with colour gradient (35 swatches) White with colour gradient (35 swatches) Plain (45 swatches). Don't unmerge the file.
There are two versions of black and white plain, this is because I used different methods and liked both effects. You can't see much in the pic, but there are slight differences in shine and the way the textures show. The shoes are connected to the pants and other shoes don't show, but you can use high heel shoes even if they don't show if you want it to sound like heels in game. - Gun holster accessory (found in hat category, not compatible with hats or cc items using the hat UV space). Can be layered over these tops and others.


3 Versions (sorry about the texture quality of this item, it was not much UV space left and a very complicated mesh): - Random cyberpunk textures and inspired designs (15 Swatches). - All colours in plain (35 Swatches) - All colours with black zebra print on straps (35 Swatches)
💜SKIN ITEMS: Mox Chest Tattoo (Chest tattoo category, 4 swatch variations of size and placement) + Rita's Face Cyberware (upper back tattoo category) + Shiny Doll Skin Overlay (face skin detail, forehead category) you can't see much, but basically makes the skin look shiny like plastic like Rita Wheelers in Cyberpunk.

Recommended CC - Accessory tops - More Accessory tops - Accessory bras
💜Disclaimers / Important info
All items have specular and normal maps.
All items are tagged correctly (as far as I know) and have the correct colour labels.
All items are disallowed for random townies.
All items (once again as far as I know) can be worn on male frame (disable the masculine tag and they appear) From now on I'll make sure to do this for all cc's since I didn't realise it was being restricted before until I tried to take some pics of a sim with male frame for this post. Since then I've fixed it all and tested it and it fits the body fine even though I made it to fit the female frame. I may fix my older sets soon too but I'll need to test they work ok.
Let me know if something doesn't appear, or if you have any issues or notice any glitches at all.
⚠️⚠️⚠️⚠️⚠️⚠️⚠️- Very high poly items, use at your own risk if your machine struggles with the sims. I couldn't reduce the poly anymore without noticing the mesh getting worse. - Some items are slightly low texture quality. I don't play with HQ mod or do HQ textures, so sometimes the textures when baked downsized show some jagged edges or pixel effects if you look super up close. You can see it a bit on some of the gradient pants or on the gun holster which as an accessory I didn't have much UV space to work with, no matter how much I tried to simplify the mesh. - Tanks have no swatches, don't forget overlays to colour the tank. - When using the tank overlays in the different ring categories make sure you don't equip more than one or they'll clash, the different ring categories for the overlays are just so you can use it in another slot if you require another accessory from that finger section) - Make sure not to add merged files as well as other packages that form them or you'll have duplicates. - Don't unmerge any files, just choose the ones you want and use as intended. If you have to unmerge them for any PERSONAL editing, remerge them again after. - Tank is quite revealing, if you're streaming or something and use adult skins, make sure to check nothing shows or that you won't get any sort of strikes (not that there is anything wrong with it at all). Alternatively check out cc accessory tops or bras that can go underneath like the ones in the Recommended CC section. - Nude version of cyberware arms to match with accessory bras/tops now available, same warning as previous point. Thank you so so so so so so so much to the lovely people and great tutorials that helped me throughout the process providing tips and tricks and info that led me to making this properly <3 It helps me keep making these conversions. Thanks to the people who requested this prompting me to make it. These beautiful meshes I converted were originally made by CD Projekt Red
💜💜💜💜💜READ AND RESPECT MY TERMS OF USE 💜💜💜💜💜
This is literally over 100 hours of work, the meshes aren't mine but converting them takes a long time (especially since I suck at making cc) and all the textures images etc were done by me, it's free for all, don't be a jerk and steal my stuff to profit from it: - DO NOT REUPLOAD - DO NOT PUT BEHIND PAYWALL OF ANY KIND in ANY FORM - DO NOT INCLUDE CC IN ANY DOWNLOADS - DONT CLAIM YOU MADE IT - DO NOT INCLUDE MESHES IN DOWNLOADS Please tag and credit me if you recolour the meshes (don't include them, link to this post), no paywall. Conversions to TS2 and TS3 allowed, no paywall, just tag me please! If you use them in pics you can tag me too I'd love to see!
💜💜💜💜💜If you like my conversions and would like to help me be able to do more, you can support me on Patreon!
💜DOWNLOAD PATREON
💜DOWNLOAD GOOGLE DRIVE
Now I'm going to take a long well deserved break.
See you chooms! 💜💜💜💜💜
#moonbiscuitsims#moonbiscuitsims4#moonbiscuitsimscyberpunk#mbsdownload#moonbiscuitsimscc#moonbiscuitsimscas#sims 4#the sims 4#ts4#sims 4 cyberpunk#the sims 4 cyberpunk#ts4 cyberpunk#cp2077#cp 2077#cyberpunk#cyberpunk 2077#rita wheeler#cyberpunk cc#sims 4 cc#ts4 cc#sims 4 cas#ts4 simblr#moonbiscuitsimsphotos#simblr
137 notes
·
View notes
Text
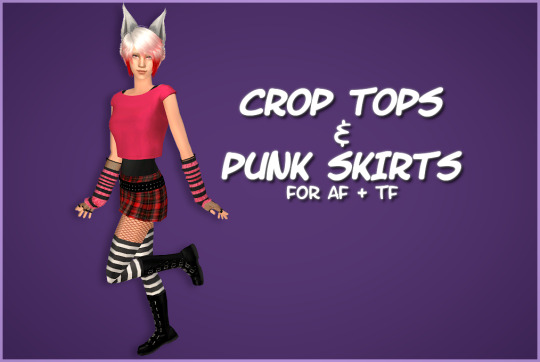

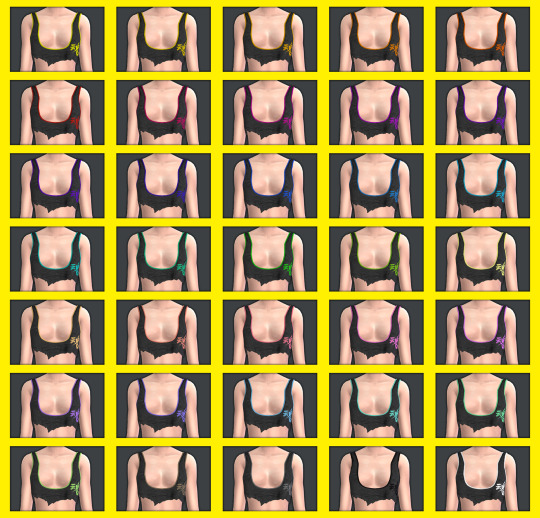
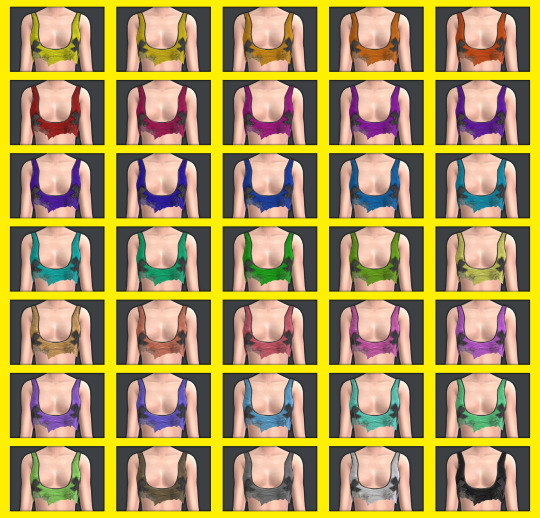
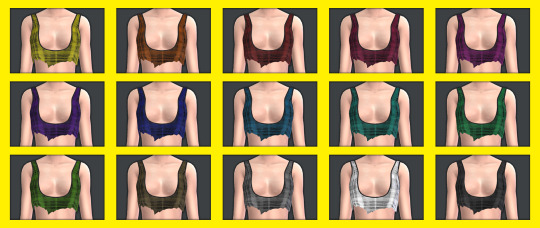
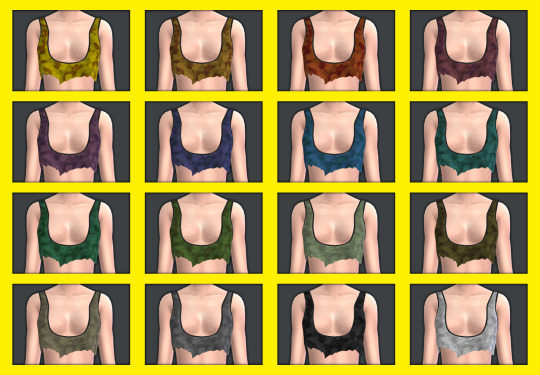
HAPPY BIRTHIVERSARY part 2 - Crop Tops & Punk Skirts
FUN FACT: The Sims 2 (2004) was released 3 days before the date upon which I was released from my mother's womb, therefore making me younger than The Sims 2 by 3 days as of September 14th 2024, but objectively older by 6 years as of September 17th 2024. As of this post, it is now my birthday. I can feel the hands of time slowly pulling me into the earth. Let's celebrate!
Today's Very Special Birthiversary post includes a set of stylish, vaguely Scene-inspired clothes for ladies: 24 recolors of the Urban Primitive skirt, separated from the Maxis outfit by Skell, and 5 Goth themed patterned recolors and 5 bright solid recolors of the 4t2 Bow Crop Top by MDPthatsme, with black tank top undershirts attached using textures by DeeDee. The clothes are for AF and TF, with Standalone and Repositoried options for TF, and they come with all morphs.
All meshes are included and special characters that would make the game load slower (specifically hyphens) have been removed from the filenames. Since the skirt is from the ever popular Maxis Match Repository Project, you probably have the mesh for the skirt lying around in your Downloads somewhere, so make sure you don't have duplicates.
For the skirts, there are two versions with tights - one of which is a mashup of fishnets by Io (colored red and black) and the Maxis black and white stockings, and the other is the Maxis shorts+fishnets texture because I liked it - and one version with bare legs, which can be used with @themeasureofasim's stockings accessory boxes. (actually only a handful work, see under the cut)
The crop tops and the skirts are 'meant' to be paired together but, being separates, you can mix and match with any other top or bottom you want.
CROP TOPS SWATCH | PUNK SKIRTS SWATCH
See under the cut for more (not very important) information.
DOWNLOAD (sfs)
Mesh credits: @mdpthatsme, Yuichen, @deedee-sims, Skell Texture and alpha credits: DeeDee, Ghanima Atreides, Creesims, Io, and Maxis Pattern credits: andrea_lauren, nerd-and-vine, ophelia_payne (@ Spoonflower), Blue Moth Fabrics, and VictoriaBat.
I have done my best to credit everyone who's resources I used. If I have misattributed or missed anybody, or if I have broken a rule in someone's TOU somewhere, please let me know.
Secondly, this is my first time 'retexturing' clothing instead of just recoloring it, as well as the first time I've done anything clothes-related in a very long time, so please be gentle to me with your criticisms and let me know if anything needs fixing <3
I wanted to recreate this outfit using only textures, because I know nothing about meshing and Milkshape scares me. As you can probably tell, I got a little carried away from the original goal.
I mashed a bunch of patterns, textures, and colors together on top of the crop top and skirt in an effort to learn 'advanced' recoloring of clothes in GIMP, as the most I've ever done before was just recoloring using pre-made PSDs. it was a bit of a disorganized disaster and there was quite a bit of blood, sweat, and tears. But the end results look... mostly nice, I think.
The arm warmers and fishnet gloves shown in the preview are a pair of accessories created by katsurinssims that I used to try to 'complete' the look, and are not included in this download.
Edit: im very sorry, I only tested a handful of the accessory stockings on the bare legs skirts, because I was very tired and there are A Lot of them, and assumed they would all work. But after a bit more testing, some of them have small gaps or poke through the boots, and the ones that are supposed to go over the crotch area end up looking like over the knee socks. Other than that, most of the knee high socks and tights work, but only on AF. I don't consider this a huge problem though, because a good amount of the tights work and the ones with gaps are barely noticeable.
There's a shoe swap that makes all of the boxes work with these skirts and I'll make another versIon of them with that mesh later.
#ts2#the sims 2#ts2cc#s2cc#sims 2 cc#sims 2 download#sims 2#happybirthiversary2024#the sims 2 anniversary#ssd cc#dl clothes#dl afclothes#dl tfclothes#i worked so fucking hard on this you don't even know
176 notes
·
View notes
Text

(ts4) cc making testing guide
we've been making cc for a longg time and figured it would be good to share how we test our own cc and make sure it works for as many sims as possible! the guide will be based on a loose understanding already of s4s.

remove the original shadow, specular, and normal maps!!! a lot of the base items you start on do have their own speculars (what makes it shiny), shadow maps (false shadows to make it look better), and normal maps (extra details outside the plain texture). very rarely those will work exactly with what new item you're making, so be sure to REMOVE them! double triple check that they're empty by clicking "Make Blank" in s4s. if your mesh is shiny even after removing the specular and there's already no normal, you need to upload just a blank 1024x2048 png to it to remove the shininess.
having weight transfer issues? try subdivision! sometimes when using "nearest vertex" weight transfers your CC can well.. goof up in CAS and be reallyyy spiky. those are the vertices that have screwed weights and smoothing out the weight transfer by subdividing it will help tremendously. subdividing will just double the amount of poly you have - imagine you're folding a piece of paper. your UV is small if you just fold your paper 4 times thus not much room for morphing wiggle room in your weights. fold that paper 16 times? that's a lot more coverage and wiggle room for morphs!
test on multiple sims - maxis defaults, cc presets, skintones, etc! more the merrier! just remember that everyone's sim is not like the standard female/male sim bases a lot of cc making is done on. you'll want to check how it looks on larger sims, different skintones (not just white to tan!), the opposite body frames, even on CC presets to see how well the weights are working. not everyone uses the same CC, so take it as a bouncing off point on what needs to be adjusted to work as best as possible. not everything is going to work perfectly! there's a lot of different mods that can make extreme changes you just can't account for if you're going for a general audience. it also helps to load different sims to try your CC on. sometimes you get a red herring where it works on the first sim you load up! all of the sudden everyone loads it up and it's not working at all. that's just ts4 for you, so watch out!
update your CC's tags! go through each and every category of your package to make sure it aligns to what it even is! make sure it appears in the right outfit category, not meant for kids, whether it should be on in the shower or not, and TAKE THAT ALLOW FOR RANDOM TICK OFF! not everyone knows how to use s4s and shouldn't be expected to go through all their CC to fix the tags so it works properly for your game
don't just stand there, make them walk! a lot of CC can look perfectly fine on a still model, but you can find a LOT of issues just by loading a walk cycle in CAS to see if there's any weight issues, clipping, or anything really odd that shouldn't be happening. people who use CC in their gameplay will be having their sims walk, talk, sit, and animate, so be sure they're just not gonna flash everybody or got some polygons stuck in their teeth!
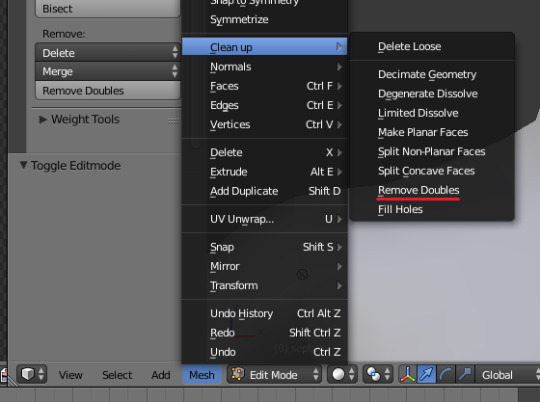
exporting a s4s mesh? let's clean it up! for some reason when you export a s4s mesh, there will be extra polygons that can easily be removed in blender. in this tutorial, we'll be using 2.7. this really helps on high poly meshes and remove any conflicting UVs that can make clipping issues.
we hope that helps! this is based on our private guide for people who test our own CC, which you should definitely try to reach out to others to test it out. each computer is unique and something can pop up you wouldn't ever come across - it doesn't hurt to try work out all the kinks before publishing! if you need some more help or starting point, we even have our own resource pack that has great references and items that will make your process go easier. good luck to your CC making journey <3
95 notes
·
View notes
Note
What is your current opinion on Unreal Engine 5? Between Digital Foundry, content creators, and people on social media, everyone appears to be constantly attacking UE5 for performance issues (stuttering, frame rate, etc.). Is this criticism warranted, or is it more a case of developers still getting used to UE5 and its complexities (meaning it will likely improve in time)?
Everything improves with time as the engineers learn the details and optimize their work. This is true of every tech platform ever and won't be any more different with Unreal Engine 5 than it has been with UE4, 3, or anything else. That said... after having very recently worked with UE5 for enough time to get used to some of its foibles and having looked into some core engineering issues in a project utilizing some of the new tech introduced in UE5 (and the caveats and side effects of using that tech), I can say with fair confidence that (some) complaints about the performance issues are definitely warranted. These aren't global to all UE5 projects, but they are major performance issues we ran into and had to solve.
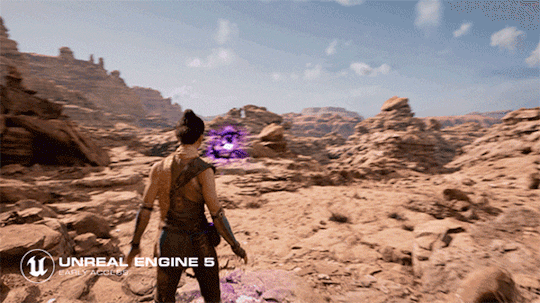
One major issue we ran into was with Nanite. Nanite is the new tech that allows incredibly detailed high poly models, a sort of [LOD system] on steroids. The Entity Component System of the Unreal Engine (every actor is a bag of individual components) allows developers to glom nanite meshes onto just about anything and everything including characters, making it very powerful and quick to stand up various different visuals. However, this also requires significant time spent optimizing that geometry for lighting and for use in game - interpenetrating bits and pieces that don't necessarily need to calculate lighting or normals or shadows unnecessarily add to the performance cost must be purged from those nanite models. Nanite looks great, but has issues that need to be ironed out and the documentation on those issues isn't fully formed because they're still being discovered (and Epic is still working on fixing them). We had major performance issues on any characters we built using nanite, which meant that our long-term goal for performance was actually to de-nanite our characters completely.

Another major issue I ran into was with the new UE5 World Partition system. World Partition is essentially their replacement for their old World Composition system, it's a means of handling level streaming for large contiguous world spaces. In any large open world, you're going to have to have individual tiles that get streamed in as the player approaches them - there's no reason to fit the entire visible world into memory at any given time with all the bells and whistles when the player can only see a small part of it. The World Partition system is supposed to stream in the necessary bits piecemeal and allow for seamless play. Unfortunately, there are a lot of issues with it that are just not documented and/or not fixed yet. I personally ran into issues with navmesh generation (the map layer used for AI pathfinding) using the World Partition that I had to ask Epic about, and their engineers responded with "Thanks for finding this bug. We'll fix it eventually, likely not in the next patch."

Most of these issues will eventually get ironed out, documented, and/or fixed as they come to light. That's pretty normal for any major piece of technology - things improve and mature as more people use it and the dev team has the time and bandwidth to fix bugs, document things better, and add quality of life features. Because this tech is still fairly new, all of the expected bleeding edge problems are showing up. You're seeing those results - the games that are forced to use the new less-tested systems are uncovering the issues (performance, bugs, missing functionality, etc.) as they go. Epic is making fixes and improvements, but us third-party game devs must still ship our games and this kind of issue is par for the course.
[Join us on Discord] and/or [Support us on Patreon]
Got a burning question you want answered?
Short questions: Ask a Game Dev on Twitter
Short questions: Ask a Game Dev on BlueSky
Long questions: Ask a Game Dev on Tumblr
Frequent Questions: The FAQ
63 notes
·
View notes