#sims 4 cc tutorial
Explore tagged Tumblr posts
Visit Tumblr Blog
Explore Tumblr blogs with no restrictions, modern design and the best experience.
Last Seen Tumblr Blogs


Fun Fact
69% of Tumblr users are millennials.
Text

(ts4) cc making testing guide
we've been making cc for a longg time and figured it would be good to share how we test our own cc and make sure it works for as many sims as possible! the guide will be based on a loose understanding already of s4s.

remove the original shadow, specular, and normal maps!!! a lot of the base items you start on do have their own speculars (what makes it shiny), shadow maps (false shadows to make it look better), and normal maps (extra details outside the plain texture). very rarely those will work exactly with what new item you're making, so be sure to REMOVE them! double triple check that they're empty by clicking "Make Blank" in s4s. if your mesh is shiny even after removing the specular and there's already no normal, you need to upload just a blank 1024x2048 png to it to remove the shininess.
having weight transfer issues? try subdivision! sometimes when using "nearest vertex" weight transfers your CC can well.. goof up in CAS and be reallyyy spiky. those are the vertices that have screwed weights and smoothing out the weight transfer by subdividing it will help tremendously. subdividing will just double the amount of poly you have - imagine you're folding a piece of paper. your UV is small if you just fold your paper 4 times thus not much room for morphing wiggle room in your weights. fold that paper 16 times? that's a lot more coverage and wiggle room for morphs!
test on multiple sims - maxis defaults, cc presets, skintones, etc! more the merrier! just remember that everyone's sim is not like the standard female/male sim bases a lot of cc making is done on. you'll want to check how it looks on larger sims, different skintones (not just white to tan!), the opposite body frames, even on CC presets to see how well the weights are working. not everyone uses the same CC, so take it as a bouncing off point on what needs to be adjusted to work as best as possible. not everything is going to work perfectly! there's a lot of different mods that can make extreme changes you just can't account for if you're going for a general audience. it also helps to load different sims to try your CC on. sometimes you get a red herring where it works on the first sim you load up! all of the sudden everyone loads it up and it's not working at all. that's just ts4 for you, so watch out!
update your CC's tags! go through each and every category of your package to make sure it aligns to what it even is! make sure it appears in the right outfit category, not meant for kids, whether it should be on in the shower or not, and TAKE THAT ALLOW FOR RANDOM TICK OFF! not everyone knows how to use s4s and shouldn't be expected to go through all their CC to fix the tags so it works properly for your game
don't just stand there, make them walk! a lot of CC can look perfectly fine on a still model, but you can find a LOT of issues just by loading a walk cycle in CAS to see if there's any weight issues, clipping, or anything really odd that shouldn't be happening. people who use CC in their gameplay will be having their sims walk, talk, sit, and animate, so be sure they're just not gonna flash everybody or got some polygons stuck in their teeth!
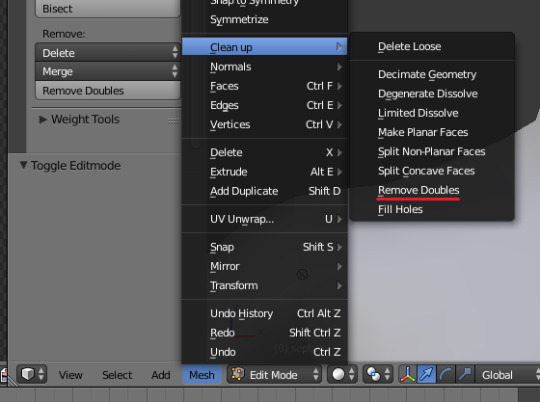
exporting a s4s mesh? let's clean it up! for some reason when you export a s4s mesh, there will be extra polygons that can easily be removed in blender. in this tutorial, we'll be using 2.7. this really helps on high poly meshes and remove any conflicting UVs that can make clipping issues.
we hope that helps! this is based on our private guide for people who test our own CC, which you should definitely try to reach out to others to test it out. each computer is unique and something can pop up you wouldn't ever come across - it doesn't hurt to try work out all the kinks before publishing! if you need some more help or starting point, we even have our own resource pack that has great references and items that will make your process go easier. good luck to your CC making journey <3
96 notes
·
View notes
Text
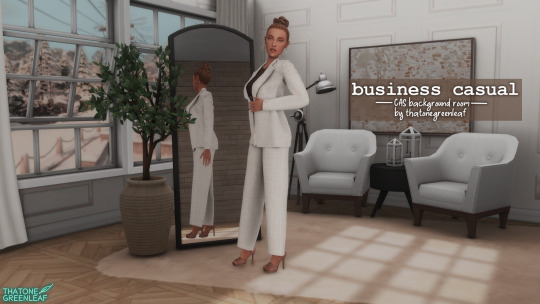
~business casual CAS background room~ (with mirror!) + tutorial!

-
A bunch of you have asked, so here it is! You can watch my tutorial on how to make your very own CAS background room with a mirror right here!
(and you can also download the room I made while filming this tutorial below!)
♥ Download the package file and put it right in your Mods folder! (up to 5 folders deep)
♥ You can only have one CAS background/room in your game at once, remove any other before putting this one in!
♥ Reflections need to be set to low, medium, or high but not OFF in your game's graphics settings for the mirror to be functional.
♥ Base Game Compatible!
♥ DX11 and DX9 compatible!
-
Follow me on twitch!
Support me on patreon!
DOWNLOAD "BUSINESS CASUAL" CAS BACKROUND ROOM ON SIM FILE SHARE!
WATCH THE TUTORIAL ON HOW TO MAKE YOUR OWN HERE!
-
TOU: do not redistribute, reupload, or claim my cc/CAS rooms/presets as your own! recolour/convert/otherwise alter for personal use OR upload with credit. (no paywalls)
♥ built using littledica's original CAS room files ♥
stuff I'm using here: reshade | cas lighting | (send an wcif if you want anything on the sim!)
#sims 4#ts4#sims4#thesims4#maxis match#maxis mix#s4cc#sims 4 cc#sims 4 custom content#cas background#sims 4 cas#cas room#ts4 cas background#sims 4 cc tutorial#cas background tutorial#cas background with mirror
373 notes
·
View notes
Text
How to make a UI Emotion Pose Override
I figured I'd explain how I made the UI Emotions pose overrides for Sims 4. This guide assumes you know how to make a pose and know Blender basics, it just explains how you find the relevant files to override and other little bits. I did search and couldn't find a tutorial for this, but maybe I didn't look hard enough. These aren't too tricky to make, and also for me make a pretty big difference in not having to look at EA animations / poses as much, haha.
You will need Blender, Sims 4 Studio and MCCC for easily achieving the relevant moods for testing.

Go to Animation > Override on Sims 4. Click the Animation button.

Type in ui_mood_ into the search bar and it will bring up all of the mood UI poses, the ones that appear in the bottom left of the screen. a_ui is the Adult poses, c_ui is Child poses. There's also i_ui which I assume is Infant, and p_ui which is Toddler. We'll edit an adult UI pose for this.
Some of them have different names to in-game: Depression - Very Sad, Elated - Very Happy, Fearless - Very Confident, In the Zone - Very Focused, Miserable - Very Uncomfortable, Pumped - Very Energised, Frustrated - Very Tense, Passionate - Very Flirty, Imaginative - Very Inspired.

This is an example from the Sims Wiki, even though this doesn't look too exaggerated on this particular example, I always thought this expression seemed a bit too cheery for some of the small things Sims get +1 happy about. (Hey, if we can't be happy then neither can any of our pixel dolls.) So let's find the one labelled 'happy' a_ui_mood_happy_x and open it. Leave the dropdown as Adult Female, then click Export and save the .blend file.
Open it in Blender, and then press 5 on the NumPad to set it to Ortho view. Now you have to try and move the view around to get the 3d viewpoint as close as possible to the rough viewpoint of the appearance of the emotion in-game. Use a screenshot of the Emotion as reference.

Once you have a similar enough viewpoint (this is more or less at the same angle as the UI pose), then make sure you Save and I recommend naming this file 'BASE' or something. This way, if you want to make more than one emotion override for the different emotions. Saves having to find the correct 'view' for every exported pose. Now it's time to make your pose!
Limitations to bear in mind: - You can't have anything that is too far forwards, like a hand reaching forward or something or it will cut off those parts (I tried a pose with the hands facing right the way forward for the 'possessed' emotion for a kind of 'grabbing at the viewer' effect, and they just are invisible if you do that) and you have to keep the arms relatively close to the body or they will also be cut off in-game if they are out to the sides too much.

This is the one I made, which is much more subtle and more suitably 'normal happy'. This tutorial assumes you know how to make a pose, so LocRot and lock in the pose on the 0th frame. Save, then go back to Sims 4 Studio, Import on the same screen you Exported the .blend on, import the new pose .blend file, then Save. Then put the .package in your Mods folder.
After that, you need to go to My Documents / Electronic Arts / The Sims 4 (or your equivalent on your computer). In this folder you'll see a file called localthumbcache.package. Delete it, otherwise you won't see your new pose in-game since it stores the emotion thumbnails.
Once you've done that, boot the game. With MCCC, if you shift-click a Sim it should give you an option to Cheat Emotions if you need to (you can use these multiple times to get the level of emotion you need depending on what Emotions you've made overrides for) to test how it looks in-game.


The top left is the new, more subtle Happy pose which I greatly prefer. The rest are examples of other poses that are part of my (free) UI Pose Overrides. The 'Very Happy' gives you an idea of the space you have and where the 'cut-off' points are.
You can easily take the overrides out without issues as well if you change your mind or want to try out new ones, you just need to delete the 'localthumbcache' package each time you add or delete a pose override so it can 'reset' the portrait images and show the right poses.
#freezerbnuuy#the sims 4 tutorial#sims 4 pose tutorial#sims 4 tutorial#sims 4 cc tutorial#ts4 tutorial
19 notes
·
View notes
Text
How to Add Wall Deco Slots to Signs Tutorial
For this tutorial, you will need Sims4Studio (S4S).
Unlike adding object deco slots to counters, you need to add the wall deco slots in two different locations in S4S in order for them to work. Step 1 details the first location to enter the deco slots. Step 2 details the second location to enter the deco slots as well as additional information that needs to be changed. Step 3 details how to check if your changes went through.
Step 1:
Create/Clone your sign object
In S4S, under the Studio Tab, go to the Rigs/Slots Tab on the right side.
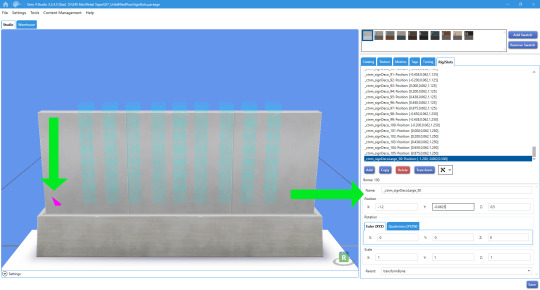
Hit the Add button.
Choose whether you want the deco slot to hold large wall deco or just small wall deco. Large wall deco slots will also hold small decor. Depending on the slot type, enter one of the following in the Name section.
_ctnm_signDeco_1
_ctnm_signDecoLarge_1
Enter your X, Y, and Z coordinates for the slot. A purple cone will appear on your mesh to indicate where your slot is.
Repeat for as many slots as you want to add.
Save your file.
Step 2:
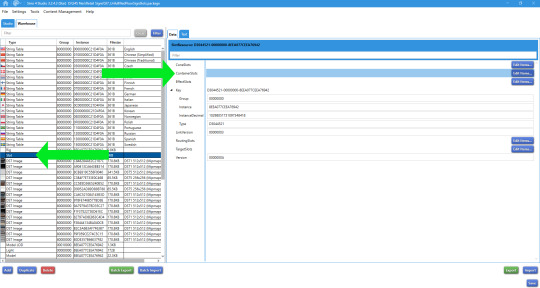
Go to the Warehouse tab.
Click on the Slot field.
On the right side, click on the “Edit Items” button next to the ContainerSlots line item. A new window will open.
Click the Add button on the bottom left side of the window
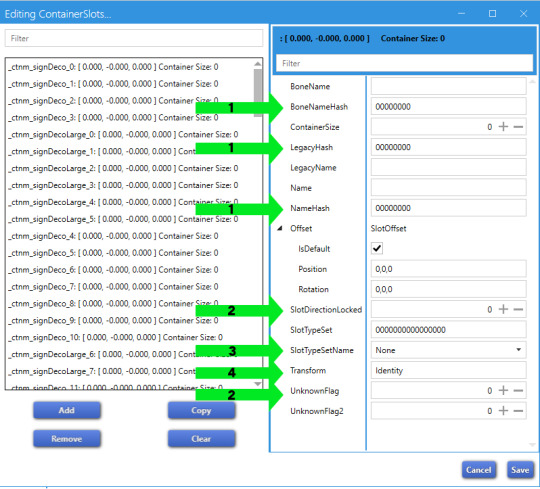
The following information will need to be changed:
BoneNameHash, LegacyHash, and NameHash
SlotDirectionLocked and UnknownFlag
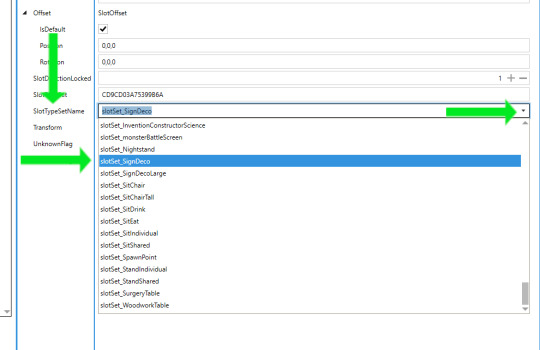
SlotTypeSetName
Transform
Leaving the window open, go back to the Warehouse tab and now click on the Rig field. On the right side, click on the text tab.
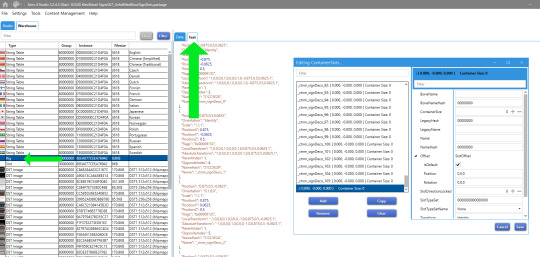
You will copy and paste information from this section into specific fields in the “Editing ContainerSlots” window.
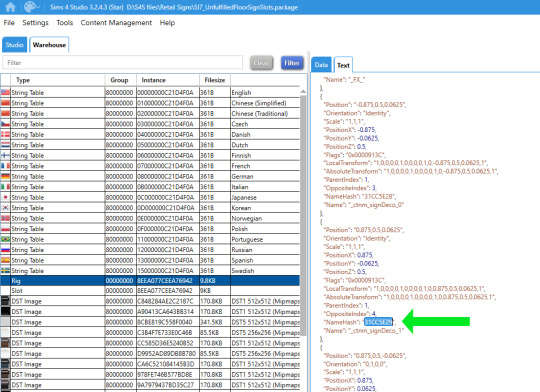
Find the appropriate slot you added in the text tab.
Copy the information from the NameHash line and paste it into the following fields in the Editing ContainerSlots window: BoneNameHash, LegacyHash, and NameHash
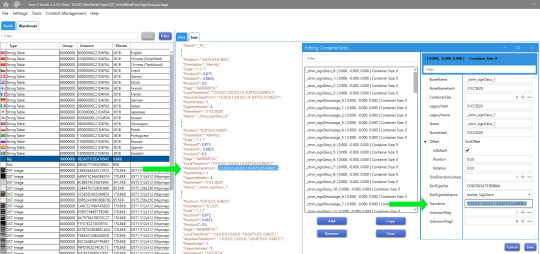
Copy the coordinates from the Absolute Transform line and paste it into the Transform field in the Editing ContainerSlots window. By default, that field will have the term Identity in it. You want to replace that with the actual coordinates.
In the Editing ContainerSlots window:
Change the following fields from a value of 0 to a value of 1
SlotDirectionLocked
UnknownFlag
In the SlotTypeSetName field, there is a drop-down box. Scroll down and select either SlotSet_signDeco or SlotSet_signDecoLarge
Repeat for all of the deco slots you added. If you navigate to the Rigs/Slots tab, all of the new slots you added will still appear as purple cones. This is normal. You need to save and close the package file and then re-open it to see that the changes took place.
Step 3:
Save the package. Close the package and then re-open it. Now when you navigate to the Rigs/Slots tab, you should see blue cylinders instead of purple cones.
BEFORE closing the package:

AFTER opening the package file again:

#the sims 4 cc tutorial#sims 4 cc tutorial#ts4 cc tutorial#the sims 4#sims 4#ts4#sims4studio#sexyirish7
3 notes
·
View notes
Note
I was hoping to recolor the Queen's Crown (for all ages) for personal use, but Sims 4 Studio is giving me this error on some of the unmerged files: System. Null Reference Exception: Object reference not set to an instance of an object. Any ideas?
If you change the main object (adult size) the slaved ones (kids sizes eg) can't find the references they have. This happens if you change the main objects casparts in any way, even if just changing the color of a swatch thumbnail. Do it like this: 1. Unmerge the All-file. 2. Place the Main file (the biggest one, with all the textures in it) in Sims4Studio folder. 3. Make a clone of the item, "Create CAS Standalone"

5. Do an "Embed all resources"
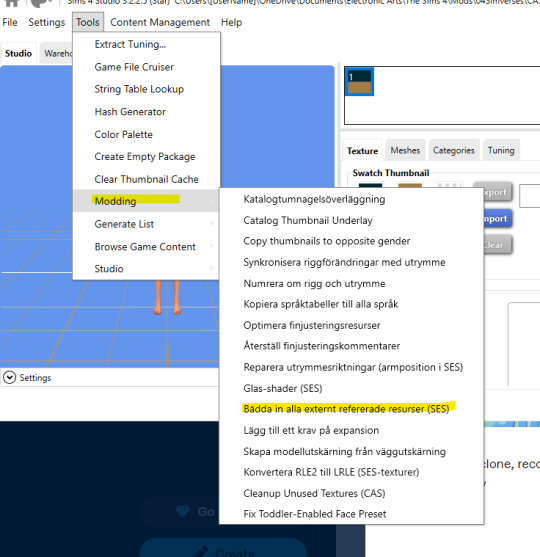
(Sorry for Swedish text, for some reason not all stay in English even if I have that as language option) 4. Now you have a standalone item, which you can recolor as usual. If you want to make kids sizes or other mesh variations, place YOUR version in the S4S folder and clone from that. You can extract the meshes from my slaved sizes if you want and use them. (Here is a link to my old tutorial for shrinking adult to kid size. Can be used for toddlers and infants too.)
Happy simming!

11 notes
·
View notes
Text
TheStarTome A Sims 4 Lightmaptex tutorial. ✨💖✨

Credits for tutorials that made this tutorial possible:
•orangemittens •@sp-creates •@alistu •sim_man123
This would not be possible without the help of
•@brainstrip •@aj-nebula •@itsonlythee-sims
I thank you all, I am ever grateful for your help!
#TheStarTome#thestartome#thestartome-tutorials#sims 4#sims 4 simblr#sims 4 custom content tutorial#the sims 4 tutorial#sims 4 cc tutorial#ts4 tutorial#sims 4 tutorial#tutorial#cc tutorial#the sims 4 custom content#content creator
14 notes
·
View notes
Text
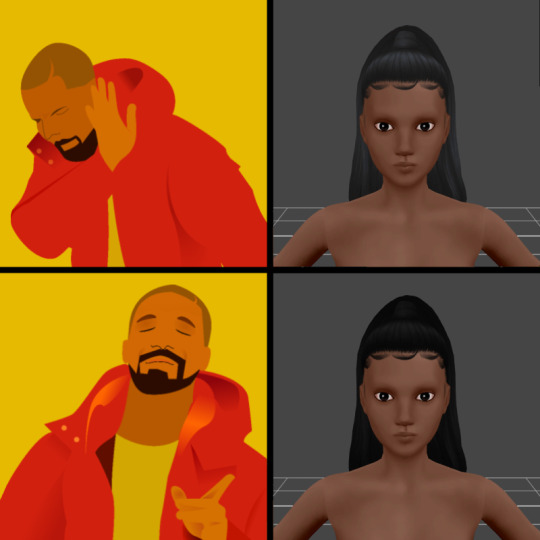
Have you ever thought that the black hair colour just wasn't black enough?
If so, I've got an easy solution for you!
DISCLAIMER! I don't mean to be hateful or rude towards anyone. Everyone is free to do as they please with their own content (as long as it complies with EA:s TOS). The original black colour just doesn't fit my taste, that's all. I made this tutorial because I thought that there might be others who share my opinion but who might not know how to change the colour. With that said, I'd like to apologise in advance if this hurts or offends anyone.
Art by Alex Espino.
The hair shown above was made by Kiara Zurk.

Let's begin!
You'll need:
- Sims 4 Studio
- A photo editing program (e.g. Photoshop, Photopea, Gimp)
1) Open the hair you want to edit in Sims 4 Studio (double click on the package file).
2) Export the blue-black texture as a PNG and save it somewhere that's easy to access.
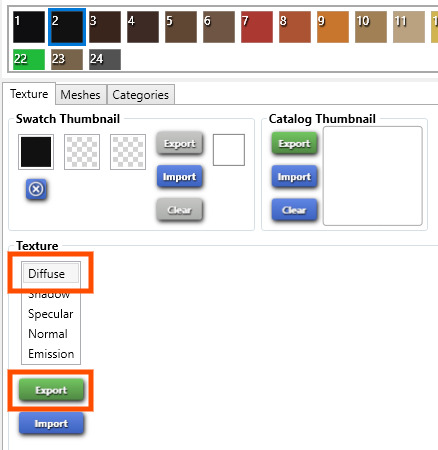
3) Open the PNG you just saved in your editing program of choice. I'll be using Photopea for this tutorial.
4) Add a 'Black & White' adjustment layer.
5) Add a 'Brightness/Contrast' adjustment layer and bring it all the way down to -150 or whatever you prefer.

6) Optional! You can flatten the image into one layer by right-clicking on any of the layers and then click on 'Flatten Image'. I personally don't bother though.
7) Save as a PNG and import it back into Sims 4 Studio. Save the package file.
That's it! Now you've got yourself a true black hair colour.
Important! If you use a Reshade preset, you need to take into account the way that preset changes colours, lighting etc. in the game. If you use a preset that darkens the colours, the hair colour might look odd if you adjusted the brightness exactly the way I did in this tutorial.
Now I'll leave you to it. Happy Simming!
#s4 cc tutorial#s4 tutorial#ts4 cc tutorial#ts4 tutorial#sims 4 tutorial#sims 4 cc tutorial#the sims 4 cc tutorial#the sims 4 tutorial#s4cc tutorial#ts4cc tutorial
24 notes
·
View notes
Text
Since the new eyelash update is here, I'm gonna teach you how to convert old eyelash cc into the new eyelash option!
First of all, we will need the Sims 4 Studio. The download link can be found here: https://sims4studio.com/board/6/download-sims-studio-open-version
Now, head into the app and click the "My Projects" button on the main menu.

Open the eyelash file (.package file) you want to convert. I'll just pick a random one for reference. Once you picked the one you want, hit open.
You will be directed into the studio, which will look like this:

Now on the right side of the screen, find the CATEGORIES button and click on it.

Once there, change the OUTFIT TYPE to MASK DETAIL EYELASHES and APPLY TO ALL SWATCHES. Save the file, and the .package file will be updated in your game. Also, make sure to double check in-game before continuing with your other custom content.

As you can see in my game, It worked! Hopefully it works for all of you, too.

And that's about it. Thanks for reading all the way.
And by the way, If you're going to distribute these publicly without the original creators consent, just don't do it. This is meant for private use only or for content creators who want to convert their eyelashes into the new eyelash section.
EDIT: As trillyke has said, This does not work with eyelashes in the glasses section as they will collide with rings and most of the accessories
#sims-4-custom-content#ts4#thesims4#customcontent#ts4cc#the sims 4 cc#the sims 4 custom content#tutorial#the sims 4#the sims community#the sims cc#sims#sims 4#simblr
4K notes
·
View notes
Text

IF YOU CAN'T ENABLE CC 🌸
Sul sul ^^
After today updates, I wasn't able to enable CC again. It doesn't matter how many times I closed and launched the game.
So I remembered that this had already happened to me before.
If you're going through the same problem, this is how you can fix it:
🌸🌸🌸🌸🌸🌸🌸🌸
HOW TO ENABLE CC AGAIN:
1- On the game home page, in the bottom right corner of the screen, you can see what the current game version is. After today's update, mine was: 1.108.318.1020. Launch the game and check the number that appears for you.
2- In your game folder (Documents>Electronic Arts> The Sims 4) you'll find a file called "GameVersion". There will be a number.
The number in that file has to match the current game version number.
When I opened mine, it was "1.107.151.1020". So I just updated it to "1.108.318.1020" and saved. Then when I launched the game I could enable CC again.
Note 1: There's a "space" before the number in "GameVersion" (as if it were a paragraph). Keep that space. Change the numbers exactly where they are.
Note 2: If you prefer, before changing the number, make a backup copy of "GameVersion" just in case. It won't harm your game, but it's better, just to prevent and make it safer.
💎 If you want a tutorial video, I made one about it some time ago. You can watch it here :)
🌸🌸🌸🌸🌸🌸🌸🌸
ALSO IMPORTANT AFTER UPDATES:
Remember to delete "localthumbcache". You can find the tutorial here.
🌸🌸🌸🌸🌸🌸🌸🌸
I'm currently checking my CC to see if they're still working.
If anything, I'll let you know :)
I hope it helps you if you're having any problems :)
Happy Simming ^^
3K notes
·
View notes
Text

hey guy's i made a quick and easy tutorial on youtube about how you can frame your sims screenshots with any cc frame you want, you don't need photoshop or any other of these overwhelmimg programs and you also don't need any kind of photo editing skills! you can find the video here. i hope it's helping some of you. love, jodie ♡
#tuts*#sims 4 mods#sims 4 cc#sims 4 simblr#sims 4 custom content#the sims 4#the sims#the sims community#sims 4 tutorial#the sims 4 custom content#sims 4 maxis match#sims custom content#sims 4#ts4 simblr#sims community#ts4
444 notes
·
View notes
Text
awhile ago I said I'd make a process video of doing @1-800-cuupid 's height heel tutorial that is more streamlined and point out some other details! I broke it down into 5 steps, but this is honestly just for those who need to see it all done in one video and such.

prepping:
before we start, you need to have your package file set and have your shoes imported already into it. have that saved and ready to go for the next step!
step 1: blender file
add a plane → make sure all numbers in the right side of the window is 0 → set cut to 0001 (or whatever cut that's after all your mesh pieces) → add a uv map and name it "uv_0" → SAVE
step 2: opening package file
import the new mesh → find the LOD0 GEOM → duplicate → change end value in group to something else (I usually go with "1") → SAVE → note down group, instance, and type values
step 3: region map & type
go to entries → edit items → new layer ("1" or the number cut you're using)
go to region type → edit items → new entry → enter group/instance/type values from earlier
step 4: cas part (your one swatch)
lods → level 0 → lod models → edit items → new entry → enter group/instance/type values from earlier
step 5: slot rays (where you adjust the height)
duplicated geom → data → slotray inter → edit items → offset → y-value noted earlier from blender → slothash: FEAE6981 → SAVE
** YOUR Y-VALUE NEEDS TO STAY POSITIVE. the number is how high up the sim will be placed above ground. your noted value might not be exactly right, but most heels stay in the range of 0.03 to 0.09. you can adjust the number and save the package without having to redo any of the previous steps.
reimport your mesh with the plane and you can now load it in game with the adjusted height!
63 notes
·
View notes
Text
~business casual CAS background room~ (with mirror!) + tutorial!
-
A bunch of you have asked, so here it is! You can watch my tutorial on how to make your very own CAS background room with a mirror right here!
(and you can also download the room I made while filming this tutorial below!)
♥ Download the package file and put it right in your Mods folder! (up to 5 folders deep)
♥ You can only have one CAS background/room in your game at once, remove any other before putting this one in!
♥ Reflections need to be set to low, medium, or high but not OFF in your game's graphics settings for the mirror to be functional.
♥ Base Game Compatible!
♥ DX11 and DX9 compatible!
-
Follow me on twitch!
Support me on patreon!
DOWNLOAD "BUSINESS CASUAL" CAS BACKROUND ROOM ON SIM FILE SHARE!
WATCH THE TUTORIAL ON HOW TO MAKE YOUR OWN HERE!
-
TOU: do not redistribute, reupload, or claim my cc/CAS rooms/presets as your own! recolour/convert/otherwise alter for personal use OR upload with credit. (no paywalls)
♥ built using littledica's original CAS room files ♥
stuff I'm using here: reshade | cas lighting | (send an wcif if you want anything on the sim!)
#sims 4#ts4#sims4#thesims4#maxis match#maxis mix#s4cc#sims 4 cc#sims 4 custom content#my cc#cas background#sims 4 cas#cas room#ts4 cas background#sims 4 cc tutorial#cas background tutorial#cas background with mirror
243 notes
·
View notes
Text

Quick Guide: Stay Safe While Downloading Sims 4 CC & Mods
I just published a quick guide to help you download Sims 4 CC & mods safely. ⚠️ From trusted sources to spotting red flags. Keep your game clean and secure! 😊
Read it now
#avoid malware in sims 4 mods#how to avoid malware sims 4 mods#how to download mods safely sims 4#patreon sims 4 cc download#safe sims 4 cc creators#safe sims 4 download sites#sims 4 cc best practices#sims 4 cc community guide#sims 4 cc download checklist#sims 4 cc education#sims 4 cc folder structure#sims 4 cc mod manager#sims 4 cc mod security tips#sims 4 cc mods support guide#sims 4 cc protection#sims 4 cc safe download#sims 4 cc safe hosting platforms#sims 4 cc safety guide#sims 4 cc safety tutorial#sims 4 cc virus warning#sims 4 cc zip file tips#sims 4 custom content security#sims 4 custom content tips#sims 4 mod folder organization#sims 4 mod malware prevention#sims 4 mod safety#sims 4 mod safety checklist#sims 4 modding guide#sims 4 mods antivirus#sims 4 script mod warning
280 notes
·
View notes
Text
Sims 4 CC Tutorial: How to make a 'Neon' Wall Light
This was a tutorial I made ages ago and have lost twice due to deleting my Tumblr account. I've decided to post it on my tutorials blog where it won't get mega-deleted by accident by my stupid ass.
I un-shamefully admit to say a lot of this is based off of @/simmerkate's Neon Lights tutorial, but the reason I have made this tutorial is because of the differences in steps with my own method:
using a vector image instead of Blender Text and how to make that vector image and import it
Some people like me prefer written tutorials
How to decimate meshes and help ensure a flat, crinkle-less surface whilst also keeping polys as low as possible
How to use the base finished .package file to make other-coloured neon lights from it
I hope this tutorial is helpful to some of you. I find written tutorials much easier personally. I try to explain everything as clearly as possible.
You can download this white bird light from SFS or MediaFire. DO NOT PAYWALL ANY EDITS OR RECOLOURS OF THIS LIGHT, NO CURSEFORGE AND NO ADFLY. My Terms of Use apply. The polys are 2.5k highest.
@thefoxburyinstitute
#sims 4 cc tutorial#ts4 cc tutorial#sims 4 tutorial#ts4 tutorial#freezerbnuuy#sims 4 custom content tutorial
9 notes
·
View notes
Text
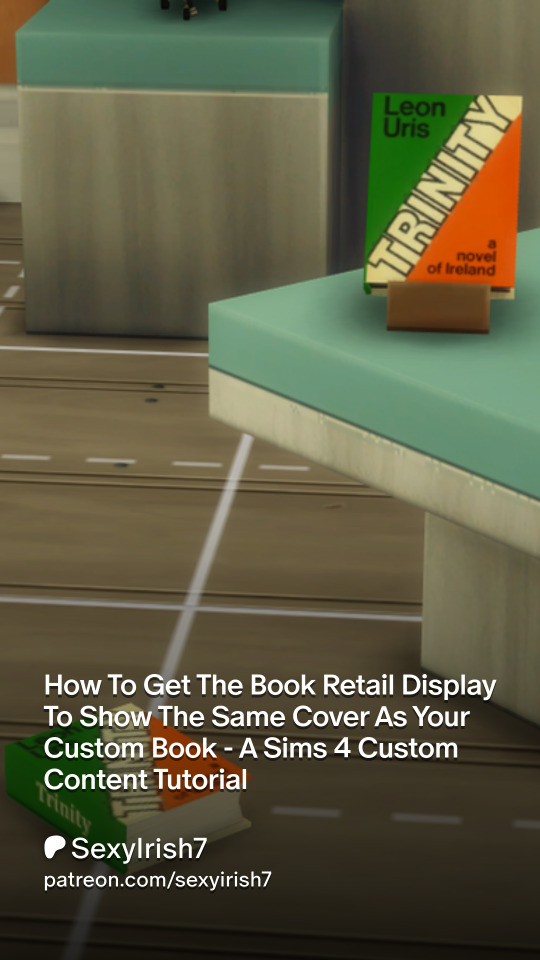
To view the tutorial, you will need to visit my patreon page here. The tutorial is available to view for free and is safe for general audiences.
#the sims 4#ts4#sims 4#custom content tutorial#sims 4 cc tutorial#ts4 cc tutorial#the sims 4 cc tutorial#sims 4 cc books#cc books#book#SexyIrish7
2 notes
·
View notes
Text
TUTORIAL
How to FIX CUSTOM EYELASHES after update 1.108.349.1020 The Sims 4
YOU NEED:
Sims 4 Studio @sims4studioofficial
Blender (I use Blender 2.79)
Instruction manual:
Opening the eyelashes that need to be repaired in Sims 4 Studio

2. Go to the "Categories" section - Item "Outfit Type" - "Eyelashes"

3. Click "Apply to All Swatches" - Click "Yes"

4. Now we need to assign the correct color to the Vertex in Blender. Go to the "Mesh" category and export the eyelash mesh

5. Open the Mesh in Blender and switch to the "Vertex Paint" mode

6. Select the display mode "Wireframe" or press the "Z" key

7. If the eyelashes are broken, they will have the wrong color. Now we need to assign the correct color

8. Click on the palette icon

9. Go to the HEX item and enter the color code. Color Number: 007F3F

10. After you entered the color code. Click "Paint" - "Set Vertex Color"

11. After that, the color of the eyelashes will change. Save the file and close the Blender

12. Go back to SIms 4 Studio and import the mesh

13. Saving the package file

14. Checking the result in the game
718 notes
·
View notes