#lasso a library card
Explore tagged Tumblr posts
Visit Tumblr Blog
Explore Tumblr blogs with no restrictions, modern design and the best experience.
Last Seen Tumblr Blogs


Fun Fact
69% of Tumblr users are millennials.
Text

coffee book tag ☕
good afternoon, my beloved bookish bats. it's 93*F outside, 81*F in this disastrous rental house, and yet I'm still craving a hot latte like a crazy person (which I can't even make using my gorgeous Breville espresso machine because we don't have a working kitchen sink). to stave off my coffee addict craving for a bit, let's do a book tag! 🦇
answer one of the prompts below OR tell me your coffee order! ⤵
cappuccino: a book everyone has read but me 🤎 Silver Elite - Dani Francis (it's on my kindle, I swear!) 🦇
latte: a sweet read ☁️ A Simple Twist of Fate - April Asher (second chance + paranormal romcom + Gilmore Girls-esque town, sexy shifter love interest, badass witch, DRAGON child) 🦇
mocha: an emotional read 💔 The Loveless World - Susan Abulhawa (I still feel it, like in my THROAT, and in my HEART, and EVERYWHERE ELSE) 🦇
espresso: a book i struggled to get through ☕️ The Sun and The Moon (cringey) Red Card (if a college version of Ted Lasso was cringey) If I Told You, I'd Have to Kiss You (*long sigh* I had hopes for you) Worth Fighting For (never thought I'd use 'Mulan' and 'cringey' in the same thought, but here we are) 🦇
flat white: a book on my tbr 🤍 Nona the Ninth - Tamsyn Muir (listen. I have to be in a specific headspace to continue The Locked Tomb. I need to be PREPARED, okay? are you prepared!?) 🦇
answer one of the prompts above OR tell me your coffee order! ☕️
tagging: @katiecomma @mimisbooknook @lpetersonwrites @profiterole-reads @jems-library @caffeinated-bibliophile @sapphic-b00ks @booksandrandomfandoms @rocrown
#books#books and coffee#coffee and books#coffee#ya books#young adult romance#young adult books#young adult fiction#young adult#romance books#book lovers#book blog#book reader#readers of tumblr#book challenge#reading challenge#batty about books#battyaboutbooks
15 notes
·
View notes
Text
Let's Look at the Luigi's Mansion Trilogy Why Not? (spoilers abound)

If you've read any of my Mario posts, you'll know that I'm a Luigi boy. What can I say, I relate to being player two, I find his personality charming, he took out a CEO, I'm also the tall younger brother, and he's just better than Mario. This only truly started for me when I played Luigi's Mansion 2 on the 3DS and I loved it. With a need for some serotonin, I decided that I should do a retrospective on the whole trilogy because it sparks joy.
This will only be on the original release of each one because it's always fun to experience a game in its original context on the original hardware. It's also all I have.
Luigi's Mansion (GameCube)

Luigi's Mansion was a launch title for the GameCube released in 2001. The game was put in a weird position being a Mario game where you didn't play as Mario while also being a Nintendo Launch title. It was received well with demonstrations and was only received better on its release with a solid A-B report card among reviewers.
The concept was pretty simple, what if Luigi was a ghost buster. The story itself is that Luigi has won a mystery raffle that he didn't enter for this old decrepit Mansion that no one wants. Mario went ahead of him, probably to check for black mold and other mystery stains. Later when Luigi arrives he quickly finds out that the mansion is very haunted and is told by his new eccentric scientist neighbor that this is obviously a rouse as the mansion didn't even exist until a few days earlier. Mario is missing having been captured by the ghost but luckily Professor E. Gadd has some ghost-hunting equipment he loans to Luigi to capture these ghosts and find his brother, which incidentally used to be his vacuum cleaner.
From here the game can officially begin, from here it's just sucking up ghosts and sucking off ghouls. You also quickly get a sense of how atmospheric this game can be, it's a very claustrophobic experience. Each room and hallway is built like a normal house minus some fake doors, Luigi also doesn't jump in this game, so if anything is out of reach you gotta use your brain to get it down. When there are ghosts in a room there is no light and the music sounds like an amateur chorus of the ghosts singing from the drawers. The hallways are usually populated by ghosts of rats and bats as well as a couple ghosts that just like to give Luigi a good scare. The music in the hallways sounds like it's mostly just the baritone and bass sections playing, all the while Luigi is nervously humming along. Oh yeah, Luigi is constantly humming the main tune, it's a fun and cute little touch. When each room is cleared the lights come on, the mood changes and Luigi starts whistling the theme.
The mansion is divided into four sections and each section has a handful of portrait ghosts. The portrait ghosts are mostly just one family, each one is unique design-wise and in terms of how to suck them up. For example, the first one is a middle-aged father who is just relaxing in his library, and to get him, you have to wait for him to yawn, that's when he exposes himself. From there you have to whip your flashlight around stunning him and start sucking before he can compose himself. When you start sucking you gotta dig in your heels and resist any move he makes. Every ghost will start flying in any direction possible so you gotta use your lassoing skills to finish them off. The portrait ghosts will also drop poison mushrooms that will shrink you but also interrupt your sucking. You also gotta be aware of any surrounding ghosts because they will attack. This is the core of the gameplay and it's pretty solid and easy to understand. I've only had issues with the stunning mechanic often being me not sucking soon enough and the ghosts vanish for a bit. Beyond that, it's easy to get the movements down.
From here I got in the zone, finding ghosts sucking them, finding the boss ghosts, and putting them back into their portraits with E. Gadd's portrait machine. At some point, you discover the Boos, the classic Mario ghosts being led by King Boo who has orchestrated the whole thing. You are then tasked with capturing a total of 50 boos, they are semi-required to reach the area boss. You don't need all of them, but you do need a fair amount of them. This is also where we find that in these games, King Boo has a unique design. He's usually depicted as a boo with a crown like Peach's but here he has a giant diamond and sleep deprivation eyes. I don't think this difference has ever been explained, but it exists.
Finally, you get to the main boss fight and I don't know why but I always struggle with this one. King boo creates this Bowser puppet and to get your boo you gotta knock the head off with spike balls you gotta suck and blow at his head. It's all pretty simply explained, yet I still struggle. Still satisfying to finally get him though. I get him, put him in a portrait, put the machine in reverse and Mario is tortured a bit before being freed. This game is so much fun, the ghost designs fit perfectly into the Mario universe, the music really sets the mood, each boo and portrait ghost has their own unique name and they even tell a couple jokes. It's just so much fun, and for some reason, it didn't get a sequel for twelve years.
Luigi's Mansion 2: Dark Moon

Over a decade later we finally got a sequel for the 3DS and this game to most of the good things about the original and just rolled with it. This time when the game opens we see that E. Gadd has moved to Evershade Valley to continue his paranormal research and this time the ghosts are pretty chill with him, to the point of being his lab assistants. That is until we see king boo flying into the air and using his own crystal to blast a crystal moon out of the sky. Doing this makes all the ghosts lose their minds and start wreaking havoc across the valley. From here E. Gadd takes shelter in a safe house and calls Luigi to once again help him to suck up some ghost. From here Luigi is teleported through his TV and E. Gadd reveals that the way to fix the valley is by finding all the pieces of the Dark Moon, the crystal from earlier. This time we have multiple mansions that are all around the same as as the one in the original.
Luigi is sent into the first mansion and the game proper begins. You find the upgraded poltergust and it is time to suck. This time the art style is a bit more cartoony but still keeps the spooky atmosphere. The gameplay itself has evolved by making it more rootin tootin to wrangle the ghosts. Now you get to flash the ghosts to stun them, and while they're frozen in shock at the audacity you have to take their picture taken without permission you start sucking hard. This is also where you find the next addition, as you're sucking you see this bar fill up, and when it does you press A to give the poltergust a quick surge of power for some extra hard ghost-sucking.
Luigi also quickly learns that the boos are involved in some way, and here is where we get the dark light. Shine it on an invisible object to reveal it and get the chance to catch a boo. Each mission has one, and finding them all unlocks a time trial. Kinda wish there was more to that, but still had fun.
You also learn that there isn't really anything like the portrait ghosts here, which is unfortunate, but the boss ghosts are something special. These ghosts hold the pieces of the Dark Moon and what they do is they possess spiders, clock towers, or walls of ice as part of the boss fight. Lots of fun and challenge to be had here, and the whole time E. Gadd is watching you on security cameras. He gets really into too, he makes a crack about making popcorn while watching the show.
We may not have portrait ghosts but we do have a ghost dog! This dog is a little rascal who appears in each area to cause some trouble and manages to evade capture each time. This little guy is just the best thing here. He takes one look at Luigi, and despite being driven crazy by the situation, he only sees a friend to play with. Unfortunately, that often means stealing the important mcguffin of the mission, bad doggy! Every time Luigi is putting ghosts in the vault the little guy comes out, drowns E. Gadd in puppy kisses, and runs off. Rinse and repeat until the final mansion.
Luigi eventually finds out that King Boo is behind this and he has also captured Mario again. The final boss fight is much more hectic than in the original. Luigi is taken into a pocket dimension where he sets up an arena and shoves Luigi into a hall to crush him like the boulder in Indiana Jones. To get any damage on King Boo, you gotta trick him into moving under a falling spike ball that he dropped. Seeing that marshmallow getting squashed with an audible thunk did make me laugh a bit.
Once King Smores is defeated, he is sucked and Luigi can free Mario, piece together the dark moon, and the ghosts come back to their senses. As the ghosts are flying free a certain pupper comes up to Luigi with a sad apologetic pouty face. Yes, Luigi adopts the doggo, and it is glorious. We all love the spooky doggy.
That is Luigi's Mansion 2, despite losing a couple things from the original, we also see the game play evolve so much that greatly improves the experience. The next entry didn't take a whole decade to come out, but it is a nice return to form.
Luigi's Mansion 3

The third entry was released for the Switch in 2019 and I ended up clearing my schedule for a weekend to complete it. Listen I laser-focused on this one, it was too much fun.
The story this time is that Mario, Luigi, and Princess Peach are all invited to a five-star resort hotel by the owner Hellen Gravely. You walk into the gilded front entrance of this hotel and instantly you see that the staff comes directly from the grave poorly disguised. They need to take some queues from Team Rocket with this low effort. The game doesn't really beat around the bush when it comes to the reveal that the place is full of ghosts. Hellen shows the gang to their rooms, Luigi settles into his bed as his polterpup snuggles up next to him, and they both pass out. Yes, the polterpup is back and you can pet him when he appears. He is the goodest boy.

Luigi is later awoken by a scream coming from Princess Peach and quickly notices how dark and dilapidated his room is. Stepping out of his room he finds that all the shiny gold and clean floors are just an illusion as it fades away. He gets to the elevator and there he finds Hellen who gives up the ghost and reveals that she is a ghost before showing King Boo has once again escaped with her help. He reveals that he put everyone else in a portrait and he chases you down the hall into a laundry chute. Down in the basement, you find the polterpup who leads you to the newest model of poltergust in E Gadd's car. The upper gives you the tutorial and you are then given the mission to find the professor and head for the penthouse to find Luigi's friends, and now the game proper can begin.
As you make your way to the ballroom to find E. Gadd, you'll find that there are of course several returning features. The strobe light, the dark light, and the charge have come back. There is some new stuff, you can shoot a suction cup out of the poltergust to give some extra leverage while moving large items. We also get an assist character called Gooigi, which is just Luigi made from lime jello. There is also now a doge function of sorts where the poltergust blasts downward pushing any ghost away, this is also helpful in getting out of a couple of traps. Now the best change, the charge is back, but instead of giving the suction an extra boost, once the bar is charged you get to beat the ever-loving shit out of these ghosts. It is too much fun to be wrangling one or two ghosts out of a crowd and then being able to beat one mother fucker with another mother fucker. You just start swinging them around and start smacking them into whatever. Yes, this also applies to boss ghosts. Speaking of which.
The boss ghosts are a return to what the first game had. Each one has a unique design, and they all have such a fun personality. I have two favorites, the movie director and the DJ. The director has you act in a kaiju movie and is a completely optional capture. The DJ has her own dance team that challenges you and as you are capturing her she starts dancing. Before each boss is fully sucked in, they all actually have their own special animation. They either pose, start whacking Luigi, or fix their hair and makeup. There is so much fun to be had here and I was here for it.
I did encounter a couple glitches which caught me off guard. In the second basement during the battle with the maintenance man, I did not realize that I needed to be in the water to fight him and I ended up breaking the game that way. The second one was at the final boss fight where Luigi got knocked around and then disappeared over the ledge and I couldn't do anything, not even a game over. I'm starting to wonder if he fell off the hotel. Speaking of the final bosses.
There are two ghosts that I'd count as the final bosses because they are back to back and hyped up the whole game. Throughout the game we see Hellen Gravely watching Luigi's progress through the security cameras and there is also of course King Boo. The Hellen fight gets pretty hectic. You have to control both Gooigi and Luigi to avoid Hellen's attacks, as well as environmental hazards. The arena is in two floors stacked on each other that you have to keep an eye on simultaneously. It took me a few tries to actually get Hellen. Once I did I could free Mario and head for the roof for the final battle. Here we find Peach and get her out of the painting before King Boo appears. Just before he tries to put everyone back into a painting the polterpup saves Luigi by knocking him out of the way. Good boy!
From here King Boo sets up a timer to beat him by threatening to put the entire resort in a painting. Once again, the goal is to land a hit with one of his spiky balls. Eventually, King Marshmellow is mushed and cleaned up, but then the hotel collapses in on itself. A few of the ghosts escape and realize that their home is now gone. This is another place where we return to some of the things the old game does. Here Luigi and friends decide to rebuild the hotel and the design gets grander the more cash you have.
That is the Luigi's Mansion trilogy. It is so much fun and charming and full of personality. From Luigi humming the main tune, to the way he interacts with the world and other characters. Even the way the ghosts behave around Luigi is just fun and endearing. These games are oozing charm. If you never played these, please go get a copy. These games have been the best thing to happen for Luigi since he was first created as a pallet swap Mario.
#duckyfruitbat#rambling#gaming#nintendo#luigi's mansion#review#luigi's mansion dark moon#luigi's mansion 3#polterpup#good boy
4 notes
·
View notes
Note
Hello Hello! I would love to request a ship if possible!?
For the Ted Lasso fandom pls
Request: Hi! I’d like to request a Ted Lasso ship. I’m pretty quiet and shy but can be very talkative when I’m comfortable around someone. I love to visit museums and spend time reading and studying atm ( I am studying to be a librarian), I love Bakery and cafe hopping, and much prefer a quiet night in eating good food and watching a movie over a night out and about, perhaps I am more of a home body than I should be!
I am a librarian and love helping my community and spending time w/ my family. I am average height, with brown hair and eyes.
I have a male gender preference
Thank youuuuuu
I ship you with Sam Obisanya!
Sam isn’t particularly shy, but he definitely takes time to warm up to you to become really chatty. You both get there quite fast, and now your nights are always filled with looong conversations about your days.
He would happily go to any museum with you, definitely takes you to the fancier ones in London that you have to pay for. And he pays for you every time without fail. He will wrestle you (gently) to get to the card machine first.
Unlike the vast majority of Richmond men, Sam loves baking with you and is actually good to it. However, he cooks good dinners a lot more, so evenings tend to be dinner from Sam and then your sweet treats for dessert.
Sam is definitely down for a night in or out, but I definitely think he’s more of a home body. He’d love a cozy night in helping you study with a movie on in the background.
He definitely comes to visit you in the library that you work in! You make him promise to come alone because the majority of his friends are too loud for a library, but he doesn’t mind as it means more quality time with you! :)
#ted lasso x reader#ship requests#ted lasso ships#sam obisanya#sam obisanya x reader#i feel like i write sam a lot for these#you’re all too perfect for him#anonymous
4 notes
·
View notes
Note
helloooo! santa here
you're sooo valid the midnights aesthetic went so hard. and cowboy like me is just. top tier.
what are your favorite colors??
also yeah that's crazy that the only library is in the high school 🥴😵💫 understandable that you haven’t gotten a library card yet 😅
how has your christmas eve been? i worked this morning but am now with my mom and family dog <3
i tried to send a picture of my dog from our walk this evening but didn’t realize you can’t do that on anon and i think that’s why my ask failed before 😔 will send it once i reveal my identity :)
talk soon!
- santa 🎅
i love all greens and blues and also purple. jewel tones are the best to me personally.
christmas eve has been decent. i had the day off so I just chilled and watched some tv. I finished up the night by wrapping my gifts (retail means I literally do everything last minute around the holidays oops). It was a nice day!
I can't wait to see your dog!!! I have a dog and a cat. My dog is roykent after the ted lasso character and my cat is eddie, like my favorite 911 character.
0 notes
Text
horrible dream that lasted three days about
-an incoming apocalypse i wanted to get ready for by getting gardening books from the library (???) and desperately asking my mom to walk my dog in the direction of the library but she was incredibly resistant to it
-somehow becoming a target to twin anime girl serial killers because we all collectively saw them do a crime so we had to stay inside but for some reason no one was taking me seriously and we all went to a park.
-said park visit ending in my brother and dog going missing and me running around trying to find them. found my brother but was very anxious about my dog so i left him and kept looking. only to black out and wake up in the convenience store under my dad's chinese restaurant. my dog waddles in and i grab him. theres a video of the anime serial killer girls messing around with the victims of the killing we were witness to. i watch a bit of it before customers start coming in.
-for some reason im aware that there should be other workers but one of the anime serial killers walk in and i lock myself in the freezer with my dog for five minutes until my social anxiety about leaving customers without a cashier kicks in and so i go upstairs to the restaurant
-i learn at the restaurant that another family and my brother's remains were found by the police and somehow that im in an alternate universe where i could prevent this from happening by going with the serial killer anime girls to find them.
-i go downstairs and suck up to the anime girl. she has the personality of toga from mha but a bit more subdued. she already knows who i am and i am a hostage now. she gives me tictacs because i am a good suck up. the other anime girl serial killer is colder. she doesnt fully trust me but i am a hostage that they have to bring along with. i am given and shown the video i mentioned earlier. ots on youtube. the playback says ive already watched a bit of it but thankfully she doesn't notice. its raining outside.
-we start and suddenly it's a fucking firstperson hitman like video game where we go from a train to a cowboy town to a minigame where we have to jump over incoming bulls through a dangling lasso and i die and respawn multiple times.
-one time i become the third anime girl serial killer (but only in disguise) with a bright yellow wig which gets me spotted immediately during our sprint away heist so i had to jump into a river, rip off my wig and for some reason the wig is the only "illegal item" i have on me so i shove it underneath my shirt. the other two anime girls are stacked in a trrenchcoat like a fake adult. they have grown attached to me. i start to feel affection for them. i steal a vest from a sheriff npc who acts as the save point before the bull jumping minigame but i fail the minigame so it didn't matter.
-i watch more of the hostage video at some point, it shows them encouraging a hostage girl to do a backflip and she's crying. but she does it and she starts laughing. i think this is the point in the arc where im supposed to be like ohh theyre not so bad but they literally killed my brother and terrorised my family in another timeline.
-i wake up. not in real life but i wake up in the dream in a house ive never lived in but ive dreamt of many times. it has the secret kiddy cube in the closet that leads to a serious of colourful padded rooms (not dissimilar to a play zoo). it has the broken clock on the cabinet where i keep my trinkets and pokemon cards (in this universe i have a lo t) it has the spiral staircase and big living room windows and the dread of someone always coming to get me.
-i actually think im awake for real. i realize the serial killer anime girls don't actually like me in this reality and while i get up in the dark early 6am morning to turn on the wifi i am afraid for my life. my family is still asleep. but they're alive
-i find my sister's room (an iteration of it where she has a king sized mattress that we share even though its her room??) and contemplate laying down. but i dont. i peek into my mom's room where my brother is sharing the bed with her. i go back to my room, anxiety spiking and lay back down on my bed. the room i return to is eerily similar in layout to my actual real room (Which i register in the dream as a previous room in a previous house we moved out of), despite me at the time only recognising it as a coincidence.
-i actually wake up for real and the anxiety fades because the apocalypse isnt happening and no anime girls or government agents are trying to kill me. massive whiplash that what i just experienced wasnt reality.
0 notes
Photo


September is Library Card Sign-Up Month. Celebrate by getting your card from your local library and read one of these library-loving novels!
The Librarian of Auschwitz by Antonio Iturbe, Lilit Thwaites (Translation)
4.16/5 stars
Based on the experience of real-life Auschwitz prisoner Dita Kraus, this is the incredible story of a girl who risked her life to keep the magic of books alive during the Holocaust. Fourteen-year-old Dita is one of the many imprisoned by the Nazis at Auschwitz. Taken, along with her mother and father, from the Terezín ghetto in Prague, Dita is adjusting to the constant terror that is life in the camp. When Jewish leader Freddy Hirsch asks Dita to take charge of the eight precious volumes the prisoners have managed to sneak past the guards, she agrees. And so Dita becomes the librarian of Auschwitz.
Out of one of the darkest chapters of human history comes this extraordinary story of courage and hope.
The Library of the Unwritten by A.J. Hackwith
3.85/5 stars
In the first book in a brilliant new fantasy series, books that aren't finished by their authors reside in the Library of the Unwritten in Hell, and it is up to the Librarian to track down any restless characters who emerge from those unfinished stories.
Many years ago, Claire was named Head Librarian of the Unwritten Wing—a neutral space in Hell where all the stories unfinished by their authors reside. Her job consists mainly of repairing and organizing books, but also of keeping an eye on restless stories that risk materializing as characters and escaping the library. When a Hero escapes from his book and goes in search of his author, Claire must track and capture him with the help of former muse and current assistant Brevity and nervous demon courier Leto.
But what should have been a simple retrieval goes horrifyingly wrong when the terrifyingly angelic Ramiel attacks them, convinced that they hold the Devil's Bible. The text of the Devil's Bible is a powerful weapon in the power struggle between Heaven and Hell, so it falls to the librarians to find a book with the power to reshape the boundaries between Heaven, Hell ... and Earth.
The Library: A Catalogue of Wonders by Stuart Kells
3.45/5 stars
A love letter to libraries and to their makers and protectors, a celebration of books as objects, and an account of how the idea of the library continues to possess our imagination Libraries are much more than mere collections of volumes. The best are magical, fabled places whose fame has become part of the cultural wealth they are designed to preserve. Some still exist today; some are lost, like those of Herculaneum and Alexandria; some have been sold or dispersed; and some never existed, such as those libraries imagined by J.R.R Tolkien, Umberto Eco, and Jorge Luis Borges, among others.
Ancient libraries, grand baroque libraries, scientific libraries, memorial libraries, personal libraries, clandestine libraries: Stuart Kells tells the stories of their creators, their prizes, their secrets and their fate. To research this book, Kells traveled around the world with his young family like modern day ‘Library Tourists.’ Kells discovered that all the world’s libraries are connected in beautiful and complex ways, that in the history of libraries, fascinating patterns are created and repeated over centuries. More importantly, he learned that stories about libraries are stories about people, containing every possible human drama.
The Library is a fascinating and engaging exploration of libraries as places of beauty and wonder. It’s a celebration of books as objects, a celebration of the anthropology and physicality of books and bookish space, and an account of the human side of these hallowed spaces by a leading and passionate bibliophile.
The Library Book by Susan Orlean
3.91/5 stars
On the morning of April 29, 1986, a fire alarm sounded in the Los Angeles Public Library. As the moments passed, the patrons and staff who had been cleared out of the building realized this was not the usual fire alarm. As one fireman recounted, “Once that first stack got going, it was ‘Goodbye, Charlie.’” The fire was disastrous: it reached 2000 degrees and burned for more than seven hours. By the time it was extinguished, it had consumed four hundred thousand books and damaged seven hundred thousand more. Investigators descended on the scene, but more than thirty years later, the mystery remains: Did someone purposefully set fire to the library—and if so, who?
Weaving her lifelong love of books and reading into an investigation of the fire, award-winning New Yorker reporter and New York Times bestselling author Susan Orlean delivers a mesmerizing and uniquely compelling book that manages to tell the broader story of libraries and librarians in a way that has never been done before.
The Invisible Library by Genevieve Cogman
3.72/5 stars
Irene is a professional spy for the mysterious Library, which harvests fiction from different realities. And along with her enigmatic assistant Kai, she's posted to an alternative London. Their mission - to retrieve a dangerous book. But when they arrive, it's already been stolen. London's underground factions seem prepared to fight to the very death to find her book. Adding to the jeopardy, this world is chaos-infested - the laws of nature bent to allow supernatural creatures and unpredictable magic. Irene's new assistant is also hiding secrets of his own. Soon, she's up to her eyebrows in a heady mix of danger, clues and secret societies. Yet failure is not an option - the nature of reality itself is at stake.
The Library of Lost and Found by Phaedra Patrick
3.71/5 stars
Librarian Martha Storm has always found it easier to connect with books than people--though not for lack of trying. She keeps careful lists of how to help others in her superhero-themed notebook. And yet, sometimes it feels like she's invisible. All of that changes when a book of fairy tales arrives on her doorstep. Inside, Martha finds a dedication written to her by her best friend--her grandmother Zelda--who died under mysterious circumstances years earlier. When Martha discovers a clue within the book that her grandmother may still be alive, she becomes determined to discover the truth. As she delves deeper into Zelda's past, she unwittingly reveals a family secret that will change her life forever. Filled with Phaedra Patrick's signature charm and vivid characters, The Library of Lost and Found is a heartwarming and poignant tale of how one woman must take control of her destiny to write her own happy ending.
#library card#library card sign up month#wonderwoman#libraries are wonderful#lasso a library card#public library#fiction#nonfiction#non fiction#reading recs#book list#book recs#reading recommendations#Book Recommendations#booklr#reading list#recommended reading#public libraries#read these books#currently reading
32 notes
·
View notes
Text
I need a running list of things I appreciate, I’m bumming myself out!
Appreciation List
My kid asking for “the bear in the sesame” when he wants to hear The Bare Necessities from The Jungle Book
I get to listen to all my favorite Disney songs again!
A really clear October afternoon
Being able to get away to go for a run in the afternoon.
Being able to run again.
Ted Lasso
Testing negative for covid
Running a meeting and finishing 1 minute early
Friday afternoons before a 3 day weekend
Having a work friend
Flipping through a catalog and imagining buying anything that catches my eye.
Trader Joe’s
Tacos for dinner
Having food to eat
Having a home to live in
People who make the world a better place
Each new day
Sending and receiving cards in the mail 💌
My kid also requests to hear “Singing in the Rain”
A perfectly ripe avocado
Public libraries
Marching bands
Clean water to drink
Taking a nap
Making chores more fun by listening to podcasts.
Chocolate
That my kid says “Oh phooey”
Pumpkins
Church rummage sales
Finally understanding what inner knowing feels like (in this one particular instance).
Blueberries
Legos
Books!
Abblasen
Kinetic sand
Puppies and kittens
Love
A perfectly ripe pear
Postsecret
Mini golf
Scalding hot showers
Hiking
A New York bagel with butter
Pizza
Local governments that invest in amenities that benefit all people.
Household appliances like washers and dryers and dishwashers that are small miracles
The way Billy Crudup’s character looks at Reese Witherspoon’s character in The Morning Show
Nurses
The way lilac leaves turn a red-purple from the edges in.
White chocolate
Wool blazers
Black watch tartan
Dresses
Well-made shoes
The way back machine
Fresh sheets
The combination of words, “leaf peeping”
Sunny days in the low 70s
Perfectly matched toddler outfits
Barbecue with South Carolina mustard bbq sauce
Tea in the evenings
School photos
Nude high heels
The Great British Bake Off
7 notes
·
View notes
Video
When we go after anything we get it (LOC) by The Library of Congress Via Flickr: Martin, W. H., 1865-1940,, photographer. When we go after anything we get it Kansas City, U.S.A. : Published by the North American Post Card Co., [1909] 1 photograph : gelatin silver print ; sheet 9 x 14 cm (postcard format) Notes: Photomontage on exaggeration postcard shows men in automobiles chasing and lassoing a larger-than-life rabbit. Title from item. Forms part of: Karen A. Stuart collection of postcards (Library of Congress). Addressed to Mr. M.J. Ross, Selinsgrove, Pa. Postmarked Depue, Illinois, October 28, 1909. DLC On recto: "Copyright 1909 by W.H. Martin." Served by appointment only (Unprocessed). To make a request, see "Access to Unprocessed Materials," www.loc.gov/rr/print/info/022_unpr.html Gift; Laura Kells ; 2019; (DLC/PP-2019:085). Subjects: Automobiles--1900-1910. Rabbits--1900-1910. Roping--1900-1910. Format: Humorous pictures--1900-1910. Montages--1900-1910. Photographic postcards--1900-1910. Photographic prints--1900-1910. Rights Info: No known restrictions on publication. Repository: Library of Congress, Prints and Photographs Division, Washington, D.C. 20540 USA, hdl.loc.gov/loc.pnp/pp.print Higher resolution image is available (Persistent URL): hdl.loc.gov/loc.pnp/ppmsca.67975 Call Number: Unprocessed in PR 13 CN 2019:085 [item]
#Library of Congress#vintage#vintage photograph#vintage photoshopping#william h. martin#karen a. stuart#postcard#humorous postcard#1909#20th century
2 notes
·
View notes
Text
˚ · . · ✵ PART THIRTY
word count: 2.4k
HAWKINS, INDIANA
MARCH 1985
Steve slid the box over to the hood of his car with a grin too wide for it to be good. The little shit already dragged me away from lunch to eat outside. Just the two of us. I knew something was coming I just didn't know what it was.
I took the box and opened up the lid.
A lasso. A bright red rope that looks like something from an actually farm.
"You know now that I have this you're in deep trouble right? This doesn't end well for you." I quipped without looking up at him.
"Can I get a head start?"
"You get five seconds starting now-one," I grab the lasso out of the box, it's already got a loop and everything. "Two," With the loop in my right hand and the coils in the other I swing it around to get used it it. "Three."
I look up and see Steve not even that far. If I didn't know him I wouldn't suspect he was a basketball player. Aren't they supposed to be fast?
I jog a bit to put less distance between us and throw the loop around him making sure to keep the momentum. It lands around his body and I pull hard on the rope and it tightens around his waist and arms.
Pulling him back to me and his car he's got a look of pure happiness on his face. "I guess I was right. You do know how to use a lasso."
I chuckle at him, shaking my head as well. Only Steve Harrington would willingly buy a lasso so that someone would catch him in it. I don't know another human being that would do that. No one.
"The only reasons that make sense for why you'd buy that is because you have a weird thing for cowgirls and being tied up." I speak.
My fingers are undoing the loop that he's in. He's not even squirming I know he's living for this shit.
Once I get him out he takes a breath and stretches his arms. My eyes try their best but I do catch his shirt go up and see a happy trail-
"Why would having a thing for cowgirls be weird?"
-
I didn't mind spending time in my high school. If I had to study there was the library, there was no reason not to use it. I just didn't like spending time in the middle school by myself. I wasn't by myself, the kids were the av room.
But I didn't want to ruin their game. The room was so small and you could only do so much before you got bored. So I decided to take a walk around the middle school. It wouldn't have bothered me if I was just a normal teenager.
I remember the hallway where the demogorgon busted through the wall. Eleven used her powers to take down those men.
The hairs on my arms are standing up when I come across it.
The classroom we were in when she disappeared. I know she's alive and okay, we all are. But it's like all my brain can focus on is those moments. The dust settling, Elven gone. I walk inside of it and close the door behind me.
My life wasn't normal before this night. I don't think it'll ever be normal after.
I can hear the door click open, meaning I've been caught. Some teacher is probably wondering why I'm snooping in their classroom. If I was stealing something.
I turn to the front door "Sorry I got lost," I stop myself when I see my mother. My mother in the doorway with two men behind her. "I thought you were gone?"
She gives them a look, and the wait outside as she steps into the room. I slowly back away from her. Crap where was my lasso when I needed it? I left my bag in the av room. I look around the room for any phone box but I can't really find it.
"Jessie I'm not here to hurt you. I never wanted to hurt you." She says, getting closer.
Yeah right! Like erasing my memories and making me do things to people-horrible things to people? That shit hurt me even though it didn't leave a physical bruise. It all hurt in the end.
I put the desk in between us.
I raise my hand at her, palm flat. "Stop right there. Don't come any closer to me. I don't want anything to do with you."
"I just wanted to give you everything that was erased from you."
What?
Why would she do that? Why would she willingly give me back whatever memories she had erased? There has to be something in it for her, I just can't tell what it is yet. Do I even want to know what she's up to ?
I shake my head at her. "No I don't want them back. The only thing I could ever want from you is for you to leave. Leave us all alone."
"You didn't tell him what you did, did you?" The way she asks me that is not sincere.
No I didn't tell my father that I killed someone using my mind. I don't plan on doing it anytime soon either. He already found out there was a monster in his bed he doesn't need to know about his killer-daughter.
Dayton knows. And he keeps on telling me it's not my fault, I know that- I just don't feel it. If my big brother is telling me that it's not my fault then what the hell is my dad gonna tell me? The same thing? Or that it's my mothers fault?
Either way, playing the blame game doesn't help me much. All it does is reiterate the fact that i used my abilities to kill someone. Whether I meant to or not, if I knew it or not. I still did it.
I swallow the lump in my throat.
"fuck you."
"You should know everything, shouldn't you? All of the details, all of the memories?" She asks but I don't respond. I just keep my distance, and keep my mouth shut. She puffs out a breath and nods her head. "If you ever want to know, use this."
I watch as she takes out a card from her jacket pocket and places it lightly on the desk.
Then I watch as she turns around and walks out of my life again. I thought the first time would also be the last time but apparently I was wrong. I don't know what she wants from me now, but she's definitely not done with me.
She closes the door and I feel like I can breathe normally again.
My eyes scan the card she left on the table. On it is a typed name and then something scribbled below it.
SAM OWENS
ASK FOR GLENDALL
-
I push open the door and sure enough the kids are all there.
I just stand there for a moment.
Do I even say anything to anyone?
If I say something to Mickey is he gonna wanna see our mother? Is he gonna tell dad? Or Dayton? What if I told my dad? What would he do? Hunt her down? Hunt down Larry Kline, the mayor of our town? Would he tell Hopper?
What if I told no one?
I feel an arm wrap around my shoulder. I almost want to let out a yelp or a scream. But I don't. I don't because I know it can't be her or anyone she knows. She left. I don't know for how long but she's gone.
Turning my head I look up at Steve. Somehow it was always him.
"Look at our little shitheads."
HAWKINS, INDIANA
MARCH 1985
I opened the door to the police station and felt instantly warmer. It definitely beats the cold outside. I step inside and un zip my jacket a little bit. I can't stay long, it already took long enough to ride here during lunch period. I've also got to ride back.
At the front desk is Florence, at the ready to greet me.
"Jessie how are you honey?"
I smile. "I'm good. Just wanted to see if Hopper was in."
She makes a face- he's probably in a mood- and points behind her. I thank her and head in to the station. I can see the other officers, who probably know my dad. Who will probably tell him I was here.
I can make up a lie for that if need be.
I just needed to see Hopper.
He's standing over someone, hands on his hips like he's about to scold them. I should probably save them from the torture. I clear my throat to get his attention and it works. He turns around to face me.
"Jessie? What are you doing here?" He asks me as I step closer to him. I don't need other people catching what I'm saying.
"I need your help with something. Something that needs to stay between us." I say pointing between the two of us to paint the picture for him.
He looks around the office before nodding over to an empty office. I almost let out a yelp when he pushes me in front of him and into the office. He then closes the door behind us and gives me the hands on hips.
He's gonna scold me?
"Now wait a minute before you lecture me on being out of school I need to show you," I dig into my coat pocket until my fingers feel the card in question. I pull it out of my pocket and hold it out for him to take from me. "this."
He takes it and looks at the card. His expression changes very quickly. "Where did you get this?"
"My mother gave it to me." He makes another face now and I nod my head at him. "I was at the middle school and she came out of nowhere claiming she wanted me to have all of my memories back."
I can hear him let out a sigh as he begins to rub his forehead. "Your mother made contact with you and you didn't tell anyone?"
"I didn't know what to do but now I'm coming to you Hopper." I try to explain my actions but really it sounds like bullshit. I was scared about going to anyone else.
"Why me? Why not your dad? Your brother?" He asks me, already knowing the answer. "You don't want to tell them that she came back. Or that you can get your memories back."
I sigh, crossing my arms over my chest. "If I tell them anything it opens a can of worms that I don't feel like talking about with them."
"But you'd talk about it with me?"
I roll my eyes at that. "If it wasn't clear before I trust you to be impartial."
He walks over to the desk and leans against it, facing me. "Jessie I need you to tell me what your so scared to tell your family."
I killed a man. That's what I'm so scared of. I'm a killer. Yes it's not black and white but the gun still went off. The bullet still killed someone. I did that. I'm the reason. And there is always this lump in my throat and this thumping in my heart that appears when I think about it.
I clear my throat and try to make sure my voice doesn't crack. "I killed someone. I made a man pull the trigger on himself."
When I look at him, he's already looking at me. And I do not need to see that look from someone else. So I look down at the floor instead. My dirty white converse. Anything instead of having to go through this again.
"I know the man whose name is on this card. He's been helping me with Jane. He's not a bad guy." He explains.
Okay so the man who could potentially give me back my memories is not a bad man. If Hopper is getting help from him, he trusts him to some extent. That's good to know. But what I don't want to know? What I don't want to stumble upon? Is me killing someone else.
I look up from the floor now. "I don't want to get them back. I'm perfectly fine the way I am. I need your help figuring out why my mother wants me to have my memories back. I mean she came back and risked being seen so it has to be something."
"What if it's nothing Jessie?"
I look at him sharply.
"It is something! For all of my life she's been doing this to me, these experiments or tests, whatever. And then she wipes them clean because she can't have her experiment walking around knowing it's an experiment." I walk towards him during my rant.
"Jessie she's go-" Hopper tries to interject but I don't let him. I'm not done.
"She's been in control the whole time. She's been toying with me for my whole life! And it's finally over and she leaves! She doesn't explain, she doesn't say she was wrong, she doesn't say jack shit to me! She just turns her back on me! Her precious experiment!" My voice starts to get louder and louder- I don't realize it because all I can see is red. All I can feel is red.
"Hey, Jessie-"
"I thought she was leaving for good! I thought there couldn't possibly be anything left for her to do to me! But then she comes back! She comes back and she tells me she didn't want to hurt me! She wants me to remember that I kill-" My words start hitting me back and my voice croaks at the end.
Hopper grabs my shoulders and makes that red that I've been seeing snap away.
"Jessie you were being controlled. You didn't have a choice in this. You were just a kid. She's the one who knew what she was doing. She's the one to blame here." He talks like- like I didn't just tell him I killed someone. Like it doesn't matter.
"But it's something. She walked away from me that night with no intention of coming back and now here she is- coming back into my life. I need to know why Hopper, I need to-"
"I'll contact him." He nods to me.
"You'll ask him about my mother?" I ask him and he nods again. "O-okay."
"Now you need to tell your dad what's happening. Beck wouldn't ever blame you, Jessie. The guy loves you and your brothers like theres nothing else in the world. He'll listen, he'll understand."
#DAMSEL#steve harrington x oc#steve harrington#steve harrington x reader#stranger things fic#stranger things imagine#stranger things x reader#stranger things#IT"S THE LASSO#The lasso of love-#I'll shut up
13 notes
·
View notes
Video
When we go after anything we get it (LOC) by The Library of Congress Via Flickr: Martin, W. H., 1865-1940,, photographer. When we go after anything we get it Kansas City, U.S.A. : Published by the North American Post Card Co., [1909] 1 photograph : gelatin silver print ; sheet 9 x 14 cm (postcard format) Notes: Photomontage on exaggeration postcard shows men in automobiles chasing and lassoing a larger-than-life rabbit. Title from item. Forms part of: Karen A. Stuart collection of postcards (Library of Congress). Addressed to Mr. M.J. Ross, Selinsgrove, Pa. Postmarked Depue, Illinois, October 28, 1909. DLC On recto: "Copyright 1909 by W.H. Martin." Served by appointment only (Unprocessed). To make a request, see "Access to Unprocessed Materials," www.loc.gov/rr/print/info/022_unpr.html Gift; Laura Kells ; 2019; (DLC/PP-2019:085). Subjects: Automobiles--1900-1910. Rabbits--1900-1910. Roping--1900-1910. Format: Humorous pictures--1900-1910. Montages--1900-1910. Photographic postcards--1900-1910. Photographic prints--1900-1910. Rights Info: No known restrictions on publication. Repository: Library of Congress, Prints and Photographs Division, Washington, D.C. 20540 USA, hdl.loc.gov/loc.pnp/pp.print Higher resolution image is available (Persistent URL): hdl.loc.gov/loc.pnp/ppmsca.67975 Call Number: Unprocessed in PR 13 CN 2019:085 [item]
1 note
·
View note
Text
WHAT ARE YOUR MUSE’S AESTHETICS ?
REPOST. don’t reblog !! BOLD any that applies to your muse and italicize any that kind of applies to your muse. feel free to add to the list.
you know the drill: bold is Lark, italics is Sparrow, and bold-italics is both !
TAGGED BY: i took it from,,,,,,someone.....a long time ago “orz
TAGGING: uhhhh idk who’s already done it but @starbrosforever / @llionheartcd, @fxlsemoon, @blasianbutterfly, @bcringme, @seigneurdesentrailles uhhhh whoever else wants it??
COLOURS
red. brown. orange. yellow. green. blue. purple. pink. black. white. teal. silver. gold. grey. lilac. metallic. matte. royal blue. strawberry red. charcoal grey. forest green. apple red. violet. navy blue. crimson. cream. mint green. bubblegum pink. sky blue. pale jade. heather grey. lavender purple.
ELEMENTS
fire. ice. water. air. earth. rain. snow. wind. moon. stars. sun. heat. cold. steam. frost. lightning. sunlight. moonlight. dawn. dusk. twilight. midnight. sunrise. sunset. dewdrops.
BODY
claws. long fingers. fangs. teeth. wings. tails. lips. bare feet. neck. shoulders. legs. freckles. unseen bruises. canines. scars. scratches. wounds. burns. fingernails. spikes. feathers. webs. eyes. hands. sweat. tears. feline. chubby. curvy. short. tall. normal height. muscular. piercings. tattoos. athletic. hair. fur. sleek.
WEAPONS
fists. legs. sword. dagger. spear. lance. bow & arrow. hammer. shield. poison. hand guns. axes. throwing axes. whips. knives. throwing knives. pepper sprays. tasers. machine guns. slingshots. katanas. maces. staffs. wands. powers. magical items. magic. rocks. mud balls. claws. teeth. stealth. strategy. forehead. warhammer. polearm. flail. lasso.
MATERIALS
gold. silver. copper. platinum. titanium. rose gold. diamonds. pearls. rubies. sapphires. emeralds. amethyst. metal. iron. rust. steel. glass. wood. porcelain. paper. wool. fur. lace. leather. silk. velvet. denim. linen. cotton. charcoal. clay. stone. asphalt. mortar. brick. marble. dust. glitter. blood. dirt. mud. smoke. ash. shadow. carbonate. rubber. synthetics. ribbon. moonstone.
NATURE
grass. leaves. trees. bark. roses. daisies. sunflowers. tulips. lavender. petals. seeds. hay. sand. rocks. roots. flowers. fungi. ocean. river. frozen lake. meadow. valley. forest. desert. tundra. savanna. rain forest. caves. underwater. coral reef. beach. waves. space. clouds. mountains. snow. mist. pond.
ANIMALS
big cats. wolves. foxes. eagles. owls. falcons. hawks. swans. snakes. turtles. ducks. bugs. spiders. birds. whales. deer. dolphins. fish. sharks. horses. cats. dogs. bunnies. penguins. crows. ravens. mice. lizards. werewolves. unicorns. pegasus. dragons. monkeys. raccoons. rats. bull. koalas.
FOODS / DRINKS
sugar. salt. candy. bubblegum. wine. champagne. hard liquor. vodka. beer. coffee. sake. tea. spices. herbs. apples. orange. lemon. cherry. strawberry. watermelon. vegetables. fruits. meat. fish. pies. desserts. chocolate. lollies. cream. caramel. berries. nuts. cinnamon. burgers. surf ‘n’ turf. burritos. pizza. ambrosia. eggs. milk. raspberries.
HOBBIES
music. art. watercolors. gardening. smithing. sculpting. painting. sketching. fighting. writing. composing. cooking. baking. sewing. training. dancing. acting. singing. martial arts. self-defense. war tactics. electronics. technology. cameras. video cameras. video games. computer. phone. movies. theater. libraries. books. magazines. cds. records. cassettes. piano. strings. violin. guitar. electronic guitar. bass guitar. harmonica. harp. woodwinds. brass. flute. bells. exploring. playing cards. poker chips. chess. dice. motorcycle riding. eating. sleeping. climbing. running. jogging. parkour. studying. horseback riding.
STYLE
lingerie. armor. cape. dress. tunic. vest. shirt. boots. ankle boots. heels. leggings. trousers. jeans. skirt. jewelry. earrings. necklace. bracelet. ring. pendant. hat. beanie hat. crown. circlet. helmet. scarf. brocade. cloaks. corsets. doublet. chest plate. gorget. bracers. belt. sash. coat. leather jacket. hood. gloves. socks. masks. mittens. cowls. braces. watches. glasses. sun glasses. straw hat. visor. eye contacts. makeup. ribbons. hoodie. sweater. converses. tennis shoes. boxers. briefs. boxer briefs. shorts. cargo. cropped pants. prosthetic. crop top. cuffed pants. clawed gauntlet. historical attire. suits.
MISC
balloons. bubbles. cityscape. light. dark. candles. growth. decay. war. peace. money. power. percussion. clocks. photos. mirrors. pets. diary. journal. fairy lights. madness. sanity. sadness. happiness. optimism. pessimism. loneliness. family. friends. comrades. assistants. co-workers. enemies. loyalty. smoking. drugs. kindness. love. hugs. kisses. spring. summer. autumn. winter. farmland. countryside. suburban. village.
#☾𝑠𝑝𝑎𝑟𝑟𝑜𝑤 : 𝑚𝑢𝑠𝑒☽ i know how the flowers felt.#☼𝐥𝐚𝐫𝐤 : 𝐦𝐮𝐬𝐞☼ strike‚ hellfire.#((idk these are more MY aesthetics for them#tho there are quite a few of their aesthetics in there as well#still gonna tag as musins rather that aesthetics tho))#☄𝒆𝒕𝒄 : 𝒒𝒖𝒆𝒖𝒆☄ patience is a virtue.
3 notes
·
View notes
Text
Adobe Photoshop Mac Catalina Crack

Adobe Photoshop Mac Catalina Cracked
Adobe Photoshop CC 2021 v22.3 macOS multi Crack TNT 16. Catalina v10.15.7 (19H2) Multi-FR (MAC) 6. Adobe Photoshop CC 2021 v22.1.1 + Neural FiltersmacOS. VueScan is a computer program for image scanning, especially of photographs, including negatives. It supports optical character recognition (OCR) of text documents. The software can be downloaded and used free of charge, but adds a watermark on scans until a license is purchased. Other adjustments to the Photoshop project should be performed on the imported Photoshop project using Adobe Photoshop program with updates happening in real-time inside Final Cut Pro X. Final Cut Pro X was made available for purchase and download on the Mac App Store on June 21, 2011 along with new versions of Motion and Compressor.
Download Adobe Photoshop 2020 MacOS Full Version. This is the most popular photo editing and graphics design software. This software used by countless Mac users throughout the world. In this CC 2020 latest version, many new features were added. Particularly concerning matters of photo editing workflow. With the help of the newest Object selection feature, you will be able to select an image area much more easily. Moreover, now object selection is empowered by Sensei, an Adobe’s AI engine.
To get the latest Photoshop CC 2020 Mac download link, you can check the panel below. It comes with the latest Adobe Zii patch to permanently remove the limitation. This application supports MacOS Catalina, Mojave, and High Sierra. Furthermore, Photoshop CC v21.1.3 update also comes with Bug Fix and Crashes Fix. So, It’s the best time for you to update your older Photoshop now.
Not only features and compatibility were updated, the Library Content on gradients, patterns, swatches, and layer shapes also got its latest update. Moreover, this application now supports Warp Objects with highly sophisticated customization systems. The system allows you to Warp Object more freely while splitting the mesh into several parts independently. Get Adobe Photoshop CC 2020 MacOS free. download full Version link now.
Adobe Photoshop 2020 Mac Full Setup Details Crack
Software Full Name : Adobe Photoshop 21.2.4 MacOS Full Version.
Setup File Name : adphs2020macv212final.zip.
Full Setup Size : 2.2 GB.
Setup Type : Offline Installer with Crack
Compatibility Architecture : MacOS Big Sur.
Latest Release Added On : January 26th, 2021.
Adobe Photoshop 2020 System Requirements
Operating SystemWindows 10Support 64 bitProcessorIntel i5 3Ghz Dual-CoreIntel Core i7 Processor 3Ghz+Memory8GB DDR316GB DDR4Hard Drive40 GB – 7200 RPM HDD40 GB – Solid State DiskGraphics CardDedicated GPU Card6 GB GPU CardScreen Resolution1366×7681920×1080
Adobe Photoshop CC 2020 MacOSX Features
New library content for Gradients, patterns, swatches, layer styles and shapes.
The new object selection tool is very exciting.
You could select it with the rectangle and then fine tune with the Lasso option.
Object selection powered by Sensei, Adobe’s AI engine.
Warp the shapes of objects or wrap textures on to them easier than ever.
Split the mesh in Transfor mode to wherever you wish.
Right Click on the Smart Object and choose Convert to Layers.
Custom content aware fill with 3 modes.
Scaling object constrained (staying in proportion) by default.
The properties panel has undergone an overhaul and become command center.
Latest features and stability update, 26 January 2021.
How to Install Adobe Photoshop CC 2020 MacOS Full Version
Free Download Adobe Photoshop 2020 MacOS Full Version.
Turn off the internet connection first.
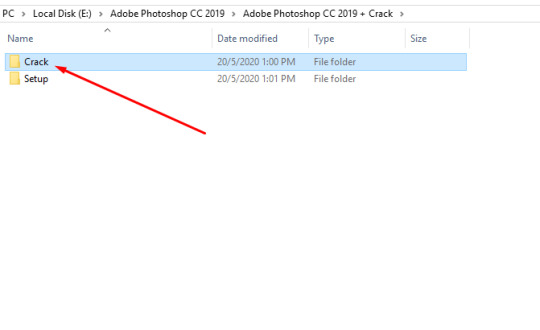
Unzip the file to the desktop.
Install the DMG file as usual.
Enjoy photo editing!
How to Fix Adobe Photoshop 2020 Installer Error
First, right-click the Install file.
Select the Show Package Contents menu.
Go to the Contents > MacOS folder.
Double click the Install application.
Adobe Photoshop 2020 Mac Free Download
Installer MacOS v21.2.4 | Google Drive | UptoBox | Up4Ever | Mediafire
File size : 2.2 GB | Password : www.yasir252.com
VueScanDeveloper(s)Hamrick Software (Ed Hamrick; David Hamrick)Initial release1998; 23 years agoStable releaseOperating systemWindows XP or later,(2) Mac OS X Panther or later, Ubuntu Linux 8.10 or later Red Hat Linux 9 or later(3)PlatformIA-32 and x86-64SizeWindows: 6 MB Mac OS: 9 MB Linux: 6 MB(3)TypeImage scanner and optical character recognitionLicenseSharewareWebsitehamrick.com
VueScan is a computer program for image scanning, especially of photographs, including negatives.(4) It supports optical character recognition (OCR) of text documents.(5)(6) The software can be downloaded and used free of charge, but adds a watermark on scans until a license is purchased.
Purpose(edit)
VueScan is intended to work with a large number of image scanners (over 6000 in January 2020), excluding specialised professional scanners such as drum scanners, on many computer operating systems (OS), even if drivers for the scanner are not available for the OS. These scanners are supplied with device drivers and software to operate them, included in their price. A 2014 review considered that the reasons to purchase VueScan are to allow older scanners not supported by drivers for newer operating systems to be used in more up-to-date systems, and for better scanning and processing of photographs (prints; also slides and negatives when supported by scanners) than is afforded by manufacturers' software.(7) The review did not report any advantages to Vuescan's processing of documents compared to other software. When compared to SilverFast, a similar program, the reviewer considered the two programs to be comparable, with support for some specific scanners better in one or the other. Vuescan supports more scanners, with a single purchase giving access to the full range of both film and flatbed scanners, and costs less.
The Vuescan program can be used with its own drivers, or with drivers supplied by the scanner manufacturer, if supported by the operating system. Vuescan drivers can also be used without the Vuescan program by applications software that supports scanning directly, such as Adobe Photoshop, again enabling the use of scanners without current manufacturers' drivers.(8)
In 2019 when Apple Inc. released macOS Catalina, they removed support for running 32-bit programs, including 32-bit drivers for scanning equipment. In response, Hamrick released VueScan 9.7, effectively saving thousands of scanners from being rendered obsolete.(9)
Overview(edit)
VueScan enables the user to modify and fine-tune the scanning parameters. The program uses its own independent method to interface with scanner hardware, and can support many older scanners under computer operating systems for which drivers are not available, allowing old scanners to be used with newer platforms that do not otherwise support them.(10)
VueScan works with more than 2,400 different supported scanners and digital cameras on Windows, 2,100 on Mac OS X and 1,900 on Linux.(11)
VueScan is supplied as one downloadable file for each operating system, which supports the full range of scanners. Without the purchase of a license the program runs in fully functional demonstration mode, identical to Professional mode, except that watermarks are superimposed on saved and printed images. Purchase of a license removes the watermark, with a standard license also providing updates for one year, and a professional license with some additional features.
As distributed VueScan supports optical character recognition of English documents; 32 additional language packages are available on its Web site.(12)
In September 2011, VueScan co-developer Ed Hamrick said that he was selling US$3 million per year of VueScan licenses.(13)
See also(edit)
Image Capture — alternative scanner software bundled free with Mac OS X
Scanner Access Now Easy (SANE) — open-source scanner API for Unix, Windows, OS/2
References(edit)
^'VueScan Downloads'. Hamrick Software. 14 February 2015. Retrieved 15 February 2015.
^'VueScan Release Notes - Windows Notes'. Hamrick Software.
^ ab'Softpedia Global Page for VueScan Downloads'. Softpedia. SoftNews NET SRL. 26 May 2011. Archived from the original on 20 August 2011. Retrieved 26 May 2011.
^Wayne Fulton (2010). 'VueScan - Film Scanner software'. Scantips.com. Retrieved 11 August 2016.
^'VueScan'. Download.com. CBS Interactive. 25 May 2011. Retrieved 26 May 2011.
^Fulton, Wayne. 'VueScan'. A few scanning tips. Retrieved 26 May 2011.
^Stone, M. David (23 October 2014). 'VueScan 9 review (rating 4/5)'. PC Mag. Retrieved 10 August 2016.
^'VueScan now scans directly to Photoshop'. Itproportal.com. 11 March 2010. Retrieved 16 August 2016.
^'VueScan 9.7 Prevents Thousands Of Scanners From Becoming Defunct'. ephotozine.com. 5 November 2019. Retrieved 5 January 2021.
^Stone, M. David (16 August 2005). 'VueScan 8.0 Professional'. PC Magazine. Ziff Davis. Retrieved 26 May 2011.
^'Supported Scanners'. Release Notes. Hamrick Software. Retrieved 20 May 2018.
^'Adding OCR Languages'. VueScan. Hamrick Software. Retrieved 26 May 2011.
^'VueScan is NOT struggling'. Retrieved 15 April 2014.
Further reading(edit)
The VueScan Bible: Everything You Need to Know for Perfect Scanning; Sascha Steinhoff; 176 pages; 2011; ISBN978-1933952697.
External links(edit)
Adobe Photoshop Mac Catalina Cracked
Retrieved from 'https://en.wikipedia.org/w/index.php?title=VueScan&oldid=1002378430'
0 notes
Text
WHAT ARE YOUR MUSE’S AESTHETICS ?
REPOST. don’t reblog !! BOLD any that applies to your muse and italicize any that kind of applies to your muse. feel free to add to the list.
TAGGED BY: myself, because i wanted to
TAGGING: take your destiny into your own hands, do whatever you want
COLOURS
red. brown. orange. yellow. green. blue. purple. pink. black. white. teal. silver. gold. grey. lilac. metallic. matte. royal blue. strawberry red. charcoal grey. forest green. apple red. violet. navy blue. crimson. cream. mint green. bubblegum pink. sky blue. pale jade. heather grey. lavender purple.
ELEMENTS
fire. ice. water. air. earth. rain. snow. wind. moon. stars. sun. heat. cold. steam. frost. lightning. sunlight. moonlight. dawn. dusk. twilight. midnight. sunrise. sunset. dewdrops.
BODY
claws. long fingers. fangs. teeth. wings. tails. lips. bare feet. neck. shoulders. legs. freckles. unseen bruises. canines. scars. scratches. wounds. burns. fingernails. spikes. feathers. webs. eyes. hands. sweat. tears. feline. chubby. curvy. short. tall. normal height. muscular. piercings. tattoos. athletic. hair. fur. sleek.
WEAPONS
fists. legs. sword. dagger. spear. lance. bow & arrow. hammer. shield. poison. hand guns. axes. throwing axes. whips. knives. throwing knives. pepper sprays. tasers. machine guns. slingshots. katanas. maces. staffs. wands. powers. magical items. magic. rocks. mud balls. claws. teeth. stealth. strategy. forehead. warhammer. polearm. flail. lasso.
MATERIALS
gold. silver. copper. platinum. titanium. rose gold. diamonds. pearls. rubies. sapphires. emeralds. amethyst. quartz. metal. iron. rust. steel. glass. wood. porcelain. paper. wool. fur. lace. leather. silk. velvet. denim. linen. cotton. charcoal. clay. stone. asphalt. mortar. brick. marble. dust. glitter. blood. dirt. mud. smoke. ash. shadow. carbonate. rubber. synthetics. ribbon. moonstone.
NATURE
grass. leaves. trees. bark. roses. daisies. sunflowers. tulips. lavender. petals. seeds. hay. sand. rocks. roots. flowers. fungi. ocean. river. frozen lake. meadow. valley. forest. desert. tundra. savanna. rain forest. caves. underwater. coral reef. beach. waves. space. clouds. mountains. snow. mist. pond.
ANIMALS
big cats. wolves. foxes. eagles. owls. falcons. hawks. swans. snakes. turtles. ducks. bugs. spiders. birds. whales. deer. dolphins. fish. sharks. horses. cats. dogs. bunnies. penguins. crows. ravens. mice. lizards. werewolves. unicorns. pegasus. dragons. monkeys. raccoons. rats. bull. koalas.
FOODS / DRINKS
sugar. salt. candy. bubblegum. wine. champagne. hard liquor. vodka. beer. coffee. sake. tea. spices. herbs. apples. orange. lemon. cherry. strawberry. watermelon. vegetables. fruits. meat. fish. pies. desserts. chocolate. lollies. cream. caramel. berries. nuts. cinnamon. burgers. surf ‘n’ turf. burritos. pizza. ambrosia. eggs. milk. raspberries.
HOBBIES
music. art. watercolors. gardening. smithing. sculpting. painting. sketching. fighting. writing. composing. cooking. baking. sewing. training. dancing. acting. singing. martial arts. self-defense. war tactics. electronics. technology. cameras. video cameras. video games. computer. phone. movies. theater. libraries. books. magazines. cds. records. cassettes. piano. strings. violin. guitar. electronic guitar. bass guitar. harmonica. harp. woodwinds. brass. flute. bells. exploring. playing cards. poker chips. chess. dice. motorcycle riding. eating. sleeping. climbing. running. jogging. parkour. studying. horseback riding.
STYLE
lingerie. armor. cape. dress. tunic. vest. shirt. boots. ankle boots. heels. leggings. trousers. jeans. skirt. jewelry. earrings. necklace. bracelet. ring. pendant. hat. beanie hat. crown. circlet. helmet. scarf. brocade. cloaks. corsets. doublet. chest plate. gorget. bracers. belt. sash. coat. leather jacket. hood. gloves. socks. masks. mittens. cowls. braces. watches. glasses. sun glasses. straw hat. visor. eye contacts. makeup. ribbons. hoodie. sweater. converses. tennis shoes. boxers. briefs. boxer briefs. shorts. cargo. cropped pants. prosthetic. crop top. cuffed pants. clawed gauntlet. historical attire. suits.
MISC
balloons. bubbles. cityscape. light. dark. candles. growth. decay. war. peace. money. power. percussion. clocks. photos. mirrors. pets. diary. journal. fairy lights. madness. sanity. sadness. happiness. optimism. pessimism. loneliness. family. friends. comrades. assistants. co-workers. enemies. loyalty. smoking. drugs. kindness. love. hugs. kisses. spring. summer. autumn. winter. farmland. countryside. suburban. village.
#ᵒᵘᵗ ᵒᶠ ᶜʳʸˢᵗᵃᶫˢ ✧ ooc.#ᶜʳʸˢᵗᵃᶫᶫᶦᶰᵉ ᑫᵘᵉᵉᶰ ᵒᶠ ᵗʰᵉ ʷᶦᵗᶜʰᶜʳᵃᶠᵗ ˢᶜᵉᶰᵉ ✦ musings.#(( sometimes you have to do things just because you want to y'know ))#read more#ᵐᵃᵈᵉ ᵒᶠ ᵐᵒᵒᶰˢᵗᵒᶰᵉ ✦ aes.#(( i guess ))
1 note
·
View note
Text
WHAT ARE YOUR MUSE’S AESTHETICS ?
REPOST. don’t reblog !! BOLD any that applies to your muse and italicize any that kind of applies to your muse. feel free to add to the list.
Bo’s is gonna be bolded, Kyle’s is gonna be italicized
TAGGED BY: @aestasetbruma
TAGGING: rob me, steal from me please
COLOURS
red. brown. orange. yellow. green. blue. purple. pink. black. white. teal. silver. gold. grey.lilac. metallic. matte. royal blue. strawberry red. charcoal grey. forest green. apple red. violet. navy blue. crimson. cream. mint green. bubblegum pink. sky blue. pale jade. heather grey. lavender purple.
ELEMENTS
fire. ice. water. air. earth. rain. snow. wind. moon. stars. sun. heat. cold. steam. frost. lightning. sunlight. moonlight. dawn. dusk. twilight. midnight. sunrise. sunset. dewdrops.
BODY
claws. long fingers. fangs. teeth. wings. tails. lips. bare feet. neck. shoulders. legs. freckles.unseen bruises. canines. scars. scratches. wounds. burns. fingernails. spikes. feathers.webs. eyes. hands. sweat. tears. feline. chubby. curvy. short. tall. normal height. muscular. piercings. tattoos. athletic. hair. fur. sleek.
WEAPONS
fists. legs. sword. dagger. spear. lance. bow & arrow. hammer. shield. poison. hand guns. axes. throwing axes. whips. knives. throwing knives. pepper sprays. tasers. machine guns. slingshots. katanas. maces. staffs. wands. powers. magical items. magic. rocks. mud balls. claws. teeth. stealth. strategy. forehead. warhammer. polearm. flail. lasso.
MATERIALS
gold. silver. copper. platinum. titanium. rose gold. diamonds. pearls. rubies. sapphires. emeralds. amethyst. metal. iron. rust. steel. glass. wood. porcelain. paper. wool. fur. lace. leather. silk. velvet. denim. linen. cotton. charcoal. clay. stone. asphalt. mortar. brick.marble. dust. glitter. blood. dirt. mud. smoke. ash. shadow. carbonate. rubber. synthetics.ribbon. moonstone.
NATURE
grass. leaves. trees. bark. roses. daisies. sunflowers. tulips. lavender. petals. seeds. hay.sand. rocks. roots. flowers. fungi. ocean. river. frozen lake. meadow. valley. forest. desert.tundra. savanna. rain forest. caves. underwater. coral reef. beach. waves. space. clouds. mountains. snow. mist. pond.
ANIMALS
big cats. wolves. foxes. eagles. owls. falcons. hawks. swans. snakes. turtles. ducks. bugs. spiders. birds. whales. deer. dolphins. fish. sharks. horses. cats. dogs. bunnies.penguins. crows. ravens. mice. lizards. werewolves. unicorns. pegasus. dragons. monkeys.raccoons. rats. bull. koalas.
FOODS / DRINKS
sugar. salt. candy. bubblegum. wine. champagne. hard liquor. vodka. beer. coffee. sake.tea. spices. herbs. apples. orange. lemon. cherry. strawberry. watermelon. vegetables.fruits. meat. fish. pies. desserts. chocolate. lollies. cream. caramel. berries. nuts.cinnamon. burgers. surf ‘n’ turf. burritos. pizza. ambrosia. eggs. milk. raspberries.
HOBBIES
music. art. watercolors. gardening. smithing. sculpting. painting. sketching. fighting. writing. composing. cooking. baking. sewing. training. dancing. acting. singing. martial arts. self-defense. war tactics. electronics. technology. cameras. video cameras. video games. computer. phone. movies. theater. libraries. books. magazines. cds. records. cassettes.piano. strings. violin. guitar. electronic guitar. bass guitar. harmonica. harp. woodwinds. brass. flute. bells. exploring. playing cards. poker chips. chess. dice. motorcycle riding.eating. sleeping. climbing. running. jogging. parkour. studying. horseback riding.
STYLE
lingerie. armor. cape. dress. tunic. vest. shirt. boots. ankle boots. heels. leggings. trousers.jeans. skirt. jewelry. earrings. necklace. bracelet. ring. pendant. hat. beanie hat. crown.circlet. helmet. scarf. brocade. cloaks. corsets. doublet. chest plate. gorget. bracers. belt.sash. coat. leather jacket. hood. gloves. socks. masks. mittens. cowls. braces. watches. glasses. sun glasses. straw hat. visor. eye contacts. makeup. ribbons. hoodie. sweater.converses. tennis shoes. boxers. briefs. boxer briefs. shorts. cargo. cropped pants. prosthetic. crop top. cuffed pants. clawed gauntlet. historical attire. suits.
MISC
balloons. bubbles. cityscape. light. dark. candles. growth. decay. war. peace. money.power. percussion. clocks. photos. mirrors. pets. diary. journal. fairy lights. madness.sanity. sadness. happiness. optimism. pessimism. loneliness. family. friends. comrades. assistants. co-workers. enemies. loyalty. smoking. drugs. kindness. love. hugs. kisses. spring. summer. autumn. winter. farmland. countryside. suburban. village.
1 note
·
View note
Text
WHAT ARE YOUR MUSE’S AESTHETICS ?
REPOST. DON’T REBLOG !! BOLD any that applies to your muse … . . …
TAGGED BY: @damagedsmile
TAGGING: @realmortal @chariotsofthegodsman @hallowedbethyname @emblemofxfeminism @patrickhockstetter @hyacinthsgirl
COLOURS .
red. brown. orange. yellow. green. blue. purple. pink. black. white. teal. silver. gold. grey. lilac. metallic. matte. royal blue. strawberry red. charcoal grey. forest green. apple red. violet. navy blue. crimson. cream. mint green. bubblegum pink. sky blue. pale jade. heather grey. lavender purple.
ELEMENTS .
fire. ice. water. air. earth. rain. snow. wind. moon. stars. sun. heat. cold. steam. frost. lightning. sunlight. moonlight. dawn. dusk. twilight. midnight . sunrise. sunset. dewdrops.
BODY .
claws. long fingers. fangs. teeth. wings. tails. lips. bare feet .neck. shoulders. legs. freckles. unseen bruises. canines. scars. scratches .wounds. burns. fingernails. spikes. feathers. webs. eyes . hands. sweat. tears .feline. chubby. curvy. short. tall. normal height. muscular. piercing. tattoos. athletic. hair. fur. sleek.
WEAPONS .
fists. legs. sword. dagger. spear. lance. bow & arrow. hammer. shield. poison. guns. axes. throwing axes. whips . knives. throwing knives. pepper sprays. tasers. machine guns. slingshots. katanas. maces. staffs. wands. powers. magical items. magic. rocks. mud balls. claws. teeth. stealth. strategy. forehead. warhammer. polearm. flail. lasso.
MATERIALS .
gold. silver. copper. platinum. titanium. rose gold. diamonds. pearls. rubies. sapphires.emeralds. amethyst. metal. iron. rust. steel. glass. wood. porcelain. paper. wool. fur. lace. leather. silk. velvet. denim. linen. cotton .charcoal. clay. stone [ lol ] asphalt. mortar. brick. marble. dust. glitter. blood. dirt. mud. smoke. ash. shadow. carbonate. rubber. synthetics. ribbon. moonstone.
NATURE .
grass. leaves. trees. bark. roses. daisies. sunflowers. tulips. lavender. petals. seeds. hay.sand. rocks. roots. flowers. fungi. ocean. river. frozen lake. meadow. valley. forest. desert .tundra. savanna. rain forest. caves. underwater. coral reef. beach. waves. space. clouds. mountains. snow. mist. pond.
ANIMALS .
big cats. wolves. foxes. eagles. owls. falcons. hawks. swans. snakes. turtles. ducks. bugs.spiders. birds. whales. deer. dolphins. fish. sharks. horses. cats. dogs. bunnies. penguins. crows. ravens. mice. lizards. werewolves. unicorns. pegasus. dragons. monkeys. raccoons. rats. bull.
FOODS / DRINKS .
sugar. salt. candy. bubblegum. wine. champagne. hard liquor. vodka. beer. coffee. sake. tea. spices. herbs. apples. orange. lemon. cherry .strawberry. watermelon. vegetables. fruits. meat. fish. pies. desserts. chocolate. lollies. cream. caramel. berries. nuts. cinnamon. burgers. surf ‘n’ turf. burritos.pizza. ambrosia. eggs. milk. raspberries.
HOBBIES .
music. art. watercolors. gardening. smithing. sculpting. painting. sketching. fighting.writing. composing.cooking. baking. sewing. training. dancing. acting. singing. martial arts. self-defense. war tactics. electronics. technology. cameras. video cameras. video games. computer. phone. movies. theater. libraries. books.magazines. cds. records. cassettes. piano. strings. violin. guitar.electric guitar. bass guitar. harmonica. harp. woodwinds. brass. flute. bells. exploring. playing cards. poker chips. chess. dice. motorcycle riding. eating.sleeping. climbing. running. jogging. parkour. studying. horseback riding.
STYLE .
lingerie. armor. cape. dress. tunic. vest. shirt. boots. ankle boots. heels. leggings. trousers. jeans. skirt. jewelry. earrings. necklace. bracelet. ring. pendant. hat. beanie hat. crown. circlet. helmet. scarf. brocade. cloaks. corsets. doublet. chest plate. gorget. bracers. belt. sash. coat. leather jacket. hood. gloves.socks. masks. mittens. cowls. braces. watches. glasses. sunglasses. straw hat. visor. eye contacts. makeup. ribbons. hoodie. sweater. converses. tennis shoes. boxers. briefs. boxer briefs. shorts. cargo. cropped pants. prosthetic. crop top. cuffed pants. clawed gauntlet. historical attire.suits.
MISC .
balloons. bubbles. cityscape. light. dark. candles. growth. decay. war.peace. money.power. percussion. clocks.photos. mirrors. pets. diary. journal. fairy lights. madness. sanity. sadness. happiness. optimism. pessimism.loneliness. family. friends. comrades. assistants. co-workers.enemies. loyalty. smoking. drugs. kindness.love. hugs.kisses.spring. summer. autumn. winter. farmland. countryside. suburban.village.
9 notes
·
View notes
Text
The Photoshop Interface
Note: All interface elements in this article refer to Adobe Photoshop CC 2019 20.0.6 release
Adobe Photoshop has many different interface elements to help you create a wide variety of imagery. This chapter will cover the most-used key elements that are employed by the creatives chronicled in this book. Once you have a clear understanding of these fundamental tools and principles, you will be better prepared to tackle similar projects on your own. Here are the topics covered in this chapter:
1.Launching Photoshop and Deleting Settings 2.Start Workspace/Welcome Screen 3.Menus and Panels 4.Workspaces 5.Tools 6.Adjustments 7.Selections and Masks 8.Saving and Exporting
I have provided an example image to illustrate the application of these fundamental tools and controls.
Launching Photoshop and Deleting Settings
We’ll begin by launching Photoshop, setting it to its default layout by doing the following: Holding down ⌘-⌥⇧(Command-Option-Shift on Mac,Control-Alt-Shift on PC), Click on the Photoshop icon in the Dock(Mac) or in Shortcuts(PC) until it launches with the following message appearing in a pop-up window:”Delete the Adobe Photoshop Settings File?” (Figure 1.1)
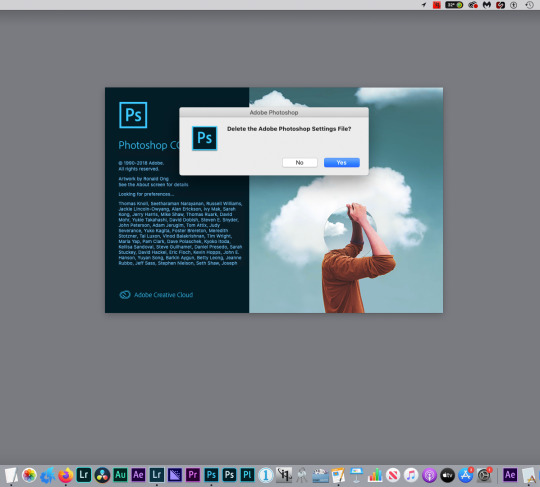
Figure 1.1 Delete settings
Once you click on “Yes”, the Start Workspace/Welcome Screen appears.(Figure 1.2)There are several options that appear for accessing images and creating new ones, as well as stock and tutorial resources. Adobe has their own Stock and Font services, provided as part of your Creative Cloud subscription.
Start Workspace/Welcome Screen
Figure 1.2 Start Workspace
HOME: Main Page, shows all elements in this screenshot LEARN: Tutorial videos and interactive tour
LR PHOTOS: Access images from Adobe Photoshop Lightroom Catalog CREATE NEW: Make a new image file, web page template, video clip using presets, templates or custom settings OPEN: Navigate to any Photoshop-compatible file stored anywhere on your computer, hard drives, memory card or the Creative Cloud
Menus and Panels
Photoshop’s Menu bar(Figure 1.3 ), provides access to a wide variety of commands, organized by their main functions. The Mac menu bar is shown here. It differs from the PC menu bar in that a PC does not have the “Apple” icon, nor does it have a Photoshop CC menu. Items that are found under the Photoshop CC menu, such as Preferences, are instead found under the Edit menu on the PC. Otherwise, most, if not all Menu items are identical on both platforms, Let’s begin with the File menu. Then Choose File>Open (⌘-O on Mac or Control-O on PC.) Fig. 1.4 Shows the image in the Essentials(default) Workspace. Workspaces are simply a particular arrangement of select Panels. Panels contain elements such as Tools, Layers, Properties, Color Swatches, Image Libraries, etc. several of which are visible in Fig. 1.4.

Figure 1.4 Menu Bar
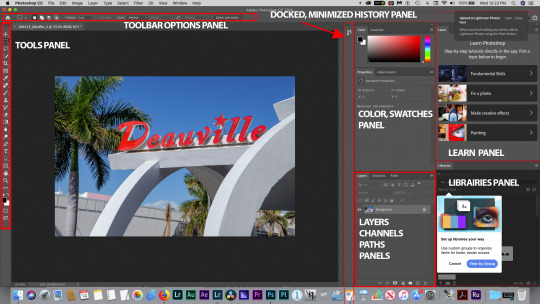
Figure 1.4 Essentials Workspace Panels
Workspaces
As you can see in the Fig 1.4 Screenshot, some panels contain other panels tabbed together in a Panel Group, Such as Layers, and Paths. These tabs may be un-docked at any time by clicking and dragging on the tab. They can also be minimized into icons in a single column, as with the History panel shown here. This default workspace can thus be rearranged to your liking, and that new arrangement can be saved as your own custom Workspace if desired. That option is found under Window>Workspace>New Workplace. You can name the new Workspace anything you want. This is a particularly useful feature if you have to share a computer in your work environment, because you can always reset the Workspace to your custom one at any time(Window>Workspace>Reset Workspace name) In this current Workspace, the panels that are visible are key Panels used on most documents and images in Photoshop, hence they are”Essentials”. Let’s look at the ones we’ll use in making some modifications to this image file. First we’ll look at the Tools Panel, Fig 1.5.
Tools
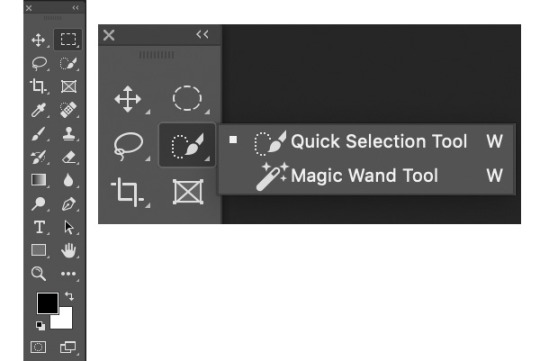
Figure 1.5 Tools Panel Figure 1.6 Flyout Menu
The Tools panel, in Fig.1.5, can be viewed as a long single column, as in Fig.1.4, or as two columns, as shown here. Clicking on the double arrows at the top right of the panel expands it into two columns. The Tools are grouped by their general functions, from top to bottom. Each Tool that has a small arrow at the bottom right has additional Tools associated with it in a flyout menu. See the example in Figure 1.6.
You’ll note that the Tool name appears, as well as a keyboard shortcut at the far right of the flyout menu. Tools have single-letter keyboard shortcuts-this tool’s is simply”W”. Both tools have the same shortcut, so the way to access a specific tool when there are multiple options like this one is to add the Shift key to the shortcut(Shift-W in this case). If there are several options under the tool flyout menu, repeating the Shift-W shortcut here will cycle through the available tools in that menu. As another example, the Lasso Tool, has 3 options which can be accessed by Shift-L, as L is the shortcut for that tool. For this image processing exercise we’ll use the Quick Select Tool(W) to make what are known as Selections. Selections are used to isolate parts of images to make modifications to just those areas that have been “Selected” using one of several tools and/or methods designed for that purpose. After we make an initial global adjustment to this image, we’ll use Selection tools to isolate and modify specific areas further. But first, let’s begin with a very basic image adjustment, Brightness/Contrast. In the screenshots from the Image menu, (Figure 1.7, Figure 1.8)select Image>Adjustments>Brightness/Contrast.
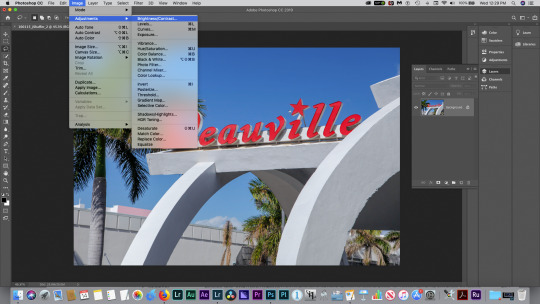
Figure 1.7 Brightness/Contrast
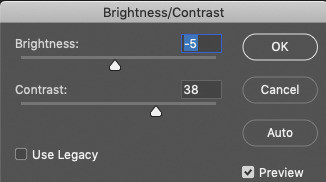
Figure 1.8 Brightness/Contrast dialog
Adjusting the sliders while observing the changes on the image arrived at the number settings above. This image edit is considered a Destructive edit, since pixel values are altered, and if the image were saved now and closed, permanently altered. This can sometimes present problems, though, should the image need to be re-adjusted. Some of the image information has been lost in the process. However, you do have a Non-Destructive alternative method to achieve the same result. You can use what is known as an Adjustment layer. You’ll use one of these to adjust the color intensity in this image-A Hue/Saturation adjustment layer. Hue is the actual shade of a color, which we assign a name such as red, green, blue, orange, etc. Saturation is the intensity of that color-the brilliance and purity of that color. We can adjust both parameters, as well as the lightness, in all colors at once, or individually selected colors, once this adjustment layer is applied. To add it, you have a couple of options-go to Layer>New Adjustment Layer>Hue/Saturation in the top menu, or as in the screenshot(Figure1.9), open the Adjustments panel by clicking on the icon at the bottom of the Layers panel as shown, and choose Hue/Saturation from the Icons that are visible in that panel. A third option would be to click and hold on that black-and-white circle icon, and choose the adjustment you want from the pulldown menu.(Figure 1.10) Photoshop has many ways to access the same commands and options-this provides you with a workflow that suits your particular preferences. As this article points out, Photoshop is used many ways by many different creatives, so having the ability to perform tasks different ways is ideally suited to different workflows.
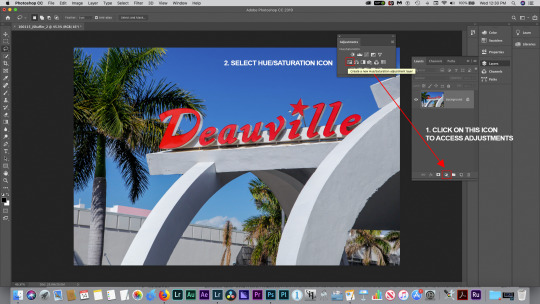
Figure.1.9 Hue/Saturation adjustment layer
Adjustments
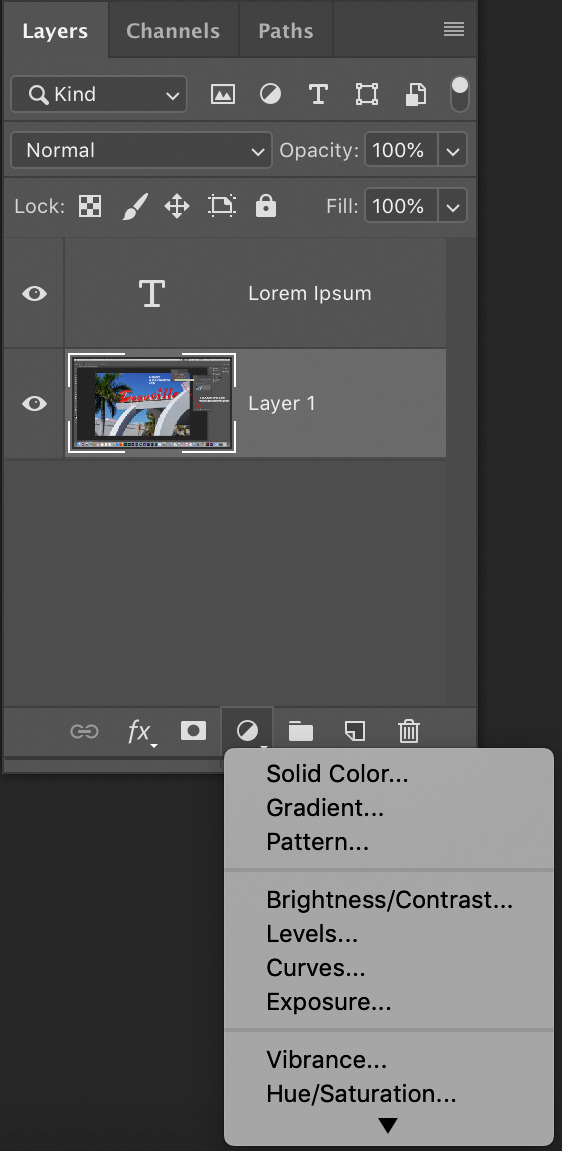
Fig.1.10 Hue/Saturation adjustment layer pulldown
Figure 1.11 shows that a Hue/Saturation adjustment layer has been created on top of the Background layer. Figure 1.11 also shows the result of double-clicking on the Hue/Saturation layer thumbnail, which makes its Properties panel visible to make the adjustment. Adjustment layers affect all layers below them in the layer stack, unless you limit them to affect only a single layer, by “clipping” the adjustment to a specific layer. (Figure 1.12) Clicking the icon indicated “clips’ the layer to the layer below. In this case, there is currently only one layer, so “clipping” it is not necessary.
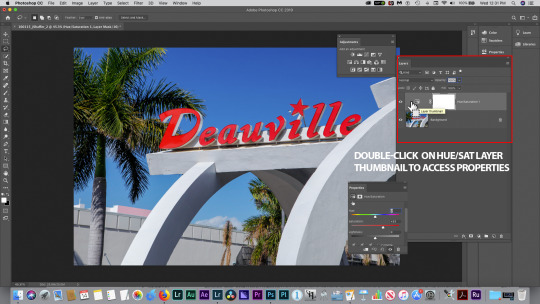
Figure.1.11 Hue/Saturation adjustment layer properties
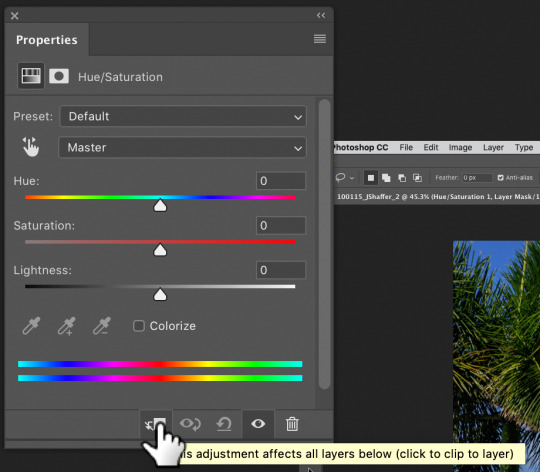
Figure 1.12 Clipping an adjustment layer
Once the Properties panel is revealed, its default settings can be modified with the Hue, Saturation, and Lightness sliders. The “Master”Pulldown menu option would enable the sliders to affect all colors simultaneously. Specific ranges of colors may also be selected from the pulldown menu. In Figure 1.13, and Figure 1.14, Cyans have been adjusted in both Saturation and Lightness sliders. Figure 1.5 is a comparison view, with the Layer Visibility icon “eyeball” deactivated by clicking on it. You can see the sky in particular is less saturated and bright in that example.
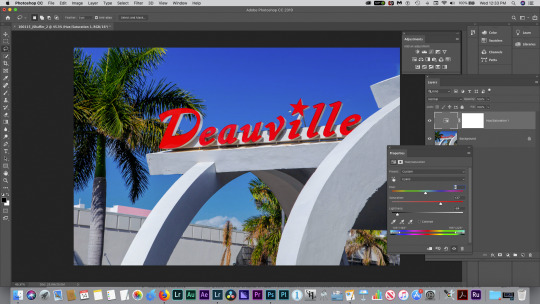
Figure 1.13 Hue/Saturation Properties Cyan
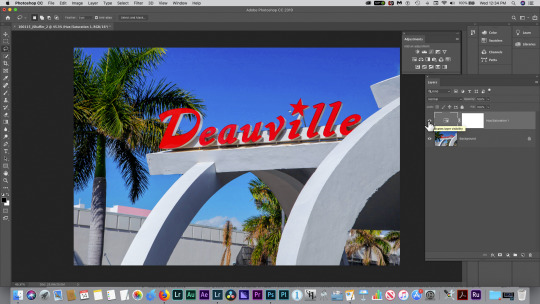
Figure 1.14 Hue/Saturation Cyan Adjust Result
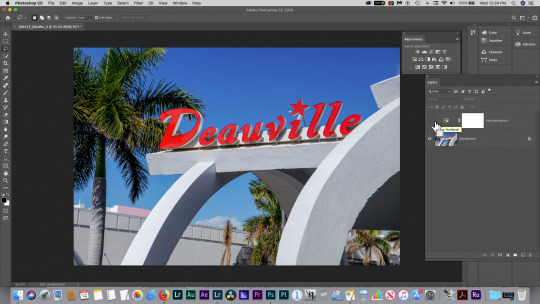
Figure 1.15 Hue/Saturation Adjustment Visibility Disabled
Selections and Masks
As mentioned previously, Selections are a method for isolating an area of an image to perform an edit on just that area, and leave the rest of the image unaffected by that edit.You can do that with this image by choosing the Quick Select tool(shortcut W). It is a brush-based tool, meaning that brush size settings will determine the selection area size of that tool. The default brush size is 30 pixels, which will suffice for this exercise. The tool has a built-in tolerance, which means the range of similar pixel values the tool will select at a given brush size. Click and drag with the tool over the concrete supports underneath the word”Deauville” in the image. The tones of the gray concrete are similar enough that the tool should create”marching ants” around the supports. These “marching ants” indicate the area currently isolated by the selection. If needed, clicking and dragging in additional areas will add to that which is currently selected.The next step will be to make an edit to that selection Figure 1.16 illustrates the result of the selection process.
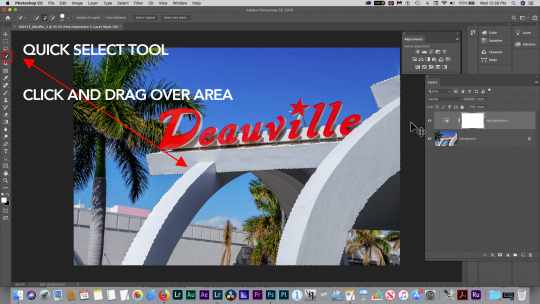
Figure 1.16 Quick Select Tool
Next, if you add a Color Balance adjustment layer while the selected area is currently active, a Layer Mask will be created , linked to the Color Balance adjustment layer, as shown in Figure 1.17.
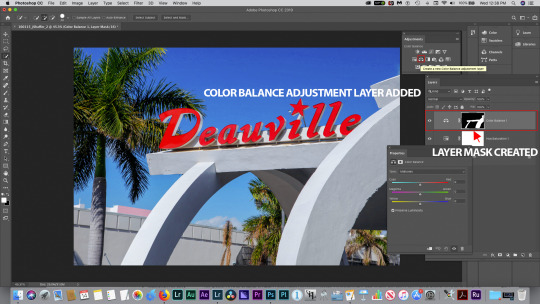
Figure 1.17 Color Balance Layer Mask
In Figure 1.18 You’ll note that the Layer Mask is a black and white representation of your original “marching ants” selection area. Black represents the area concealed from the adjustment effect, and white represents the area revealed, and thus changed, by the effect. A good mnemonic for Layer Masks is”Black conceals, White reveals”. You will also note that the Layer mask has a chain link icon next to the icon for the adjustment layer, in this case represented by scales(Color Balance).

Figure 1.18 Color Balance Layer Mask detail
The Properties panel for Color Balance defaults to Midtone adjustments, but we’ll pull down to adjust Highlights, which will have greater effect on the light-colored concrete. See Figure 1.19.
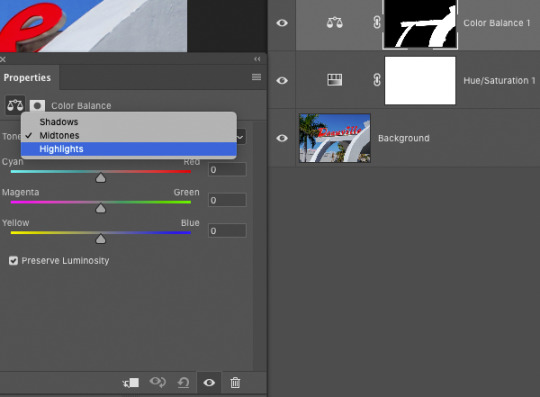
Figure 1.19 Color Balance Highlights
Moving the top slider towards Cyan results in a shifting of the concrete towards that color. See Figure 1.20 and 1.21
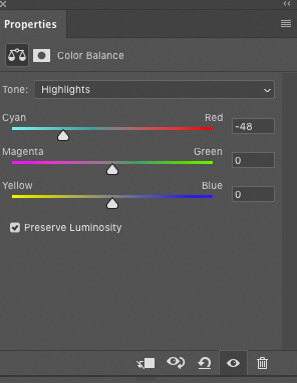
Figure 1.20 Color Balance Cyan Shift
Returning to the Background layer by clicking in the gray area to the right of the layer name, a new selection is created with the Quick Select tool of the medium gray wall behind the hotel entrance. Figure 1.22 shows the selected area.
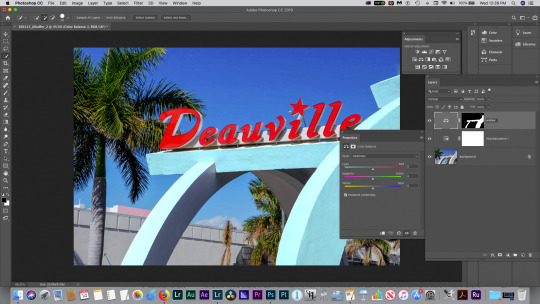
Figure 1.21 Color Balance Cyan Shift Result
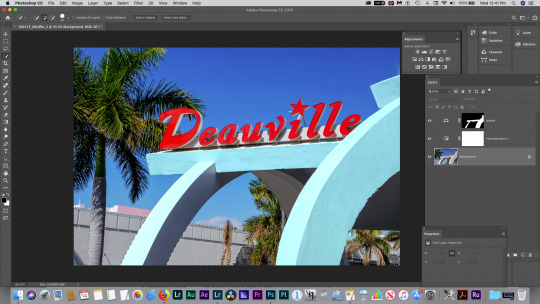
Figure 1.22 New Selection Area
By choosing another adjustment layer, Photo Filter from the Adjustment panel, as with the Hue/Saturation layer, the selection area becomes a layer mask on the Photo Filter layer. This new layer is created immediately above the Background layer you selected in the layers panel. This is always the case when you create a new layer; it is always placed directly above the currently active layer. Of course, you can move layers in the layer stack by clicking and dragging them up or down in the layer stack. A blue line appears when you have moved it far enough to drop into place. The only layer in this document that can’t currently be moved in the stack is the Background layer, which has a lock symbol at the far right. Locked layers cannot be moved, cannot contain transparent pixels, and cannot have a layer below them. Should any of those things become necessary in your file, however, you can unlock the layer simply by clicking on that lock symbol. See Figure 1.23.
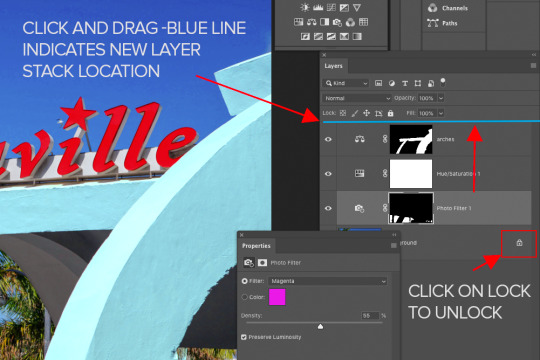
Figure 1.23 Photo Filter, Moving layers, removing lock
The Photo Filter Properties panel should be open. If you don’t see it, just choose Window>Properties from the main menu. As you can see in Figure 1.24, I have chosen a Magenta filter, with a density of 55%, which fills in the selected, masked gray area in the background.
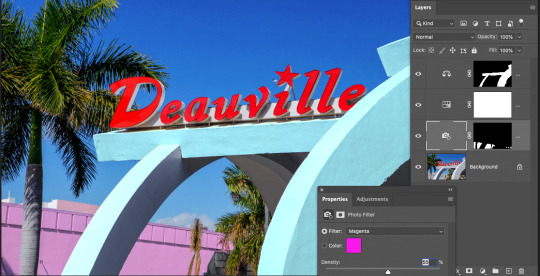
Figure 1.24, Photo Filter Applied
Next, I chose the Zoom tool, and zoomed in to about 148%, mousing down to the bottom of the image by holding down the Spacebar. Holding down the Spacebar with any active tool turns it into the Hand tool, which allows you to move around a zoomed-in image. This facilitated examining if the entire area I wanted to fill with the magenta color is indeed filled with that color. In Figure 1.25, it is not covering the area in the middle of the smaller plant. This is easily remedied however, since we have a layer mask on that layer. As mentioned previously, black areas of the mask are concealed from the effect, white areas reveal it. To correct a layer mask, you can paint on black wherever needed to conceal more, or white to reveal more. In this case, I want to reveal more, so painting in the missing areas on the layer mask with white paint is necessary. Clicking on the layer mask thumbnail in the Photo Filter layer, additional white lines form around the perimeter of the layer mask icon, which indicates that only the layer mask is currently selected. This is also indicated by the tab at the top of the document, again shown in Figure 1.25.
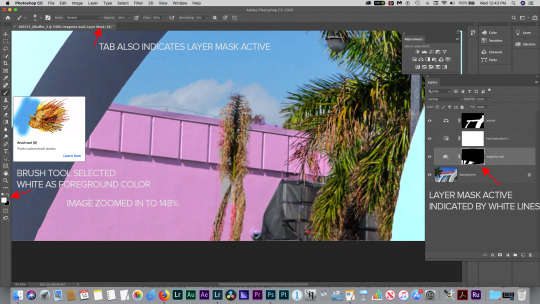
Figure 1.25 Layer Mask modification
With the brush tool selected, I mad sure white was the foreground color chosen in the color picker, by clicking on the “X” key, which is the keyboard shortcut for flipping foreground and background colors. When a layer mask is active, only black, white or gray are color options-no other colors can be chosen, or are even useful when working on a layer mask. I chose a 13 pixel soft-edged brush, and carefully painted in white up to the plant’s edges to fill it in with the Photo Filter’s magenta color. If necessary, zoom into more to see the edges of the plant and where to paint in the mask, Figure 1.26 shows how to set this up.
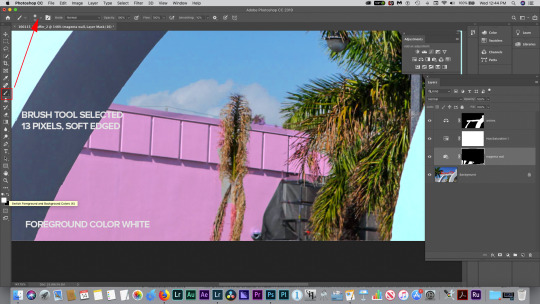
Figure 1.26 Brush tool, paint color
Figure 1.27 shows the layer mask painting completed.
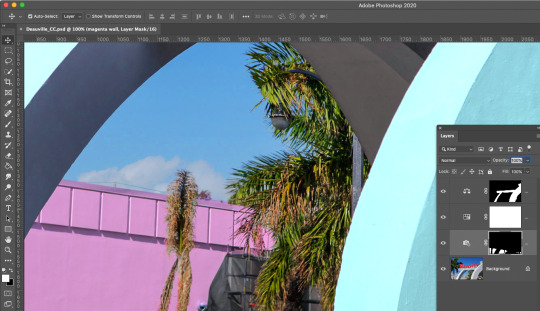
Figure 1.27 layer Mask completed
Zooming back out(keyboard shortcut ⌘-(minus sign) or Control -minus sign PC), you can see the completed image. Next it should be saved, and we have a number of options depending on the end use intended for this photo. First, we’ll check the resolution by choosing Image>Image Size from the main menu.See Figure 1.28 and 1.29.
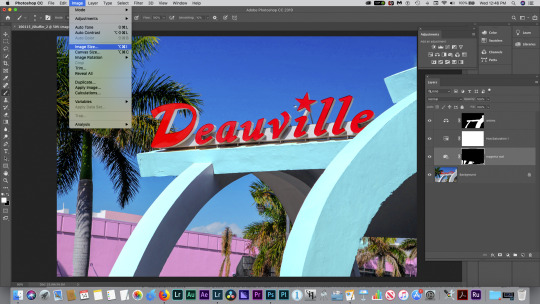
Figure 1.28 Image Size
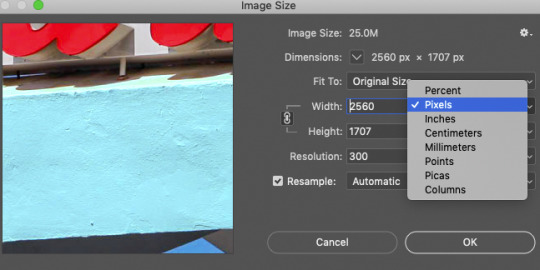
Figure 1.29 Image Size dialog
Resolution refers to the number of pixels in an image needed to resolve enough fine detail for a given output device or medium at a given viewing distance. In the case of screen-based output, such as a website or broadcast television, a general rule of thumb is that only 72 pixels per inch of resolution is required to meet the detail standard. We measure images intended for these types of output in pixel dimensions, and their size relationship to the screen dimensions in pixels. So if you have a 500 pixel wide image on a 1920x1080 pixel screen, the image would take up about one quarter the screen area. See Figure 1.30.
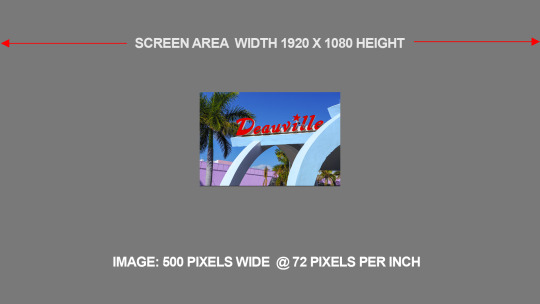
Figure 1.30 Resolution
However, if you wanted to make a print of this image in the same size, you would need approximately 240-300 pixels per inch of resolution to make a sharp print, with no obvious Pixelization. So, instead of an image 500 pixels across @72 pixels per inch, you’d need an image 2083 pixels wide @ 300 pixels per inch. Resizing the image in Image Size would result in Upsampling, which is a mathematical recalculation known as an algorithm. This re-calculation attempts to add in the missing pixels, which in Photoshop it does not generally do very well, resulting in an unsharp, often pixelated image. See Figures 1.31, 1.32 and1.33.

Figure 1.31 Image size @ 72 ppi (pixels per inch)

Figure 1.32 Image size upsampled to 300 ppi

Figure 1.33 Image soft and pixelated
As you can see from these examples, using an image that only has enough resolution for screen-based output is not recommended for print output, as the image cannot easily be scaled up without a loss of important detail. The solution to this problem is to make sure your image has enough resolution for print output to begin with, as scaling the image down (downsampling) is much less damaging to the image quality overall. Here’s the image sized to 2560 x 1707 pixels @ 300 pixels per inch(ppi)seen in Figure 1.34. In Figure 1.35, and 1.36 the image is scaled down(downsampled) to 500 pixels across @ 72 ppi. Even when viewed at 200% in Photoshop, the image quality is much better than the upsampled example in Figure 1.33. Photoshop’s algorithm is simply better at tossing away pixels than adding in missing ones, as these images prove.

Figure 1.34 Image size 2560 x1707 @ 300 ppi
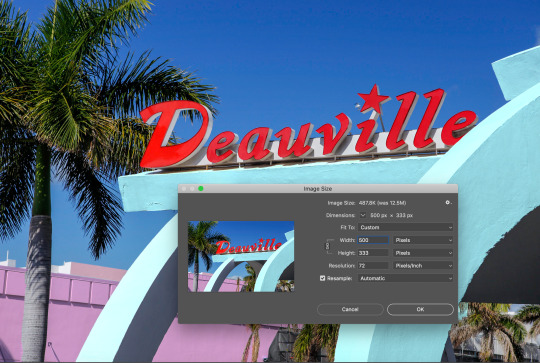
Figure 1.35 Image size downsampled to 500 pixels across @72 ppi
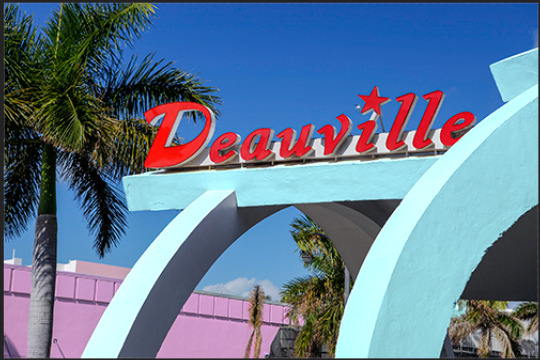
Figure 1.36 Image downsampled, viewed at 200% Photoshop also provides a method for previewing the output using different file types, compression settings and resolution options.This can be found under the File>Save for web(Legacy). See Figure 1.37.
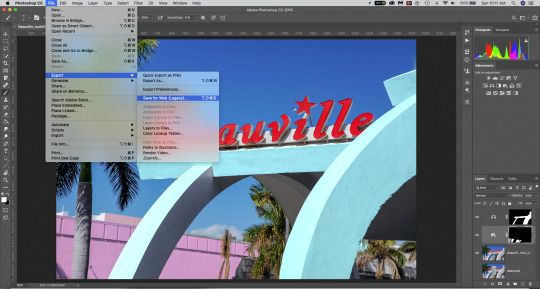
Figure 1.37 File> Export>Save for Web(Legacy)

Figure 1.38 2-up comparison
The interface can be viewed a number of different ways: Original, Optimized, 2-up and 4-up. Original simply shows the file at its current resolution and file type. Optimized will display the file compressed using the current settings in the upper right corner under Presets. 2-up and 4-up are the most useful views, however, as they allow for before-and-after visual comparisons of image quality. The 2-up view is shown in Figure 1.38, depicting the original 16.7 Megabyte file on the left, and a JPEG at 60 quality(High preset) on the right. In this case, the file would be reduced to 735.2 K(Kilobytes) with this setting, and below that is an indication of file load times with different bandwidth internet connection speeds. Here it states that the file will load in 5 seconds at 2 Mbps (2 Mega-bits, not bytes!) per second, which is a typical speed for a modern cable modem as of this writing. Of course, that would be still too slow for most viewers today, and that is because the file is still in its original pixel dimensions: 2560x1707 pixels, which would be huge on most viewers’ screens, which are often no more than 1920x1080 pixels in size. So, a reduction of image size is definitely in order if the intent is to upload this file to a web page. Otherwise, it can remain at the full dimensions if the intent is to provide a file for emailing that can even be printed out by the recipient. In general, most email servers will accept files up to 3MB. Larger files may be blocked by anti-virus software at the email server. There are multiple ways to compress files depending on the end use. Available here are GIF, JPEG, PNG-8, PNG-24 and WBMP. This interface provides the ability to compare several of them at once. GIF compression is used on photos only when creating animated GIFs and occasionally when transparency in the original file needs to be retained, as the JPEG format does not support transparent pixels. GIFs allow for a reduction of the number of colors in an image, using different settings, and reducing the image to as little as 2 colors. This results in a dot pattern known as dithering, which is the compression method attempting to simulate colors and tonal changes that are being removed by using a dot pattern. As you can see in Figure 1.39, it is often an undesirable artifact in continuous tone type images such as a photo. It fares much better as a compression method for solid tones and some gradients such as those found in logos and other “flat art” illustrations. The exception is the animated GIF, which if it employs 256 or sometimes, 128 colors, it can be acceptable for that kind of output. See Figure 1.40.
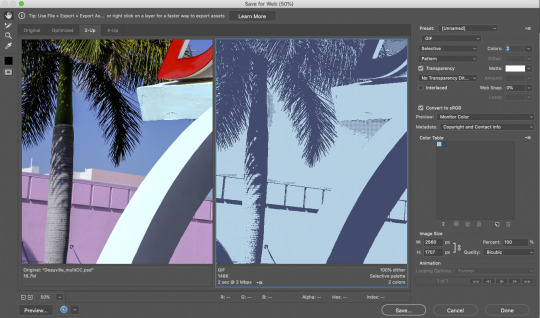
Figure 1.39 2 color GIF

Figure 1.40 256 color GIF
Further color reduction usually causes too much dithering, so it is not typically used to reduce the file size any further in the GIF format. JPEG is the preferred compression method for photographs, as it excels at reducing file size without sacrificing the continuous tone quality of the image. There are a number of presets available in the interface, from Low (15) to Maximum(100). All will reduce the file size significantly, and Maximum is rarely needed to retain enough quality for web-based images. Anywhere from 60-80 (High-Very High) settings are generally sufficient, even for emailed images intended for printing. A 4-up comparison view can be seen in Figure 1.41. Image quality is very good in all of these settings, so it is most desirable to choose the smallest file size that retains the quality level. You’ll note that “Optimized” is checked by default at the top right. Progressive, the other option, is rarely used today as it is a relic of the days of dial-up modems and slower connection speeds. It “progressively”increases resolution as it loads, at first pixelated and then sharp.The currently selected setting is outlined in blue at bottom left, and if chosen, would be the output settings used here to create the JPEG file for export.
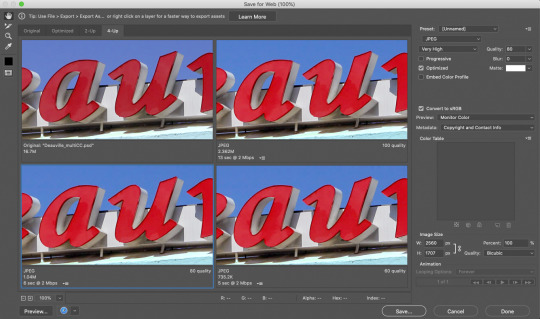
Figure 1.41 JPEG Comparison
Of course, as mentioned previously, reducing the file size is very important for an image to load quickly on a web page, so you can easily reset the pixel dimensions as shown in Figure 1.42. Select one dimension with your cursor, and as long as the chain link symbol to the right of those dimensions is indicating width and height are linked(a bracketed line next to the link is visible). The image will scale proportionally, keeping the Aspect Ratio, as the dimensional relationship is known, consistent throughout the process. Here I have changed the pixel dimensions to 500 px wide, 333 px high, or 19.53% of the original size. You can even set up the interface to preview the compressed image in various internet browsers, such as Fiirefox, Chrome, Safari etc. Figure 1.43 shows how to set that up, and Figure 1.44 shows the Preview window in the browser(Safari shown here). Figure 1.45 shows the actual Preview in the browser, along with some html source code below.
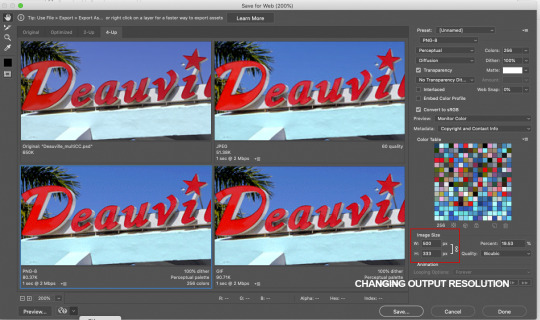
Figure 1.42 Changing Output Resolution
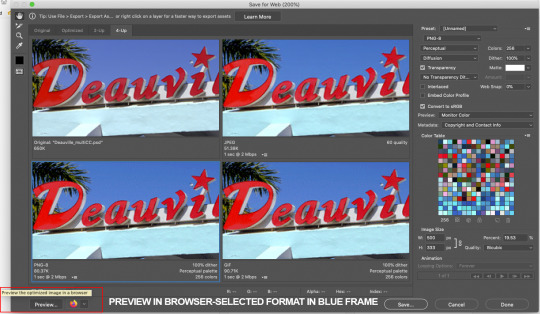
Figure 1.43 Preview in Browser
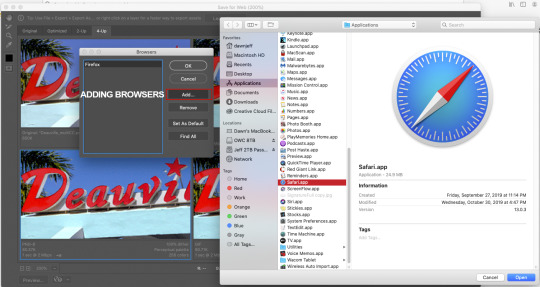
Figure 1.44 Adding a browser
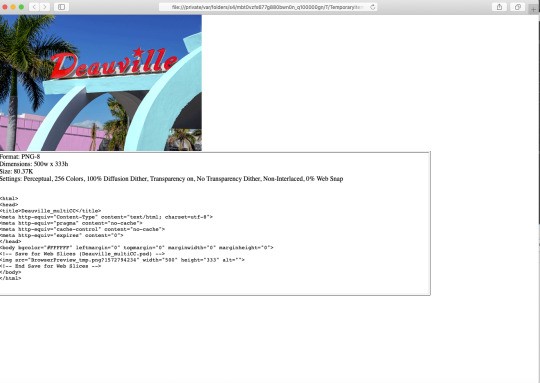
Figure 1.45 Browser preview
It is also possible to compare different compression methods and file formats in the 4-up window. In Figure 1.46, you can see the differences in quality and file size between the Original and JPEG, GIF, PNG-8, side by side.
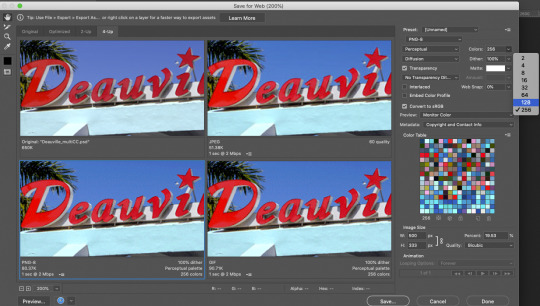
Figure 1.46 File format comparison.
PNG is an option that is often employed on websites as well. It has the added benefit of allowing transparency in a photo while retaining better continuous tone quality as compared with the GIF format. The PNG format comes in two versions-PNG-8 and PNG-24. PNG-8 can exhibit some of the dithering effect that GIF does, although the resultant file size is a little smaller than GIF at the same Color Table settings. This can also be seen in Figure 1.46. PNG-24 will be similar in quality to JPEG(smoother continuous tone) at the expense of a larger file size. It is also often used when there is a fair amount of type in the image, as it is usually sharper than a JPEG in that situation. Since the format has increased in popularity, Photoshop also provides a Quick Export to PNG option, in addition to the Save fore Web(Legacy) export.
The term Legacy here refers to the methods that have been incorporated into Photoshop from earlier versions, and is usually referenced to distinguish it from newer commands that may perform the same task. In this case, the newer version is a simplified, and much more limited interface-File>Export> Quick Export as PNG. The PNG Quick Export Preferences only provide a choice of PNG-8 or PNG-24. PNG-8 creates a smaller file with fewer colors due to lower bit depth. PNG-24 contains more bit depth, and thus will be of higher image quality at the expense of a significantly larger file size. See Figure 1.48.

Figure 1.47 Quick Export as PNG
Preferences for the PNG output can be found under the Photoshop CC menu on the Mac and under the Edit menu on PCs. Navigate to the Export Preferences as shown in figure 1.49.
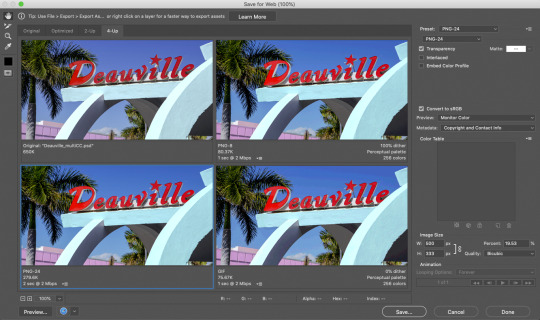
Figure 1.48 PNG Quality Comparison
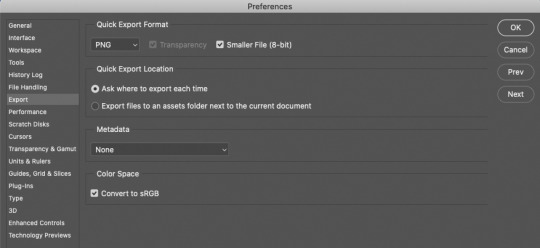
Figure 1.49 Quick Export PNG Preferences
While all these options work well for web and other screenbased output, other formats are often used for print, such as TIFF and PSD. TIFF can support layered files, and can be saved either as completely un-compressed, or compressed using a “lossless” algorithm known as LZW compression. This method preserves more image quality than JPEG’s “lossy” compression, and thus is used when output quality must be optimal. Large, high resolution print output, such as trade show displays, point-of-sale displays or gallery prints are examples that require this. PSD is the native file format of Photoshop. While TIFF can support layers, PSD is my preferred format for saving the master layered file. The reason is simply that I can establish that format as a signifier that the file contains layers, without needing to open it, as would be required with a TIFF. So, my preferred and recommended output workflow is this:
• PSD: Master file from which all other output is generated. Contains layers. Largest file size due to layers and high resolution.
• TIFF: “Flattened”file(all layers merged into one single layer) May also be compressed using LZW compression to make file size small enough for upload or email. Designated mainly for high-quality print output.
• JPEG:“Flattened” and compressed file, used for web or screen-based output, optimized using Save For Web settings. Also used for compressed high-resolution uploads to service bureaus and commercial printers. If the file size can be reduced to under 3MB, most email servers will accept it as an attachment.
• PNG: Alternate web or screen output. Used mainly when transparency or type quality is paramount in a continuous tone(photo quality image). PNG-8 is a smaller file size than PNG-24, but may cause dithering artifacts.
• GIF:Used on logos and vector-based illustrative artwork primarily, as the color table can be reduced to fewer colors more successfully on that type of image, resulting in a smaller file size for web optimization. 128 or 256 color tables can be a applied to animated GIFs created from photographs, which is generally the only time you would use the GIF format for photos. The dither pattern that can result with fewer colors is particularly undesirable when applied to photographs.
Figure 1.50 File Formats
•Photoshop PDF: For many print and web projects, PDFs are used when the files contain large amounts of type, as it embeds the fonts used in the document.This eliminated the need to have the particular font used installed on the computer that receives the file. PDF also allows multiple files to be combined into a “slideshow” presentation, or a multi-page, printable document. Many commercial printers who print on 4-color printing presses prefer a PDF of the page layouts in their workflow, particularly because of the embedded font feature. • Large Document Format: Used when the file size exceeds 2GB, it is not supported in older versions of Photoshop that could not address image files of that size. The format supports images up to 300,000 pixels in any dimension. It also supports 32-bit HDR (high dynamic range) images, which are merged from multiple image captures to extend the tonal range of the image.
Most of the other file formats in the “Save” pulldown menu are used infrequently, some even rarely, as they are very specific to one industry or are now dormant, such as Scitex CT, Photoshop EPS,Photoshop DCS 1.0 and 2.0, which are used by the commercial printing industry. PCX is another example-a legacy format for Windows computers, now largely supplanted by JPEG, BMP and GIF. Others, such as DICOM, are specific to medical imaging (x-rays, CT scans, MRI etc.) or for outputting high resolution 3D images, such as the Pixar format. One other factor to consider when saving and exporting, particularly in print output, is to maintain what is known as a “Color-Managed” workflow. This workflow requires a calibrated monitor to maintain consistent color reproduction through the image processing and output stages. First, a calibration device, such as the iOne from X-rite, is attached to the computer via a USB input, and then placed onto the monitor screen. Using the software that comes with the device, a series of colors and tones are projected and read by the device, which standardizes monitor brightness and color(white point). Once this is done, a Profile of your monitor is saved onto the computer and referenced when displaying files in Photoshop. Those files can have an input color profile of their own, such as sRGB, Adobe 1998, Generic CMYK, Pro Photo and others, known as a Color Space.
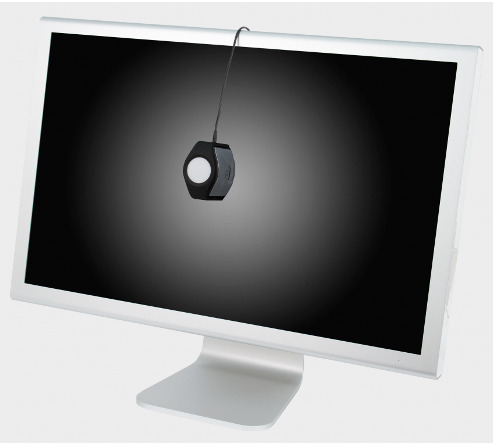
Figure 1.51 iOne Calibration
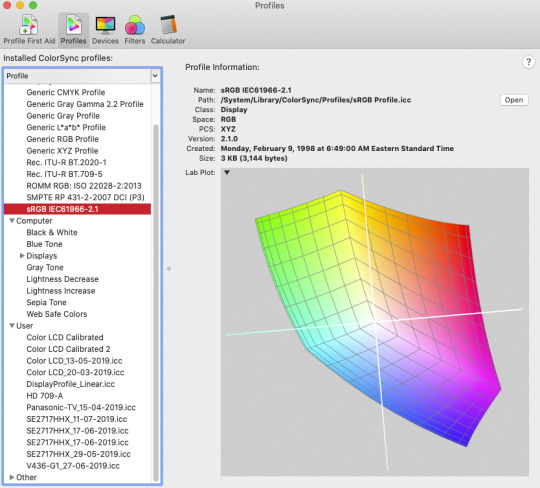
Figure 1.52 sRGB Color Space
The Color Spaces most commonly used are: • sRGB: A target color space for screen-based images, both web and video on the web. It is also sometimes employed by photographic printing services as well. It is a range of color that works for both Windows and Mac display environments and web browsers. REC 709, a broadcast video color space, is nearly identical in range(gamut) to sRGB. See Figure 1.5.2
• Adobe 1998- A wider range of color(gamut) than sRGB, often used for high-quality print output such as multi-ink color photographic printers. Only a few high-end monitors can display the full range of colors possible in Adobe 1998, and four-color printing presses fall far out of the range that Adobe 1998 is capable of reproducing. Most photo-quality inkjet printers have 6-12 ink colors, which extends the range of printable colors significantly. A calibrated profile for that device and the paper brand/type it is printing on is also required to obtain predictable and consistent results when outputting. Many inkjet paper manufacturers provide custom ICC Profiles of their papers. ICC(international Color Consortium) is an international standards organization that sets those standards for color managements systems, supporting utilities such as Apple’s Color Sync Utility, which can graphically display the color gamut of color spaces and output devices, as seen in Figure 1.53.
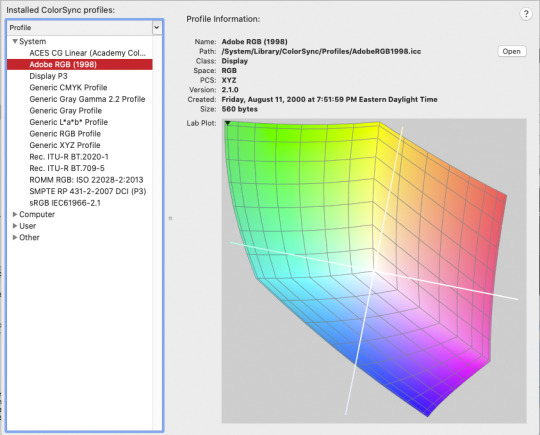
Figure 1.53 Adobe 1998 Color Space
• Pro Photo-Currently the widest gamut(range) color space. It is used mainly for “Master Negative” RAW capture photo images, (which do not have an embedded color profile) in 16-bit color, which can contain over 4,000 levels of tone, and millions of colors. It is particularly good at reproducing the most saturated colors. No monitor currently exist that can display the full range of colors possible in Pro Photo color space, and no printer output can print all those colors as well, but it is used as the primary color space for images like this with the consideration that, in the near future, both monitors and printers will be able to reproduce what is there in the original file. In addition, the greater amount of information allows for significantly more aggressive image editing and processing while still retaining color and tonal detail. See Figure 1.54.
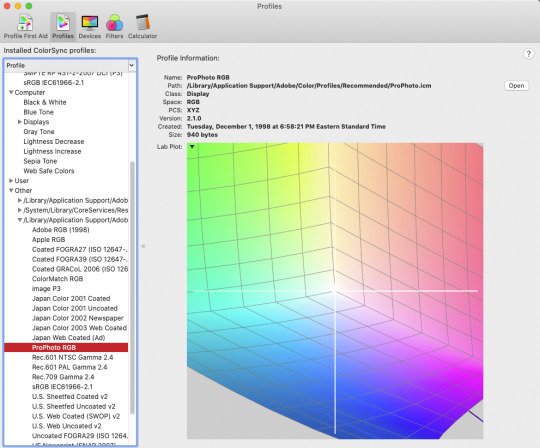
Figure 1.54 Pro Photo Color Space

Figure 1.55 CMYK Color Space
• Generic CMYK- While the other color spaces mentioned here are in RGB color,(red, Green, Blue) which is the color range that monitors and inkjet printers use. CMYK refers to four-color printing press ink colors-Cyan, Magenta, yellow, and Black. The “K” refers to Black, not to be confused with “B” for Blue as in RGB. These colors are viewed by reflected light off the paper surface, not in transmitted light like that of a computer screen. The CMYK color space is thus a very narrow range of less saturated colors, and darker colors, as can be seen represented by the ColorSync Utility in Figure 1.55.
Photoshop’s Color management features allow the user to preview or “Soft Proof” the output on the computer monitor before sending the file to a printer or other output device. Figure 1.55 shows the menu item to preview an image in the default CMYK color space, which in North America is US Web Coated SWOP v2: This refers to the type of printing press-Single Web Offset Press, or SWOP, is a Web press. This term used in the industry refers to printing on large, continuous rolls of paper, called a Web, as opposed to Sheetfed, which are large single sheets of paper. Coated means the paper has a coating to prevent excessive ink absorption. The SWOP Coated is the standard, since most printing press jobs are printed this way in North America. Other standards, such as those for Sheetfed presses, European and Asian standards can also be chosen as required.

Figure 1.56 Soft Proof setup CMYK
The soft-proofing feature can also display colors that are out-of-gamut, or the range of printable colors. A default Gray overlay, known as a Gamut Warning indicates the colors that are out-of-range for the output device, in this case, a printing press. This can be used as a guide to modify the image so the colors fit within the range of the device. See Figure 1.57.
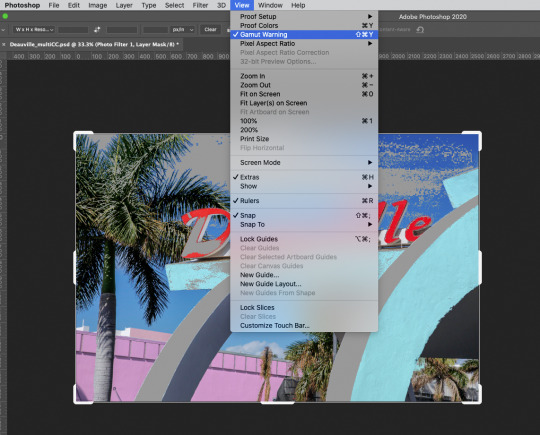
Figure 1.57 View>Gamut Warning
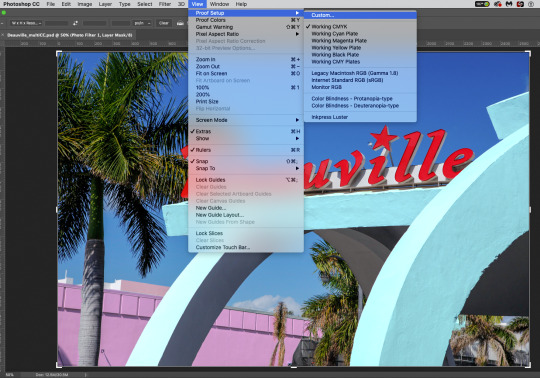
Figure 1.58 Choosing Custom Soft Proofing setup
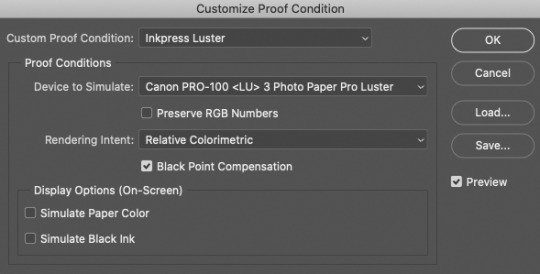
Figure 1.59 Customized Proof Condition
This feature can be used with any output device, and is commonly used when sending a file to a photo-quality inkjet printer that contains more ink colors. It utilizes a calibrated profile of the particular printer model and paper stock chosen. These profile are often easily obtained from the paper manufacturer’s website, and on the Mac are installed into a subfolder within the ColorSync folder in the System. Once installed, they become accessible in the View>Proof Setup>Custom pulldown menu. Figures 1.58 and 1.59 show that the soft proofing is set up for a Canon Pro 100 inkjet printer output on Luster paper. Once selected, the monitor displays a preview, and Gamut Warning can be chosen to preview any out-of-range colors, just as was done with the CMYK Preview. In Figure 1.60, the Gamut Warning for the Canon Pro 100 on Luster paper is shown, indicating some adjustment should be made to better match the printer’s range.Typically the issue is one of too much color saturation in certain hues. Photoshop has a method of selection, known as Color Range, that can select just the Out-of-Gamut colors, and use that selection area to create a Layer mask in an Adjustment layer that corresponds to and only affects those colors. In Figure 1.61, 1.62, and 1.63, you can see how those colors are selected using Color Range.
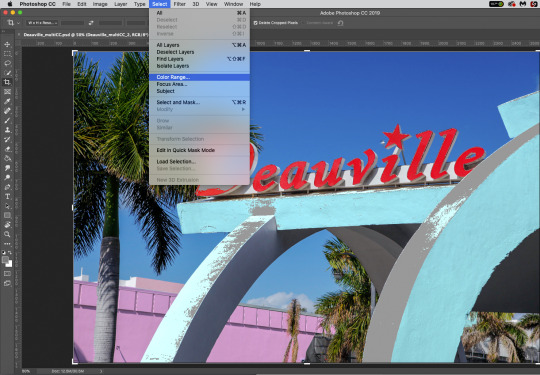
Figure 1.60 Gamut Warning Inkpress Luster paper
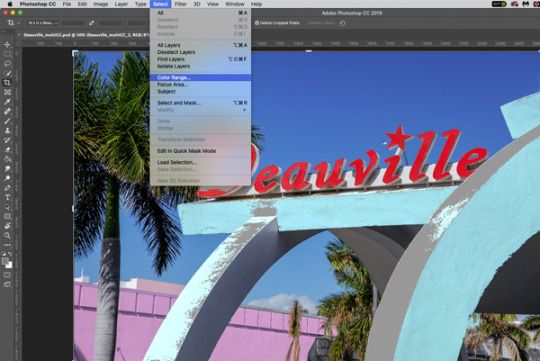
Figure 1.61Select>Color Range
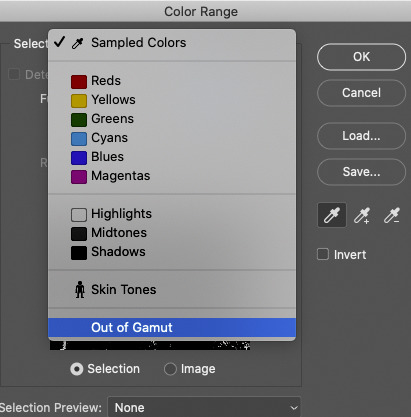
Figure 1.62 Color Range>Out of Gamut
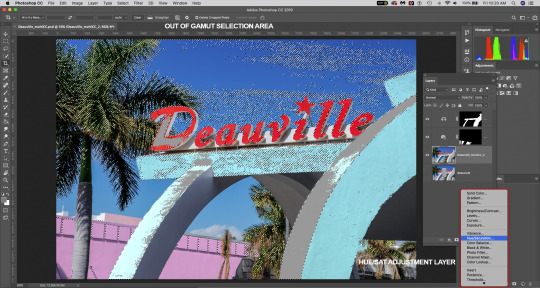
Figure 1.63 Out of Gamut Selection area, Hue/Saturation adjustment chosen A Hue/Saturation adjustment was chosen, and a Layer mask is automatically created revealing only the out-of gamut colors selected. Here, an overall reduction of Saturation in the Master range(all colors), brings the image into the printer’s output range on the Luster paper stock. Figure 1.64 shows this clearly, as the gray overlay from the Gamut Warning has largely disappeared.In Figure 1.65, some Saturation is returned to the Reds by an additional adjustment to the Hue/Saturation layer which is still within the printer’s range.
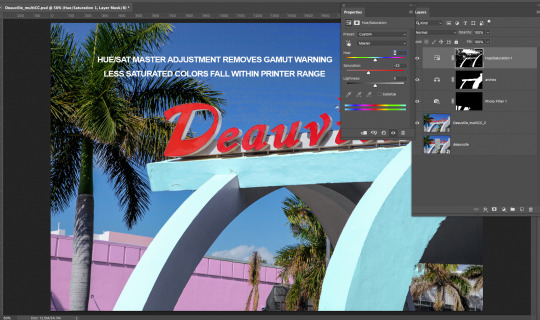
Figure 1.64 Hue Saturation adjustment applied
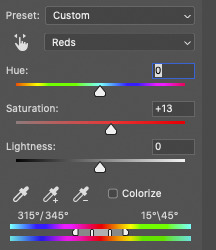
Figure 1.65 Red saturation increase Now that we’ve determined that the colors will print very close to the screen image by employing Soft Proofing, our next step is to set up proper Color Management settings for printing. To do that, we’ll choose FIle>Print.The highlighted pulldown menus of the Dialog box that pops up from choice are shown in Figure 1.66

Figure 1.66 Photoshop Print Settings
At the top is the Printer chosen, and then the key color management settings are selected. Under Color Handling, Photoshop Manages Colors is chosen so that all our calibrated color adjustments to the image are sent directly from Photoshop to the printer. If we chose Printer Manages Colors, the Printer will alter those color numbers again, which will result in the color being incorrect. The Printer Profile determines how those colors fit into the range of the paper stock and printer, so the correct paper profile must be chosen here. The Rendering Intent determines what method Photoshop will use to map those colors to that Printer Profile. Relative Colorimetric is generally chosen as the most accurate, although Perceptual can often work as well, particularly on very saturated color images. The preview image to the left of these pulldown menus will show the effect of choosing a different Rendering Intent. The visual difference between Perceptual and Relative Colorimetric is often small and subtle, and is a matter of personal choice and very specific to the image content. The other two options, Absolute Colorimetric and Saturation are not generally used for photo inkjet output. Saturation works best on graphics like pie or bar charts. Absolute Colorimetric is sometimes preferred by commercial printer for their press setup. See Figure 1.67.
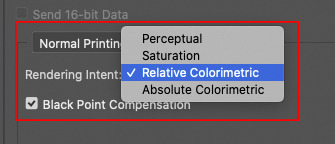
Figure 1.67 Rendering Intents
Black Point Compensation is checked by default. This generally preserves shadow detail in the image by mapping the deepest black to a black level the printer can reproduce. Normal Printing is also selected by default, and is the correct setting for most direct printing to an inkjet or other photo quality printer.However, one can take the “Soft Proofing” on screen to another level,known as Hard Proofing. A Hard Proof is a printed output that simulates the CMYK output of a printing press on a photo quality printer. To generate this output, you should choose Hard Proof instead ofNormal Printing, as shown in Figure 1.68. Choose Working CMYK as the Proof setup, which will use the CMYK Proofing Profile selected in the Edit>Color Settings menu, seen in Figure 1.69.
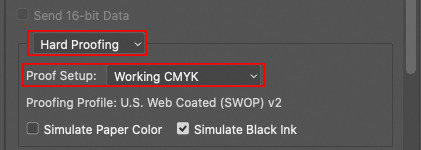
Figure 1.68 Hard Proofing
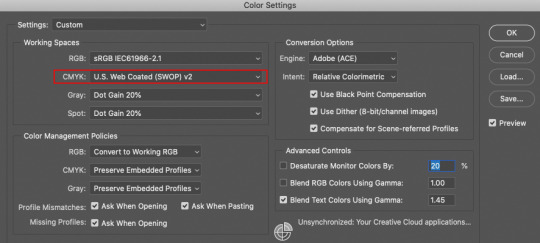
Figure 1.69 Color Settings Scrolling down in the dialog box allows you to setup the orientation(horizontal or vertical) and scale of the image on the paper,as well as adding any printing registration marks that may be required in a “Proof” print provided to a commercial printer. See Figure 1.70.
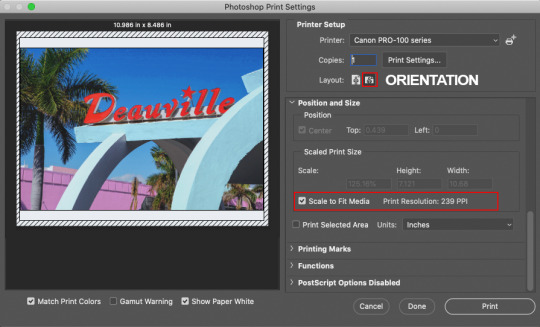
Figure 1.70 Print output Scale and Orientation
Once the color management settings, orientation and scale are all selected, the last step is to Click on Print Settings at the top under Printer Setup. The dialog box that appears will vary with the printer brand and model, and here you will see the dialog box for a Canon Pro 100 printer as an example. Several pulldown menus should be addressed here, as they will have an effect on the final output.
Figure 1.71 Shows several key options:
• Paper Size
• Media Type (Paper chosen)
• Paper Source( single sheet from tray, straight-through feed, or roll)
• Print Quality (Draft, Standard or High)

Figure 1.71 Paper size, Quality and Media, Source, and Print Quality Figure
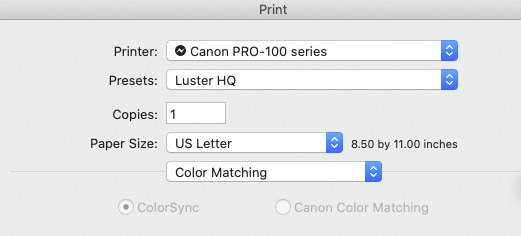
1.72 Color Matching
Figure 1.72 Shows the pulldown menu option for Color Matching, under Quality and Media. Color Matching allows you to choose whether you use the System’s Color Matching(in this case Apple’s ColorSync) or the printer’s Color Matching. This Option is grayed out here because we have chosen Photoshop Manages Color,which uses the System’s Color Management, which is the recommended workflow for accurate color reproduction. Once these settings are established, they may be saved as a Preset under the Preset pull down menu. This is highly recommended if you regularly print on the same paper stock. See Figure 1.73. Click the Save button at the lower right of the dialog box to return to the Photoshop Print Settings menu, then click Print.
Once you have all these settings in the dialog box selected as required by your particular printer, you should save them as a Preset, particularly if you use the same paper type regularly. Figure 1.73 shows the pulldown menu for Presets.
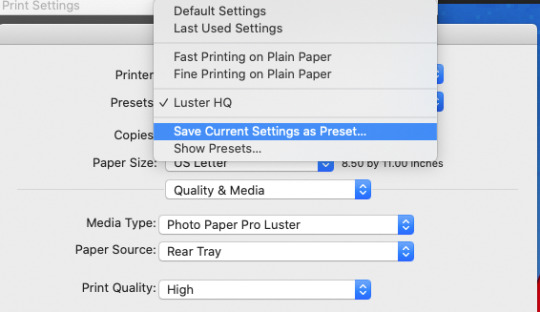
Figure 1.73 Save Current settings a Preset
Now you’ve learned a bit about Photoshop’s Interface, Workspaces, and Tools. You’ve also seen how you can make non-destructive edits using Adjustments, Selections, and Masks. Lastly you now know different ways to Save and Export your images, including Print output. I’d love to see what you can do with this knowledge-Send me a link to your images!
0 notes