#linux add user to group
Explore tagged Tumblr posts
Visit Tumblr Blog
Explore Tumblr blogs with no restrictions, modern design and the best experience.
Last Seen Tumblr Blogs


Fun Fact
Tumblr has a low social media market share in South America.
Text
How I ditched streaming services and learned to love Linux: A step-by-step guide to building your very own personal media streaming server (V2.0: REVISED AND EXPANDED EDITION)
This is a revised, corrected and expanded version of my tutorial on setting up a personal media server that previously appeared on my old blog (donjuan-auxenfers). I expect that that post is still making the rounds (hopefully with my addendum on modifying group share permissions in Ubuntu to circumvent 0x8007003B "Unexpected Network Error" messages in Windows 10/11 when transferring files) but I have no way of checking. Anyway this new revised version of the tutorial corrects one or two small errors I discovered when rereading what I wrote, adds links to all products mentioned and is just more polished generally. I also expanded it a bit, pointing more adventurous users toward programs such as Sonarr/Radarr/Lidarr and Overseerr which can be used for automating user requests and media collection.
So then, what is this tutorial? This is a tutorial on how to build and set up your own personal media server using Ubuntu as an operating system and Plex (or Jellyfin) to not only manage your media, but to also stream that media to your devices both at home and abroad anywhere in the world where you have an internet connection. Its intent is to show you how building a personal media server and stuffing it full of films, TV, and music that you acquired through indiscriminate and voracious media piracy various legal methods will free you to completely ditch paid streaming services. No more will you have to pay for Disney+, Netflix, HBOMAX, Hulu, Amazon Prime, Peacock, CBS All Access, Paramount+, Crave or any other streaming service that is not named Criterion Channel. Instead whenever you want to watch your favourite films and television shows, you’ll have your own personal service that only features things that you want to see, with files that you have control over. And for music fans out there, both Jellyfin and Plex support music streaming, meaning you can even ditch music streaming services. Goodbye Spotify, Youtube Music, Tidal and Apple Music, welcome back unreasonably large MP3 (or FLAC) collections.
On the hardware front, I’m going to offer a few options catered towards different budgets and media library sizes. The cost of getting a media server up and running using this guide will cost you anywhere from $450 CAD/$325 USD at the low end to $1500 CAD/$1100 USD at the high end (it could go higher). My server was priced closer to the higher figure, but I went and got a lot more storage than most people need. If that seems like a little much, consider for a moment, do you have a roommate, a close friend, or a family member who would be willing to chip in a few bucks towards your little project provided they get access? Well that's how I funded my server. It might also be worth thinking about the cost over time, i.e. how much you spend yearly on subscriptions vs. a one time cost of setting up a server. Additionally there's just the joy of being able to scream "fuck you" at all those show cancelling, library deleting, hedge fund vampire CEOs who run the studios through denying them your money. Drive a stake through David Zaslav's heart.
On the software side I will walk you step-by-step through installing Ubuntu as your server's operating system, configuring your storage as a RAIDz array with ZFS, sharing your zpool to Windows with Samba, running a remote connection between your server and your Windows PC, and then a little about started with Plex/Jellyfin. Every terminal command you will need to input will be provided, and I even share a custom #bash script that will make used vs. available drive space on your server display correctly in Windows.
If you have a different preferred flavour of Linux (Arch, Manjaro, Redhat, Fedora, Mint, OpenSUSE, CentOS, Slackware etc. et. al.) and are aching to tell me off for being basic and using Ubuntu, this tutorial is not for you. The sort of person with a preferred Linux distro is the sort of person who can do this sort of thing in their sleep. Also I don't care. This tutorial is intended for the average home computer user. This is also why we’re not using a more exotic home server solution like running everything through Docker Containers and managing it through a dashboard like Homarr or Heimdall. While such solutions are fantastic and can be very easy to maintain once you have it all set up, wrapping your brain around Docker is a whole thing in and of itself. If you do follow this tutorial and had fun putting everything together, then I would encourage you to return in a year’s time, do your research and set up everything with Docker Containers.
Lastly, this is a tutorial aimed at Windows users. Although I was a daily user of OS X for many years (roughly 2008-2023) and I've dabbled quite a bit with various Linux distributions (mostly Ubuntu and Manjaro), my primary OS these days is Windows 11. Many things in this tutorial will still be applicable to Mac users, but others (e.g. setting up shares) you will have to look up for yourself. I doubt it would be difficult to do so.
Nothing in this tutorial will require feats of computing expertise. All you will need is a basic computer literacy (i.e. an understanding of what a filesystem and directory are, and a degree of comfort in the settings menu) and a willingness to learn a thing or two. While this guide may look overwhelming at first glance, it is only because I want to be as thorough as possible. I want you to understand exactly what it is you're doing, I don't want you to just blindly follow steps. If you half-way know what you’re doing, you will be much better prepared if you ever need to troubleshoot.
Honestly, once you have all the hardware ready it shouldn't take more than an afternoon or two to get everything up and running.
(This tutorial is just shy of seven thousand words long so the rest is under the cut.)
Step One: Choosing Your Hardware
Linux is a light weight operating system, depending on the distribution there's close to no bloat. There are recent distributions available at this very moment that will run perfectly fine on a fourteen year old i3 with 4GB of RAM. Moreover, running Plex or Jellyfin isn’t resource intensive in 90% of use cases. All this is to say, we don’t require an expensive or powerful computer. This means that there are several options available: 1) use an old computer you already have sitting around but aren't using 2) buy a used workstation from eBay, or what I believe to be the best option, 3) order an N100 Mini-PC from AliExpress or Amazon.
Note: If you already have an old PC sitting around that you’ve decided to use, fantastic, move on to the next step.
When weighing your options, keep a few things in mind: the number of people you expect to be streaming simultaneously at any one time, the resolution and bitrate of your media library (4k video takes a lot more processing power than 1080p) and most importantly, how many of those clients are going to be transcoding at any one time. Transcoding is what happens when the playback device does not natively support direct playback of the source file. This can happen for a number of reasons, such as the playback device's native resolution being lower than the file's internal resolution, or because the source file was encoded in a video codec unsupported by the playback device.
Ideally we want any transcoding to be performed by hardware. This means we should be looking for a computer with an Intel processor with Quick Sync. Quick Sync is a dedicated core on the CPU die designed specifically for video encoding and decoding. This specialized hardware makes for highly efficient transcoding both in terms of processing overhead and power draw. Without these Quick Sync cores, transcoding must be brute forced through software. This takes up much more of a CPU’s processing power and requires much more energy. But not all Quick Sync cores are created equal and you need to keep this in mind if you've decided either to use an old computer or to shop for a used workstation on eBay
Any Intel processor from second generation Core (Sandy Bridge circa 2011) onward has Quick Sync cores. It's not until 6th gen (Skylake), however, that the cores support the H.265 HEVC codec. Intel’s 10th gen (Comet Lake) processors introduce support for 10bit HEVC and HDR tone mapping. And the recent 12th gen (Alder Lake) processors brought with them hardware AV1 decoding. As an example, while an 8th gen (Kaby Lake) i5-8500 will be able to hardware transcode a H.265 encoded file, it will fall back to software transcoding if given a 10bit H.265 file. If you’ve decided to use that old PC or to look on eBay for an old Dell Optiplex keep this in mind.
Note 1: The price of old workstations varies wildly and fluctuates frequently. If you get lucky and go shopping shortly after a workplace has liquidated a large number of their workstations you can find deals for as low as $100 on a barebones system, but generally an i5-8500 workstation with 16gb RAM will cost you somewhere in the area of $260 CAD/$200 USD.
Note 2: The AMD equivalent to Quick Sync is called Video Core Next, and while it's fine, it's not as efficient and not as mature a technology. It was only introduced with the first generation Ryzen CPUs and it only got decent with their newest CPUs, we want something cheap.
Alternatively you could forgo having to keep track of what generation of CPU is equipped with Quick Sync cores that feature support for which codecs, and just buy an N100 mini-PC. For around the same price or less of a used workstation you can pick up a mini-PC with an Intel N100 processor. The N100 is a four-core processor based on the 12th gen Alder Lake architecture and comes equipped with the latest revision of the Quick Sync cores. These little processors offer astounding hardware transcoding capabilities for their size and power draw. Otherwise they perform equivalent to an i5-6500, which isn't a terrible CPU. A friend of mine uses an N100 machine as a dedicated retro emulation gaming system and it does everything up to 6th generation consoles just fine. The N100 is also a remarkably efficient chip, it sips power. In fact, the difference between running one of these and an old workstation could work out to hundreds of dollars a year in energy bills depending on where you live.
You can find these Mini-PCs all over Amazon or for a little cheaper on AliExpress. They range in price from $170 CAD/$125 USD for a no name N100 with 8GB RAM to $280 CAD/$200 USD for a Beelink S12 Pro with 16GB RAM. The brand doesn't really matter, they're all coming from the same three factories in Shenzen, go for whichever one fits your budget or has features you want. 8GB RAM should be enough, Linux is lightweight and Plex only calls for 2GB RAM. 16GB RAM might result in a slightly snappier experience, especially with ZFS. A 256GB SSD is more than enough for what we need as a boot drive, but going for a bigger drive might allow you to get away with things like creating preview thumbnails for Plex, but it’s up to you and your budget.
The Mini-PC I wound up buying was a Firebat AK2 Plus with 8GB RAM and a 256GB SSD. It looks like this:

Note: Be forewarned that if you decide to order a Mini-PC from AliExpress, note the type of power adapter it ships with. The mini-PC I bought came with an EU power adapter and I had to supply my own North American power supply. Thankfully this is a minor issue as barrel plug 30W/12V/2.5A power adapters are easy to find and can be had for $10.
Step Two: Choosing Your Storage
Storage is the most important part of our build. It is also the most expensive. Thankfully it’s also the most easily upgrade-able down the line.
For people with a smaller media collection (4TB to 8TB), a more limited budget, or who will only ever have two simultaneous streams running, I would say that the most economical course of action would be to buy a USB 3.0 8TB external HDD. Something like this one from Western Digital or this one from Seagate. One of these external drives will cost you in the area of $200 CAD/$140 USD. Down the line you could add a second external drive or replace it with a multi-drive RAIDz set up such as detailed below.
If a single external drive the path for you, move on to step three.
For people with larger media libraries (12TB+), who prefer media in 4k, or care who about data redundancy, the answer is a RAID array featuring multiple HDDs in an enclosure.
Note: If you are using an old PC or used workstatiom as your server and have the room for at least three 3.5" drives, and as many open SATA ports on your mother board you won't need an enclosure, just install the drives into the case. If your old computer is a laptop or doesn’t have room for more internal drives, then I would suggest an enclosure.
The minimum number of drives needed to run a RAIDz array is three, and seeing as RAIDz is what we will be using, you should be looking for an enclosure with three to five bays. I think that four disks makes for a good compromise for a home server. Regardless of whether you go for a three, four, or five bay enclosure, do be aware that in a RAIDz array the space equivalent of one of the drives will be dedicated to parity at a ratio expressed by the equation 1 − 1/n i.e. in a four bay enclosure equipped with four 12TB drives, if we configured our drives in a RAIDz1 array we would be left with a total of 36TB of usable space (48TB raw size). The reason for why we might sacrifice storage space in such a manner will be explained in the next section.
A four bay enclosure will cost somewhere in the area of $200 CDN/$140 USD. You don't need anything fancy, we don't need anything with hardware RAID controls (RAIDz is done entirely in software) or even USB-C. An enclosure with USB 3.0 will perform perfectly fine. Don’t worry too much about USB speed bottlenecks. A mechanical HDD will be limited by the speed of its mechanism long before before it will be limited by the speed of a USB connection. I've seen decent looking enclosures from TerraMaster, Yottamaster, Mediasonic and Sabrent.
When it comes to selecting the drives, as of this writing, the best value (dollar per gigabyte) are those in the range of 12TB to 20TB. I settled on 12TB drives myself. If 12TB to 20TB drives are out of your budget, go with what you can afford, or look into refurbished drives. I'm not sold on the idea of refurbished drives but many people swear by them.
When shopping for harddrives, search for drives designed specifically for NAS use. Drives designed for NAS use typically have better vibration dampening and are designed to be active 24/7. They will also often make use of CMR (conventional magnetic recording) as opposed to SMR (shingled magnetic recording). This nets them a sizable read/write performance bump over typical desktop drives. Seagate Ironwolf and Toshiba NAS are both well regarded brands when it comes to NAS drives. I would avoid Western Digital Red drives at this time. WD Reds were a go to recommendation up until earlier this year when it was revealed that they feature firmware that will throw up false SMART warnings telling you to replace the drive at the three year mark quite often when there is nothing at all wrong with that drive. It will likely even be good for another six, seven, or more years.

Step Three: Installing Linux
For this step you will need a USB thumbdrive of at least 6GB in capacity, an .ISO of Ubuntu, and a way to make that thumbdrive bootable media.
First download a copy of Ubuntu desktop (for best performance we could download the Server release, but for new Linux users I would recommend against the server release. The server release is strictly command line interface only, and having a GUI is very helpful for most people. Not many people are wholly comfortable doing everything through the command line, I'm certainly not one of them, and I grew up with DOS 6.0. 22.04.3 Jammy Jellyfish is the current Long Term Service release, this is the one to get.
Download the .ISO and then download and install balenaEtcher on your Windows PC. BalenaEtcher is an easy to use program for creating bootable media, you simply insert your thumbdrive, select the .ISO you just downloaded, and it will create a bootable installation media for you.
Once you've made a bootable media and you've got your Mini-PC (or you old PC/used workstation) in front of you, hook it directly into your router with an ethernet cable, and then plug in the HDD enclosure, a monitor, a mouse and a keyboard. Now turn that sucker on and hit whatever key gets you into the BIOS (typically ESC, DEL or F2). If you’re using a Mini-PC check to make sure that the P1 and P2 power limits are set correctly, my N100's P1 limit was set at 10W, a full 20W under the chip's power limit. Also make sure that the RAM is running at the advertised speed. My Mini-PC’s RAM was set at 2333Mhz out of the box when it should have been 3200Mhz. Once you’ve done that, key over to the boot order and place the USB drive first in the boot order. Then save the BIOS settings and restart.
After you restart you’ll be greeted by Ubuntu's installation screen. Installing Ubuntu is really straight forward, select the "minimal" installation option, as we won't need anything on this computer except for a browser (Ubuntu comes preinstalled with Firefox) and Plex Media Server/Jellyfin Media Server. Also remember to delete and reformat that Windows partition! We don't need it.
Step Four: Installing ZFS and Setting Up the RAIDz Array
Note: If you opted for just a single external HDD skip this step and move onto setting up a Samba share.
Once Ubuntu is installed it's time to configure our storage by installing ZFS to build our RAIDz array. ZFS is a "next-gen" file system that is both massively flexible and massively complex. It's capable of snapshot backup, self healing error correction, ZFS pools can be configured with drives operating in a supplemental manner alongside the storage vdev (e.g. fast cache, dedicated secondary intent log, hot swap spares etc.). It's also a file system very amenable to fine tuning. Block and sector size are adjustable to use case and you're afforded the option of different methods of inline compression. If you'd like a very detailed overview and explanation of its various features and tips on tuning a ZFS array check out these articles from Ars Technica. For now we're going to ignore all these features and keep it simple, we're going to pull our drives together into a single vdev running in RAIDz which will be the entirety of our zpool, no fancy cache drive or SLOG.
Open up the terminal and type the following commands:
sudo apt update
then
sudo apt install zfsutils-linux
This will install the ZFS utility. Verify that it's installed with the following command:
zfs --version
Now, it's time to check that the HDDs we have in the enclosure are healthy, running, and recognized. We also want to find out their device IDs and take note of them:
sudo fdisk -1
Note: You might be wondering why some of these commands require "sudo" in front of them while others don't. "Sudo" is short for "super user do”. When and where "sudo" is used has to do with the way permissions are set up in Linux. Only the "root" user has the access level to perform certain tasks in Linux. As a matter of security and safety regular user accounts are kept separate from the "root" user. It's not advised (or even possible) to boot into Linux as "root" with most modern distributions. Instead by using "sudo" our regular user account is temporarily given the power to do otherwise forbidden things. Don't worry about it too much at this stage, but if you want to know more check out this introduction.
If everything is working you should get a list of the various drives detected along with their device IDs which will look like this: /dev/sdc. You can also check the device IDs of the drives by opening the disk utility app. Jot these IDs down as we'll need them for our next step, creating our RAIDz array.
RAIDz is similar to RAID-5 in that instead of striping your data over multiple disks, exchanging redundancy for speed and available space (RAID-0), or mirroring your data writing by two copies of every piece (RAID-1), it instead writes parity blocks across the disks in addition to striping, this provides a balance of speed, redundancy and available space. If a single drive fails, the parity blocks on the working drives can be used to reconstruct the entire array as soon as a replacement drive is added.
Additionally, RAIDz improves over some of the common RAID-5 flaws. It's more resilient and capable of self healing, as it is capable of automatically checking for errors against a checksum. It's more forgiving in this way, and it's likely that you'll be able to detect when a drive is dying well before it fails. A RAIDz array can survive the loss of any one drive.
Note: While RAIDz is indeed resilient, if a second drive fails during the rebuild, you're fucked. Always keep backups of things you can't afford to lose. This tutorial, however, is not about proper data safety.
To create the pool, use the following command:
sudo zpool create "zpoolnamehere" raidz "device IDs of drives we're putting in the pool"
For example, let's creatively name our zpool "mypool". This poil will consist of four drives which have the device IDs: sdb, sdc, sdd, and sde. The resulting command will look like this:
sudo zpool create mypool raidz /dev/sdb /dev/sdc /dev/sdd /dev/sde
If as an example you bought five HDDs and decided you wanted more redundancy dedicating two drive to this purpose, we would modify the command to "raidz2" and the command would look something like the following:
sudo zpool create mypool raidz2 /dev/sdb /dev/sdc /dev/sdd /dev/sde /dev/sdf
An array configured like this is known as RAIDz2 and is able to survive two disk failures.
Once the zpool has been created, we can check its status with the command:
zpool status
Or more concisely with:
zpool list
The nice thing about ZFS as a file system is that a pool is ready to go immediately after creation. If we were to set up a traditional RAID-5 array using mbam, we'd have to sit through a potentially hours long process of reformatting and partitioning the drives. Instead we're ready to go right out the gates.
The zpool should be automatically mounted to the filesystem after creation, check on that with the following:
df -hT | grep zfs
Note: If your computer ever loses power suddenly, say in event of a power outage, you may have to re-import your pool. In most cases, ZFS will automatically import and mount your pool, but if it doesn’t and you can't see your array, simply open the terminal and type sudo zpool import -a.
By default a zpool is mounted at /"zpoolname". The pool should be under our ownership but let's make sure with the following command:
sudo chown -R "yourlinuxusername" /"zpoolname"
Note: Changing file and folder ownership with "chown" and file and folder permissions with "chmod" are essential commands for much of the admin work in Linux, but we won't be dealing with them extensively in this guide. If you'd like a deeper tutorial and explanation you can check out these two guides: chown and chmod.

You can access the zpool file system through the GUI by opening the file manager (the Ubuntu default file manager is called Nautilus) and clicking on "Other Locations" on the sidebar, then entering the Ubuntu file system and looking for a folder with your pool's name. Bookmark the folder on the sidebar for easy access.

Your storage pool is now ready to go. Assuming that we already have some files on our Windows PC we want to copy to over, we're going to need to install and configure Samba to make the pool accessible in Windows.
Step Five: Setting Up Samba/Sharing
Samba is what's going to let us share the zpool with Windows and allow us to write to it from our Windows machine. First let's install Samba with the following commands:
sudo apt-get update
then
sudo apt-get install samba
Next create a password for Samba.
sudo smbpswd -a "yourlinuxusername"
It will then prompt you to create a password. Just reuse your Ubuntu user password for simplicity's sake.
Note: if you're using just a single external drive replace the zpool location in the following commands with wherever it is your external drive is mounted, for more information see this guide on mounting an external drive in Ubuntu.
After you've created a password we're going to create a shareable folder in our pool with this command
mkdir /"zpoolname"/"foldername"
Now we're going to open the smb.conf file and make that folder shareable. Enter the following command.
sudo nano /etc/samba/smb.conf
This will open the .conf file in nano, the terminal text editor program. Now at the end of smb.conf add the following entry:
["foldername"]
path = /"zpoolname"/"foldername"
available = yes
valid users = "yourlinuxusername"
read only = no
writable = yes
browseable = yes
guest ok = no
Ensure that there are no line breaks between the lines and that there's a space on both sides of the equals sign. Our next step is to allow Samba traffic through the firewall:
sudo ufw allow samba
Finally restart the Samba service:
sudo systemctl restart smbd
At this point we'll be able to access to the pool, browse its contents, and read and write to it from Windows. But there's one more thing left to do, Windows doesn't natively support the ZFS file systems and will read the used/available/total space in the pool incorrectly. Windows will read available space as total drive space, and all used space as null. This leads to Windows only displaying a dwindling amount of "available" space as the drives are filled. We can fix this! Functionally this doesn't actually matter, we can still write and read to and from the disk, it just makes it difficult to tell at a glance the proportion of used/available space, so this is an optional step but one I recommend (this step is also unnecessary if you're just using a single external drive). What we're going to do is write a little shell script in #bash. Open nano with the terminal with the command:
nano
Now insert the following code:
#!/bin/bash CUR_PATH=`pwd` ZFS_CHECK_OUTPUT=$(zfs get type $CUR_PATH 2>&1 > /dev/null) > /dev/null if [[ $ZFS_CHECK_OUTPUT == *not\ a\ ZFS* ]] then IS_ZFS=false else IS_ZFS=true fi if [[ $IS_ZFS = false ]] then df $CUR_PATH | tail -1 | awk '{print $2" "$4}' else USED=$((`zfs get -o value -Hp used $CUR_PATH` / 1024)) > /dev/null AVAIL=$((`zfs get -o value -Hp available $CUR_PATH` / 1024)) > /dev/null TOTAL=$(($USED+$AVAIL)) > /dev/null echo $TOTAL $AVAIL fi
Save the script as "dfree.sh" to /home/"yourlinuxusername" then change the ownership of the file to make it executable with this command:
sudo chmod 774 dfree.sh
Now open smb.conf with sudo again:
sudo nano /etc/samba/smb.conf
Now add this entry to the top of the configuration file to direct Samba to use the results of our script when Windows asks for a reading on the pool's used/available/total drive space:
[global]
dfree command = /home/"yourlinuxusername"/dfree.sh
Save the changes to smb.conf and then restart Samba again with the terminal:
sudo systemctl restart smbd
Now there’s one more thing we need to do to fully set up the Samba share, and that’s to modify a hidden group permission. In the terminal window type the following command:
usermod -a -G sambashare “yourlinuxusername”
Then restart samba again:
sudo systemctl restart smbd
If we don’t do this last step, everything will appear to work fine, and you will even be able to see and map the drive from Windows and even begin transferring files, but you'd soon run into a lot of frustration. As every ten minutes or so a file would fail to transfer and you would get a window announcing “0x8007003B Unexpected Network Error”. This window would require your manual input to continue the transfer with the file next in the queue. And at the end it would reattempt to transfer whichever files failed the first time around. 99% of the time they’ll go through that second try, but this is still all a major pain in the ass. Especially if you’ve got a lot of data to transfer or you want to step away from the computer for a while.
It turns out samba can act a little weirdly with the higher read/write speeds of RAIDz arrays and transfers from Windows, and will intermittently crash and restart itself if this group option isn’t changed. Inputting the above command will prevent you from ever seeing that window.
The last thing we're going to do before switching over to our Windows PC is grab the IP address of our Linux machine. Enter the following command:
hostname -I
This will spit out this computer's IP address on the local network (it will look something like 192.168.0.x), write it down. It might be a good idea once you're done here to go into your router settings and reserving that IP for your Linux system in the DHCP settings. Check the manual for your specific model router on how to access its settings, typically it can be accessed by opening a browser and typing http:\\192.168.0.1 in the address bar, but your router may be different.
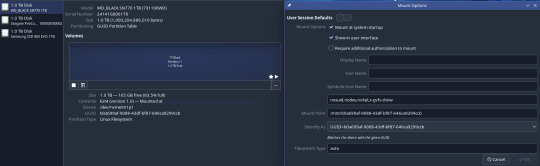
Okay we’re done with our Linux computer for now. Get on over to your Windows PC, open File Explorer, right click on Network and click "Map network drive". Select Z: as the drive letter (you don't want to map the network drive to a letter you could conceivably be using for other purposes) and enter the IP of your Linux machine and location of the share like so: \\"LINUXCOMPUTERLOCALIPADDRESSGOESHERE"\"zpoolnamegoeshere"\. Windows will then ask you for your username and password, enter the ones you set earlier in Samba and you're good. If you've done everything right it should look something like this:

You can now start moving media over from Windows to the share folder. It's a good idea to have a hard line running to all machines. Moving files over Wi-Fi is going to be tortuously slow, the only thing that’s going to make the transfer time tolerable (hours instead of days) is a solid wired connection between both machines and your router.
Step Six: Setting Up Remote Desktop Access to Your Server
After the server is up and going, you’ll want to be able to access it remotely from Windows. Barring serious maintenance/updates, this is how you'll access it most of the time. On your Linux system open the terminal and enter:
sudo apt install xrdp
Then:
sudo systemctl enable xrdp
Once it's finished installing, open “Settings” on the sidebar and turn off "automatic login" in the User category. Then log out of your account. Attempting to remotely connect to your Linux computer while you’re logged in will result in a black screen!
Now get back on your Windows PC, open search and look for "RDP". A program called "Remote Desktop Connection" should pop up, open this program as an administrator by right-clicking and selecting “run as an administrator”. You’ll be greeted with a window. In the field marked “Computer” type in the IP address of your Linux computer. Press connect and you'll be greeted with a new window and prompt asking for your username and password. Enter your Ubuntu username and password here.

If everything went right, you’ll be logged into your Linux computer. If the performance is sluggish, adjust the display options. Lowering the resolution and colour depth do a lot to make the interface feel snappier.

Remote access is how we're going to be using our Linux system from now, barring edge cases like needing to get into the BIOS or upgrading to a new version of Ubuntu. Everything else from performing maintenance like a monthly zpool scrub to checking zpool status and updating software can all be done remotely.

This is how my server lives its life now, happily humming and chirping away on the floor next to the couch in a corner of the living room.
Step Seven: Plex Media Server/Jellyfin
Okay we’ve got all the ground work finished and our server is almost up and running. We’ve got Ubuntu up and running, our storage array is primed, we’ve set up remote connections and sharing, and maybe we’ve moved over some of favourite movies and TV shows.
Now we need to decide on the media server software to use which will stream our media to us and organize our library. For most people I’d recommend Plex. It just works 99% of the time. That said, Jellyfin has a lot to recommend it by too, even if it is rougher around the edges. Some people run both simultaneously, it’s not that big of an extra strain. I do recommend doing a little bit of your own research into the features each platform offers, but as a quick run down, consider some of the following points:
Plex is closed source and is funded through PlexPass purchases while Jellyfin is open source and entirely user driven. This means a number of things: for one, Plex requires you to purchase a “PlexPass” (purchased as a one time lifetime fee $159.99 CDN/$120 USD or paid for on a monthly or yearly subscription basis) in order to access to certain features, like hardware transcoding (and we want hardware transcoding) or automated intro/credits detection and skipping, Jellyfin offers some of these features for free through plugins. Plex supports a lot more devices than Jellyfin and updates more frequently. That said, Jellyfin's Android and iOS apps are completely free, while the Plex Android and iOS apps must be activated for a one time cost of $6 CDN/$5 USD. But that $6 fee gets you a mobile app that is much more functional and features a unified UI across platforms, the Plex mobile apps are simply a more polished experience. The Jellyfin apps are a bit of a mess and the iOS and Android versions are very different from each other.
Jellyfin’s actual media player is more fully featured than Plex's, but on the other hand Jellyfin's UI, library customization and automatic media tagging really pale in comparison to Plex. Streaming your music library is free through both Jellyfin and Plex, but Plex offers the PlexAmp app for dedicated music streaming which boasts a number of fantastic features, unfortunately some of those fantastic features require a PlexPass. If your internet is down, Jellyfin can still do local streaming, while Plex can fail to play files unless you've got it set up a certain way. Jellyfin has a slew of neat niche features like support for Comic Book libraries with the .cbz/.cbt file types, but then Plex offers some free ad-supported TV and films, they even have a free channel that plays nothing but Classic Doctor Who.
Ultimately it's up to you, I settled on Plex because although some features are pay-walled, it just works. It's more reliable and easier to use, and a one-time fee is much easier to swallow than a subscription. I had a pretty easy time getting my boomer parents and tech illiterate brother introduced to and using Plex and I don't know if I would've had as easy a time doing that with Jellyfin. I do also need to mention that Jellyfin does take a little extra bit of tinkering to get going in Ubuntu, you’ll have to set up process permissions, so if you're more tolerant to tinkering, Jellyfin might be up your alley and I’ll trust that you can follow their installation and configuration guide. For everyone else, I recommend Plex.
So pick your poison: Plex or Jellyfin.
Note: The easiest way to download and install either of these packages in Ubuntu is through Snap Store.
After you've installed one (or both), opening either app will launch a browser window into the browser version of the app allowing you to set all the options server side.
The process of adding creating media libraries is essentially the same in both Plex and Jellyfin. You create a separate libraries for Television, Movies, and Music and add the folders which contain the respective types of media to their respective libraries. The only difficult or time consuming aspect is ensuring that your files and folders follow the appropriate naming conventions:
Plex naming guide for Movies
Plex naming guide for Television
Jellyfin follows the same naming rules but I find their media scanner to be a lot less accurate and forgiving than Plex. Once you've selected the folders to be scanned the service will scan your files, tagging everything and adding metadata. Although I find do find Plex more accurate, it can still erroneously tag some things and you might have to manually clean up some tags in a large library. (When I initially created my library it tagged the 1963-1989 Doctor Who as some Korean soap opera and I needed to manually select the correct match after which everything was tagged normally.) It can also be a bit testy with anime (especially OVAs) be sure to check TVDB to ensure that you have your files and folders structured and named correctly. If something is not showing up at all, double check the name.
Once that's done, organizing and customizing your library is easy. You can set up collections, grouping items together to fit a theme or collect together all the entries in a franchise. You can make playlists, and add custom artwork to entries. It's fun setting up collections with posters to match, there are even several websites dedicated to help you do this like PosterDB. As an example, below are two collections in my library, one collecting all the entries in a franchise, the other follows a theme.

My Star Trek collection, featuring all eleven television series, and thirteen films.

My Best of the Worst collection, featuring sixty-nine films previously showcased on RedLetterMedia’s Best of the Worst. They’re all absolutely terrible and I love them.
As for settings, ensure you've got Remote Access going, it should work automatically and be sure to set your upload speed after running a speed test. In the library settings set the database cache to 2000MB to ensure a snappier and more responsive browsing experience, and then check that playback quality is set to original/maximum. If you’re severely bandwidth limited on your upload and have remote users, you might want to limit the remote stream bitrate to something more reasonable, just as a note of comparison Netflix’s 1080p bitrate is approximately 5Mbps, although almost anyone watching through a chromium based browser is streaming at 720p and 3mbps. Other than that you should be good to go. For actually playing your files, there's a Plex app for just about every platform imaginable. I mostly watch television and films on my laptop using the Windows Plex app, but I also use the Android app which can broadcast to the chromecast connected to the TV in the office and the Android TV app for our smart TV. Both are fully functional and easy to navigate, and I can also attest to the OS X version being equally functional.
Part Eight: Finding Media
Now, this is not really a piracy tutorial, there are plenty of those out there. But if you’re unaware, BitTorrent is free and pretty easy to use, just pick a client (qBittorrent is the best) and go find some public trackers to peruse. Just know now that all the best trackers are private and invite only, and that they can be exceptionally difficult to get into. I’m already on a few, and even then, some of the best ones are wholly out of my reach.
If you decide to take the left hand path and turn to Usenet you’ll have to pay. First you’ll need to sign up with a provider like Newshosting or EasyNews for access to Usenet itself, and then to actually find anything you’re going to need to sign up with an indexer like NZBGeek or NZBFinder. There are dozens of indexers, and many people cross post between them, but for more obscure media it’s worth checking multiple. You’ll also need a binary downloader like SABnzbd. That caveat aside, Usenet is faster, bigger, older, less traceable than BitTorrent, and altogether slicker. I honestly prefer it, and I'm kicking myself for taking this long to start using it because I was scared off by the price. I’ve found so many things on Usenet that I had sought in vain elsewhere for years, like a 2010 Italian film about a massacre perpetrated by the SS that played the festival circuit but never received a home media release; some absolute hero uploaded a rip of a festival screener DVD to Usenet. Anyway, figure out the rest of this shit on your own and remember to use protection, get yourself behind a VPN, use a SOCKS5 proxy with your BitTorrent client, etc.
On the legal side of things, if you’re around my age, you (or your family) probably have a big pile of DVDs and Blu-Rays sitting around unwatched and half forgotten. Why not do a bit of amateur media preservation, rip them and upload them to your server for easier access? (Your tools for this are going to be Handbrake to do the ripping and AnyDVD to break any encryption.) I went to the trouble of ripping all my SCTV DVDs (five box sets worth) because none of it is on streaming nor could it be found on any pirate source I tried. I’m glad I did, forty years on it’s still one of the funniest shows to ever be on TV.
Part Nine/Epilogue: Sonarr/Radarr/Lidarr and Overseerr
There are a lot of ways to automate your server for better functionality or to add features you and other users might find useful. Sonarr, Radarr, and Lidarr are a part of a suite of “Servarr” services (there’s also Readarr for books and Whisparr for adult content) that allow you to automate the collection of new episodes of TV shows (Sonarr), new movie releases (Radarr) and music releases (Lidarr). They hook in to your BitTorrent client or Usenet binary newsgroup downloader and crawl your preferred Torrent trackers and Usenet indexers, alerting you to new releases and automatically grabbing them. You can also use these services to manually search for new media, and even replace/upgrade your existing media with better quality uploads. They’re really a little tricky to set up on a bare metal Ubuntu install (ideally you should be running them in Docker Containers), and I won’t be providing a step by step on installing and running them, I’m simply making you aware of their existence.
The other bit of kit I want to make you aware of is Overseerr which is a program that scans your Plex media library and will serve recommendations based on what you like. It also allows you and your users to request specific media. It can even be integrated with Sonarr/Radarr/Lidarr so that fulfilling those requests is fully automated.
And you're done. It really wasn't all that hard. Enjoy your media. Enjoy the control you have over that media. And be safe in the knowledge that no hedgefund CEO motherfucker who hates the movies but who is somehow in control of a major studio will be able to disappear anything in your library as a tax write-off.
1K notes
·
View notes
Text
"how do I keep my art from being scraped for AI from now on?"
if you post images online, there's no 100% guaranteed way to prevent this, and you can probably assume that there's no need to remove/edit existing content. you might contest this as a matter of data privacy and workers' rights, but you might also be looking for smaller, more immediate actions to take.
...so I made this list! I can't vouch for the effectiveness of all of these, but I wanted to compile as many options as possible so you can decide what's best for you.
Discouraging data scraping and "opting out"
robots.txt - This is a file placed in a website's home directory to "ask" web crawlers not to access certain parts of a site. If you have your own website, you can edit this yourself, or you can check which crawlers a site disallows by adding /robots.txt at the end of the URL. This article has instructions for blocking some bots that scrape data for AI.
HTML metadata - DeviantArt (i know) has proposed the "noai" and "noimageai" meta tags for opting images out of machine learning datasets, while Mojeek proposed "noml". To use all three, you'd put the following in your webpages' headers:
<meta name="robots" content="noai, noimageai, noml">
Have I Been Trained? - A tool by Spawning to search for images in the LAION-5B and LAION-400M datasets and opt your images and web domain out of future model training. Spawning claims that Stability AI and Hugging Face have agreed to respect these opt-outs. Try searching for usernames!
Kudurru - A tool by Spawning (currently a Wordpress plugin) in closed beta that purportedly blocks/redirects AI scrapers from your website. I don't know much about how this one works.
ai.txt - Similar to robots.txt. A new type of permissions file for AI training proposed by Spawning.
ArtShield Watermarker - Web-based tool to add Stable Diffusion's "invisible watermark" to images, which may cause an image to be recognized as AI-generated and excluded from data scraping and/or model training. Source available on GitHub. Doesn't seem to have updated/posted on social media since last year.
Image processing... things
these are popular now, but there seems to be some confusion regarding the goal of these tools; these aren't meant to "kill" AI art, and they won't affect existing models. they won't magically guarantee full protection, so you probably shouldn't loudly announce that you're using them to try to bait AI users into responding
Glaze - UChicago's tool to add "adversarial noise" to art to disrupt style mimicry. Devs recommend glazing pictures last. Runs on Windows and Mac (Nvidia GPU required)
WebGlaze - Free browser-based Glaze service for those who can't run Glaze locally. Request an invite by following their instructions.
Mist - Another adversarial noise tool, by Psyker Group. Runs on Windows and Linux (Nvidia GPU required) or on web with a Google Colab Notebook.
Nightshade - UChicago's tool to distort AI's recognition of features and "poison" datasets, with the goal of making it inconvenient to use images scraped without consent. The guide recommends that you do not disclose whether your art is nightshaded. Nightshade chooses a tag that's relevant to your image. You should use this word in the image's caption/alt text when you post the image online. This means the alt text will accurately describe what's in the image-- there is no reason to ever write false/mismatched alt text!!! Runs on Windows and Mac (Nvidia GPU required)
Sanative AI - Web-based "anti-AI watermark"-- maybe comparable to Glaze and Mist. I can't find much about this one except that they won a "Responsible AI Challenge" hosted by Mozilla last year.
Just Add A Regular Watermark - It doesn't take a lot of processing power to add a watermark, so why not? Try adding complexities like warping, changes in color/opacity, and blurring to make it more annoying for an AI (or human) to remove. You could even try testing your watermark against an AI watermark remover. (the privacy policy claims that they don't keep or otherwise use your images, but use your own judgment)
given that energy consumption was the focus of some AI art criticism, I'm not sure if the benefits of these GPU-intensive tools outweigh the cost, and I'd like to know more about that. in any case, I thought that people writing alt text/image descriptions more often would've been a neat side effect of Nightshade being used, so I hope to see more of that in the future, at least!
246 notes
·
View notes
Text
Worse than Trolls: Engagement Optimisers, Tourists, Socialisers, and Enablers
As I previously explained, most online content moderation falls under I-know-it-when-I-see-it. There is very little else to say. People know spam when they see it, and I don't need to define what spam is. Spammers know they are spamming, and are unable and thankfully unwilling to argue your moderation decisions.
On the other end of the spectrum, there are ever so slightly corrosive behaviours than can destabilise an online community in the long term, often without the perpetrators knowing it, or at least without bad faith, without ill intent.
Engagement Optimisers
Users naturally optimise engagement by responding to feedback. When posting memes and cat pictures is rewarded, users post more cat pictures. When posting memes is rewarded, users post more memes.
If your users start to do this on purpose, you might have a problem. For example, somebody might notice that clickbait titles lead to more click-through in forum threads. The people who give their threads vague and mysterious titles get more replies. The people who add a call to action to their OP get more replies: Please share your opinions in the comments below. The people who ask broad, open-ended and opinion-based questions are more likely to get more replies: What programming language should I learn?
If somebody says something contentious or inflammatory by accident, that's fine. You morally can't fault them for sincerely held beliefs or misconceptions, or for soliciting a broader base of opinion. Only when done on purpose, and systematically, it becomes dangerous.
You may end up with a situation where power users learn to play the game and play it better and better, at least better than most users. This can give the people who learned to game the system outsized influence, even when there is no algorithm or karma or no way to spend the karma, because they gain more mindshare and notoriety.
You may also experience a systemic change, because many or most users catch on, and start modifying their behaviour and post different content in order to get noticed.
Still there is the possibility that your users, through group dynamics nobody is consciously exploiting, reward and promote mostly cat pictures and stupid puns, even though no individual user comes to your forum for stupid puns and cat pictures.
Early on in the history of Reddit, this was recognised as a major problem. You could farm upvotes by posting something like "DAE eat chocolate ice cream?", "Upvote if you're going to vote for Ron Paul", or "Linux sucks! There are no good text editors!"
Reddit tried to curb this, somewhat unsuccessfully at first, then more successfully, but in the long run, they lost the battle against their own user base and entropy itself.
Compare this with YouTube, where a call to action is not just allowed, but encouraged by YouTube itself. It's regularly part of the latest set of official tips for creators to grow their audiences. YouTubers thus say "What are your opinions on this topic? Let me know in the comments below!" or "Please like and subscribe".
Tourists
Tourists come in to make drive-by comments in flame war threads. Tourists google a question, find your forum, post a single question, and leave forever when they get the right answer. Tourists come in from Reddit. Tourists don't play the game. Tourists don't read the forum. Tourists don't read the FAQ.
You can't really punish people for coming to your site or channel and making their first comment. I mean, you can, but then they will definitely not come back.
Churn is bad. Tourists are churn personified. If most content comes from tourists, then your community culture is defined by tourists. You lose the ability to shape the culture of your site. It's easy to deter tourists, but it's hard to do so without also deterring people who would otherwise have become proper contributors or community members.
If somebody joins your web site, doesn't read the rules, doesn't read the FAQ, creates more work for the moderators, and is a minor annoyance to the established users without ever rising to the level of a serious rule violation, it's easy for that person to say "We all have to start somewhere" or "You'll never attract new people if you keep enforcing the rules like that."
If you have rules about cross-posting or proper spelling and punctuation, you have to be firm. You cannot retreat every time somebody who hasn't read the rules asks "Why are you so mean to me?"
On the other hand, I remember multiple times when I hopped in an IRC to ask a question like "Is this a known bug? Should I wait for the next release?" or "Does anybody want to collaborate on a game jam next month? Is anybody considering joining Ludum Dare?" only to be told "We don't accept bug reports in here. Bug reports need to be entered into bugzilla in the proper format." or "Please post job postings in the jobs channel only!"
Socialisers
Socialisers talk about off-topic stuff only. They hang out in the off-topic board or channel, and they tell everybody about their youngest child, their morning commute, or the story of how they met their spouse. Socialisers rarely engage with the actual main topic of the community, but everybody knows them, because they post a lot of off-topic content.
As long as socialisers know that the forum is about, and know their stuff, it's fine. The guy whose youngest son just got into middle school and who met his wife when they both reached for the last bottle of herbal shampoo at the supermarket isn't really disrupting your anime forum as long as he watches anime. If he could comment about the different animation studios that worked on Sailor Moon, but chooses not to, he's fine. The problem with socialisers only becomes noticeable when they attract socialisers who do not know or care anything about the on-topic content. If that happens, your forum is no longer a forum where some Haskell programmers post their lunch, it's a forum to post pictures of your lunch.
Enablers
Enablers are one step worse than socialisers. They don't just don't contribute on-topic content, they make the discussion actively worse. If you have a rule such as "do no post a maths homework question" or "do not answer personal questions" or "do not ask other people to answer your question in a DM", the enabler will happily comply anyway. "It's no skin off my back" he says, as he answers the homework question. "It's no skin off my back" he says, as he paraphrases the FAQ again. The enabler will make a good-faith effort to answer bad-faith questions, and he will enable people who just can't be bothered to read the FAQ and follow the rules.
Now there may be multiple reasons why you're not allowed to answer personal questions, ranging from OPSEC about pet names and the colour of your car to professionalism, and depending on those, this may be a big deal or not. When it comes to homework or answering in a DM, the reasoning should be straightforward.
The worst kind of enabling is probably taking abuse in stride, and continuing the conversation. If somebody starts insulting the other people in the conversation, the least you could do is disengage. If somebody calls people names because they can't solve his problem, you should not enable him and try to help him, too.
The most subtle kind of enabling behaviour is a response to Cunningham-style trolling. When somebody posts "Linux sucks, there are no good text editors", then the last thing you should do is reward this kind of behaviour. When somebody posts "I can't solve this in Python, I guess C++ is just a better language. I think I should go back and use C++", then you should say "Good riddance, and may the gods have mercy on the C++ forum."
The most common kind of enabling is when people ask a question and can't be bothered to Google it first, and somebody copies the question into Google it and pastes the answer. The long-term consequence of such behaviour is not only a degraded quality of the conversation, but a forum culture where people regularly Google answers (or worse, ask ChatGPT) and paste the result without checking.
Maybe in the future, something like "I asked ChatGPT this, is this true" or "Copilot wrote this code, can you help debug it" will become more common, and humouring these kinds of people will become the most common toxic enabling behaviour.
Drama Magnets/Troll Feeders
Finally, there is a kind of person who enables trolls and harassers by being thin-skinned, very easy to make fun of, and by boosting every insult. There is a certain kind of person who will just endlessly complain about being wronged in small ways, and will take offence to small perceived slights. This allows a malicious actor to get out much more in terms of reactions than he puts in. If a troll can poke somebody once, and get dozens of "Ow ow" and "he poked me" and "woe is me, I have been poked" out of a target, that will only motivate him.
If somebody freely volunteers his weak spots, things he is self-conscious about, ways to rile him up in the form of a profile, carrd, or bio, then trolls will have it even easier.
So What?
Over time, too many enablers, tourists, or drama magnets may or may not ruin your online community. Over time, engagement optimisers can slowly but steadily ruin your community. Socialisers may not notice or care either way.
A code of conduct may protect your community against bad actors, but it can't protect your forum culture from clueless actors. It's incredibly hard to create a good set of punitive rules against this. As a moderator, it's emotionally difficult to enforce rules against this. You don't want to kick people while they are down, and you don't want to punish them for making popular content, even if it's just pictures of kittens and pictures of their lunch.
The only way you can achieve anything is by educating your users, and hoping they give a damn about forum culture.
14 notes
·
View notes
Text
Obsidian And RTX AI PCs For Advanced Large Language Model

How to Utilize Obsidian‘s Generative AI Tools. Two plug-ins created by the community demonstrate how RTX AI PCs can support large language models for the next generation of app developers.
Obsidian Meaning
Obsidian is a note-taking and personal knowledge base program that works with Markdown files. Users may create internal linkages for notes using it, and they can see the relationships as a graph. It is intended to assist users in flexible, non-linearly structuring and organizing their ideas and information. Commercial licenses are available for purchase, however personal usage of the program is free.
Obsidian Features
Electron is the foundation of Obsidian. It is a cross-platform program that works on mobile operating systems like iOS and Android in addition to Windows, Linux, and macOS. The program does not have a web-based version. By installing plugins and themes, users may expand the functionality of Obsidian across all platforms by integrating it with other tools or adding new capabilities.
Obsidian distinguishes between community plugins, which are submitted by users and made available as open-source software via GitHub, and core plugins, which are made available and maintained by the Obsidian team. A calendar widget and a task board in the Kanban style are two examples of community plugins. The software comes with more than 200 community-made themes.
Every new note in Obsidian creates a new text document, and all of the documents are searchable inside the app. Obsidian works with a folder of text documents. Obsidian generates an interactive graph that illustrates the connections between notes and permits internal connectivity between notes. While Markdown is used to accomplish text formatting in Obsidian, Obsidian offers quick previewing of produced content.
Generative AI Tools In Obsidian
A group of AI aficionados is exploring with methods to incorporate the potent technology into standard productivity practices as generative AI develops and speeds up industry.
Community plug-in-supporting applications empower users to investigate the ways in which large language models (LLMs) might improve a range of activities. Users using RTX AI PCs may easily incorporate local LLMs by employing local inference servers that are powered by the NVIDIA RTX-accelerated llama.cpp software library.
It previously examined how consumers might maximize their online surfing experience by using Leo AI in the Brave web browser. Today, it examine Obsidian, a well-known writing and note-taking tool that uses the Markdown markup language and is helpful for managing intricate and connected records for many projects. Several of the community-developed plug-ins that add functionality to the app allow users to connect Obsidian to a local inferencing server, such as LM Studio or Ollama.
To connect Obsidian to LM Studio, just select the “Developer” button on the left panel, load any downloaded model, enable the CORS toggle, and click “Start.” This will enable LM Studio’s local server capabilities. Because the plug-ins will need this information to connect, make a note of the chat completion URL from the “Developer” log console (“http://localhost:1234/v1/chat/completions” by default).
Next, visit the “Settings” tab after launching Obsidian. After selecting “Community plug-ins,” choose “Browse.” Although there are a number of LLM-related community plug-ins, Text Generator and Smart Connections are two well-liked choices.
For creating notes and summaries on a study subject, for example, Text Generator is useful in an Obsidian vault.
Asking queries about the contents of an Obsidian vault, such the solution to a trivia question that was stored years ago, is made easier using Smart Connections.
Open the Text Generator settings, choose “Custom” under “Provider profile,” and then enter the whole URL in the “Endpoint” section. After turning on the plug-in, adjust the settings for Smart Connections. For the model platform, choose “Custom Local (OpenAI Format)” from the options panel on the right side of the screen. Next, as they appear in LM Studio, type the model name (for example, “gemma-2-27b-instruct”) and the URL into the corresponding fields.
The plug-ins will work when the fields are completed. If users are interested in what’s going on on the local server side, the LM Studio user interface will also display recorded activities.
Transforming Workflows With Obsidian AI Plug-Ins
Consider a scenario where a user want to organize a trip to the made-up city of Lunar City and come up with suggestions for things to do there. “What to Do in Lunar City” would be the title of the new note that the user would begin. A few more instructions must be included in the query submitted to the LLM in order to direct the results, since Lunar City is not an actual location. The model will create a list of things to do while traveling if you click the Text Generator plug-in button.
Obsidian will ask LM Studio to provide a response using the Text Generator plug-in, and LM Studio will then execute the Gemma 2 27B model. The model can rapidly provide a list of tasks if the user’s machine has RTX GPU acceleration.
Or let’s say that years later, the user’s buddy is visiting Lunar City and is looking for a place to dine. Although the user may not be able to recall the names of the restaurants they visited, they can review the notes in their vault Obsidian‘s word for a collection of notes to see whether they have any written notes.
A user may ask inquiries about their vault of notes and other material using the Smart Connections plug-in instead of going through all of the notes by hand. In order to help with the process, the plug-in retrieves pertinent information from the user’s notes and responds to the request using the same LM Studio server. The plug-in uses a method known as retrieval-augmented generation to do this.
Although these are entertaining examples, users may see the true advantages and enhancements in daily productivity after experimenting with these features for a while. Two examples of how community developers and AI fans are using AI to enhance their PC experiences are Obsidian plug-ins.
Thousands of open-source models are available for developers to include into their Windows programs using NVIDIA GeForce RTX technology.
Read more on Govindhtech.com
#Obsidian#RTXAIPCs#LLM#LargeLanguageModel#AI#GenerativeAI#NVIDIARTX#LMStudio#RTXGPU#News#Technews#Technology#Technologynews#Technologytrends#govindhtech
3 notes
·
View notes
Text

SYSTEM ADMIN INTERVIEW QUESTIONS 24-25
Table of Content
Introduction
File Permissions
User and Group Management:
Cron Jobs
System Performance Monitoring
Package Management (Red Hat)
Conclusion
Introduction
The IT field is vast, and Linux is an important player, especially in cloud computing. This blog is written under the guidance of industry experts to help all tech and non-tech background individuals secure interviews for roles in the IT domain related to Red Hat Linux.
File Permissions
Briefly explain how Linux file permissions work, and how you would change the permissions of a file using chmod. In Linux, each file and directory has three types of permissions: read (r), write (w), and execute (x) for three categories of users: owner, group, and others. Example: You will use chmod 744 filename, where the digits represent the permission in octal (7 = rwx, 4 = r–, etc.) to give full permission to the owner and read-only permission to groups and others.
What is the purpose of the umask command? How is it helpful to control default file permissions?umask sets the default permissions for newly created files and directories by subtracting from the full permissions (777 for directories and 666 for files). Example: If you set the umask to 022, new files will have permissions of 644 (rw-r–r–), and directories will have 755 (rwxr-xr-x).
User and Group Management:
Name the command that adds a new user in Linux and the command responsible for adding a user to a group. The Linux useradd command creates a new user, while the usermod command adds a user to a specific group. Example: Create a user called Jenny by sudo useradd jenny and add him to the developer’s group by sudo usermod—aG developers jenny, where the—aG option adds users to more groups without removing them from other groups.
How do you view the groups that a user belongs to in Linux?
The group command in Linux helps to identify the group a user belongs to and is followed by the username. Example: To check user John’s group: groups john
Cron Jobs
What do you mean by cron jobs, and how is it scheduled to run a script every day at 2 AM?
A cron job is defined in a crontab file. Cron is a Linux utility to schedule tasks to run automatically at specified times. Example: To schedule a script ( /home/user/backup.sh ) to run daily at 2 AM: 0 2 * * * /home/user/backup.sh Where 0 means the minimum hour is 2, every day, every month, every day of the week.
How would you prevent cron job emails from being sent every time the job runs?
By default, cron sends an email with the output of the job. You can prevent this by redirecting the output to /dev/null. Example: To run a script daily at 2 AM and discard its output: 0 2 * * * /home/user/backup.sh > /dev/null 2>&1
System Performance Monitoring
How can you monitor system performance in Linux? Name some tools with their uses.
Some of the tools to monitor the performance are: Top: Live view of system processes and usage of resource htop: More user-friendly when compared to the top with an interactive interface. vmstat: Displays information about processes, memory, paging, block IO, and CPU usage. iostat: Showcases Central Processing Unit (CPU) and I/O statistics for devices and partitions. Example: You can use the top command ( top ) to identify processes consuming too much CPU or memory.
In Linux, how would you check the usage of disk space?
The df command checks disk space usage, and Du is responsible for checking the size of the directory/file. Example: To check overall disk space usage: df -h The -h option depicts the size in a human-readable format like GB, MB, etc.
Package Management (Red Hat)
How do you install, update, or remove packages in Red Hat-based Linux distributions by yum command?
In Red Hat and CentOS systems, the yum package manager is used to install, update, or remove software. Install a package: sudo yum install httpd This installs the Apache web server. Update a package: sudo yum update httpd Remove a package:sudo yum remove httpd
By which command will you check the installation of a package on a Red Hat system?
The yum list installed command is required to check whether the package is installed. Example: To check if httpd (Apache) is installed: yum list installed httpd
Conclusion
The questions are designed by our experienced corporate faculty which will help you to prepare well for various positions that require Linux such as System Admin.
Contact for Course Details – 8447712333
2 notes
·
View notes
Text
Version 585
youtube
windows
zip
exe
macOS
app
linux
tar.zst
I had a great couple of weeks getting the tag siblings and parents dialogs to load quickly.
full changelog
fast siblings and parents
The PTR has been a painful success. It is great, and I am grateful for how it keeps growing, but every time we add ten thousand or a hundred thousand new things somewhere, it lags out some bit of UI where I never thought it would be a problem. Anyone who has tried to work with PTR siblings or parents knows what I am talking about--it can take five or ten seconds, every single time, to load the manage tag siblings/parents dialogs. The same is true for anyone who has programmatically imported siblings from a booru--adding 100,000 pairs can be neat, but editing them manually is then a constant frustration.
So! I have rewritten both dialogs, and the long and short of it is they now load instantly. If they need to review some pairs to do logic (like 'hey, does this new pair the user wants to add conflict with the existing pair structure?'), it all happens in the background, usually so quickly you never notice it. We'll see how this actually works on IRL situations, but I do feel good about all this work. There was a lot to do, but it ultimately seemed to go well, enough that I had time for some bells and whistles.
Beyond some optimisations and loop-detection fixes, there's a workflow change in that these two dialogs now have a 'stickier' workspace. The list of pairs has typically shown anything related to what you have waiting to be added, and I have now extended that to say 'and they now stay in view after you add'. Whenever you type in a tag, everything related to that tag is loaded up and stays in view while you work on other things. If you want to clear the workspace, you can just click a button to reset. I hope this makes it easier to edit and even merge larger sibling groups.
This is all a big change, and I'm sure I've messed up somewhere. If you do siblings or parents a lot, give it all a go and let me know how it works out. The PTR really is huge, and some larger groups may still take a second or two to load--we'll see.
other highlights
Hitting escape now deselects any taglist!
options->media viewer gets a new 'Do not allow mouse media drag-panning when the media has duration' checkbox. If you often misclick when scrubbing, try it out.
I pared down the spammy 'added to x service 3 days ago' lines in the media viewer's top hover. It now pretty much just says 'imported, modified'. If you need to see archived time or something, note that the timestamps are still available on the normal media right-click menu, on the flyout submenu off the top row.
next week
I have lots of small things to be getting on with, so I'll just catch up on my normal queue.
2 notes
·
View notes
Text
Linux for FFXIV and more, Extended version
Its been a month since my previous post about FFXIV and general use with Linux. The more time I spend with it, the more I have both refined my setup and and made discoveries that are worth going more in-depth about. This is going to be a long one, so I'm putting it under a cut as a megapost of nerd shit.

Chapter 1 : Discord
First up, and the first thing that might make a new user turn right back around: Discord. Look. If you're an MMO player, chances are you have your social circle of friends that live across country, or across several countries, that you want to hang and share things with. If you're here and you don't use Discord constantly, I have questions about you. Anyway.
Discord screenshare does not work. It virtually never has. Now, full truth is that, sure, you can share your screen. But not audio. Wanna stream games to your friends in chat? Not viable. Wanna group watch something? Not viable. The available workarounds for this are a combination of technical bodgework to make your mic transmit screen audio (which a new or casual user is unlikely to do, or want, since you can't talk while doing it) and potential ToS violations using 3rd party clients. I consider my Discord account too essential to risk a ToS ban.
Surely Discord is working on this righ-

Ah.
Discord's own feedback forum has a thread that is over 4 years old with near 1900 upvotes for a Linux screensharing fix and there has been no traction. It is the most upvoted topic and second place has 500. I'm not holding my breath on this one.
Maybe this isn't important for everyone, but this single feature in this single programme is going to be the thing that keeps Windows reluctantly installed on one of my drives.
Chapter 2: Ways to Play FFXIV (and others ft. Lutris)
I went over, in my last post, how Steam's compatibility features will run FFXIV just fine if you have the Steam version (and the non-steam version if you copy over the game files from a Windows install). The more graceful solution for non-steam accounts, which I explored for the sake of cleanliness, is Lutris. TL;DR - Lutris will run anything you don't have through Steam.
What is it?
Lutris is a programme that installs games and game launchers inside a compatibility framework that mimics a Windows environment, similarly to how Steam does. The Lutris website maintains a library of configurations which allow you to install launcher based games, with the option for Lutris to download the launcher for you, or download the install file yourself and provide Lutris with it to complete the configuration. You could make an account with Lutris if you like, but it is not necessary.
I successfully installed Battle.net (and installed WoW though the Battle.net launcher) and FFXIV fresh with Lutris. So far it has been flawless*. You can do this with other storefronts too, if you have games on the Epic store, EA store, etc.
Lutris will set up a folder for the game and, nested inside, is an entire windows directory and virtual C:\ drive where you can go in and view the install. In theory, tools like shaders that only need be dropped in the game folder should work by dropping them here in the same way, but I have not tested this. You can also add any .exe to Lutris and have it try to run it, though success is not guaranteed.
Chapter 3: Desktop Environment
As far as I am concerned, there are two options here.
KDE and GNOME
Most Linux distros will give you an option to pick. Either when you download the install media or during the install itself. The important thing to remember is that your desktop is not specific to your distro. Ubuntu comes with GNOME but you can download and install KDE later if you want to, and switch between the two at login.
Pick based on how you like the look. GNOME has a MacOS look and feel and simple menus. KDE is more Windows-like with more customization of colours, themes, and extended system menus that may be more familiar to Windows users and easier to get to things like detailed networking options. KDE also has HDR support, if that's a thing you have.
Each comes with an array of software which can be installed independent of the desktop environment you use. For example, I use KDE but have GNOME's Disks utility downloaded as my go-to for disk management. When I use GNOME, I still use KDE's Spectacle for a snipping tool and KDE's Krita as a screenshot editor.
Chapter 4: *Caveats and I am an Optimization and Temperature Control Freak
You're still here! Awesome! Now I am going to go over some things that have more to do with the fact that I am a freak about my PC hardware. If you are a laptop user, and/or are the type to just use one SSD and touch nothing about your PC, this might be safe for you to skip.
4a: Storage
SSDs and HDDs that are not your primary install drive for Linux will often be mounted in the system as removable media. This means that they have the potential to be reassigned to different mount points on each boot. You might see how this might be a problem if your Steam or Lutris libraries are not on the same SSD as your Linux install. This turned my Lutris install of WoW upside down several times.
This is something that I would love to be able to provide a new-user friendly solution for, but it isn't a friendly process if I'm being honest. How you do this will likely vary depending on your comfort with the command line and the distro and desktop environment you use. The solution I came to was to have drives mount by their UUID in GNOME's Disks utility. Disks is pretty friendly and makes this not terribly technical.
Finding the UUID if you don't use Disks is something for a more detailed guide, but if you haven't run off yet you're either invested enough to look that up or already know how to do it.
4b: Controlling Fans and GPU (all of this is going to require command line, editing config files, and more knowledge or strong googling.)
I am very particular about two things with my PC. Operating temperatures and fan noise. If you build your own PCs, chances are you're like this too. Fan control on Linux is a mixed bag, since we don't have access to the excellent Rem0o FanControl. Generally, if you connect all your fans to normal fan headers, you can set up your fan curves in BIOS and let that take care of everything. Alternatively, modern distros have lm-sensors and fan control, both of which require command line to configure and use. There is a gui app for fan control, but in my case, downloading it through my package manager always returns a version that uses Fahrenheit instead of Celsius and I couldn't abide it or be bothered installing it from GitHub. I have Lian Li Uni Fans, AL120 v2. These come with a USB controller normally run by Lian Li's software, which has to be told to pass control over to the motherboard connector. On the off chance that you have these too, here is a utility that allows you to set this in Linux. In the end, I let my BIOS take care of all my fans for simplicity's sake, after setting up that UniFan utility.
For advanced GPU and CPU control there is corectrl. For the most part corectrl is great and straightforward, but for some GPUs you need to edit specific boot options outlined in their install guide (this ended up being the case for my 6900XT, which I run an undervolt on. If you want it to run without requiring a password every time, that needs to be tweaked as well.
After all that, I have my temps and noise balanced just as well as I did in Windows! Yay!
Chapter 5: Boy Howdy Do I Hate Flatpaks and Snaps
For those of you who are not yet Linux users and somehow got this far, an explanation is on order.
The traditional way of installing applications on Linux is though the command line terminal, using a package manager. If I wish to install Steam on Ubuntu, I will open up my terminal and use the apt package manager with "apt-get install steam", or in Arch i'll use pacman with "pacman -S steam". This prompts the package manager to download and install the application and its dependencies from a repository managed by the organization that maintains the distro. This looks a little intimidating to new users, but is the one "true" way to install things.
Distros and desktop environments will almost always come with an app or software center that allows you to install applications through an easy graphical interface. These applications are packaged in Flatpak or Snap packages.
In KDE this is Discover.

Unfortunately these things suck.
When you properly install an application, it has access to everything it could need with regards to hardware and software dependencies. Steam, for example, needs access to your hardware to add secondary drives to your library. OBS needs access to webcams or capture cards, etc.
Flatpaks and Snaps are self-contained. They run in their own sandbox, isolated from the rest of the system. Ergo, Steam installed this way cannot access additional drives to add for additional library storage. OBS installed this way cannot access said capture cards or other devices.
This makes me very angry, since these user friendly packages could be doing so much to make Linux easier to use for newcomers, but they are hamstrung in functionality compared to a command line install.
Chapter 6: RGB GaMeRRRr
Install OpenRGB.
...ok, OpenRGB is a bit much if you're used to something like iQue or Synapse. In my experience, I needed to determine how many LEDs were in my fans and RGB strip. That info is generally available online. Once I did that math and told OpenRGB how many LEDs were connected, it was fairly easy to use after that. I generally just do solid colours, but OpenRGB and its plugins are another rabbit hole to get into.
OpenRGB also supports a long list of keyboards and mice... which mine aren't on (the Razer Naga X is such a lost and forgotten lil mouse), but that's ok, most people will be covered by this.
Chapter 7: A Point About Drivers
With Windows, we're used to having to install drivers for most things. Desktop Linux is different with the way drivers are handled. Which is to say, you don't have to do anything. Drivers are part of the kernel that makes up Linux. If you are using a rolling release (Arch-based) distro, you are getting all the drivers everywhere all at once every time you update. For other distros, the long term support version may be behind on drivers for things released after the LTS distro, but more current (often deceptively named 'unstable') releases are generally good about updates. This leads in to a much larger discussion about distros, but without getting into that, the TL;DR is: You're fine, just get your Nvidia drivers and everything else is already there.
I think that's it for now okbye
3 notes
·
View notes
Text
"The Right Way to Add Users to Sudoers Without Compromising Security"
Granting administrative privileges in Linux isn’t just about functionality — it’s a matter of trust and security. The sudoers system is a powerful way to control access, but misusing it can lead to serious vulnerabilities.
This blog breaks down the correct, secure, and thoughtful way to add users to the sudoers system without exposing your Linux environment to risk — all without diving into terminal commands.
🧠 Why the Sudoers System Exists
In Linux, the root user has full control over the system. However, it’s unsafe to use this account directly or share access to it. That’s where sudo comes in — it acts like a controlled gate, letting approved users carry out admin tasks while tracking and limiting their power.
The sudoers system defines who can use sudo, and what actions they are allowed to perform.
🎯 The Real Goal: Controlled Administrative Access
When adding users to sudoers, the goal is not just to “make it work” — it’s to do so responsibly, following these core principles:
🔐 1. Minimum Required Access
Don’t grant full administrative rights unless it’s absolutely necessary. Most users only need limited privileges to perform specific tasks.
Example: A developer might only need permission to restart a web server — not to install software or edit system files.
🧩 2. Specific, Not Broad Permissions
Avoid giving overly broad permissions. It’s better to allow access to only the tools or actions a user truly needs, rather than giving full access across the system.
Why this matters: Over-permissioned users could unintentionally (or maliciously) change critical system settings.
📁 3. Organized and Trackable Access
Structure your access rules so they are clear and easy to review. Keep user permissions separated and well-documented. This helps during audits, troubleshooting, or team changes.
👥 4. Use Roles or Groups Wisely
If multiple users need the same level of access, consider organizing them into a group. That way, you can manage their privileges collectively, without having to repeat rules for each person.
🧪 5. Test and Monitor Privileges Regularly
Granting sudo access isn’t a one-time task. Regularly review who has access and ensure that all privileges are still necessary. Also, monitor system logs to track how sudo privileges are being used.
🚫 Common Mistakes to Avoid
Even experienced admins can introduce risk if they’re not careful. Here are some things not to do: ❌ Mistake⚠️ Risk IntroducedGiving full system access to casual usersIncreases chance of critical errorsAllowing unrestricted access to sensitive toolsUsers might bypass intended security controlsSkipping access reviewsOutdated permissions can lead to long-term vulnerabilitiesNot recording who has what permissionsMakes audits and incident response harder
✅ Best Practices Summary
Here’s a recap of how to add users to sudoers safely and correctly:
Only give access that’s needed for the user’s role
Be precise about what actions users can perform
Avoid full administrative access unless absolutely necessary
Keep access policies clean, structured, and documented
Regularly audit and review who has sudo access
🏁 Final Thoughts
Adding a user to the sudoers system isn't just about function — it's a security decision that should be made with care. By following a structured, minimal-access approach, you can keep your Linux system both productive and protected.
In short:
✅ Give access thoughtfully ✅ Review regularly ✅ Grant only what's required
1 note
·
View note
Text
How to Hire a Linux Kernel Developer: Skills, Experience & Interview Questions

Linux powers everything from web servers to embedded devices, and its core lies at Linux Kernel - a crucial layer that demands deep expertise for modification, maintenance, and optimization. For tech companies that are building high-performance systems, device drivers, or custom operating environments the decision to hire software developers proficient in Linux Kernel can be a strategic move.
But kernel development is a niche skill and to hire the right developer requires you to know what to look for and to ask the right questions. In this article, we will cover how you can do it.
Finding the Right Low-Level Expert for High-Performance Systems
Kernel engineers bridge the gap between user-level apps and hardware by working at the lowest software layer. Frequently, when hiring Linux kernel developers, you often want to:
Patch or modify the kernel to work with particular hardware.
Create or troubleshoot device drivers.
Boost system efficiency or lower delay.
Assure mission-critical systems' security and stability.
This isn't how applications are usually developed. It calls for a solid understanding of memory management, operating systems, and the nuances of C programming.
Key Skills to Look For
Give these crucial areas top priority while vetting applicants:
Proficiency in C: Since C is used for nearly all kernel development, in-depth expertise is non negotiable.
Kernel module experience: Applicants should be able to write, compile, and load kernel modules.
Tools for Debugging and Profiling: It's crucial to be familiar with programs like gdb, perf, and ftrace.
Knowledge of OS Internals: Key ideas include scheduling, memory management, and I/O systems.
Version Control & Patch Submissions: It is highly advantageous to contribute to open-source projects or the mainline Linux kernel.
A candidate's ability to communicate effectively across time zones and accurately document their work is also essential if you're looking to hire remote developers.
Where to Find Talent
Using conventional methods to hire Linux kernel developers isn't always simple. These engineers frequently contribute to specialized communities like Git repositories and kernel mailing groups, or they work on open-source projects.
Some tech companies decide to collaborate with organizations that focus on low-level software development or embedded technologies. Others seek to hire programmers who possess a solid foundation in C and OS, then train them in kernel-specific techniques.
Interview Questions to Ask
After you've found a good applicant, probe further with focused questions:
What distinguishes user space from kernel space?
How would a production system's kernel panic be debugged?
Could you describe the Linux kernel's memory allocation mechanism?
Have you submitted bug fixes or patches to the mainline kernel?
How are dependencies between kernel modules managed?
What function does the Linux kernel's scheduler serve?
Asking them to describe a recent kernel-related project, including its objectives, tools, and methods for testing and validating their work, is another option.
Summing Up
You must know exactly what your system needs and what kernel experience will provide it in order to hire Linux kernel engineers. The correct hire adds dependability, speed, and profound technical understanding to everything from driver creation to system optimization.
These developers are essential to tech companies creating scalable and secure infrastructure. Whether you're looking to hire remote developers or in-house developers, a careful, skills-based strategy can help you find the best fit.
0 notes
Text
Postal SMTP install and setup on a virtual server

Postal is a full suite for mail delivery with robust features suited for running a bulk email sending SMTP server. Postal is open source and free. Some of its features are: - UI for maintaining different aspects of your mail server - Runs on containers, hence allows for up and down horizontal scaling - Email security features such as spam and antivirus - IP pools to help you maintain a good sending reputation by sending via multiple IPs - Multitenant support - multiple users, domains and organizations - Monitoring queue for outgoing and incoming mail - Built in DNS setup and monitoring to ensure mail domains are set up correctly List of full postal features
Possible cloud providers to use with Postal
You can use Postal with any VPS or Linux server providers of your choice, however here are some we recommend: Vultr Cloud (Get free $300 credit) - In case your SMTP port is blocked, you can contact Vultr support, and they will open it for you after providing a personal identification method. DigitalOcean (Get free $200 Credit) - You will also need to contact DigitalOcean support for SMTP port to be open for you. Hetzner ( Get free €20) - SMTP port is open for most accounts, if yours isn't, contact the Hetzner support and request for it to be unblocked for you Contabo (Cheapest VPS) - Contabo doesn't block SMTP ports. In case you are unable to send mail, contact support. Interserver
Postal Minimum requirements
- At least 4GB of RAM - At least 2 CPU cores - At least 25GB disk space - You can use docker or any Container runtime app. Ensure Docker Compose plugin is also installed. - Port 25 outbound should be open (A lot of cloud providers block it)
Postal Installation
Should be installed on its own server, meaning, no other items should be running on the server. A fresh server install is recommended. Broad overview of the installation procedure - Install Docker and the other needed apps - Configuration of postal and add DNS entries - Start Postal - Make your first user - Login to the web interface to create virtual mail servers Step by step install Postal Step 1 : Install docker and additional system utilities In this guide, I will use Debian 12 . Feel free to follow along with Ubuntu. The OS to be used does not matter, provided you can install docker or any docker alternative for running container images. Commands for installing Docker on Debian 12 (Read the comments to understand what each command does): #Uninstall any previously installed conflicting software . If you have none of them installed it's ok for pkg in docker.io docker-doc docker-compose podman-docker containerd runc; do sudo apt-get remove $pkg; done #Add Docker's official GPG key: sudo apt-get update sudo apt-get install ca-certificates curl -y sudo install -m 0755 -d /etc/apt/keyrings sudo curl -fsSL https://download.docker.com/linux/debian/gpg -o /etc/apt/keyrings/docker.asc sudo chmod a+r /etc/apt/keyrings/docker.asc #Add the Docker repository to Apt sources: echo "deb https://download.docker.com/linux/debian $(. /etc/os-release && echo "$VERSION_CODENAME") stable" | sudo tee /etc/apt/sources.list.d/docker.list > /dev/null sudo apt-get update #Install the docker packages sudo apt-get install docker-ce docker-ce-cli containerd.io docker-buildx-plugin docker-compose-plugin -y #You can verify that the installation is successful by running the hello-world image sudo docker run hello-world Add the current user to the docker group so that you don't have to use sudo when not logged in as the root user. ##Add your current user to the docker group. sudo usermod -aG docker $USER #Reboot the server sudo reboot Finally test if you can run docker without sudo ##Test that you don't need sudo to run docker docker run hello-world Step 2 : Get the postal installation helper repository The Postal installation helper has all the docker compose files and the important bootstrapping tools needed for generating configuration files. Install various needed tools #Install additional system utlities apt install git vim htop curl jq -y Then clone the helper repository. sudo git clone https://github.com/postalserver/install /opt/postal/install sudo ln -s /opt/postal/install/bin/postal /usr/bin/postal Step 3 : Install MariaDB database Here is a sample MariaDB container from the postal docs. But you can use the docker compose file below it. docker run -d --name postal-mariadb -p 127.0.0.1:3306:3306 --restart always -e MARIADB_DATABASE=postal -e MARIADB_ROOT_PASSWORD=postal mariadb Here is a tested mariadb compose file to run a secure MariaDB 11.4 container. You can change the version to any image you prefer. vi docker-compose.yaml services: mariadb: image: mariadb:11.4 container_name: postal-mariadb restart: unless-stopped environment: MYSQL_ROOT_PASSWORD: ${DB_ROOT_PASSWORD} volumes: - mariadb_data:/var/lib/mysql network_mode: host # Set to use the host's network mode security_opt: - no-new-privileges:true read_only: true tmpfs: - /tmp - /run/mysqld healthcheck: test: interval: 30s timeout: 10s retries: 5 volumes: mariadb_data: You need to create an environment file with the Database password . To simplify things, postal will use the root user to access the Database.env file example is below. Place it in the same location as the compose file. DB_ROOT_PASSWORD=ExtremelyStrongPasswordHere Run docker compose up -d and ensure the database is healthy. Step 4 : Bootstrap the domain for your Postal web interface & Database configs First add DNS records for your postal domain. The most significant records at this stage are the A and/or AAAA records. This is the domain where you'll be accessing the postal UI and for simplicity will also act as the SMTP server. If using Cloudflare, turn off the Cloudflare proxy. sudo postal bootstrap postal.yourdomain.com The above will generate three files in /opt/postal/config. - postal.yml is the main postal configuration file - signing.key is the private key used to sign various things in Postal - Caddyfile is the configuration for the Caddy web server Open /opt/postal/config/postal.yml and add all the values for DB and other settings. Go through the file and see what else you can edit. At the very least, enter the correct DB details for postal message_db and main_db. Step 5 : Initialize the Postal database and create an admin user postal initialize postal make-user If everything goes well with postal initialize, then celebrate. This is the part where you may face some issues due to DB connection failures. Step 6 : Start running postal # run postal postal start #checking postal status postal status # If you make any config changes in future you can restart postal like so # postal restart Step 7 : Proxy for web traffic To handle web traffic and ensure TLS termination you can use any proxy server of your choice, nginx, traefik , caddy etc. Based on Postal documentation, the following will start up caddy. You can use the compose file below it. Caddy is easy to use and does a lot for you out of the box. Ensure your A records are pointing to your server before running Caddy. docker run -d --name postal-caddy --restart always --network host -v /opt/postal/config/Caddyfile:/etc/caddy/Caddyfile -v /opt/postal/caddy-data:/data caddy Here is a compose file you can use instead of the above docker run command. Name it something like caddy-compose.yaml services: postal-caddy: image: caddy container_name: postal-caddy restart: always network_mode: host volumes: - /opt/postal/config/Caddyfile:/etc/caddy/Caddyfile - /opt/postal/caddy-data:/data You can run it by doing docker compose -f caddy-compose.yaml up -d Now it's time to go to the browser and login. Use the domain, bootstrapped earlier. Add an organization, create server and add a domain. This is done via the UI and it is very straight forward. For every domain you add, ensure to add the DNS records you are provided.
Enable IP Pools
One of the reasons why Postal is great for bulk email sending, is because it allows for sending emails using multiple IPs in a round-robin fashion. Pre-requisites - Ensure the IPs you want to add as part of the pool, are already added to your VPS/server. Every cloud provider has a documentation for adding additional IPs, make sure you follow their guide to add all the IPs to the network. When you run ip a , you should see the IP addresses you intend to use in the pool. Enabling IP pools in the Postal config First step is to enable IP pools settings in the postal configuration, then restart postal. Add the following configuration in the postal.yaml (/opt/postal/config/postal.yml) file to enable pools. If the section postal: , exists, then just add use_ip_pools: true under it. postal: use_ip_pools: true Then restart postal. postal stop && postal start The next step is to go to the postal interface on your browser. A new IP pools link is now visible at the top right corner of your postal dashboard. You can use the IP pools link to add a pool, then assign IP addresses in the pools. A pool could be something like marketing, transactions, billing, general etc. Once the pools are created and IPs assigned to them, you can attach a pool to an organization. This organization can now use the provided IP addresses to send emails. Open up an organization and assign a pool to it. Organizations → choose IPs → choose pools . You can then assign the IP pool to servers from the server's Settings page. You can also use the IP pool to configure IP rules for the organization or server. At any point, if you are lost, look at the Postal documentation. Read the full article
0 notes
Text
I have Linux Mint on my travel laptop. I do not have it on my Larger Less-Travel-y Laptop, because I need Acrobat Pro to do work, and I am a Word user at a skill level that makes switching to Libre Office difficult. (Also I use both Word and Acrobat Pro in my day job; there is no option of "just get used to something else." It'd always be "get used to both.") I also use ABBYY FineReader, and there is absolutely nothing Linux-friendly that compares.
Can attest that Linux Mint is easy to install and easy to use. Slightly more difficult to set up to run on a flash drive that remembers your settings instead of wiping the base OS. (...I hauled in Linux-Fluent Daughter to set that up. I could've done it alone but was getting frustrated. Creating partitions on a flash drive is not fun for non-techies.)
(Srsly, Linux folks, why the hell is there no How To Switch From Windows website? Why is there no nice, open community and attached Discord for So You Want To Defenestrate Your Computer? No tiny nonprofit focused on End The Chromebook Conspiracy? Where's the "We convert Win7 Laptops into Linux For Students" group?)
Notes from a power Windows user who has loved Linux for decades but has very little practical experience with it:
The "choose a distro" advice is terrible. There are no guidelines for it, 2/3 of the searchable advice about it is more than 10 years old, and fully half of that is "how to get the smallest possible distro onto your very tiny ancient drive." And it's great to know that I can run Linux off a 2gb flash drive! But. It's not what I actually need.
Info about "how do I run this set of programs I use all the time" is also terrible. And often hostile, and packed with "you should be using open source software instead."
At no point in the "hey you should try Linux!" discussions does anyone mention "oh by the way, some laptops will have no native support for certain exotic features like audio or printing. You will need to track down special drivers or weird third-party plugin things to make those work. You will only discover this lack after you have installed Linux, joined a Zoom call, and realized that your OS thinks your speakers don't exist."
Choose a password you are comfortable typing A LOT. Seriously, security is less of an issue here than "password I can type 30 times during a fix-it session." You can switch to a more secure password when you're comfortable with the OS. (Don't use "password" or "pa55w0rd" as your password, but you also don't need to go the "correct horse battery staple" route.)
A notable number of apps do not have a "click here to install" feature that we get used to with Windows. Snap and Flatpak are not difficult to learn or work with, but they are different. (And they usually take more space than expected.)
A lot of apps require frequent updates to function. Especially the ones that don't have a native Linux version. This is also frustrating.
OS emulators and virtual drives are next-level techistry and any suggestions for using them should be followed with either a very solid tutorial (in TEXT form, not a video) or an offer to hand-hold while someone gets it set up.
Once you start using Linux - if it's Mint, it will mostly seem like Windows. Sometimes there'll be a weird error message. WHEN SEARCHING FOR ADVICE: make sure to add [linux mint] to the search terms, AND limit the results to the last year. Otherwise, you wind up finding forum posts from 2014 that say "Ugh this driver issue has been FIXED; just fuckin install Ubuntu 12 already." (Ubuntu is currently at 24.1.)
Some people will tell you you can use Linux without getting into command-line activity. They are lying. You will need to be at least somewhat comfortable with the Terminal. This is not hard, but it is different. And there are no starter tutorials on this. (I have been looking literally for decades.) (I do not speak Command Line well enough to write one.)
Some people will tell you Linux isn't functional unless you learn a whole lot of command-line functions and do most of your operations from there. They are also lying.
There are differences between the distros that, as a Windows or Mac user, you cannot comprehend. Like. They will rattle off a list of features and those will mean nothing to you. They mean nothing to me. I went with Mint because it is "most like Windows." My daughter uses PopOS because it has better VR support. I think.
You will occasionally have to re-install the whole damn OS, and it will be terrifying. It will tell you your files are safe. This is correct, if you have not done weird customized wonkery to them, in which case, you don't need the warning.
Google knows about Linux and they are Not Happy. Newer Chromebooks can't be directly converted to Linux without fucking with the hardware - as in, open them up and remove the thing they installed to make Linux not work. (Or rather, to make ChromeOS always recoverable.) However, even those will allow running Linux off a flash drive.
The key advantages to Linux:
Lack of Microsoft & Apple's increasing demands to collect all your personal data.
Lack of random "upgrades" that fuck up your existing processes. (That said: If you use cloud-based apps - like, oh, Discord - you will need frequent updates anyway.)
Whateverthefuck is going on with AI invading your computer - you can dodge all of that.
If you do want to customize things, you can. You can change a lot of the appearance, the startup details, what software gets priority in the system, and a whole swarm of back-end details that most Windows users (including me) are pretty much oblivious to. CAVEAT: None of that is as easy as many Linux stans make it sound. SECOND CAVEAT: If you customize your system to hell and back, you won't be able to work (well) on a standard base-install version. The result of this, is that Linux experts often flounder when helping newbies, because they don't know what any of the default settings are anymore. (They are experts. They know what's available and how to make it work. They just don't know where it's hiding in your system.)
Linux will run on much smaller, slower computers than MS or Apple, because, see above, it's not trying to spy on you or inflict AI shenanigans on you. A basic student-functional Linux laptop can be much cheaper than what's needed to run the current Windows or MacOS, and less cloud-driven that Chromebooks.
I swear to fucking god. I would claw out OneDrive from my computer if I could. I would burn down their servers if I could. I would run down their stocks to the ground if I could. I hope every single one of their workers gets a better offer from a competitor in the next 24 hours. I hope every single one of their light bulbs explodes at the same time. I hope every single carton of milk in their fridge will always be expired.
Stop backing up my fucking files.
Stop asking me to back up my fucking files.
Stop taking my fucking files off my fucking computer.
I don't want a fucking reminder in three fucking days. Let me fucking say no.
Fuckers.
29K notes
·
View notes
Text
Adding, managing and deleting groups on Linux
User groups on Linux systems are often set up to provide access permissions to specific groups of users who share some responsibility. For example, a particular group of users may be allowed to run commands with superuser privilege or access a group of shared files. Another group may be given permission to add, update or remove user accounts. User groups provide a way to give specific people…
0 notes
Text
Email Client - Mailspring
The Sleek Email Client for the Modern User
In today’s digital age, email is a central communication tool for both personal and professional life. With countless email clients available, Mailspring stands out as one of the sleekest and most feature-rich email applications. Whether you're a productivity enthusiast, a remote worker, or someone who simply wants a well-organized inbox, Mailspring offers a clean, efficient, and customizable solution. In this blog post, we'll take a closer look at Mailspring, its features, and why it might just be the email client you've been looking for.
What is Mailspring?
Mailspring is an open-source, cross-platform email client that combines speed, style, and productivity. Available on Windows, macOS, and Linux, it’s designed to give users a modern email experience that helps them manage their inbox efficiently. Whether you're a casual user or someone managing multiple email accounts, Mailspring's interface and features cater to a wide range of needs.
Key Features of Mailspring
Unified Inbox for Multiple Accounts One of Mailspring’s standout features is its unified inbox, which allows users to manage multiple email accounts in a single place. You can add Gmail, Outlook, Yahoo, iCloud, or even custom IMAP/SMTP accounts, and manage all your emails seamlessly from one window. This eliminates the need to juggle between different accounts or apps, streamlining the way you handle email.
Sleek and Modern Interface Mailspring boasts a minimalistic yet elegant design, with a clean interface that enhances productivity. It offers a dark mode for users who prefer a more subdued look, and the customization options ensure that the interface feels personal and comfortable to use. From its customizable themes to its intuitive layout, Mailspring’s design is tailored to make email management more enjoyable.
Advanced Search Capabilities Searching through your emails is made easy with Mailspring's advanced search function. It allows you to quickly find any email, whether it’s based on the sender, subject, content, or attachments. This makes it much faster to locate important information, especially if you have a large volume of emails in your inbox.
Smart Filters Mailspring provides smart filters that can automatically organize your emails based on pre-defined criteria. This can save time by filtering out spam, categorizing newsletters, and grouping other similar emails. The smart filters let you focus on the most important messages without having to manually sort through everything.
Email Tracking and Insights One of the most innovative features of Mailspring is its email tracking functionality. With Mailspring’s Pro version, you can track when your emails are opened and even see the recipient’s location and device. This is especially useful for professionals who need to track important communications, ensuring follow-ups are timely and effective.
Snooze Emails Sometimes, you don’t have the time to respond to an email right away. Mailspring lets you snooze emails, which means you can temporarily remove them from your inbox and have them pop back up at a later time that you choose. This feature helps you stay focused and manage your time effectively.
Touch and Gesture Support If you're using a touchscreen device, Mailspring supports gestures like swiping to archive or delete emails. This enhances the user experience on tablets or laptops with touchscreens, making the interface more interactive and responsive.
Translation Features Mailspring offers integrated translation support, which can be a life-saver when communicating with international contacts. You can translate incoming emails into your preferred language, breaking down language barriers and fostering smoother communication.
Performance and Speed
Mailspring is optimized for performance, meaning it loads quickly and handles large email volumes without slowing down. It also offers a responsive design, which makes navigating between folders and emails a breeze. Users who manage multiple accounts will appreciate the responsiveness and smooth transitions between their email accounts.
Mailspring Pro: Additional Features
While the free version of Mailspring provides a solid foundation for managing email, the Pro version adds some premium features that can elevate your email management experience. These include:
Email Scheduling: Send emails at a specific time, even if you’re offline.
Customizable Signatures: Create and manage multiple email signatures for different accounts.
Priority Support: Get faster support from the Mailspring team.
The Pro version is available for a subscription, but many users find the free version already quite comprehensive for everyday use.
How to Get Started with Mailspring
Getting started with Mailspring is simple. Head over to the official website, download the version compatible with your operating system (Windows, macOS, or Linux), and install it. After installation, you can add your email accounts and start exploring the features.
Mailspring also offers robust documentation, including guides and FAQs, to help users make the most of the app. If you're new to Mailspring, the intuitive interface and smooth onboarding process make it easy to dive right in.
Why Choose Mailspring?
Efficiency: With features like smart filters, snooze, and advanced search, Mailspring helps you manage your inbox more effectively.
User-Friendly: Its clean and modern interface makes it easy for anyone to use, whether you're tech-savvy or a beginner.
Cross-Platform: Available on multiple platforms, Mailspring works seamlessly across all your devices, ensuring that your email is always within reach.
Customizable: With a wide range of themes and customization options, you can make Mailspring feel like your own.
Conclusion
Mailspring is an impressive email client that ticks all the boxes for those seeking a modern, fast, and efficient way to manage their emails. Its combination of powerful features, sleek design, and cross-platform support makes it a standout choice for both personal and professional use. If you’re tired of your current email client or looking to switch to something that’s more feature-packed and user-friendly, Mailspring is worth a try.
Give it a shot today and experience email like never before!
0 notes
Text
Amazon DCV 2024.0 Supports Ubuntu 24.04 LTS With Security

NICE DCV is a different entity now. Along with improvements and bug fixes, NICE DCV is now known as Amazon DCV with the 2024.0 release.
The DCV protocol that powers Amazon Web Services(AWS) managed services like Amazon AppStream 2.0 and Amazon WorkSpaces is now regularly referred to by its new moniker.
What’s new with version 2024.0?
A number of improvements and updates are included in Amazon DCV 2024.0 for better usability, security, and performance. The most recent Ubuntu 24.04 LTS is now supported by the 2024.0 release, which also offers extended long-term support to ease system maintenance and the most recent security patches. Wayland support is incorporated into the DCV client on Ubuntu 24.04, which improves application isolation and graphical rendering efficiency. Furthermore, DCV 2024.0 now activates the QUIC UDP protocol by default, providing clients with optimal streaming performance. Additionally, when a remote user connects, the update adds the option to wipe the Linux host screen, blocking local access and interaction with the distant session.
What is Amazon DCV?
Customers may securely provide remote desktops and application streaming from any cloud or data center to any device, over a variety of network conditions, with Amazon DCV, a high-performance remote display protocol. Customers can run graphic-intensive programs remotely on EC2 instances and stream their user interface to less complex client PCs, doing away with the requirement for pricey dedicated workstations, thanks to Amazon DCV and Amazon EC2. Customers use Amazon DCV for their remote visualization needs across a wide spectrum of HPC workloads. Moreover, well-known services like Amazon Appstream 2.0, AWS Nimble Studio, and AWS RoboMaker use the Amazon DCV streaming protocol.
Advantages
Elevated Efficiency
You don’t have to pick between responsiveness and visual quality when using Amazon DCV. With no loss of image accuracy, it can respond to your apps almost instantly thanks to the bandwidth-adaptive streaming protocol.
Reduced Costs
Customers may run graphics-intensive apps remotely and avoid spending a lot of money on dedicated workstations or moving big volumes of data from the cloud to client PCs thanks to a very responsive streaming experience. It also allows several sessions to share a single GPU on Linux servers, which further reduces server infrastructure expenses for clients.
Adaptable Implementations
Service providers have access to a reliable and adaptable protocol for streaming apps that supports both on-premises and cloud usage thanks to browser-based access and cross-OS interoperability.
Entire Security
To protect customer data privacy, it sends pixels rather than geometry. To further guarantee the security of client data, it uses TLS protocol to secure end-user inputs as well as pixels.
Features
In addition to native clients for Windows, Linux, and MacOS and an HTML5 client for web browser access, it supports remote environments running both Windows and Linux. Multiple displays, 4K resolution, USB devices, multi-channel audio, smart cards, stylus/touch capabilities, and file redirection are all supported by native clients.
The lifecycle of it session may be easily created and managed programmatically across a fleet of servers with the help of DCV Session Manager. Developers can create personalized Amazon DCV web browser client applications with the help of the Amazon DCV web client SDK.
How to Install DCV on Amazon EC2?
Implement:
Sign up for an AWS account and activate it.
Open the AWS Management Console and log in.
Either download and install the relevant Amazon DCV server on your EC2 instance, or choose the proper Amazon DCV AMI from the Amazon Web Services Marketplace, then create an AMI using your application stack.
After confirming that traffic on port 8443 is permitted by your security group’s inbound rules, deploy EC2 instances with the Amazon DCV server installed.
Link:
On your device, download and install the relevant Amazon DCV native client.
Use the web client or native Amazon DCV client to connect to your distant computer at https://:8443.
Stream:
Use AmazonDCV to stream your graphics apps across several devices.
Use cases
Visualization of 3D Graphics
HPC workloads are becoming more complicated and consuming enormous volumes of data in a variety of industrial verticals, including Oil & Gas, Life Sciences, and Design & Engineering. The streaming protocol offered by Amazon DCV makes it unnecessary to send output files to client devices and offers a seamless, bandwidth-efficient remote streaming experience for HPC 3D graphics.
Application Access via a Browser
The Web Client for Amazon DCV is compatible with all HTML5 browsers and offers a mobile device-portable streaming experience. By removing the need to manage native clients without sacrificing streaming speed, the Web Client significantly lessens the operational pressure on IT departments. With the Amazon DCV Web Client SDK, you can create your own DCV Web Client.
Personalized Remote Apps
The simplicity with which it offers streaming protocol integration might be advantageous for custom remote applications and managed services. With native clients that support up to 4 monitors at 4K resolution each, Amazon DCV uses end-to-end AES-256 encryption to safeguard both pixels and end-user inputs.
Amazon DCV Pricing
Amazon Entire Cloud:
Using Amazon DCV on AWS does not incur any additional fees. Clients only have to pay for the EC2 resources they really utilize.
On-site and third-party cloud computing
Please get in touch with DCV distributors or resellers in your area here for more information about licensing and pricing for Amazon DCV.
Read more on Govindhtech.com
#AmazonDCV#Ubuntu24.04LTS#Ubuntu#DCV#AmazonWebServices#AmazonAppStream#EC2instances#AmazonEC2#News#TechNews#TechnologyNews#Technologytrends#technology#govindhtech
2 notes
·
View notes
Text
Deploying Red Hat Linux on AWS, Azure, and Google Cloud
Red Hat Enterprise Linux (RHEL) is a preferred choice for enterprises looking for a stable, secure, and high-performance Linux distribution in the cloud. Whether you're running applications, managing workloads, or setting up a scalable infrastructure, deploying RHEL on public cloud platforms like AWS, Azure, and Google Cloud offers flexibility and efficiency.
In this guide, we will walk you through the process of deploying RHEL on Amazon Web Services (AWS), Microsoft Azure, and Google Cloud Platform (GCP).
Why Deploy Red Hat Linux in the Cloud?
Deploying RHEL on the cloud provides several benefits, including:
Scalability: Easily scale resources based on demand.
Security: Enterprise-grade security with Red Hat’s continuous updates.
Cost-Effectiveness: Pay-as-you-go pricing reduces upfront costs.
High Availability: Cloud providers offer redundancy and failover solutions.
Integration with DevOps: Seamlessly use Red Hat tools like Ansible and OpenShift.
Deploying Red Hat Linux on AWS
Step 1: Subscribe to RHEL on AWS Marketplace
Go to AWS Marketplace and search for "Red Hat Enterprise Linux."
Choose the version that suits your requirements (RHEL 8, RHEL 9, etc.).
Click on "Continue to Subscribe" and accept the terms.
Step 2: Launch an EC2 Instance
Open the AWS Management Console and navigate to EC2 > Instances.
Click Launch Instance and select your subscribed RHEL AMI.
Choose the instance type (e.g., t2.micro for testing, m5.large for production).
Configure networking, security groups, and storage as needed.
Assign an SSH key pair for secure access.
Review and launch the instance.
Step 3: Connect to Your RHEL Instance
Use SSH to connect:ssh -i your-key.pem ec2-user@your-instance-ip
Update your system:sudo yum update -y
Deploying Red Hat Linux on Microsoft Azure
Step 1: Create a Virtual Machine (VM)
Log in to the Azure Portal.
Click on Create a resource > Virtual Machine.
Search for "Red Hat Enterprise Linux" and select the appropriate version.
Click Create and configure the following:
Choose a subscription and resource group.
Select a region.
Choose a VM size (e.g., Standard_B2s for basic use, D-Series for production).
Configure networking and firewall rules.
Step 2: Configure VM Settings and Deploy
Choose authentication type (SSH key is recommended for security).
Configure disk settings and enable monitoring if needed.
Click Review + Create, then click Create to deploy the VM.
Step 3: Connect to Your RHEL VM
Get the public IP from the Azure portal.
SSH into the VM:ssh -i your-key.pem azureuser@your-vm-ip
Run system updates:sudo yum update -y
Deploying Red Hat Linux on Google Cloud (GCP)
Step 1: Create a Virtual Machine Instance
Log in to the Google Cloud Console.
Navigate to Compute Engine > VM Instances.
Click Create Instance and set up the following:
Choose a name and region.
Select a machine type (e.g., e2-medium for small workloads, n1-standard-4 for production).
Under Boot disk, click Change and select Red Hat Enterprise Linux.
Step 2: Configure Firewall and SSH Access
Enable HTTP/HTTPS traffic if needed.
Add your SSH key under Security.
Click Create to launch the instance.
Step 3: Connect to Your RHEL Instance
Use SSH via Google Cloud Console or terminal:gcloud compute ssh --zone your-zone your-instance-name
Run updates and configure your system:sudo yum update -y
Conclusion
Deploying Red Hat Linux on AWS, Azure, and Google Cloud is a seamless process that provides businesses with a powerful, scalable, and secure operating system. By leveraging cloud-native tools, automation, and Red Hat’s enterprise support, you can optimize performance, enhance security, and ensure smooth operations in the cloud.
Are you ready to deploy RHEL in the cloud? Let us know your experiences and any challenges you've faced in the comments below! For more details www.hawkstack.com
0 notes
Text
Chimera-Linux with btrfs
Chimera Linux is a rather new from the ground up Linux Distribution built with LLVM, MUSL, BSDUtils and dinitit comes with GNOME and KDE Plasma. It, however doesn't come with a installer so here's how to install the KDE flavour with btrfs root and home directories plus a swap partition for use in Linux KVM with UEFI.
Step 1. Get a Chimera live image from https://repo.chimera-linux.org/live/latest/
I use the chimera-linux-x86_64-LIVE-XXXXXXXX-plasma.iso image with KDE Plasma 6 and the following steps assume you do the same.
Step 2. Boot the live image
Step 3. Prepare the target disk with KDE Partition Manager
/dev/vda /dev/vda1, vfat, EFI System, 500 MB /dev/vda2, btrfs, Root FS, subvols @ & @home , rest of the disk /dev/vda3, swap, SWAP FS, 2x RAM Size
Step 4. Open Konsole and do the following
doas -s mkdir -p /media/root mount -t btrfs /dev/vda2 /media/root chmod 755 /media/root btrfs subvolume create /media/root/@ btrfs subvolume create /media/root/@home btrfs subvolume set-default /media/root/@ umount /media/root mount -t btrfs -o compress=zstd:5,ssd,noatime,subvol=/@ /dev/vda2 /media/root mkdir -p /media/root/home mount -t btrfs -o compress=zstd:5,ssd,noatime,subvol=/@home /dev/vda2 /media/root/home mkdir -p /media/root/boot/efi mount -t vfat /dev/sda1 /media/root/boot/efi
let's bootstrap our new chimera system
chimera-bootstrap -l /media/root exit
time to chroot into our vergin system
doas chimera-chroot /media/root
time to bring everything up to date
apk update apk upgrade --available
if something is iffy
apk fix
we want our swap to show up in the fstab
swapon /dev/vda3
Let's build a fstab
genfstab / >> /etc/fstab
install the latest LTS Kernel
apk add linux-lts
install the latest released kernel
apk add linux-stable update-initramfs -c -k all
time for EFI GRUB
apk add grub-x86_64-efi grub-install -v --efi-directory=/boot/efi update-grub
install KDE, Firefox, Thunderbird
apk add plasma-desktop flatpak smartmontools ufw firefox thunderbird qemu-guest-agent-dinit spice-vdagent-dinit
Set root password
passwd root
create main user
useradd myuser passwd myuser
add user to relevant groups
usermod -a -G wheel,kvm,plugdev myuser
Set hostname
echo chimera > /etc/hostname
set timezone
ln -sf /usr/share/zoneinfo/Europe/Berlin /etc/localtime
Configure some services
syslog-ng
dinitctl enable -o syslog-ng
sshd
dinitctl enable -o sshd
KDE Login Manager
dinitctl enable -o sddm
only needed when in KVM VM
dinitctl enable -o spice-vdagentd dinitctl enable -o qemu-ag
network time client
dinitctl enable -o chrony
network manager defaults to dhcp client on first ethernet interface
dinitctl enable -o networkmanager
optional: enable firewall if installed
dinitctl enable -o ufw
see the firewall status
ufw status
configure flatpak
flatpak remote-add --if-not-exists flathub https://dl.flathub.org/repo/flathub.flatpakrepo
just to be sure
update-initramfs -c -k all update-grub
exit from chroot
exit
umount drive
doas umount /media/root/boot/efi doas umount /media/root/home doas umount /media/root
Step 5. Reboot the System
1 note
·
View note