#linux opensource
Explore tagged Tumblr posts
Visit Tumblr Blog
Explore Tumblr blogs with no restrictions, modern design and the best experience.
Last Seen Tumblr Blogs


Fun Fact
Post activity is at the highest at 4:00 pm EDT; notes peak at 10:00 pm EDT.
Text
the audacity. lol.

1K notes
·
View notes
Text

Pulled a sneaky on my co-worker today :p
491 notes
·
View notes
Text
in wake of yet another wave of people being turned off by windows, here's a guide on how to dual boot windows and 🐧 linux 🐧 (useful for when you're not sure if you wanna make the switch and just wanna experiment with the OS for a bit!)
if you look up followup guides online you're gonna see that people are telling you to use ubuntu but i am gonna show you how to do this using kubuntu instead because fuck GNOME. all my homies hate GNOME.
i'm just kidding, use whatever distro you like. my favorite's kubuntu (for a beginner home environment). read up on the others if you're curious. and don't let some rando on reddit tell you that you need pop! OS for gaming. gaming on linux is possible without it.
why kubuntu?
- it's very user friendly
- it comes with applications people might already be familiar with (VLC player and firefox for example)
- libreoffice already preinstalled
- no GNOME (sorry GNOME enthusiasts, let me old man yell at the clouds) (also i'm playing this up for the laughs. wholesome kde/gnome meme at the bottom of this post.)
for people who are interested in this beyond my tl;dr: read this
(if you're a linux user, don't expect any tech wizardry here. i know there's a billion other and arguably better ways to do x y and/or z. what i'm trying to do here is to keep these instructions previous windows user friendly. point and click. no CLI bro, it'll scare the less tech savvy hoes. no vim supremacy talk (although hell yeah vim supremacy). if they like the OS they'll figure out bash all by themselves in no time.)
first of all, there'll be a GUI. you don't need to type lines of code to get this all running. we're not going for the ✨hackerman aesthetics✨ today. grab a mouse and a keyboard and you're good to go.
what you need is a computer/laptop/etc with enough disk space to install both windows and linux on it. i'm recommending to reserve at least a 100gb for the both of them. in the process of this you'll learn how to re-allocate disk space either way and you'll learn how to give and take some, we'll do a bit of disk partitioning to fit them both on a single disk.
and that's enough babbling for now, let's get to the actual tutorial:
🚨IMPORTANT. DO NOT ATTEMPT THIS ON A 32BIT SYSTEM. ONLY DO THIS IF YOU'RE WORKING WITH A 64BIT SYSTEM. 🚨 (win10 and win11: settings -> system -> about -> device specifications -> system type ) it should say 64bit operating system, x64-based processor.
step 1: install windows on your computer FIRST. my favorite way of doing this is by creating an installation media with rufus. you can either grab and prepare two usb sticks for each OS, or you can prepare them one after the other. (pro tip: get two usb sticks, that way you can label them and store them away in case you need to reinstall windows/linux or want to install it somewhere else)
in order to do this, you need to download three things:
rufus
win10 (listen. i know switching to win11 is difficult. not much of a fan of it either. but support's gonna end for good. you will run into hiccups. it'll be frustrating for everyone involved. hate to say it, but in this case i'd opt for installing its dreadful successor over there ->) or win11
kubuntu (the download at the top is always the latest, most up-to-date one)
when grabbing your windows installation of choice pick this option here, not the media creation tool option at the top of the page:

side note: there's also very legit key sellers out there who can hook you up with cheap keys. you're allowed to do that if you use those keys privately. don't do this in an enterprise environment though. and don't waste money on it if your ultimate goal is to switch to linux entirely at one point.
from here it's very easy sailing. plug your usb drive into your computer and fire up rufus (just double click it).

🚨two very important things though!!!!!!:🚨
triple check your usb device. whatever one you selected will get wiped entirely in order to make space for your installation media. if you want to be on the safe side only plug in the ONE usb stick you want to use. and back up any music, pictures or whatever else you had on there before or it'll be gone forever.
you can only install ONE OS on ONE usb drive. so you need to do this twice, once with your kubuntu iso and once with your windows iso, on a different drive each.
done. now you can dispense windows and linux left and right, whenever and wherever you feel like it. you could, for example, start with your designated dual boot device. installing windows is now as simple as plugging the usb device into your computer and booting it up. from there, click your way through the installation process and come back to this tutorial when you're ready.
step 2: preparing the disks for a dual boot setup
on your fresh install, find your disk partitions. in your search bar enter either "diskmgr" and hit enter or just type "partitions". the former opens your disk manager right away, the latter serves you up with this "create and format hard disk partitions" search result and that's what you're gonna be clicking.

you'll end up on a screen that looks more or less like in the screenshot below. depending on how many disks you've installed this might look different, but the basic gist is the same. we're going to snip a little bit off Disk 0 and make space for kubuntu on it. my screenshot isn't the best example because i'm using the whole disk and in order to practice what i preach i'd have to go against my own advice. that piece of advice is: if this screen intimidates you and you're not sure what you're doing here, hands off your (C:) drive, EFI system, and recovery partition. however, if you're feeling particularly fearless, go check out the amount of "free space" to the right. is there more than 30gb left available? if so, you're free to right click your (C:) drive and click "shrink volume"

this screen will pop up:

the minimum disk space required for kubuntu is 25gb. the recommended one is 50gb. for an installation like this, about 30gb are enough. in order to do that, simply change the value at
Enter the amount of space to shrink in MB: to 30000
and hit Shrink.
once that's done your partitions will have changed and unallocated space at about the size of 30gb should be visible under Disk 0 at the bottom like in the bottom left of this screenshot (courtesy of microsoft.com):

this is gonna be kubuntu's new home on your disk.
step 3: boot order, BIOS/UEFI changes
all you need to do now is plug the kubuntu-usb drive you prepared earlier with rufus into your computer again and reboot that bad boy.
the next step has no screenshots. we're heading into your UEFI/BIOS (by hitting a specific key (like ESC, F10, Enter) while your computer boots up) and that'll look different for everyone reading this. if this section has you completely lost, google how to do these steps for your machine.
a good search term would be: "[YOUR DEVICE (i.e Lenovo, your mainboard's name, etc.)] change boot order"
what you need to do is to tell your computer to boot your USB before it tries to boot up windows. otherwise you won't be able to install kubuntu.
this can be done by entering your BIOS/UEFI and navigating to a point called something along the lines of "boot". from "boot order" to "booting devices" to "startup configuration", it could be called anything.
what'll be a common point though is that it'll list all your bootable devices. the topmost one is usually the one that boots up first, so if your usb is anywhere below that, make sure to drag and drop or otherwise move it to the top.
when you're done navigate to Save & Exit. your computer will then boot up kubuntu's install wizard. you'll be greeted with this:

shocker, i know, but click "Install Kubuntu" on the right.
step 4: kubuntu installation
this is a guided installation. just like when you're installing windows you'll be prompted when you need to make changes. if i remember correctly it's going to ask you for your preferred keyboard layout, a network connection, additional software you might want to install, and all of that is up to you.
but once you reach the point where it asks you where you want to install kubuntu we'll have to make a couple of important choices.

🚨 another important note 🚨
do NOT pick any of the top three options. they will overwrite your already existing windows installation.
click manual instead. we're going to point it to our unallocated disk space. hit continue. you will be shown another disk partition screen.
what you're looking for are your 30gb of free space. just like with the USB drive when we were working with rufus, make sure you're picking the right one. triple check at the very least. the chosen disk will get wiped.

click it until the screen "create a new partition" pops up.
change the following settings to:
New partition size in megabytes: 512
Use as: EFI System Partition
hit OK.
click your free space again. same procedure.
change the following settings to:
New partition size in megabytes: 8000 (*this might be different in your case, read on.)
Use As: Swap Area
hit OK
click your free space a third time. we need one more partition.
change the following settings to:
don't change anything about the partition size this time. we're letting it use up the rest of the resources.
Use as: Ext4 journaling system
Mount Point: /
you're done here as well.
*about the 8000 megabytes in the second step: this is about your RAM size. if you have 4gb instead type 4000, and so on.
once you're sure your configuration is good and ready to go, hit "Install Now". up until here you can go back and make changes to your settings. once you've clicked the button, there's no going back.
finally, select your timezone and create a user account. then hit continue. the installation should finish up... and you'll be good to go.
you'll be told to remove the USB drive from your computer and reboot your machine.
now when your computer boots up, you should end up on a black screen with a little bit of text in the top left corner. ubuntu and windows boot manager should be mentioned there. naturally, when you click ubuntu you will boot into your kubuntu. likewise if you hit windows boot manager your windows login screen will come up.
and that's that folks. go ham on messing around with your linux distro. customize it to your liking. make yourself familiar with the shell (on kubuntu, when you're on your desktop, hit CTRL+ALT+T).
for starters, you could feed it the first commands i always punch into fresh Linux installs:
sudo apt-get update
sudo apt-get upgrade
sudo apt-get install vim
(you'll thank me for the vim one later)
turn your back on windows. taste freedom. nothing sexier than open source, baby.
sources (mainly for the pictures): 1, 2
further reading for the curious: 1, 2
linux basics (includes CLI commands)
kubuntu documentation (this is your new best friend. it'll tell you everything about kubuntu that you need to know.
and finally the promised kde/gnome meme:

#windows#linuxposting#had a long day at work and i had to type this twice and i'm struggling to keep my eyes open#not guaranteeing that i didn't skip a step or something in there#so if someone linux savvy spots them feel free to point them out so i can make fixes to this post accordingly#opensource posting
122 notes
·
View notes
Text
Browsing HyperCard stacks on our RP2350-based Fruit Jam 🍏📂
With a little more tweaking, we've got a nice big 12MB disk image loading into our Pico-Mac port https://github.com/jepler/pico-mac/tree/rp2350-fruitjam to the Fruit Jam https://www.adafruit.com/product/6200 — that 16MB of internal flash is coming in super useful now!
That means not only can we run System 6 but also install some nice software like HyperCard https://en.wikipedia.org/wiki/HyperCard !
As kids, we loved playing and making HyperCard stacks, so it's neat to see that we can still navigate the classics on an RP2350. Many stacks have music or sound effects, so we'll revisit these once we get audio playback working.
#marchintosh#hypercard#retrocomputing#pico#macintosh#fruitjam#rp2350#system6#vintagecomputing#mac#hackintosh#homemadecomputer#electronics#opensource#programming#maker#diy#tech#computing#engineering#linux#python#java#software engineering#coding#flashmemory#12mb#16mb#diskimage#software
18 notes
·
View notes
Text

23 notes
·
View notes
Text
Basic Linux Security (Updated 2025)
Install Unattended Upgrades and enable the "unattended-upgrades" service.
Install ClamAV and enable "clamav-freshclam" service.
Install and run Lynis to audit your OS.
Use the "last -20" command to see the last 20 users that have been on the system.
Install UFW and enable the service.
Check your repo sources (eg; /etc/apt/).
Check the /etc/passwd and /etc/shadow lists for any unusual accounts.
User the finger command to check on activity summaries.
Check /var/logs for unusual activity.
Use "ps -aux | grep TERM" or "ps -ef | grep TERM" to check for suspicious ongoing processes.
Check for failed sudo attempts with "grep "NOT in sudoers" /var/log/auth.log.
Check journalctl for system messages.
Check to make sure rsyslog is running with "sudo systemctl status rsyslog" (or "sudo service rsyslog status") and if it's not enable with "sudo systemctl enable rsyslog".
Perform an nmap scan on your machine/network.
Use netstat to check for unusual network activity.
Use various security apps to test you machine and network.
Change your config files for various services (ssh, apache2, etc) to non-standard configurations.
Disabled guest accounts.
Double up on ssh security by requiring both keys and passwords.
Check your package manager for any install suspicious apps (keyloggers, cleaners, etc).
Use Rootkit Scanners (chkrootkit, rkhunter).
Double SSH Security (Key + Password).
Disabled Guest Accounts.
Enabled Software Limiters (Fail2Ban, AppArmor).
Verify System Integrity via fsck.
Utilize ngrep/other networking apps to monitor traffic.
Utilize common honeypot software (endlessh).
Create new system-launch subroutines via crontab or shell scripts.
Ensure System Backups are Enabled (rsnapshot).
Check for suspicious kernel modules with "lsmod"
#linux#security#linuxsecurity#computersecurity#networking#networksecurity#opensource#open source#linux security#network#ubuntu#kali#parrot#debian#gentoo#redhat
175 notes
·
View notes
Text
55 notes
·
View notes
Text
Check out the final result of our Ubuntu 24.04 makeover with the Orchis Theme!
We’ve turned a standard setup into a sleek and elegant desktop. If you’re curious to see how it looks or want some inspiration for your own Ubuntu 24.04, give our video a watch! 🎥💻
👀 Watch here:
youtube
Feel free to drop a comment and let us know what you think!
16 notes
·
View notes
Text
KDE Plasma 6.4 released
Plasma is a popular desktop (and mobile) environment for GNU/Linux and other UNIX-like operating systems. Among other things it also powers the desktop mode of Steam Deck gaming handheld. The KDE community today announced the latest release: Plasma 6.4. This fresh new release improves on nearly every front, with progress being made in accessibility, color rendering, tablet support, window management, and more.
Plasma already offered virtual desktops and customizable tiles to help organize your windows and activities, and now it lets you choose a different configuration of tiles on each virtual desktop. The Wayland session brings some new accessibility features: you can now move the pointer using your keyboard’s number pad keys, or use a three-finger touchpad pinch gesture to zoom in or out. Plasma file transfer notification now shows a speed graph, giving you a more visual idea of how fast the transfer is going, and how long it will take to complete. When any applications are in full screen mode Plasma will now enter Do Not Disturb mode and only show urgent notifications, and when you exit full screen mode, you’ll see a summary of any notifications you missed. Now when an application tries to access the microphone and finds it muted, a notification will pop up. A new feature in the Application Launcher widget will place a green New! tag next to newly installed apps, so you can easily find where something you just installed lives in the menu. The Display and Monitor page in System Settings comes with a brand new HDR calibration wizard, and support for Extended Dynamic Range (a different kind of HDR) and P010 video color format has been added. System Monitor now supports usage monitoring for AMD and Intel graphic cards, it can even show the GPU usage on a per-process basis. Spectacle, the built-in app for taking screenshots and screen recordings, has much improved design and more streamlined functionality. The background of the desktop or window now darkens when an authentication dialog shows up, helping you locate and focus on the window asking for your password. There’s a brand-new Animations page in System Settings that groups all the settings for purely visual animated effects into one place, making it easier to find and configure them. Aurorae is a newly added SVG vector graphics theme engine for KWin window decorations.
You can read more about these and many other other features in the Plasma 6.4 anounncement and complete changelog.
#linux#freesoftware#free software#opensource#open source#software#computers#operatingsystems#operating systems#information technology#informationtechnology#kde#kde plasma#gnu#unix#bsd
2 notes
·
View notes
Text
Screenshot of the SCO Group's website as it appeared on November 28, 2002

#Tech#Linux#SCOLinux#OpenSource#TechHistory#LinuxHistory#OperatingSystem#2002Tech#SoftwareDevelopment
2 notes
·
View notes
Text
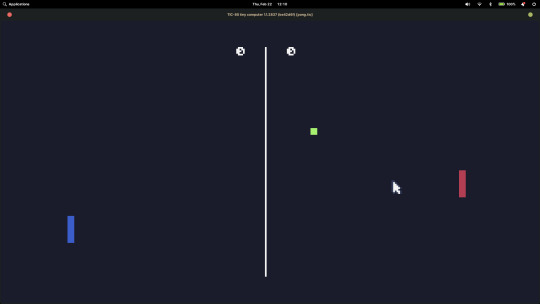
coding tip for visual learners 👀
whenever i don't understand how the fuck code is supposed to work i simply annotate it by hand and attempt to dissect whatever the blob of code is trying to tell me :)
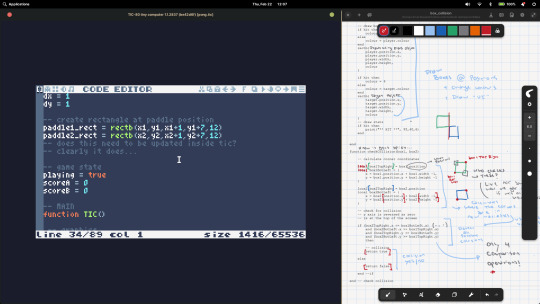
(right now i am trying to make collisions work in my first pong clone)
7 notes
·
View notes
Text

506 notes
·
View notes
Link
That's what matters!
#linuxadmin #tools #vim #emacs #opensourcesoftware #productivity
2 notes
·
View notes
Text
"See" the Sounds of Classic Mac Audio 🔊🍏
We're working on the Pico-Mac port https://github.com/jepler/pico-mac/tree/rp2350-fruitjam to Fruit Jam https://www.adafruit.com/product/6200 and one thing we really want to add is sound support for classic Mac games and HyperCard stacks.
Audio on the hardware we're emulating is pretty straightforward: every scanline of the video generator also outputs one byte of PWM (Pulse Width Modulation) data. We have 370 horizontal lines—352 visible and 18 during the vsync—at a 60.15 Hz refresh rate, producing approximately 22.255 kHz audio. That data is written to memory address $1FD00 http://www.mac.linux-m68k.org/devel/plushw.php so all we have to do now is pipe that 8-bit PWM signal either out to a timer on the RP2350 microcontroller or To the TLV320DAC3100 I²S amplifier onboard Fruit Jam, for that sweet, sweet 'Wild Eep' https://www.facebook.com/adafruitindustries/videos/1873371666122621
#marchintosh#classicmac#retrogaming#pwm#macintosh#hypercard#fruitjam#adafruit#raspberrypi#hardwarehacking#opensource#vintagecomputing#soundemulation#makers#electronics#diytech#audioprogramming#rp2350#macaudio#emulation#retrohardware#techinnovation#embeddeddevelopment#circuitpython#engineering#programming#linux#python#java#software engineering
18 notes
·
View notes

Text
Abricotine (markdown editor here running in linux on chromebook) is my current fav text editor for throwing tens of thousands of words in. 70k and it doesn't even chug on this cheap chromebook. linux on chromebook has this bug that disallows alt-tabbing once you're in fullscreen, which I'm treating as a feature.

look at that, respects my markdown headings and automatically puts it into a table of contents and everything. If I ever want to go check on other sections I just make myself a
###### bookmark here
and it'll create a heading so I can jump right back in. (alt-shift-M hides the menu, which is hidden here)
Highly recommend. Runs on Windows also.
#fox text#a plug for#abricotine#it's free#opensource#runs on windows but i'm a fan of running linux on a chromebook#you can also firefox on the same chromebook#low power machines are so good
14 notes
·
View notes