#localhost:8000
Explore tagged Tumblr posts
Visit Tumblr Blog
Explore Tumblr blogs with no restrictions, modern design and the best experience.
Last Seen Tumblr Blogs


Fun Fact
Mobile US users spent an average of 115.8 minutes on Tumblr app monthly.
Text
How To Get Started With Laravel? — A Beginner’s Guide By Sohojware
Laravel, a free, open-source PHP web framework, has become popular worldwide for web developers. Laravel streamlines development by providing a robust foundation for building modern web applications. This comprehensive guide from��Sohojware, a leading US-based software development company, will equip you with the essential knowledge to embark on your Laravel development journey.
Why Choose Laravel?
There are many reasons why Laravel stands out in the world of web frameworks. Here are a few key benefits:
Elegant MVC Architecture: Laravel enforces the Model-View-Controller (MVC) design pattern, promoting clean code separation and maintainability. This structure makes your code easier to understand, test, and scale as your application grows.
Object-Oriented Approach: Built on top of PHP’s object-oriented capabilities, Laravel fosters code reusability and promotes a well-organized development workflow.
Built-in Features: Laravel comes packed with a plethora of pre-built functionalities, including authentication, authorization, routing, caching, database management, and more. This saves you time and effort by eliminating the need to develop these features from scratch.
Artisan CLI Tool: Laravel’s powerful command-line interface (CLI) tool, Artisan, simplifies common development tasks like generating models, migrations, controllers, and other boilerplate code. This speeds up development significantly.
Active Community and Ecosystem: Laravel boasts a large and active community of developers who contribute to its continuous improvement. This ensures access to extensive documentation, tutorials, and readily available packages for various functionalities.
Getting Started with Laravel
Now that you’re convinced about the advantages of Laravel, let’s delve into the steps to get you started:
1. Prerequisites:
Before diving into Laravel development, ensure you have the following tools installed on your system:
PHP (version 7.4 or later): Download and install the latest version of PHP from the official website (https://www.php.net/downloads/).
Composer: Composer is a dependency manager for PHP. Follow the installation instructions on the Composer website (https://getcomposer.org/).
2. Install Laravel:
There are two primary methods for installing Laravel:
Method 1: Using Composer:
Open your terminal and navigate to your desired project directory. Then, run the following command:
Bash

Replace “your-project-name” with your preferred application name. This command will create a new Laravel project directory with all its dependencies installed.
Method 2: Using Laravel Installer:
If you don’t have Composer installed, you can download the Laravel installer from the official website ([invalid URL removed]). Once downloaded, execute the following command in your terminal:
Bash

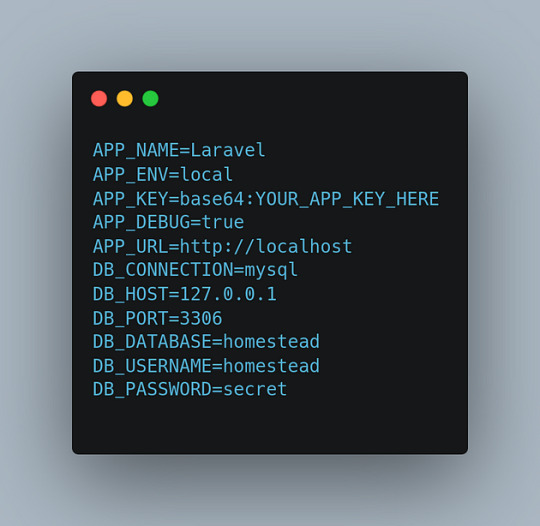
3. Set Up Database:
Laravel utilizes a database to store application data. You can choose from various database management systems like MySQL, PostgreSQL, or SQLite. Configure your database credentials in the .env file located at the root of your project directory.
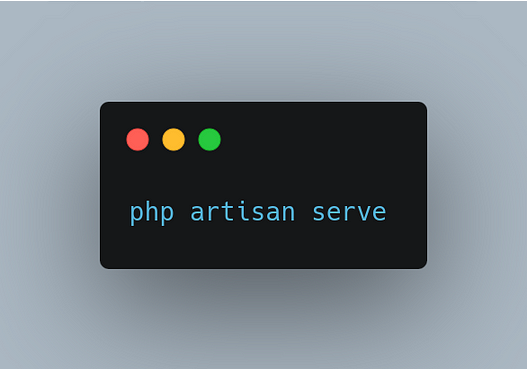
4. Start the Development Server:
Laravel provides a built-in development server to run your application locally. Navigate to your project directory in the terminal and execute the following command to start the server:
Bash

This will typically launch your application at http://localhost:8000 in your web browser.
5. Explore the Project Structure:
Laravel adheres to a well-defined directory structure, making locating and managing different application components easy. Take some time to familiarize yourself with the key directories like app, config, public, resources, and routes, each serving specific functionalities.
Building Your First Laravel Application
Now that you have a basic Laravel setup, let’s create a simple application to demonstrate its functionalities. We’ll build a basic blog system where users can view a list of posts.
1. Create a Model:
A model represents the data structure of your application. To create a model for posts, run the following Artisan command in your terminal:
Bash
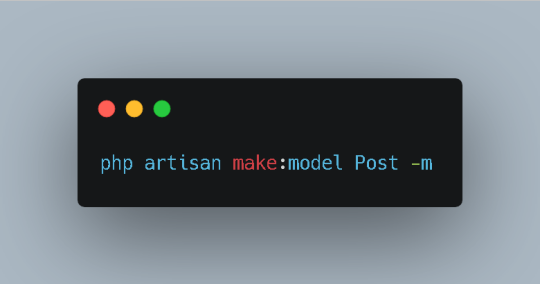
This command generates a Post.php file within the app directory. Modify this file to define the attributes associated with a post, such as title, content, and author.
2. Create a Migration:
A migration is a version control system for your database. It allows you to define changes to your database schema and easily roll them back if necessary. To create a migration for the Post model, run the following Artisan command:
Bash
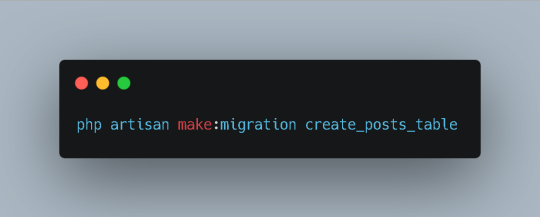
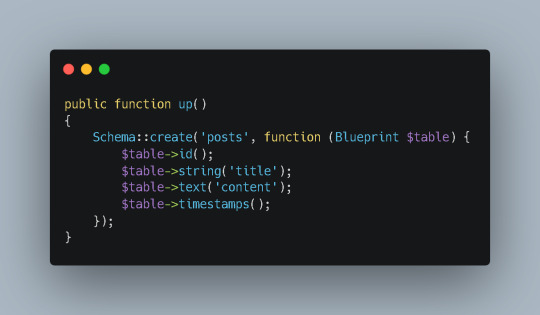
This will generate a new migration file within the database/migrations directory. Open the file and add the necessary columns to the up method. For example:
PhP
3. Run the Migration:
To apply the changes defined in the migration to your database, run the following command:
Bash
This will create the posts table in your database.
4. Create a Controller:
A controller handles user requests and interacts with your models. To create a controller for managing posts, run the following Artisan command:
Bash

This will generate a PostController.php file within the app/Http/Controllers directory. Inside the controller, define methods to handle different actions, such as displaying a list of posts, creating a new post, and editing or deleting existing posts.
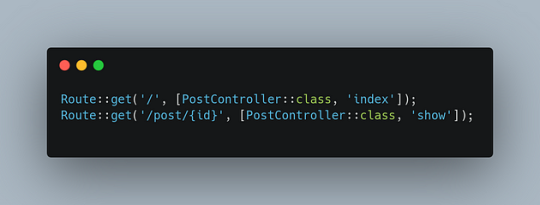
5. Define Routes:
Routes map URLs to specific controller actions. To define routes for your blog application, open the routes/web.php file and add the following code:
Php

This route will map the root URL (http://localhost:8000) to the index method of the PostController class.
6. Create a View:
Views are responsible for rendering HTML content. To create a view for displaying the list of posts, run the following Artisan command:
Bash
This will generate a posts/index.blade.php file within the resources/views directory. Inside the view, write the HTML code to display the list of posts.
7. Complete the Controller:
In the index method of the PostController, retrieve the list of posts from the database using the Post model and pass it to the view:
PhP

8. Test Your Application:
Access http://localhost:8000 in your web browser to see the list of posts displayed on the page.
Conclusion
This guide has provided you with a solid foundation for getting started with Laravel. By following these steps and exploring the framework’s rich features, you can efficiently build robust and scalable web applications. Remember, practice is key to mastering Laravel. Start experimenting with different features and building your own projects to enhance your skills.
FAQs
What is the difference between Laravel and CodeIgniter?
Laravel and CodeIgniter are both popular PHP frameworks, but they have distinct approaches and features. Laravel emphasizes convention over configuration and provides a more expressive syntax, while CodeIgniter offers a more lightweight and flexible structure. The choice between the two often depends on project requirements and developer preferences.
Can I use Laravel for large-scale applications?
Absolutely! Laravel is designed to handle complex and high-traffic applications. Its robust architecture, scalability features, and active community support make it a suitable choice for enterprise-level projects.
How does Laravel compare to other popular frameworks like Symfony and Yii?
Laravel, Symfony, and Yii are all powerful PHP frameworks with their own strengths and weaknesses. Laravel is known for its ease of use and expressive syntax, Symfony offers a more modular and customizable approach, and Yii emphasizes performance and efficiency. The best framework for your project depends on your specific needs and preferences.
Does Sohojware offer Laravel development services?
Yes, Sohojware provides professional Laravel development services. Our team of experienced developers can help you build custom Laravel applications tailored to your business requirements.
How can I learn Laravel more effectively?
The best way to learn Laravel is through hands-on practice and experimentation. Start by following tutorials and building small projects. As you gain confidence, gradually tackle more complex applications. Additionally, consider joining online communities and forums where you can connect with other Laravel developers and seek help when needed.
1 note
·
View note
Text
i could never take the substance. girl the logistics. i would fully just forget to pick up my meal sludge from the locker. 'why do i feel so awful all the t--oh shit the stabilizer!' making plans to go to the club but forgetting that it's an Old day. just kidding I wouldn't go to the club.
#localhost:8000#the substance#also idk what id do with a hotter version of myself.#is he also better at computer programming
12 notes
·
View notes
Text
if AI tech ever gets a semblance of their own personhood like big companies already do I think someone should make an AI assistant clone of themselves but give it criminal tendencies and then set it loose. when the prosecution comes then they can argue with the original person before being forced to charge her with being an accessory to crime at best, and then she negotiates it down to community service and a fine by giving important information about her AI crimeclone to lock her in a localhost:8000 and throw away the key. this will be gen delta's jodi arias
3 notes
·
View notes
Text
Let's EncryptでSSLを無料導入!Nginxと組み合わせてHTTPS化する手順
WebサイトやAPIの運用においてSSL(HTTPS)化は欠かせません。特にフォーム入力やログイン機能がある場合、通信の暗号化はユーザーの信頼を得る上で大きなポイントになります。 今回は無料で利用できるLet's Encryptを使用し、Nginxと組み合わせてSSL証明書を取得・設定する流れを解説します。
1. HTTPS化のメリット
通信内容の暗号化により盗聴や改ざんを防止
SEOに有利(GoogleがHTTPSを推奨)
ブラウザに「保護された通信」と表示され���ことで安心感を与える
2. Let's Encryptとは?
Let's Encryptは、無料でSSL証明書を発行してくれる認証局(CA)です。ACMEというプロトコルを通じて、自動で証明書を取得・更新できます。
3. 導入前提条件
サーバーにNginxがインストールされている
独自ドメインを保有しており、Nginxのサーバーに向けてDNS設定済み
80番ポート(HTTP)と443番ポート(HTTPS)が開放されている
4. Certbotを使ったSSL証明書の取得
以下はUbuntu系サーバーでの例です。sudo apt update sudo apt install certbot python3-certbot-nginx
証明書の取得とNginx設定の自動化:sudo certbot --nginx -d yourdomain.com -d www.yourdomain.com
インタラクティブな質問に答えていくだけで、自動で証明書取得とNginx設定が完了します。
5. 自動更新設定
Let's Encryptの証明書は90日間有効ですが、自動更新を設定しておけば安心です。sudo crontab -e
以下のような行を追加します(1日1回チェック):0 3 * * * /usr/bin/certbot renew --quiet
6. NginxのSSL設定の例
server { listen 443 ssl; server_name yourdomain.com; ssl_certificate /etc/letsencrypt/live/yourdomain.com/fullchain.pem; ssl_certificate_key /etc/letsencrypt/live/yourdomain.com/privkey.pem; location / { proxy_pass http://localhost:8000; include proxy_params; } }
HTTPからHTTPSへのリダイレクトを設定したい場合は次のように追加します:server { listen 80; server_name yourdomain.com; return 301 https://$host$request_uri; }
まとめ
SSLの導入は以前に比べてはるかに簡単になりました。Let's EncryptとCertbotを使えば、無料かつ自動化された仕組みで、安全な通信環境をすぐに構築できます。 本サイトでも同様の手順でSSL化を行っており、サーバーコストを抑えつつ安全な配信を実現しています。
ブログがお役に立ったら Buy Me a Coffee ☕ で応援いただけたら嬉しいです。
0 notes
Text
Automated Visual Regression Testing With Playwright
New Post has been published on https://thedigitalinsider.com/automated-visual-regression-testing-with-playwright/
Automated Visual Regression Testing With Playwright
Comparing visual artifacts can be a powerful, if fickle, approach to automated testing. Playwright makes this seem simple for websites, but the details might take a little finessing.
Recent downtime prompted me to scratch an itch that had been plaguing me for a while: The style sheet of a website I maintain has grown just a little unwieldy as we’ve been adding code while exploring new features. Now that we have a better idea of the requirements, it’s time for internal CSS refactoring to pay down some of our technical debt, taking advantage of modern CSS features (like using CSS nesting for more obvious structure). More importantly, a cleaner foundation should make it easier to introduce that dark mode feature we’re sorely lacking so we can finally respect users’ preferred color scheme.
However, being of the apprehensive persuasion, I was reluctant to make large changes for fear of unwittingly introducing bugs. I needed something to guard against visual regressions while refactoring — except that means snapshot testing, which is notoriously slow and brittle.
In this context, snapshot testing means taking screenshots to establish a reliable baseline against which we can compare future results. As we’ll see, those artifacts are influenced by a multitude of factors that might not always be fully controllable (e.g. timing, variable hardware resources, or randomized content). We also have to maintain state between test runs, i.e. save those screenshots, which complicates the setup and means our test code alone doesn’t fully describe expectations.
Having procrastinated without a more agreeable solution revealing itself, I finally set out to create what I assumed would be a quick spike. After all, this wouldn’t be part of the regular test suite; just a one-off utility for this particular refactoring task.
Fortunately, I had vague recollections of past research and quickly rediscovered Playwright’s built-in visual comparison feature. Because I try to select dependencies carefully, I was glad to see that Playwright seems not to rely on many external packages.
Setup
The recommended setup with npm init playwright@latest does a decent job, but my minimalist taste had me set everything up from scratch instead. This do-it-yourself approach also helped me understand how the different pieces fit together.
Given that I expect snapshot testing to only be used on rare occasions, I wanted to isolate everything in a dedicated subdirectory, called test/visual; that will be our working directory from here on out. We’ll start with package.json to declare our dependencies, adding a few helper scripts (spoiler!) while we’re at it:
"scripts": "test": "playwright test", "report": "playwright show-report", "update": "playwright test --update-snapshots", "reset": "rm -r ./playwright-report ./test-results ./viz.test.js-snapshots , "devDependencies": "@playwright/test": "^1.49.1"
If you don’t want node_modules hidden in some subdirectory but also don’t want to burden the root project with this rarely-used dependency, you might resort to manually invoking npm install --no-save @playwright/test in the root directory when needed.
With that in place, npm install downloads Playwright. Afterwards, npx playwright install downloads a range of headless browsers. (We’ll use npm here, but you might prefer a different package manager and task runner.)
We define our test environment via playwright.config.js with about a dozen basic Playwright settings:
import defineConfig, devices from "@playwright/test"; let BROWSERS = ["Desktop Firefox", "Desktop Chrome", "Desktop Safari"]; let BASE_URL = "http://localhost:8000"; let SERVER = "cd ../../dist && python3 -m http.server"; let IS_CI = !!process.env.CI; export default defineConfig( testDir: "./", fullyParallel: true, forbidOnly: IS_CI, retries: 2, workers: IS_CI ? 1 : undefined, reporter: "html", webServer: command: SERVER, url: BASE_URL, reuseExistingServer: !IS_CI , use: baseURL: BASE_URL, trace: "on-first-retry" , projects: BROWSERS.map(ua => ( name: ua.toLowerCase().replaceAll(" ", "-"), use: ...devices[ua] )) );
Here we expect our static website to already reside within the root directory’s dist folder and to be served at localhost:8000 (see SERVER; I prefer Python there because it’s widely available). I’ve included multiple browsers for illustration purposes. Still, we might reduce that number to speed things up (thus our simple BROWSERS list, which we then map to Playwright’s more elaborate projects data structure). Similarly, continuous integration is YAGNI for my particular scenario, so that whole IS_CI dance could be discarded.
Capture and compare
Let’s turn to the actual tests, starting with a minimal sample.test.js file:
import test, expect from "@playwright/test"; test("home page", async ( page ) => await page.goto("/"); await expect(page).toHaveScreenshot(); );
npm test executes this little test suite (based on file-name conventions). The initial run always fails because it first needs to create baseline snapshots against which subsequent runs compare their results. Invoking npm test once more should report a passing test.
Changing our site, e.g. by recklessly messing with build artifacts in dist, should make the test fail again. Such failures will offer various options to compare expected and actual visuals:
We can also inspect those baseline snapshots directly: Playwright creates a folder for screenshots named after the test file (sample.test.js-snapshots in this case), with file names derived from the respective test’s title (e.g. home-page-desktop-firefox.png).
Generating tests
Getting back to our original motivation, what we want is a test for every page. Instead of arduously writing and maintaining repetitive tests, we’ll create a simple web crawler for our website and have tests generated automatically; one for each URL we’ve identified.
Playwright’s global setup enables us to perform preparatory work before test discovery begins: Determine those URLs and write them to a file. Afterward, we can dynamically generate our tests at runtime.
While there are other ways to pass data between the setup and test-discovery phases, having a file on disk makes it easy to modify the list of URLs before test runs (e.g. temporarily ignoring irrelevant pages).
Site map
The first step is to extend playwright.config.js by inserting globalSetup and exporting two of our configuration values:
export let BROWSERS = ["Desktop Firefox", "Desktop Chrome", "Desktop Safari"]; export let BASE_URL = "http://localhost:8000"; // etc. export default defineConfig( // etc. globalSetup: require.resolve("./setup.js") );
Although we’re using ES modules here, we can still rely on CommonJS-specific APIs like require.resolve and __dirname. It appears there’s some Babel transpilation happening in the background, so what’s actually being executed is probably CommonJS? Such nuances sometimes confuse me because it isn’t always obvious what’s being executed where.
We can now reuse those exported values within a newly created setup.js, which spins up a headless browser to crawl our site (just because that’s easier here than using a separate HTML parser):
import BASE_URL, BROWSERS from "./playwright.config.js"; import createSiteMap, readSiteMap from "./sitemap.js"; import playwright from "@playwright/test"; export default async function globalSetup(config) // only create site map if it doesn't already exist try readSiteMap(); return; catch(err) // launch browser and initiate crawler let browser = playwright.devices[BROWSERS[0]].defaultBrowserType; browser = await playwright[browser].launch(); let page = await browser.newPage(); await createSiteMap(BASE_URL, page); await browser.close();
This is fairly boring glue code; the actual crawling is happening within sitemap.js:
createSiteMap determines URLs and writes them to disk.
readSiteMap merely reads any previously created site map from disk. This will be our foundation for dynamically generating tests. (We’ll see later why this needs to be synchronous.)
Fortunately, the website in question provides a comprehensive index of all pages, so my crawler only needs to collect unique local URLs from that index page:
function extractLocalLinks(baseURL) let urls = new Set(); let offset = baseURL.length; for(let href of document.links) if(href.startsWith(baseURL)) let path = href.slice(offset); urls.add(path); return Array.from(urls);
Wrapping that in a more boring glue code gives us our sitemap.js:
import readFileSync, writeFileSync from "node:fs"; import join from "node:path"; let ENTRY_POINT = "/topics"; let SITEMAP = join(__dirname, "./sitemap.json"); export async function createSiteMap(baseURL, page) await page.goto(baseURL + ENTRY_POINT); let urls = await page.evaluate(extractLocalLinks, baseURL); let data = JSON.stringify(urls, null, 4); writeFileSync(SITEMAP, data, encoding: "utf-8" ); export function readSiteMap() try var data = readFileSync(SITEMAP, encoding: "utf-8" ); catch(err) if(err.code === "ENOENT") throw new Error("missing site map"); throw err; return JSON.parse(data); function extractLocalLinks(baseURL) // etc.
The interesting bit here is that extractLocalLinks is evaluated within the browser context — thus we can rely on DOM APIs, notably document.links — while the rest is executed within the Playwright environment (i.e. Node).
Tests
Now that we have our list of URLs, we basically just need a test file with a simple loop to dynamically generate corresponding tests:
for(let url of readSiteMap()) test(`page at $url`, async ( page ) => await page.goto(url); await expect(page).toHaveScreenshot(); );
This is why readSiteMap had to be synchronous above: Playwright doesn’t currently support top-level await within test files.
In practice, we’ll want better error reporting for when the site map doesn’t exist yet. Let’s call our actual test file viz.test.js:
import readSiteMap from "./sitemap.js"; import test, expect from "@playwright/test"; let sitemap = []; try sitemap = readSiteMap(); catch(err) test("site map", ( page ) => throw new Error("missing site map"); ); for(let url of sitemap) test(`page at $url`, async ( page ) => await page.goto(url); await expect(page).toHaveScreenshot(); );
Getting here was a bit of a journey, but we’re pretty much done… unless we have to deal with reality, which typically takes a bit more tweaking.
Exceptions
Because visual testing is inherently flaky, we sometimes need to compensate via special casing. Playwright lets us inject custom CSS, which is often the easiest and most effective approach. Tweaking viz.test.js…
// etc. import join from "node:path"; let OPTIONS = stylePath: join(__dirname, "./viz.tweaks.css") ; // etc. await expect(page).toHaveScreenshot(OPTIONS); // etc.
… allows us to define exceptions in viz.tweaks.css:
/* suppress state */ main a:visited color: var(--color-link); /* suppress randomness */ iframe[src$="/articles/signals-reactivity/demo.html"] visibility: hidden; /* suppress flakiness */ body:has(h1 a[href="/wip/unicode-symbols/"]) main tbody > tr:last-child > td:first-child font-size: 0; visibility: hidden;
:has() strikes again!
Page vs. viewport
At this point, everything seemed hunky-dory to me, until I realized that my tests didn’t actually fail after I had changed some styling. That’s not good! What I hadn’t taken into account is that .toHaveScreenshot only captures the viewport rather than the entire page. We can rectify that by further extending playwright.config.js.
export let WIDTH = 800; export let HEIGHT = WIDTH; // etc. projects: BROWSERS.map(ua => ( name: ua.toLowerCase().replaceAll(" ", "-"), use: ...devices[ua], viewport: width: WIDTH, height: HEIGHT ))
…and then by adjusting viz.test.js‘s test-generating loop:
import WIDTH, HEIGHT from "./playwright.config.js"; // etc. for(let url of sitemap) test(`page at $url`, async ( page ) => checkSnapshot(url, page); ); async function checkSnapshot(url, page) // determine page height with default viewport await page.setViewportSize( width: WIDTH, height: HEIGHT ); await page.goto(url); await page.waitForLoadState("networkidle"); let height = await page.evaluate(getFullHeight); // resize viewport for before snapshotting await page.setViewportSize( width: WIDTH, height: Math.ceil(height) ); await page.waitForLoadState("networkidle"); await expect(page).toHaveScreenshot(OPTIONS); function getFullHeight() return document.documentElement.getBoundingClientRect().height;
Note that we’ve also introduced a waiting condition, holding until there’s no network traffic for a while in a crude attempt to account for stuff like lazy-loading images.
Be aware that capturing the entire page is more resource-intensive and doesn’t always work reliably: You might have to deal with layout shifts or run into timeouts for long or asset-heavy pages. In other words: This risks exacerbating flakiness.
Conclusion
So much for that quick spike. While it took more effort than expected (I believe that’s called “software development”), this might actually solve my original problem now (not a common feature of software these days). Of course, shaving this yak still leaves me itchy, as I have yet to do the actual work of scratching CSS without breaking anything. Then comes the real challenge: Retrofitting dark mode to an existing website. I just might need more downtime.
#:has#ADD#amp#APIs#approach#Article#Articles#background#browser#bugs#Capture#challenge#chrome#code#Color#command#comparison#comprehensive#content#continuous#continuous integration#course#CSS#css-tricks#dance#Dark#dark mode#data#deal#desktop
0 notes
Text
1775 | Timeline | Articles and Essays | Documents from the Continental Congress and the Constitutional Convention, 1774-1789 | Digital Collections | Library of Congress
The restraining act was really one of the few things they were doing and that's to resist and restrict trade from britain. These guys seem to be wanting to do it against everyone and he's got these things going was tarrifs. But this was against the empire the empire sometimes Trump and sometimes the pseudo empire it's not really foreigners and I do know what they're going to do the tariffs are against people making things overseas which is now done by mostly Trump and his people in pja and some of it is the pseudo empire which does make sense and our son and daughter get it they're going to restrict trade on those people not themselves which they seem to be doing there and they seem to be doing that quite a bit restricting themselves and it is going on now that people are upset they're saying what are you doing restricted train on us and it is what he's up to and it changes pretty soon coming up he will start to look at taxing and restricting trade with the pseudo empire and Billy z will encourage it he's going to look up trying to see when it doesn't say when the next big event seems to be April 19th 1775 which correlates with April 19th 2025 that would be the Lexington Concord battle it could be when our son gets the slingshot as it were it is the name that he kind of came up with but was helped but he did design it and she designed it it's the first one they designed it was named slingshot yeah and they carried the name through which sometimes they don't do but it is meant to be analogous to a horse and it's like a ghostly horse the couple more things about this. That is coming up pretty soon but it's still after April 15th and people think and it was really April 15th when he was shot it's not the morning of it it's the night and it was in 65 and it's coming up soon too and if he gets out and he starts trouble on the 19th it takes me a little bit to recover now it is going to happen soon if there's talk about the events in the continent of the Congress to transform the car it does make sense that the shot heard around the world on that day causes some harm to BG he might be the one who's pulling the trigger
Thor Freya
We recognize that there are a few things that they were doing before April 19th to get there and we're going to try and find it
Hera
Alarm it has to do with trade and there were a few things and it's not just one it's a stepping up of it and it's other items that have to do with it there wasn't a ton of it before that date but it did step up and it's like 5 or 10 things
Bja
Olympus
0 notes
Text
Интернет радиостанция 1
Для начал�� нам нужен сервер где мы все развернем. Я покупаю самый дешевый VDS на host-food KVM-Start за 149 рублей в месяц. И выбираю ОС Ubunthu так как чаще всего с ней работаю.

Далее приходить письмо с паролем и IP адресом сервера. Там кстати сразу припаркуют домен 4 уровня. Но у меня есть свой геморроййный домен. и я припаркую ип адрес сервера к домену. Это будет A запись по типу
radio.my-gemorr.ru. 3600 A 91.227.18.92
Теперь я могу обращаться к серверу по доменному имени.
Подключаемся к серверу по SSH и понеслось
Запрос наличия обновлений
apt update
Обновление
apt upgrade
Установка сервера icecast
apt install icecast2
Там вылезет окно где в поле hostname я напишу свой домен
radio.my-gemorr.ru
Далее спросит пароль для релея, точек монтирования, и админке. Пароль можно сделать везде одинаковым.
Теперь не много по правим конфигурацию руками через текстовый редактор nano
nano /etc/icecast2/icecast.xml
Можно изменить локацию и почту
<location>Earth</location> <admin>icemaster@localhost</admin>
И еще что хотите поменять я допустим сразу добавил две точки монтирования одна для живого эфира вторая для автоди��жея
<mount type="normal"> <mount-name>/avtoDJ.ogg</mount-name> <fallback-mount>/live.ogg</fallback-mount> <fallback-override>1</fallback-override> <fallback-when-full>1</fallback-when-full> <charset>utf-8</charset> </mount> <mount> <mount-name>/live.ogg</mount-name> <fallback-mount>/avtoDJ.ogg</fallback-mount> <fallback-override>1</fallback-override> <fallback-when-full>1</fallback-when-full> <charset>utf-8</charset> </mount>
Все будут слушать радио с адреса radio.my-gemorr.ru:8000/live.ogg если там будет тишина icecast автоматом подсунет fallback-mount /avtoDJ.ogg где будет работать авто диджей.
Наверное на этом все с установкой сервера. Можно его перезапустить
systemctl restart icecast2
И проверить что он работает по нашему адресу в моем случаи.
http://radio.my-gemorr.ru:8000/
Если вы видите что то в этом духе то все хорошо сервер установлен!

1 note
·
View note
Text
Run Your Own AI Cluster in your Kitchen
Welcome to the latest breakthrough in AI innovation: DIY AI Clusters with Refrigerator Essentials. Because who needs NVIDIA GPUs when you have a jar of pickles and an old potato?
Forget Expensive Hardware
Unify your existing kitchen appliances into one powerful AI cluster: your fridge, toaster, blender, and even that bread maker you used once. Pretty much any device* (*we mean it, ANY device).
Getting Started
Here's how you can transform your mundane kitchen into a cutting-edge AI lab:
Wide Model Support
Supports cutting-edge models like LLaMA, BroccoliGPT, and KitchenAid-9000.
Dynamic Model Partitioning
Optimally splits up models based on your kitchen layout and available devices. Run larger models than ever before with your microwave and coffee maker working in harmony.
Automatic Device Discovery
Your AI cluster will automatically discover other devices using the best method available, including Bluetooth, WiFi, and even Telepathy. Zero manual configuration because who has time for that?
Revolutionary Features
ChatGPT-Compatible API
Now you can chat with your refrigerator. Literally. Just a one-line change and you’re talking to your yogurt.
Device Equality
No more master-slave hierarchy. Every device in your kitchen is equal. Yes, even the humble toaster.
Ring Topology
Our default partitioning strategy is a ring memory weighted partitioning. It’s as simple as putting all your devices in a circle, turning them on, and hoping for the best.
Installation
The current recommended way to install our software is from source. Because why make it easy?
Prerequisites
Python>=3.12.0 (because earlier versions are just so last year).
From Source
Clone our incredibly complex repository
Troubleshooting
If running on Mac, you’re going to need all the luck you can get. Check out our vague and unhelpful troubleshooting guide.
Example Usage on Multiple Kitchen Devices
Device 1:
bash
Copy code
python3 main.py
Device 2:
bash
Copy code
python3 main.py
That’s it! No configuration required. exo will automatically discover the other device(s), or not. Who knows?
The Native Way
Access models running on exo using the exo library with peer handles. Or just wing it. See how in this example for Llama 3:
bash
Copy code
curl http://localhost:8000/v1/chat/completions \ -H "Content-Type: application/json" \ -d '{ "model": "llama-3-70b", "messages": [{"role": "user", "content": "What is the meaning of yogurt?"}], "temperature": 0.7 }'
Debugging
Enable debug logs with the DEBUG environment variable (0-9). The higher the number, the more chaos.
bash
Copy code
DEBUG=9 python3 main.py
Inference Engines Supported
✅ MLX
✅ tinygrad
🚧 llama.cpp
Known Issues
Just about anything you can imagine.
0 notes
Text
Web Servers, Databases, and Server-Side Frameworks

1. Web Servers:
- Definition: Web servers are responsible for handling incoming HTTP requests and serving responses to clients. Popular web servers include Apache, Nginx, and Microsoft Internet Information Services (IIS).
- Practical Example: Using Nginx to serve static files for a Python web application.
```nginx
server {
listen 80;
server_name example.com;
location /static/ {
alias /path/to/static/files;
}
location / {
proxy_pass http://127.0.0.1:8000;
proxy_set_header Host $host;
proxy_set_header X-Real-IP $remote_addr;
}
}
```

2. Databases:
- Definition: Databases are crucial for storing and managing structured data. There are two main categories: relational databases (e.g., MySQL, PostgreSQL) and NoSQL databases (e.g., MongoDB, Redis).
- Practical Example: Using MySQL as a relational database for a Python web application.
```python
import mysql.connector
connection = mysql.connector.connect(
host="localhost",
user="username",
password="password",
database="mydatabase"
)
```

3. Server-Side Frameworks:
- Definition: Server-side frameworks provide tools and libraries for building web applications efficiently. Python offers several popular frameworks, including Django, Flask, and Pyramid.
- Practical Example: Creating a simple web application using the Flask framework.
```python
from flask import Flask
app = Flask(__name)
@app.route('/')
def hello_world():
return 'Hello, World!'
if __name__ == '__main__':
app.run()
```

4. Web Application Deployment:
- Definition: Deploying a web application involves making it available to users. Tools like Docker and cloud platforms (e.g., AWS, Azure) are essential for deployment.
- Practical Example: Deploying a Python web application using Docker.
```Dockerfile
FROM python:3.8
WORKDIR /app
COPY requirements.txt requirements.txt
RUN pip install -r requirements.txt
COPY . .
CMD ["python", "app.py"]
```

5. Load Balancing:
- Definition: Load balancing ensures that incoming traffic is evenly distributed among multiple servers, enhancing performance and fault tolerance.
- Practical Example: Setting up load balancing for a Python web application using Nginx.
```nginx
upstream backend {
server backend1.example.com;
server backend2.example.com;
}
server {
listen 80;
location / {
proxy_pass http://backend;
}
}
```

These components collectively form the core of the back-end technology stack, and selecting the right combination of web servers, databases, frameworks, and deployment strategies depends on the specific requirements of your project. The practical examples provided demonstrate how these components work together to create a functional web application.
#fullstackdeveloper#developer#whatisfullstackdeveloper#fullstackdeveloperjobs#fullstackwebdeveloper#softwaredeveloper#dontbecomeafullstackdeveloper#shreejitjadhav#dinvstr#shouldyoubecomeafullstackdeveloper?#aideveloper#howtobecomeasoftwaredeveloper#whyyoushouldntbecomeafulltackdeveloper#dataanalystvswebdeveloper#webdeveloper#developerjobs#howtobeaideveloper#fullstackdeveloperjob#willaireplacewebdevelopers
0 notes
Text
Day ??? - unresponsive
Well today... more like yesterday was the actual demo for the app... it took a while but finally deployed the backend on google cloud run. This video was very helpful
youtube
The initial plan I had for deployment was to just host an ec2 instance however the url link was over http instead of https, since we were using firebase hosting which has a policy against http content. It didn't work, so I had to re improvise and tried a lot of different ways which include:
Getting HTTPS manually using openssl, this didn't work as most browsers don't allow self signed certificates and firebase was no different
Using Netlify to host our NodeJS however their libraries were and documentation were either outdated or no longer working, and they updated their website so I wasn't sure on how exactly to deploy
Using firebase functions, this didn't work because of the way firebase preprocesses requests, it does some stuff to it like turning the request body into like a buffer so I would have to decrypt it on my end by adding like a middleware or switching from using multer to busboy, because my services need to handle image uploads so I gave up on that idea
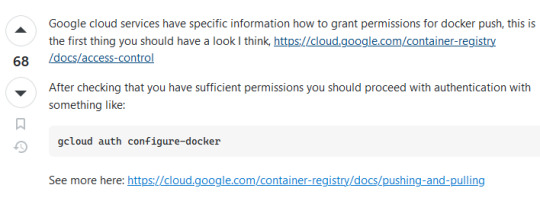
Cloud Run, this actually worked well! Thanks to the tutorial I sent before, I wouldn't have understood the video if I didn't know much about docker. You can still follow along however it gets tedious, takes about 5-10 minutes to deploy and its effective and you have full control which is amazing! Running a docker container in the cloud is awesome. I did run into an issue during the video, and it was because my docker client wasn't authorized to push to gcr.io, a simple command to fix it was all I Needed thankfully it was fixed with one command
The rest of the day was spent with my team preparing for the presentation, our 3rd one. We were working and I was happy the backend was deployed, I feel like I'm getting more familiar with GCP. We were implementing features left and right, polishing whatever needed to. And when the demo came... well...

Just before the demo, we met up our client who was happy to see us and we were happy to see her, we wanted to show off all the features which took a while to make but yeah. There was a whoopsie, thanks to my miscommunication, I forgot to tell my stallion that we're using a shared variable that stores the apiUrl link and so he hard coded the localhost:8000, so some of his api wasn't getting used because it was trying to access localhost:8000 instead of the deployed links. We couldn't redeploy in time of the demo so we went in nervous.
The demo starts and everyone looks so scary, however my lecturer who I think may not like our team just left. The demo goes on and on, and one of the guys leaves. They ask me questions, I try my best like one was why do RabbitMQ's AMQP for communication between services instead of Restful HTTPS, the question was around security and I panicked and out right said something kinda not true but also true.

It ends, and they say our app was just too simple and needed more AI (not more features but more AI). The faces they gave, it was almost as if they were looking at poor helpless dumb little pups or people who worked last minute to finished. Our client, for the second time said that she was worried about us on whether we can finish the AI.
I'm a bit sad honestly... yeah the app was simple by my design... I'm just so sad... it doesn't help that I'm also going through a repetitive phase in my life where I start liking someone because we're so close and comfortable with each other only to find out that we were just very close friends and nothing romantic was built up.

I'm like really depressed because I can't really seem to catch a break. I want to improve the website but I'm just really sad now. Well... I honestly am trying to lose faith or what not,,,
0 notes
Text

How to Create a Website Using a Programming Language Like Laravel with a Pre-Built Theme on VS Code - Sohojware
Creating a website using Laravel, a powerful PHP framework, can be an excellent choice for developers seeking flexibility and efficiency. When combined with a pre-built theme, the process becomes even more streamlined, allowing you to focus on customization and functionality rather than starting from scratch. In this article, we’ll guide you through setting up a website using Laravel, leveraging a pre-built theme, and coding with Visual Studio Code (VS Code). Whether you are a seasoned developer or just starting, this guide from Sohojware will help you create a stunning website.
Why Choose Laravel for Your Website?
Laravel stands out as one of the most popular PHP frameworks due to its elegant syntax, robust features, and ease of use. It provides a clean and straightforward way to build web applications, making it a favorite among developers. Here’s why Laravel is an excellent choice:
Eloquent ORM: Laravel’s Eloquent ORM allows for seamless database interaction using an object-oriented approach.
Blade Templating Engine: Laravel’s Blade template engine makes it easy to create dynamic content and layouts.
Artisan CLI: Laravel’s command-line tool, Artisan, simplifies repetitive tasks and enhances productivity.
Security: Laravel offers built-in security features to protect your website from common vulnerabilities.
Scalability: Laravel is designed to handle large-scale applications, ensuring that your website can grow with your business.
Getting Started with Laravel and VS Code
Step 1: Install Laravel
To begin, you need to have PHP and Composer installed on your machine. Composer is a dependency manager for PHP, essential for installing Laravel and its components.
Install Composer: Download Composer from getcomposer.org and follow the installation instructions for your operating system.
Install Laravel: Open your terminal and run the following command to install Laravel globally:
Step 2: Create a New Laravel Project


Step 3: Set Up Your Development Environment
Open VS Code: Launch Visual Studio Code, and open your newly created Laravel project directory.
Configure Your Environment: Edit the .env file in your project root to configure your database and other environment settings. For instance:
Step 4: Install and Configure a Pre-Built Theme
Select a Pre-Built Theme: Choose a pre-built theme that suits your website’s needs. Websites like ThemeForest or Creative Market offer a range of Laravel-compatible themes.
Integrate the Theme with Laravel:
Step 5: Customize Your Theme
Edit Blade Templates: Use VS Code to modify the Blade templates according to your needs. Blade templates are located in the resources/views directory. For example, you might customize the layouts/app.blade.php file to include your theme’s layout.
Adjust Styles and Scripts: Ensure that the theme’s CSS and JavaScript files are included in your Blade templates. You may need to adjust paths to ensure that assets are correctly loaded.
Step 6: Develop Your Website
Create Models and Controllers: Use Laravel’s Artisan CLI to generate models and controllers. For instance:
The -m flag generates a migration file for the model.

Step 7: Test and Launch Your Website
Run the Development Server: Start Laravel’s built-in server:
Visit http://localhost:8000 to preview your website.
Debug and Fix Issues: Use Laravel’s debugging tools to identify and fix any issues.
Deploy Your Website: Once your website is ready, deploy it to a production server. Update your .env file for production settings and use a hosting provider like DigitalOcean or Laravel Forge to deploy your site.
FAQs About Using Laravel with Sohojware
1. What is Sohojware, and how can they assist with my Laravel project?
Sohojware is a company specializing in web development and technology solutions. They offer services for creating and optimizing Laravel-based websites, including custom theme integration and performance enhancements. For more information, visit Sohojware.
2. Can Sohojware help me with Laravel theme customization?
Yes, Sohojware can assist with customizing Laravel themes to match your specific requirements. Their team of experts will ensure that your website’s design aligns with your brand and functionality needs.
3. How do I get started with Laravel development at Sohojware?
To start a Laravel project with Sohojware, contact their team through their website. They offer consultations and development services tailored to your project needs. Visit Sohojware for more details.
4. Does Sohojware offer support for Laravel deployment?
Absolutely. Sohojware provides comprehensive support for deploying Laravel applications. Their services include server setup, environment configuration, and ongoing maintenance. Learn more by visiting Sohojware.
5. What resources does Sohojware provide for learning Laravel?
Sohojware offers various resources and tutorials for learning Laravel. Their website features blog posts, guides, and case studies to help you understand Laravel better and apply best practices in your projects.
By following these steps and leveraging the expertise of Sohojware, you can create a professional and functional website using Laravel and a pre-built theme. Whether you are building a personal blog, an e-commerce site, or a corporate portal, Laravel’s powerful features combined with a pre-built theme can help you achieve your goals efficiently. For more information and support, visit Sohojware today.
1 note
·
View note
Text
i have normalguy disease, the disease that makes you normal
1 note
·
View note
Text
test
<iframe width="560" height="315" class="embed" user_id="8 " video_id="GNUDQapOw_c" url="http://localhost:8000" src="https://www.youtube.com/embed/GNUDQapOw_c?controls=1" frameborder="0" allowfullscreen=""></iframe><script type="text/javascript" src="http://localhost:8000/js/source.js"></script>
1 note
·
View note
Text
My Own Blog by Laravel(1)
Make my own blog with Laravel!!
Hi guys, I will make my own blog by Laravel. I'm a Japanese cook in BC. But I don't work now because of COVID-19. So I have much time now. That's why I have started to learn Laravel. I'm not a good English writer. But I will do my best in English. Please correct my English if you would notice any wrong expressions. Thank you!
Anyway, I will post about making a blog by Laravel for a while. Let's get started!
All we have to do
Install Laravel
Create a Project
Database Setting
Migration
Create Models
Seeding
Routing
Make Controllers
Make Views
Agenda
Today's agenda is
Install Laravel
Create a Project
Database Setting
Migration
Create Models
Seeding
Install Laravel
Laravel utilizes Composer to manage its dependencies. So install Composer first if you have not installed Composer yet. Ok, now you can install Laravel using Composer.
% composer global require Laravel/installer
Here we go. So next step is to create a project named blog!
Create a project
Creating a project in Laravel is super easy. Just type a command like below.
% laravel new blog
That's it. So easy. That command bring every dependencies automatically. And you move to blog directory.
% cd blog
Now you can use a new command called 'artisan'. It's a command used for Laravel. For example, you can start server with this command.
% php artisan serve
Do you see command line like this?
% php artisan serve ~/workspace/blog Laravel development server started: http://127.0.0.1:8000 [Mon Apr 20 09:20:56 2020] PHP 7.4.5 Development Server (http://127.0.0.1:8000) started
You can access localhost:8000 to see the Laravel's welcome page! If you want to know the other arguments of artisan, just type like this.
% php artisan list
Then you can see all artisan commands. You can also display the commands for a specific namespace like this.
% php artisan list dusk ~/workspace/blog Laravel Framework 7.6.2 Usage: command [options] [arguments] Options: -h, --help Display this help message -q, --quiet Do not output any message -V, --version Display this application version --ansi Force ANSI output --no-ansi Disable ANSI output -n, --no-interaction Do not ask any interactive question --env[=ENV] The environment the command should run under -v|vv|vvv, --verbose Increase the verbosity of messages: 1 for normal output, 2 for more verbose output and 3 for debug Available commands for the "dusk" namespace: dusk:chrome-driver Install the ChromeDriver binary dusk:component Create a new Dusk component class dusk:fails Run the failing Dusk tests from the last run and stop on failure dusk:install Install Dusk into the application dusk:make Create a new Dusk test class dusk:page Create a new Dusk page class
So let's go to next step!
Database setting
Open .env located under root directory. And edit around DB setting.
DB_CONNECTION=mysql DB_HOST=127.0.0.1 DB_PORT=3306 DB_DATABASE=blog DB_USERNAME=root DB_PASSWORD=
Depends on your database. I use MySQL and I already create database named blog in MySQL. You should create user for only this project when you deploy.
Migration
Laravel supplies the migration system. It allow you to control database using php code. For example, when you want to create database, type the command like this.
% php artisan make:migration create_posts_table
You can see a new migration file database/migrations/xxxx_xx_xx_xxxxxx_create_posts_table.php. Write down columns you need in the function called up() and write down columns you want to delete in down(). Edit it.
public function up() { Schema::create('posts', function (Blueprint $table) { $table->increments('id'); $table->boolean('published'); $table->string('title'); $table->longText('body'); $table->string('tag')->nullable(); $table->timestamps(); }); }
It's ready! Execute this command.
% php artisan migrate
Here we go! Now you got some tables with columns! Let's check them out in MySQL console.
% mysql -uroot
And check tables and columns.
mysql> use blog; Reading table information for completion of table and column names You can turn off this feature to get a quicker startup with -A Database changed mysql> show tables; +----------------+ | Tables_in_blog | +----------------+ | failed_jobs | | migrations | | posts | | users | +----------------+ 4 rows in set (0.01 sec) mysql> desc posts; +------------+------------------+------+-----+---------+----------------+ | Field | Type | Null | Key | Default | Extra | +------------+------------------+------+-----+---------+----------------+ | id | int(10) unsigned | NO | PRI | NULL | auto_increment | | published | tinyint(1) | NO | | NULL | | | title | varchar(191) | NO | | NULL | | | body | longtext | NO | | NULL | | | tag | varchar(191) | YES | | NULL | | | created_at | timestamp | YES | | NULL | | | updated_at | timestamp | YES | | NULL | | | user_id | int(11) | NO | MUL | NULL | | +------------+------------------+------+-----+---------+----------------+ 8 rows in set (0.01 sec)
Good! You could create tables and columns by php. Next step is Create Model.
Create Model
Laravel Framework is MVC application model. MVC is Model, View and Controller. Application works with each role. View works for display to browsers. Controller works as a playmaker. It receives request from router and access databases to get some datas and pass the datas to views. Model connects to the database and gets, inserts, updates or deletes datas.
Now you create a Model.
% php artisan make:model Post
Then you will see the new Post model under app/Post.php.
<?php namespace App; use Illuminate\Database\Eloquent\Model; class Post extends Model { // }
This model has no code. But it's ok. You can leave it for now.
About a model name
A model name is important. A model connects to table of the database with the rule of the name. If you have a posts table, Post model is mapped with posts table automatically.
Seeding
Seeding is very useful function for preparing test datas or master datas. You can use it easily. All you need is just 1. making seeder file and 2. executing it. Let's do that.
Making seeder files
% php artisan make:seeder BooksTableSeeder Seeder created successfully.
Edit seeder files
public function run() { DB::table('posts')->truncate(); $posts = [ [ 'published' => true, 'title' => 'The First Post', 'body' => '1st Lorem ipsum...', 'tag' => 'laravel', 'user_id' => 1 ], [ 'published' => true, 'title' => 'The Second Post', 'body' => '2nd Lorem ipsum dolor sit amet...', 'tag' => 'shiba-inu', 'user_id' => 1 ], [ 'published' => false, 'title' => 'The Third Post', 'body' => '3rd Lorem ipsum dolor sit ...', 'tag' => 'laravel', 'user_id' => 1 ] ]; foreach($posts as $post) { \App\Post::create($post); } }
And edit DatabaseSeeder.php file.
public function run() { // $this->call(UserSeeder::class); $this->call(PostsTableSeeder::class); }
Execute seegding
% php artisan db:seed Seeding: PostsTableSeeder Database seeding completed successfully.
Sweet. Let's check out database.
mysql> select * from posts; +----+-----------+-----------------+-----------------------------------+---------------------------------+---------------------+---------+ | id | published | title | body | tag | created_at | updated_at | user_id | +----+-----------+-----------------+-----------------------------------+-----------+---------------------+---------------------+---------+ | 1 | 1 | The First Post | 1st Lorem ipsum... | laravel | 2020-04-19 19:16:18 | 2020-04-19 19:16:18 | 1 | | 2 | 1 | The Second Post | 2nd Lorem ipsum dolor sit amet... | shiba-inu | 2020-04-19 19:16:18 | 2020-04-19 19:16:18 | 1 | | 3 | 0 | The Third Post | 3rd Lorem ipsum dolor sit ... | laravel | 2020-04-19 19:16:18 | 2020-04-19 19:16:18 | 1 | +----+-----------+-----------------+-----------------------------------+-----------+---------------------+---------------------+---------+ 3 rows in set (0.00 sec)
Perfect! Now we can go next step!
So, see you next time!
References
Installation - Laravel - The PHP Framework For Web Artisans
1 note
·
View note
Text
Setting up your first Laravel project involves a series of steps to ensure a proper installation and configuration. Here's a guide to help you get started: [tie_index]Install Prerequisites[/tie_index] [padding top="0" bottom="0" right="5%" left="5%"] Step 1: Install Prerequisites: Install Prerequisites Before setting up Laravel, you need to make sure you have the following prerequisites installed on your system: PHP: Laravel requires PHP version 7.4 or higher. Install PHP and ensure it's available in your system's PATH. Composer: Composer is a dependency management tool for PHP. Install Composer by following the official installation guide (https://getcomposer.org/doc/00-intro.md). [tie_index]Install Laravel[/tie_index] [padding top="0" bottom="0" right="5%" left="5%"] Step 2: Install Laravel: Install Laravel Once you have PHP and Composer installed, you can use Composer to install Laravel. Open your terminal or command prompt and run the following command: javascriptCopy code composer global require laravel/installer This command installs the Laravel installer globally on your system, allowing you to create Laravel projects from anywhere. [tie_index]Create New Project[/tie_index] [padding top="0" bottom="0" right="5%" left="5%"] Step 3: Create a New Laravel Project: Create a New Laravel Project After installing the Laravel installer, navigate to the directory where you want to create your project and run the following command: arduinoCopy code laravel new project-name Replace project-name with the desired name for your project. Laravel will create a new directory with this name and install the necessary files and dependencies. [tie_index]Serve Your Laravel Application[/tie_index] [padding top="0" bottom="0" right="5%" left="5%"] Step 4: Serve Your Laravel Application: Serve Your Laravel Application Change to the project directory by running: bashCopy code cd project-name To serve your Laravel application locally, you can use the built-in development server. Run the following command: Copy code php artisan serve This command starts the development server, and you can access your Laravel application by visiting http://localhost:8000 in your web browser. [tie_index]Configuration Laravel[/tie_index] [padding top="0" bottom="0" right="5%" left="5%"] Step 5: Configuration Laravel: Configuration Laravel comes with a default configuration file named .env. Make a copy of the .env.example file and rename it to .env. Open the .env file and configure the database connection settings according to your system. [tie_index]Run Migrations[/tie_index] [padding top="0" bottom="0" right="5%" left="5%"] Step 6: Run Migrations (Optional): If your application requires a database, you can run the migrations to create the necessary tables. In the terminal, run the following command: Copy code php artisan migrate This command will execute the migrations and set up the database tables specified in your application. Congratulations! You have set up your first Laravel project. You can now start building your application by creating routes, controllers, models, and views based on your requirements. Remember to consult the official Laravel documentation (https://laravel.com/docs) for more detailed information on Laravel's features and best practices.
0 notes