#look the file said 1080p
Text
☆ UPSCALING LOW QUALITY FOOTAGE
what i used:
• 2021 macbook pro with m1 chip (390/500gb storage used she's hanging in there)
• photoshop 2020
• mpv (for screencaps but this isn't needed!)
• handbrake (available for linux, mac and windows here)
• video source to gif
what is handbrake?
basically its a software that helps you change the format of videos, such as for certain devices or screens, or in the case that we're going to utilise, quality and frame rate!
disclaimer:
handbrake is super easy to use and very beginner friendly for this procedure and it can make a video go from 30fps to 60fps however it does not replace the quality of true 4k/blue/master-pro res files. in the gif below, this is the level of detail in a master pro-res file.

getting started
it's easiest first to note the timestamps of the video you want to encode, and keep in mind that unless your computer is incredibly powerful, i wouldn't try to encode an hour worth of footage in one run! my laptop could handle about 30 seconds in one go before she started toasting.
using handbrake:
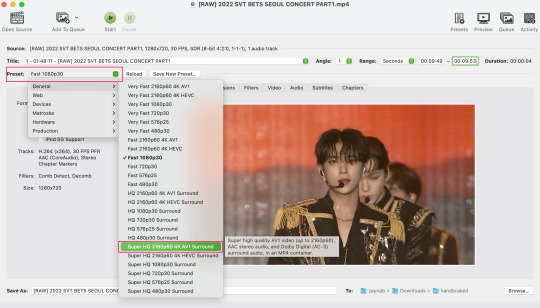
once you've downloaded the software, open the software and it will come up with a pop up window asking you to open the video source (that is presumably saved within your folders) and go ahead and do so!
in the range section, use the drop down button to navigate to seconds and enter your timestamp. the duration on the side will show how long of the footage you're gonna encode is!

then go down to the save as, and give your footage 'to be snipped' a name. this isn't necessary but useful because if you're planning to say, encode 3 or 4 small parts of footage in one sitting, each encoding instance will overwrite the previous one. so i just call mine 'cut 1', 'cut 2' and so on.

next go to preset, and there you'll see such a wide variety of options that you can play around with, with differing qualities, frame rates, sound options, and so on. for the sake of this tutorial, i'm using 'superhq 2160p60 4k av1 surround' and i've used the drop down menu to select it! then go ahead and press start! the time taken to complete depends on the duration of footage that you sent to encode! you'll find your encoded video as an .mp4 file in your designated folder (which you can change via browse at the bottom)
what next?
• if you prefer to open footage directly into photoshop (my ps can't handle it), then go for it!
• if you screencap as i do, then just use mpv or whatever screencapping program you prefer to make the screencaps and open in ps in your usual manner.
• you can use the timestamps to further process the video through vapoursynth to denoise, but i've yet to try that!
the results
for this first set of example footage, i used footage from the be the sun concert file, which is almost 2 hours in length and 4gb in file size.


you can see the difference in the smooth frame rate of the footage, as well as the quality of the sharpening!
and to utilise the bane of gifmaking, a gose episode, notorious for dodgy pixelated frames and less hd quality in 1080p on youtube, i ran it through the same settings!

these are the exact same files, downloaded using 4k video downloader and with the same sharpening, but see how on the original file, the sharpening looks a bit more harsh and 'outlined' while it seems to sit softer on the encoded 4k version!
so i mainly use handbrake for dvd files, or not-so-hd 1080p youtube videos or videos that seem a bit clunkier but i had never tried them on a tv/film file so take a look below! i used a 1gb (so not very good quality) of a show (as compared to its 4gb files).
as i said at the start in the disclaimer, handbrake can't replicate true file quality, as you'd expect to see in a proper hd bluray/t*rrent file of a show but there's an interesting difference in the frame rate. personally it's not something i would utilise much there but its all up to individual preference on how someone prefers to have their gifs <3
this is a very basic run-through of how i used handbrake, as i haven't really explored all its features and i use this as a quick process when i'm running through seventeen dvd/dl files but i feel like it would work well on general youtube videos (such as interviews, episodes, behind the scenes) and feel free to send an ask/message for any help/clarification! <33
#ps help#usergif#gif tutorial#kpop gif tutorial#seventeen#completeresources#2605#userace#niniblr#emification#usershreyu#heymax#arieslofi#tusermlee#userbloomingwarrior#uservivaldi#userzil#userfanni#userrozza#usermoonchild#userraffa#tuserjen#usernik
286 notes
·
View notes
Text
hi everyone! I've gotten several requests to make a tutorial on how to make gifs for someone just starting out and I finally got around to slapping a tutorial together.
This tutorial will cover:
software recommendations
choosing what to gif
creating a gif step by step with probably a lot of unnecessary detail
some tips and tricks:)
(This particular tutorial will not cover how to find tv and movies to download and gif, or any specific instructions on coloring. only the basic gif making process.)
so for the purposes of this tutorial, we will be using Adobe Photoshop, which is the most common program for making gifs, and the one I recommend. the version you have doesn't make a major difference in terms of capabilities but the interface may be slightly different looking if you have an older version or a different type of device. you cannot make or edit gifs in any mobile version of the photoshop application.
Optionally, we will also be using Adobe Premiere Rush/Pro or another video editing software of your choice. wherever you are downloading Photoshop, whether from Adobe or a third party, you should easily be able to acquire Premiere as well.
I am aiming to be as detailed as possible in this tutorial, so it may sound more time consuming than it really is. once you get the hang of things, it goes fast. the most time consuming part by far is the editing and coloring.
in my opinion, one thing that majorly saves time while giffing is knowing your keyboard shortcuts and using your mouse/trackpad as little as possible. I will be going over these in this tutorial as well.
before we begin, some general tips:
gifs of single shots that do not cut between angles or subjects generally will look the best, barring exceptions
for a single gif set, choosing scenes and shots with similar lighting will be easiest to get to look uniform when compiled together, since editing wildly different looking scenes to have similar coloring and lighting is hard and takes some practice!
avoid shots that will require you to majorly crop or zoom to properly frame the subject, as this will greatly diminish quality
speaking of quality, gifs will look best using 1080p video, but you can get away with 720p as well. I would not recommend giffing with anything lower resolution than that
Tumblr's upload capacity for image and gif files is 10mb. be sure when exporting your finished gif that it is under that size. if it is a bit over, you can try trimming a few frames off your gif in the video timeline.
if you get frustrated, don't give up! giffing is hard and complicated especially if you are new to photoshop. I tried to make this tutorial as detailed as possible so it's easy to understand (although im sure I still forgot some stuff)
ok onto the tutorial!!!
STEP ONE: choose what range of frames you want to gif, and how.
once you have decided what you want to gif, there are two main way to convert your episode into a range of frames to make into a gif. the first is by screencapping. this involves downloading a program like mplayer or vlc which can be used to convert video files into "stacks" of screencaps, which can then be separated into whatever range of frames you want and imported into photoshop. this is seemingly by far the most common method I have seen amongst gifmakers*, but personally I don't care for it and I think it's more confusing and time consuming overall, so I will be explaining the second method: importing video frames to layers.
now, normally what this would mean is opening the full episode in photoshop and using the pathetic little playheads on either end of the scrub bar to trim the file into a clip. this is where your video editing software comes into play.
open whatever episode or movie you want to gif in your program. if it is a large file like a long movie in 1080p, this may take a few seconds. like I said, I am using Premiere Rush. I will be using a random episode of 9-1-1 for my example gif.
in your media browser, hover over whichever episode you want (you can also just add the whole episode to your project and scrub through, but that can take longer unless you know what time stamp you're after). click the fullscreen button by the bottom righthand corner.
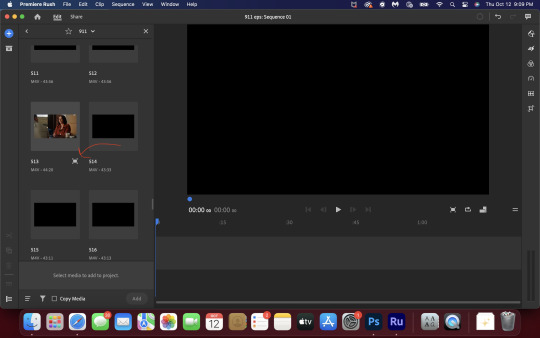
now you can scrub through and trim the episode before you even import it to premiere. this makes trimming your clip even easier.
use the trim bar (yellow outlines) to trim as close as you can around the scene you want to gif.
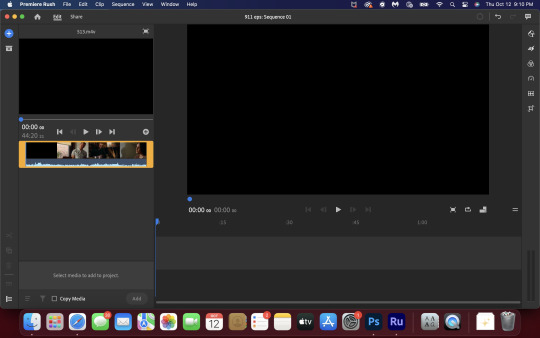
then click this plus, and then "add" below. this will add the clip to your project.
now, move the blue playhead up to the frame you want your gif to start on. then, use the scissors button off to the left to slice the clip. select the portion before the playhead, and delete it.
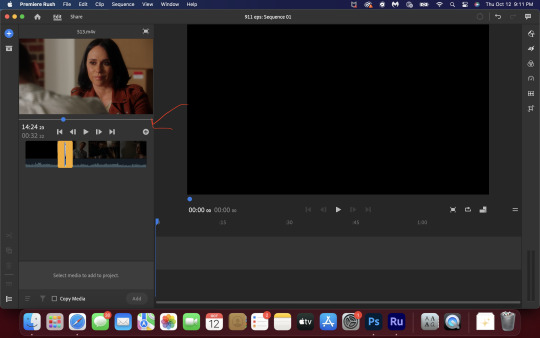
now move the playhead to where you want the gif to stop. a good length for most gifs is around 1.5-2 seconds in my opinion. some may be shorter depending on how long the shot is, or longer if you plan on making them smaller (remember, the uploading capacity on Tumblr is 10mb per file.) trim again, now delete the portion after the playhead. you can also use the left and right arrows beside the play button to move frame by frame, and you can adjust the side of the horizontal scroll bar below your clip to “zoom” in on it and make scrubbing easier.
once you have your clip, go up to where it says "share". your clip will be rendered, and then you can click export to save it.
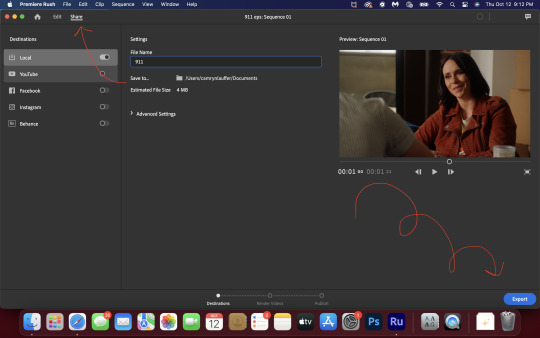
repeat step one as many times as you want for each gif. I know this may sound complicated, but like I said above once you get in the rhythm this step takes only a few seconds.
STEP TWO: create your gif!
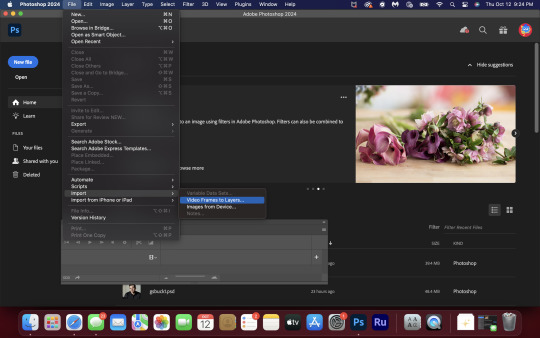
close premiere. open photoshop. head to the control bar at the top. select file > import > import video frames to layers.
navigate to whatever folder you exported your clip to. select it, and hit enter. a second popup will appear asking you to select your range of frames. since you have already trimmed your clip to your liking, simply hit enter a second time.
now your screen looks like this, and we are going to crop and resize our gif! (troubleshooting: if you do not see the timeline bar at the bottom, select window from the control bar, scroll down, and make sure timeline is selected as part of your workspace. Adjustments and layers should be there automatically but if not add them too).

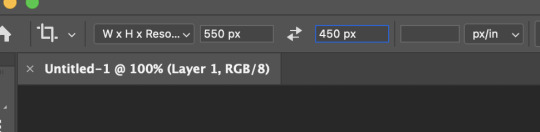
Tumblr posts are 540px wide, so in order to make my gifs as small as possible while maintaining quality, I typically crop my gifs to be around 550-600px wide, with varying heights depending on what shape I want the gif to be. experiment with this a little and decide what works for you. just don't make the width lower than 540px. once you have the portion of the frame you want inside the cropping grid, hit enter again. sometimes you have to hit it twice.
here are the measurements I am using for this gif
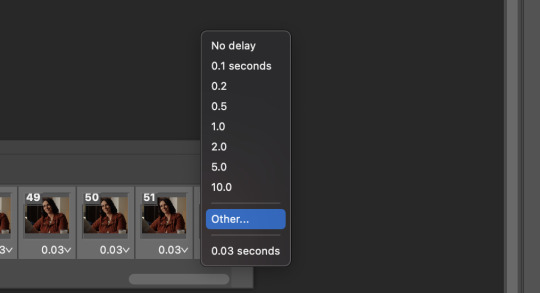
now in your timeline, select frame 1. hold down the shift key and scroll to the end to select the very last frame, thereby highlighting them all. from here we will edit our frame delay rate. photoshop will automatically set it to .03s, which will make your finished gif awkwardly fast. I typically use .05s, or .06s if I want a gif to be subtly slower (this comes in handy if the shot you are trying to gif is very short). anything longer than .06s will look weird though. choose "other" from this menu and type in your delay rate. make sure not to miss the zero after the decimal.
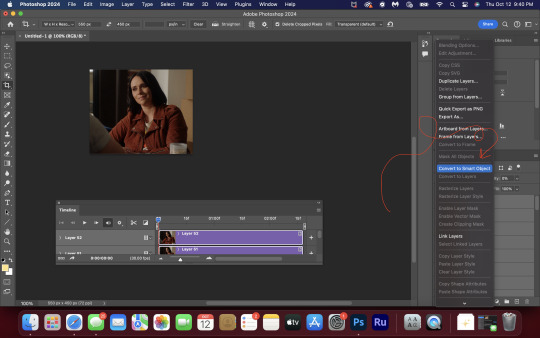
once you've set your frame rate, go to the other end of your timeline and click here to convert your frames into a video timeline.

then press option + command + A (on Mac) or windows + alt + A (on PC) to select all layers. then right click (control + click with a trackpad) on any one of the highlighted layers in your layers tab off to the right. scroll down in the popup menu and select Convert to Smart Object.
THAT'S IT!! CONGRATULATIONS!!!!! WE HAVE GIF!!!
from here comes the fun part!! you will begin adding action filters like sharpening as well as adjustment layers to color and edit your gif. experiment with different adjustments and styles until you find something you like. too many adjustment layers will up the size of the finished gif though, so I tend to keep mine to 3-4 layers max unless its a really hard to color scene. if anyone is interested in a separate coloring tutorial, please let me know!
once you are finished editing your gif, click file > export > save for web (legacy) OR hit shift + option + command + S. play your gif in the export window to make sure it looks okay, and then hit save!
I hope you guys find this helpful and informative! please hit up my in box if you have any questions or if anything doesn't make sense. happy giffing!!!
*one reason people seem to prefer screencapping to this method, is saving all the individual clips as video files does take up a lot of space on your scratch drive, which in turn can cause your computer to work slowly or crash programs. this can be rectified by making sure to delete the clips from your computer once you are done making the gifs. another space hoarder to look out for is the proxy files of your episodes that will be automatically saved to your hard drive whenever you add an episode to your project in Premiere. Periodically, go through your storage and delete all the .proxy video files. this will not delete the original episode files, only the proxy files created by Premiere.
tagging some mutuals to sb hehe: @shitouttabuck @lover-of-mine @honestlydarkprincess @eddiediaaz @compactdiscmp3 @eddiebabygirldiaz @bigfootsmom @callaplums @athenagranted @firemedicdiaz @sibylsleaves @loserdiaz @buck2eddie @diazass @eddiediaztho @giddyupbuck @monsterrae1 @icecreampotluck @sunflowerdiaiz @swiftfootedachilles @singlethread @aziraaphales @911onabc
117 notes
·
View notes
Note
Are there any places to watch kikiader in good quality?
For a while I thought the old 480p DVD rips were the only way to watch it, and that's how I did it... BUT this ask inspired me to look a little further and found that someone put the subs from said DVD on the 1080p blu-ray release!!
Keep in mind that this means a hefty download size and I haven't looked at it further than the first episode to check if there's any errors, but this seems good :]
71 notes
·
View notes
Text
learn from my mistakes: Blender to Youtube
when we release I'm gonna write a very detailed article on the making of this short film. but since I never found a great summary of the whole process anywhere and had to figure it out myself, here's an overview of the best method I found to get a decent output for a Blender animation with lots of dark gradients on Youtube.
when you render, save it as OpenEXR (a 32-bit floating point format; Blender will save the raw 'scene-referred' colours). this will chew up a ton of hard drive space, but doing this really saved my bacon, since I could easily render patches to fix problems in the scene and freely adjust the exposure in post.
now, in the Video Sequence Editor, import all your EXRs. apply any tweaks or patches you create at this point. render everything out to 16-bit TIFF files in the sRGB colour space. this is necessary because of how Blender internally invokes ffmpeg to encode video, which does everything in 8bit and doesn't properly dither when it converts.
encode the resulting files using encoder that supports a high bit depth internally. I used Hybrid. Ideally use a modern codec such as HEVC or VP9. (that said I had some trouble getting VP9 to work right.)
since we rendered at 1080p and we want to force Youtube to give us higher bitrates, at the same time as encoding, upscale to 4k using lanczos. (Ideally we'd do this earlier, but Blender's internal upscale doesn't support kernels like lanczos.) this is a horrible hack and I hate it, but it won't increase your filesize much, and it will look much nicer on Youtube. of course if you can afford the compute time, render in 4k in the first place!
upload it to Youtube, wait for them to reencode. watch the result. cry.
if you want formatted subtitles, create your subtitles using Aegisub and convert them to YTT format. this will take some finagling. more on that later
18 notes
·
View notes
Note
your gifs are so nice! would you be willing to share your sharpening? and if it's not too much trouble do a quick rundown of your coloring process?
hi anon! it's no trouble at all, if it helps i'm happy to share <3
first i'd like to say that the size and speed of your gifs is key for the sharpen to look good! an incorrectly sized gif will look wonky on desktop (mobile is not very noticeable but desktop is where your gifs can potentially look bad if you size incorrectly) and same for slow-ish gifs, the slower your gif is the more the imperfections show so a correct speed hides the ugly parts lol
these are the standard tumblr photoset sizes

now with that out of the way i'm going to put everything under the cut bc it's probs going to be very long lol if you have any questions after reading all of this, do not hesitate to come back and i'll try to explain better!
okay! first i’d like to point out that i use an older photoshop, simply bc i like how they work lol i work on photoshop cs6 so to enable the same options i’m going to show you here you’ll have to have enabled the legacy option in the smart sharpen filters.
my sharpen varies depending on my source material tbh here are some examples:
source material: music videos
i actually use mvs downloaded from vimeo but these take longer to be up bc the directors don't usually upload at the same time the video is coming out unlike youtube mv, so if i'm working with something from youtube i like to get the biggest format available, so 4k and if it's not available then 1080p will do
i like to do big gifs for mvs so thats 540px width, these are my crop settings (putting it like that i don’t have to manually resize to 540px after cropping bc it’s going to be already the correct size)

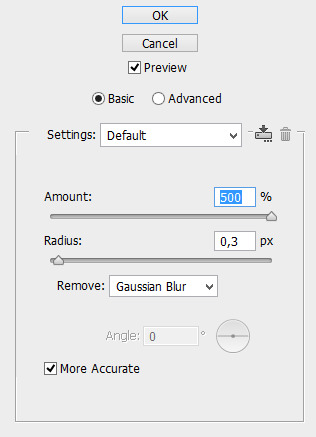
and my sharpen for these is this

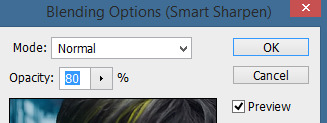
and then i lower the opacity of it to 75/80%, double clicking here

this is the result:


and my gif speed for mvs in particular is this

looks very crispy and ready to color away!
source material: stage videos in .ts format
for stages i like to work with .ts files since they are very high quality recordings of the stages and generally the gifs come out nicer. for stages that are from youtube the next part of this will probs help but this part will be focused on .ts files.
i get my files from kpop24hrs which is invite only right now and invites are a bitch to get a hold of but if you have access it’ll make your life so easy when giffing stages, there’s also twitter to look up files! for stray kids the fastest .ts uploader on twitter is @/STEii_e but if you look up the date + stray kids + .ts the tweets will show! anyway, back to the important thing
for .ts files i work with AviSynth! my computer hates vapoursynth so i use it’s older sibling lol it does the work just fine for what i use it imo bc i usually end up sharpening on photoshop. if you’d like an avisynth tutorial, this is what i used to learn about it and if you’d like to try vapoursynth there’s tons of tutorials from tumblr if you google, the most complete one is from user realstraykids
i modified my avisynth processor for it to have a denoiser (which is a feature from vapoursynth) to have my gifs look a little more smooth but that effect can also be achieved using topaz tbh

these are the output settings i get on the resizer

like i said i modified some things to have a denoiser so it won’t look like this on a regular avisynth
using debilinear usually makes my gif already look a bit sharp, so if i see it’s good i don’t use a sharpen, if i see it need a little push i’ll use a smart sharpen of 500% radius and 0.3px amount, and i’ll use a gaussian blur filter set to 0,3 and i lower it’s opacity to 75/80%


results:

and my gif speed for .ts stages

now it’s all ready to color!
final source material: your regular youtube/twitter/vlive video
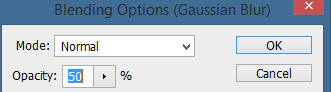
anyone that ever worked with a lq-ish video know how they just look ugly no matter how your try to sharpen, specially vlives and now channie’s rooms on youtube (*shaking fist in the air* damn you 720p videos!!) so i found a way to make them look decent, in this case i oversharpen using a 500% 0.4px smart shapen and then i slap a gaussian blur of 0,3 (lowered to 50% opacity) on top of it to smooth things out, more often than not it works very well but some videos are just plain bad (looking at you twitter) so this will work if you tweak the gaussian blur to your liking. i also recommend to work with small gifs if your video is not 1080p bc they’ll look better, but if you like pain like me and love big gifs this is what i do:


my results:


and my gif speed for these kind of videos

that’s about it for my sharpen tricks!
for coloring i like to do vibrant gifs, i adapted my latest method from this and this, and another tutorial that i can’t find rn, but for my base what i do is two curves layers, a levels layer to bring up darks, then i do a hue/sat to fix up colors, then i do vibrance and finally i selective color to fix things up. i’m going to show you on this binnie and minho gifs
first we use a curves layer and we set it on automatic (no worries if it gets too bright, we’ll be fixing as we go)

now we do a second curves layer, for this one we’ll use the black color picker from the curves layer and pick the darkest point on our gif

now we fix the darks and we bring some brightness with a levels layer
now we do a hue/saturation layer, here i fix up the reds and yellows, sometimes i skip it if the gif already looks good after the first 3 layers if that’s the case i go directly to the next step which is vibrance, in this case i only did minho in this step bc i felt like binnie’s was okay after the first 3 layers
now it’s the vibrance layer, for making the colors pop out more

and now the final layer: selective color! here we fix again red and yellows

that was my base coloring! sometimes i put in a gradient map in between the curves layers and the levels but only sometimes. after this if i want to mess around with colors i mostly go with another hue/sat layer or just use selective color, hue/sat is great for color manipulation. anyway, this is the finished result and my saving settings!


that was really long lmao, i hope it helps somehow? like i said if anything isn’t clear pls come back and we’ll go around it again <3
109 notes
·
View notes
Note
hi! i'm a huge fan of your gifs, especially the queen ones and i was wondering if there's any tips you use, any programs? i want to start giffing but have no idea where to start 😅
aw that's really lovely to hear 💚 i'm still a baby gifmaker really so there isn't a lot that i can provide in terms of advice that hasn't already been said but here's what i got:
the biggest thing to start out with is finding HQ videos, 4K if your computer can handle it but 1080p is still good (it's part of the reason i gif a lot of montreal and budapest because the video quality available is so good). i mostly get my videos from torrenting (like TV shows or movies) or downloading from youtube at the highest quality available (just search "download youtube videos" and use one of the sites)
i've been torrenting since i was like 15 so i've been doing it for awhile, but get yourself a client like bittorrent and a VPN and just dig through the internet. torrent host sites are always being taken down and being put back up so sometimes ya gotta just trial and error it to find the files you're looking for
for screencapping these days i use MPV and a .conf file. here is a good tutorial for that
for the actual editing i use photoshop which i also torrented but if you don't feel like dealing with that process or paying for it outright, there's photopea. my wonderful friend @miwtual started a photopea source blog for tutorials you can check out here
if you are using photoshop, there are like a bazillion tutorials out there on how to upload your screencaps, how to color, how to sharpen, etc etc and those are my lifelines. follow blogs like @pscentral @usergif @gifmakerresource etc and just like dig through all of their tutorials
my biggest advice is follow other creators and share their stuff. you can get lots of inspiration and support from other creators. plus other gifmakers leave the best tags on your edits, like it's pure serotonin
the number one thing to remember is your gifs might be ugly at first and that's so normal and okay. when i was moving blogs and reblogging my old edits over to this blog to have under my edit tag, i fully didn't include a lot of my older edits cuz they were just bad. you'll only get better with practice!!!!
i hope this helps! sometimes the best thing to do is google "gif tutorial tumblr" and just scroll through all the amazing tutorials folks have created over the years. i hope you have so much fun on your giffing journey!!!! 💖💖💖
8 notes
·
View notes
Note
hi i love your gifs! do you have any suggestions on how to minimize the grainy look to them when saving in photoshop? they look okay beforehand but then when going to save they have that look to them. do you use different save settings out of selective/adaptive and diffusion/pattern depending on what you're making or stick to the same? thank you!
hello! thank you <3
i do use adaptive/selective and diffusion most of the time, sometimes pattern if it looks better than diffusion. unfortunately, gifs for web can only be saved with a maximum of 256 different colors. because of that, gifs are always gonna look grainier once rendered and saved than as it is opened in photoshop, where there is no color limit.
here are some tricks i do to ensure the best gif quality possible:
most important: use the best file quality you can find. 1080p is the minimum for sure, in my opinion.
also very important: don't over brighten your gif. the more light you introduce in a darker gif, the more grain it will create. if you really must brighten the gif, do it slowly over a few layers stacked, rather than going all in with one curves layer, for example.
the third most important thing: don't oversharpen. if you overhsarpen a gif, it's easy to introduce grain that shouldn't be there, especially for images that have a lot of details in it. instead, be gentle with the sharpen settings, and don't hesitate to fine tune the settings for each gif. i find that gifs with a lot of details, as well as smaller sized gifs (like 268px wide gifs) don't need as much sharpening as a large gif with little details.
oversaturation can also bring more grain into a gif, especially when saving as a gif for web. because of that 256 colors limit, if a gif has too many very saturated bright colors, you may lose quality in the saturated areas because 256 is simply not enough to render all the colors in your gif. if that happens, focus on a few colors instead of having all colors very saturated. you can also "kill" colors you're not using, or barely using, with a hue/saturation layer (for example bring the green and magenta saturations to 0 in that layer if you don't really have a lot in your gif).
also keep the dark areas of the gif, well, dark. make sure you don't lift the "blacks" too much so they look gray and grainy. i like to use a selective color layer to fix that, if it happens (use the black slider in the blacks tab of selective color).
all that being said, some movies and shows are just grainier overall and there's not much to do except trying to smooth it out with filters, or embrace the grain look and go easy on the coloring and sharpening. it's usually what i do!
i hope this helps a little :)
11 notes
·
View notes
Note
could you make a detailed tutorial on how you do your big gifs, specifically the hotd ones? i struggle a lot with coloring cause everything is so grainy and dark. i have every episode in 1080p but the quality just doesn't seem to be that good once it's giffed
hi anon!
i have a comprehensive tutorial of sorts in the works, but i have, uh, absolutely no idea when it will be done. that said, i do have some tips/example psds i'm happy to share right now ✨
basic tips
to start off: my giffing process is the same no matter the size of the gifs. i use the process outlined in tay's incredible tutorial, so just follow that if you want to do exactly what i'm doing
always gif from 1080p or higher (i’m using 1080p here)
use the "load files into stack" method (see tutorial above) instead of "import video frames to layers"; this will give you much clearer, crisper gifs
crop once and do not attempt to resize once you have cropped; resizing/recropping will introduce a lot of fuzz
coloring tips
some caveats! coloring is hard, yo, and there are a million different way to go about it. the best (and least immediately helpful) advice i can give you is honestly to just screw around and figure out exactly what each adjustment option does—curves, exposure, levels, channel mixer, etc.—and start piecing together your own style
when it comes to "grainy" gifs, there are gifs with film grain and gifs that are noisy/fuzzy. hq footage will have film grain, and lightening aggressively tends to highlight that. if you're worried about noisy or fuzzy gifs, "files into stack" and cropping only once should help minimize those issues
also, hbo hates gifmakers. got and hotd are both straight up nightmares to color, so if you feel like you're struggling, just know that everyone is struggling :/
lighten first: i usually try one or two curves layers first to see if i like what the rgb "auto" option gives me. if i don't, i move on to exposure and adjust using that tool
darken the blacks: it sounds counterintuitive, but as you lighten the scene, you need to make sure you're not washing it out as well. darken blacks using selective color or increase contrast using levels (or both)
adjust colors: hotd is hideously yellow a lot of the time, so channel mixer is your friend here. i typically increase the green slider in the blue output channel and then fine tune by decreasing yellows in selective color. if i'm still struggling, i'll go to hue/saturation and adjust the yellows there
smooth artifacts: artifacts are blocky sections that don't match the coloring on the rest of the gif. do your best to correct them by adjusting in selective color or by cheating and applying a black and white gradient map over the gif— set the blend mode to color and reduce the opacity to around 10-20% to smooth out some of the artifacts
duplicate + blur: if you're really struggling with excessive fuzziness/artifacts, you can duplicate your base gif directly on top of the original, add gaussian blur at 3.5, and set the opacity to somewhere between 10-25% to smooth out the mess. be aware that this will increase your overall file size
adjust export settings: i use "diffusion" exclusively, but that's a personal preference. some people think "pattern" looks cleaner, and sometimes it can help reduce noise
and finally, here's a selection of psds i've used for hotd scenes:
psd #1
psd #2
psd #3
psd #4
there you go! these psds should give you a pretty good look at how i color, but feel free to send me another ask if you any more questions or want tips on coloring a particular scene!
good luck!
78 notes
·
View notes
Note
You make such beautiful gifs, the quality and coloring are simply wonderful.... I'm slowly getting into making gifs myself but I'm really struggling since my results come out looking muddy/low quality whenever I upload them (for example, uploading on twitter) .
And so I was wondering if you were ever up to making a tutorial on what your process is to get the results that you get.
Thank you for sharing your work with us, always a pleasure to see.
Thank you! Happy you like my gifs!
Learning to gif is a journey, and most people's first gifs don't turn out as nice as they want them to, so you're not alone. There's a lot of trial and error involved.
As for tutorials, I follow the same steps as most of the gif tutorials you'll find on tumblr. If you're not using Photoshop to make your gifs, you might want to try it. I'd recommend just finding a tutorial on how to make gifs in Photoshop on tumblr and working from that. Aside from one caveat, which I'll get to later, I don't have much to add about the gif making process that hasn't already been said.
The requirements for Twitter are a bit different than Tumblr as Twitter processes gifs differently than tumblr (and Twitter is worse). I don't make twitter gifs very frequently, so I can't give you the best advice for that. What I can say is that you'll need your gifs to be large enough for Twitter. You'll want to look up the optimal size for gifs on twitter because the last time I posted gifs to Twitter, the optimal size was larger than Tumblr. Once you figure this out, you should be able to make pretty good gifs for Twitter.
In terms of general gif making, for best results you should use HD files. This is going to be key. You want to use either 1080p or 4k, and in my experience, 4k doesn't significantly improve gifs unless you want to zoom in, in which case the extra resolution of a 4k file helps a lot. I use 1080p unless I want to zoom in.
You also want to make sure the file you download isn't overly compressed because overly compressed video is much more difficult to brighten and color. If you're looking to download an episode of a tv show, you may find a few different files. I usually go for the largest 1080p version because that will give me the best quality. The smaller 1080p files are noticeably worse quality than the larger 1080p files. They both say 1080p, but they are not the same - that smaller file size came with sacrifices. Ripping straight off a blu ray will usually give you great results, but the files can be very large.
Now on to the one thing I do differently than what you'll see in a lot of gif tutorials - I don't sharpen in Photoshop. I use Topaz Video AI. This is a resource-intensive program, and I run it on an expensive laptop which allows it to run quickly. It's not going to run well on everyone's computer, so if you're working with 1080p files, it's absolutely not necessary. I use it a lot because I like it, but sharpening in photoshop will be fine if you're gifing an HD file.
If you're working with standard definition content, Topaz Video AI makes a world of difference. If you're asking me about my gifs because you saw my Scrubs gifs, then, unfortunately, Topaz Video AI is the secret to how they're much higher quality than anything you'd make from the SD/DVD files that are available.
I do know that a lot of people have used Topaz Video AI (or a similar program) to upscale many older series, so if you're looking to gif a standard definition series, someone out there may have already done the work for you. For example, I know you can find upscaled Xena episodes pretty easily these days, which was not the case when I first started using topaz to make my gifs.
And if you can't find an HD file, you just have to make the best with what you have. Sometimes that's the only option.
Hope this is helpful!
#reply#i know it's not super specific#but the gif tutorials on tumblr are usually pretty good for the basics#and this is what I have to add that might not be in there
3 notes
·
View notes
Text
a shaggy dog story:
a while back I wanted a plugin for winamp that would play a full album front to back in order, pick another album from the library/playlist at random, and then play that album front to back in order.
fishmech suggested some plugins that would accomplish this, so I applied them and it worked as intended. mostly. for some reason it worked fine within playlists, but the program started crashing sometimes if I tried to play stuff straight from the library. but I don't actually do that much, so I just tolerated it. I assume it's because it runs out of memory if there's too many albums loaded at once?
anyway lite responded to the music ask thing and I wanted to look through songs I like from the 1980s, which was a good decade for music and hard to just pick one I liked off the top of my head. playing from the library was crashing the program though, so I decided to actually try and fix the issue
my first thought was, well, I can just remove the plugins right? so I removed one of them easily, but the other was being stubborn for some reason, so I opened the directory to try and just yank the file manually. it didn't have a clear filename that I could see, so I yanked one that looked right and booted the program again.
this fixed the issue with crashing, but as a side effect had apparently completely removed playlist functionality from the UI. hm. I put the file back and booted winamp again, but it seemed to just eat the file and it wasn't in the directory, or in the trash bin, and the playlist ui was still missing.
I'd been putting off updating or reinstalling the program for a while because the current owners of winamp keep trying to do weird shit to it like add nft integration and a bunch of vague sounding business speak that I cant' be bothered to parse. I downloaded it anyway and axed the nft plugin, and this theoretically worked fine, but for some reason the windows weren't displaying at the right resolution on my monitor (I think because one is 1080p and the other is 720 and it got confused) and I couldn't figure out how to fix this. fuck.
so I ended up grabbing WACUP, the winamp clone being developed by a former nullsoft dev, since it seems to have a decent reputation and presumably wouldn't have any weird bloat. I got it configured pretty quickly, imported my skin library, music, and playlists, and it has been working basically fine ever since
...oh, but the guy making WACUP was the one who made the playlist separator, the plugin that was breaking things in the first place. and said functionality comes pre-installed in WACUP.

10 notes
·
View notes
Note
Hi! I have a question abt files to make gif from. You prev said the bigger (4k) size the better but I was wondering what size are the files you use for your movie and tv shows episodes? And which version cause there's bluray, trueHD, 4k, 2061p, 1080p, webrip, REMUX etc I looked at some of the 4k files and for some reasons they all look like the colors are washed out or something so I find them harder to color so I was wondering which versions you usually get
*same anon* also for the 4k files, there's HDH, SDR and HDR and honestly idk the differences and it's all confusing haha
hi! I use both 1080p and 2160p (which is the same thing as 4k) and the file sizes vary depending on that and the source itself. the difference between 1080p and 2160p are the dimensions and file size of the screencaps - the larger it is, the more pixels it can hold and thus the details and quality is higher. to my understanding, remux is uncompressed 1080p and has huge file sizes - sometimes can be as good as 4k. bluray, webrip etc is just where they come from.
I usually ignore everything else when t*rrenting and just look for the quality I want, if it's 1080p or 2160p, and find the one that has been downloaded (seeded) the most or second most, depending on the file size as I usually go for the larger one especially for 1080p, where there's more options. I also usually get mkv files, which are always better quality than mp4 files, but not all programs can open mkv. for 4k, it is always hdr (washed out). the version of the screencapping program I use, mpv, will colour correct the screencaps but it will still be darker and slightly more muted than 1080p. there are also some 4k files that are pink and green for some reason - look at the screenshot previews and definitely avoid those.
if you're going to use 4k, just be aware that it takes a lot longer to download, screencap, make the gifs and it requires a lot more space so I usually only use them for gifs with large dimensions and when making blended and colourful gifs - otherwise 1080p at a larger file size is enough, especially for new shows and movies.
hope this helped!
6 notes
·
View notes
Note
Wait, we have to be using 4K now in order to have decent gifs :(? Most of the editors on here has said that a high-quality 1080 P file is more than enough. Not all of us have space for 4K, is that really the only acceptable file size for editing now?
it depends on a lot of things honestly.... I think movies have usually a better quality than tv shows, look at disney + shows, the quality is mediocre... once again, if you use a remux file, your gif will have a very good quality. But if want to download spiderman in remux 1080p for example, it will weight around 20/25 GB, It's a lot. You can download a file in 4K light instead of a huge 1080p file and it weights around 5GB. For animation, i almost always download 4K light and the quality is better than a regular 1080p. If you really know how to color things (don't look at me, i'm bad at it), 1080p can be enough!. Let's be honest, it's not like people who don't gif actually care about the quality... and not a lot of people gif with 4K. I bought a new mac 2 months ago and i couldn't gif with 4k before, i'm just discovering a new world. But i can assure you, i tried to color stranger things for months. it was bad. i tried with 4k and it was instantaneously better. if you compare old movies in 1080p to recent ones, you will see that the quality was better....
9 notes
·
View notes
Note
hey! how do you make your gifs look so fucking clear and how do you add subtitles if you don’t mind me asking!!! thanks🫶🏾🫶🏾🫶🏾
thank you for saying my gifs look clear omg!!!! hoenstly i have found that the best thing to do for that is download large file sizes of high quality for the stuff you want to gif, like 1080p and a minimum of 5gb file size (for movies, for tv i would say about 3gb per ep depending on the length of the eps). i dont tend to do much larger than that bc my wifi is SO slow that it would literally take days to download anything bigger, but i really think it is soooo helpful for making gifs look more crisp and it makes coloring a breeze. like you'll notice that anything i gif that just comes from youtube where i dont have a lot of control over the quality and file size tends to look um. well i dont love the way those gifs come out!! smart sharpen is also the most important tool for this and these are my settings:

very occasionally i use 2 sharpens if i'm working with something of lower quality (or if i just like the way it looks) and so i use the settings above and then another sharpen with these settings

as for the subtitles i have a saved psd file that i just drag and drop to every new gif i make!! these are my text settings (i tend to play around with the font size and color with every set):
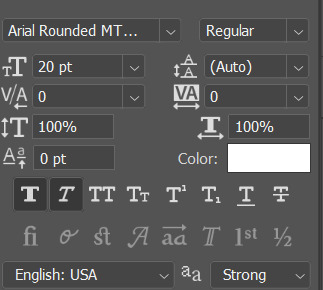

if it's easier i have also uploaded the psd i use to mediafire (do people still use mediafire...) right here!!
i hope any of this was helpful i know im not the best at explaining things so please let me know if anything i said makes no sense or if you have any other questions!!! i'd be happy to help in any way i can <33
#answered#anonymous#if there is an ad for the mediafire link just know i make no money from that LOL#i know people download WAY bigger file sizes but i am just way too lazy for that <3 and i think my laptop would explode
4 notes
·
View notes
Note
tbh Silent Hill 2 doesn't even need a remaster, let alone a remake, just a re-release. just take the existing PS2 version, bump it up to 1080p, give me an options menu and a toggle for OG tank controls vs a more modern control scheme, and put it on PC. Bam, done!
Package it with 1 & 3 for bonus points, and you'll make every single Silent Hill fan happy.
Yeah, that's way easier said than done
Konami did a whoopsie and lost the original files for the game. Meaning, no high-resolution cutscenes, no high-bit rate voiceovers, no original models or textures. You would have to do all of those from scratch and you can't just... Take a PS2 disk and datamine it from there, because it's all been compressed to shit with 2001 tech so it would look good enough on a tiny-ass CRT TV in the corner of your kitchen.
2 notes
·
View notes
Note
waaait there's plans to ruin gifs and such more? caprisun pls.
oh it's bad lj 😭 in this update post they said they're experimenting with "serving some GIFs as looping MP4 files" to make gifs load faster on pages with a lot of gifs, and it's reducing quality badly. just in my drafts it's taking a gif that looks like this:

and making it look like this:

essentially taking a 1080p download and making it worth about as much as a 480p dl 🙃
just very discouraging, i really hope changes are made to this because gifmakers deserve a lot better :(
2 notes
·
View notes
Note
hiii i hope you are taking care of yourself and that the semester ends okay sending a lot of love 💝💕💕
i wanted to ask if by chance you knew where it would be possible to find online (w english captions) bts the best japan making of? at least i think that’s the title. it’s from when a lot of them were wearing light purple and hobi had the platinum blonde cuntyness going on. and they were interviewing each other or s/t in this clip i saw? like nj asked tae what he wanted at this moment, and tae said he wanted to have hobi and hobi was blushing
i know this is a longshot 😭 but if you know where i could find the longer video, i’d be so grateful! only asking since you are the resident hobi encyclopedia 😭😭 nw if not possible, and again hope your semester ends well!! thank you for all the hots gifs also 🥹🫶
hi! thank u so much thats very sweet n im glad u like my gifs 🥺🫶🫶 its no bother i know which one u mean and u can watch it with eng subs from dwellingsouls here ( let me know if u need help with the password to their site)! just scroll down to the 2021 section and its called "BTS THE BEST Limited Edition B DVD" u can stream it in 720p right from their site or download it in 1080p! it seems like u just wanted to watch but if u were looking for a higher quality version to gif i can look for that too just let me know,, im always happy to look for files for u guys since i know it can be frustrating<3
#mail#its my pleasure to be a jhope encyclopedia i have a terrible memory but when it comes to him i can remember exact dates 🫡 lol
1 note
·
View note
Last Seen Blogs

behind-the-gloves
In Defense of Psi Corps

evviscom-blog
VISUAL COMMUNICATION

shurekimmie
Untitled

willow-pond-gemstones
Willow Pond Gemstones

distributorbesarsorexunderwear
Distributor Besar Sorex Underwear