#manual testing tutorial
Explore tagged Tumblr posts
Visit Tumblr Blog
Explore Tumblr blogs with no restrictions, modern design and the best experience.
Last Seen Tumblr Blogs


Fun Fact
Tumblr has 411 employees.
Text
#manual tutorial#manual testing tutorials for beginners#manual testing tutorial#manual testing#online training#tutorials#testing#india
0 notes
Text
Needle Felt Siffrin Build Log: (oct 6 - nov 20, 2024)


Credits goes wholely to @insertdisc5 for creating ISAT and siffrin's design! I am just here to attempt to make cool fanart (and get more people to play isat.. my devious plans are going great so far :3) As always, this isn't a tutorial- it is just a log about how i go about approaching a sculpture and I hope this collection of resources can help others make their own sifs!!
PSA: this has some spoilers for endgame CGs/sprites on my references image board ( also might see it in the backgrounds of my process pics). And bc this is needle felting, you will see some sharp needles! beware!
my inspiration was the intro cutscene where Sif eats the star, so my main goal was to adhere to the style of ISAT as closely as possible while transfering it to 3D space. And I knew i also wanted to try making the cloak for stopmotion purposes, so my process was tailored towards having control over the fabric with wire inlaid within the cloak (more on that later).
I ended up not sticking eyebrows on top of siffrin's bangs lol but anyways, first order of business is Gather Reference! v important. pureref is free and an awesome program. I also do some sketches to visualize the pose and important details i wanted to include in the sculpt.
behold the isat wiki gallery page! tawnysoup wrote an awesome ISAT style guide that absolutely rings true in 3d space too!! adrienne made a sif hair guide here!! (sorry i couldnt find the original link, but it's on the wiki). It says ref komaeda hair so that's what i looked at, along with other adjacent hairstyles! I also like doing drawovers on in progress photos to previs shapes n stuff to get a better idea of the end result.
Also if you're like me and struggle with translating stuff into 3D space, take a look at how people make 3d models and figurines! sketchfab is also a great resource! I looked at the link botw model by Christoph Schoch here for hair ref. (I used Maya, but there's a blender version too ! you can pose characters too if your model has been rigged!)


Face:
Started off blocking out the main shapes of eyelids and iris, and then filling in the colour details in the iris and the star highlights before moving onto adding thin black outlines and eyelashes. I didn't take many in-progress photos cause i kept ripping stuff out to redo them many many times, sorry!! This eye took about 3 hrs bc i just wasn't happy with it!! Sometimes it do be the vibe to give up, go to bed and see how it looks in the morning (more often than naught, it looks fine and it was the "dont trust yourself after 9pm" speaking)

The Mouth:
Couldn't decide if i even wanted to add a mouth as per usual with all my humanoid sculptures.. but i did some drawover tests first to see what expression i liked and to try to visualize it from multiple angles. (I was also testing the placement of stars on the hat brim here)

And then I redid the mouth like 3 times cause the angle just wasn't right (this went on for about the course of a week yay!)
Hair: woe baldfrin be upon ye


I made the hair strands individually first, and then since Sif has some of the hair at the back dyed black, i covered some of the tips with black wool (manually) (I think it would go much faster if i just took a marker to it, but hahaha i love pain and detailing!! )
And then the rest of it was positioning strands with sewing pins layer by layer, always looking at it from different multiple angles- sometimes tailoring the angle or swoop of individual hair flippies. At one point I thought the back looked too cluttered, but the hat covers a lot of it anyways!! yay for hiding mistakes! (imo this is a similar process to how cosplayers style wigs, but on a smaller scale and the same level of time consuming)
As always, look to your reference for guides, and I always do a whole bunch of drawovers over in progress photos to ascertain what was working and what wasn't.
Hat:
A trick to get a super pointy tip, make another tip seperately while keeping the connection point unfelted, and then combine the two to make super pointy hat!! (this also helps if you made the hat too short and need it to be taller. ask me how i know)

The embroidery on the hat brim was done in a hoop and then invisible stitched to the felted top portion. Technically you don't need a hoop but it helps keep the fabric tension, so you avoid puckers in your embroidery. You can also use iron-on stabilizer if your fabric is loose weave or particularly thin. this is the tutorial i used for the stars embroidery! particularly the fly stitch one, french knots, and the criss-cross stitches. highly recommend needlenthread for embroidery stitches and techniques! i learned all my embroidery from this single site alone.

For fabric, I think I used a polycotton i had in my stash,, unsure of the actual fiber content bc i bought it a long time ago. I used DMC Satin floss which was nice and subtle shiny but frayed a lot so it was kind of a pain to stitch with... but keep a short thread length and perservere through it!! After the embroidery was done, I folded up the raw edges and invisible sewed it to the top portion of the hat.
General shape:
Ok general structure of the body is this: wire armature body covered with black wool -> cloak lining & wire cage -> edge of lining is invisibly sewn to the main cloak at the hem -> head

Don't be afraid to mess around with the pattern, it's essentially a pizza with a slice taken out of it to form a steep cone shape!! Use draft paper before cutting into felt to save material! (i think i made like 3 cloaks before i was happy with the shape lol).
You can also hide the seam of the cloak and collars by gently messing up the fibers of the felt with your fingers or a felting needle btw! you can also sandpaper the seams according to Sarah Spaceman in this vid (highly recommend them for their in depth cosplay/crafting builds holy smokes), though since sif cloak is at such a smol scale, I just blended the seam with my felting needle.
For the lining wire cage section, I sewed in wire around the cloak, so the main rotation point is at the top neck area under the collar. These paddles are used to keep whatever pose I need the cloak to be in for stopmotion purposes. Then after the wire is done, I invisibly sewed the lining to the cloak at the hem (same technique as the hat brim to the lining there).
In hindsight, I should've used a thinner fabric for the lining, but i only had sheer white in my stash so had to go with double felt, thus resulting in a really bulky lining but oh well!

Heels:
started with the general boot shape, then tacking on the diamond shape heel stack and also diamond shape sole bc we're committed to the bit here. I skewer the boot onto the armature which also conveniently hides the connection point into the base to keep the whole thing upright and also I can rotate the boot to tweak the angle if needed.

Pins:
I kinda just trial and error'd jewellery wire with pliers into the pin shapes. They're itty bitty!! had a whole bunch of fails before i got two nice ones. A hot tip is to use needle nose pliers and wrap the wire around the tip to get a smooth circle shape!

Base:
I smoothed out the edge of a circular wood base with a dremel, and then used wood stainer to get the black colour. It ended up kinda looking like I took a sharpie to it, but whatever.... now i have a whole ass can of black wood stainer........ I then made a rough mountain of black wool and stuck the feet armature in. And now he's standing!!

Normally at this point when I'm done felting everything, to get a smooth finish, I'd take a small pair of scissors and carefully snip away any flyaway fibers, but this time, I just left them fluffy cause i think that's what sif would do :3c
Photoshoot:
Normally I do shoots using daylight but it was winter so the sun was nonexistent. So I broke out the home lighting setup aka dollarstore posterboard for a nice smooth background, and then hit it with the overhead Fill, side Fill 2, and Rim light, and use white paper/posterboard for bounce light if one side feels too dark. But if things are overexposed, you can move the light sources away until the harshness dims down. I'm using a Olympus mirrorless camera (handed down to me by my sibling so i dont remember the model exactly), which can connect to my phone as a remote so I can avoid shaking the camera when i take photos. Pretty nifty for stopmotion purposes! (yes my camera stand is a stack of notebooks, a tissuebox and some eva foam under the lens, don't judge me)


Stopmotion animation:
I'm still figuring stopmo out on my part, but my process was straight ahead animation ... move the cloak a cm, take a pic.... move another cm, click.... and repeat until i get a version I was happy with. My ref was the cloak animation from Gris (beautiful game btw). The 2d star animation was also done straight ahead using procreate, exported in png with a transparent background, and finally stitched together with the stopmotion footage in photoshop.

My turnarounds are also stopmotion! also secret hack, the turntable is a fidget spinner sticky tacked to a cake platter.
And i think that's all! i mainly wanted to share how I go about thinking about taking a 2d concept and moving it to 3D. I also didn't go in depth into how to actually do the needle felting bc I don't think I''d be very helpful I'm a very good teacher by telling yall to just keep stabbing until it looks right (i'm self taught for this hobby),,, if anyone wants it though, i can share a bunch of tutorials and other felters' process that helped me learn more needle felting!
Hopefully this was helpful to someone! Feel free to send asks if ya got any questions or if anything needs clarification! Or show me your works! I love seeing other people's crafts :3
here have a cookie for making it this far 🥐
#in stars and time#siffrin#isat#isat siffrin#isat fanart#needle felt#soft sculpture#know that i am devouring all the nice words yall leave in the tags/comments of my posts :holding back tears:#I hesitate to call this a tutorial bc this is just how i fumble my way through crafting anything lmao#the only reason I know how long I worked on a project are timestamps on wip photos and however long the day's video essay or letsplay is#sorry time is immaterial when i get into crafting mode#reason why this log is so late is bc after i finish a project i'm perpetually hit with the ray of 'i dont ever want to look at this again'#hence why photos never get edited#AND THIS POST SAT IN MY DRAFTS FOR 2 MONTHS DUE TO BLOODBORNE BRAINROT SORRY#done is better than perfect!!!#sorry i dont control the braincell#sorry for using a million exclaimation points! i am not good at this.. conveying my anxiety in written form!!! my toxic trait
1K notes
·
View notes
Text


~urban haze~ reshade preset!
I've been using this preset on my twitch for a bit now, and i've finally gotten around to releasing it!! I'm very happy with it and I currently use it for everything😅
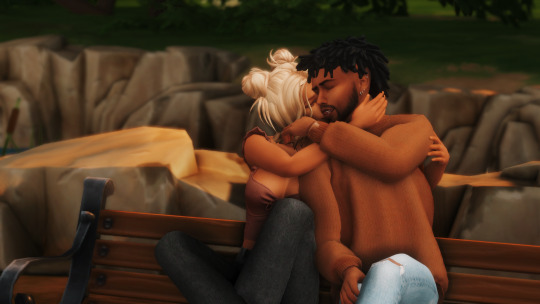
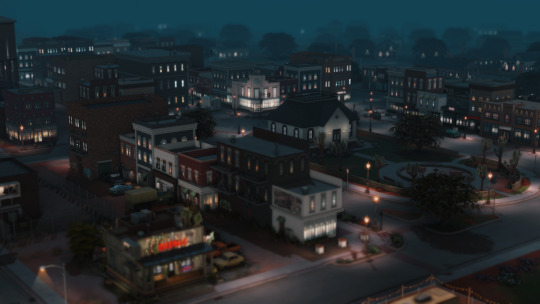
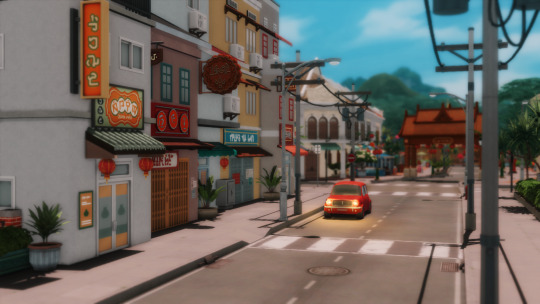
Urban haze has a focus on realistic lighting with a slight hazy and warm feel. Less blue in shadows, darker nights, deeper afternoon shadows, saturated sunsets, balanced greenery. Use it in any world, I've tested them all :)
__________________________________________
How to download:
♥ Download Reshade: (I use reshade 5.7.0, I can't say how this preset will behave with other versions of reshade, or G-shade.)
♥ During Reshade Installation, select The Sims 4, choose DirectX9 as the rendering API.
♥ Effect Packages to install: standard effects, sweetFX by CeeJay, qUINT by Marty McFly, color effects by prod80, and Legacy effects.
♥ Download urban haze below, drop it in your Sims 4 installation's "Bin" Folder
♥ Open the Sims 4, Disable edge-smoothing in your graphics settings if it's not already, In the reshade menu, set RESHADE_DEPTH_INPUT_IS_REVERSED= to 0 in global preprocessor definitions if it's not, and MXAO_TWO_LAYER= and MXAO_SMOOTHNORMALS= both to 1 in qUINT_mxao's preprocessor's definitions.
♥ If you're struggling with installation, I suggest you check out @kindlespice's installation tutorial! It was made for reshade 4.9.0 but the instructions remain the same.
__________________________________________
Notes:
♥ Both Depth of field shaders are off by default, you can enable them using their shortcuts: ctrl + Q (MagicDOF), ctrl + W (MartyMcFlyDOF) or enable them manually.
♥ MXAO.fx also has a shortcut (ctrl + R) bc sometimes the DOF blur makes the shadows weird, most of the time it's fine!
♥ Could potentially be gameplay friendly, depending on your GPU! The MXAO and DOF shaders will be the most performance heavy, feel free to adjust to your liking.
♥ The pictures above were taken with this preset and no further editing, but I do use a few lighting mods that will affect how my game looks:
♥ NoBlu by Luumia
♥ NoGlo by Luumia
♥ twinkle toes by softerhaze
URBAN HAZE RESHADE PRESET ↠ download on sim file share!
Follow me on twitch!
Support me on patreon!
TOU: do not redistribute, reupload, or claim my cc/CAS rooms/presets as your own! recolour/convert/otherwise alter for personal use OR upload with credit. (no paywalls)
1K notes
·
View notes
Text
Luo Binghe Shimeji (Extended Version!)


a couple years ago, riladoo created an adorable binghe shime! he could be picked up and tossed around your computer screens, climb around on all your windows, multiply, and all the other cute things that come in the standard base shimeji set.
more recently, i reached out to riladoo with a commission request - more action sets for binghe! over the past couple months, riladoo has worked hard to make some adorable binghe art, and i've updated all the source code and config files to accommodate the new actions! 🎉
the extended action set includes: - a 'sit and eat' idle action - two 'head patting' actions when the mouse hovers over him - a 'fall and cry' action for when he falls from tall heights - a 'land nicely' action for when you place him down gently
the original binghe shime listing on riladoo's gumroad has been updated to have all these new actions, so go grab him now!! he's free / pay what you want! 🥰
i've put more details about the new action sets + general shimeji setup tips below the cut, but otherwise -- LET THE BINGHE COMPUTER INFECTION COMMENCE !!
**these extended actions only work on windows, not mac. sorry ;w; the original shime set has a mac version, though!
Extended Action Set Details
when you download the files from riladoo, you're looking for the .zip file labeled "Updated Shime code" !

sit and eat this is an idle action that will trigger randomly the same as any other idle action. if you want to trigger it manually, you can right click the shime -> 'set behavior' -> 'sit and eat'
head pats these are 'stay' actions that will trigger automatically when you hover your mouse over the shime. i recommend hovering your mouse over his head for maximum head-pat-effectiveness! unfortunately, this action won't play if the shime is actively climbing a wall/ceiling - maybe in the future this can be extended further, but for now there are only head patting actions for sitting and standing poses :>
falling variations (crying / default / land nicely) there are now a total of 3 'falling' actions. to see the 'fall and cry' action, allow binghe to fall from the top half of your monitor. to see the standard/original 'fall and trip' action, allow binghe to fall from the low-mid range portion of your monitor. to see the 'land nicely' action, gently place binghe down at the bottom of your monitor. this means you're rewarded for catching binghe when he falls off a window - if you catch him and set him down, he lands nicely, but if you let him fall normally, he'll start crying!! 🥰
Shimeji Installation Tips
if you've never had a shimeji before - don't worry, they're super easy to install! i recommend following this video tutorial created by the person who originally created the source code for shimeji. you can skip the parts about downloading the shimeji itself - you'll get that from riladoo's website :>
if you install everything but opening the shimeji executable does nothing, download jarfix to resolve this issue.
if you follow the tutorial and update the 'interactive windows' but the shime still doesn't stand/climb on the specified windows, restart your computer to resolve this issue. alternatively, make sure you don't have any 'unexpected' monitors plugged in - a friend of mine had their shime constantly falling down through their monitor onto their screen drawpad, which was confusing until it got figured out!
if you are on mac instead of windows.... i am so sorry i actually have no idea how to help 🙇♂️ the original/default binghe shimeji set DOES have a mac os folder in with the downloads, but i've never tested it (don't use mac), and even if it works, it won't include the extended actions (i didn't build an executable for mac with the new code).
More Questions???
feel free to hit me up! in the replies of this post / through DMs / send an ask - whatever is best for you. i'll tag any asks i get about the shime with #binghe shime chronicles so they get archived nicely. i got very familiar with all the source code / config files to get this lil guy set up with his extended actions, so hopefully i can answer any questions you have! 💪😤
that's all!! i am so happy w how the new actions turned out - the art riladoo did for them is SO cute! - and i hope y'all will be, too!
531 notes
·
View notes
Text
A small but very useful tutorial
written with the help of chatGPT
Why Use Upscayl?
Upscayl is a great tool for improving textures and reference images. Whether you are working on character skins, environmental textures, or UI elements, this program helps to:
Increase image resolution without losing quality
Reduce pixelation and enhance details
Improve the clarity of textures for a more realistic look
How I Use Upscayl (look at the photo)
Finding or Creating a Reference Image I start with an image that I want to enhance. This could be a low-resolution texture or a reference image for a new design.
Adding Noise for Testing To demonstrate how Upscayl improves images, I intentionally added noise to a mask texture. This allows me to compare the before and after results more clearly.
Processing the Image in Upscayl I import the noisy texture into Upscayl and choose an appropriate AI model. The program processes the image, enhancing its details and removing unwanted noise.
Examining the Results After running the texture through Upscayl, the difference is clear: the texture appears sharper, more detailed, and free of noise, making it more suitable for in-game use.
Enhancing Existing Game Textures
Apart from improving references, Upscayl is also useful for enhancing in-game textures, such as character skins. If a skin looks too blurry or low-resolution, running it through Upscayl can significantly improve its appearance without having to manually repaint details.


#sims3#sims#ts3#simblr#s3#sourlemonsimblr#sls#sims4#the sims#sims 2#tutorial#not sims#sims tutorial#cc tutorial
113 notes
·
View notes
Text
Gaming GIF Tutorial (2025)
Here is my current GIF making process from video game captures!

PART 1: Capturing Video
The best tip I can give you when it comes to capturing video from your games, is to invest in an injectable photomode tools - I personally use Otis_Inf's cameras because they are easy to use and run smoothly. With these tools, you can not only toggle the UI, but also pause cutscenes and manually change the camera. They are great for both screenshots and video recording!
As for the recording part, I personally prefer NVIDIA's built-in recording tools, but OBS also works well in my experience when NVIDIA is being fussy.
PART 2: Image Conversion
Do yourself a huge favour and download PotPlayer. It is superior to VLC in more ways than one in my opinion, but is especially helpful for its Consecutive Image Capturer tool.
Open the video recording in PotPlayer, and use CTRL + G to open the tool. If this is your first time, be sure to set up a folder for your image captures before anything else! Here are the settings I use, albeit the "Every # frame" I change from time to time:
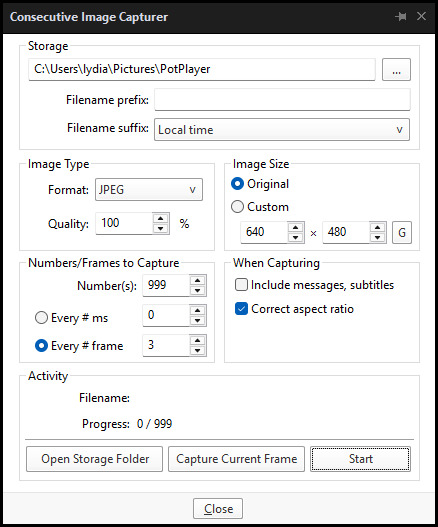
When you're ready, hit the "Start" button, then play the part of the video you want to turn into a GIF. When you're done, pause the video, and hit the "Stop" button. You can then check the images captured in your specified storage folder.
(TIP: Start the video a few seconds a head and stop a few seconds after the part you want to make into a GIF, then manually delete the extra images if necessary. This will reduce the chance of any unwanted cut-offs if there is any lagging.)
PART 3: Image Setup
Now, this part I personally always do in GIMP, because I find its "Open as Layers" and image resizing options 100% better and easier to use than Photoshop. But you don't have to use GIMP, you can do this part in Photoshop as well if you prefer.
Open the images each as an individual layer. Then, crop and/or scale to no more than 540px wide if you're uploading to Tumblr.
(TIP: This might just be a picky thing on my end, but I like to also make sure the height is a multiple of 10. I get clean results this way, so I stick to it.)
If you use GIMP for this part, export the file as .psd when done.
PART 4: Sharpening
If you use GIMP first, now it's time to open the file in Photoshop.
The very first thing I always do is sharpen the image using the "Smart Sharpen" filter. Because we downsized the image, the Smart Sharpen will help it look more crisp and naturally sized. These are the settings I mostly use, though sometimes I change the Amount to 200 if it's a little too crunchy:

Here's a comparison between before and after sharpening:


Repeat the Smart Sharpen filter for ALL the layers!
PART 5: Timeline
First, if your timeline isn't visible, turn it on by click on Windows > Timeline. Then, change the mode from video to frame:

Click "Create Frame Animation" with the very bottom layer selected. Then, click on the menu icon on the far-right of the Timeline, and click "Make Frames from Layers" to add the rest of the frames.
Make sure the delay should be 0 seconds between frames for the smoothest animation, and make sure that the looping is set to forever so that the GIF doesn't stop.
Part 5: Editing
Now that the GIF is set up, this is the part where you can add make edits to the colours, brightness/contrast, add text, etc. as overlays that will affect all the layers below it.
Click on the very top layer so that it is the one highlighted. (Not in the timeline, in the layers box; keep Frame 1 highlighted in the timeline!)
For this example, I'm just going to adjust the levels a bit, but you can experiment with all kinds of fun effects with time and patience. Try a gradient mask, for example!
To test your GIF with the applied effects, hit the Play button in the Timeline. Just remember to always stop at Frame 1 again before you make changes, because otherwise you may run into trouble where the changes are only applied to certain frames. This is also why it's important to always place your adjustment layers at the very top!
Part 6: Exporting
When exporting your GIF with plans to post to Tumblr, I strongly recommend doing all you can to keep the image size below 5mb. Otherwise, it will be compressed to hell and back. If it's over 5mb, try deleting some frames, increasing the black parts, or you can reduce to number of colours in the settings we're about to cover below. Or, you can use EZGIF's optimization tools afterwards to reduce it while keeping better quality than what Tumblr will do to it.
Click on File > Export > Save for Web (Legacy). Here are the settings I always use:

This GIF example is under 5mb, yay! So we don't need to fiddle with anything, we can just save it as is.
I hope this tutorial has offered you some insight and encouragement into making your own GIFs! If you found it helpful, please reblog!
135 notes
·
View notes
Text


Neural Filters Tutorial for Gifmakers by @antoniosvivaldi
Hi everyone! In light of my blog’s 10th birthday, I’m delighted to reveal my highly anticipated gifmaking tutorial using Neural Filters - a very powerful collection of filters that really broadened my scope in gifmaking over the past 12 months.
Before I get into this tutorial, I want to thank @laurabenanti, @maines , @cobbbvanth, and @cal-kestis for their unconditional support over the course of my journey of investigating the Neural Filters & their valuable inputs on the rendering performance!
In this tutorial, I will outline what the Photoshop Neural Filters do and how I use them in my workflow - multiple examples will be provided for better clarity. Finally, I will talk about some known performance issues with the filters & some feasible workarounds.
Tutorial Structure:
Meet the Neural Filters: What they are and what they do
Why I use Neural Filters? How I use Neural Filters in my giffing workflow
Getting started: The giffing workflow in a nutshell and installing the Neural Filters
Applying Neural Filters onto your gif: Making use of the Neural Filters settings; with multiple examples
Testing your system: recommended if you’re using Neural Filters for the first time
Rendering performance: Common Neural Filters performance issues & workarounds
For quick reference, here are the examples that I will show in this tutorial:
Example 1: Image Enhancement | improving the image quality of gifs prepared from highly compressed video files
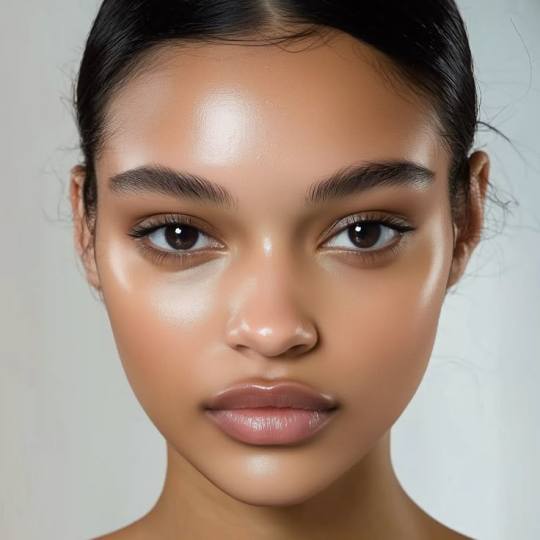
Example 2: Facial Enhancement | enhancing an individual's facial features
Example 3: Colour Manipulation | colourising B&W gifs for a colourful gifset
Example 4: Artistic effects | transforming landscapes & adding artistic effects onto your gifs
Example 5: Putting it all together | my usual giffing workflow using Neural Filters
What you need & need to know:
Software: Photoshop 2021 or later (recommended: 2023 or later)*
Hardware: 8GB of RAM; having a supported GPU is highly recommended*
Difficulty: Advanced (requires a lot of patience); knowledge in gifmaking and using video timeline assumed
Key concepts: Smart Layer / Smart Filters
Benchmarking your system: Neural Filters test files**
Supplementary materials: Tutorial Resources / Detailed findings on rendering gifs with Neural Filters + known issues***
*I primarily gif on an M2 Max MacBook Pro that's running Photoshop 2024, but I also have experiences gifmaking on few other Mac models from 2012 ~ 2023.
**Using Neural Filters can be resource intensive, so it’s helpful to run the test files yourself. I’ll outline some known performance issues with Neural Filters and workarounds later in the tutorial.
***This supplementary page contains additional Neural Filters benchmark tests and instructions, as well as more information on the rendering performance (for Apple Silicon-based devices) when subject to heavy Neural Filters gifmaking workflows
Tutorial under the cut. Like / Reblog this post if you find this tutorial helpful. Linking this post as an inspo link will also be greatly appreciated!
1. Meet the Neural Filters!
Neural Filters are powered by Adobe's machine learning engine known as Adobe Sensei. It is a non-destructive method to help streamline workflows that would've been difficult and/or tedious to do manually.
Here are the Neural Filters available in Photoshop 2024:


Skin Smoothing: Removes blemishes on the skin
Smart Portrait: This a cloud-based filter that allows you to change the mood, facial age, hair, etc using the sliders+
Makeup Transfer: Applies the makeup (from a reference image) to the eyes & mouth area of your image
Landscape Mixer: Transforms the landscape of your image (e.g. seasons & time of the day, etc), based on the landscape features of a reference image
Style Transfer: Applies artistic styles e.g. texturings (from a reference image) onto your image
Harmonisation: Applies the colour balance of your image based on the lighting of the background image+
Colour Transfer: Applies the colour scheme (of a reference image) onto your image
Colourise: Adds colours onto a B&W image
Super Zoom: Zoom / crop an image without losing resolution+
Depth Blur: Blurs the background of the image
JPEG Artefacts Removal: Removes artefacts caused by JPEG compression
Photo Restoration: Enhances image quality & facial details
+These three filters aren't used in my giffing workflow. The cloud-based nature of Smart Portrait leads to disjointed looking frames. For Harmonisation, applying this on a gif causes Neural Filter timeout error. Finally, Super Zoom does not currently support output as a Smart Filter
If you're running Photoshop 2021 or earlier version of Photoshop 2022, you will see a smaller selection of Neural Filters:


Things to be aware of:
You can apply up to six Neural Filters at the same time
Filters where you can use your own reference images: Makeup Transfer (portraits only), Landscape Mixer, Style Transfer (not available in Photoshop 2021), and Colour Transfer
Later iterations of Photoshop 2023 & newer: The first three default presets for Landscape Mixer and Colour Transfer are currently broken.
2. Why I use Neural Filters?
Here are my four main Neural Filters use cases in my gifmaking process. In each use case I'll list out the filters that I use:

Enhancing Image Quality:
Common wisdom is to find the highest quality video to gif from for a media release & avoid YouTube whenever possible. However for smaller / niche media (e.g. new & upcoming musical artists), prepping gifs from highly compressed YouTube videos is inevitable.
So how do I get around with this? I have found Neural Filters pretty handy when it comes to both correcting issues from video compression & enhancing details in gifs prepared from these highly compressed video files.
Filters used: JPEG Artefacts Removal / Photo Restoration
Facial Enhancement:
When I prepare gifs from highly compressed videos, something I like to do is to enhance the facial features. This is again useful when I make gifsets from compressed videos & want to fill up my final panel with a close-up shot.
Filters used: Skin Smoothing / Makeup Transfer / Photo Restoration (Facial Enhancement slider)
Colour Manipulation:
Neural Filters is a powerful way to do advanced colour manipulation - whether I want to quickly transform the colour scheme of a gif or transform a B&W clip into something colourful.
Filters used: Colourise / Colour Transfer
Artistic Effects:
This is one of my favourite things to do with Neural Filters! I enjoy using the filters to create artistic effects by feeding textures that I've downloaded as reference images. I also enjoy using these filters to transform the overall the atmosphere of my composite gifs. The gifsets where I've leveraged Neural Filters for artistic effects could be found under this tag on usergif.
Filters used: Landscape Mixer / Style Transfer / Depth Blur
How I use Neural Filters over different stages of my gifmaking workflow:
I want to outline how I use different Neural Filters throughout my gifmaking process. This can be roughly divided into two stages:
Stage I: Enhancement and/or Colourising | Takes place early in my gifmaking process. I process a large amount of component gifs by applying Neural Filters for enhancement purposes and adding some base colourings.++
Stage II: Artistic Effects & more Colour Manipulation | Takes place when I'm assembling my component gifs in the big PSD / PSB composition file that will be my final gif panel.
I will walk through this in more detail later in the tutorial.
++I personally like to keep the size of the component gifs in their original resolution (a mixture of 1080p & 4K), to get best possible results from the Neural Filters and have more flexibility later on in my workflow. I resize & sharpen these gifs after they're placed into my final PSD composition files in Tumblr dimensions.
3. Getting started
The essence is to output Neural Filters as a Smart Filter on the smart object when working with the Video Timeline interface. Your workflow will contain the following steps:
Prepare your gif
In the frame animation interface, set the frame delay to 0.03s and convert your gif to the Video Timeline
In the Video Timeline interface, go to Filter > Neural Filters and output to a Smart Filter
Flatten or render your gif (either approach is fine). To flatten your gif, play the "flatten" action from the gif prep action pack. To render your gif as a .mov file, go to File > Export > Render Video & use the following settings.

Setting up:
o.) To get started, prepare your gifs the usual way - whether you screencap or clip videos. You should see your prepared gif in the frame animation interface as follows:

Note: As mentioned earlier, I keep the gifs in their original resolution right now because working with a larger dimension document allows more flexibility later on in my workflow. I have also found that I get higher quality results working with more pixels. I eventually do my final sharpening & resizing when I fit all of my component gifs to a main PSD composition file (that's of Tumblr dimension).
i.) To use Smart Filters, convert your gif to a Smart Video Layer.
As an aside, I like to work with everything in 0.03s until I finish everything (then correct the frame delay to 0.05s when I upload my panels onto Tumblr).
For convenience, I use my own action pack to first set the frame delay to 0.03s (highlighted in yellow) and then convert to timeline (highlighted in red) to access the Video Timeline interface. To play an action, press the play button highlighted in green.

Once you've converted this gif to a Smart Video Layer, you'll see the Video Timeline interface as follows:

ii.) Select your gif (now as a Smart Layer) and go to Filter > Neural Filters

Installing Neural Filters:
Install the individual Neural Filters that you want to use. If the filter isn't installed, it will show a cloud symbol (highlighted in yellow). If the filter is already installed, it will show a toggle button (highlighted in green)

When you toggle this button, the Neural Filters preview window will look like this (where the toggle button next to the filter that you use turns blue)

4. Using Neural Filters
Once you have installed the Neural Filters that you want to use in your gif, you can toggle on a filter and play around with the sliders until you're satisfied. Here I'll walkthrough multiple concrete examples of how I use Neural Filters in my giffing process.
Example 1: Image enhancement | sample gifset
This is my typical Stage I Neural Filters gifmaking workflow. When giffing older or more niche media releases, my main concern is the video compression that leads to a lot of artefacts in the screencapped / video clipped gifs.
To fix the artefacts from compression, I go to Filter > Neural Filters, and toggle JPEG Artefacts Removal filter. Then I choose the strength of the filter (boxed in green), output this as a Smart Filter (boxed in yellow), and press OK (boxed in red).
Note: The filter has to be fully processed before you could press the OK button!

After applying the Neural Filters, you'll see "Neural Filters" under the Smart Filters property of the smart layer

Flatten / render your gif
Example 2: Facial enhancement | sample gifset
This is my routine use case during my Stage I Neural Filters gifmaking workflow. For musical artists (e.g. Maisie Peters), YouTube is often the only place where I'm able to find some videos to prepare gifs from. However even the highest resolution video available on YouTube is highly compressed.
Go to Filter > Neural Filters and toggle on Photo Restoration. If Photoshop recognises faces in the image, there will be a "Facial Enhancement" slider under the filter settings.

Play around with the Photo Enhancement & Facial Enhancement sliders. You can also expand the "Adjustment" menu make additional adjustments e.g. remove noises and reducing different types of artefacts.

Once you're happy with the results, press OK and then flatten / render your gif.
Example 3: Colour Manipulation | sample gifset
Want to make a colourful gifset but the source video is in B&W? This is where Colourise from Neural Filters comes in handy! This same colourising approach is also very helpful for colouring poor-lit scenes as detailed in this tutorial.
Here's a B&W gif that we want to colourise:

Highly recommended: add some adjustment layers onto the B&W gif to improve the contrast & depth. This will give you higher quality results when you colourise your gif.
Go to Filter > Neural Filters and toggle on Colourise.

Make sure "Auto colour image" is enabled.
Play around with further adjustments e.g. colour balance, until you're satisfied then press OK.
Important: When you colourise a gif, you need to double check that the resulting skin tone is accurate to real life. I personally go to Google Images and search up photoshoots of the individual / character that I'm giffing for quick reference.
Add additional adjustment layers until you're happy with the colouring of the skin tone.

Once you're happy with the additional adjustments, flatten / render your gif. And voila!

Note: For Colour Manipulation, I use Colourise in my Stage I workflow and Colour Transfer in my Stage II workflow to do other types of colour manipulations (e.g. transforming the colour scheme of the component gifs)
Example 4: Artistic Effects | sample gifset
This is where I use Neural Filters for the bulk of my Stage II workflow: the most enjoyable stage in my editing process!
Normally I would be working with my big composition files with multiple component gifs inside it. To begin the fun, drag a component gif (in PSD file) to the main PSD composition file.
Resize this gif in the composition file until you're happy with the placement

Duplicate this gif. Sharpen the bottom layer (highlighted in yellow), and then select the top layer (highlighted in green) & go to Filter > Neural Filters

I like to use Style Transfer and Landscape Mixer to create artistic effects from Neural Filters. In this particular example, I've chosen Landscape Mixer
Select a preset or feed a custom image to the filter (here I chose a texture that I've on my computer)

Play around with the different sliders e.g. time of the day / seasons
Important: uncheck "Harmonise Subject" & "Preserve Subject" - these two settings are known to cause performance issues when you render a multiframe smart object (e.g. for a gif)

Once you're happy with the artistic effect, press OK
To ensure you preserve the actual subject you want to gif (bc Preserve Subject is unchecked), add a layer mask onto the top layer (with Neural Filters) and mask out the facial region. You might need to play around with the Layer Mask Position keyframes or Rotoscope your subject in the process.
After you're happy with the masking, flatten / render this composition file and voila!

Example 5: Putting it all together | sample gifset
Let's recap on the Neural Filters gifmaking workflow and where Stage I and Stage II fit in my gifmaking process:
i. Preparing & enhancing the component gifs
Prepare all component gifs and convert them to smart layers
Stage I: Add base colourings & apply Photo Restoration / JPEG Artefacts Removal to enhance the gif's image quality
Flatten all of these component gifs and convert them back to Smart Video Layers (this process can take a lot of time)
Some of these enhanced gifs will be Rotoscoped so this is done before adding the gifs to the big PSD composition file
ii. Setting up the big PSD composition file
Make a separate PSD composition file (Ctrl / Cmmd + N) that's of Tumblr dimension (e.g. 540px in width)
Drag all of the component gifs used into this PSD composition file
Enable Video Timeline and trim the work area
In the composition file, resize / move the component gifs until you're happy with the placement & sharpen these gifs if you haven't already done so
Duplicate the layers that you want to use Neural Filters on
iii. Working with Neural Filters in the PSD composition file
Stage II: Neural Filters to create artistic effects / more colour manipulations!
Mask the smart layers with Neural Filters to both preserve the subject and avoid colouring issues from the filters
Flatten / render the PSD composition file: the more component gifs in your composition file, the longer the exporting will take. (I prefer to render the composition file into a .mov clip to prevent overriding a file that I've spent effort putting together.)
Note: In some of my layout gifsets (where I've heavily used Neural Filters in Stage II), the rendering time for the panel took more than 20 minutes. This is one of the rare instances where I was maxing out my computer's memory.
Useful things to take note of:
Important: If you're using Neural Filters for Colour Manipulation or Artistic Effects, you need to take a lot of care ensuring that the skin tone of nonwhite characters / individuals is accurately coloured
Use the Facial Enhancement slider from Photo Restoration in moderation, if you max out the slider value you risk oversharpening your gif later on in your gifmaking workflow
You will get higher quality results from Neural Filters by working with larger image dimensions: This gives Neural Filters more pixels to work with. You also get better quality results by feeding higher resolution reference images to the Neural Filters.
Makeup Transfer is more stable when the person / character has minimal motion in your gif
You might get unexpected results from Landscape Mixer if you feed a reference image that don't feature a distinctive landscape. This is not always a bad thing: for instance, I have used this texture as a reference image for Landscape Mixer, to create the shimmery effects as seen in this gifset
5. Testing your system
If this is the first time you're applying Neural Filters directly onto a gif, it will be helpful to test out your system yourself. This will help:
Gauge the expected rendering time that you'll need to wait for your gif to export, given specific Neural Filters that you've used
Identify potential performance issues when you render the gif: this is important and will determine whether you will need to fully playback your gif before flattening / rendering the file.
Understand how your system's resources are being utilised: Inputs from Windows PC users & Mac users alike are welcome!
About the Neural Filters test files:
Contains six distinct files, each using different Neural Filters
Two sizes of test files: one copy in full HD (1080p) and another copy downsized to 540px
One folder containing the flattened / rendered test files
How to use the Neural Filters test files:
What you need:
Photoshop 2022 or newer (recommended: 2023 or later)
Install the following Neural Filters: Landscape Mixer / Style Transfer / Colour Transfer / Colourise / Photo Restoration / Depth Blur
Recommended for some Apple Silicon-based MacBook Pro models: Enable High Power Mode
How to use the test files:
For optimal performance, close all background apps
Open a test file
Flatten the test file into frames (load this action pack & play the “flatten” action)
Take note of the time it takes until you’re directed to the frame animation interface
Compare the rendered frames to the expected results in this folder: check that all of the frames look the same. If they don't, you will need to fully playback the test file in full before flattening the file.†
Re-run the test file without the Neural Filters and take note of how long it takes before you're directed to the frame animation interface
Recommended: Take note of how your system is utilised during the rendering process (more info here for MacOS users)
†This is a performance issue known as flickering that I will discuss in the next section. If you come across this, you'll have to playback a gif where you've used Neural Filters (on the video timeline) in full, prior to flattening / rendering it.
Factors that could affect the rendering performance / time (more info):
The number of frames, dimension, and colour bit depth of your gif
If you use Neural Filters with facial recognition features, the rendering time will be affected by the number of characters / individuals in your gif
Most resource intensive filters (powered by largest machine learning models): Landscape Mixer / Photo Restoration (with Facial Enhancement) / and JPEG Artefacts Removal
Least resource intensive filters (smallest machine learning models): Colour Transfer / Colourise
The number of Neural Filters that you apply at once / The number of component gifs with Neural Filters in your PSD file
Your system: system memory, the GPU, and the architecture of the system's CPU+++
+++ Rendering a gif with Neural Filters demands a lot of system memory & GPU horsepower. Rendering will be faster & more reliable on newer computers, as these systems have CPU & GPU with more modern instruction sets that are geared towards machine learning-based tasks.
Additionally, the unified memory architecture of Apple Silicon M-series chips are found to be quite efficient at processing Neural Filters.
6. Performance issues & workarounds
Common Performance issues:
I will discuss several common issues related to rendering or exporting a multi-frame smart object (e.g. your composite gif) that uses Neural Filters below. This is commonly caused by insufficient system memory and/or the GPU.
Flickering frames: in the flattened / rendered file, Neural Filters aren't applied to some of the frames+-+
Scrambled frames: the frames in the flattened / rendered file isn't in order
Neural Filters exceeded the timeout limit error: this is normally a software related issue
Long export / rendering time: long rendering time is expected in heavy workflows
Laggy Photoshop / system interface: having to wait quite a long time to preview the next frame on the timeline
Issues with Landscape Mixer: Using the filter gives ill-defined defined results (Common in older systems)--
Workarounds:
Workarounds that could reduce unreliable rendering performance & long rendering time:
Close other apps running in the background
Work with smaller colour bit depth (i.e. 8-bit rather than 16-bit)
Downsize your gif before converting to the video timeline-+-
Try to keep the number of frames as low as possible
Avoid stacking multiple Neural Filters at once. Try applying & rendering the filters that you want one by one
Specific workarounds for specific issues:
How to resolve flickering frames: If you come across flickering, you will need to playback your gif on the video timeline in full to find the frames where the filter isn't applied. You will need to select all of the frames to allow Photoshop to reprocess these, before you render your gif.+-+
What to do if you come across Neural Filters timeout error? This is caused by several incompatible Neural Filters e.g. Harmonisation (both the filter itself and as a setting in Landscape Mixer), Scratch Reduction in Photo Restoration, and trying to stack multiple Neural Filters with facial recognition features.
If the timeout error is caused by stacking multiple filters, a feasible workaround is to apply the Neural Filters that you want to use one by one over multiple rendering sessions, rather all of them in one go.
+-+This is a very common issue for Apple Silicon-based Macs. Flickering happens when a gif with Neural Filters is rendered without being previously played back in the timeline.
This issue is likely related to the memory bandwidth & the GPU cores of the chips, because not all Apple Silicon-based Macs exhibit this behaviour (i.e. devices equipped with Max / Ultra M-series chips are mostly unaffected).
-- As mentioned in the supplementary page, Landscape Mixer requires a lot of GPU horsepower to be fully rendered. For older systems (pre-2017 builds), there are no workarounds other than to avoid using this filter.
-+- For smaller dimensions, the size of the machine learning models powering the filters play an outsized role in the rendering time (i.e. marginal reduction in rendering time when downsizing 1080p file to Tumblr dimensions). If you use filters powered by larger models e.g. Landscape Mixer and Photo Restoration, you will need to be very patient when exporting your gif.
7. More useful resources on using Neural Filters
Creating animations with Neural Filters effects | Max Novak
Using Neural Filters to colour correct by @edteachs
I hope this is helpful! If you have any questions or need any help related to the tutorial, feel free to send me an ask 💖
#photoshop tutorial#gif tutorial#dearindies#usernik#useryoshi#usershreyu#userisaiah#userroza#userrobin#userraffa#usercats#userriel#useralien#userjoeys#usertj#alielook#swearphil#*#my resources#my tutorials
538 notes
·
View notes
Text
youtube
NEW VIDEO TUTORIAL 🩷
Yes, you see right, I uploaded another tutorial just ONE week after the last one, but I just had to explain more stuff.
In this video I talk about vertex groups and how to add them manually to your mesh. This is a follow up video of the last one where I talk about adding own assets into the game, but it also stands very well on it's own if you have problems with the famous "weight transfer" or "data transfer" method.
Definitely check it out if you want to understand vertex groups, bones and weights a bit more!
Here are the timestamps:
00:00 Intro
01:00 Explaining Vertex Groups [Rig, Pose Mode]
01:35 Bone list and Bone tab [Parent & Child Bone]
02:16 Recap of what happened in the previous video [Data Transfer]
02:40 Checking out the current vertex groups and weights
03:29 Finding new bone and adding it to the mesh [Add vertex groups, add weights]
04:54 Deleting unnecessary vertex groups
05:00 Testing the new vertex group and its weight
05:12 Example of different weight paint
05:25 Another demonstration of parent & child bones
05:52 Finding more vertex groups and adding them
06:54 Adjusting the mesh to avoid clipping
07:16 Extra: how to clear custom posing of the rig
07:40 Ingame demo & Outro
76 notes
·
View notes
Text
Tutorial: How to adjust joint position (in TS2 object skeleton)
This tut is NOT meant for beginners because I don't explain how to use SimPe or Milkshape. But actual process is very basic: you change joint coordinates and do GMDC model rebuild. The tricky part is to get coordinates right.
If you don't know much about joint assignments, start with this tutorial: "Retaining object animations in your new package" by Bluetexasbonnie @ MTS2, which explains how to add joint assignments to custom stuff cloned from functional objects (to make parts of the mesh move when Sims interact with it).
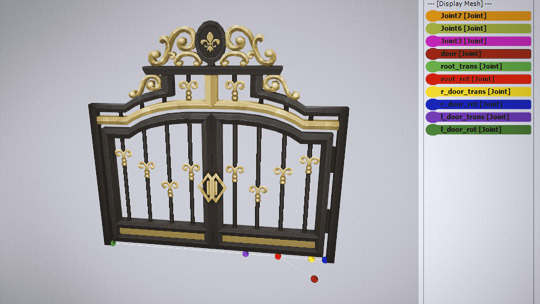
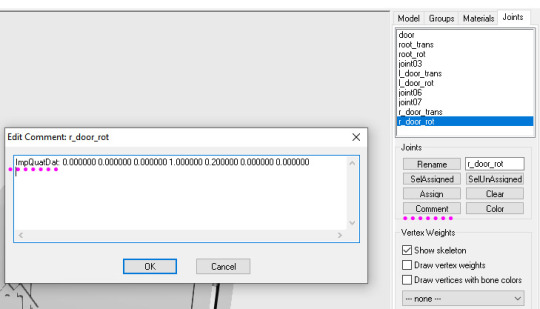
The pic above: SimPe GMDC skeleton preview. You can click on each joint name to see which part is assigned to it. Gate is here.
This will work for simple object skeletons without IK Bones.
There are no plugins that would allow us to properly import TS2 CRES skeleton data with IK bones - like sims, pets and more - to any 3D program
If object has IK Bones - you'll find out when importing CRES to Milkshape. If it displays a notification "joints with rotation values found...", IK Bones are present and there's a high risk that skeleton: A. will not be imported. B. if it's imported, it will get mangled. C. will be mangled after using model rebuild option.
I've experimented with car skeletons (those have IK Bones), managed to edit car door joints but it required removing wheel bone assignments - because wheel movement becomes wonky after doing model rebuild
/FYI: steps 1 - 5 are optional, you can edit CRES joint coordinates right away if you know the right values - which is usually not the case/.
Export GMDC with your custom mesh
Export CRES (if you wish to preview entire skeleton and/or joint names)
Import GMDC to Milkshape
Import CRES (if you need it. Plugin is called: Sims2 AniMesh CRES Skeleton Import. Click 'yes' to 'replace all bones?'). You should be able to see entire skeleton imported. Note that Milkshape won't let you export a GMDC after you imported CRES skeleton unless you change joint comments (point 7.)
Measure how much you need to move the joint. You can create a box as ruler substitute, then check the distance with extended manual edit plugin. If you're not sure where to place your joint, you can move it and test if object animations look alright (import CRES again to reset joint position).
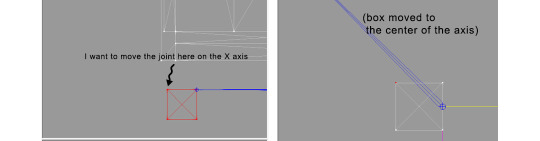
tip: when working on GMDC in Milkshape you can rename the model parts in model list (door right, door left etc). Only names inside the model comments actually get exported.
6. Go back to SimPe, open CRES resource. Remember TS2 is using flipped coordinates: X = -X, -X = X, Y = Z, Z = Y. Edit joint Translation data, commit, save.
Optional: you can export CRES skeleton again and import to Milkshape to test if joint has moved to the right position.
7. Go to GMDC, Model tab - hit rebuild, commit, save.
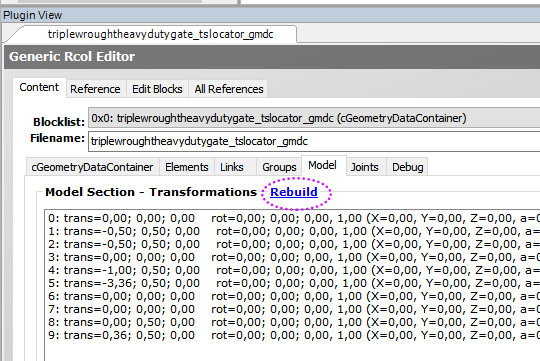
if you have the edited object placed on a lot, it's gonna look weird when you load the game. You need to re-buy it from catalogue to see results.
If for some reason you'd like to export entire GMDC with your imported CRES skeleton, Milkshape won't let you do that. You'll get "ERR: No quaternion values stored" error. You need to go to Joints tab and edit each Joint comment to ImpQuatDat: (that's imp, with capital i )
Notes:
if you go to GMDC Joints tab, there's also a rebuild option to update single joint - but I've tried it on car door joints and it didn't work.
If you edit joint coordinates in CRES, for example- move the car door forward, and preview skeleton in GMDC viewer, your model is gonna look fine. But in the game every vertex assigned to that joint will also be moved forward. That's why you need to use model rebuild option. In theory, if you'd like to skip rebuild, you could import GMDC to milkshape and move the door backwards to compensate for joint adjustments? I haven't tried that (yet).
81 notes
·
View notes
Text
SRWE or AI? Best Ways to Upscale Sims 4 Screenshots
Are you also tired of seeing social media mercilessly crush your The Sims 4 screenshots? We’ve tried every trick in the book to keep our pics crisp – SRWE, AI upscalers, you name it – and now we’re ready to break down how to save your favorite sim’s photos from pixelation, quick and easy. In this article, we’ll explain (no tech jargon, promise!) what actually works, plus share our hands-on experience and top tips.
Your upscaling method depends heavily on the source image and the look you’re going for. We all have different ideas of what makes a sims beautiful – some love natural textures, even slight skin imperfections, while others prefer flawlessly smooth, hyper-sharp results.
We’ve tested different upscaling tools to help boost your screenshot quality. But to find your perfect match – the one that makes your shots look just right (by your standards!) – we recommend trying a few yourself.
You can enhance screenshots both before and after saving them! We’ve covered both approaches, so pick whichever suits you best.
Before Saving the Screenshot: SRWE (Simple Runtime Window Editor)
This tool is well-known in The Sims 4 community – there are tons of YouTube tutorials covering it. When it comes to improving image quality before taking a screenshot, SRWE is one of the first solutions that comes to mind.
It works by bypassing Windows' DPI scaling, allowing you to capture screenshots at a higher resolution without blurring.
Pros:
— A fantastic tool: it delivers the exact same image but in much better quality.
— No conflicts with GShade/ReShade: your presets will look exactly as intended.
— Free and easy to install, no hidden costs or complicated setup.
— No post-processing needed, preserves original texture and UI quality.
— No extra plugins or presets required, works right out of the box.
— Great performance even on low-end PCs. If your computer can run GShade, SRWE will work just fine.
Cons:
— Limited functionality.
— Some users find SRWE a bit tricky to set up (though we personally disagree).
Now, let’s break down how to use it and what results to expect.
If you prefer a video guide, check out this link for a detailed walkthrough by Chii.
Step 1
First things first – you'll need to download the program itself. It's available for free on GitHub – you can grab it here.
There's no real benefit to getting the version with pre-configured profiles, so just download the standard version without profiles.
Step 2
Extract the files from the archive.
It doesn’t matter where you store them on your computer – it won’t affect how the program works.
Step 3
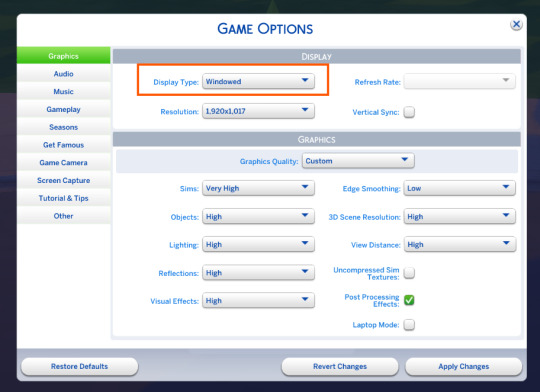
Now it’s time to launch the game and switch from fullscreen to windowed mode in the settings. You can also do this with the Alt+Enter shortcut.
Step 4
Set up your shot exactly how you want it. Open the location, pose your sims, apply any presets if needed. At this point, you can take a regular screenshot (for comparison) using your usual method.
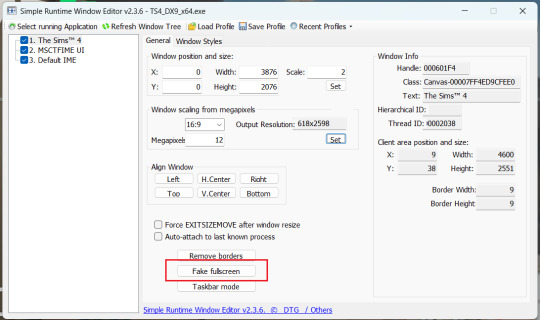
Step 5
1. Go back to the SRWE folder.
There are only two files inside – one of them launches the program (no installation needed).

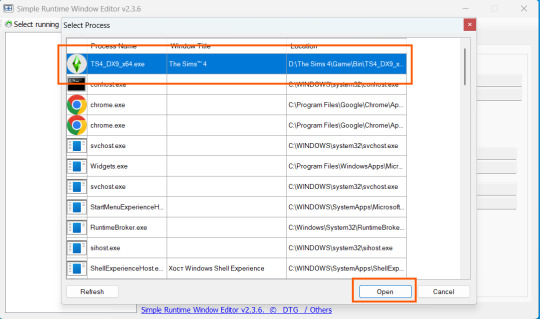
2. In the window that opens, select The Sims 4 from the list.
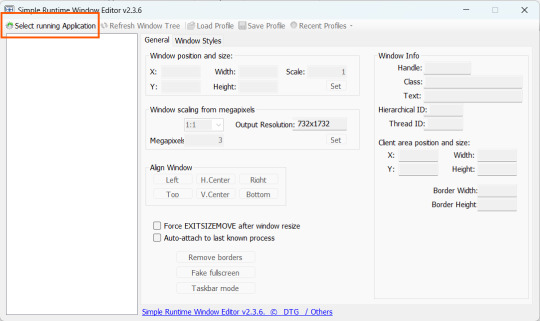
3. Check all the boxes.
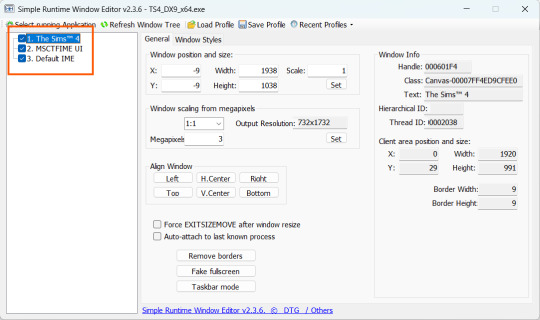
4. Image Size
You can set your screenshot size in a few different ways:
— The easiest method: Multiply your current resolution by the desired factor. For example, to upscale 1080p to 4K, multiply by 2. Tap Set.
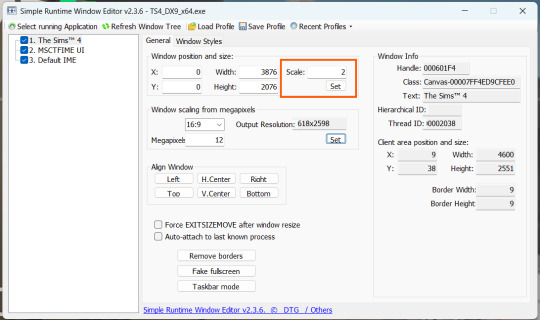
— Manual input: Enter your preferred pixel dimensions. Tap Set.
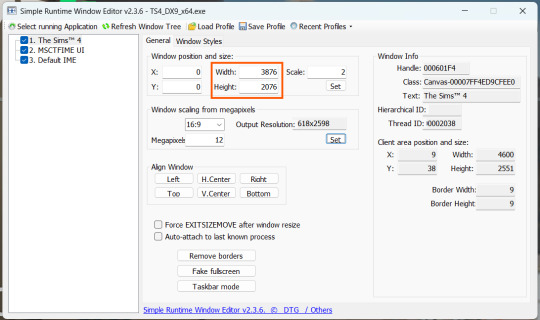
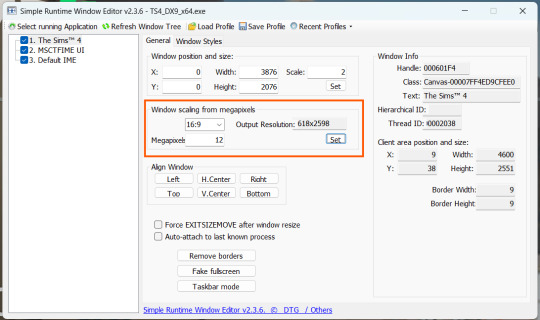
— Aspect ratio mode: Choose a format (1:1, 16:9, 4:3, etc.) and set your target megapixels. The program will automatically calculate the dimensions. Tap Set.
Honestly, you can experiment with any size. During our tests, even a weak PC handled an 8K screenshot without issues – though realistically, 4K is more than enough for most purposes.
Plus, if you're capturing in-game scenes (not just CAS), your screenshots will already be pretty large in file size. You probably won’t want them taking up even more space unnecessarily.
Step 6
Now when you return to the game, you'll notice the image has become significantly larger and no longer fits your screen resolution – you're only seeing a part of it.
Don't panic! Just wait for your preset to fully load (if you're using one), then take your screenshot as you normally would.
Step 7
Once you've captured your planned screenshot, head back to SRWE and click "Fake Fullscreen" to return to the original resolution.
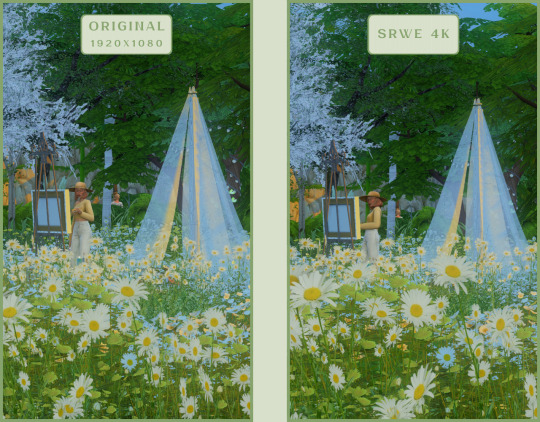
Now let's compare our results.
Gameplay Scenes
CAS
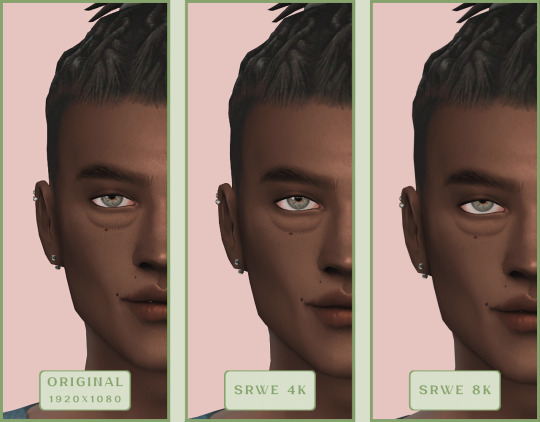
For in-game screenshots, this method works much better if you have at least a moderately powerful PC. After upscaling, navigation can become tricky due to lag. That said, it's still completely doable since we've prepared our scene in advance.
Post-Processing Screenshots
We've tested several post-processing programs: two paid options and several free ones.
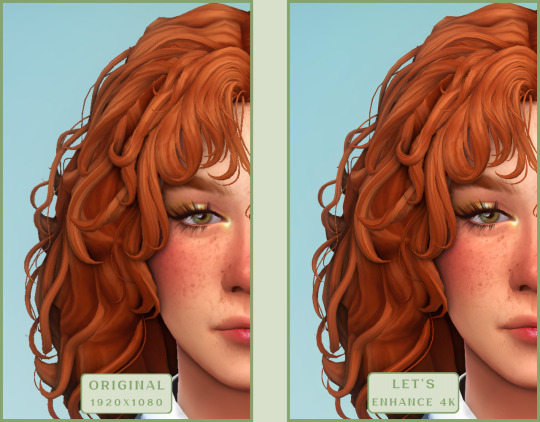
Let's start with the paid options – Topaz Gigapixel AI and Let's Enhance.
Topaz Gigapixel AI
A specialized tool from Topaz Labs designed specifically for AI-powered image upscaling.
It doesn’t include extra features like noise reduction or face correction, but it delivers more precise upscaling, which is especially useful for The Sims 4 screenshots.
Pros:
— Upscale up to 600% (6x) without losing detail.
— Preserves texture clarity (hair, clothing, patterns).
— Automatically restores lost details (e.g., small decor items).
— Supports batch processing (multiple screenshots at once).
Cons:
— $99 price tag.
— Requires a powerful PC for 4K upscaling.
— Limited functionality (just upscaling, no additional edits).
— Trial version doesn’t allow exports.
Example:

Let's Enhance
A convenient online AI-powered tool for enhancing screenshots. No downloads required – just head to https://letsenhance.io/boost and you're good to go.
Pros:
— Automatic upscaling up to 16K, boosts resolution without losing detail (hair and clothing textures become sharper).
— Dead simple to use: just upload your screenshot, pick a model, and download the result.
— AI doesn't just upscale, it subtly "beautifies" images too (though this is subjective, of course).
Cons:
— Free version limits you to 10 images/month (watermarked downloads; subscription starts at $9/month).
— Internet connection required (no offline mode).
We found these settings work best for Sims screenshots:
Now, let's see the results:
Free Upscaling Tools: Upscayl (with detailed usage guide), Bigjpg, and Waifu2x.
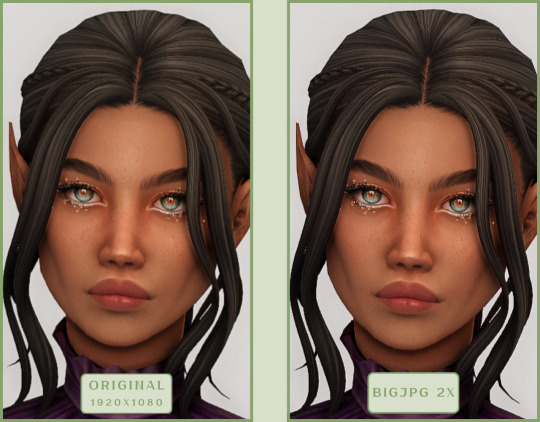
Bigjpg
A handy tool for basic image upscaling tasks, though the free version has limitations on processing speed and number of images.
Pros:
— Solid baseline results: boosts resolution effectively, making images noticeably sharper with genuine quality improvement.
— Free 2x/4x upscaling with watermark-free downloads.
Cons:
— Free version restricts image quantity, size, and processing speed.
— Lacks advanced parameter fine-tuning.
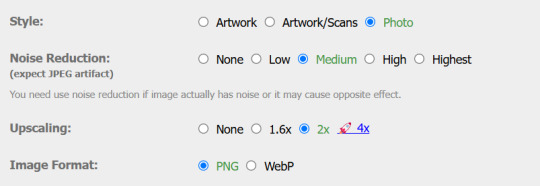
Our recommended settings combo:

The 4x upscale delivers noticeably weaker results.
Sample Bigjpg output:
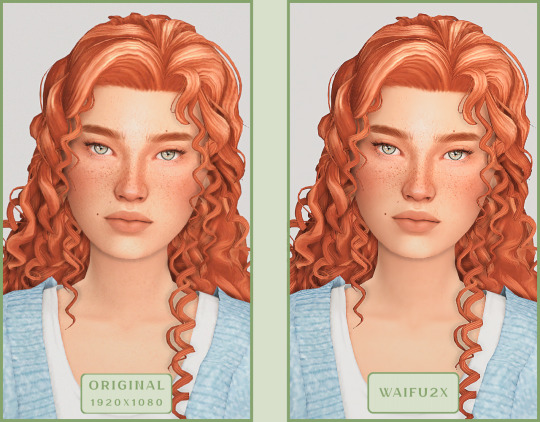
Waifu2x
A free neural network-based tool. Originally created for upscaling anime images, but works perfectly for The Sims 4 as well.
Pros:
— Upscales images 1.5x–2x without noticeable distortion.
— Preserves art style, doesn't turn pixel art into a "blurry mess" (unlike some other upscalers).
— Available in both online and offline versions.
— Offline version supports batch processing of screenshots.
— Free 2x upscaling with no watermarks.
— No powerful PC required.
Cons:
— Free online version has a 5MB file size limit.
— Maximum 2x scale (no higher options).
— Lacks advanced parameter tuning.
Our recommended settings:
Waifu2x results:
Upscayl
A free, open-source program that uses neural networks to upscale images without quality loss.
Pros:
— Upscales images without distortion.
— Enhances fine details.
— Supports multiple AI models for different screenshot styles.
— Offline version handles batch processing.
— Free 4x upscaling with no watermarks.
— Doesn't require a powerful PC for 2x upscaling.
— Works offline, no internet needed after installation.
Cons:
— Requires a powerful PC for 4x upscaling.
— Minimalist interface – fewer beginner-friendly guides.
— Lacks advanced parameter tuning.
Given Upscayl's minimalist interface and lack of detailed tutorials, we decided to provide a more thorough walkthrough.
Step 1
First, download the program from its GitHub page. It's completely free and open-source.
Multiple versions are available – choose the one matching your system. For standard Windows, download the file highlighted in the screenshot below.
Step 2
Run the installer as administrator.
Install location doesn't matter – it won't affect performance. Select the destination folder. Click "Install".
Step 3
Upscayl includes several built-in AI models (good for testing), but we strongly recommend downloading custom models for better results:
1. Download the custom models pack here (also accessible via Settings → Add Custom Models in-app).
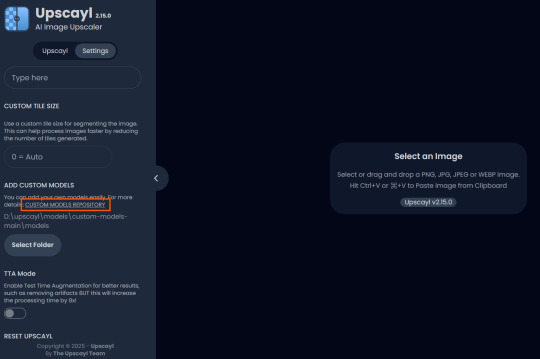
2. Extract the archive.
3. Navigate to custom-models-main → custom-models-main.
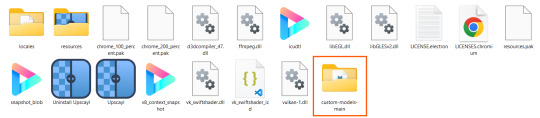
Move this folder to your Upscayl installation directory (optional: rename it).
Your Upscayl folder should now look like this:
4. Add Custom Models:
— Launch Upscayl.
— Go to Settings and click Select Folder.
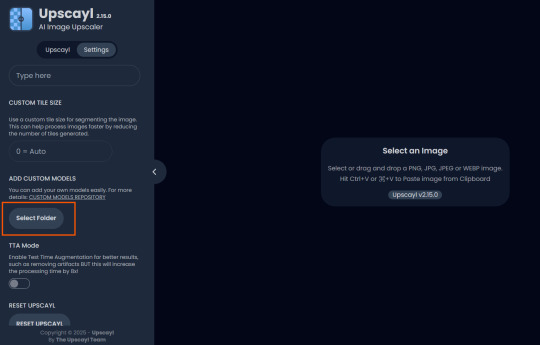
— Navigate to Upscayl → custom-models-main → models
Critical: The folder must be named "models" – don't rename it.
Step 4
Now that you have both the default and custom models loaded, it's time to start enhancing your screenshots.
1. Click Select Image or simply drag and drop your file into the processing area.
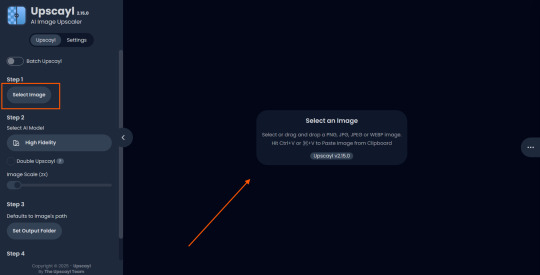
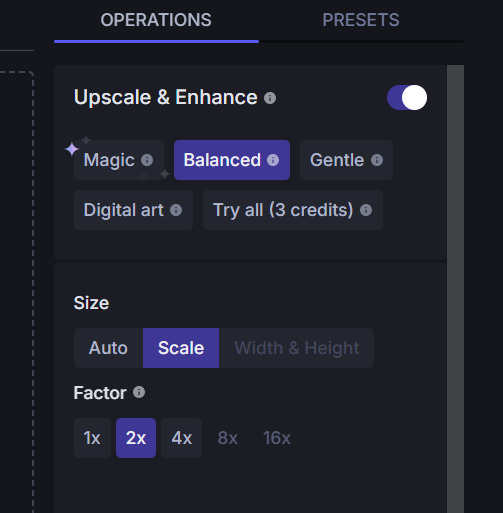
2. Choose Upscale Factor.
While Upscayl supports up to 16x magnification, it warns that anything above 5x may severely strain your system.
For optimal results, stick with 2x to 4x.
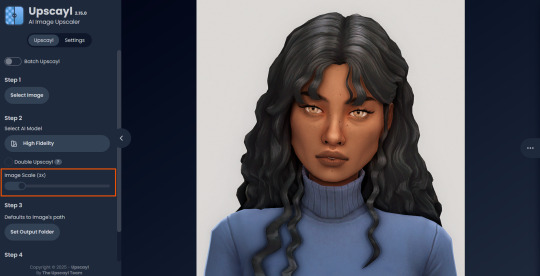
3. Select AI Model.
Click the Select AI Model dropdown: default models show before/after previews, custom models appear as a text list.
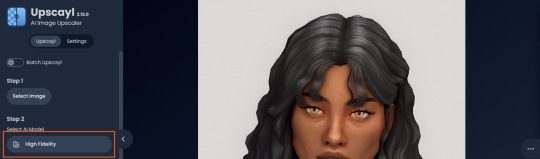
4. Experiment! Try different models on the same screenshot. Test various scales (2x, 3x, 4x) – sometimes better results come from modest scaling, while 4x might degrade quality.
For this demo, we'll use the first default model.
5. Click to begin enhancement.
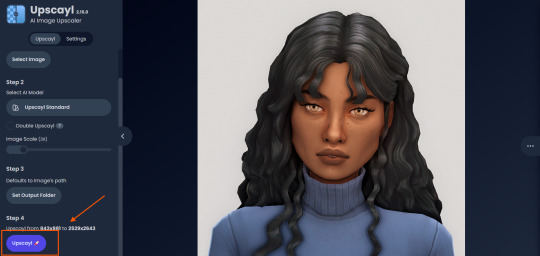
6. Processing time duration depends on original image quality, selected parameters and your PC's power (may complete quickly or take several minutes).
After processing, you'll see a clear side-by-side comparison of the changes.
7. Click the three-dot menu (⋮) for advanced viewing options.
Magnifying lens compares original vs. enhanced versions side-by-side.
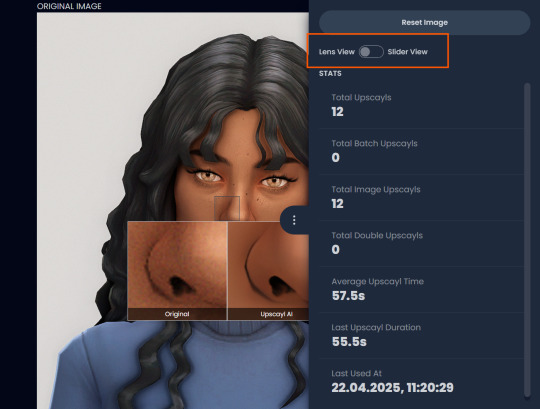
Also you may reset to original and revert all changes instantly.
8. Save your image.
By default, Upscayl saves to the source image's folder. To change this click Set Output Folder.

9. After this, use the Ctrl+S keyboard shortcut, and the new image will be saved. The original filename will be appended with the name of the AI model used and the upscaling scale applied.
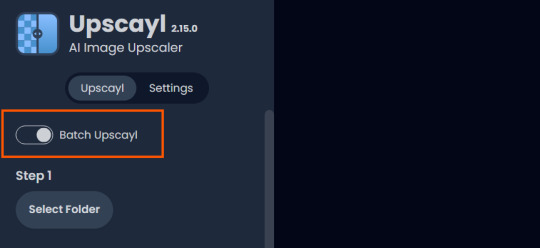
You can also use batch processing. Before loading images, you simply need to enable batch loading.
In the settings, there are different format options for saving processed images: PNG, JPG, WEBP. To preserve the best quality, we recommend choosing PNG.
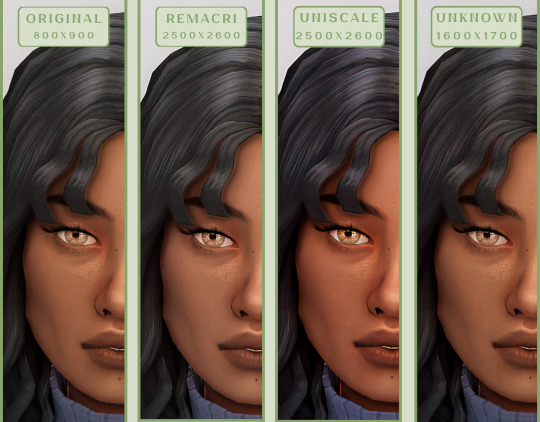
Finally, we're sharing the AI model options we liked best for processing Sims screenshots:
— Remacri (default model)
— Uniscale Restore (custom model)
— Unknown-2.0.1 (custom model)
🌱 Create your family tree with TheSimsTree
❓ Support 🌸 Our Blog
#TheSimsTree#simslegacy#legacychallenge#sims4#sims2#sims3#simsfamily#simstree#sims#sims4legacy#sims4roleplay#sims4stories#sims4couple#thesims4#ts4#ts4cc#plumtreeapp#simsta#simstagram#sims proposal#sims ideas#inzoi
38 notes
·
View notes
Text
Stuffed animal enabler and autonomy fix with traits incorporation

Today I have a mod for you all that was inspired by @chocolatecitysim stream. Have you ever put a stuffed animal somewhere in the nursery as decoration? Only to find it lasts no time at all before one of them pluck it down to talk through it to a toddler that is busy, which makes them immediately drop it somewhere on the floor before wandering off. Grrrr! In a previous mod of mine where I enable teddy interactions for older Sims I solved the issue by turning off autonomy. I decided to try something more nuanced, so today I have my new version of a teddy enabler with some global stuffed animal autonomy fixes baked in.
Enabled features on the 6 maxis stuffed animals - Carry and play with enabled for teens, adults and elders - Talk through enabled for kids. Yay more sibling interaction options! Some temporary floating occurs (see video below) but overall, animations work great. - Carry interaction enabled on lil chimera plush bunny, which for some reason did not have it
Global changes to stuffed animal autonomy - Teens, adults and elders may not interact autonomously with stuffed animals in any way, if the object is sitting in a slot. It's decorative, leave it alone! If it's on the floor, knock yourself out. - Children can autonomously take bears from surfaces to play or carry, but not to talk through. This is the default setting, it is controlled in a BCON and can easily be changed if you want it different. It is labelled explaining how to edit, all you have to do is switch between 0 and 1 depending on what you want. - Children may only talk through to toddlers, because they float in the air when doing it to older Sims, whereas with toddlers the animation mostly works (see video below) - If carry and play with is enabled for teen, adult and elders, they will only autonomously do so if they have the childish trait. - Talk through autonomy for teens, adults and elders is limited to sims who are 8 or higher playful personality, or that have the nurturing trait.
These global changes impact all stuffed animals. However I can't globally enable the interactions on CC animals, because the menu is held in each object. So if you want CC stuffed animals to make full use of this, you need to manually edit the TTAB to match the mod. I have included a short video tutorial in the zip, of how to do so. If not enabled, the only change in behavior with CC stuffed animals is that older Sims can not take them from slots in order to talk through, and they will only talk through if 8+ playful or nurturing.
If you do not use traits, do not worry, the mod does not require them to work. The only difference is you won't have any autonomous play with or carry in older Sims, and talk through is limited to 8 or higher playful Sims. Easy inventory check is not required.
Download from simfileshare
Conflicts: My original "BearEnabledTeenAndUpNoAutonomy"-mods. Remove those (one file per stuffed animal, with the name of the object at the start) if you want to use this. Will conflict with other mods that alter TTAB of maxis stuffed animals, or that edit the guardian bhavs of play with, carry and talk through interactions. Introduces a new BHAV to the stuffed animal semi global, and a new bcon. HCDUs will detect all forms of conflicts. Conflicts with parts of simler90's ToyStuffedAnimalFix, specifically the part that removes unavailable Sims as options for the talk through interaction. I recommend you load my mod last, but for more in-depth information on why and how that changes behavior you'll see, please see this reply to conflict report.
Credits: chocolatecitysims for inspiring me to retry my approach to this, picknmix for helping confirm the way to test for being in a slot
Here is the video of what talk through to a toddler looks like for kids. They float briefly at different parts of the picking up, squatting and putting down parts of the animation, but the talking itself they are on the floor. Doesn't bother me, but I wanted to show so you can decide if it's too much for your taste :)
260 notes
·
View notes
Text
#manual testing#manual testing tutorial#manual testing tutorials#testing#testing tutorial#tutorial academy#tutorials
0 notes
Text
wrixie's guide to default eyes 🤩
welcome to my guide on making default eye colors for the sims 4 this'll be my first ever tutorial and it's a big one so please bear with me!
if you have any questions please don't be afraid to send me a message!
here you will hopefully learn how to: make defaults for humans, aliens and vampires as well as cats, dogs and mini goats and sheep! -> i'm unsure about how to do cottage living animals anymore due to s4s changing and the foxes are currently bugged to be gray :( BUT i will provide my files so you can just recolor them and merge them back together down below
you will need a few things to start: sims4studio, photo editing software such as gimp or photoshop to create and edit your textures, some meshes that i've provided + these body templates
human defaults (and beginning steps):
open up sims4studio, locate the CAS button, under that you should have 'override' ticked instead of the default 'create CAS standalone' then click the big CAS button to go to the next step
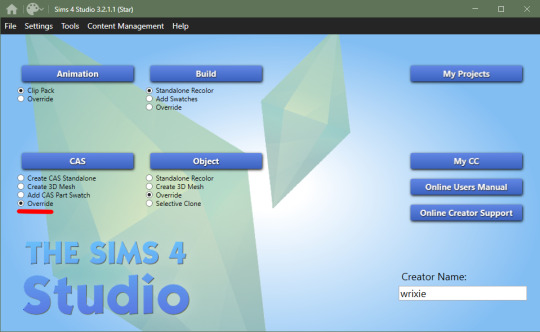
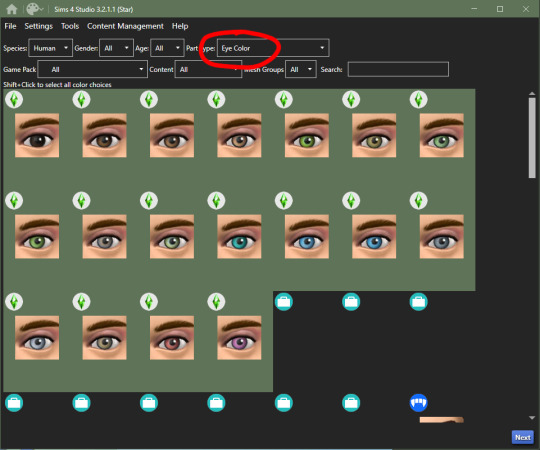
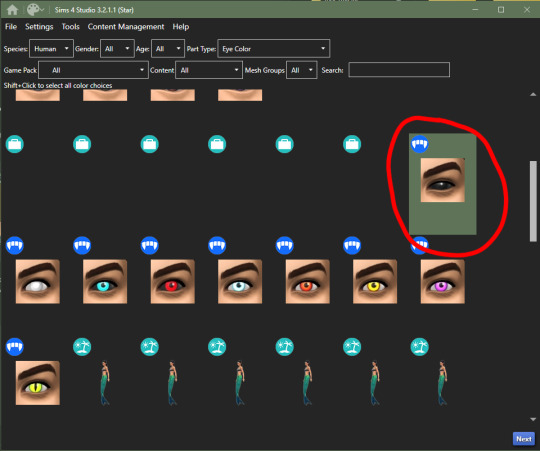
2. you'll see a few drop down menus, locate 'Part Type:', scroll down until you find 'Eye Color', we're doing human eyes so shift+click all of the base game default colors and click next
3. save your new .package file what ever you please i recommend something like -> yourname_eyename_default <- make sure to have it save into your mods folder or somewhere where you can easily access it (i saved mine into my mods folder)
4. this is where you'll import all your eye colors - assuming you've made your eye textures, locate the 'Texture' box in the 'Texture' panel, you'll see three maps: Diffuse, Shadow + Specular, import your eye texture in the 'Diffuse' texture for all of your eye colors, click on 'Specular' then click on the purple 'Make Blank' button to get rid of the cloudy shine on the default eyes (you'll have to do this manually for each swatch)


alien eyes:
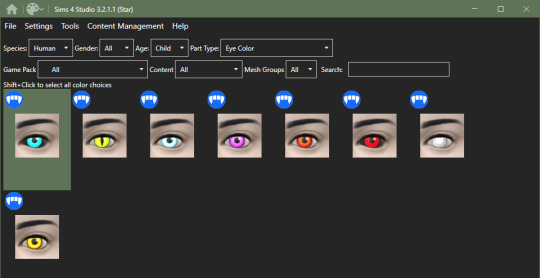
you'll do the same as the human in terms of selecting 'override' in the CAS section then locate 'Part Type:', scroll down until you find 'Eye Color', but instead of selecting the human eyes, we'll select the all of the alien eyes with shift+click - they don't have previews for some reason

2. then you can follow the previous steps, save your file under yourename_eyename_aliens_default into your mods folder
3. same as the humans, import all of your alien eyes into their proper swatches but this time there's two more maps: Normal + Emission - you do not need to touch these for aliens as alien eyes do not glow and the emission map is for glowing textures (i have no idea how to do this)
4. make your 'Specular' maps blank and click save!
vampire eyes:
do the same as the others in terms of selecting 'override' in the CAS section of the main menu, locate 'Part Type:', scroll down until you find 'Eye Color', but instead of selecting the all of the human/alien eyes, we'll be selecting the black swatch for right now - this black swatch is for all ages
2. import your black swatch in 'Diffuse' and make the 'Specular' blank
3. this is where you can veer off and follow a different tutorial to get the glow of the vampire eyes or you can continue without it here; go into your photo editing software, create a 1024x2048 image and fill it in completely with black and save it as emission (this is what you'll use to lose the glow and make the eyes work)
4. in the 'Texture' panel, go to 'Emission' and import your black image you just made and save it as -> yourname_eyename_vampires_black < (or what have you)
5. now change the 'Age: All' to 'Adult', select the next eye color, save it as the color it is and follow steps 2 - 4
6. after completing all of your adult swatches, change 'Age: Adult' to 'Child' and repeat the steps you just took with each eye color you will have to do the same with toddler and infant eyes as well; save child files with _CU in the file name, _PU for toddlers and _infants for ya know... infants
7. once you have all your swatches done, make sure to test them before this next step (merging the files into one, this is an optional step but highly recommended) go back to the main menu and under 'Content Management' click 'Merge Packages..'

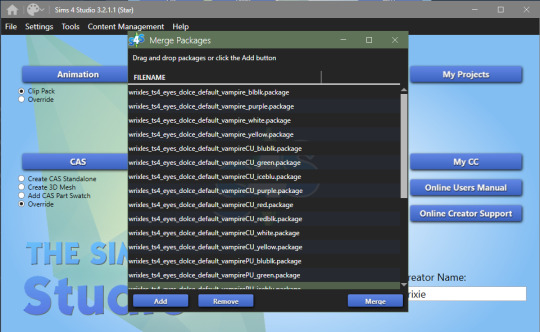
8. click 'Add' and select all of your vampire eye files, click 'Merge' and name it what you want
cats & dogs:
with sims4studio open, the CAS section should still have 'override' ticked, click CAS again and in the drop down menus, change 'Species: Human' to Large Dog, Small Dog, Cat, Foxes, or Horses; if you don't have the textures already, export the default texture so you have it as a base

2. import each of your textures in the 'Diffuse' map and make your 'Specular' map blank for each color and save
3. for heterochromia you can use these meshes - edit the textures to add your own, import your texture to the 'Diffuse' map and make your 'Specular' map blank for each color and save as _heterochromia
4. remember to test before merging - go back to the main menu and under 'Content Management' click 'Merge Packages..', add your files and merge them
mini goats & sheep:
in the Object section of the main menu, tick 'override' and click the Object button

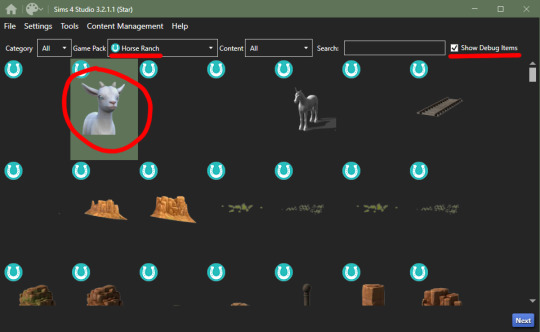
2. in the 'Game Pack' drop down menu, choose 'Horse Ranch' and tick 'Show Debug Items' and at the very top, you should see the mini goat, select this and click next save it as what you would like to
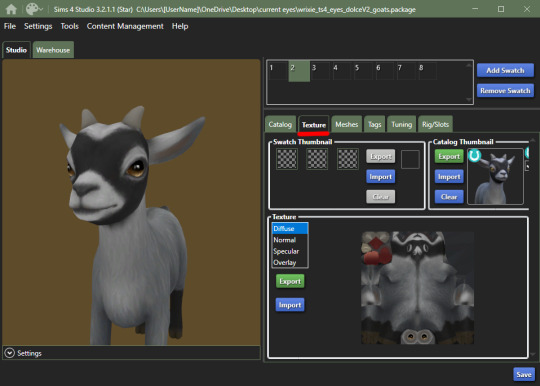
3. go into the 'Texture' tab and export all the goats textures if you haven't already made your eyes - when you have your textures done, import them into the 'Diffuse' map for each swatch and save
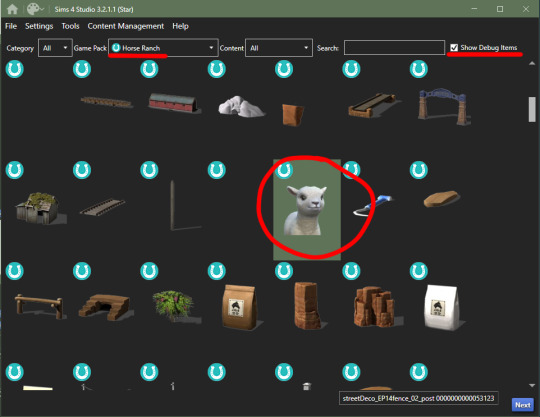
4. go back to the main menu and repeat steps 1 + 2 but instead of selecting the mini goats, scroll down until you see the mini sheep, should only be a tick or two down and then repeat step 3
cottage living:
go to my folder and download the meshes you need here i'll go through recoloring each animal, we're going to start with the wild rabbits; open the rabbits file
ignore the top file you don't need to edit this
'Export' (not the batch export) each rabbit texture, open them up in your photo editor and add your own eye texture then 'Import' each of them in their proper swatch and save
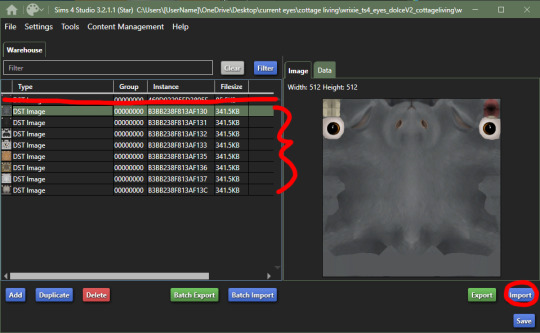
next will be the llamas, open up the file, you might be put into the 'Warehouse' tab, switch over to the 'Studio' tab
export all the 'Diffuse' textures of each swatch, open them up in your photo editor and add your own eye texture then 'Import' each of them in their proper swatch and save
cows are next, open up the file, ignore the top file and 'Export' the three textures then edit them in your photo editor to add your own eyes
'Import' each swatch in their proper place and save

lastly, for now, are the chickens, open up the file in sims4studio, 'Export' the first 6 image files, ignore the next 2, then export then last 5 and repeat editing and adding your own eye textures to them
once that's done, 'Import' all your swatches in their proper places and save
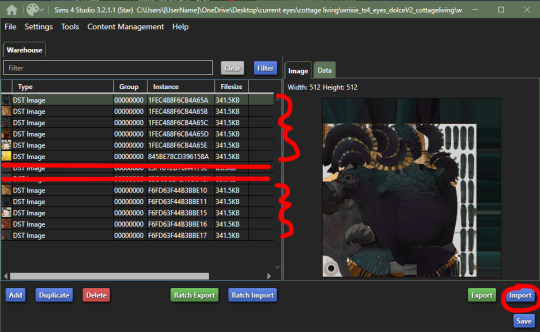
how to convert non-defaults/contacts to default:
1. open up sims4studio, locate the CAS button, under that you should have 'override' ticked instead of the default 'create CAS standalone'
2. before clicking on the CAS button, go to My Projects and open up the contacts you want to make default and 'Export' each color to save it on your computer
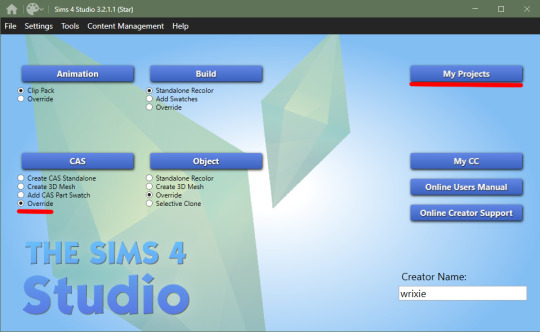
3. now you're going to basically follow the beginning steps again, go back to the main menu and click the big CAS button, then it's 'Part Type: Eye Color', shift+click all human eyes or vampire or alien eyes and hit next (i'll be doing human eyes) if you were put into the 'Warehouse' tab switch over to the 'Studio' tab.
4. 'Import' your textures to each swatch to the 'Diffuse' map and make the 'Specular' blank and save!
244 notes
·
View notes
Text
BACK BY REQUEST : MY PERSONAL SERVER TEMPLATE.
below is a guide for the channels, as well as tips and tricks for using this template and a few recommendations for bots. ( link & image heavy )
NOTE: this is an outdated template, and is not the server i currently use - if you would like to see an updated version of this ( my roleplay group or 1x1 roleplay servers, or others ), please let me know!!
GET THE SERVER | FREE ( tips appreciated !! )
BOT SUGGESTIONS.
tupperbox ( for proxying your muses for discord roleplay )
writerbot ( for writing sprints, goals & prompts )
reminder ( for reminders / birthday updates )
threadtracker ( for tracking threads on discord )
TIPS.
messletters ( for fancy text )
this entire tag by @dayslily ( for discord tips & tricks )
turn on community for the forum features ( linked to tutorial )
WELCOME CENTER.
ooc : updates / generally in large community servers you can subscribe to get updates sent to you personal server, this is a good place to send them. alternatively, you can utilize webhooks to send your tumblr notifications to your discord server in this channel. ( see tutorial here ).
ooc : emails / i use this channel to keep track of my logins for various tumblr blogs and other websites.
ooc : reminders / using a bot, i set this channel to have reminders for various things, such as personal reminders, roleplay to do list and even character & partner birthdays
ooc : todolist / you could use a bot, or just manually update this channel with your current todolist.
ooc : drafts / i will occasional leave drafts to replies here so i can come back for them at a later point
BOTS.
bot : writing / my preferred bot for this is writer bot - linked above, i use this channel to set/check my goals, set up writing sprints, and occasionally get prompts for writing.
bot : tupperbox / i like to set up all my tuppers in privacy, so i find having my own sever with a channel makes it easy to change my avatar and other tupper information quick and also to test them without spamming a group tupper channel. ( tupperbox - linked above )
bot : reminders / i will often set up a channel for reminders because i'm super forgetful and having a reminder bot helps me get to tasks in a timely manner ( when i remember to set up the bot!! lol ) ( reminder bot - linked above )
bot : tracker / i'm not sure if this tracker has the function to work cross server yet, you'd have to check with the makers on their github, but this is great for 1x1 and group servers. ( thread tracker - linked above )
DEVELOPMENT.
dev : names / a channel to store ideas for muse names, etomology, etc
dev : prompts / a channel to store ask memes, character & writing prompts, etc
dev : inspiration / a channel to store character/muse inspiration, photos, videos, posts, even just a list of words/aesthetics, etc
dev : brainstorm / a place to spitball ideas for new muses and/or plots, i like to utilize the voice message feature here and just talk out my ideas so i can listen back to them later when incorporating them into a new muse.
dev : headcanons / a channel to store headcanons ( if utilizing the community feature, you could make this a forum and separate the headcanons into posts for each muse : see image below for example ).
dev : faces / a channel to store resources for you muse face claims, i would store social media posts, photoshoots, gif set links, etc ( if utilizing the community feature, you could make this a forum and separate the faces into posts for each face claim : see image below for example ).
ROLEPLAY.
rp : masterlist / a channel to host your own character masterlist, you can format this however you like, or even use forums - you could link to other channels in the muse category.
rp : plots / a channel to post links and ideas for plots wanted for muses and roleplay groups.
rp : wishlist / a channel to post roleplay wishlist items, links, ideas, etc
rp : promotions / a channel to post links for roleplay promotions either to your own groups or groups that you'd like to keep an eye on.
rp : groups / i use this channel to store the links to my current roleplay groups, links to the main blog, any relevant sideblogs, as well as a list of muses i currently have active within them.
rp : partners / helpful for storing a list of mains (for indies), with names, pronouns, links to rules, muses, etc - or for 1x1 lists of partners.
RESOURCES.
all of these are pretty self explanatory, you can store resources you use for tumblr and other types of roleplay in these channels, gifs, icons, templates, themes, etc.
ACTIVE MUSES.
muse : name / you can basically store your muse information, biographies, links to blogs, musings, edits, and whatever else you like. ( if utilizing the community feature, you could make this a forum and separate items into posts : see image below for example )

CONNECTIONS.
ship : name • name / similarly to the muse section, you can store your ship dynamic and details here, links to you partner's blog, ship tag, edits, headcanons, etc ( if utilizing the community feature, you could make this a forum and separate items into posts : see image below for example )
326 notes
·
View notes
Text
Bruce’s Day Off: DIY Adventure
Chapter 1
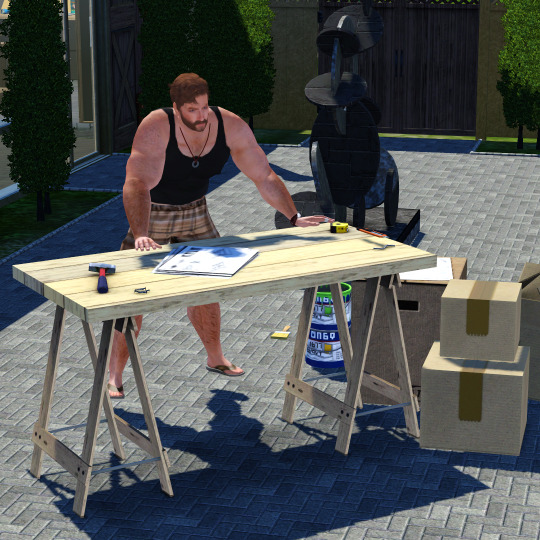
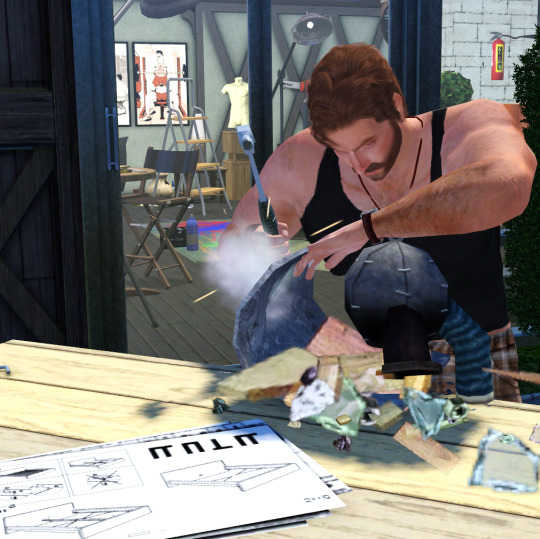

It was Bruce’s rare day off in Riverview, and instead of taking a relaxing break, he decided to tackle something he had been putting off for weeks: assembling the chair he impulsively bought online. The box had arrived days ago, heavy and slightly intimidating, but today, with coffee in hand and determination in his heart, Bruce was ready.
He opened the box and laid out the pieces on his living room floor. There were more parts than he expected — screws, bolts, and what seemed like an unnecessarily thick instruction manual. "How hard can it be?" he muttered, glancing at the cover. Famous last words.
An hour in, Bruce had already managed to attach the seat backward, drop an essential screw under the couch, and accidentally tighten a bolt so much it wouldn’t budge. Frustration mounting, he took a deep breath and leaned back on the half-assembled chair, only to have it collapse beneath him.
After some creative problem-solving (and a quick internet search for a tutorial), he finally made progress. By lunchtime, the chair was starting to resemble something functional. He smiled, proud of his work.
By mid-afternoon, it was complete. He plopped down, testing its sturdiness. "Not bad," he said, spinning around like a kid in a new toy.
Bruce spent the rest of the day relaxing in his new chair, scrolling through his favorite art forums and sketching some ideas for his next piece. It wasn’t a glamorous day off, but it was a productive one—and Bruce was oddly proud of his new DIY skills.
42 notes
·
View notes
Text
Some Tips for new DBH modders

This will have 2 sections :
1 . QUANTIC dream textures - getting them stable throughout the game
2. Handy tool I found for normal maps.
QD TEXTURES - MY TOOL KEEPS BREAKING?
this is for the 2 ppl that actually mod Detroit and want to make their mods public and usable the entire game. and don't know abt this.
As you probably know, models ( containers ) share textures. So when you update a quantic dream texture for 1 model you need to update every single container/model that shares that texture or else it'll look black and crash your game. Why? because your game is expecting the file in qd format for that container when it's a dds file now.
But I'm sure youve noticed after the 3rd or so containers texture being 'refreshed' ( inserting the texture for each use of it in the tool) it just breaks. The only way around this is to tell the game it should expect a dds format manually.
Ok enough yapping. Here’s the tutorial :
Add your texture like you normally would in the editor. Do this for only one model, u can do it for more just before it crashes if u want too it shouldn’t affect it, I haven’t tested it tho.
Enable editing for all the containers/models that use that texture. So it clones it.
Now,, Repeat these steps for every texture that needs to be made into dds format other than the ones you changed in the editor:
1.Using Rk900 (INTO_3) as an example, I swapped the connor into_2 model face texture so now we need to tell the game to expect a dds for nines face. Get the offset of nines’ face texture. It’s SUPER important that the INTO_3 container is cloned as the offset will be different.
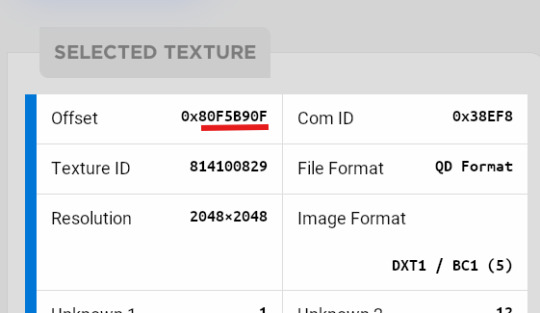
2.go to ( ctrl + g ) to the offset in d26 file. (so 80F5B90F)
3.change the following : we start at ‘0E’ for this example.

Change the 14th and 19th bytes (02) to 01 . it should look like this now
The hex code will change for each texture, but it will always be the 14th and 19th bytes.

4.Repeat for all textures and models that use them :)
Your tool will now load the containers correctly ( they will appear black still, but it will work ingame.)
USEFUL TOOL FOR CREATING NORMAL MAPS:
Normal maps are what gives flat surfaces fake 3d-ness without actually being there ! An example of this is the pores of dbh characters. Normal maps basically allow us to use less polygons which is good for efficiency:))
How do normal maps work ? Well all digital images contain 3 color channels : Red, Green and Blue (RGB) , what normal maps do is assign x,y,z values to these channels. So red would be the x value, green is the y value , blue is the z value . These give us the fake 3d values for each pixel that alter how our game calculates the light ( surface normals ) .
I use this website to generate my normal maps from height maps :
Height maps are black and white images that tell us the height (z value) of each pixel, typically white is high,black is low. Here is an example of the sylus mask I made :

IMPORTANT!! 99% of dbh’s normal maps DONT have a blue channel ( z value) so you HAVE to remove the blue channel completely after generating it from here.
This was how my modified face texture looked like after nuking the blue channel ( in gimp you have to go to colors -> Components -> decompose and delete the blue channel then recompose it )
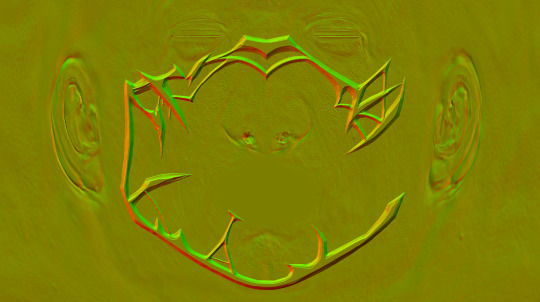
^^ basically i overlayed the new normal map over connors original one.
Ok thats it. idk if this helps anyone but here u go :P
Pls correct me if I’m wrong abt anything, I’m small brain tbh
11 notes
·
View notes